
GG-332 - Cooker Infiniton - Free user manual and instructions
Find the device manual for free GG-332 Infiniton in PDF.


| Product Type | Built-in gas hob |
| Brand | Infiniton |
| Model | GG-332 |
| Top Plate Material | Glass |
| Dimensions (W x D x H) | 600 x 510 x 90 mm |
| Electrical Supply | 220-240 V, 50-60 Hz, 2 W (ignition only) |
| Gas Connection | G1/2" female thread |
| Burner Configuration | 1 Wok burner (3.6 kW), 1 Semi-rapid burner (1.75 kW), 1 Auxiliary burner (1.0 kW) |
| Total Heat Input (ΣQn) | 6.05 kW |
| Ignition System | Continuous spark ignition (automatic) |
| Safety Features | Flame failure safety device on each burner |
| Gas Types Supported | LPG (G30 29 mbar) and Natural Gas (G20 20 mbar) |
| Adjustable Minimum Flame | Yes, via bypass screw |
| Pan Support Material | Enameled steel (cast iron pans not recommended) |
| Cut-Out Dimensions | 560 x 480 mm (see manual for exact) |
| Recommended Hood Distance | 65-70 cm above gas hob |
| Maintenance & Cleaning | Clean with damp cloth; avoid abrasive cleaners; burner parts removable for washing |
| Disposal | Do not dispose as household waste; recycle via WEEE collection points |
| Warranty | Refer to warranty card (standard 2 years in EU) |
| Installation Requirement | Must be installed by a qualified gas engineer; ensure adequate ventilation |
Frequently Asked Questions - GG-332 Infiniton
User questions about GG-332 Infiniton
0 question about this device. Answer the ones you know or ask your own.
Ask a new question about this device
Download the instructions for your Cooker in PDF format for free! Find your manual GG-332 - Infiniton and take your electronic device back in hand. On this page are published all the documents necessary for the use of your device. GG-332 by Infiniton.
USER MANUAL GG-332 Infiniton
natural_image
Diagram of a square container with a top platform and internal flow arrows, no text or symbols present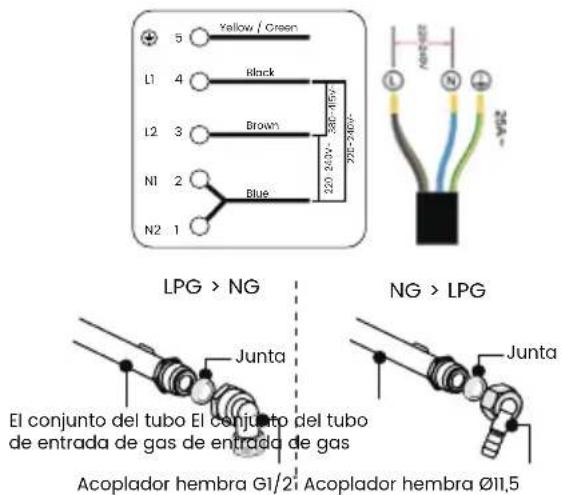
natural_image
Symbol of a trash bin crossed out by two crossed lines, with a solid black rectangle below (no text or labels)| Modelo X(mm) Y(mm) Z(mm) | |||
| GAS-CR2BGAS-IX02 | 262 480 | 300 | |
| GG-331GG-332GGMCI-315GG-429GAS419HGG-43BK | 560 480 | 600 | |
| GAS-320WBGASDL4 | 560 490 | 600 | |
natural_image
Illustration of a silicon tool injecting into a cross-shaped object on a base, with no visible text or symbols.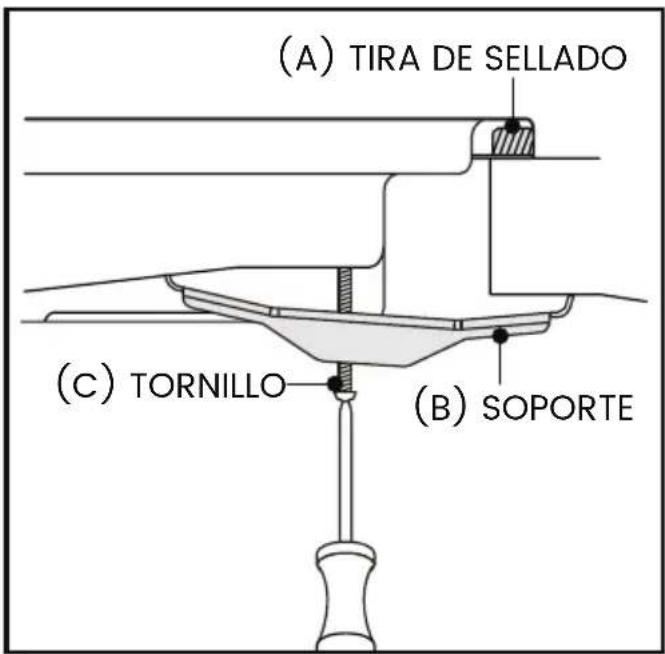
natural_image
Technical line drawing of a mechanical clamp or bracket assembly with exploded view and directional arrow (no text or symbols)natural_image
Simple diagram with a circle, star, and curved arrows (no text or symbols)| Content | English |
| Quick guide to installation | 24 |
| Safety instructions | 25 |
| Installation | 29 |
| How to use | 35 |
| Cooking with Infiniton | 38 |
| Maintenance & cleaning | 39 |
| Troubleshooting | 40 |
EN30 Compliance
If the country symbol does not appear on the product, it is necessary to refer to the installation instructions, which should provide the necessary instructions regarding modification of the product to suit the conditions of use in the country.
The power cord of this product comes with a plug, no additional wiring is necessary.
This appliance is a class 3 appliance according to EN 30-1-1 for gas appliances: built-in appliance.
The manufacturer is exempt from any liability in the event of non-compliance with the requirements of this manual. All operations relating to installation, regulation and conversion to other types of gas must be carried out by an authorized installer, in compliance with all applicable regulations, standards and specifications of the local gas and electricity suppliers.
It is recommended to contact the Technical Assistance Service for conversion to another type of gas. Before starting, disconnect the power and gas supply to the appliance.
This appliance is designed for household use only, not for commercial or professional use.
The warranty will only be valid if the appliance is used for the purpose for which it was designed.
Before installation, check that the local distribution conditions (gas type and pressure) and the setting of the appliance are compatible. The setting conditions of the appliance are shown on the label or on the nameplate.
This appliance may only be installed in a well-ventilated location in accordance with current regulations and ventilation specifications.
The appliance must not be connected to a combustion product disposal device.
The power cord must be secured to the appliance to prevent it from coming into contact with hot parts of the oven or hotplate. Appliances with a power supply must be grounded. Do not tamper with the inside of the appliance. If necessary, call our Technical Assistance Service.
This appliance is a Class 3 appliance in accordance with EN 30-1-1 for gas appliances:
built-in appliance. The furniture next to the appliance must be made of non-flammable materials. The laminate covering and the glue used to attach it must be heat-resistant.
This appliance may not be installed above refrigerators, washing machines, dishwashers or similar. An oven must have forced ventilation to install a hotplate on top of it. Check the oven dimensions in the installation manual.
This appliance shall be installed in accordance with current regulations and used only in a well-ventilated space. Read the instructions before installing or using this appliance.
The joy of cooking
Infiniton would like to give you a brief guide to help you get the most out of your gas hob. Take note!
Get the most out of your Infiniton hob
The operation of an Infiniton cooktop is very simple thanks to the technology we have employed to make your everyday life easier. Just follow these simple tips and enjoy a kitchen for years to come.
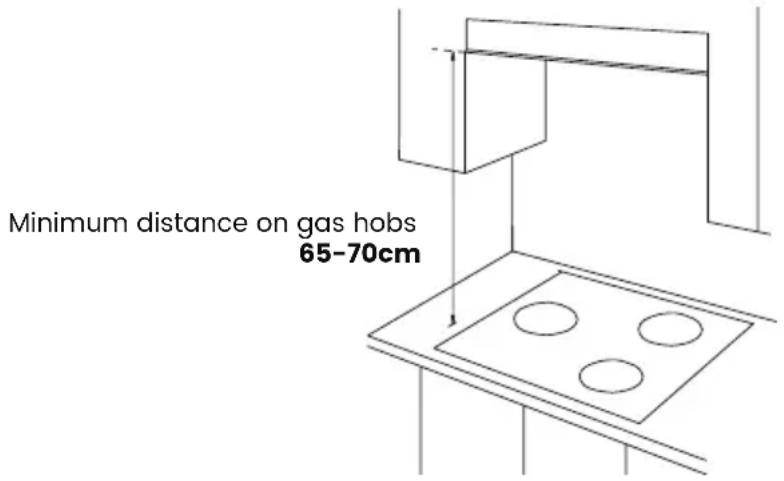
What is the recommended distance between the hob and the cooker hood?
It will always depend on each model, although the minimum distance between the cooking zone and the extraction zone will generally be between 55cm - 65cm for vitroceramic or induction hobs.
If the hob is a gas hob, the recommended distance will be somewhat greater, between 65cm - 70cm.
Protect the surface of your hob
Use only certified products that do not scratch or damage your cooktop such as liquid or foam cleaners, then apply a clean damp cloth and it will be as good as new.
What power level should I use for each recipe?
It is usual to get down to work with any recipe and use the maximum power of your cooker, but each food is cooked differently. For example, for cooking rice, we will use a low power setting, while medium power settings are ideal for boiling potatoes or a stew. It is advisable to use the maximum power setting only for frying, meat, fish and frozen foods.
Which equipment can I use on my hob?
If you have a glass-ceramic or gas hob, you can use either. They accept all types of pots and pans. If you have an induction hob, the base of pans and pots must be ferromagnetic and of a certain thickness.
Please read the contents of each section in the instruction manual for detailed instructions on how to operate your new Infiniton cooktop properly.
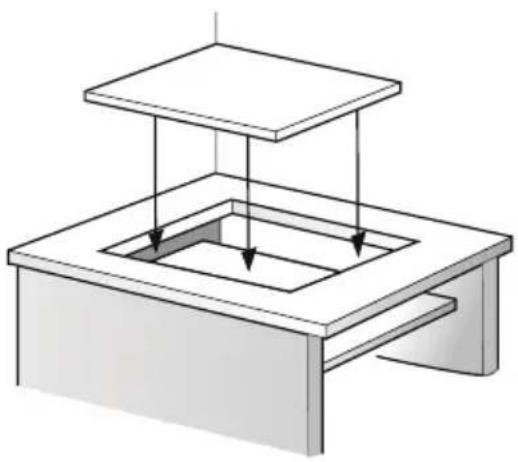
1. Choose a good location
Please refer to the installation section of the user manual.
2. Make the electrical and gas connections
Refer to the electrical and gas connections section of the user manual.
natural_image
3D diagram of a square container with internal flow arrows, no text or symbols present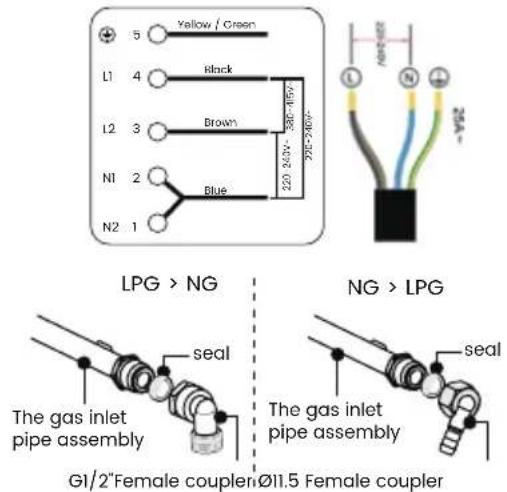
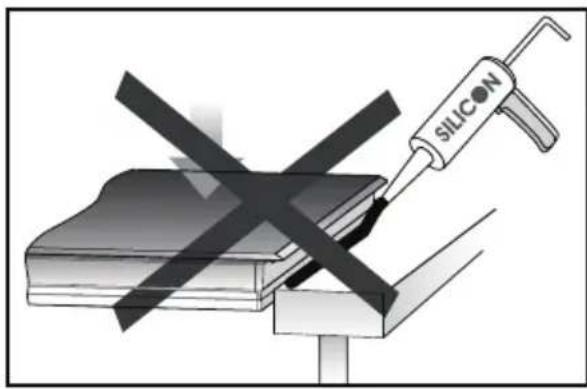
3. Never seal the plate to the recess with silicone.
Sealing the hob with silicone is not recommended, as if the hob has to be removed, it will be very difficult to remove it from the worktop and may even break the glass.
Infiniton is not responsible for any damage caused by applying silicone, which would void the warranty.
4. Switch on the hob
Press the control knob of the cooker you wish to plug in and turn it anticlockwise to its maximum position.
5. Turn off the hob completely
To turn the cooker off, turn the control knob to the gas position.
CAUTION: The use of a gas stove produces heat, moisture and combustion products in the room in which it is installed. Ensure that the kitchen is well ventilated, especially when the appliance is in use.
Heavy and prolonged use of the appliance may require additional ventilation, e.g., increased mechanical ventilation where available, additional ventilation to safely remove the products of combustion to the outside (external) air and at the same time provide air changes in the room with additional ventilation. Consult a professional before installing additional ventilation.
CAUTION: This appliance is for cooking only. It must not be used for other purposes, such as space heating. CAUTION: Accessible parts may be hot when the grill and/or oven are in use. Keep children away. CAUTION: In case of breakage of the glass surface:
- immediately turn off all burners and any electrical heating elements and isolate the appliance from the mains,
- do not touch the surface of the appliance,
- do not use the appliance.
Where hob guards may be used, the instructions for use and maintenance shall advise that only hob guards designed by the appliance manufacturer or declared suitable by the appliance manufacturer, or hob guards incorporated in the appliance, should be used.
The instructions for use shall state that the use of unsuitable hob protectors may cause accidents.
General security
For your safety and to ensure correct use, before installing and using the device for the first time, please read this user manual carefully, including its tips and warnings. To avoid unnecessary errors and accidents, it is important to ensure that all persons using the device are thoroughly familiar with its operation and safety features. Keep these instructions and ensure that they remain with the device if it is moved or sold, so that all those who use it throughout its lifetime are adequately informed about the use and safety of the device.
For the safety of life and property, observe the precautions in these user instructions, as the manufacturer is not liable for damage caused by omission.
Safety of children and vulnerable persons
- This appliance can be used by children aged from 8 years and above and persons with reduced physical, sensory or mental capabilities or lack of experience and knowledge if they have been given supervision or instruction concerning use of the appliance in a safe way and understand the hazards involved.
• Children up to 8 years of age can charge and discharge this appliance.
• Children should be supervised to ensure that they do not play with the appliance. - Cleaning and user maintenance shall not be made by children unless they are 8 years of age or older and supervised.
- Keep all containers away from children. There is a risk of suffocation.
- If you are discarding the appliance, pull the plug out of the socket, cut the power cord (as close to the appliance as possible) and remove the door to prevent children from getting an electric shock if it falls or closes.
Electrical connections
• Make sure that the power cord is not trapped by the appliance, as this could damage it.
- Connect the appliance to a grounded socket outlet protected by a fuse that complies with the values in the “Technical specifications” table.
- The installation of the earth connection must be carried out by a qualified electrician.
- Ensure that the machine is installed in accordance with local regulations.
- Water and electrical connections must be carried out by a qualified technician in accordance with the manufacturer's instructions and local safety regulations..

WARNING! Do not use multiple plugs or extension cords.

WARNING! The product must not have an external switching device, such as a timer or
connected to a circuit that switches on and off regularly.

WARNING! Do not disconnect the plug from the socket outlet if flammable gases are nearby.

WARNING! Never pull out the plug with wet hands.

WARNING! Always pull the plug, not the cable.

WARNING! Always unplug the product when not in use
If you have an active implanted medical device (e.g. pacemaker or defibrillator), check with your doctor that it complies with EC Council Directive 90/385/EEC of 20 June 1990 as well as EN 45502-2-1 and EN 45502-2-2 and that it has been selected, implanted and programmed in accordance with VDE-AR-E 2750-10.
If these requirements are met and both non-metallic cookware and containers with non-metallic handles are used, the use of this hotplate is harmless under normal conditions of use.

WARNING! Risk of fire
Leaving the hob unattended when cooking with oil or fat can be dangerous and can cause fires.
• Never leave oils and fats unattended.
- Never try to put out a fire with water, but only by switching off the appliance and then covering the flames with a lid or a fire blanket.
• The cooking surface gets very hot.
- Never place flammable objects on or near the cooking surface.
- Never store objects on the cooking surface.
• The appliance becomes hot.
- Do not store flammable objects or aerosols in the drawers directly below the hob.
- Cooktop covers can cause accidents, e.g. due to overheating, ignition or flying fragments of material.
• Do not use any cooktop covers.
• Always switch the hob off at the main switch after each use.
- Do not wait for the hob to switch off automatically if there is no pan.
- Food may catch fire.
- The cooking process must be monitored. Short processes must be continuously monitored.

WARNING! Risk of burns
- The appliance and the parts in contact with it (especially if the hob has a frame) become hot during use.
• Proceed with caution to avoid coming into contact with the heating elements. - Young children (under 8 years of age) should be kept away from the appliance if they are not under the supervision of an adult.
- Protective grids for hotplates can cause accidents.
- Do not use any protective grids for hotplates.
• The appliance becomes hot during operation. - Allow the appliance to cool down before cleaning.
- Metal objects heat up quickly when they come into contact with the hotplate.
- Never place metal objects such as knives, forks, spoons or lids on the hob.

WARNING! Risk of electric shock
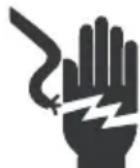
Disconnect the mains power supply before installing the hob. Failure to do so may result in death or electric shock. The electrical installation must be carried out by professional and qualified personnel.
- If the mains connection cable of this appliance is damaged, it must be replaced with a special connection cable which can be purchased either from the Service Centre or directly from the manufacturer.
- Do not cook on a cracked or broken cooktop. If the surface of the hob is broken or cracked, immediately switch off the appliance at the mains (wall switch) and contact a qualified technician.
- Failure to comply with this advice may result in electric shock or death.
WARNING! Risk of injury
- Pans can suddenly jump upwards due to the presence of liquid between the base of the pan and the cooking zone.
• Always keep the cooking zone and the base of the pan dry.
• Never place frozen containers on the cooking zone. - When cooking in a bain-marie, the glass and the cooking vessel may shatter due to overheating.
- The bain-marie container must not directly touch the base of the pan containing water.
• Use only heat-resistant cooking vessels.
• An appliance with a broken or torn surface can cause injuries and cuts. - Do not use the appliance if it has a broken or torn surface.
WARNING! Risk of suffocation
Children can put the packaging material over their heads, or roll up in it, and suffocate.
- Keep the packaging material out of the reach of children.
• Do not allow children to play with the packaging.
• If children find small parts, they may inhale or swallow them and suffocate. - Keep small parts out of the reach of children.
• Do not allow children to play with small parts.
Important safety instructions
- Never leave the appliance unattended when in use.
- Boiling causes smoke and grease spillage which may ignite.
- Never use the appliance as a work or storage surface.
• Never leave objects or utensils on the appliance.
- Do not place or leave magnetisable objects (e.g. credit cards, memory cards), electronic devices (e.g. computers, smartphones) or flammable objects near the appliance, as they may be affected by its electromagnetic field or cause a deflagration in the room.
• Never use the appliance to heat the room.
• After use, always switch off the cooking zones and the hob as described in this manual).
- Do not allow children to play with, sit, stand or climb on the appliance.
- Do not store objects of interest to children in the cabinets above the appliance. Children climbing on the hob can cause serious injury.
- Do not leave children unattended or unattended in the area where the appliance is in use.
- Children or persons with a disability that limits their ability to use the appliance must have a responsible and competent person instruct them in its use. The adult must be convinced that they can use the appliance without danger to themselves or their environment.
- Do not use scouring pads or other abrasive cleaning agents to clean the cooktop as they may scratch the cooktop surface.
- This appliance is intended for use in domestic and similar applications such as: -staff cooking areas in shops, offices and other work environments; -cottages; -by customers in hotels, motels and other residential type environments; -bed and breakfast type environments.
Important safety warnings for gas installations
- This appliance must be installed according to the rules and located in a well-ventilated environment. The use of a gas cooker generates heat and humidity in the room where it is installed. Make sure that the cooker is well ventilated: keep the natural ventilation openings open or install a mechanical ventilation device.
- Before installation, make sure that the gas and electrical supply complies with the type specified on the rating plate.
- The gas pipe and power cable must be installed in such a way that they do not touch any part of the appliance.
• Do not spray around the appliance when it is in operation.
• Make sure that the controls are closed when not in use.
If there is a gas leak, take the following precautions
• Do not switch on the light.
- Do not switch off or plug in any electrical appliance and do not touch any electrical socket.
- Stop using the product and turn off the gas valve.
- Open the window to ventilate.
- Contact our technical service.
Service
- Any electrical work required to service the appliance must be carried out by a qualified electrician or competent person.
- This product must be serviced by an authorised Service Centre, and only original spare parts must be used.
natural_image
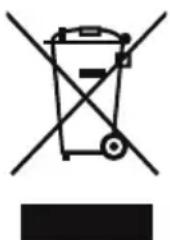
Symbol of a trash bin crossed out by two crossed lines, with no text or labels present.This symbol on the product or on its packaging indicates that this product must not be treated as household waste. Instead, it must be taken to the appropriate collection point for the recycling of electrical and electronic equipment.
By ensuring this product is disposed of correctly, you will help prevent potential negative consequences for the environment and human health, which could otherwise be caused by inappropriate waste handling of this product.
For more detailed information about recycling of this product, please contact your local authorities, your household waste disposal service or the shop where you purchased the product.
Packing materials
Materials with the symbol 🙏 are recyclable. Dispose of the packaging in a suitable collection container for recycling.
Disposal of the device
- Disconnect the plug from the socket.
- Cut the power cord and discard it.
Before installing the hob, make sure that:
• The work surface is square and level, and no structural furniture interferes with space requirements.
• The work surface is made of a heat-resistant and insulating material.
- If the hob is installed above an oven, the oven has a built-in fan.
• The installation shall comply with all clearance requirements and current standards and regulations.
- A suitable disconnection switch is incorporated in the fixed wiring system to allow for complete disconnection of the mains supply. The isolating switch shall be mounted and positioned in accordance with local electrical installation rules and regulations.
- The isolating switch must be approved and must provide 3 mm contact separation on all poles (or on all active [phase] conductors if local wiring regulations allow this variation of requirements).
• The isolating switch must be accessible to the customer after the hob has been installed.
- Consult local building authorities and ordinances if in doubt about installation.
- Use heat-resistant, easy-to-clean finishes (such as ceramic tile) for wall surfaces surrounding the cooktop.
After installing the hob, make sure that:
• The power cord is not accessible through cabinet doors or drawers.
• There is an adequate flow of fresh air from the outside of the cabinet to the base of the hob.
- If the hob is installed on top of a drawer or cabinet, a thermal protection barrier must be installed under the base of the hob.
• The isolation switch is accessible to the customer.
Required distances for the installation of the hob with an extractor hood above it
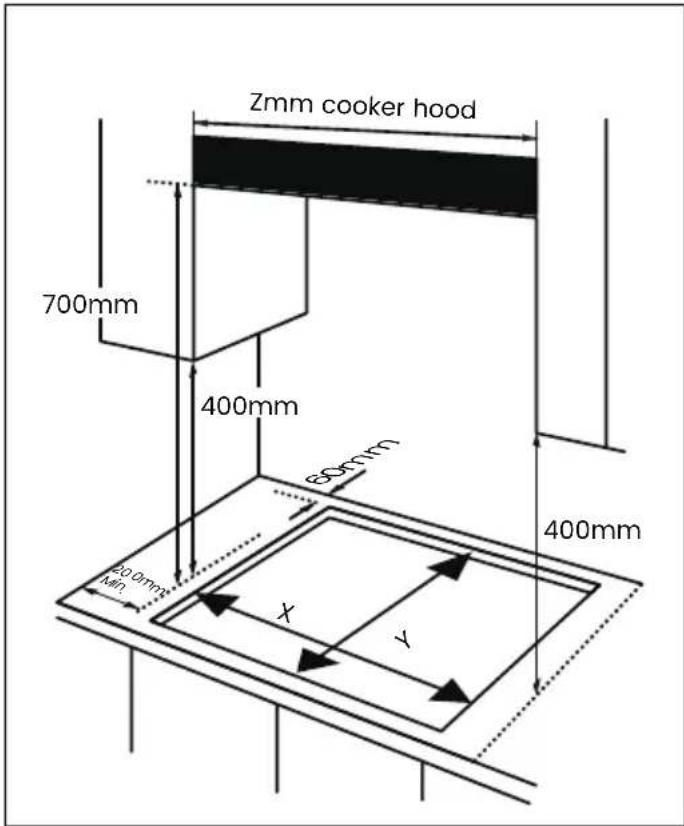
| Model X(mm) Y(mm) Z(mm) | |||
| GAS-CR2BGAS-IX02 | 262 480 | 300 | |
| GG-331GG-332GGMCI-315GG-429GAS419HGG-43BK | 560 480 | 600 | |
| GAS-320WBGASDL4 | 560 490 | 600 | |
This appliance must be installed inside a kitchen, ensuring the minimum distance allowed:
- The edges of the hob should have a minimum distance of 60mm from one side or the back of the hob.
- 700mm between the high point of the surface of the hob (including the burners) and the underside of any horizontal surface on which it rests.
- 400mm between the surface of the plate, provided that the bottom of the horizontal surface is in line with the other edge of the plate. If the bottom is lower than 400mm, then there should be at least 50mm horizontally to the edge of the plate.
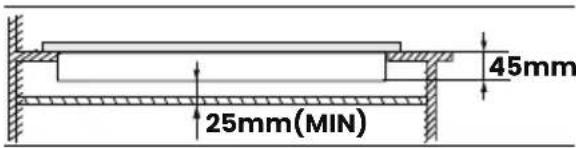
Note: The oven must have forced ventilation to install a hob on top of it. Check the oven dimensions in the installation manual.
This appliance is not connected to a device for the evacuation of combustion products. It must be installed and connected in accordance with the installation regulations in force. Particular attention must be paid to the relevant ventilation requirements.
prior to installation, ensure that the local distribution conditions (nature of the gas and gas pressure) and the adjustment of the appliance are compatible.
the adjustment conditions for this appliance are stated on the label (or data plate).
this appliance is not connected to a combustion products evacuation device. It shall be installed and connected in accordance with current installation regulations. Particular attention shall be given to the relevant requirements regarding ventilation.
the adjustment conditions for this appliance are stated on the label (or data plate).
- Remove the cooking grate, burner cover and flame spreader, and place the product upside down on a padded mat.
- Make sure that the ignition equipment and flame control equipment are not affected in this operation.
- Stick the sponge on the edge around the bottom perimeter of the product. Do not leave gaps that have not been sealed with the sponge along the entire perimeter.
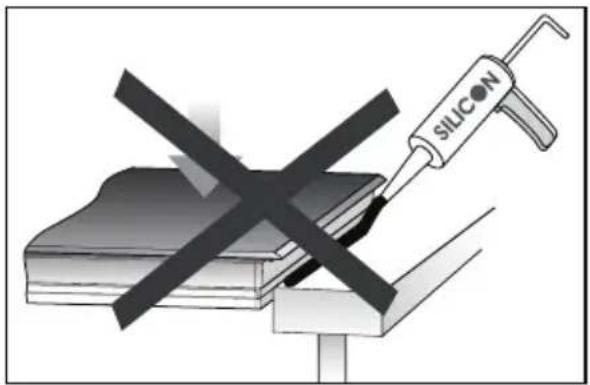
Never seal the plate to the recess with silicone.
Sealing the hob with silicone is not recommended, as if the hob has to be removed, it will be very difficult to remove it from the worktop and may even break the glass.
Infiniton is not responsible for any damage caused by applying silicone, which would void the warranty.
natural_image
Illustration of a silicon tool injecting into a cross-shaped object on a base, with no visible text or symbols.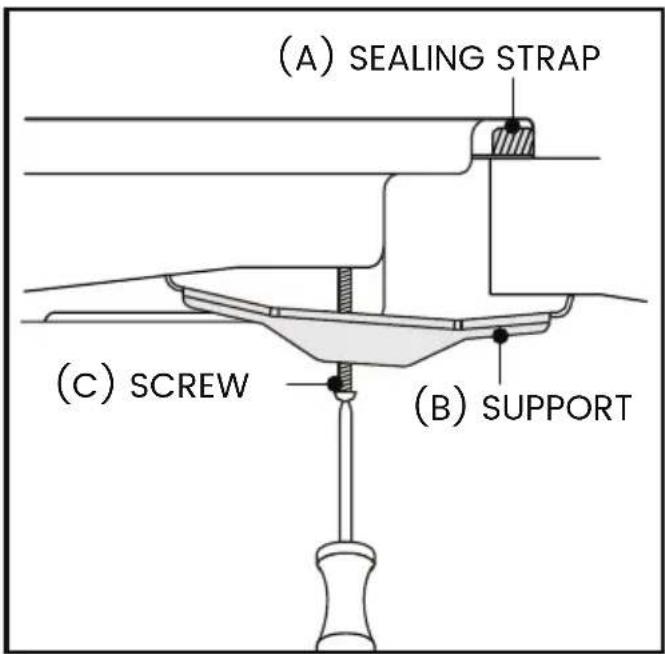
- Position the bracket (B) by aligning it over the screw holes. There is a set of screw holes for each corner of the plate (H). Slightly tighten the screw (C) towards the bracket (B), so that the bracket locks onto the hob and you can adjust the position.
- Carefully rotate the hotplate and then gently insert it into the recess you have cut out.
- On the underside of the hob, adjust the brackets to the appropriate position on the hob. Then tighten the screws (C) to ensure that it is secured in position.
Gas connection
This appliance must be installed and connected in accordance with installation regulations in force in the country in which the appliance is to be used.
This appliance is supplied to run on LPG and natural gas. Conversion for use on LPG and natural gases must only be undertaken by a qualified person.
Gas supply replacement and installation guidelines:
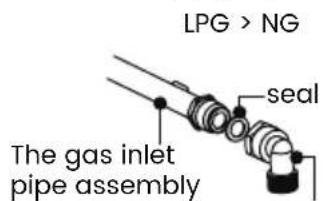
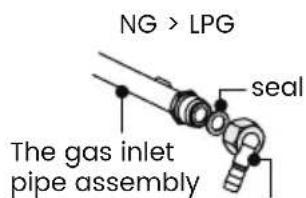
G1/2"Female coupler ∅11.5 Female coupler
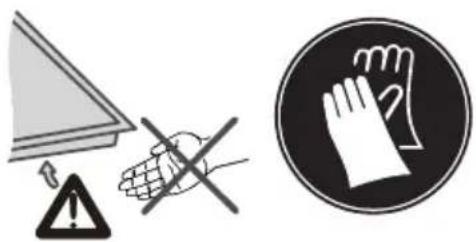
Installation of appliance
Note: Wear protective gloves to fit the hob.
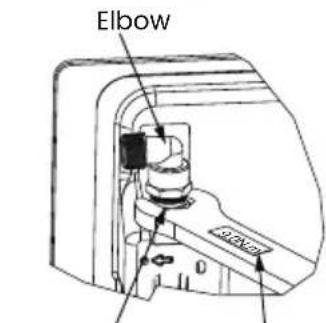
Black nut of manifold
Torque: 9±1N.m
Caution!
If necessary to adjust or install the elbow, it is allowed only torque wrench with 9±1N.m, and work on the Black nut of manifold instead of on the elbow.
(1) Adjusting the direction of elbow
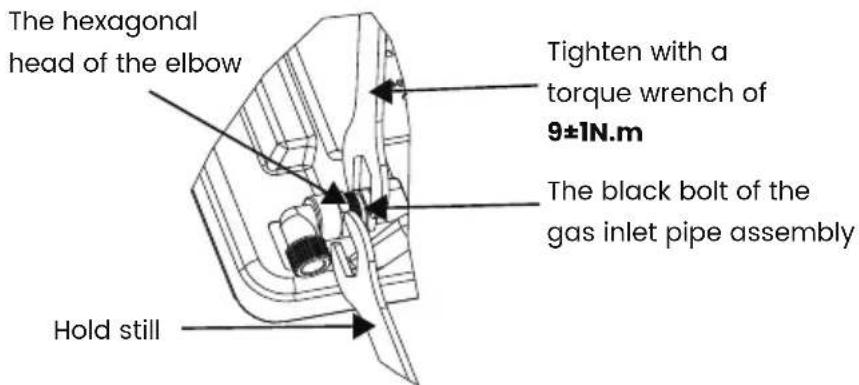
After loosening the elbow, adjust the elbow interface to the required direction as required, and keep the hexagonal head of the elbow motionless with a wrench. Use a 9±1N.m torque wrench to tighten the black bolt of the gas inlet pipe assembly. Ensure that the torque of the wrench is within the required range to prevent elbow breakage or damage caused by excessive force.
After the installation is tightened, check whether the parts are in good condition and test the air tightness to ensure the tightness of the installation. The installer is responsible for the results of the process.
(2) Installing the gas hob
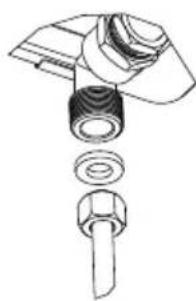
This appliance should be installed by a registered Gas Safe Engineer!
natural_image
Exploded view diagram of a mechanical assembly showing bolt, nut, and housing (no text or labels)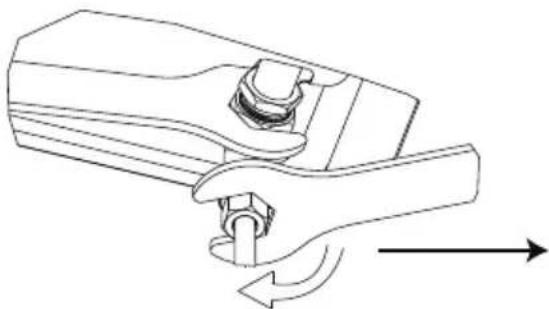
natural_image
Technical line drawing of a mechanical clamp or lever mechanism with directional arrows indicating motion (no text or symbols)Do not use too much force when tightening; Otherwise, it will cause elbow fracture or rubber ring deformation and leakage. Note that the torque wrench must be used to tighten with a torque of 10N.m. The maximum torque cannot exceed 20N.m.
Gas connection
The gas connection must be located in position where the stop tap is accessible.
The end of the inlet connection point of the gas hob has a 1/2" thread that allows for:
A fixed connection
■ Connection using a flexible pipe (L min. 1 m - max. 3 m)
The watertight seal supplied must be inserted between the manifold outlet and the gas supply. You must prevent the pipe from coming into contact with moving parts of the kitchen unit (for example, a drawer) and prevent access to any spaces which might become obstructed.

Danger of leaks!
If any connection is handled, check the seal.
The manufacturer is not liable for any connection leaking, after being handled.
- According to the law, all gas equipment must be installed by competent persons in accordance with current legislation on safety of installations and rules of use.
• Make sure that you comply with the law.
| Model | Gas type & pressure | Heat input and orifice size marked(mm) | |||
| Wok burner R | rapid burner Semi-rapid | Auxiliary-rapid | |||
| 3.3kW(240g/h) | 3.0kW(218g/h) | 1.75kW(127g/h) | 1.0kW(73g/h) | ||
| GAS-CR2BGAS-IX02 | G30 29mbar | 0.91 | / | / | 0.50 |
| G20 20mbar | 1.39 | / | / | 0.78 | |
| GAS-320WBGG-429GASDL4GG-43BK | G30 29mbar | 0.93 | / | 0.66 | 0.50 |
| G20 20mbar | 1.28 | / | 1.00 | 0.78 | |
| GGMCI-315GAS419H | G30 29mbar | / | 0.87 | 0.66 | 0.50 |
| G20 20mbar | / | 1.30 | 1.00 | 0.78 | |
| 3.6kW(262g/h) | 3.0kW(218g/h) | 1.75kW(127g/h) | 1.0kW(73g/h) | ||
| GG-332 | G30 29mbar | 0.97 | / | 0.66 | 0.50 |
| G20 20mbar | 1.41 | / | 1.00 | 0.78 | |
| 4.0kW(291g/h) | 3.0kW(218g/h) | 1.75kW(127g/h) | 1.0kW(73g/h) | ||
| GG-331 | G30 29mbar | 1.00 | / | 0.66 | 0.50 |
| G20 20mbar | 1.50 | / | 1.00 | 0.78 | |
Gas conversion
• Exercise caution in operations and adjustments when converting from one gas to another.
• This work must be carried out by a qualified technician.
• Before starting, turn off the gas and electrical power to the appliance.
1. Replace the burner nozzle
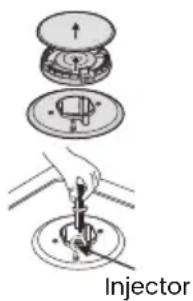
Remove the pot support, burner cap and flame spreader.
Unscrew the injector with a 7 mm spanner and replace it with the injector stipulated for the new gas flow. After replacement, it is advisable to tighten the injectors in place.
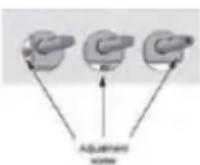
2. Adjust the minimum flame level
Turn the knob to the minimum.
Remove the knob inside the spanner shaft and tighten the small screw in the centre of the spanner shaft. The correct setting is obtained when the flame is approximately 3-4 mm long.

← Control knob
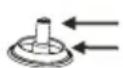
Adjustement screw Seal ring
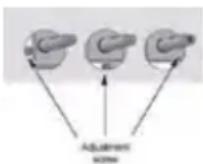
* For butane/propane gas, the screw adjustment must be correctly tightened.
correctly tightened.
* Replace the key in the knob.
* Make sure that the flame does not go out quickly when going from maximum to minimum.
Make sure that the flame does not go out quickly when switching from maximum to minimum.
Repeat this process for each of the gas connections.

WARNING!

Electric shock hazard
Disconnect the mains power supply before installing the board. Failure to do so may result in death or electric shock. The electrical and plumbing installation must be carried out by professional and qualified personnel.
About the mains connection
For personal safety reasons:
- Do not use an extension cord or adapter plug with this product.
- Do not, under any circumstances, cut or remove the grounding wire from the power cord.
Electrical requirements
Refer to the specification label for voltage rating and connect the board to the appropriate power supply.

Precautions
- The hob must be installed by qualified personnel or technicians. Please never carry out the operation yourself if you are not sure.
- The hob must not be installed directly above a dishwasher, refrigerator, freezer, washing machine or tumble dryer, as moisture may damage the electronics of the hob.
- The materials surrounding the cooking zone must ensure optimum heat radiation to improve reliability.
- The wall and worktop must be able to withstand high temperatures.
- A steam cleaner must not be used.
Electrical connection
- Make sure that the voltage and frequency of the current correspond to those on the specification label.
• Only connect the plug to a properly grounded outlet. - If the socket to which the product is to be connected is not suitable for the plug, replace the plug, rather than using an adapter or similar, as this may cause overheating and burns.
- The power cord must not touch any hot parts and must be positioned so that its temperature does not exceed 75^ C at any point.
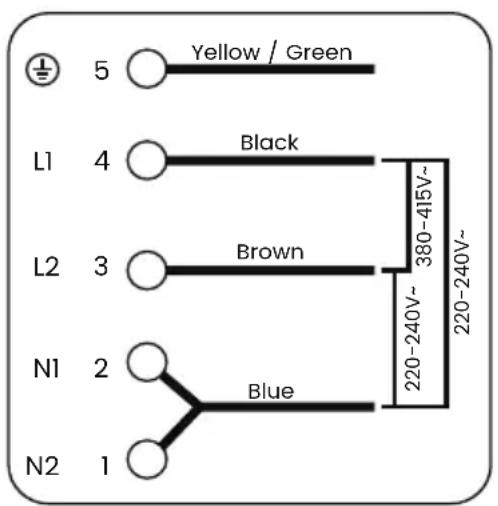
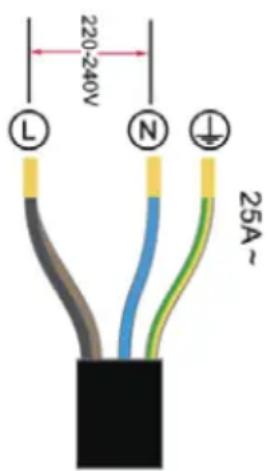
The picture on the left shows how the electrical connection is to be made using two types of connection:
- Single-phase
- Three-phase
If the cable is damaged, it must be replaced immediately.
If the appliance is connected directly to the mains, a single-pole circuit breaker with an opening of at least 3 mm between the contacts must be installed.
of at least 3 mm between the contacts.
The cable must not be bent or compressed.
Technical specifications
Weight and dimensions are approximate. As we continually strive to improve our products, we may change specifications and designs without notice.
| Model | Top Plate | Dimension (W*D*H) | Ignition device | Gas Connection | Electric supply | Burner Feature | Σ Qn |
| GAS-CR2B | Glass | 520*300*90 | Continuous Ignition Type | G1/2 thread | 220-220-2 50Hz-60Hz, 2W | Mini Wok(1), Auxiliary(1) | 4.3kW |
| GAS-IX02 | Stainless Steel | 520*300*90 | |||||
| GG-331 | Glass | 600*510*100 | Wok(1), Semi-rapid(1), Auxiliary(1) | 6.75kW | |||
| GG-332 | Glass | 600*510*90 | |||||
| GAS-320WB | Stainless Steel | 590*510*90 | 6.05kW | ||||
| GGMCI-315 | Glass | 600*510*90 | Rapid(1), Semi-rapid(1), Auxiliary(1) | 5.75kW | |||
| GG-429 GG-43BK | Glass | 600*510*102 | Wok(1), Semi-rapid(2), Auxiliary(1) | 7.8kW | |||
| GASDL4 | Stainless Steel | 590*510*90 | |||||
| GAS419H 60 | Stainless Steel*510*95 | Rapid(1), Semi-rapid(2), Auxiliary(1) | 7.5kW |
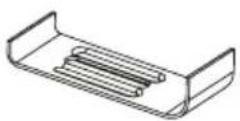
Gas elbow User's manual
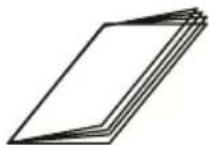
(1)
How to use your Infiniton gas hob
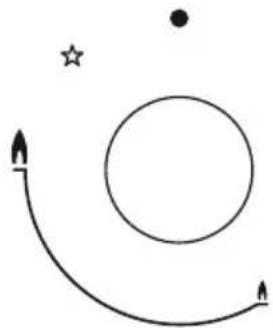
The following symbols will appear on the control panel near each control knob:
Gas off / cut off gas supply to this fire
Long flame (maximum setting)
Short flame (minimum setting)
natural_image
Simple diagram with a circle, star, and curved arrows (no text or symbols)• The minimum setting is the one at the counterclockwise end.
• All operating positions must be selected between the maximum and minimum positions.
- The symbol on the control panel near the control knob will indicate the operation of the burner in question.
Automatic ignition with flame failure safety device
The product is equipped with a flame failure safety device on each burner, which is designed to stop gas leakage.
Switching on the gas hob
- Press the control knob of the hob you wish to plug in and turn it anticlockwise to the maximum position.
- Holding down the knob will activate the automatic ignition of the hob.
- Hold down the knob for 15 seconds after the flame appears. If after 15 seconds the burner has not ignited, stop using the appliance, open the door and/or wait at least 1 minute before attempting another ignition.
- After this 15 second interval, to regulate the flame, you must continue to turn the knob anticlockwise until the flame has a considerable level.
- The operating position must be between the maximum and minimum position.
- To turn the cooker off, turn the knob to the gas position.
- In the event of a misfire, the burners can be properly covered with a match.
The diameter of the back of the pan should correspond to the following table for the proper functioning of the gas hob.
| Burners | Pans | |
| Min Max | ||
| Triple crown 200mm 220mm | ||
| Fast 200mm 220mm | ||
| Semi-fast 200mm 220mm | ||
| Auxiliary 120mm 160mm | ||
Do not use cooking utensils that extend beyond the edges of the cooker.
| NOYES | |||
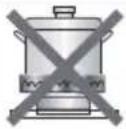 | Do not use small diameter cookware on large burners.The flame should never come up the sides of the cookware. | Always use cookware that is suitable for each burner, to avoid wasting gas and discoloring the cookware. | 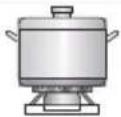 |
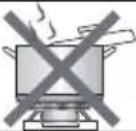 | Avoid cooking without a lid or with the lid half off-as this wastes energy. | Place a lid on the cookware. | 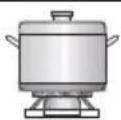 |
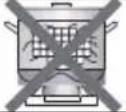 | Do not use a pan with a convex or concave bottom. | Only use pots, saucepans and frying pans with a thick, flat bottom. | 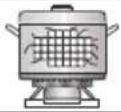 |
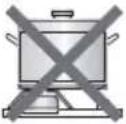 | Do not place cookware on one side of a burner, as it could tip over. | Always place the cookware right over the burners, not to one side. |  |
| Do not use cookware with a large diameter on the burners near the controls, which when placed on the middle of the burner may touch the controls or be so close to them that they increase the temperature in this area and may cause damage. | |||
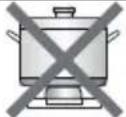 | Never place cookware directly on top of the burner. | Place the cookware on top of the trivet. | |
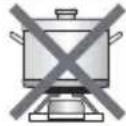 | Do not place anything, e.g. flame tamer, asbestos mat, between pan and pan support as serious damage to the appliance may result. | ||
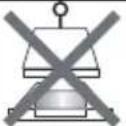 | Do not use excessive weight and do not hit the cooktop with heavy objects. | Handle cookware carefully when they are on the burner. | 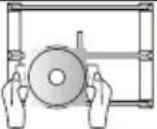 |
- Do not use cast iron pans, earthenware or ceramic pots, grills, broilers or broiler pans, as heat build-up may damage the appliance.
- Do not touch the cooking surface or the guard during use.
• As soon as a liquid starts to boil, lower the flame so that it only keeps the liquid at a simmer. - Fats and oil can release flammable vapors when heated. Keep flames or other hot objects away from different fats and oils when cooking with them.
- Since the vapors given off by very hot oil can cause spontaneous combustion, keep an eye on your food during cooking.
Cooking tips and hints
WARNING! Be careful when frying, as oil and fat heat up very quickly, especially when using the Boost function. At extremely high temperatures, oil and fat ignite spontaneously, posing a serious fire hazard.
- When food starts to boil, reduce the temperature.
• Using a lid will reduce cooking times and save energy by retaining heat. - Reduce the amount of liquid or fat to reduce cooking time.
- Start cooking on a high setting and reduce the setting when the food has warmed up.
Simmering
Simmering occurs below boiling point, at about 85^ C, when bubbles gradually rise to the surface of the liquid being cooked. This is the key to delicious soups and tender stews, as the flavours develop without overcooking the food. You should also cook egg-based sauces and flour-thickened sauces below the boiling point.
Cooking rice
Some tasks, such as cooking rice by the absorption method, may require a setting higher than the lowest setting to ensure that the food is cooked properly in the recommended time.
Browning a fillet of meat
For cooking juicy and tasty steaks:
- Let the meat stand at room temperature for about 20 minutes before cooking.
- Heat a large frying pan.
- Brush both sides of the steak with oil. Drizzle a small amount of oil into the hot pan and then place the meat in the hot pan.
- Turn the steak only once during cooking. The exact cooking time will depend on the thickness of the steak and how cooked you want it. Time may vary from 2 to 8 minutes per side. Press the steak to measure the degree of doneness: the more firm the steak looks, the more done it is.
- Let the steak rest on a warm plate for a few minutes to relax and tenderise before serving.
Stir-fry
- Choose a flat-bottomed wok (induction compatible) or a large frying pan.
- Have all the ingredients and equipment ready. Stir-frying should be quick. If cooking large quantities, cook the food in several smaller batches.
- Preheat the pan briefly and add two tablespoons of oil.
- Cook the meat first, set aside and keep warm.
- Sauté the vegetables. When they are hot but still crisp, turn the cooking zone to a lower setting, return the meat to the pan and add your sauce.
- Stir the ingredients gently to heat through.
- Serve immediately.
WARNING! When an unsuitably sized or non-magnetic frying pan (e.g. aluminium) or any other small object (e.g. knife, fork...) is left on the hob, the hob will automatically switch to standby within 1 minute. The fan will continue to run for another 1 minute.
General cleaning
• Cleaning should only be carried out when the product is completely cool.
• The product must be disconnected from the mains before cleaning.
- Clean the product regularly, preferably after each use.
- Abrasive cleaners or sharp objects may damage the surface of the product.
• Cleaning should be carried out with water and a little liquid.
Cooking grate and control knobs
- Remove the grill from the hob
• Clean with a damp cloth
• Dry with a soft dry cloth
Hob surface
- Clean the surface of the hob using a soft, well-wrung cloth.
• Dry the surface thoroughly after cleaning. - Remove food or liquids from the burners as soon as possible to avoid the risk of corrosion.
• The stainless steel parts of the product may discolour. This is normal due to high temperatures.
• Whenever you use the appliance, clean these parts with a product suitable for stainless steel.
Burners
• All burner elements can be removed for cleaning.
- Wash the burner elements with hot soapy water and remove marks with a mild cleaning paste.
• If the marks are difficult to remove, a nickel sponge well soaked in soap can be carefully used.
• After cleaning, be sure to dry with a soft cloth.
Refit the auxiliary, semi-fast, fast and triple crown burners as follows:
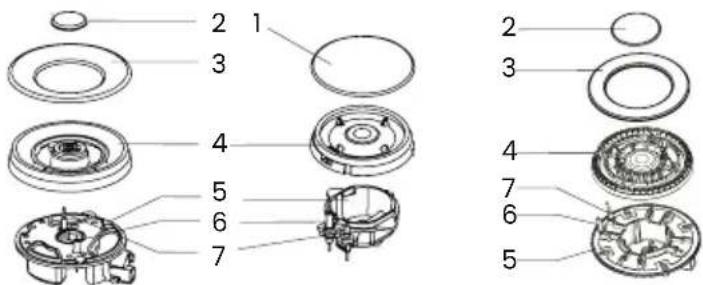
- Place the flame diffuser (4) on the burner (5), so that the ignition equipment and the flame control equipment are inserted into their respective holes. The flame diffuser must fit correctly.
- Place the burner cover (1,2,3) over the flame diffuser (4), so that they fit into their respective holes.
- Place the parts in the correct order after cleaning.
- The parts must fit perfectly.
| PROBLEM POSSIBLE CAUSE SOLUTION | ||
| The hob does not light. | No flame.Burner cap is incorrectly assembled.Gas valve is closed. closed. | Make sure that the hob is connected to the mains connected to the mains and that it is switched on. Check if there is a power cut in your home or in the area.Assemble the lid correctly.Check that the gas valve is open. |
| Irregular flame | The gas valve is closed.The burner cap is incorrectly assembled.Some food residue is obstructing the flame outlet.Burners are wet. | Check that the gas valve is open.Assemble the lid correctly.Clean with a dry cloth any food debris that may be obstructing the flame outlet.Dry the burner feet with a soft, dry cloth. |
| Noise when flame burns and ignites. | The burner cover is incorrectly assembled. | Assemble the cover correctly. |
| Flame goes out during use. | Burners are dirty.Liquid has been spilled on the flame.A strong draught has extinguished the flame. | Clean the burners properly.Turn the cooker off, wait for one minute and then turn the cooker on again.Turn the hob off and check that there are no draughts that could be affecting the hob. Wait one minute and turn the hob back on. |
| Flame is yellow. | Flame diffuser orifices are clogged.You are using a different gas. | Clean the flame diffuser.Check the type of gas you are using. |
| Flame is unstable. The burner | cap is incorrectly assembled. | Mount the burner cap correctly. |
| Smells of gas. There is a gas | leak. | Immediately turn off the gas hob, close the gas valve and open the windows in the room to ventilate.Contact the official technical service. |
If the problems are not solved, please contact your nearest service centre.
INFINITON
GAS HOB
GAS-CR2B
ean: 8436546195764
GAS-IX02
ean:8436546195771
GAS-320WB
ean: 8436546195726
GG-331
ean: 8436546192947
GG-332
ean: 8436546192954
GG-429
ean: 8436546196020
GGMCI-315
ean: 8436546192930
GASDL4
ean: 8436546196389
GAS419H
ean:8436546192961
GG-43BK
ean: 8445639002896
natural_image
3D diagram of a square container with internal flow arrows, no text or symbols presentnatural_image
Symbol of a trash bin crossed out by two crossed lines, with no text or labels present.Before installing the hob, make sure that:
• The work surface is square and level, and no structural furniture interferes with space requirements.
• The work surface is made of a heat-resistant and insulating material.
- If the hob is installed above an oven, the oven has a built-in fan.
• The installation shall comply with all clearance requirements and current standards and regulations.
- A suitable disconnection switch is incorporated in the fixed wiring system to allow for complete disconnection of the mains supply. The isolating switch shall be mounted and positioned in accordance with local electrical installation rules and regulations.
- The isolating switch must be approved and must provide 3 mm contact separation on all poles (or on all active [phase] conductors if local wiring regulations allow this variation of requirements).
• The isolating switch must be accessible to the customer after the hob has been installed.
- Consult local building authorities and ordinances if in doubt about installation.
- Use heat-resistant, easy-to-clean finishes (such as ceramic tile) for wall surfaces surrounding the cooktop.
After installing the hob, make sure that:
- The power cord is not accessible through cabinet doors or drawers.
• There is an adequate flow of fresh air from the outside of the cabinet to the base of the hob. - If the hob is installed on top of a drawer or cabinet, a thermal protection barrier must be installed under the base of the hob.
• The isolation switch is accessible to the customer.
| Model X(mm) Y(mm) Z(mm) | |||
| GAS-CR2BGAS-IX02 | 262 480 | 300 | |
| GG-331GG-332GGMCI-315GG-429GAS419HGG-43BK | 560 480 | 600 | |
| GAS-320WBGASDL4 | 560 490 | 600 | |
natural_image
Technical line drawing of a mechanical clamp or bracket assembly with exploded view and directional arrow (no text or symbols)Adjustement screw Seal ring
natural_image
Simple diagram with a circle, star, and curved arrows (no text or symbols)¿Necesitas ayuda?
natural_image
Silhouette of a person wearing a headset with a crossed-out wrench icon (no text or symbols)
INFINITON
TÉRMINOS Y REGISTRO DE GARANTÍA
- EN30 Compliance
- The joy of cooking
- Get the most out of your Infiniton hob
- What is the recommended distance between the hob and the cooker hood?
- Protect the surface of your hob
- What power level should I use for each recipe?
- Which equipment can I use on my hob?
- Choose a good location
- Make the electrical and gas connections
- Never seal the plate to the recess with silicone.
- Switch on the hob
- Turn off the hob completely
- General security
- Safety of children and vulnerable persons
- Electrical connections
- WARNING! Risk of fire
- WARNING! Risk of burns
- WARNING! Risk of electric shock
- WARNING! Risk of injury
- WARNING! Risk of suffocation
- Important safety instructions
- Important safety warnings for gas installations
- If there is a gas leak, take the following precautions
- Service
- Packing materials
- Disposal of the device
- Before installing the hob, make sure that:
- After installing the hob, make sure that:
- Required distances for the installation of the hob with an extractor hood above it
- This appliance must be installed inside a kitchen, ensuring the minimum distance allowed:
- Never seal the plate to the recess with silicone.
- Gas connection
- Caution!
- Adjusting the direction of elbow
- Installing the gas hob
- Gas conversion
- Replace the burner nozzle
- Adjust the minimum flame level
- WARNING!
- Electric shock hazard
- About the mains connection
- Electrical requirements
- Precautions
- Electrical connection
- Technical specifications
- How to use your Infiniton gas hob
- Automatic ignition with flame failure safety device
- Switching on the gas hob
- Cooking tips and hints
- Simmering
- Cooking rice
- Browning a fillet of meat
- Stir-fry
- General cleaning
- Cooking grate and control knobs
- Hob surface
- Burners
- Refit the auxiliary, semi-fast, fast and triple crown burners as follows:
- INFINITON
- ¿Necesitas ayuda?
- TÉRMINOS Y REGISTRO DE GARANTÍA
Brand : Infiniton
Model : GG-332
Category : Cooker