
DS 57190 B IN - Range hood Orbegozo - Free user manual and instructions
Find the device manual for free DS 57190 B IN Orbegozo in PDF.


| Product type | Extractor hood |
| Brand | Orbegozo |
| Model | DS 57190 B IN |
| Rated voltage | 220-240 V, 50 Hz |
| Rated power | 195 W |
| Motor power | 190 W |
| Lighting | 2 lamps of 2.5 W (low voltage 12 V) |
| Number of speeds | 3 (low, medium, high) |
| Extraction duct diameter | 150 mm |
| Airflow rate | ≥ 642.4 m³/h |
| Pressure | ≥ 359 Pa |
| Noise level | 70 dB(A) |
| Grease filter type | High-density stainless steel metal filter, washable (dishwasher safe at 60°C) |
| Charcoal filter | Optional, non-washable, replace every 4 months |
| Minimum distance from hob | 65 cm (gas), 65-75 cm recommended |
| Appliance class | Class I (mandatory earthing) |
| Installation | Wall-mounted, fixings provided |
| Control | Push buttons (off, low, medium, high, lighting) |
| Maintenance | Regular cleaning of metal filter (every 2-3 weeks) and hood (every 2 months) |
| Safety | Automatic shut-off not mentioned, do not flambé under the hood |
| Spare parts | Bulbs 2.5 W, charcoal filter |
Frequently Asked Questions - DS 57190 B IN Orbegozo
User questions about DS 57190 B IN Orbegozo
0 question about this device. Answer the ones you know or ask your own.
Ask a new question about this device
Download the instructions for your Range hood in PDF format for free! Find your manual DS 57190 B IN - Orbegozo and take your electronic device back in hand. On this page are published all the documents necessary for the use of your device. DS 57190 B IN by Orbegozo.
USER MANUAL DS 57190 B IN Orbegozo
natural_image
Exterior view of a stainless steel kitchen range hood (no text or symbols visible)DS 57190 B IN
Sonifer,S.A.
Read this manual carefully before running this appliance and save it for reference in order to obtain the best results and ensure safe use.
pic6C
Oil sooot filter mesh | Malla del filtro de hollín de aceite
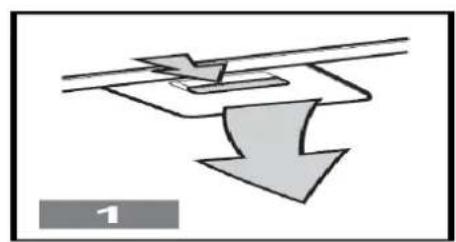
natural_image
Diagram showing a downward arrow and a horizontal line with an arrow, no text or symbols present| Normal light | Lámpara normal |
| High speed | Velocidad alta |
| Mid speed | Velocidad media |
| Low speed | Velocidad baja |
| Motor | Motor |
| Transformer | Transformador |
| Light | Lámpara |
| Electrical outlet | Salida eléctrica |
| Control switch | Interruptor de control |
(12)PARÁMETROS PRINCIPALES
-
This appliance can be used by children aged from 8 years and above and persons with reduced physical, sensory or mental capabilities or lack of experience and knowledge if they have been given supervision or instruction concerning use of the appliance in a safe way and understand the hazards involved. Children must never play with the appliance. Cleaning and user maintenance must never be carried out by children without supervision.
-
Children should be supervised to ensure that they do not play with the appliance.
-
Keep the appliance and the cable cord out of the reach of children less than 8 years old.
-
WARNING: In order to ensure your children's safety, please keep all packaging (plastic bags, boxes, polystyrene etc.) out of their reach.
-
If the supply cord is damaged it must be repaired by the Authorized Service Agent in order to avoid hazards.
-
Never pull on the cord when unplugging.
-
Do not use the unit with a damaged cord or plug, or if it is not working properly.
-
Do not handle the appliance with wet hands.
-
Never immerse the appliance in water or any other liquid.
-
Make sure the appliance has been unplugged before cleaning.
-
This appliance must be installed following the national regulations for electrical installations.
-
This appliance is for household use only.
-
In case that you need a copy of the instruction manual, you can ask for it writing an email to sonifer@sonifer.es.
-
WARNING: In case of misuse, there is a risk of possible injury.
- The cooking vapours must not be discharged into a flue used for venting combustion fumes or gases, nor into a duct used as a flue for rooms in which open flame appliances are installed. The installation for the discharge of the vapours must comply with all local and national codes and safety standards. If the hoods is being used in the outdoor vented mode where other vented fuel-burning appliances are installed, you must check to make sure that there is a sufficient supply of air to the room.
- Never let the children operate the machine
- The cooker hood is for home use only, not suitable for barbecue, Roast shop and other commercial purpose.
- Please ask the technical person to do the assembling.
- The cooker hood and its filter mesh should be clean regularly in order to keep in good working order.
- Before cleaning, please switch the power off at the main supply.
- Clean the cooker hood according to the instruction manual and keep the cooker hood from the danger of burning.
- If there is any fault with the appliance, please call the service department to arrange a service engineer.
- If the supply cord is damaged it must be repaired by its manufacturer, its Service Agent or a similarly qualified person in order to avoid a hazard.
- This appliance must be installed following the national regulations for electrical installations.
- Do not attempt to check the filters while the hood is in operation.
- Do not obstruct the ventilation slots for discharging the air.
- Do not touch the lamps or the lamp diffusers after prolonged use of the hood.
- Flambéing food beneath the hood is strictly prohibited.
- Avoid using and open flame, as it could damage the filters and increase the risk of fire.
- Never leave frying food unattended to prevent hot oil from catching fire.
- Before performing any maintenance, disconnect the hood from the electrical mains.
- The manufacturer will not be held liable for damages caused by failure to follow the foregoing instructions.
- Exhaust air should not be sent by conductors used to evacuate fumes from equipment powered by gas or other fuel.
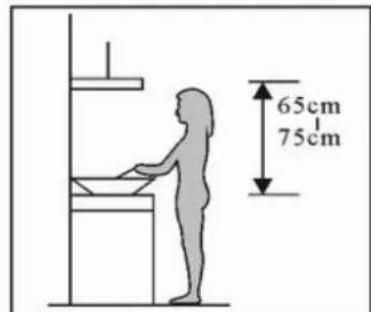
- The minimum distance between elements of cooking and the bottom of the hood must be at least 65cm if the hood is installed on a gas cooking element. If the instructions for installation of gas cooking element to indicate a greater distance, should be taken into account. The distance of 65cm cannot be reduced.
- The regulations regarding air evacuation must be respected.
(2)NOTICE
-
Thank you for choosing our cooker hood. Please read the instruction manual carefully before use.
-
The installation work must be undertaken by a qualified and competent fitter.
-
The manufacturer disclaims all liability for any damage or injury caused as a result of not following instructions for installation contained in the following text.
The cooker hood is used on 220/240v, 50Hz.
(3)FEATURE
-
The cooker hood uses high quality materials, and is made with a streamlined design.
-
Equipped with a large power low noise electric motor and centrifugal leaf, it produces strong suction, low noise, non stick grease filter and easy to clean.
-
With the isolated low voltage circuit board control, 12vDC input, the lights are therefore safer.
-
Special wind tunnel construction and oil collector design, free dirt will be absorbed in a second.
(4). INSTALLATION
4.1 For optimum performance the extractor hood should be installed approximately 65-75 cm above the ho
4.2 The hood is supplied with screws and rawlplugs which are suitable for most types of wall and ceiling. However it is advisable to consult a qualified technician to ensure that the materials are right for your wall or ceiling. The wall or ceiling must be strong enough to support the weight of the hood.
4.3 Electrical connection: The mains current must match the current stated
on the characteristics label situated inside the Hood. If the plug included is correct, connect the hood to a socket which meets safety requirements in an accessible location. If the hood includes a direct mains connection, use a double pole switch with a minimum distance between open contacts of 3 mm (accessible).
4.4 Study Figure A.
4.5 For wall installation drill three 8 mm holes every 100 mm in line with the hook of the hood.
4.6 Insert the rawlplugs.
4.7 Fix the hook to the wall and install the plate.
4.8 Fix the one-way valve with the screws supplied, add the reductor and the soot tube, and draw it outwards (see Figure B).
4.9 Place on the wall (Figure C).
4.10 Calculate the final height of the U-shaped section and pull the inside of the U-shaped section up to the correct height.
4.11 Secure the template in the lower tube using the screws supplied to mark out and drill two 8 mm holes in the wall (Figure D).
4.12 Finally, drill two 8 mm holes in a suitable p lace in line with the second plate (Figure E) and tighten the two screws.
The connection should be made as follows:
| BROWN | = | L (live) |
| BLUE | = | N (neutral) |
| YELLOW/GREEN | = | Earth |
THE CLASS 2 HOOD MUST NOT BE EARTHED
Second class hoods with the characteristics label containing the double square symbol.
The connection should be made as follows;
| BROWN | = | L (live) |
| BLUE | = | N (neutral) |
(5) NOTICE OF INSTALLATION
- Before installation, please ensure the area is clean to avoid suction of the remaining bits of broken wood and dust.
- It cannot share the same air ventilation tube with other appliance such as gas tube, warmer tube, and hot wind tube.
- The bending of ventilation tube should be≥120°, parallel or above the start point and should be connected to the external wall.
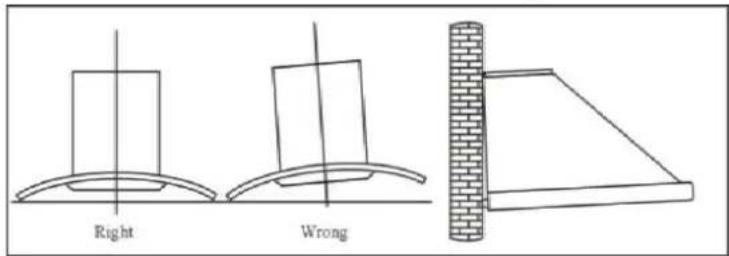
- After installation, make sure that the extractor is level to avoid grease collection at one end.
(6) USE
Pic5
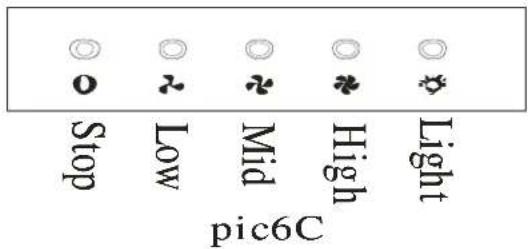
Speed adjustment .See pictures
Push button
- Push stop button, and the motor will stop.
- Push the Low button, the buzzer will buzz once, and the motor runs at low speed.
- Push the high button, the buzzer will buzz once, and the motor runs at mid speed.
- Push the High button, the buzzer will buzz once, and the motor runs at high speed.
- Push the light button and the two lights will come on. Push it again and the light will turn off.
(7) MAINTENANCE
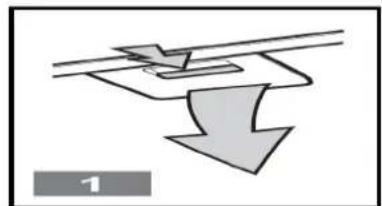
7.1 The cleaning of the carbon grease filter mesh
The filter mesh is made of high-density stainless steel. Please do not use the corrosive detergent on it. Keeping this filter clean will keep the appliance running correctly. Please strictly follow the guidelines below.
Method 1: Put the mesh into 40-50 c clean water, pour on detergent, and soak for 2-3 mins. Wear gloves and clean with a soft brush. Please do not apply too much pressure, as the mesh is delicate and will damage easy. Method 2: If instructed to do so, it can be put into a dishwasher, set the temperature at around 60 degrees.
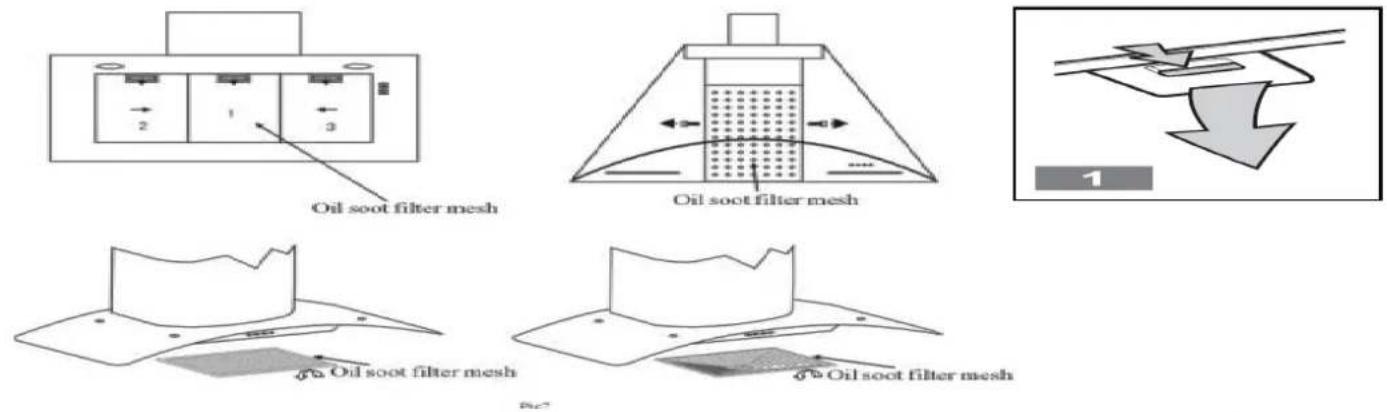
7.2 Notice of cleaning cooker hood
A. To protect the main body from corrosion over a long period of time, the cooker hood should be cleaned with hot water plus non corrosive detergent every two months.
B. Please do not use abrasive detergent for it will damage the body.
C. Keep the motor and other spare parts free from water, as this will cause damage to the appliance.
D. Before cleaning the appliance please remember to cut off power
E. The carbon filter shouldn't be exposed to heat.
F. Please don't tear open the fixed bar around the carbon filter
G. If the plug or cord is damaged, please call an authorised after sales service to replace it.
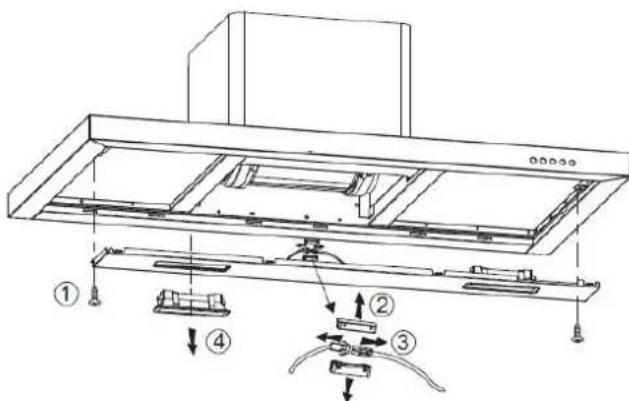
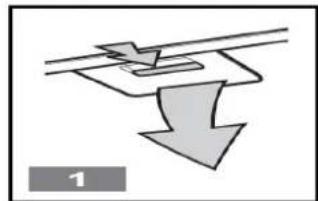
(8) BULB REPLACEMENT
Note: if the bulb is faulty, replace immediately.
- Disconnect from the mains.
- Remove protective glass.
- Replace burnt out bulb(s).
- Replace protective glass.
BULB 2.5W max
(9) SETTING UP AND CHANGING THE ACTIVE CARBON FILTER
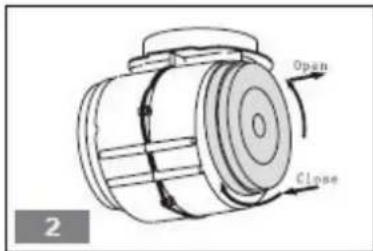
This system is used in locations without ducting to the outside or when it is not possible to install such ducting.
Disconnect the machine from the mains.
A. Remove metal filters.
B. The circular filters (Figure 2) are located at either end of the motor. Turn the carbon filters anti-clockwise until they are unscrewed.
C. Apply reverse procedure to install the carbon filter.
Warning: the active carbon filter cannot be washed or recycled. It should be changed at least every four months.
(10).ABNORMITY AND SOLUTION
| Fault | Cause | Solution | |
| Light on, but motor does not work | The leaf blocked | Get rid of the blocking | |
| The capacitor damaged | Replace capacitor | ||
| The motor jammed bearing damaged | Replace motor | ||
| The internal with of motor off or a bad smell from the motor | Replace motor | ||
| Light does not work, motor does not work | Beside the above mentioned, check the following: | ||
| Light damaged | Replace lights | ||
| Power cord looses | Connect the wires as per the electric diagram | ||
| Oil leakage | One way valve and the air ventilation entrance are not tightly sealed | Take down the one way valve and seal with glue | |
| Leakage from the connection of U-shaped section and cover | Take U-shaped section down and seal with soap or paint | ||
| Shake of the body | The leaf damaged and causes shaking | Replace the leaf | |
| The motor is not tightly hanged | Lock the motor tightly | ||
| The body is not tightly hanged | Fixed the body tightly | ||
| Insufficient suction | The distance between the body and the gas top too long | Readjust the distance | |
| Too much ventilation from open doors or windows | Choose a new place and resemble the machine | ||
| The machine inclines | The fixing screw not tight enough | Tighten the hanging screw and make it horizontal | |
| The hanging screw not tight enough | Tighten the hanging screw and make it horizontal | ||
(11).ELECTRICAL DIAGRAM.
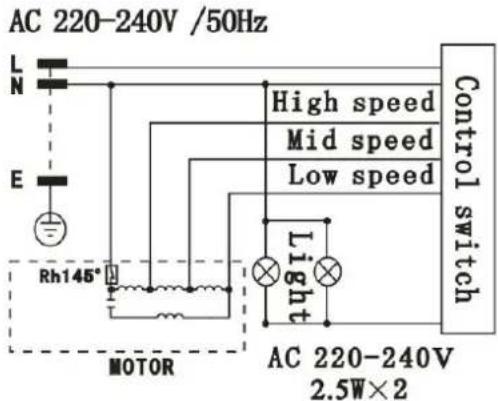
(12). MAIN PARAMETERS
| Rated Input | 220V-240V, 50Hz |
| Rated Power | 195W |
| Lighting Power | 2.5W X 2 |
| Motor Power | 190W |
| Drive Mode | Single Motor |
| Speed | Speed I Speed II Speed III |
| Air tube diameter | 150MM |
| Air output | ≥642.4m3/h |
| Air pressure | ≥359Pa |
| Noise | 70dB(A) |
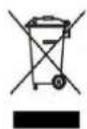
Disposal of old electrical appliances.
The European directive 2002/96/EC on Waste Electrical and Electronic Equipment (WEEE), requires that old household electrical appliances must not be disposed of in the normal unsorted municipal waste stream. Old appliances must be collected separately in order to optimize the recovery and
recycling of the materials they contain, and reduce the impact on human health and the environment.
The crossed out “wheeled bin” symbol on the product reminds you of your obligation, that when you dispose of the appliance, it must be separately collected.
Consumers should contact their local authority or retailer for information concerning the correct disposal of their old appliance.
DECLARATION OF CONFORMITY:
This device complies with the requirements of the Low Voltage Directive 2014/35/EU and the requirements of the EMC directive 2014/30/EU.
(1) AVIS DE SÉCURITÉ
(7) ENTRETIEN
natural_image
Diagram showing a downward arrow with a small rectangular object above it, no text or symbols present(8) REMPLACEMENT DES AMPOULES
(9) MONTAGE ET REMPLACEMENT DU FILTRE À CHARBON ACTIF
(7) MANUTENÇÃO
7.1 A limpeza da rede de carbono do filtro de gordura
natural_image
Diagram showing a downward arrow and a star on a horizontal line, with no text or symbols present.- Anomalias e Solução
CA 220-240 V 50 Hz
Alta velocidade
Média velocidade
Baixa velocidade
Saída eléctrica
Interruptor de controlo
Motor
Transformador
- (2)NOTICE
- (3)FEATURE
- (4). INSTALLATION
- NOTICE OF INSTALLATION
- Speed adjustment .See pictures
- Push button
- MAINTENANCE
- The cleaning of the carbon grease filter mesh
- Notice of cleaning cooker hood
- BULB REPLACEMENT
- BULB 2.5W max
- SETTING UP AND CHANGING THE ACTIVE CARBON FILTER
- (10).ABNORMITY AND SOLUTION
- (11).ELECTRICAL DIAGRAM.
- (12). MAIN PARAMETERS
- Disposal of old electrical appliances.
- DECLARATION OF CONFORMITY:
- AVIS DE SÉCURITÉ
- ENTRETIEN
- REMPLACEMENT DES AMPOULES
- MONTAGE ET REMPLACEMENT DU FILTRE À CHARBON ACTIF
- MANUTENÇÃO
- A limpeza da rede de carbono do filtro de gordura
Brand : Orbegozo
Model : DS 57190 B IN
Category : Range hood