
SKS 4 A1 - Night lamp SILVERCREST - Free user manual and instructions
Find the device manual for free SKS 4 A1 SILVERCREST in PDF.

User questions about SKS 4 A1 SILVERCREST
0 question about this device. Answer the ones you know or ask your own.
Ask a new question about this device
Download the instructions for your Night lamp in PDF format for free! Find your manual SKS 4 A1 - SILVERCREST and take your electronic device back in hand. On this page are published all the documents necessary for the use of your device. SKS 4 A1 by SILVERCREST.
USER MANUAL SKS 4 A1 SILVERCREST
Operating instructions and safety instructions
DE AT CH
Before reading, unfold the page containing the illustrations and familiarise yourself with all functions of the device.
DE AT CH
Operating instructions and safety instructions
Page
1
Contents
Introduction 2
Information about these operating instructions 2
Proper use 2
Warning notices 2
Safety information 3
Basic safety instructions 3
Notes on batteries and rechargeable batteries 5
Check package contents 6
Appliance description 7
Function 8
Operating the appliance 8
Setting up 8
Connecting the power supply 8
Inserting and changing the motif disc 9
Controls....10
Overview 10
Activating/deactivating alarm signals 10
Switching the night light on/off 11
Set alarm time mode 11
Adjusting the light intensity 11
Menu settings 12
Setting the time 12
Setting the alarm times 13
Setting the sound 14
Switching the illuminated area on/off 15
Setting the illuminated area 15
Troubleshooting 16
Cleaning 16
Storage 17
Disposal 17
Disposal of the appliance/mains adapter 17
Disposal of the batteries 17
Disposal of the packaging 17
Attachment 18
Technical data 18
Kompernass Handels GmbH warranty 19
Service 20
Importer 20
Introduction
Information about these operating instructions
Congratulations on the purchase of your new appliance. You have selected a high-quality product.
The operating instructions are part of this product. They contain important information on safety, usage and disposal. Before using the product, please familiarise yourself with all operating and safety instructions. Use the product only as described and for the range of applications specified. Retain these operating instructions for future reference. Please also pass these operating instructions on to any future owner.
Proper use
This appliance is intended for use as a sleep trainer, alarm clock and night light for children. The appliance is intended for use in dry interiors of private households. Do not use the appliance in commercial or industrial areas.
The appliance is not intended for any other purpose nor for use beyond the scope described. Claims of any kind for damage resulting from misuse, incompetent repairs, unauthorised modification or the use of unauthorised spare parts will not be accepted.
Warning notices
The following warnings are used in these operating instructions:

DANGER
A warning notice at this hazard level indicates an imminently hazardous situation.
Failure to avoid this hazardous situation could result in serious injuries or even death.
▶ Follow the instructions on this warning label to avoid the risk of death or serious injury.
CAUTION
A warning notice at this hazard level indicates a risk of property damage.
Failure to avoid this situation could result in property damage.
▶ Follow the instructions in this warning notice to prevent property damage.
NOTE
▶ A note provides additional information which will assist you in using the appliance.
Safety information
This section contains important safety instructions for using the appliance.
This appliance complies with statutory safety regulations. Improper use may result in personal injury and property damage.
Basic safety instructions
■ Check the appliance for visible external damage before use. Do not use a appliance that has been damaged or dropped.
■ If the cable or connections are damaged, have them replaced by authorised specialists or Customer Service.
■ Do not use the appliance if the mains power adapter or the connection cable are damaged.
■ The mains adapter and the welded connection cable may not be repaired. In the event of a defect, the entire mains adapter must be replaced with another of identical design.
■ This appliance may be used by children aged 3 years and above and by persons with limited physical, sensory or mental capabilities or lack of experience and knowledge, provided that they are under supervision or have been told how to use the appliance safely and are aware of the potential risks.
■ 0-3 Caution! Not suitable for children under 3 years.
■ Do not allow children to use the appliance as a toy.
■ Cleaning and user maintenance tasks may not be carried out by children unless they are supervised.
DANGER! Do not allow children to play with the packaging material! Keep all packaging materials away from children. There is a risk of suffocation!
■ Do not make any unauthorised modifications or alterations to the appliance.
■ Never open the appliance housing. There are no user-service-able or replaceable components inside the appliance.
■ All repairs must be carried out by authorised specialist companies or by the Customer Service department. Improper repairs may put the user at risk. They will also invalidate any warranty claim.
■ Defective components must always be replaced with original replacement parts. Compliance with the safety requirements can only be guaranteed by using these replacement parts.


Use the appliance and the mains adapter only in dry interior rooms.
■ Protect the appliance from water droplets or spray. Never submerge the appliance in water, do not set up the appliance in the vicinity of water and do not place any object filled with liquid (i.e. vases) on the appliance.
- Keep the appliance away from open flames (e.g. candles) at all times. Do not place burning candles on or next to the product. This will help to prevent fires.
■ Avoid exposing the appliance to direct sunlight.
■ Operate the appliance only with the supplied power adapter.
■ To avoid damage caused by overheating, do not cover the mains power adapter.
■ The mains adapter draws power as long as it is plugged in (standby mode). To completely disconnect the appliance from the power supply, the plug must be removed from the mains power socket.
■ To disconnect the mains adapter, always pull only on the plug itself, not on the power cable.
■ Never touch the mains adapter or the connecting cable with wet hands!
■ The mains power socket being used must be easily accessible at all times so that the mains adapter can be quickly removed from the mains power socket in the event of an emergency.
In the case of a malfunction (unusual noises or smoke) or a thunderstorm, disconnect the mains adapter from the power socket. Have the appliance checked by a qualified specialist before using it again.
Notes on batteries and rechargeable batteries
DANGER!
Mishandling the batteries can cause fires, explosions, leakages or other hazards!
■ Do not swallow batteries: there is a risk of chemical burns.
- Keep new and used batteries away from children.
■ If the battery compartment no longer closes securely, stop using the product and keep it away from children.
■ If you suspect batteries may have been swallowed or have got into any part of the body, seek immediate medical help.
■ Chemicals from leaking or damaged batteries can cause skin irritations when touched. Therefore, use suitable protective gloves. In event of contact with your skin, rinse off with plenty of water. If the chemicals come into contact with your eyes, rinse them thoroughly with plenty of water, do not rub and consult a doctor immediately.
■ Batteries must never be short-circuited, taken apart, deformed or thrown into a fire. There is a risk of an explosion.
■ Do attempt to recharge non-rechargeable batteries. There is a risk of fire and/or explosion!
■ When inserting the batteries, pay attention to the correct polarity (plus/+ and minus/−).
■ Do not mix different types of batteries.
■ Due to increased risk of leakage, empty batteries should be removed.
■ During extended periods of non-use (e.g. during storage), remove the batteries to prevent possible damage caused by battery leakage.
Check package contents
The appliance is supplied with the following components as standard:
- Kids' sleep trainer
• 2 interchangeable motif discs - Mains adapter
• 3 batteries, type AA/Mignon/LR6 - Quick start guide
- Operating instructions

DANGER
▶ Do not allow children to play with packaging materials. There is a risk of suffocation!
◆ Remove all parts of the appliance, the quick start guide and the operating instructions from the packaging.
◆ Remove all packaging materials from the appliance.
NOTE
▶ Check the package for completeness and signs of visible damage.
▶ If the delivery is incomplete or damage has occurred as a result of defective packaging or during transport, contact the service hotline (see section Service).
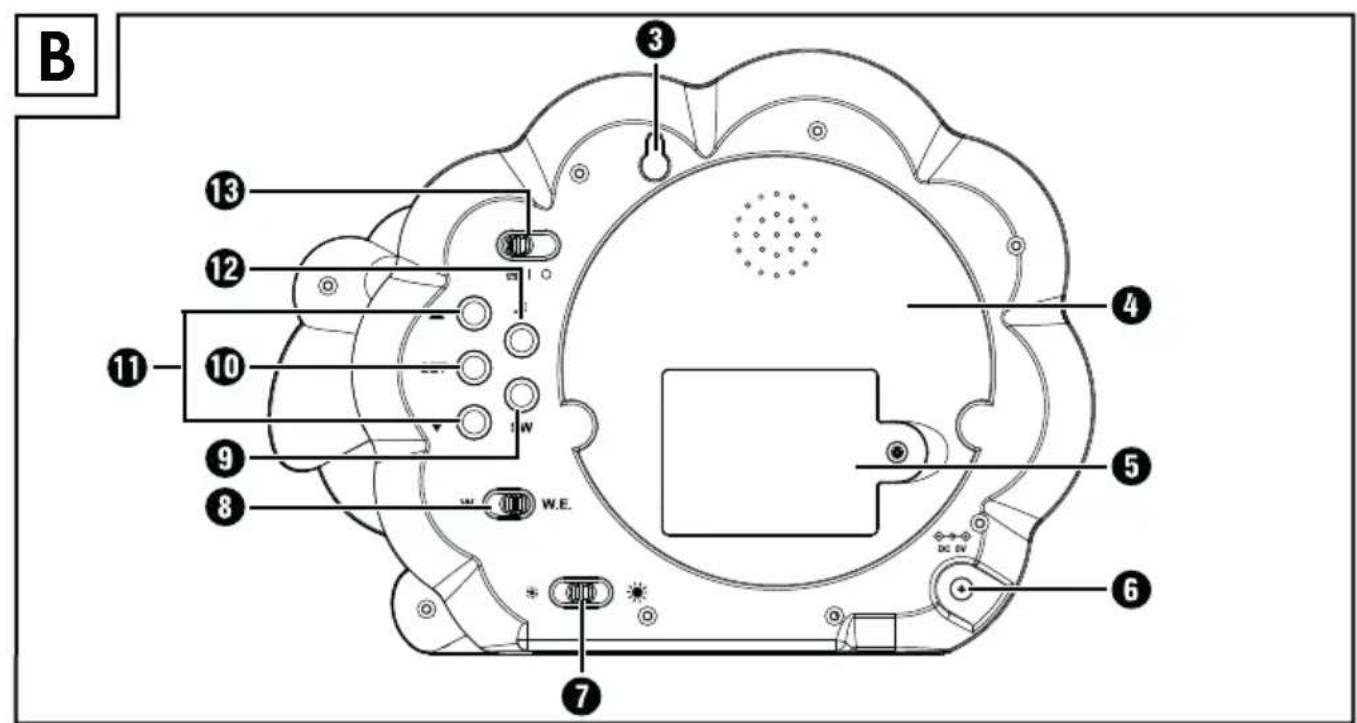
Appliance description
(For illustrations, see fold-out page; for the functions of keys and switches see section "Controls".)
A. Front
① Display
② Illuminated area
B. Rear
③ Hanger for wall mounting
4 Storage compartment for a motif disc
⑤ Battery compartment
6 Connection socket for the mains adapter
⑦ Slider switch
8 Slider switch W./W.E.
9 SW button
10 SET button
11 Arrow buttons ▲ ▼
12 Lullaby button
13 Main switch ON
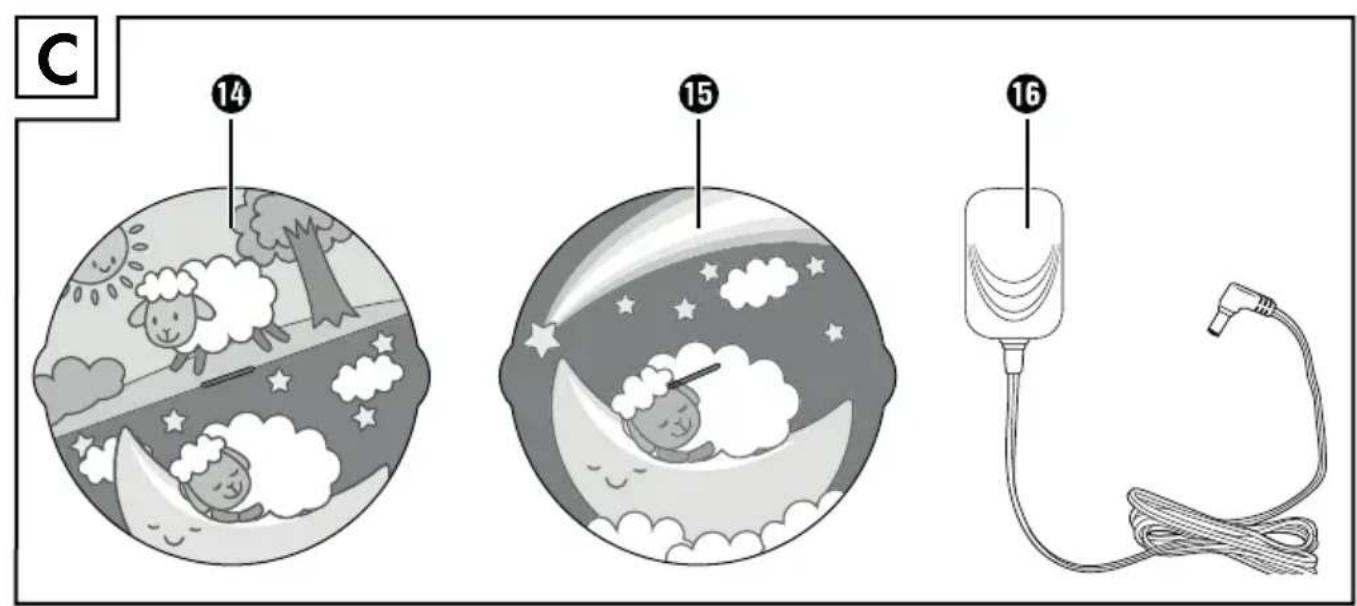
C. Accessories
14 Motif disc with two images (sleep trainer function)
⑮ Motif disc with one image (night light function)
16 Mains adapter
Function
The child sleep trainer helps your child get used to a regular sleep-wake schedule. Visible and audible signals playfully indicate to your child whether it is time to get up or go to sleep.
The motif disc with two images 14 is used as a sleep trainer. Explain to your child that it is time to get up when the awake image lights up and time to sleep when the sleeping figure lights up.
We recommend using the appliance as a sleep trainer from about 30 months of age.
In order to use the appliance as a sleep trainer, you must put the appliance into operation (see section "Operating the appliance"), insert a motif disc (see section "Inserting and changing the motif disc"), set the time (see section "Setting the time"), switch on the alarms (see section "Switching the alarm times") and set the alarm time mode (see section "Set alarm time mode"). You do not need to make any further settings if you are satisfied with the default settings.
For younger children (up to 30 months), you can initially use the appliance as a conventional night light (see section "Switching the night light on/off"). The motif disc with one image 15 is intended for this purpose.
Operating the appliance
Setting up
■ The surface on which the appliance is to be installed should be stable and level.
■ Alternatively, the appliance can be hung from the hanger. For safe wall mounting, use a 5 x 25 mm wall plug and a corresponding screw (not included)
■ Do not place or hang the appliance near heat sources such as radiators or other heat-generating appliances.
Connecting the power supply
The appliance can be operated either with batteries or with the mains adapter 16.
NOTE
▶ If you disconnect the appliance from the power supply, all settings will be cleared and reset to the factory defaults. We recommend inserting batteries even if you want to use the appliance in mains operation. This ensures that no settings are lost in the event of a power failure.
▶ If you use the night light often, we recommend the use of the mains adapter 16.
Battery operation
NOTE
For battery operation, use 3 x 1.5 V AA/Mignon/LR6 batteries (included).
▶ When the battery level is low, the symbol flashes on the display ①. Replace the batteries as soon as possible.
◆ Using a Phillips screwdriver, loosen the screw of the battery compartment on the back of the appliance.
Remove the cover of the battery compartment ^5 .
- Insert the batteries into the battery compartment 5. Place the batteries into the battery compartment 5 as indicated on the polarity diagram.
◆ Close the cover of the battery compartment ^5 and tighten the screw again.
Mains power operation
Connect the supplied mains adapter to the connection socket of the appliance and to a mains socket.
After the power supply has been established, both halves of the illuminated area ② illuminate briefly, and the display ① switches on and shows a face. The appliance is in standby mode.
Inserting and changing the motif disc
The motif disc with one image 15 is provided for use as a night light. The motif disc with two images 14 is intended for use as a sleep trainer.
Place the motif disc in the depression so that the two tabs of the motif disc slide into the two recesses on the edge of the illuminated area ②.
- Turn the motif disc clockwise until it sits firmly on the front of the illuminated area ②.
◆ Turn the motif disc anticlockwise to remove it.
NOTE
▶ Store the unused motif disc in the storage compartment ^4 at the rear of the appliance. To do this, push the motif disc from above behind the two tabs.
Controls
Overview
Overview of the buttons and switches on the back of the appliance:
| Key Function | |
| Main switch [IMAGE] | ► Switch alarm signals on and off:ONActivate alarm with light and sound,switch on light; | Activate alarm with light only (no sound),switch on light;○ Deactivate alarm (no light, no sound),switch off light |
| Lullaby button [IMAGE] | ► Press and hold for 3 seconds to play the set lullaby; press again to stop (otherwise stops automatically after 10 minutes) |
| SET button [IMAGE] | ► Press and hold for 3 seconds to call up the menu► Press to confirm menu entries |
| Arrow buttons ▲▼ [IMAGE] | ► In the standard display: display set alarm times► In the menu: navigate in the respective menu► keep pressed for fast scrolling |
| SW button [IMAGE] | ► Switch between face and time on the display [IMAGE] |
| W./W.E. slider switch [IMAGE] | ► Change alarm time mode:W. = weekdays (Mon-Fri)W.E. = weekend (Sat/Sun) |
| [IMAGE] slider switch [IMAGE] | ► Set the brightness of the display [IMAGE] |
Activating/deactivating alarm signals
You can set how and if the alarm should be switched on with the main switch
ON | 13:
■ Set the main switch to the position of the wake-up time and bedtime are to be displayed with light and sound. At the set wake-up or bedtime, sounds or a melody will play for approx. 10 minutes. In addition, the upper part of the motif disc with the awake image is illuminated at wake-up time and the lower part with the sleeping image at bedtime.
NOTE
▶ To stop the alarm prematurely, set the main switch B to the position if you want the light to remain on, or C if you want the sound and light to be turned off.
■ Set the main switch to the position if you only want to display the wake-up time and bedtime with light, i.e. without sound.
■ Set the Main switch to the position to deactivate all alarm signals.
NOTE
When the light is activated, the illuminated area ^2 lights up as soon as you turn the main switch ^13 to the position ☎ or ^1 . If you do not want the illuminated area ^2 to light up for a long time, you can either activate the alarm shortly before or at the set alarm times or deactivate the light completely (section "Switching the illuminated area on/off").
Switching the night light on/off
You can also use the appliance solely as a night light. The motif disc with one image 15 is intended for this purpose.
To turn the night light on or off:
◆ Set the main switch13 to the position I.
If you have not already done so, switch on the LED light of the illuminated area ② (see section "Switching the illuminated area on/off").
◆ Activate both LED lights of illuminated area② (see section "Setting the illuminated area").
The night light is on. To turn off the night light:
◆ Set the main switch13 to the position ○
Set alarm time mode
You can set different alarm times for the days of the week and the weekend. Use this function if you want your child to sleep and get up at other times on the weekend than during the week.
On weekdays (Mon-Fri) move the W./W.E. slider switch ⑧ to the position W. and on weekends (Sat/Sun) to the position W.E.
For the preset times and setting options see section "Setting the alarm times".
Adjusting the light intensity
Set the brightness of the display ① using the slider switch ⚙️ ⑦ on the back of the appliance.
Menu settings
The appliance is delivered with preset sleep and wake-up times. This means that you do not have to make any further settings in the menu (except for the time) if the default settings are suitable for you.
NOTE
▶ To return to the previous menu item, select the symbol and press the SET button 10.
▶ If no setting is made in the menus for more than approx. 20 seconds, the setting menu is closed and the system returns to standby mode (face or time on the display ①). Settings made up till then are retained.
Setting the time
To set the time:
In standby mode (face or time on the display 1), press and hold the SET button 10 for approx. 3 seconds to call up the main menu. The symbol for the time setting ⏻ flashes on the display 1.
◆ Press the SET button⑩ to enter the time menu. (i) 100000000000000000000000000000000000000000000000000000
◆ Press the arrow buttons ▲ ⬇ to toggle between 12h and 24h format display. In 12h format, an "A" appears behind the time in the morning and a "P" in the afternoon.
◆ Press the SET button10 to confirm your selection and set the current time.
◆ Use the arrow buttons ▲▼11 to set the current hour and then press the SET button 10.
◆ Use the arrow buttons ▲▼10 to set the current minute and press the SET button 10 to confirm your entry.
NOTE
▶ You can use the SW button ⑨ to switch between face and time on the display ①.
Setting the alarm times
The appliance has three different alarm time modes, each with preset sleep and wake-up times. The alarm time modes are preset as follows:
W. For the alarm during the week (Monday–Friday)

Wake-up: 07:30 a.m.

Sleep: 08:30 p.m.
W.E. For the weekend alarm (Saturday/Sunday)

Wake-up: 08:00 a.m.
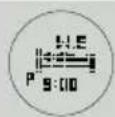
Sleep: 09:00 p.m.
NAP For the midday nap
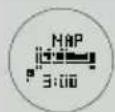
Sleep: 03:00 p.m.

Wake-up: 04:00 p.m.
Proceed as follows to set your own alarm times:
In standby mode (face or time on the display ①), press and hold the SET button ⑩ for approx. 3 seconds to call up the main menu. The symbol for the time setting ⏻ flashes on the display ⑪.
Use the arrow buttons ▲▼11 to select the symbol for the alarm times and press the SET button 10. The symbol flashes.
Use the arrow buttons ▲▼11 to select the alarm time mode (W., W.E., NAP) for which you want to set the alarm and press the SET button 10.
◆ Use the arrow buttons ▲▼11 to select the time of day for which you want to set the alarm and press the SET button 10.
for the wake-up time
- - for bedtime
Use the arrow buttons ▲▼11 to set the hour at which you want to wake up or sleep and press the SET button 10.
Use the arrow buttons ▲▼11 to set the minutes at which you want to wake up or sleep and press the SET button 10.
Confirm the ± 1 symbol by pressing the SET button 10 to return to the alarm time mode selection.
To exit the setup menu, use the arrow buttons ▲▼11 to select the symbol and press the SET button 10.
Setting the sound
There are four different sounds or melodies to choose from, which can be used to show your child how much time he or she has to get up or sleep.
Use the procedure below to adjust the preset sound settings:
Setting the alarm sound and volume
Adjust the volume at which you want your child to wake up:
In standby mode (face or time on the display 1), press and hold the SET button 10 for approx. 3 seconds to call up the main menu. The symbol for the time setting 🏱 flashes on the display 1.
Use the arrow buttons ▲▼11 to select the alarm setting symbol and press the SET button 10.
◆ To set the alarm volume, press the SET button 10 again.
Use the arrow buttons ▲▼1 to set the desired volume and then press the SET button 10. Press the SET button 10 again to return to the previous menu i.
Set the sound you want your child to wake up to:
In the alarm settings menu, use the arrow buttons ▲▼⑪ to select the sound settings symbol and press the SET button ⑩.
♦ Select the desired sound using the arrow buttons ▲▼11 and press the SET button 10. Press the SET button 10 again to return to the previous menu ↓.
To exit the setup menu, use the arrow buttons ▲ 11 to select the +! symbol and press the SET button 10.
Setting the sleep melody and volume
Adjust the volume at which your child's bedtime is displayed:
In standby mode(face or time on the display 1), press and hold the SET button 10 for approx. 3 seconds to call up the main menu. The symbol for the time setting 🏱 flashes on the display 1.
Use the arrow buttons ▲▼11 to select the symbol for the sleep melody settings ♪ and press the SET button 10.
◆ To adjust the volume of the sleep melody, press the SET button 10 again.
Use the arrow buttons ▲▼11 to set the desired volume and then press the SET button 10. Press the SET button 10 again to return to the previous menu 4.
Set the melody to be used to show your child the sleep time:
◆ Select the melody setting symbol from the sleep tune settings menu using the arrow buttons ▲▼⑪ and press the SET button ⑩.
Select the desired melody with the arrow buttons ▲▼⑪ and press the SET ⑩ button. Press the SET button ⑩ again to return to the previous menu ↩.
To exit the setup menu, use the arrow buttons ▲▼11 to select the #symbol and press the SET button 10.
Switching the illuminated area on/off
By default, the light of the illuminated area ② is activated. This means that, depending on the time of day and the setting, one or both halves of the illuminated area ② are permanently illuminated as soon as the main switch ⑬ is in the ⏰ (light + sound) or I (light only) position.
If the alarm is only to be activated with sound and you do not want to use the night light, you can completely deactivate the LED light of illuminated area ②.
In standby mode (face or time on the display 1), press and hold the SET button 10 for approx. 3 seconds to call up the main menu. The symbol for the time setting ⏻ flashes on the display 1.
Use the arrow buttons ▲▼11 to select the symbol for the light setting 🧑️ and press the SET button 10.
◆ Select to turn off the light or to turn the light back on again.
To exit the setup menu, use the arrow buttons ▲ 11 to select the symbol and press the SET button 10.
Setting the illuminated area
You can make your own settings for the two LED lights of the illuminated area ②.
NOTE
The light must be activated. When the light is deactivated, neither of the two LEDs lights up (see section "Switching the illuminated area on/off").
In standby modeface or time on the display ①), press and hold the SET button ⑩ for approx. 3 seconds to call up the main menu. The symbol for the time setting ⏻ flashes on the display ⑪.
Use the arrow buttons ▲▼11 to select the symbol for the illuminated area and press the SET button 10.
◆ Use the arrow buttons ▲▼11 to set the desired function:
- ①: Both halves of the illuminated area ② always light up when the light is switched on and in the event of an alarm.
- Ⓞ: When the light is switched on and in the event of an alarm, only one of the two halves of the illuminated area ② lights up.
To exit the setup menu, use the arrow buttons ▲ 11 to select the + symbol and press the SET button 10.
Troubleshooting
| Fault Possible cause Remedy | ||
| The appliance is not connected to the mains. | Make sure that the mains adapter 16is connected to the connection socket6 and to a mains socket. | |
| The appliance is not working. | No batteries in the battery compartment 5 or the batteries are dead. | Check that the batteries have sufficient charge and replace them if necessary. |
| The batteries are inserted incorrectly in battery compartment 5. | Check that the batteries are properly inserted in the battery compartment5. Place the batteries into the battery compartment 5 as indicated on the polarity diagram. | |
| The alarm does not start or the light or sound does not work. | The appliance is not connected to the mains. | Make sure that the mains adapter 16is connected to the connection socket6 and to a mains socket. |
| The main switch 13 is in the position ○ | Make sure that the main switch 13is in the night + sound) or (light only) position. |
If the above suggestions do not resolve the problem, or if you experience any other type of problem, please contact Customer Service.
Cleaning

DANGER
Risk of fatal injury from electrocution!
▶ Unplug the mains adapted from the wall socket before cleaning.
CAUTION
▶ To avoid irreparable damage to the appliance, ensure that no moisture can penetrate the appliance during cleaning.
▶ Do not use caustic, abrasive or solvent-based cleaning materials. These can irreparably damage the surfaces of the appliance.
- Clean the surfaces of the appliance and the motif disc ^14 ⑮ with a soft, dry cloth.
Use a lightly moistened cloth and a mild detergent to remove stubborn dirt residues. Wipe with a cloth moistened only with water to remove detergent residue. Dry all parts well.
Storage
If you do not intend to use the appliance for an extended period of time, disconnect it from the power supply, remove the batteries and store it in a clean, dry place without exposure to direct sunlight.
Disposal
Disposal of the appliance/mains adapter
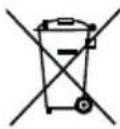
Never dispose of the appliance or the mains adapter in your normal domestic waste. These products are subject to the provisions of European Directive 2012/19/EU.

Dispose of the appliance and the mains adapter via an approved disposal company or your municipal waste facility. Please comply with all applicable regulations. Please contact your waste disposal facility if you are in any doubt.


Your local community or municipal authorities can provide information on how to dispose of the worn-out product.
Disposal of the batteries

Used batteries must not be disposed of in household waste. Consumers are legally obliged to dispose of batteries at a collection point in their community/city district or at a retail store.
The purpose of this obligation is to ensure that batteries are disposed of in an environmentally friendly manner. They may contain poisonous heavy metals and must be disposed of in accordance with the rules for the treatment of hazardous waste. The chemical symbols for heavy metals are as follows: Cd = cadmium, Hg = mercury, Pb = lead. Only dispose of batteries that are fully discharged.
Disposal of the packaging

The packaging materials have been selected for their environmental friendliness and ease of disposal and are therefore recyclable.
Dispose of packaging materials that are no longer needed in accordance with applicable local regulations.

Dispose of the packaging in an environmentally friendly manner.
Note the labelling on the packaging and separate the packaging material components for disposal if necessary. The packaging material is labelled with abbreviations (a) and numbers (b) with the following meanings:
1-7:plastics,
20-22: paper and cardboard,
80-98 composites.
Attachment
Technical data
| Appliance | |
| Power supply via mains adapter 16 | 5 V = (DC) / 0.15 A |
| Polarity |  (positive inside, negative outside) (positive inside, negative outside) |
| Power supply via batteries | 3 x 1.5 V = (DC)(type AA/mignon/LR6) |
| Mains adapter 16 | |
| Type designation ZD5C050015BSE | |
| Manufacturer E-TEK Electronics Manufactory Co., LTD | |
| Input voltage/current 100-240 V | ~ (AC), 50/60 Hz, 0,2 A |
| Output voltage/current 5 V | = (DC), 150 mA |
| Protection class | II/□ (double insulation) |
| Efficiency class |  |
| Transformer for toys |  |
| Protection type | IP40: Protected against ingress of solid foreign objects with a diameter of >1 mm. |
| SMPS - switch mode power adapter |  |
| Nominal ambient temperature (ta) 25°C | |
| Polarity |  (positive inside, negative outside) (positive inside, negative outside) |
| Safety transformer, short-circuit proof |  |
This appliance has a 3-year warranty valid from the date of purchase. If this product has any faults, you, the buyer, have certain statutory rights. Your statutory rights are not restricted in any way by the warranty described below.
Warranty conditions
The validity period of the warranty starts from the date of purchase. Please keep your original receipt in a safe place. This document will be required as proof of purchase.
If any material or production fault occurs within three years of the date of purchase of the product, we will either repair or replace the product for you at our discretion. This warranty service is dependent on you presenting the defective appliance and the proof of purchase (receipt) and a short written description of the fault and its time of occurrence.
If the defect is covered by the warranty, your product will either be repaired or replaced by us. The repair or replacement of a product does not signify the beginning of a new warranty period.
Warranty period and statutory claims for defects
The warranty period is not prolonged by repairs effected under the warranty. This also applies to replaced and repaired components. Any damage and defects present at the time of purchase must be reported immediately after unpacking. Repairs carried out after expiry of the warranty period shall be subject to a fee.
Scope of the warranty
This appliance has been manufactured in accordance with strict quality guidelines and inspected meticulously prior to delivery.
The warranty covers material faults or production faults. The warranty does not extend to product parts subject to normal wear and tear or fragile parts such as switches, batteries, baking moulds or parts made of glass.
The warranty does not apply if the product has been damaged, improperly used or improperly maintained. The directions in the operating instructions for the product regarding proper use of the product are to be strictly followed. Uses and actions that are discouraged in the operating instructions or which are warned against must be avoided.
This product is intended solely for private use and not for commercial purposes. The warranty shall be deemed void in cases of misuse or improper handling, use of force and modifications / repairs which have not been carried out by one of our authorised Service centres.
Warranty claim procedure
To ensure quick processing of your case, please observe the following instructions:
■ Please have the till receipt and the item number (e.g. IAN 12345) available as proof of purchase.
■ You will find the item number on the type plate, an engraving on the front page of the instructions (bottom left), or as a sticker on the rear or bottom of the appliance.
If functional or other defects occur, please contact the service department listed either by telephone or by e-mail.
■ You can return a defective product to us free of charge to the service address that will be provided to you. Ensure that you enclose the proof of purchase (till receipt) and information about what the defect is and when it occurred.

You can download these instructions along with many other manuals, product videos and software on www.lidl-service.com.
Service
GB Service Great Britain
Tel.: 0800 404 7657
E-Mail: kompernass@lidl.co.uk
IE Service Ireland
Tel.: 1890 930 034
(0,08 EUR/Min., (peak))
(0,06 EUR/Min., (off peak))
E-Mail: kompernass@lidl.ie
IAN 313843
Importer
Please note that the following address is not the service address. Please use the service address provided in the operating instructions.
KOMPERNASS HANDELS GMBH
BURGSTRASSE 21
DE-44867 BOCHUM
GERMANY
www.kompernass.com
Inhaltsverzeichnis
Einführung 22
KOMPERNASS HANDELS GMBH
BURGSTRASSE 21
DE-44867 BOCHUM
DEUTSCHLAND
www.kompernass.com
KOMPERNASS HANDELS GMBH
BURGSTRASSE 21
DE-44867 BOCHUM
GERMANY
www.kompernass.com