
150-058 - Detector Marquant - Free user manual and instructions
Find the device manual for free 150-058 Marquant in PDF.


| Product Type | Smoke Detector |
| Brand | Marquant |
| Model | 150-058 |
| Power Source | 9V Battery (included) |
| Sensor Type | Photoelectric |
| Alarm Sound Level | 85 dB at 10 ft |
| Test Button | Yes, for function check |
| Low Battery Indication | Chirp every 60 seconds |
| Silence/Hush Feature | Yes, temporarily silences nuisance alarms |
| Dimensions (L x W x H) | 4.7 x 4.7 x 1.5 inches |
| Weight | 0.5 lb |
| Operating Temperature | 40°F to 100°F (4°C to 38°C) |
| Humidity Range | 10% to 95% non-condensing |
| Lifespan | 10 years from manufacture date |
| Certification | UL listed |
| Mounting | Ceiling or wall |
| Interconnectable | No, standalone only |
| Warranty | 10 years limited |
| Included Items | Detector, mounting bracket, screws, 9V battery, manual |
| Cleaning Instructions | Vacuum dust from vents monthly |
| Battery Replacement | When low battery chirp occurs, replace with fresh 9V battery |
| End of Life Warning | Will chirp every 30 days when expired |
Frequently Asked Questions - 150-058 Marquant
User questions about 150-058 Marquant
0 question about this device. Answer the ones you know or ask your own.
Ask a new question about this device
Download the instructions for your Detector in PDF format for free! Find your manual 150-058 - Marquant and take your electronic device back in hand. On this page are published all the documents necessary for the use of your device. 150-058 by Marquant.
USER MANUAL 150-058 Marquant
Operating Instructions for Metal Detector
150-058

natural_image
Black metal detector with attached probe and base plate (no text or symbols visible)SV Bruksanvisning i original
NO Bruksanvisning i original
EN Operating instructions in original
SVENSKA 4
SÄKERHETSANVISNINGAR 4
SAFETY INSTRUCTIONS....30
General safety instructions 30
Electrical safety....30
Personal safety 30
Using and maintaining power tools.... 30
Service 30
Special safety instructions 30
TECHNICAL DATA....31
DESCRIPTION 31
OPERATION....32
Assembly 32
Batteries 32
Headphones....32
Functions and indicator lamps 32
Use 33
DISC/TONE knob 34
Use....36
Tips for searching in different environments.... 36
MAINTENANCE 37
Cleaning 37
EXPLODED VIEW 37
SÄKERHETSANVISNINGAR
- Batterilucka
- Hörlursuttag
- Armstöd
- Handtag
- Elektronikenhet
- Signalindikator med visare
- Övre skaft
- Sladd
- Låsmutter
- Nedre skaft
- Svängtapp
- Vingmutter
- Sökspole
HANDHAVANDE
Montering
natural_image
Technical line drawing of a mechanical device with a lever and base, no text or symbols presentnatural_image
Simple line drawing of a robotic arm with a sensor and connecting rod (no text or symbols)- Batterideksel
- Hodetelefonuttak
- Armstøtte
- Håndtak
- Elektronikkenhet
- Signalindikator med viser
- ∅vre skaft
- Ledning
- Låsemutter
- Nedre skaft
- Dreietapp
- Vingemutter
- Søkespole
BRUK
Montering
natural_image
Illustration of a precision optical bench with a lever and base, no text or symbols presentnatural_image
Simple line drawing of a robotic arm with a sensor and connecting rod, alongside a coiled wire (no text or symbols)natural_image
Line drawing of a mechanical device with a lever and base, no text or symbols presentnatural_image
Illustration of a person using a tool on a table, no text or symbols presentnatural_image
Simple line drawing of a robotic arm with a key and two curved chains (no text or symbols)Read the Operating Instructions carefully before use
General safety instructions
WARNING
- Read all warnings, safety instructions and other directives.
- Failure to follow all the instructions and safety instructions can result in the risk of electric shock, fire and/or serious personal injury.
- Save these instructions and safety instructions for future reference.
Electrical safety
Do not expose the machine to rain or moisture. If water gets into the machine this will increase the risk of electric shock.
Personal safety
- Stay alert. Observe care at all times and use your common sense when working with the machine. Never use the machine is you are tired or under the influence of drugs, alcohol or medication.
- Do not overreach. Always maintain a firm footing and good balance. This will enable you to have better control over the machine in unexpected situations.
Using and maintaining power tools
- Do not use the machine if it cannot be switched on and off with the power switch.
- Remove the batteries from the machine before making any adjustments, replacing accessories or putting it away.
- Store the machine out of the reach of children when not in use. Never allow children, or anyone who is unfamiliar with the machine and these instructions, to use the tool.
- Maintain the machine. Make sure that moving parts are properly adjusted and do not jam and that no parts are incorrectly fitted or damaged. Check for any other factors that could influence functionality. If the machine is damaged, it must be repaired before using it again.
Service
The machine must only be serviced by qualified service personnel using identical spare parts. This will ensure that the machine remains safe to use.
Special safety instructions
- All the stickers on the equipment must be intact and legible. These markings provide important safety information.
- Always handle the equipment with care. The circuit board and casing can be damaged if the equipment is dropped, which can lead to malfunctioning.
- Insert the batteries with the correct polarity. Do not mix different types of batteries, or batteries with different capacities or charging levels.
- Wear approved safety glasses and safety gloves during assembly and when excavating.
- Follow local regulations for use, excavations and findings. Obtain permission from the land owner before using the equipment on private land.
- Use and store the equipment at normal temperature. Extreme temperatures can shorten the service-life of electronic equipment and damage plastic parts.
- Avoid electric shocks. The equipment can detect buried power lines, explosives and other objects that can cause personal injury if interfered with. Do not use the equipment in places where power lines or conduits can be found just below the surface. Never search in military zones where there could be mines or other explosives in the ground. Avoid contact with lines that are, or could be, live. Avoid sweeping pipes, especially if they could contain flammable gas or liquid. Use your common sense before using the equipment in unfamiliar areas. Do not use the equipment if there is there is the slightest risk that it is not safe to use it.
- Keep the equipment away from lamps, televisions, computers and mobile phones. They can all cause electromagnetic interference.
- Only the detection coil and plastic part on the lower handle are waterproof. Do not immerse the equipment in water deeper than up to the plastic part on the lower handle.
- Keep the equipment clean. Wipe the casing every time it has been used. The detection coil can be washed and fully immersed in water. Never immerse the electronic unit in water or any other liquid. Protect the electronic unit from rain, moisture and mist. Remove the handle and wipe clean after using it in sandy conditions.
- Always use the correct tool for the job. This machine is intended for specific applications. Never modify the equipment in any way. Do not use the equipment for anything other than the purpose for which it is intended.
• This is not a toy. Store out of the reach of children. - If you have a pacemaker, contact your doctor before using the equipment. Electromagnetic fields can influence the functionality of pacemakers, or cause malfunctioning. . Persons who have pacemakers should also:
- avoid using the equipment on their own
- maintain and inspect the equipment properly to avoid the risk of electric shock.
- The warnings and instructions in these Operating Instructions do not cover all of the possible situations that may arise. The operator must employ caution and common sense.
TECHNICAL DATA
Power supply
6 x 1.5 V AA
Headphone jack 3.5 mm
Functions Sensitivity control
Separation of metals
Metal indicator
Target localisation
Automatic ground balancing
Mode selector
DESCRIPTION

- Battery cover
- Headphone outlet
- Armrest
- Handle
- Electronic unit
- Signal indicator with display
- Upper handle
- Power cord
- Lock nut
- Lower handle
- Pivot
- Wing nut
- Detection coil
OPERATION
Assembly
NOTE: When adjusting the length of the metal detector the conical plastic sleeve (19) must be held in place with the narrow end facing the narrow end of the lock (20).
- Fit the two handles together by pushing the threaded insert (24) over the end of the upper handle (15). Make sure that the hooks on the insert lock into the grooves in the end of the handle. Put the narrow end of the conical bushing (19) in the lock nut (20) and carefully screw the nut on over the insert (24). Put the lower handle (18) in the lock nut. Turn the lower handle so that the power cord is wound round both handles instead of hanging loose. Tighten the nut anticlockwise to lock the handle secure.
- Adjust the length of the handle by screwing the lock nut clockwise, adjust the lower handle to the required length and turn the lock nut anticlockwise to lock.
- Adjust the angle of the detection coil by releasing the pivot (21) and wing nut (22) and changing the angle. Angle the detection coil so that it is parallel with the ground when holding the tool by the handle your one arm in the armrest (13).
- Adjust the length of the metal detector again if necessary after adjusting the angle of the detection coil.

Batteries
- Make sure the power switch/volume knob is in the Off position.
- Open the battery cover (26) on the back of the electronic unit and insert 6 AA batteries (not included) with the correct polarity. Replace the battery cover.
- Replace the batteries when the indicator lamp LOW BAT on the signal indicator (36) goes on.
NOTE:
- Only use new batteries of the correct size and type. Do not mix old and new batteries, different types of batteries (standard, alkaline or rechargeable), or rechargeable batteries of different capacities.
• Always remove old or weak batteries. They can leak chemicals that damage the electronic parts. - Remove the batteries if the machine is not going to be used for a week.
• Recycle old batteries in accordance with local regulations. - The battery life can be prolonged by using headphones, because they consume less current than the built-in speaker.
- Replace the batteries when the indicator lamp LOW BAT on the signal indicator (36) goes on.
Headphones
- Connect headphones (not included) to the headphone jack.
- Check that the power switch/volyume knob is in the OFF position before connecting headphones. Adjust to low volume before starting to listen.
NOTE:
- Do not listen at extremely high volume. Prolonged exposure to high volume can cause a permanent hearing impairment.
- Do not wear headphones when using the machine in areas where there is traffic. Pay attention to traffic safety at all times.
Functions and indicator lamps
Power switch/volume (34) - switches on the unit and adjusts the sound level.
SENS (33) – adjusts the sensitivity of the unit. The 0 setting is the lowest level and 10 is the highest. A high sensitivity should normally be selected. In mineral rich areas, or areas with electrical interference, a lower level can be more effective.
MODE (1) – choose between three different modes: DISC, ALL METAL and TONE.
Target button – used in ALL METAL mode to determine the positioning of an object.
DISC/TONE (35) – knob for identifying metal.
Signal indicator – indicates signal strength when metal is detected.
DISC, ALL METAL and TONE are motion-sensitive modes. The detection coil must be in motion to detect an object.
The target position is used to determine the exact position of an object under the ground surface.

Use
Before starting to seach outdoors, test the machine with metal samples. You need test objects made of the following metals:
- iron
- nickel
- zinc
• silver
Place the machine on wooden or plastic surface with detection coil turned upwards. Make sure that the surface/table is not near a television, computer or other unit that can cause electromagnetic interference.

natural_image
Line drawing of a mechanical device with a lever and base, no text or symbols presentNOTE: Remove any wristwatches, rings or other metal objects from your hands and fingers. Start the machine and turn the volume knob to the middle position. Set the mode selector to the middle position (ALL METAL).

Move the test object back and forth at least 5 cm over the middle of the detector coil. The machine reacts to each sample with an audible signal and the pointer on the signal indicator moves to the right.
NOTE
- The test object must be moving, because the unit is in motion-sensitive mode. The machine will not react otherwise.
• Turn the SENS knob from 0 to 10 to increase the sensitivity of the machine. - Use the DISC/TONE knob to search for specific metals by adjusting the machine so that it will not detect other types of metal.
DISC/TONE knob
If the DISC/TONE knob is set to 0 the machine will react to all metal objects with an audible signal and the signal indicator pointer will move to the right.

-
Set the VOLUME and SENS knobs to the middle position if you do not want the machine to detect iron.
-
Set the mode selector to DISC and turn the DISC/TONE knob to about nine o'clock.

-
Test the machine by sweeping the iron object back and forth 5–7 cm over the detection coil. The machine should not react (the signal indicator pointer should not move and no audible signal should be heard). When you sweep with the other metal objects a signal should be heard and pointer should move.
-
Turn the DISC/TONE to about eleven o'clock to exclude nickel. Sweep with the nickel object in front of the detection coil. The machine will not react to the nickel object or iron object. It will react to the other objects.
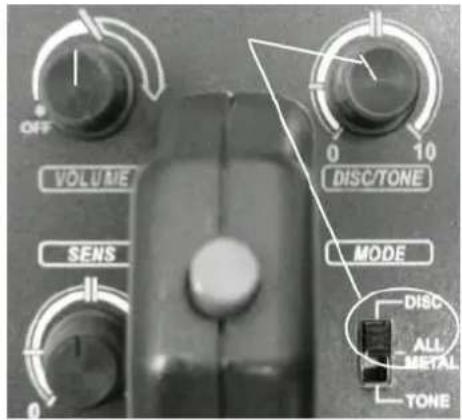
- Turn DISC/TONE to about one o'clock to prevent detection of zinc objects. Only silver objects should be detected now.

NOTE: The position to detect aluminium is close to the position for silver. Both metals should therefore be detected at the same time. The position to detect gold is close to the position for nickel. The machine can be set to detect all metals and at the same time to signal a specific metal differently from the others.
- Set the mode selector to TONE and turn the VOLUME and SENS knobs to middle position.
- Turn the DISC/TONE knob to about nine o'clock (iron setting). Sweep with the iron object 5–8 cm over the detection coil. The machine will emit a short audible signal and the signal indicator pointer will move to the right. When you sweep with the other object a long signal will be heard.
- Turn the DISC/TONE knob to specify that a short audible signal will be used for other metals.
-
To detect specific metals, set the mode selector to ALL METAL and turn the VOLUME and SENS knobs to middle position.
-
Press the red target button (6) on the panel. Place the silver object about 12 cm from the middle of the detection coil. A continuous, long tone will be heard and the signal indicator pointer will move to the right.
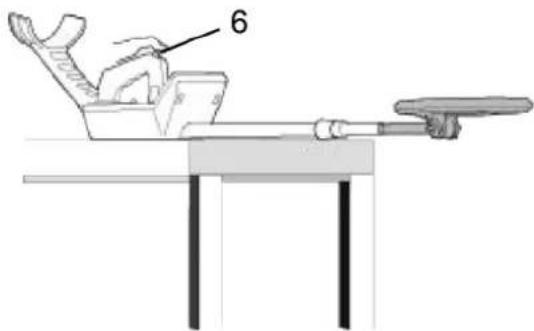
- Hold the object still and release the target button. Wait two seconds and press the target button again. The sensitivity of the machine will be reduced.
- NOTE: Even if the object is not moved the unit will will go quiet when the sensitivity has been reduced.
- Repeat with the object closer to the unit. A signal will be heard. When using the machine to search outdoors you can use the target button to determine the exact position of a metal object.
Use
When all the tests and settings have been completed the tool is ready to be used outdoors. Set the mode selector to ALL METAL and turn the SENS knob to the highest level. Turn the VOLUME knob to the required level.
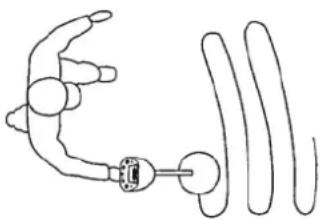
- Sweep the detection coil slowly back and forth in an arc about 1–5 cm over the ground.
natural_image
Simple line drawing of a robotic arm with a sensor and connecting rod, alongside a coiled wire (no text or symbols)- If you hear an audible signal or the signal indicator pointer moves to the right, this means you have found a metal object.
- Use the target button to determine the exact position of the object. Now use DISC or TONE mode to determine which sort of metal it is and whether you want to dig up the object.
- Switch off the machine and remove the batteries after use. Clean the machine and store it indoors out of the reach of children.
Tips for searching in different environments
There are many factors that influence the sensitivity and precision when detecting objects, including the angle, depth, size and degree of corrosion of the object. Different ground or water conditions, as well as electromagnetic or electrical interference in the vicinity of the object, can affect detection. Other metal detectors in the vicinity will also create interference. If more than one unit is used they should therefore be kept at a distance of at least 10 metres from each other. Tips:
- If other metal detectors in the search area create interference you can stop this interference by reducing the SENS setting.
- You can also reduce the SENS setting if there is interference from electric cables, televisions, radios or other electrical units in the search area.
- The machine can emit an audible signal when searching in mineral rich areas even if there is no metal. Lower the SENS setting, raise the DISC setting and increase the distance between the detection coil and the ground until false signals go quiet. Adjust the DISC setting by placing a metal test object in mineral rich earth or wet sand and adjusting the setting before starting.
- When search in a rubbish tip you can turn the DISC knob to the middle position so that the machine ignores most worthless metal objects like nails, capsules, tins and small pieces of iron.
- Remove all excavation tools made of metal during the search.
- In general there is a conflicting relationship between the SENS and DISC settings. Higher sensitivity produces inferior separation. You can reduce the sensitivity for better separation.
MAINTENANCE
No parts on the machine can be serviced by the user.
Switch off the machine and remove the batteries before inspection, maintenance or cleaning.
• Do not use the equipment if it is damaged. Rectify the problem before using the equipment again.
Cleaning
- Always check that the equipment is in good condition before using it. Check that all screw connections are tight, that moving parts are correctly adjusted and can move freely, that no parts are incorrectly fitted or defective, that no wires are damaged, and that there are no other factors that could affect functionality.
- Handle the equipment with care. The circuit board and casing can be damaged if the equipment is dropped, which can lead to malfunctioning.
- Clean the external parts of the equipment after use. Clean with a damp cloth and wipe dry. Do not use strong chemicals, detergents or solvents.
EXPLODED VIEW

Subject to printing errors and design changes over which we have no control. In the event of problems, please contact our service department.
www.jula.com

Care for the environment!
Must not be discarded with household waste!
This product contains electrical or electronic
components that should be recycled
Leave the product for recycling at the designated
station e.g. the local authority's recycling station.
CE
EC DECLARATION OF CONFORMITY
EG FÖRSÄKRAN OM ÖVERENSSTÄMMELSE
EF SAMSVARSERKLÆRING
DEKLARACJA ZGODNOŚCI WE

Jula AB, Box 363, SE-532 24 SKARA, SWEDEN
Electromagnetic Compatibility 2004/108/EC
EN 61326-1:2006, EN 61326-2-2:2006
This product was CE marked in year -11
Skara 2011-06-28
Fredil K
Fredrik Bohman
PRODUCT MANAGER
- Operating Instructions for Metal Detector
- SVENSKA 4
- SÄKERHETSANVISNINGAR 4
- SÄKERHETSANVISNINGAR
- HANDHAVANDE
- Montering
- BRUK
- Read the Operating Instructions carefully before use
- General safety instructions
- WARNING
- Electrical safety
- Personal safety
- Using and maintaining power tools
- Service
- Special safety instructions
- TECHNICAL DATA
- DESCRIPTION
- OPERATION
- Assembly
- Batteries
- NOTE:
- Headphones
- Functions and indicator lamps
- Use
- NOTE
- DISC/TONE knob
- Tips for searching in different environments
- MAINTENANCE
- Cleaning
- EXPLODED VIEW
- Care for the environment!
- CE
- EC DECLARATION OF CONFORMITY
- EG FÖRSÄKRAN OM ÖVERENSSTÄMMELSE
- EF SAMSVARSERKLÆRING
- DEKLARACJA ZGODNOŚCI WE
Brand : Marquant
Model : 150-058
Category : Detector