
RF-D20U - Radio PANASONIC - Free user manual and instructions
Find the device manual for free RF-D20U PANASONIC in PDF.


| Product Type | AM/FM Portable Radio |
| Brand | Panasonic |
| Model | RF-D20U |
| Dimensions (approx.) | 200 x 120 x 70 mm (7.9 x 4.7 x 2.8 in) |
| Weight (approx.) | 500 g (1.1 lbs) |
| Power Source | AC 120V 60Hz or 4 x AA batteries (not included) |
| Tuning Bands | AM (520-1710 kHz), FM (87.5-108 MHz) |
| Antenna | Built-in ferrite bar (AM), telescopic rod (FM) |
| Speaker | Single 3-inch dynamic speaker |
| Audio Output | 3.5 mm headphone jack |
| Controls | Volume knob, tuning knob, band selector, power |
| Additional Functions | Sleep timer, alarm with buzzer/radio |
| Display | Analog dial with backlight |
| Body Material | ABS plastic |
| Color | Black/silver (typical) |
| Maintenance | Wipe with a soft dry cloth; avoid liquids |
| Safety | Keep away from moisture and heat sources |
| Spare Parts & Reparability | Contact Panasonic service center for replacement parts |
| User Manual | Available for free download in PDF on notice-facile.com |
Frequently Asked Questions - RF-D20U PANASONIC
User questions about RF-D20U PANASONIC
0 question about this device. Answer the ones you know or ask your own.
Ask a new question about this device
Download the instructions for your Radio in PDF format for free! Find your manual RF-D20U - PANASONIC and take your electronic device back in hand. On this page are published all the documents necessary for the use of your device. RF-D20U by PANASONIC.
USER MANUAL RF-D20U PANASONIC
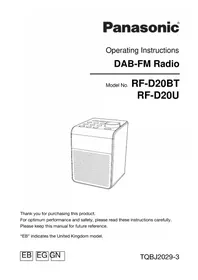
Operating Instructions
DAB-FM Radio
Model No. RF-D20BT RF-D20U

Thank you for purchasing this product.
For optimum performance and safety, please read these instructions carefully.
Please keep this manual for future reference.
"EB" indicates the United Kingdom model.
These operating instructions are applicable for models RF-D20BT and RF-D20U.
RF-D20BT: Indicates features applicable to RF-D20BT.
RF-D20U: Indicates features applicable to RF-D20U.
Unless otherwise indicated, illustrations in these operating instructions are of RF-D20BT.
Your system and the illustrations can look differently.
Product Identification Marking is located on the bottom of the unit.
Safety precautions
WARNING!
Unit
- To reduce the risk of fire, electric shock or product damage,
- Do not let water or other liquids drip or splash inside the unit.
- Do not expose accessories (AC mains lead and AC adaptor) to rain, moisture, dripping or splashing.
- Do not place objects filled with liquids, such as vases, on accessories.
- Use only the recommended accessories.
- Do not remove covers.
- Do not repair this unit by yourself. Refer servicing to qualified service personnel.
CAUTION!
Unit
- Do not place sources of naked flames, such as lighted candles, on this unit.
- This unit is intended for use in moderate climates.
- This unit may receive radio interference caused by mobile telephones during use. If such interference occurs, please increase separation between this unit and the mobile telephone.
AC mains lead
- The mains plug is the disconnecting device. Install this unit so that the mains plug can be unplugged from the socket outlet immediately.
Battery
- Danger of explosion if battery is incorrectly replaced. Replace only with the type recommended by the manufacturer.
- When disposing of the batteries, please contact your local authorities or dealer and ask for the correct method of disposal.
- Do not heat or expose to flame.
- Do not leave the battery(ies) in a car exposed to direct sunlight for a long period of time with doors and windows closed.
- Do not break open or short-circuit the battery.
- Do not charge the alkaline or manganese battery.
- Do not use the battery if the cover has peeled off.
- Remove the battery if you do not use the unit for a long period of time or if the unit is to be powered exclusively by AC power. Keep in a cool, dark area.
Small objects
- The VOLUME knob and DC IN cover can come off when pulled hard. To prevent children from swallowing, do not pull it off.
Caution for AC mains lead
(For the AC mains plug of three pins)
For your safety, please read the following text carefully.
This appliance is supplied with a moulded three pin mains plug for your safety and convenience.
A 5-ampere fuse is fitted in this plug.
Should the fuse need to be replaced, please ensure that the replacement fuse has a rating of 5 amperes and that it is approved by ASTA or BSI to BS1362.
Check for the ASTA mark or the BSI mark on the body of the fuse.
If the plug contains a removable fuse cover, you must ensure that it is refitted when the fuse is replaced.
If you lose the fuse cover, the plug must not be used until a replacement cover is obtained.
A replacement fuse cover can be purchased from your local dealer.
Before use
Remove the connector cover.
How to replace the fuse
The location of the fuse differs according to the type of AC mains plug (figures A and B). Confirm the AC mains plug fitted and follow the instructions below.
Illustrations may differ from the actual AC mains plug.
- Open the fuse cover with a screwdriver.

- Replace the fuse and close or attach the fuse cover.

Supplied accessories
Check and identify the supplied accessories.
□ 1 AC mains lead
For the United Kingdom and Ireland (K2CT3YY00034)

For Australia
For Continental Europe

☐ 1 AC adaptor (TPBPA266)

Note:
Product numbers correct as of December 2016. These may be subject to change.
Table of contents
Safety precautions 2
Caution for AC mains lead ..... 3
Supplied accessories ..... 4
References 4
Overview of controls. 6
(Important) About the splash proof 7
Power sources 8
Getting started 9
DAB/DAB+ 9
FM radio 11
Bluetooth® 12
System settings 14
Troubleshooting 15
Maintenance 16
Specifications 17
Limited Warranty (For Australia only) 22
References
Sales and Support Information
For the United Kingdom and Ireland
Customer Communications Centre
- For customers within the UK: 0344 844 3899
- For customers within Ireland: 01 289 8333
- Monday – Friday 9:00am – 5:00pm (Excluding public holidays).
- For further support on your product, please visit our website: www.panasonic.co.uk
Direct Sales at Panasonic UK
- Order accessory and consumable items for your product with ease and confidence by phoning our Customer Communications Centre Monday – Friday 9:00am – 5:00pm (Excluding public holidays).
- Or go online through our Internet Accessory ordering application at www.pas-europe.com.
- Most major credit and debit cards accepted.
- All enquiries, transactions and distribution facilities are provided directly by Panasonic UK.
- It couldn't be simpler!
- Also available through our Internet is direct shopping for a wide range of finished products. Take a browse on our website for further details.
The symbols on this product (including the accessories) represent the following:

AC

DC

Class II equipment (The construction of the product is double-insulated.)

ON

Standby
About Bluetooth®
Panasonic cannot be held responsible for data and/or information that can possibly be compromised during a wireless transmission.
Frequency band
- This system uses the 2.4 GHz frequency band.
Certification
- This system conforms to the frequency restrictions and has received certification based on frequency laws. Thus, a wireless permit is not necessary.
- The actions below are punishable by law:
- Taking apart or modifying the unit.
- Removing specification indications.
Restrictions of use
- Wireless transmission and/or usage with all Bluetooth® equipped devices is not guaranteed.
- All devices must conform to standards set by Bluetooth SIG, Inc.
- Depending on the specifications and settings of a device, it can fail to connect or some operations can be different.
- This system supports Bluetooth ® security features. But depending on the operating environment and/or settings, this security is possibly not sufficient. Transmit data wirelessly to this system with caution.
- This system cannot transmit data to a Bluetooth® device.
Range of use
- Use this device at a maximum range of 10 m.
- The range can decrease depending on the environment, obstacles, or interference.
Interference from other devices
- This system may not function properly and troubles such as noise and sound jumps may arise due to radio wave interference if this unit is located too close to other Bluetooth® devices or devices that use the 2.4 GHz band.
- This system may not function properly if radio waves from a nearby broadcasting station, etc. are too strong.
Intended usage
- This system is for normal, general use only.
- Do not use this system near equipment or in an environment that is sensitive to radio frequency interference (e.g., airports, hospitals, laboratories, etc.).
Licenses
The Bluetooth® word mark and logos are registered trademarks owned by Bluetooth SIG, Inc. and any use of such marks by Panasonic Corporation is under license. Other trademarks and trade names are those of their respective owners.
Overview of controls

① Standby/on switch [⏻/ɪ] Press to switch the unit from on to standby mode or vice versa. In standby mode, the unit still consumes a small amount of power. ② Select “Bluetooth” as the audio source. During Bluetooth® source playback, press to pause or resume playback. ③ Direct preset buttons. ④ View available information. ⑤ Auto tuning for FM stations. ⑥ Select desired frequency in manual tuning. View available options. ⑦ Select the audio source: → DAB → FM → Bluetooth. ⑧ Adjust the volume level.
⑨Confirm an option ⑩View available menu ⑪Display panel ⑫ RF-D20U DC-IN terminal and USB port cover RF-D20BT DC IN terminal cover ⑬Battery compartment ⑭Antenna Extend the antenna, adjust the length, angle and direction for best reception.
Signal strength indicator

(Important) About the splash proof
Splash proof performance*
Specifications for this unit are equivalent of IPX3 of IEC 60529.
About the IPX3 (liquid ingress protection level against spraying water)
This unit is compatible to operate after water spraying up to 60 degrees from vertical at 10 liters / min at a pressure of 80-100kN/m 2 for 5 minutes.
* Splash proof is not guaranteed under all conditions.
Cautions for using around water
Conform to following. Improper use may result in a malfunction.
- Securely close the DC IN and battery cover.
- Do not open or close the DC IN and battery cover with wet hands or when water droplets are on this unit. Doing so may cause malfunction such as terminal rusting with the water droplets.
- Do not pour soap water or detergent, or immerse in water.
- Remove any hair, lint, sand, dust, etc., that maybe attached to the rubber seal on the DC IN and battery cover before closing.
- Leaving the device with water droplets in a cold region may result to malfunction such as the covers stuck closed.
- The sound may become softer or warped when water is accumulated in the speaker of this unit. Wipe this unit with a dry, soft cloth.
- Water may accumulate inside the speaker and on top of this unit. Tilt the set to drain the water.
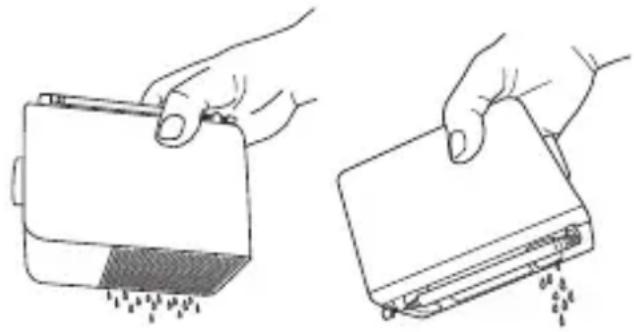
- When water enters inside this unit, stop using this unit, and contact the nearest Dealer or Service Center. Malfunction due to exposure to water by improper handling by the customer will not be covered by the warranty. Supplied accessories are not splash proof.
Power sources
Using the household mains socket
Connect the AC adaptor and AC mains lead firmly to the unit and the household mains socket.

(For the AC mains plug of three pins) READ THE "Caution for AC mains lead" BEFORE CONNECTION.
Note:
- Do not use any other AC adaptors except the supplied one.
- The unit is in the standby condition when the AC adaptor is connected. The primary circuit is always “live” as long as the AC adaptor is connected to an electrical outlet.
Charging a portable device
RF-D20U
The USB port at the rear of the unit can be used to charge a portable device.
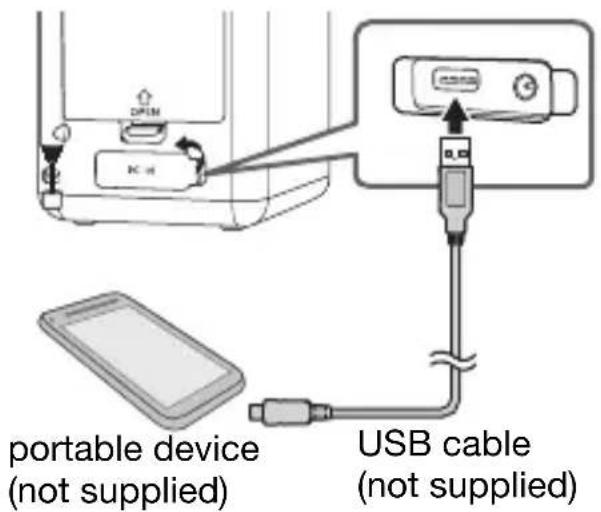
Note:
- You can charge the portable device only when the unit is connected to the household mains socket, either switched on or in standby mode.
- Some devices cannot be charged as the maximum USB charging current is 0.5 A only.
Using the batteries (not supplied)
Use alkaline or manganese batteries. Install the batteries so that the poles (+ and -) align with those in the unit.
This unit will use the batteries as the power source when you disconnect the AC mains lead. The battery indicator will light up.
The battery indicator shows the battery levels.

Caution!
Be careful when adjusting the antenna or in handling the unit, always keep the antenna away from your face to avoid an injury.
Note:
When the battery indicator “☐” begins flashing, replace all 3 of the batteries.
Getting started
1 Extend the antenna.
2 Press [⏻/ɪ] to switch on the unit.
The first time you switch on the unit, it will enter DAB mode and automatically scan for stations. It sets the time and date (if data is available) and starts playing the first station it finds.
Number of stations found
Note:
In standby mode, the unit shows the time and date (only when the unit is powered by AC).
DAB/DAB+
DAB (Digital Audio Broadcasting) is a procedure of broadcasting the radio digitally. It gives less interference and better sound quality.
This unit supports DAB in "BAND III" bands.
DAB operation
The first time you enter DAB mode, or if the station list is empty, the unit will start the full scan and memorise the stations.
You can perform the full scan procedure when there is a new station or a station becomes available.
1 Press [SOURCE] to select "DAB".
2 Press [MENU] to select "Full scan" and then press [ENTER] to start full scan.
To cancel, press [MENU].
Remove unavailable listed stations
This unit indicates those stations that are closed or no longer available with a question mark in front of the station name. You can remove these stations from the station list.
1 Press [MENU] and then press [TUNE/SELECT] to select "Prune".
2 Press [ENTER].
3 Press [TUNE/SELECT] to select "Yes" and then press [ENTER].
To cancel, select "No".
![Prune? ( Listening to a station 1 Press [TUNE/SELECT] to select a station from the station list. 2 Press [ENTER] to tune to the selected station. Note: "indicates a secondary service station. Secondary service stations are always listed next to their primary station in the station list. Presetting s…](/content/2026/05/871939/images/03fb27fa202210bf2b44a9689de576100f700a6a235a202b13fff6619d12cbb0.jpg)

- SAFETY PRECAUTIONS
- WARNING
- UNIT
- CAUTION
- AC MAINS LEAD
- BATTERY
- SMALL OBJECTS
- CAUTION FOR AC MAINS LEAD
- BEFORE USE
- HOW TO REPLACE THE FUSE
- SUPPLIED ACCESSORIES
- NOTE
- TABLE OF CONTENTS
- REFERENCES
- SALES AND SUPPORT INFORMATION
- FOR THE UNITED KINGDOM AND IRELAND
- CUSTOMER COMMUNICATIONS CENTRE
- DIRECT SALES AT PANASONIC UK
- ABOUT BLUETOOTH®
- FREQUENCY BAND
- CERTIFICATION
- RESTRICTIONS OF USE
- RANGE OF USE
- INTERFERENCE FROM OTHER DEVICES
- INTENDED USAGE
- LICENSES
- OVERVIEW OF CONTROLS
- (IMPORTANT) ABOUT THE SPLASH PROOF
- SPLASH PROOF PERFORMANCE
- ABOUT THE IPX3 (LIQUID INGRESS PROTECTION LEVEL AGAINST SPRAYING WATER)
- CAUTIONS FOR USING AROUND WATER
- POWER SOURCES
- USING THE HOUSEHOLD MAINS SOCKET
- CHARGING A PORTABLE DEVICE
- USING THE BATTERIES (NOT SUPPLIED)
- GETTING STARTED
- DAB/DAB
- DAB OPERATION
- REMOVE UNAVAILABLE LISTED STATIONS
Brand : PANASONIC
Model : RF-D20U
Category : Radio