
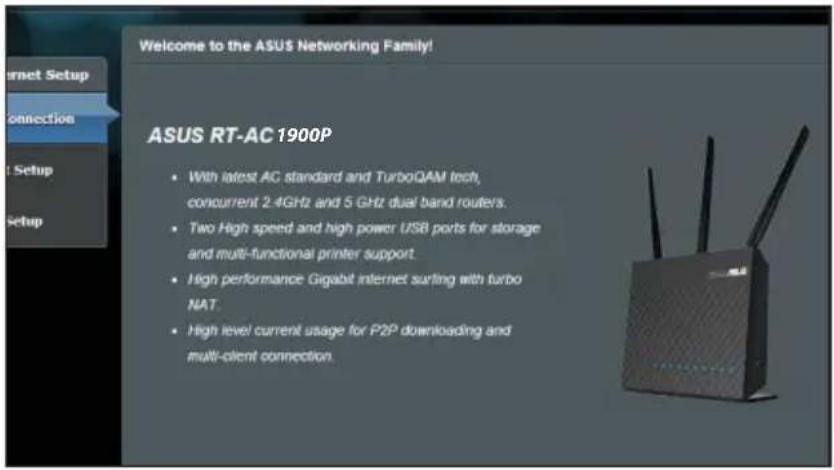
RT-AC1900P - Router ASUS - Free user manual and instructions
Find the device manual for free RT-AC1900P ASUS in PDF.

| Product Type | Wireless Router |
| Model | RT-AC1900P |
| Brand | ASUS |
| Wireless Standard | IEEE 802.11a/b/g/n/ac |
| Frequency Bands | 2.4 GHz & 5 GHz |
| Max Speed | AC1900 (600 Mbps on 2.4 GHz + 1300 Mbps on 5 GHz) |
| Antennas | 3 x Detachable external antennas |
| Ports | 1 x WAN, 4 x LAN (10/100/1000 Mbps), 1 x USB 3.0, 1 x USB 2.0 |
| Buttons | WPS, Wi-Fi On/Off, Power, LED On/Off, Reset |
| LEDs | Power, WAN, LAN 1-4, 2.4GHz, 5GHz, USB 3.0, USB 2.0, WPS |
| Power Supply | DC 19V, 1.75A |
| Dimensions (W x D x H) | 8.7 x 6.7 x 1.9 inches |
| Weight | 1.2 lbs |
| Management | ASUSWRT web GUI, AiCloud app |
| Security | WPA/WPA2, WPS, Firewall |
| Supported File Systems | FAT16, FAT32, EXT2, EXT3, NTFS |
| Maximum USB Disk Support | Up to 2TB |
| Special Features | QIS wizard, WPS, AiCloud, dual-band simultaneous |
| Compliance | FCC Part 15, CE, IC, R&TTE |
Frequently Asked Questions - RT-AC1900P ASUS
User questions about RT-AC1900P ASUS
0 question about this device. Answer the ones you know or ask your own.
Ask a new question about this device
Download the instructions for your Router in PDF format for free! Find your manual RT-AC1900P - ASUS and take your electronic device back in hand. On this page are published all the documents necessary for the use of your device. RT-AC1900P by ASUS.
USER MANUAL RT-AC1900P ASUS
natural_image
Line drawing of a 15GOS network router with two speakers and three Ethernet ports (no text or symbols on the device body)快速使用指南
NOTE: If any of the items is damaged or missing, contact your retailer.
A quick look at your RT-AC1900P
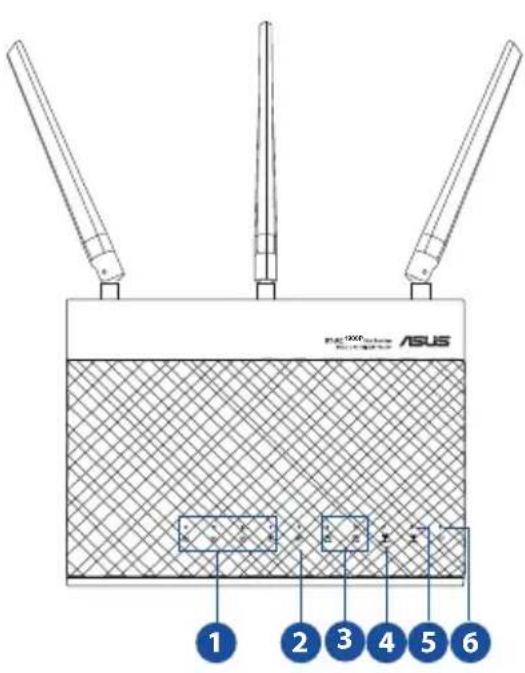
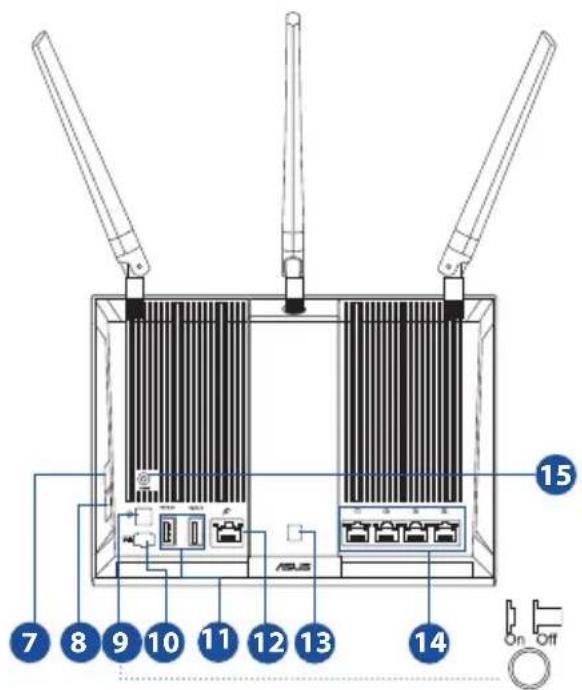
| 1) LAN 1~4 LED 6) Power LED 11) USB 3.0/2.0 ports | ||
| 2) WAN (Internet) LED 7) WPS button 12) WAN port | ||
| 3) USB 3.0/2.0 LED 8) Wi-Fi On/Off button 13) LED On/Off button | ||
| 4) 2.4GHz LED 9) Power switch 14) LAN ports | ||
| 5) 5GHz LED | 10) Power (DC-IN) port | 15) Reset button |

NOTES:
• USB External HDD/Flash disk:
- The wireless router works with most USB HDDs/Flash disks up to 2TB and supports read-write access for FAT16, FAT32, EXT2, EXT3, and NTFS.
• To safely remove the USB disk, launch the web GUI (http://192.168.1.1), then in the Network Map page's upper right corner, click the USB icon and click Eject USB 3.0 / USB 2.0.
• Incorrect removal of the USB disk may cause data corruption. - For the list of file system and hard disk partitions that the wireless router supports, visit http://event.asus.com/networks/disksupport
- For the list of printers that the wireless router supports, visit http://event.asus.com/networks/printersupport
Installing your router

IMPORTANT: Before installing the router, ensure that Internet connection is available
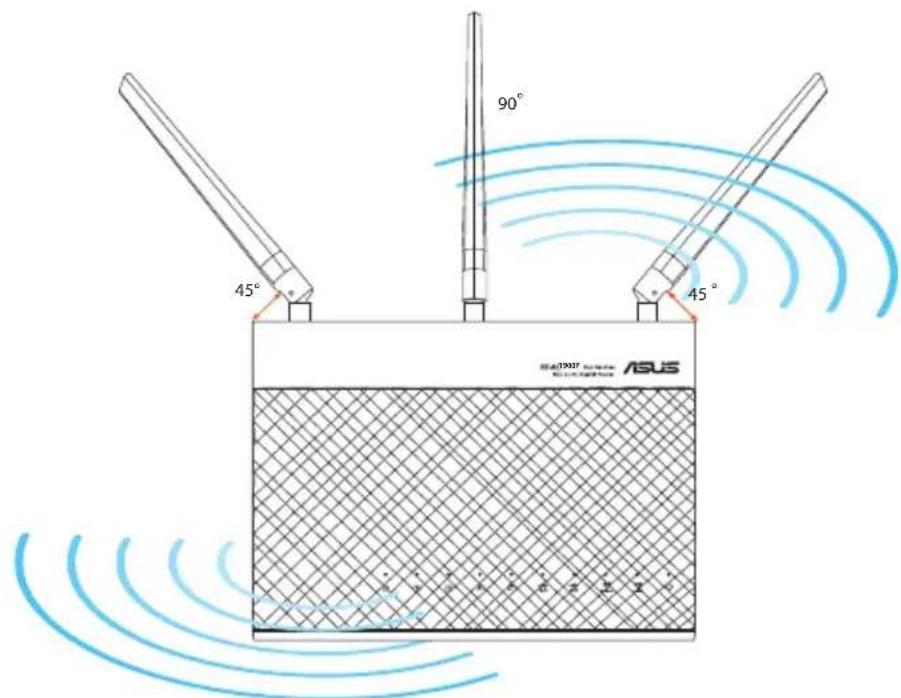
1. Position your wireless router.
For the optimal wireless transmission between the wireless router and connected wireless devices, ensure that you:
- Place the wireless router in a centralized area for a maximum wireless coverage for the network devices.
- Keep the wireless router away from metal obstructions and away from direct sunlight.
- Keep the wireless router away from 802.11g or 20MHz only Wi-Fi devices, 2.4GHz computer peripherals, Bluetooth devices, cordless phones, transformers, heavy-duty motors, fluorescent lights, microwave ovens, refrigerators, and other industrial equipment to prevent signal interference or loss.
- To ensure the best wireless signal, orient the three detachable antennas as shown in the drawing below.
• Always update to the latest firmware. Visit the ASUS website at http://www.asus.com to get the latest firmware updates.
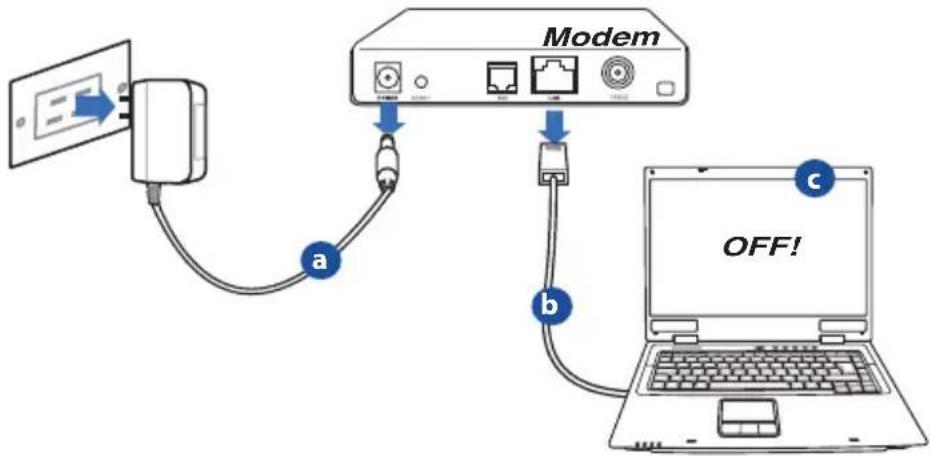
2. Prepare your modem.
a. Unplug the AC adapter from the power outlet and disconnect it from your cable/ADSL modem.
b. Disconnect the network cable from your cable/ADSL modem.
c. Reboot your computer (recommended).
flowchart
graph TD
    A["Modem"] -->|a| B["Laptop"]
    A -->|b| C["Laptop"]
    A -->|c| D["Laptop"]

WARNING! Before disconnecting the wires/cables, ensure that your cable/ADSL modem has been turned off for at least two minutes. If your modem has a backup battery, remove it as well.
3. Set up your wireless environment.

flowchart
graph TD
    A["Wall Power Outlet"] -->|1| B["Power"]
    B --> C["MODSTM"]
    C --> D["LAN"]
    D --> E["Computer"]
    C --> F["WAN"]
    F --> G["RT-AC190XP"]
a. Insert your wireless router's AC adapter to the DC-IN port and plug it to a power outlet.
b. Using another network cable, connect your modem to your wireless router's WAN port.
c. Insert your modem's AC adapter to the the DC-IN port and plug it to a power outlet.
d. Using the bundled network cable, connect your computer to your wireless router's LAN port. Ensure that the WAN and LAN LEDs are blinking.

NOTE: You can also set up RT-AC1900P using a mobile device such as smartphone or tablet PC. To do this, go to Setup your router using a mobile device for details.
4. Disable some settings on your computer.
a. Disable the proxy server, if enabled.
b. Set the TCP/IP settings to automatically obtain an IP address.
c. Disable the dial-up connection, if enabled.

NOTE: For more details on disabling your computer settings, refer to Frequently Asked Questions (FAQs).
Setting up your router using the Quick Internet Setup Wizard
To set up your router using QIS ((Quick Internet Setup):
- Press the power button at the back of your router. Ensure that the Power, LAN and WAN LEDs are on.
- Launch your web browser such as Internet Explorer, Firefox, Google Chrome, or Safari.

NOTE: If QIS does not launch automatically, enter http://192.168.1.1 or http://router.asus.com in the address bar and refresh the browser again.
- Assign your router login name and password and click Next. You will need this login name and password to log into RT-AC1900P to view or change the router settings. You can take note of your router login name and password for future use.
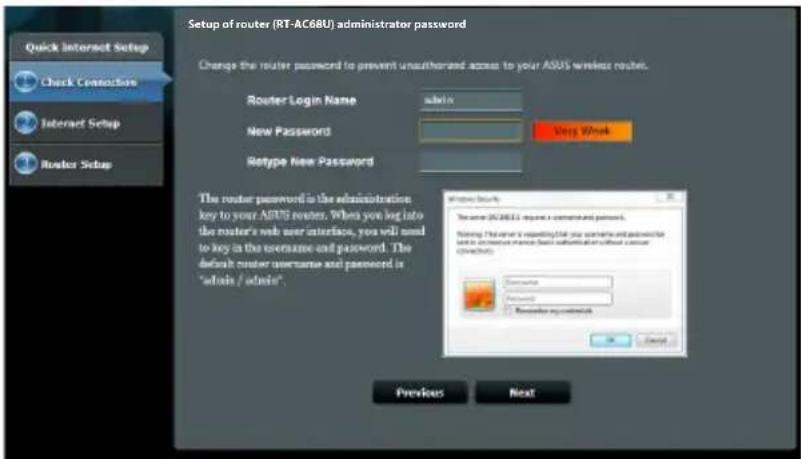
Login name:
Login password:
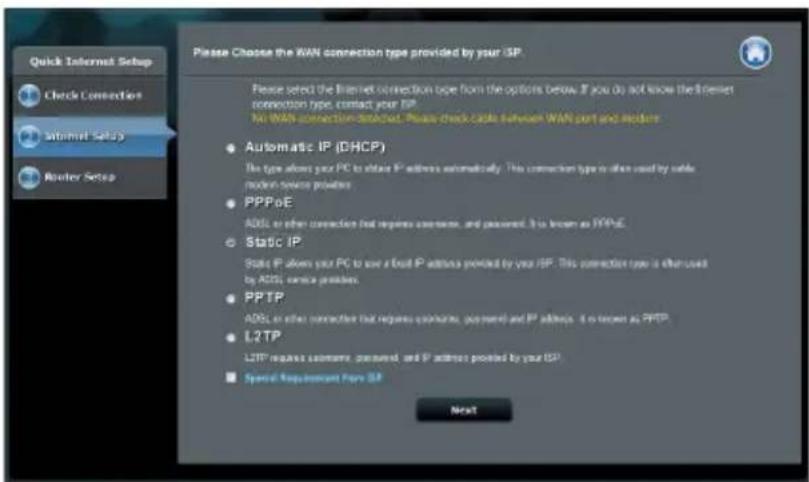
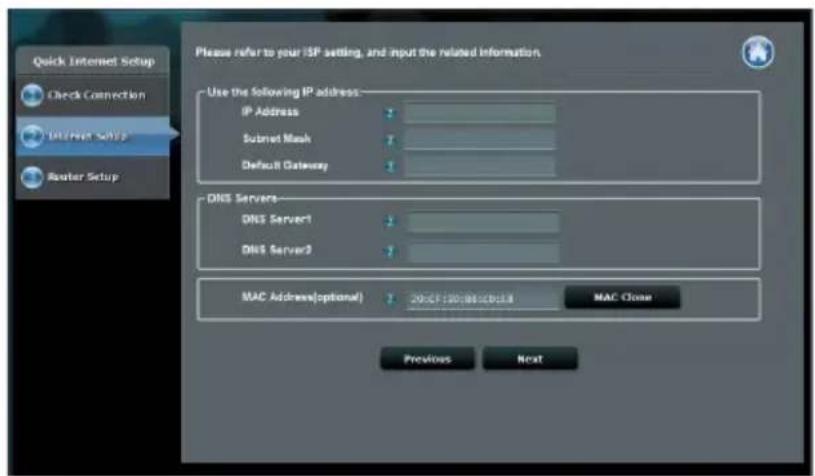
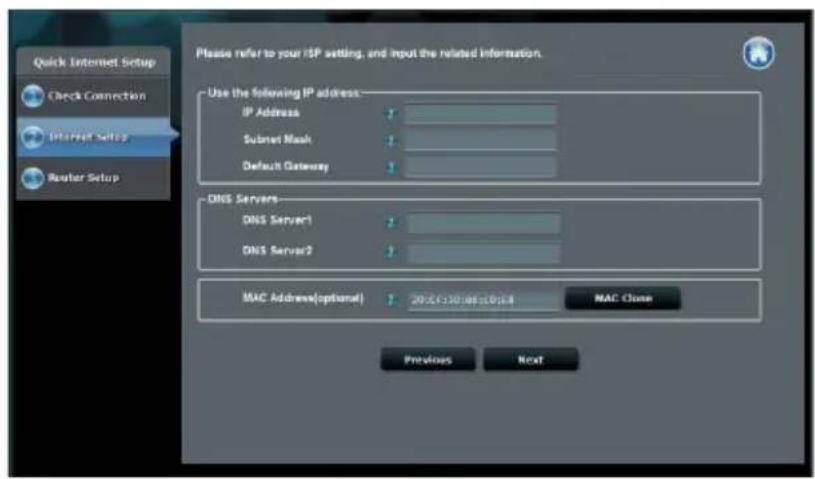
- The wireless router's Quick Internet Setup (QIS) feature automatically detects if your ISP connection type is Dynamic IP, PPPoE, PPTP, L2TP, and Static IP. Please obtain the necessary information about your Internet connection type from your Internet Service Provider (ISP). If your connection type is Dynamic IP (DHCP), QIS wizard will automatically direct you to the next step.

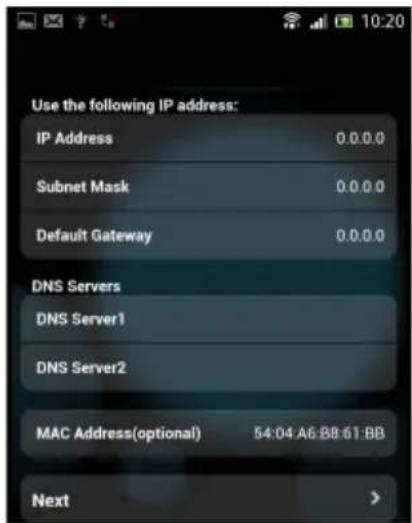
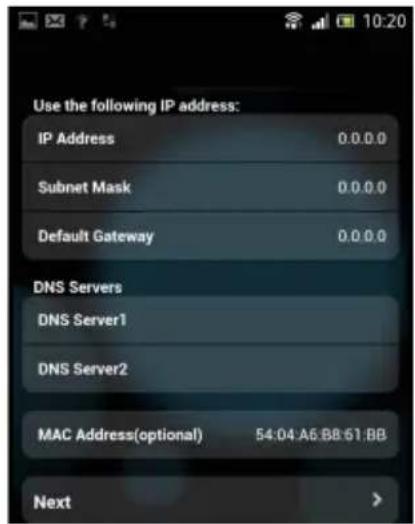
NOTE: If your connection type is Static IP, choose Static IP and click Next. Key in IP address, subnet mask, default gateway and DNS server information provided by your ISP. Click Next to proceed.
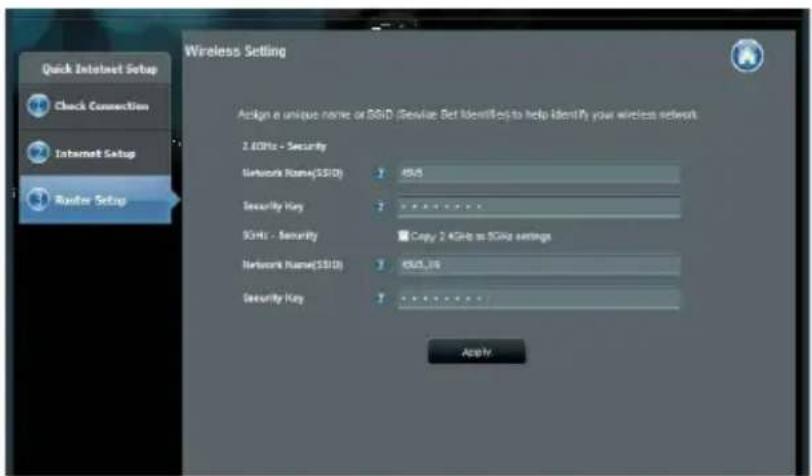
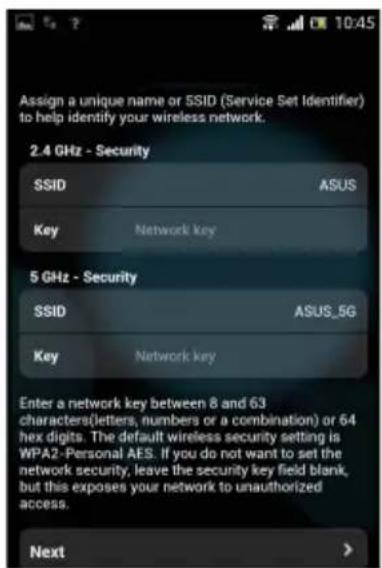
- Assign the network name (SSID) and security key for your 2.4GHz and 5GHz wireless connection. Click Apply when done.
- Your Internet and wireless settings are displayed. Click Next to continue.
- Read the wireless network connection tutorial. When done, click Finish.

NOTES:
• You can assign a network name with up to 32 characters.
• Watch the setup tutorial video if needed.

Setting up your router using a mobile device (optional)
You can also use your mobile device such as a smartphone or a tablet PC to set up RT-AC1900P through QIS wizard. The QIS wizard will automatically switch to the mobile version if you use a smartphone or a tablet PC to launch it.
To set up your router using a mobile device:
- Turn on RT-AC1900P.
- Enable Wi-Fi function of your mobile device.
- Search for the SSID ASUS, which is the default SSID of your RT-AC1900P wireless network. Click this SSID to connect and wait for the status to display Wi-Fi connected.
- Launch your mobile device web browser.

NOTE: If QIS does not launch automatically, enter http://192.168.1.1 or http://router.asus.com in the address bar and refresh the browser again. You can also use your mobile device to scan for the QR code here to go to RT-AC1900P's web interface.

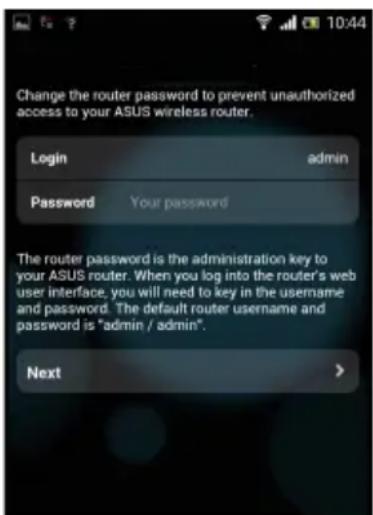
- Assign your router login name and password, and click Next. You will need this login name and password to log into RT-AC1900P's web interface to view or change router settings. Ensure that you take note of your router login name and password for future use.
Login name:
Login password:
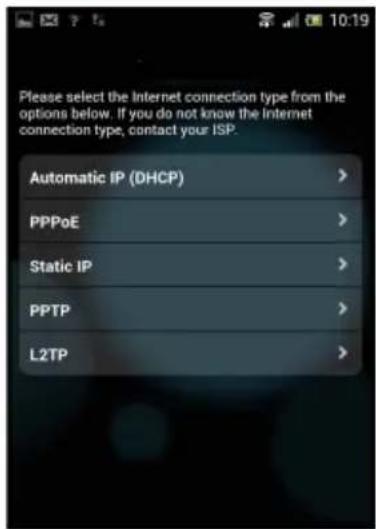
- The QIS feature automatically detects if your ISP connection type is Dynamic IP, PPPoE, PPTP, L2TP, and Static IP. Enter the necessary information that your Internet Service Provider (ISP) has provided. If your connection type is Dynamic IP (DHCP), QIS wizard will automatically direct you to the next step.

NOTE: If your connection type is Static IP, choose Static IP and click Next. Enter the IP address, subnet mask, default gateway and DNS server information provided by your ISP. Click Next to proceed.
- Assign the network name (SSID) and security key for your 2.4GHz and 5GHz wireless connection. Click Apply when done.
- Your Internet and wireless settings are displayed. Click Next to continue.
- Read the wireless network connection tutorial. When done, click Finish.

NOTES: You can assign a network name with up to 32 characters.
Connect to the wireless network
There are two ways for your wireless clients (notebook, tablet PC, smartphone and so on) to connect to RT-AC1900P's wireless network.
Connect to the wireless network manually
To connect to the wireless network manually:
- Enable the Wi-Fi function on your wireless client to scan for available wireless networks.
- Select the SSID or network name that you assigned to your RT-AC1900P's network.
- Enter the password and click Connect.
Connect to the wireless network through WPS
RT-AC1900P has a WPS (Wi-Fi Protected Setup) button for you to connect your wireless client to RT-AC1900P's network without entering password. To connect to the wireless network through WPS:
- Press the WPS button at the back of RT-AC1900P. Refer to the section A quick look at your RT-AC1900P for the location of the WPS button).
- Press the WPS button of your wireless client within two minutes or follow the WPS instructions that came with the wireless client. When connecting via WPS, the Power LED on your router blinks fast.
- Wait until your router's Power LED turns into a solid light indicating a successfully connection between your router and your wireless client.
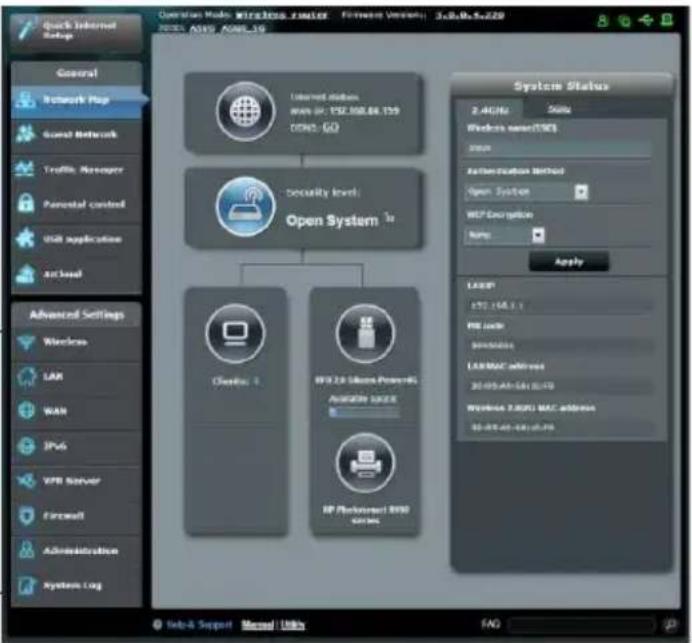
Managing the router via the ASUSWRT web GUI
Your wireless router comes with the intuitive ASUSWRT web graphical user interface. ASUSWRT allows you to easily configure its various features through a web browser such as Internet Explorer, Firefox, Safari, or Google Chrome.

NOTE: Use the search bar on the bottom of the interface to get more information from ASUS technical support site http://support.asus.com.
flowchart
graph TD
    A["Open System"] --> B["Bluetooth 1"]
    A --> C["Wi-Fi 2.0 Systems Power& Available Service"]
    A --> D["RP Platform 8900 Series"]
    E["Security Level"] --> F["Bluetooth 1"]
    E --> G["Wi-Fi 2.0 Systems Power& Available Service"]
    H["System Status"] --> I["2.4GHz"]
    H --> J["3.5GHz"]
    H --> K["4.6GHz"]
    L["Accession Method"] --> M["Open System"]
    N["WP Energy"] --> O["Apply"]
    P["LANP"] --> Q["30/45/45 GHz"]
    R["USB 2.000 MAC address"] --> S["30/45/45 GHz"]

IMPORTANT:
- For more details on using your router's Web GUI, refer to the user manual.
- Alway check and upgrade firmware to the latest version for better experience.
- Visit ASUS Networking video channel for tutorial videos on featured functions.

AiCloud
ASUS AiCloud app provides you with access to your data wherever and whenever you have an Internet connection. It also allows you to access your ASUS WebStorage account via the AiCloud mobile app on your iOS or Android device, or via a web browser.
To install AiCloud:
- Ensure that your router's firmware version is the latest one and supports AiCloud.
- Download AiCloud app from Google Play or App Store.
- Install your USB storage device to your router. Refer to section A quick look at your RT-AC1900P for the location of the USB ports.
- Connect your iOS or Android devices to the router through Wi-Fi. The Ai-Cloud app will automatically guide you through the setup process.
- You can now access, stream and share to all files in your USB storage. Search ASUS AiCloud for more information. Watch tutorial videos for step-by-step guide.

Google Play

App Store
Frequently Asked Questions (FAQs)
After following the steps, I still cannot access the wireless router's web graphics user interface (web GUI) to configure the wireless router settings.
Ensure that your PC's proxy settings are disabled and your PC'S IP address is obtained from the DHCP server automatically. for details on disabling the proxy settings, visit the ASUS Support site at http://support.asus.com. For details on using the DHCP server to obtain IP addresses automatically, refer to your Windows® or Mac operating system's help feature.
The client cannot establish a wireless connection with the router.
Out of Range:
- Put the router closer to the wireless client.
• Try to change the channel settings.
Authentication:
• Use wired connection to connect to the router.
- Check the wireless security settings.
- Press the Reset button at the rear panel for more than five seconds.
Cannot find the router:
- Press the Reset button at the rear panel for more than five seconds.
- Check the setting in the wireless adapter such as SSID and encryption settings.
Cannot access the Internet via wireless LAN adapter.
- Move the router closer to the wireless client.
- Check whether the wireless adapter is connected to the correct wireless router.
-
Check whether the wireless channel in use conforms to the channels available in your country/area.
• Check the encryption settings. -
Check if the ADSL or Cable connection is correct.
• Retry using another Ethernet cable.
If the ADSL "LINK" light blinks continuously or stays off, Internet access is not possible - the Router is unable to establish a connection with the ADSL network.
• Ensure that all your cables are all properly connected.
- Disconnect the power cord from the ADSL or cable modem, wait a few minutes, then reconnect the cord.
- If the ADSL light continues to blink or stays OFF, contact your ADSL service provider.
Network name or encryption keys are forgotten.
- Try setting up the wired connection and configuring the wireless encryption again.
- Press the Reset button of the wireless router for more than five seconds.
• Factory default settings:
| User name / Password:admin / admin | IP address:192.168.1.1 | SSID:ASUS |
Where can I find more information about the wireless router?
• Technical Support site: https://www.asus.com/support
- Customer Hotline: Refer to the Support Hotline in this Quick Start Guide
包装内容物
☑ RT-AC1900P 无线路由器
RJ45网线
电源适配器
快速使用指


登录名称:
登录密码:

注意:
ASUS recycling and takeback programs come from our commitment to the highest standards for protecting our environment. We believe in providing solutions for you to be able to responsibly recycle our products, batteries, other components, as well as the packaging materials. Please go to http://csr.asus.com/english/Takeback.htm for the detailed recycling information in different regions.
REACH
Complying with the REACH (Registration, Evaluation, Authorisation, and Restriction of Chemicals) regulatory framework, we published the chemical substances in our products at ASUS REACH website at http://csr.asus.com/english/REACH.htm
Federal Communications Commission Statement
This device complies with Part 15 of the FCC Rules. Operation is subject to the following two conditions:
• This device may not cause harmful interference.
- This device must accept any interference received, including interference that may cause undesired operation.
This equipment has been tested and found to comply with the limits for a class B digital device, pursuant to part 15 of the FCC Rules. These limits are designed to provide reasonable protection against harmful interference in a residential installation.
This equipment generates, uses and can radiate radio frequency energy and, if not installed and used in accordance with the instructions, may cause harmful interference to radio communications. However, there is no guarantee that interference will not occur in a particular installation. If this equipment does cause harmful interference to radio or television reception, which can be determined by turning the equipment off and on, the user is encouraged to try to correct the interference by one or more of the following measures:
• Reorient or relocate the receiving antenna.
- Increase the separation between the equipment and receiver.
- Connect the equipment into an outlet on a circuit different from that to which the receiver is connected.
- Consult the dealer or an experienced radio/TV technician for help.

WARNING! Any changes or modifications not expressly approved by the party responsible for compliance could void the user's authority to operate the equipment.
Prohibition of Co-location
This device and its antenna(s) must not be co-located or operating in conjunction with any other antenna or transmitter.
IMPORTANT NOTE:
Radiation Exposure Statement: This equipment complies with FCC radiation exposure limits set forth for an uncontrolled environment. End users must follow the specific operating instructions for satisfying RF exposure compliance. To maintain compliance with FCC exposure compliance requirement, please follow operation instruction as documented in this manual.
Declaration of Conformity for R&TTE directive 1999/5/EC
Essential requirements – Article 3
Protection requirements for health and safety – Article 3.1a
Testing for electric safety according to EN 60950-1 has been conducted. These are considered relevant and sufficient.
Protection requirements for electromagnetic compatibility – Article 3.1b
Testing for electromagnetic compatibility according to EN 301 489-1 and EN 301 489-17 has been conducted. These are considered relevant and sufficient.
Effective use of the radio spectrum – Article 3.2
Testing for radio test suites according to EN 300 328-2 has been conducted. These are considered relevant and sufficient.
CE Mark Warning
This is a Class B product, in a domestic environment, this product may cause radio interference, in which case the user may be required to take adequate measures. Operation Channels: CH1\~11 for N. America; Ch1\~14 for Japan; CH1\~13 for Europe (ETSI)
This equipment may be operated in AT, BE, CY, CZ, DK, EE, FI, FR, DE, GR, HU, IE, IT, LU, MT, NL, PL, PT, SK, SL, ES, SE, GB, IS, LI, NO, CH, BG, RO, RT.
Canada, Industry Canada (IC) Notices
This Class B digital apparatus complies with Canadian ICES-003 and RSS-210.
Operation is subject to the following two conditions: (1) this device may not cause interference, and (2) this device must accept any interference, including interference that may cause undesired operation of the device.
Radio Frequency (RF) Exposure Information
The radiated output power of the ASUS Wireless Device is below the Industry Canada (IC) radio frequency exposure limits. The ASUS Wireless Device should be used in such a manner such that the potential for human contact during normal operation is minimized.
This device has been evaluated for and shown compliant with the IC Speci c Absorption Rate ("SAR") limits when installed in speci c host products operated in portable
This device has been certified for use in Canada. Status of the listing in the Industry Canada's REL (Radio Equipment List) can be found at the following web address: http://www.ic.gc.ca/app/sitt/reltel/srch/nwRdSrch.do?lang=eng
Additional Canadian information on RF exposure also can be found at the following web http://www.ic.gc.ca/eic/site/smt-gst.nsf/eng/sf08792.html
Canada, avis d'Industry Canada (IC)
http://www.ic.gc.ca/app/sitt/reltel/srch/nwRdSrch.do?lang=eng
http://www.ic.gc.ca/eic/site/smt-gst.nsf/eng/sf08792.html
NCC 警語
- NOTES:
- • USB External HDD/Flash disk:
- Installing your router
- Position your wireless router.
- Prepare your modem.
- Set up your wireless environment.
- Disable some settings on your computer.
- Setting up your router using the Quick Internet Setup Wizard
- Setting up your router using a mobile device (optional)
- Connect to the wireless network
- Connect to the wireless network manually
- Connect to the wireless network through WPS
- Managing the router via the ASUSWRT web GUI
- IMPORTANT:
- AiCloud
- Frequently Asked Questions (FAQs)
- After following the steps, I still cannot access the wireless router's web graphics user interface (web GUI) to configure the wireless router settings.
- The client cannot establish a wireless connection with the router.
- Out of Range:
- Authentication:
- Cannot find the router:
- Cannot access the Internet via wireless LAN adapter.
- If the ADSL "LINK" light blinks continuously or stays off, Internet access is not possible - the Router is unable to establish a connection with the ADSL network.
- Network name or encryption keys are forgotten.
- Where can I find more information about the wireless router?
- 包装内容物
- 注意:
- REACH
- Federal Communications Commission Statement
- Prohibition of Co-location
- IMPORTANT NOTE:
- Declaration of Conformity for R&TTE directive 1999/5/EC
- CE Mark Warning
- Canada, Industry Canada (IC) Notices
- Radio Frequency (RF) Exposure Information
- Canada, avis d'Industry Canada (IC)
- NCC 警語
Brand : ASUS
Model : RT-AC1900P
Category : Router