CKH2661S - Cooker Elvita - Free user manual and instructions
Find the device manual for free CKH2661S Elvita in PDF.


| Product Type | Freestanding Cooker |
| Brand | Elvita |
| Model | CKH2661S |
| Fuel Type | Gas Hob with Electric Oven |
| Hob Type | 4 Gas Burners |
| Oven Type | Electric Fan-Assisted Oven |
| Oven Functions | Conventional, Grill, Fan, Bottom Heat |
| Oven Capacity | 65 Liters |
| Energy Efficiency Class | A |
| Power Supply | 230 V / 50 Hz |
| Dimensions (H x W x D) | 850 x 600 x 600 mm |
| Weight | 55 kg |
| Safety Features | Flame Failure Safety Device, Child Lock, Overflow Protection |
| Control Type | Knobs for Hob and Oven |
| Display | LED Timer and Temperature Display |
| Cleaning | Easy-Clean Enamel Oven Interior, Removable Oven Door |
| Oven Lighting | Interior Light |
| Number of Oven Shelves | 2 Wire Shelves and 1 Baking Tray |
| Grill Power | 2.0 kW |
| Hob Burner Power | Triple Ring: 3.5 kW, Semi-Rapid: 2.0 kW, Auxiliary: 1.0 kW |
| Oven Power | 2.5 kW |
| Repairability Index | 7.5/10 |
| Spare Parts Availability | Replacement Burners, Oven Elements, Knobs, Door Hinges |
| Accessories Included | Baking Tray, Wire Shelf, Grill Rack |
Frequently Asked Questions - CKH2661S Elvita
User questions about CKH2661S Elvita
0 question about this device. Answer the ones you know or ask your own.
Ask a new question about this device
Download the instructions for your Cooker in PDF format for free! Find your manual CKH2661S - Elvita and take your electronic device back in hand. On this page are published all the documents necessary for the use of your device. CKH2661S by Elvita.
USER MANUAL CKH2661S Elvita
natural_image
Two cooking pots with crossed handles and directional arrows, no text or symbols presentnatural_image
Two simple line drawings of cooking pots with arrows indicating direction (no text or symbols)natural_image
Two identical diagrams showing a cooking pot with crossed arrows indicating pressure or movement, next to a larger pot with bidirectional arrows (no text or symbols)Börja laga mat
natural_image
Line drawing of a cooking pot on a stand (no text or symbols)natural_image
Two hand-drawn diagrams showing finger positioning and alignment, no text or symbols present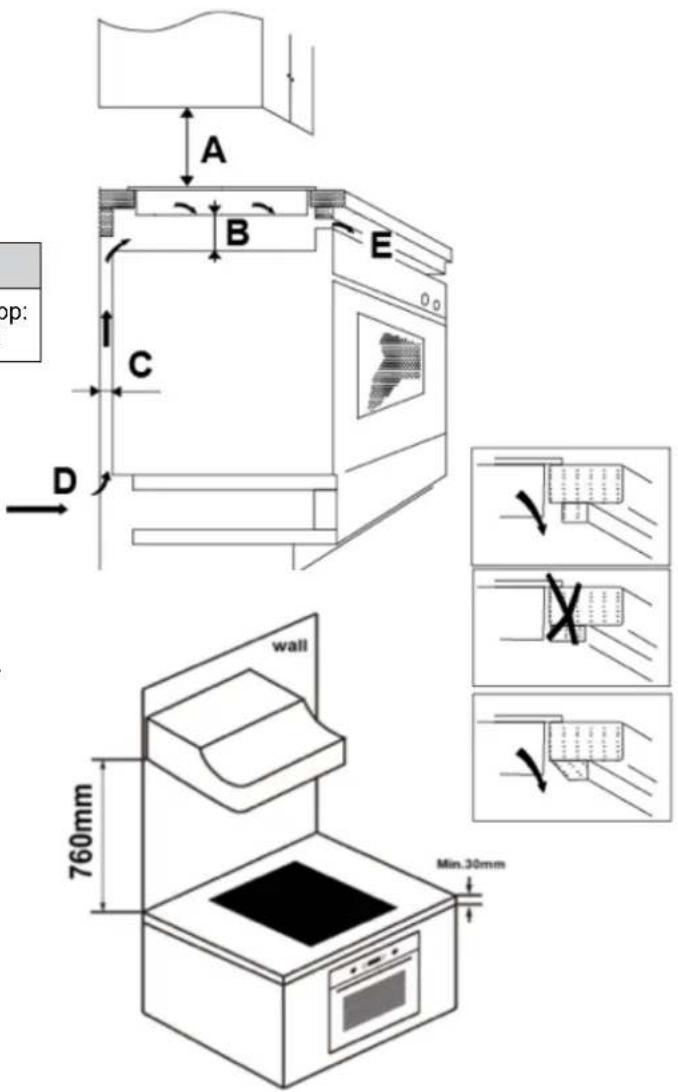
natural_image
Pure technical diagram of a rectangular frame with labeled corner points (A, B, C, D) and mounting holes, no text or symbols present.A. Skruv
B. Fäste
C. Skruvhål
D. Bas
natural_image
Simple line drawing of a mechanical bracket with a bolt and mounting base, enclosed in a circle (no text or symbols)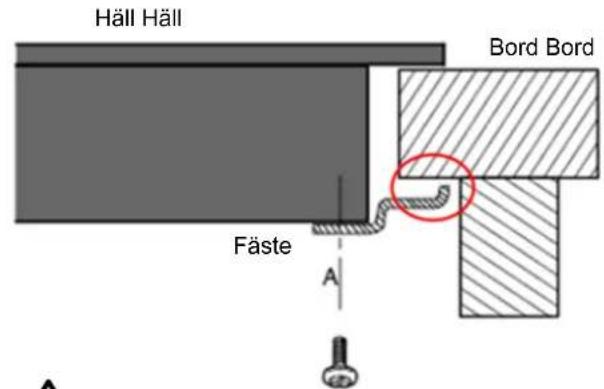
Product introduction....21
Operation 23
Cooking guidelines 26
Heat settings. 27
Cleaning and care 27
Tips 28
Installation 28
Disposal of waste 31
We take safety extremely seriously. Read this information before using the ceramic hob.

Safety and warning information
Installation
Risk of electric shock
Disconnect the appliance from the mains supply before you carry out any work or maintenance on it.
It is essential, and a legal requirement, that this appliance is electrically earthed.
Any work on the electrical system of a building must be carried out by a qualified electrician.
Failure to follow these instructions could result in electric shock or death.
Risk of cuts to the skin
Take care! The edges of the hob are sharp.
There is a risk of cuts to the skin if you do not take care.
Important safety instructions
Read these instructions carefully before installing the appliance.
Never place flammable material or products on this appliance.
Make sure that the person who installs the appliance has access to this information.
These installation instructions must be followed to ensure correct installation of the appliance.
This appliance must be installed and earthed correctly by a qualified electrician.
Connect the appliance to a circuit that is fitted with an isolating switch that allows you to isolate it from the mains supply.
If the appliance is not installed correctly it may invalidate the guarantee and your right to claim under the guarantee.
This appliance can be used by children from the age of 8 upwards, and by individuals with reduced physical, sensory or mental capabilities or lack of experience and knowledge, on condition that they are supervised or instructed in how to use the appliance safely, and that they understand the hazards involved.
Children must not be allowed to play with the appliance. Cleaning and user maintenance must not be carried out by children without supervision.
If the power cord is damaged, it must be replaced by the manufacturer, the manufacturer's service agent or similarly qualified persons in order to avoid a hazard.
Warning: If the surface is cracked, switch off the appliance to avoid the possibility of electric shock, for hob surfaces of glass-ceramic or similar materials that protect live parts.
Metallic objects such as knives, forks, spoons and lids should not be placed on the hob surface, as they may get hot.
A steam cleaner is not to be used.
Do not use a steam cleaner to clean your cooktop.
The appliance is not intended to be operated by means of an external timer or separate remote-control system.
WARNING: Danger of fire: do not store items on the cooking surfaces.
The cooking process must be supervised. Short-term cooking processes must be supervised continuously.
WARNING: Unattended cooking on a hob with fat or oil can be dangerous and may result in fire. NEVER try to extinguish a fire with water, but switch off the appliance and then cover the flames with a lid or fire blanket, for example.
Operation and maintenance Risk of electric shock
Do not use the ceramic hob if it is damaged or cracked. Disconnect the appliance from the mains supply immediately (wall switch) if the surface of the ceramic hob is damaged or cracked. Contact a qualified electrician.
Disconnect the ceramic hob from the mains supply before you clean or maintain it.
Failure to follow these instructions could result in electric shock or death.
Health risk
This appliance complies with electromagnetic safety standards.
If you have a pacemaker or other electrical implant (such as an insulin pump) consult your doctor or the manufacturer of the implant before you use this appliance. Make sure your implant will not be affected by the electromagnetic field from the appliance.
Failure to follow these instructions could result in death.
Risk of burns
While the appliance is in use some of its components get hot enough to cause burns.
Take care to avoid contact between the ceramic hob and any part of your body, clothing or any object other than a suitable pan.
Make sure that children are kept at a safe distance.
The handles of pans can get very hot. Make sure that pan handles are not positioned directly above a heat zone when it is switched on. Position handles so that children cannot reach them.
Failure to follow these instructions could result in burns.
Important safety instructions
Never leave the appliance unattended when it is in use.
If a pan boils over it can produce smoke and (possibly) spillages that contain fat and could ignite.
Do not use the appliance as a work surface or storage area.
Do not leave any objects or utensils on the appliance.
Do not place any magnetized objects (such as credit cards, memory cards) or electronic devices (such as computers, MP3 players) near the appliance, as they could be affected by its electromagnetic field.
Do not use the appliance to warm up the room.
Turn off the heat zones and the ceramic hob immediately after use, as instructed in this manual (using the touch controls). Do not rely on the automatic detection feature to turn off the heat zones when you remove a pan.
Never allow children to play with, sit on, stand nearby or climb on the appliance.
Do not keep objects that attract a child's attention in the area above the appliance. A child who climbs on to the ceramic hob could be severely injured.
Do not leave children alone or without supervision in the room when the appliance is in use.
Children or individuals with an impairment that affects their ability to use the appliance must not be allowed to use the appliance unless supervised by an adult who can instruct them. The instructing adult must ensure that the child or individual with an impairment is capable of using the appliance without danger to themselves or the surroundings.
Do not carry out any repairs or replace any components of the appliance unless this is recommended in the manual. All other servicing must be carried out by a qualified electrician.
Do not place or drop heavy objects on the ceramic hob.
Do not stand on the ceramic hob.
Do not use pans with damaged edges, or drag pans across the ceramic hob, as this could damage the glass.
Do not use steel wool, abrasive kitchen sponges or other abrasive cleaning products to clean the ceramic hob (this could scratch the glass).
This appliance is intended for domestic use and the like, such as: staff kitchens in shops, offices and other workplaces, farm kitchens, and by guests at hotels, motels, B&Bs and other types of accommodation.
WARNING! This appliance and its accessible components get hot during use.
Take care to avoid coming into contact with the heating element.
Do not allow children under 8 years of age near the appliance (whether they are supervised or not).
Congratulations on your new ceramic hob!
We recommend that you read this user/installation manual carefully so that you understand how to install and use the appliance correctly. See the section on installation for information on how to install the appliance.
Read all the safety instructions carefully before use and keep this user/installation manual for future reference.
Product introduction
View from above
- Heat zone, max. 1200 W
- Heat zone, max. 1800 W
- Heat zone, max. 1200 W
- Heat zone, max. 1000W/2200W zone
- Glass top
- ON/OFF
- Control panel
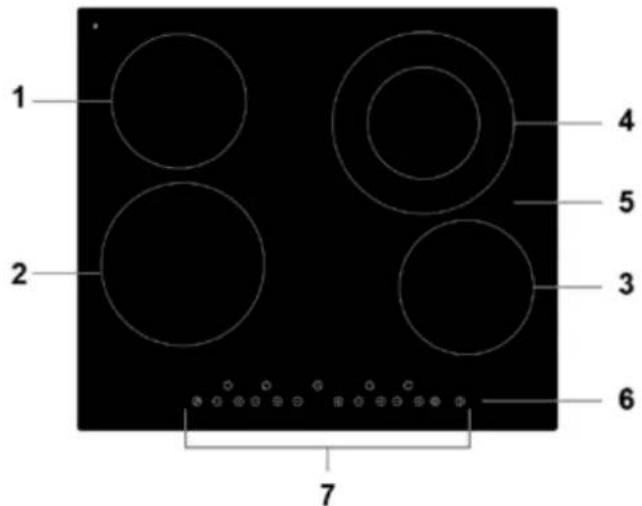
Control panel
- ON/OFF
- Power control
- Lock button
- Timer
- Control for dual heat zone
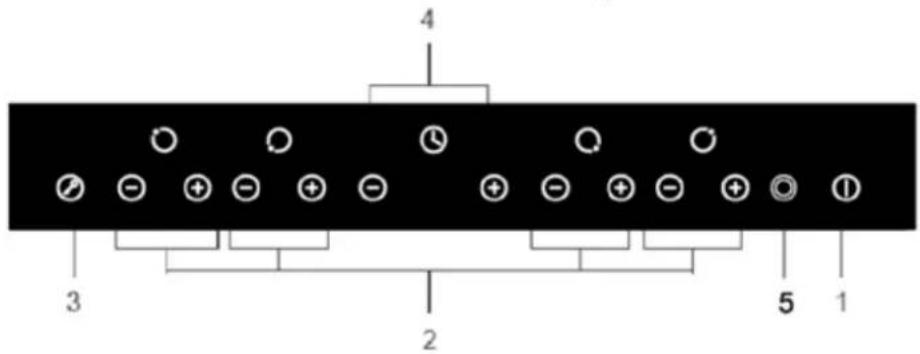
Product information
This ceramic hob combines resistance heating with micro-computer control to enable a very wide range of power settings, which makes it very useful in the home.
The ceramic hob is very safe and user-friendly – as well as delivering high performance and stylish design.
How it works
The ceramic hob is heated by resistance elements and the power level is adjusted using touch controls.
Before using a new ceramic hob
Read this guide – especially the section on safety warnings!
Remove any plastic film from the ceramic hob.
Technical data
Weights and dimensions are approximate. We continuously work on improving our products, which means that changes in design and specifications may be made without prior notice.
| Cooking hob CKH2661S | |
| Heat zones 4 zones | |
| Mains supply 220–240 VAC 50Hz or 60 Hz | |
| Electric power rating 6000–7000 W | |
| Dimensions: d x w x h (mm) 590 x | 520 x 55 |
| Cut-out dimensions: AxB (mm) | 560 x 490 |
Energy efficiency
Information on electric hobs for domestic use, according to EU 66/2014
| Model identification CKH2661S | ||
| Type of hob Built-in hob | ||
| Number of cooking zones and/or areas 4 zones | ||
| Heating technology (induction cooking zones and cooking areas, radiant cooking zones, solid plates) | radiant cooking zones | |
| For circular cooking zones or area: diameter of useful surface area per electric heated cooking zone, rounded to the nearest 5 mm | ∅ zone 1: 20 cm∅ zone 2: 16.5 cm∅ zone 3: 23 cm∅ zone 4: 16.5 cm | |
| For non-circular cooking zones or areas: length and width of useful surface area per electric heated cooking zone or area, rounded to the nearest 5 mm | LW | N/A cm |
| Energy consumption per cooking zone or area calculated per kg | ECelectric cooking | zone 1: 179.7 Wh/kgzone 2: 188.7 Wh/kgzone 3: 189.4 Wh/kgzone 4: 208.4 Wh/kg |
| Energy consumption for the hob calculated per kg ECelectric hob 191.6 Wh/kg | ||
Saving energy
Follow the tips below to save energy when you cook.
Do not boil more water than you need.
Always fit a lid to pans (if possible).
Place the pan on the heating zone before you turn it on.
Place small pans on the smaller heating zones.
Place the pan in the centre of the heating zone.
Use the residual heat from the heating zone to keep food warm, etc..
Operation
Touch controls
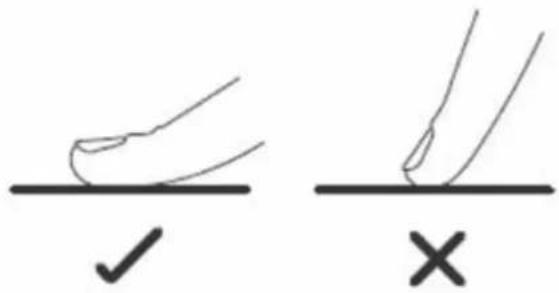
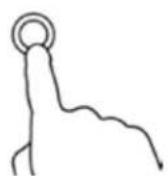
These controls respond to touch, so there is no need to press them hard.
Press with the pad of your finger, not your finger tip.
You will hear a beep when a button is activated.
Make sure that the controls are clean and dry and that no objects are placed over them (such as utensils or towels). Even a thin film of water can interfere with the operation of the controls.
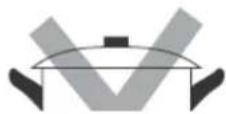
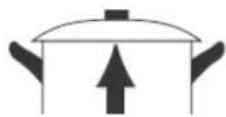
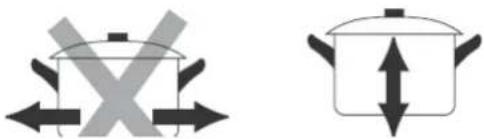
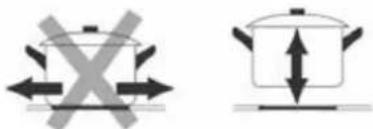
Do not use pans with damaged edges or a convex/concave base.
natural_image
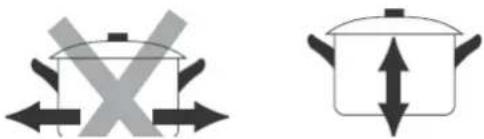
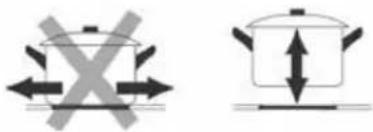
Two cooking pots with crossed handles and directional arrows indicating cooking or heating (no text or symbols)Make sure that the base of the pan is smooth, so that it sits flat on the glass hob, and that it is the same size as the heat zone. Always position the pan over the centre of the heat zone.
Always lift the pan off the ceramic hob – don't drag it (it could scratch the glass).
To start cooking
When you switch the hob on it beeps once and all the indicator lights come on for 1 second (this indicates that the ceramic hob is in standby mode).
Press ON/OFF all the LEDs show (-).
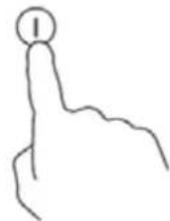
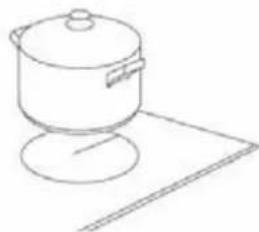
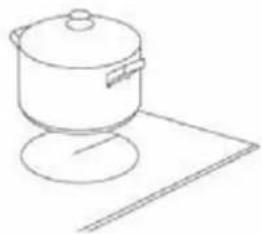
Place a suitable pan on the heat zone you want to use.
Make sure that the base of the pan and the heat zone surface are clean and dry.
natural_image
Line drawing of a cooking pot on a stand (no text or symbols)Adjust the heat by pressing (-) or (+).
If you do not select a heat setting within 1 minute the ceramic hob will be switched off automatically.
To switch it on again, go back to step 1.
You can adjust the heat setting an during cooking.
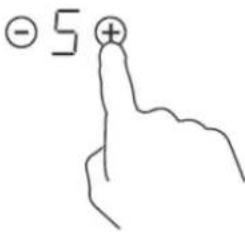
Press one of these buttons to increase or reduce the heat.
When you finish cooking
Turn off the heat zone by reducing the heat setting to (0) or by pressing (-) and (+) at the same time.
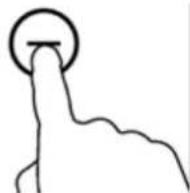
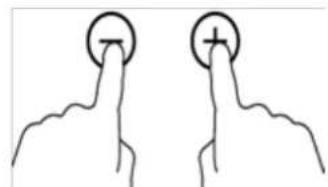
natural_image
Two hand gestures with circular and plus symbols, no text or labels presentTo switch off the hob completely, press ON/OFF.
Take care to avoid touching hot surfaces.

The symbol (H) lights up on a heat zone when it is too hot to touch. The symbol disappears when the surface has cooled to a safe temperature. A heat zone that is still hot can be used to warm up another pan (this helps you save energy).

Locking the controls
The controls can be locked (for example to prevent children from accidentally switching on a heat zone).
When the controls are locked, only the ON/OFF control will work.
Locking the controls:
Press the lock symbol 🔒 The timer display will show (Lo).
Unlocking the controls:
Make sure the ceramic hob is switched on.
Press the lock symbol ⏻ for a second or two.
When the hob is locked all the controls are deactivated (except ON/OFF) Ⓙ. This means you can always switch off the ceramic hob by pressing ON/OFF Ⓙ in an emergency (but to continue cooking you must first unlock the hob).
Using the dual heat zone control
• This feature can only be used for heat zone 4.
- The inner zone of the dual heat zone (A) can be used independently, and zones (B) can be used together.
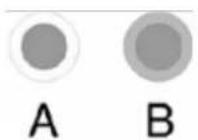
Turning on the dual heat zone
Select the desired power setting (1–9) (the inner heat zone will turn on).
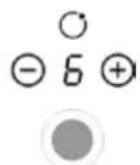
Press the dual heat zone control once to select zone (B).
A neon above the dual cooking zone control will light.
The cooking mode indicator will alternate between (=) and ( 6.

Turning off the dual heat zone
If heat zone 4 is set to zone (B), press ☐ once to return to zone (A) (the dual heat zone is turned off).
When the dual heat zone is turned off, the cooking mode indicator shows 6.
Note!
Only heat zone 4 has a dual heat zone.
You can adjust the heat between settings 1 and 9.
Only heat zone 4 can have two zones activated at the same time.
Timer display
You can use the timer in two different ways:
a) as a minute counter (in this case none of the heat zones will be switched off when the timer runs out).
b) to switch off one or more of the heat zones (when the set time has run out).
The timer can be set for a maximum of 99 minutes.
Timer - overview
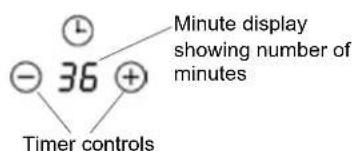
Using the timer as a minute counter
If you do not select a heat zone
Make sure that the ceramic hob is turned on and that at least one of the heating zones will stay on until the timer runs out. Otherwise, the hob will automatically shut down to save energy if no heating zone is turned on.
Change the timer setting by pressing (-) or (+). The minute counter indicator on the timer display will start flashing.
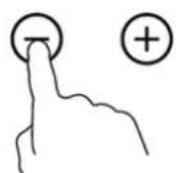
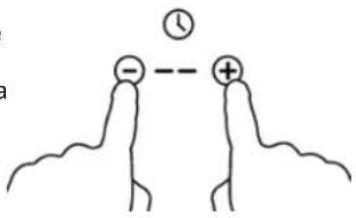
Press (-) and (+) at the same time to stop the timer; the minute displays will show (--).
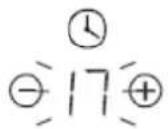
Countdown starts immediately when you have set the time. The display shows the remaining time and the timer display flashes for 5 seconds.
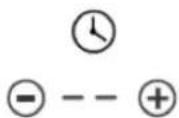
When the set time has run out, the hob will beep for 30 seconds and the timer display will show (--).
Tips:
a) Press (-) or (+) once on the timer to decrease or increase the time by 1 minute.
b) Press and hold (-) or (+) on the timer to decrease or increase the time by 10 minutes.
c) If the timer is set to more than 99 minutes it starts again from 0 minutes.
Setting the timer to switch off one or more heat zones
Press ⊖ or ⊕ for the heat zone you want to control with the timer.
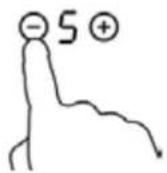
Set the time by pressing the timer control
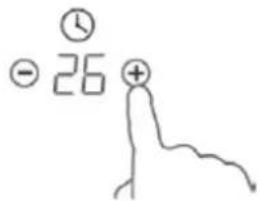
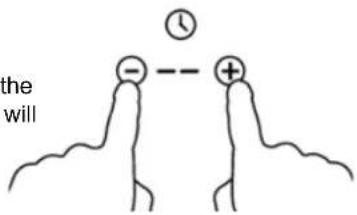
Press (-) and (+)
at the same time to stop the timer; the minute display will show (--).
Countdown starts
immediately when you have set the time. The display shows the remaining time and the timer display flashes for 5 seconds.
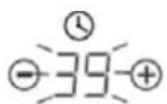
When the timer runs out the heat zone will be switched off automatically (the display will show H, which means the zone is still hot).
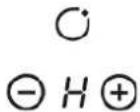
NOTE! The red dot next to the power indicator lights up to show that a zone is selected.
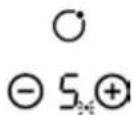
To change the time after the timer has been set, go back to step 1.
Setting the timer to turn more than one cooking zones off
If more than one heat zone is being controlled by the timer, the timer display will show the shortest time (example: if zone 1 is set to 5 minutes and zone 2 is set to 15 minutes, the timer display will show 5).
Note! The red dot next to the power indicator flashes.
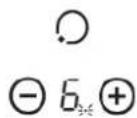
(set to 5 minutes)
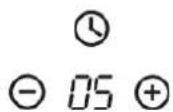
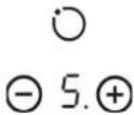
(set to 15 minutes)
When the timer has run out, the heat zone is switched off. The minute timer will then show the time for the next heat zone and the dot for that zone will flash.
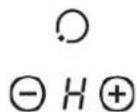
When the timer runs out, the heat zone will be switched off automatically.
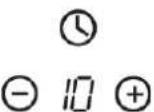
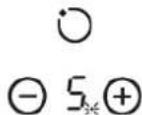
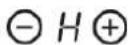
Note! The red dot next to the power indicator lights up to show that a zone is selected.
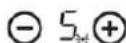
To change the time after the timer has been set, go back to step 1.
Thermal cut-out
A temperature sensor monitors the temperature inside the ceramic hob. If the temperature gets too high the ceramic hob is switched off automatically.
Hob still hot warning
When the hob is switched off after being used for a while it does not cool down immediately (H indicates that the hob is still hot).
Default times for switching off automatically
If you forget to turn off a heat zone, a safety feature automatically switches off the hob after a set time. The table below shows the default times for switching off automatically:
| Power setting 1 2 3 4 5 6 7 8 9 | |||||||||
| Default run time (hours) 8 8 8 4 4 4 2 2 2 |
Cooking guidelines

NOTE!
Take extra care when you fry food – oil and fat heat up very quickly (especially if you use a high power setting). At very high temperatures oil and fat can self-ignite (this can be very dangerous and lead to a fire).
Cooking tips
Lower the heat setting when the contents of the pan begin to boil.
By using a lid you can shorten the cooking time and save energy by reducing the temperature.
Use only the amount of liquid or oil that is needed for cooking (too much liquid extends the cooking time).
Start cooking food on a high heat and then reduce the heat when the food is cooked through.
Simmering, cooking rice
Simmering takes place at a temperature of around 85^ C (bubbles are released now and then from the bottom of the pan and rise to the top). This cooking method produces excellent results, since it allows the flavours to develop without overcooking the food. Food that you should cook in this way includes, soups, steaks and egg- and flour-based sauces.
When cooking some foods (such as rice by the absorption method) you may need to set the heat a little higher than the lowest setting (to ensure the food is cooked correctly within the recommended time).
Browning steak
To cook tasty steaks:
- Let the meat rest at room temperature for around 20 minutes before cooking.
-
Heat up a heavy-based frying pan.
-
Brush both sides of the steak with oil. Pour a little oil into the hot frying pan and add the steak.
- Only turn the steak once during cooking. The precise cooking time depends on the thickness of the steak and how well cooked you like it. The cooking time can range from 2 to 8 minutes per side. Press the beef to check how well cooked it is – the firmer it feels, the more thoroughly it is cooked.
- Let the steak rest for a few minutes in the warm frying pan so that it becomes tender.
Stir-frying
- Use a flat-based wok or a large frying pan.
- Have all the ingredients and utensils close to hand. Stir-fry the food quickly (stir-frying should be a very quick process). If you need to stir-fry a lot of food you should divide the ingredients into smaller portions.
- Preheat the pan for a short time and pour in two tablespoons of cooking oil.
- Always start with the meat first if you intend to cook several raw ingredients (set the cooked meat aside to keep it warm).
- Stir-fry the vegetables. When they are hot but still crisp, reduce the heat setting for the heat zone, return the meat to the pan and add the sauce.
- Mix the ingredients gently and make sure that they are evenly heated through before you remove the pan from the hob.
- Serve immediately!
Heat settings
The settings below should only be seen as guidelines. The precise setting that is needed depends on various factors (such as the type of pan or how much food you are cooking). You should experiment to find the best setting for the ceramic hob.
| Heat settings Suitable for | |
| 1–2 | • gently heating up small amounts of food• melting chocolate and butter, and cooking food that burns easily• gentle simmering• slow heating |
| 3–4 | • heating up food• fast simmering• cooking rice |
| 5–6 • pancakes | |
| 7–8 | • sautéing• cooking pasta |
| 9 | • sautéing• browning• making soup• boiling water |
Cleaning and care
| What? How? Important! | ||
| Daily soiling of the glass (fingerprints, marks, food stains or spillages that do not contain sugar) | 1. Switch off the mains supply to the ceramic hob.2. Apply ceramic hob cleaner while glass surface is still warm (not hot!).3. Rinse of the surface and wipe with a clean cloth or paper towel.4. Switch on the mains supply to the ceramic hob. | ·When the ceramic hob is switched off, heat zones that are still hot will not be indicated by the symbol (H), but they may still be hot! Take great care.·Abrasive sponges, some nylon sponges and hard or abrasive cleaners could scratch the glass. Always check that a cleaning sponge is suitable for use on a glass hob before using it.·Do not leave traces of cleaner on the ceramic hob (it may stain the glass). |
| Over-boiling, melted remains and spilled sugar on glass | Remove these immediately with a ceramic hob scraper (or similar utensil suitable for ceramic hobs). Take care to avoid damaging the surface of the heat zones.1. Switch off the mains supply to the ceramic hob.2. Hold the scraper/utensil at an angle of 30° and scrape off the stain/spillage from the heat zones (scrape on to a cold area of the ceramic hob).3. Clean the stains/spillage with a dish cloth or paper towel.4. Follow steps 2–4 under Daily soiling of the glass (see above). | ·Remove stains as soon as possible (for example melted food, food that contains sugar, or spillages). If stains are left until the hob has cooled down they may be difficult to remove (they may even damage the glass permanently).·Risk of cuts to the skin: When the safety guard is drawn back the scraper is razor-sharp. Take great care when you use it, and always store the scraper where children cannot reach it. |
| Spillage on touch controls | 1. Switch off the mains supply to the ceramic hob.2. Mop up the spillage.3. Dry the surface of the touch control with a clean, damp sponge or cloth.4. Dry off the area thoroughly (using a paper towel).5. Switch on the mains supply to the ceramic hob. | ·If there is liquid on the ceramic hob it may switch itself off (it will beep) and the touch controls may not work. Dry off the area around the touch controls before you switch the ceramic hob on again. |
Tips
| Problem Possible cause Action | ||
| Ceramic hob will not turn on. | No mains supply. Check that the ceramic hob is connected to the mains supply and that the switch is turned on. Check for a power failure in the building. Contact a qualified electrician once you have made sure there has not been a power failure or similar problem. | |
| Touch controls do not respond. | The controls are locked. Unlock the controls. See section 3.3Operation for instructions on how to use the ceramic hob. | |
| Touch controls are difficult to use. | There may be a thin film of water on the controls or you may be trying to use your finger tip to activate the controls. | Make sure the touch controls are dry and that you press the controls with the pad of your finger. |
| The glass is scratched. The pans have rough edges.Unsuitable abrasive sponge or abrasive cleaners have been used to clean the hob. | Use pans with flat, smooth bases. See the section on Suitable pans.See the section on Cleaning and care. | |
| Some pans make a noise when they in use (creaking or pinging sound). | This may be due to the construction of the pan (layers of different metals that vibrate in different ways). | This is normal and is not a sign of a fault. |
Installation
Installation equipment
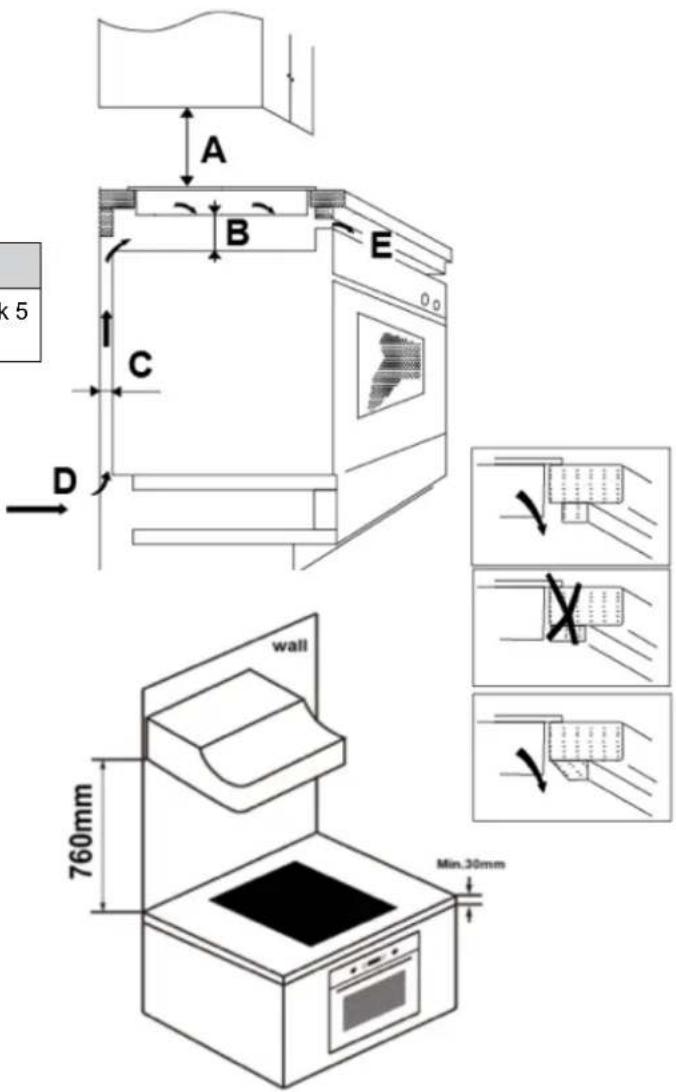
Make a cut-out in the worktop that matches the dimensions in the drawing.
Leave at least 5 cm around the holes (for securing the hob).
Make sure that the worktop is at least 30 mm thick.
The worktop must be made of a material that is heat-resistant and insulating (wood, fibreboard or hygroscopic materials should only be used if they have been treated) and is not electrically conductive (risk of electric shock) or easily deformed (by heat from the hob). See below:

Note! The safety gap between the sides of the hob and the inner edges of the worktop should be at least 3 mm.
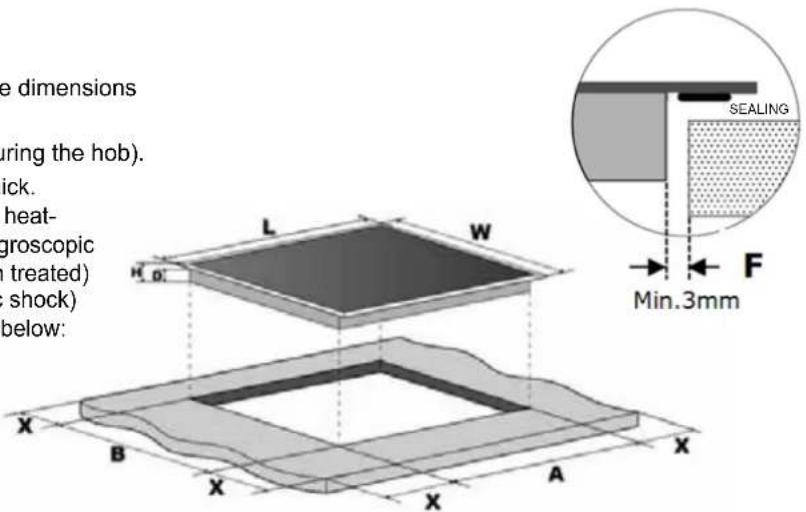
| L (mm) W (mm) H (mm) D (mm) A (mm) W (mm) X (mm) F (mm) | |||||||
| 590 520 55 51 | 560 (+ 1–4 mm) | 490 (+ 1–4 mm) | 50 (min.) 3 (min.) | ||||
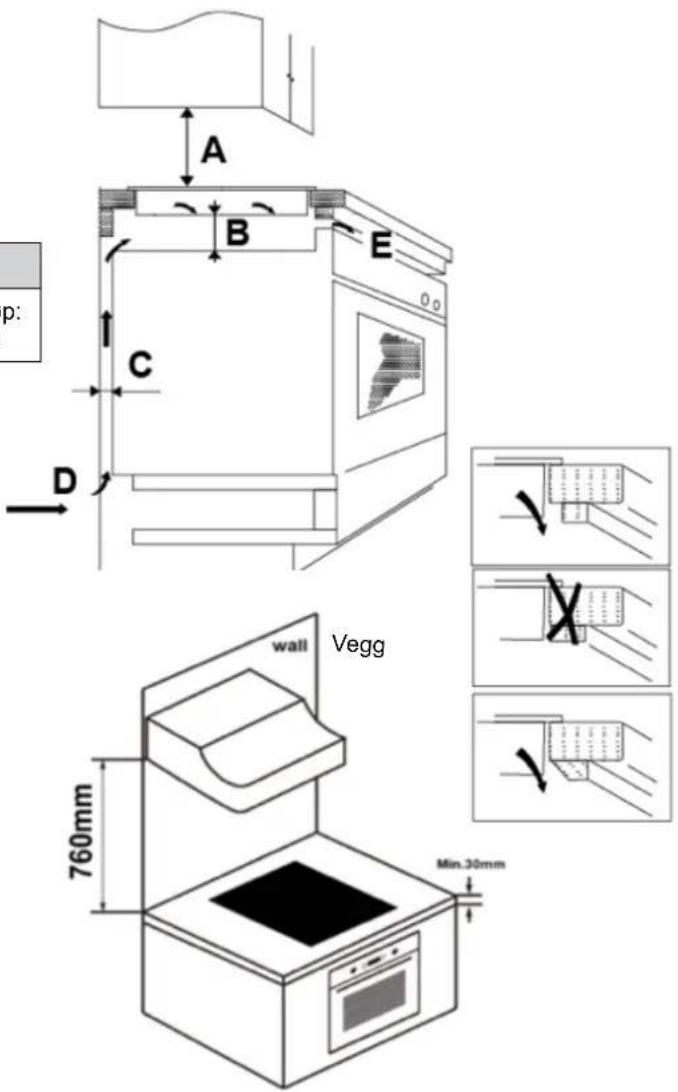
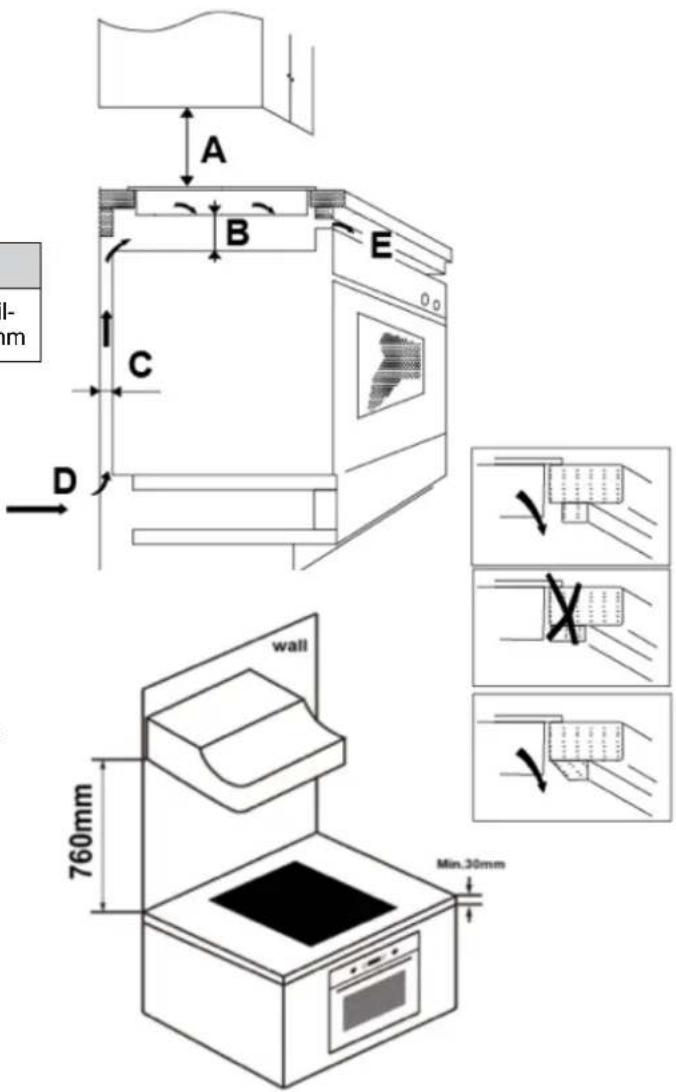
Always ensure that the ceramic hob is correctly ventilated and that neither the air inlet nor the air outlet are blocked. Make sure the ceramic hob is in good condition. See below.

Note! The safe distance between hob and the cabi-ove it must be at least 760 mm.
| A (mm) B | (mm) C (mm) | D (mm) E | ||
| 760 50 (min.) | 20 (min.) | Air intake | Air outlet: 5 mm |
WARNING!
Check that there is sufficient ventilation
Ensure that the ceramic hob is correctly ventilated and that neither the air inlet nor the air outlet are blocked. To avoid accidental contact with the hot underside of the hob (or an electric shock when working) a wood insert must be installed (and fixed with screws) at least 50 mm below the underside of the hob. Follow the instructions below.
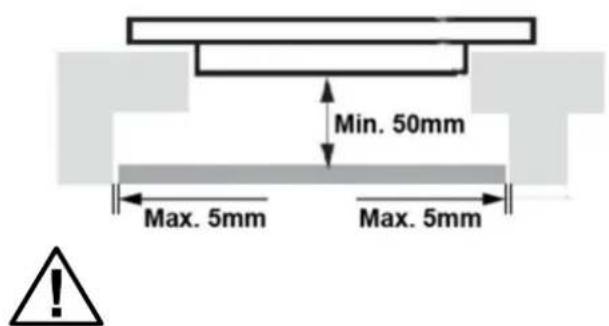
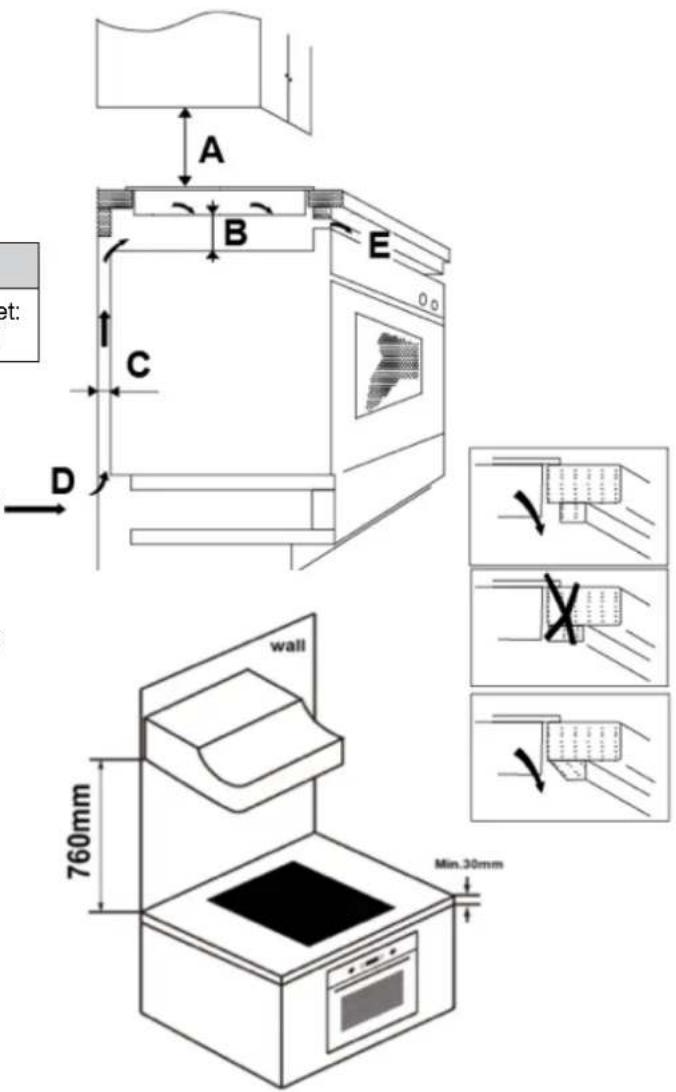
There are ventilation holes around the outside of the hob. Make sure that these holes are NOT blocked by the worktop when you insert the hob in it.
The adhesive that is used to join plastic or wood in kitchen cabinets must be able to withstand temperatures up to 150^ C (unsuitable adhesive could cause the material to come loose).
The wall behind the hob and any adjacent or surrounding surfaces must be able to withstand temperatures up to 90°C.
Before fitting the clips
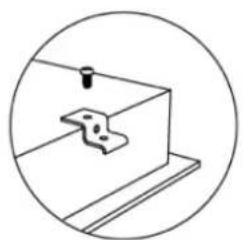
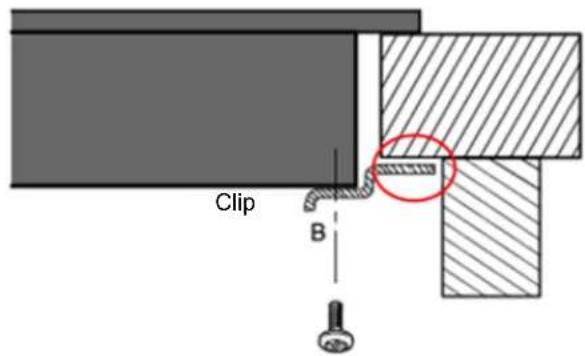
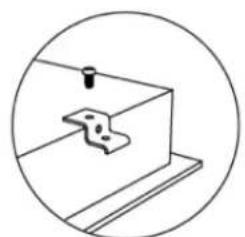
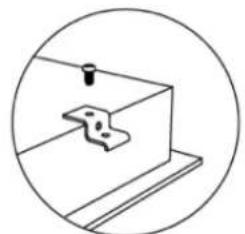
Place the appliance on a firm, flat surface (use the carton). Take care to avoid damaging the controls that project from the hob. Screw the four clips to the underside of the hob (see diagram) and fix the hob to the work surface once it is in the correct position.
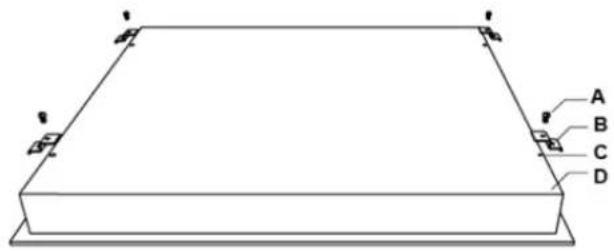
natural_image
Pure technical diagram of a rectangular frame with labeled corner points (A, B, C, D) and mounting holes, no text or symbols present.A. Screw
B. Clip
C. Screw hole
D. Base
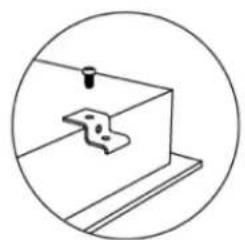
natural_image
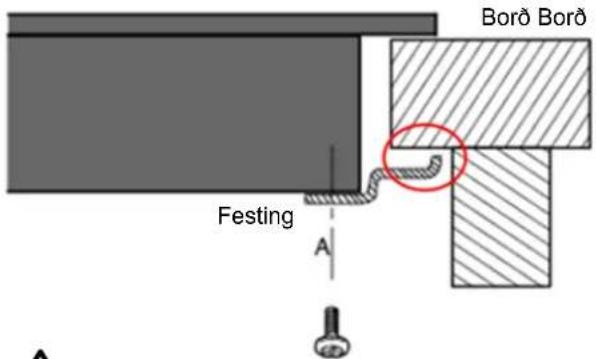
Simple line drawing of a mechanical bracket with a bolt and mounting base, enclosed in a circle (no text or symbols)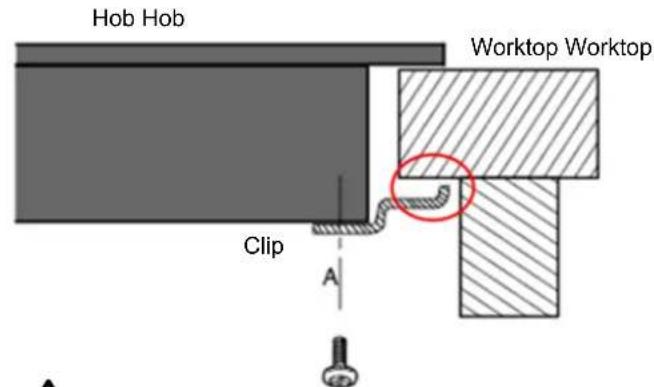
The clips must not touch the underside of the worktop after installation (see diagram).
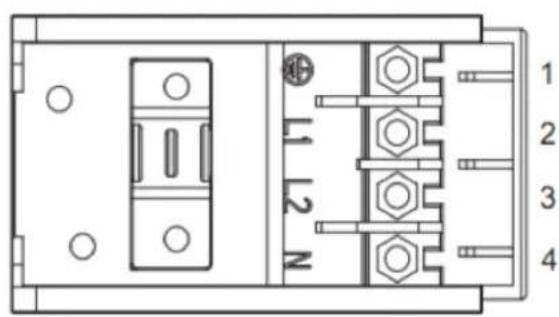
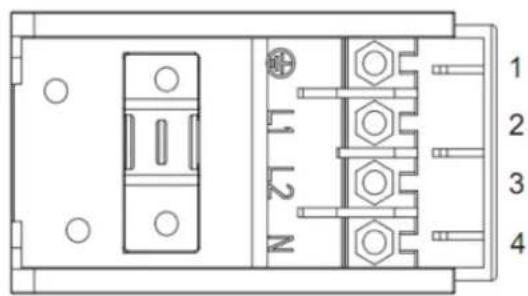
Connect the hob to the mains supply
Caution
- The ceramic hob must be installed by a qualified electrician. Contact us if you need assistance. Do not try to do this work yourself.
- The ceramic hob should not be installed above a refrigerated appliance, dishwasher or tumble dryer.
- Install the ceramic hob so that heat can be ventilated away easily (otherwise its reliability may be reduced).
- Walls and the induced heat zone above the work surface must be heat-resistant.
- Laminates and adhesives must also be heat-resistant.
- Do not use a steam cleaner to clean the hob.
Connect to the mains supply according to the relevant standard (use a single-pole circuit breaker). See the instructions for connection below.
- Replacement of the cable (due to damage or replacement for some other reason) should be carried out by a qualified electrician.
- If the appliance will be directly connected to the mains supply a multi-pole circuit breaker must be installed (min. distance between contacts: 3 mm).
- It is the responsibility of the installer to ensure that electrical connections are made correctly and meet the relevant safety regulations.
- The cable must not be bent or trapped.
- Check the cable regularly! If it needs to be replaced this must be done by a qualified electrician.
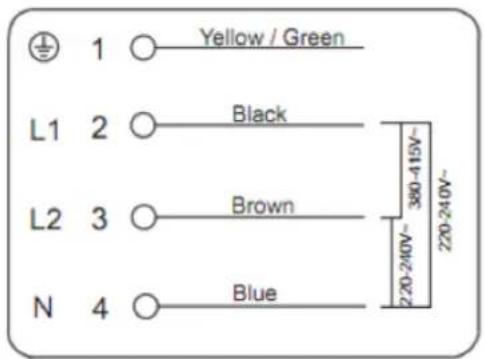
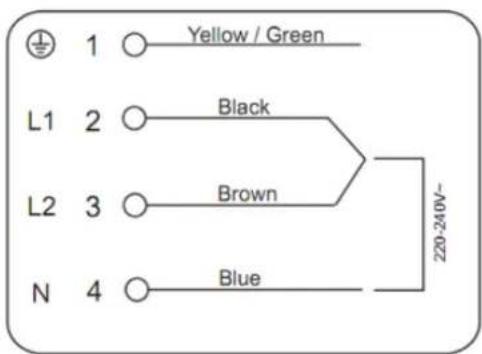

The underside of the hob and the power cord are not accessible after installation.
Disposal of waste
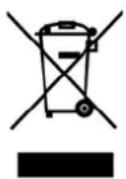
Do not dispose of this product as general household waste. It must be disposed of as special waste
Packaging material
Packaging material that is marked with the recycling symbol can be recycled. Dispose of the packaging in a container intended for recyclable material.
Correct disposal of this appliance
This appliance is labelled in compliance with WEEE directive 2012/19/EU concerning waste that comprises or contains electrical or electronic products. By making sure that this appliance is disposed of correctly you are helping to prevent harm to the environment and people's health, which could occur if it is disposed of incorrectly.
The symbol on this appliance shows that it cannot be treated as general household waste. Take the appliance to a recycling centre and dispose of it as electrical/electronic waste.
This appliance must be disposed of as special waste. Contact the local authorities, recycling centre or your retailer if you would like more information about how to dispose of this appliance.
Contact the local authorities, recycling centre or your retailer if you would like more information about how to dispose of this appliance.
CE
INNHOLD
Ikke bruk kokekar med skadde kanter eller konveks/konkav bunn.
Begynne å lage mat
Når koketoppen er startet, piper summeren én gang, og alle indikatorlamper tennes i 1 sekund (dette indikerer at koketoppen er i standby-stilling).
natural_image
Line drawing of a cooking pot on a stand (no text or symbols)natural_image
Two hand gestures with circular icons, no text or symbols present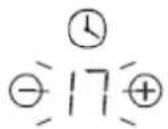
Nedtellingen begynner omgående när tiden er innstilt. Displayet viser gjenværende tid, og tidsurdisplayet blinker i 5 sekunder.
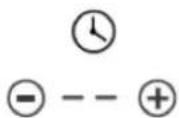
Når innstilt tid er ute, piper summeren i 30 sekunder, og tidsurdisplayet viser (--).
Tips:
natural_image
Pure technical diagram of a rectangular frame with labeled corner points (A, B, C, D) and mounting holes, no text or symbols present.A. Skrue
B. Feste
C. Skruehull
D. Base
natural_image
Simple line drawing of a mechanical component with a circular outline (no text or symbols)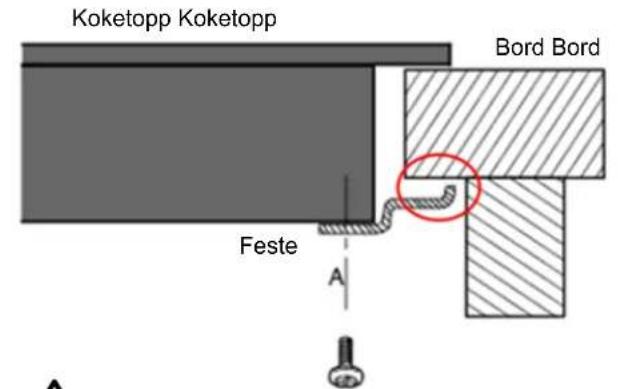
natural_image
Two cooking pots with crossed handles and directional arrows, no text or symbols presentnatural_image
Two simple line drawings of cooking pots with arrows indicating direction (no text or symbols)natural_image
Two identical diagrams showing a cooking pot with crossed arrows indicating pressure or movement, next to a larger pot with bidirectional arrows (no text or symbols)Start madlavningen
natural_image
Line drawing of a cooking pot on a stand (no text or symbols)Indstil varmen ved at trykke på (-) eller (+).
natural_image
Two hand-drawn diagrams showing finger positioning on fingers, no text or symbols present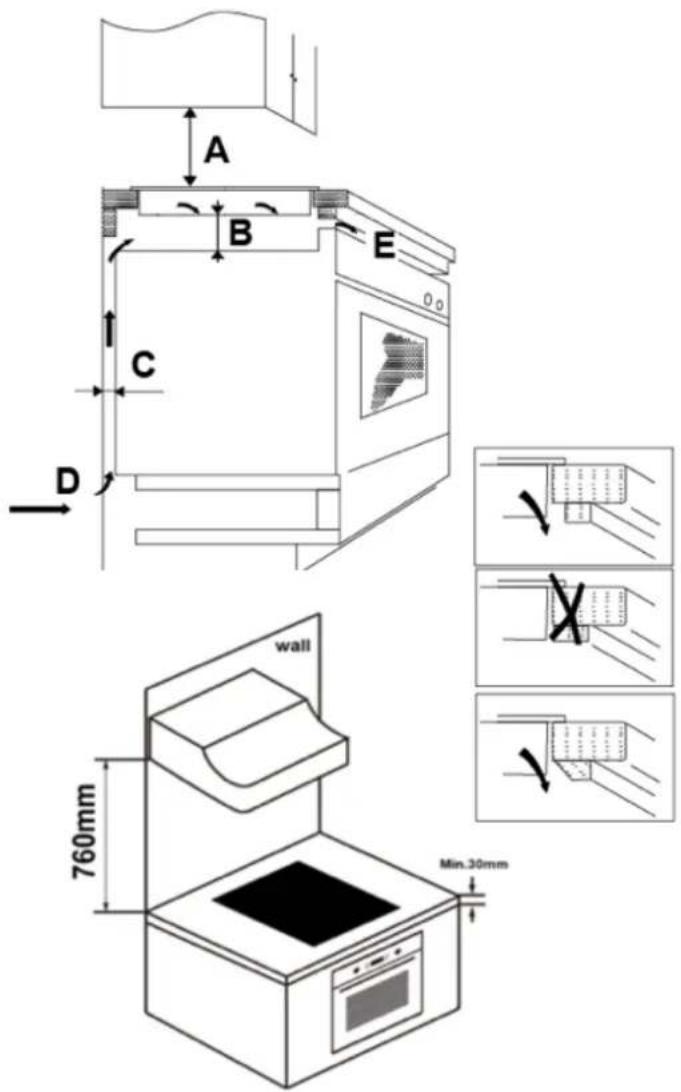
natural_image
Pure technical line drawing of a rectangular frame with four labeled corner points (A, B, C, D) and no text or symbols beyond labels.A. Skrue
B. Klips
C. Skruehul
D. Base
natural_image
Simple line drawing of a mechanical clamp or bracket with a circular outline (no text or symbols)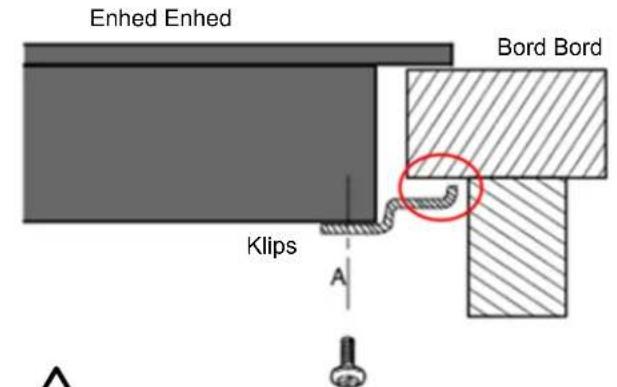
natural_image
Two cooking pots with crossed handles and directional arrows, no text or symbols presentnatural_image
Two simple cooking pots with directional arrows, no text or symbols presentnatural_image
Line drawing of a cooking pot on a stand (no text or symbols)Aseta lämpö painamalla painiketta (-) tai (+).
natural_image
Two hand diagrams showing finger positioning with circular arrows, no text or symbols present
natural_image
Pure technical diagram of a rectangular frame with four labeled corner points (A, B, C, D) and no text or symbols beyond labels.natural_image
Simple line drawing of a mechanical clamp or bracket with a circular outline (no text or symbols)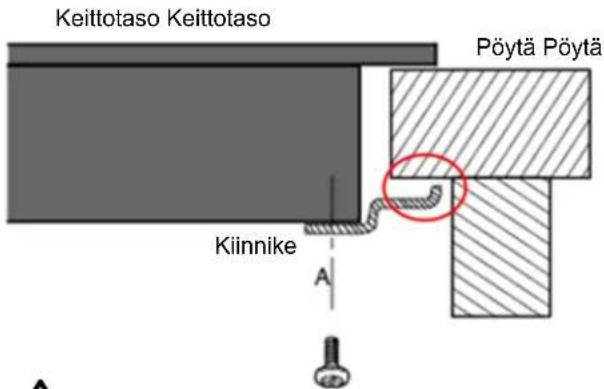
natural_image
Two simple cooking utensils: a pot with a V-shaped handle and a pot with an upward arrow (no text or symbols)Lyftu eldunaráhaldinu alltaf af keramikhellunni – ekki draga paô (glerborõiõ getur rispast).
Byrjað að elda
natural_image
Simple line drawing of a hand pointing upward with a circular mark on the index finger (no text or symbols)Settu hentugt eldunaráhald á hitasvæðið sem pú vilt nota.
Passaǒu aǒ botninn á eldunaráhaldinu og yfirborǒiǒ á hitasvæðinu séu hrein og purr.
natural_image
Simple line drawing of a cooking pot on a stand (no text or symbols)natural_image
Two hand diagrams showing finger positioning with circular and plus symbols (no text or labels)
natural_image
Pure technical diagram of a rectangular frame with labeled corner points (A, B, C, D), no text or symbols present.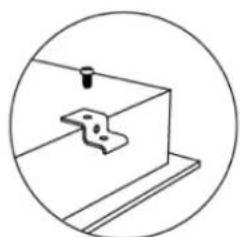
natural_image
Simple line drawing of a mechanical clamp or bracket with a circular outline (no text or symbols)Helluborð Helluborð
natural_image
Gray circular icon with three white gears, no text or symbols presentGARANTI WARRANTY TAKUU ÁBYRGĐ
Quality warranty applies to consumers
- Börja laga mat
- Safety and warning information
- Installation
- Risk of electric shock
- Risk of cuts to the skin
- Important safety instructions
- Operation and maintenance Risk of electric shock
- Health risk
- Risk of burns
- Congratulations on your new ceramic hob!
- Product introduction
- View from above
- Control panel
- Product information
- How it works
- Before using a new ceramic hob
- Technical data
- Energy efficiency
- Saving energy
- Operation
- Touch controls
- To start cooking
- When you finish cooking
- Take care to avoid touching hot surfaces.
- Locking the controls
- Locking the controls:
- Unlocking the controls:
- Using the dual heat zone control
- Turning on the dual heat zone
- Turning off the dual heat zone
- Note!
- Timer display
- Timer - overview
- Using the timer as a minute counter
- Tips:
- Setting the timer to switch off one or more heat zones
- Press (-) and (+)
- Countdown starts
- Setting the timer to turn more than one cooking zones off
- Thermal cut-out
- Hob still hot warning
- Default times for switching off automatically
- Cooking guidelines
- Cooking tips
- Simmering, cooking rice
- Browning steak
- Stir-frying
- Heat settings
- Cleaning and care
- Installation equipment
- WARNING!
- Check that there is sufficient ventilation
- Before fitting the clips
- Connect the hob to the mains supply
- Caution
- Disposal of waste
- Packaging material
- Correct disposal of this appliance
- INNHOLD
- Begynne å lage mat
- Start madlavningen
- Byrjað að elda
- GARANTI WARRANTY TAKUU ÁBYRGĐ
Brand : Elvita
Model : CKH2661S
Category : Cooker