WIR 2.0 - Wireless repeater Andersson - Free user manual and instructions
Find the device manual for free WIR 2.0 Andersson in PDF.


| Product Type | Wireless Repeater / Range Extender |
| Model | WIR 2.0 |
| Brand | Andersson |
| Supported Modes | Repeater Mode, Access Point Mode |
| Wireless Standards | IEEE 802.11 b/g/n |
| Frequency Band | 2.4 GHz |
| Interfaces | 1 x RJ-45 Fast Ethernet Port |
| Security Encryption | 64/128-bit WEP, WPA, WPA2, WPA/WPA2 PSK |
| Default IP Address | 192.168.10.1 |
| Default Username / Password | admin / admin |
| Management | Web-based GUI (HTTP) |
| WPS Button | Yes |
| Reset Button | Yes (press for a few seconds) |
| Firmware Upgrade | Via web interface |
| Package Contents | 1 x Wireless Repeater, 1 x RJ-45 Cable, 1 x Quick Installation Guide |
| Power Supply | AC Wall Plug (built-in) |
Frequently Asked Questions - WIR 2.0 Andersson
User questions about WIR 2.0 Andersson
0 question about this device. Answer the ones you know or ask your own.
Ask a new question about this device
Download the instructions for your Wireless repeater in PDF format for free! Find your manual WIR 2.0 - Andersson and take your electronic device back in hand. On this page are published all the documents necessary for the use of your device. WIR 2.0 by Andersson.
USER MANUAL WIR 2.0 Andersson
natural_image
White and black electronic device with control buttons and a circular icon (no readable text or symbols)Copyright
This manual is the copyright of CI no 556520-4137. No part of this manual may be revised, copied or transmitted in any way without written permission from CI no 556520-4137.
Statement
This manual does not provide any warranty or related declarations. All information in this manual including the product specification, pictures and literatures is just for reference, CI no 556520-4137 reserves the rights to update contents of this manual without further notice.
Copyright
English
Package Contents, Open Source Code 4
Getting Started 5
How to configure the Wi-Fi Repeater 6-9
Connect Your Computer/Laptop 10-11
Configure IP Address 12
Configuring via Web Browser 13
Wireless Base Configuration – Repeater Mode 14
Change Management password 15
Firmware Upgrade 16
Factory Default and Settings Backup, Restore 17
Svenska
Uppgradera firmware 30
1 x Wireless Repeater
1 x RJ-45 Networking Cable
1 x Quick installation Guide
Open Source Code
This product includes software codes developed by third parties. These software codes are subject to either the GNU General Public License (GPL), Version 2, June 1991 or the GNU Lesser General Public License (LGPL), Version 2.1, February 1999. You can copy, distribute, and/or modify in accordance with the terms and conditions of GPL or LGPL.
The source code should be complete, if you think we need to provide any additional source code files under GNU General Public License (GPL), please contact us. We are committed to meeting the requirements of the GNU General Public License (GPL).
Please refer to the GNU GPL Web site for further information. http://www.gnu.org/licenses/licenses.en.html.
Setting up a Wireless Infrastructure Network
For a typical wireless setup at home (as shown below, Please do the following:
Wireless Repeater Mode
You will need WiFi AP/Router Internet access

flowchart
graph TD
    A["Internet"] --> B["Computer 1"]
    A --> C["Computer 3"]
    A --> D["WiFi Repeater"]
    A --> E["Router"]
Wireless AP Mode
You will need broadband Router Internet access
Connect the WiFi-Repeater to your Router/Switch with RJ-45 Cable

flowchart
graph TD
    A["Internet"] --> B["Computer 1"]
    A --> C["Computer 2"]
    A --> D["Computer 3"]
    A --> E["Wi-Fi Repeater"]
    A --> F["Lan Cable"]
    A --> G["Router"]
    style A fill:#f9f,stroke:#333
    style B fill:#ccf,stroke:#333
    style C fill:#ccf,stroke:#333
    style D fill:#ccf,stroke:#333
    style E fill:#ccf,stroke:#333
    style F fill:#ccf,stroke:#333
    style G fill:#ccf,stroke:#333
How to configure the Wi-Fi Repeater
You can configure the wireless repeater by connecting it to your computer/laptop with enclosed RJ45 cable or wirelessly.
Configure the Wireless Repeater wirelessly.
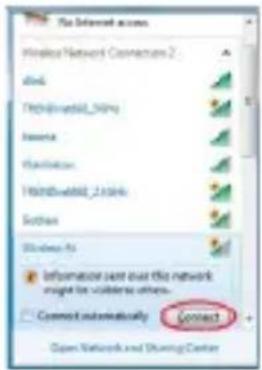
- Plug the Wireless repeater to a wall socket. Open Connect to a Network by right-clicking the network icon (or) in the notification area. You will find the signal from the Wireless Repeater. Click on 'Connect' then wait for a few seconds.

- Open web browser and type http://192.168.10.1 in the browser's address box. This number is the default IP address for this device.
Note: Please check whether the Wireless Repeater accord with factory default settings if you can't download http://192.168.10.1. If you are still not sure what causes the problem, you can reset the Wireless Repeater by pressing the RESET button for a few seconds, then try again.
- The login screen below will appear. Enter the "User Name" and "Password" then click "OK" to login. The default User name is "admin" and Password is "admin".
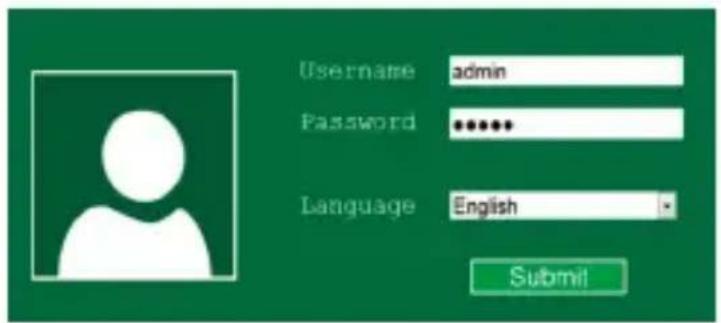
- After logging in, you will see the web page below:

- Select your Wireless SSID to continue.

- When you see below, please do not change any setting but only insert the key of your network.

Configure the Wi-Fi Repeater with RJ45 Cable.
- Plug the Wi-Fi Repeater to a wall socket. Connect your computer / laptop with the Wi-Fi Repeater with enclosed RJ45 Cable.
- Follow process 3 - 7 on previous pages to configure your Wi-Fi Repeater.
Configure the Wireless AP Mode.
- Plug the Wi-Fi Repeater into a wall socket.
- Follow process 3-4 on the previous pages.
- Click on 'AP' to continue.


- The following message will be displayed on your web browser:
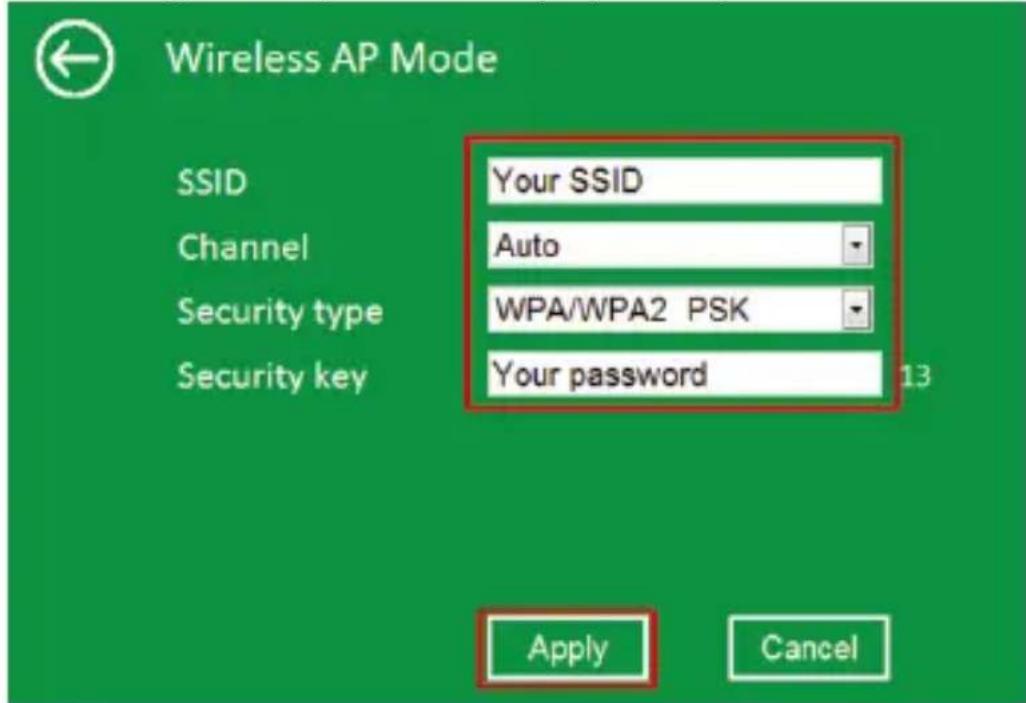
| SSID the “SSID” of your repeater wireless network. | |
| Channel Auto (recommended) | |
| Security type Setup the wireless security and encryption to prevent from unauthorized access and monitoring.Supports 64/128-bit WEP, WPA, WPA2, WPA/WPA2 encryption methods. | |
| Security key The “Password” of your repeater wireless network. |
Click 'Apply', and the repeater will restart. Wait for a few seconds before your Wireless Repeater is ready to be used.
Adding wireless computers to the Wireless Repeater
- Log on to the computer.
- Plug the wireless repeater to a wall socket.
Open Connect to a Network by right-clicking the network icon (
or (i) in the notification area.

-
Choose the wireless network from the list that appears, and then click Connect.
-
Type the network security key or passphrase if you are asked to do so, and then click OK. You'll see a confirmation message when you are connected to the network.

- To confirm that you added the computer, do the following:
Open Network by clicking the Start button, and then clicking Control Panel. In the search box, type network, and then, under Network and Sharing Center, click View network
computers and devices. You should see icons for the computer you added and for the other computers and devices that are part of the network.
Note : If you don't see icons in the Network folder, then network discovery and file sharing might be turned off.
Adding a Wireless computers to the Wireless Repeater with WPS Button
- Log on to the computer.
- Press the WPS button of the wireless repeater directly for 2-3 seconds.
- Press the WPS button of the wireless adapter connected to your computer directly for 2-3 seconds. Click Finish to complete the WPS configuration. (Please check your Wireless adapter Manual with WPS configuration)
- You should see icons for the computer you added and for the other computers and devices that are part of the network.
Adding a wired (Ethernet) computer to the wireless repeater
- Plug the wireless repeater to a wall socket. Connect your computer / laptop with the wireless repeater with enclosed RJ45 Cable.
- To confirm that you added the computer, do the following: Open Network by clicking the Start button , and then clicking Control Panel. In the search box, type network, and then, under Network and Sharing Center, click View network computers and devices. You should see icons for the computer you added and for the other computers and devices that are part of the network.
For more information:
http://windows.microsoft.com/en-US/windows7/Add-a-device-or-computer-to-a-network
http://windows.microsoft.com/en-US/windows7/Setting-up-a-Wirelessetwork
http://windows.microsoft.com/en-US/windows-vista/Setting-up-a-Wirelessetwork
How to configure your computer/laptop with the Network IP Address
- Log on to the computer.
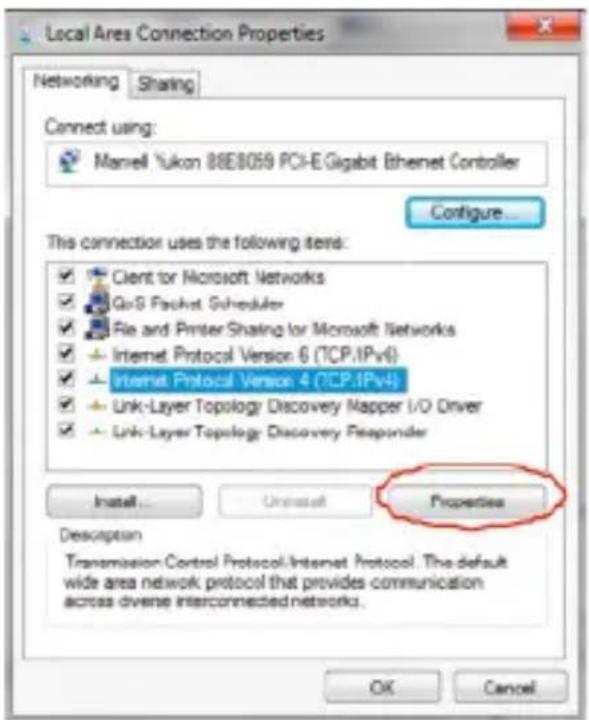
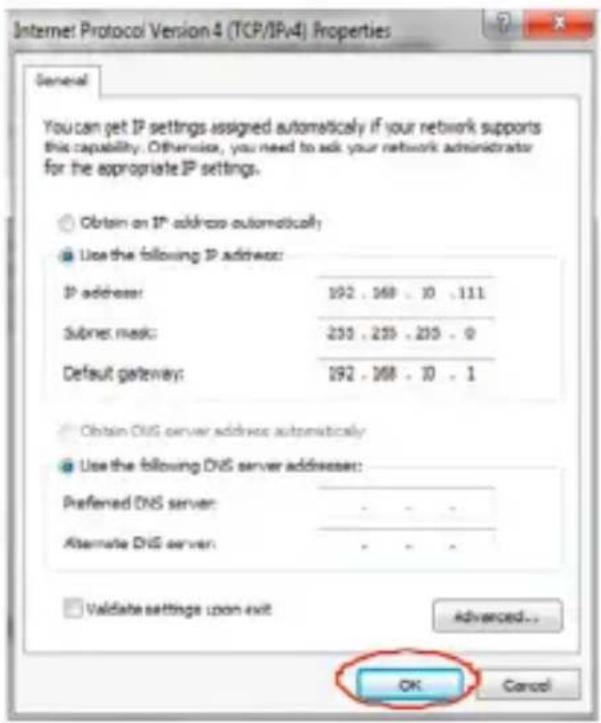
- Click the "Start" button (it should be located at the lower-left corner of your screen), then click "Control Panel". Click "View Network Status and Tasks", and then click "Manage Network Connections". Right-click "Local Area Network", then select "Properties". When the "Local Area Connection Properties" window appears, select "Internet Protocol Version 4 (TCP/IPv4)" and then click "Properties".
- Setting IP address manually: Type IP address is 192.168.10.x (x is from 2 to 254), and Subnet mask is 255.255.255.0. Type the Router's LAN IP address (the default IP is 192.168.10.1) into the Default gateway field.

Configuring via Web Browser
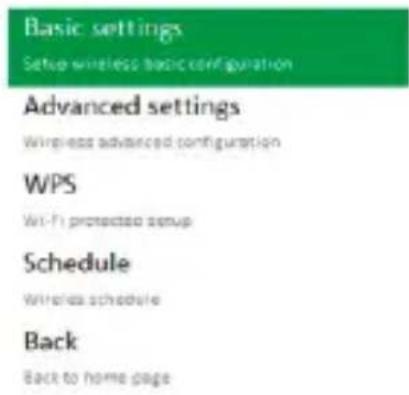
In AP mode and click “Wireless -> Basic Settings” located at the web management interface, the following message will be displayed on your web browser:
You could configure the minimum number of Wireless settings for communication, such as Network Name (SSID) and Channel. The Access Point can be set simply with only the minimum setting items.
Wireless settings

Basic settings

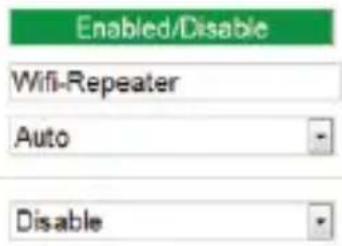
| Wireless Enable | Wireless On/Off |
| SSID the “SSID” of your repeater wireless network. | |
| Channel Auto (recommended) | |
| Security type Setup the wireless security and encryption to prevent from unauthorized access and monitoring.Supports 64/128-bit WEP, WPA, WPA2, WPA/WPA2 encryption methods. | |
| Security key The “Password” of your repeater wireless network. | |
Click 'Apply', and the Wireless Repeater will restart.
Wireless Base Configuration – Repeater Mode
In Repeater mode and click “Wireless-> Basic Settings” located at the web management
interface, the following message will be displayed on your web browser:
Wireless settings
Basic settings

Apply
| Wireless Enable Wireless On/Off | |
| Delete Remove the | repeater connection profile |
| Repeater ssid | Auto (recommended) |
| Security type Set the repeater SSID security type. | |
| Security key The “Password” of your repeater wireless network. | |
Click 'Apply', and the Wireless Repeater will restart.
Change Management password
Default password is “admin”, and it’s displayed on the login prompt when accessed from web browser. There’s a security risk if you don’t change the default password, since everyone can see it. This is very important when you have wireless function enabled.
To change password, please follow the following instructions: Please click 'Management -> Password' menu on the web management interface, the following message will be displayed on your web browser:

If you want to keep original password unchanged, click 'Cancel'. Click 'Apply', and the Wireless Repeater will log off.
Firmware Upgrade
The system software used by this router is called as ‘firmware’, just like any applications on your computer, when you replace the old application with a new one, your computer will be equipped with new function. You can also use this firmware upgrade function to add new functions to your router, even fix the bugs of this router.
Please click ‘Management-> Upgrade Firmware’ located at the web management interface, and then the following message will be displayed on your web browser:

Click ‘Browse’ button first; you’ll be prompted to provide the filename of firmware upgrade file. Please download the latest firmware file from our website, and use it to upgrade your router.
After a firmware upgrade file is selected, click 'Upgrade' button, and the router will start firmware upgrade procedure automatically. The procedure may take several minutes. Please be patient.
NOTE: Never interrupt the upgrade procedure by closing the web browser or physically disconnect your computer from router. If the firmware you uploaded is corrupt, the firmware upgrade will fail, and you may have to return this router to the dealer of purchase to ask for help. (Warranty voids if you interrupted the upgrade procedure).
Factory Default and Settings Backup, Restore
You can backup all settings of this router to a file, so you can make several copied of router configuration for security reason.
To backup or restore router settings, please follow the following instructions:
Please click ‘Save/Reload setting’ located at the web management interface, then the following message will be displayed on your web browser:

| Save Settings to File | Press ‘Save...’ button, you can save it as another filename for different versions, and keep it in a safe place. |
| Load Settings | Press ‘Browse...’ to pick a previously-saved configuration file from your computer, and then click ‘Upload...’ to transfer the configuration file to router. After the configuration is uploaded, the router’s configuration will be replaced by the file you just uploaded. |
| Reset Settings | Click this ‘Reset’ button to remove all settings you made, and restore the configuration of this router back to factory default settings. |
1 x WIR 2.0 Wireless repeater
1 x Snabbstartsguide
Konfigurera Wi-Fi-repeatern med RJ45-kabel.


http://windows.microsoft.com/sv-SE/windows7/Add-a-device-or-computer-to-a-network
http://windows.microsoft.com/sv-SE/windows7/Setting-up-a-Wirelessetwork
http://windows.microsoft.com/sv-SE/windows-vista/Setting-up-a-Wirelessetwork
Konfigurera via webbläsaren
Basic settings

Setup wireless basic configuration
Advanced settings
Wireless advanced configuration
WPS
Wt-1: protected setup
Schedule
Vertriebs schedule
Back
Back to home page
Basic settings
Wireless Enable
SSID
Channel
Security type
WPA2 encryption
Security key
Enabled'Disable
WiFi-Repeater
Auto
WPA2 PSK
□TKIP
●●●●●●●●●●●●●●
Apply
Configure the Wireless Repeater wirelessly.
- Koble Wireless-N miniruteren til et vegguttak.
Koble Wi-Fi-repeatern til ruteren/svitsjen med RJ-45-kabelen
http://windows.microsoft.com/nb-NO/windows7/Add-a-device-or-computer-to-a-network
http://windows.microsoft.com/nb-NO/windows7/Setting-up-a-Wirelessetwork
http://windows.microsoft.com/nb-NO/windows-vista/Setting-up-a-Wirelessetwork
Konfigurerer med nettverkets IP-adresse
Slik konfigurerer du datamaskinen med nettverkets IP-adresse.

Setup wireless basic configuration
Advanced settings
Wireless advanced configuration
WPS
WIF protected setup
Schedule
Wireless schedule
Back
Back to home page
Basic settings
Wireless Enable
SSID
Channel
Security type
Enabled/Disable
Wifi-Repeater
Auto

Disable

Apply
Setup wireless basic configuration
Advanced settings
Wireless advanced configuration
WPS
Var-F: projected setup
Schedule
The quick brown fox jumps over the lazy dog.
Back
Back to home page
Basic settings
Wireless Enable
SSID
Channel
Enabled/Disable
WiFi-Repeater
Auto
Security type
WPA2 encryption
Security key
WPA2 PSK
□TKIP
●●●●●●●●●●●●●
Apply
- Copyright
- Statement
- English
- Svenska
- Open Source Code
- Setting up a Wireless Infrastructure Network
- Wireless Repeater Mode
- Wireless AP Mode
- How to configure the Wi-Fi Repeater
- Configure the Wireless Repeater wirelessly.
- Configure the Wi-Fi Repeater with RJ45 Cable.
- Configure the Wireless AP Mode.
- Adding wireless computers to the Wireless Repeater
- Adding a Wireless computers to the Wireless Repeater with WPS Button
- Adding a wired (Ethernet) computer to the wireless repeater
- Configuring via Web Browser
- Wireless settings
- Basic settings
- Wireless Base Configuration – Repeater Mode
- Change Management password
- Firmware Upgrade
- Factory Default and Settings Backup, Restore
- Konfigurera Wi-Fi-repeatern med RJ45-kabel.
- Konfigurera via webbläsaren
- Koble Wi-Fi-repeatern til ruteren/svitsjen med RJ-45-kabelen
- Konfigurerer med nettverkets IP-adresse
- Advanced settings
- WPS
- Schedule
- Back
Brand : Andersson
Model : WIR 2.0
Category : Wireless repeater