608-205 - Battery charger Hamron - Free user manual and instructions
Find the device manual for free 608-205 Hamron in PDF.


| Product Type | Battery Charger |
| Brand | Hamron |
| Model | 608-205 |
| Dimensions (approx.) | 18 x 12 x 8 cm |
| Weight (approx.) | 1.2 kg |
| Input Voltage | 230 V AC, 50 Hz |
| Output Voltage | 6 V / 12 V selectable |
| Charging Current | 4 A (maximum) |
| Battery Types Supported | Lead-acid (wet, gel, AGM) |
| Main Functions | Automatic charging, overcharge protection, reverse polarity protection, short circuit protection, trickle charge maintenance |
| Display / Indicators | LED indicators for power, charging, full charge, fault |
| Maintenance & Cleaning | Disconnect from mains before cleaning; wipe with dry cloth; ensure vents are unobstructed |
| Safety Features | Reverse polarity protection, spark-proof clamps, thermal overload cut-off, IP20 rating |
| Spare Parts & Repairability | Replaceable fuse; contact manufacturer for cable or casing replacement |
| Operating Temperature | 0°C to 40°C |
| Storage Temperature | -20°C to 60°C |
| Included Accessories | Battery clamps (red/black), AC power cord, user manual |
| Certifications | CE, RoHS |
Frequently Asked Questions - 608-205 Hamron
User questions about 608-205 Hamron
0 question about this device. Answer the ones you know or ask your own.
Ask a new question about this device
Download the instructions for your Battery charger in PDF format for free! Find your manual 608-205 - Hamron and take your electronic device back in hand. On this page are published all the documents necessary for the use of your device. 608-205 by Hamron.
USER MANUAL 608-205 Hamron
EN - Operating instructions (Translation of the original instructions)
Jula reserves the right to make changes. In the event of problems, please contact our service department.
www.jula.com
Tillverkare/ Produsent / Produenci/ Manufacturer
Jula AB, Box 363, 532 24 SKARA
Importör/ Importør/ Importer/ Importer
SAFETY INSTRUCTIONS....24
TECHNICAL DATA 25
DESCRIPTION 26
USE....27
Auxiliary starter battery 27
Battery control 27
Work light 28
Auxiliary starting of engine 28
Power supply via 12 V outlet on the auxiliary starter. 29
MAINTENANCE 29
SÄKERHETSANVISNINGAR
Read the user instructions carefully before use.
Save them for future reference.
WARNING:
- The auxiliary starter is supplied with a partially charged battery. The battery must be charged for 38 hours immediately after purchase. Do NOT use the battery before it has been charged for at least 38 hours. Do NOT use the auxiliary starter during this charging time. Failure to follow these instructions voids the warranty.
- Do not turn the power switch or the starter cables to the ON position if the indicator light is red. Only turn it to the ON position of the light is green.
- Never short-circuit the clamps with any metal object or by allowing them to touch each other. This can cause sparks, explosion and/or material damage.
- Before trying to start the engine, check that the positive and negative clamps are connected correctly to the battery and the vehicle. Wrongly connected clamps can cause sparks, explosion and/or material damage.
• Always wear safety glasses when handling batteries.
- If you get battery acid in your eyes, rinse immediately with cold, running water for at least 10 minutes and call a doctor.
- If you get battery acid on your skin, rinse immediately in plenty of fresh water and wash thoroughly with soap and water. Call a doctor if redness, pain or irritation persist.
- Remove all metal objects from your body (rings, bracelets, necklaces, watches, etc.) when using the auxiliary starter.
- Switch off the auxiliary starter when not in use. Store in a dry and cool place.
- Do not open the auxiliary starter. The auxiliary starter does not contain any parts that can be repaired by the user. The warranty will be invalidated if the appliance is opened up.
- Store out of the reach of children. The charger is not intended to be used by persons (children or adults) with any form of functional disorders, or by persons who do not have sufficient experience or knowledge on how to use it, unless they have received instructions concerning the use of the charger by someone who is responsible for their safety. Keep children under supervision to make sure they do not play with the charger. Do not allow children to use, clean or maintain the charger without supervision.
Risk of explosion
- Do not expose the battery to naked flames or high temperatures: risk of explosion.
- Contains sealed lead-acid battery. Discard the battery immediately if the casing is damaged.
• Take suitable measures to avoid personal injury and/or material damage. - Batteries must be disposed of in accordance with applicable regulations.
TECHNICAL DATA
| Weight 5.9 kg | |
| Dimensions W250 x H280 x D130 mm | |
| Voltage | 12 V |
| Charging power 11 A | |
| Capacity | 17 Ah |
| Start current 400 A | |
| Max. start current 900 A | |
| Storage temperature dry and cool | |
DESCRIPTION

-
Indicator for polarity error
-
Power switch for 12 V outlet
-
12 V outlet
-
Battery control button
-
Indicator light for charging level
-
Charging indicator light
-
Charging connection
-
Power switch for work light
-
Work light
-
Positive clamp (red) and negative clamp (black) for starter cables
-
230 V charger
-
Cable for 12 V charging
-
Power switch for starter cables (on the left side of the auxiliary starter) Always leave in the OFF position except when using auxiliary starting.
USE
AUXILIARY STARTER BATTERY
- The auxiliary starter has a built-in, maintenance-free, sealed, rechargeable lead acid battery. Normal lifetime is up to 500 charging cycles.
- The auxiliary starter is partially charged on delivery, but must be charged for at least 38 hours before first use, even if the indicator light shows a fully charged battery. Otherwise the battery could be permanently damaged.
- Do not charge the auxiliary starter for more than 48 hours. Only use the adapters supplied for charging.
- Ensure that the battery is always charged, so it is ready for use when needed. The battery will not be damaged by being charged often. Charge the battery as soon as possible after use, and it will last longer. The battery lifetime will be shortened if it is discharged a lot and often without being recharged.
- Do not allow the auxiliary starter battery to remain discharged for long periods, as this can destroy the battery. Lead acid batteries discharge by themselves over time, particularly at extreme temperatures.
- Store in a dry and cool place. The battery should be maintenance charged at 2–3 month intervals if it is not used – more often if it is stored in a very hot or very cold place – to keep it in the best condition.
- NOTE: Do not use any of the functions of the auxiliary starter while charging is in progress.
Charge the auxiliary starter battery via a 230 V mains outlet.
- Connect the 230 V charger to a mains outlet and to the charging connection on the auxiliary starter. The charging indicator light will come on.
- It takes 34–36 hours to charge the battery fully, depending on the charge level.
Charge the auxiliary starter battery via a 12 V outlet.
- Connect the cable for 12 V charging to the vehicle's 12 V outlet and to the 12 V charging connection on the auxiliary starter unit.
- It takes 14–16 hours to charge the battery fully, depending on the charge level.
- NOTE: On some vehicles, the ignition must be switched on for the 12 V outlet to be live.
BATTERY CONTROL
- Press the battery control button to see the charge level in the built-in battery in the auxiliary starter.
- The indicator lights come on to show the battery charge level. The indicator lights go off when you release the button.
- Disconnect the charging adapter from the battery to get a correct indication.
Indicator lights
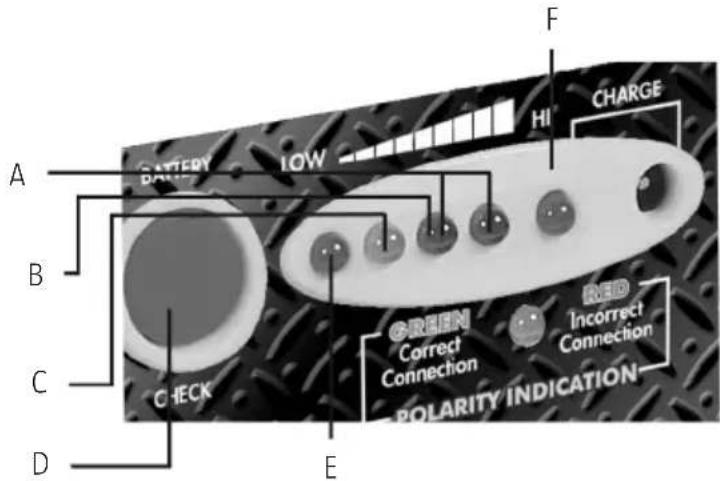
A. Two green indicator lights: No charging required. The battery is fully charged. Ideal level for auxiliary starter.
B. Green indicator light: Good charging level. The auxiliary starter can power most appliances intended for 12 VDC. It may need to be fully charged to be used as an auxiliary starter.
C. Orange indicator light: Low charge level – recharge as soon as possible.
D. Battery control button
E. Red light: Recharge as soon as possible – very low charge level.
F. The red light comes on while the battery is being charged and stays on when it is fully charged. The light goes off when the charging adapter is disconnected.
WORK LIGHT
- The work light is powered by the built-in battery in the auxiliary starter.
- Switch the working light on and off with the power switch.
- Switch the work light off when not in use to save the battery.
AUXILIARY STARTING OF ENGINE
NOTE: Place the auxiliary starter so that it cannot fall over when the vehicle starts. Place the cables so they cannot be damaged by the cooling fan or drive belts.
Before auxiliary starting of engine
- The auxiliary starter must be fully charged when it used to start the engine. Check that the power switch for the starter cables is in the OFF position.
- Do not attempt to use the auxiliary starter to start the engine if the battery indicator light is not green when you check it – this could permanently damage the battery.
- Switch off the ignition and all systems (lights, radio, air-conditioning etc.) in the vehicle. Put it out of gear and pull the handbrake on. Automatic gearboxes should be in position P (parking).
- Disconnect any equipment connected to the 12 V outlet. Turn all switches on the auxiliary starter to the OFF position.
Use auxiliary starting
- Check that the negative terminal on the battery is connected to the vehicle chassis (usually).
- Connect the red positive clamp (+) on the auxiliary starter firmly to the positive terminal (+) on the vehicle battery.
- Connect the black negative clamp (-) firmly to some metal part of the vehicle as far away from the battery as possible. Do not connect it to the negative terminal on the battery. Check that both terminals make good contact. Check polarity markings on the cable.
- If the indicator light is green, turn the power switch for the starter cables to the ON position.
- If the indicator light is red, you should swap the connection clamps over before continuing.
-
Run the starter motor repeatedly for 5–6 seconds until the engine starts.
-
If the engine does not start after 2–3 attempts, let the auxiliary starter cool for 3 minutes and try again.
-
Stop trying to start the engine immediately if the battery indicator light does not show that the battery is sufficiently charged.
-
Once the engine has started, turn the switch for the starter cables to the OFF position then disconnect first the black negative clamp (-) and then the red positive clamp (+).
-
Replace the clamps on the auxiliary starter and charge the battery as soon as possible.
POWER SUPPLY VIA 12 V OUTLET ON THE AUXILIARY STARTER.
The auxiliary starter can be used to power 12 V products with a 12 V plug to fit the cigarette lighter socket.
- Lift the cover.
- Connect the plug from your 12 V product to the outlet.
- Start the product in the normal way.
- Press the test button from time to time to check the charge level in the battery.
MAINTENANCE
REPLACING THE BATTERY
WARNING: Do not burn batteries – risk of explosion.
- If the battery still has replaced in spite of everything, open the cover by removing the screws.
- Lift off the back cover to get at the battery.
- Insert a new battery and replace the cover.

Värna om miljön!
Care for the environment!
Must not be discarded with household waste! This product contains electrical or electronic components that should be recycled. Leave the product for recycling at the designated station e.g. the local authority's recycling station.
- SAFETY INSTRUCTIONS....24
- TECHNICAL DATA 25
- DESCRIPTION 26
- USE....27
- Auxiliary starter battery 27
- Battery control 27
- Work light 28
- Auxiliary starting of engine 28
- Power supply via 12 V outlet on the auxiliary starter. 29
- MAINTENANCE 29
- SÄKERHETSANVISNINGAR
- Read the user instructions carefully before use.
- WARNING:
- Risk of explosion
- DESCRIPTION
- USE
- AUXILIARY STARTER BATTERY
- Charge the auxiliary starter battery via a 230 V mains outlet.
- Charge the auxiliary starter battery via a 12 V outlet.
- BATTERY CONTROL
- Indicator lights
- WORK LIGHT
- AUXILIARY STARTING OF ENGINE
- Before auxiliary starting of engine
- Use auxiliary starting
- POWER SUPPLY VIA 12 V OUTLET ON THE AUXILIARY STARTER.
- MAINTENANCE
- REPLACING THE BATTERY
- Värna om miljön!
- Care for the environment!
Brand : Hamron
Model : 608-205
Category : Battery charger