
ZWM 416 WH - Dishwasher Hansa - Free user manual and instructions
Find the device manual for free ZWM 416 WH Hansa in PDF.


| Product Type | Freestanding Dishwasher |
| Brand | Hansa |
| Model | ZWM 416 WH |
| Color | White |
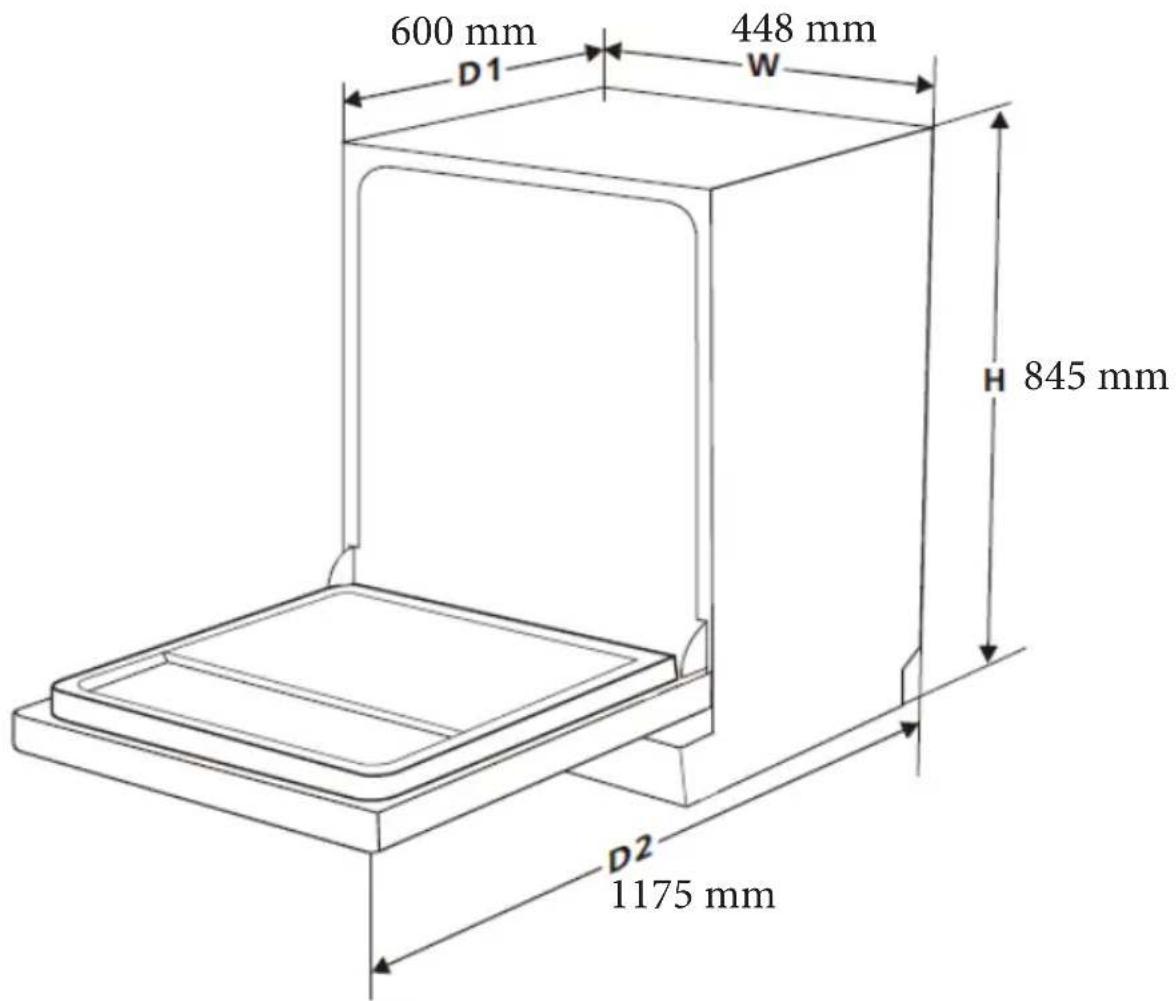
| Height | 85 cm |
| Width | 60 cm |
| Depth | 60 cm |
| Weight | 45 kg |
| Power Supply | 230 V, 50 Hz |
| Energy Efficiency Class | E (EU scale A to G) |
| Annual Energy Consumption | 290 kWh |
| Water Consumption per Cycle | 12 L |
| Capacity | 13 Place Settings |
| Noise Level | 49 dB(A) |
| Number of Programs | 6 |
| Programs | Eco, Intensive 70°C, Normal 60°C, Quick 45°C, Rinse, Soak |
| Delay Start | 3-9 Hours |
| Safety Features | Child Lock, Anti-Flood System |
| Water Connection | Cold Water Only |
| Salt and Rinse Aid Dispenser | Yes |
| Removable Cutlery Basket | Yes |
| Filter System | Self-Cleaning Filter |
| Interior Light | No |
| Spare Parts Availability | Available from Hansa Service |
Frequently Asked Questions - ZWM 416 WH Hansa
User questions about ZWM 416 WH Hansa
0 question about this device. Answer the ones you know or ask your own.
Ask a new question about this device
Download the instructions for your Dishwasher in PDF format for free! Find your manual ZWM 416 WH - Hansa and take your electronic device back in hand. On this page are published all the documents necessary for the use of your device. ZWM 416 WH by Hansa.
USER MANUAL ZWM 416 WH Hansa
natural_image
Simple line icon of a shopping bag with rings, no text or symbols presentDISPOSAL OF OLD APPLIANCE
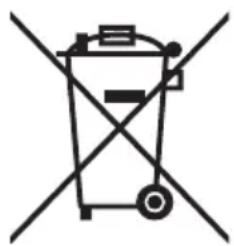
natural_image
Symbol of a trash bin crossed with a diagonal line, representing waste or discharge (no text or labels)
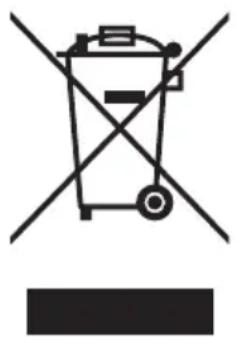
In accordance with European Directive 2012/19/EU and local legislation regarding used electrical and electronic goods, this appliance is marked with the symbol of the crossed-out waste container. This marking indicates that the appliance must not be disposed of together with other household waste after it has been used.
The user is obliged to hand it over to waste collection centre collecting used electrical and electronic goods. The collectors, including local collection points, shops and local authority departments provide recycling schemes.
Proper handling of used electrical and electronic goods helps avoid environmental and health hazards resulting from the presence of dangerous components and the inappropriate storage and processing of such goods.
CONTENTS
WE ARE ENVIRONMENTALLY FRIENDLY 3
BASIC INFORMATION 5
SAFETY INSTRUCTIONS 6
INSTALL THE APPLIANCE 13
DESCRIPTION OF THE APPLIANCE 16
CLEANING AND MAINTENANCE 33
WE ARE ENVIRONMENTALLY FRIENDLY
For many years, Hansa has consistently pursued pro-ecological policy.
Concern for the environment is as important for us as the use of modern technology.
The development of technology has enabled our factories to become more environmentally friendly – we use less and less water, electricity and less waste water and solid waste is generated in the production.
A lot of attention is paid to materials used in production. We strive to use only those that do not contain harmful substances and make recycling and safe disposal possible after use.
Dear customer!
Thank you for choosing an Hansa product. For years we have delivered high-quality appliances, so that household chores become a real pleasure. Before being packaged and leaving the manufacturer, this appliance was thoroughly checked with regard to safety and functionality. We also endeavour to make sure that modern technology in Hansa products always goes hand in hand with a unique design.
Before using the appliance, please carefully read these Operating Instructions Follow these instruction to avoid improper use and ensure long and reliable operation of the appliance. Learn the principles of the safe use to avoid accidents.
Store these operating instructions in a safe place to use them for reference whenever needed. These Operating Instructions contain all the necessary information that will make the use of your Hansa appliance simple and fun. We also encourage you to find out more about other Hansa appliances.
We hope using your new appliance is a pleasure.

Hansa
Haushaltsgeräte
BASIC INFORMATION
Carefully read the operating instructions before plugging dishwasher to a power outlet and using the appliance. Operating instruction include tips that will help you avoid the risk of injury and damage to the appliance. Keep dishwasher documentation in a safe place for possible future use.
These operating instructions have been prepared for a range of appliances and some features described herein may not apply to your appliance.
MANUFACTURER'S DECLARATION
The manufacturer hereby declares that this product meets the requirements of the following European directives:
■ Low Voltage Directive 2014/35/EU,
■ Electromagnetic Compatibility (EMC) Directive 2014/30/EE,
■ Eco-design Directive2009/125/EU,
■ RoHS Directive2011/65/EU,
and has been marked with the C symbol and issued with a declaration of compliance made available to market regulators.
©
| Before first use This appliance | ance can be used by children aged 8 years and older or persons with physical, mental or sensory handicaps, or those who are inexperienced or unfamiliar with the appliance, provided they are supervised or have been instructed how to safely use the appliance and are familiar with the associated risks. Ensure that children do not play with the appliance. Children should not be allowed to clean or maintain the appliance. |
| Children less than 3 years of age shall be kept away unless continuously supervised. | |
| Child safety Do not allow child | children to play with the appliance. |
| Dishwashing detergents can be caustic and irritate the eyes, mouth and throat. Read the safety notes from detergent manufacturer. | |
| Never leave children unsupervised when the appliance is open. It can contain residue detergent. | |
| Child safety Dishwasher wa | ter is not suitable for drinking. Danger of injury from the caustic chemicals. |
| When you open the door during a programme, be careful as water temperature is high. | |
| To avoid injury always place long and sharp/pointed items (e.g. forks, knives) in the cutlery basket, pointing down, or flat on the top basket. | |
| Daily maintenance Use the | appliance for household dishwashing only. |
| Do not use solvents in the appli-ance as there is a risk of expo-sion. | |
| Do not sit or stand on the open door and do not place any objects on it. The device may overturn. | |
| Do not open the door when the appliance is operating. Hot water or steam can be released. | |
| Do not leave the door open, be-cause they it can pose a hazard. | |
| Washing tableware in a house-hold dishwasher usually uses less energy and water than washing up by hand. | |
| In case of problems Refer | repair and modifications of the appliance to qualified technicians only. |
| In the event of problems or repairs, unplug the appliance from the wall outlet: | |
| Unplug the appliance by pulling the plug, | |
| Turn off the circuit breaker. | |
| Do not pull the power cord, pull the plug only. Close the water supply. | |
| Recommendations Loading | ing the dishwasher to the capacity indicated by the manufacturer will save energy and water. |
| To save energy and water, rinse food residue of the dishes before loading the dishes into the dishwasher. Run the dishwasher with full load. | |
| Do not put dishes with food leftovers in the appliance. | |
| Use pre-wash programme only when needed. | |
| Load bowls, cups and mugs bottom facing up. | |
| Do not load in the appliance any dishes that are not dishwasher safe and do not load too many dishes. | |
| It is not recommended to pre-rinse the tableware, as this leads to an increase in water and energy consumption. | |
| Dishes and utensils that are not suitable for dish-washers. | Ashtrays, candles, cleaning pastes, paints, chemicals, ferro-alloys; |
| Forks, spoons and knives with a handle made of wood, ivory or Nacre, glued items, items contaminated with abrasive powders, acid or base | |
| Plastic dishes that are not resistant to high temperature, containers made of copper or tin; | |
| Aluminium and silver items (may be stained or loose lustre) | |
| Some delicate types of glass, porcelain with decorative prints, as prints may fade even after the first wash; some crystal dishes as they may lose their transparency, glued silverware sensitive to high temperatures, lead crystal glass, chopping boards, items made with synthetic fibres; | |
| Absorbent objects such as a sponge or kitchen cloths are not suitable for the dishwasher. | |
| Before buying dishes in the future make sure they are dishwasher safe. | |
| RECYCLING Packaging and | some parts of the appliance are made of materials suitable for recycling. They are marked with the recycling symbol and information about the type of material. |
| Before using the appliance remove all packaging and dispose of it in accordance with the regulations. | |
| Warning!The packaging can be dangerous for children.Recyclable materials can be taken to local waste collection.Additional information can be obtained from local authorities and at waste disposal points. |
UNPACKING

natural_image
Recycling symbol composed of three chasing arrows forming a triangle (no text or labels)During transportation, protective packaging was used to protect the appliance against any damage. After unpacking, please dispose of all elements of packaging in a way that will not cause damage to the environment.
All materials used for packaging the appliance are environmentally friendly; they are 100% recyclable and are marked with the appropriate symbol.
Important! Packaging materials (bags, polyethylene, polystyrene, etc.) should be kept away from children during unpacking.
| SCRAPPING OF AN OLD APPLIANCE | The materials used in making of this appliance can be reused, as indicated. By reusing or recycling the materials or parts, you will be playing an important part in protecting our environment. |
| Information about the relevant disposal points for worn-out electrical goods is available from your local authorities. | |
| Thank you for your contribution to environmental protection. | |
| To avoid risks, prevent the appliance pending transport from being used. | |
| Disconnect the plug and cut the power cord. Also damage the door lock. |
INSTALL THE APPLIANCE
PLACE YOUR APPLIANCE
When choosing the place of installation, make sure you will be able to easily load and remove dishes and utensils from the dishwasher.
Do not place the appliance in a room where the temperature can fall below 0^ C.
Before installing unpack the appliance following the instructions on the packaging.
When you move the appliance do not handle it by the door or control panel.
Leave some room on all sides to have convenient access to the dishwasher when cleaning.
■ Make sure that when you set the dishwasher you do not crush the water supply and drain hose. Also, make sure that the appliance is not places on the power cord.
Level the appliance using the adjustable legs. Proper level ensures trouble-free opening and closing the dishwasher doors.
If the dishwasher door will not close properly, check that the appliance stands firmly on the floor, if not, adjust using the adjustable legs.
WATER SUPPLY CONNECTION
Make sure that domestic water supply system is suitable for the dishwasher. It is recommended to install a filter in the water supply line to avoid damage to the appliance due to impurities (such as sand, clay, rust, etc.) that occasionally occur in water. This will also prevent accumulation of sediment after dishwashing.
WATER SUPPLY HOSE
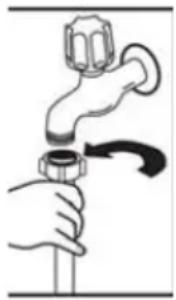
natural_image
Illustration of a hand holding a faucet with a valve, no text or symbols presentDo not use the water supply hose from the old dishwasher. Use the new water supply hose provided with the appliance. Before connecting, rinse the hose with water. Connect the water supply hose directly to the water feed valve. The domestic water system pressure should be at least 0.03 MPa and up to 1 MPa. If the water pressure exceeds 1 MPa, install pressure reducing valve.
When the connection is ready, open the valve completely and check for leaks. For safety reasons, close the water supply tap after every wash.

NOTE: Aquastop water supply is used in some dishwasher models. Dangerous voltage could occur with Aquastop. Do not cut the Aquastop water supply. Do not allow it to bend or twist
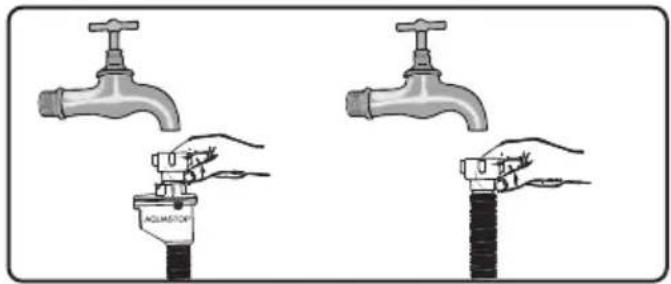

Note: For safety reasons, close the water tap after every wash
THE DRAIN HOSE
The drain hose can be connected directly to a water drain or kitchen sink stub pipe. You can also drain the water directly into the sink using the special bracket (if available), placing the drain hose outlet on the kitchen sink edge. The drain hose connection should be made at least 50 cm and up to 110 cm from the floor.
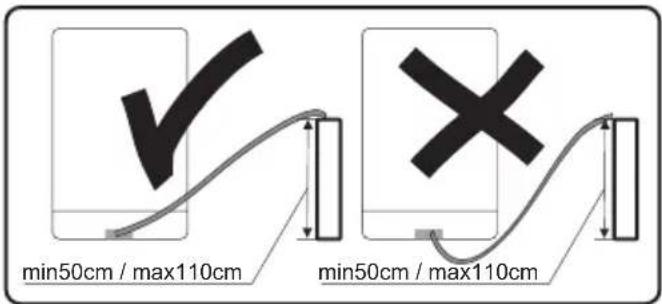

If the drain hose is longer than 4 m, dishes may not be washed properly. The manufacturer will not be held responsible.
ELECTRICAL CONNECTION
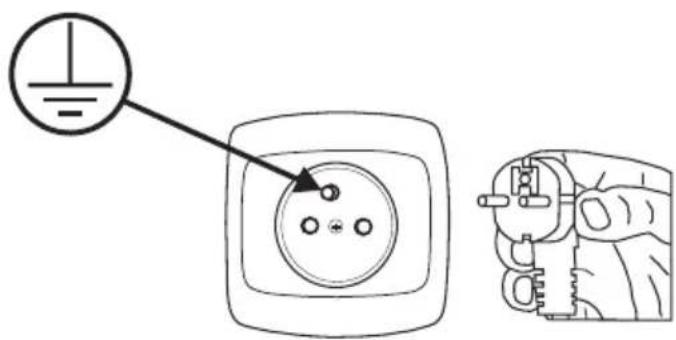
Grounded plug must be connected to a grounded power outlet with a proper voltage. If there is no grounding, refer this to a qualified electrician. If you operate the appliance without proper grounding, the manufacturer does not assume any liability for the possible resulting damage.

Domestic electrical system must be protected with a 10-16A fuse.
The appliance must be supplied with 220-240 V AC. If the supply voltage is 110 V, use 3000W, 110/220 V set-up transformer to connect the appliance. Do not connect the appliance during installation.

Always use the plug provided with the appliance. When you operate the appliance at lower voltage the dishwashing efficiency will deteriorate and may damage the appliance.
The power cord may only be replaced by authorized service or a qualified electrician. Failure to comply with these rules may lead to an accident.
For safety reasons, you should always unplug the appliance after you have finished using it.
In order not to avoid electric shock, do not remove the plug from the wall outlet with wet hands.
When you unplug the appliance from the wall outlet, always pull the plug. Never pull the power cord.
FEATURES AND COMPONENTS
DESCRIPTION OF THE APPLIANCE
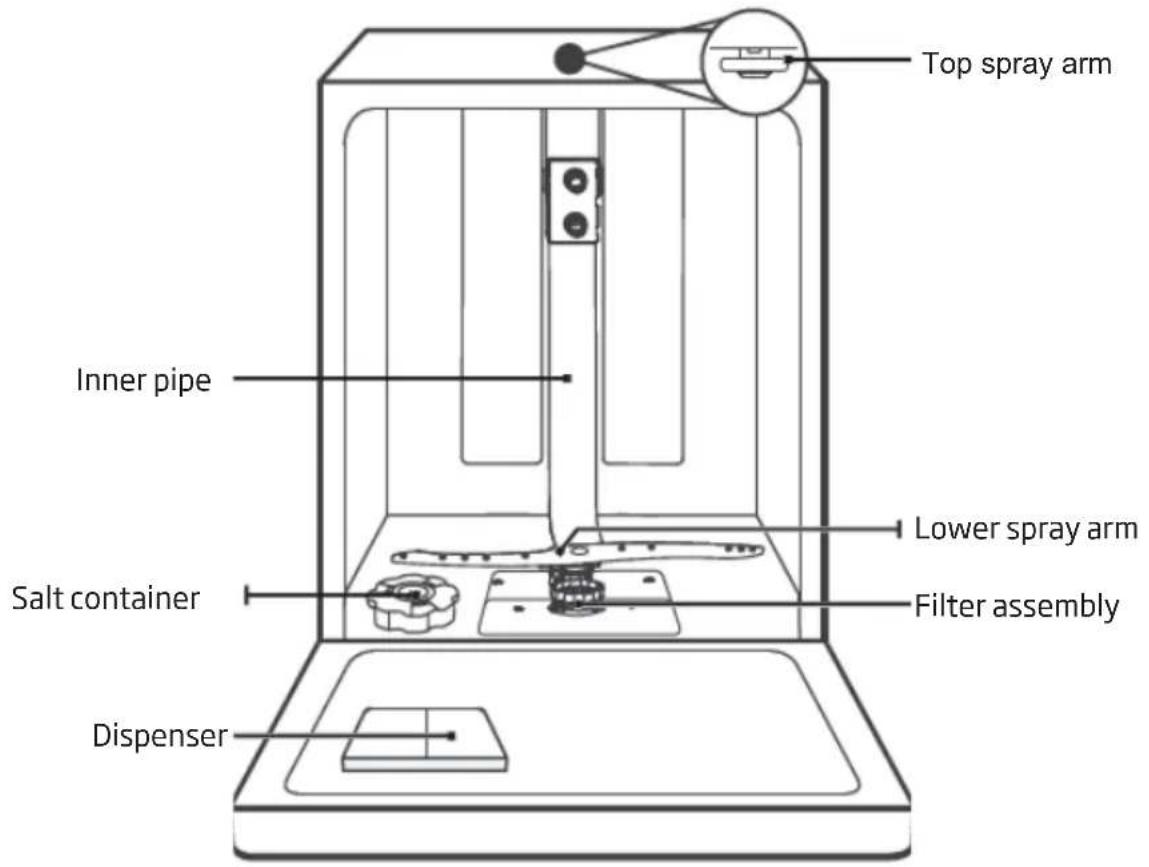
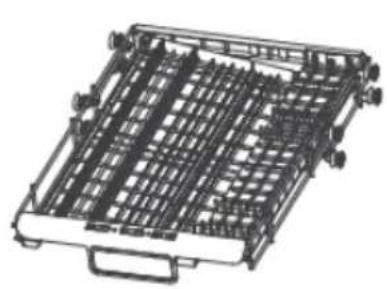
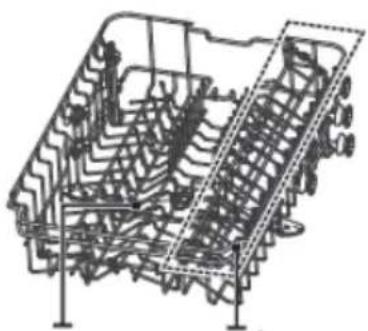
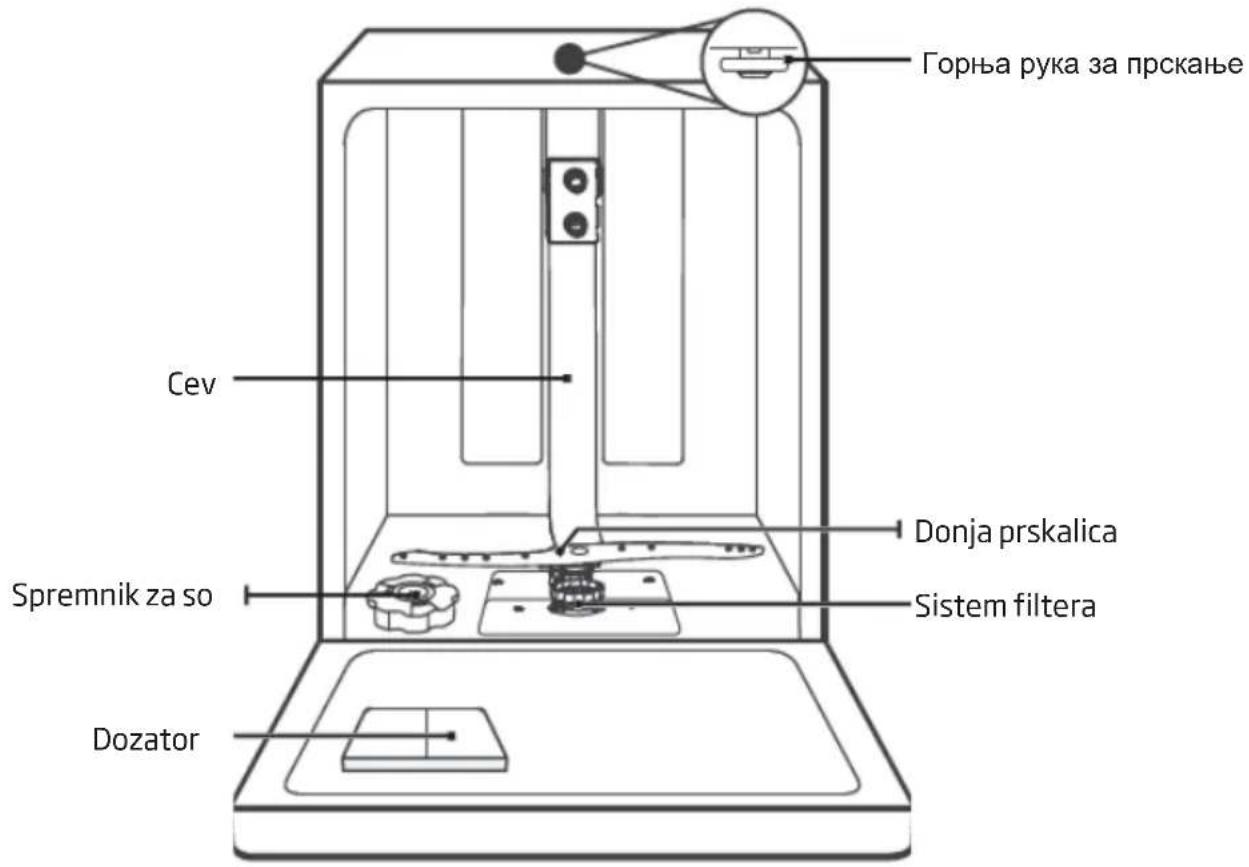
The features and components of the appliance (fig. 1):
natural_image
Technical line drawing of a mechanical assembly with grid-like components (no text or symbols)Cutlery basket
Upper spray arm
natural_image
Technical line drawing of a mechanical assembly with no visible text or symbolsCup rack
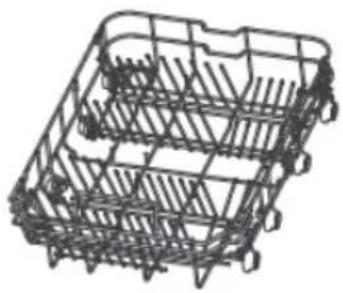
natural_image
Line drawing of a multi-tiered shopping basket structure (no text or symbols)Lower basket
Upper basket
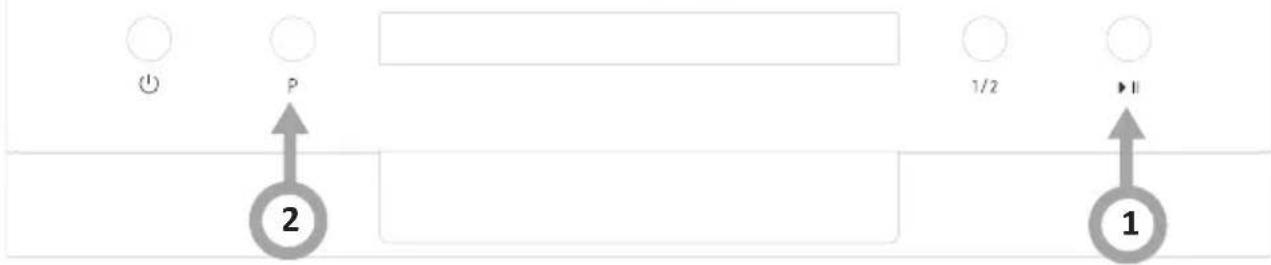
DISPLAY AND CONTROL PANEL

::Hansa

(1)

P


1/2

▶
- Draw out the lower and upper basket, load the dishes and push them back. It is commended to load the lower basket first, then the upper one (see the section entitled Loading the Dishwasher).
- Pour in the detergent (see the section entitled Salt, Detergent and Rinse Aid).
- Insert the plug into the socket. The power supply is 220-240 VAC /50 Hz, the specification of the socket is 10A 250VAC. Make sure that the water supply is turned on to full pressure.
- Close the door, press the On/Off button, and the On/Off light will turn on.
- Turn the programbutton, the wash programwill be changed as follows direction:
Universal->Intensive->Glass->ECO->90 min->Soak;
If a program is selected, the response light will light. Then press the Start/Pause button, the dishwasher begins to start.
Adding dishes during the program:
- You can add extra dishes at any time before detergent is released.
- Press the Start/Pause button to pause the dishwashing programme.
- Open the door gently.
- You can open the door completely when spray arms come to a stop.
- Add the dishes.
- Close the door.
- Press Start/Pause, and the dishwasher will resume programme after 10 seconds.
PREPARE THE APPLIANCE FOR OPERATION
1
Before first use
Before using the appliance, verify that the data given on the rating plate matches that of local power outlets.
■ Remove all packing materials from inside of the appliance.
Prepare special salt (water softener).
Pour water into the special salt dispenser and then add about 1.5 kg of special salt (dishwasher salt).
Pour rinse aid into the dispenser.
2
The importance of water descaling
A dishwasher requires soft water (with low calcium content) to operate efficiently. Otherwise, white residue main remain on the dishes and inside the appliance. This has a negative impact on the quality of dishwashing, rinsing and drying. When the water flows through the softener, ions responsible for the water hardness are removed, and the water becomes soft, for best dishwashing results. Depending on the degree of water hardness, the ions responsible for water hardness accumulate quickly inside the water softener. Therefore, the water softener must be regenerated to operate with the same efficiency during the next wash. This is why special salt is used in the dishwasher.
3
Add special salt
Only use special salt intended for dishwashers.
Any other type of salt that is not intended for use in a dishwasher, especially regular kitchen salt, will damage the water softener. In the event of damage caused by the use of the wrong salt, the manufacturer's warranty is void and we will not be liable for damage. Fill with special salt before running the washing programme.
This will prevent spilled special salt or salty water from remaining on the bottom of the device, which may cause corrosion.
flowchart
graph LR
    A["Hand holding a cup with a lid"] --> B["Add salt to a container"]
    B --> C["Salt being added to the cup"]
    C --> D["Heating liquid from a container"]
    D --> E["Heating back to a cup"]
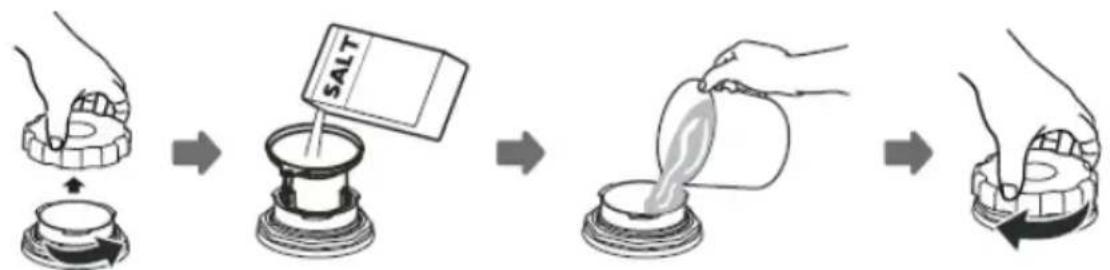
- Remove the lower basket from the appliance and unscrew the special salt dispenser cap.
- Place the end of the funnel (included) in the hole and pour about 1.5 kg of salt.
- Pour water into the dispenser until full. It is normal that a small amount of water spills out of the special salt dispenser.
- After you fill the dispenser, screw the cap on.
- When you fill the dispenser with special salt, the add salt indicator goes out.
- Start the washing programme immediately after filling the dispenser with special salt (the quick wash is recommended). Otherwise, salty water can damage the filters, the pump or other important appliance components This is not covered by the warranty.
NOTE:
Fill the special salt dispenser when the special salt indicator on the control panel lights up. Depending on the rate of salt dissolution, the special salt indicator may still be on even after filling the dispenser.
If there is no special salt indicator on the control panel (on some models), you can estimate when to top up the dispenser based on the number of wash cycles performed.
If some special salt spills, run the soaking programme or a quick wash programme.


4
The test strip
The dishwashing effectiveness is linked to water hardness. Therefore, the appliance is equipped with a system to reduce the hardness of the water supply. The dishwashing effectiveness is improved when the system is set correctly. To check water hardness contact the municipal water company or determined the water hardness using test strip (if available).
 | 1 min. | 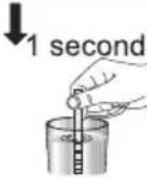 | 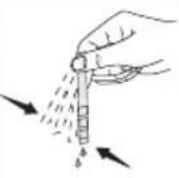 | 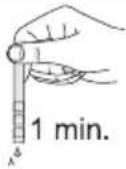 | 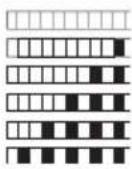 | Level 1 – no calciumLevel 2 – very small calcium contentLevel 3 – small calcium contentLevel 4 – medium calcium contentLevel 5 – high calcium contentLevel 6 - very high calcium content |
5
Fill the detergent dispenser
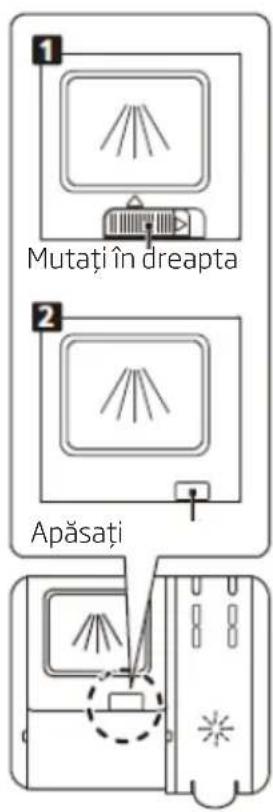
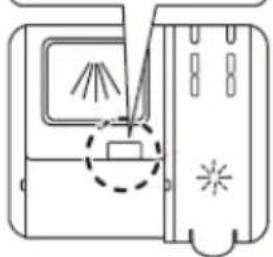
Open the detergent dispenser flap by pressing the detergent dispenser tab to release the lock as shown in the figure. The detergent dispenser features volume marking. Using these markings (lines) you can measure the correct amount of detergent. The dispenser can accommodate a maximum of 30g of detergent.
Open the pack with dishwasher detergent and in the case of heavily soiled dishes pour 25 cm ^3 detergent into the main wash compartment (A) or 15 cm ^3 for less soiled dishes (B). If the dishes remained unwashed for an extended period of time or if food has dried, pour 5 cm ^3 detergent into the pre-wash compartment and start the dishwasher. Depending on the amount of soil and the water hardness you may need to add more detergent.
natural_image
Diagram of a device with a lid and ventilation slots, showing airflow direction (no text or symbols)Please note that the setting may be different depending on the water contamination. Follow the manufacturer's instructions on the detergent packaging.
6
Multi-component (multitab) detergents (eg. 2-in-1, 3-in-1, etc.)
There are three types of detergents:
- Containing phosphates and chlorine,
- Containing phosphates and no chlorine,
- Containing no phosphates and no chlorine.
The latest tablets are generally phosphate-free. Since phosphates have water softening properties, we recommend adding salt to the container even if the water hardness is only 6°dH. If you use phosphate-free detergent where water is hard, white residue may be visible on the dishes.
You can prevent this by increasing the amount of detergent. Chlorine-free detergents have less bleaching effect. Stains may not be entirely removed. Select the programme with a higher wash temperature.
Generally, using multi-component detergents suitable results are obtained only under certain conditions. Such detergents contain rinse aid and/or special salt in a specific amount. It is recommended to use special salt when using multi-component tablets.
7
What you should pay attention to when using these tablets.
■ Always check the type of detergent used and whether it is a multi-component product.
■ Make sure that the detergent used is appropriate for tap water hardness.
■ Follow the instructions on the product packaging.
If the detergent is in the form of tablets, never place it the cutlery basket. Always place the tablet in the detergent dispenser compartment.
The use of these detergents yields good results only in certain applications. Using this type of detergent you should contact the manufacturer for information about proper use.
If you use the detergent properly and dishwasher settings are correct you can save on salt and/or rinse aid.
If dishwashing results while using 2-in-1 or 3-in-1 detergents are not satisfactory (traces of lime scale on the dishes), please contact the detergent manufacturer. The warranty does not cover complaints due to the use of multi-component detergents.

Recommended use: For best results using multi-component cleaning agents, add special salt and rinse aid in the dishwasher and set the water hardness and amount of rinse aid to the lowest setting.
The solubility of the detergent tablets made by different manufacturers can vary with regard to temperature and time. It is therefore not recommended to use detergent tablets in quick programmes. It is recommended to use powder detergents in quick programmes.

Always store detergents in a dry, cool place, out of reach of children. Add detergent to the dispenser immediately before using the appliance.
Warning: If encounter another problem when using a multi-component detergent, please contact the detergent manufacturer.
Stop using multi-component detergents
■ Add special salt and rinse aid to dispensers.
■ Set the water hardness to the highest level (6) and run an empty dishwasher.
■ Adjust the water hardness.
■ Adjust rinse aid setting.
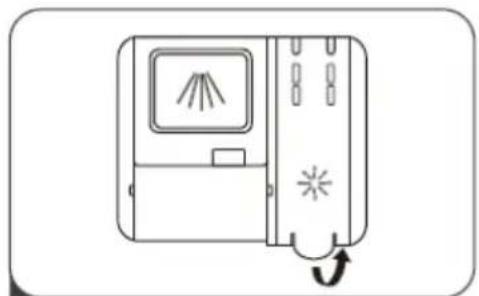
Add rinse aid to the dispenser and adjust setting
Use rinse aid to prevent the formation of white water drops, lime scale spots, white streaks that may occur on the dishes, as well as to improve the drying process. Contrary to popular belief, it not only serves to obtain a shiny dishes, but also to facilitate drying. For this reason, make sure there is always sufficient amount of rinse aid in the dispenser.
natural_image
Line drawing of a device with a screen and directional arrow, no text or symbols presentnatural_image
Line drawing of a hand inserting a device into a device with a screen and antenna (no text or symbols)natural_image
Line drawing of a hand pressing down on a device with a screen and scroll (no text or symbols)Adjusting the rinse aid reservoir
To achieve a better drying performance with limited rinse aid, the dishwasher is designed to adjust the consumption by user. Follow the below steps.
- Close the door and switch on the appliance.
- Within 60 seconds after step 1, press the Program button more than 5 seconds, and then press the Delay button to enter the set model, the rinse aid indication blinks as 1Hz frequency.
- Press the Program button to select the proper set according to your using habits, the sets will change in the following sequence: D1->D2->D3->D4->D5->D1.
The higher the number, the more rinse aid the dishwasher uses. - Without operation in 5 seconds or press the Power button to complete the setup and exit the setup mode.
Water hardness table
| Water hard-ness | German degrees [dH] | French degrees [dF] | British degrees [dE] | Water hardness level indicator | Special salt consumption [g/cycle] |
| 10~5 | 0~9 0~6 | H1 soak | 0 | ||
| 26-11 | 10-20 7-14 | H2 90' | 9 | ||
| 312-17 | 21-30 15-21 | H3 90'; soak | 12 | ||
| 418-22 | 31-40 22-28 | H4 Eco | 20 | ||
| 523-34 | 41-60 29-42 | H5 Eco; soak | 30 | ||
| 635-55 | 61-98 | 43-69 | H6 Eco; 90' | 60 |
If the water hardness is higher than the maximum values given in the table above, or if you use water from a deep well, it is recommended to use filters and water treatment equipment.
NOTE: The factory settings are for the water hardness level 3.
Open the door. Switch on the appliance;
Within 60 seconds from switching on the dishwasher, press and hold the Programme button for more than 5 seconds.
Press the Programme button repeatedly to select the proper setting suitable for to your local requirements. The following settings are available: H1->H2->H3->H4->H5->H6;
Press the on/off button to save the setting.
The use of detergents
Use a detergent for domestic dishwashers. On the market you can find detergent intended for dishwashers in the form of powder, gel and tablets. The detergent must be placed in the dispenser before starting the dishwasher. Store detergent in a cool and dry place, out of reach of children. Do not overfill the detergent dispenser, otherwise the detergent may not dissolve completely and leave streaks on the dishes. If you need more information on the detergent used, please contact the manufacturer directly.
LOAD DISHES INTO DISHWASHER
1
Upper basket
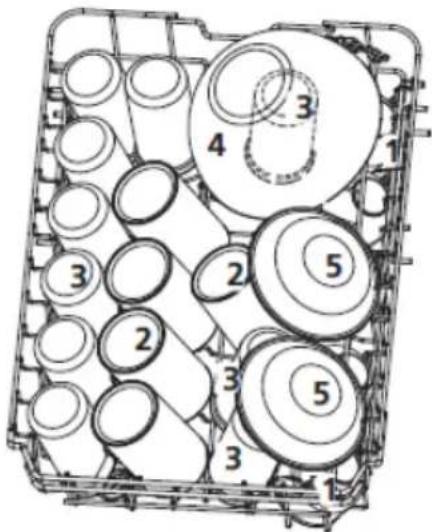
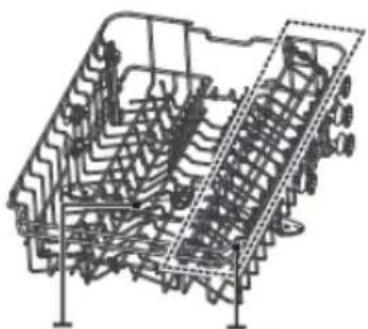
The upper basket is designed for washing delicate dishes such as glasses, cups, plates, etc. Dishes that are placed in the upper basket should be less soiled than dishes in the lower basket. You can place long forks, knives and spoons horizontally on shelves so as not to obstruct the spray arms..
EN 60436
2
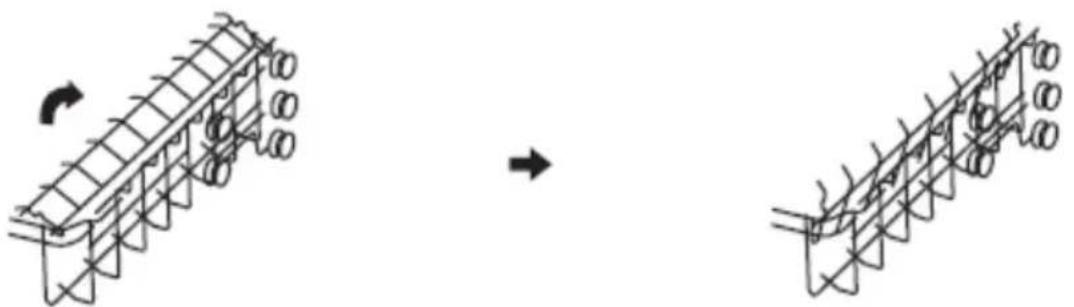
Fold the mugs and cups shelves
Fold the shelves to increase the capacity of the upper basket. You can place the glasses and mugs on the shelves. Raise the cup shelf to make more space in the basket for taller items. You can then lean the taller glasses against the shelf. It can also be removed if it is not needed.
natural_image
Diagram showing two stages of a mechanical assembly with rotating components, no text or symbols present3
Fold the dishwasher basket spikes
The spikes are used to hold the plates. They can be folded, making more room for large dishes.
4
Tips for using the dishwasher basket:
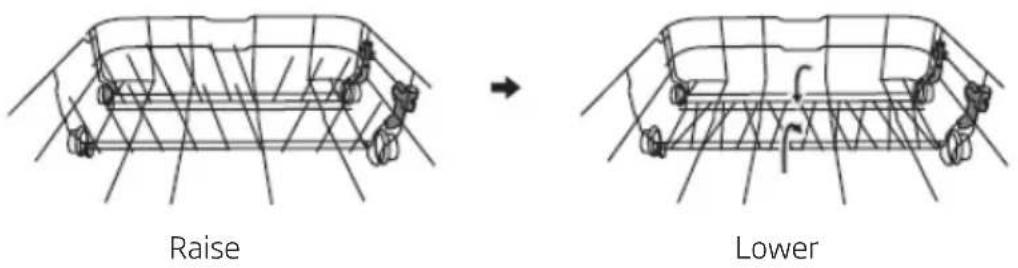
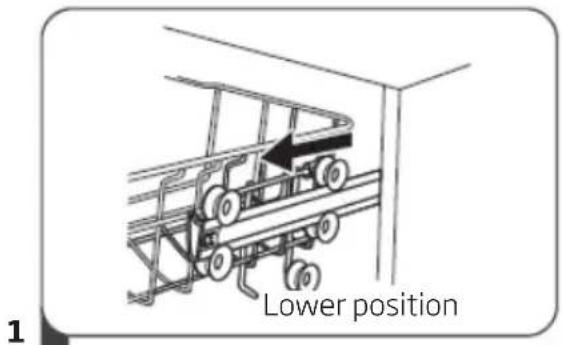
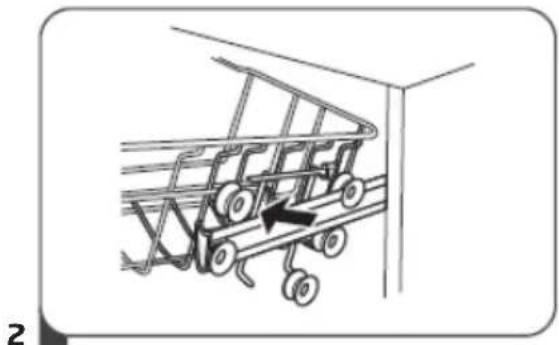
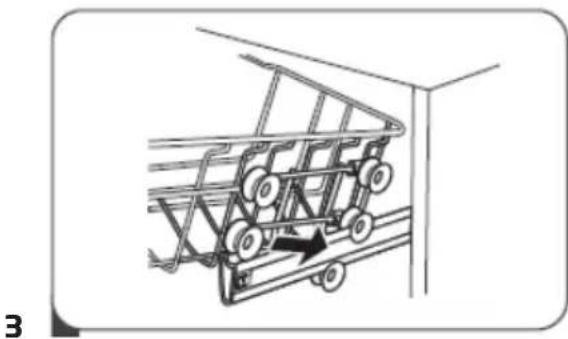
Adjust the upper basket
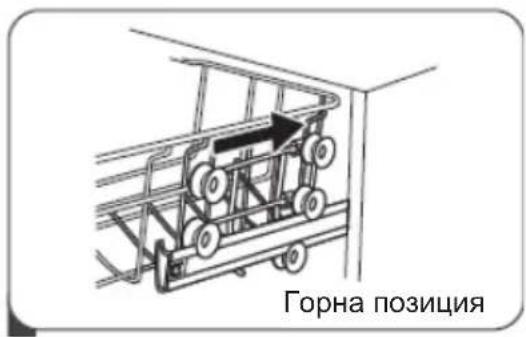
Type 1:
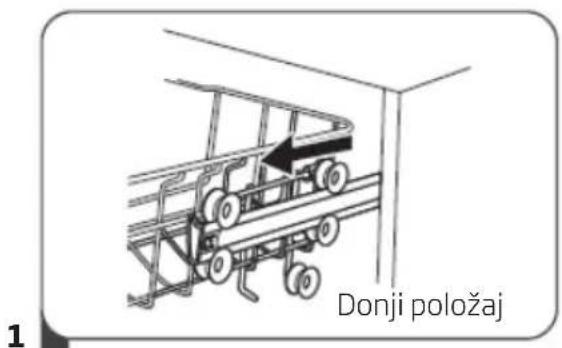
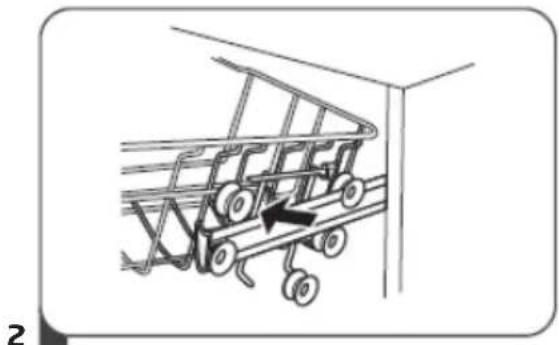
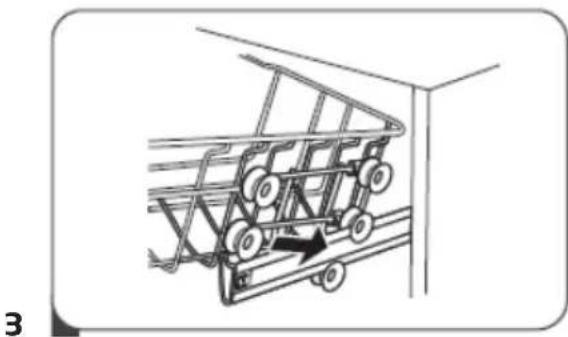
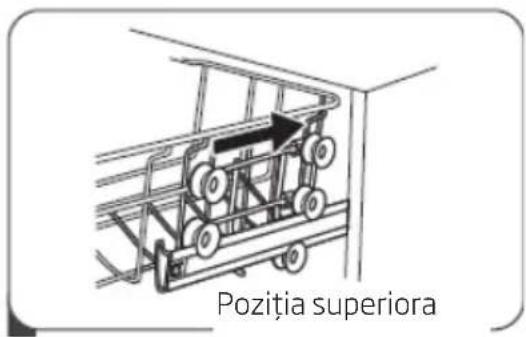
The height of the upper basket can be easily adjusted to accommodate tall pots and pans in the upper or lower basket.
To adjust the height of the upper basket:
natural_image
Diagram of a shopping cart with wheels and an arrow indicating direction (no text or symbols)- Extend the upper basket.
- Remove the upper basket.
natural_image
Diagram of a shopping cart with wheels and an arrow indicating direction (no text or symbols)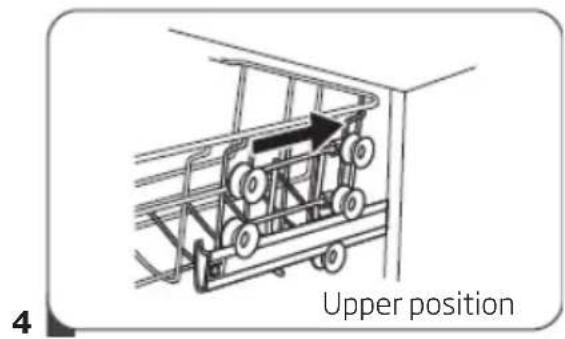
- Mount the basket on the upper or lower rollers.
- Insert the upper basket.
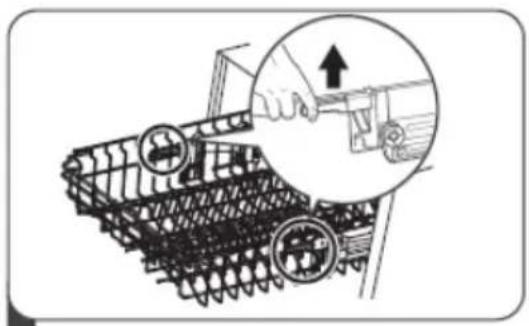
Type 2:
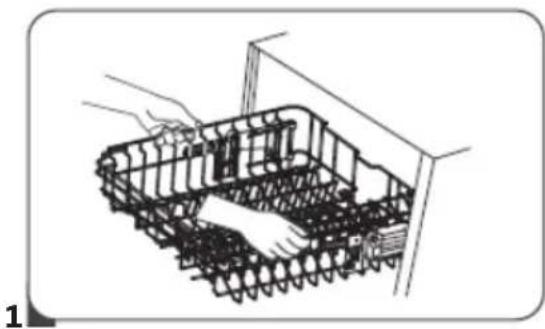
natural_image
Diagram of a robotic platform with chains and sensors, no text or symbols present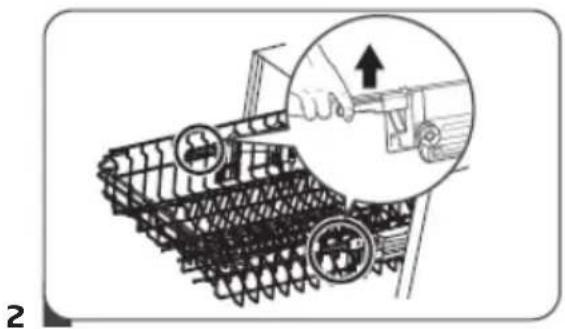
natural_image
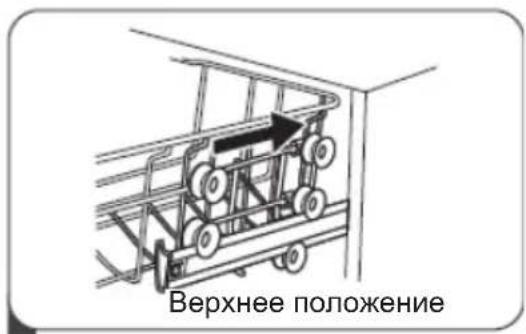
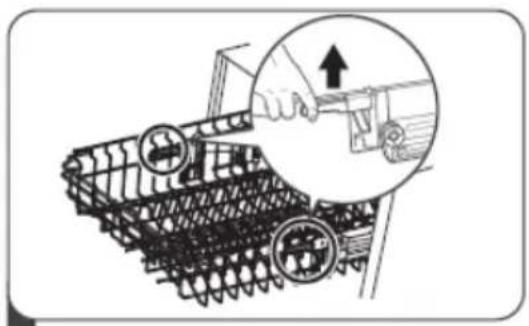
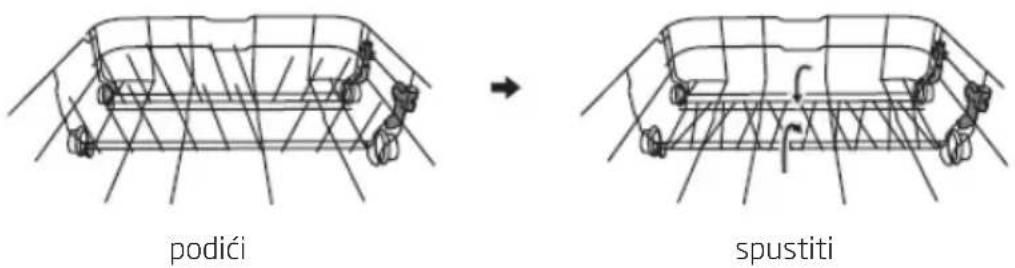
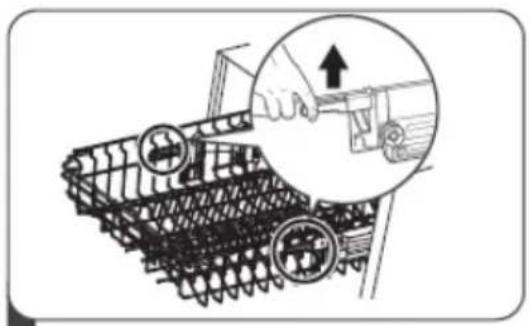
Illustration of a tracked vehicle with a hand operating a tool, showing mechanical components and a magnified inset (no text or symbols)- To raise the basket to the upper position, raise it until it is at the same height on both sides. Make sure it is securely attached to the rails.
- To lower the basket, push down and release the handles.
5
Lower basket
Put plates, bowls, pots, etc. in the lower basket. Make sure that dishes in the lower basket do not block the spray arm and it can rotate freely. Place large pans and heavily soiled items such as pots, pans, lids, dishes, etc. in the lower basket. Place dishes upside down, so that water does not collect inside.

Place the dishes in such a way that they do not block the spray arm.
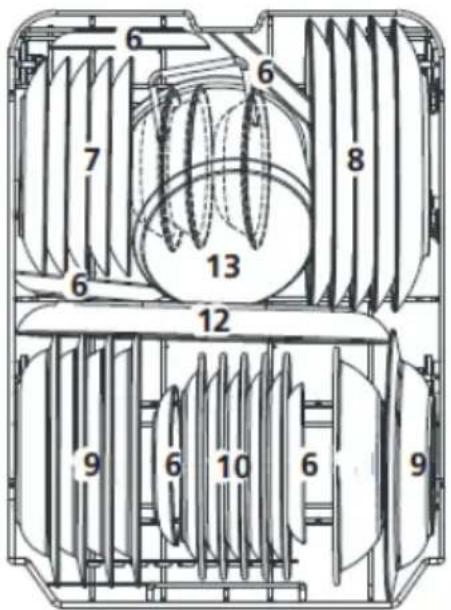
EN 60436
6
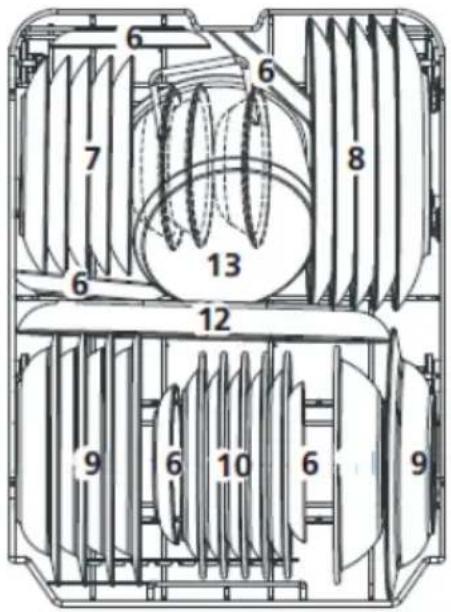
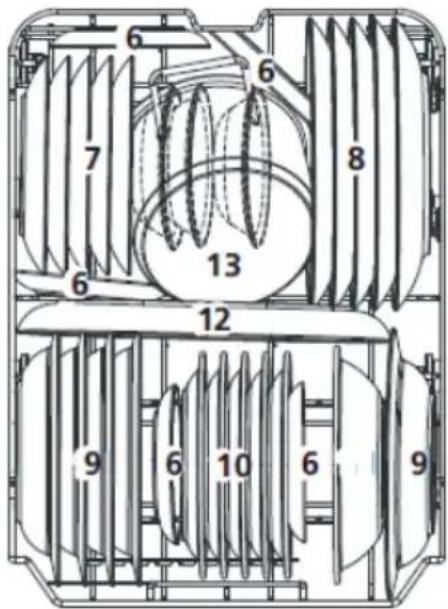
The standard load and test results
Capacity:
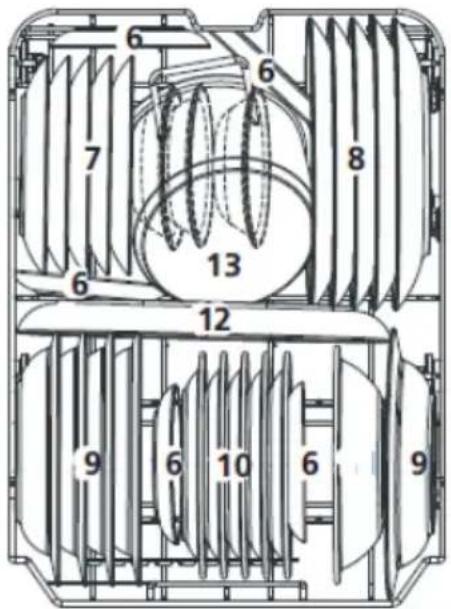
The upper and lower basket: 10 place settings. Set the upper basket to the upper position. Place the cups on the shelves.
Detergent/rinse aid
4+1, in accordance with the EN 60436 international standards/rinse aid dose: max
Test programme
Eco, in accordance with the EN 60436 international standard
Upper basket
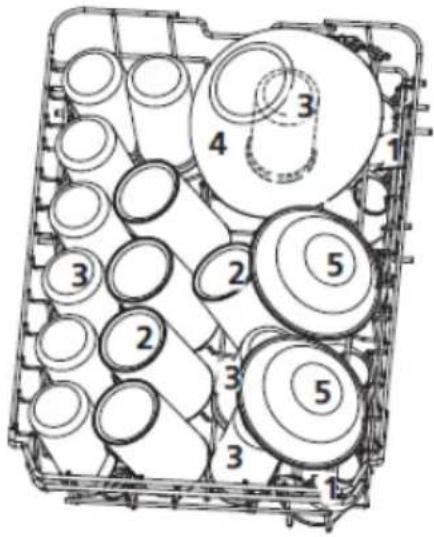
Lower basket
- Cups
- Saucers
- Glass
- Mug
- Dessert bowls
- Glass bowl
- Dessert plates
- Dinner plates
- Soup plates
- Melamine dessert plates
- Melamine bowl
- Oval platter
- Small pot
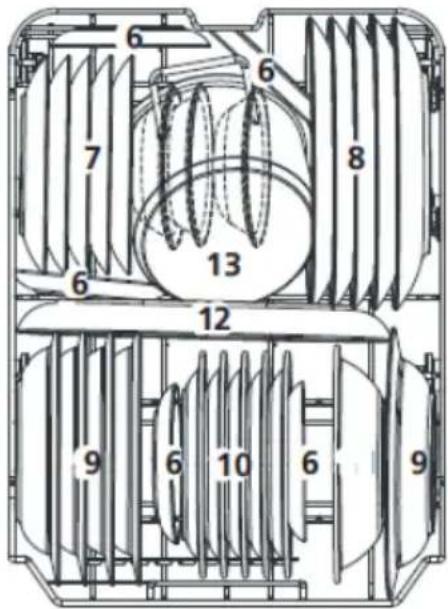
Tests specification according to EN 60436
Capacity -10 standard place settings
Upper basket setting – lower position
Programme - ECO
Rinse dose setting – max
Water hardness setting - H3
Cutlery basket
Place knives and forks separately from each other, and make sure they do not touch as this may cause poor washing results.
For best washing results place knives and forks in the cutlery basket, and make sure: they do not touch and place objects in the middle.
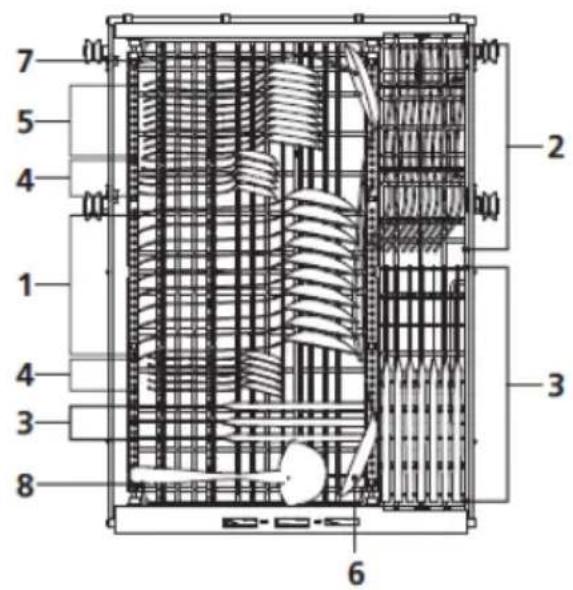
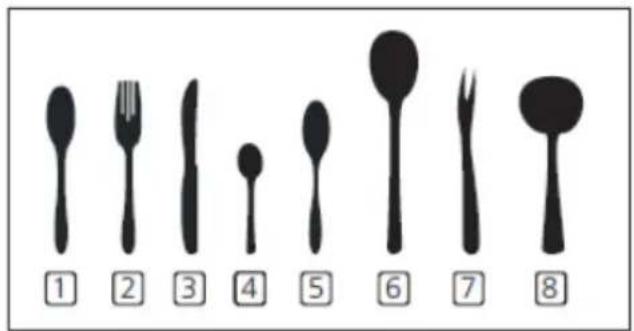
| Item Cutlery | |
| 1 Soup spoons | |
| 2 Forks | |
| 3 Knives | |
| 4 Tea spoons | |
| 5 Dessert spoons | |
| 6 Serving spoons | |
| 7 Forks for serving | |
| 8 Spoons for sauces | |
TURN ON THE APPLIANCE AND SELECT PROGRAMME
1
Turn on the appliance
- Slide out the upper and lower the basket, place the dishes inside and slide baskets back in the dishwasher.
It is recommended to first load the lower basket and then the upper basket. - Pour detergent.
- Insert the plug into the wall outlet. Power data can be found on the product sheet. Make sure that the water supply is turned on and set to the maximum pressure.
- Close the door, press the Power button, to switch on the machine.
- Choose a program, the response light will turn on. Then press the Start/Pause button, the dishwasher will start its cycle.
2
Change programme
You can change the programme only if it runs for a short time. Otherwise the detergent is already dissolved in water and the water could be pumped out. In this case, refill the dispenser with detergent and start the washing program from the beginning. To reset your dishwasher, please follow the instructions below:
- Press the Start/Pause button to pause the washing.
- Press Program button for more than 3 seconds - the program will cancel.
- Press the Program button to select the desired program.
- Press the Start/Pause button, the dishwasher will start.
3
Add dishes during the programme:
You can add extra dishes at any time before detergent is released. In this case, follow the instructions below:
- Press the Start/Pause button to pause the washing.
- Wait 5 seconds then open the door.
- Add the forgotten dishes.
- Close the door.
- Press the Start/Pause button after 10 seconds, the dishwasher will start.

WARNING!
Be careful when opening the door during the dishwashing programme as hot steam can be released and cause scalding.
4
The dishwashing programme completes
Press on/off button to turn off the appliance. Close water supply tap and open the dishwasher door. Wait a few minutes before unloading the dishwasher. Allow dishes to cool. Hot dishes are more susceptible to breakage. Also the dishes will dry.
Turn off the dishwasher
The programme is completed only when the programme indicator is on, but not flashing.
- Press on/off button to turn off the appliance.
- Close water supply tap!
Open the door carefully.
Hot dishes are more susceptible to breakage. Before unloading the dishwasher leave the dishes to cool for about 15 minutes.
Open the dishwasher door, leave it ajar and wait a few minutes before removing the dishes.
This will allow the dishes to cool and dry.
Unload the dishwasher
It is normal that the dishwasher interior is wet.
First remove dishes from the lower basket and then from the upper basket. This will prevent water dripping from the upper basket on the dishes in the lower basket.
CLEANING AND MAINTENANCE
1
Clean external surfaces
Door and door seal
To remove food residue, clean the door gasket regularly with a soft, moist cloth. When loading dishes into the dishwasher, food and drink residue may deposit on the sides of the dishwasher door. These surfaces are outside the dishwasher compartment and the water from the spray arms does not reach them. Remove any residue before closing the door.
Control Panel
Wipe the control panel ONLY with a soft, damp cloth.

WARNING
Do NOT use any spray cleaner to prevent water ingress into the door lock and electrical components.
Do not use any abrasive detergents or sharp cleaners on external surfaces. Some paper towels may also leave scratches or marks on the surface.
2
Clean internal surfaces Filter system
The filter system at the bottom of the dishwasher compartment stops coarse residue during wash cycle. This residue can cause clogging of the filters. Regularly check the condition of the filters and rinse them under running water, if necessary. Clean the filters as follows.

NOTE:
Figures are for illustrative purposes only Filter systems and spray arms may vary in individual models.
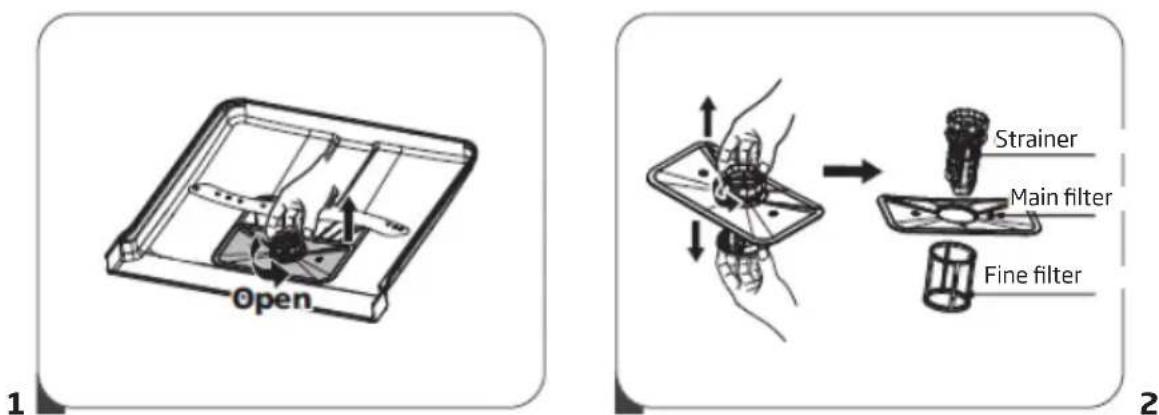
- Hold the strainer and turn it counter clockwise to unscrew. Lift the filter up and remove it from the dishwasher.
- The fine filter can be removed from the bottom of the filter assembly. The strainer can be disengaged from the main filter by gently squeezing the edges and pulling.
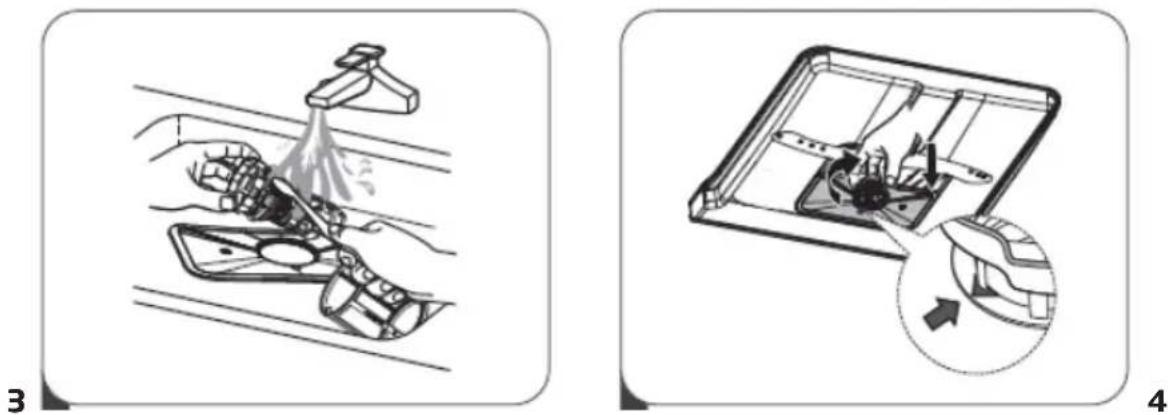
- Larger residues can be rinsed under running water. Clean the filter completely with a soft, clean brush.
- Install the filters in reverse order, place the filter insert and turn clockwise as indicated by the arrow.

WARNING
Do not overtighten the filters. Carefully replace the filters and install in place. Otherwise, contaminants can enter the dishwasher's systems and cause clogging.
NEVER use the dishwasher without the filter assembly. Incorrect filter replacement can reduce the appliance effectiveness and cause damage to the dishes and cutlery.
3
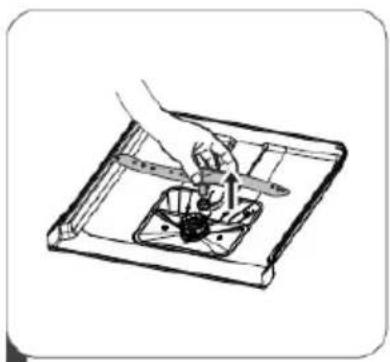
Spray arms
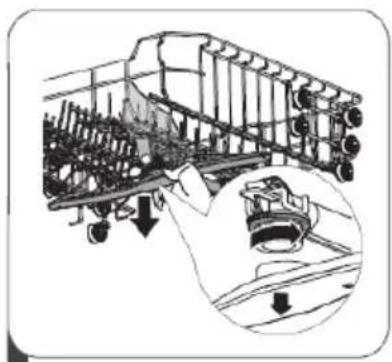
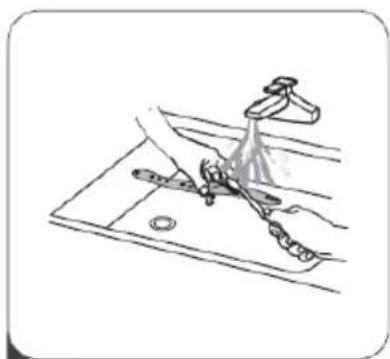
Clean the spray arms regularly. Hard water and detergents can clog the nozzles and the spray arm slide rings.
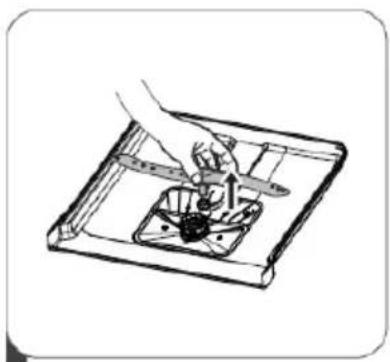
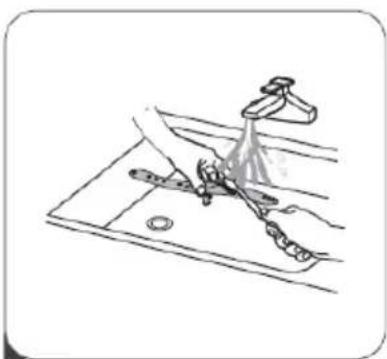
Clean spray arms:
natural_image
Technical line drawing of a mechanical assembly with internal components and a magnified inset showing a close-up detail (no text or symbols)2
natural_image
Illustration of a hand using a tool to adjust or install a component on a tray (no text or symbols visible)3
natural_image
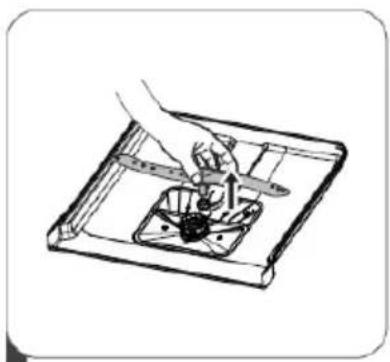
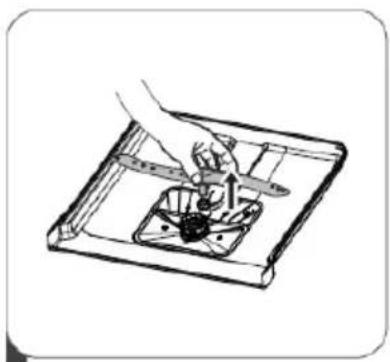
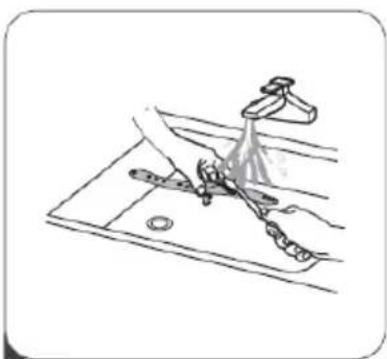
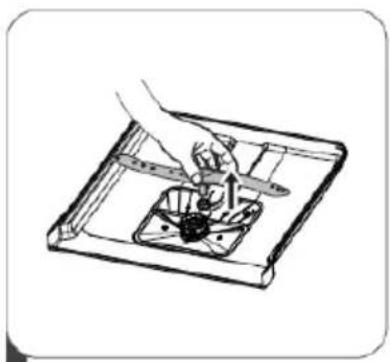
Line drawing of a kitchen sink with faucet and water spray (no text or symbols)- To remove the upper spray arm, hold the nut in place and turn the arm counter clockwise.
- To remove the lower spray arm, pull the arm up.
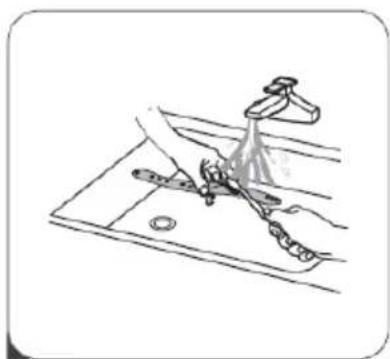
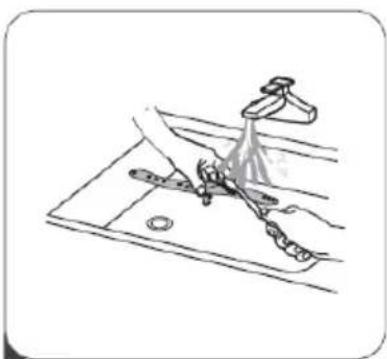
- Clean the spray arms with a soft brush in warm soapy water. Rinse the arms and install in the appliance.
4
Clean the dishwasher
Frost protection
In winter, the dishwasher must be protected against freezing temperature. After each wash:
- Disconnect the dishwasher from power.
- Turn off the water supply and disconnect the water inlet hose from the water valve.
- Drain the water from the inlet hose and the water valve. (Collect the water in a bowl)
- Reconnect the water inlet hose to the water valve.
- Remove the filter and use a sponge to collect the water from the bottom of the dishwasher.
After each wash
After each wash, close the water supply to the appliance and leave the door slightly ajar, so that moisture and odours are not trapped inside.
Unplug the appliance
Unplug the appliance from the wall outlet before any cleaning and maintenance.
Do not use solvents or abrasive detergents.
Do not use solvents or abrasive detergents to clean the outer parts and the rubber seals of the dishwasher. Use only cloths and warm soapy water.
To remove stains from the inside use a cloth dampened with water and a little vinegar or cleaning detergent intended specifically for dishwashers.
If the dishwasher is not used for a long time
It is recommended to run the washing programme with an empty dishwasher, then unplug the appliance from power, close the water supply and leave the door slightly ajar. This protects the gaskets and prevents the formation of unpleasant odours in the appliance.
Move the appliance
If the appliance needs to be moved, try to keep it in an upright position. If absolutely unavoidable, you can rest the appliance on the back wall.
ERROR CODES AND TROUBLESHOOTING
In the event of a fault, the dishwasher displays error codes that identify the problem:
| ERROR CODE | DESCRIPTION OF THE FAULT | ACTION |
| The soak light flicker fleetly | Longer water inlet time. | Tap is closed or water intake is re-stricted, or water pressure is too low |
| The 90 min and soak lights flicker fleetly | The required temperature has not been reached. | Malfunction of heating element. |
| The ECO light flicker fleetly | Overflow Some dish washer element leaks. | |
| The Universal, Eco and soak indicator flickers fleetly | Failure of communication between main PCB with display PCB. | Open circuit or break wiring for the communication. |
WARNING!
If overflow occurs, turn off the main water valve before calling for service.
If there is water in the bottom tray due to overflow or a small leak, empty the water before starting the dishwasher.
| Problem Possible cause | Solution | |
| The dishwasher will not start | The dishwasher will not start | The dishwasher door is open – close the door. |
| The appliance is not connected to the mains power The Delay start function is selected | Close the door carefully, make sure it is closed fully | |
| Child Lock is enabled (selected models) | Turn off the Child Lock | |
| The dishwasher beeps at the end of the wash cycle | It indicates the end of the wash programme and emits a beep | |
| The rinse aid indicator is on | The LED display shows "Lsb" | Add rinse aid |
| The wash cycle takes too long | The dishwasher is connected to hot water | Check the dishwasher, make sure it is properly connected to hot water |
| The duration of the wash programme varies depending on how soiled the dishes are | When heavy soil is detected, auto and normal programmes, automatically extend the wash cycle duration | |
| The disinfection option has been selected | When you select the disinfection option, the wash cycle time will be extended to reach the disinfection temperature | |
| The dishes are not clean enough | The water pressure is temporarily low | Use a dishwasher when the pressure is normal |
| The temperature of the inlet water is low | Ensure that the dishwasher is connected to hot water. Try not to use the dishwasher if hot water is used elsewhere in the household | |
| The dishes are arranged too close together. The detergent is used incorrectly | Rearrange the dishes in accordance with the instructions. Use the amount of detergent suitable for the water hardness and the selected wash programme. Use a new/different detergent | |
| The selected wash programme is not suitable for the level of soil on the dishes | Select a different, more intensive/longer wash programme | |
| The spray arm rotation is blocked | Make sure that the spray arm rotates freely | |
| The dishwasher will not start | The dishwasher will not start | Close the door carefully, make sure it is closed fully |
| The appliance is not connected to the mains power The Delay start function is selected | Check the connection to the power supply | |
| To change the setting, refer to the Start Delay section in the operating instructions | ||
| Child Lock is enabled (selected models) | Deactivate the Child Lock function, refer to the Child Lock section in the operating instructions. | |
| The dishes are not dry enough | The detergent dispenser is empty | Fill the rinse aid dispenser or increase the dispensed amount |
| Dishes placed incorrectly in the dishwasher | Rearrange the dishes in accordance with the instructions. | |
| The selected programme dose not include the drying stage | Select the wash program that includes drying | |
| Stains and deposits on dishes | Water too hard In the case | of very hard water, a water softener should be installed |
| Dishes placed incorrectly in the dishwasher | Rearrange the dishes in accordance with the instructions. | |
| An old rinse aid was used | Use new rinse aid | |
| Rinse aid dispenser is empty | Add rinse aid to the dispenser | |
| Too much detergent Use less detergent if water is soft | ||
| The temperature of water supplied to the dishwasher exceeds 70°C | Reduce the temperature of the water supply | |
| The detergent was not fully released from the dispenser | The detergent may be too old | Use a new/different detergent |
| The spray arm rotation is blocked | Rearrange the dishes making sure that the spray arm rotation is not restricted | |
| The detergent dispenser will not close | The lid of the detergent dispenser is malfunctioning | Add detergent and rinse aid according to the instructions |
| The water was not drained from the dishwasher | The previous programme was not completed or was interrupted | For information on how to select a suitable wash programme, please refer to the operating instructions |
| Food residue or glass shards clogged the pump. | Remove foreign body. | |
| The dishwasher does drain the water properly | The drain is clogged Check | the air trap. |
| The drain hose is bent | Make sure that the drain hose is correctly connected to the drain | |
| Foam in the dishwasher | The wrong detergent was used | Make sure that the detergent used is suitable for dishwashers |
| The dishwasher is leaking | The use of the wrong detergent resulted in a deposit | Make sure that the detergent used is suitable for dishwashers |
| The dishwasher is not levelled | Level the dishwasher | |
| Black or grey streaks on the dishes | The aluminium dishes rubbed against the plates. | Rearrange the dishes |
| The interior of the dishwasher is stained | Coffee and tea grounds Use | a certified stain removal agent |
| A reddish stain Load the dishes and run the rinsing programme which will reduce the stain formation | ||
| Noise Noise of the detergent | dispenser lid opening or water drain pump operating | This is normal. |
| A hard object in the dishwasher's system. When the object drops to bottom, the noise should stop | If the noise continues after the full wash cycle, call service. | |
| The appliance does not fill with water | The water tap is shut off | Check that the water tap is open |
| The door lock may not be engaged | Make sure that the door is closed. | |
For more information about the product, please refer to the EU EPREL Product Database at https://eprel.ec.europa.eu. For more information, please use your mobile device to scan the QR code on the energy label or enter the product model listed on the energy label in the EPREL search engine https://eprel.ec.europa.eu/
WARRANTY AND AFTER SALES SERVICE
Warranty
Warranty service as stated on the warranty card. The manufacturer shall not be held liable for any damage caused by improper use of the product.
Service
- The manufacturer recommends that all repairs and adjustments be carried out by the Factory Service Technician or the Manufacturer's Authorized Service Point. For safety reasons, repairs should be referred to professionals.
- Repairs carried out by unqualified persons may seriously endanger the appliance user.
- Pursuant to Commission Regulation (EU) 2019/2022, the minimum availability period for spare parts necessary to repair the appliance is 7 or 10 years depending on the type and purpose of the spare part.
- The list of spare parts and the ordering procedure are available on the websites of the manufacturer, importer or an authorized representative.
- The minimum warranty period for the appliance offered by the manufacturer, importer or authorized representative is given in the warranty card.
- The warranty shall be void if you make any independent adaptations or alterations, tamper with seals or other appliance safety devices or its parts or interfere with the appliance contrary to operating instructions.
In the event of appliance malfunction, request assistance or repair.
If your appliance needs repair, please contact the service centre. Please see warranty card for address and contact details of our service centre. Before contacting us, please have ready the appliance serial number, which can be found on the identification sticker: For your convenience, please write it down below:

natural_image
Collection of kitchen utensils and kitchenware icons arranged in rows (no text or symbols)
Hansa
Haushaltsgeräte
ИНСТРУКЦИЯ ПО
ЭКСПЛУАТАЦИИ
RU
ZWM416WH.1 / ZWM416WH
ZWM416WEH
ZWM416SEH.1 / ZWM416SEH

natural_image
Simple line icon of a shopping bag with rings, no text or symbols presentСОДЕРЖАНИЕ
natural_image
Symbol of a trash bin crossed with a diagonal line, representing no waste or discharge (no text or labels)
natural_image
Simple line drawing of a three chasing recycling symbol (no text or labels)natural_image
Illustration of a hand holding a pipe with a valve, showing a curved arrow indicating motion (no text or symbols)natural_image
3D wireframe model of a mechanical tray or rack structure with no visible text or symbolsnatural_image
Technical line drawing of a mechanical assembly with no visible text or symbolsnatural_image
Line drawing of a multi-tiered wire cage or basket structure (no text or symbols)Нижняя корзина
Верхняя корзина
flowchart
graph LR
    A["Hand holding a salt container"] --> B["Add salt to a container"]
    B --> C["Salt being poured into the container"]
    C --> D["Hand pouring liquid into a container with a bucket"]
    D --> E["Back to a container"]
natural_image
Simple line drawing of a monitor with three rays and a control panel (no text or symbols)Переместить
влево
natural_image
Simple line drawing of a rectangular frame with a central vertical line and a small mark at the bottom (no text or symbols)Нажать
natural_image
Diagram of a device with laser feed and explosion effect, no text or symbols present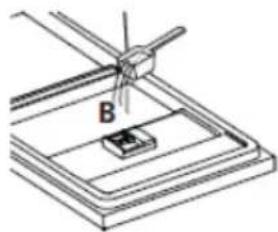
natural_image
Diagram of a mechanical setup with a labeled component B, showing a lever and base plate (no text or symbols present)natural_image
Diagram of a device with a fan and starburst symbol, no readable text or labelsnatural_image
Line drawing of a device with a screen and directional arrow, no text or symbols presentnatural_image
Line drawing of a hand inserting a device into a device with a screen showing a tree (no text or symbols)natural_image
Illustration of a hand pressing down on a device with a red circle highlighting the button (no text or symbols)EN 60436
2
natural_image
Diagram showing structural deformation of a mechanical component before and after, with no visible text or symbols3
natural_image
Diagram of a car chassis with wheels and an arrow indicating motion (no text or symbols)natural_image
Diagram of a shopping cart with wheels and an arrow indicating direction (no text or symbols)4
natural_image
Technical line drawing of a mechanical assembly with no visible text or symbols2
natural_image
Illustration of a tracked vehicle with a hand operating a tool, showing mechanical components and a magnified inset (no text or symbols)EN 60436
6
Нижняя корзина
natural_image
Technical line drawing of a mechanical assembly with internal components and a magnified inset showing a close-up detail (no text or symbols)2
natural_image
Line drawing of a hand using a tool to adjust or install a component on a tray (no text or symbols)3
natural_image
Line drawing of a kitchen sink with a hand washing it, no text or symbols presentnatural_image
Collection of kitchen utensils and kitchenware icons arranged in rows (no text or symbols)UPUTSTVO ZA UPOTREBU SR
ZWM416WH.1 / ZWM416WH
ZWM416WEH
ZWM416SEH.1 / ZWM416SEH

natural_image
Simple line icon of a shopping bag with rings, no text or symbols presentODLAGANJE ISTROŠENIH UREĐAJA
natural_image
Symbol of a trash bin crossed with two crossed lines, no text or numbers presentOvaj uređaj je označen u skladu sa evropskom direktivom 2012/19/EU. Ujedno je označen simbolom precrtanog kontejnera za otpatke. Oznaka na proizvodu pokazuje da ovaj proizvod posle njegovog životnog veka ne može da buđe biti tretiran kao ostali kućni otpad.
Korisnik ima obavezu da ovaj proizyod pređa na odgovarajuće sabirno mesto za reciklažu potrošene električne i elektronske opreme. Institucije za prikupljanje ovakvog otpada, uključujući lokalne sabirne tačke, kupovna mesta, opštinske jedinice, sačinjavaju odgovarajući sistem koji omogućava zbrinjavanje ove opreme. Pravilno odlaganje potrošene električne i elektronske opreme sprečava potencijalne negativne posledice za okolinu i ljudsko zdravlje koje inace mogu da budu uzrokovane neodgovarajućim odlaganjem ovog proizvoda.
UKLANJANJE PAKOVANJA

natural_image
Recycling symbol composed of three chasing arrows forming a triangle (no text or labels)Uređaj je za vreme transporta zaštićen od oštećenja. Posle vađenja uređaja iz pakovanja molimo Vas da elemente ambalaže uklonite na način koji ne ugrožava prirodnu sredinu.
Svi materijali korišteni za ambalažu nisu štetni za prirodnu okolinu, 100% je moguća reciklaža i označeni su
natural_image
Illustration of a hand holding a faucet with a valve, no text or symbols presentNe koristiti crevo za vodu sa stare mašine za sudove. Koristiti novo dovodno crevo koje je isporučeno zajedno sa uređajem. Pre priključivanja isprati ga vodom sa unutrašnje strane. Priključiti dovodno crevo direktno na dovodni ventil. Pritisak vode u instalaciji trebao bi da iznosi najmanje,03 MPa, a maksimalno 1 MPa. Ako pritisak vode prelazi 1 MPa, pre mašine za sudove montirati ventil za redukciju pritiska.
Posle priključivanja otvoriti ventil do kraja i proveriti propusnost.
UPOZNAJ SVOJ UREĐAJ
OPIS APARATA
Niže su navedeni elementi uređaja (Crt. 1):
natural_image
3D wireframe model of a mechanical tray or rack structure with no visible text or symbolsKorpica pribora za jelo
natural_image
Technical line drawing of a mechanical assembly with no visible text or symbolsnatural_image
3D wireframe model of a multi-tiered plastic basket structure (no text or symbols)Donja korpa
Gornja korpa
DISPLEJ I PLOČA

::Hansa
flowchart
graph TD
    A["①"] --> B["P"]
    B --> C["1/2"]
    C --> D["1"]
    D --> E["②"]
    E --> A
flowchart
graph LR
    A["Hand holding a plate with a salt container"] --> B["Add to a base plate"]
    B --> C["Salt being poured into a pot"]
    C --> D["Hear pouring liquid into a container"]
    D --> E["Reprocessing into a container with a curved arrow"]
- Izvući donju korpu iz aparata i odvrnuti poklopac rezervoara.
- Stavite kraj levka (ako je priložen) u otvor i sipajte oko 1,5kg soli.
- Vodom do vrha napuniti rezervoar soli. Normalno je da manja količina vode izade iz rezervoara.
- Posle punjenja rezervoara zavrnuti poklopac.
- Posle punjenja spremnika soli indikator soli se gasi.
- Odmah posle punjenja spremnika soli pokrenuti program pranja (preporučujemo da pokrenete kratki program). U protivnom, slana voda može da ošetiti filtere, pumpu ili druge važne delove aparata. To nije obuhvaćeno garancijom.
PAŽNJA:
Spremnik za so napuniti kad se zapali indikator soli ( ) na komandnoj ploči. Zavisno od tempa otapanja soli indikator soli može da svetli i posle punjenja spremnika.
Ako na komandnoj tabli nema indikatora (u nekim modelima), možemo da procenimo kad treba napuniti dozator na bazi broja izvedenih ciklusa pranja.
natural_image
Diagram of a device with a tray and fan, showing internal components and an arrow indicating direction (no text or symbols)natural_image
Line drawing of a device with a screen and directional arrow, no text or symbols presentnatural_image
Line drawing of a hand inserting a device into a device with a screen and cable (no text or symbols)natural_image
Line drawing of a hand pressing down on a device with a scroll icon (no text or symbols)3 Затвори поклопац.
EN 60436
2
natural_image
Diagram showing structural deformation of a mechanical component before and after, with no visible text or symbols3
Sklapanje preklopnih uložaka korpe
Šiljci služe za pridržavanje tanjira. Možemo da ih sklopimo i dobijemo više prostora za velike sudove.
4
Instrukcije za upotrebu korpe: Regulacija gornje korpe Vrsta 1:
Visinu gornje korpe možemo da jednostavno podesimo za što lakše postavljanje visokih sudova u donju ili gornju korpu. Za regulaciju gornje korpe:
natural_image
Diagram of a car with wheels and an arrow indicating motion, no text or symbols present- Izvući gornju korpu.
- Izvaditi gořnju kórpu.
natural_image
Diagram of a shopping cart with wheels and an arrow indicating direction (no text or symbols)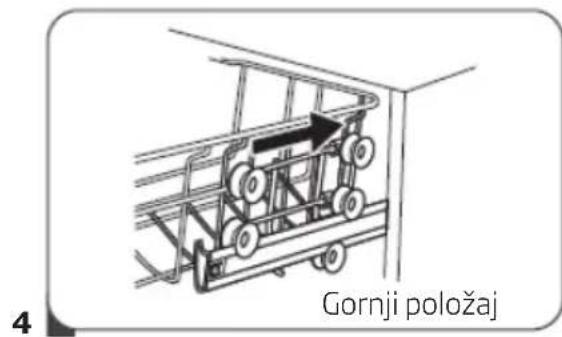
natural_image
Diagram of a mechanical assembly with hands operating a housing (no text or symbols visible)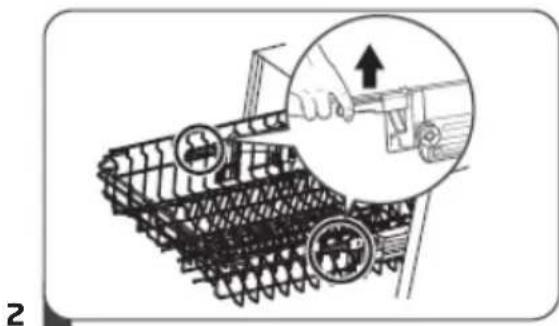
natural_image
Illustration of a tracked vehicle with a hand adjusting a tool, showing mechanical components and a magnified inset (no text or symbols)- Za podizanje korpe u gornji položaj dizati dok se sa obe strane ne nađe na istoj visini. Proveriti da dobro leži na šinama.
- Za spuštanje korpe gurnuti poluge dole i pustiti.
5
Donja korpa
U donju korpu stavljati tanjire, činije, šerpe itd. Proveriti da sudovi u korpi ne blokiraju prskalicu koja mora da se nesmetano okreće. U donju korpu stavljati velike sudove i te koje je teže oprati, na primer lonce, tiganje, poklopce, tacne itd. Sudove postavljati dnom prema gore da u njima ne skuplja voda.

EN 60436
6
Standardno punjenje i rezultati ispitivanja:
Kapacitet:
Donja i gornja korpa: 10 kompleta. Gornju korpu podesiti u gornjem položaju. Šalice za kafu stavljati na fioke.
Deterdžent/Sredstvo za sjaj
4+1, u skladu sa normama EN 60436 (međunarodne norme) / regulacija doziranja sredstva za sjaj: max
Test programa
Donja korpa
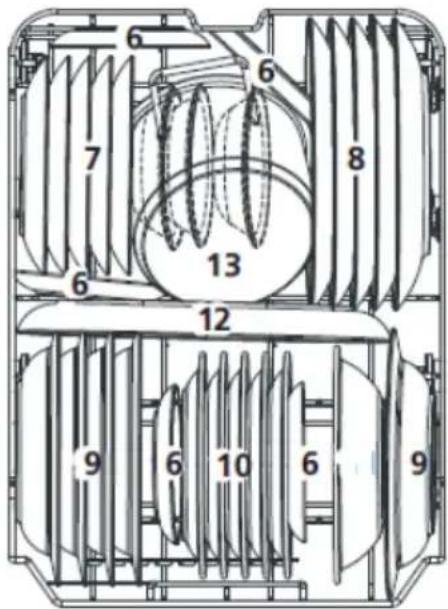
Informacije za ispitivanje u skladu sa nor- mom EN 60436
Kapacitet - 10 standardnih kompleta sudova
-
Uhvatiti grubi filter, okrenuti ga prema levo i odvrnuti. Podignuti filter i izvaditi iz mašine za sudove.
-
Fini filter možemo da izvučemo iz dna sistema filtera. Grubi filter možemo da odvojimo od glavnog filtera tako da delikatno pritisnemo rub i povučemo.
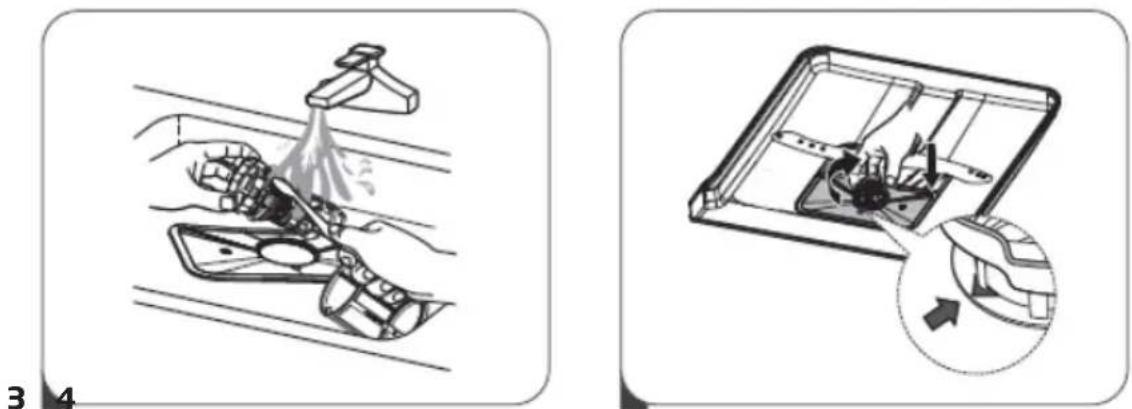
- Veće ostatke isprati tekućom vodom. Filtere možemo preciznije očistiti pomoću meke, čiste četkice.
- Filtere montirati obrnutim redosledom, staviti umetak filtera i okrenuti prema desno u skladu sa strelicom.

UPOZORENJE
natural_image
Technical line drawing of a mechanical assembly with internal components and a magnified inset showing a close-up detail (no text or symbols)2
natural_image
Illustration of a hand using a tool to adjust or install a component on a tray (no text or symbols visible)3
natural_image
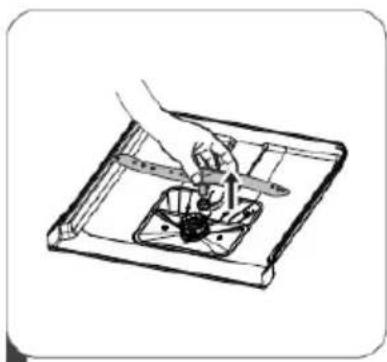
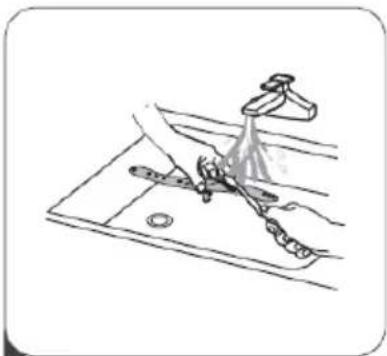
Line drawing of a kitchen sink with faucet and utensils (no text or symbols)- Za skidanje gornje prskalice pridržati maticu na mestu i okrenuti prskalicu prema levo.
- Za skidanje donje prskalice povući je prema gore.
- Operite prskalice u sapunastoj, toploj vodi sa mekom četkom. Isprati prskalice i montirati u aparat.
4
Čišćenje mašine za sudove
Zaštita od zamrzavanja
Zimi štititi mašinu za sudove od zamrzavanja. Posle svakog pranja:
- Isključiti mašinu za sudove iz električne mreže.
- Prekinite dovod vode i odvojite cev za dovod vode od ventila vode.
- Ispustite vodu iz ulazne cevi i ventila vode. (Sakupite vodu u šerpu)
- Ponovo priključite cev za dovod vode na ventil vode.
- Izvući fiter i upotrebiti sunder za skupljanje vode sa dna mašine za sudove.
Posle svakog pranja
Posle svakog pranja isključite dovod vode u aparat i ostavite vrata lagano otvorena, tako da vlaga i mirisi ne ostanu zarobljeni u unutrašnjosti.
Izvadite utikač
natural_image
Collection of kitchen utensils and kitchenware icons arranged in rows (no text or symbols)
Hansa
Haushaltsgeräte
INSTRUCTIUNI
DE UTILIZARE
RO
ZWM416WH.1 / ZWM416WH
ZWM416WEH
ZWM416SEH.1 / ZWM416SEH

natural_image
Simple line icon of a shopping bag with rings, no text or symbols presentÎNDEPĂRTAREA DISPOZITIVELOR UZATE
natural_image
Symbol of a trash bin crossed with two crossed lines and a solid black rectangle below (no text or labels)natural_image
Recycling symbol composed of three chasing arrows forming a triangle (no text or labels)natural_image
Illustration of a hand holding a faucet with a valve, no text or symbols presentCUNOAŞTEȚI DISPOZITIVUL PE CARE ÎL VEȚI FOLOSI
DESCRIEREA DISPOZITIVULUI
flowchart
graph LR
    A["Hand holding a salt container"] --> B["Add to a container with a salt lamp"]
    B --> C["Add to a container with a salt lamp using salt"]
    C --> D["Add to a container with a salt lamp pouring salt into a container"]
natural_image
Diagram of a device with a tray, vent, and indicator lights (no text or symbols)natural_image
Line drawing of a device with a screen and door, showing a circular arrow indicating rotation (no text or symbols)natural_image
Line drawing of a hand inserting a device into a device with a screen and cable (no text or symbols)natural_image
Illustration of a hand pressing down on a device with a scroll arrow indicating rotation (no text or symbols)EN 60436
2
natural_image
Diagram showing a structural assembly before and after rotation, with no visible text or symbols3
4
natural_image
Diagram of a car chassis with wheels and an arrow indicating motion (no text or symbols)natural_image
Diagram of a car with wheels and an arrow indicating motion, no text or symbols present4
natural_image
Line drawing of a mechanical device inside a housing, showing internal components and hands interacting (no text or symbols)2
natural_image
Illustration of a tracked military vehicle with a hand adjusting its gear, showing mechanical components and a magnified inset (no text or symbols)EN 60436
6
Coşul inferior
natural_image
Technical line drawing of a mechanical assembly with internal components and a magnified inset showing a close-up detail (no text or symbols)2
natural_image
Illustration of a hand using a tool to adjust or install a component on a tray (no text or symbols visible)3
natural_image
Line drawing of a kitchen sink with faucet and water spray (no text or symbols)natural_image
Collection of kitchen utensils and kitchenware icons arranged in rows (no text or symbols)
Hansa
Haushaltsgeräte
NAUDOJIMO INSTRUKCIJA LT
ZWM416WH.1 / ZWM416WH
ZWM416WEH
ZWM416SEH.1 / ZWM416SEH

natural_image
Simple line icon of a shopping bag with rings, no text or symbols presentPANAUDOTU PRIETAISU
ŠALINIMAS
natural_image
Symbol of a trash bin crossed with a diagonal line, representing waste sorting or disposal (no text or labels)
natural_image
Simple line drawing of a three chasing recycling symbol (no text or labels)natural_image
Illustration of a hand holding a pipe with a valve, no text or symbols presentPAŽINKITE SAVO PRIETAISA
PRIETAISO APRAŠYMAS
flowchart
graph LR
    A["Person mixing a cup with salt"] --> B["Add salt"]
    B --> C["Salt with a container labeled 'SALT'"]
    C --> D["Add liquid into a container with a flame"]
    D --> E["Final container with arrow indicating rotation"]
natural_image
Diagram of a device with a lid and ventilation slots, showing airflow direction (no text or symbols)natural_image
Line drawing of a device with a screen and door, showing a circular arrow indicating rotation (no text or symbols)natural_image
Line drawing of a hand inserting a device into a device with a screen and cable (no text or symbols)natural_image
Line drawing of a hand pressing down on a device with a scroll icon (no text or symbols)EN 60436
2
natural_image
Diagram showing a structural assembly before and after rotation, with no visible text or symbols3
natural_image
Diagram of a car with wheels and an arrow indicating motion, no text or symbols presentnatural_image
Diagram of a shopping cart with wheels and an arrow indicating direction (no text or symbols)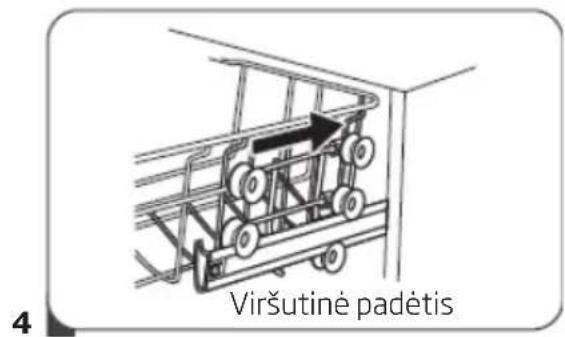
natural_image
Diagram of a mechanical assembly with hands operating a housing (no text or symbols visible)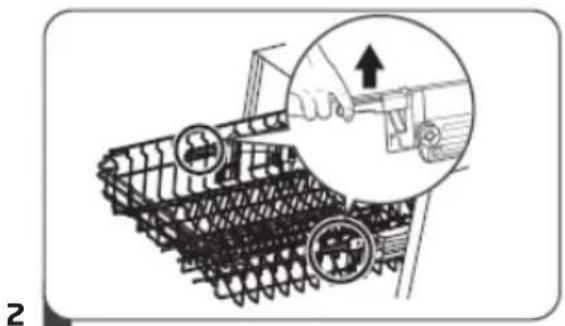
natural_image
Illustration of a tracked vehicle with a hand operating a tool, showing mechanical components and a magnified inset (no text or symbols)EN 60436
6
Apatinis krepšys
natural_image
Technical line drawing of a mechanical assembly with internal components and a magnified inset showing a close-up detail (no text or symbols)2
natural_image
Illustration of a hand using a tool to adjust or install a mechanical component on a tray (no text or symbols visible)3
natural_image
Line drawing of a kitchen sink with faucet and water spray (no text or symbols)natural_image
Collection of kitchen utensils and kitchenware icons arranged in rows (no text or symbols)
Hansa
Haushaltsgeräte
ИНСТРУКЦИЯ
ЗА УПОТРЕБА
BG
ZWM416WH.1 / ZWM416WH
ZWM416WEH
ZWM416SEH.1 / ZWM416SEH

natural_image
Simple line icon of a shopping bag with rings, no text or symbols presentОБЕЗВРЕЖДАНЕ НА
ИЗНОСЕНИ УРЕДИ
natural_image
Symbol of a trash bin crossed out by two diagonal lines (no text or labels)
natural_image
Recycling symbol composed of three chasing arrows forming a triangle (no text or labels)natural_image
Illustration of a hand holding a faucet with a valve, no text or symbols presentflowchart
graph LR
    A["Hand holding a salt container"] --> B["Add salt to a container"]
    B --> C["Salt being poured into the container"]
    C --> D["Hear pouring liquid into a container"]
    D --> E["Hear adding a salt"]
natural_image
Diagram of a device with a fan and screen, showing no text or symbolsnatural_image
Simple line drawing of a device with a screen and fan, showing a button and directional arrow (no text or symbols)natural_image
Line drawing of a hand inserting a device into a device with a screen showing a triangular symbol (no text or labels)natural_image
Illustration of a hand pressing down on a device with a curved arrow indicating rotation (no text or symbols)3 Затворете капака.
EN 60436
2
natural_image
Diagram showing a structural assembly before and after rotation, with no visible text or symbols3
natural_image
Diagram of a car chassis with wheels and an arrow indicating motion (no text or symbols)natural_image
Diagram of a car with wheels and a directional arrow, no text or symbols present4
natural_image
Diagram of a robotic platform with hands operating it, no text or symbols present2
natural_image
Illustration of a tracked vehicle with gear and a hand adjusting a component, showing no text or symbols.EN 60436
6
Долна кошница
natural_image
Technical line drawing of a mechanical assembly with internal components and directional arrows (no text or symbols)2
natural_image
Illustration of a hand using a tool to adjust or install a component on a tray (no text or symbols visible)3
natural_image
Line drawing of a kitchen sink with a hand washing it, no text or symbols presentnatural_image
Collection of kitchen utensils and kitchenware icons arranged in rows (no text or symbols)
Hansa
Haushaltsgeräte
- DISPOSAL OF OLD APPLIANCE
- CONTENTS
- WE ARE ENVIRONMENTALLY FRIENDLY
- Dear customer!
- BASIC INFORMATION
- MANUFACTURER'S DECLARATION
- UNPACKING
- INSTALL THE APPLIANCE
- PLACE YOUR APPLIANCE
- WATER SUPPLY CONNECTION
- WATER SUPPLY HOSE
- THE DRAIN HOSE
- ELECTRICAL CONNECTION
- FEATURES AND COMPONENTS
- DESCRIPTION OF THE APPLIANCE
- DISPLAY AND CONTROL PANEL
- Adding dishes during the program:
- PREPARE THE APPLIANCE FOR OPERATION
- 1
- Before first use
- 2
- The importance of water descaling
- 3
- Add special salt
- Only use special salt intended for dishwashers.
- NOTE:
- The test strip
- Fill the detergent dispenser
- Multi-component (multitab) detergents (eg. 2-in-1, 3-in-1, etc.)
- Add rinse aid to the dispenser and adjust setting
- The use of detergents
- LOAD DISHES INTO DISHWASHER
- Upper basket
- Fold the mugs and cups shelves
- Fold the dishwasher basket spikes
- Tips for using the dishwasher basket:
- Adjust the upper basket
- Type 1:
- Type 2:
- Lower basket
- The standard load and test results
- Capacity:
- Detergent/rinse aid
- Test programme
- Tests specification according to EN 60436
- Cutlery basket
- TURN ON THE APPLIANCE AND SELECT PROGRAMME
- Turn on the appliance
- Change programme
- Add dishes during the programme:
- WARNING!
- The dishwashing programme completes
- CLEANING AND MAINTENANCE
- Door and door seal
- Control Panel
- WARNING
- Clean internal surfaces Filter system
- Spray arms
- Clean the dishwasher
- Frost protection
- After each wash
- Unplug the appliance
- Move the appliance
- ERROR CODES AND TROUBLESHOOTING
- WARRANTY AND AFTER SALES SERVICE
- Warranty
- Service
- In the event of appliance malfunction, request assistance or repair.
- Hansa
- ИНСТРУКЦИЯ ПО
- ЭКСПЛУАТАЦИИ
- RU
- СОДЕРЖАНИЕ
- UPUTSTVO ZA UPOTREBU SR
- ODLAGANJE ISTROŠENIH UREĐAJA
- UKLANJANJE PAKOVANJA
- UPOZNAJ SVOJ UREĐAJ
- OPIS APARATA
- DISPLEJ I PLOČA
- PAŽNJA:
- Sklapanje preklopnih uložaka korpe
- Instrukcije za upotrebu korpe: Regulacija gornje korpe Vrsta 1:
- Donja korpa
- Standardno punjenje i rezultati ispitivanja:
- Kapacitet:
- Deterdžent/Sredstvo za sjaj
- Test programa
- Informacije za ispitivanje u skladu sa nor- mom EN 60436
- UPOZORENJE
- Čišćenje mašine za sudove
- Zaštita od zamrzavanja
- Posle svakog pranja
- Izvadite utikač
- INSTRUCTIUNI
- DE UTILIZARE
- RO
- ÎNDEPĂRTAREA DISPOZITIVELOR UZATE
- CUNOAŞTEȚI DISPOZITIVUL PE CARE ÎL VEȚI FOLOSI
- DESCRIEREA DISPOZITIVULUI
- NAUDOJIMO INSTRUKCIJA LT
- PANAUDOTU PRIETAISU
- ŠALINIMAS
- PAŽINKITE SAVO PRIETAISA
- PRIETAISO APRAŠYMAS
- ИНСТРУКЦИЯ
- ЗА УПОТРЕБА
- BG
- ОБЕЗВРЕЖДАНЕ НА
- ИЗНОСЕНИ УРЕДИ
Brand : Hansa
Model : ZWM 416 WH
Category : Dishwasher