
TV-5407LED - Television Premier - Free user manual and instructions
Find the device manual for free TV-5407LED Premier in PDF.


| Product Type | LED TV |
| Brand | Premier |
| Model | TV-5407LED |
| Screen Size | 54 inches (diagonal) |
| Resolution | 1920 x 1080 (Full HD) |
| Refresh Rate | 60 Hz |
| Dimensions (with stand) | 1230 x 770 x 240 mm |
| Weight (with stand) | 14.5 kg |
| Power Consumption (typical) | 80 W |
| Power Supply | AC 100-240 V, 50/60 Hz |
| Connectivity | HDMI x3, USB x2, VGA, Component, Composite, RF |
| Audio Output | 2 x 8 W speakers, headphone jack |
| Smart TV Features | Built-in Wi-Fi, DLNA, Media Player |
| Remote Control | Infrared with dedicated Netflix/YouTube buttons |
| Wall Mount Compatible | Yes, VESA 400 x 200 mm |
| Energy Efficiency Class | A+ |
| Standby Power Consumption | < 0.5 W |
| Operating Temperature | 5°C to 35°C |
| Cleaning Instructions | Wipe with a soft, dry cloth. Avoid solvents. |
| Safety Features | Ventilation slots, automatic power off, tilt stability |
| Spare Parts Availability | Contact Premier support for remote, stand, power board |
| Repairability Index | 5.5 / 10 (moderate repairability) |
Frequently Asked Questions - TV-5407LED Premier
User questions about TV-5407LED Premier
0 question about this device. Answer the ones you know or ask your own.
Ask a new question about this device
Download the instructions for your Television in PDF format for free! Find your manual TV-5407LED - Premier and take your electronic device back in hand. On this page are published all the documents necessary for the use of your device. TV-5407LED by Premier.
USER MANUAL TV-5407LED Premier
natural_image
Front view of a black CRT television displaying the brand name '##PRAINTER' on its front screen (no additional text or symbols visible)ESTIMADO CLIENTE
natural_image
Illustration of a computer monitor with arrows indicating rotation and a black X symbol below (no text or symbols)
natural_image
Illustration of a hand interacting with a flat-screen monitor, showing rotational arrows and a checkmark (no text or symbols)natural_image
Illustration of a hand holding a blank screen with a black X symbol below (no text or symbols on the screen or background)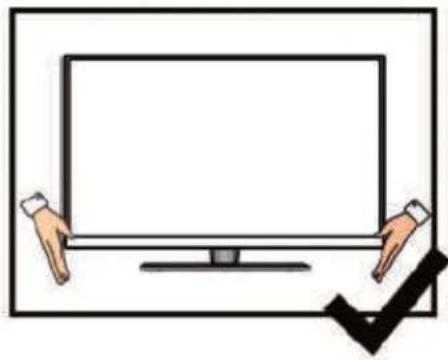
natural_image
Illustration of hands holding a blank screen with a checkmark below (no text or symbols)natural_image
Technical line drawing of a computer chassis with visible internal components and connectors (no text or symbols)natural_image
Simple line drawing of a rectangular electronic device with a handle and internal components (no text or symbols)natural_image
Simple line drawing of a flatboard with a handle and a clip (no text or symbols)natural_image
Simple line drawing of a rectangular electronic component with two internal slots and a small circular feature (no text or symbols)SONIDO
natural_image
Front view of a black CRT television displaying the brand name '##PRAINTER' on its front screen (no additional text or symbols visible)PREZADO CLIENTE
natural_image
Illustration of a computer monitor with arrows indicating rotation and a 'X' symbol below (no text or labels)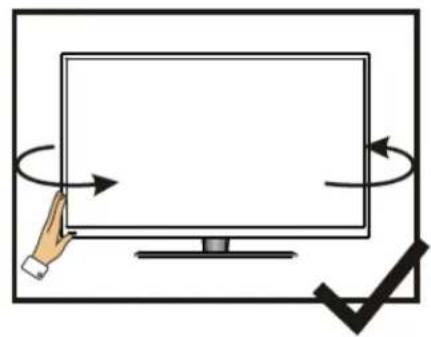
natural_image
Illustration of a hand holding a monitor with arrows indicating rotation, next to a checkmark (no text or symbols)natural_image
Illustration of a hand holding a blank screen with a black X symbol below (no text or symbols on the screen or background)
natural_image
Illustration of hands holding a blank screen with a checkmark below (no text or symbols)natural_image
Technical line drawing of a computer chassis with internal components and connectors (no text or symbols)natural_image
Simple line drawing of a rectangular electronic device with a handle and base (no text or symbols)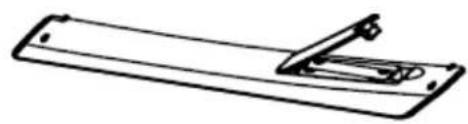
natural_image
Simple line drawing of a rectangular object with a folded corner and a handle (no text or symbols)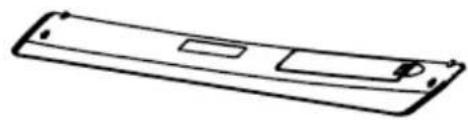
natural_image
Simple line drawing of a rectangular electronic component with two internal slots and a base (no text or symbols)
- Definir Senha:
natural_image
Front view of a black CRT television displaying the '141 Promotion' logo on screen (no additional text or symbols visible)DEAR CUSTOMER
In order to achieve the best performance of your product, please read this instruction manual carefully before using, and keep it for future reference.
If you need extra support, please write to info@premiermundo.com

CAUTION
RISK OF ELECTRIC SHOCK, DO NOT OPEN

Caution: To reduce the risk of electric shock do not open this device, there are not serviceable parts for customers. Please refer any maintenance or repair to qualified personnel.

This sign means the existence of dangerous voltage at the inside of the unit, which states a risk of electric shock.

This sign means that there are important instructions of operation and handling in the manual that comes with this device.
PREMIER CUSTOMER SERVICE
| Venezuela: | 0800 – ELECTRIC (353-2874) |
| Panama: | 300-5185 |
| Website | www.premiermundo.com |
| E-mail: | servicioalcliente@premiermundo.com |
NOTE
This unit may be submitted to changes in specifications, characteristics and/or operation without prior notice to the user, in order to continue improving and developing its technology.
PRECAUTION
-
Read these instructions.
-
Keep these instructions.
-
Heed all warnings.
-
Follow all instructions.
-
This apparatus with CLASS II construction.
-
Do not use this apparatus near water, the apparatus shall not be exposed to dripping or splashing and that no objects filled with liquids, such as vases, shall be placed on the apparatus.
-
Clean only with dry cloth.
-
Do not install this apparatus in windtight places such as the wall-unit. Do not block any ventilation openings.
-
Do not install near any heat sources such as radiators, heat registers, stoves, or other apparatus (including amplifiers) that produce heat.
-
Do not defeat the safety purpose of the polarized or grounding-type plug. A polarized plug has two blades with one wider than the other. A grounding type plug has two blades and a third grounding prong. The wide blade or the third prong are provided for your safety. If the provided plug does not fit into your outlet, consult an electrician for replacement of the obsolete outlet.
-
Protect the power cord from being walked on or pinched particularly at plugs, convenience receptacles, and the point where they exit from the apparatus.
-
Only use attachments/accessories specified by the manufacturer.
-
Use only with the cart, stand, tripod, bracket, or table specified by the manufacturer, or sold with the apparatus. When a cart is used, use caution when moving the cart/apparatus combination to avoid injury from tip-over.
-
Unplug this apparatus during lightning storms or when unused for long periods of time.
-
Refer all servicing to qualified service personnel. Servicing is required when the apparatus has been damaged in any way, such as power-supply cord or plug is damaged, liquid has been spilled or objects have fallen into the apparatus, the apparatus has been exposed to rain or moisture, does not operate normally, or has been dropped.

CAUTION
Danger of explosion if battery is incorrectly replaced.
Replace only with the same or equivalent type.
Batteries shall not be exposed to excessive heat such as sunshine, fire or the like.
Used batteries should not be thrown into the garbage can, please leave them at an appropriate depot.

CAUTION
Where the MAINS plug or an appliance coupler is used as the disconnect device, the disconnect device shall remain readily operable.

CAUTION
These servicing instructions are for use by qualified service personnel only. To reduce the risk of electric shock, do not perform any servicing other than that contained in the operating instructions unless you are qualified to do so.
Attention:
Motionless picture might cause permanent destruction to the display.
- Be sure not to display motionless picture on the L D TV for more than 2 hours, because it would cause picture remnants to appear, which is called "screen burns". To avoid such picture remnants, please decrease the "contrast" and "brightness" of the display when displaying motionless picture.
- While watching TV program in 4:3 size mode for a long time, there would be traces on the edge of the screen's left, right and center parts because of different transmission of the light on the screen. Similar impact on the screen will occur when playing DVD or connecting games control. Products destroyed by these reasons can't be guaranteed for maintenance.
- It might cause picture remnants to display electronic games and motionless picture of PC more than a period of time. To avoid such effect, please decrease the "contrast" and "brightness" when displaying motionless picture.
IMPORTANT INFORMATION
If a television is not positioned in a sufficiently stable location, it can be potentially hazardous due to falling. Many injuries, particularly to children, can be avoided by taking simple precautions such as:
- Using cabinets or stands recommended by the manufacturer of the television.
- Only using furniture that can safely support the television.
- Ensuring the television is not overhanging the edge of the supporting furniture.
- Not placing the television on tall furniture (for example, cupboards or bookcases) without anchoring both the furniture and the television to a suitable support.
- Not standing the televisions on cloth or other materials placed between the television and supporting furniture.
- Educating children about the dangers of climbing on furniture to reach the television or its controls.
- The each USB terminal should be loaded with 0.5 A under normal operation;
- Do not attach candle to accessible opening area, to avoid flammable foreign material from entering the TV

• Minimum distances around the apparatus for sufficient ventilation;
- The ventilation should not be impeded by covering the ventilation openings with items, such as newspapers, table-cloths, curtains, etc.:
- No naked flame sources, such as lighted candles, should be placed on the apparatus;
- Attention should be drawn to the environmental aspects of battery disposal;
• The use of apparatus in tropical and/or moderate climates.
- Put the TV in the environment of moderate temperature, not to lay aside the Air Conditioner outlet or stove to avoid damage.
- Use both hands when carrying TV, make TV suffer stable outside force.
- Place the TV on a firm and flat surface, leaving a space of at lease 10cm around the set and 30cm from the top of the set to the wall or cabinet. Ensure the TV is positioned close to the wall to avoid it falling when pushed.

- To avoid the TV overturning, when installed, it must with screw through screw hole on the base for fixingTV on the desk

Top view
- When you turning the TV set, do not hold the top side of the TV set, you should hold the bottom side.

natural_image
Illustration of a hand pointing at a screen with arrows indicating rotation, next to a black 'X' symbol (no text or labels)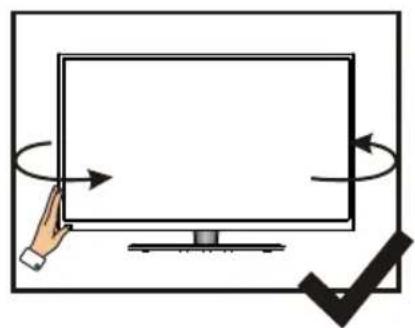
natural_image
Illustration of a hand interacting with a computer monitor and directional arrows, no text or symbols present- When you lifting the TV set, do not use one hand to handle it. you should lift the TV set by two hands.

natural_image
Illustration of a computer monitor with a hand pointing at it and a black X symbol below (no text or symbols on the monitor or background)
natural_image
Illustration of a hand holding a blank screen with a checkmark below (no text or symbols)CONTENTS
1. Connection and Preparation of TV.... 2
1.1 Accessories 2
1.2 Installation of Stand.... 2
1.3 Installation of Wall Mount Kit(Optional).... 2
1.4 Keys and Interfaces.... 3
1.5 Remote Control.... 4
1.6 Installation of Batteries.... 5
2. Basic Operation.... 5
2.1 Power ON/OFF 5
2.2 Setting of Standby Mode 5
2.3 Selection of Input Mode 5
2.4 Menu Option Adjustment....6
2.5 Menu Functions .....7
2.5.1 PICTURE Function.... 7
2.5.2 SOUND Function 8
2.5.3 CHANNEL Function 9
2.5.4 TIME Function.... 10
2.5.5 OPTION Function.... 11
2.6 Multimedia 17
2.6.1 MEDIA Function 17
2.6.2 USB Remote.... 17
2.6.3 USB Function.... 17
2.6.4 PHOTO.... 18
2.6.5 MUSIC.... 18
2.6.6 MOVIE.... 19
2.6.7 TEXT.... 19
- Technical Specification.... 20
- Supported Signal Modes.... 21
- Simple Troubleshooting 22
1. Connection and Preparation of TV
1.1 Accessories
★ User Manual x 1
★ Remote Control x 1
Battery (UM-4/R03P/AAA) x 2
★ Wall Mount Kit x 1 (Pre-assembled)(Optional)
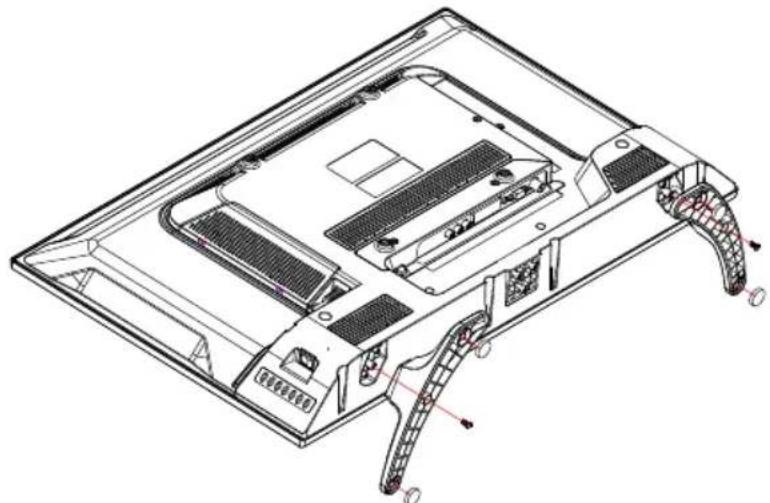
1.2 Installation of Stand
(For the physical structure, please refer to the real object)
natural_image
Technical line drawing of a laptop chassis showing internal components and ventilation slots (no text or labels)① Place the TV with the front panel facing downwards on the soft cloth or soft pads on a desk.
② Please put the PVC sticker on the turning axle firstly.
③ Insert the stand into the bottom socket of the TV.
④ Insert the screws into the sockets and tighten them.
1.3 Installation of Wall Mount Kit(Optional)
The Wall Mount Kit can help install the TV on the wall.
For more information about wall mounting, please refer to the instructions provided along with the wall mount kit.
When wall mounting the product, please contact qualified personnel.
If users choose to install the TV by themselves, the producer is irresponsible for any possible damages caused either to the product or to persons.
1.4 Keys and Interfaces
The design and specification takes actual products as the standard

- Remote sensor window
- Power indicator
- Speaker
- Power switch
- Menu key
- Program + key
- Program "key
- Volume "+ key
- Volume "Key
- Source key
- Standby key
- Power plug input
13.VIDEO output - HDMI1
15.HDMI2
16.PC(VGA) input - PC AUDIO input
- RF input
19.YPbPr input
20.AV input
21.USB1/USB2 - AUDIO LINE OUT

flowchart
graph TD
    A["19"] --> B["VIDEO"]
    C["20"] --> D["L"]
    E["21"] --> F["USB2"]
    G["22"] --> H["USB1"]
    I["VIDEO OUT"] --> J["HDMI1"]
    K["HDMI2"] --> L["PC(VGA)"]
    M["PC AUDIO"] --> N["RF IN"]
    O["13"] --> P["14"]
    Q["15"] --> R["16"]
    S["17"] --> T["18"]
1.5 Remote Control

-
STANDBY(☐): Standby turn on and off.
-
SOURCE: Select the signal source.
-
0\~9: Continue to press the keys to select a channel.
-
DISPLAY: Display the information of current video and audio.
-
RECALL: Return to previous channel.
-
FREEZE: Freeze the picture.
-
FAV+: Add favorite.
-
CH LIST: Channel list
-
FAV.LIST: Favorite channel list
-
VOL+: Increase the volume.
-
CH∧: Select the channel forward.
-
MUTE: Mute sound.
-
VOL-: Decrease the volume.
-
CHV: Select the channel backward.
-
MENU: Enter or exit menu.
-
EXIT: Exit menu or operation.
-
▲,▼,◀,▶ key: The menu item selection.
-
ENTER: Confirm or enter.
-
S.MODE: Select the sound mode.
20.CCD/▶II:
TV mode: Change the CCD mode ; MEDIA mode: Press one time to pause, press twice to playback.
- MTS/■:
TV mode: Change the MTS mode;
MEDIA mode: ■Stop the playback and return to filelist.
-
P.MODE: Select the picture mode.
-
ZOOM: Zoom in or out the current picture.(Some pictures or videos may not be operated.)
-
A-B: Setup repeat play segment.
-
REPEAT: Allows you to repeat single, random, shuffle and folder.
-
FB: Fast Backward
-
NEXT: Next
-
FF: Fast Forward
29.PREV.: Previous
-
RED: Invalid.
-
BLUE: Invalid.
-
GREEN: Invalid.
-
YELLOW: Invalid.
1.6 Installation of Batteries

natural_image
Three technical line drawings of a rectangular electronic component with mounting holes and a handle (no text or symbols)-
Open the back lid of the remote control.
-
Install two 7#(AAA)1.5V batteries.
Ensure the correct polarity of the batteries.
- Cover the back lid.
Please take out of the batteries from the remote control for long time of no use.
If the remote control doesn't work properly, please carry out the following checks.
- Check the TV is turned on.
- Check the polarity of the batteries are correct.
- Check the batteries are not drained.
- Check the power supply is normal or the power cord is correctly connected.
- Check there are no special fluorescent light or neon light around.
2. Basic Operation
2.1 Power ON/OFF
- Connect the power cord to the AC input. Insert the power cord into the appropriate socket.
- Press the Power switch to switch on the TV, then press Power button to turn on the unit.
- Press the Power switch again to switch off the TV.
Note: After switch off the TV, please don't immediately re-open the power switch, should be delayed one minute more to re-open the power switch.
2.2 Setting of Standby Mode
- Press ( ⏻ button to turn on the unit.
- Press ( ⏻) button again to return the display to standby mode. The power indicator turns red.
- Be sure not to set your TV in standby mode for a long period of time.
2.3 Selection of Input Mode
This set has different signal source modes, you may continue to press the Source button to select a signal source.
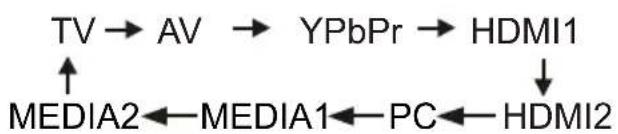
flowchart
graph TD
    TV --> AV --> YPbPr --> HDMI1
    TV --> MEDIA2 <-- MEDIA1 <-- PC <-- HDMI2
    YPbPr --> HDMI1
    HDMI2 --> HDMI2
When selecting the signal source, the screen will display the information.
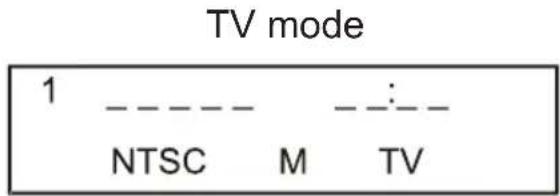
When there is no signal from the selected source, the warning message will be displayed as per illustration. Either change the channel in TV mode or press Source button to change source.
No Signal
2.4 Menu Option Adjustment
After you have installed the batteries into the remote control, you will need to set some preferences on the L D TV, using the menu system.
- The buttons for menu option adjustment include: Menu, ▲, ▼ ◀, ▶ Enter buttons.
- Press the Menu button to open the OSD Menu, then press ◀, ▶ button to select the pages. The pages are displayed in the following sequence (circular display):

flowchart
graph LR
    A["CHANNEL"] --> B["PICTURE SOUND"]
    B --> C["TIME"] --> D["OPTION"]
Note: "CHANNEL" is only for TV.
① Mees button to display the menu system.
② Press ◀, ▶ button to select the menu pages.
3 Press ▶, and then press ▲ ▼ button to select an item.
4 Press ◀, ▶button to select or adjust a setting.
⑤ If you do not make a selection within 10 seconds, the menu will close automatically.
6 Press the Menu button to return or exit OSD menu.
2.5 Menu Functions 2.5.1 PICTURE Function
- Press MENU key to display the main menu on the screen.
- Press ◀/▶ key to select "Picture" option.
- Press ▼ key to enter "Picture" submenu.

Picture Mode
Your TV has four picture settings (Standard, Mild, User, Dynamic.) that are preset at the factory. Only "User" mode can be set to your preference by adjusting particular items such as Contrast, Brightness, Sharpness, Tint, Color.
- Press ▲/▼ key to select "Picture Mode" option.
- Press ENTER key to select one picture mode.

User settings for PICTURE (Contrast, Brightness, Color, Sharpness, Tint)
Your set has several settings which allow you to control picture quality.
- Press ▲/▼ key to select a particular item.
- Press ◀/▶ key to decrease or increase the value of a particular item.
Note: The adjusted values are stored according to the selected particular item.
Contrast: Adjusts the lightness and darkness between objects and the background.
Brightness: Adjusts the brightness of the picture.
Color: Adjusts the colors, making them lighter or darker.
Sharpness: Adjusts the outline of objects to either sharpen them or make them more dull.
Tint: Adjusts the color of objects, making them more red or green for a more natural look.
Tint can only be adjusted when signal is NTSC.
Adjusting the Color Temperature
You can change the color of the entire screen according to your preference.
- Press ▲/▼ key to select "Color Temp" option.
- Press ◀/▶ key to select one color temp.
Cool: Makes whites bluish. Medium: Keeps whites white. Warm: Makes whites reddish.
Noise Reduction
You can change the picture quality by adjusting this item.
- Press ▲/▼key to select "Noise Reduction" option,
- Press ENTER or ▶ key to go into the subitem,
- Press ENTER Key to select one option.
2.5.2 SOUND Function
- Press MENU key to display the main menu on the screen.
- Press ▲/▼ key to select "Sound" option.
- Press ▶ key to enter "Sound" submenu.
Sound Mode
You can select the type of special sound settings to be used when watching a given broadcast.
Your TV has five sound settings (Standard, Music Movie Sports, Used.) that are preset at the factory.
- Press ▲/▼ key to select "Sound Mode" option.
- Press ENTER key to select one sound mode.
Balance
If the volumes of the left speaker and the right speaker are not the same, you can adjust the "Balance" to suit your personal preference.
- Press ▲/▼ key to select "Balance" option.
- Press ◀/▶ key to decrease or increase the value of the item.


Auto Volume
Each broadcasting station has its own signal conditions, and it is inconvenient to adjust the volume every time the channel is changed. "Auto Volume" automatically adjusts the volume of the desired channel by lowering the sound output when the modulation signal is high or by raising the sound output when the modulation signal is low.
- Press ▲/▼ key to select "Auto Volume" option.
- Press ◀/▶ key to select "On" or "Off".
Surround Sound
Select the Surround Sound.(Off / On)
2.5.3 CHANNEL Function
- Press MENU key to display the main menu on the screen.
- Press ◀/▶ key to select "Channel" option.
- Press ▶ key to enter "Channel" submenu.
Tune Type
- Press ▲/▼ key to select "Tune Type" option.
- Press ◀/▶ key to select "Cable" or "Air".

Auto Tuning
The TV auto matically cycles through all of the available channels and stores them in memory.
- Press ▲/▼Key to select "Auto Tuning" option.
- Press ENTER or ▶ Key, then a notice window will be displayed on the screen.
When Searching, press MENU key to exit tuning at any moment. - After all the available channels are stored, the searching menu will exit.
ATV Manual Tuning
Current CH Set the channel number
Color system Select the color system
PAL/SECAM/NTSC
Sound System Select the sound system (DK/BG/MN/I)

Fine-Turn Adjust the frequency of the channel finely.
AFC Automatic Fine tuning.
Search Press ◀ to seach down from the current frequency, and press ▶ to search up.

2.5.4 TIME Function
Time
- Press MENU key to display the main menu on the screen.
- Press ▲/▼ key to select the "TIME" option,
- Press ▼ key to enter "TIME" submenu.

Sleep Timer
- Press ▲/▼ key to select "Sleep Time" option,
- Press ▲/▼ key repeatedly until the desired time apprars (off, 10min, 20min, 30min, 60min, 90min, 120min, 180min, 240min)
- Press ENTER key to confirm.
Auto Sleep
- Press ▲/▼ key to select "Auto sleep" option,
- Press ENTER key to gointo the subitem.
- Press ▲/▼ key to select "off, 3H,4H,or 5H"
- Press ENTER key to confirm.
OSD Time
- Press ▲/▼ key to select "OSD Time" option,
- Press ENTER key to gointo the subitem.
- Press ▲/▼ key to select "off, 5s, 10s, 15s, 20s, 25s or 30s"
- Press ENTER key to confirm.
2.5.5 OPTION Function
- Press MENU key to display the main menu on the screen.
- Press ◀/▶ key to select "Option" option.
- Press ENTER key to enter "Option" submenu.

OSD LANGUAGE
You can modify the OSD set to suit your user preferences.
- Press ▲/▼ key to select "OSD LANGUAGE option.
- Press ENTER or ▶ key to display the OSD setting menu.
- Press ◀/▶ to select the proper language.
- Press ENTER to confirm.
Aspect Ration
You can modify the picture size to suit your user preferences.
1、Press ◀/▶ key to select Aspect Ratio option.
2、Press ENTER or ▶ key to display the Aspect Ration setting menu.
3、Press ▲/▼ to select one setting.
4、Press ENTER button to confirm and return.
Blue Screen
- Press ▲/▼ key to select "Blue Screen" option.
- Press ◀/▶ key to choose on or off.

Caption
The caption feature has two options:
Adjustment only for TV, AV input signal.
- Captions: An onscreen display of the dialogue, narration, and sound effects of the videos that are closed captioned (usually marked as "C/C" in TV listings).
- Text: An onscreen display of information not related to the current program, such as weather or stock data (when provided by individual stations).
To view captions or text:
① Press the Menu button, and then press ◀ or ▶ button until the "OPTION" menu appears.
② Press ▲ or ▼ button to highlight the "Caption" item and then press ENTER button to enter Sub-menu.
③ Press ▲ or ▼ button to choose one of "CC1", "CC2", "CC3", "CC4", "Text1", "Text2", "Text3", "Text4", "Off" as follows,
• To view captions, highlight "CC1", "CC2", "CC3" or "CC4".
Note: If the program or video you selected is not closed captioned, no captions will display onscreen.
• To view text, highlight "Text1", "Text2", "Text3" or "Text4".
Note: If text is not available in your area, a black rectangle may appear onscreen. If this happens, turn off the Closed Caption feature.
Note: A closed caption signal may not display in the following situations,
- when a videotape has been dubbed.
- when the signal reception is weak.
- when the signal reception is nonstandard.
④ Press "ENTER" to select this function.
⑤ Press the Menu button to return or exit.
Note: You can also press CCD button repeatedly on the remote control to change the CC mode.
Parent Control
Some programs and movies include signals that classify the content of the program (dialog, language, sex, violence). The "Parent Control" control feature in this detects the signals and blocks the programs according to your selections. To use this feature, perform the following setup.
Adjustment only for TV, AV input signal.
① Press the Menu button, and then press ◀ or ▶ button until the "Option" menu appears.
② Press ▲ or ▼ button to highlight the "Parent Control" item.
③ Input the initial password "0000" and the contral menu will display display on the screen.

④ Press ENTER and then a menu will occur on screen.

Parent Control
• Using the "Set Password" item
① When enter the "Enter Password" select "Set Password".
② Use 0\~9 buttons to input your OLD password.
③ Use 0\~9 buttons to input your new password.
④ Use 0\~9 buttons to confirm your password.
⑤ If it is correct, will auto return.
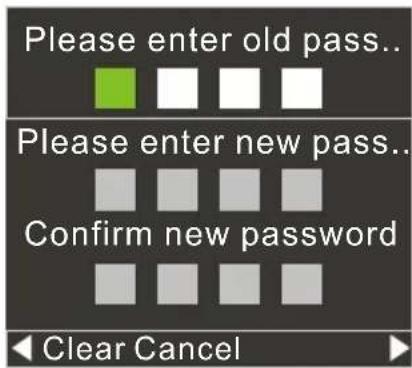
• Using the "Lock System" item
① When enter the "Enter Password" Sub-menu, select "Lock System".
② Press ◀/▶ button to "on" or "off".
③ Press the Menu button to return or exit.
Note: "Input Block", "V-Chip", "Canada" is only for "System Lock On".
• Using the "TV RATING" item
① When enter the "Enter Password" Sub-menu, then select "TV".
② Press ▲, ▼, ◀, ► button to select an item,
③ Press ENTER key to Block (display "🔒") or unblock
④ Press the Menu button to return or exit.

Parent Control
The aged-based TV Guideline and content themes you can lock are listed as follows,
| Item | Description and Content Themes |
| TV-Y | All children (This program is designed to be appropriate for all children.) |
| TV-Y7 | Directed to older children (This program is designed for children aged 7 and above.)Note: Programs in which fantasy violence may be more intense or more combative than other programs in this category. |
| TV-G | General audience (Most parents would find this program suitable for all ages.) |
| TV-PG | Parental Guidance Suggested (This program contains material that parents may find unsuitable for younger children.)D) Some suggestive dialogL) Infrequent coarse languageS) Some sexual situationsV) Moderate violence |
| TV-14 | Parents strongly cautioned (This program contains some material that many parents would find unsuitable for children under 14 years of age.)D) Intensely suggestive dialogL) Strong, coarse languageS) Intense sexual situationsV) Intense violence |
| TV-MA | Mature audience only (This program is specifically designed to be viewed by adults and therefore may be unsuitable for children under 17.)L) Crude or indecent languageS) Explicit sexual situationsV) Graphic violence |
• Using the "MPAA RATING" item
① When enter the "Enter Password" Sub-menu, then select "MPAA".
② Press ◀ or ▶ button to select an item, Block (display "Lock") or unblock
③Press the Menu button to return or exit.
Parent Control
The MPAA rating you can select are described as follows:
| Item | Description and Content Themes |
| G | General audience (Appropriate for all ages) |
| PG | Parental Guidance Suggested (Some material may not be suitable for children.) |
| PG-13 | Parents strongly cautioned (This material may be inappropriate for children under 13.) |
| R | Restricted (Under 17 requires accompanying parent or adult guardian.) |
| NC-17 | Not intended for anyone 17 and under |
| X | X-rated (For adults only) |
• Using the "Canada English RATING" item
① When enter the "Enter Password" Sub-menu, then select "Canada English".
② Press ◀ or ▶ button to select an item Block (display "Lock") or unblock
③Press the Menu button to return or exit.
| Item | Description and Content Themes |
| C | Children |
| C8+ | Children 8 years and older |
| G | General programming |
| PG | Parental guidance |
| 14+ | Viewers 14 and older |
| 18+ | Adult programming |
• Using the "Canada French RATING" item
① When enter the "Enter Password" Sub-menu, then select "Canada French".
② Press ◀ or ▶ button to select an item, Block (display "Lock") or unblock
③Press the Menu button to return or exit.
| Item | Description and Content Themes |
| G | Children |
| 8ans+ | Not recommended for younger children |
| 13 ans+ | Not recommended for ages under 13 |
| 16 ans+ | Not recommended for ages under 16 |
| 18 ans+ | This program is restricted to adults |
2.6 Multimedia
2.6.1 MEDIA Function
USB Introduction
This TV is embedded with one USB port digital media player. It can find devices that support USB1.1/2.0, including flash disk, USB hard disk and digital camera. It supports functions as: Display pictures, Play music files, Play video files, Display text files.
Note: please do not remove the cable during the data transfer. It may cause problems for the system.
| Multimedia data | Format |
| Image | JPEG; BMP; PNG |
| Music | MP3, WMA |
| Video | MPEG-1(.DAT/.MPG)MPEG-2(.MPG/.VOB)MPEG-4(.AVI/.MP4)Digital movies |
| TXT | .txt |
2.6.2 USB Remote

- ▶: Press one time to pause, press again to playback.
- ■: Stop the playback and return to file list.
- A-B: Setup repeat play segment.
- REPEAT: Allows you to repeat single, random, shuffle and folder.
- ◀◀: Press the buttons to visually search backward at 2X - 4X - 8X - 16X speed.
- ▶▶: Skipforward.
- ▶▶: press the buttons to visually search forward at 2X - 4X - 8X - 16X speed.
- ◀◀: Skipbackward.
2.6.3 USB Function
※ Adjustment of the USB
① Press the SOURCE button, and then press ▲ or ▼ button to highlight the "MEDIA" item and then press ENTER button.
② Press ◀ or ▶ button to highlight the "PHOTO", "MUSIC", "MOVIE", "TEXT" item and then press ENTER button.
③ Press the SOURCE button to return or exit.

2.6.4 PHOTO
A、Press ◀ or ▶ to select folder or file, press ENTER button to enter next folder, press EXIT to return previous folder.
B、Press ◀ or ▶ to select the PHOTO that you want, press ENTER button to select playlist than press ▶ button to play.
C、Press Display button to the media item.
D、Press ◀ or ▶ button to highlight the media and than press ENTER button

Play/pause, Previous, Next, Stop, Repeat ALL, Music Off, Playlist, Info.

Rotate, Rotate, Zoom In, Zoom Out, Move View.
2.6.5 MUSIC
A、Press ◀ or ▶ to select folder or file, press ENTER button to enter next folder, press EXIT to return previous folder.
B、Press ◀ or ▶ to select the MUSIC that you want, press ENTER button to select playlist than press ▶ button to play.
C、Press Display button to the media item.
D、Press ◀ or ▶ button to highlight the media and than press ENTER button

Play/pause, Fast Backward, Fast Forward, Previous, Next, Stop, Repeat ALL, MUTE.

Playlist, Info., Goto Time.
2.6.6 MOVIE
A、Press ◀ or ▶ to select folder or file, press ENTER button to enter next folder, press EXIT to return previous folder.
B、Press ◀ or ▶ to select the MOVIE that you want, press ENTER button to select playlist than press ▶ button to play.
C、Press Display button to the media item.
D、Press ◀ or ▶ button to highlight the media and than press ENTER button

Play/pause, Fast Backward, Fast Forward, Previous, Next, Stop, Repeat ALL, Set A/B

Playlist, Info. , Slow Fw, Step Fw, Goto Time, Zoom In, Zoom Out, Aspect Ratio

Move View.
2.6.7 TEXT
A、Press ◀ or ▶ to select folder or file, press ENTER button to enter next folder, press EXIT to return previous folder.
B、Press ◀ or ▶ to select the TEXT that you want, press ENTER button to select playlist than press ▶ button to play.
C、Press Display button to the media item.
D、Press ◀ or ▶ button to highlight the media and than press ENTER button

Prev Page, Next Page, Previous, Next, Stop, Music Off, Playlist, Info.

- Technical Specification
| Product Model | TV-5407LED |
| Screen Size | 32" diagonal |
| Aspect Ratio | 16:9 |
| Power Supply | AC 100-240V~, 50/60 Hz |
| Power Consumption | 60W |
| TV System | NTSC M PAL M/N |
| Audio Output Power (Internal) | 5WX2 |
| Input Terminal | + Antenna Input (F Type) x 1 VGA (D-Sub 15 Pin Type) x 1+ HDMI Connector x 2 Y Pb Pr Input Terminals x 1+ Video Input RCA Terminals x 1+ Stereo Audio x 1 RCA x 1 (Phone Jack for VGA)+ USB x 2 |
| Output Terminal | + 1 set of Video output RCA Terminals + Audio Line Out |
| Outline Size (LxWxH)(mm) without stand with stand | 731x81x437 731x190x468 |
| Working Temperature | 0°C~40°C |
| Working Humidity | 20% ~ 80% Non-condensing |
Note: The specifications shown above may change without notice for quality improvement.
AUDIO LINE OUT (3.5mm pin type)
It is used for the external amplifier connection. The audio output level can be controlled by the volume button. In order to obtain better quality of sound, user can preset the volume level at the middle position before connecting to external devices. When plug in the jack, the audio sound of TV will be automatically cut off.
Remind: -- Preset the volume of TV set to your desired level before disconnecting the audio signal cable.
4. Supported Signal Modes
A. VGA Mode
| Resolution | Horizontal Frequency (KHz) | Vertical Frequency (Hz) |
| 640 x 480 31.50 60.00 | ||
| 800 x 600 | 35.16 56.25 | |
| 37.90 60.00 | ||
| 1024 x 768 48.40 60.00 |
Note: You're suggested to use the VGA connecting cord of not more than 5 meters to ensure the appropriate picture quality.
B. YPbPr Mode
| Resolution | Horizontal Frequency (KHz) | Vertical Frequency (Hz) |
| 480i 15.734 59.94 | ||
| 480p(720x480) 31.468 59.94 | ||
| 576i 15.625 50.00 | ||
| 576p(720x576) 31.25 50.00 | ||
| 720p(1280x720) | 37.50 50.00 | |
| 45.00 60.00 | ||
| 1080i | 28.13 50.00 | |
| 33.75 60.00 | ||
| 1080P(1920x1080) | 67.50 60.00 | |
| 56.25 50.00 | ||
C. HDMI Mode
| Resolution | Horizontal Frequency (KHz) | Vertical Frequency (Hz) |
| 480p | 31.468 | 59.94 |
| 576p | 31.25 | 50.00 |
| 720P | 45.00 | 60.00 |
| 1080i | 33.75 | 60.00 |
| 1080P(1920X1080) | 67.50 | 60.00 |
- When the signal received by the Display exceeds the allowed range, a warning message will appear on the screen.
- You can con rm the input signal format onscreen.
5. Simple Troubleshooting
If the display fails or the performance changes dramatically, check the Display in accordance with the following instructions. Remember to check the peripherals to pinpoint the source of the failure.
| Symptom Solution | |
| Power cannot be turned on.(Power indicator does not light.) | -Check that both ends of the power cable are plugged into the socket appropriately and the wall socket is operational. |
| No Input Signal message appears. | -Check that the signal line is connected properly.-Check that the power of the relevant peripherals is turned on.-Check that the Input option that has been selected matches with the input signal. |
| The remote control does not function properly. | -Check the batteries are not drained.(Use new batteries.)-Check that the remote control is within the operating range.-Check that the remote control is pointed to the remote control window on the display.-Check that there are no obstacles between the remote control and the remote control window. |
| Flashing spots or stripes appear on the screen. | -Check that there are no emission (Car, HV cable or Neon lamp) or other possible interference sources. |
| Image colour or quality deteriorates. | -Check that all the video settings are adjusted appropriately, such as brightness, contrast, colour etc.-For more information about video settings, refer to OSD Functions in Chapter 2. |
| Screen position and size are incorrect. | -Check that the screen position and size is adjusted appropriately. |
| Image or colour is incorrect. | -Check that the signal line is connected properly.-When connecting to a PC, you can change the resolution of the PC to acquire the correct image.The discrepancy of the PC output signal may affect the display of the image. |
| Display warning message. | -Check that the input signal line is properly fixed.-Select the correct input signal.-For more information, refer to Supported Signal Modes in Chapter 4. |
- ESTIMADO CLIENTE
- SONIDO
- PREZADO CLIENTE
- DEAR CUSTOMER
- CAUTION
- NOTE
- PRECAUTION
- Attention:
- IMPORTANT INFORMATION
- CONTENTS
- Connection and Preparation of TV.... 2
- Basic Operation.... 5
- Multimedia 17
- Connection and Preparation of TV
- Accessories
- Installation of Stand
- Installation of Wall Mount Kit(Optional)
- Keys and Interfaces
- Remote Control
- Installation of Batteries
- Basic Operation
- Power ON/OFF
- Setting of Standby Mode
- Selection of Input Mode
- Menu Option Adjustment
- Menu Functions 2.5.1 PICTURE Function
- Picture Mode
- Adjusting the Color Temperature
- Noise Reduction
- SOUND Function
- Sound Mode
- Balance
- Auto Volume
- CHANNEL Function
- Tune Type
- Auto Tuning
- ATV Manual Tuning
- TIME Function
- Time
- Sleep Timer
- Auto Sleep
- OSD Time
- OPTION Function
- OSD LANGUAGE
- Aspect Ration
- Blue Screen
- Caption
- Parent Control
- Multimedia
- MEDIA Function
- USB Introduction
- USB Remote
- USB Function
- PHOTO
- MUSIC
- MOVIE
- TEXT
- Supported Signal Modes
- Simple Troubleshooting
Brand : Premier
Model : TV-5407LED
Category : Television