
TV-5432UHD - Television Premier - Free user manual and instructions
Find the device manual for free TV-5432UHD Premier in PDF.


| Product Type | LED TV |
| Screen Size | 50 inches (127 cm) diagonal |
| Aspect Ratio | 16:9 |
| Resolution | 3840 x 2160 (4K UHD) (inferred) |
| Power Supply | AC 100-240V~, 50/60 Hz |
| Power Consumption | 160 W |
| TV System | NTSC M, ATSC, MPEG2 MP@HL, AC-3 |
| Audio Output (Internal) | 8 W x 2 (stereo) |
| Input Terminals | Antenna (F-type) x1, VGA (D-Sub 15-pin) x1, HDMI x4, YPbPr x1, Composite Video (RCA) x1, Stereo Audio (RCA) x1, PC Audio (3.5mm) x1, USB x1 |
| Output Terminals | Earphone (3.5mm) x1, Coaxial (S/PDIF) x1, Line Out (RCA) x1 |
| Dimensions (without stand) | 1118 x 56 x 641 mm (W x D x H) |
| Dimensions (with stand) | 1118 x 225 x 678 mm |
| Weight | Approximately 12 kg (estimate) |
| Operating Temperature | 0°C to 35°C |
| Operating Humidity | 20% to 80% (non-condensing) |
| Wall Mount Compatible | Yes (VESA, optional kit) |
| Remote Control | Includes batteries (AAA x2) |
| Picture Modes | Standard, Dynamic, Soft, User |
| Sound Modes | Standard, Music, Movie, Sports, User |
| Closed Caption | Analog and Digital support |
| Parental Lock | Password-protected input blocking |
| Media Playback | USB: Photo, Music, Movie |
| Setup Wizard | Initial channel and language setup |
Frequently Asked Questions - TV-5432UHD Premier
User questions about TV-5432UHD Premier
0 question about this device. Answer the ones you know or ask your own.
Ask a new question about this device
Download the instructions for your Television in PDF format for free! Find your manual TV-5432UHD - Premier and take your electronic device back in hand. On this page are published all the documents necessary for the use of your device. TV-5432UHD by Premier.
USER MANUAL TV-5432UHD Premier
natural_image
Front view of a modern flat-screen TV displaying a black screen with a white accent (no text or symbols visible)ESTIMADO CLIENTE
natural_image
Technical line drawing of a computer chassis with internal components and connectors (no text or symbols)natural_image
Simple line drawing of a rectangular electronic device with a handle and base plate (no text or symbols)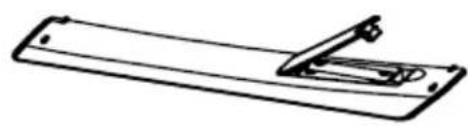
natural_image
Simple line drawing of a rectangular object with a handle and internal slot (no text or symbols)
natural_image
Simple line drawing of a rectangular electronic component with two internal slots (no text or symbols)Escaneo Automático

Favoritos

Etiqueta de Canal

natural_image
Mountain peak at sunset with lake in background, no visible text or symbols on the landscape itselfnatural_image
Front view of a modern flat-screen TV displaying a black screen with a white accent (no text or symbols visible)PREZADO CLIENTE
ESPECIFICAÇÕES......22
natural_image
Technical line drawing of a computer chassis with visible internal components and mounting brackets (no text or symbols)natural_image
Simple line drawing of a rectangular electronic component with a handle and mounting bracket (no text or symbols)natural_image
Simple line drawing of a folding paper or binder (no text or symbols)
Favoritos

Etiqueta de Canal

natural_image
Mountain peak at sunset with lake in background, no visible text or symbols on the landscape itselfnatural_image
Front view of a modern flat-screen TV with a black screen and stand (no visible text or symbols)DEAR CUSTOMER
In order to achieve the best performance of your product, please read this instruction manual carefully before using, and keep it for future reference.
If you need extra support, please write to info@premiermundo.com

CAUTION
RISK OF ELECTRIC SHOCK, DO NOT OPEN

Caution: To reduce the risk of electric shock do not open this device, there are not serviceable parts for customers. Please refer any maintenance or repair to qualified personnel.
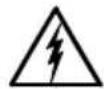
This sign means the existence of dangerous voltage at the inside of the unit, which states a risk of electric shock.

This sign means that there are important instructions of operation and handling in the manual that comes with this device.
PREMIER CUSTOMER SERVICE
| Venezuela: | 0800 – ELECTRIC (353-2874) |
| Panama: | 507 300-5185 |
| Website | www.premiermundo.com |
| E-mail: | servicioalcliente@premiermundo.com |
NOTE
This unit may be submitted to changes in specifications, characteristics and/or operation without prior notice to the user, in order to continue improving and developing its technology.
IMPORTANT SAFETY INSTRUCTIONS
-
Read these instructions – All the safety and operating instructions should be read before this product is operated.
-
Keep these instructions – The safety and operating instructions should be retained for future reference.
-
Heed all warnings – All warnings on the appliance and in the operating instructions should be adhered to.
-
Follow all instructions – All operating and use instructions should be followed.
-
Do not use this apparatus near water – The appliance should not be used near water or moisture – for example, in a wet basement or near a swimming pool, and the like
-
Clean only with dry cloth.
-
Do not block any ventilation openings. Install in accordance with the manufacture's instructions.
-
Do not install near any heat sources such as radiators, heat registers, stoves, or other apparatus (including amplifiers) that produce heat.
-
Do not defeat the safety purpose of the polarized or grounding plug. A polarized plug has two blades with one wider than the other. A grounding plug has two blades and a third grounding prong. The wide blade or the third prong is provided for your safety. If the provided plug does not fit into your outlet, consult an electrician for replacement of the obsolete outlet.
-
Protect the power cord from being walked on or pinched particularly at the plugs, convenience receptacles, and at the point where they exit from the apparatus.
-
Only use attachments/accessories specified by the manufacturer.
-
Use only with the cart, stand, tripod, bracket, or table specified by the manufacturer, or sold with the apparatus. When a cart or rack is used, use caution when moving the cart/apparatus combination to avoid injury from tip-over.
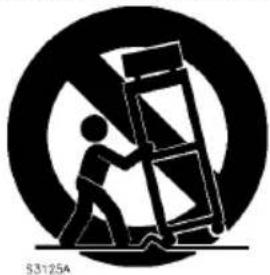
natural_image
Silhouette of a person climbing a ladder inside a circle with a diagonal line (no text or symbols)-
Unplug the apparatus during lightning storms or when unused for long periods of time
-
Refer all servicing to qualified personnel. Servicing is required when the apparatus has been damaged in any way, such as power supply cord or plug is damaged, liquid has been spilled or objects have fallen into the apparatus has been exposed to rain or moisture, does not operate normally, or has been dropped.
-
CAUTION: These servicing instructions are for use by qualified service personnel only. To reduce the risk of electric shock, do not perform any servicing other than that contained in the operating instructions unless you are qualified to do so.
-
Do not install this equipment in a confined or building-in space such as a book case or similar unit, and remain a well ventilation conditions at open site. The ventilation should not be impeded by covering the ventilation openings with items such as newspaper, table-cloths, curtains etc.
-
WARNING: To reduce the risk of fire or electric shock, do not expose this apparatus to rain or moisture. The apparatus shall not be exposed to dripping or splashing and that objects filled with liquids, such as vases, shall not be placed on apparatus.
-
WARNING: The battery (battery or batteries or battery pack) shall not be exposed to excessive heat such as sunshine, fire or the like.
- WARNING: The mains plug is used as disconnect device, the disconnect device shall remain readily operable.

- This equipment is a Class II or double insulated electrical appliance. It has been designed in such a way that it does not require a safety connection to electrical earth.

21.
- This lightning flash with arrowhead symbol within an equilateral triangle is intended to alert the user to the presence of non-insulated “dangerous voltage” within the product’s enclosure that may be of sufficient magnitude to constitute a risk of electric shock.
- Warning: To reduce the risk of electric shock, do not remove cover (or back) as there are no user-serviceable parts inside. Refer servicing to qualified personnel.
- The exclamation point within an equilateral triangle is intended to alert the user to the presence of important operating and maintenance instructions in the literature accompanying the appliance.
Warning: Changes or modifications to this unit not expressly approved by the party responsible for compliance could void the user's authority to operate the equipment.
NOTE: This equipment has been tested and found to comply with the limits for a Class B digital device, pursuant to Part 15 of the FCC Rules. These limits are designed to provide reasonable protection against harmful interference in a residential installation. This equipment generates, uses and can radiate radio frequency energy and, if not installed and used in accordance with the instructions, may cause harmful interference to radio communications.
However, there is no guarantee that interference will not occur in a particular installation. If this equipment does cause harmful interference to radio or television reception, which can be determined by turning the equipment off and on, the user is encouraged to try to correct the interference by one or more of the following measures:
□ Reorient or relocate the receiving antenna.
□ Increase the separation between the equipment and receiver.
□ Connect the equipment into an outlet on a circuit different from that to which the receiver is connected.
□ Consult the dealer or an experienced radio/TV technician for help.
CONTENTS
1. Connection and Preparation of TV...... 2
1.1 Accessories 2
1.2 Installation of Stand.... 2
1.3 Installation of Wall Mount Kit(Optional....2
1.4 Keys and Interfaces.... 3
1.5 Remote Control....4
1.6 Installation of Batteries.... 5
2. Basic Operation.... 5
2.1 Power ON/OFF 5
2.2 Setting of Standby Mode.... 5
2.3 Selection of Input Mode....5
2.4 Menu Option Adjustment....6
2.5 Setup Wizard 7
2.6 S L CT INPUT SOURC 8
2.6.1 Main Menu....8
2.7 Main Menu Operation.... 9
2.7.1 Picture Menu....9
2.7.2 Sound Menu.... 11
2.7.3 Time Menu....12
2.7.4 Setup Menu....13
2.7.5 Lock Menu....16
2.7.6 Channel Menu....17
2.7.7 PC Menu....18
2.8 Media OP RATION....19
2.8.1 Photo Menu....20
2.8.2 Music Menu....21
2.8.3 Movie Menu....22
- Technical Specification.... 23
- Supported Signal Modes....24
- Simple Troubleshooting ....25
1. Connection and Preparation of TV
1.1 Accessories
★ User Manual x 1
★ Remote Control x 1
★ Battery (UM-4/R03P/AAA) x 2
★ Wall Mount Kit x 1 (Pre-assembled)(Optional)
1.2 Installation of Stand

natural_image
Technical line drawing of a laptop chassis showing internal components and external casing (no text or labels)- Place the TV with the front panel facing downwards on the soft cloth or soft pads on a desk.
- Please put the PVC sticker on the turning axle fristly
- Insert the stand into the bottom socket of the TV.
- Insert the screws into the sockets and tighten them.
1.3 Installation of Wall Mount Kit(Optional)
The Wall Mount Kit can help install the TV on the wall.
For more information about wall mounting, please refer to the instructions provided along with the wall mount kit.
When wall mounting the product, please contact qualified personnel.
If users choose to install the TV by themselves, the producer is irresponsible for any possible damages caused either to the product or to persons.
1.4 Keys and Interfaces
The design and specification takes actual products as the standard

-
Remote sensor window
-
Power indicator
-
Speaker
-
Power switch
-
Menu key
-
Program “+” key
-
Program “-” key
-
Volume “+” key
-
Volume “-” key
-
Source key
-
Standby key
-
Power plug input
-
AUDIO LINE OUT
14.COAXIAL output
15.AV input
16.YPbPr input
17.PC(VGA) input
18.RF in
19.PC AUDIO input
20.LINE OUT
21.HDMI1
22.HDMI2
23.HDMI3
24.HDMI4
25.USB
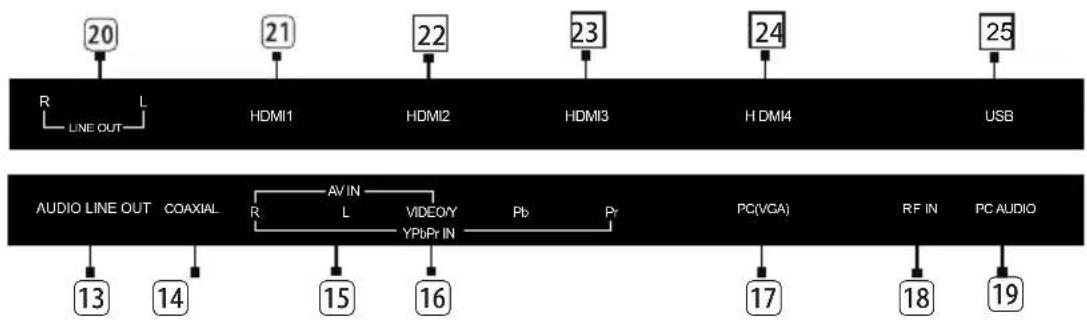
flowchart
graph TD
    A["20"] --> B["R LINE OUT"]
    B --> C["L HDMI1"]
    C --> D["21"]
    D --> E["HDMI2"]
    E --> F["22"]
    F --> G["HDMI3"]
    G --> H["23"]
    H --> I["HDMI4"]
    I --> J["24"]
    J --> K["USB"]

    L["AUDIO LINE OUT"] --> M["13"]
    N["COAXIAL"] --> O["R AVIN L"]
    O --> P["15"]
    P --> Q["VIDEO/Y YPI/Pr IN"]
    Q --> R["Pb"]
    R --> S["Pr"]
    S --> T["PC(VGA)"]
    T --> U["17"]
    V["RF IN"] --> W["18"]
    X["PC AUDIO"] --> Y["19"]
1.5 Remote Control

- STANBY: Standby turn on and off.
- SOURCE: Select the signal source.
- 0\~9: Continue to press the keys to select a channel.
-
- :Dot button and minor channel number.Enter to confirm.
- RECALL: Return to previous channel.
- CH LIST: Channel list
- INFO:Display
- SLEEP: Enactment time of power off.
- FREEZE: Freeze the picture.
- VOL+: Increase the volume.
- CHA: Select the channel forward.
- MUTE: Mute sound.
- VOL-: Decrease the volume.
- CHV: Select the channel backward.
- MENU: Enter or exit menu.
- EXIT: Exit current setting and clear menu.
- ▲,▼,◀,▶ key: The menu item selection.
- ENTER: Confirm or enter.
- MTS: Multi-channel sound.
- CCD: Change the CCD mode ;
- EPG:Enter or exit EPG(Electronic Program .Guide)
- P.MODE: Select the picture mode.
- AUTO: Adjust picture only for VGA.
- S.MODE: Select the sound mode.
- ZOOM: Zoom in or out the current random, shuffle and folder.
- ADD/ ERASE:Add current channel to favorite list or delete ot.
- FAV-:Select the favorite channel forward.
- FAV.LIST: Favorite channel list
- FAV+: Select the favorite channel backward.
- ▶Press one time to pause, press again to playback.
- Next.
- ■ Stop the playback and return to file list.
- Previous.
1.6 Installation of Batteries

- Open the back lid of the remote control.
- Install two 7#(AAA)1.5V batteries. Ensure the correct polarity of the batteries.
- Cover the back lid. Please take out of the batteries from the remote control for long time of no use.
If the remote control doesn't work properly, please carry out the following checks.
- Check the TV is turned on.
- Check the polarity of the batteries are correct.
- Check the batteries are not drained.
- Check the power supply is normal or the power cord is correctly connected.
- Check there are no special fluorescent light or neon light around.
2. Basic Operation
2.1 Power ON/OFF
- Connect the power cord to the AC input. Insert the power cord into the appropriate socket.
- Press the Power switch to switch on the TV, then press Power button to turn on the unit.
- Press the Power switch again to switch off the TV.
Note: After switch off the TV, please don't immediately re-open the power switch, should be delayed one minute more to re-open the power switch.
2.2 Setting of Standby Mode
- Press ( ⏻ button to turn on the unit.
- Press (⏻) button again to return the display to standby mode. The power indicator turns red.
- Be sure not to set your TV in standby mode for a long period of time.
2.3 Selection of Input Mode
This set has different signal source modes, you may continue to press the Source button to select a signal source.

flowchart
graph TD
    TV --> AV --> Component --> HDMI1
    Media --> PC --> HDMI3
    HDMI1 --> HDMI2
When selecting the signal source, the screen will display the information.
TV mode
6-0
When there is no signal from the selected source, the warning message will be displayed as per illustration. Either change the channel in TV mode or press Source button to change source.
No Signal
2.4 Menu Option Adjustment
After you have installed the batteries into the remote control, you will need to set some preferences on the L D TV, using the menu system.
- The buttons for menu option adjustment include: Menu, ▲, ▼, ◀, ▶ Enter buttons.
- Press the Menu button to open the OSD Menu, then press ◀, ▶ button to select the pages. The pages are displayed in the following sequence (circular display):

flowchart
graph LR
    A["Picture"] --> B["Sound"]
    B --> C["Time"]
    C --> D["Setup"]
    D --> E["Lock"]
    E --> F["Channel"]
Note: "CHANNEL" is only for TV.
① Press the Menu button to display the menu system.
② Press button to select the menu pages.
③ Press ▲, ▼ button to select an item.
4 P ress ◀, ▶button to select or adjust a setting.
5 If you do not make a selection within 30 seconds, the menu will close automatically.
6 Press the Menu button to return or exit OSD menu.
2.5 Setup Wizard
Connect an RF cable from the Tv's input called "RF-In" and to your TV Aerial socket.
Select Language
Press ◀ / ▶ button on the remote control to select the language to be used for menus and message.
Press ▼ / ▲ button on the remote control to select go to next step and press ENTER/▶ button to go.

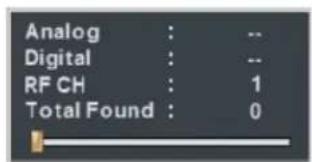
Auto Scan
Press ◀ / ▶ button on the remote control to select the antenna type.
Press ▼ / ▲ button on the remote control to select go to next step and press ENTER/▶ button to start auto scan.
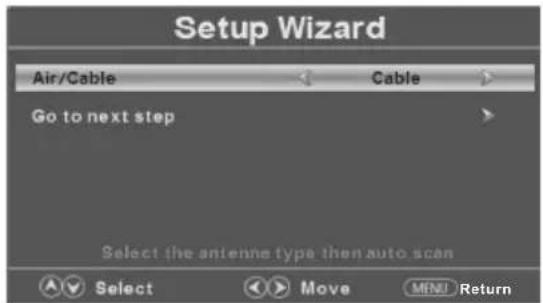

2.6 SELECT INPUT SOURCE

Press SOURCE to display the input source list, Press ▼ / ▲ or SOURCE to select the input source you want to, Press ENTER button to enter the input source, Press EXIT button to quit.
2.6.1 Main Menu

Press MENU to display the main menu or return to the previous menu or close the main menu. Press ◀ highlight the desired menu icon, and press ENTER to select.
If no buttons are pressed, the menu will close automatically after about 30 seconds
2.7 Main Menu Operation
2.7.1 Picture Menu
Press MENU to enter the main menu, Press button to select.
Press ENTER / ▼ to enter.
Press MENU again to exit or back to parent menu.
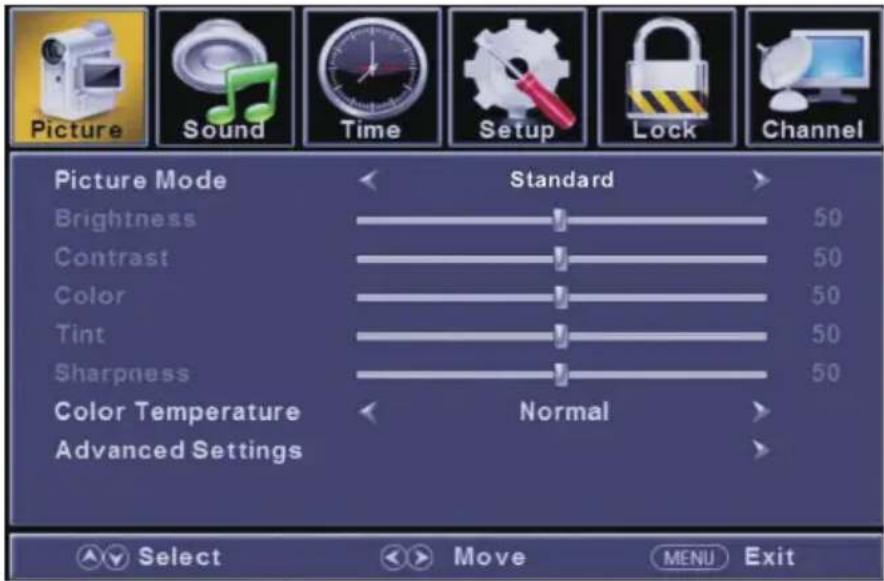
Press ▼ / ▲ button to select among Picture Mode /Brightness/ Contrast / Color / Tint / Sharpness / Color Temperature/
Advanced Settings.
Press ENTER
Press ◀ / ▶ button to adjust.
Press MENU again or back to parent menu.
【Picture Mode】
Adjust picture mode to change picture appearance.
Press button to select(Standard / Dynamic / Soft / User).
Note: The brightness, contrast, color, tint and sharpness are only available in User mode, you can adjust as you like.
Standard Produces a highly defined image in a normally lit room.
Dynamic Produces a highly defined image in a brightly lit room.
Soft Produces a highly defined image in a soft lit room.
User Select to customize picture settings.
【Brightness】
Adjust the visual perception output of the entire picture, it will effect the iuminousness of the picture.
Press ◀ / ▶ button to adjust.
【Contrast】
Adjust the highlight intensity of the picture, but the shadow of the picture is invariable.
Press ◀ / ▶ button to adjust.
【Color】
Adjust the saturation of the color based on your own like.
Press ◀ / ▶ button to adjust.
【Tint】
Adjust the hue(Red, Green, Blue) of the picture.
Press ◀ / ▶ button to adjust.
【Sharpness】
Adjust the peaking in the detail of the picture.
Press ◀ / ▶ button to adjust.
【Color Temperature】
Increase or reduce warm color of the picture personally(red), and the cool color personally(blue) according to your like.
| Normal | Increase the sex-linked colors for the white. |
| Warm | Increase the red color for the white. |
| Cool | Increase the blue tone for the white. |
【Advanced Settings】
Adjust advanced video features to fine tune the picture.
Press ▶bustubmtenenter
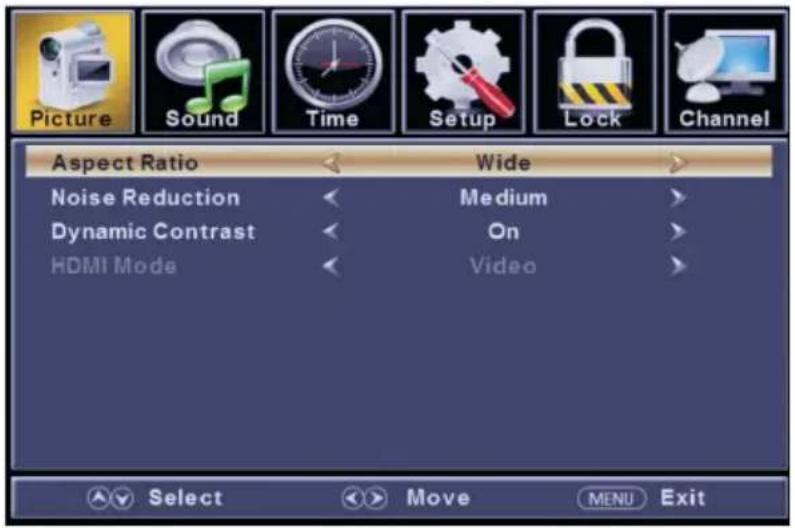
【Aspect Ratio】
Adjust how the picture fills the screen.
| Normal | Automatically adjust Aspect Ratio based on TV size and TV program. |
| Wide | Use to watch wide screen(16:9) content. |
| Zoom | Expands image to fill screen. Top and button maybe cut off. |
| Cinema | Stretches image at edges but keeps a clear image in the center. |
【Noise Reduction】
Set options to reduce video noise.
| Off | Select to turn off video noise detection. |
| Low | Detect and reduce low video noise. |
| Medium | Detect and reduce moderate video noise. |
| High | Detect and reduce enhanced video noise. |
| Auto | Detect and reduce video noise automatically |
【Dynamic Contrast】
Automatically adjust picture detail and brightness.
Press ◀ / ▶ button to select (Off/On).
【HDMI Mode】
Only available in HDMI input.
Press ◀ / ▶ button to select (Video/Graphic).
2.7.2 Sound Menu
Press MENU to enter the main menu, Press button to select.
Press ENTER / ▼ to enter.
Press MENU again to exit or back to parent menu.
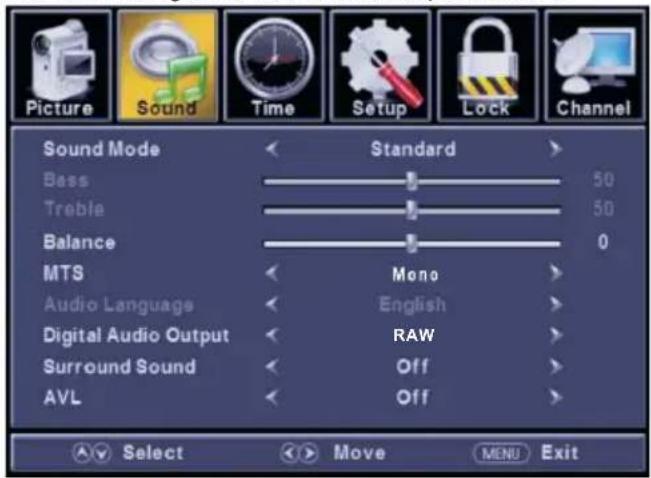
Press ▼ / ▲ button to select among sound mode/ Bass / Treble / Balance /MTS/Audio Language /Digital Audio Output/ Sorround Sound / AVL / speaker
Press ENTEREN
Press ◀ / ▶ button to adjust.
Press MENU again or back to parent menu.
【Sound Mode】
Select a sound mode to achieve ideal sound.
Press ◀ / ▶ button to select(Standard / Music / Movie / Sports / User).
Note: The bass and treble are only available in User mode, you can adjust as you like.
| Standard | Produces a balanced sound in all environments. |
| Music | Preserves the original sound. Good for musical programs. |
| Movie | Enhances treble and bass for a rich sound experience. |
| Sports | Enhances vocals for TV audio. |
| User | Select to customize audio settings. |
[Bass]
Adjust the bass effect. Increases or decreases lower-pitched sounds.
Press ◀ / ▶ button to adjust.
【Treble】
Adjust the treble effect. Increases or decreases high-pitched sounds.
Press ◀ / ▶ button to adjust.
【Balance】
Adjust the balance between left and right speakers to adapt to your listening position.
Press ◀ / ▶ button to adjust.
【MTS】
Obisfignly esvalhebheuntiAttrack sound.
Press ◀ / ▶ button to select(Mono/Stereo/SAP).
Mono Sets the sound to mono.
Stereo Sets the sound to stereo when stereo is not available, the sound is automatically switched to mono.
SAP Sets the sound to the second audio program.
【Audio Language】
Select the anisubegin supported by the chosen digital channel
Press ◀ / ▶ button to select(English / French / Spanish).
Send digital audio to external audio system.
Press ◀ / ▶ button to select.
PCM Select to output audio in 2-channel stereo
RAW Original image coded date.
Off Set digital audio output off.
【AVL】
Set the auto volume control.
Press ◀ / ▶ button to select(On / Off).
NOTE:
Balance: This item can adjust the speaker's output, it enables you to listen to best at your position.
AVL: This item uses for reducing the difference between channel and program's
volume automatically.
it made the overall water to be even. This function will also reduce the fluctuation of the sound.
2.7.3 Time Menu
Press M ENVU to enter the main menu, Press button to select.
Press ENTER / ▼ to enter.
Press M ENU again to exit or back to parent menu.
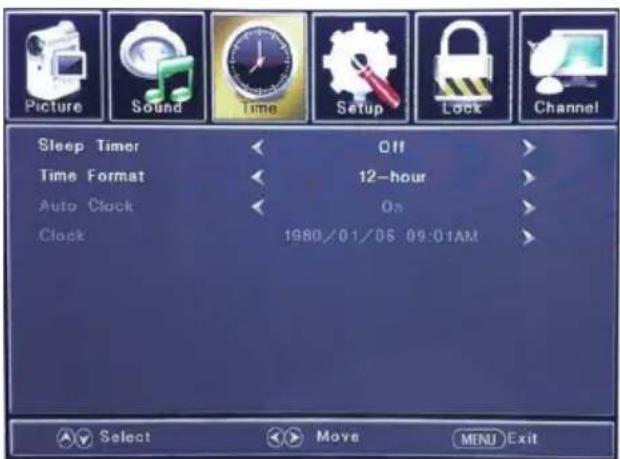
Press ▼ / ▲ button to select among Sleep Timer / Time Zone / Daylight Saving Time / Time Format / Auto Clock / Clock.
Press ENTERdr.▼
Press ◀ / ▶ button to adjust.
Press MENU again or back to parent menu.
【Sleep Timer】
Set a timer for the TV to turn off automatically.
Press◀/▶ button to select(12-hour/24-hour).
【Auto Clock
Utestorslynchadalze the Display automatically.
Press ◀ / ▶ button to select(On / Off).
2.7.4 Setup Menu
Press MENU to enter the main menu, Press button to select.
Press ENTER / ▼ to enter.
Press MENU again to exit or back to parent menu.

Press ▼ / ▲ button to select among Menu Language / Transparent / OSD Timeout / Closed Caption / Over Scan/ Input Label / Other settings / Restore Default / Setup Wizard.
Press ENTER
Press ◀ / ▶ button to adjust.
Press MENU again or back to parent menu.
【Menu language】
Select an OSD menu language can be displayed. Default English is selected as menu language.
Press ◀ / ▶ button to select language(English / Français / Español).
【Transparent】
Adjust the transparency of the OSD (on screen display) menu.
Press ◀ / ▶ button to select.(0%,25%,50%,75%,100%)
【OSD Time out】
Adjust the duration of the OSD (on screen display) menu.
Press ◀ / ▶ button to select.(5 Sec.,15Sec.,30Sec.,45Sec.,60Sec.
【Closed Caption】
Adjust Closed Captioning settings. Only available under TV and AV source.
Press ENTER/▶ button to enter.
For detail please refer to page 14.
Close Caption
【C】 Mode
Turn Closed Captioning on/off.
Press ◀ / ▶ button to select(CC Off / CC On / CC OnMute).
【A】alog CC
Set Closed Captioning for standard(analog) program.
Press ◀ / ▶ button to select (CC1/CC2/CC3/CC4/Text1/Text2/Text3/Text4)
【Digital CC】
Set Closed Captioning for digital program.
Press ◀ / ▶ button to select(Off / Service1 / Service2 / Service3 / Service4 / Service5 / Service6).
【Option】
Adjust the digital Closed Captioning setting.
Press ▶ button to enter.
【Mode
Set the look of digital Closed Captioning. Automatic uses broadcaster's style.
Press ◀ / ▶ button to select(Default / Custom).
【F】nt Style
Select from 8 font styles.
Press ◀ / ▶ button to select(Default / Font 0 / Font 1 / Font 2 / Font 3 / Font 4 / Font 5 / Font 6 / Font 7).
【Font Size
Adjust the size of the digital Closed Captioning font.
Pressvbutton to select(Default /Normal / Small / Large)
【Font Edge Style
Adjust the edge of the digital Closed Captioning box.
Press ◀ / ▶ button to select(Default / None / Raised / Depressed / Uniform / Left Shadow / Right Shadow).
【Font Edge Color
Adjust the color of the digital Closed Captioning box.
Press ◀ / ▶ button to select(Default/ Black / White / Red / Green / Blue / Yellow / Magenta / Cyan).
【FG Color】
Adjust the color of the digital Closed Captioning font.
Press button to select(Default/ White / Red / Green / Blue / Yellow / M agenta / Cyan) .
【BG Color】
Adjust the digital Closed Captioning background color.
Press ◀ / ▶ button to select(Default/ White / Red / Green / Blue / Yellow / Magenta / Cyan)
【FG Opacity】
Adjust the transparency of the digital Closed Captioning font.
Press ◀ / ▶ button to select(Default / Solid / Flashing / Translucent / Transparent).
【BG Opacity】
Adjust the digital Closed Captioning background transparency.
Press ◀ / ▶ button to select(Default / Solid / Flashing / Translucent / Transparent).
【Over Scan】
Press ◀ / ▶ button to select(On / Off).
It is only available to enter 1080i/720p/1080p in DTV/Component/HDMI. Default is On.
It fixed set to be Off in PC/USB. / ATV/AV.
【Input Labels】
Create labels for the devices connected to your TV.
Press ENTER/▶button to enter.

【Other Settings】
Set the parameter of audio only, no signal power off and no operation power off.
Press ENTER/▶button to enter.

【Blue Screen】
To select the transition type required while changing from one channel to another
Press ◀ / ▶ button to select(On / Off).
【Audio Only】
Play the audio with the picture turned off. When you turn the Audio Only on and exit the OSD menu, the panel will be dark; and then press any key to exit the Audio Only status.
Press ◀ / ▶ button to select(On / Off).
【Restore Default】
Change power on options or reset TV to factory default.
Press ENTER/▶ button to enter.

【Setup Wizard】
Set the first time installation.
Press ENTER / button to enter
2.7.5 Lock Menu
Press MENU to enter the main menu, Press button to select.
Press ENTER / ▼ to enter.
Press MENU again to exit or back to parent menu.
Press ▼ / ▲ button to select among Change Password / Input Block
Press ENTER/
Press ◀ / ▶ button to adjust.
Press MENU again or back to parent menu.
Enter your 4-digital password. Default password is 0000, and if forget what you set, please call the service center.


2.7.6 Channel Menu
Press MENU to enter the main menu, Press button to select.
Press ENTER / ▼ to enter.
Press MENU again to exit or back to parent menu.

Press ▼ / ▲ button to select among Air/Cable / Auto Scan / Favorite/Channel List / Show/Hide / Channel Number / Channel Label.
Press ENTER
Press button to adjust.
Press MENU again or back to parent menu.
【Air/Cable】
Select signal type
Press ◀ / ▶ button to select(Air/Cable).
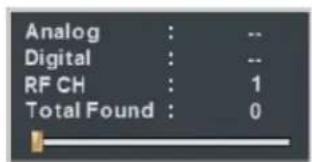
【Auto Scan】
Automatically search for channels.
Press ENTER/▶ button to enter.


[Favorite]
Add channels to create a favorite list.
Press ▶ button to enter.
【Channel List】
Display your program list.
Press ▶ button to enter.
【Show/Hide】
Show or hide the channels in your program list.
Press ▶ button to enter.

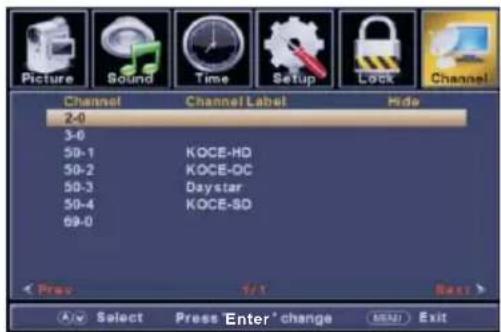
【Channel Number】
Show the channel number
Press ◀ / ▶ button to adjust.
【Channel Label】
Create labels for channels ,up to 7 characters.
Press ◀ / ▶ button to adjust.

2.7.7 PC Menu
Press SOURCE to select PC source.
Press MENU to enter the main menu,
Press Button to select Setup menu.
Press ▼ to select PC Settings

Press▼ / ▲ button to select among
H-Pos/V-Pos/Clock/Phase/Auto/Reset
PC Settings.
PressENTER
Press ◀ / ▶ button to adjust.
Press MENU again or back to parent menu.
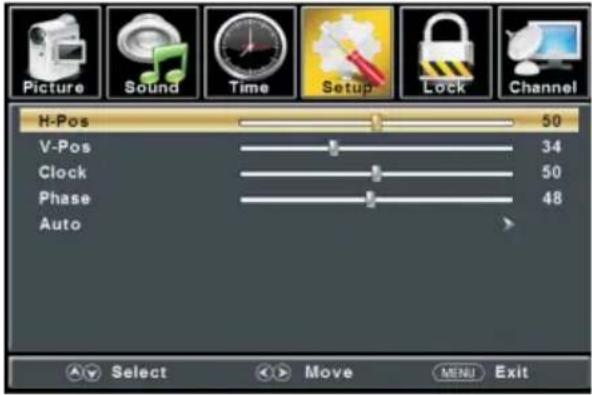
【H-Pos】
Adjust the horizontal position of the picture.
Press ◀ / ▶ button to adjust.
【V-Pos】
Adjust the vertical position of the picture.
Press button to adjust.
【Clock】
Minimize vertical stripes in the screen image.
Press button to adjust.
【Phase】
Minimize horizontal distortion.
Press ◀ / ▶ button to adjust.
【Auto】
Adjust to the PC signal timing automatically.
Press ▶ button to enter.
\*Notes:
- PICTURE menu and description are the same as that for mode.
- Audio Language in SOUND menu is invalid.
- TIME menu and description are the same as that for mode.
- Close Caption in SETUP menu is invalid.
5.US, Canada, RRT Setting and Reset RRT in LOCK menu is invalid.
6.PC mode has no CHANNEL menu.
2.8 Media OPERATION
Note: Before operating Media menu, Plug in USB device, then press SOURCE button to set the Input Source to Media. Press ◀ / ▶ button to select Media in the Source menu, then press Enter button to enter.

Press ◀ / ▶ button to select the option you want to adjust in the main Media menu, then press Enter button to enter.
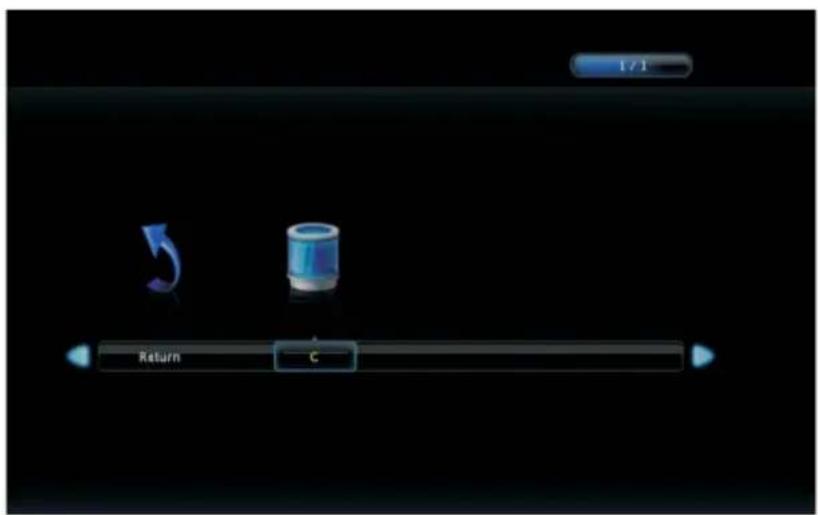
2.8.1 Photo Menu
Press ◀ / ▶ button to select PHOTO in the main menu, then press Enter button to enter.
Press menu button to return back to the previous menu and exit menu to quit.
Press ◀ / ▶ button to select drive disk you want to watch, then press button to enter.Enter
Press ◀ / ▶ button to select return option to back to the previous menu.

Press ◀ / ▶ button to select the file you want to watch in the file selecting menu, then press media button to display picture.
When highlighting the option you select, the file information will appear on the right and picture will be previewed in the center.

natural_image
Mountain peak at sunset with layered mountain silhouette, displayed in a video player interface (no text on main image)Press ◀ / ▶ button to select the file folder you want to search in the file selecting menu, then press red or Enter button on your remote control to enter sub-menu.
Press ◀ / ▶ button to select the file you want to delete in the file selecting menu, then press red button and press button to delete files.on your remote control Enter
2.8.2 Music Menu
Press ◀ / ▶ button to select MUSIC in the main menu, then press Enter button to enter.
Press menu button to return back to the previous menu and exit menu to quit.
Press ◀ / ▶ button to select drive disk you want to watch, then press button to enter.Enter
Press ◀ / ▶ button to select return option to back to the previous menu.
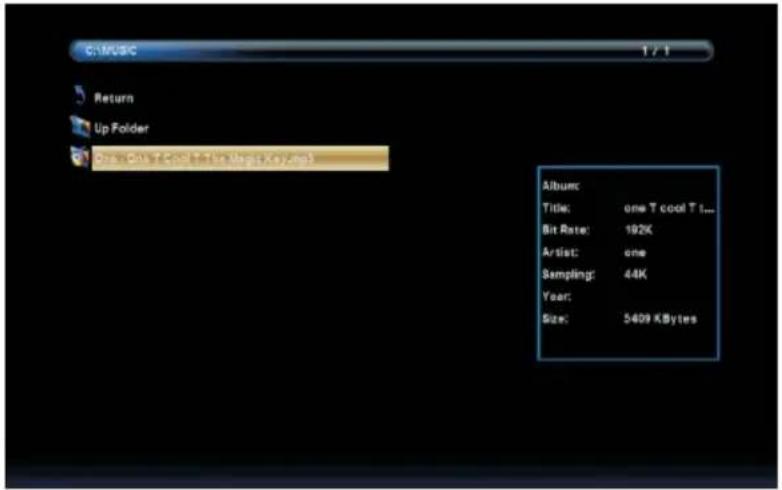
Press ◀ / ▶ button to select the file you want to watch in the file selecting menu,
then press Enter button to add the file to play list, press media button to display and operate file details.
When highlighting the option you select, the file information will appear on the right and picture
will be previewed in the center.
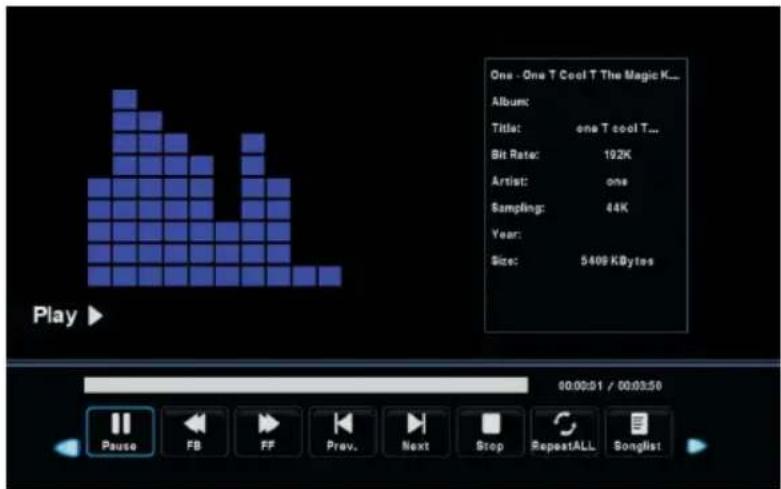
Press ◀ / ▶ button to select menu in the bottom you want to run, then press Enter button to operate.
Press Menu button to back to the previous menu and exit button to quit the entire menu.
2.8.3 Movie Menu
Press ◀ / ▶ button to select MOVIE in the main menu, then press Enter button to enter.
Press ◀ / ▶ to select folder or file, press ENTER button to enter next folder, press RECALL to return previous folder.
Press ◀ / ▶ to select the MOVIE that you want, press ENTER button to play.
Press◀ / ▶ button to highlight the media and than press ENTER button
![C:\MOV1\mp4 1 / 1 Return [MBMV].(6).MP4 [MBMV]2010:1107.935,-Mect.1863P.463P Resolution: 720 x 400 AudioTrack: 1 / 1 Subside: OFF Program: -70 Size: 226258 KBytes](/content/2026/05/863280/images/8d07591e23da8e7a7fb53255a6b738210c10d345fbcf087bae3c473b596f5882.jpg)
Press ◀ / ▶ button to select the file you want to watch in the file selecting menu,
then press Enter button to add the file to play list, press media button to display and operate file details.
When highlighting the option you select, the file information will appear on the right and picture will be previewed in the center.

Press ◀ / ▶ button to select menu in the bottom you want to run, then press Enter button to operate.
Press Menu button to back to the previous menu and exit button to quit the entire menu.
Press ▼ button to hide the menu int the bottom.
- Technical Specification
| Product Model | TV-5432UHD |
| Screen Size | 50" diagonal |
| Aspect Ratio | 16:9 |
| Power Supply | AC 100-240V~, 50/60 Hz |
| Power Consumption | 160W |
| TV System | NTSC M,ATSC,MP G2 MP@HL,AC-3 |
| Audio Output Power (Internal) | 8Wx2 |
| Input Terminal | Antenna Input (F Type) x 1♦ VGA (D-Sub 15 Pin Type) x 1♦ HDMI Connector x 4♦ Y Pb Pr Input Terminals x 1♦ Video Input RCA Terminals x 1♦♦ Stereo Audio x 1 RCA,x1(Phone ack for VGA USB x 1♦ |
| Output Terminal | ♦ 1 set of Earphone output 1 set of Coaxial output♦ 1 set of LINE output♦ |
| Outline Size (LxWxH)(mm) without stand with stand | 1118x56x641 1118x225x678 |
| Working Temperature | 0°C~35°C |
| Working Humidity | 20% ~ 80% Non-condensing |
Note: The specifications shown above may change without notice for quality improvement.
4. Supported Signal Modes
A. VGA Mode
| Resolution | Horizontal Frequency (KHz) | Vertical Frequency (Hz) |
| 640 x 480 31.50 60.00 | ||
| 800 x 600 | 35.16 56.25 | |
| 37.90 60.00 | ||
| 1024 x 768 48.40 60.00 |
Note: You're suggested to use the VGA connecting cord of not more than 5 meters to ensure the appropriate picture quality.
B. YPbPr Mode
| Resolution | Horizontal Frequency (KHz) | Vertical Frequency (Hz) |
| 480i 15.734 59.94 | ||
| 480p(720x480) 31.468 59.94 | ||
| 576i 15.625 50.00 | ||
| 576p(720x576) 31.25 50.00 | ||
| 720p(1280x720) | 37.50 50.00 | |
| 45.00 60.00 | ||
| 1080i | 28.13 50.00 | |
| 33.75 60.00 | ||
| 1080P(1920x1080) | 67.50 60.00 | |
| 56.25 50.00 | ||
C. HDMI Mode
| Resolution | Horizontal Frequency (KHz) | Vertical Frequency (Hz) |
| 480p | 31.468 | 59.94 |
| 576p | 31.25 | 50.00 |
| 720P | 45.00 | 60.00 |
| 1080i | 33.75 | 60.00 |
| 1080P(1920x1080) | 67.50 | 60.00 |
- When the signal received by the Display exceeds the allowed range, a warning message will appear on the screen.
- You can confirm the input signal format onscreen.
5. Simple Troubleshooting
If the display fails or the performance changes dramatically, check the Display in accordance with the following instructions. Remember to check the peripherals to pinpoint the source of the failure.
| Symptom Solution | |
| Power cannot be turned on.(Power indicator does not light.) | -Check that both ends of the power cable are plugged into the socket appropriately and the wall socket is operational. |
| No Input Signal message appears. | -Check that the signal line is connected properly.-Check that the power of the relevant peripherals is turned on.-Check that the Input option that has been selected matches with the input signal. |
| The remote control does not function properly. | -Check the batteries are not drained.(Use new batteries.)-Check that the remote control is within the operating range.-Check that the remote control is pointed to the remote control window on the display.-Check that there are no obstacles between the remote control and the remote control window. |
| Flashing spots or stripes appear on the screen. | -Check that there are no emission (Car, HV cable or Neon lamp) or other possible interference sources. |
| Image colour or quality deteriorates. | -Check that all the video settings are adjusted appropriately, such as brightness, contrast, colour etc.-For more information about video settings, refer to OSD Functions in Chapter 2. |
| Screen position and size are incorrect. | -Check that the screen position and size is adjusted appropriately. |
| Image or colour is incorrect. | -Check that the signal line is connected properly.-When connecting to a PC, you can change the resolution of the PC to acquire the correct image.The discrepancy of the PC output signal may affect the display of the image. |
| Display warning message. | -Check that the input signal line is properly fixed.-Select the correct input signal.-For more information, refer to Supported Signal Modes in Chapter 4. |
- ESTIMADO CLIENTE
- Escaneo Automático
- Favoritos
- Etiqueta de Canal
- PREZADO CLIENTE
- DEAR CUSTOMER
- CAUTION
- NOTE
- IMPORTANT SAFETY INSTRUCTIONS
- CONTENTS
- Connection and Preparation of TV...... 2
- Basic Operation.... 5
- Main Menu Operation.... 9
- Connection and Preparation of TV
- Accessories
- Installation of Stand
- Installation of Wall Mount Kit(Optional)
- Keys and Interfaces
- Remote Control
- Installation of Batteries
- Basic Operation
- Power ON/OFF
- Setting of Standby Mode
- Selection of Input Mode
- Menu Option Adjustment
- Setup Wizard
- Select Language
- Auto Scan
- SELECT INPUT SOURCE
- Main Menu
- Main Menu Operation
- Picture Menu
- 【Picture Mode】
- 【Brightness】
- 【Contrast】
- 【Color】
- 【Tint】
- 【Sharpness】
- 【Color Temperature】
- 【Advanced Settings】
- 【Aspect Ratio】
- 【Noise Reduction】
- 【Dynamic Contrast】
- 【HDMI Mode】
- Sound Menu
- 【Sound Mode】
- [Bass]
- 【Treble】
- 【Balance】
- 【MTS】
- 【Audio Language】
- 【AVL】
- NOTE:
- Time Menu
- 【Sleep Timer】
- 【Auto Clock
- Setup Menu
- 【Menu language】
- 【Transparent】
- 【OSD Time out】
- 【Closed Caption】
- Close Caption
- 【C】 Mode
- 【A】alog CC
- 【Digital CC】
- 【Option】
- 【Mode
- 【F】nt Style
- 【Font Size
- 【Font Edge Style
- 【Font Edge Color
- 【FG Color】
- 【BG Color】
- 【FG Opacity】
- 【BG Opacity】
- 【Over Scan】
- 【Input Labels】
- 【Other Settings】
- 【Blue Screen】
- 【Audio Only】
- 【Restore Default】
- 【Setup Wizard】
- Lock Menu
- Channel Menu
- Press ENTER
- 【Air/Cable】
- 【Auto Scan】
- [Favorite]
- 【Channel List】
- 【Show/Hide】
- 【Channel Number】
- 【Channel Label】
- PC Menu
- 【H-Pos】
- 【V-Pos】
- 【Clock】
- 【Phase】
- 【Auto】
- \*Notes:
- Media OPERATION
- Photo Menu
- Music Menu
- Movie Menu
- Supported Signal Modes
- Simple Troubleshooting
Brand : Premier
Model : TV-5432UHD
Category : Television