
W5-600MF - Oven Witt - Free user manual and instructions
Find the device manual for free W5-600MF Witt in PDF.


| Product Type | Built-in Electric Oven |
| Model | W5-600MF |
| Brand | Witt |
| Energy Source | Electric |
| Oven Capacity | 65 Liters |
| Dimensions (H x W x D) | 595 x 595 x 560 mm |
| Cutout Dimensions (H x W x D) | 590 x 560 x 550 mm |
| Weight | 28 kg |
| Power Consumption (Convection) | 3300 W |
| Heating Functions | Top Heat, Bottom Heat, Fan-Assisted, Grill, Defrost, Pizza Mode |
| Temperature Range | 50°C – 250°C |
| Control Type | Knob and Digital Display |
| Timer | Yes, with minute minder and auto shut-off |
| Interior Light | Yes, halogen |
| Cleaning Type | Hydrolytic (AquaClean) |
| Safety Features | Child Lock, CoolTouch Door, Overheat Protection |
| Door Type | Triple-Glazed, Removable Inner Glass |
| Oven Shelf (Number of Shelves) | 3 Shelf Levels |
| Accessories Included | 1 Baking Tray, 1 Wire Rack, 1 Grill Rack |
| Energy Efficiency Class | A+ |
| Voltage / Frequency | 220-240 V / 50 Hz |
| Warranty | 2 Years |
Frequently Asked Questions - W5-600MF Witt
User questions about W5-600MF Witt
0 question about this device. Answer the ones you know or ask your own.
Ask a new question about this device
Download the instructions for your Oven in PDF format for free! Find your manual W5-600MF - Witt and take your electronic device back in hand. On this page are published all the documents necessary for the use of your device. W5-600MF by Witt.
USER MANUAL W5-600MF Witt
User manual Witt ovens ENG
W5-450MF W5-600MF W7-900WMF
Indholdsfortegnelse
natural_image
Simple line drawing of a trash bin with no text or symbolsnatural_image
Two-panel illustration showing hands cleaning a kitchen appliance: one with liquid being poured into a oven, the other with cloth and paper on a door (no text or symbols)natural_image
Illustration of a hand holding a device with a grid-like structure and label B (no text or symbols on the diagram itself)natural_image
Close-up of a hand holding a small object against a metal rack (no visible text or symbols)natural_image
Illustration of a person using a tool on a device, with an upward arrow and labeled point A (no text or symbols beyond the label)natural_image
Illustration of a hand holding a document with arrows indicating movement (no text or symbols)natural_image
Close-up of a mechanical component with a hammer and bracket, no visible text or symbolsnatural_image
Illustration of a hand interacting with a laptop screen displaying two arrows (no text or symbols present)natural_image
Hand holding a wall-mounted device with a handle, no visible text or symbols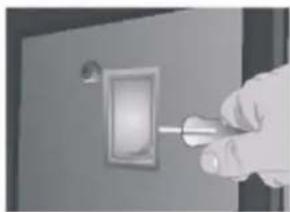
natural_image
Hand holding a tool interacting with an open electrical switch (no text or symbols visible)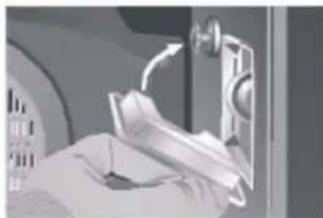
natural_image
Close-up of a hand using a tool to clean or adjust a component, no visible text or symbolsnatural_image
Close-up of hands using a tool to adjust a small object (no text or symbols visible)Fejlsøgning
| A | 557.0mm |
| B | 363mm |
| C | 440mm |
| D | 540.0mm |
| E | 595.0mm |
| F | 455.0mm |
| G | 15mm |
| H | 460.0mm |
| I | min 580.0mm |
| J | 450.0mm |
| K | 558-568.0mm |
| L | min. 10mm |
| M | 90.0mm |
Indbygningsmål
| Mål i mm | |
| A | 859mm |
| B | 470mm |
| C | 470mm |
| D | 535.0mm |
| E | 892.0mm |
| F | 480.0mm |
| G | 10mm |
| H | 485.0mm |
| I | min 550.0mm |
| J | 475.0mm |
| K | 860.0mm |
| L | 10.0mm |
| M | 90.0mm |
Garanti
Storms Hvidevareservice, tlf. 74 41 50 05
natural_image
Symbol of a trash bin crossed with no text or labelsnatural_image
Two-panel illustration showing hands cleaning a kitchen appliance: one with a bucket being poured into a microwave oven, the other with a cloth cleaning the interior (no text or symbols)Energisparråd
Ta ut ugnstegarna (W7-900WMF)
natural_image
Illustration of a hand holding a wire rack with a labeled component (B), no text or symbols present.Rengöring av ugnens tak (W7-900WMF)
natural_image
Close-up of a hand holding a small object with a labeled point A, against a metallic grid background (no text or symbols beyond the label)natural_image
Close-up of hands operating a mechanical device with a labeled component (A), no visible text or symbols.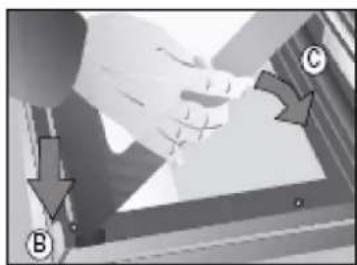
natural_image
Illustration of a hand holding a document with arrows indicating direction (no text or symbols)Avmontering av glasluckan (W7-900WMF)
natural_image
Close-up of a mechanical component with a circular symbol and arrow, no visible text or labelsnatural_image
Illustration of a person interacting with a laptop displaying two arrows (no text or symbols)natural_image
Close-up of a hand installing or adjusting a wall-mounted device with a handle (no visible text or symbols)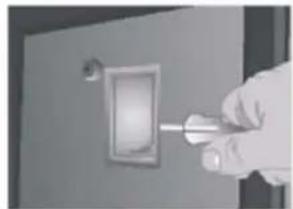
natural_image
Hand holding a tool interacting with an open electrical switch (no text or symbols visible)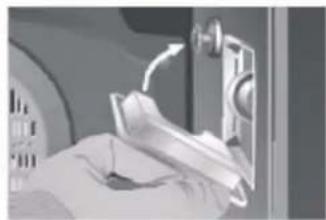
natural_image
Close-up of a hand cleaning a car door with a tool (no visible text or symbols)Byta glödlampa (W7-900WMF)
natural_image
Close-up of hands using a screwdriver to adjust a small component (no visible text or symbols)Felsökning
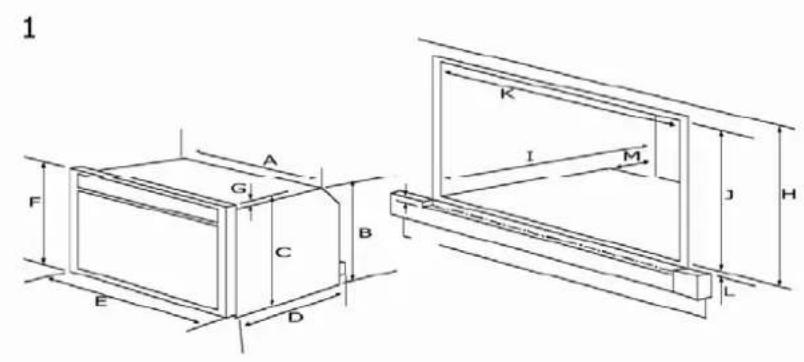
Inbyggnadsmått i mm
| A | 557.0mm |
| B | 363mm |
| C | 440mm |
| D | 540.0mm |
| E | 595.0mm |
| F | 455.0mm |
| G | 15mm |
| H | 460.0mm |
| I | min 580.0mm |
| J | 450.0mm |
| K | 558-568.0mm |
| L | min. 10mm |
| M | 90.0mm |
Inbyggnadsmått
| Mått i mm | |
| A | 557.0mm |
| B | 483.0mm |
| C | 564.0mm |
| D | 540.0mm |
| E | 595.0mm |
| F | 595.0mm |
| G | 31.0mm |
| H | min 600.0mm |
| I | min 580.0mm |
| J | 590mm |
| K | 558-568.0mm |
| L | min. 10mm |
| M | 90.0mm |
3
Inbyggnadsmått
| Mått i mm | |
| A | 859mm |
| B | 470mm |
| C | 470mm |
| D | 535.0mm |
| E | 892.0mm |
| F | 480.0mm |
| G | 10mm |
| H | 485.0mm |
| I | min 550.0mm |
| J | 475.0mm |
| K | 860.0mm |
| L | 10.0mm |
| M | 90.0mm |
Garanti
Description of the ovens....61
W5-450MF 61
W5-600MF 61
W7-900WMF 62
Safety notes....63
Ecological Packaging 64
Using the oven 65
Using The Programmer / Clock....65
Setting the time of day....66
How to change the alarm signal 66
Minute minder 66
Setting the Cook Time....66
Setting the End Time....67
Setting the Automatic Programmer 67
Cancellation of the automatic programmer 67
Good advice when using the programmer 68
Oven functions....69
Grill....71
Cleaning with steam 72
Cleaning and maintenance....73
Instructions for Removing the Supports and the Back Panel 73
Cleaning the Oven Door....74
Changing the oven bulb....75
Troubleshooting....77
Installation 78
Before installation 78
Before you start 78
Installing appliance under worktop 79
Securing the appliance....79
Connecting the electricity supply 80
Installation dimensions (W5-450MF) 81
Installation dimension (W5-600MF) 82
Installation dimension (W7-900WMF) 83
Guarantee....84
Service (Finland and Norway) 85
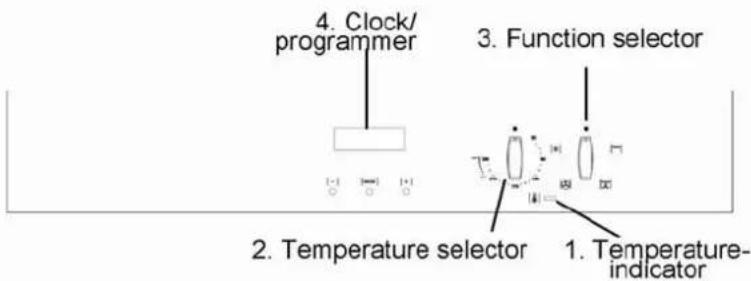
Description of the oven W5-450MF
| Function What does it do? | |
| 1. The temperature indicator | Illuminates when the oven has reached the temperature selected, signaling that pre-heating is completed. |
| 2. The temperature selector | Allows you to set the temperature required by recipes in °C. |
| 3. The function selector | Allows you to chose a function which best suits the food you are cooking. |
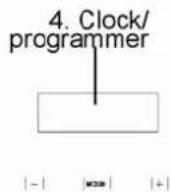
| 4. The clock / programmer | When not in use as a programmer displays the time of day. It is used also to act as a minute minder and also an auto programmer to activate the oven when you are not there. |
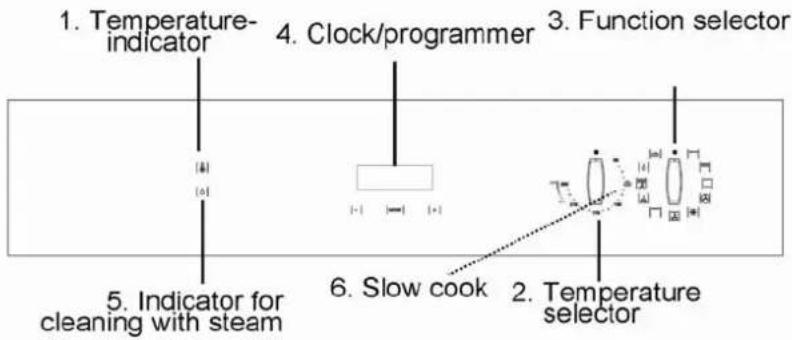
Description of the oven W5-600MF
| Function What does | it do? |
| 1. The temperature indicator | Illuminates when the oven has reached the temperature selected, signaling that pre-heating is completed. |
| 2. The temperature selector | Allows you to set the temperature required by recipes in °C. |
| 3. The function selector | Allows you to chose a function which best suits the food you are cooking. |
| 4. The clock / programmer | When not in use as a programmer displays the time of day. It is used also to act as a minute minder and also an auto programmer to activate the oven when you are not there. |
| 5. Cleaning with steam | Illuminates to show that the function is in use. |
| 6. The Slow Cook function | Is a set low temperature for long, slow cooking. |
Description of the oven W7-900WMF
| Function What does it do? | |
| 1. The temperature indicator | Illuminates when the oven has reached the temperature selected, signaling that pre-heating is completed. |
| 2. The temperature selector | Allows you to set the temperature required by recipes in °C. |
| 3. The function selector | Allows you to chose a function which best suits the food you are cooking. |
| 4. The clock / programmer When not in use as a programmer displays the time of day. It is used also to act as a minute minder and also an auto programmer to activate the oven when you are not there. | |
| 5. Cleaning with steam | Illuminates to show that the function is in use. |
- Function selector
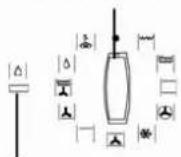
-
Cleaning with steam
-
Temperature selector
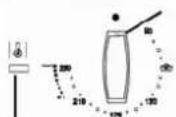
- Temperature indicator
Safety notes
Carefully read this Instruction Manual before use to get the best results from your oven. Due to the manufacturing process there may be residues of grease and other substances. To eliminate these, proceed as follows:
- Remove all the packaging material, including the protective plastic, if included.
- Select the function “conventional oven (top + bottom heat)” or “fanned oven” at 200 °C for one hour.
• To cool the oven open the door to allow ventilation and odours to escape from inside.
• After cooling, clean the oven and the accessories. - During the first use, fumes and odours may occur and the kitchen should therefore be well ventilated.
Electrical Safety
- Any repairs must be carried out by an authorized Service Agent, using original spare parts. Repairs carried out by other people, may cause damage or malfunction to the equipment and endanger your safety. It may also invalidate any warranty.
- Disconnect your oven if it breaks down.
Safety Notes
- The oven MUST NOT be operated with the door open.
- The appliance is not intended for use by young children or infirm persons without supervision. Young children should be supervised to ensure they do not play with the appliance.
- Do not allow children to approach the oven while it is in use, as high temperatures can be reached.
- The manufacturer will not be held responsible if this oven is used for anything other than domestic purposes.
- Only use the oven when it is installed within kitchen units.
- Do not store oils, fats or inflammable materials inside the oven, as it could be dangerous if the oven is switched on.
- Do not lean, sit or place food on the open door of the oven.
- Do not cover the bottom of the oven with aluminium foil.
- To use the oven, insert the tray or rack supplied onto the side guides inside the oven. The trays and racks are fitted with a system to facilitate partial extraction and make handling easier.
- Do not put containers or food on the floor of the oven. Always use the trays and grids.
- While using the oven, open the door as little as possible to reduce electricity consumption.
- When moving or removing hot dishes inside the oven, make sure you wear protective oven gloves.
- To cool the oven, open the door to allow ventilation and odours to escape from inside.
- It is not unusual for condensation to form on the door while the oven is in use - this is most common with foods which have a high moisture content.
- Parts of the appliance may become hot while in use. Always make sure that children are supervised when they are near to the appliance.
- Call Customer Care for a service engineer's visit if:
- You find over a period of time that the oven becomes hotter at a particular temperature – the thermostat may need replacing.
o The cooling fan fails to work.
- Always use the Minute Minder if you are leaving the oven unattended - this reduces the risk of food burning.
Ecological Packaging
The packaging materials are completely recyclable and can be used again. Check with your local authority on the regulations for disposing of this material.
The symbol 📋 on the product or on its packaging indicates that this product may not be treated as household waste. Instead it shall be handed over to the applicable collection point for the recycling of electrical and electronic equipment. By ensuring this product is disposed of correctly, you will help prevent potential negative consequences for the environment and human health, which could otherwise be caused by inappropriate waste handling of this product. Please contact your local city office, your household waste disposal service or the shop where you purchased the product.
Carefully read this Instruction Manual before use to get the best results from your oven. Due to the manufacturing process there may be residues of grease and other substances. To eliminate these, proceed as follows:
- Remove all the packaging material, including the protective plastic, if included.
- Select the Conventional oven function (top + bottom heat) or the Fanned oven function at 200 °C for one hour.
- To cool the oven open the door to allow ventilation and odors to escape from inside.
• After cooling, clean the oven and the accessories. - During the first use, fumes and odors may occur and the kitchen should therefore be well ventilated.
Using the oven
Through your programmer you will be able to set the time of day, the minute minder, and use the semi and fully automatic cooking functions. The programmer is vital to the working of your appliance, and reading this section will make sure that you get the most out of your oven(s).
The programmer buttons
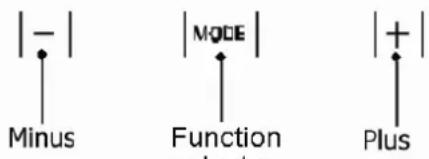
There are three buttons on this type of timer. The table below shows you what the symbols look like – depending on what model you have – and what they do.
This is a 24 hour clock. Before you use your appliance for the first time, you must ensure that the time of day is set.
- Before the oven can be used the time of day must be set.
- Use the selection buttons to choose function and temperature.
The function selector can be turned both ways.
The temperature selector can only be turned clockwise.
- The function can be changed during cooking as long as the oven is used manually and not programmed.
- You need to choose both a function and a temperature.
- The oven light comes on when the function selector is turned.
- Temperature indicator shows that the oven is warming. It turns off when the oven has reached the set temperature.
- To turn off the oven – set both the function and temperature selector on "0".
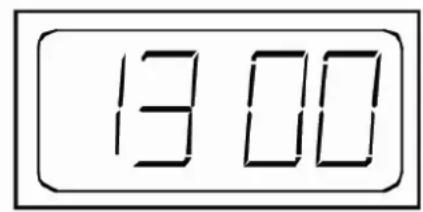
Clock/programmer
Through the clock/programmer you have the following opportunities:
• To set the time of day
- Set cook time, Set end time, Set automatic programmer
- Minute minder
The programmer buttons
There are three buttons on this type of timer. The table below shows you what the symbols look like – depending on what model you have – and what they do.
 | Down / MinusUsed to decrease cook / end time, remove minutes to the minute minder and adjust the time of day. Also used for selecting an alarm tone. |
 | Up / PlusUsed to increase the cook / end time, add minutes to the minute minder and adjust the time of day. |
| ModeUsed to select the functions available on the programmer.Press once for minute minder. Press twice for cook time. Press three times for end time.How to use these functions is explained later in this section. |
Setting the time of day
- Press the plus and minus buttons together for a few seconds and then release.
- The '●' in between the numbers on the LED display will begin to flash.
- While the 'I' is flashing, it is possible to adjust the time of day using the plus and minus buttons.
- Once the time has been set, allow approximately 30 seconds before using any of the other timer functions.
- This will ensure that the time of day remains correct.
Changing the alarm tone
- Press 'plus' and 'minus' simultaneously. There will be a blinking '●' in the centre of the display.
- Press 'mode' to display the text "ton" then press 'minus' button repeatedly to change the alarm tone.
Setting the minute minder
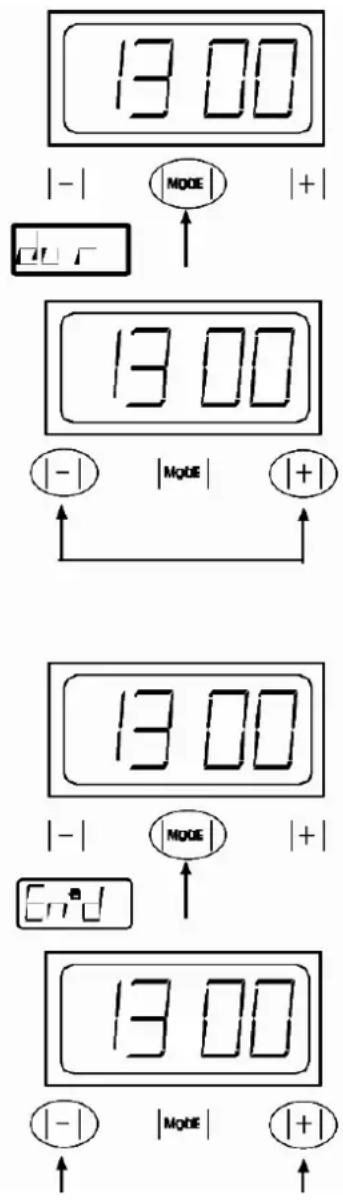
- To set the minute minder, touch 'mode' once. The bell symbol will appear and start flashing. The flashing only lasts for 5 seconds, so the minute minder must be set within this time.
- Use the plus and minus buttons to set the length of time required. Once this has been done, the minute minder is set.
- When the selected length of time has counted down an alarm will sound. To cancel the tone, touch any of the timer pads.
- Should you need to cancel the minute minder at any time during use, touch 'mode' once, and then touch the plus and minus together.
Semi – automatic cooking methods
The duration method. (Switch off after a set time period)
- Touch 'mode' twice, which will skip past the minute minder.
- The display will flash the word "DUR" and 'Auto' will flash on the left hand side of the display.
- Use the plus and minus to set the length of time you want to cook for. This must be done within 5 seconds – or the time of day will show again.
- Once this is done the oven will switch off once the cooking time has elapsed, and an alarm will sound.
- To switch off the alarm touch any of the touch pads.
- To view any remaining time, touch 'mode' twice.

The end time method (Switch off at a set end time)
- Touch 'mode' three times, which will skip past the minute minder and the duration method.
- The display will flash "END", 'Auto' will flash on the left hand side of the display.
- Use the plus and minus to select the time the oven is required to turn off.
- Once this is done the oven will switch off at the time you have selected. To switch off the alarm, touch any of the touch pads.
Fully automatic cooking
Switch on and off automatically
- This requires both the duration and the end time to be entered. The timer will work out the start time and begin cooking.
- Touch 'mode' twice, which will skip past the minute minder.
- The display will flash the word "DUR" and 'Auto' will flash on the left hand side of the display.
- Use the plus and minus to set the length of time you want to cook for. This must be done within 5 seconds, or the time of day will show again.
- Touch ‘mode’ three times, which will skip past the minute minder and the duration programmer.
- The display will flash "END" and 'Auto' will flash on the left hand side of the display.
- Use the plus and minus button to set the time you require the oven to switch off at.
- Once this is done, the oven will be set to switch off at the time you have selected.
- Set the oven to the temperature, switch on the oven and place your food inside. The oven light will not be illuminated at this point.
- The timer will then calculate the start time from the information you have programmed. The oven lights inside the cavity will switch on indicating that cooking has begun.
- Once cooking is completed, an alarm will sound and the oven will switch off. To cancel the alarm tone, press any button.
- To cancel any of the semi and full automatic functions at any time, press the plus and minus buttons together.
The automatic cooking symbol will appear to show that the oven is no longer in manual mode, but in automatic mode.
Important: Once the oven has switched off – return the oven controls to the ‘off’ position.
Important: Remove food as soon as it has cooked.
Good advice when using the programmer
Do
- Familiarize yourself with the use of the programmer.
- Select foods that are as cold as possible, preferably straight from the fridge.
- Choose foods that are suitable for cooking from a cold start, as some foods will be affected by storage at room temperature for prolonged periods of time.
- Make sure that all foods are thoroughly thawed – especially meats.
• Cover dishes with lids or foil. - Try to keep the end time as close to your return as possible.
Do not
- Place warm food in the oven for delayed start cooking. Foods should be thoroughly cooled before placing in the oven.
- Set up any automatic programs while the oven cavity is warm i.e. straight after use. Always allow the oven to cool down first.
- Cook dishes containing poultry or left over meats. Pies and pastries with wet fillings should also never be cooked using the automatic setting – they are not suitable.
• Over fill dishes containing liquids. - We recommend that you use the auto programmer under supervision for the first few occasions to ensure that timing and temperatures are correct. This will help to prevent over or under cooking of foods as adjustments can be made.
Oven functions
| Function | What is it |
 | Single variable grillUsed for grilling smaller amounts of food – only half of the grill element is used.Grill with oven door closed. |
 | Variable Dual GrillUsed for grilling larger amounts of food as the whole grill element is used.Grill with oven door closed. |
 | Conventional oven (top + bottom heat) (Not W5-450MF)Used for general cooking purposes and suits most recipes. |
 | Fanned ovenUsed for general cooking purposes. Provides an even heat throughout the oven, which is useful for batch baking. You may find that you need to reduce the temperature setting for recipes, or reduce the cooking time as this is a very efficient heat setting. |
 | DefrostUses the fan only (no heat). Ideal for defrosting frozen desserts and joints of meat. |
 | Intensive bake (top, bottom + fanned) (Not W5-450MF)Uses all elements, plus the fan. Best use is for baking with pastry cases as it eliminates the need to bake blind.) |
 | Top heat (Not W5-450MF) |
 | Base heat + fanUse for baking pastry dishes which require a crisp base, but have a moist filling which should not dry out. |
 | Grill + fan (Not W5-450MF)Used for grilling foods. The fan circulates the heat quickly around the food – and eliminates the need for turning on foods such as bacon which a thinly sliced.Grill with oven door closed. |
 | Cleaning with steam (Not W5-450MF)Oven cleaning function. See “Cleaning with steam” section for more information. |
 | Slow CookA low temperature function which is used to cook foods for a lengthy period. Produces very tender results with pot roasts etc. |
When using the fanned oven function for cooking, we recommend either reducing the temperature setting by around 10C, or reduce the recipe time by around 10 minutes – however, please bear in mind that all cooking results are based on personal preference and taste.
CAUTION:
When using the Single Variable Grill, Dual Variable Grill and the Grill Plus Fan Functions the oven door MUST remain closed.
NOTE:
To use slow cook set the 'slow cook' function by touching the icon and set the cooking time on the timer.
Using Your Grill
Before you start grilling
Before you use the grill, make sure you have placed the utensils in the position you need as once the grill is on you may injure yourself if you try to move the shelf.
• Always close the door while the grill is in use.
- Touch the Oven On icon
-
Touch the icon for the grill function. The pre-set heat setting will appear in the temperature display window.
-
The temperature indicator displays a set temperature for the cooking function selected. If you wish to modify this temperature, touch the temperature display screen until + and - flash. Then touch + or - to select the desired temperature.
While the grill is heating up, the “°” on the temperature display screen flashes to indicate that the oven is heating up. This will cycle on and off during cooking.
- To switch off, touch the Oven off icon.
- The dual grill uses the entire top element and is ideal for grilling large quantities of food, and toasting bread products
- The single grill uses part of the element only, and is better suited to grill smaller amounts of food.
Aluminium Foil
Never cover the grill pan or grill trivet with foil, or allow fat to build up in the grill pan, as this creates a fire hazard
- Types of grill:
○ Single grill: has one grill element.
o Dual grill: has two grill elements, which can be used together, or as a single grill
- Lowest temp - 50°C
• Highest temp - 250°C
- For best results:
o Pre-heat the grill for about 3 minutes.
- Please note: the grill pan handle is designed for sliding the grill pan into and out of the grill cavity. It is not to be used for lifted the pan.
Cleaning with steam
Description
The oven cleaning function featured in your oven is intended to help you keep your oven neat and tidy. An amount of cleaning solution is vaporised automatically. The combined effects of heat and steam soften the soil deposits on the oven wall enamel and facilitate their removal.
Activate oven cleaning
-
Remove the baking sheet and the universal baking pan from the oven. The baking grill may remain in the oven.
-
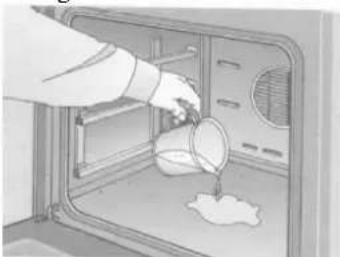
Pour approx. 300 ml of water mixed with a little dishwashing detergent into the floor pan of the oven cavity. In the case of heavy soil build-up, you may wish to allow the cleaning solution to soak in for a while before you activate the cleaning function.
natural_image
Illustration of a person pouring liquid into a microwave oven with a bucket (no text or symbols)-
Close the oven door.
-
Choose the "steam clean" function || . The oven cleaning control lamp is illuminated. After approx. 22 minutes the program cycle is completed. A buzzer sounds.
-
Turn the oven off and the oven cleaning control lamp extinguishes.
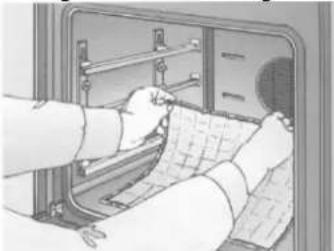
Open the oven door and pick up the remaining water with a large absorbent sponge cloth.
natural_image
Person installing or repairing a patterned fabric inside a machine (no visible text or symbols)Using the detergent-soaked sponge cloth, a soft brush or a plastic pot scrubber, wipe of the oven interior. Stubborn soil remnants can be removed with a cleaning scraper for glass-ceramic.
Wipe clean with clear water and dry with a soft cloth (do not forget to wipe under the oven door seal).
Cleaning and maintenance
Caution!
Before carrying out any work, the appliance must be disconnected from the electricity supply.
The inside of the oven should be cleaned to remove food and grease deposits, which can give off smoke or odors and cause stains to appear.
- With the oven cold and for enameled surfaces (e.g. the floor of the oven) use a nylon brush or sponge with warm soapy water. If using special oven cleaning products, use only on enameled surfaces and follow the manufacturer's instructions.
• Clean the outside of the oven and the accessories with warm soapy water or with a mild detergent. - For stainless steel surfaces, clean with care and only use sponges or cloths that cannot scratch them, or use a specialist stainless steel cleaner – always follow the manufacturer's instructions.
Cautions
- Do not clean the inside of your oven with a steam or pressurized water jet.
• Do not use either metallic scouring pads or any material that could scratch the enamel.
• For your own safety, never switch the oven on without the back panel that protects the fan.
• Do not remove the control knobs when cleaning the outside of the oven.
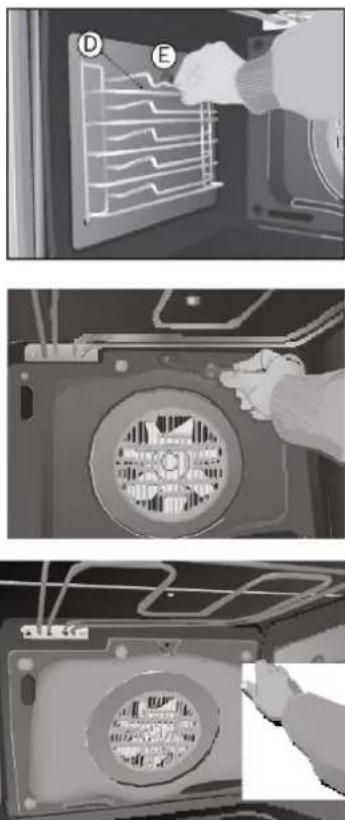
Instructions for Removing the Supports and the Back Panel (W5-450MF and W5-600MF)
- Remove the accessories from inside the oven.
- Ease out the supports (D), releasing them from the bolt (E)
- To disassemble the back panel, remove screw.
- Proceed in reverse order to re-assemble.
Removing the supports (W7-900WMF)
- Remove the accessories from inside the oven.
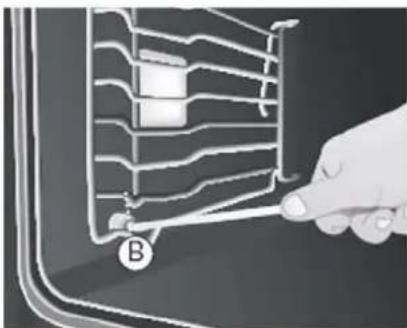
- Ease out the supports, releasing them from the bolt (B)
- Proceed in reverse order to re-assemble.
Use of the Fold-down Grill (W7-900WMF)
To clean the upper part of the oven,
- Wait until the oven is cold.
- Turn the screw (A) and lower the grill element as far as possible.
- Clean the upper part of the oven and return the grill element to its or
natural_image
Illustration of a hand holding a grid-like object with label B, no text or symbols present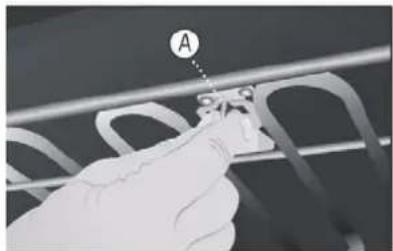
natural_image
Close-up of a hand holding a small object against a metallic frame, with no visible text or symbols.Cleaning the Oven Door
To remove the inner door glass:
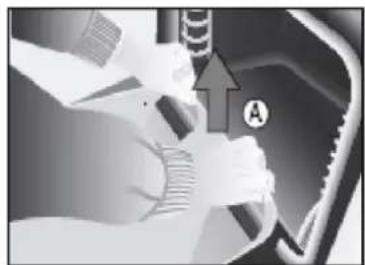
- Open the door fully.
- Pull the glass towards you from the bottom (A).
- The Inner door glass can now be removed for cleaning.
natural_image
Close-up of hands operating a mechanical device with a labeled component 'A' (no readable text or symbols beyond the label)To reassemble the inner door glass:
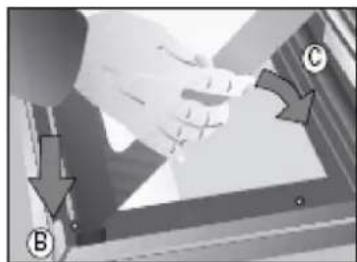
Holding the inner door glass with the chamfer in the bottom right hand corner.
Warning: Take care when removing the inner door glass as once removed the oven door will return to the closed position.
Reassemble the inner door glass:
- Insert the metal clips in the cut outs at the top of the inner door panel (B).
- Lower the glass into the door (C).
Do not use metal scouring pads, wire brushes or commercial or abrasive powders to clean the oven door glass. They may scratch the surface and cause the glass to break.
natural_image
Close-up of a hand holding a small object, with arrows indicating direction (no visible text or symbols)Cleaning the oven door (W7-900WMF)
To remove the inner door glass
- Open the door fully.
- Completely turn the two clips (c)
- Hold the sides of the oven door with both hands and close it slowly. The hinges are released from their fixtures when the door is approximately half open / half closed.
- It is then possible to remove the door.
To assemble the door:
- Hold the sides of the oven door with both hands and insert the hinges into the holes on the front of the oven.
- Slowly open the oven door completely.
- Lower the hinge clips again.
- Close the door.
Do not use metal scouring pads, wire brushes or commercial or abrasive powders to clean the oven door glass. They may scratch the surface and cause the glass to break.
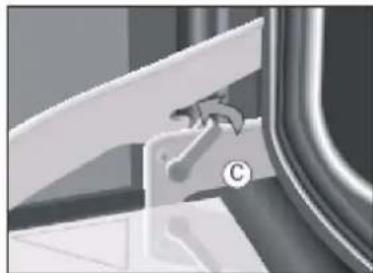
natural_image
Close-up of a mechanical component with a hammer and letter 'C' indicating a detail (no readable text or symbols)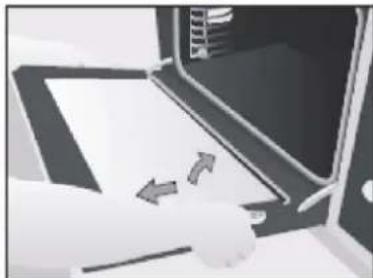
natural_image
Illustration of a hand interacting with a laptop screen displaying two arrows (no text or symbols)WARNING: Do not touch the hinges when opening or closing the oven door.
Changing the oven bulb (W5-600MF og W5-450MF)
Caution: Before carrying out any work, the appliance must be disconnected from the electricity supply
- Ease out the telescopic guides, releasing them from the bolt (A).
- Loosen the lens from the lamp holder with the help of the appropriate tool.
- Exchange the bulb.
- Replace the lens, making sure it fits in the correct position without forcing it.
The replacement bulb must be temperature resistant to 300 °C . These can be ordered from our Customer Care Centre or be purchased from your local hardware store. Please take the old bulb with you for reference.
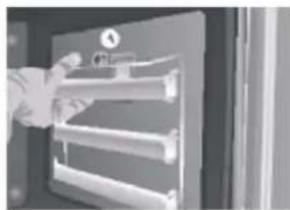
natural_image
Hand installing or adjusting a wall-mounted device with a control panel (no visible text or symbols)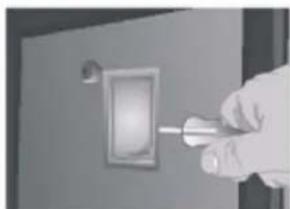
natural_image
Hand holding a tool inside an electrical outlet (no text or symbols visible)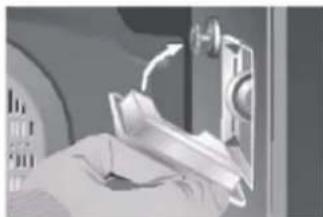
natural_image
Close-up of a hand cleaning a wall-mounted device with a circular arrow indicating rotation (no text or symbols visible)Changing the oven bulb (W7-900WMF)
- Unscrew the side support for the tray.
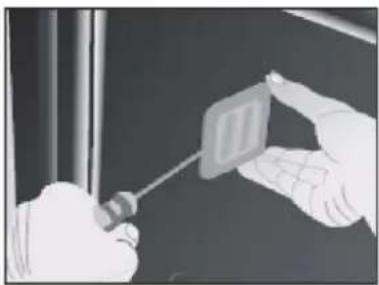
- Remove the glass cover by carefully levering it with a screw driver.
- Unscrew the old bulb, and replace it with a new one.
- Replace the glass shade by pressing it in until it is fully housed.
- The replacement bulb must be temperature resistant to 300^ C.
- These can be ordered from our Customer Care Centre or be purchased from your local hardware store.
- Please take the old bulb with you for reference.
natural_image
Close-up of hands using a screwdriver to adjust a small component (no visible text or symbols)Troubleshooting
The oven does not work
- Check the connection to the electrical circuit.
- Check the fuses and current limiter of your installation.
- Ensure the clock is in the manual or programmed mode.
- Check the position of the function and temperature selectors
The inside light of the oven does not work
- Change the bulb.
- Check that the bulb has been replaced in accordance with the instruction manual.
The heating indicator light does not work
- Select a temperature.
- Select a setting.
- It should only light up while the oven is heating up towards the selected temperature.
Smoke is given off while the oven is working
• This is normal during its first use.
• Periodically clean the oven.
- Reduce the amount of grease or oil added to the tray.
- Do not use higher temperature settings than those in the cooking tables, or recipe.
Expected cooking results are not achieved
- Check the cooking tables to obtain guidance on the working of your oven.
- Check the recipe that you have been using, and the function. Fan ovens cook more efficiently than conventional ovens – so adjustment to time and temperature may be required.
If, despite these recommendations, the problem continues, contact our Customer Care Centre.
Installation
After connecting the electricity, check that all the electrical parts of the oven are working.
Installation must only be performed by a fully qualified electrician who must ensure regulations in force for installation are observed.
Installation
This information is intended for the installer, as the person responsible for assembly and electrical connection. If you install the oven yourself, the manufacturer will not be held responsible for any possible damage.
Before Installation.
To unpack the oven, pull the tab located on the lower part of the box and to move it, hold by the lateral handles and never by the oven door handle.
The adhesive used for the plastic covering of kitchen furniture must be able to withstand temperatures up to 85^ C.
Always make sure that this appliance is fitted by a competent electrician.
Before you start
- Always make sure that you have carefully read through the installation pages of this book – careful planning at the beginning will ensure a quick and easy installation.
- Take care when moving this appliance, it may be heavier than it looks! If you need to lift the appliance, make sure you use an appropriate lifting method.
- Soft, or uneven flooring may be damaged unless the appliance is moved with care.
- Do not attempt to move the oven by pulling on the handles or doors, we recommend that you open the door and grasp the frame of the cooker. Please wear protective gloves for this, and make sure the door cannot trap your fingers.
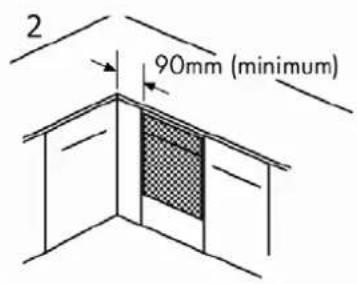
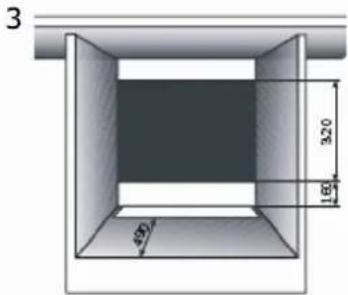
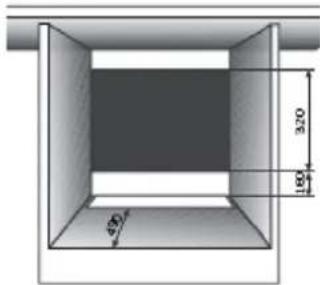
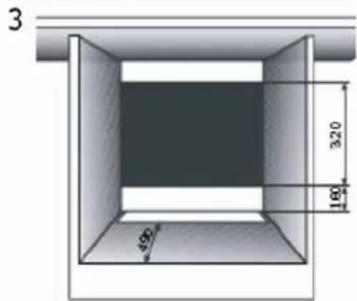
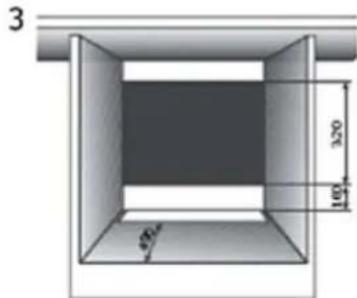
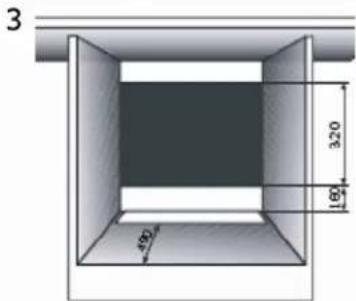
- To fit multi-function appliances it is important that the back part of the unit, corresponding to the shaded must be free from any projections (pipes, sockets etc).
- Please make sure that you have enough space for your appliance, use the table and diagrams shown to help determine this.
Warning: This appliance must be earthed
- Leave the appliance in the base tray packaging until you are ready to install it. When you remove the appliance from the base tray packaging, take care not to damage it.
- Whilst every care is taken to eliminate burrs and raw edges from this product, please take care when handling - we recommend the use of protective gloves during installation.
- Please note that all dimensions and sizes given are nominal, some variation is to be expected.
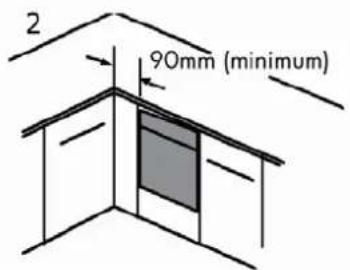
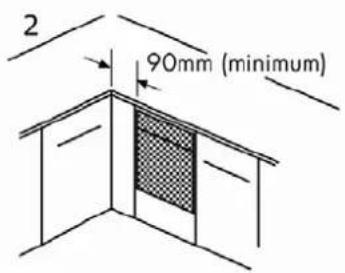
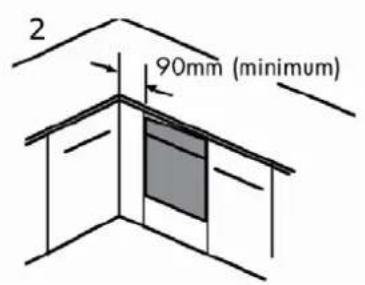
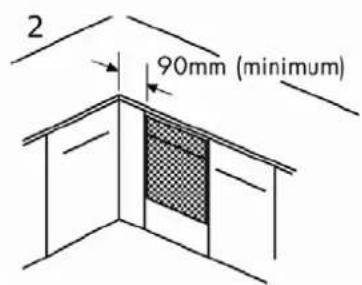
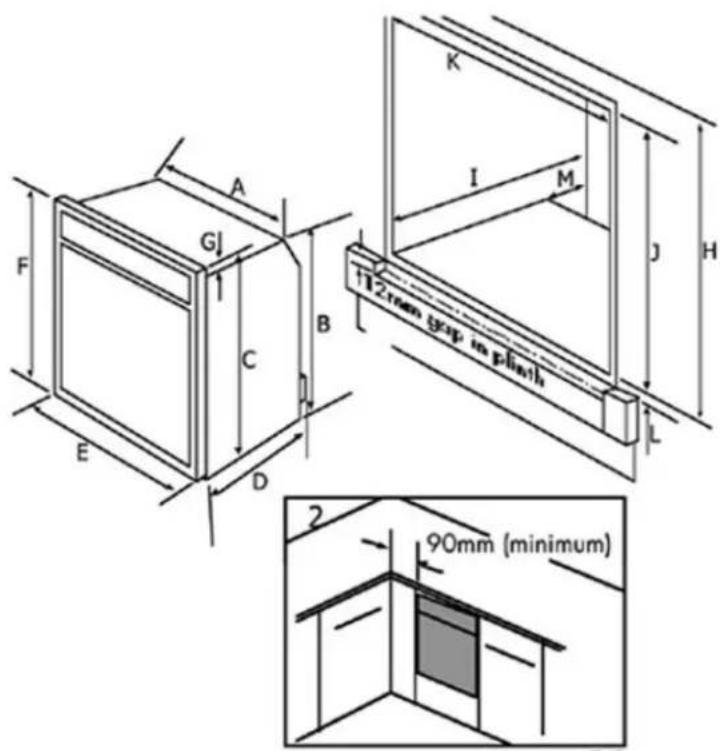
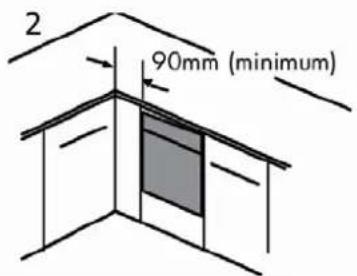
- If this appliance is to be installed near to a corner where the adjacent cabinets run at right angles forward of the appliance, there must be a gap of at least 90mm between the appliance and the cabinets, to prevent overheating of the cabinets.
Important:
- Do not modify the outer panels of this appliance in any way.
- Fixing screws - The fixing screws are in a polythene bag in the oven pack.
- Depending on the method of installation, some of the screws may not be needed.
- If you have a non standard size of cabinet which leaves a gap above or below the appliance, you may be able to buy a trim kit (to fill in the gap) from the supplier of your cabinets.
- Remove the fixing screws from the polythene bag on the top of the appliance, but leave the appliance in the base
- tray packaging until you are ready to install it.
- Note: When removing the appliance from the base tray packaging care should be taken not to damage the appliance.
- When installing in a typical 600mm deep, built in housing unit, the false back should be removed from the housing unit to provide the necessary depth for installation.
- When the false back is removed, it is normally the case that the support shelf for the appliance leaves a gap between the back edge and the wall of approximately 80mm.
- If no gap occurs between the back edge of the shelf and the wall behind the unit, we recommend that a gap of at least 30mm is made by shortening the shelf.
- The appliance is designed to fit into a standard 600mm wide housing unit, with minimum internal dimensions as shown.
- Please note that all sizes are nominal, and some variation is to be expected.
Installing appliance under a worktop
- Where the appliance is installed under a worktop, with a hob installed above it, the installation instructions for the hob must be read in conjunction with these instructions.
- When installing a gas hob above the appliance, care must be taken to ensure the hob inlet pipe is as close to the back wall as possible, so it doesn't obstruct the appliance or the appliance inlet pipe.
- If a flexible inlet pipe is used, it must hang vertically and not be trapped between the oven and rear wall.
Connecting the electricity supply
- We recommend that the appliance is connected by a qualified electrician who will comply with the I.E.E. and local regulations.
Securing the appliance
- This appliance must be securely fixed into the cabinetry. Use the screws supplied to fix the appliance to the cabinetry through the holes in the front frame.
Electrical connection
IMPORTANT: We recommend that the appliance is connected by a qualified electrician, who is a member of the N.I.C.E.I.C. and who will comply with the I.E.E. and local regulations.
Important: Ensure that you route all mains electrical cables well clear of any adjacent heat source, such as an oven or grill.
Warning: This appliance must be earthed.
- Where a fixed connection is used, a device allowing the appliance to be isolated on all poles from the mains supply with a contact opening width of at least 3mm must be provided.
- The mains terminal block is positioned at the right hand rear of the top service panel.
- Connect the cable to the terminal block, and tighten the cable clamp.
- Electrical connection in Denmark - Sweden - Norway - Finland the oven is to be connected to 1 phase, neutral and earth, 230V. Use a H 05 VVF cable (3x1,5mm²).
- Close the terminal box, ensuring that the cover is engaged on the locking tabs.
- After connection to the electricity supply please check that all electrical parts of the appliance are working.
Electrical connection W7-600MF (DK, SE, NO, FI)
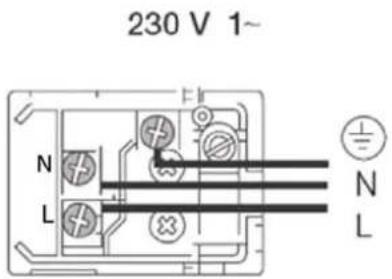
$$ 3 \times 1, 5 \mathrm{mm} ^ {2} $$
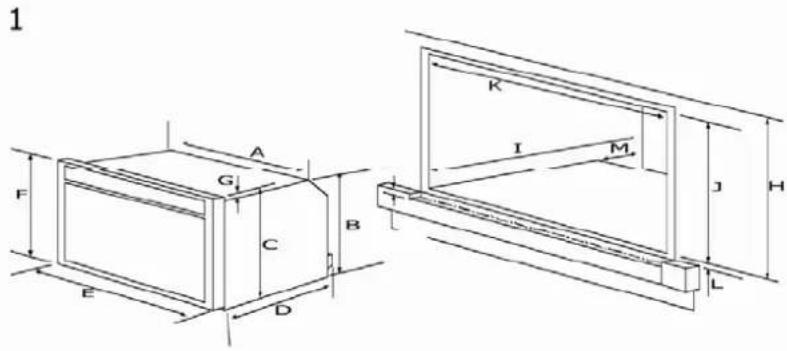
Installation dimensions in mm
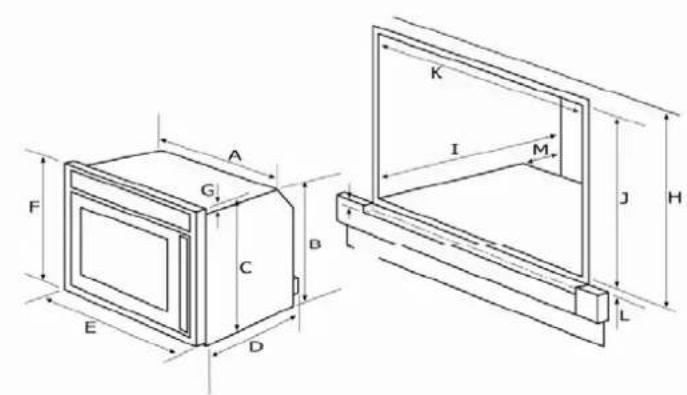
| A | 557.0mm |
| B | 363mm |
| C | 440mm |
| D | 540.0mm |
| E | 595.0mm |
| F | 455.0mm |
| G | 15mm |
| H | 460.0mm |
| I | min 580.0mm |
| J | 450.0mm |
| K | 558-568.0mm |
| L | min. 10mm |
| M | 90.0mm |
Installation dimensions
| In mm | |
| A | 557.0mm |
| B | 483.0mm |
| C | 564.0mm |
| D | 540.0mm |
| E | 595.0mm |
| F | 595.0mm |
| G | 31.0mm |
| H | min 600.0mm |
| I | min 580.0mm |
| J | 590mm |
| K | 558-568.0mm |
| L | min. 10mm |
| M | 90.0mm |
Installation dimensions
| In mm | |
| A | 859mm |
| B | 470mm |
| C | 470mm |
| D | 535.0mm |
| E | 892.0mm |
| F | 480.0mm |
| G | 10mm |
| H | 485.0mm |
| I | min 550.0mm |
| J | 475.0mm |
| K | 860.0mm |
| L | 10.0mm |
| M | 90.0mm |
Takuu
- User manual Witt ovens ENG
- Indholdsfortegnelse
- Fejlsøgning
- Garanti
- Energisparråd
- Ta ut ugnstegarna (W7-900WMF)
- Rengöring av ugnens tak (W7-900WMF)
- Avmontering av glasluckan (W7-900WMF)
- Byta glödlampa (W7-900WMF)
- Felsökning
- Description of the ovens....61
- Safety notes....63
- Ecological Packaging 64
- Using the oven 65
- Oven functions....69
- Troubleshooting....77
- Description of the oven W5-450MF
- Description of the oven W5-600MF
- Description of the oven W7-900WMF
- Safety notes
- Electrical Safety
- Ecological Packaging
- Using the oven
- The programmer buttons
- Clock/programmer
- Setting the time of day
- Changing the alarm tone
- Setting the minute minder
- Semi – automatic cooking methods
- Fully automatic cooking
- Switch on and off automatically
- Good advice when using the programmer
- Do
- Do not
- CAUTION:
- NOTE:
- Using Your Grill
- Before you start grilling
- Aluminium Foil
- Cleaning with steam
- Description
- Activate oven cleaning
- Cleaning and maintenance
- Caution!
- Cautions
- Instructions for Removing the Supports and the Back Panel (W5-450MF and W5-600MF)
- Removing the supports (W7-900WMF)
- Use of the Fold-down Grill (W7-900WMF)
- Cleaning the Oven Door
- Reassemble the inner door glass:
- Cleaning the oven door (W7-900WMF)
- To assemble the door:
- Changing the oven bulb (W5-600MF og W5-450MF)
- Changing the oven bulb (W7-900WMF)
- Troubleshooting
- The oven does not work
- The inside light of the oven does not work
- The heating indicator light does not work
- Smoke is given off while the oven is working
- Expected cooking results are not achieved
- Installation
- Before Installation.
- Before you start
- Important:
- Installing appliance under a worktop
- Connecting the electricity supply
- Securing the appliance
- Electrical connection
- Takuu
Brand : Witt
Model : W5-600MF
Category : Oven