245-070 - Coffee maker Exido - Free user manual and instructions
Find the device manual for free 245-070 Exido in PDF.


| Product Type | Coffee Maker |
| Brand | Exido |
| Model | 245-070 |
| Dimensions (approx) | 25 x 20 x 30 cm |
| Weight (approx) | 1.5 kg |
| Power Supply | 220-240 V ~ 50/60 Hz |
| Power Consumption (approx) | 800-1000 W |
| Water Tank Capacity | 1.25 L (approx. 10-12 cups) |
| Carafe Type | Glass carafe with lid |
| Filtration System | Reusable permanent filter (included) |
| Keep Warm Function | Automatic keep warm for approx. 40 min |
| Water Level Indicator | Transparent water tank with markings |
| Auto Shut-off | Yes, after brewing cycle |
| Anti-drip System | Stops drip when carafe is removed |
| Pause & Serve Function | Allows pouring a cup before cycle ends |
| Control Panel | One-button operation with power indicator |
| Cleaning | Descale regularly; wash carafe and filter in warm soapy water |
| Safety Features | Boil-dry protection, overheating protection |
| Spare Parts Available | Carafe, filter, water tank available from manufacturer |
| Repairability | Serviceable by qualified technician; user-replaceable parts: filter, carafe |
Frequently Asked Questions - 245-070 Exido
User questions about 245-070 Exido
0 question about this device. Answer the ones you know or ask your own.
Ask a new question about this device
Download the instructions for your Coffee maker in PDF format for free! Find your manual 245-070 - Exido and take your electronic device back in hand. On this page are published all the documents necessary for the use of your device. 245-070 by Exido.
USER MANUAL 245-070 Exido
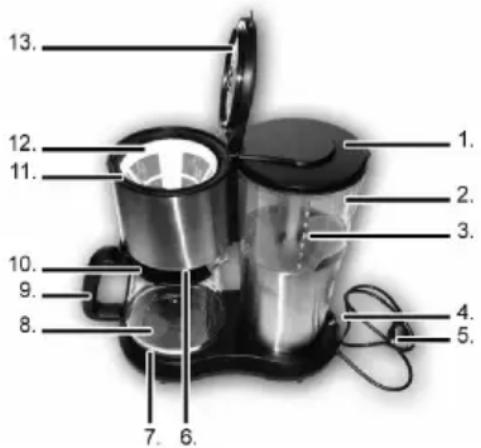
OVERSIGT OVER APPARATETS DELE
OFTE STILTE SP∅RSMÅL
To get the best out of your new appliance, please read this user guide carefully before using it for the first time. Take particular note of the safety precautions.
We also recommend that you keep the user guide for future reference, so that you can remind yourself of the functions of your appliance.
SAFETY MEASURES
General
- Incorrect use of this appliance may cause personal injury and damage.
- Use for its intended purpose only. The manufacturer is not responsible for any injury or damage resulting from incorrect use or handling (see also Guarantee Terms).
- For domestic use only. Not for outdoor or commercial use.
- For connection to 230 V, 50 Hz only. The appliance must be earthed.
- The appliance, cord or plug must not be placed in water or any other liquid.
- Never touch the appliance, cord or plug with wet or damp hands.
- Keep the appliance under constant supervision while in use. keep an eye on children.
- Only use accessories manufactured or recommended by the manufacturer.
Use
- Always place the appliance on a dry, level, firm and heat resistant surface well away from any edges.
- Always place the appliance at a safe distance from flammable objects such as curtains, tablecloths or similar.
- Do not cover.
- The glass and metal parts get very hot during use. Do not touch them due to the danger of burns.
- Freshly brewed coffee and the steam it generates are very hot. Take care to avoid scalding yourself or others.
- Never switch appliance on unless there is water in the reservoir or coffee in the coffee pot.
- Never put hot or boiling water in the reservoir. Use cold water only. Ensure the appliance is switched off when filling with water.
- The water level in the reservoir must not exceed the top mark on the water level gauge.
- Never put the glass pot on a cooking ring or in an oven/microwave oven. Do not place it on the hotplate when it is empty or almost empty and the appliance is switched on.
- Do not use the glass pot if it has a loose or defective handle, or if it is broken in any other way.
- Please note that the appliance will remain hot for a while after you switch it off. Always allow it to cool completely before you put it away or clean it.
Cord and plug
- Do not let the cord hang out over the edge of the work surface.
- Check that it is not possible to pull or trip over the cord or any extension cord.
- Keep the cord and appliance away from heat sources, hot objects, naked flames and the hot parts of the appliance.
- Turn off the appliance and remove the plug from the socket when cleaning, or when not in use. Avoid pulling the cord when removing the plug from the socket. Instead, hold the plug.
- Ensure that the cord is fully extended.
- The cord must not be twisted or wound around the appliance.
- Check regularly that neither cord nor plug is damaged and do not use if they are, or if the appliance has been dropped or damaged in any other way.
- If the appliance, cord or plug have been damaged, have them inspected and if necessary repaired by an authorised repair engineer. Never try to repair the appliance yourself. Please contact the store where you bought the appliance for repairs under guarantee. Unauthorised repairs or modifications to the appliance will invalidate the guarantee.
KEY TO MAIN COMPONENTS OF THE APPLIANCE
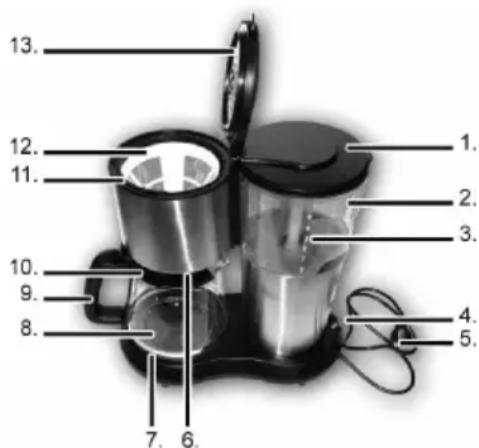
- Lid for water reservoir
- Water reservoir
- Water level gauge
- On/off button with control light
- Cord with plug
- Anti-drip device (not visible on picture)
- Hotplate
- Glass pot
- Handle
- Lid for glass pot
- Filter funnel
- Permanent filter
- Lid for filter funnel
PRIOR TO FIRST USE
- Unroll the cord (5) fully before use.
- To rinse out the inside, fill the reservoir (2) with water, switch on and allow the water to run through the appliance, before using it to make coffee.
USING THE APPLIANCE
- Plug in and switch on the power.
- Flip open the cover for the water reservoir (1) and carefully pour the required amount of water into the water reservoir. Close the lid again.
o Do not fill above the top mark on the level gauge (3). - Open the lid for the filter funnel (13), and flip it all the way back. Place a filter (size 1 x 4) in the filter funnel (11), and put coffee into it. Alternatively, use the permanent filter (12) instead of disposable filters. Close the lid again.
-
Ensure that the lid (10) for the glass pot is down and then place the pot (8) on the hotplate (7) beneath the filter funnel.
-
Switch on the appliance by switching the on/off button (4) to "I". The control light in the switch is lit and the appliance starts working.
- You can remove the glass pot during brewing to pour a cup. The automatic anti-drip device (6) ensures that coffee does not drip from the filter onto the hotplate. As soon as you replace the glass pot, brewing will resume. Make sure you put the pot back within 30 seconds or less, as otherwise the filter funnel could overflow.
o Always make sure the lid on the glass pot is closed, otherwise the anti-drip device does not work correctly.
-
Once the coffee is ready, the hotplate under the glass pot will keep it hot.
-
Switch off by pushing the on/off button to the "0" position.
o The appliance is fitted with an overheating cut-out which automatically switches it off if you forget.
CLEANING
- Remove plug from the mains socket, and allow the appliance to cool down before cleaning it.
- The appliance must not be submerged in any form of liquid.
- Clean the appliance by wiping it with a damp cloth. A little detergent can be added if the appliance is heavily soiled.
- Never use a scouring pad or any form of strong solvents or abrasive cleaning agents to clean the appliance, as those may damage the outside surfaces of the appliance.
- The filter funnel, the permanent filter and the glass pot can be washed by hand or in a dishwasher.
DESCALING
The lime content of ordinary tap water means limescale may gradually be deposited inside the appliance. This limescale may be loosened using acetic acid (NOT ordinary vinegar) or descaler, available in supermarkets, etc.
- Mix 100 ml acetic acid with 300 ml cold water, or follow the instructions on the descaler packaging.
- Pour the solution into the reservoir and switch on the appliance using the on/off button.
- Allow half of the solution to run through, and then switch off using the on/off button.
- Switch off for approx. 10 minutes, and then switch on again, and allow the rest of the solution to run through.
- To remove the final residues of limescale and acetic acid, pour a pot of cold water into the water reservoir, switch on and allow the water to run through.
- Run fresh water through the appliance 3 times (as described in point 5). The appliance is now ready for use.
INFORMATION ON DISPOSAL AND RECYCLING OF THIS PRODUCT
Please note that this Adexi product is marked with this
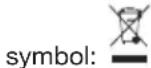
This means that this product must not be disposed of together with ordinary household waste, as electrical and electronic waste must be disposed of separately.
In accordance with the WEEE directive, every member state must ensure correct collection, recovery, handling and recycling of electrical and electronic waste. Private households in the EU can take used equipment to special recycling stations free of charge. In some member states you can, in certain cases, return the used equipment to the retailer from whom you purchased it, if you are purchasing new equipment.
Contact your retailer, distributor or the municipal authorities for further information on what to do with electrical and electronic waste.
GUARANTEE TERMS
The guarantee does not apply:
- if the above instructions are not followed
- if the apparatus has been interfered with
- if the appliance has been mishandled, subjected to rough treatment, or has suffered any other form of damage
- If faults have arisen because of faults in your electricity supply.
Due to the constant development of our products in terms of function and design, we reserve the right to make changes to the product without warning.
FREQUENTLY ASKED QUESTIONS
If you have any questions regarding use of the appliance and cannot find the answer in this user guide, please try our website at www.adexi.eu.
Go to the "Consumer Service" menu, click on "Question & Answer" to see the most frequently asked questions.
You can also see contact details if you need to contact us for technical issues, repairs, accessories and spare parts.
IMPORTER
Adexi Group
www.adexi.eu
We cannot be held responsible for any printing errors.
DE
EINLEITUNG
Brand : Exido
Model : 245-070
Category : Coffee maker