
BF 201 - Refrigerator Ariston Thermo - Free user manual and instructions
Find the device manual for free BF 201 Ariston Thermo in PDF.


| Product Type | Freezer (free-standing) |
| Brand | Ariston Thermo |
| Model | BF 201 |
| Power Supply | 220-240 V ~ 50 Hz |
| Power Consumption | 150 W |
| Fuse Rating | 15 A |
| Refrigerant | R134a |
| Freezing Capacity | 4 kg/24 h |
| Temperature Control | Mechanical knob, settings 0-4 (0=off, 4=maximum cold) |
| Defrost System | Manual defrost with drain tray |
| Ice Tray | Patented design with top-fill water hole and 90° rotation to release cubes |
| Indicator Lights | Green (power on), Yellow (continuous operation for freezing), Red (insufficient temperature) |
| Storage Compartments | Upper freezing compartments, lower drawers (removable except lowest) |
| Door Seal | Magnetic seal, cleanable and replaceable |
| Safety Features | Child safety lock removal recommendation, earthing required, no barefoot/hands operation |
| Installation Requirements | Away from heat sources, well-ventilated room, allow 3 hours upright before plugging |
| Cleaning | Use water and bicarbonate solution; no abrasives or detergents |
| Energy Saving | Medium temperature settings, minimize door openings, keep seals clean, defrost when frost thick |
| Noise Level | Refrigerant noise is normal; ensure level installation to reduce vibration |
| Standard Compliance | EC safety standards (EN60), UK electrical safety, EC radio interference directive 87/308 |
Frequently Asked Questions - BF 201 Ariston Thermo
User questions about BF 201 Ariston Thermo
0 question about this device. Answer the ones you know or ask your own.
Ask a new question about this device
Download the instructions for your Refrigerator in PDF format for free! Find your manual BF 201 - Ariston Thermo and take your electronic device back in hand. On this page are published all the documents necessary for the use of your device. BF 201 by Ariston Thermo.
USER MANUAL BF 201 Ariston Thermo
Installation and use
Congelador
Instalação e uso
Fryseskab
Instruzione
Frysskåp
To maintain the EFFICIENCY and SAFETY of this appliance, we recommend:
- call only the Service Centers authorized by the manufacturer
- always use original Spare Parts
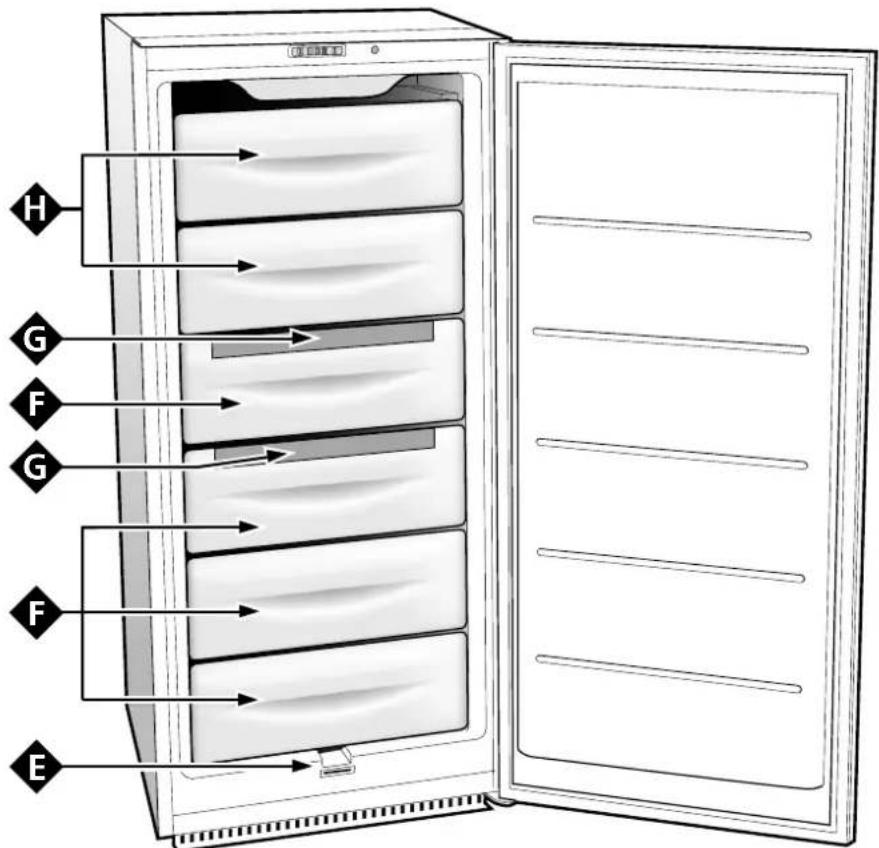
Fig. 1
natural_image
Diagram showing a mechanical assembly with a curved arrow and a bowl (no text or symbols)Fig. 2
Safety - a good habit to get into.
ATTENTION
Read your manual carefully since it contains instructions which will ensure safe installation, use and maintenance of your appliance.
Your Refrigerator is built to International safety standards (EN60) ans has been awarded the European approval mark (IMQ) for compliance with UK electrical safety requirements. It also meets the EC standards on the prevention and elimination of radio interference (EC directive 87/308 - 02.06.89).
- This appliance is designed to be used indoors and under no circumstances should it be installed outside even if protected by a roof. Leaving the appliance exposed to the rain and whether is exceedingly dangerous.
- The appliance should be used only by adults and exclusively for storing foodstuffs in compliance with the instructions provided in this manual. Under no circumstances should children be allowed to operate, or tamper with, this product.
- Do not attempt to operate or handle this appliance when barefoot, or with wet hands or feet.
- It is highly recommended that you do not operate this appliance by connecting it to the power supply with extensions or multiple socket plugs. If the refrigerator has been installed between two cabinets, make sure that the supply chord is not dangerously crimped or trapped beneath a heavy object.
-
Never pull the cable or the appliance to remove the plug from the socket; this is exceedingly dangerous.
-
Do not touch the internal cooling elements, especially if your hands are wet, since you could burn or hurt yourself. Do not place ice cubes straight from the freezer into your mouth as this may result in burns.
- Before doing any cleaning, disconnect the appliance from the electricity (by pulling out the plug or turning off the general switch in your home).
- Before disposing of your old appliance, remember to break or remove the lock as a safety measure to protect children who might lock themselves inside the appliance when playing. In addition, if the appliance is a new one with a lock, keeo the key out of the reach of small children.
- If your appliance is not operating properly, read the chapter entitled, "Trouble Shooting", which might help you resolve the problem, before calling an after-sales service centre. Do not attempt to repair the appliance by tampering with the internal components.
- If the power supply cord must be replaced, please contact one of our Customer Service Centers. In some cases, the connections are made using special terminals and in others a special tool must be used to access the connections.
- Do not use electric appliances inside the compartment for food storage, if these are not those recommended by the manufacturer.
- At the end of the functional life of your appliance – containing cyclopentane gas in the insulation foam and perhaps gas R600a (isobutane) in the refrigeration circuit – the latter should made safe before being sent to the dump. For this operation, please contact your dealer or the Local Organisation in charge of waste disposal.
Installation
To ensure that the appliance operates properly and to reduce energy consumption, it is important that the appliance is installed correctly.
Ventilation
The compressor and condenser generate heat and, therefore, need to be ventilated properly. Rooms with less than perfect ventilation are not very suited for installation of the appliance. Therefore, it should be installed in a room with an opening (window or French window) that provide the appropriate amount of air re-circulation. It is also important that the room not be too humid.
During installation, make sure not to cover or obstruct the grates that allow for proper ventilation of the appliance.
Away from Heat
Avoid positioning the appliance in a place where it is directly exposed to sunlight or near an oven, cook top or the like.
Electrical Connection and Earthing
Before proceeding with the electrical connection, make sure that the voltage indicated on the rating plate, located within the freezer, corresponds to the mains voltage in your home and that the socket is fitted with a standard earthing wire in accordance with safety standards for 46/90 systems. If the socket is not fitted with an earthing wire, the manufacturer will not be held liability for any damages and or injuries arising out of the use of the appliance. Do not use multiple sockets or adapters.
Position the appliance in such a way that you can access the socket where it is plugged in.
Insufficient power?
The electrical socket must be able to handle the maximum power load of the appliance, which is indicated on the rating plate located within the freezer.
Before making the electrical connection ...
After the appliance has been delivered, place it in the vertical upright position and wait at least 3 hours before inserting the plug into the socket in order to ensure that it functions properly.
A Closer Look

Temperature Adjustment Knob
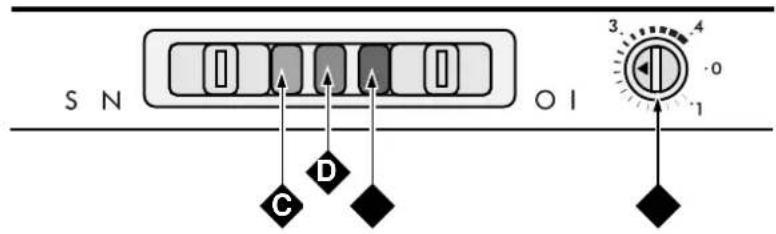
This knob makes it possible to adjust the internal temperature of the freezer with the following settings:
- 0: The freezer is off;
- 1: Freezer is on low;
- 4: Freezer is on high;
By turning the knob from setting "1" to setting "4" allows you to lower the temperature.

Storage Compartments

Ice tray

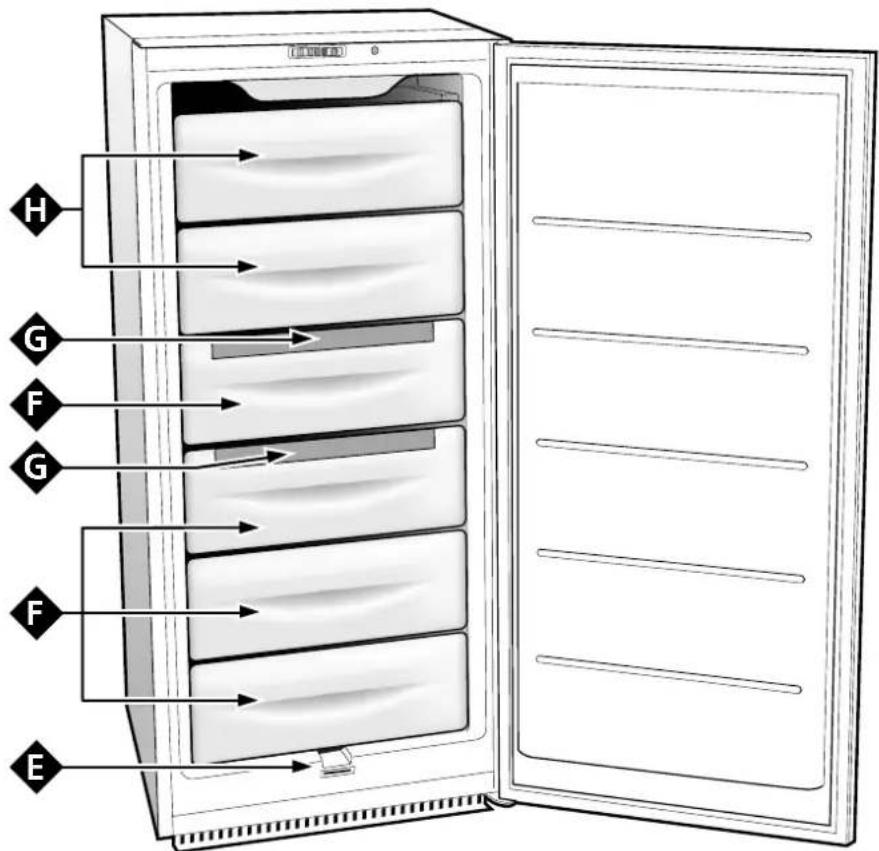
Compartments Used for Freezing and Storage

Green Light
When the light is on (move the switch to the right) this indicates that the appliance is connected to the mains. When the switch is moved to the left (green light covered), the appliance is disconnected from the mains.

Yellow Light
When this light is on (move the switch to the left), the compressor will operate continuously to reach the lower temperatures necessary for freezing fresh foods quickly. By moving the switch to the right (yellow light covered) the freezer is operated by the thermostat.

Red Light
This light goes on when the temperature inside the appliance is not sufficient to preserve foodstuffs.

Drain system for drawing off defrost water
Setting Up Your Appliance
NOTICE
After transport stand the appliance upright and wait at least 3 hours before plugging the appliance into the mains to ensure proper performance.
Use average temperature settings to ensure optimum performance and to save energy.
Once the appliance has been connected to the mains, ensure that the green light is on and turn the yellow light on as well.
When the red light is off, turn off the yellow light: the appliance is now ready for use.
Getting the Most Out of Your Appliance
Tips on Freezing
- Remember that you should never refreeze products you have allowed to thaw, even if only partially. Once thawed, cook the food, then either eat (within 24 hours) or refreeze it
- Consult a specialized manual when packaging foods for freezing.
- For the best storage and thawing, remember to freeze small portions. This will ensure rapid and uniform freezing. Mark package with a description of the contents and the date it was frozen.
- Freeze only the quantities (in kg) shown on the data plate on the inside of the freezer.
- To freeze food, first turn the yellow lamp on and then introduce the food to be frozen inside the upper compartments "G", making sure that these are laid out in direct contact with the cooling shelves as much as possible and that they do not touch any provisions which have already been frozen in the same compartment.
- The introduction of a considerable amount of food to be frozen could momentarily raise the temperature within the freezer compartment (the red lamp lights up). This situation, being only transitory, does not compromise the good preservation of those foods already stored.
- After 24 hours, once the freezing process is over, make sure you switch the yellow lamp off.
Warning: Please do not forget to do this if you want to avoid wasting energy.
- In the case of power failure or breakdown, do not open the freezer door. This will help maintain the temperature inside the freezer, ensuring that foods are conserved for at least 20 hours.
- Do not place full bottles in the freezer because liquids increase in volume when they freeze and this could cause the bottles to burst.
Storage
For best storage of fresh-frozen and frozen foods, do not set the thermostat knob below 1, regardless of the ambient temperature of the room where the freezer is installed. For ambient temperatures of up to 25°-27°C, the thermostat knob should be set between 2 and 3, while for temperatures up to 32°C the setting should be between 3 and 4.
Follow the instructions on the packages of frozen foods scrupulously. If none are provided, do not store the food for more than 3 months from the date of purchase.
When purchasing frozen foods, make sure that they have been stored at the proper temperature and that the package is properly sealed. When purchasing frozen foods, it is best to transport them in appropriate containers to keep them cold and then place them in the freezer immediately.
If the package is damp on the outside or is abnormally swollen, it is likely that the package was stored at an inadequate temperature and the food has deteriorated.
To maximize the freezer volume, it is possible to remove the drawers (except the lowest one), and to arrange the food directly on top of the evaporating plates. Ensure that the door is properly closed after putting food in the freezer.
Ice trays
This new concept of ice trays is an exclusive Merloni patent. The fact that they are situated on the top part of the freezer drawers ensures greater ergonomics and cleanliness: the ice no longer comes into contact with the food placed inside the freezer compartment; furthermore, the dripping of the water during filling is avoided (a lid to cover up the hole after filling with water is also provided).
Instructions for use (Fig. 1)
Fill up the tray with water via the special hole up to the level indicated (MAX WATER LEVEL), taking care not to exceed it: inserting more water than is necessary will lead to the formation of ice which could obstruct the exit of the ice cubes. If you have used an excessive amount of water, you will have to wait until the ice has melted, empty out the tray and refill it with water.
Once you have filled the ice tray up with water through the hole indicated, turn it by 90°. This new concept of ice trays is an exclusive Merloni patent. The fact that they are situated on the top part of the freezer drawers ensures greater ergonomics and cleanliness.
Once the ice has formed, all you need to do is to knock the tray against a hard surface so that the ice cubes come away from their housing and come out of the same hole used to fill the tray with water. To make it easier for the ice cubes to come out, wet the outside of the tray.
WARNING: every time you fill up the ice tray with water, make sure that the same is completely empty and that there are no traces of ice left inside it.
The minimum time required for ice to form well is approximately 8 hours.
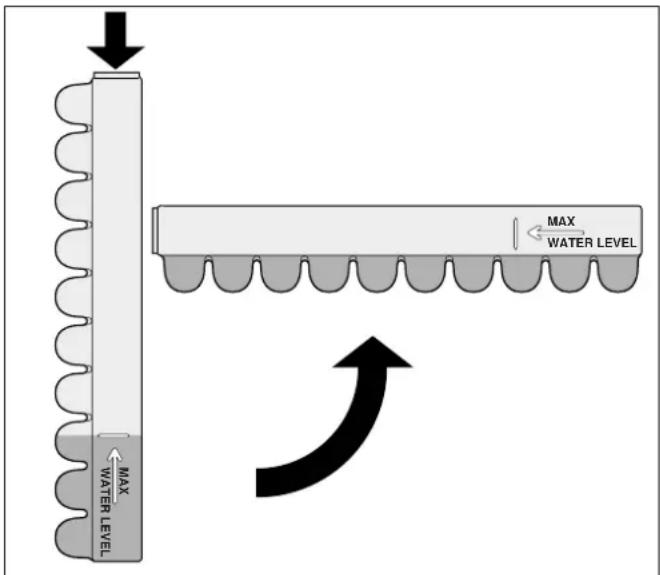
Fig. 1
Guide to Using the Freezer
Meat and Fish
| Food Wrapping | Tenderising (days) | Storage (months) | Thawing Time | |
| Beef Roast Tinfoil 2 / 3 9 / 10 Not required. | ||||
| Lamb Tinfoil 1 / 2 6 Not required. | ||||
| Pork Roast Tinfoil 1 6 Not required. | ||||
| Veal Roast Tinfoil 1 8 Not required. | ||||
| Veal/Pork Chops | Each piece wrapped in cling wrap and then in tinfoil (4 to 6 slices) | 6 Not required. | ||
| Veal/Lamb Cutlets | Each piece wrapped in cling wrap and then in tinfoil (4 to 6 slices) | 6 Not required. | ||
| Minced Meat | In aluminium containers covered with cling wrap. | Freshly minced | 2 Slowly in refrigerator. | |
| Heart and Liver Plastic Baggies 3 Not required. | ||||
| Sausages Cling Wrap or | Tinfoil 2 As necessary. | |||
| Chicken and Turkey Tinfoil 1 / 3 9 Very slowly in refrigerator. | ||||
| Duck and Goose Tinfoil 1 / 4 6 Very slowly in refrigerator. | ||||
| Pheasant, Partrige and Wild Duck | Tinfoil 1 / 3 9 Very slowly in refrigerator. | |||
| Hare and Rabbit | Tinfoil 3 / 4 6 Very slowly in refrigerator. | |||
| Venison | Tinfoil or Cling Wrap | 5 / 6 9 Very slowly in refrigerator. | ||
| Large Fish | Tinfoil or Cling Wrap | 4 / 6 | Very slowly in refrigerator. | |
| Small Fish | Plastic Baggies | 2 / 3 | Not required. | |
| Crustaceans | Plastic Baggies | 3 / 6 | Not required. | |
| Shellfish | Store in salted water in aluminium containers or plastic containers. | 3 Very slowly in refrigerator. | ||
| Boiled Fish Tinfoil or Cling Wrap | 12 | In hot water. | ||
| Fried Fish | Plastic Baggies | 4 / 6 | Directly in pan. | |
Fruits and Vegetables
| Food Preparation | Blanching Time | Wrapping | Storage (months) | Thawing Time | |
| Apples and Pears Peel | and cut into slices. 2' | In Containers (cover with syrup) | 12 | In refrigerator very slowly. | |
| Apricots, Peaches, Cherries and Plums | Peel and pit. 1' / 2' | In Containers (cover with syrup) | 12 | In refrigerator very slowly. | |
| Strawberries Blackberries and Raspberries | Rinse and fry. | In Containers (cover with sugar) | 10 / 12 | In refrigerator very slowly. | |
| Cooked Fruit Cut, cook and strain. | In Containers (add 10% sugar) | 12 | In refrigerator very slowly. | ||
| Fruit Juice Wash, cut and crush. | In Containers (sugar to taste) | 10 / 12 | In refrigerator very slowly. | ||
| Cauliflower | Remove leaves, cut head into small pieces and blanch in water and a little lemon juice. | 2' Plastic Baggies 12 Not required. | |||
| Cabbage and Brussel Sprouts | Wash and cut into small pieces. | 1' / 2' Plastic Baggies 10 / 12 At room temperature. | |||
| Peas Shell and wash. 2' Plastic Baggies 12 Not required. | |||||
| French Beans Wash and slice if required. 2 Plastic Baggies 10 / 12 Not required. | |||||
| Carrots, Peppers and Turnips | Peel, wash and slice if necessary. | 3' / 4' Plastic Baggies 12 Not required. | |||
| Mushrooms and Asparagus | Wash, peel and cut up. | 3' / 4' | Plastic Baggies or Containers | 6 At room temperature. | |
| Spinach | Wash and mince. | 2' Plastic Baggies 12 At room temperature. | |||
| Vegetable for Soups | Wash and cut up in small pieces. | 3' | Plastic Baggies or Containers | 6 / 7 | Not required. |
| Various Foods Preparation | Blanching Time | Wrapping | Storage (months) | Thawing time | |
| Bread | Plastic Baggies | 4 | At room temperature and in the oven. | ||
| Cakes | Plastic Baggies | 6 | About 10 minutes at room temperature, cook at 100/200°C. | ||
| Cream | Plastic Containers | 6 | At room temperature or in refrigerator. | ||
| Butter | In original wrapping or tinfoil | 6 In refrigerator. | |||
| Boiled Food or Vegetable Soup | Plastic or Glass Containers | 3 / 6 | At room temperature or in hot water. | ||
| Eggs | Freeze without shells in small containers | 10 | At room temperature or in refrigerator. | ||
Energy Saving Tips
- Install the Appliance Correctly
This means that the appliance should be installed away from sources of heat or direct sunlight, in a well ventilated room.
THE ACTUAL ENERGY CONSUMPTION OF THE APPLIANCE DEPENDS ON THE WAY THE SAME IS USED AND ON ITS LOCATION.
The consumption tests were performed in 560mm deep column units, the most common installation setting for this appliance.
- Correct Temperature Settings
Set the freezer temperature knob to one of the medium settings. Very low temperatures will not only consume a great deal of energy, but will neither improve nor lengthen the storage life of the food.
- Shut the Doors
Open your appliance only when strictly necessary - every time you open the door most of the cold air will be lost. In order to restore the correct temperature, the motor will have to run and consume energy.
- Check the Door Seals
Keep the seals clean and pliable so that they fit closely against the door to ensure that no cold air is lost.
- Avoid Frost Buildup
Remember to check the sides of the freezer for frost. When the frost becomes too thick, defrost the freezer immediately (See, "Caring for Your Appliance").
Caring for Your Appliance
Before doing any cleaning, disconnect the appliance from the electricity (by pulling out the plug or turning off the general switch in your home).
Defrosting
It is a good idea to remove the frost buildup from the inside of the appliance from time to time.
WARNING: do not damage the refrigeration circuit.
Make sure not to use pointed metal objects to do so as this could result in piercing the refrigeration circuits, causing irreparable damage to the appliance. Use the plastic scraper provided with the freezer.
Use the plastic scraper provided for this purpose. To defrost the appliance completely (this should be done once or twice a year), turn off the green light and leave the door open until the frost has completely thawed.
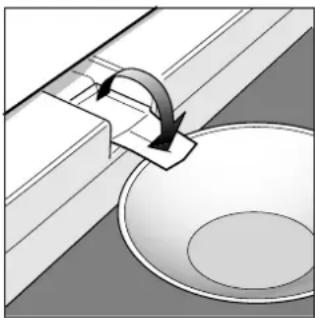
The freezer is equipped with a system to drain the water from the defrosting procedure. Simply, place a container in the position indicated in fig. 2.
To speed up defrosting, one or more pots of warm water can be placed inside the appliance.
While defrosting the freezer, it is a good idea to wrap the food taken from the freezer in several layers of paper and place it in a cool place. Since the temperature of the frozen food will inevitably rise, it is best to consume it quickly as its storage life will have been shortened.
Cleaning and Maintenance
The inside of the freezer should be cleaned on a periodic basis after it has been defrosted. Only use a water and bicarbonate solution to clean the appliance. Do not use abrasive cleaning products, detergents or soap. After the inside has been cleaned, rinse well with clean water and dry carefully.
Once the appliance has been cleaned, turn on the appliance, following the instructions in "Setting Up Your Appliance."
natural_image
Diagram showing a curved arrow interacting with a rectangular object above a bowl (no text or symbols present)Fig. 2
Troubleshooting
The Green Light is Off
Have you checked if:
• there is power to the unit?
- the main power switch to the house is on?
The Red Alarm Light is Always On
Have you checked if:
- the door is closed properly and the seal is still OK?
• the door is being opened too often? - the temperature knob is on the right setting?
• there is too much frost buildup?
The Motor Runs Constantly
Have you checked if:
- the yellow light is on (constant operation setting)?
• the thermostat is on the right setting?
The Appliance Makes Too Much Noise
Have you checked if:
• the freezer is level?
- the appliance has been installed between cabinets that vibrate and make noise?
- it is the noise made by the refrigerant, which occurs even when the compressor is off (this is not a defect).
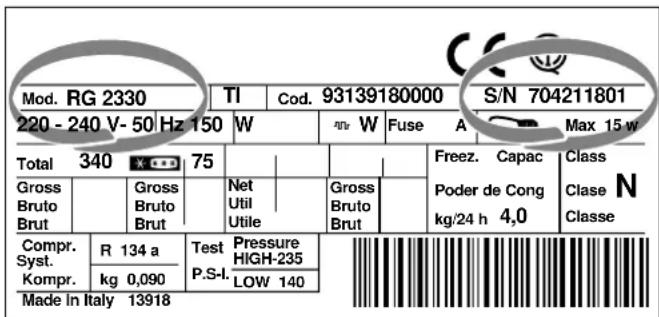
If after all the checks, the appliance still does not operate or the problem persists, call the nearest Service Centre and inform them of: the type of problem, the abbreviation of the model name (Mod.) and the relative numbers (S/N) written on the rating plate located within the freezer (see examples in the figures below).
Never call on unauthorized technicians and always refuse spare parts which are not originals.
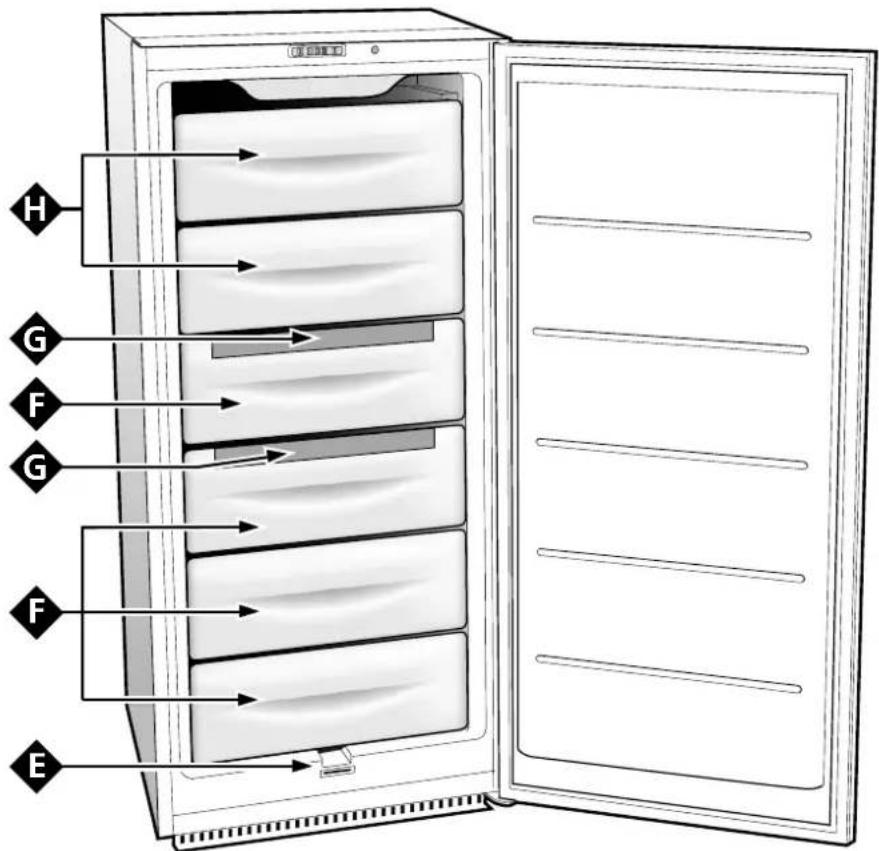
Fig. 2
natural_image
Diagram showing a mechanical component interacting with a bowl, no text or symbols presentFig. 2
Há um problema?
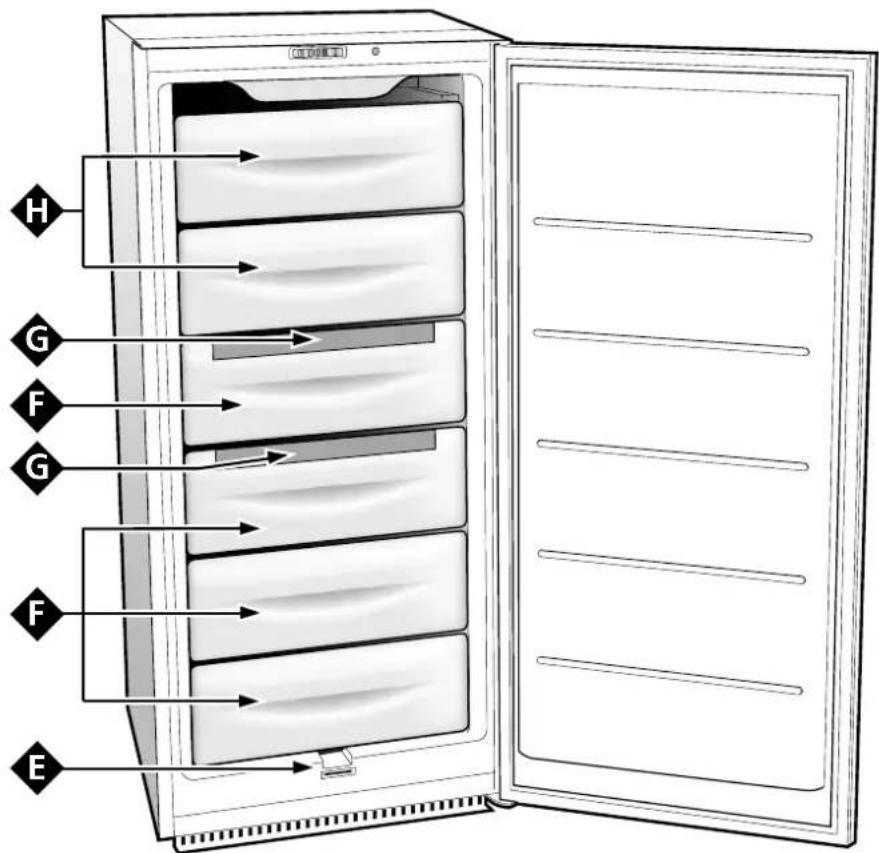
Fig. 1
Råd til indpakning og til nedfrysning
Kød og fisk
natural_image
Diagram showing a mechanical component interacting with a bowl (no text or symbols present)Fig. 2
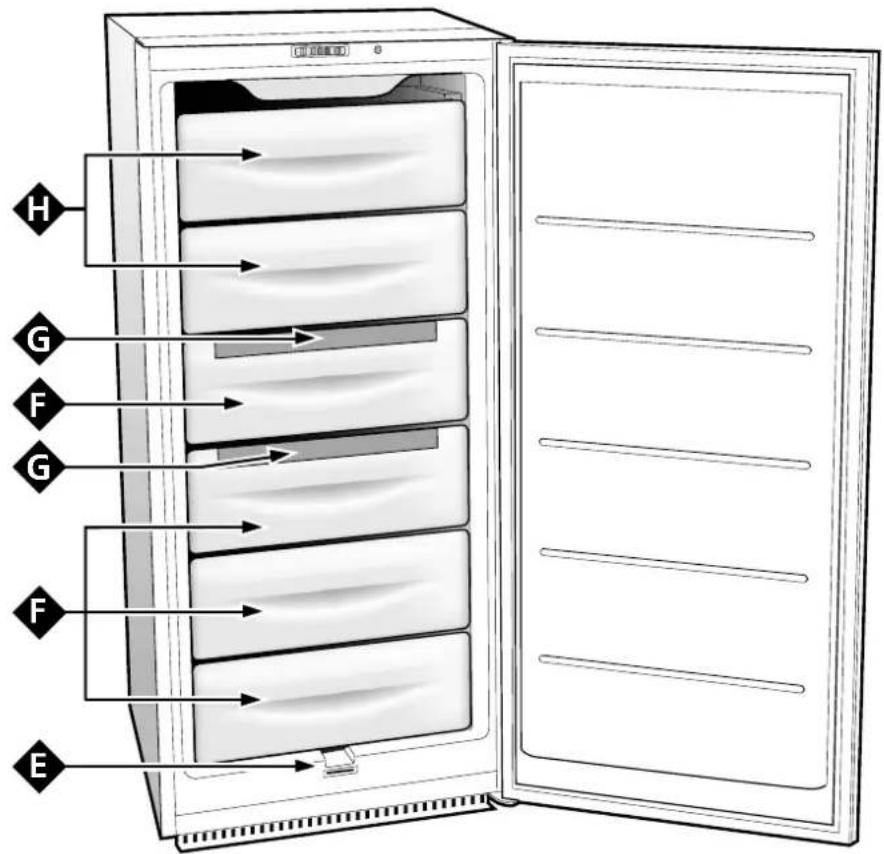
Fig. 1
natural_image
Diagram showing a mechanical assembly with a curved arrow and a bowl (no text or symbols)Fig. 2
- Congelador
- Fryseskab
- Frysskåp
- To maintain the EFFICIENCY and SAFETY of this appliance, we recommend:
- Safety - a good habit to get into.
- ATTENTION
- Installation
- Ventilation
- Away from Heat
- Electrical Connection and Earthing
- Insufficient power?
- Before making the electrical connection ...
- A Closer Look
- Temperature Adjustment Knob
- Green Light
- Yellow Light
- Red Light
- Setting Up Your Appliance
- NOTICE
- Getting the Most Out of Your Appliance
- Tips on Freezing
- Storage
- Ice trays
- Instructions for use (Fig. 1)
- Guide to Using the Freezer
- Energy Saving Tips
- - Install the Appliance Correctly
- THE ACTUAL ENERGY CONSUMPTION OF THE APPLIANCE DEPENDS ON THE WAY THE SAME IS USED AND ON ITS LOCATION.
- - Correct Temperature Settings
- - Shut the Doors
- - Check the Door Seals
- - Avoid Frost Buildup
- Caring for Your Appliance
- Defrosting
- WARNING: do not damage the refrigeration circuit.
- Cleaning and Maintenance
- Troubleshooting
- The Green Light is Off
- The Red Alarm Light is Always On
- The Motor Runs Constantly
- The Appliance Makes Too Much Noise
- Há um problema?
- Råd til indpakning og til nedfrysning
Brand : Ariston Thermo
Model : BF 201
Category : Refrigerator