
HELICON MK2 - Loudspeaker Dali - Free user manual and instructions
Find the device manual for free HELICON MK2 Dali in PDF.


| Product Type | Floorstanding loudspeaker |
| Model | HELICON MK2 (e.g., 800 MK2) |
| Frequency Range (±3 dB) | 31 - 27,000 Hz |
| Sensitivity | 89.5 dB (2.83V/1m) |
| Nominal Impedance | 4 ohms |
| Recommended Amplifier Power | 50 - 400 W |
| Maximum SPL | 113 dB |
| Crossover Frequencies | 3,000 Hz / 13,000 Hz |
| Drivers | 2 x 8" low-frequency, 1 x 6½" mid-range, 1 x 25 mm soft dome tweeter, 1 x 10 x 55 mm ribbon tweeter |
| Bass Reflex Tuning Frequency | 28.5 Hz |
| Dimensions (H x W x D) | 1126 x 304 x 527 mm (44.3 x 12.0 x 20.7 in) |
| Weight | 40.9 kg (90.1 lbs) |
| Terminals | Bi-wire (accepts banana plugs, spade lugs, bare wire) |
| Finishes | Real wood veneer, high gloss lacquered (Rosemary or Cherry) |
| Accessories Included | Spikes, coasters, DALI CONNECT cables, grilles |
| Safety Features | Class II construction, no user-serviceable parts, automatic shutdown on subwoofer (if applicable) |
| Maintenance | Clean with soft dry cloth; vacuum grilles; avoid direct sunlight |
| Disposal | Do not dispose with household waste; follow local e-waste recycling regulations |
Frequently Asked Questions - HELICON MK2 Dali
User questions about HELICON MK2 Dali
0 question about this device. Answer the ones you know or ask your own.
Ask a new question about this device
Download the instructions for your Loudspeaker in PDF format for free! Find your manual HELICON MK2 - Dali and take your electronic device back in hand. On this page are published all the documents necessary for the use of your device. HELICON MK2 by Dali.
USER MANUAL HELICON MK2 Dali
HELICON / HELICON MK2 MANUAL

ENGUSH, DEUTSCH, DANSK
CONTENTS
DANISH AUDIOPHILE LOUDSPEAKER INDUSTRIES....3
SAFETY GUIDELINES....4
UNPACKING 5
ACCESSORIES 5
GRILLES 5
SPIKES 5
DALI CONNECT CABLES 6
CONNECTION....7
SCREW TERMINALS 7
BI-WIRING/BI-AMPING 7
CABLES 8
CONNECTION OF HELICON S600/S600MK2 8
ADJUSTMENT OF HELICON S600/S600MK2 10
VOLUME ADJUSTMENT....11
Congratulations on your selection of DALI HELICON/HELICON MK2 loudspeakers. This manual is intended to provide safety guidelines and advice on how to achieve maximum performance from your new loudspeakers. In the manual, you will find instructions on how to connect, setup and maintain your loudspeakers. Please read the manual thoroughly before starting.
You can also find information about your new speakers and sign up for the DALI newsletter at www.dali.dk.
If you need further advice, please consult your authorized DALI dealer.
Enjoy!
SAFETY GUIDELINES UNPACKING

CAUTION
RISK OF ELECTRIC SHOCK
DO NOT OPEN

CAUTION: RISK OF ELECTRIC SHOCK DO NOT OPEN CAUTION: TO REDUCE THE RISK OF ELECTRIC SHOCK, DO NOT REMOVE THE BACK PANEL. NO USER-SERVICEABLE PARTS INSIDE. REFER SERVICING TO QUALIFIED PERSONNEL.

The lightning flash within an equilateral triangle is intended to alert you to the presence of uninsulated "dangerous voltage" within the product's enclosure that may be of sufficient insgritude to constitute an electric shock to persons.

The examination point within an eculateral triangle is intended to alert you to the presence of important operating and maintenance (servicing) instructions in the literature accompanying the appliance.
- Read instructions - All the safety and operating instructions should be used before the appliance is operated.
- Retain instructions - The safety and operating instructions should be retained for future reference.
- Heed Warnings - All warnings on the appliance and in the operating instructions should be adhered to.
- Follow Instructions - All operating and use Instructions should be followed.
- Water and Moisture - The appliance should not be used near water - for example, near a bathtub, washbox, kitchen sink, laundry tub, in a seat basement, or near a swimming pool and the life.
- Carts and Stands - The appliance should be used only with a cart or stand if recommended by the manufacturer.
- Wall or Ceiling Mounting - The appliance should be mounted to a wall or ceiling only as recommended by the manufacturer.
B. Ventilation - The appliance should be situated so that its location or position does not interfere with proper ventilation. For example, the appliance should not be situated on a bed, sofa, rug, or similar surface that may block the ventilation openings, or placed in a built-in installation, such as a bookcase or cabinet, that may impede the flow of air through the ventilation openings. -
Host - The appliance should be situated away from level sources such as rotators, heat registers, sieves, or other appliances that produce heat.
-
Power Smartes - The appliance should be connected to a power supply unit of the type described in the anesting instructions in as marked on the appliance.
-
Power Card Protection - Power-supply cords should be mated so that they are not likely to be walked on or sinchred by items placed on or against them, paying particular attention to cords at plugs, convenience receptacles and the point where they exit from appliance.
-
Clearing - Do not use any liquid cleaners. Use only a dry cloth to wipe off dust and grease.
-
Non-use Periods - The power cord of the appliance should be unpugged from the outlet when left unused for a long period of time.
1-1. Object and Liquid Entry - Care should be taken so that objects do not fall and liquids are not rolled into the enclosure through openings.
- Damage Requiring Service - The appliance should be serviced by qualified personnel when
a) The power-supply cord or the plug has been damaged; or
b) Objects have failure, or liquid has been soiled into the appliance, or
c) The appliance has been exposed to rain; or
d) The appliance does not appear to operate normally, or exhibits a marked change in performance, or
e) The appliance has been dropped, or the enclosure damaged.
- Servicing - The user should not attempt to service the appliance beyond that described in the operating instructions. All other servicing should be referred to qualified service personnel.
Carefully unpack the loudspeaker. Please follow the handling instructions on the carton. For your personal safety, we recommend that two persons handle the speakers while unpacking. Be careful not to damage the drivers and the cabinet while unpacking.
ACCESSORIES
Depending on the loudspeaker model, various accessories are included.
GRILLES
Loudspeakers are delivered with the grilles already mounted. If you wish to remove the grille, loosen it by gently tugging at the plungers that hold the grille in place. It is important that the plungers are loosened equally before removing the grille. Otherwise, the grille might be damaged.
SPIKES
Floorstanding loudspeakers come with a set of spikes including contra nut (metric M10 thread) and coasters for protecting your floor. The spikes can be mounted in the threaded inserts in the base of the loudspeakers.
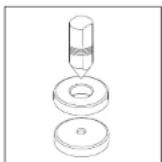
Spike
Centre nut
Coaster

installation of spikes threaded inserts


On hard surfaces, we recommend using the spikes without casters

On salt surfaces (like a carpet) we recommend using the spikes without casters. Please note that there is a risk of damaging the surface underneath the carpet.

On soft surfaces (like a head floor) we recommend using the spikes with masters to avoid damage of the surface.
Generally, we recommend experimenting with the position of the speakers in your listening room to get the best performance. Therefore, it is advisable to wait until you have found the final position for the loudspeakers before mounting the spikes.
DALI CONNECT CABLES
The loudspeakers come with a set of DALI CONNECT cables for use if you don't use bi-amping/wiring (does not apply to HELICON S600). The short CONNECT cables have spade lugs at both ends which should be connected as shown in the diagram below. Connect the two red terminals to each other and the two black terminals to each other.


DAL CONNECT OR HELICON
speakers.

DAL CONNECT OF HELICON MK2 speakers.
CONNECTION
Before connecting or disconnecting any cables, always turn off the amplifier to avoid electrical shock or damage to your equipment.
For installation of the HELICON S600/S600MK2 subwoofers, skip the next two paragraphs – go to the "Connection of HELICON S600/S600MK2" section.
SCREW TERMINALS
The high quality terminals on the HELICON/HELICON MK2 loudspeakers accept the following types of termination:
- 4 mm banana plugs
• Loudspeaker cables with spade lugs - Bare wire ends
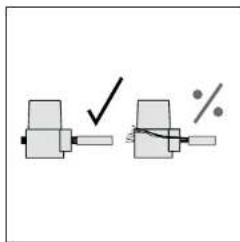
When using any of the options, make sure that the screw terminals are firmly tightened for best connection. Make certain that the cable ends are firmly pushed into the terminals and that there are no loose wires, which could cause a short circuit and damage the amplifier.
BI-WIRING/BI-AMPING
All HELICON/HELICON MK2 models can be bi-wired (one set of cables for the bass and one set for the midrange/tweeters) or bi-amped (one amplifier for the bass and one for the midrange/tweeters). Please use the DALI CONNECT cables (or similar) to connect the low and high frequency sections, if you are not bi-wiring/bi-amping the speakers (as described in the previous section). Instead of DALI CONNECT cables, you may also use a piece of loudspeaker cable.
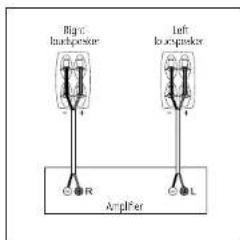
Normal wiring
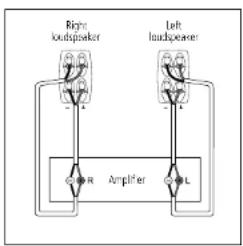
The connection to your amplifier is extremely important for your sound experience. Therefore, we recommend using high quality loudspeaker cables from DALI.
Regardless of whether you use your loudspeakers single-wired, bi-wired or bi-amped, please use the same length and type of loudspeaker cable for left and right loudspeakers.
For the perfect sound experience (both stereo and surround sound systems), the right speaker must be connected to the output terminals marked "R" or "Right" on your amplifier and the left speaker to the terminals marked "L" or "Left".
A detail that is often overlooked is connection in correct phase, i.e. the red terminal (+) on the amplifier must be connected to the red terminal (+) on the speaker, and the black terminal (-) on the amplifier should be connected to the black terminal (-) on the speaker.
If just one speaker in a stereo or surround sound system is connected out of phase, the bass will be weak and the overall sound will be diffuse.
CONNECTION OF HELICON S600/S600MK2
HELICON S600/S600 MK2 offer several connection options depending on your system. The subwoofer is suitable both for stereo and surround systems.
There is a built-in crossover and power amplifier in the subwoofer. The subwoofer has a separate input, if you wish to bypass the crossover, for instance when using a surround processor with built-in crossover.
The subwoofer has a built-in highpass filter and separate connectors for access to a high-pass filtered signal.
We recommend using high quality interconnect cables between your amplifier and subwoofer.
Connecting to a Stereo Signal with Full Frequency Range
When connecting the subwoofer directly to a preamp without built-in crossover network of high quality, we recommend that you connect the subwoofer inputs "LINE IN - LEFT/RIGHT" to a full-range signal from a normal preamplifier output. This way, the subwoofer's built-in crossover network filters the signal so that the subwoofer exclusively reproduces the lowest frequencies.
When the subwoofer inputs "LINE IN - LEFT/RIGHT" are fed a full-frequency stereo signal, it is possible to take a highpass filtered signal from the "LINE OUT - LEFT/RIGHT" sockets. This means that the low frequencies, which will be handled by the subwoofer, have been filtered out. The highpass filtered signal is then fed to the power amplifier that drives the main speakers. As a result, these speakers no longer have to handle the demanding low frequencies, which in turn means enhanced clarity from the main speakers.
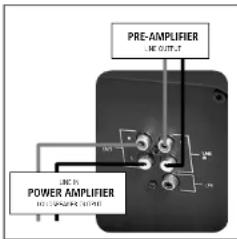
Connecting to a Mono Signal with Full Frequency Range
When connecting the subwoofer to just one channel, for instance when using two units in a stereo set-up, and if you still want to utilize the built-in crossover network of the subwoofer to divide the signal as described in the section concerning connection to a stereo signal, the subwoofer input "LINE IN - LEFT" should be used. As with the stereo connection, the built-in crossover networks of the subwoofer split the audio signal, resulting in the subwoofer

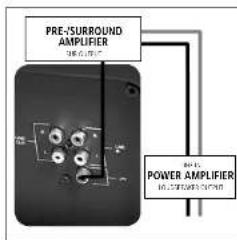
er exclusively reproducing the low frequencies. From the output socket "LINE OUT - LEFT" a highpass filtered signal may be tapped, as when using a stereo connection. Please note that there is no signal available on the "LINE OUT - RIGHT" socket.
Connecting to a Lowpass Filtered Mono Signal
When using the subwoofer with a surround amplifier or other equipment with access to a filtered mono output for subwoofer use, it is advantageous to connect this signal to the subwoofer's input marked "LFE". When the subwoofer is connected via "LFE", the signal bypasses the crossover network and goes directly to the amplifier. In this setup, there is no signal available at the output "LINE OUT". Any adjustment of the crossover frequency takes place elsewhere in the system, typically the surround
processor/amplifier. Please follow the instructions provided in that component's manual. When using the "LFE" input, the level and phase controls of the S600 are still active and these should be adjusted as recommended in the section concerning adjustments.
ADJUSTMENT OF HELICON S600/S600MK2
When you have decided upon which method of connection you want and positioned the subwoofer (see the chapter "Positioning Loudspeakers – HELICON S600/S600MK2"), you can commence the exciting process of adjusting the system. Please note that positioning the subwoofer will have a lot of influence on its contribution to the overall sound. If for example, the subwoofer is positioned in a corner, the bass level will be much higher than if it is positioned midway between two corners (due to acoustic loading of the subwoofer). If using the subwoofer in conjunction with the C200 center loudspeaker, the subwoofer should be positioned so that the C200 can stand on top of the subwoofer.
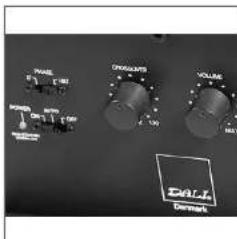
The following adjustment methods are recommended to achieve the best results. Use a piece of music you know well, and that preferably includes rhythmic bass such as kettle drums, bass guitar etc.
Start with "VOLUME" and "CROSSOVER" in the middle of the dial (12 o'clock). Turn the "PHASE" switch to position 180°, and "POWER" to the "ON" position.
VOLUME ADJUSTMENT
Adjust the volume of the subwoofer so that the bass matches the level of the front speakers. You should be able to appreciate the subwoofer's contribution to the sound, without it ever being overpowering. Bass must be tight and accurate, so that the subwoofer reproduces the exact amount of bass present in the music/soundtrack, no more and no less. If installing the subwoofer in a surround sound system, it is practical to select a fixed level on the subwoofer and adjust subwoofer output using the surround amplifier's set-up function. If bass levels are set too high, distortion will reduce the quality of your listening experience. Please note that the position of the subwoofer will have major influence on its sonic contribution.
Once the volume level is adjusted, you can start the equally important adjustment of the overlap between the front loudspeakers and the subwoofer. To do so, adjust up and down using "CROSSOVER" until you can hear that the bass is even and with no drop-out. You may have to adjust the volume again.
SETTING PHASE
Try both settings – if necessary combined with new adjustment of volume and crossover frequency. In any event, it is a good idea to listen to the system for a few days before making any final adjustments. Using the same setting for surround sound and stereo does not always achieve the best results. It is therefore a good idea to note the setup you prefer for surround sound and stereo setups.
SELECTING AUTO FUNCTION
The "AUTO" function puts the subwoofer into standby after approx. 10 minutes with no signal received at the inputs. When a signal is present again on one of the inputs, the built-in subwoofer amplifier powers up automatically. The "POWER" button is the main on/off switch. We recommend switching off the system when it is not to be used for long periods. When connecting or changing connections, always disconnect the mains electricity.
OVERLOADING
If the subwoofer is seriously overloaded, the built-in safety circuit will power down the amplifier. If this occurs, turn the system volume down and the subwoofer will automatically power up again after a short period. The built-in safety circuit is not a guarantee against damage as a result of overloading.
POSITIONING OF LOUDSPEAKERS
GENERAL
Position the HELICON/HELICON MK2 speakers at least 25cm/10" from the rear wall with the rear of the speakers parallel with the wall. Do not toe in the speakers towards the listening position, unless you are listening at extreme off axis angles. For optimum results, the speakers should be placed at least 60cm/25" from side walls.
The loudspeakers should be positioned so that so-called mirror sources are avoided (direct reflections from the loudspeaker to a wall to the listening position). If you have mirror sources, the effect can be minimized e.g. by placing a plant, tapestry or other object with an irregular surface at some point in the reflection's path.
If possible, improvement can almost always be made by experimenting with the loudspeaker and listening positions. Just a few centimeters/inches can make a difference because of different room coupling.
For critical listening, the listener should always be seated on the center axis between the two loudspeakers and with the same distance to each speaker. In the optimal listening setup, the distances from left speaker to right speaker, from right speaker to the listening position and from the listening position to the left speaker should all be equal, forming an equilateral triangle.
For rear/side channel speakers in a surround system, make sure that there is an unobstructed path from the tweeter modules to the listening position. Do not point the loudspeakers directly towards the listening position. Carefully follow the instructions included with your surround amplifier/receiver on how to calibrate and align the output of all the speakers in the surround setup.
HELICON 300/300MK2
DALI HELICON 300/300MK2 is a compact loudspeaker, very well suited for stand mounting in small to medium sized rooms. Optimally, the height of the stand must be approximately 55cm/22". The speakers will also work fine as surround speakers in larger rooms.
HELICON STAND is a dedicated stand for HELICON 300/300MK2. The stand is ordered separately to match the wood finish of your speakers.
HELICON 400/400MK2
DALI HELICON 400/400MK2 is a medium sized floorstanding loudspeaker very well suited for small to medium sized rooms. The speakers are very well suited for stereo setups as well as surround systems. HELICON 400/400MK2 is equally well suited as front and rear speakers in a surround system.
HELICON 800/800MK2
DALI HELICON 800/800MK2 is a large sized floorstanding loudspeaker. The speakers are very well suited for large rooms for the ultimate stereo or surround experience. HELICON 800/800MK2 is equally well suited as front and rear speakers in a surround system.
Perfect integration of the sound from the different drivers is achieved at distances above approximately 3m/120" -HELICON 800/800MK2 is recommended for larger rooms where long distances between loudspeaker and listener are possible.
HELICON S600/S600MK2
DALI HELICON S600/S600MK2 is designed specifically for use with the other HELICON loudspeakers. It can be used both as a bass supplement in a stereo setup as well as larger surround sound setups.
Used in a surround setup, the HELICON S600/S600MK2 can be used as a stand for the DALI HELICON C200, because the top of the subwoofer has the same curvature as the cabinet of the
HELICON W200
HELICON C200. In surround setups, this makes it possible to position the subwoofer and center speaker midway between the two main front loudspeakers.
If the subwoofer is used without the center loudspeaker, it can be positioned up against the wall, because it is a sealed enclosure design without rear-firing bass ports.
A piece of rubber foam is supplied with the subwoofer to be inserted between the subwoofer and the HELICON C200 center channel.
HELICON C200
DALI HELICON C200 is designed specifically for use with the other HELICON loudspeakers in a surround system.
A minimum distance from the rear of the center loudspeaker to the rear wall of at least 10cm/4" is recommended due to the rear-firing bass reflex ports.
The center loudspeaker is designed to be positioned in the center position relative to the TV set or projection screen.
The height of the center loudspeaker is less critical than the other HELICON speakers, because the vertical tilt of the subwoofer can be adjusted due to the curvature of the cabinet. It is preferred that the drivers are pointing in the direction of the listeners ears. So, if the center speaker is positioned low, it should be tilted backwards.
If the HELICON S600/600MK2 subwoofer is not used as a stand for the center speaker, a dedicated base matching the curvature of the cabinet is sold separately, making it easy to position the center loudspeaker on a shelf or in a rack system.
The drivers in HELICON C200 are magnetically shielded. Therefore, the center loudspeaker can be positioned relatively close to a CRT TV set without disturbing the picture.
HELICON W200 is a medium sized wall-mount loudspeaker which has a variety of options for use. It can be used alone in a compact stereo setup or combined with a subwoofer if more deep bass is desired. It can also be used as front and/or side/rear speakers in a surround system in combination with a subwoofer.
HELICON W200 comes with an integrated bracket for easy wall mounting.
When used as a stereo/front loudspeaker, the dome tweeter should be elevated to approximately ear height at the preferred listening position.
When used as a rear loudspeaker, the bottom of the cabinet should be approximately at ear height (the bracket should be mounted approximately 130cm/50" above the floor).
For stereo or surround use, the hybrid tweeter module should be below the woofer and the speakers should point towards the listening position.
At the rear of the loudspeaker, there is a vertical groove for the loudspeaker cable.
Mounting
The wall brackets MUST be fitted with rawiplugs suitable for the wall material. The brackets must be mounted absolutely horizontally.
The bracket must be screwed firmly in place. We recommend using a spirit level to ensure that the bracket is mounted absolutely level.

The enclosed bushing is mounted on the pin in the middle of the bracket.

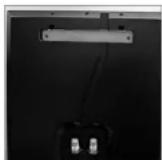


The two side screws are inserted so that there is approximately 14mm between the bracket and the lower lip of the screw head.
The hook bracket on the back of the loudspeaker fits over the wall bracket.
Carefully position the loudspeaker over the wall bracket, so that all the screw heads match up to the holes in the loudspeaker cabinet.
Tighten the screws using the enclosed Allen key. Minor unevenness can be compensated at this stage. We recommend re-tightening all screws after approximately 14 days.
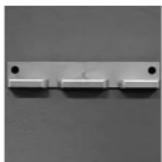
When mounting the Helicon W200 close to the ceiling, do not use the bushing and adjustment screws. Instead, rubber bumpers are fitted to the wall bracket, as seen in the photo. The loudspeaker is then suspended over the bracket and secured using the vertical pin in the middle of the bracket.
BREAK-IN
Like any mechanical system, a loudspeaker requires a "break-in" period. You will experience a gradual increase in sound quality during an initial period. Unlike other mechanical systems, the lifespan of a loudspeaker is increased by regular use.
To shorten the break-in period, you can let your speakers play at moderate to high volume levels for some days.
MAINTENANCE
Clean the cabinets with a soft, dry cloth (microfiber is recommended). If the cabinets are dirty, wipe with a soft cloth dipped in all-purpose cleaner and then wrung out. Be very careful when wiping the speaker cones/domes, as they are very fragile.
Grilles can be vacuumed and wiped with a well-wrung, lint-free cloth and mild all-purpose cleaner.
Minor surface scratches can be carefully polished away with polish. We recommend 3M Finesse-it, 3M item no. 09639.
AVOID DIRECT SUNLIGHT
Real wood veneer cabinets are (like furniture, etc.) sensitive to sunlight which might cause fading over time. To reduce fading, we recommend avoiding exposing the HELICON loudspeakers to direct sunlight.
DISPOSAL
If you want to dispose this product, do not mix it with general household waste. There is a separate collection system for used electronic products in accordance with legislation that requires proper treatment, recovery and recycling. Private households in the 25 member states of the EU, in Switzerland and Norway may return their used electronic products free of charge to designated collection

facilities or to a retailer (if you purchase a similar new one). For countries not mentioned above, please contact your local authorities for the correct method of disposal. By doing so you will ensure that your disposed product undergoes the necessary treatment, recovery and recycling and thus prevent potential negative effects on the environment and human health.
POWER AND ACOUSTIC PRESSURE
How loud a speaker is able to play and still sound good is completely dependent on the signal it has to reproduce. So that, in practice, you cannot define an unequivocal level for use in comparing different speakers.
Obviously, lots of pure, undistorted output from a large amplifier is better than a distorted signal from a small amplifier stretched beyond its capacity. The signal from a distorting (clipping) amplifier contains much more high-frequency information than an undistorted signal, and therefore puts a heavy strain on the high-frequency driver. Consequently, speakers are most often damaged by small amplifiers forced to work too hard - and very rarely by large amplifiers, which are practically running idle.
It is worth noting that when the tone controls are turned above the neutral setting this places a substantial burden on both speakers and amplifier. In a good sound system, tone controls should only be used to compensate for poor recordings and not to permanently compensate for weaknesses elsewhere in the system. Therefore, DALI recommends that the tone controls generally be set to the neutral position and that you achieve your desired sound image through correct positioning of the speakers.
Ensuring that you keep the volume low enough to keep the sound clear and undistorted will minimize the strain on both speakers and amplifier.
TECHNICAL SPECIFICATIONS
There are countless methods for evaluating speakers from a technical point of view resulting in technical specifications, graphs and characteristics. However, none of them actually represent how a speaker really sounds and the realism it is able to reproduce. It is up to the individual to decide whether one speaker sounds better than another. Still, we would like to present the objective technical specifications which we find most relevant.
But remember, technical data reveal nothing about how music will sound when reproduced by a given music system. DALI speakers are designed to reproduce music as true to the source as possible. But it is up to you to decide what you think of the sound quality – trust your senses!
Enjoy your new speakers!
MK2 MK1
| HELICON-HELICON 800/800MHz 400/400MHz 300/300MHz | ||||
| Frequency range = 3 dB [Hz] 31.27 | 030 31.5 | 27,000 37 | 27,000 | |
| 500 (MHz)Crossover Frequencies [Hz] 3,00013,000 | 3,00013,500 | 3,00013,000 | ||
| Sensitivity (2.83V/1 m2) [dB] | 89.5 | 88.0 | 86.0 | |
| Nominal Imporance [ohms] | 4.0 | 4.0 | 4.0 | |
| Minimum Imporance [forms] | 3.5 | 3.7 | 4.3 | |
| Maximum SPI [dB] | 13 | 11 | 108 | |
| Reccumercised Amp. power [W] | 50 - 400 | 50 - 300 | 50 - 200 | |
| Terminals | Bi-Wire | Bi-Wire | Bi-Wire | |
| High Frequency Driver(s)Soft done*1 x 25 | 1 x 10 x 55 | 1 x 25 | 1 x 10 x 55 | |
| Mid-range Driver(s) | 1 x 6%* | — | — | |
| Low-frequency Driver(s) | 2 x 8* | 2 x 6%* | 1 x 6%* | |
| Bass Reflect Turing Frequency [Hz] | 28.5 | 32.0 | 34.5 | |
| Distance from Rear Wall (inch) | > 25 / 10 | > 25 / 10 | > 25 / 10 | |
| Dimensions (1 x W x Di) [mm] | 112.6 x 30.4 x 52.7 | 102.5 x 26.7 x 49.0 | 43.5 x 20.7 x 37.3 | |
| Dimensions (1 x W x Di) [inch] | 44.3 x 12.0 x 26.7 | 40.4 x 10.5 x 16.3 | 17.1 x 8.7 x 14.7 | |
| Weight (kg/lbs) | 40.9/90.1 | 31.6/66.7 | 9.8/21.6 | |
| Dimensions (1 x W x Di) [mm] | 112.6 x 30.4 x 53.8 | 102.5 x 26.7 x 50.1 | 43.5 x 20.8 x 40.2 | |
| Dimensions (1 x W x Di) [inch] | 44.3 x 12.0 x 21.2 | 40.4 x 10.5 x 16.7 | 17.1 x 8.2 x 15.8 | |
| Weight (kg/lbs) | 42.4/93.5 | 32.0/70.5 | 10.5/23.1 | |
| MTC spikes | MTC spikes | DAI CONNECT shunt cables | DAI CONNECT shunt cables | |
| Accessories | DAI CONNECT shunt cables | |||
| Finishes | Rod award, high glass bequeered Resceral or Chloro | |||
| HELICON 'HELICON C200 | HELICON W200 S600/S600MK2 | |||
| Frequency range = -3 dB [Hz] 49 - 27 | 003 41 - 25,000 25 - 175 | |||
| Crossover Frequencies [Hz] 2,800 | 45 | |||
| 13,000 | 13,000 | 120 | ||
| Sensitivity [dBW/1=] [dB] | 30.0 | 89.0 | - | |
| Nominal impedance [ohms] | 4.0 | 4.0 | 20k | |
| Minimum importance [orms] | 3.8 | 4.0 | 20k | |
| Maximum SRL [dB] | 11 | 98 | 1 / | |
| Racer-mediated Amp. power [W] | 50 - 250 | 30 - 150 | - | |
| Amplifier Power [W] | - | - | 300 RMSI - 600 [peak] | |
| Terminals | Bi-Wire | Bi-Wire | Phono | |
| High Frequency Soft dome* | x 25 | x 25 | - | |
| Drivers (mm) | Ribbon | 1 × 10 × 55 | 1 × 10 × 55 | - |
| Midance Driver(s) | - | - | ||
| Low frequency Driver(s) | 1 × 60^ * | 1 × 60^ * | 2 × 12^ * | |
| Bass Reflex Turing Frequency [Hz] | 36.0 | - | - | |
| Distance from Rose Wall (endird) | > 10.4 | 0 / 0 | 0.10 | |
| Dimensions (h x W x Di) (mm) | 64.8 x 46.1 x 21.9 | 45.2 x 32.9 x 20.7 | 64.3 x 41.9 x 41.4 | |
| Dimensions (h x W x Di) (inch) | 25.5 x 18.1 x 8.3 | 17.8 x 12.8 x 8.1 | 25.3 x 16.5 x 16.3 | |
| Weight (kg/lb) | 18/40.5 | 9.5/20.9 | 40/88.1 | |
| Dimensions (h x W x Di) (mm) | - | - | 64.3 x 41.9 x 41.4 | |
| Dimensions (h x W x Di) (inch) | - | - | 25.3 x 16.5 x 16.3 | |
| Weight (kg/lb) | - | - | 40/88.1 | |
| Accessories shunt cables shunt cables | Rubber feetDAI CONNECTWall bracketRubber pad | DAI CONNECT | M/10 spikes | |
| Finishes | Real award, high gloss lacquered Rasenat or Chery | |||
^1 RMS Watt ^2 Silk
ENGLISH, DEUTSCH, DANSK
INHALT
DANISH AUDIOPHILE LOUDSPEAKER INDUSTRIES....21
HELICON 800/800MK2 ....31
HELICON S600/S600MK2 31
HELICON C200 32
HELICON W200 33
EINSPIELPHASE 35
PFLEGE 35
DIREKTE SONNENEINSTRAHLUNG VERMEIDEN 35
ENTSORGUNG 35


- HELICON / HELICON MK2 MANUAL
- CONTENTS
- SAFETY GUIDELINES UNPACKING
- ACCESSORIES
- GRILLES
- SPIKES
- DALI CONNECT CABLES
- CONNECTION
- SCREW TERMINALS
- BI-WIRING/BI-AMPING
- CONNECTION OF HELICON S600/S600MK2
- Connecting to a Stereo Signal with Full Frequency Range
- Connecting to a Mono Signal with Full Frequency Range
- Connecting to a Lowpass Filtered Mono Signal
- ADJUSTMENT OF HELICON S600/S600MK2
- VOLUME ADJUSTMENT
- SETTING PHASE
- SELECTING AUTO FUNCTION
- OVERLOADING
- POSITIONING OF LOUDSPEAKERS
- GENERAL
- HELICON 300/300MK2
- HELICON 400/400MK2
- HELICON 800/800MK2
- HELICON S600/S600MK2
- HELICON W200
- HELICON C200
- Mounting
- BREAK-IN
- MAINTENANCE
- AVOID DIRECT SUNLIGHT
- DISPOSAL
- POWER AND ACOUSTIC PRESSURE
- TECHNICAL SPECIFICATIONS
- INHALT
Brand : Dali
Model : HELICON MK2
Category : Loudspeaker