
DGS 850 - Steamer Rommelsbacher - Free user manual and instructions
Find the device manual for free DGS 850 Rommelsbacher in PDF.


| Product Type | Electric Steamer |
| Brand | Rommelsbacher |
| Model | DGS 850 |
| Power Consumption | 800 W |
| Water Tank Capacity | 1.5 L |
| Number of Tiers | 2 |
| Cooking Capacity per Tier | Approx. 3 L |
| Material (Tiers) | Stainless Steel |
| Material (Base) | Plastic |
| Dimensions (H x W x D) | 30 x 30 x 30 cm |
| Weight | 2.0 kg |
| Timer | 60-minute mechanical timer with bell |
| Auto Shut-off | Yes, when water runs out or timer ends |
| Keep Warm Function | Yes, automatic after cooking |
| Functions | Steam cooking, reheating, defrosting, blanching |
| Cleaning | Dishwasher-safe tiers and lid; descale base regularly |
| Safety Features | Boil-dry protection, cool-touch handles, secure lid lock |
| Spare Parts Availability | Replacement tiers, lid, and heating element available |
| Cord Length | 1.0 m |
| Voltage | 220-240 V, 50/60 Hz |
Frequently Asked Questions - DGS 850 Rommelsbacher
User questions about DGS 850 Rommelsbacher
0 question about this device. Answer the ones you know or ask your own.
Ask a new question about this device
Download the instructions for your Steamer in PDF format for free! Find your manual DGS 850 - Rommelsbacher and take your electronic device back in hand. On this page are published all the documents necessary for the use of your device. DGS 850 by Rommelsbacher.
USER MANUAL DGS 850 Rommelsbacher
natural_image
Abstract geometric pattern with vertical lines inside a circle (no text or symbols)ROMMELSBACHER
D
Bedienungsanleitung
GBtruction manual
natural_image
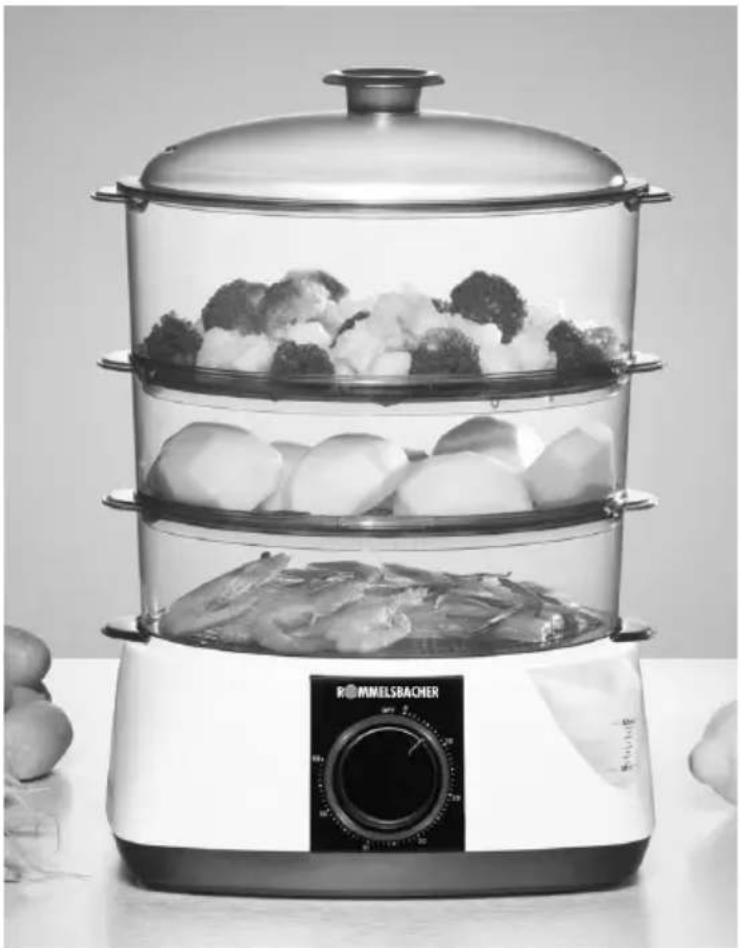
Black-and-white photo of a three-tier cooking steamer with broccoli, eggs, and meat inside (no visible text or symbols)DGS 850
Dampfgarer
Steamer
Produktbeschreibung / Product description
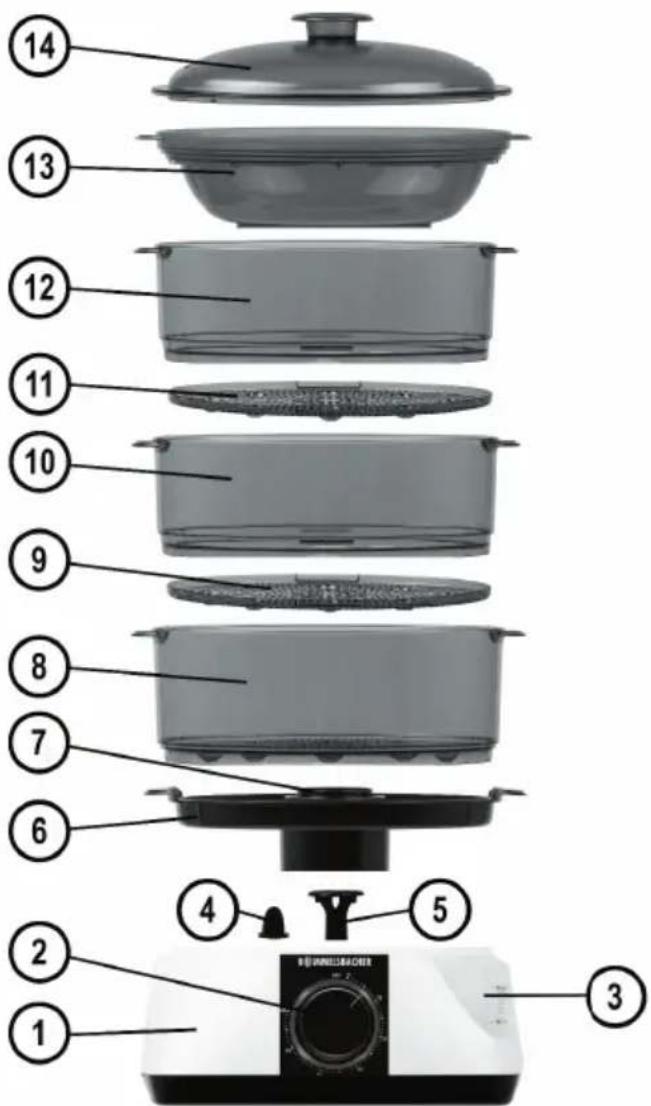
Scope of supply....14
Packing material 14
For your safety 15
General safety advices 15
Safety advices for using the appliance .... 15
Application possibilities .... 16
Flavour distribution cap 16
Prior to initial use ....17
Operating panel 17
Operating the appliance.... 17
Steaming trays 17
Preparation 18
Starting and stopping the cooking process ... 18
Boil dry protection.... 18
Refilling water....19
Making eggs 19
Making rice....19
Cleaning and maintenance 20
Descaling the appliance 20
Storage 21
Useful tips....21
Steaming chart....22

natural_image
Close-up of a hand holding a small black object inside a white appliance (no visible text or symbols)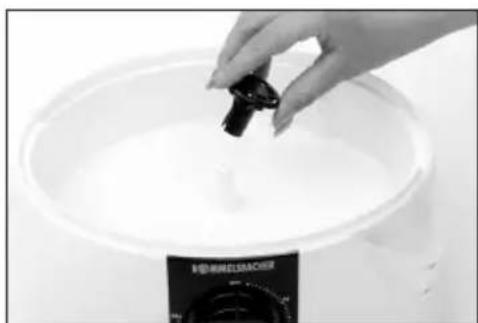
natural_image
Hand pouring liquid into a white pot on a stovetop (no visible text or symbols)natural_image
Close-up of a white ceramic pot with a black knob and a black control box labeled 'BELLWELSRACHER' (no other text or symbols visible)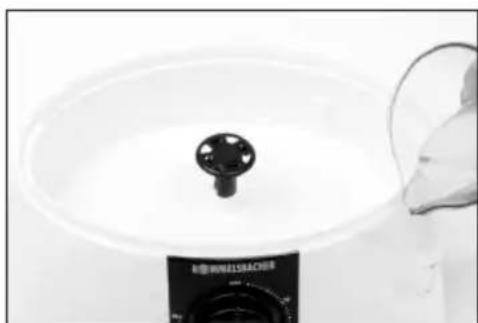
natural_image
Close-up of a kitchen sink with a black knob and a white pot, next to a glass stand (no visible text or symbols)natural_image
Close-up of a kitchen appliance with a 'R@MMELSBACHER' control knob (no visible text beyond label)Eier zubereiten
We are pleased you decided in favour of this superior steamer and would like to thank you for your confidence. Its easy operation and wide range of applications will certainly fill you with enthusiasm as well. To make sure you can enjoy using this appliance for a long time,
please read through the following notes carefully and observe them. Keep this instruction manual safely. Hand out all documents to third persons when passing on the appliance. Thank you very much.
Intended use
The appliance is designed for cooking food (domestic use only). Other uses or modifications of the appliance are not intended and harbour considerable risks. For damage arising from not intended use, the manufacturer does not assume liability. The appliance is not designed for commercial use.
Technical data
Only connect the appliance to an isolated ground receptacle installed according to regulations. The rated voltage must comply with the details on the rating label. Only connect to alternating current!
Nominal voltage: 230 V\~50 Hz
Nominal power: 825 W
Protection class: I
Standby consumption: 0 W
Max. water quantity: 1.1 l – for ca. 60 min. operation
Scope of supply
Check the scope of supply for completeness as well as the soundness of the product and all components (see product description page 2) immediately after unpacking.
Packing material
Do not simply throw the packing material away but recycle it. Deliver paper, cardboard and corrugated cardboard packing to collecting facilities. Also put plastic packing material and foils into the intended collecting basins.




In the examples for the plastic marking PE stands for polyethylene, the code figure 02 for PE-HD, 04 for PE-LD, PP for polypropylene, PS for polystyrene.

WARNING: Read all safety advices and instructions. Non-observance of the safety advices and instructions may cause electric shock, fire and/or bad injuries!
General safety advices:
• Always keep children under 8 away from the product and the power cord.
• Children from the age of 8 must be supervised when cleaning or maintaining the appliance.
- Children from the age of 8 and persons not having the knowledge or experience in operating the appliance or having handicaps of physical, sensorial or mental nature must not operate the appliance without supervision or instruction by a person, responsible for their safety. Do not leave the appliance unattended during operation!
• Children should be supervised in order to ensure that they do not play with the appliance.
- Packing material like e. g. foil bags should be kept away from children.
- Do not operate this unit with an external timer or a separate telecontrol system.
- Prior to each use, check the appliance and the attachments for soundness, it must not be operated if it has been dropped or shows visible damage. In these cases, the power supply must be disconnected and the appliance has to be checked by a specialist.
- When laying the power cord, make sure that no one can get entangled or stumble over it in order to avoid that the appliance is pulled down accidentally.
- Keep the power cord away from hot surfaces, sharp edges and mechanical forces. Check the power cord regularly for damage and deteriorations. Damaged or entangled cords increase the risk of an electric shock.
- Do not misuse the power cord for unplugging the appliance!
- Never immerse the base unit, power cord and power plug in water for cleaning.
- Do not store the appliance outside or in wet rooms.
- This electrical appliance complies with the relevant safety standards. In case of signs of damage to the appliance or the power cord, unplug the appliance immediately. Repairs may be affected by authorised specialist shops only. Improper repairs may result in considerable dangers for the user.
- Improper use and disregard of the instruction manual void all warranty claims.
Safety advices for using the appliance:

WARNING: Hazard of injury/burns/scalding!
- The surfaces of appliance, steaming trays, lid, condensate collector, accessories and the water in the water tank are getting hot during use.
- Hot surfaces as well as residual water in water tank and condensate collector firstly stay hot even after switch-off!
- Be careful when working with hot liquids or foods!
Thus, act with care:
- Only touch steaming trays, universal bowl and lid at the integrated handles. Use pot cloths for handling hot food!
- Lift the lid slowly, turned away from you and let the steam escape to the back! Do not lean over the appliance when it is producing steam. Always keep the lid closed during operation!
- Place the appliance on a stable and even surface (no varnished surfaces, no table cloths etc.) and do not operate it in the vicinity of sources of heat (oven, gas flame etc.) or in explosive environments, where inflammable liquids or gases are located.
- Keep a distance of at least 10 cm around the appliance to avoid damage by heat or steam and to grant an unobstructed working area. Make sure there is no furniture sensitive to heat or moisture above the appliance. Make sure steam can draw off easily!
- Place it beyond children's reach!
- Always use sufficient water for the required cooking time and do not cover the water tank with aluminium foil or anything else!
- When overfilling, boiling water may spurt out during operation!
- Do not add anything directly to the water (salt, spices, oils, wine etc.). This might impair water circulation and damage water tank and heating element!
- For checking if the food is done, use kitchen tongs or long-handled cutlery!
- Should there be residual water in the water tank or condensate collector after the steaming process, empty it after cooling down only.
- Do not operate the appliance without steam distributor, condensate collector and steaming tray with lid!
- Do not use any vessels, bowls and other accessories which are not particularly qualified for this appliance!
• Always unplug the appliance before cleaning! - Do not move the appliance when hot. Appliance and accessories must have cooled down completely before cleaning or moving!
- Never immerse base unit, power cord and plug in water for cleaning!
• Pull the power plug after each use for safe switch-off!
Application possibilities
Steaming is one of the healthiest ways of cooking. It mostly preserves flavour, vitamins, colour and nutrients of fresh food. You can use grease, salt and spices sparingly.
The appliance is especially suitable for steaming and cooking potatoes and vegetables of all kinds, fish, poultry, meat and eggs but also for rice, dumplings, pudding, stewed fruit and much more.
Flavour distribution cap
The integrated flavour distribution cap makes it possible to flavour the food to be cooked additionally. For this individual refinement, both dried and fresh herbs, spices and flavouring ingredients can be used.
For example, nutmeg goes well with all kinds of cabbage, garlic with broccoli, chervil with peas, rosemary or nutmeg with potatoes, lemon balm with asparagus. For refining beef, green pepper corns are popular and curry flavour for chicken. Desserts can be refined by adding flavour of lemon zest or vanilla bean, too.
Prior to initial use
For a start, please clean the appliance as well as all attachments. For more detailed information please refer to "Cleaning and maintenance".
Operating panel
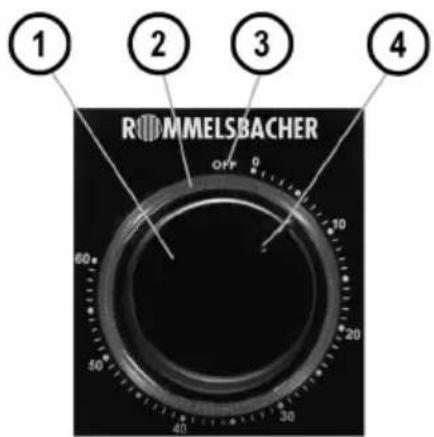
| 1 | knob |
| 2 | pilot lamp (blue backlit decorative ring) |
| 3 | position "OFF" |
| 4 | position mark at knob |
Operating the appliance

WARNING: Hazard of injury/burns/scalding!
- The surfaces of appliance, steaming trays, lid, condensate collector, accessories and the water in the water tank are getting hot during use.
- Hot surfaces as well as residual water in water tank and condensate collector firstly stay hot even after switch-off!
- When opening the lid or removing the steaming trays, hot steam may escape!
- Be careful when working with hot liquids or foods!
Steaming trays
- You can use 1, 2 or 3 steaming trays simultaneously. Food with the longest steaming time should be placed in the lowest steaming tray, food with the shortest steaming time in the top steaming tray.
• Steaming tray "no. 1" has a fixed bottom. - The steaming trays "no. 2" and "no. 3" have a removable bottom. When removing the bottoms of the middle and bottom steaming tray, your cooking chamber will be larger for making larger quantities of food (e.g. chicken). When assembling the steaming trays, make sure the rim of the bottom faces upwards.
- The handles of the steaming trays are marked with numbers. They show the succession in which the trays have to be stacked:
o bottom level: steaming tray "no. 1"
o middle level: steaming tray "no. 2"
o top level: steaming tray "no. 3"
Preparation
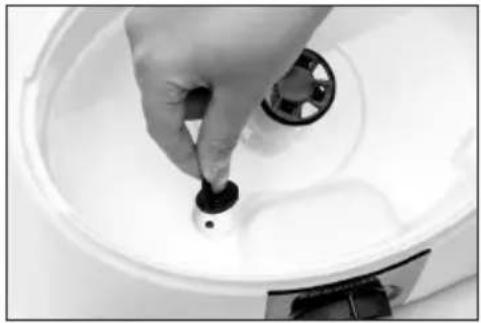
- Set the appliance up according to instructions. Turn the knob to position "OFF".
- Mount the strainer insert in the water tank and attach the steam distributor correctly.
natural_image
Close-up of a hand using a tool to press or inspect a small black component on a white circular surface (no text or symbols visible)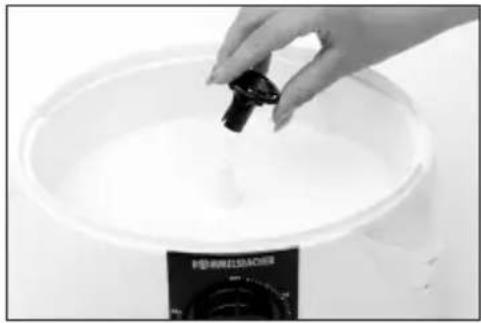
natural_image
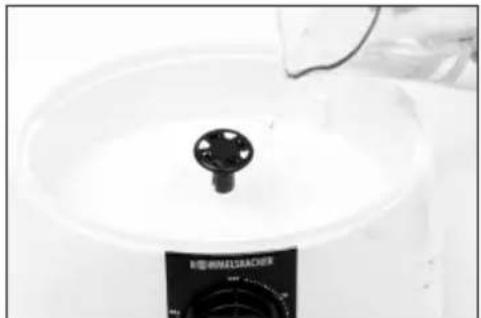
Hand pouring liquid into a white pot with a black lid, no visible text or symbols- Fill the water tank directly or via the water refill port with fresh water (observe the min./max. marking).
natural_image
Close-up of a white ceramic bowl with a black knob and a black control panel labeled 'BEEWELCHACHER' (no other text or symbols visible)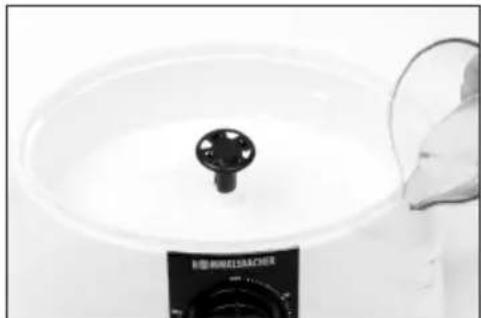
natural_image
Close-up of a white circular basin with a black knob and a small container labeled 'HOMOELSACHER' (no other text or symbols visible)- If applicable, moisten the mesh of the flavour distribution cap with water and fill it with herbs/spices (max. 1 – 2 teaspoons of dried herbs/spices; chop fresh ingredients).
• Put the condensate collector on. - Place the steaming trays in the succession "no. 1" – "no. 2" – "no. 3" on the condensate collector.
• Finally, put the lid on.
Starting and stopping the cooking process
• Pull the power cord out of the cord compartment and plug it in.
- For starting, turn the knob clockwise to the desired time (see „Steaming chart“).
The pilot lamp glows blue.
• The appliance starts and generates steam within a short time.
- After the set time has elapsed, there is an acoustic signal and the appliance switches off automatically. The pilot lamp goes off.
• Take the ready food out and let the appliance cool down.
• Empty residual water of the condensate collector and the water tank.
• Always pull the mains plug after use!
NOTE: The cooking process can be quit any time by turning the knob to "OFF" position.
Boil dry protection
The appliance has a boil dry protection. Should water run short during operation, the heating reduces its power automatically and is thus protected against damage. No steam is generated. The heating cycles in this mode until water is refilled, the set time has elapsed or the appliance is switched off.
Refilling water (possible during operation)
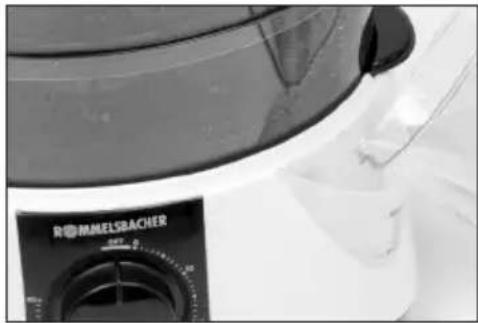
- Check the water quantity in the water tank regularly via the external water level gauge.
- Fill the water tank carefully with fresh water via the water refill port (observe the min./max. marking).
natural_image
Close-up of a kitchen appliance with a control panel and a brush (no visible text or symbols)Making eggs
• Prepare the appliance for use (see "Preparation").
- Pierce the eggs and place them in the intended recesses in the steaming tray.
- Place the steaming tray on the condensate collector and attach the lid.
- Start the appliance (see "Starting and stopping the cooking process" and „Steaming chart").
Making rice
• Prepare the appliance for use (see "Preparation").
- Place the universal bowl in the steaming tray.
- Fill the universal bowl with the desired quantity of rice and water, at the ratio of 1 to 1.5 (e.g. 100 g rice / 150 ml water). The max. quantity for rice is 250 g.
- Place the steaming tray with the universal bowl on the condensate collector and attach the lid.
- Start the appliance (see "Starting and stopping the cooking process" and „Steaming chart").
Cleaning and maintenance


• Always unplug the appliance before cleaning and let it cool down!
- Never immerse the base unit, power cord or plug in water or clean them under running water!
WARNING: Hazard of injury/burns/scalding
- The surfaces of appliance, steaming trays, lid, condensate collector, accessories and the water in the water tank are getting hot during use.
-
Hot surfaces as well as residual water in water tank and condensate collector firstly stay hot even after switch-off
-
Clean the appliance immediately after use and cooling down so that residues will not dry up.
• All parts are not suitable for cleaning in the dishwasher. - Clean base unit and water tank with a moist cloth and wipe them dry. Highly pigmented foods (e.g. carrots) may stain the appliance's plastic parts. Wipe those parts with some cooking oil before cleaning them.
- Detach the small strainer insert in the water tank as well as the steam distributor and clean these parts in clear water. Afterwards, attach them again.
- Clean steaming trays, universal bowl, condensate collector and lid in warm water with some dishwashing detergent and wipe them dry.
- Make sure you will not damage the mesh of the flavour distribution cap when cleaning the condensate collector.
- Do not use any abrasives and solvents or sharp objects!
• Never use a steam jet appliance for cleaning!
Descaling the appliance
For ensuring flawless function, the appliance must be descaled regularly. Depending on the hardness of your tap water, the appliance must be descaled after 15 hours of operation at the latest. Observe the following instructions when descaling your appliance!
- For descaling we recommend 1 litre vinegar water at the rate of 1/3 vinegar essence and 2/3 water.
Do not use any other decalcifiers!
- Pour the prepared mixture in the water tank (observe the max. filling quantity).
- Attach the condensate collector.
- Attach steaming tray "no. 1".
- Attach the lid.
- For starting the descaling process, turn the knob clockwise to 30 min. The pilot lamp glows blue.
• The appliance starts and generates steam within a short time. - After the set time has elapsed, there is an acoustic signal and the appliance switches off automatically.
The pilot lamp goes off.
- Let the appliance cool down, then empty residual water of condensate collector and water tank.
- Rinse the water tank thoroughly with clear water several times, clean condensate collector, strainer insert and steam distributor.
• Always pull the mains plug after use!
Storage
- Deposit the power cord in the cord compartment.
- To store the appliance, place the steaming tray "no. 1" in steaming tray "no. 2" and these together in steaming tray "no. 3". Attach universal bowl and lid.
- Place the stacked trays on the condensate collector and then all together on the base unit.
• This will save storage space.
Useful tips
- One layer of food will steam more quickly than several layers. Therefore, steaming time increases with quantity of food, e. g. 1 kg of cauliflower florets require longer than 0.5 kg.
• To ensure best results, make sure that all pieces are of a similar size. - If pieces are of different sizes and have to be layered, place the smaller pieces on top.
- Do not cram food into the steaming trays. Leave enough room between the pieces to ensure a good supply of steam circulation.
- When steaming larger amounts, stir the food with a long-handled spoon after half of the steaming time.
- Never steam frozen meat, poultry or seafood. Always thaw everything completely first.
- The universal bowl is also an ideal container for steaming other foods such as fruit, soups, puddings etc.
- Place the largest pieces or those with the longest steaming times (also rice) in the bottom steaming tray. When using the upper trays, steaming times are usually a little longer, therefore add a further 5 to 8 minutes.
- As taste can spread through condensation, place meat and fish in the bottom steaming tray.
- When preparing foods with different steaming times, start with the food with the longest steaming time in the bottom tray. If the remaining steaming time is as long as that for those foods with the shortest steaming time, carefully remove the cover and place the next tray with the food still to be steamed on top of it. Then place the cover on top again.
Steaming chart
- The steaming times shown in the chart are only approximate. Times can vary according to the size of food, quantities in the steaming trays, the freshness of foods and personal tastes.
- Steaming times apply to the quantities shown in the chart. If not specified otherwise, all steaming times refer to the use of the bottom tray.
| Vegetables Type Quantity Steaming time Recommendations | ||||
| Cut off thick stems from cauliflower, broccoli and cabbage.Steam green, leafy vegetables for the shortest possible time as they lose colour easily.Salt and season vegetables after steaming for best results.Frozen vegetables need not be thawed before steaming. | ||||
| Artichokes fresh 2 - 3 | medium size | 50 - 55 minutes | ||
| Asparagus fresh | frozen | 400 g400 g | 14 - 16 minutes18 - 20 minutes | lay flat in basketcriss-cross 2nd layer to allow steam flow |
| Beans, green fresh | frozen | 400 g400 g | 25 - 30 minutes35 - 40 minutes | stir halfway through steam time |
| Broccoli fresh | frozen | 400 g400 g | 16 - 20 minutes20 - 23 minutes | stir halfway through steam time |
| Brussels sprouts fresh | 400 g 20 - 23 minutes stir halfway through steam time | |||
| Cabbage fresh, chopped | 400 g 35 - 40 minutes stir halfway through steam time | |||
| Carrots | fresh, sliced | 400 g | 22 - 25 minutes | stir halfway through steam time |
| Corn on the cob | fresh, whole | 15 minutes | turn halfway through steam time | |
| Cauliflower | fresh, florets frozen | 400 g400 g | 18 - 20 minutes20 - 23 minutes | stir halfway through steam time |
| Courgettes | fresh, in slices | 400 g | 15 - 20 minutes | stir halfway through steam time |
| Mushrooms | fresh 200 g 15 - 20 minutes stir halfway through steam time | |||
| Peas | frozen | 400 g 15 - 18 minutes stir halfway through steam time | ||
| Potatoes | peeled and chopped | 900 g | 20 minutes | stir halfway through steam time |
| New potatoes | fresh, whole | 400 g 25 - 30 minutes | ||
| Spinach | fresh frozen | 250 g400 g | 10 - 12 minutes18 - 20 minutes | |
| Fish and Seafood | Type Quantity Steaming time Recommendations | |||
| Fish is done as its colour turns opaque.Frozen fish may be steamed without defrosting if separated before steaming and the cooking time is extended.Spices like dill, lemon balm, garlic and lemon wedges can be added in the flavour distribution cap. | ||||
| Lobster, tails | fresh | 2 pieces | 22 - 25 minutes | meat will be opaque; cook longer if necessary |
| Fish, fillets | frozenfresh | 250 g250 g | 12 - 15 minutes10 - 12 minutes | |
| Fish, thick steaks | salmon, codtuna | 250/400 g250/400 g | 12 - 15 minutes15 - 20 minutes | |
| Mussels | fresh 400 g 10 - 12 minutes steaming is done when shells are completely open | |||
| Oysters | fresh | 6 pieces | 16 - 20 minutes | steaming is done when shells are completely open |
| Prawns | fresh 400 g 10 - 12 minutes stir halfway through steam time | |||
| Poultry Type Quant | ty Steaming time Recommendations | |||
| Chicken boneless breast | drumsticks | 400 g | 15 - 18 minutes | remove skin before cookingafter steaming, brown skin under grill if desired |
| 400 g | 22 - 28 minutes | |||
| Meat and sausages | Type Quantity Steaming time Recommendations | |||
| Steaming has the advantage of allowing all the fat to drip away during cooking. Due to the gentle heat only choose tender, lean cuts of meat and trim all fat. Meat suitable for grilling is ideal for steaming.Serve steamed meat and poultry with flavoursome sauces or marinade before steaming.Thoroughly cook all food before serving. Pierce with a long object (knife or skewer) to check if done.Sausages must be completely cooked before steaming.Add fresh herbs in the flavour distribution cap for flavour. | ||||
| Beef in slices, fillet steak or sirloin | 250 g 12 - 15 minutes trim all fat, steamed beef has a firm texture | |||
| Lamb chops with or without bones | 4 chops 15 - 20 minutes trim all fat | |||
| Pork fillet, loin steaks or loin chops | 400 g or 4 pieces | 8 - 13 minutes trim all fat | ||
| Sausages(pre-cooked) | frankfurter 400 g 400 g | 17 minutes 15 minutes | pierce skins before steaming | |
| Rice Quantity Amount of | water | Steaming time Recommendations | |
| Use the universal bowl and add the required amount of water together with the rice.For menu cooking always place the universal bowl in the topmost steam tray as the flavours of the other foods may spread through the condensed water. | |||
| White rice 100 g250 g | 150 ml400 ml | 25 minutes35 minutes | serves 1 - 2serves 3 - 4 |
| Brown rice 250 g | 400 ml 40 minutes | serves 3 - 4 | |
| Eggs | Quantity | Steaming time Recommendations | ||
| Soft-boiled | max. 8 | 8 minutes | sit eggs in the egg holders(recesses in the steaming trays) | |
| Hard-boiled | 15 minutes | |||

- ROMMELSBACHER
- Produktbeschreibung / Product description
- Eier zubereiten
- Intended use
- Technical data
- Scope of supply
- Packing material
- WARNING: Read all safety advices and instructions. Non-observance of the safety advices and instructions may cause electric shock, fire and/or bad injuries!
- General safety advices:
- Safety advices for using the appliance:
- WARNING: Hazard of injury/burns/scalding!
- Thus, act with care:
- Application possibilities
- Flavour distribution cap
- Prior to initial use
- Operating panel
- Operating the appliance
- Steaming trays
- Preparation
- Starting and stopping the cooking process
- Boil dry protection
- Refilling water (possible during operation)
- Making eggs
- Making rice
- Cleaning and maintenance
- WARNING: Hazard of injury/burns/scalding
- Descaling the appliance
- Do not use any other decalcifiers!
- Storage
- Useful tips
- Steaming chart
Brand : Rommelsbacher
Model : DGS 850
Category : Steamer