
Lektor 3 - Loudspeaker Dali - Free user manual and instructions
Find the device manual for free Lektor 3 Dali in PDF.


| Product Type | Bookshelf Speaker |
| Brand | Dali |
| Model | Lektor 3 |
| Dimensions (HxWxD) | 350 x 200 x 310 mm |
| Weight | 7.5 kg |
| Power Handling | 120 W (RMS) |
| Frequency Range | 59 - 25,000 Hz |
| Sensitivity | 86 dB (2.83 V/1 m) |
| Impedance | 6 ohms |
| Driver Configuration | 1x 1" tweeter, 1x 6.5" woofer |
| Recommended Amplifier Power | 30 - 150 W |
| Finish Available | Black Ash, Walnut, Light Walnut |
| Warranty | 2 years (Europe) or 5 years (varies by region) |
| Connection Type | Single-wire binding posts |
| Stand Mountable | Yes (via keyhole or threaded inserts) |
| Cleaning Instructions | Wipe with a soft, dry cloth. Do not use solvents. |
| Safety Precautions | Keep away from moisture and heat sources. Do not overload. |
| Spare Parts | Contact Dali authorized service center for replacement drivers or grilles. |
| General Use | For music and home theater setups. |
Frequently Asked Questions - Lektor 3 Dali
User questions about Lektor 3 Dali
0 question about this device. Answer the ones you know or ask your own.
Ask a new question about this device
Download the instructions for your Loudspeaker in PDF format for free! Find your manual Lektor 3 - Dali and take your electronic device back in hand. On this page are published all the documents necessary for the use of your device. Lektor 3 by Dali.
USER MANUAL Lektor 3 Dali
MAYA SUCHEMA HELICOM BIS ALBON HOCO + LUKTOR® CONCEPT SUSKMODER
LEKTOR MANUAL

IN ADMIRATION OF MUSIC
CAU UK +44 (0)45 544 2537 INAI USA +1 303 464 7000 CML Centaur +43 5872 1122 www.cultds

IN ADMIRATION OF MUSIC
| LEKTOR 8 LEKTOR 6 LEKTOR 3 LEKTOR 2 LEKTOR 1 LEKTOR LCS LEKTOR SUD | ||||||
| • | ||||||
| Packaging Sprabendjo pr. carban | 1122211 | |||||
2


FIGURE 2C FIGURE FIGURE 2D
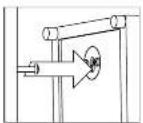


FIGURE 4A FIGURE 4B


FIGURE 4C

FIGURE 4D FIGURE 5A FIGURE 5B


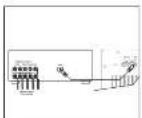
FIGURE 5C FIGURE 6


FIGURE 7

FIGURE 8

CONTENTS
English Page 6
German
Page
Danish
Page
Russian Page 24
CAUTION
RISK OF ELECTRIC SHOCK DO NOT OPEN. TO REDUCE THE RISK OF ELECTRIC SHOCK, DO NOT REMOVE THE BACK PANEL. NO USER-SERVICEABLE PARTS INSIDE. REFER SERVICING TO QUALIFIED PERSONNEL.

The lighting flash within an equilateral triangle is intended to start you to the presence of non-insulated "stungrenous voltage" within the product's enclosure that may be of sufficient magnitude to constitute an electric shock as perone.

The examination point within an equalateral triangle is intended to steel you in the process of impeded operating and maintenance (new ramp) instructions in the literature accompanying the appliance.
1 Read instructions - all the safety and operating instructions should be read before the appliance is operated.
2 Retain instructions - the safety and operating instructions should be retained for future reference.
3 Heed warnings - all warnings on the appliance and in the operating instructions should be adhered to.
4 Follow instructions - all operating and use instructions should be followed.
5 Water and moisture - the appliance should not be used near water - for example, near a bathtub, washbowl, kitchen sink, laundry tub, in a wet basement, or near a swimming pool and the like.
6 Carts and stands - the appliance should be used only with a cart or stand if recommended by the manufacturer.
7 Wall or ceiling mounting - the appliance should be mounted to a wall or ceiling only as recommended by the manufacturer.
8 Ventilation - the appliance should be situated so that its location or position does not interfere with proper ventilation. For example, the appliance should not be situated on a bed, sofa, rug, or similar surface that may block the ventilation openings; or placed in a built-in installation, such as a bookcase or cabinet, that may impede the flow of air through the ventilation openings.
9 Heat - the appliance should be situated away from heat sources such as radiators, heat registers, stoves, or other appliances that produce heat.
10 Power sources - the appliance should be connected to a power supply only of the type described in the operating instructions or as marked on the appliance.
11 Power cord protection - power-supply cords should be routed so that they are not likely to be walked on or pinched by items placed on or against them, paying particular attention to cords at plugs, convenience receptacles and the point where they exit from appliance.
12 Cleaning - do not use any liquid cleaners. Use only a dry cloth to wipe off dust and grease.
13 Non-use periods - the power cord of the appliance should be unplugged from the outlet when left unused for a long period of time.
14 Object and liquid entry - care should be taken so that objects do not fall and liquids are not spilled into the enclosure through openings.
15 Damage requiring service - the appliance should be serviced by qualified personnel when:
a) The power-supply cord or the plug
has been damaged;
b) Objects have fallen, or liquid has been
spilled into the appliance; or
c) The appliance has been exposed to rain; or
d) The appliance does not appear to operate
normally, or exhibits a marked change
in performance; or
e) The appliance has been dropped,
or the enclosure damaged.
16 Servicing - the user should not attempt to service the appliance beyond that described in the opera ting instructions. All other servicing should be referred to qualified service personnel.
CONTENTS
1.0 Owner's Manual Page 8
2.0 Unpacking Page 8
3.0 Maintenance Page 8
4.0 Avoid Direct Sunlight Page 8
5.0 Environmental Information and Disposal Page 8
6.0 Running-in Page 8
7.0 Speaker Setup and Positioning Page 8
8.0 Magnetic Shielding Page 9
9.0 Positioning Page 9
10.0 Connection Page 10
11.0 LEKTOR SUB Page 10
12.0 Technical Specifications Page 11
1.0 OWNER'S MANUAL
Congratulations with your new fine speakers. Please read this manual thoroughly before unpacking and installing your new speakers to get the most out of your purchase. You can find more information on our website: www.dali.dk or by contacting your authorized DALI dealer.
2.0 UNPACKING
Be careful not to damage the contents when you unpack the parts. Check that all parts are contained in the cardboard box, see Table 1. Keep the packaging materials should your speaker need to be relocated or serviced.
3.0 MAINTENANCE
Cleaning the speaker surfaces can be done with ordinary household cleaning agents. Avoid using products that are abrasive, or contain acid, alkali or anti-bacterial agents. Avoid using aerosols. Avoid using cleaning agents directly on the drive units and clean them with extreme care, particularly the tweeter. The grille fabric may be cleaned using a vacuum cleaner or a normal clothes brush.
4.0 AVOID DIRECT SUNLIGHT
The surfaces of the speakers may fade over time when exposed to direct sunlight. Therefore avoid positioning the speakers in direct sunlight.
5.0 ENVIRONMENTAL INFORMATION AND DISPOSAL
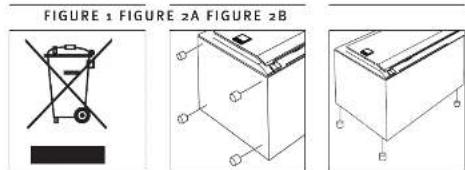
DALI products are designed to meet the international directives concerning Restriction of Hazardous Substances (RoHS) and disposal of Waste Electrical and Electronic Equipment (WEEE). The waste symbol indicates that the speakers meet the directives, see Figure 1. The speakers must be processed or recycled appropriately. Please consult your local waste authority for guidance.
6.0 RUNNING-IN
You should expect the sound quality from your new speakers to gradually improve during the first period of use. Nothing particular has to be done in order to run in the speakers – but expect up to 100 hours of playback (depending on playback level) before full performance level is reached.
7.0 SPEAKER SETUP AND POSITIONING
7.1 LEKTOR 1/2/3/LCR
The speakers can be positioned on a stand/shelf or hung on a wall using the integrated wall bracket(s). If positioned on a stand or shelf, the enclosed rubber bumpers can be mounted under the speaker for stable and vibration free positioning, see Figure 2A. If hung on a wall, mount the bumpers on the rear edge of the speakers, see Figure 2B. The speakers are hung on a wall using one or two screw(s) mounted in the wall. The screw(s) must fit the wall bracket(s) on the rear side of the speaker, see Figure 2C. LEKTOR LCR can be hung vertically if used as left/right/rear speaker, or horizontally if used as center channel speaker. If used as an on-wall center channel, two screws must be used to hang the speaker, see Figure 2D.

7.2 LEKTOR 6/8/SUB
The speakers are designed to stand on the floor. LEKTOR 6 and 8 can be used with spikes (Metric MB thread), or rubber bumpers under the speakers, see Figure 2A/3. Be careful not to over tighten the locking nuts. Spikes or rubber bumpers can improve the sound quality. You can try both to hear what gives the best sound quality in your setup. Please be aware, that spikes may damage the floor, if it is not protected by e.g. coins under the spikes.
8.0 MAGNETIC SHIELDING
The speaker drive units produce a magnetic field which may interfere with CRT televisions/monitors, hard drives, audio and video tapes as well as swipe cards etc. Therefore keep such items away from the speakers to avoid damage.
9.0 POSITIONING
To achieve the best results, the loudspeaker setup should be symmetrical round your favorite listening position (except for LEKTOR SUB), see Figure 4A - C. We recommend that you experiment with the position of your loudspeakers – the sound quality will change depending on the loudspeaker position. For LEKTOR 1/2/3/LCR, the speakers should ideally be positioned, so that the height of the tweeter is approximately at ear height when seated in your favorite listening position.
LEKTOR 6, 8 and SUB are designed as floor standing speakers. They should be positioned minimum 10 – 20 cm (4 – 8") from the rear wall. Ideally LEKTOR 1/2/LCR are designed to be positioned flat up against the wall. LEKTOR 3 is designed for both stand mounting and on-wall positioning flat up against the wall.
Objects positioned between the speaker and listening position might negatively affect sound quality. The speakers are designed to meet our wide dispersion principle, so they should not be angled towards the listening position, but be positioned parallel with the rear wall, see Figure 4D. By parallel positioning, the distortion in the main listening area will be lowered and the room integration will be better. The wide dispersion principle will also ensure that sound is spread evenly within a large area in the listening room.
Every room has its own distinctive acoustics, which influence the way we experience sound from a speaker. The sound you hear consists of direct sound from the speakers and reflected sound from the floor, ceiling and walls. The latter will affect how you experience the sound.
As a basic rule, try to avoid large, hard and reflective areas in the immediate vicinity of your loudspeakers as it will typically cause strong reflections, which might disturb the precision and spatial effect of the sound reproduction. Reflection might be suppressed by positioning e.g. a plant between the speaker and the reflecting surface. Soft items such as carpets, curtains etc. might help if the sound is too bright.
Both the amount and quality of the deep bass depend on the size and shape of the room, and the position of the speakers. Positioning the speakers near a side or back wall will accentuate the bass. A corner location will accentuate it even more, but will also increase the reflections.
10.0 CONNECTION
Always turn off your amplifier/subwoofer before connecting any cables or altering any connections.
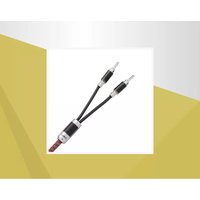
We recommend using special speaker and signal cables. Consult your authorized DALI dealer for guidance on selection of speaker and signal cables. Use same type cable for all speakers in the setup (except for the subwoofer). Make sure to connect the correct amplifier output to the correct speaker - see Figure 5A - C for stereo/surround sound setups. Make sure to connect the positive amplifier output terminal (red) to the positive speaker input terminal (red) and the negative amplifier output terminal (black) to the negative speaker input terminal (black), see Figure 6. If just one speaker is Incorrectly connected, the bass might be weak and the overall sound might be diffuse.
Make sure that there are no loose cable strands/ends which potentially can short circuit and damage the amplifier, see Figure 7. The binding posts accept bare cable ends or 4mm banana plugs.
11.0 LEKTOR SUB
LEKTOR SUB is an active subwoofer with built-in amplifier. On the bottom of the subwoofer there is a bass reflex port opening. Make sure that the rubber feet will make clearance between the floor and the bottom of the subwoofer, so that air can flow freely from the bass reflex port. On the rear side of the subwoofer you will find the amplifier (see Figure 8), which have the following features:
1) Line In L + R, connect your stereo or surround sound amplifier to these inputs using a RCA cable (sold separately). Adjustment of "Phase", "Crossover" and "Volume" must be done on the subwoofer. You might also want to use connection through the LFE input (see point 2).
2) LFE In, connect your surround sound amplifier to this input using a RCA cable (sold separately). Adjustment of "Crossover" must be done in the surround sound amplifier.
3) Auto selector: On: the subwoofer is always on when the power switch (9) is on.
Auto: the subwoofer will power up upon detection of an input signal on the "Line In" inputs (1 + 2). The subwoofer will power down after approximately 20 minutes with no input signal present on the input connectors. Off: the subwoofer will be powered down.
4) "Volume" adjustment: Start adjusting the volume of your subwoofer so the bass level matches the level from the main speakers (with the Crossover (5) knob in the middle position and Phase switch (6) in the 180° setting). Adjust the level so the contribution from the subwoofer is firm and precise - but without the bass being too dominant. If you adjust the volume level too high, your total sound experience may be disturbed by distortion. Remember that the location of the subwoofer/listening position has a major effect on the sound pressure you experience.
5) "Crossover" adjustment: adjust the overlap between the subwoofer and the main speakers by adjusting "Crossover" up and down until you hear the bass is smooth and without "holes". You may need to readjust the Volume setting (4) slightly after this adjustment.
6) "Phase" switch, 0° or 180°: adjust subwoofer phase to match the main speakers in the speaker setup – try both settings to determine which setting sounds best. It might be necessary to readjust both Volume level (4) and Crossover (5) again.
7) Mains cable connector: check that the voltage written below the mains connector matches your mains voltage.
8) Fuse compartment: If the subwoofer does not power up, check that the fuse in the fuse compartment is not blown. If blown, replace the fuse with the same type as the original. If the fuse blows multiple times, have your subwoofer serviced at an authorized service facility.
9) "Power" switch: powers the subwoofer on or off. Power off the subwoofer if it is not used for extended periods. Always power off the subwoofer when changing connection(s).
10) Heat sink: do not cover! Caution - can be hot!
To connect the subwoofer to your stereo or surround sound system, please consult the owner's manual for your stereo/surround sound amplifier to locate a subwoofer output terminal or a pre-out output terminal. The subwoofer must be connected to the amplifier using a RCA cable (sold separately).
There are two primary connection options:
A) Connect the subwoofer to a stereo amplifier
Connect the output terminal(s) of the stereo amplifier to the
"Line Input L + R" connectors on the subwoofer amplifier
B) Connect the subwoofer to a surround sound amplifier
Connect the subwoofer/LFE output terminal on the surround sound
amplifier to "LFE Input" terminal on the subwoofer amplifier.
12.0 TECHNICAL SPECIFICATIONS
In Table 2 (see page 24) you will find most common specifications for our speakers. Please do remember, that the sound quality from a speaker cannot be judged by technical specifications. To compare the different speakers, we recommend you to listen to the different speakers in question.
VORSICHT
| LEKTOR 1 | LEKTOR 2 | LEKTOR 3 | LEKTOR 6 | LEKTOR 8 | LEKTOR LCR | LEKTOR SUB | ||
| Frequency Range +/- 3 dB [Hz] | 51 - 27000 | 49 - 27000 | 48 - 27000 | 47 - 27000 | 38.5 - 27000 | 52 - 27000 | 31 - 180 | |
| Sensitivity (2.83V/1m) [dB] | 84.0 | 85.0 | 88.0 | 90.5 | 89.5 | 87.5 | - | |
| Nominal Impedance [ohms] | 8 | 6 | 6 | 6 | 6 | 8 | 20k | |
| Maximum SPL [dB] | 104 | 106 | 108 | 110 | 112 | 109 | 110 | |
| Recommended Amp. Power [Watts] | 40 - 100 | 25 - 100 | 25 - 120 | 30 - 150 | 40 - 180 | 25 - 120 | - | |
| Max Amplifier Power Output [Watt RMS] | - | - | - | - | - | - | 300 | |
| Continuous IEC Power Output [Watt RMS] | - | - | - | - | - | - | 180 | |
| Crossover Frequencies [Hz] | 2900 | 2700 | 2800 | 700/2900 | 600/3500 | 3200 | 40 - 120 | |
| Crossover Principle | 2-way | 2-way | 2-way | 212 -way | 3-way | 2-way | 1-way | |
| Soft Dome Tweeter [mm] | 1 x 28 | 1 x 28 | 1 x 28 | 1 x 28 | 1 x 28 | 1 x 28 | - | |
| Midrange Driver [inch] | - | - | - | - | 1 x 5 | - | - | |
| Low Frequency driver(s) [inch] | 1 × 4^1/_2 | 1 x 5 | 1 × 6^1/_2 | 2 × 6^1/_2 | 2 x 8 | 2 x 5 | 1 x 10 | |
| Enclosure Type | Bass reflex | Bass reflex | Bass reflex | Bass reflex | Bass reflex | Bass reflex | Bass reflex | |
| Bass Reflex Tuning Frequency [Hz] | 56.0 | 50.0 | 47.5 | 47.5 | 36.0 | 45.5 | 34.5 | |
| Connection Input(s) | Single wire | Single wire | Single wire | Single wire | Single wire | Single wire | RCA | |
| Recommended Placement | Wall/shelf/(stand) | Wall/shelf/(stand) | (Wall)/shelf/stand | Floor | Floor | Wall/shelf/above screen/below screen | Floor | |
| Magnetic Shielding | No | No | No | No | No | No | No | |
| Standby Power Consumption [Watt] | - | - | - | - | - | - | 1,5 | |
| Dimensions (H x W x D) [mm] | 260 x 146 x 211 | 310 x 176 x 221 | 387 x 200 x 255 | 929 x 207 x 285 | 1059 x 251 x 370 | 600 x 172 x 175 | 355 x 310 x 394 | |
| Dimensions (H x W x D) [inches] | 10.2 x 5.7 x 8.3 | 12.2 x 6.9 x 8.7 | 15.2 x 7.9 x 10.0 | 36.6 x 8.1 x 11.2 | 41.7 x 9.9 x 14.6 | 23.6 x 6.8 x 6.9 | 14.0 x 12.2 x 15.5 | |
| Accessories | Manual, rubber bumpers, wall bracket included | Manual, rubber bumpers, wall bracket included | Manual, rubber bumpers, wall bracket included | Manual, rubber bumpers, M8 spikes | Manual, rubber bumpers, M8 spikes | Manual, rubber bumpers, wall bracket included | Manual, rubber feet, mains cable included | |
| Weight [kg/lb] | 3.1/6.8 | 4.1/9.0 | 6.4/14.1 | 14.2/31.3 | 24.2/53.4 | 7.0/15.4 | 14.5/32.0 | |
| Finishes | Vinyl/Light walnut, black | Vinyl/Light walnut, black | Vinyl/Light walnut, black | Vinyl/Light walnut, black | Vinyl/Light walnut, black | Vinyl/Light walnut, black | Vinyl/Light walnut, black |
All technical specifications are subject to change without notice.



Brand : Dali
Model : Lektor 3
Category : Loudspeaker