
M-DL40 - Car radio Macrom - Free user manual and instructions
Find the device manual for free M-DL40 Macrom in PDF.


| Product Type | Car Stereo |
| Brand | Macrom |
| Model | M-DL40 |
| Power Supply | DC 12V (Negative Ground) |
| Maximum Output Power | 4 x 40 Watts |
| Fuse Rating | 15 Amperes (max) |
| Dimensions (W x H x D) | 178 x 92 x 50 mm |
| Radio Frequency Coverage | FM 87.5–108.0 MHz, MW 522–1620 kHz |
| Audio Formats Supported | MP3, WMA, APE, OGG, FLAC, WAV |
| Video Formats Supported | AVI, RMVB/RM, 3GP, MP4, FLV, DAT, MPG |
| Picture Formats Supported | JPEG, BMP |
| Connectivity | USB, SD Card Slot, AUX Input, Remote Control |
| Additional Features | RDS, EQ Presets (Class, Pop, Rock, Jazz, Vocal, Null), Bass/Treble, Balance/Fader, Subwoofer Output |
| Installation Type | DIN (178 mm width) |
| Accessories Included | Mounting Bracket, Trim Plate, Screws, Release Keys, Wire Connector, Remote Control, User Manual |
| Safety Precautions | Use only in 12V negative ground vehicles; do not disassemble; laser radiation hazard |
| Maintenance | Wipe with damp cloth; avoid harsh chemicals; keep dry |
Frequently Asked Questions - M-DL40 Macrom
User questions about M-DL40 Macrom
0 question about this device. Answer the ones you know or ask your own.
Ask a new question about this device
Download the instructions for your Car radio in PDF format for free! Find your manual M-DL40 - Macrom and take your electronic device back in hand. On this page are published all the documents necessary for the use of your device. M-DL40 by Macrom.
USER MANUAL M-DL40 Macrom
Use only in a 12-volt DC negative-ground electrical system.
Be sure to connect the color coded leads according to the diagram.
Incorrect connections may cause the unit to malfunction or damage the vehicles, electrical system.
Be sure to connect the speaker (-) leads to the speaker (-) terminal.
Never connect the left and right channel speaker cables each other or to the vehicle body.
Make sure all the connections are completely correct before turning on your unit.
Using a fuse with a higher amperage rating may cause serious damage to the unit.
DO NOT attempt to disassemble the unit.
Laser beams from the optical pick up are dangerous to the eyes.
Do NOT block vents or radiator panels. Doing so many cause heat to build up inside and may result in fire.
Make sure those pins or other foreign objects do not get inside the unit; they may cause malfunctions, or create safety hazards such as electrical shock or laser beam exposure.
Keep the volume at a level at which you can hear outside warning sounds (horns sirens, etc.).
Stop the vehicle before carrying out any operation that could interfere with your driving.
Do NOT work in extremely high or low temperature.
Be sure the temperature inside the vehicle is between +60°C and -10°C before turning on your unit.
SPECIFICATION
| GENERAL | DC 12 Volts, |
| Power Supply Requirements | Negative Ground |
| Chassis Dimensions | 178x 92x 50 mm |
| Bass (at 100 Hz) | + 10 dB / 10 dB |
| Treble (at 10 kHz) | + 10 dB / 10 dB |
| Maximum Output Power | 4 x 40W |
| Safety fuse | 15 Ampere (max.) |
FM STEREO RADIO
| Frequency Coverage | 87.5 to 108.0 Mhz |
| IF | 10.7 Mhz |
| Sensitivity(S/N=30dB) | 10dB |
| Stereo Separation | 30 dB |
MW STEREO RADIO
| Frequency Coverage | 522 to 1620 kHz |
| IF | 450 kHz |
| Sensitivity(S/N=20dB) | 32 dBu |
ACCESSORIES
| Mounting Bracket(Half Sleeve) | 1 |
| Trim plate | 1 |
| Mounting Screw M5 | 1 |
| Rubber | 1 |
| Release key | 2 |
| User manual | 1 |
| Wire connector | 1 |
| Remote control | 1 |
Note:
Due to continuous product improvement, specifications and design are subject to change without prior notice.
FRONT PANEL
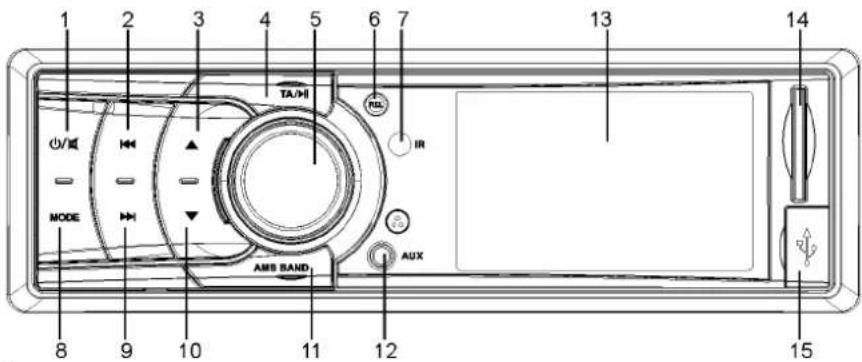
1.
Press this button to switch on the unit. When the system is on, press this button to shut off the sound output and press again to resume.
When the system is on, press and hold this button to turn off the unit.
2/9. |<</>
In radio mode, press the keys to search for a station automatically, press and hold to search for a station manually.
In playback mode, press these keys to select the track you want to play. Press and hold to active fast forward or fast rewind search.
3/10. ▲ / ▼
In radio mode, press the buttons to select the previous or next preset stations.
In playback mode, press the buttons to select a 10+or 10-song.
A Picture viewing can be rotated by pressing the button.
- AF/>>
In radio mode, press this button to turn on or off AF function. In playback mode, press the button to pause/start play.
- VOL
Rotating: Rotate to adjust the volume level.
Press once: Press and rotate to select the functions provided.
Following functions can be accessed by press the volume control knob; in the order specified:
VOL→BASS→TREB→BAL→FAD→SUBW
Rotate the volume control to change the setting of these functions.
In radio mode, press and hold to enter system setup.
Press I<< / >>1 button to select the BEEP, CLO ADJ, CLO MODE, RADIO AREA and TFT BRIGHT settings and press VOL button to confirm.
In BEEP mode, press the |<< / >>| button to select turn ON the BEEP function, press again to resume.
In CLO ADJ mode, press |<< / >>| button to start the hour setting or minute setting.
In CLO MODE mode, press |<< / >>| button to select 12H or 24 H mode.
In AREA mode, press |<</>| button to select one of the following areas: EUROPE, USA, OIRT, JAPAN,M-EAST, AUSTRALIA, LATIN and ASIA.
In TFT BRIGHT mode, press |<< / >>| button to adjust the TFT brightness (0\~20), the defaulted is 10.
In the above setting, press VOL button to confirm then press VOL button again to exit.
-
REL: Press this button to release the front panel.
-
IR windows
-
MODE
Press the button to switch between the input modes.
- AMS/BAND
In radio mode,
press once: To select one of the radio bands;
press and hold : To store the station into the memory in the descending order of the instantaneous signal strength.
In playback mode, press the button to switch to audio list, video list and picture list.
- AUX IN
Insert audio cord, press MODE button on the unit to switch to AUX mode.
-
TFT display
-
SD Card slot
Insert SD card, it will play the files of SD card automatically.
Note: Once the SD cards could not eject after pressing, just take it out manually.
- USB insert slot
Insert USB device, it will play the files in it automatically.
REMOTE CONTROL

1. ⏻ /MUTE
When the unit is off, press the button to switch on the unit.
In power on, press and hold PWR button to turn off the unit.
In power on, press the button to function MUTE on/off.
- AF
In radio mode, press AF button to turn on/off the AF function.
- MODE
Press the button to switch between the input modes.
- EQ
To select between the available DSP model viz. CLASS, POP,
ROCK, JAZZ, VOCAL and NULL.
5/16. >>| / |<<
In radio mode, press the keys to search for a station automatically, press and hold to search for a station manually.
In playback mode, press the keys to select the track expected to play. Press and hold to play in fast forward or fast rewind.
- SETUP/ > ||
Press this button to pause the playback.
In radio mode, press and hold to start the system setup.
Please refer to the VOL button operation about the front panel for details.
- NUMBER BUTTONS
NUMERALS 1-6 (in radio mode)
Press the keys to select a preset station directly.
Press and hold the keys to store the current station in preset memory band.
3/RPT: In playback mode, press to repeat playing.
4/RDM: Press to play the songs in random order.
5 / F-
Press the button to go to the 10- song.(when an MP3 / WMA is being played).
A Picture viewing can be rotated by pressing the button.
6 / F+
Press the button to go to the 10+ song. (when an MP3 /
WMA is being played).
A Picture viewing can be rotated by pressing the button.
7/LOC
Press this button to select a strong or weak radio reception.
8/BAND
Press this button to switch between the radio bands available.
9/AMS
Press this button to scan the preset stations.
Press and hold: To store the station into the memory in the descending order of the instantaneous signal strength.
- REG
In radio mode, press this button to function REG ON/OFF.
- DISP
Press this button to display the current time.
In radio mode, press and hold this button to switch between the FM mode and RDS mode.
-
■: In playback mode, press this button stop play.
-
PTY
In radio mode, press the button to select one of the programme types.
-
TA: In radio mode, press TA button to turn on/off
-
SCAN
In radio mode, press it to search stations, when a station is searched, the program will be broadcast for 10 seconds then new stations will be searched continually and circlely.
In playback mode, press this button to scan the songs and the first 10 seconds of each song will be played.
-
ST : In radio mode, press this button to switch output mode between STEREO and MONO.
-
LOUD: Press this button to function LOUD on/off.
-
V-, SEL, V+
Press V+/V- button to adjust the volume.
The individual settings can be adjusted by V+/V- button.
Press SEL button to select special features: VOL, BASS, TREB, BAL, FAD and SUBW.
-
CLEAR: Press the button to clear the false enters.
-
EON
In radio mode, press this button to function EON on or off.
- GOTO
In playback mode, press the button to go to the exact song.
For example, in playing, press GOTO button firstly then press number button 2 and 0, the 20th one will be played.
MP4/MP5 OPERATION
LOADING AN MP4/MP5 FILE
Insert a USB/SD with audio and/or video files, the unit supports files with following formats.
-
Audio formats: MP3, WMA, APE, OGG, FLAC, and WAV.
-
Picture format: JPEG, BMP.
-
Video formats: AVI, RMVB/RM, 3GP, MP4, FLV, DAT, and MPG.
MODES SELECTION
Press BAND button on the panel to be back to these lection menu then press BAND button again to switch the available sources: audio, picture and video.
Press >II button to confirm the selection.
AUDIO/VIDEO PLAYING
Selection
Press I<< / >>I button to select a previous/next item.
Press F- button on the remote control to select the previous 10- item while press F+ button on the remote control to select the next 10+ item.
Press and hold |<< / >>| button to play fast rewind or fast forward and press >II to cancel it.
Pause playing
In playback mode, press >II button to pause playing.
Press it again to resume playing.
Scan playing
In playback mode, the scan function enables you to listen to the first 10 seconds of the song.
Press SCAN button to activate / de-activate scan function.
Repeat playing
In playback mode, press 3/RPT button to repeatedly select one of the repeat modes: REPEAT ONE,
REPEAT ALL.
Press again to cancel repeat function.
Random playing
In playback mode, press 4/RDM button to play in random order.
Press again to cancel the function.
Stop playing
In playback mode, press ■ button on the remote control to stop playing and press >ll button to resume playing.
PICTURE VIEWING
Picture viewing
In picture viewing mode, press F+/F- button on the remote control OR ▲/▼ button on the panel to rotate the picture clockwise/counterclockwise 90°.
Note: It is not available in automatic viewing mode.
Automatic/manual viewing a picture
In picture viewing mode, press >ll button to switch between automatic and manual viewing picture mode.
Next/previous picture viewing
In manual viewing mode, press I<</>l button to view a previous/next picture.
Note: It is not available in automatic viewing mode.
NOTES ON USB/SD
Insert USB device or SD card.
-
Wait for several seconds the audio files in USB or SD will play automatically with the USB or M-CARD flag on the front panel flashing.
-
When there are USB, SD in the unit, press MODE button to select USB or SD source.
-
When playing, insert a USB device or SD card, the last insert device will play automatically.
WARNING
The video watching and the picture viewing can only be succeeded in car braking mode.
INSTALLATION
INSTALLATION PROCEDURES
First complete the electrical connections, and then check them for correctness.
INSTALLATION OF THE UNIT
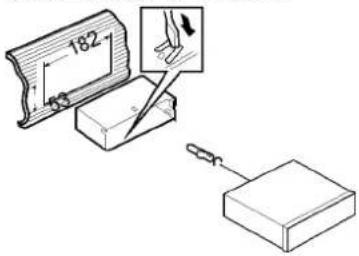
1. Metal Sleeve
Install the metal sleeve in the dashboard.
For optimal performance of the player, the metal sleeve should be positioned horizontally (between 10 and +30). Fix metal sleeve into place by pressing the metal tags outwards using screwdriver.
2. Front Mounting
Slide the radio into the metal sleeve until the springs at either side of the radio snap into the openings of the sleeve.

3. Removing Radio
Insert the levers supplied with the unit into the grooves at both sides of the unit they lock.
Pull the levers toward you makes it possible to remove the unit from the dashboard.
REAR-MOUNT
Installation using the screw holes on the sides of the unit.
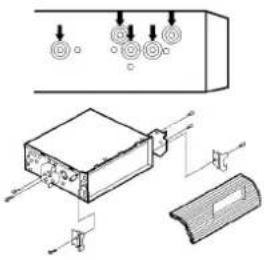
Remove the outer rim around the front panel and the side springs.
Select a position where the screw holes of the mounting bracket and the screw holes of the radio become aligned and tighten the screws at 2 places on each side.
REMOVE AND INSTALL THE FRONT PANEL
-
Press the release button and pull-off the front panel. Keep front panel into the case.
-
To install the front panel, insert the panel into the housing, slide in to the right hand side and push in till locked.
-
Make sure the panel is properly installed. Otherwise, abnormalities occurs on the display or some keys will not function properly.
CABLE CONNECTION

Note: A wrong connection can be easily detected by our technical service for a repair request under the warranty.
Your warranty can be rejected in that case
TROUBLE SHOOTING
Before going through the check list, check wiring connection.
If any of the problems persist after check list has been made, consult your nearest service dealer.
| Symptom | Cause | Solution |
| No power. | The car ignition is not on. | If the power supply is properly connected to the car accessory terminal, switch the ignition key to ACC. |
| The fuse is blown. Replace the fuse. | ||
| Volume is in minimum. Adjust volume to a desired level. No sound. | ||
| Wiring is not properly connected. Due to telephone mute. | Check wiring connect.Ensure your phone MUTE is on. | |
| Sound skips. The installation angle | is not more than 30 degrees. | Adjust the installation angle to less than 30degrees. |
| The operation keys do not work. The built-in micro compute is not operated properly due to noise. | Press the RESET button.Front panel is not properly fixed into its place.Contacts between front and main unit are dirty. Clean contacts with a cotton bud soaked in isopropyl alcohol. | |
| station automatic selection does not work. | The antenna cable is not work or connected. | Insert the antenna cable firmly. The rad |
| The Signals are too weak. | Select a station manually. | |
io does not receive the
MAINTENANCE
- Keep the product dry. If it does get wet, wipe it dry immediately. Liquids might contain minerals that can corrode the electronic circuits.
- Keep the product away from dust and dirt, which can cause premature wear of part.
- Handle the product gently and carefully dropping it can damage circuit boards and cases, and can cause the product to work improperly.
- Wipe the product with a dampened cloth occasionally to keep it looking new. Do not use harsh chemicals, cleaning solvents, or strong detergents to clean the product.
- Use and store the product only in normal temperature environment.
High temperature can shorten the life of electronic devices and distort or melt plastic parts.
The MACROM brand is a registered trade mark of MACROM SA and any use of such marks by ALDINET S.p.A. is under license.

ALDINET S.p.A.
Viale C. Colombo 8 - 20090 Trezzano s/N (Mi) - Italy
Tel. +39 02 48478.1
www.macrom.it


- SPECIFICATION
- Note:
- FRONT PANEL
- 1.
- REMOTE CONTROL
- ⏻ /MUTE
- MP4/MP5 OPERATION
- MODES SELECTION
- AUDIO/VIDEO PLAYING
- PICTURE VIEWING
- NOTES ON USB/SD
- WARNING
- INSTALLATION
- INSTALLATION PROCEDURES
- Metal Sleeve
- Front Mounting
- Removing Radio
- REAR-MOUNT
- REMOVE AND INSTALL THE FRONT PANEL
- TROUBLE SHOOTING
- MAINTENANCE
Brand : Macrom
Model : M-DL40
Category : Car radio