
ACR-3888 - Wristwatch AKAI - Free user manual and instructions
Find the device manual for free ACR-3888 AKAI in PDF.


| Product Type | Analog Quartz Wristwatch |
| Brand | AKAI |
| Model | ACR-3888 |
| Movement Type | Japanese Quartz |
| Display Type | Analog with Date Window |
| Case Diameter | 42 mm |
| Case Thickness | 11 mm |
| Band Width | 20 mm |
| Weight | 95 g |
| Power Source | 1 x SR626SW Battery |
| Battery Life | Approximately 2 years |
| Water Resistance | 3 ATM (Splash/Shower Resistant) |
| Case Material | Stainless Steel |
| Band Material | Leather |
| Crystal | Mineral Glass |
| Functions | Hour, Minute, Second Hands, Day-Date Display |
| Clasp Type | Buckle |
| Cleaning | Wipe with a soft cloth, avoid solvents |
| Maintenance | Battery replacement every 2 years by a professional |
| Safety | Keep away from strong magnetic fields |
| Spare Parts Availability | Batteries and straps widely available |
Frequently Asked Questions - ACR-3888 AKAI
User questions about ACR-3888 AKAI
0 question about this device. Answer the ones you know or ask your own.
Ask a new question about this device
Download the instructions for your Wristwatch in PDF format for free! Find your manual ACR-3888 - AKAI and take your electronic device back in hand. On this page are published all the documents necessary for the use of your device. ACR-3888 by AKAI.
USER MANUAL ACR-3888 AKAI
INSTRUCTION MANUAL
MANUAL DE INTRUCTIUNI
ΟΛΗΓΙΕΣ ΛΕΙΤΟΥΡΓΙΑΣ
First Use of the Device /Introduction
- Select a proper place for the device. A dry, level and ship proof surface is suitable.
• Make sure the device is vented sufficiently!
• In all modes, the display automatically switches to the time display after about 10 seconds.
Power supply
-
Make sure the grid voltage corresponds to the figures on the rating plate.
-
Plug the power supply unit into a properly installed protective contact socket.
-
Connect the device with the power supply unit by plugging the jack of the power supply unit into the "DC 5V" jack.
Caution:
• This device should only be used with the mains supply unit (included). Do not use it for other devices.
- Only use a 5V power supply unit ( ⊖C⊕). A different supply unit may damage the device.
Note
• Disconnect from mains power supply during longer periods of non-use.
• If you did not insert another reserve battery, the time and the station memory will be lost as soon as the power supply
is interrupted.
Inserting the reserve batteries
(Batteries are not included in the scope of delivery)
In case of power failure or if the power supply unit is pulled from the plug, the settings are maintained if the reserve batteries are inserted.
-
Open the battery compartment on the bottom side.
-
Insert two type AAA/R031.5V batteries. Check that the polarity is correct (see battery compartment).
-
Close the battery compartment.
Warning:
The batteries shall not be exposed to excessive heat such as sunshine, fire or the like. Danger of explosion!
CAUTION:
Batteries can leak battery acid. If the device is out of use for a long period of time, remove the batteries.
• Different battery types or new and used batteries must not be used together.
- Batteries are not to be disposed of together with domestic wastes. Dispose of the used batteries at the relevant collection bin or at your dealer's.
USB-OUT CHARGE Charging Socket
You can charge your Smart phone through this jack. Use the USB cable of your Smart phone for the connection.
Note:
Due to the different Smart phone types that are offered today, and their different charging capacities, the loading
duration is dependent on the Smart phone used and its operating condition.
• A playback of audio-files through this connector is not possible.
USB playback port
This device has been developed in line with the latest technical advances in the USB field. The wide range of different USB storage devices of all types which are currently on the market, unfortunately do not allow us to guarantee full compatibility with all USB storage devices. For this reason, in rare cases there may be problems in playing back files from USB storage devices. This is not a malfunction of the device.
General Operation
Switch device on/off
- You can toggle the device between standby and radio mode with the ON/OFF button.
- To disconnect the unit completely from the mains, pull the mains plug from the socket.
Volume
By pressing the AL1/VOL. / AL2/VOL. buttons you can adjust the desired volume.
FM/USB button
Press the FM/USB button until the desired operating mode is shown on the display.
Display Brightness
In time display mode, use the DISPLAY/HIGH/LOW/OFF button to adjust the display brightness. Select from: Light, dark and off.
Setting the time (in standby)
-
Keep the TIME/SET/M-button pressed for a short time. The time indicator begins to flash.
-
Set the hours with the HOUR-TU button and the minutes with the MIN/TU button.
NOTE:
If you do not press a button within 4 seconds, the settings are automatically accepted.
SNOOZE/SLEEP button (Delayed switch-off)
When the device is switched on, you can set the time after which the device will turn into standby mode; set the time in 10 minutes' intervals from 90 to 10 minutes. The device will turn off automatically after the preset time.
Press the SNOOZE/SLEEP button for 2 seconds. The notification "90" will appear in the display.
Press the button repeatedly to replace the time in steps of 10. The "OFF" selling deactivates the function.
NOTE:
• To call up the still remaining time, press the button briefly.
- When activated the dot in the display next to "SLEEP" is illuminated.
Radio Mode
-
Fully uncoil the wire antenna.
-
Press FM/USB button. A dot lights up on the display next to FM (frequency modulation)
-
Search for radio stations:
Briefly press the MIN/TU+/HOUR/TU- buttons, until you have found the radio station which you are looking for. Preset station: Keep the TIME SET/M- button pressed for approx. 3 seconds. Select a preset location with the buttons MIN/TU-/HOUR/TU-. Preset the TIME SET/M1 button one more. The station is preset.
NOTE:
- If the reception is too weak and there is interference on the received station, try to improve the reception by altering the position and uncoiling or coiling the antenna.
Select the preset radio station
While in radio operation, repeatedly press the TIME/SET/M1 button or press the buttons MIN/TU1 / HOUR/TU-. One preset location after the other will be called up.
Projection
You can use this unit to project the time onto a wall or the ceiling.
• You can switch this function on and off with the PROJECTION button
• Swivel the PROJECTOR to the desired position
• The back side of the projector has the FOCUS setting wheel with which you can adjust the sharpness of the projection.
USB Playback Mode
-
Press FM/USB button. Select USB function and "USB" will appear on the LED display.
-
Insert USB into USB playback port and music will begin to play.
-
Press the PREV button to backward to last song.
-
Press the NEXT button to forward to next song
-
Press PAUSE button to pause the song.
Alarm Function
General Information
- You'd like to be woken up by radio? First set a station. The deice switches on the last FM radio station that was set.
- When the alarm time is reached, a dot flashes next to "BUZZER AL1" or "RADIO AL1" and/or "BUZZER AL2" or RADIO AL2".
Setting of the Alarm (in standby mode)
You can set two alarm times. Proceed as follows:
-
Keep the ALI/VOL - button pressed for approx.3 seconds. The indicator begins to flash.
-
Set the hours with the HOUR/TU button and the minutes with the MIN/TU button.
-
Then use the AL1/VOL button to select how you want to be woken up. Select from:
•Buzzer (ALI BUZZER):
A buzzer sounds when the alarm time is reached. The volume of the buzzer cannot be adjusted.
• Last heard radio frequency (AI.1 RADIO):
As soon as your set alarm time is shown, the radio switches on. The last tuned FM station plays at the last
set volume.
- After you have made the setting, the selected alarm time flashes for ca.3seconds. The alarm time is stored. Then the current time is displayed.
To set the second alarm time, repeat the above steps with the AL2/VOL+ button.
NOTE:
In case of an activated alarm time, a dot will light up at "AL1 RI77FD/ AL1 RADIO" and/or at "AL2 RI77FD
AL2 RADIO ™
• If you do not press a button within 4 seconds, the settings are accepted automatically.
• The alarm function ends automatically after approx. 60 minutes and the device switches off.
Turning off the Alarm
To shut the alarm signal off until the next day, press the ON/OFF button.
Automatic Alarm Interval
The automatically set alarm function can be shut off for approximately 9 minutes with the SNOOZE/SLEEP button.
NOTE:
If the function is activated, the dot next to "AL1 BUZZER" / AL1 RADIO" and/or at "AL2 BUZZER / AL2 RADIO" will flush.
Deactivate the Alarm Function (in standby mode)
Press AL1/VOL- or AL2/VOL+ until the dot at "AL1 BUZZER/ AL1 RADIO" and/or at "AL2 BUZZER/AL2 RADIO" goes out.
Technical Data
Model:
ACR-3888
Power supply
DC 5V, IA
Power consumption.
Battery power reserve: 2x 1.5V, AAA, R03
Frequency range: FM 87.5 - 108.0MHz
External power adaptor
Input: AC 100 240V, 50/60Hz, 0.18A
Output: DC5V/1A
Polarity
⊕-←⊕
Protection class: II
The right to make technical and design modifications in the course of continuous product development remains reserved.
This device complies with all current CE directives, such as electromagnetic compatibility and low voltage directive and is manufactured according to the latest safety regulations.

IMPORTANT SAFETY INSTRUCTIONS
Warping
-
No naked flame sources, such as lighted candles, should be placed on the apparatus.
-
Attention should be drawn to environmental aspects of battery disposal.
-
Do not install this equipment in a confined or building-in space such as a book case or similar unit, and remain a well ventilation conditions. The ventilation should not be impeded by covering the ventilation openings with items such as newspaper, table-cloths, curtains etc.
-
WARNING. Only use attachments/accessories specified or provided by the manufacturer.
-
WARNING: Please refer the information on exterior bottom enclosure for electrical and safety information before installing or operating the apparatus.
-
WARNING. To reduce the risk of fire or electric shock, do not expose this apparatus to rain or moisture. The apparatus shall not be exposed to dripping or splashing and that objects filled with liquids, such as vases, shall not be placed on apparatus.
-
WARNING: The battery (battery or batteries or battery pack) shall not be exposed to excessive heat such as sunshine, fire or the like.
-
WARNING: The direct-plag switching adaptor is used as disconnect device, the disconnect device shall remain readily operable.
-
When not in use and during movement, please take care of the power cord set. When put into use again, please make sure the power cord set being not damaged, if any damages found, please look for the service person to replace the power cord set specified by the manufacturer or have the same characteristics as the original one.
-
Use of the apparatus in moderate climates.
-
Correct Disposal of this product. This marking indicates that this product should not be disposed with other household wastes throughout the EU. To prevent possible harm to the environment or human health from uncontrolled waste disposal, recycle it responsibly to promote the sustainable reuse of material resources. To return your used device, please use the return and collection systems or contact the retailer where the product was purchased. They can take this product for environmental safe recycling.
-
This equipment is a Class II or double insulated electrical appliance. It has been designed in such a way that it does not require a safety connection to electrical earth.

DISPOSAL OF ELECTRICAL AND ELECTRONIC EQUIPMENT

This symbol on the product or packaging means that the product should not be treated as household waste.
Do not throw garbage at the end of its life, but take it to a collection center for recycling, in this way you
will help to protect the environment and be able to prevent any negative consequences that it would have on
the environment and human health.
To find your nearest collection center:
-Contact local authorities
- Access the website: www.mmediu.ro
- Request additional information from the store where you purchased the product.
Components
-
Buton PROIECTIE
-
Buton ON/OFF
-
Buton FM/USB
-
Buton TIME/SET/M1
-
Buton SNOOZE/ SLEEP/
DISPLAY HIGH/LOW/OFF
PAUSE/PLAY
-
Bulan HOUR/TU-/PREV
-
Bulan MIN:TU+NEXT
S. Balan AL1/VOL.-
•Buzzer (AL1 BUZZER):
•Buzzer (ALI BUZZER):
•Buzzer (AL1 BUZZER):
We, INTERVISION TRADING RO SRL, default importer (manufacturer), with registered office in Mosoia Commune, Smeura Village, 8 Fagetului Alley, declare under sole responsibility that the following products:
Brand name: AKAI
Type: ACR-3888
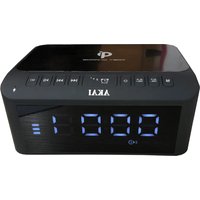
Descriptions: CLOCK RADIO
Lot: 20211100XXXX
to which this declaration related is in conformity with the essential requirements of the following directives of the Council of the European Communities:
EUROPEAN COMMUNITY DIRECTIVE 2014/53/EU
EUROPEAN COMMUNITY DIRECTIVE 2014/35/EU
EUROPEAN COMMUNITY DIRECTIVE 2014/30/EU
EUROPEAN COMMUNITY DIRECTIVE 2011/65/EU AMD 2015/863/EU
The products are compliant with the following standards and safety regulations:
| EN 62368-1:2020+A11:2020 | EN 61000-3-3:2013 / A1:2019 |
| EN 62479:2010 | IEC 62321-3-1:2013 ; |
| EN 50663:2017 | IEC 62321-5:2013 ; |
| EN 303 345-1 V1.1.1 (2019-06) | IEC 62321-6:2015 ; |
| EN 303 345-1 V1.1.1 (2021-06) | IEC 62321-7-1:2015 ; |
| EN 55032:2015 / A11:2020 | IEC 62321-7-2:2017 ; |
| EN 55035:2017 / A11:2020 | IEC 62321-8:2017 |
| EN 61000-3-2:2019 / A1:2021 | IEC 62321-4:2013+AMD1:2017 |
Certificate of conformity issued based on the SZ2211102-56349E-RFA1; SZ2211102-56349E-RFA1; SZ2211102-56349E-RF-22A1; SZ2211102-56349E-EM-01A1; SZ2211102-56349E-SFA1; 170302037SZN-001 and ESTC-211115001 of Bay Area Compliance Laboratories Corp. (Shenzhen) 5F(B-West), 6F, 7F, the 3rd Phase of Wan Li Industrial Building D, Shihua Rd, FuTian Free Trade Zone, Shenzhen, China www.baclcorp.com.cn.
Intervision Trading Ro SRL,
Signature:

Printed name and Position:
CIOBANU DORIN - GENERAL MANAGER
Date: December 10 th , 2021
Place: Pitesti, Romania

- First Use of the Device /Introduction
- Power supply
- Caution:
- Note
- Inserting the reserve batteries
- USB-OUT CHARGE Charging Socket
- USB playback port
- General Operation
- Switch device on/off
- Volume
- FM/USB button
- Display Brightness
- Setting the time (in standby)
- SNOOZE/SLEEP button (Delayed switch-off)
- NOTE:
- Radio Mode
- Select the preset radio station
- Projection
- USB Playback Mode
- Alarm Function
- General Information
- Setting of the Alarm (in standby mode)
- Turning off the Alarm
- Automatic Alarm Interval
- Deactivate the Alarm Function (in standby mode)
- IMPORTANT SAFETY INSTRUCTIONS
- DISPOSAL OF ELECTRICAL AND ELECTRONIC EQUIPMENT
- Components
- •Buzzer (AL1 BUZZER):
- •Buzzer (ALI BUZZER):
Brand : AKAI
Model : ACR-3888
Category : Wristwatch