
VSX-835 - Receiver KLIPSCH - Free user manual and instructions
Find the device manual for free VSX-835 KLIPSCH in PDF.


| Product Type | AV Receiver |
| Model | VSX-835 |
| Brand | Klipsch |
| Channels | 7.1 (up to 5.1.2 with height speakers) |
| Output Power | 80 W per channel (8 Ω, 20 Hz–20 kHz, 0.08% THD, FTC) |
| HDMI Inputs | 4 (HDCP 2.3) |
| HDMI Output | 1 (ARC/eARC) |
| Video Support | 4K/120Hz, 8K/60Hz, HDR10+, Dolby Vision, HLG |
| Audio Decoding | Dolby Atmos, DTS:X, IMAX Enhanced, Dolby TrueHD, DTS-HD Master Audio |
| Bluetooth | Version 5.0, codecs SBC, AAC |
| Speaker Impedance | 4 Ω – 16 Ω |
| Dimensions (W × H × D) | 435 mm × 148 mm × 321 mm (17 1/8" × 5 13/16" × 12 5/8") |
| Weight | 8.2 kg (18.1 lbs) |
| Power Consumption | 490 W (full operation) |
| Standby Power | 0.2 W (without CEC features) |
| Power Supply | AC 120 V, 60 Hz (North American models) or AC 220–240 V, 50/60 Hz |
| MCACC Calibration | Yes (Full Auto MCACC with supplied microphone) |
| Firmware Update | Via USB |
| Zone B Support | Yes (speaker terminals or line/pre-out) |
| Personal Presets | 3 buttons (store input, listening mode, volume, etc.) |
Frequently Asked Questions - VSX-835 KLIPSCH
User questions about VSX-835 KLIPSCH
0 question about this device. Answer the ones you know or ask your own.
Ask a new question about this device
Download the instructions for your Receiver in PDF format for free! Find your manual VSX-835 - KLIPSCH and take your electronic device back in hand. On this page are published all the documents necessary for the use of your device. VSX-835 by KLIPSCH.
USER MANUAL VSX-835 KLIPSCH

Firmware Update

Troubleshooting

Supplementary Information
Features, etc. released in firmware updates

Reducing the Power Consumption in Standby State
When the following functions are enabled, the power consumption in standby state increases. To reduce the power consumption in standby state, check each setting and set the functions to "Off".
-HDMI CEC (→p87)
-HDMI Standby Through (→p87)
- USB Power Out at Standby (→p90)
☐ Detailed contents (Next page)







Before starting the procedure 6
Firmware Update 7
Update Information of the firmware 7
Checking the Firmware Version of the Unit 7
Firmware Update Procedure 7
Part Names 9
Front Panel 9
Display 11
Rear Panel 12
Remote Controller 14
Inputting Characters 16
Speaker Layout
The listening room and the speaker layout 18
3.1 Channel System 19
5.1 Channel System 20
7.1 Channel System 21
3.1.2 Channel System 22
5.1.2 Channel System 23
Speaker Installation
Setting Up the Speakers 24
Speaker Connections
Speakers you can use with this unit and cable connections 30 Connect the Subwoofer 31
Connections
Notes regarding connections with HDMI cables 44
Connections 44
Connecting the TV 45
To ARC/eARC TV 45 To Non-ARC TV 45
Connecting Playback Devices 47
Connections to BD/DVD and GAME with HDMI jacks 47 Connecting an Audio Component 48
Connecting an Integrated Amplifier or Transmitter (ZONE B) 49
Connecting Antennas 50
Connecting the Power Cord 51
Playback
Basic Operations 53
Turning the power on 53 Selecting a source to play 53
Adjusting the volume 54






Using the linking function (HDMI CEC) 54
Switching the display 55
Listening Mode 56
Selecting a Listening mode 56
BLUETOOTH® Playback 57
Listening To the Radio 58
Listening To the AM/FM Radio
(AM : North American, Taiwanese, Middle
East, Australian and Asian models) 58
Using RDS
(European, Middle East, Australian and Asian models) 60
Listening To DAB Digital Radio
(European models only) 61
Presetting a Radio Station 62
Adjusting the tone 63
AV Adjust 64
ZONE B Playback 66
Connections 66
Playing Back 67
Using PERSONAL PRESET 68
Setup
Setup Menu 70
Menu list 70
Input/Output Assign 72
Speaker 76
MCACC 80
Audio Adjust 82
Source 85
Hardware 87
Miscellaneous 91
Initial Setup with Auto Start-up Wizard 93
Operations 93
-
Speaker Setup 94
-
ARC Setup 94
-
Full Auto MCACC 95
Troubleshooting
Before starting the procedure 97
When the unit is operating erratically 98
Troubleshooting 99




Appendix
Speaker Layouts and Selectable Listening Modes 108
Input Formats and Selectable Listening Modes 110
Listening Mode Effects 114
Speaker combinations 119
General Specifications 120







Before starting the procedure
What's in the box

natural_image
Line drawing of a portable electronic device with control knobs and a display (no text or symbols)


① Main unit (1)
② Remote controller (RC-971R) (1), Batteries (AAA/R03) (2)
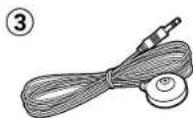
③ Speaker setup microphone (1)
• Used during Initial Setup.
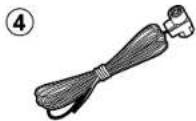
④ Indoor FM antenna (North American, Taiwanese, Middle East, Australian and Asian model) (1)
⑤ AM loop antenna (North American, Taiwanese, Middle East, Australian and Asian model) (1)
⑥ DAB/FM antenna (European models) (1)
- Initial Setup Guide (1)




* This document is an online instruction manual. This is not supplied with the product.
Note
- Connect speakers with an impedance of 4 to 16 .
- The power cord must be connected only after all other connections are completed.
- We will not accept any responsibility for damage arising from the connection with equipment manufactured by other companies.
- Details on the firmware update will be posted on our website and through other means at a later date.
- The illustrations in this manual use those of North American models unless otherwise mentioned.
- Specifications and appearance are subject to change without prior notice.



Firmware Update
Disclaimer: The program and accompanying online documentation are furnished to you for use at your own risk.
Our company will not be liable and you will have no remedy for damages for any claim of any kind whatsoever concerning your use of the program or the accompanying online documentation, regardless of legal theory, and whether arising in tort or contract.
In no event will our company be liable to you or any third party for any special, indirect, incidental, or consequential damages of any kind, including, but not limited to, compensation, reimbursement or damages on account of the loss of present or prospective profits, loss of data, or for any other reason whatsoever.
Update Information of the firmware
For the latest firmware contents and the firmware version, visit website.
Checking the Firmware Version of the Unit
To confirm the firmware version of your product, press the HOME button on the remote controller, and refer to "Miscellaneous" - "Firmware Update" - "Version" (→p92).
Firmware Update Procedure
Updating can take about 20 minutes. Existing settings are maintained.
Updating via USB
- Save only the updating data on the USB storage device. Delete any other data.
- While updating the firmware, do not do the following:
- Disconnecting and reconnecting cables, USB storage device, speaker setup microphone or headphones, or performing operations on the unit such as turning the power off
- Prepare a 1 GB or larger USB storage device. The format of USB storage devices supports FAT16 or FAT32 file system format.
– Media inserted into a USB card reader may not be used for this function.
– USB storage devices equipped with the security function are not supported. - USB hubs and USB devices equipped with the hub function are not supported. Do not connect these devices to the unit.
- If "HDMI CEC" is set to "On", set it to "Off".
- Press HOME button. Next, select "Hardware" - "HDMI", press ENTER, select "HDMI CEC" and select "Off".
* Depending on the USB storage device or its content, long time may be required for loading, the content may not be loaded correctly, or power may not be supplied correctly.
* Our company will not be liable whatsoever for any loss or damage of data, or storage failure arising from the use of the USB storage device. Please note this in advance.
* The descriptions may differ from the actual on-screen displays, however, operations and functions are the same.







Update
- Connect the USB storage device to your PC.
- Download the firmware file from the our company's website to your PC and unzip.
Firmware files are named as below.
PIOAVR**** R****.zip
Unzip the file on your PC. The number of unzipped files and folders varies depending on the model.
- Copy all unzipped files and folders to the root folder of the USB storage device.
- Make sure to copy the unzipped files.
-
Connect the USB storage device to the USB port of this unit.
-
If an AC adapter is supplied with the USB storage device, connect the AC adapter, and use it with a household outlet.
-
If the USB storage device has been partitioned, each section will be treated as an independent device.
-
Turn on the power of the unit and wait for about 20 seconds.
-
Press the ⏻HOME button on the remote controller, select "Miscellaneous"
- "Firmware Update" - "Update via USB" with the cursors in order, then press ENTER.
- If "Firmware Update" is not available for selection, wait until the system has started.
-
"Update via USB" will not be available for selection if the firmware of the unit is the latest.
-
Press ENTER with "Update" selected, and start update.
"Completed!" is displayed when updating is completed.
- Check the progress on the display of the unit.
-
During the update, do not turn the power off, or disconnect or reconnect the USB storage device.
-
Disconnect the USB storage device from the unit.
-
Press ⓍSTANDBY/ON button on the main unit to turn the unit into standby mode. The process is completed, and your firmware is updated to the latest version.
- Do not use ⒹSTANDBY/ON button on the remote controller.
If an Error Message is Displayed
If an error occurs, "*-* * Error!" is displayed on the display of the unit. ("*" represents an alphanumeric character.) Refer to the following descriptions and check.
Error Code
- *-01, *-10;
The USB storage device cannot be recognized. Check if the USB storage device or USB cable is securely inserted to the USB port of the unit.
Connect the USB storage device to an external power source if it has its own power supply.
• *-05, *-13, *-20, *-21:
The firmware file is not present in the root folder of the USB storage device, or the firmware file is for another model. Retry from the download of the firmware file.
- Others:
After removing the power plug once, insert it to the outlet, and then start the operation from the beginning.







Part Names
Front Panel
setup microphone. (→p80, p95)
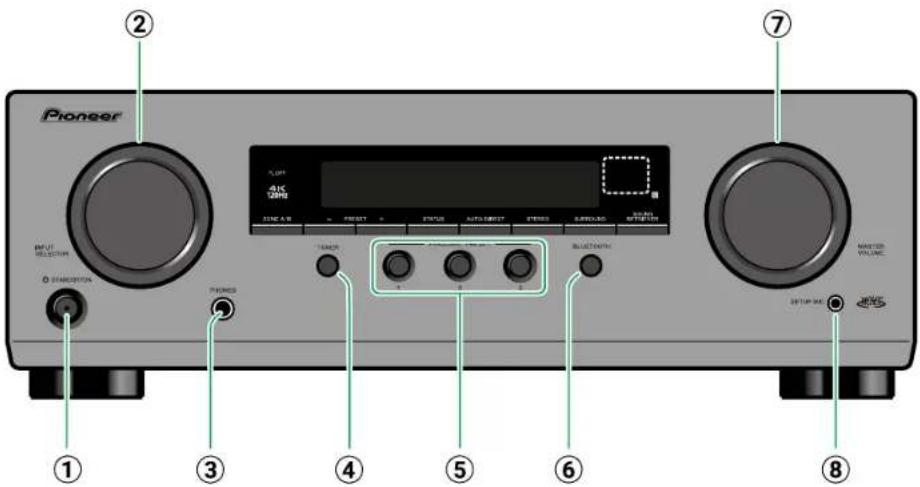
① STANDBY/ON button
② INPUT SELECTOR dial: Switch the input to be played.
③ PHONES jack: Headphones with a standard plug (ø1/4" / 6.3 mm) are connected.
④ TUNER button*1 /DAB/FM button*2 : Switches the input to be played to "TUNER". Also, pressing this button repeatedly switches the input between "AM"*1, "FM" and "DAB"*2.
*1 North American, Taiwanese, Middle East,
Australian and Asian models
*2 European models
⑤ PERSONAL PRESET 1/2/3 buttons: Registers the current setting conditions such as input selector, listening mode, etc. or call the registered settings. (→p68)
⑥ BLUETOOTH button: Switches the input to be played to "BLUETOOTH".
⑦ MASTER VOLUME
⑧ SETUP MIC jack: Connect the supplied speaker



Front Panel

⑨ 4K 120Hz indicator: Lights up when output video signals with 4K 120Hz.
⑩ FL OFF indicator: Lights up when the display is turned off by repeatedly pressing the DIMMER button on the remote controller.
⑪ ZONE A/B button: Selects an audio output destination from among "ZONE A", "ZONE B" and "ZONE A+B". (→p66)
⑫ PRESET +/- button: Selects preset radio stations registered when using TUNER.
(→p62)
⑬ Display (→p11)
⑭ STATUS button: Switches the information on the display and is used to operate RDS (European, Middle East, Australian and Asian models). (→p60)
⑮ Listening mode button: Press "AUTO/DIRECT", "SURROUND" or "STEREO" to switch the listening mode. (→p56)
⑯ SOUND RETRIEVER button: Turns on/off the
Sound Retriever function that provides better sound quality for compressed audio.
⑰ Remote control sensor: Receives signals from the remote controller.
- The signal range of the remote controller is within about 16°/5 m, at an angle of 20° on the perpendicular axis and 30° to either side.







DisplayDisplay

A).
B: Outputs audio only to the other place (ZONE B).
AB: Outputs audio to both the main room (ZONE A) and other place (ZONE B).
⑥ Lights when headphones are connected.
⑦ Blinks when muting is on.
⑧ Lights when adjusting the volume.
⑨ Speaker/Channel display: Displays the output channel that corresponds to the selected listening mode.
① Displays various information of the input signals.
② Lights in the following conditions.
*: Connected by BLUETOOTH.
HDMI: HDMI signals are input and the HDMI input is selected.
DIGITAL: Digital signals are input and the digital input is selected.
③ Lights according to the type of input digital audio signal and the listening mode.
④ Lights in the following conditions.




RDS (European, Middle East, Australian and Asian models): Receiving RDS broadcasting.
TUNED: Receiving DAB (European models)/AM(North American, Taiwanese, Middle East, Australian and Asian models)/FM radio.
STEREO: Receiving FM stereo.
SLEEP: Sleep timer is set. (→p90)
AUTO STBY: Auto Standby is set. (→p90)
⑤ Displays the audio output destination. A: Outputs audio only to the main room (ZONE


*ANTENNA DAB/FM terminal (European models): Connect the supplied antennas.

① HDMI OUT jacks: Transmit video signals and audio signals with an HDMI cable connected to a TV.
② HDMI IN jacks: Transmit video signals and audio signals with an HDMI cable connected to an AV component.
③ POWER OUT port: You can supply power (5 V/1 A) to the Streaming media player connected to the HDMI IN terminal of this unit with a USB cable (→p47). The playback function of music
files and power supply to smart phones/tablets, or other devices are not supported.
④ Power cord
⑤ DIGITAL AUDIO IN OPTICAL/COAXIAL jacks: Input TV or AV component digital audio signals with a digital optical cable or digital coaxial cable.
⑥ ANTENNA AM LOOP/FM UNBAL 75 Ω terminal: (North American, Taiwanese, Middle East, Australian and Asian models) Connect the supplied antennas.






⑦ AUDIO IN jacks: Input TV or AV component audio signals with an analog audio cable.
⑧ ZONE B LINE/PRE OUT jacks: Output audio signals with an analog audio cable connected to an integrated amplifier or a transmitter in the other place (ZONE B).
⑨ SUBWOOFER PRE OUT jack: Connect a powered subwoofer with a subwoofer cable. Up to two powered subwoofers can be connected. The same signal is output from each of the
SUBWOOFER PRE OUT jacks. ⑩ SPEAKERS terminals: Connect speakers with speaker cables. (North American and Taiwanese models are banana plug ready. Use plugs with a diameter of 4 mm.) Y plug connection is not supported.






Remote Controller Remote Controller

① STANDBY/ON button
② ZONE A/B button: Selects an audio output destination from among "ZONE A", "ZONE B" and "ZONE A+B". (-p67)
③ SLEEP button: Set the sleep timer. Select the time from "30 min", "60 min" and "90 min". (→p90)
④ PERSONAL PRESET 1/2/3 buttons: Registers the current setting conditions such as input selector, listening mode, etc. or call the registered settings. (→p68)
⑤ Input selector buttons: Switches the input to be played.
⑥ Play buttons: Used for playback operation of a BLUETOOTH-enabled device. If the unit is switched to "CEC MODE" using the ②1 MODE button, an HDMI CEC function-enabled AV component can be operated. (Depending on the device, operation may not be possible.)
⑦ AV ADJUST button: Settings such as "HDMI" and "Audio" can be made quickly during play on the TV screen. (→p64)
⑧ iSTATUS button: Switches the information on the display and is used to operate RDS (European, Middle East, Australian, and Asian models) (→p60).
⑨ Cursor ▲/▼/◄/► UP/DOWN/LEFT/RIGHT buttons and ENTER button: Select the item with the cursors, and press ENTER to confirm your selection.
10 HOME button: Display advanced setting items on the TV or the display to have a more enjoyable experience with this unit. (→p70)
⑪ RETURN/EXIT button: Returns the display to the previous state.





Remote Controller

⑫ MUTE button: Temporarily mutes audio. Press the button again to cancel muting.
⑬ TONE/DIALOG/SW buttons: Adjusts the sound quality of the speakers and volume level of the subwoofer. (→p63)
⑭ VOLUME buttons
⑮ LISTENING MODE buttons: Selects a listening mode (→p56).
⑯ DIMMER button: You can switch the display off or adjust the brightness of the display in three steps.
⑰ CLEAR button: Deletes all characters you have entered when entering text on the TV screen.
⑱ +Fav button: Used to register DAB (European models)/AM (North American, Taiwanese, Middle East, Australian and Asian models)/FM radio stations. (→p62)
19 AUDIO SEL button: When a device is connected to two or more audio input terminals for one input selector, you can select which audio input signal to play.
20 SOUND RETRIEVER button: Turns on/off the Sound Retriever function that provides better sound quality for compressed audio.
② MODE button: Switches between automatic tuning and manual tuning (→p58) for AM (North American, Taiwanese, Middle East, Australian and Asian models)/FM stations, and allows you to select the order for displaying DAB stations (European models) (→p61). Also, when an HDMI CEC function-enabled AV component is connected to this unit, you can switch "⑥ Play buttons" between "CEC MODE" and "RCV MODE" (normal mode).



Inputting Characters
You can input characters or symbols on the keyboard displayed on the TV screen such as when naming a preset radio station (→p85).
- Select a character or symbol with the cursors ▲/▼/◄/► UP/DOWN/LEFT/RIGHT on the remote controller and press the ENTER button.
- When saving characters after input, select "OK" and press the ENTER button.
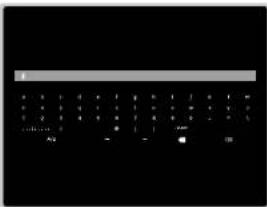

- Select "A/a" to switch between upper and lower cases. (Can also be switched with the MODE button on the remote controller.)
• To enter a space, select "Space". - To delete a character on the left of the cursor, select " "
- To delete all the input characters, press the CLEAR button on the remote control.





Speaker Layout
This unit can be used in different ways, depending on the layout of the speakers you are installing. Select the speaker layout that suits the installation environment, then confirm the methods for installation and connection.
☐ Speaker layout ( p19)
☐ Speaker Installation (→p24)
☐ Speaker Connections (→p29)
☐ Speaker Combinations (→p119)






The listening room and the speaker layout
Speaker Layout
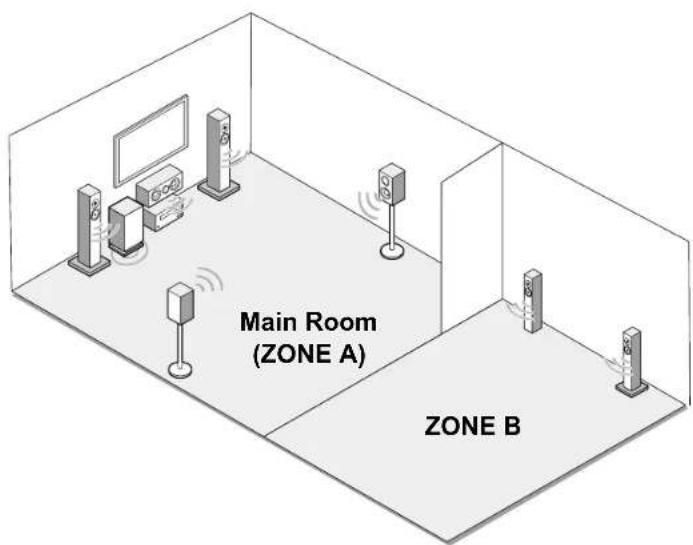
ZONE A Speakers
The speaker system set up in the main room (where this unit is located).
ZONE B Speakers
The 2 ch speaker system set up in the other place (ZONE B). This enables you to play the same source in the main room and the other place at the same time. – Playing Back (ZONE B) (→p66)


3.1 Channel System
A 3.1 Channel System that combines front speakers with a center speaker and a subwoofer.
Basic system (→p25)

natural_image
Line drawing of a room setup with speakers, TV, and a box (no text or symbols)3.1 ch + ZONE B (→p25)
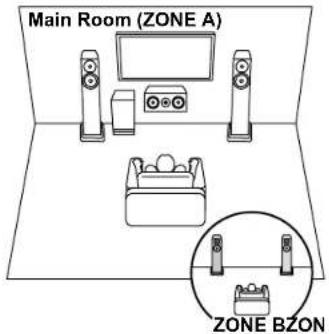
3.1 ch (Bi-Amping (Front)) (→p25)

natural_image
Line drawing of a room setup with speakers, TV, and a box (no text or symbols)






5.1 Channel System
This is a basic 5.1 Channel System.
Basic system (→p25)

natural_image
Line drawing of a room setup with speakers, TV, and equipment (no text or symbols)5.1 ch + ZONE B (→p25)

5.1 ch (Bi-Amping (Front)) (→p25)

natural_image
Line drawing of a room setup with speakers, TV, and storage unit (no text or symbols)





Speaker Layout
7.1 Channel System This is a 7.1 Channel System that consists of the basic 5.1 Channel System and added surround back speakers.
Basic system (→p26)

natural_image
Line drawing of a room setup with speakers, TV, and lighting fixtures (no text or symbols)





3.1.2 Channel System
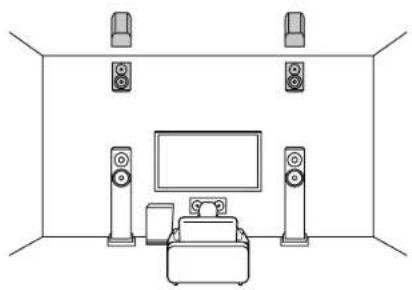
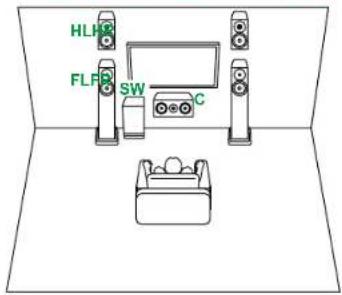
A Speaker System that is a 3.1 Channel System with one set of height speakers added.
3.1.2 ch (Front High or Rear High) (→p27)
natural_image
Line drawing of a room with a TV, speakers, and two speakers above (no text or symbols)3.1.2 ch (Top Front or Top Middle or Top Rear)

natural_image
Simple line drawing of a person relaxing in a room with ceiling lights and a vertical post (no text or symbols)3.1.2 ch (Dolby Enabled Speakers (Front))
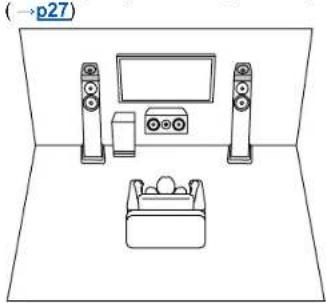
natural_image
Line drawing of a room setup with speakers, TV, and a box (no text or symbols)3.1.2 ch + ZONE B ( p27)
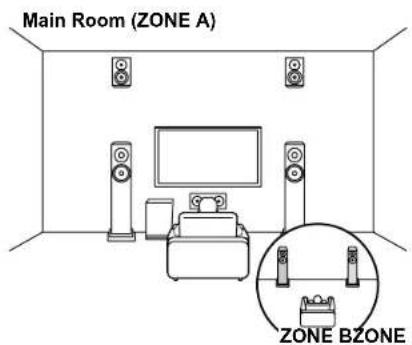
3.1.2 ch (Bi-Amping (Front)) (→p27)
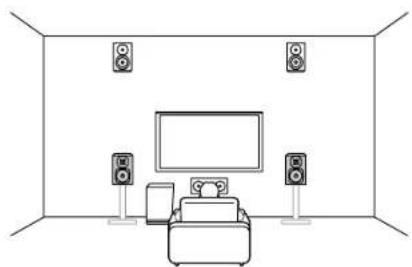
natural_image
Line drawing of a room with a TV, speakers, and two speakers (no text or symbols)






Speaker Layout
5.1.2 Channel System A Speaker System that is a 5.1 Channel System with one set of height speakers added.
5.1.2 ch (Front High or Rear High) (→p28)
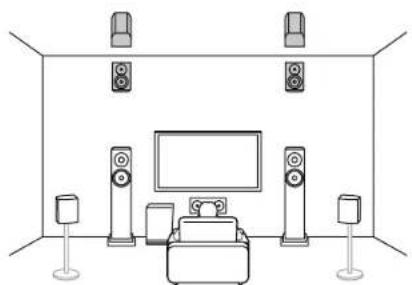
natural_image
Line drawing of a modern living room with speakers, TV, and furniture (no text or symbols)5.1.2 ch (Top Front or Top Middle or Top Rear) (→p28)

natural_image
Line drawing of a person relaxing in a room with ceiling lights and a small TV stand (no text or symbols)5.1.2 ch (Dolby Enabled Speakers (Front or Surround)) (→p28)

natural_image
Line drawing of a room setup with speakers, TV, and storage unit (no text or symbols)






Speaker Installation

Setting Up the Speakers
How the speakers are set up depends on the size and shape of the room, so here we introduce just a basic layout example.
The alphabetic symbols used in this chapter represent the following speakers:
FL Front speaker Left
FR Front speaker Right
C Center speaker
SW powered SubWoofer
SL Surround speaker Left
SR Surround speaker Right
SBL Surround Back speaker Left
SBR Surround Back speaker Right
FHL Front High speaker Left
FHR Front High speaker Right
RHL Rear High|speaker Left
RHR Rear High speaker Right
TFL Top Front speaker Left
TFR Top Front speaker Right
TML Top Middle speaker Left
TMR Top Middle speaker Right
TRL Top Rear speaker Left
TRR Top Rear speaker Right
DFL Dolby enabled speaker Front Left
DFR Dolby enabled speaker Front Right
DSL Dolby enabled speaker Surround Left
DSR Dolby enabled speaker Surround Right


3.1 Channel System

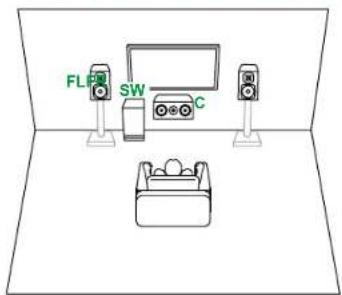
FL, FR Place the Left and Right Front Speakers to match ear height.
C The center speaker should be set up facing the listening position at an angle.
SW Place next to the Front Speakers.
Speaker Installation
5.1 Channel System
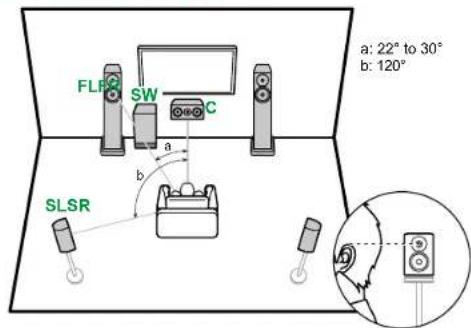
FL, FR Place the Left and Right Front Speakers to match ear height.
C The center speaker should be set up facing the listening position at an angle.
SW Place next to the Front Speakers.
SL, SR Place the Left and Right Surround Speakers to be just above ear height.
■ 3.1 ch connection (→p32)
■ 3.1 ch + ZONE B connection (→p33)
■ 3.1 ch (Bi-Amping (Front)) connection (→p34)


■ 5.1 ch connection (→p35)
■ 5.1 ch + ZONE B connection (→p36)
■ 5.1 ch (Bi-Amping (Front)) connection (→p37)


Speaker Installation
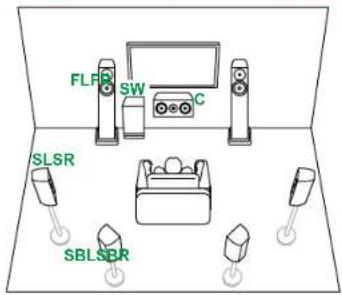
7.1 Channel System

FL, FR Place the Left and Right Front Speakers to match ear height.
C The center speaker should be set up facing the listening position at an angle.
SW Place next to the Front Speakers.
SL, SR Place the Left and Right Surround Speakers to be just above ear height.
SBL, SBR Place the Left and Right Surround Back Speakers at ear height.
- If surround back speakers are installed, be sure to install surround speakers as well.
■ 7.1 ch connection (→p38)






3.1.2 Channel System
High Speakers

FHL, FHR Place the front high speakers directly above the front speakers, angled to face the listening position.
RHL, RHR Place the rear high speakers so the lateral distance matches the front speakers, angled to face the listening position.
■ 3.1.2 ch connection (→p39)
■ 3.1.2 ch + ZONE B connection (→p40)
■ 3.1.2 ch (Bi-Amping (Front)) connection (→p41)



Speaker Installation
Top Speakers

TFL, TFR Fit top front speakers on the ceiling in front of the listening position.
TML, TMR Fit top middle speakers on the ceiling directly above the listening position.
TRL, TRR Fit top rear speakers on the ceiling behind the listening position.
- Match the lateral distance of the top speakers to the front speakers.
Dolby Enabled Speakers

DFL, DFR The Dolby enabled speakers (front) are installed on top of the front speakers.



5.1.2 Channel System
High Speakers

FHL, FHR Place the front high speakers directly above the front speakers, angled to face the listening position.
RHL, RHR Place the rear high speakers so the lateral distance matches the front speakers, angled to face the listening position.
■ 5.1.2 ch connection (→p42)



Speaker Installation
Top Speakers

TFL, TFR Fit top front speakers on the ceiling in front of the listening position.
TML, TMR Fit top middle speakers on the ceiling directly above the listening position.
TRL, TRR Fit top rear speakers on the ceiling behind the listening position.
- Match the lateral distance of the top speakers to the front speakers.
Dolby Enabled Speakers
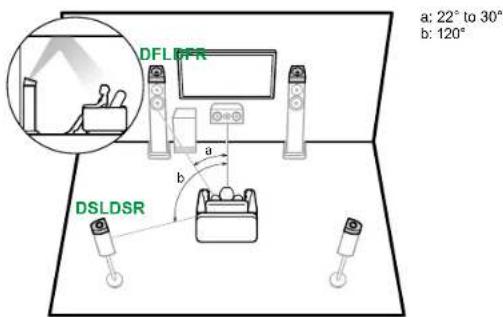
DFL, DFR The Dolby enabled speakers (front) are installed on top of the front speakers.
DSL, DSR The Dolby enabled speakers (surround) are installed on top of the surround speakers.


Speaker Connections

(Before starting the procedure)
Speakers you can use with this unit and cable connections
30
Connect the Subwoofer 31
3.1 Channel System 32, 33, 34
5.1 Channel System 35, 36, 37
7.1 Channel System 38
3.1.2 Channel System 39, 40, 41
5.1.2 Channel System 42







Speakers you can use with this unit and cable connections
■ Speakers you can use with this unit
This unit supports speakers with 4 Ω to 16 Ω impedance. For speaker impedance, check the speaker instruction manual.
■ (Note) Speaker Impedance
If any of the speakers to be connected has an impedance of 4 Ω or more and less than 6 Ω, set "Speaker Impedance" to "4ohms" for "Speaker Setup" in the Initial Setup section (→p93). When setting "Speaker Impedance" from the Setup menu, press the ⚠ HOME button on the remote controller to display the Setup menu, and set "Speaker" - "Configuration", then set "Speaker Impedance" (→p76) to "4ohms".
■ Connect the Speaker Cables
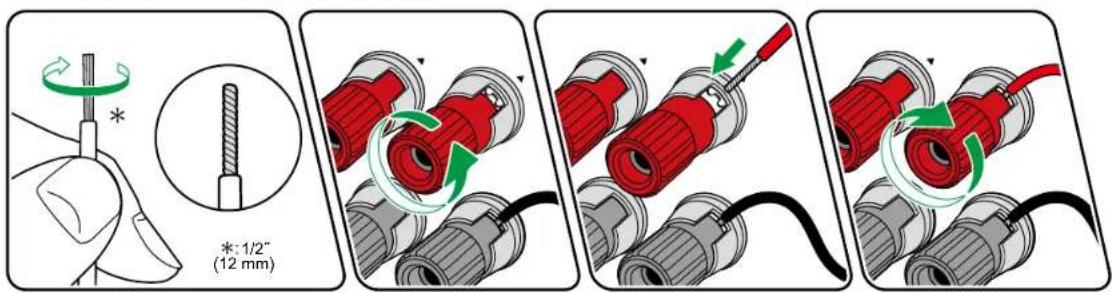
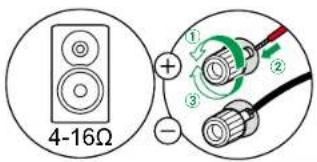
Make correct connection between the unit's jacks and speaker's jacks (+ side to + side, and - side to - side) for each channel. If the connection is wrong, a bass sound will not be reproduced properly due to reverse phase. Twist the wires exposed from the tip of the speaker cable so that the wires do not stick out of the speaker terminal when connecting. If the exposed wires touch the rear panel, or the + side and - side wires touch each other, a malfunction may occur.

natural_image
Illustration of a red fuse with black leads emitting lightning bolts, no text or symbols present




Connect the Subwoofer
Speaker Connections

Connect a powered subwoofer with this unit using a subwoofer cable.
- Up to two powered subwoofers can be connected. The same signal is output from each SUBWOOFER PRE OUT jack.
a Subwoofer cable






3.1 Channel System

Speaker Connections
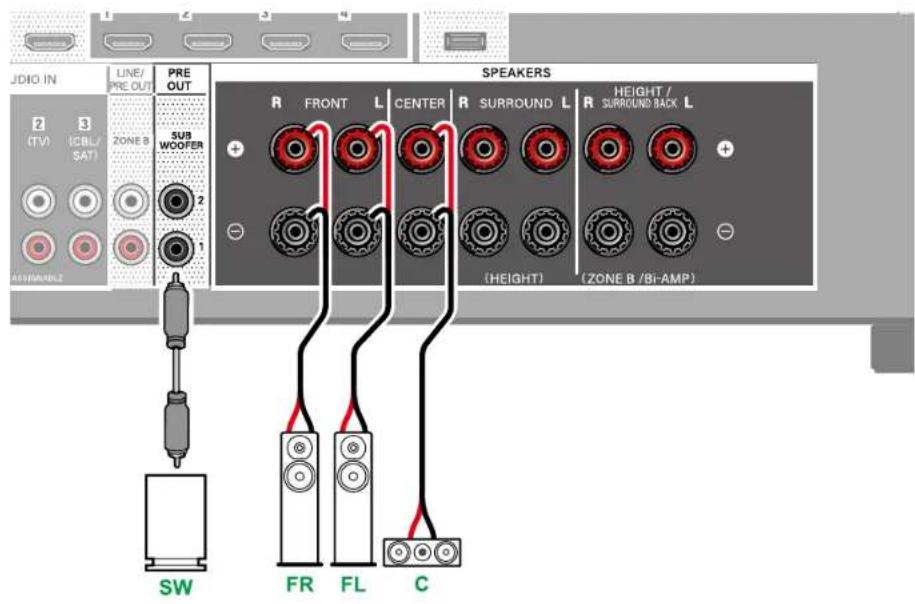


Speaker Connections
■ 3.1 Channel System + ZONE B SPEAKER
MAIN ROOM (ZONE A)

ZONE B

- Playing Back (ZONE B) (→p66)

MAIN ROOM (ZONE A): The speaker system set up in the main room (where this unit is located).
ZONE B: A 2ch speaker system set up in another place (ZONE B). You can play the same source in the other place as in the main room.
- When connecting an Integrated Amplifier to this unit, refer to "Connecting an Integrated Amplifier or Transmitter (ZONE B)" (→p49).


Speaker Connections
■ 3.1 Channel System (Bi-Amping the Speakers)

Be sure to remove the jumper bar connecting between the woofer jacks and tweeter jacks of the Bi-Amping supported speakers. Refer to the instruction manual of your speakers as well.







5.1 Channel System

Speaker Connections




Speaker Connections
5.1 Channel System + ZONE B SPEAKER
MAIN ROOM (ZONE A)

ZONE B

- Playing Back (ZONE B) (→p66)

MAIN ROOM (ZONE A): The speaker system set up in the main room (where this unit is located).
ZONE B: A 2ch speaker system set up in another place (ZONE B). You can play the same source in the other place as in the main room.
- When connecting an Integrated Amplifier to this unit, refer to "Connecting an Integrated Amplifier or Transmitter (ZONE B)" (→p49).






Speaker Connections
■ 5.1 Channel System (Bi-Amping the Speakers)

Be sure to remove the jumper bar connecting between the woofer jacks and tweeter jacks of the Bi-Amping supported speakers. Refer to the instruction manual of your speakers as well.





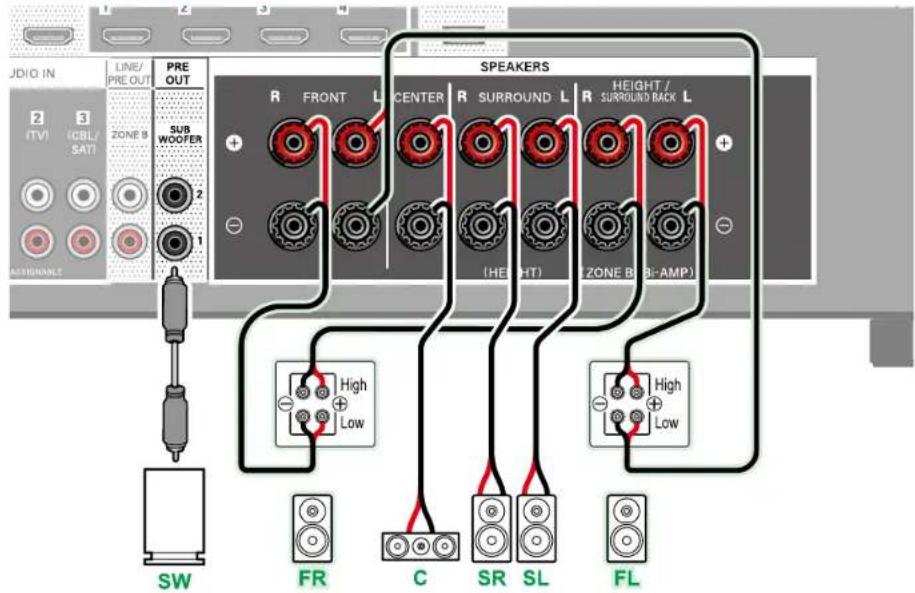
7.1 Channel System
Speaker Connections

- While ZONE B playback (→p66) is being performed, surround back speakers cannot play audio.






3.1.2 Channel System
Speaker Connections

*1 Connect the Height Speakers you have actually installed (HL/HR: Height Speakers, Top Speakers, Dolby Enabled Speakers).






Speaker Connections
■ 3.1.2 Channel System + ZONE B SPEAKER
MAIN ROOM (ZONE A)

ZONE B

- Playing Back (ZONE B) (→p66)

*1 Connect the Height Speakers you have actually installed (HL/HR: Height Speakers, Top Speakers, Dolby Enabled Speakers).
MAIN ROOM (ZONE A): The speaker system set up in the main room (where this unit is located).
ZONE B: A 2ch speaker system set up in another place (ZONE B). You can play the same source in the other place as in the main room.
- When connecting an Integrated Amplifier to this unit, refer to "Connecting an Integrated Amplifier or Transmitter (ZONE B)" (→p49).





Speaker Connections
■ 3.1.2 Channel System (Bi-Amping the Speakers)


*1 *1
Be sure to remove the jumper bar connecting between the woofer jacks and tweeter jacks of the Bi-Amping supported speakers. Refer to the instruction manual of your speakers as well.
*1 Connect the Height Speakers you have actually installed (HL/HR: Height Speakers, Top Speakers, Dolby Enabled Speakers).



5.1.2 Channel System

Speaker Connections
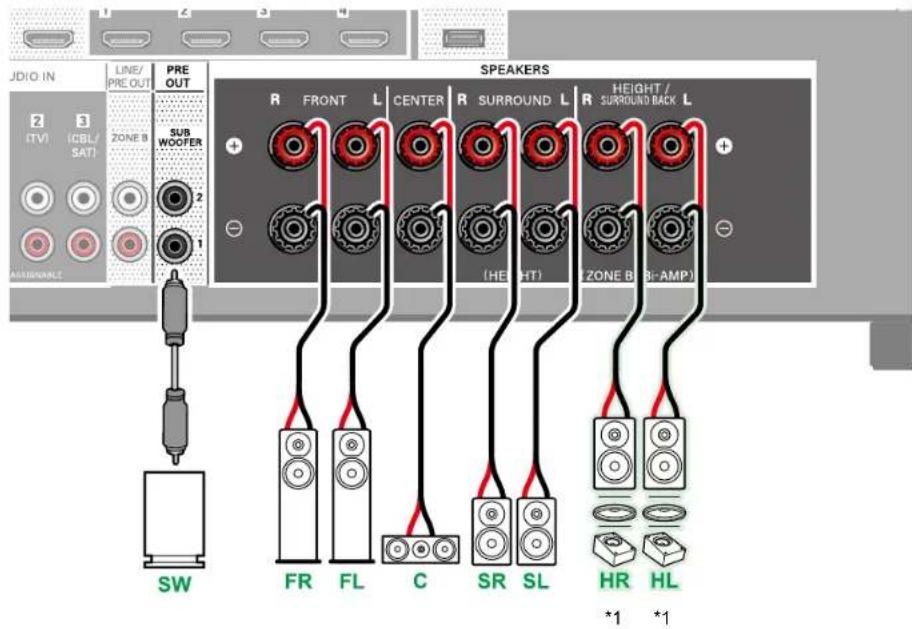
*1 Connect the Height Speakers you have actually installed (HL/HR: Height Speakers, Top Speakers, Dolby Enabled Speakers).
- While ZONE B playback (→p66) is being performed, height speakers cannot play audio.







Connections
Notes regarding connections with HDMI cables 44
Connecting the TV 45
Connecting Playback Devices 47
Connecting an Integrated Amplifier or Transmitter (ZONE B) 49
Connecting Antennas 50
Connecting the Power Cord 51







Notes regarding connections with HDMI cables
HDMI (High-Definition Multimedia Interface) is a digital interface standard for connecting TVs, projectors, Blu-ray Disc players, game consoles, and other video components. With HDMI, a single cable can carry control signals, digital video, and digital audio.
Connections
Push HDMI cables straight in and all the way. You can damage the terminals if you try to insert at an angle.
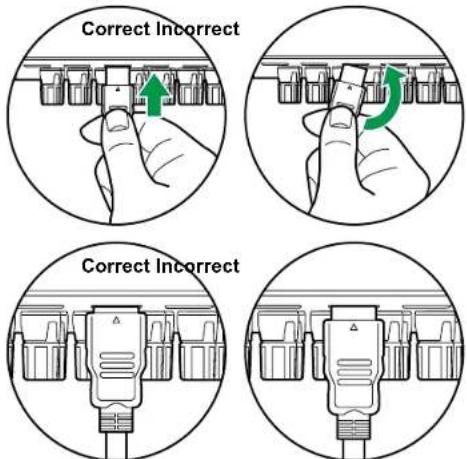
- Hold the terminal housing on the HDMI cable when unplugging. Pulling on the cable may lead to damaged cabling.
■ (Note) Placement of cables
Putting a load on HDMI cables can lead to poor operational performance. Place the cables so there is no load put on them.
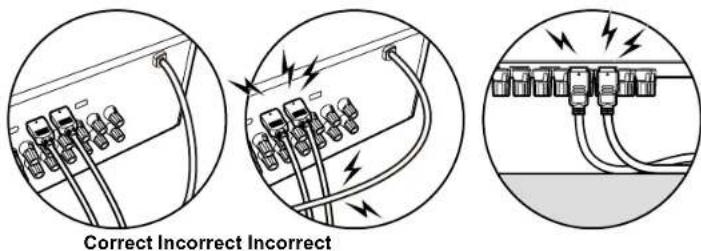
- When 4K high-quality video (4K 120 Hz, etc.) or 8K high-quality video (8K 60 Hz, etc.) is to be played, use ULTRA High Speed HDMI Cable that has the "ULTRA HIGH SPEED" label attached to the packaging.







Connecting the TV
By connecting a TV to this unit, you can show the video from AV devices connected to this unit on the TV and also play the sound from the TV through this unit.

a HDMI cable, b Digital optical cable




To ARC/eARC TV
If the TV supports the ARC (Audio Return Channel) function(*), use only the HDMI cable to connect with the TV. Use the ARC-compatible HDMI IN jack of the TV for connection. You connect the HDMI cable to the HDMI OUT jack labeled "ARC" on the receiver side.
- When a TV compatible with the eARC function is connected, use an HDMI cable that supports Ethernet.
To Non-ARC TV
If the TV does not support the ARC (Audio Return Channel) function(*), connect an HDMI cable and digital optical cable. If the TV does not have a DIGITAL OPTICAL OUT jack, you can use an analog audio cable to connect with the AUDIO IN TV jack.
- If you use a cable set-top box, etc. connected to the input jack of this unit to watch TV (without using a TV's built-in tuner), connection with a digital optical cable or analog audio cable is not required.

Setup
- When not using the ARC function, set "Hardware" - "HDMI" - "Audio Return Channel (eARC supported)" (→p88) in the setup menu to "Off".
(*)The ARC function and eARC function transmit the audio signals of the TV via an HDMI cable, and plays the audio of the TV on this unit. To check if the TV supports the ARC function and eARC function, refer to the instruction manual of the TV, etc.
ARC/eARC compatible audio formats (→p122)



Connections
- Settings are required when 8K high-quality video is to be played. Refer to "HDMI 4K/8K Signal Format" (→p72) for information on the settings. Also, use an HDMI cable that supports 8K video.


Connecting Playback Devices
Connections to BD/DVD and GAME with HDMI jacks

GAMEBD/DVD Cable/Satellite set-top box
This is a connection example of an AV component equipped with an HDMI jack. When connecting with an AV component that conforms to the CEC (Consumer Electronics Control) standard, you can use the HDMI CEC function(*) that enables linking with input selectors, etc. and the HDMI Standby Through function that can transmit video and audio signals of the AV component to the TV even if this unit is in standby mode.
- Settings are required when 8K high-quality video is to be played. Refer to "HDMI 4K/8K Signal Format" (→p72) for information on the settings. Also, use an HDMI cable that supports 8K video.
- The corresponding resolution is different depending on the HDMI jack connected. See "Corresponding input resolutions" (→p123) for details.
- Settings are required when 8K high-quality video is to be played. Refer to "HDMI 4K/8K Signal Format" (→p72) for information on the settings. Also, use an HDMI cable that supports 8K video.
- The corresponding resolution is different depending on the HDMI jack connected. See "Corresponding input resolutions" (→p123) for details.
Note
- To enjoy digital surround sound including Dolby Digital, set the audio output of the connected Blu-ray Disc player etc. to the Bitstream output.
(*)The HDMI CEC function: This function enables various linking operations with CEC-compliant devices, such as switching input selectors interlocking with a CEC-compliant player, switching audio output between TV and this unit or adjusting the volume using the remote controller of a CEC-compliant TV, and automatically switching this unit to standby when the TV is turned off.
a HDMI cable







Connecting an Audio Component

This is a connection example of an audio component. Connect a CD player using a digital coaxial cable or analog audio cable.
a Digital coaxial cable, b Analog audio cable






Connecting an Integrated Amplifier or Transmitter (ZONE B)

By connecting an Integrated Amplifier to the ZONE B LINE/PRE OUT terminal, you can play the same source in the other place (ZONE B) as in the main room. Also, when you connect a transmitter for wireless headphones or wireless speakers, you can play audio through these devices.

Setup
When connecting an integrated amplifier that does not have a volume control, in Initial Setup (→p93), set "Speaker Setup" - "Zone B Output Level" to "Variable". To set the "Zone B Output Level" from the Setup menu, press
HOME on the remote controller, and set "Speaker" - "Configuration" - "Zone B Output Level" (-p76) to "Variable". If you do not set this, the volume output will be very loud and there is a danger of damage to the integrated amplifier, speakers, etc.
a Analog audio cable



□ Playing Back (ZONE B) (→p67)


Connecting Antennas
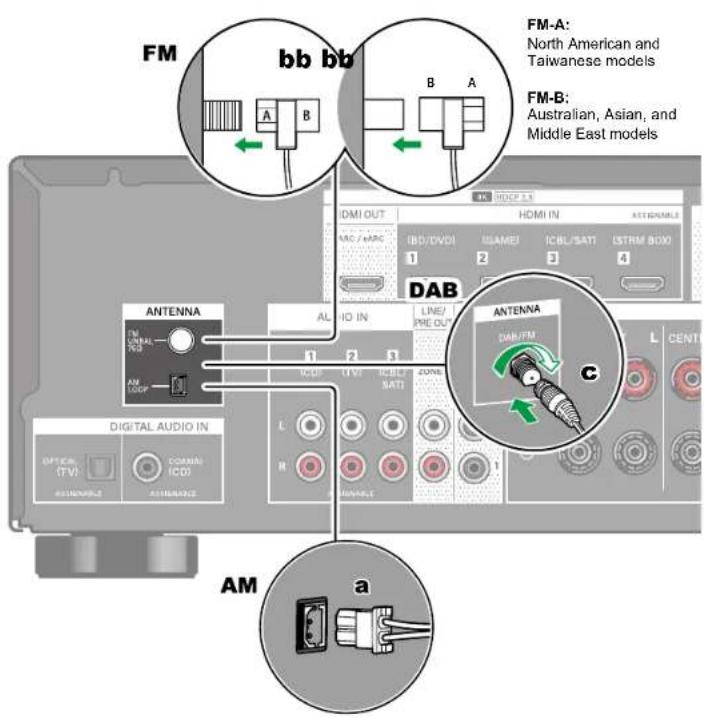
North American, Taiwanese, Middle East, Australian and Asian models Connect the antenna to this unit, and set up the antenna at the best position for listening while receiving radio signals. Attach the indoor FM antenna to the wall using push pins or adhesive tape.


European models Make sure the plug is pushed in all the way, then fix in place by turning the nut to the right. Use a tack or similar to fix the antenna to a wall.

a AM loop antenna, b Indoor FM antenna, c DAB/FM antenna







Connecting the Power Cord

Connect the power cord after all the connections are completed.
a Power cord








Playback
Basic Operations
Basic Operations 53
Listening Mode 56
BLUETOOTH® Playback 57
Listening To the Radio 58
Adjusting the tone 63
AV Adjust
64
Convenience functions
ZONE B Playback 66
Using PERSONAL PRESET 68






Basic Operations
Turning the power on
- Press dSTANDBY/ON on the remote controller to turn on the power of the unit.

You can also turn on the power of the unit with the following operations:
- Pressing STANDBY/ON on the main unit.
- Using the linking function (HDMI CEC) (→p54)
Selecting a source to play
- Press an input selector button on the remote controller to select a source. For example, to play the device connected to the BD/DVD jack, press the BD/DVD button. To listen to the audio of the TV, press TV button.
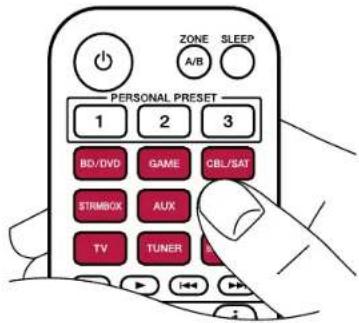
You can also select a source to play with the following operations:
- Turn the INPUT SELECTOR dial on the main unit.



Adjusting the volume
- Press the VOLUME buttons on the remote controller to adjust the volume. To temporarily turn off the sound, press the ☑MUTE button. Press again to cancel.
- When Dolby Vision images are received, the volume bar on the TV screen changes from blue to magenta.
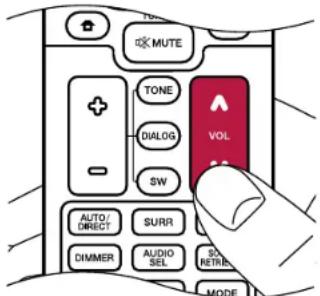
You can also adjust the volume with the following operations:
– Using the MASTER VOLUME on the main unit
- Using the linking function (HDMI CEC) (→p54)
Playback
Using the linking function (HDMI CEC)
By using an HDMI cable and connecting to a TV that is compatible with the HDMI CEC (Consumer Electronics Control) function, you are able to perform operations such as adjusting the volume of this unit with the TV's remote controller and link power On/Off. Furthermore, if you have connected a Blu-ray Disc player, GAME, etc. that is compatible with the HDMI CEC function, input switching is performed automatically.
- HDMI CEC settings ( →p87) (the default value is "On")
- For information about the HDMI CEC functions of the TV, refer to the operating instructions, etc., for the TV.
- The unit is designed to link with products that comply with the CEC standard, and that linked operation is not always guaranteed with all CEC devices.
- For linked functions to work properly, do not connect CEC-compliant devices exceeding the connectable number to the HDMI jack as shown below.
- Blu-ray Disc/DVD players: up to 3 units
- Blu-ray Disc/DVD recorders: up to 3 units
– Cable TV tuner, terrestrial digital tuner, and satellite broadcasting tuner: up to 4 units







Switching the display
Repeatedly pressing the STATUS button on the remote controller switches the display of the main unit in the following order.
- The content displayed depends on the source, BLUETOOTH, etc., being played.
- Depending on the audio signal, "B (Back)" or "W (Wide)" is displayed next to the number of channels of the input format.
- Not all the information is necessarily displayed.

flowchart
graph TD
    A["Listening mode"] --> B["DTS Neural : X"]
    B --> C["Input format"]
    C --> D["DTS 5.1"]
    D --> E["The display is switched in a few seconds."]
    E --> F["Sampling frequency"]
    F --> G["48.0 kHz"]
    G --> H["Input signal resolution"]
    H --> I["1080 p/59 16:9"]
    I --> J["Input source and volume"]
    J --> K["BD/DVD 40.0"]







Listening Mode
The listening mode can be switched by pressing the "AUTO/DIRECT", "SURR", and "STEREO" buttons repeatedly during play.
- For details of the effects of each listening mode, refer to "Listening Mode Effects" (→p114).
- For listening modes selectable for each audio format of input signals, refer to "Input Formats and Selectable Listening Modes" (→p110).
Selecting a Listening mode
- Press one from among AUTO/DIRECT, SURR, and STEREO during playback.

- Press the selected button repeatedly to switch the modes displayed on the display of the main unit.
DTS
- Each of AUTO/DIRECT, SURR, and STEREO buttons stores the listening mode that was selected last. If content incompatible of the listening mode selected last is played, the most standard listening mode for the content is automatically selected.
Dolby Atmos

IMAX ENHANCED
Manufactured under license from Dolby Laboratories. Dolby, Dolby Vision, Dolby Atmos, Dolby Audio, and the double-D symbol are trademarks of Dolby Laboratories.
For DTS patents, see http://patents.dts.com. Manufactured under license from DTS, Inc. or under license from DTS Licensing Limited. DTS, DTS:X, and Virtual:X logos are registered trademarks or trademarks of DTS, Inc. and its affiliates in the United States and other countries. © 2023 DTS, Inc. ALL RIGHTS RESERVED.
Manufactured under license from IMAX Corporation. IMAX® is a registered trademark of IMAX Corporation in the United States and/or other countries. For DTS patents, see http://patents.dts.com. Manufactured under license from DTS, Inc. DTS and the DTS logo are registered trademarks or trademarks of DTS, Inc. in the United States and other countries. © 2020 DTS, Inc. ALL RIGHTS RESERVED.


BLUETOOTH® Playback
You can wirelessly play music on a smartphone or other BLUETOOTH wireless technology enabled device through the speakers connected to this unit.

natural_image
Illustration of a hand holding a smartphone with wireless signal waves next to an electronic device (no text or symbols present)
The illustration shows an image.
Perform the following procedure when this unit is on.
Pairing
- When you press the BLUETOOTH button, "Now Pairing..." is displayed on this unit's display, and the pairing mode is enabled.
Now Pairing...
-
Enable (turn on) the BLUETOOTH function of the BLUETOOTH enabled device, and then select this unit from among the devices displayed. If a password is requested, enter "0000".
-
This unit is displayed as "Pioneer VSX-835 XXXXXX".
- To connect another BLUETOOTH enabled device, press and hold the BLUETOOTH button until "Now Pairing..." is displayed, and then perform step 2. This unit can store the pairing information of up to 8 paired devices.
- The coverage area is approx. 48'/15 m. Note that connection is not always guaranteed with all BLUETOOTH enabled devices.
Playing Back
- Perform the connection procedure on the BLUETOOTH enabled device.
- Playing the music file.
The input on this unit automatically switches to "BLUETOOTH".
Turn up the volume of the BLUETOOTH enabled device to an appropriate level.
- Due to the characteristics of BLUETOOTH wireless technology, the sound produced on this unit may slightly be behind the sound played on the BLUETOOTH enabled device.


Listening To the Radio

AMFMDAB


You can receive AM (North American, Taiwanese, Middle East, Australian and Asian models)/FM/DAB (European models) radio on this unit with the built-in tuner.
Listening To the AM/FM Radio (AM : North American, Taiwanese, Middle East, Australian and Asian models)
Perform the following procedure when this unit is on.
■ Tuning Automatically
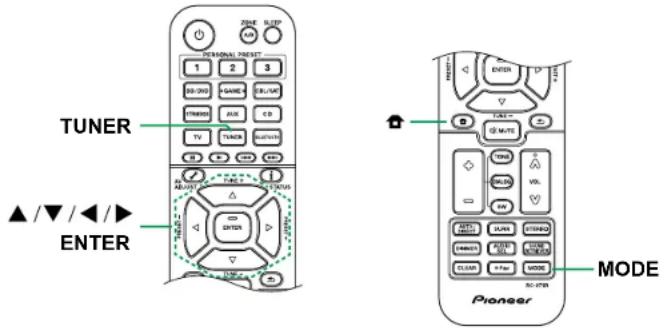
- Press TUNER repeatedly to select either "AM" or "FM".
- Press MODE repeatedly to display "TunMode: Auto" on the display.
TunMode: Auto
- When you press the cursors ▲/▼P/DOWN, automatic tuning starts, and searching stops when a station is found. When tuned in to a radio station, the "TUNED" indicator on the display lights up. When tuned in to an FM radio station, the "STEREO" indicator lights up.
When FM broadcasts reception is poor: Perform the procedure for "Tuning Manually" ( p58). Note that if you tune manually, the reception for FM broadcasts will be monaural rather than stereo, irrespective of the sensitivity of the reception.
■ Tuning Manually
Note that if you tune manually, the reception for FM broadcasts will be monaural rather than stereo, irrespective of the sensitivity of the reception.
- Press TUNER repeatedly to select either "AM" or "FM".
- Press MODE repeatedly to display "TunMode: Manual" on the display.
TunMode: Manual
- While pressing the cursors ▲ UP/DOWN, select the desired radio station.
- Each time you press the cursors ▲ UP/DOWN, the frequency changes by 1 step. If the button is held down, the frequency changes continuously, and if the button is released, the frequency stops changing.


Playback
■ Frequency step setting (North American, Taiwanese, Middle East, Australian and Asian models)
Press ⬆HOME on the remote controller, and from the Setup menu select "Miscellaneous" - "Tuner" - "AM/FM Frequency Step" (North American and Taiwanese models) or "AM Frequency Step" (Middle East, Australian and Asian models), and then select the frequency step for your area. Note that when this setting is changed, all radio presets are deleted.




☐ Presetting a Radio Station ( p62)



Playback
Using RDS (European, Middle East, Australian and Asian models)
RDS stands for Radio Data System, and is a method of transmitting data in FM radio signals. In regions where RDS can be used, when you tune in to a radio station broadcasting program information, the radio station name is displayed on the display. When you press the STATUS button on the remote controller in this state, you can use the following functions.
■ Display Text Information (Radio Text)
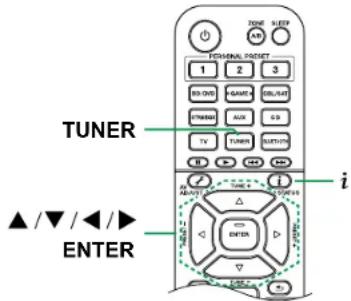
- While the name of the station is being displayed on the display, press the i STATUS button on the remote controller once. The Radio Text (RT), which is text information delivered by the station, is displayed scrolling across the display. "No Text Data" is displayed when no text information is delivered.
■ Search for Stations by Program Type
- While the name of the station is being displayed on the display, press the i STATUS button on the remote controller twice.
- If none of the Program Types are set for the radio station under reception, "None" is displayed.
- Press the cursor buttons ← LEFT/RIGHT on the remote controller to select the Program Type you want to search for, and then press the ENTER button to start the search.
- The Program Types displayed are as follows: None / News (News reports) / Affairs (Current affairs) / Info (Information) / Sport / Educate (Education) / Drama / Culture / Science (Science and technology) / Varied / Pop M (Pop music) / Rock M (Rock music) / Easy M (Middle of the road music) / Light M (Light classics) / Classics (Serious classics) / Other M (Other music) / Weather / Finance / Children (Children's programmes) / Social (Social affairs) / Religion / Phone In / Travel / Leisure / Jazz (Jazz music) / Country (Country music) / Nation M (National music) / Oldies (Oldies music) / Folk M (Folk music) / Document (Documentary)
-
The information displayed may not match the content delivered by the station.
-
When a station is found, the station blinks on the display. Pressing the ENTER button in this state will receive that station. If you don't press the ENTER button, the unit starts to search for another station.
- If no stations are found, the message "Not Found" is displayed.
- Unusual characters may be displayed when the unit receives unsupported characters. This is not a malfunction. Also, if the signal from a station is weak, information may not be displayed.
☐ Presetting a Radio Station (→p62)


Listening To DAB Digital Radio (European models only)
Perform the following procedure when this unit is on.
- Press TUNER repeatedly to select "DAB".
- The very first time you select DAB, the Auto Tuning function automatically scans the DAB Band 3 for the multiplexes (i.e., stations) available in your area. Once the scanning process is complete, the first station that was detected is selected.
Scan: 100%
- Select the desired radio station with ▲ ▼P/DOWN.
- If a new DAB station is introduced, or you move to a new area, press HOME, then use the cursors and ENTER button to run the "DAB Auto Scan" in "Miscellaneous" - "Tuner".

Playback
■ Changing the order stations are displayed
You can sort the available stations alphabetically or by multiplex.
- Press MODE repeatedly to set the method for sorting the display order from the following.
Alphabet (default setting): Sort stations alphabetically.
Multiplex: Sort stations by multiplex.
■ Displaying DAB Radio Information
- Press iSTATUS repeatedly to display more information about the selected DAB station.
DLS (Dynamic Label Segment): When tuned to a station that's broadcasting DLS text data, the text will scroll across the display.
Program Type: Displays the type of program.
Bit Rate and Audio Mode: Displays the station's bit rate and audio mode (Stereo, Mono).
Quality: Displays the signal quality.
0 - 59: Poor reception
60 - 79: Good reception
80 - 100: Excellent reception
Multiplex Name: Displays the name of the current multiplex.
Multiplex Number and Frequency: Displays the number and frequency of the current multiplex.



☐ Presetting a Radio Station (→p62)


Presetting a Radio Station
Playback
■ Registration Procedure
You can preset up to 40(*) of your favorite radio stations.
(*) North American, Taiwanese, Middle East, Australian and Asian models: AM and FM stations
European models: FM and DAB stations
After tuning in to the radio station you want to register, perform the following procedure.
- Press + Fav so that the preset number on the display blinks.
FM 87.5 MHz
- While the preset number is blinking (approx. 8 seconds), repeatedly press the cursors ◀ LEFT/RIGHT to select a number between 1 and 40.
- Press + Fav again to register the station. When the station is registered, the preset number stops blinking. Repeat this steps to register your favorite radio stations.

■ Selecting a Preset Radio Station
- Press TUNER.
- Press the cursors ◀ EFT/RIGHT to select a preset number.
■ Deleting a Preset Radio Station
- Press TUNER.
- Press the cursors ◀ EFT/RIGHT to select the preset number to delete.
- After pressing +Fav, press CLEAR while the preset number is blinking, and delete the preset number. When deleted, the number on the display disappears.







Adjusting the tone
Adjusting the TREBLE/BASS
You can adjust the sound quality of the speakers.
- Press TONE repeatedly to select Treble or Bass and adjust the content. Treble: Enhances or moderates the high-tone range of the speakers. Bass: Enhances or moderates the low-tone range of the speakers.
- Press + or - for adjustment.
Adjusting the DIALOG
Emphasizes movie dialogues and music vocals to listen to them more easily. It is effective to movie lines in particular. Also, it exerts the effect even if the center speaker is not used. Select a desired level from "1" (low) to "5" (high).
- Press DIALOG.
- Press + or - for adjustment.
- Depending on the input source or listening mode setting, selection is not possible, or the desired effect may not be achieved.
Adjusting the SUBWOOFER
Adjust the speaker level of the subwoofer while listening to the sound.
- Press SW.
- Press + or - to adjust the level between "-15.0 dB" and "+12.0 dB".
- If you set the unit to the standby mode, the adjustments you made will be restored to the previous statuses.







AV Adjust
You can quickly set convenient features such as adjusting sound quality.

You can make the settings on the TV screen while playing something. Press
AV ADJUST on the remote controller to display the "AV Adjust" menu
Select the item with the cursor ▲ UP/DOWN buttons of the remote controller and press ENTER to confirm your selection.
Use the cursors to change the settings.
- To return to the previous screen, press RETURN/EXIT.
- To exit the settings, press AV ADJUST.
Note
- When the input signals are ones that need a high bandwidth, such as 8K signals, the "AV Adjust" may not be displayed.
HDMI
Sound Delay: If the video is behind the audio, you can delay the audio to offset the gap. Different settings can be set for each input selector.
Audio Return Channel: You can enjoy the sound of the HDMI-connected ARC-compatible TV through the speakers connected to the unit. Select "On" when listening to the audio of TV using the speakers of this unit. Select "Off" when the ARC function is not used.
Audio
Sound Retriever: Improve the quality of the compressed audio. Playback sound of lossy compressed files such as MP3 will be improved. The setting can be separately set to each input selector. The setting is effective in the signals of 48 kHz or less. The setting is not effective in the bitstream signals.
- It cannot be set if the listening mode is Direct or Pure Direct.
Midnight: Make small sounds easily heard. It is useful when you need to reduce the volume while watching a movie late night.
- It cannot be set if the listening mode is Direct or Pure Direct.
- The setting cannot be used in the following cases.
- If "Loudness Management" is set to "Off" when playing Dolby Digital Plus or Dolby TrueHD
- When the input signal is DTS:X and "Dialog Control" is other than 0 dB




Playback
Stereo Assign: This function enables you to select a pair of speakers to output stereo sound. Apart from the front speakers (Front), you can select the Surround speakers (Surround), Surround Back speakers (Surround Back), and Height speakers (Height).
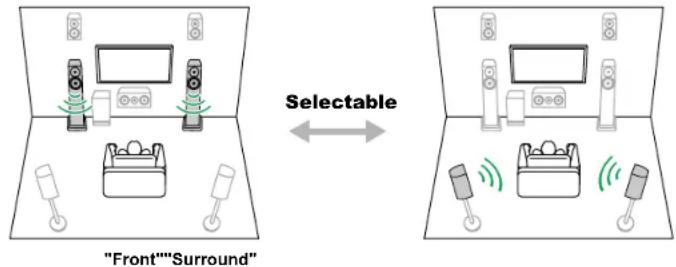
- The listening mode switches to "Stereo" if the audio output destination is changed.
Zone B: Select a method of outputting audio to ZONE B from among "Off", "On (A+B)" and "On (B)".
Room EQ
MCACC EQ: Enable or disable the equalizer function that corrects for distortion caused by the acoustic environment of the room.
- It cannot be set if the listening mode is Pure Direct.
Phase Control: Correct phase disturbance in the low range to enhance the bass. This enables you to achieve powerful bass reproduction that is faithful to the original sound.
- It cannot be set if the listening mode is Pure Direct.
Theater Filter: Adjust the soundtrack that was processed to enhance its high pitch range, in order to make it suitable for home theater.
- It cannot be set if the listening mode is Direct or Pure Direct.
Level
Front: Adjust the speaker level of the front speakers while listening to the sound.
Center: Adjust the speaker level of the center speaker while listening to the sound.
Subwoofer: Adjust the speaker level of the subwoofer while listening to the sound.
- If you set the unit to the standby mode, the adjustments you made will be restored to the previous statuses.




ZONE B Playback
While performing playback in the main room (ZONE A), you can enjoy the audio of the same source in the other place (ZONE B) at the same time.

Connections
When connecting the speakers in the other place (ZONE B) to the ZONE B SPEAKER terminal on this unit.
- 3.1 Channel System + ZONE B SPEAKER (→p33)
- 5.1 Channel System + ZONE B SPEAKER (→p36)
- 3.1.2 Channel System + ZONE B SPEAKER (→p40)
When connecting an Integrated Amplifier or transmitter in the other place (ZONE B) to the ZONE B LINE/PRE OUT terminal on this unit.
- "Connecting an Integrated Amplifier or Transmitter (ZONE B)" (→p49)




□ Playing Back (→p67)


Playing Back
Playback
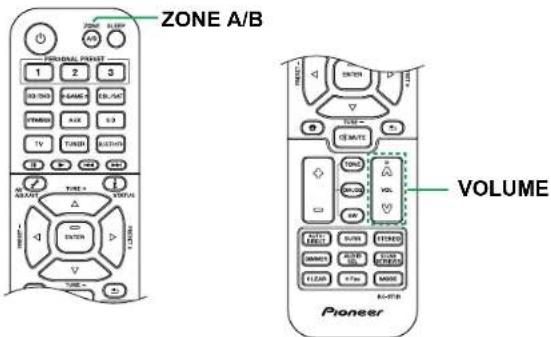
- Press ZONE A/B to select an audio output destination.
- ZONE A: Outputs audio only to the main room (ZONE A). "A" on the display of the main unit lights up.
- ZONE B: Outputs audio only to the other place (ZONE B). "B" on the display of the main unit lights up.
- ZONE A+B: Outputs audio to both the main room (ZONE A) and the other place (ZONE B). "A" and "B" on the display of the main unit light up.
AB
- Start play on the AV component.
- Press the VOLUME buttons on the remote controller to adjust the volume.
- If the integrated amplifier has a volume control, control the volume on the integrated amplifier.
- If the wireless headphones or wireless speakers have volume controls, control the volume on those devices.
- If "ZONE A+B" is selected as an audio output destination, you can select only the "Stereo" listening mode for the main room (ZONE A) when using the 2.1ch speaker layout. When using a speaker layout of 3.1ch or more, you can select only the "Ext.Stereo" listening mode.







Using PERSONAL PRESET
You can register settings (→p68) such as the current input selector and listening mode with the three PERSONAL PRESET buttons, and call a registered setting in a single operation.
e.g.) Pressing the PERSONAL PRESET button will automatically switch the input selector to "TUNER" to receive the registered station. Also, the listening mode and volume level are switched as registered.

Settings that can be registered
The following settings can be registered with PERSONAL PRESET.
- You can register AM (North American, Taiwanese, Middle East, Australian and Asian models)/FM/DAB (European models) radio stations.
- Listening mode
– Volume level (Upper limit "0.0 dB") - Output destination (Zone)
- Sound Retriever function's "On" and "Off"
- TREBLE/BASS/DIALOG, etc.
* When AM/FM/DAB radio stations are registered, TUNER's preset numbers "38", "39" and "40" (→p62) are overwritten.


Registration
Perform the following steps in the state of the setting to register.
- Press and hold any of the 1 to 3 buttons of PERSONAL PRESET.
- "Preset Written" appears on the display, and the setting is registered. If registration has already been made, the registered setting is overwritten.
Using the registered settings
- Press any of the 1 to 3 buttons of PERSONAL PRESET with which settings have been registered.
Checking the registered settings
- Press ⬆HOME, select "Input/Output Assign" - "PERSONAL PRESET Information" (→p75) in the Setup menu, and press ENTER.
- The registered settings are displayed in the list. • Some of the items such as the Sound Retriever function are not displayed in the list.



Setup
Setup Menu 70
Initial Setup with Auto Start-up Wizard 93



Setup Menu
Use the OSD (On-Screen Displays) that appear on the TV to make the settings.
Press ⬆HOME on the remote controller to display the Setup menu.
Select the item with the cursor ▲/▼ UP/DOWN buttons of the remote controller and press ENTER to confirm your selection.
Use the cursors ◀ EFT/RIGHT to change the default values.
- To return to the previous screen, press RETURN/EXIT.
- To exit the settings, press ⓊHOME.

Menu list
| Input/Output Assign | TV Out / OSD | Make settings for TV output and On-Screen Displays (OSD) that appear on the TV. | p72 |
| HDMI Input Change input assignment between the input selectors and HDMI IN jacks. | p73 | ||
| Digital Audio Input | Change input assignment between the input selectors and DIGITAL AUDIO IN COAXIAL/OPTICAL jacks. | p73 | |
| Analog Audio Input | Change input assignment between the input selectors and AUDIO IN jacks. | p74 | |
| Input Skip | You can skip inputs to which nothing is connected when selecting them with the INPUT SELECTOR dial on the main unit or with the INPUT SELECT button on the remote controller. | p74 | |
| PERSONAL PRESET Information | Confirm the registered contents of 1 to 3 buttons of PERSONAL PRESET. | p75 | |
| Speaker | Configuration | Change the settings of connection environment of the speakers. | p76 |
| Crossover | Change the settings of crossover frequencies. | p77 | |
| Distance | Set the distance from each speaker to the listening position. | p78 | |
| Channel Level | Adjust the volume level of each speaker. | p78 | |
| Dolby Enabled Speaker | Change the settings of Dolby Enabled Speakers. | p79 | |
| Speaker Virtualizer | The Speaker Virtualizer function can be switched between On and Off. | p79 | |
| MCACC | Full Auto MCACC | Measure the test tone of each speaker and automatically set the optimal volume level and crossover frequency. | p80 |
| MCACC Data Check | Confirm the number of channels of the connected speakers and the contents and values of setting items of each speaker. | p81 | |







Setup
| Audio Adjust | Dual Mono / Mono | Change the settings of multiplex audio playback. | p82 |
| Dolby Change the setting of when Dolby signals are input. | p82 | ||
| DTS/IMAX Change the setting of when DTS signals are input. | p83 | ||
| Volume Change the Volume settings. | p84 | ||
| Source | Input Volume Absorber | Adjust the volume level when there are differences in volume level among multiple devices connected to this unit. | p85 |
| Name Edit Set an easy name for each input. | p85 | ||
| Audio Select | Select the priority for input selection when multiple audio sources are connected to one input selector. | p86 | |
| Hardware HDMI Change the settings of the HDMI function. | p87 | ||
| p89 | |||
| p90 | |||
| Miscellaneous | Tuner | Change the settings for Tuner. | p91 |
| Firmware Update | Change the settings for Firmware Update. | p92 | |
| Initial Setup | Make the initial setup from the setup menu. | p92 | |
| Lock | Lock the Setup menu so that the settings cannot be changed. | p92 | |
| Factory Reset | All the settings are restored to factory defaults. | p92 | |





Input/Output Assign Input/Output Assign
Setup
TV Out / OSD
Make settings for TV output and On-Screen Displays (OSD) that appear on the TV.
☐ Upscaling (Default Value: Off)
When using a TV that supports 4K/8K, video signals input at 1080p can be automatically upscaled to 4K/8K for output. Video signals that are input at 4K can also automatically be output as 8K. Note that to output as 8K, set "HDMI 4K/8K Signal Format" (→p72) to "8K Standard" or "8K Enhanced", and you need to connect to a TV that is compatible with the 8K signal format with an HDMI cable.
If the TV does not support the 4K/8K resolution with the same frequency as the frequency of HDMI input video signals, upscaling to 4K or 8K is not correctly performed. Check the frequency of 4K/8K resolution supported by the TV, and change the resolution of the video signals input from the AV component.
| Off When this function is not used | |
| • Select "Off" if your TV does not support 4K/8K. | |
| Auto When this function is used | |
☐ Super Resolution (Default Value: 2)
When you have set "Upscaling" to "Auto", you can select the degree of video signal correction from "Off" and between "1" (weak) and "3" (strong).
☐ HDMI 4K/8K Signal Format
Set the 4K/8K signal format input and output by this unit. Set to suit the TV or player connected.
- The corresponding resolution is different depending on the HDMI IN jack connected. See "Corresponding input resolutions" (→p123) for details.
BD/DVD (Default Value: 4K Enhanced)
GAME (Default Value: 8K Enhanced)
CBL/SAT (Default Value: 4K Enhanced)
STRM BOX (Default Value: 4K Enhanced)
| 4K Standard | When using a High Speed HDMI Cable that supports 10.2 Gbps to connect a TV or player compatible with standard 4K signal formats (4K 30 Hz, etc.) |
| 4K Enhanced | When using a Premium High Speed HDMI Cable that supports 18 Gbps to connect a TV or player compatible with high-definition 4K signal formats (4K 60 Hz, 4K HDR, etc.)• There may be some image disruption depending on the connected component and the HDMI cable. If this occurs, switch to "4K Standard". |
| 8K Standard | When using an ULTRA High Speed HDMI Cable that supports 48 Gbps to connect a TV or player compatible with 4K 120 Hz, 5K 30 Hz, or 8K 30 Hz signal formats |
| 8K Enhanced | When using an ULTRA High Speed HDMI Cable that supports 48 Gbps to connect a TV or player compatible with 5K 60 Hz or 8K 60 Hz signal formats |





Input/Output Assign
Setup
☐ OSD Language (Default Value: English)
Select the on-screen display language from the following. (North American models) English, German, French, Spanish, Italian, Dutch, Swedish (European, Taiwanese, Middle East, Australian and Asian models) English, German, French, Spanish, Italian, Dutch, Swedish, Russian, Chinese
□ Impose OSD (Default Value: On)
Set whether or not to display information such as volume adjustment or switching of input on the TV screen.
| On OSD is displayed on the TV |
| • OSD may not be displayed depending on the input signal even if "On" is selected. |
| • When Dolby Vision signals are input, the volume bar changes from blue to magenta. |
| Off OSD is not displayed on the TV |
☐ Screen Saver (Default Value: 3 minutes)
Set the time to start the screen saver. Select a value from "3 minutes", "5 minutes", "10 minutes" and "Off".
HDMI Input
Change input assignment between the input selectors and HDMI IN jacks.
☐ BD/DVD (Default Value: HDMI 1 (HDCP 2.3)) GAME (Default Value: HDMI 2 (HDCP 2.3)) CBL/SAT (Default Value: HDMI 3 (HDCP 2.3)) STRM BOX (Default Value: HDMI 4 (HDCP 2.3))
"HDMI 1 (HDCP 2.3)" to "HDMI 4 (HDCP 2.3)": Assign any HDMI IN jack to each of the input selectors. If you do not assign a jack, select "--". To select an HDMI IN jack already assigned to another input selector, change its setting to "--" first.
Digital Audio Input
Change input assignment between the input selectors and DIGITAL AUDIO IN COAXIAL/OPTICAL jacks. If you do not assign a jack, select "--".
☐ BD/DVD (Default Value: --) GAME (Default Value: --) CBL/SAT (Default Value: --) STRM BOX (Default Value: --) CD (Default Value: COAXIAL) TV (Default Value: OPTICAL)
COAXIAL, OPTICAL Assign the COAXIAL jacks or OPTICAL jacks to any input selector.


Input/Output Assign
Setup
Analog Audio Input
Change input assignment between the input selectors and AUDIO IN jacks. If you do not assign a jack, select "--".
☐ BD/DVD (Default Value: ---)
GAME (Default Value: ---)
CBL/SAT (Default Value: AUDIO 3)
STRM BOX (Default Value: ---)
AUX (Default Value: ---)
CD (Default Value: AUDIO 1)
TV (Default Value: AUDIO 2)
| AUDIO 1, AUDIO 2, AUDIO 3 | Assign the AUDIO IN jacks to any input selector. |
Input Skip
You can skip inputs to which nothing is connected when selecting them with the INPUT SELECTOR dial on the main unit or with the INPUT SELECT button on the remote controller.
☐ BD/DVD (Default Value: Use)
GAME (Default Value: Use)
CBL/SAT (Default Value: Use)
STRM BOX (Default Value: Use)
AUX (Default Value: Use)
CD (Default Value: Use)
TV (Default Value: Use)
TUNER (Default Value: Use)
BLUETOOTH (Default Value: Use)
| Use | Use this input. |
| Skip | Skip this input. |







■ PERSONAL PRESET Information
Confirm the registered contents of 1 to 3 buttons of PERSONAL PRESET. The registered settings are displayed in the list.
☐ Preset (Default Value: Preset 1)
| Setting Item Default Value Setting | Details | |
| Preset Preset 1 | Selects a preset | number from among "Preset 1", "Preset 2" and "Preset 3". |
| Input Selector | --- | Displays the input selector that has been set. |
| Band/Station | --- | Displays the set "AM", "FM" or "DAB" band and the Preset Name for the station. |
| Listening Mode | --- Displays the listening mode that has been set. | |
| Volume --- Displays the volume level that has been set.(Upper limit "-32 dB") | ||
| Zone | --- | Displays the output destination (Zone) from among "A", "B" or "A+B" that has been set. |
- "Band/Station" is displayed only when the input selector is set to "TUNER".
- Preset Name of "Band/Station" is displayed with the name set by "Source" - "Name Edit". If the name is not set, the frequency of the radio station is displayed instead.




SpeakerSpeaker
Setup
Configuration
Change the settings of connection environment of the speakers.
☐ Speaker Channels (Default Value: 7.1 ch)
Select "2.1 ch", "3.1 ch", "4.1 ch", "5.1 ch", "6.1 ch", "7.1 ch", "2.1.2 ch", "3.1.2 ch", "4.1.2 ch" or "5.1.2 ch" to suit the number of speaker channels connected.
Subwoofer (Default Value: Yes)
Set whether a subwoofer is connected or not.
Yes When a subwoofer is connected
No When a subwoofer is not connected
☐ Height Speaker (Default Value: Top Middle)
Set the speaker type if height speakers are connected to the SURROUND BACK or HEIGHT terminals.
Select "Top Middle", "Top Rear", "Rear High", "Dolby Speaker (Front)", "Dolby Speaker (Surr)", "Front High" or "Top Front" according to the type and layout of the connected speakers.
- If an item cannot be selected even though connection is correct, check that the settings in "Speaker Channels" matches the number of connected channels.
☐ Zone B Speaker (Default Value: No)
Set whether speakers are connected to Zone B speaker terminals.
No When speakers are not connected to Zone B speaker terminals
Yes When speakers are connected to Zone B speaker terminals
☐ Zone B Output Level (Default Value: Fixed)
Select whether to adjust the volume on the integrated Amplifier in the other place (ZONE B) or on this unit when outputting to ZONE B.
- This setting is fixed to "Variable" if "Zone B Speaker" is set to "Yes".
Fixed Adjust on the integrated amplifier in the other place (ZONE B)
Variable Adjust on this unit
☐ Bi-Amp (Default Value: No)
Set whether the front speakers are bi-amp connected.
- This setting is fixed to "No" if "Zone B Speaker" is set to "Yes".
- This setting cannot be selected when surround back speakers or height speakers are installed. However, when the "Speaker Channels" is "2.1.2 ch" or "3.1.2 ch", the setting is available.
No When front speakers are not bi-amp connected
Yes When front speakers are bi-amp connected
☐ Speaker Impedance (Default Value: 6 ohms or above)
Set the impedance (Ω) of the connected speakers.
- For impedance, check the indications on the back of the speakers or their instruction manual.
4ohms When any of the connected speakers have 4 Ω or more to less than 6 Ω impedance
6 ohms or above | When the connected speakers all have 6 Ω or more impedance





Speaker
Setup
Crossover
Set what number of Hz in the low frequency range is output from each speaker and what should be output from the subwoofer. When a subwoofer is not to be used, set to "Large" so that the bass is output from the speakers.
Front (Default Value: Small)
Center (Default Value: Small)
Height (Default Value: Small)
Surround (Default Value: Small)
Surround Back (Default Value: Small)
Crossover (Default Value: 80 Hz)
- This setting is disabled when the IMAX sound mode has been applied. However, when the "IMAX User Setting" (→p83) is "Manual" (default value is Auto), it is enabled.
Front:
Set according to the speakers to be used.
"Small": When not using floor standing front speakers.
"Large": When using floor standing front speakers.
- If "Configuration" - "Subwoofer" is set to "No", "Front" will be fixed to "Large" and the low pitched range of the other channels will be output from the front speakers. Refer to the instruction manual of your speakers to make the setting.
Center, Height, Surround:
Set according to the speakers to be used.
"Small": When speaker where the speaker diameter is 16 cm or less are to be used.
"Large": When speaker where the speaker diameter is larger than 16 cm are to be used.
- When "Front" is set to "Small", this is set to "Small".
- If an item cannot be selected even though connection is correct, check that the settings in "Configuration" - "Speaker Channels" matches the number of connected channels.
Surround Back:
Set according to the speakers to be used.
"Small": When speaker where the speaker diameter is 16 cm or less are to be used.
"Large": When speaker where the speaker diameter is larger than 16 cm are to be used.
- When "Surround" is set to "Small", this is set to "Small".
- If an item cannot be selected even though connection is correct, check that the settings in "Configuration" - "Speaker Channels" matches the number of connected channels.
Crossover:
When there are speakers that have been set to "Small", set the Hz under which you would like other speakers to play bass, and also set Hz under which you would like the LFE (low frequency effect) to play the bass.
The value from "50 Hz" to "200 Hz" can be set.
Double Bass:
This can be selected only when "Configuration" - "Subwoofer" is set to "Yes" and "Front" is set to "Large".
Boost bass output by feeding bass sounds from the front left and right speakers and the center speaker to the subwoofer.
"On": Bass output will be boosted
"Off": Bass output will not be boosted
- The setting will not automatically be configured even if you performed Full Auto MCACC.





Speaker
Setup

Distance
Set the distance from each speaker to the listening position.
Front Left
(Default Value: 10.0 ft/3.00 m)
Center
(Default Value: 10.0 ft/3.00 m)
Front Right
(Default Value: 10.0 ft/3.00 m)
Height Left
(Default Value: 10.0 ft/3.00 m)
Height Right
(Default Value: 10.0 ft/3.00 m)
Surround Right
(Default Value: 10.0 ft/3.00 m)
Surround Back Right (Default Value: 10.0 ft/3.00 m)
Surround Back Let
ft (Default Value: 10.0 ft/3.00 m)
Surround Left
(Default Value: 10.0 ft/3.00 m)
Subwoofer
(Default Value: 10.0 ft/3.00 m)
- Default values vary depending on the regions.
- The unit of distance can be changed by pressing the MODE button on the remote controller. When the unit is set as feet, you can set between 0.1 ft and 30.0 ft in increments of 0.1 ft. When the unit is set as meters, you can set between 0.03 m and 9.00 m in increments of 0.03 m.

Channel Level
Adjust the volume level of each speaker.
Front Left
(Default Value: 0.0 dB)
Center
(Default Value: 0.0 dB)
Front Right
(Default Value: 0.0 dB)
Height Left
(Default Value: 0.0 dB)
Height Right
(Default Value: 0.0 dB)
Surround Right
(Default Value: 0.0 dB)
Surround Back Right
(Default Value: 0.0 dB)
Surround Back Left
(Default Value: 0.0 dB)
Surround Left
(Default Value: 0.0 dB)
Subwoofer
(Default Value: 0.0 dB)
Select a value between "-12.0 dB" and "+12.0 dB" (-15.0 dB" and "+12.0 dB" for Subwoofer) (in 0.5 dB increments). A test tone will be output each time you change the value. Select the desired level.



Speaker
Setup
Dolby Enabled Speaker
Change the settings of Dolby Enabled Speakers.
- This setting can be selected when "Configuration" - "Height Speaker" is set to "Dolby Speaker".
☐ Distance from the ceiling (Default Value: 6.0 ft/1.80 m)
Set the distance between the Dolby Enabled Speaker and the ceiling. Select between "0.1 ft"/"0.03 m" and "15.0 ft"/"4.50 m" ("0.1 ft"/"0.03 m" units).
- The unit of distance (ft/m) is displayed using the unit selected for the "Distance" setting.
☐ Reflex Optimizer (Default Value: Off)
You can enhance the reflection effect of Dolby Enabled Speakers from the ceiling.
- The function is not effective if the listening mode is Pure Direct.
Off When this function is not used On When this function is used
Speaker Virtualizer
The Speaker Virtualizer function can be switched between On and Off.
☐ Speaker Virtualizer (Default Value: On)
On The listening mode with virtual speaker effect such as F.S.Surround can be selected.
Off The listening mode with virtual speaker effect such as F.S.Surround cannot be selected.


MCACC
Setup
Full Auto MCACC
Place the supplied speaker setup microphone in the listening position, measure the test tones emitted by the speakers, then the unit automatically sets the optimum volume level for each speaker, the crossover frequencies, and the distance from the listening position. This also reduces the effect of the standing wave in accordance with the viewing environment and automatically adjusts the equalizers for the speakers and enables correction of distortion caused by the acoustic environment of the room.
- Calibration takes between 3 and 12 minutes to be completed. The speakers emit the test tone at high volume during measurement, so be careful of your surroundings. Keep the room as quiet as possible during measurement.
- If you connect a subwoofer, check the power and volume of the subwoofer. Set the subwoofer volume to more than half.
-
If the power of this unit suddenly turns off, the wires in the speaker cables have touched the rear panel or other wires, and the protection circuit is working. Twist the wires again securely, and make sure they do not stick out of the speaker terminals when connecting.
-
Select the connected speaker configuration.

Note that the image on the screen changes each time you select the number of channels in "Speaker Channels".
- Place the supplied speaker setup microphone at the listening position, and connect it to the SETUP MIC jack on the main unit.

When placing the speaker setup microphone on a tripod, refer to the illustration.
- Confirm a test tone is output from the subwoofer and press ENTER.
- Press ENTER. Then, test tones are output from each speaker, and the connected speakers and the noise in the surrounding environment are automatically measured.
- The measurement results in step 4 are displayed. Select "Next" and press ENTER to output the test tone again to automatically set the settings such as volume level, crossover frequency, etc., to their optimum.
- When an error message is displayed or when the connected speakers cannot be detected, perform re-measurement by selecting "Retry" and pressing ENTER.
- When it cannot be resolved by performing the re-measurement, confirm if the speakers are connected correctly. If there is any problem with the speaker connection, perform the connection after disconnecting the power cord.
- When the measurement is completed, the measurement results are displayed.
You can check each setting using the cursors ▶ EFT/RIGHT. Select "Save" and press ENTER to save the settings.
- Disconnect the speaker setup microphone.





MCACC
Setup
MCACC Data Check
You can check the number of speaker channels connected and the content and values you have set for each of the speaker settings.
Speaker Setting
You can check the number of speaker channels connected and the large and small settings you have set for the low range reproduction capabilities for each of the speakers.
Channel Level
You can check the output level settings for each of the speakers.
Speaker Distance
You can check the distance from each speaker to the listening position.





Audio Adjust Audio Adjust
Setup
Dual Mono / Mono
Change the settings of multiplex audio playback.
Dual Mono (Default Value: Main)
Set the audio channel or language to be output when playing multiplex audio or multilingual broadcasts, etc.
- For multiplex audio broadcasts, pressing the i STATUS button on the remote controller will display "1+1" on the main unit's display.
| Main Main channel only |
| Sub Sub channel only |
| Main / Sub Main and sub channels will be output at the same time. |
☐ Mono Input Channel (Default Value: Left + Right)
Set the input channel when playing back analog or 2 ch PCM signals in the Mono listening mode.
| Left Left channel only |
| Right Right channel only |
| Left + Right Left and right channels |
Dolby
Change the setting of when Dolby signals are input.
☐ Loudness Management (Default Value: On)
When playing Dolby TrueHD, enable the dialog normalization function which keeps the volume of dialog at a certain level. Note that when this setting is "Off", the Midnight function that allows you to enjoy surround at low volumes is fixed to "Off" when playing Dolby Digital Plus/Dolby TrueHD.
| On | When this function is used |
| Off | When this function is not used |
☐ Center Spread (Default Value: Off)
Adjust the width of the front sound field created when playing back with the Dolby Audio - Surr listening mode.
- Depending on the speaker settings, "Off" is applied.
| On | The sound field is spread to left and right. |
| Off | The sound field is centralized. |
☐ Dialogue Enhancement (Default Value: Off)
Improves the intelligibility of dialogue by continually monitoring audio and applying dynamic processing.
| On | When this function is used |
| Off | When this function is not used |







Audio Adjust
Setup
DTS/IMAX
Change the setting of when DTS signals are input.
☐ Dialog Control (Default Value: 0 dB)
You can increase the volume of dialog portion of the audio up to 6 dB by 1 dB step so that you can hear the dialog easily in noisy atmosphere.
- This cannot be set for content other than DTS:X.
- Depending on the content, this function may not be selected.
IMAX Mode (Default Value: Auto)
Set the IMAX sound mode.
| Auto IMAX sound mode is automatically applied when IMAX content is detected. |
| On In cases when this unit is unable to recognize IMAX content, you can apply the IMAX sound mode by turning this setting "On". |
| Off Disable this function |
IMAX User Setting (Default Value: Auto)
When playing IMAX content with the IMAX sound mode, select whether to automatically apply the speaker setting recommended by IMAX or to set it manually.
- This cannot be selected when the "IMAX Mode" is "Off".
Auto To use the speaker setup recommended by IMAX. Manual To manually set "IMAX Bass Feeding" and "IMAX LFE Mute Level".
IMAX Bass Feeding (Default Value: On)
Set the route for the bass component of the audio.
- This cannot be selected when the "IMAX User Setting" is "Auto".
On The bass component of each channel is output according to the crossover settings (→p77).
Off Only the LFE signal is output.
☐ IMAX LFE Mute Level (Default Value: 0 dB)
- This cannot be selected when the "IMAX User Setting" is "Auto".
You can set the volume for the LFE when IMAX signals are being input. Select "-∞ dB" or a value between "0 dB" and "-20 dB".





Audio Adjust
Setup
Volume
Change the Volume settings.
Volume Display (Default Value: Absolute)
Switch the volume display between the absolute value and relative value. The absolute value 82.0 is equivalent to the relative value 0.0 dB.
Absolute Absolute value such as "0.5" and "99.5"
Relative Relative value such as "-81.0 dB" and "+18.0 dB"
☐ Mute Level (Default Value: -∞ dB)
Set the volume lowered from the listening volume when muting is on. Select a value from "-∞ dB", "-40 dB" and "-20 dB".
☐ Volume Limit (Default Value: Off)
Set the maximum value to prevent the volume from becoming too loud. Select a value from "Off", "-32 dB" to "+17 dB".
☐ Power On Level (Default Value: Last)
Set the volume level of when the power is turned on. Select a value from "Last" (Volume level before entering standby mode), "-∞ dB", and "-81.5 dB" to "+18.0 dB". You cannot set a higher value than that of "Volume Limit".
☐ Headphone Level (Default Value: 0.0 dB)
Adjust the output level of headphones. Select a value between "-12.0 dB" and "+12.0 dB".







SourceSource
Setup
■ Input Volume Absorber
Adjust the volume level when there are differences in volume level among multiple devices connected to this unit. Select the input selector to make the setting.
☐ Input Volume Absorber (Default Value: 0.0 dB)
Select a value between "-12.0 dB" and "+12.0 dB". Set a negative value if the volume of the target device is larger than the others and a positive value if smaller. To check the audio, play back the connected device.
Name Edit
Set an easy name for each input. The set name appears on the main unit's display. Select the input selector to make the setting.
☐ Name Edit (Default Value: Input name)
- Select a character or symbol with the cursors, and press ENTER. Repeat this operation to input up to 10 characters.
"A/a": Switches between upper and lower cases. (Pressing MODE on the remote controller also toggles between upper and lower cases)
"←" "→": Moves the cursor in the arrow direction.
"Removes a character on the left of the cursor.
"Space": Enters a space. - Pressing CLEAR on the remote controller will remove all the input characters.
-
After inputting, select "OK" with the cursors, and press ENTER. The input name will be saved.
To restore the name to the default value, press CLEAR on the remote controller on the input screen. Then while nothing is entered, select "OK", and press ENTER. -
To name a preset radio station, press TUNER on the remote controller, select AM (North American, Taiwanese, Middle East, Australian and Asian models)/FM, and select the preset number. (Preset names cannot be given to DAB stations (European models))
- This cannot be set if the "BLUETOOTH" input is selected.



Source
Setup
Audio Select
Select the priority for input selection when multiple audio sources are connected to one input selector, such as connections to both the "CD" DIGITAL IN jack and the "CD" AUDIO IN jack. The setting can be separately set to each input selector button. Select the input selector to configure. Note that there are some default values you cannot change.
☐ BD/DVD (Default Value: HDMI)
GAME (Default Value: HDMI)
CBL/SAT (Default Value: HDMI)
STRM BOX (Default Value: HDMI)
CD (Default Value: COAXIAL)
TV (Default Value: ARC)
| ARC When giving priority to input signal from ARC compatible TVThis item can be selected only when "Hardware" - "HDMI" - "Audio Return Channel (eARC supported)" is set to "On" and also the "TV" input is selected. |
| HDMI When giving priority to input signal from HDMI IN jacksThis item can be selected only when the input to be set is assigned to the HDMI jack in the "Input/Output Assign" - "HDMI Input" setting. |
| COAXIAL When giving priority to input signal from DIGITAL AUDIO IN COAXIAL jacksThis item can be selected only when the input to be set is assigned to the COAXIAL jack in the "Input/Output Assign" - "Digital Audio Input" setting. |
| OPTICAL When giving priority to input signal from DIGITAL AUDIO IN OPTICAL jacksThis item can be selected only when the input to be set is assigned to the OPTICAL jack in the "Input/Output Assign" - "Digital Audio Input" setting. |
| Analog | When giving priority to the input signal from AUDIO IN jacks• This item can be selected only when the input to be set is assigned to the AUDIO IN jack in the "Input/Output Assign" - "Analog Audio Input" setting. |
☐ Fixed PCM (Default Value: Off)
Select whether to fix input signals to PCM (except multi-channel PCM) when you select "HDMI", "COAXIAL", or "OPTICAL" in the "Audio Select" setting. Set this item to "On" if noise is produced or truncation occurs at the beginning of a track when playing PCM sources. Select "Off" normally.
Each time the "Audio Select" setting is changed, the setting is restored to "Off".
- The setting cannot be changed when "TUNER" or "BLUETOOTH" input is selected.






HardwareHardware
Setup
HDMI
Change the settings of the HDMI function.
☐ HDMI CEC (Default Value: On)
Setting this to "On" enables the input selection link and other link functions with HDMI-connected CEC-compatible device.
When this setting is changed, turn off and then on again the power of all connected devices.
- Depending on the TV to use, a link setting may be required on the TV.
- Setting this to "On" and closing the operation screen will display the name of the connected CEC-compatible device and "CEC On" on the main unit's display.
- When this function is set to "On", the power consumption in standby state increases, however, the increase in power consumption is minimized by automatically entering the HYBRID STANDBY mode where only the essential circuits operate.
- If you operate the MASTER VOLUME dial on the main unit when this setting is "On" and audio is output from the TV speakers, audio will be output also from the speakers connected to this unit. To output audio from only either of them, change the setting of this unit or TV, or reduce the volume of this unit.
- If abnormal behavior is observed when this is set to "On", set it to "Off".
- If a connected device is not CEC-compatible, or if you are not sure whether it is compatible, set it to "Off".
On When this function is used
Off When this function is not used
☐ HDMI Standby Through (Default Value: Auto (Eco))
When this is set to anything other than "Off", you can play the video and audio of an HDMI-connected player on the TV even if the unit is in standby mode. Also, only "Auto" and "Auto (Eco)" can be selected if "HDMI CEC" is set to "On". If you select anything else, set "HDMI CEC" to "Off".
- When this function is set to a value other than "Off", the power consumption in standby state increases, however, the increase in power consumption is minimized by automatically entering the HYBRID STANDBY mode where only the essential circuits operate.
- To play a non-CEC compliant player on the TV, turn the unit on and switch the input.
- When using a CEC-compliant TV, you can reduce the power consumption in standby mode by selecting "Auto (Eco)".
| Off When this function is not used | |
| BD/DVD, GAME, CBL/SAT, STRM BOX | For example, if you select "BD/DVD", you can play the equipment connected to the "BD/DVD" jack on the TV even if the unit is in standby mode. Select this setting if you have decided which player to use with this function. |
| Last You can play on the TV the video and audio of the input selected immediately before the unit is switched to standby. | |
| Auto, Auto (Eco) | Select one of these settings when you have connected equipment that conforms to the CEC standard. You can play the video and audio of the input selected on the TV, irrespective of what input was selected immediately prior to the unit being switched to standby, using the CEC link function. |







Hardware
Setup
☐ Audio TV Out (Default Value: Auto)
You can enjoy audio through the speakers of the TV while this unit is on.
- Listening mode cannot be changed while "Audio TV Out" is set to "On" and audio is being output from the TV.
- Depending on your TV or input signal of the connected device, audio may not be output from the TV even if this is set to "On". In such a case, audio is output from the speakers of the unit.
- Audio is output from this unit if you operate the MASTER VOLUME dial on this unit when audio that is input to this unit is output from your TV speakers. If you do not want to output audio, change the setting of this unit or TV, or reduce the volume of this unit.
On When this function is used
Off When this function is not used
| Auto When the | "HDMI CEC" setting is "On", the setting is fixed to "Auto". With "Auto", when audio is output from the TV speakers, audio is not output from the speakers of this unit, and when audio is output from the speakers of this unit, audio is not output from the TV speakers.If the HDMI CEC setting is off on the TV, there may be audio output from both the TV speakers and the speakers of this unit. |
☐ Audio Return Channel (eARC supported) (Default Value: On)
You can enjoy the sound of an HDMI-connected ARC-compatible TV or eARC-compatible TV through the speakers connected to the unit.
On When enjoying the TV sound through the speakers connected to the unit
Off When the ARC function or eARC function is not used
☐ Auto Delay (Default Value: On)
Automatically corrects desynchronization between the video and audio signals based on the information from the HDMI Lip-Sync-compatible TV.
On When enabling the automatic correction function
Off When not using the automatic correction function







Hardware
Setup
Bluetooth
Change the settings for the BLUETOOTH function.
Bluetooth Receiver (Default Value: On)
Select whether or not to use the BLUETOOTH function.
| On Enables connection with a BLUETOOTH wireless technology enabled device by using the BLUETOOTH function. Select "On" also when making various BLUETOOTH settings. |
| Off When not using the BLUETOOTH function |
☐ Auto Input Change (Default Value: On)
When a BLUETOOTH enabled device is played while it is connected to the unit, the input of the unit can be automatically switched to "BLUETOOTH".
| On The input will automatically become "BLUETOOTH" when a BLUETOOTH enabled device is connected. • If the input is not switched automatically, set to "Off" and change the input manually. |
| Off The function is disabled. |
☐ Auto Reconnect (Default Value: On)
This function automatically reconnects to the BLUETOOTH wireless technology enabled device connected last when you change the input to "BLUETOOTH".
| On When this function is usedThis may not work with some BLUETOOTH wireless technology enabled devices. |
| Off When this function is not used |
□ Pairing Information (Default Value: -)
You can initialize the pairing information stored on this unit. Pressing ENTER when "Clear" is displayed initializes the pairing information stored on this unit.
- This function does not initialize the pairing information on the BLUETOOTH wireless technology enabled device. When pairing the unit again with the device, be sure to clear the pairing information on the BLUETOOTH wireless technology enabled device in advance. For information on how to clear the pairing information, refer to the BLUETOOTH wireless technology enabled device's instruction manual.
☐ Device (Default Value: -)
Displays the name of the BLUETOOTH wireless technology enabled device connected to the unit.
The name is not displayed when "Status" is "Ready" and "Pairing".
□ Status (Default Value: -)
Displays the status of the BLUETOOTH wireless technology enabled device connected to the unit.
| Ready Not paired | |
| Pairing Paired | |
| Connected Successfully connected | |
- Wait for a while if "Bluetooth" cannot be selected. It will appear when the BLUETOOTH function is started up.







Hardware
Setup
Power Management
Change the settings for the power-save function.
Sleep Timer (Default Value: Off)
| 30 minutes,60 minutes,90 minutes | You can allow the unit to enter standby automatically when the specified time elapsed. Select a value from "30 minutes", "60 minutes" and "90 minutes". |
| Off Does not turn the unit to standby automatically. | |
☐ Auto Standby (Default Value: On/Off)
This setting allows the unit to enter standby mode automatically after 20 minutes of inactivity without any video or audio input. (When "USB Power Out at Standby" is enabled, the unit enters the HYBRID STANDBY mode which minimizes the increase in power consumption.)
- Default values vary depending on the regions.
| On The unit will automatically enter standby mode ("AUTO STBY" will light).• "Auto Standby" is displayed on the main unit's display and TV screen 30 seconds before entering standby mode. |
| Off The unit will not automatically enter standby mode. |
☐ Auto Standby in HDMI Standby Through (Default Value: On/Off)
Enable or disable "Auto Standby" while "HDMI Standby Through" is on.
- Default values vary depending on the regions.
| On The setting will be enabled. |
| This setting cannot be set to "On" if "Auto Standby" and"HDMI Standby Through" are set to "Off". |
| Off The setting will be disabled. |
☐ USB Power Out at Standby (Default Value: Off)
Devices connected to the USB port (5 V/1 A) on the rear of the unit can be supplied with electricity even when this unit is in standby mode when this function is "On".
- When this function is set to "On", the power consumption in standby state increases, however, the increase in power consumption is minimized by automatically entering the HYBRID STANDBY mode where only the essential circuits operate.






Miscellaneous Miscellaneous
Setup

Tuner
Change the settings for Tuner.
☐ AM/FM Frequency Step (North American and Taiwanese models) (Default Value: 10 kHz / 0.2 MHz)
Select a frequency step to suit your residential area. Select "10 kHz/0.2 MHz" or "9 kHz/0.05 MHz".
- When this setting is changed, all radio presets are deleted.
☐ AM Frequency Step (Middle East, Australian and Asian models) (Default Value: 9 kHz)
Select a frequency step to suit your residential area. Select "10 kHz" or "9 kHz".
- When this setting is changed, all radio presets are deleted.
☐ FM Search Level (European models) (Default Value: Normal)
If automatic tuning regularly stops on FM stations with weak reception when "Normal" is selected, select "Strong" so only those FM stations with strong reception are selected.
☐ DAB Auto Scan (European models) (Default Value: -)
You can run the auto scan when new DAB stations are added or when you move house.
☐ DAB DRC (European models) (Default Value: Off)
With the DRC (Dynamic Range Control) setting, you can reduce the dynamic range of DAB digital radio so that you can still hear quiet parts even when listening at low volume levels - ideal for listening to the radio late at night when you don't want to disturb anyone.
Off DRC off
Large Large reduction in dynamic range
Small Small reduction in dynamic range




Miscellaneous
Setup
■ Firmware Update
Change the settings for Firmware Update.
☐ Version (Default Value: -)
The current firmware version is displayed.
Update via USB (Default Value: -)
Press ENTER to select when updating the firmware via USB.
- Wait for a while if "Firmware Update" cannot be selected.
Initial Setup
Make the initial setup from the setup menu.
- Wait for a while if "Initial Setup" cannot be selected.
Lock
Lock the Setup menu so that the settings cannot be changed.
Setup Parameter (Default Value: Unlocked)
Lock the Setup menu so that the settings cannot be changed.
Locked The menu is locked.
Unlocked The menu is unlocked.
Factory Reset
All the settings are restored to factory defaults.
☐ Factory Reset (Default Value: -)
All the settings are restored to factory defaults.
Select "Start", and press the ENTER button.
- If "Factory Reset" is performed, your settings are restored to the default values. Be sure to note down your setting contents beforehand.







Initial Setup with Auto Start-up Wizard
Operations


When you turn the unit on for the first time after purchase, the Initial Setup screen is automatically displayed on the TV to allow you to make settings required for startup using simple operations following on-screen guidance.

- Switch the input of the TV to the input connected to the unit.
- Put batteries into the remote controller of this unit.
- Press ⬆STANDBY/ON on the remote controller to turn the unit on.
- When the language selection screen is displayed on TV, select the language with the cursors ▲ UP/DOWN and press ENTER.
- Select the item with the cursors of the remote controller, and press ENTER to confirm your selection. To return to the previous screen, press RETURN/EXIT.
- If you have terminated the Initial Setup halfway, turn this unit to standby mode. Then turning the power on again can display the Initial Setup again. The Initial Setup appears on the screen each time the power is turned on unless the Initial Set up is completed or "Never Show Again" is selected on the first screen.





- To perform the Initial Setup again after the setting is completed, press HOME, select "Miscellaneous" - "Initial Setup", and press ENTER.
Setup
1. Speaker Setup
- Select the connected speaker configuration, and press ENTER. Note that the image on the screen changes each time you select the number of channels in "Speaker Channels".
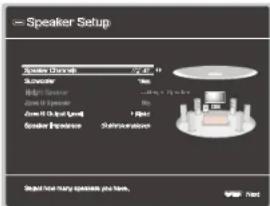
- The speaker combination selected in step 1 is displayed. "Yes" is displayed for the selected speakers. If the setting is correct, press ENTER.
- Select "Next" and press ENTER. Then a test tone is output from each speaker to confirm the connection. Selecting each speaker with the cursors ▲/▼ UP/DOWN will output the test tone. Press ENTER after confirmation.
- If there is no problem with the speaker connection, select "Next" and press ENTER. To return to "Speaker Setup", select "Back to Speaker Setup" and press ENTER.
2. ARC Setup
To connect with an ARC-compatible TV, select "Yes". The ARC setting on this unit turns on, and you can listen to the TV's audio through this unit.
- If you select "Yes", the HDMI CEC function is enabled and power consumption increases during standby.






3. Full Auto MCACC
Place the supplied speaker setup microphone in the listening position, measure the test tones emitted by the speakers, then the unit automatically sets the optimum volume level for each speaker, the crossover frequencies, and the distance from the listening position. This also reduces the effect of the standing wave in accordance with the viewing environment and automatically adjusts the equalizers for the speakers and enables correction of distortion caused by the acoustic environment of the room.
- It takes between 3 and 12 minutes for calibration to be completed. Each speaker outputs the test tone at high volume during measurement, so be careful of your surroundings. Also, keep the room as quiet as possible during measurement.
- If you connect a subwoofer, check the power and volume of the subwoofer. Set the subwoofer volume to more than half.
-
If the power of this unit suddenly turns off, the wires in the speaker cables have touched the rear panel or other wires, and the protection circuit is working. Twist the wires again securely, and make sure they do not stick out of the speaker terminals when connecting.
-
Place the supplied speaker setup microphone at the listening position, and connect it to the SETUP MIC jack on the main unit.

When placing the speaker setup microphone on a tripod, refer to the illustration.
- Confirm a test tone is output from the subwoofer and press ENTER.
- Press ENTER to output test tones from each speaker, and the connected speakers and the noise in the surrounding environment are automatically measured.




Setup
-
The measurement results in step 3 are displayed. If there is no problem in the detection result of the speaker, select "Next" and press ENTER to output the test tone again to automatically set the settings such as volume level, crossover frequency, etc., to their optimum.
-
When an error message is displayed or when the connected speakers cannot be detected, perform re-measurement by selecting "Retry" and pressing ENTER.
-
When it cannot be resolved by performing the re-measurement, confirm if the speakers are connected correctly. If there is any problem with the speaker connection, perform the connection after disconnecting the power cord.
-
When the measurement is completed, the measurement results are displayed. You can check each setting using the cursors ◀/▶LEFT/RIGHT. Select "Save" and press ENTER to save the settings.
- Disconnect the speaker setup microphone.



Troubleshooting
Troubleshooting
Before starting the procedure 97
When the unit is operating erratically 98
Try restarting the unit 98
Resetting the unit (this resets the unit settings to the default)
Troubleshooting 99
■ Power 99
■ Audio 100
■ Listening Modes 102
■ Video 103
Linked operation 104
■ Tuner 10
■ BLUETOOTH function 104
■ ZONE B function 105
■ Remote Controller 105
■ Display 106
■ Others 106







Before starting the procedure
Troubleshooting
Problems may be solved by simply turning the power on/off or disconnecting/connecting the power cord, which is easier than working on the connection, setting and operating procedure. Try the simple measures on both the unit and the connected device. If the problem is that the video or audio is not output or the HDMI linked operation does not work, disconnecting/connecting the HDMI cable may solve it. When reconnecting, be careful not to wind the HDMI cable since if wound the HDMI cable may not fit well. After reconnecting, turn off and on the unit and the connected device.

natural_image
Two circular diagrams showing a hand inserting a plug into a panel, with green arrows indicating direction (no text or symbols)- The AV receiver contains a microPC for signal processing and control functions. In very rare situations, severe interference, noise from an external source, or static electricity may cause it to lockup. In the unlikely event that this happens, unplug the power cord from the wall outlet, wait at least 5 seconds, and then plug it back in.
- Our company is not responsible for damages (such as CD rental fees) due to unsuccessful recordings caused by the unit's malfunction. Before you record important data, make sure that the material will be recorded correctly.


When the unit is operating erratically
☐ Try restarting the unit
Restarting this unit may solve the problem. Set the main unit to standby, then after waiting for 5 seconds or more, press and hold the \$TANDBY/ON button of the main unit for at least 5 seconds, and then restart the unit. (The settings on this unit are kept.) If the problem persists after restarting the unit, unplug and plug the power cords or HDMI cable of this unit and connected devices.

☐ Resetting the unit (this resets the unit settings to the default)
If the restart of the unit does not solve the problem, reset the unit, and restore all the settings to the factory default at the time of purchase. This may solve the problem. If the unit is reset, your settings are restored to the default values. Be sure to note down your setting contents before performing the following operations. Note that it is not possible to reset the unit during the Initial Setup process. Before doing the following procedures, press RETURN/EXIT to exit Initial Setup.
- While pressing and holding AUTO/DIRECT on the main unit with the unit turned on, press the ⬤STANDBY/ON button.
- "Clear" is displayed on the display, and the unit returns to the standby state.
Do not remove the power cord until "Clear" disappears from the display. To reset the remote controller, while pressing and holding MODE, press the CLEAR button at least 3 seconds.






Troubleshooting
Troubleshooting

Power
☐ When the power is turned on, "Diagnostic mode" appears on the display of the main unit
- The protection circuit function may have operated. If the unit suddenly enters the standby state and "Diagnostic mode" appears on the display of the main unit when the power is turned on again, this function is diagnosing whether or not the main unit is malfunctioning or there is an abnormality with the speaker cable connection. When the diagnosis is complete, the following messages are displayed.
| Check speaker | If the unit returns to the normal ON state after "Diagnostic mode" appears on the display, the speaker cable may have been short-circuited. After setting the power of this unit to standby state, connect the speaker cable again. Twist the wires exposed from the tip of the speaker cable so that the wires do not stick out of the speaker terminal. |
| NG: * * * * * | If the operation has stopped with "NG" displayed on the display, set the power of this unit to standby state immediately and remove the power plug from the outlet. The unit may be malfunctioning. Consult a dealer. |

The unit turns off unexpectedly
- If "Hardware" - "Power Management" - "Auto Standby" on the Setup menu is activated, the unit automatically enters the standby mode. - The protection circuit function may have operated due to an abnormal rise in temperature of the unit. In such a case, the power turns off repeatedly even if the power is turned on each time. Secure sufficient ventilation space around the unit, wait for a while until the temperature of the unit decreases. Then, turn the power on again.
WARNING: If smoke, smell or abnormal noise is produced by the unit, unplug the power cord from the outlet immediately, and contact the dealer or our company's support.






Troubleshooting

Audio
- Make sure that the speaker setup microphone is no longer connected.
- Confirm that the connection between the output jack on the connected device and the input jack on this unit is correct.
- Make sure that none of the connecting cables are bent, twisted, or damaged.
- If "MUTING" is displayed on the display and ✗ is blinking, press ✗ MUTE on the remote controller to cancel muting.
- While headphones are connected to the PHONES jack, no sound is output from the speakers.
- When "Source" - "Audio Select" - "Fixed PCM" in the Setup menu is set to "On", no sound is played if signals other than PCM are input. Change the setting to Off.
Check the following if the problem persists after you have confirmed the above.
☐ No sound from the TV
- Change the input selector on this unit to the position of the terminal to which the TV is connected.
- If the TV doesn't support the ARC function, along with connection by HDMI, connect the TV and this unit using a digital optical cable. (→p45)
- Change the input selector on this unit to the position of the jack to which the player is connected.
- Check the digital audio output setting on the connected device. On some game consoles, such as those supporting DVD, the default setting may be off.
- For some DVD-Video discs, you need to select an audio output format from a menu.
☐ No sound from a connected player
☐ A speaker produces no sound
- Make sure that the polarity (+/-) of the speaker cables is correct, and that no bare wires are in contact with the metal part of speaker terminals.
- Make sure that the speaker cables are not shorting out.
- Check "Connect the Speaker Cables" (→p30) to see if the speaker connections have been made correctly. Settings for the speaker
connection environment need to be made in "Speaker Setup" in Initial Setup. Check "Initial Setup with Auto Start-up Wizard" (→p93). - Depending on the input signal and listening mode, not much sound may be output from speakers. Select another listening mode to see if sound is output.
- If surround back speakers are installed, be sure to install surround speakers as well.
- A maximum of 5 ch playback is possible when Bi-Amping connection is used. Be sure to remove the jumper bar on the speakers when using Bi-Amping connection.


Troubleshooting
☐ The subwoofer produces no sound
If the setting of the front speakers is "Large", the low range elements will be output from the front speakers instead of from the subwoofer during 2 ch audio input of TV or music. To output the sound from the subwoofer, make one of the following settings.
- Change the front speakers settings to "Small".
The low range elements will be output from the subwoofer rather than the front speakers. We do not recommend changing this if your front speakers have good low range reproduction capabilities.
- Change "Double Bass" to "On".
The low range elements of the front speakers will be output from both the front speakers and the subwoofer. Due to this, the bass sound may be emphasized too much. In such a case, do not change the setting, or make the setting with the above option 1.
- For the setting details, refer to "Speaker" - "Crossover"
- If the input signals do not contain subwoofer audio elements (LFE), the subwoofer may produce no sound.
☐ Noise can be heard
- Using cable ties to bundle analog audio cables, power cords, speaker cables, etc. may degrade the audio performance. Do not bundle the cords.
- An audio cable may be picking up interference. Change the position of the cables.
☐ The beginning of audio received by an HDMI IN cannot be heard
- Since it takes longer to identify the format of an HDMI signal than it does for other digital audio signals, audio output may not start immediately.
☐ Sound suddenly reduces
- When the temperature inside the unit exceeds a certain temperature for extended periods of use, the volume may be lowered automatically to protect the circuits.





Listening Modes
- To enjoy digital surround playback in formats such as Dolby Digital, you need to make a connection for audio signals with an HDMI cable, digital coaxial cable or digital optical cable. Also, audio output need to be set to Bitstream output on the connected Blu-ray Disc player, etc.
- Press i STATUS on the remote controller several times to switch the display of the main unit, and you can check the input format.
Check the following if the problem persists after you have confirmed the above.
□ Cannot select a desired listening mode
- Depending on the connection status of the speaker, some listening modes may not be selected. Check "Speaker Layouts and Selectable Listening Modes" (→p108) or "Input Formats and Selectable Listening Modes" (→p110).
□ Cannot listen to the sound in Dolby TrueHD, Dolby Atmos or DTS-HD Master Audio format
- If the audio in Dolby TrueHD, Dolby Atmos or DTS-HD Master Audio format cannot be output correctly in the source format, set "BD video supplementary sound" (or reencode, secondary sound, video additional audio, etc.) to "Off" in the setting of a connected Blu-ray Disc player, etc. After changing the setting, switch the listening mode to that for each source, and confirm.
□ About Dolby signals
- When surround back speakers are included in the speaker layout, and software that is recorded with the 5.1 channel Dolby audio format is played, the surround channel audio may be output from the surround back speakers.
- Some Dolby Atmos audio format that is used on games, etc., may be recognized as "Multichannel PCM". If this occurs, check the firmware updates for the game console.
□ About DTS signals
- With media that switches suddenly from DTS to PCM, PCM playback may not start immediately. In such a case, stop playback on the player side for approx. 3 seconds or more. Then, resume playback. The playback will be performed normally.
- DTS playback may not be performed normally on some CD and LD players even if the player and this unit are digitally connected. If some processing (e.g., output level adjustment, sampling frequency conversion, or frequency characteristic conversion) has been executed for the DTS signal being output, this unit cannot recognize it as a genuine DTS signal, and noise may occur.
- While playing a DTS-compatible disc, if a pause or skip operation is performed on your player, noise may occur for a short period. This is not a malfunction.







Troubleshooting

Video
- Confirm that the connection between the output jack on the connected device and the input jack on this unit is correct.
- Make sure that none of the connecting cables are bent, twisted, or damaged.
- When the TV image is blurry or unclear, the power cord or connection cables of the unit may have interfered. In such a case, keep distance between TV antenna cable and cables of the unit.
- Check the switching of the input screen on the monitor side such as a TV.
Check the following if the problem persists after you have confirmed the above.
□ No image appears
- Change the input selector on this unit to the position of the jack to which the player is connected.
- To display video from the connected player on the TV while the unit is in standby, you need to enable "Hardware" - "HDMI" - "HDMI Standby Through" in the Setup menu. For details of the HDMI Standby Through function, refer to "Hardware" - "HDMI". (→p87)
- Check if "Resolution Error" is displayed on the main unit display when video input via HDMI IN jack is not displayed. In this case, the TV does not support the resolution of the video input from the player. Change the setting on the player.
• Normal operation with an HDMI-DVI adapter is not guaranteed. In addition, video signals output from a PC are not guaranteed.
- Try switching off the Deep Color function. To turn off the Deep Color function, simultaneously press the SURROUND and STANDBY/ON buttons on the main unit. While holding down SURROUND, press STANDBY/ON repeatedly until "Deep Color:Off" appears on the display. To reactivate the Deep Color function, repeat the above described step until "Deep Color:On" is appeared on the display.
□ Images flicker
- The output resolution of the player may not be compatible with the resolution of the TV. If the player is connected to this unit with an HDMI cable, change the output resolution on the player. Also this may be solved by changing the screen mode on the TV.
☐ Video and audio are out of synch
- Depending on the settings on your TV and connection environment, the video may be behind the audio. To adjust, press ⚫ AV ADJUST on the remote controller, and adjust in "HDMI" - "Sound Delay" in the "AV Adjust". (→p64)





Troubleshooting
Linked operation
☐ HDMI linked operation does not work with CEC-compliant devices, such as a TV
- In the Setup menu of the unit, set "Hardware" - "HDMI" - "HDMI CEC" to "On".
- It is also necessary to set HDMI linking on the CEC-compliant device. Check the instruction manual.
- When connecting a Sharp brand player or recorder to the HDMI IN jacks, set "Hardware" - "HDMI" - "HDMI Standby Through" to "Auto".
Tuner
☐ Poor reception or much noise
- Recheck the antenna connection.
- Move the antenna away from the speaker cord or power cord.
- Move the unit away from your TV or PC.
- Passing cars or airplanes in the vicinity can cause interference.
- If radio waves are blocked by concrete walls, etc., radio reception may be poor.
- Change the reception mode to mono (→p58).
- When listening to an AM station, operating the remote controller may cause noise. (North American, Taiwanese, Middle East, Australian and Asian models)
- FM reception may be clearer if you use the antenna jack on the wall used for the TV.
■ BLUETOOTH function
- Unplug and plug the power cord of the unit, or turn off and on the BLUETOOTH enabled device. Restart of the BLUETOOTH enabled device may be effective.
- BLUETOOTH enabled devices must support the A2DP profile.
- Because a radio wave interference will occur, this unit may not be used near devices such as a microwave oven or cordless phone which use the radio wave in the 2.4 GHz range.
- A metallic object near the unit can affect on the radio wave, and BLUETOOTH connection may not be possible.
Check the following if the problem persists after you have confirmed the above.
☐ Cannot transmit from a BLUETOOTH wireless technology enabled device (PC, smartphone, etc.) to this unit
- Check if the BLUETOOTH function of the BLUETOOTH enabled device is enabled.






☐ Cannot connect a BLUETOOTH wireless technology enabled device (PC, smartphone, etc.) to this unit
- Initialize the pairing information and perform pairing again.
Firstly delete all the pairing information saved on this unit. In the Setup menu, select "Hardware" - "Bluetooth" - "Bluetooth Receiver" - "Pairing Information", then press ENTER while "Clear" is displayed.
Next, delete the pairing information of this unit that is saved on the BLUETOOTH wireless technology enabled device. For information on how to clear the pairing information, refer to the BLUETOOTH enabled device's instruction manual.
Finally, perform pairing again. Refer to "BLUETOOTH® Playback" (→p57) for pairing instructions.
□ Music playback is unavailable on the unit even after successful BLUETOOTH connection
- If the volume setting on this unit or the BLUETOOTH wireless technology enabled device is low, audio may not be played. Check the volume setting on this unit or the BLUETOOTH wireless technology enabled device.
- Some BLUETOOTH wireless technology enabled devices may be equipped with a Send/Receive selector switch. Try switching the setting to suit the application the device is being used for.
- Depending on the characteristics or specifications of the BLUETOOTH enabled device, music may not be played back on this unit.
☐ Sound is interrupted
- There maybe a problem with the BLUETOOTH enabled device. Check the information on a web page.
☐ The audio quality is poor after connection with a BLUETOOTH enabled device
- The BLUETOOTH reception is poor. Move the BLUETOOTH enabled device closer to the unit, or remove any obstacle between the BLUETOOTH enabled device and this unit.
ZONE B function
☐ Cannot output audio to ZONE B
- To output audio to ZONE B, set the audio output destination to "ZONE A+B" or "ZONE B".
(→p66)
Remote Controller
- Make sure that the batteries are inserted with the correct polarity.
- Insert new batteries. Do not mix different types of batteries, or old and new batteries.
- Make sure that the sensor of the main unit is not subjected to direct sunlight or inverter-type fluorescent lights. Relocate it if necessary.
- If the main unit is installed in a rack or cabinet with colored-glass doors, or if the doors are closed, the remote controller may not work normally.






Troubleshooting
Display
☐ The display does not light up
- When the Dimmer function is working, the display may go dim or turn off. Press the DIMMER button, and change the brightness level of the display. (→p15)
Others
☐ Strange noise can be heard from the unit
- If you have connected another device to the same outlet as this unit, strange noise may occur under the influence of the device. If the symptom is remedied by removing the power plug of the other device from the outlet, use different outlets for this unit and the device.
☐ The message "Noise Error" appears during Full Auto MCACC
- This can be caused by a malfunction in your speaker unit. Check the speaker output, etc.
☐ The measurement results of Full Auto MCACC show different distances to the speakers from the actual ones
- Depending on the speakers you are using, some errors may occur in the measurement results. If this is the case, make the settings in "Speaker" (→p78) - "Distance" in the Setup menu.
☐ The measurement results of Full Auto MCACC show that the volume level of the subwoofer has been corrected to the lower limit
- The volume level correction of the subwoofer may not have been completed. Lower the volume of the subwoofer before Full Auto MCACC measurement.







Appendix
Appendix
Speaker Layouts and Selectable Listening Modes 108
Input Formats and Selectable Listening Modes 110
Listening Mode Effects 114
Speaker combinations 119
General Specifications 120





Speaker Layouts and Selectable Listening Modes
See the following table for selectable listening modes for each speaker layout.
| Listening mode | Speaker layout (ch) | |||||||||
| 2.1 | 3.1 | 4.1 | 5.1 | 6.1 | 7.1 | 2.1.2 | 3.1.2 | 4.1.2 | 5.1.2 | |
| DD (Dolby Audio - DD) | (*) (*)1 | (*1)*2 (*2) | (*3)*3 (*3) | ✓ | ✓ | ✓ | ✓ | ✓ | ||
| DD+ (Dolby Audio - DD+) | (*)1 | (*)1 | (*)1 | (*)1(*2) | (*)1(*2) | (*)1 | (*)1 | (*)1 | ||
| DTHD (Dolby Audio - TrueHD) | (*)1 | (*)1 | (*)1 | (*)1(*2) | (*)1(*2) | (*)1 | (*)1 | (*)1 | ||
| Atmos | ✓ | ✓ | ✓ | ✓ | ✓ | ✓ | ||||
| Atmos 2.0/2.1 | ✓ | |||||||||
| Atmos 3.0/3.1 | ✓ | |||||||||
| Atmos 4.0/4.1 | ✓ | |||||||||
| Atmos 5.0/5.1 | ✓ | |||||||||
| Atmos 6.0/6.1 | ✓ | |||||||||
| Atmos 7.0/7.1 | ✓ | |||||||||
| Atmos 2.0.2/2.1.2 | ✓ | |||||||||
| Atmos 3.0.2/3.1.2 | ✓ | |||||||||
| Dolby Surround (Dolby Audio - Surr) | ✓ | ✓ | ✓ | ✓ | ✓ | ✓ | ✓ | ✓ | ✓ | ✓ |
| Dolby Surr 2.0/2.1 (Dolby Audio - Surr) | ✓ | |||||||||
| Dolby Surr 3.0/3.1 (Dolby Audio - Surr) | ✓ | |||||||||
| Dolby Surr 4.0/4.1 (Dolby Audio - Surr) | ✓ | |||||||||
| Dolby Surr 5.0/5.1 (Dolby Audio - Surr) | ✓ | |||||||||
| Dolby Surr 6.0/6.1 (Dolby Audio - Surr) | ✓ | |||||||||
| Dolby Surr 7.0/7.1 (Dolby Audio - Surr) | ✓ | |||||||||
| Dolby Surr 2.0.2/2.1.2 (Dolby Audio - Surr) | ✓ | |||||||||
| Dolby Surr 3.0.2/3.1.2 (Dolby Audio - Surr) | ✓ | |||||||||







Appendix
| Listening mode | Speaker layout (ch) | |||||||||
| 2.1 | 3.1 | 4.1 | 5.1 | 6.1 | 7.1 | 2.1.2 | 3.1.2 | 4.1.2 | 5.1.2 | |
| DTS | √ | √ | √ | √ | √ | (*3) (*3) (*2) | √ | |||
| DTS-HD | √ | √ | √ | √ | √ | √ | √ | √ | ||
| DTS:X | √ | √ | √ | √ | √ | √ | √ | √ | √ | |
| DTS Neural:X | √ | √ | √ | √ | √ | √ | √ | √ | √ | √ |
| IMAX DTS | √ | √ | √ | √ | √ | (*4) (*3) (*2) (*3) (*3) | √ | √ | √ | |
| IMAX DTS:X | √ | √ | √ | √ | √ | √ | √ | √ | √ | √ |
| IMAX Neural:X | √ | √ | √ | √ | √ | √ | √ | √ | √ | √ |
| PCM | √ | (*1) (*1) (*1)*(*1) (*1) (*3)*(*3) (*3) | √ | √ | √ | √ | √ | |||
| DSD | (*1) (*1) (*1)*(*5) (*5) (*2) (*3) (*3) | √ | √ | √ | √ | √ | ||||
| Stereo | √ | (*6) (*6) (*6) (*6) (*6) (*8) (*6) (*6) (*6) | √ | √ | √ | √ | √ | √ | ||
| Mono | √ | (*6) (*6) (*6) (*6) (*6) (*8) (*6) (*6) (*6) | √ | √ | √ | √ | √ | √ | ||
| Mono Music | √ | √ | √ | √ | √ | √ | √ | √ | √ | |
| Ext.Stereo | √ | √ | √ | √ | √ | √ | √ | √ | √ | |
| Classical | √ | √ | √ | √ | √ | √ | √ | √ | ||
| Ent.Show (Entertainment Show) | √ | √ | √ | √ | √ | √ | √ | √ | ||
| Drama | √ | √ | √ | √ | √ | √ | √ | √ | ||
| Unplugged | √ | √ | √ | √ | √ | √ | √ | √ | ||
| F.S.Surround (Front Stage Surround) | √ | √ | (*6) | (*7) | (*6) | (*7) | (*6) | (*7) | (*6) | (*7) |
*1: Reproduced with the sound field according to the number of channels of input signals.
*2: If 4.1 ch or 5.1 ch Dolby signals (DD, DD+, DTHD) are input, surround channel audio is output from the surround back speakers.
*3: Not output from height speakers.
*4: Surround channel audio is output from the surround back speakers.
*5: Not output from surround back speakers.
*6: Output only from front speakers.
*7: Output only from front speakers and center speaker.






Appendix
Input Formats and Selectable Listening Modes
You can select a variety of listening modes according to the audio format of the signal to be input.
- The Stereo mode can be selected with any audio format.
- When analog signals are being input in the Pure Direct mode, the modes switches to the Analog Direct mode which passes signals directly to the amplifier without passing through the DSP (Digital Signal Processor).
- Listening modes available when headphones are connected are Pure Direct and Stereo only.
| Input format\Listening mode | Pure Direct Direct Stereo | DD(Dolby Audio - DD) (*1) | DD+ (Dolby Audio - DD+) (*1)(*2) | DTHD(Dolby Audio - TrueHD) (*1) | Atmos (*10) | Dolby Surr (Dolby Audio - Surr) (*10) |
| 2-channel signal input | ||||||
| Analog / PCM | √ | √ | ||||
| DSD | √ | √ | ||||
| DD / DD+ / DTHD | √ | √ | ||||
| DTS / DTS 96/24 / DTS Express / DTS-HD HR / DTS-HD MSTR (*12)(*13) | √ | *(8) | ||||
| Multi-channel signal input | ||||||
| Multich PCM | √ | √ | ||||
| DSD | √ | √ | ||||
| DD | √ | √ | √ | |||
| DD+ | √ | √ | √ | |||
| DTHD | √ | √ | √ | |||
| Atmos | √ | √ | ||||
| DTS | √ | √ | ||||
| DTS 96/24 (*12) | √ | √ | ||||
| DTS Express (*13) | √ | |||||
| DTS-HD HR (*13) | √ | √ | ||||
| DTS-HD MSTR (*13) | √ | √ | ||||
| DTS-ES Discrete (*12) | √ | √ | ||||
| DTS-ES Matrix (*12) | √ | √ | ||||
| DTS:X | √ | |||||
| IMAX DTS | √ | |||||
| IMAX DTS:X | √ | |||||






Appendix
| Input format\Listening mode | DTS (*1) DTS | HD DTS:X | DTS Neural:X (*3) | IMAX DTS (*7) | IMAX DTS:X (*7) | IMAX Neural:X (*7) | |
| 2-channel signal input | |||||||
| Analog / PCM | ✓ | ||||||
| DSD | ✓ | ||||||
| DD / DD+ / DTHD | ✓ | ||||||
| DTS / DTS 96/24 / DTS Express / DTS-HD HR / DTS-HD MSTR (*12)(*13) | ✓ | ||||||
| Multi-channel signal input | |||||||
| Multich PCM | ✓ | ||||||
| DSD | ✓ | ||||||
| DD | ✓ | ||||||
| DD+ | ✓ | ||||||
| DTHD | ✓ | ||||||
| Atmos | |||||||
| DTS | ✓ | ✓ | |||||
| DTS 96/24 (*12) | ✓ | ✓ | |||||
| DTS Express (*13) | ✓ | ✓ | |||||
| DTS-HD HR (*13) | ✓ | ✓ | |||||
| DTS-HD MSTR (*13) | ✓ | ✓ | |||||
| DTS-ES Discrete (*12) | ✓ | ✓ | |||||
| DTS-ES Matrix (*12) | ✓ | ✓ | |||||
| DTS:X | ✓ | ||||||
| IMAX DTS | √(*11) (*11) | ✓ | ✓ | ✓ | |||
| IMAX DTS:X | √(*11) | ✓ | |||||







Appendix
| Input format\Listening mode | PCM(Multich PCM) (*1) | DSD(*1)(*9) | Mono | Classical / Unplugged / Ent.Show (Entertainment Show) / Drama (*4) | Ext.Stereo / Mono Music (*5) | F.S.Surround(Front Stage Surround)(*6) |
| 2-channel signal input | ||||||
| Analog / PCM | √ | √ | √ | √ | ||
| DSD | √ | √ | √ | |||
| DD / DD+ / DTHD | √ | √ | √ | |||
| DTS / DTS 96/24 / DTSExpress / DTS-HD HR /DTS-HD MSTR (*12)(*13) | √ | √ | √ | |||
| Multi-channel signal input | ||||||
| Multich PCM | √ | √ | √ | √ | ||
| DSD | √ | √ | √ | √ | ||
| DD | √ | √ | √ | |||
| DD+ | √ | √ | √ | |||
| DTHD | √ | √ | √ | |||
| Atmos | √ | √ | √ | |||
| DTS | √ | √ | √ | |||
| DTS 96/24 (*12) | √ | √ | √ | |||
| DTS Express (*13) | √ | √ | √ | |||
| DTS-HD HR (*13) | √ | √ | √ | |||
| DTS-HD MSTR (*13) | √ | √ | √ | |||
| DTS-ES Discrete (*12) | √ | √ | √ | |||
| DTS-ES Matrix (*12) | √ | √ | √ | |||
| DTS:X | √ | √ | √ | |||
| IMAX DTS | √ | √ | √ | |||
| IMAX DTS:X | √ | √ | √ | |||







Appendix
(*1) A center speaker or surround speakers need to be installed.
(*2) If the input source is Blu-ray Disc and the speaker layout is 5.1 ch or less, DD+ cannot be selected. Instead, the listening mode for DD can be selected.
(*3) If the input format is any of the following and the number of channels is monaural, this listening mode becomes unavailable. - DTS, DTS 96/24, DTS Express, DTS-HD HR, DTS-HD MSTR, PCM
(*4) Surround speakers or height speakers need to be installed.
(*5) A center speaker, surround speakers, or height speakers need to be installed.
(*6) Cannot be selected if "Speaker Virtualizer" (→p79) is set to "Off".
(*7) Cannot be selected when the "IMAX Mode" (→p83) is set to "Off" (the default value is Auto).
(*8) This cannot be selected when the input format is DTS Express.
(*9) Cannot be selected when the input format is monaural.
(*10) The listening mode displayed depends on the speaker layout (→p108). Furthermore, when the setting for "Speaker Virtualizer" (→p79) is "Off" (the default value is On), then modes other than Damos and Dolby Surr cannot be selected.
(*11) Can only be selected when the "IMAX Mode" (→p83) is set to "Off" (the default value is Auto).
(*12) Displayed as "DTS" on this unit.
(*13) Displayed as "DTS-HD" on this unit.



☐ Speaker Layouts and Selectable Listening Modes (→p108)



Listening Mode Effects
Appendix
In alphabetical order
Classical
Suitable for classical or operatic music. This mode emphasizes the surround channels in order to widen the sound image, and simulates the natural reverberation of a large hall.
Direct/Pure Direct
The "Direct" mode shuts down some processing that can affect sound quality, such as the tone control features, so you can enjoy even better sound quality. The "Pure Direct" mode shuts down even more processes that affects sound quality, so you get a more faithful reproduction of the original sound. In this case, the speaker calibration made with MCACC is invalid.
Atmos
Since this mode calculates the positional data of audio recorded in Dolby Atmos audio in real-time and outputs it from appropriate speakers, you can enjoy the natural and stereophonic sound field of Dolby Atmos with any speaker layout including connection of only front speakers. Also, the Dolby Atmos sound design can be reproduced more faithfully by connecting surround back speakers or height speakers. You can select this mode when inputting the Dolby Atmos audio format.
Unlike existing surround systems, Dolby Atmos does not rely on channels, but rather enables the accurate placement of sound objects that have independent motion in a 3D space with even greater clarity. Dolby Atmos is an optional audio format for Blu-ray Discs and achieves a more stereophonic sound field by introducing a sound field above the listener.
According to the speaker layout, the following listening modes are displayed.
- Atmos 2.0/2.1: When only front speakers are installed
- Atmos 3.0/3.1: When front speakers and center speaker are installed
- Atmos 4.0/4.1: When front speakers and surround speakers are installed
- Atmos 5.0/5.1: When front speakers, center speaker and surround speakers are installed
- Atmos 6.0/6.1: When front speakers, surround speakers and surround back speakers are installed



-At mos 7.0/7.1: When front speakers, center speaker, surround speakers and surround back speakers are installed
- Atmos 2.0.2/2.1.2: When front speakers and height speakers are installed
- Atmos 3.0.2/3.1.2: When front speakers, center speaker and height speakers are installed
-
Atmos: Selectable in the "4.1.2 ch" or "5.1.2 ch" setting with surround speakers and height speakers installed.
-
To enable transfer of this audio format, connect via an HDMI cable and set the audio output on the player to Bitstream output.
- When "Speaker Virtualizer" (→p79) is set to "Off" (Default: On), modes other than ☒ Atmos cannot be selected.



Appendix
DD (Dolby Audio - DD)
This mode faithfully reproduces the sound design recorded in the Dolby Digital audio format.
Dolby Digital is a multi-channel digital format developed by Dolby Laboratories, Inc. and is widely adopted for use in movie production. It is also a standard audio format for DVD-Video and Blu-ray Discs. It is possible to record a maximum of 5.1 channels on a DVD-Video or Blu-ray Disc; two front channels, one center channel, two surround channels, and the LFE channel dedicated to the bass region (sound elements for the subwoofer).
- To enable transfer of this audio format, connect via a digital cable and set the audio output on the player to Bitstream output.
This mode faithfully reproduces the sound design recorded in the Dolby Digital Plus audio format.
The Dolby Digital Plus format has been improved based on Dolby Digital, increasing the number of channels and endeavoring to improve sound quality by giving more flexibility in data bit rates. Dolby Digital Plus is an optional audio format based on 5.1 ch for Blu-ray Discs. It is possible to record a maximum of 7.1 channels with additional channels such as the surround back channel.
- To enable transfer of this audio format, connect via an HDMI cable and set the audio output on the player to Bitstream output.
■ Dolby Surr (Dolby Audio - Surr)
This listening mode expands 2 ch or 5.1 ch input signals to 5.1 ch, 7.1 ch or 5.1.2 ch. This mode expands actual channels to more channels for playback according to the configuration of the connected speakers. Also, even if there is no speaker for expansion, for example when only front speakers are connected, audio of surround channel or height channel is virtually created for expansion playback.
According to the speaker layout, the following listening modes are displayed.
– Dolby Surr 2.0/2.1: When only front speakers are installed
– Dolby Surr 3.0/3.1: When front speakers and center speaker are installed
– Dolby Surr 4.0/4.1: When front speakers and surround speakers are installed
- Dolby Surr 5.0/5.1: When front speakers, center speaker and surround speakers are installed
- Dolby Surr 6.0/6.1: When front speakers, surround speakers and surround back speakers are installed
– Dolby Surr 7.0/7.1: When front speakers, center speaker, surround speakers and surround back speakers are installed
– Dolby Surr 2.0.2/2.1.2: When front speakers and height speakers are installed
- Dolby Surr 3.0.2/3.1.2: When front speakers, center speaker and height speakers are installed
- Dolby Surround: Selectable in the "4.1.2 ch" or "5.1.2 ch" setting with surround speakers and height speakers installed.
- When "Speaker Virtualizer" (→p79) is set to "Off" (Default: On), modes other than Dolby Surr cannot be selected.





Appendix
DTHD (Dolby Audio - TrueHD)
This mode faithfully reproduces the sound design recorded in the Dolby TrueHD audio format.
The Dolby TrueHD audio format is a "lossless" format expanded based on the lossless compression technology referred to as MLP, and it faithfully reproduces the master audio recorded in the studio. Dolby TrueHD is an optional audio format based on 5.1 ch for Blu-ray Discs. It is possible to record a maximum of 7.1 channels with additional channels such as the surround back channel. 7.1 ch is recorded at 96 kHz/24 bit, and 5.1 ch is recorded at 192 kHz/24 bit.
- To enable transfer of this audio format, connect via an HDMI cable and set the audio output on the player to Bitstream output.
Drama
Suitable for TV shows produced in a TV studio. This mode enhances the surround effects to the entire sound to give clarity to voices and create a realistic acoustic image.
DSD
This mode is suitable for playing sources recorded in DSD.
- This unit supports the DSD signal input from the HDMI input terminal. However, depending on the connected player, better sound may be obtained by setting the output on the player side to the PCM output.
- This listening mode cannot be selected if the output setting on your Blu-ray Disc/DVD player is not set to DSD.
DTS
This mode faithfully reproduces the sound design recorded in the DTS audio format.
The DTS audio format is a multi-channel digital format developed by DTS, Inc. This format is an optional audio format for DVD-Video and a standard format for Blu-ray Discs.
To enable transfer of this audio format, connect via a digital cable and set the audio output on the player to Bitstream output.
DTS-HD
This mode faithfully reproduces the sound design recorded in the DTS-HD High Resolution Audio audio format or DTS-HD Master Audio.
These audio formats are optional audio format based on 5.1 ch for Blu-ray Discs. It is possible to record a maximum of 7.1 channels with additional channels such as the surround back channel at a sampling rate of 96 kHz and at a resolution of 24 bits.
- To enable transfer of this audio format, connect via an HDMI cable and set the audio output on the player to Bitstream output.
DTS Neural:X
This listening mode expands actual channels to more channels for playback to suit the configuration of the connected speakers by expanding the input signals from 2 channels or 5.1 channels to 5.1 channels or 7.1 channels respectively.
DTS Virtual:X
DTS Virtual:X listening mode uses the proprietary audio processing technology to create spacious 3D sound including audio from up above without connecting height speakers.
This mode can be selected in any speaker layout such as front speakers-only connection. You can enjoy your favorite movies or TV programs with a more immersive audio experience.
- This mode cannot be selected when Dolby Atmos signal is input or height speakers are connected.
- This mode cannot be selected when "Speaker Virtualizer" (→p79) is set to "Off" (Default: On).






Appendix
DTS:X
This mode faithfully reproduces the sound design recorded in the DTS:X audio format.
The DTS:X audio format is a combination of the mixing method based on traditional channel based formats (5.1 ch and 7.1 ch) and object based dynamic audio mixing, and it is characterized by the precise positioning of sounds and the ability to express sound movement.
- To enable transfer of this audio format, connect via an HDMI cable and set the audio output on the player to Bitstream output.
Ent.Show (Entertainment Show)
Suitable for rock or pop music. Listening to music in this mode creates a lively sound field with a powerful acoustic image, like being at a club or rock concert.
■ Ext.Stereo (Extended Stereo)
This mode is ideal for background music. Stereo sound is played through the surround speakers as well as the front speakers, creating a stereo image.
■ F.S.Surround (Front Stage Surround)
In this mode, you can enjoy a virtual playback of multichannel surround sound even with only two or three speakers. This works by controlling how sounds reach the listener's left and right ears.
- This mode cannot be selected when "Speaker Virtualizer" (→p79) is set to "Off" (Default: On).




IMAX
IMAX is an innovator in entertainment technology, combining proprietary software, architecture and equipment to create experiences that take you beyond the edge of your seat to a world you've never imagined. Top filmmakers and studios utilize IMAX theatres to connect with audiences in extraordinary ways. IMAX leverages its proprietary image enhancement process, DMR, to create clearer, sharper images--just as the director intended. With its specialized, custom theatre environment designed to widen the field of view, and unique sound systems that cover the entire theatre evenly, IMAX delivers a truly immersive film experience.
IMAX Enhanced:
IMAX Enhanced brings the world's most immersive entertainment experience into the home. IMAX Enhanced products include the highest-end TVs, projectors, sound bars and A/V receivers that meet stringent performance standards established by IMAX, DTS and Hollywood's leading colorists to deliver unparalleled quality and scale to in-home entertainment.
IMAX Enhanced content is digitally re-mastered for the home environment to provide sharper images and more powerful sound--just as the filmmaker intended. Available on Ultra HD Blu-ray discs and 4K streaming services, it leverages DTS:X codec technology integrated in certified home entertainment devices to deliver an exclusive, fully immersive experience.
IMAX Mode optimizes all settings for the playback of remastered IMAX Enhanced content, ensuring the best possible picture and sound. When "IMAX DTS" is displayed, IMAX Mode is optimized for the playback of 5.1 IMAX Enhanced content. When "IMAX DTS:X" is displayed, IMAX Mode is optimized for the playback of fully immersive IMAX Enhanced content.
- To enable transfer of this audio format, connect via an HDMI cable and set the audio output on the player to Bitstream output.
IMAX listening modes:
- IMAX DTS: Displayed when there is DTS audio format input which includes IMAX Enhanced content.
- IMAX DTS:X: Displayed when there is DTS:X audio format input which includes IMAX Enhanced content.
- IMAX Neural:X: This listening mode expands the playback signal to 5.1.2 channels or 7.1 channels to suit the connected speaker configuration when the input signal is 5.1 channels. Displayed when there is DTS audio format input which includes IMAX Enhanced content.



- IMAX Mode is set to "Auto" at the time of purchase (→p83). The listening mode automatically switches when IMAX Enhanced content is recognized, but when playing IMAX Enhanced content received through streaming services on a TV, etc., the IMAX Enhanced content may not be recognized and the listening mode may not switch. Set the IMAX mode to "On" in this case.
- When surround back speakers are connected and DTS audio format that includes 5.1-channel IMAX Enhanced content is played with IMAX DTS, the surround channel audio is output from the surround back speakers.
Mono
In this mode, monaural audio is played from the center speaker at the time of inputting an analog signal or PCM signal. If there is no center speaker connected, monaural audio is played from the front speakers.
Mono Music
In this mode, all speakers output the same sound in mono, so the sound you hear is the same regardless of where you are within the listening room.
PCM
Mode suitable for playing sources recorded in multichannel PCM.
Stereo
In this mode, sound is output from the right and left front speakers and subwoofer.
Unplugged
Suitable for acoustic instruments, vocals and jazz. This mode emphasizes the front sound field image, giving the impression of being in front of the stage.


Appendix
Speaker combinations
- Up to two powered subwoofers can be connected in either combination.
| Speaker Channels | FRONT | CENTER | SURROUND | SURROUND BACK | HEIGHT Bi-AMP | ZONE B (ZONE SPEAKER) |
| 2.1 ch | √ | √ (*1) (*1) | √ | |||
| 3.1 ch | √ | √ | √ (*1) (*1) | √ | ||
| 4.1 ch | √ | √ | √ (*1) (*1) | √ | ||
| 5.1 ch | √ | √ | √ | √ (*1) (*1) | √ | |
| 6.1 ch | √ | √ | √ | |||
| 7.1 ch | √ | √ | √ | √ | ||
| 2.1.2 ch | √ | √ | √ (*1) (*1) | |||
| 3.1.2 ch | √ | √ | √ | √ (*1) (*1) | ||
| 4.1.2 ch | √ | √ | √ | |||
| 5.1.2 ch | √ | √ | √ | √ |
(*1) You can select either Bi-AMP or ZONE SPEAKER.






General Specifications
| Amplifier Section | can and Taiwanese models | European, Middle East, Australian and Asian models |
| Rated Output Power | (North American models)With 8 ohm loads, both channels driven, from 20 Hz-20 kHz; rated 80 watts per channel minimum RMS power, with no more than 0.08% total harmonic distortion from 250 milliwatts to rated output. (FTC)(Taiwanese models)7 ch × 135 W at 6 ohms, 1 kHz, 1 ch driven of 1% THD (IEC) | 7 ch × 135 W at 6 ohms, 1 kHz, 1 ch driven of 1% THD (IEC) |
| Maximum Effective Output Power | (North American models)165 W at 6 ohms, 1 kHz, 1 ch driven of 10% THD(Taiwanese models)7 ch × 155 W at 6 ohms, 1 kHz, 1 ch driven of 10% THD(JEITA) | (European models)7 ch × 155 W at 6 ohms, 1 kHz, 1 ch driven of 10% THD(IEC)(Middle East, Australian and Asian models)7 ch × 155 W at 6 ohms, 1 kHz, 1 ch driven of 10% THD(JEITA) |
| THD+N (Total Harmonic Distortion + Noise) 0.08% (20 Hz - 20,000 Hz, Rated output power) | ||
| Input Sensitivity and Impedance 200 mV/32 kΩ (LINE(RCA)) | ||
| Rated RCA Output Level and Impedance | PRE OUT (SUBWOOFER): 1 V/470 Ω | |
| LINE/PRE OUT (ZONE B): 1 V/200 mV/2.3 kΩ | ||
| Frequency Response 10 Hz - 100 kHz/+1 dB, -3 dB (Direct/Pure Direct) | ||
| Tone Control Characteristics ±10 dB, 20 Hz (BAS S), ±10 dB, 20 kHz (TREBLE) | ||
| Signal to Noise Ratio 106 dB (IHF-A, LINE IN, SP OUT) | ||
| Supported impedance of Speakers 4 Ω - 16 Ω | ||
| Headphone Rated Output 80 mW + 80 mW (32 Ω) | 1 kHz, 10% THD) | |
| Supported impedance of Headphones 8 Ω - 600 Ω | ||
| Headphones Frequency Response 10 Hz - 100 kHz | ||




Appendix
| Tuner Section | in and Taiwanese models | European, Middle East, Australian and Asian models |
| FM Tuning Frequency Range 87.5 MHz - 107.9 MHz 87.5 MHz - 108.0 MHz, RDS | ||
| 50 dB quieting sensitivity (FM MONO) 2.8 μV, 20.2 dBf (IHF, 1 kHz, 100% MOD) | ||
| AM Tuning Frequency Range 530 kHz - 1710 kHz | (Middle East, Australian and Asian models)522/530 kHz - 1611/1710 kHz | |
| DAB Tuning Frequency Range - | (European models)174.928 MHz - 239.200 MHz (Band III) | |
| DAB Sensitivity - | (European models)-100 dBm (Min.) (Band III) | |
| Preset Channel 40 | ||
| BLUETOOTH Section | American and Taiwanese models | European, Middle East, Australian and Asian models |
| Communication system BLUETOOTH Specification version 5.0 | ||
| Frequency band 2.4 GHz (2.402 - 2.480 GHz) | ||
| Modulation method FHSS (Frequency Hopping Spread Spectrum) | ||
| Compatible BLUETOOTH profiles | A2DP v1.3, AVRCP v1.6, AVDTP v1.3, AVCTP v1.4 | |
| Supported Codecs | SBC, AAC | |
| Transmission range (A2DP) | 20 Hz - 20 kHz (Sampling frequency 44.1 kHz) | |
| Maximum communication range | Line of sight approx. 15 m(*) (*)The actual range will vary depending on factors such as obstacles between devices, magnetic fields around a microwave oven,static electricity, cordless phone, reception sensitivity, antenna's performance, operating system, software application, etc. | |


Appendix
| HDMI | d Taiwanese models | European, Middle East, Australian and Asian models |
| Input 4 | ||
| Output 1 | ||
| Input *1 | ||||
| HDMI 1 HDMI 2 HDMI 3 HDMI 4 | ||||
| bandwidth 40Gbps 40Gbps 40Gbps 40Gbps 40Gbps | ||||
| ALLM | √ | √ | √ | √ |
| Gaming-VRR | √ | √ | √ | √ |
| QFT | √ | √ | √ | √ |
| SBTM | √ | √ | √ | √ |
| DSC | √ | √ | √ | √ |
| Uncompressed 8K/60p | 8K/60p | 8K/60p | 8K/60p | |
| 4:2:0 | 4:2:0 | 4:2:0 | 4:2:0 | |
| Compressed (TV needs DSC) | 8K/60p | 8K/60p | 8K/60p | 8K/60p |
| 4:4:4 | 4:4:4 | 4:4:4 | 4:4:4 | |
| ARC / eARC *2 | ||||
| HDR10 /HLG (BT.2020) | √ | √ | √ | √ |
| HDR10+ | √ | √ | √ | √ |
| Output |
| ✓ |
| ✓ |
| ✓ |
| ✓ |
| 8K/60p4:2:0 |
| 8K/60p4:4:4 |
| ✓ |
| ✓ |
| ✓ |
*1 Audio Format: 2 ch linear PCM (32 kHz, 44.1 kHz, 48 kHz, 88.2 kHz, 96 kHz, 176.4 kHz, 192 kHz, 16/20/24 bit)
Multi-channel linear PCM (Maximum 7.1 channels, 32 kHz, 44.1 kHz, 48 kHz, 88.2 kHz, 96 kHz, 176.4 kHz, 192 kHz, 16/20/24 bit)
Bitstream (Dolby Digital, Dolby Digital Plus, Dolby TrueHD, Dolby Atmos, DTS, DTS-ES, DTS 96/24, DTS-HD Master Audio, DTS-HD High Resolution Audio, DTS Express, DTS:X, IMAX DTS, IMAX DTS:X, DSD(2.8 MHz), PCM)
*2 ARC compatible audio formats: PCM, Dolby Digital, Dolby Digital Plus, DTS (DTS 96/24, DTS-ES etc.), DTS-HD High Resolution Audio, IMAX DTS eARC compatible audio formats: PCM, Dolby Digital, Dolby Digital Plus, DTS (DTS 96/24, DTS-ES etc.), Dolby TrueHD, Dolby Atmos, DTS- HD Master Audio, DTS:X, Multichannel PCM, DTS-HD High Resolution Audio, IMAX DTS, IMAX DTS:X







Appendix
| Corresponding input resolutions | Frame rate Color | or space Color depth | HDMI IN 1 - 4 | |
| 4K(3840 × 2160p) | 24/25/30 Hz YCbCr4 | 4:2:2 12 bit | √ | |
| YCbCr4:4:4/RGB 8 bit | √ | |||
| 10/12 bit | √ | |||
| 4K SMPTE(4096 × 2160p) | 48/50/60 Hz YCbCr4 | 4:2:0 8 bit | √ | |
| 10/12 bit | √ | |||
| YCbCr4:2:2 12 bit | √ | |||
| YCbCr4:4:4/RGB 8 bit | √ | |||
| 10/12 bit | √ | |||
| 100/120 Hz YCbCr4 | 2:0 8/10/12 bit | √ | ||
| YCbCr4:2:2 12 bit | √ | |||
| YCbCr4:4:4/RGB 8/10 bit | √ | |||
| 12 bit | √(*1) | |||
| 5K(5120 × 2160p) | 24/25/30 Hz YCbCr4 | 4:2:2 12 bit | √ | |
| YCbCr4:4:4/RGB 8 bit | √ | |||
| 10/12 bit | √ | |||
| 48/50/60 Hz YCbCr4 | 4:2:0 8/10/12 bit | √(*2) | ||
| YCbCr4:2:2 12 bit | √ | |||
| YCbCr4:4:4/RGB 8 bit | √ | |||
| 10/12 bit | √ | |||
| 8K(7680 × 4320p) | 24/25/30 Hz YCbCr4 | 4:2:0 8/10/12 bit | √ | |
| YCbCr4:2:2 12 bit | √ | |||
| YCbCr4:4:4/RGB 8/10 bit | √ | |||
| 12 bit | √(*1) | |||
| 48/50/60 Hz YCbCr4 | 4:2:0 8/10 bit | √ | ||
| 12 bit | √(*1) | |||
| YCbCr4:2:2 12 bit | √(*1) | |||
| YCbCr4:4:4/RGB 8/10/12 bit | √(*1) | |||
(*1) Video compressed with DSC (Display Stream Compression) can be input and output. DSC is a video compression technique that enables the transmission of high-resolution video, which requires high bandwidth, via HDMI. While playing this video format, there is no on-screen display when you perform such operations as using the AV Adjust or adjusting the volume.
(*2) 5K, 48 Hz, YCbCr4:2:0, 8/10/12 bit is not supported.
- The output from the HDMI OUT jack to the TV is the same resolution as the input. When using a TV that supports 4K, 1080p HDMI video signals can also be output as 4K.






Appendix
| USB Section | and Taiwanese models | European, Middle East, Australian and Asian models |
| USB 1 (Only for supplying power to Streaming media player, 5 V/1.0 A) | ||
| General | nd Taiwanese models | European, Middle East, Australian and Asian models |
| Power Supply AC 120 V, 60 Hz AC 220 - 240 V, 50/60 Hz | ||
| Power Consumption 490 W 480 W | ||
| Full Standby mode 0.2 W 0.3 W | ||
| HDMI CEC Standby 0.2 W 0.3 W | ||
| Dimensions (W × H × D) | 435 mm × 148 mm × 321 mm17-1/8" × 5-13/16" × 12-5/8" | |
| Weight 8.2 kg (18.1 lbs.) 8.4 kg (18.5 lbs.) | ||
| Maximum radio-frequency power transmitted in the frequency band(s) | - | (European models)2402 MHz - 2480 MHz (4 dBm (e.i.r.p)) |
| Audio Inputs | and Taiwanese models | European, Middle East, Australian and Asian models |
| Analog 3 (RCA×3) | ||
| Digital | 2 (COAXIAL×1, OPTICAL×1)Supported sampling rates for PCM signals (stereo, mono) from a digital input are 32 kHz, 44.1 kHz, 48 kHz, 88.2 kHz, 96 kHz/16 bit, 20 bit, and 24 bit. | |



Appendix
| Audio Outputs | an and Taiwanese models | European, Middle East, Australian and Asian models |
| Analog | ZONE B LINE/PRE OUT,SUBWOOFER PRE OUT ×2 | |
| Speaker Outputs | FRONT L/R, CENTER,SURROUND L/R, SURROUND BACK L/R or HEIGHT L/R or ZONE B L/R(North American and Taiwanese models support banana plugs) | |
| Phones 1 (ø 6.3 mm, 1/4") | ||
| Others | d Taiwanese models | European, Middle East, Australian and Asian models |
| Setup Mic 1 (Front) | ||
Specifications and features are subject to change without notice.




License and Trademark


Pioneer
SN 29404123_EN
"Pioneer" and "MCACC logo" are trademarks of Pioneer Corporation, and are used under license.
F2307-0


- Firmware Update
- Troubleshooting
- Supplementary Information
- Reducing the Power Consumption in Standby State
- Before starting the procedure 6
- Firmware Update 7
- Part Names 9
- Inputting Characters 16
- Speaker Layout
- Speaker Installation
- Speaker Connections
- Connections
- Playback
- Listening Mode 56
- BLUETOOTH® Playback 57
- Listening To the Radio 58
- Adjusting the tone 63
- AV Adjust 64
- ZONE B Playback 66
- Using PERSONAL PRESET 68
- Setup
- Setup Menu 70
- Initial Setup with Auto Start-up Wizard 93
- Appendix
- Before starting the procedure
- Note
- Update Information of the firmware
- Checking the Firmware Version of the Unit
- Firmware Update Procedure
- Updating via USB
- Update
- If an Error Message is Displayed
- Error Code
- Part Names
- Front Panel
- DisplayDisplay
- Remote Controller Remote Controller
- Remote Controller
- Inputting Characters
- The listening room and the speaker layout
- ZONE A Speakers
- ZONE B Speakers
- Channel System
- Channel System
- Channel System This is a 7.1 Channel System that consists of the basic 5.1 Channel System and added surround back speakers.
- Channel System
- Channel System A Speaker System that is a 5.1 Channel System with one set of height speakers added.
- Setting Up the Speakers
- Channel System
- Channel System
- Speakers you can use with this unit and cable connections
- ■ Speakers you can use with this unit
- ■ (Note) Speaker Impedance
- ■ Connect the Speaker Cables
- Connect the Subwoofer
- ■ 3.1 Channel System + ZONE B SPEAKER
- ■ 3.1 Channel System (Bi-Amping the Speakers)
- Channel System + ZONE B SPEAKER
- ■ 5.1 Channel System (Bi-Amping the Speakers)
- ■ 3.1.2 Channel System + ZONE B SPEAKER
- ■ 3.1.2 Channel System (Bi-Amping the Speakers)
- Notes regarding connections with HDMI cables
- ■ (Note) Placement of cables
- Connecting the TV
- To ARC/eARC TV
- To Non-ARC TV
- Connecting Playback Devices
- Connections to BD/DVD and GAME with HDMI jacks
- Connecting an Audio Component
- Connecting an Integrated Amplifier or Transmitter (ZONE B)
- □ Playing Back (ZONE B) (→p67)
- Connecting Antennas
- Connecting the Power Cord
- Basic Operations
- Turning the power on
- Selecting a source to play
- Adjusting the volume
- Using the linking function (HDMI CEC)
- Switching the display
- Listening Mode
- Selecting a Listening mode
- DTS
- Dolby Atmos
- BLUETOOTH® Playback
- Pairing
- Playing Back
- Listening To the Radio
- Listening To the AM/FM Radio (AM : North American, Taiwanese, Middle East, Australian and Asian models)
- ■ Tuning Automatically
- TunMode: Auto
- ■ Tuning Manually
- TunMode: Manual
- ■ Frequency step setting (North American, Taiwanese, Middle East, Australian and Asian models)
- Using RDS (European, Middle East, Australian and Asian models)
- ■ Display Text Information (Radio Text)
- ■ Search for Stations by Program Type
- ☐ Presetting a Radio Station (→p62)
- Listening To DAB Digital Radio (European models only)
- ■ Changing the order stations are displayed
- ■ Displaying DAB Radio Information
- Presetting a Radio Station
- ■ Registration Procedure
- ■ Selecting a Preset Radio Station
- ■ Deleting a Preset Radio Station
- Adjusting the tone
- Adjusting the TREBLE/BASS
- Adjusting the DIALOG
- Adjusting the SUBWOOFER
- AV Adjust
- HDMI
- Audio
- Room EQ
- Level
- ZONE B Playback
- Using PERSONAL PRESET
- Settings that can be registered
- Registration
- Using the registered settings
- Checking the registered settings
- Setup Menu
- Input/Output Assign Input/Output Assign
- TV Out / OSD
- ☐ Upscaling (Default Value: Off)
- ☐ Super Resolution (Default Value: 2)
- ☐ HDMI 4K/8K Signal Format
- BD/DVD (Default Value: 4K Enhanced)
- Input/Output Assign
- ☐ OSD Language (Default Value: English)
- □ Impose OSD (Default Value: On)
- ☐ Screen Saver (Default Value: 3 minutes)
- HDMI Input
- Digital Audio Input
- Analog Audio Input
- Input Skip
- ■ PERSONAL PRESET Information
- SpeakerSpeaker
- Configuration
- Speaker
- Crossover
- Front (Default Value: Small)
- Front:
- Center, Height, Surround:
- Surround Back:
- Crossover:
- Double Bass:
- Distance
- Channel Level
- Dolby Enabled Speaker
- Speaker Virtualizer
- MCACC
- Full Auto MCACC
- MCACC Data Check
- Speaker Setting
- Speaker Distance
- Audio Adjust Audio Adjust
- Dual Mono / Mono
- Dolby
- Audio Adjust
- DTS/IMAX
- IMAX Bass Feeding (Default Value: On)
- ☐ IMAX LFE Mute Level (Default Value: 0 dB)
- Volume
- SourceSource
- ■ Input Volume Absorber
- ☐ Input Volume Absorber (Default Value: 0.0 dB)
- Name Edit
- ☐ Name Edit (Default Value: Input name)
- Source
- Audio Select
- ☐ BD/DVD (Default Value: HDMI)
- ☐ Fixed PCM (Default Value: Off)
- HardwareHardware
- ☐ HDMI CEC (Default Value: On)
- ☐ HDMI Standby Through (Default Value: Auto (Eco))
- Hardware
- ☐ Audio TV Out (Default Value: Auto)
- ☐ Audio Return Channel (eARC supported) (Default Value: On)
- ☐ Auto Delay (Default Value: On)
- Bluetooth
- Bluetooth Receiver (Default Value: On)
- ☐ Auto Input Change (Default Value: On)
- ☐ Auto Reconnect (Default Value: On)
- □ Pairing Information (Default Value: -)
- ☐ Device (Default Value: -)
- □ Status (Default Value: -)
- Power Management
- ☐ Auto Standby (Default Value: On/Off)
- ☐ Auto Standby in HDMI Standby Through (Default Value: On/Off)
- ☐ USB Power Out at Standby (Default Value: Off)
- Miscellaneous Miscellaneous
- Tuner
- Miscellaneous
- ■ Firmware Update
- Initial Setup
- Lock
- Factory Reset
- Initial Setup with Auto Start-up Wizard
- Operations
- Speaker Setup
- ARC Setup
- Full Auto MCACC
- Before starting the procedure 97
- When the unit is operating erratically 98
- Troubleshooting 99
- When the unit is operating erratically
- ☐ Try restarting the unit
- ☐ Resetting the unit (this resets the unit settings to the default)
- Power
- ☐ When the power is turned on, "Diagnostic mode" appears on the display of the main unit
- The unit turns off unexpectedly
- ☐ No sound from the TV
- ☐ No sound from a connected player
- ☐ A speaker produces no sound
- ☐ The subwoofer produces no sound
- ☐ Noise can be heard
- ☐ The beginning of audio received by an HDMI IN cannot be heard
- ☐ Sound suddenly reduces
- Listening Modes
- □ Cannot select a desired listening mode
- □ Cannot listen to the sound in Dolby TrueHD, Dolby Atmos or DTS-HD Master Audio format
- □ About Dolby signals
- □ About DTS signals
- Video
- □ No image appears
- □ Images flicker
- ☐ Video and audio are out of synch
- Linked operation
- ☐ HDMI linked operation does not work with CEC-compliant devices, such as a TV
- ☐ Poor reception or much noise
- ■ BLUETOOTH function
- ☐ Cannot transmit from a BLUETOOTH wireless technology enabled device (PC, smartphone, etc.) to this unit
- ☐ Cannot connect a BLUETOOTH wireless technology enabled device (PC, smartphone, etc.) to this unit
- □ Music playback is unavailable on the unit even after successful BLUETOOTH connection
- ☐ Sound is interrupted
- ☐ The audio quality is poor after connection with a BLUETOOTH enabled device
- ZONE B function
- ☐ Cannot output audio to ZONE B
- Display
- ☐ The display does not light up
- Others
- ☐ Strange noise can be heard from the unit
- ☐ The message "Noise Error" appears during Full Auto MCACC
- ☐ The measurement results of Full Auto MCACC show different distances to the speakers from the actual ones
- ☐ The measurement results of Full Auto MCACC show that the volume level of the subwoofer has been corrected to the lower limit
- Speaker Layouts and Selectable Listening Modes
- Input Formats and Selectable Listening Modes
- Listening Mode Effects
- In alphabetical order
- Classical
- Direct/Pure Direct
- Atmos
- DD (Dolby Audio - DD)
- ■ Dolby Surr (Dolby Audio - Surr)
- DTHD (Dolby Audio - TrueHD)
- Drama
- DSD
- DTS-HD
- DTS Neural:X
- DTS Virtual:X
- DTS:X
- Ent.Show (Entertainment Show)
- ■ Ext.Stereo (Extended Stereo)
- ■ F.S.Surround (Front Stage Surround)
- IMAX
- IMAX Enhanced:
- IMAX listening modes:
- Mono
- Mono Music
- PCM
- Stereo
- Unplugged
- Speaker combinations
- Pioneer
Brand : KLIPSCH
Model : VSX-835
Category : Receiver