
BPH 20 - Meter PCE Instruments - Free user manual and instructions
Find the device manual for free BPH 20 PCE Instruments in PDF.


| Product Type | Portable pH/mV/Conductivity Meter |
| Model | PCE-BPH 20 |
| Brand | PCE Instruments |
| Dimensions | 165 x 90 x 32 mm |
| Weight | 310 g |
| Power Supply | DC 12V / 1A via included adapter |
| Display | 7 inch TFT color LCD, 1024 x 600 pixels, capacitive touch |
| pH Measuring Range | (-2.00 to 19.999) pH |
| pH Resolution | 0.1 / 0.01 pH |
| pH Accuracy | ±0.002 pH (meter), ±0.01 pH (complete kit) |
| mV Measuring Range | -1999.9 mV to 1999.9 mV |
| mV Resolution | 0.1 mV |
| Conductivity Measuring Range | 0.00 µS/cm to 199.9 mS/cm (5 ranges) |
| TDS Measuring Range | 0 to 100 g/L |
| Salinity Measuring Range | 0 to 100 ppt |
| Resistivity Measuring Range | 0 to 100 MΩ·cm |
| Temperature Compensation | Automatic or manual (0 to 100 °C) |
| Calibration | Auto-recognition of 15 pH buffers (3 series) and 8 conductivity standards (2 series); up to 3-point pH calibration |
| Data Storage | 300 groups with date, value, unit, temperature |
| Connectivity | Bluetooth for wireless printer or mobile app |
| IP Rating | IP57 (dustproof and waterproof) |
| Included Accessories | pH composite electrode, conductivity electrode, temperature electrode, DC adapter (2 pcs?), electrode bracket, manual |
| Maintenance | Clean electrodes with purified water; store pH electrode in KCl solution; replace electrode if worn |
| Safety Precautions | Do not touch or scratch glass bulb; avoid organic solvents; calibrate regularly |
| Warranty | 1 year free repair/replacement for manufacturing defects (electrodes excluded) |
Frequently Asked Questions - BPH 20 PCE Instruments
User questions about BPH 20 PCE Instruments
0 question about this device. Answer the ones you know or ask your own.
Ask a new question about this device
Download the instructions for your Meter in PDF format for free! Find your manual BPH 20 - PCE Instruments and take your electronic device back in hand. On this page are published all the documents necessary for the use of your device. BPH 20 by PCE Instruments.
USER MANUAL BPH 20 PCE Instruments
Table of Contents
-
Brief Introduction....3
-
Technical Parameters....4
-
Instructions to the Meter....5
3.1. Main Interface Display ....5
3.2. PH Interface Display ....10
3.3. Conductivity Interface Display....15
3.4. Measurement information preservation, query and delete 19
- pH Measurement 20
4.1. Preparation Work 20
4.2. Meter Calibration ....20
4.3. pH solution Test 22
4.4. Considerations 22
-
MV Measurement 23
-
Conductivity Measurement 24
6.1. Preparation Work 24
6.2. Meter's Calibration 24
6.3. Conductivity solution Test 24
6.4. Important Statement 25
6.5. Considerations ......26
-
Meter's Complete Kit ....27
-
Warranty 27
1. Brief Instruction
Thanks for buying and using the model PCE-BPH 20 pH / mV / Conductivity Meter (the following called “meter” in short).
Before using this meter, please read the operation manual carefully in order to help use and maintain it correctly. On the basis of improving instrument of performance constantly, we reserve the right of changing the content of this manual and accessories in case of not notifying in advance.
This meter is a perfect combination with the most advanced electronic technology, sensor technology and software design. The meter can measure the parameters of pH/ conductivity and temperature for high accuracy water solution. It is the best portable pH/conductivity meter with the highest performance and the lowest cost. It is suitable for the trade such as the mining industry, power plant, water treatment projects and environmental protection, etc.
Built-in ARM32 bit microprocessor chip, beautiful appearance, multi-functional and easy to use, this meter has the following prominent features:
1.1. Built-in microprocessor chip, with the intelligent functions of automatic calibration, automatic/manual temperature compensation, data storage, multiple function settings.
1.2. Adopts digital filter and step slipping technology to intelligently improve meter's response speed and result accuracy.
1.3. The new pH meter electrode and the temperature electrode are used to make the PH measurement model have automatic temperature compensation and manual ammonia compensation function. It is more convenient to use, more accurate and more accurate, new electrical conductivity electrode and temperature electrode are used at the same time. The electrical conductivity measurement model has automatic temperature compensation function, and it can also measure RES, TDS, and also can be used. SAL is more convenient to use and more accurate.
1.4. PH calibration can automatically identify 15 kinds of buffer solutions. There are three standard buffer solutions: the European and American series, the NIST series and the China series, can be calibrated at one point, two point and three point, and automatically identify 8 conductivity calibration solutions when the electrical conductivity is calibrated. There are two kinds of standard liquid: the European and American series and the Chinese series. The point calibration method is convenient for the customer to choose.
1.5. Meter's circuit board adopts SMT film-covering technology to improve meter's production reliability.
1.6. Adopt 1024 x 600 high resolution 7 inch TFT color LCD screen, capacitive touch screen, and operate more sensitively.
1.7. The meter has wireless Bluetooth function and can connect to a wireless Bluetooth printer or connect to mobile phone APP.
1.8. Dustproof and waterproof meter meets IP57 rating.
2. Technical Parameters
2.1. pH
| Measuring range | (-2.00 - 19.999) pH |
| Resolution | 0.1/0.01 pH |
| Accuracy | Meter:±0.002pH; Complete Kit: ±0.01pH |
| Input current | ≤ 1 × 10^-12 A |
| Input impedance | ≥ 3 × 10^12 Ω |
| Stability | ±0.01 pH/3h |
| Temp. Compensation range | (0 - 100) °C (auto/manual) |
2.2. mV
| Measuring range (mV/ORP/EH) | -1999.9 mV - 0 - 1999.9mV |
| Resolution | 0.1mV |
| Accuracy | Meter:±0.3% FS |
2.3. Conductivity
| Measuring range | Conductivity:(0.00 - 19.99) μS/cm (20.0 - 199.9) μS/cm(200 - 1999) μS/cm (2.00 - 19.99) mS/cm(20.0 - 199.9) mS/cmTDS 0 - 100 g/lSalinity 0 - 100 pptResistivity 0 - 100 MΩ·cm |
| Resolution | 0.01/0.1/1 μS/cm 0.01/0.1 mS/cm |
| Accuracy | Meter: ±0.5% FSConnect meter with electrode: ±1.0% FS |
| Temp. compensation range | 0 - 100 °C (manual / auto) |
| Electrode constant | 0.1 / 1 / 10 cm-1 |
| Benchmark temperature | 25 °C, 20 °C and 18 °C |
2.4. Other Technical Parameters
| Data storage | 300 groups |
| Storage content | date, measuring value, measuring unit and temperature, |
| Power | DC12V/1A |
| Size and weight | Meter: 165 x 90 x 32 mm/310 g |
| Quality and safety certification | ISO9001:2000, CE and CMC |
2.5. Working Condition
| Environment temperature | 5 - 35 °C (0.01 °C) |
| Environmental humidity | ≤85% |
| IP rating | IP54 Dustproof and waterproof |
3. Instructions to the Meter
3.1. Main Interface Display
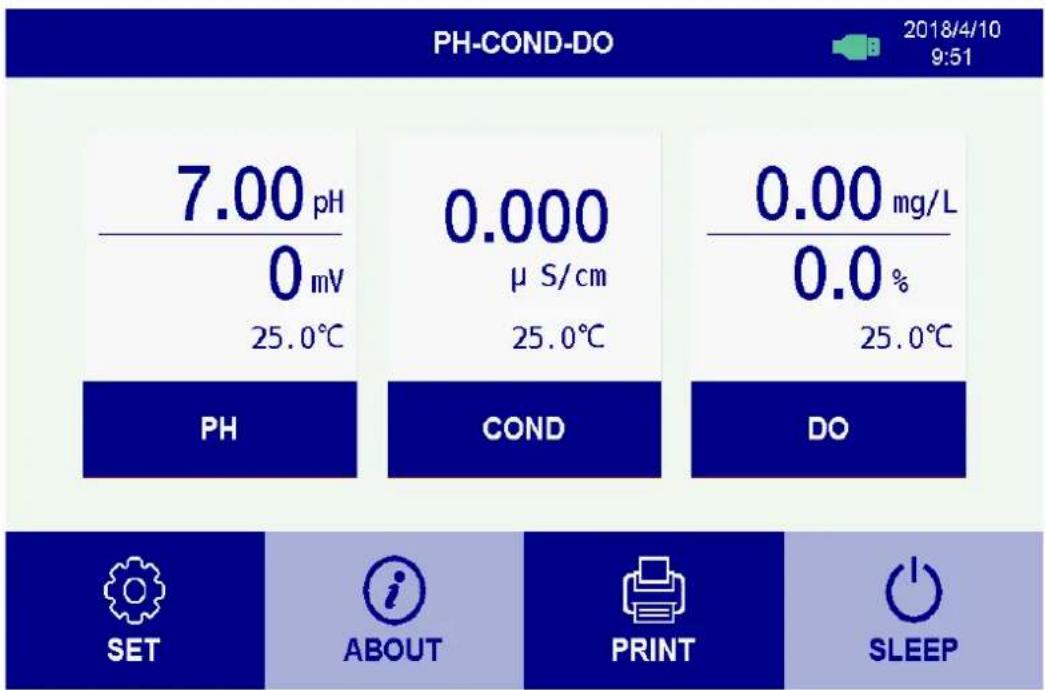
3.1.1. Setting (by setting the key, as in the following diagram)
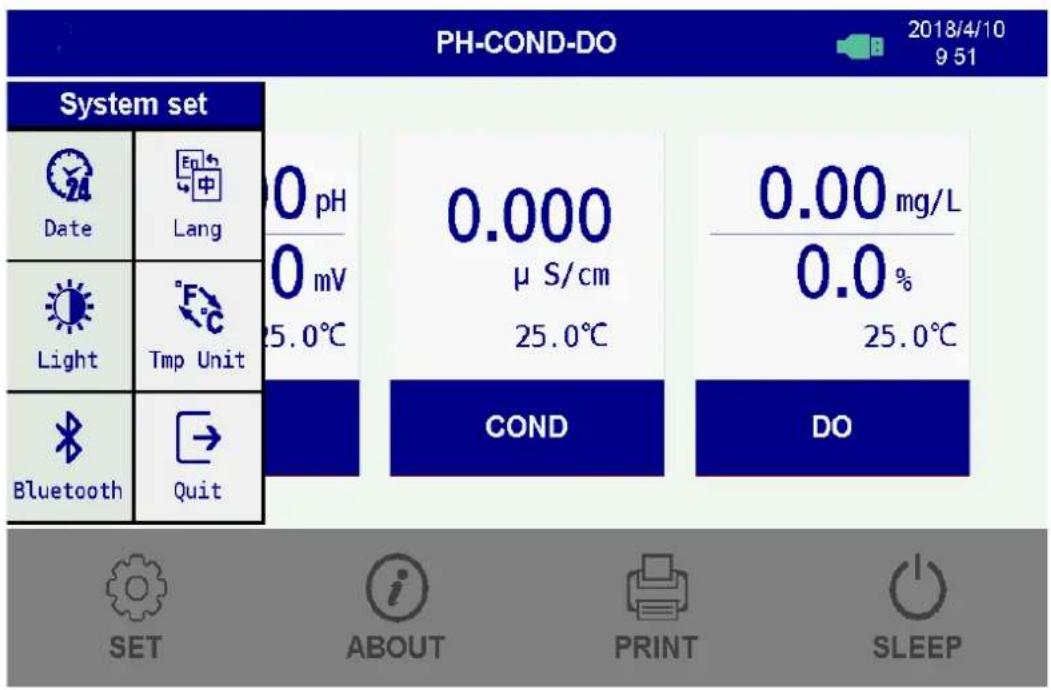
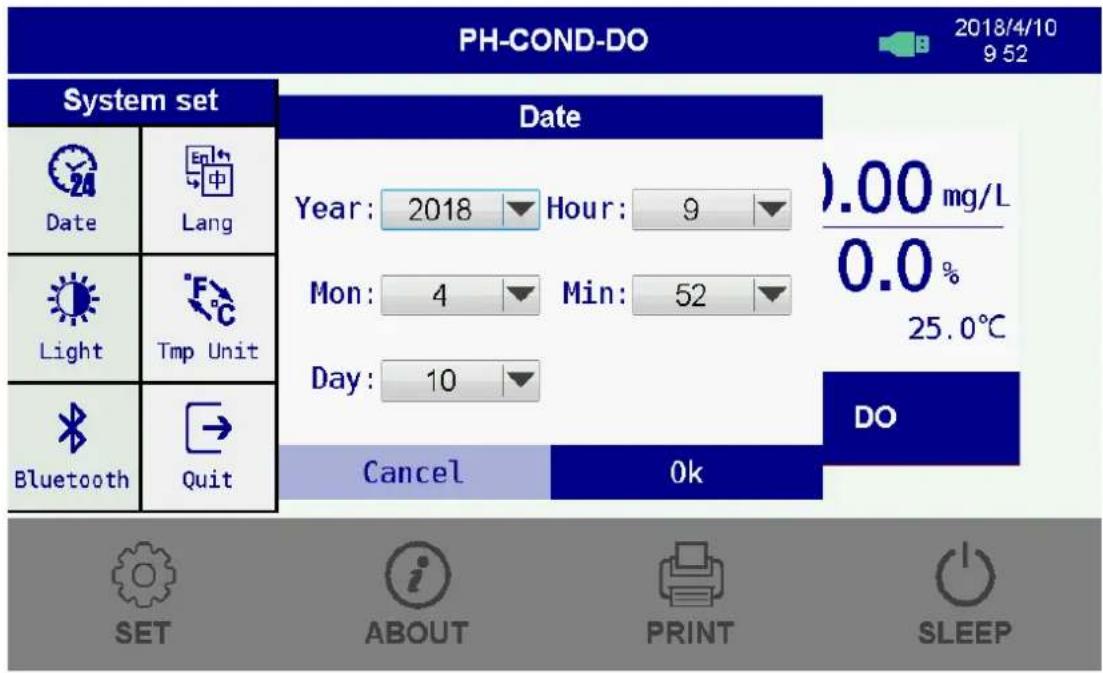
a) Time setting: setting the date and time menu, modifying the current clock time; setting the display according to the time, such as the following figure, changing the date after the arrow at the back of the date and time, by determining the date and time to save the modified date, by cancellate.
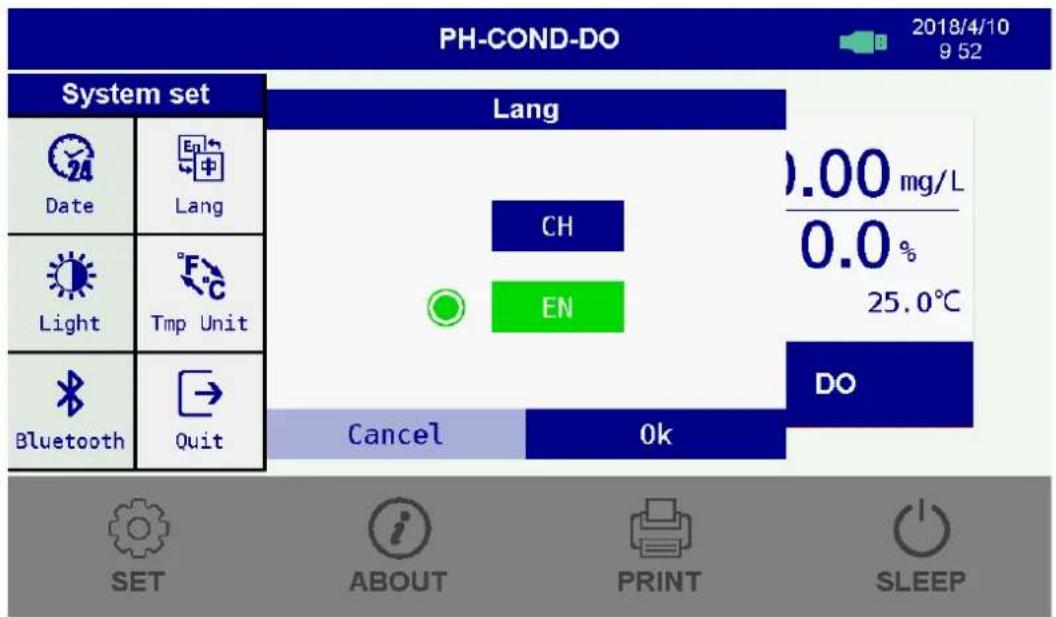
b) Language settings: Chinese and English settings; set the display in language as below, select CH or EN according to the required display interface, by determining the save settings, by cancellations.
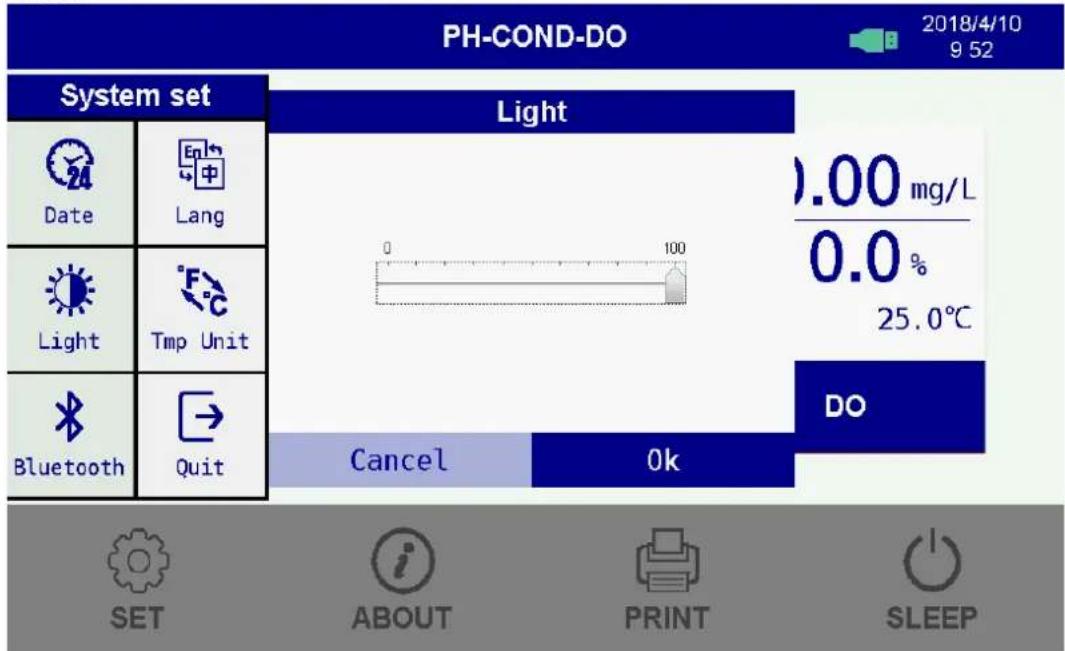
c) Brightness adjustment: adjust the LCD backlight brightness according to the brightness adjustment, as shown below, drag the delimit to set the brightness, press the confirmation save settings to cancel the return.
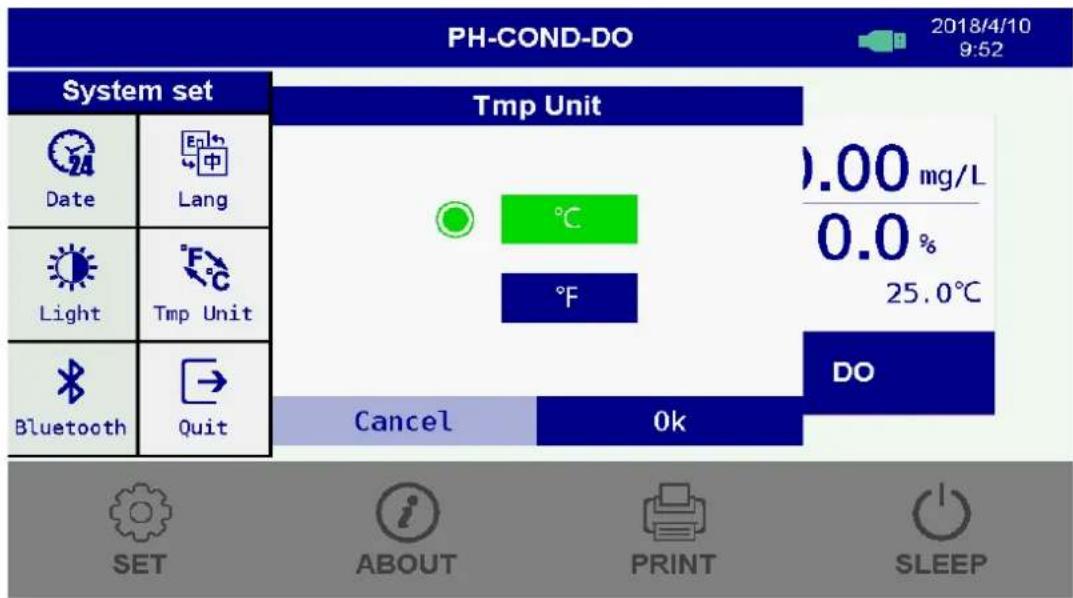
d) Temperature unit: centigrade or optional (defaults); according to the temperature unit displayed as the following figure, select the unit to compensate for the temperature of the unit C or to determine the storage setting, according to the cancellation return.
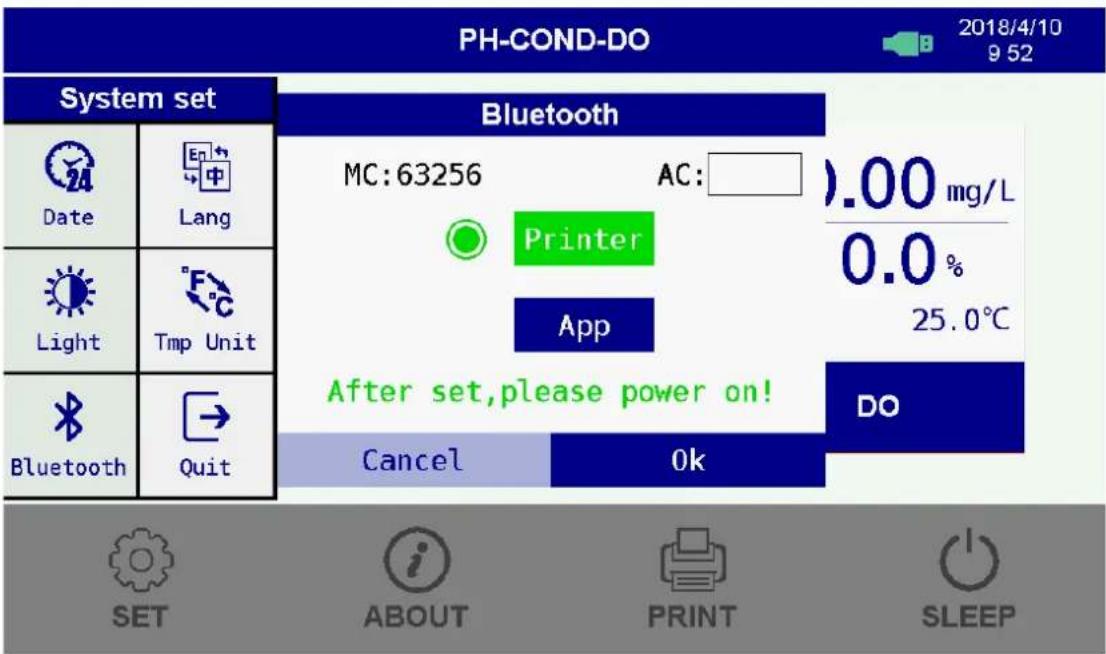
e) Bluetooth settings: connect to Bluetooth printer or mobile phone APP. According to the Bluetooth settings, you can choose to connect the Bluetooth printer or the phone APP, enter the authorization code, press the confirm save settings, press cancel to return.
f) Exit settings: return to main interface after pressing exit settings.
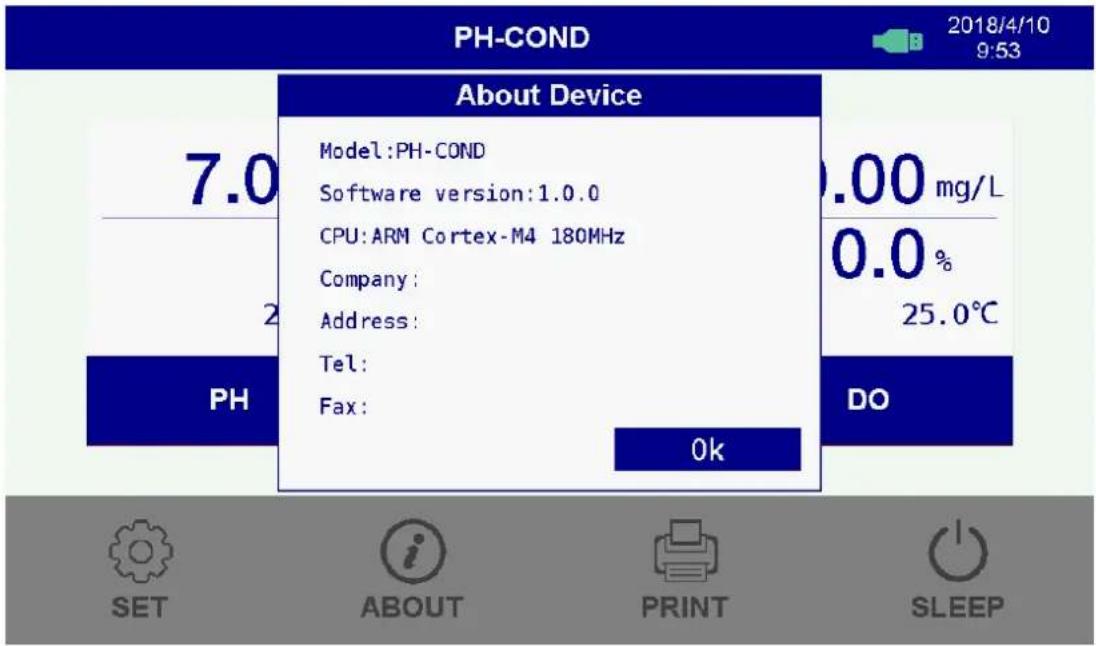
3.1.2. Equipment about
Display information about device hardware and software version as shown below.
3.1.3. Printing
Print the current measurement parameters according to the measurement.
3.1.4. Sleep
Turn off LCD backlight display according to sleep device and enter sleep standby status as shown below.
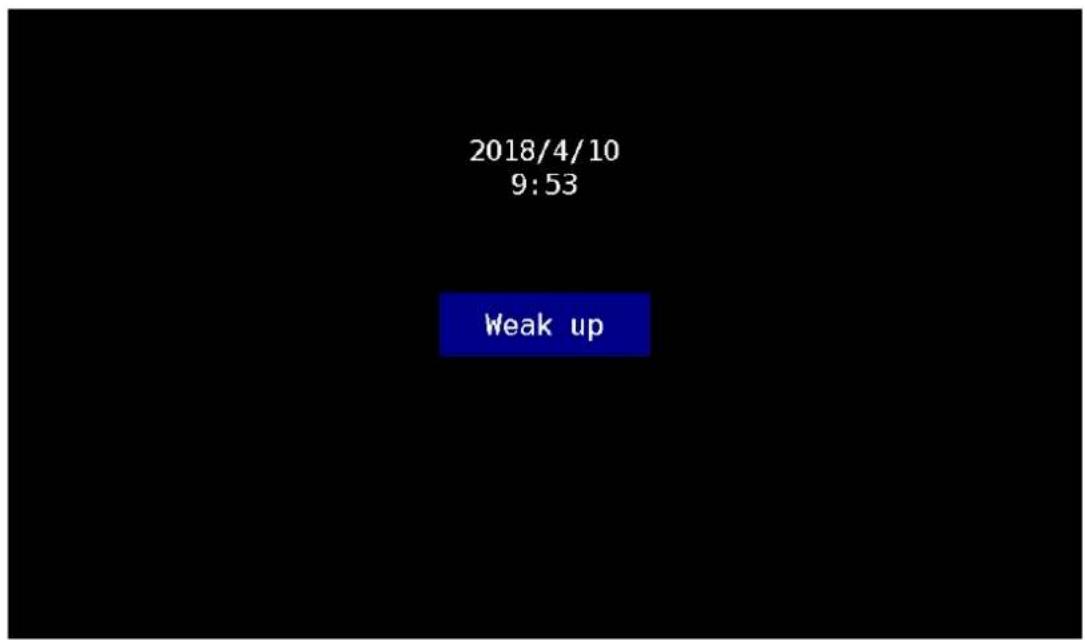
3.2. pH interface display
(at the main interface of the instrument displayed by PH as shown below)
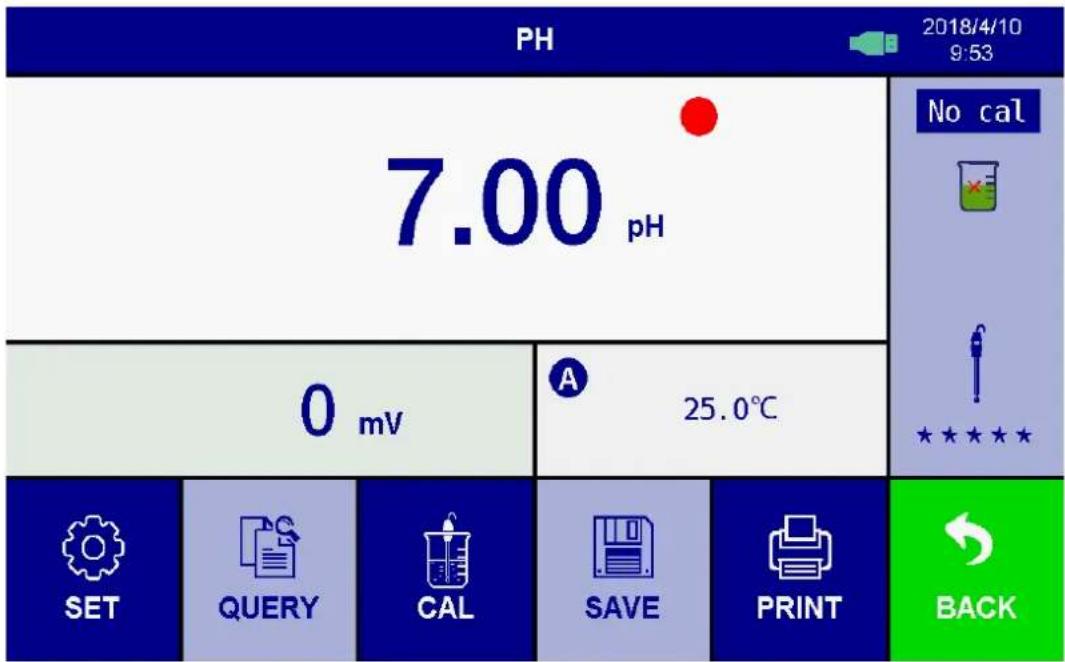
3.2.1. Display interface description
1) PH measurement data display interface;
2) MV measurement data display interface;
3) Measuring temperature shows that "A" stands for automatic, and "M" stands for manual operation.
4) The calibration indicator of the standard buffer solution;
5) The indicator of the state of the electrode.
6) Storage equipment sign
7) Sign of stability
3.2.2. Settings: enter the settings menu as set by setting
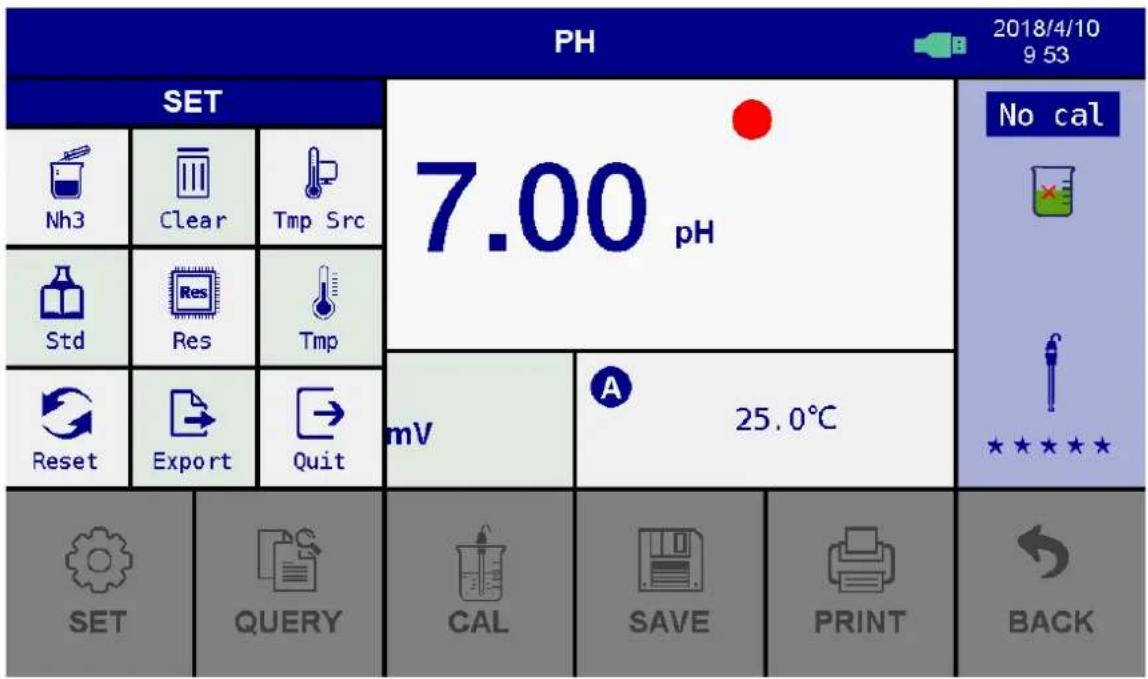
other
| Category | PH Value | Test Description | | :--- | :--- | :--- | | No cal | 7.00 pH | 7.00 pH | | Std | | | | Reset | | mv | | SET | | QUERY | | RESET | | | | Save | 25.0°C | 25.0°C | | PRINT | | BACK |a) Adding ammonia compensation: "no compensation", "pure water compensation", "ammonia compensation" three modes; according to the addition of ammonia compensation into the following diagram, according to the determination of the storage settings, by cancellations return.
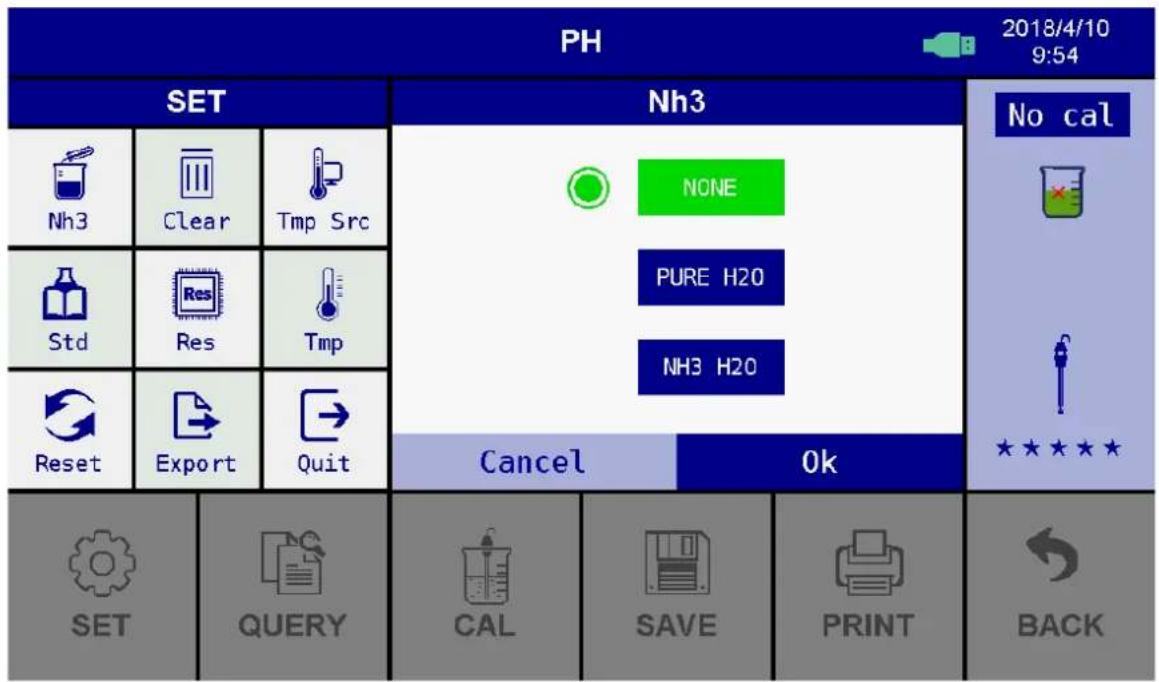
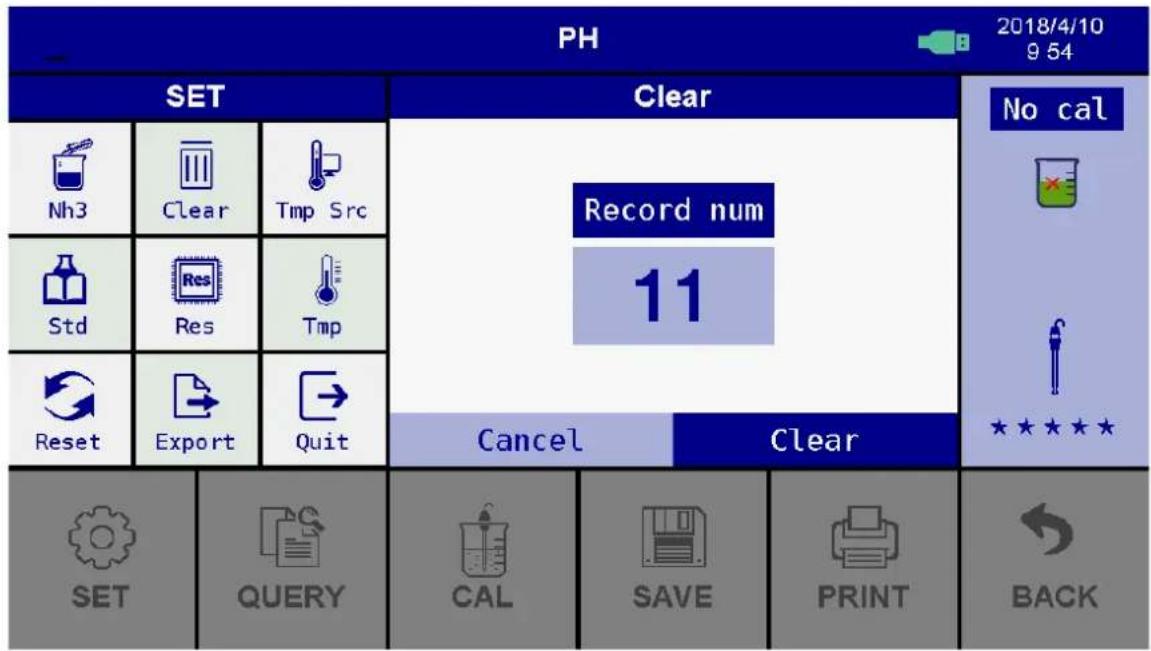
b) Record empty: empty the current storage of all data. Clear the entries according to the record, clear the empty storage records, and cancel the return.
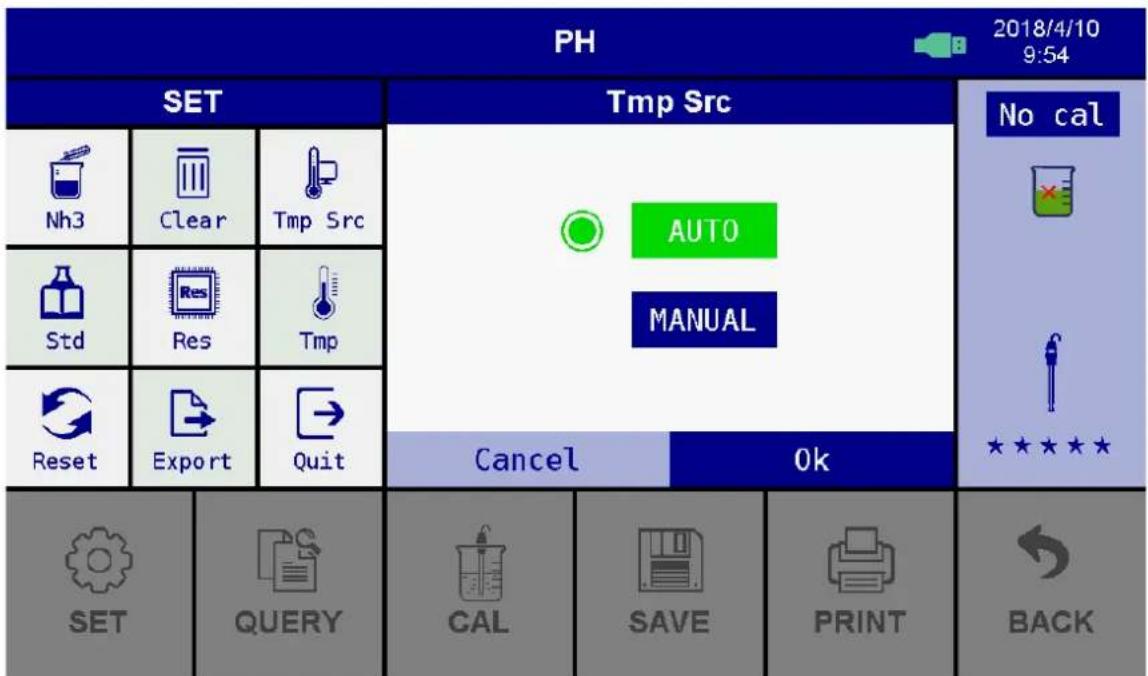
c) The source of temperature: "automatic" and "manual" two modes; according to the temperature source, such as the following diagram, the selection is or automatically press the set to save, by cancellation return.
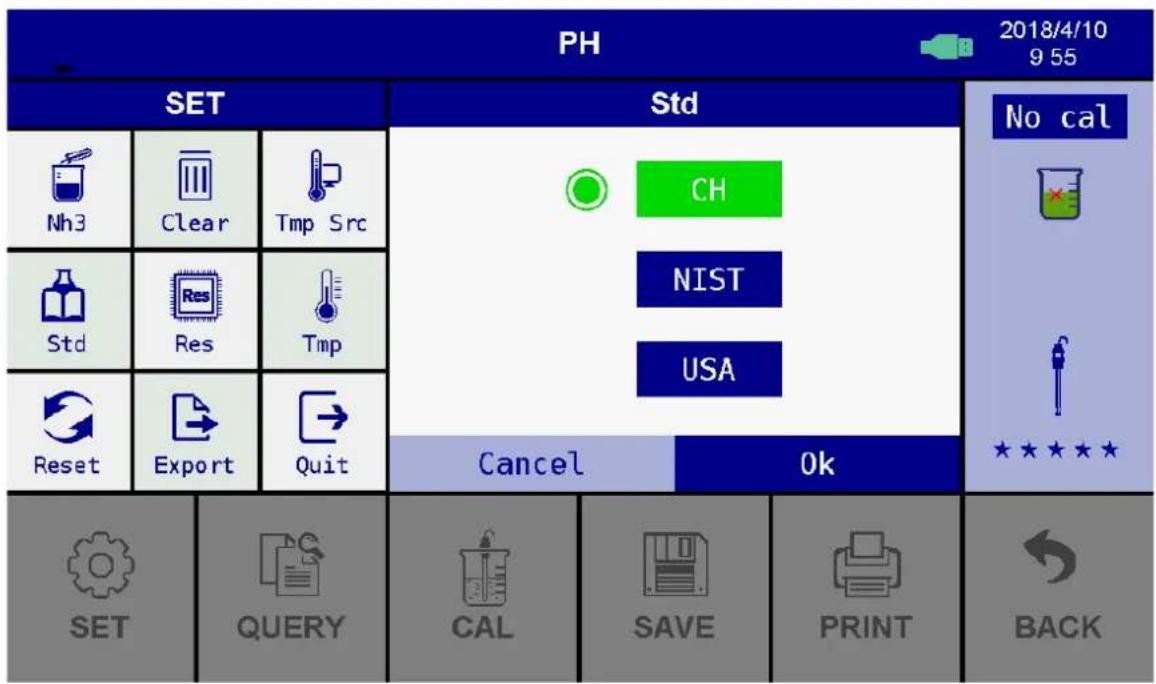
d) Series of standard liquid: standard calibration liquid, "national standard", "NIST" and "European and American" series; according to the series of standard liquid, such as the following diagram, the selection standard is determined to save the setting and is returned by cancellation.
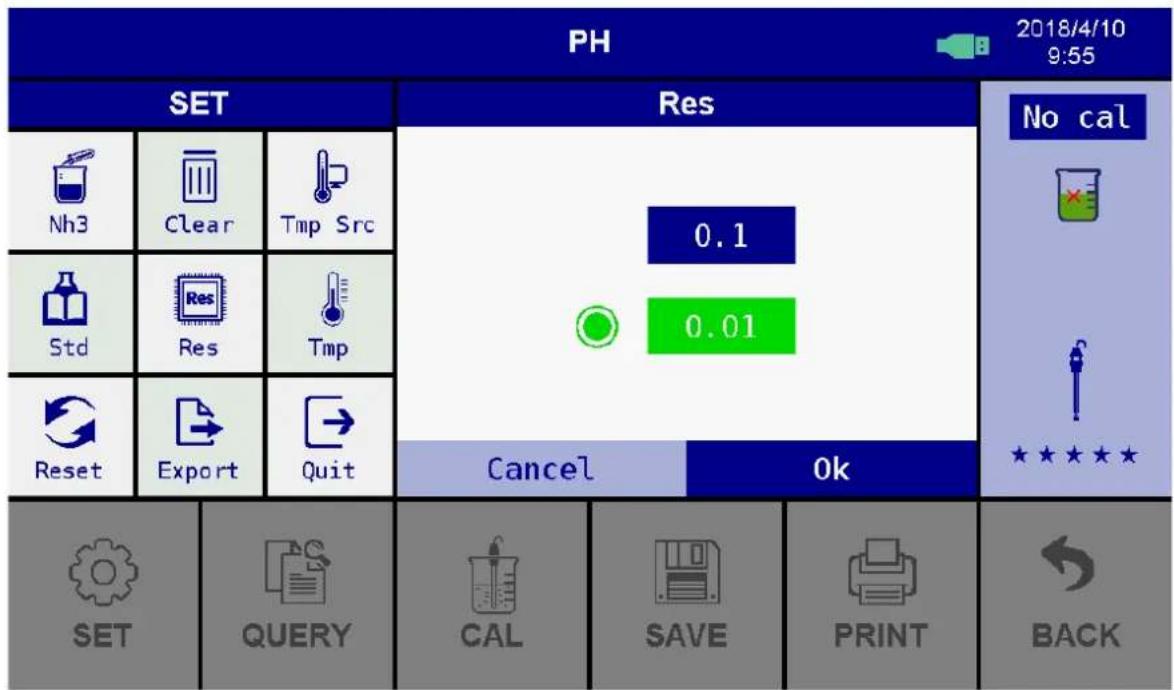
e) Resolution: 0.1pH and 0.01pH; according to the resolution, select the appropriate resolution as shown below, press the confirmation save settings and cancel the return.
f) Manual temperature: manual temperature setting;
g) Resume factory: restore factory settings, delete all records;
h) Data export: save the data into the U disk.
i) Quit Setup: return to the test interface by pressing the exit settings.
3.2.3. Query
Querying all current saved data, including information, mode, temperature, and date of preservation. According to the query, display the following page, press the previous page, turn the next page, delete the data by clear, and exit according to the exit.
| PH | 2018/4/10 9 54 | ||||||
| Record query | No cal | ||||||
| NO | PH | MV | TMP | DATE | |||
| 1 | 7.00 pH | 0 mV | 25.0 °C | 2018/3/29 14:45 | |||
| 2 | 7.00 pH | 0 mV | 25.0 °C | 2018/3/29 14:47 | |||
| 3 | 7.00 pH | 0 mV | 25.0 °C | 2018/3/29 14:49 | |||
| 4 | 7.00 pH | 0 mV | 25.0 °C | 2018/3/29 14:51 | |||
| 5 | 7.00 pH | 0 mV | 36.7 °C | 2018/3/30 10:50 | |||
| 6 | 7.000 pH | 0 mV | 25.0 °C | 2018/3/30 13:6 | |||
| 7 | 7.00 pH | 0 mV | 25.0 °C | 2018/3/30 16:5 | |||
| 8 | 7.00 pH | 0 mV | 25.0 °C | 2018/3/30 16:5 | |||
| Clear | Pre page | 1/2 | Next page | Quit | |||
3.2.4. Calibration
Using standard calibration liquid to calibrate the electrode, the instrument can be calibrated at one point, two points and three point three kinds. When the user is calibrated, it can be calibrated at any point. No order is needed. After the calibration, the standard value of the calibrated solution will be displayed on the right side to facilitate the customer's view.
3.2.5. Preservation
Save the current measurement value, including information on measurement, mode, temperature, and date of preservation.
3.2.6. Printing
To print the current measurement data, the instrument can connect the wireless Bluetooth printer. Before printing, you need to set the Bluetooth as the printer mode (the default is the printer mode) in the system settings, open the printer power, the printer is close to the device, and directly click the "print" button to print the current measurement value.
3.3. Conductivity interface display
(at the main interface of the instrument displayed by COND, as shown below)
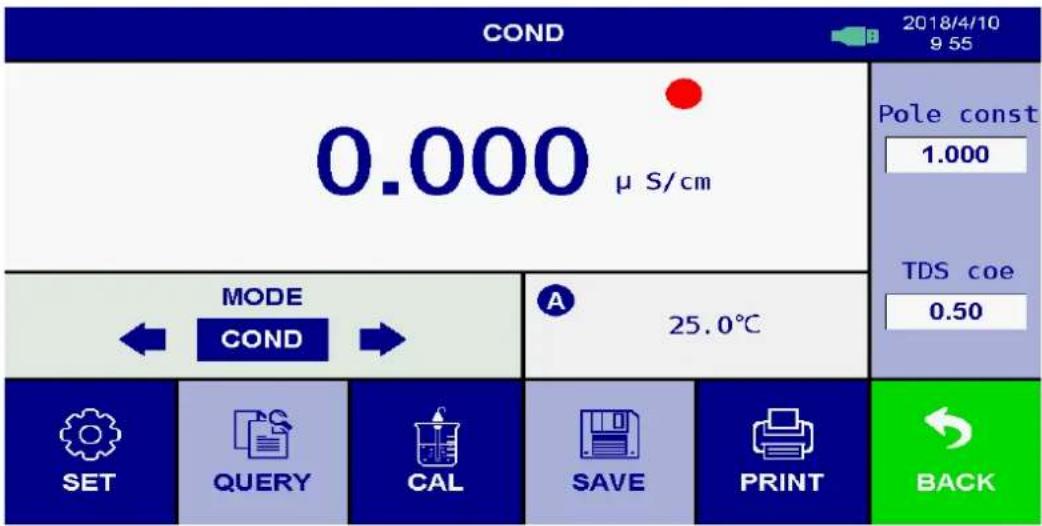
3.3.1. Display interface description
1) Measurement data display interface;
2) Mode selection, "COND", "RES", "TDS" and "SAL" are four modes.
3) Measuring temperature shows that "A" stands for automatic, and "M" stands for manual operation.
4) Setting of the electrode constant (default 1),
5) TDS coefficient setting (default 0.50).
6) Storage equipment sign
7) Sign of stability
3.3.2. Settings: enter the settings menu as set by setting
| COND | 2018/4/10 9 55 | |||||
| SET | .000 μS/cm | Pole const 1.000 TDS coe 0.50 | ||||
| Ref tmp | Clear | Tmp src | ||||
| Std | Tmp coe | Tmp | ||||
| Reset | Export | Quit | → | A 25.0℃ | ||
| SEPT | QUERY | CAL | CACT | SAVE | EXCK | |
a)
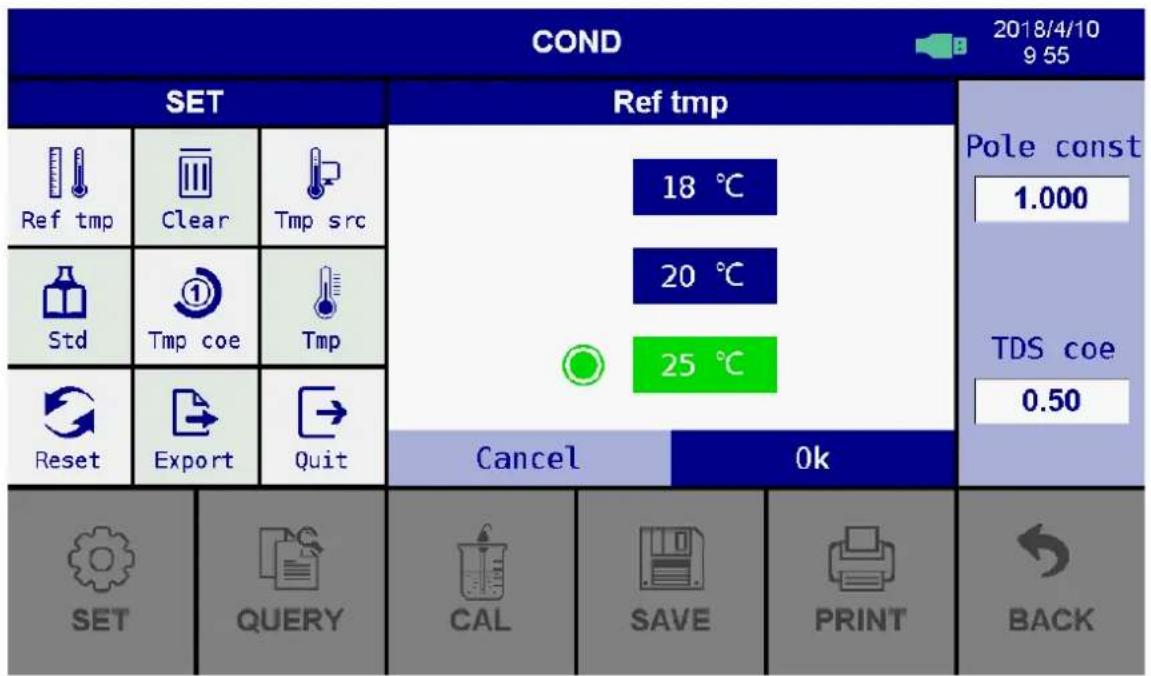
Reference temperature: "18 °C", "20 °C", "25 °C", three modes; at the base temperature, enter the
following diagram, select the appropriate reference temperature to determine the storage settings, by cancellations return
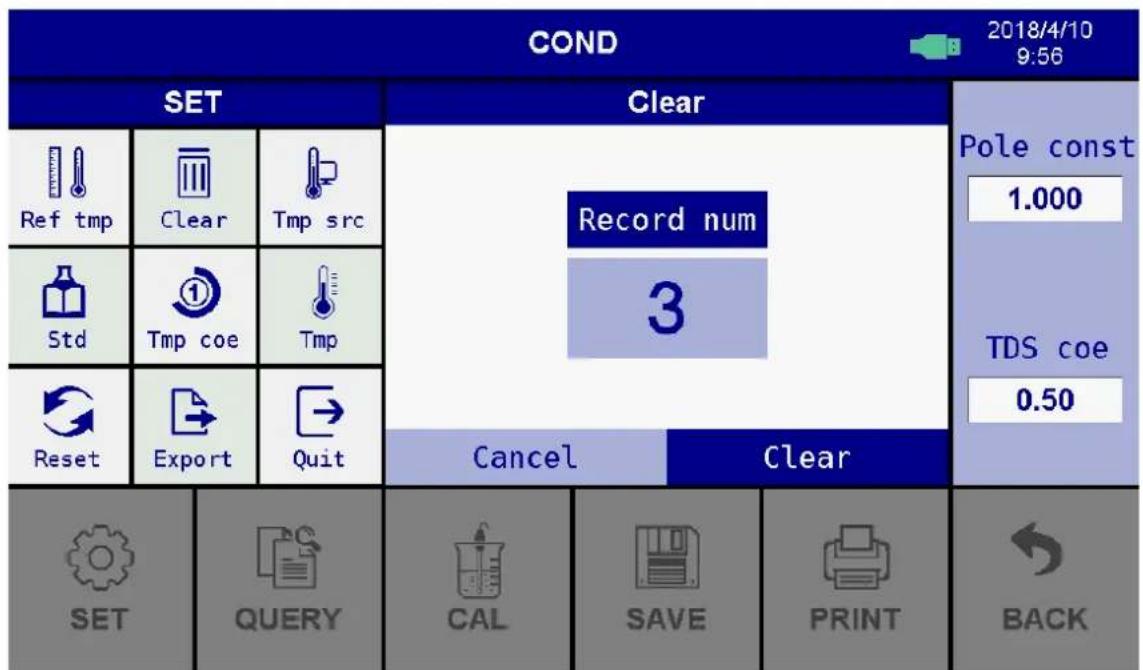
b) Record empty: empty all stored data. Clear the entries according to the record, clear the empty storage records, and cancel the return.
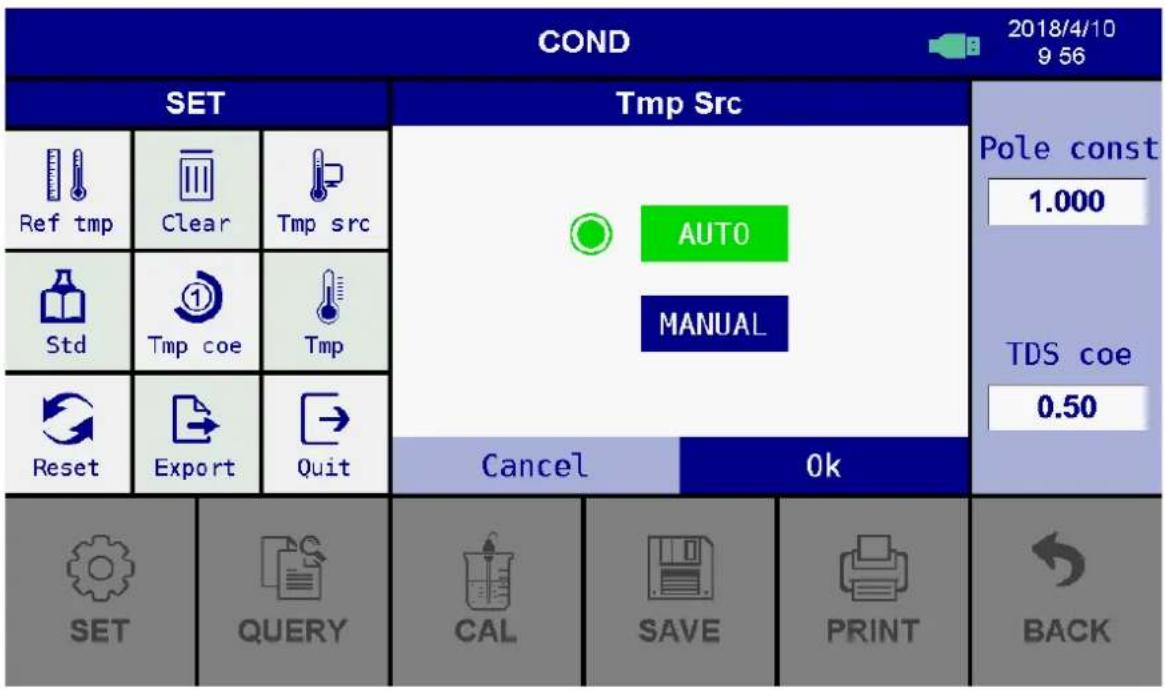
c) The source of temperature: "automatic" and "manual" two modes; according to the temperature source, such as the following diagram, the selection is or automatically press the set to save, by cancellation return.
d) Series of standard liquid: standard calibration liquid, "national standard", and "European and American" series; according to the series of standard liquid, such as the following chart, the selection standard is determined to save the setting and is returned by cancellation.
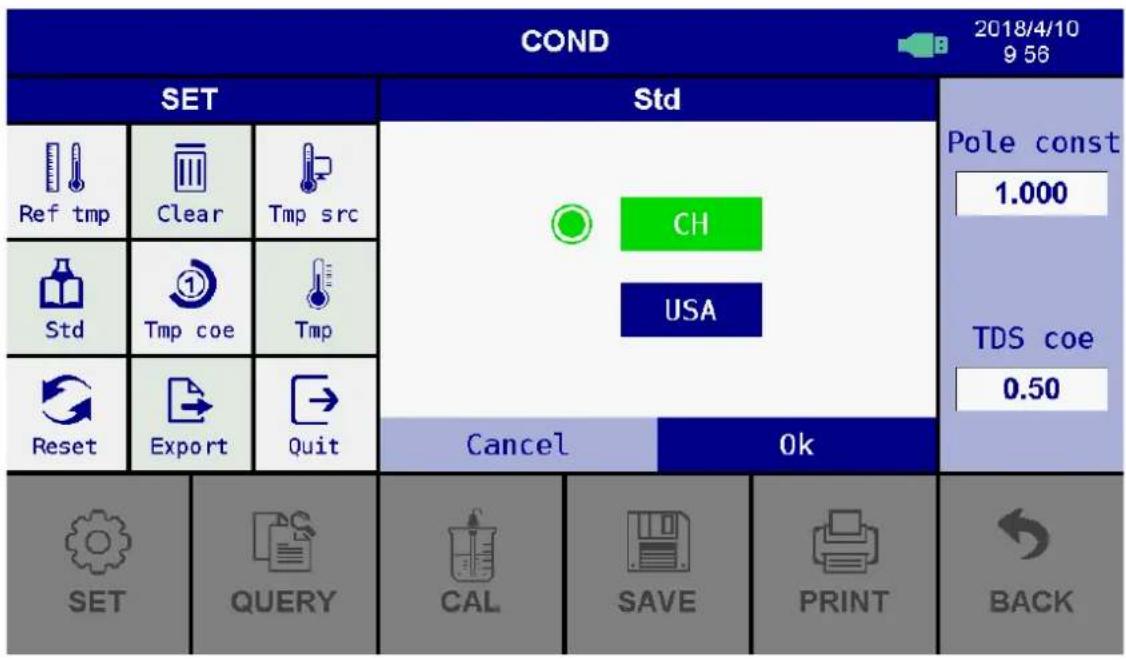
e) Temperature compensation coefficient: input the value to be compensated according to the temperature compensation coefficient (0.00-9.99%).
f) Manual temperature: manual temperature setting at 0.0-99.9 C;
g) Resume factory: restore factory settings, delete all records;
h) Data export: save the data into the U disk.
i) Quit Setup: return to the test interface by pressing the exit settings.
3.3.3. Inquire
Querying all current saved data, including information, mode, temperature, and date of preservation. According to the query, display the following page, press the previous page, turn the next page, delete the data by clear, and exit according to the exit.
| COND | 2018/4/10 9:56 | ||||||
| Record query | Pole const 1.000 TDS coe 0.50 | ||||||
| NO | VALUE | MODE | TMP | DATE | |||
| 1 | 0.000 μ S/cm | COND | 25.0 °C | 2018/3/29 14:45 | |||
| 2 | 0.000 μ S/cm | COND | 25.0 °C | 2018/3/30 11:54 | |||
| 3 | 0.000 μ S/cm | COND | 25.0 °C | 2018/3/30 16:30 | |||
| Clear | Pre page | 1/1 | Next page | Quit | |||
| SET | QUERY | CAL | SAVE | BACK | |||
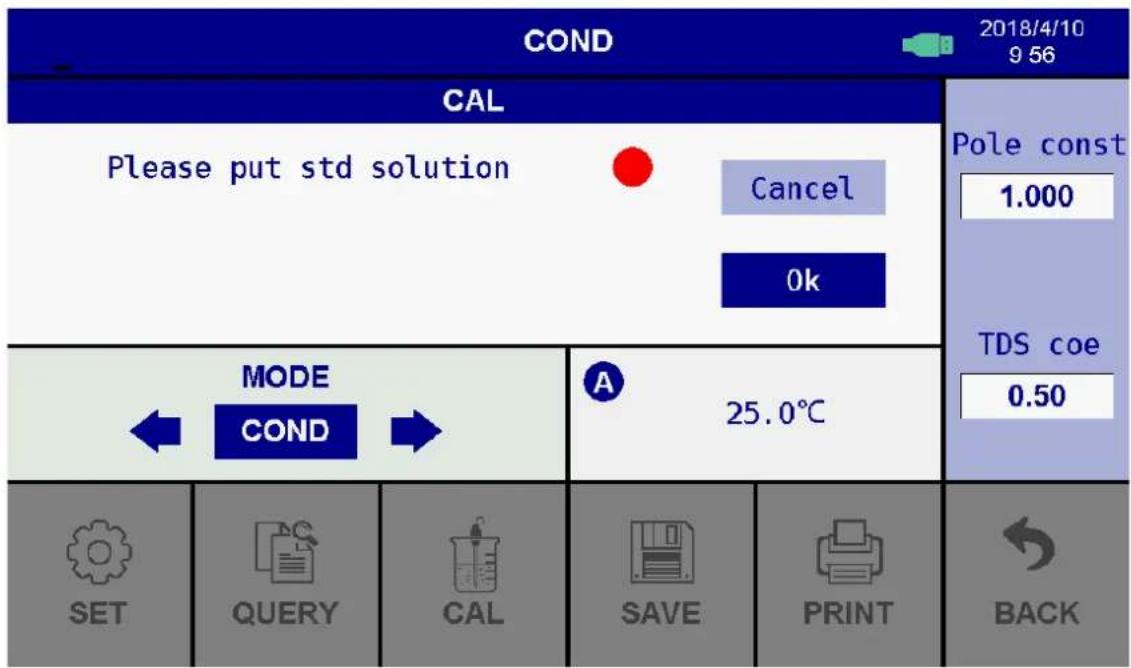
3.3.4. Calibration
The standard calibration liquid is used to calibrate the electrode, the electrode is put into the standard solution, the stable symbol is set from red to green, and the new electrode has been calibrated when it is cancelled and the new electrode is in the factory. Its constant value is marked on the electrode, and the calibration is not needed again, and the direct input electrode is often used. The value can be used as the following diagram.
3.3.5. Preservation
Save and save the current measurement value, including the measurement value, mode, temperature value, and date of preservation.
3.3.6. Printing
By printing and printing the current measurement data, the instrument can connect the wireless Bluetooth printer. Before printing, it is necessary to set the Bluetooth as the printer mode in the system setting (the default is the printer mode), open the printer power, the distance from the printer to the device as close as possible, and directly click the "print" button to print the current. The measured value.
3.4. Measurement information preservation, query and delete
3.4.1. Save measurement information
In the measurement mode, when the measured value is stable, the upper right corner stability symbol is changed from red to red.
For green, press the Save button to save the current measurement value. The instrument can store 300 sets of numbers.
According to it.
3.4.2. Query measurement information
In the measurement mode, click the "query" button to query the saved data, and the data information contains the measurement value, the mode, the temperature value, and the storage date.
Support page flip function, each page contains 8 saved data, press "last page" or "down".
Page "page and check.
3.4.3. Removes the stored measurement information
In data query mode, click the clear button to confirm whether the system is cleared.
All records can be deleted again by clicking "confirm".
4. pH Measurement
4.1. Preparation Work
4.1.1. Switch on the DC12V/1A power and press the "pH" button at the main interface to enter the pH measurement interface.
4.1.2. Check E-201-9 composite electrode, check whether the PH composite electrode glass remains moist. If the glass bubble is damaged, the electrode will not be used properly. The surface of the bulb is too dry. It needs to be soaked in saturated potassium chloride solution for 24 hours, then activated, and then used.
4.1.3. Insert the PH composite electrode and the temperature electrode into the corresponding interface.
4.2. Meter Calibration
4.2.1. Selection of standard calibration liquid.
a) Select the "standard solution series" in the settings menu. The three series are selected as follows.
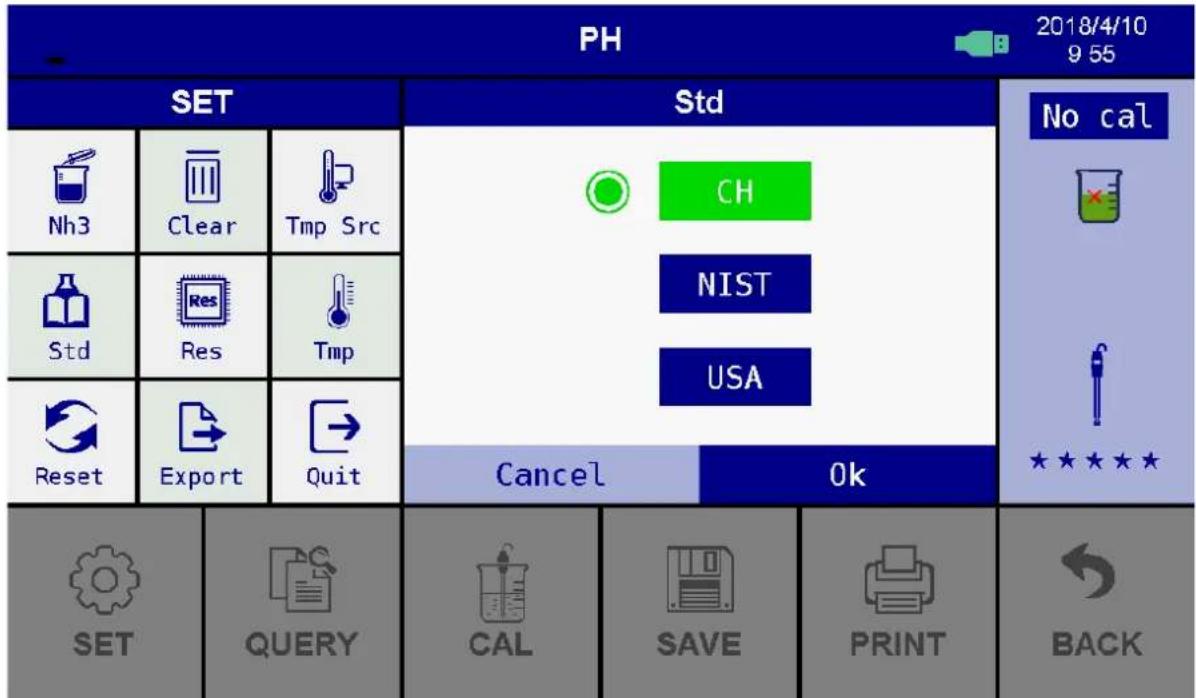
Three series of standard buffer solution values:
CH (China Series):1.68 pH, 4.00 pH, 6.86 pH,9.18 pH, 12.46pH
NIS (NIST Series): 1.68 pH, 4.01 pH, 6.86 pH, 9.18 pH, 12.45pH
USA (European and American Series): 1.68 pH, 4.01 pH, 7.00pH, 10.01pH, 12.45pH
b) After the standard is selected, enter the calibration mode according to the "calibration" button (as shown below).
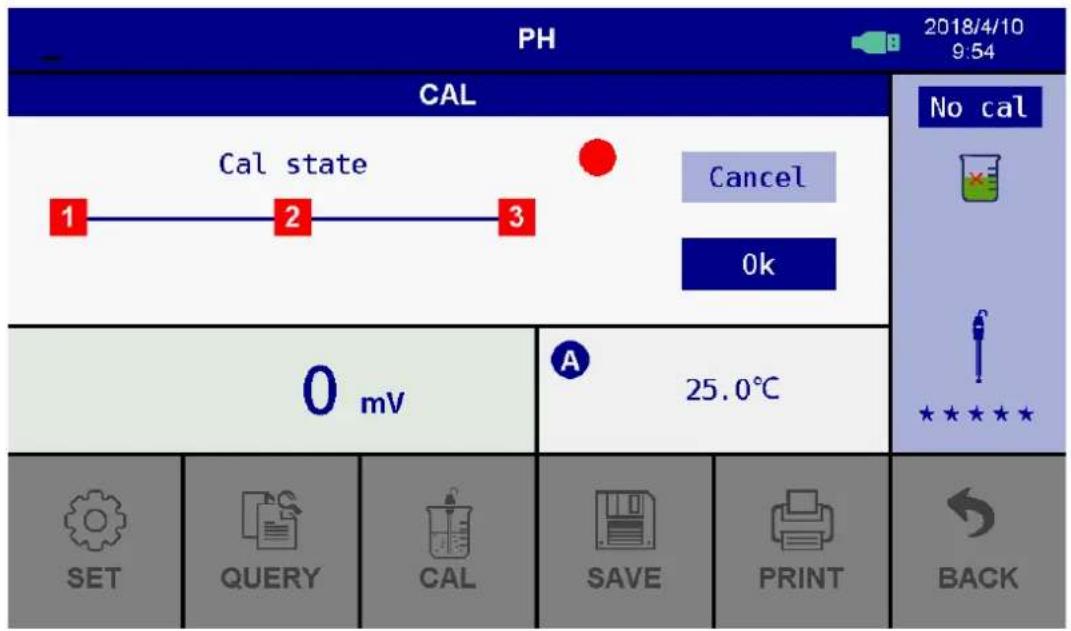
The specific calibration steps are shown in the following calibration instructions.
4.2.2. Calibration description
a) The instrument can be automatically calibrated at one point, two or three points. When the first calibration is completed, the calibration mode is pulled out and the calibration mode is entered. The right display area will show the calibrated standard liquid value. When the measurement accuracy is less than +0.1pH , a buffer solution is selected according to the range of measurement. The point calibration is OK.
b) When the second point calibration is completed, press "Cancel" to exit the calibration mode and enter. In the measurement mode, the right display area shows the calibrated standard liquid value, the measured value is only in the acid range, and the pH4.00 and pH6.86 calibration can be selected; if the measurement is only in the alkaline range, the calibration of pH6.86 and pH9.18 can be selected.
c) If the measuring range is wide, or the pH electrode has long aging time, the three-point calibration should be selected, which will make the measurement accuracy higher. However, the pH electrode used for the first time must be calibrated at three points, and the slope of the adjustment instrument is consistent with that of the pH electrode.
4.3. pH Solution Test
Immerge pH electrode into the sample solution after washing and dry it, rock the electrode holder and still, When the measured value is stable and displays the green stable icon, the reading value is the pH value of the solution.
Note: According to the pH equal temperature measuring theory: the closer the temperature of the sample solution with the calibration solution, the more accurate the measuring value will be acquired. So please comply with this theory.
4.4. Considerations
4.4.1. Calibration times of meter rely on the sample, electrode performance and required accuracy. For high accurate measurement ( ≤slant±0.02pH ), which should be calibrated immediately with high accurate standard buffer solution, for general accuracy measuring ( ≤slant±0.1pH ), which can be used almost one week or long time once be calibrated.
4.4.2. The meter must be recalibrated in the following situations:
a) New changed or unused electrode for a long time;
b) After measuring acid (pH<2) or alkaline (pH>12) solution;
c) After measuring solution which contains fluoride and concentrated organic solution;
d) The solution's temperature is much different with calibration temperature.
4.4.3. The soaking solution in the protecting bottle of front pH electrode is to keep the glass bulb and junction activating. Loose the capsule, pull out the electrode and wash it in purified water before measuring. Insert the electrode and screw tight the capsule after measuring to prevent the solution leaking. If the soaking solution is turbid or moldy, please wash and change a new one at once.
4.4.4. The preparation of the soaking solution: take 25g analytical pure KCL, dissolved with purified water and dilute to 100mL. Electrode should avoid soaking in purified water protein solution and acid fluoride solution for a long time as well avoid getting touching with organic silicon lipidic matters.
4.4.5. To calibrate the meter with the given value pH buffer solution, the pH value of the standard buffer solution must be reliable so as to improve the accuracy. Buffer solution should be changed in time after many times using.
4.4.6. Always keep the meter clean and dry; especially for the socket of meter and electrode, otherwise it may lead to an inaccurate measurement or invalidity. To clean and dry them with medical cotton with dehydrated alcohol if there are any dirty.
4.4.7. The sensitive glass bulb in the front of combination electrode should not touch with hard things, any broken and rough will make the electrode invalidity. Before and after measuring, the electrode should be washed with purified water, and dry electrode after washing, don't clean glass bulb with tissue for it will effect stability of electrode potential and enlarge response time. The electrode should be washed many times for removing the sample stuck on the electrode, or wash with suitable solvent then clean the solvent with purified water after measuring sticky sample.
4.4.8. An electrode be used for a long time, or measured solution which contains a polluting solute easily for the sensitive bulb, or a substance resulting in jam at the junction, the electrode will be getting passivated, its sensitivity will decrease and its response is getting slow, the reading are not correct. It could adopt the following method for various cases:
a) The glass bulb is contaminated and aging: Put the electrode into 0.1 mol/L dilute hydrochloric acid (Preparation: diluted 9 mL hydrochloric acid to 1000 mL with purified water) for 24 h. Rinse it with purified water, then dipped it into the electrode dipping solution for 24 h. If the passivation is serious, then user can also put the bulb of electrode into 4% HF (hydrofluoric acid) or the electrode activation solution for 3 to 5 seconds, rinsing it with purified water, and dipped it in the electrode soaking solution for 24 h to renew it.
b) Wash for contaminated glass bulb and junction: (For reference)
| Contamination | Abluent |
| Inorganic metal oxide | diluted acid less than 1mol/L |
| Organic lipidic matter | dilute washing (weak alkaline) |
| Resin macromolecule matter | dilute alcohol, acetone, ether |
| Proteinic haematocyte sediment | Acidic enzymatic solution (such as dried yeast) |
| Kinds of paint | dilute bleacher, peroxide |
4.4.9. pH electrode using period is about 1 year, but its life will be shortened if using condition is poor or incorrect maintenance. So it should be replaced immediately after electrode become aging or invalid.
4.4.10. When the meter is abnormal, please restore the device to the factory settings, then calibrate and test it.
5. mV Measurement
5.1. Switch on the DC12V/1A power and press the "pH" button at the main interface to enter the pH measurement interface.
5.2. Is connected to the ORP composite electrode or ion composite electrode. Wash and dry, immerse in the tested solution, stir it slightly, then place it at rest. When the green stability indicator icon is stabilized and displayed, the current measurement is displayed in the mV display area.
5.3. When mV is measured, the customer only needs to read the values in the mV display area, and the display values in the pH display area. It can be ignored and only read the mV display value.
6. Conductivity Measurement
6.1. Preparation Work
6.1.1. Switch on the DC12V power supply and press the "COND" button to select the conductivity measurement mode.
6.1.2. Check whether the conductivity electrode pole piece is intact. If the electrode pole piece glass is damaged, the conductivity electrode pole piece rusts will cause the electrode not to be used normally, so we should replace the new electrode.
6.1.3. Connect the conductivity electrode and temperature electrode into the meter.
6.2. Meter's Calibration (Standard solution calibration method)
According to the "calibration" key, enter the calibration mode, clean the conductance electrode with pure water and dump it dry, immerse in the 1408 s/cm calibration solution with the temperature electrode, stir it at rest, wait for stability, click "confirm", and then show the standard value of the current calibration solution at this time, 1408 mu s/cm, and then confirm the confirmation again. Calibration results, calibration is completed, exit calibration mode, enter the measurement mode.
After calibration, the normal value of the current calibration electrode will be displayed on the right side of the display area.
Note:
a) The meter has been calibrated before leaving factory, so generally users can use it directly.
b) The standard solution method is aimed at the long time use of conductance electrode, which leads to inaccuracy of conductance constant. The new conductance electrode has been calibrated before being released. Its constant is marked on the electrode and input constant before use.
6.3. Conductivity solution Test
6.3.1. Clean and dry the conductance electrode, put it in a solution with the temperature electrode, stir it at rest, wait for the data to be stable, and read the data, that is, the measurement of the conductivity of the solution.
6.3.2. Clicks "MODE" or "to" in the "MODE" area, which can display conductivity value, resistivity value, salinity value and salinity value.
6.4. Important Statement
6.4.1. This meter build-in below two kinds of calibration solution series,
a) USA (Europe & U.S.A. series) — 84 μS/cm, 1413 μS/cm, 12.88 mS/cm and 111.9 mS/cm
b) CH (China series) — 146.6μS/cm, 1408μS/cm, 12.85mS/cm and 111.3 mS/cm
6.4.2. This meter has a unique one-point calibration function, to choose one calibration solution based on the principle of the water samples and calibration solution conductivity as close as possible, in general the most common calibration solution is 1408 S/cm. Use the equipped conductivity electrode (K=1), and do calibrate with 1408 S/cm calibration solution, can use within the range of less than 100 mS/cm. Please choose refer to the chart (6-1).
Chart (6-1)
| Measuring range | 0.05 to 20μS/cm | 0.5μS/cm to 200mS/cm | ||
| Electrode constant K=0.1cm-1 (flow test) | K=1.0cm-1 | |||
| Calibration solution | 84μS/cm | 84μS/cm | 1413μS/cm | 12.88 mS/cm111.9 mS/cm |
6.4.3. There are two kinds of method which are standard solution calibration method and constant calibration method for conductivity electrode calibration which have been set in meter, the statement in item 4.2. “electrode calibration” is the standard calibration method, and when the accuracy of standard solution is accurate then suggest the standard solution calibration method is priority selected, it can ensure the best accuracy. If user used to use constant calibration method, it can be set according to the constant on the conductance electrode (The new conductance electrode manufacturers have been standard accurate, customers can be used at ease, such as long-term no use or fouling. In order to ensure accuracy, first clean up the electrode and then calibrate the standard solution.)
6.4.4. The temperature compensation coefficient of the meter setting is 2.00 %/°C by producer. However, the conductivity temperature coefficient is different for solution of different variety and concentrations, the user can refer chart (6-2), as well as the data which they own get in the experiment, to set in the parameters setting of parameter setting. At the same time, meter will do automatic non-linear temperature compensation in the high purified water which less than 10 S/cm.
Note: When the coefficient of temperature compensation is set to be 0.00, that is, there is no temperature compensation when testing, the measuring value based on current temperature.
Chart (6-2)
| Solution | Temperature compensation coefficient |
| NaCl salt solution | 2.12 %/°C |
| 5%NaOH solution | 1.72 %/°C |
| Dilute ammonia solution | 1.8 8%/°C |
| 10% hydrochloric acid solution | 1.32 %/°C |
| 5% sulfuric acid solution | 0.9 6%/°C |
6.5. Considerations
6.5.1. The conductivity electrode has been calibrated before meter leaving factory, its constant value is marked on the electrode, user can direct set constant value, direct use without calibration.
6.5.2. Recommend calibrating one time every month under the normal circumstances; The use of the conductance electrode after a period of time also needs to be calibrated once.
6.5.3. Keeping the conductivity electrode clean and wash it with purified water, then throw off the water on it before and after testing. It's better to rinse electrodes with sample solution;
6.5.4. The DJS series platinum black conductivity electrode surface is plated with a layer of metal platinum black to use as lowering the electrode polarization, enlarge measuring range, so cannot polish the surface of platinum black, only can wash it in water by shaking, in case to damage the platinum black coating; for organic stained things can be washed with hot water with detergent or alcohol.
6.5.5. Conductivity electrode before use can be immersed in purified water, to prevent the platinum black from passivation, if found the platinum black plated electrode is invalid, can immerse it into 10% nitric acid solution or 10% hydrochloric acid for 2 minutes, then rinse with purified water and again test. If the situation does not improve, then need to replace platinum black, or replacing a new conductivity electrode.
6.5.6. When the meter is abnormal, please set up the instrument to restore the factory settings, then calibrate and test it.
7. Meter's Complete Kit
7.1. Model PCE-BPH 20 pH/ Conductivity meter ....1 unit
7.2. Composite electrode 1 pc
7.3. Conductivity electrode 1 pc
7.4. Temperature electrode 1 pc
7.5. 12V/1A power adapter.... 2 pc
7.6. Manual....1 pc
7.7. Electrode bracket (containing base) 1 pc
8. Warranty
8.1. We warrant this meter to be free of charge maintain, replace the parts or products under normal using circumstances, from purchased time within one year caused by manufacturing bad and unable to work.
8.2. Attached electrodes do not belong to this warrant range. But, if the newly purchased electrode went wrong without using, it's free of charge to maintain and replace.
8.3. The above warranty is not apply to defects resulting from action of user such as misuse, improper wiring, operation outside of specification, improper maintenance or repair, or unauthorized modification.


- Table of Contents
- Brief Instruction
- Technical Parameters
- pH
- mV
- Conductivity
- Other Technical Parameters
- Working Condition
- Instructions to the Meter
- Main Interface Display
- Setting (by setting the key, as in the following diagram)
- Equipment about
- Printing
- Sleep
- pH interface display
- Display interface description
- Settings: enter the settings menu as set by setting
- Query
- Calibration
- Preservation
- Printing
- Conductivity interface display
- Display interface description
- Settings: enter the settings menu as set by setting
- Inquire
- Calibration
- Preservation
- Printing
- Measurement information preservation, query and delete
- Save measurement information
- Query measurement information
- Removes the stored measurement information
- pH Measurement
- Preparation Work
- Meter Calibration
- Calibration description
- pH Solution Test
- Considerations
- mV Measurement
- Conductivity Measurement
- Preparation Work
- Meter's Calibration (Standard solution calibration method)
- Note:
- Conductivity solution Test
- Important Statement
- Considerations
- Meter's Complete Kit
- Warranty
Brand : PCE Instruments
Model : BPH 20
Category : Meter