
KWM 8212 A INV - Autres appareils électroménagers Koenic - Free user manual and instructions
Find the device manual for free KWM 8212 A INV Koenic in PDF.


| Product Type | Freestanding Washing Machine |
| Model | KWM 8212 A INV |
| Brand | Koenic |
| Capacity | 8 kg |
| Spin Speed | 1200 rpm |
| Motor Type | Inverter Motor |
| Energy Efficiency Class | A |
| Washing Programs | 15 programs including Cotton, Synthetics, Delicates, Quick Wash, Eco, etc. |
| Display | Digital LED |
| Dimensions (H x W x D) | 85 cm x 60 cm x 55 cm |
| Weight | 65 kg |
| Power Supply | 220-240 V, 50 Hz |
| Power Consumption | 2000 W (heating), 500 W (motor) |
| Water Consumption | 50 L per cycle (average) |
| Noise Level (Wash/Spin) | 58 dB / 75 dB |
| Safety Features | Child lock, overflow protection, unbalanced load detection |
| Maintenance | Clean detergent drawer, drain pump filter, and door seal regularly |
| Spare Parts Availability | Door seal, belt, pump, control board, drum bearings |
| Repairability Index | 8.0 / 10 |
| Warranty | 2 years |
| User Manual Languages | EN, DE, FR, NL, etc. |
Frequently Asked Questions - KWM 8212 A INV Koenic
User questions about KWM 8212 A INV Koenic
0 question about this device. Answer the ones you know or ask your own.
Ask a new question about this device
Download the instructions for your Autres appareils électroménagers in PDF format for free! Find your manual KWM 8212 A INV - Koenic and take your electronic device back in hand. On this page are published all the documents necessary for the use of your device. KWM 8212 A INV by Koenic.
USER MANUAL KWM 8212 A INV Koenic
H. (a) S. (b) S. (c).
(50)1-paclit
C2016
公司负责人:徐勇、周
(3)本次股东大会决议的有效期
F. 608214民, 2017.1.25
CE
KOENIC
Washing machine
CofA12749
(3) _1 (2) _2 (1) _3
匝C:14.18 027695481
301917821
natural_image
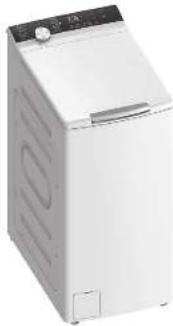
White washing machine with black top and side door, no visible text or symbols on the bodyO###
English
-
-
EN Before using the product for the first time, make sure, that all hydrophilic connections of the product are correctly sealed and connected to both the device as well as the water mains. Check all connections periodically to avoid possible leakage.
natural_image
Diagram of a faucet with arrows indicating flow direction (no text or symbols)natural_image
Technical diagram of a mechanical component with internal cavities and mounting holes (no text or symbols)natural_image
Simple line drawing of a cabinet with a red arrow indicating rotation (no text or symbols)natural_image
Diagram of a vehicle front view showing seat positions and directional arrows (no text or labels)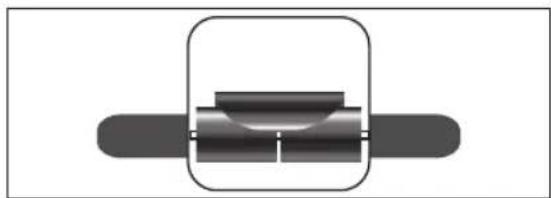
natural_image
Pure diagram of a mechanical component with no text, numbers, or symbolsEN • Detergent needs to be added in compartment I after selecting pre-washing.
• Make sure that both hatches are locked correctly. All metal hooks must fit correctly in the recesses.
• Make sure that no laundry is trapped between the hatches and the drum or between the two hatches.
- Check the drum before each laundry. It must roll smoothly.
Sicherheitshinweise
- This product can be used by children aged from 8 years and above and persons with reduced physical, sensory or mental capabilities, or lack of experience and knowledge if they are being supervised or have received instructions concerning the use of the product in a safe way and understand the hazards involved.
• Children shall not play with the product. - Cleaning and user maintenance shall not be carried out by children unless they are supervised.
- Children less than 3 years should be kept away unless continuously supervised.
- A damaged power cord may only be replaced by an authorised service agent in order to avoid hazards.
- The maximum mass of dry clothes to be used in the product is 8 kg.
- The ventilation openings of this product must not be obstructed, e.g. by carpet.
- This product is connected to the water mains. Consider the minimum and maximum permitted inlet water pressure, see chapter Technical Data. Consider all instructions about the installation for detachable hose-sets and use new hose-sets for installation. Do not reuse old hose-sets.
Safety instructions
- The product is designed for the washing of normal household quantities in the home, or in household-like, non-commercial environments. Household-like environments include staff kitchens in shops, offices, agricultural and other small businesses, or for use by guests at bed-and-breakfast establishments, small hotels and similar residential facilities.
- Read this user manual thoroughly before first use and pass it on with the product. Pay attention to the warnings on the product and in this user manual. It contains important information for your safety as well as for the use and maintenance of the equipment.
- Use the product only for its intended purpose and with recommended accessories and components. Improper use or wrong operation may lead to hazards.
- Never leave the product unsupervised while it is switched on.
- Never immerse electrical parts of the product in water or any other fluids during cleaning or operation. Never hold the product under running water.
- Do not, under any circumstances attempt to repair the product yourself. For servicing and repairs, please consult an authorised service agent (e.g. damaged power cord, product has been dropped during installation, etc.).
- The mains voltage must match the information on the rating label of the product.
- Avoid damages to the power cord that may be caused by kinks or contact with sharp corners.
-
Keep this product, including power cord and power plug away from all heat sources such as ovens, hot plates and other heat-producing products/objects.
-
Only unplug from the power socket by the plug itself. Do not pull on the cord.
- Unplug the product...
- when the product is not being used,
- in case of malfunctions,
- before attaching / detaching accessories and
- before cleaning the product.
- Use this product in dry indoor areas only and never outdoors.
- Never use, expose or put the product near to: - direct sunlight and dust;
- fire (fireplace, grill, candles), water (water splashes, vases, bath tub) or heavy moisture.
- This product is not intended for commercial use. It is designed for household use only.
- Important! Check to ensure that the product is in a serviceable condition before use. The product shall not be used, if it shows any signs of damage or it's suspected to be defect.
Congratulations!
Thank you for your purchase of a KOENIC product. Please read this manual carefully and keep it for future reference.
Intended use
This product is designed for washing clothes and textiles. Any other use may result in damage to the product or injuries. This product is designed for household use only and not intended for commercial use.
The Imtron GmbH assumes no liability for damage to the product, for property damage or for personal injury due to careless or improper usage of the product, or usage of the product, which does not meet the manufacturer's specified purpose.
Before first time use
Carefully remove the product and accessories from the original packaging. It is recommended to keep the original packaging for storage. If you wish to dispose of the original packaging, please observe applicable legal provisions. Should you have any questions regarding proper disposal, contact your local waste management center.
Inspect the delivery contents for completeness and damages. Should the delivery contents be incomplete or damaged, contact your sales outlet immediately.
After unpacking, please refer to chapter
Cleaning and care.
Warranty and spare parts
The warranty period of the product, as well as the applicable conditions of the warranty can be found in the warranty card provided with the product. The spare parts, which are listed in the corresponding ecodesign directive, can be obtained by contacting the customer service center, for a period of at least 7 years, respectively 10 years.
Content
1 x Washing machine
1 x Aqua stop water inlet hose
1 x User manual
1 x Warranty card
Controls and components
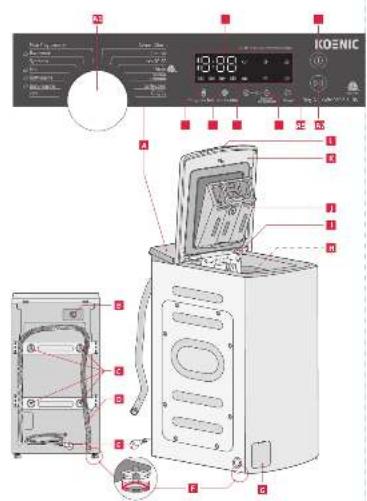
A Control panel
A1 Program selector
A2 Indicator lights and display
A3 On / off switch
A4 Start / pause button
A5 Steam button Dampf
A6 Delay button Startzeit-Verzögerung
A7 Function button Funktion
A8 Spin speed button Schleudern
A9 Temperature button Temperatur
B Water connection incl. hose
c Transport protections (4x!)
D Sewage hose
Power cord with plug
F Adjustable feet
G Lint filter
H Washing drum
I Washing drum hatches with interlock
J Detergent box
K Lid
L Handle with lid release

Transport restraints must be removed before the first use as described in chapter Installation.
Technical data
Rated Voltage : 220 - 240 V\~, 50 Hz
Rated power : 1900 W
Protection class : I
Max. capacity : 8 kg
Dimensions : 400 x 610 x 875 mm
Protection degree : IPX4
Inlet water pressure : 0.1-1 MPa
Inlet water temperature : Cold
English
Installation
Note:
The washing machine is equipped with power cord and plug and needs sewage and tap water connections. Before installation, make sure that a suitable wall outlet is at the desired place of installation.
Consider the dimensions (chapter Technical data) of the product for placing and installation.

Caution
- Before initial operation, the transport restraints must be removed from the backside of the unit. Operating the washing machine with mounted transport restraints leads to serious damages.
- Keep the transport restraints for later use. Never transport the device without correctly mounted transport restraints!
Fig. 1 Loosen the four transport restraints with a wrench (13 mm) and unscrew them completely. Insert the 4 supplied blind plugs in the holes.
Fig. 2 Place the washing machine on an even, horizontal and steady surface. For levelling, the feet are adjustable and can be screwed in or out.
- If the feet cannot be loosened by hand, use pliers.
- Turn the feet to the right to screw them in and to the left to unscrew them.
- Use a spirit level to check whether the appliance is levelled. If the appliance is not standing horizontally or is tilting, the feet must be adjusted again.
- If the unit is levelled and does not tilt, tighten the nuts with an open-end wrench.
Note:
Note the following, when placing the appliance on a platform:
The appliance might move during spinning and could fall of a platform. To prevent this, the feet must be secured with retaining tabs (available in specialized stores).
Fig. 3 The washing machine must be connected to a drain.
- The drain hose is already fixed to the sewage connection. Pull the hose out of the clamps and unwind it.
- Connect the other end to the drain pipe (option A or B). Observe the max. height of the hose end.
Note:
- When connecting to drinking water make sure that you connect the appliance using a safety device against drinking water contamination through backflow (according to DIN EN 1717). We recommend that installation, including water supply and electrical connections, and repairs are carried out by a qualified technician.
- To avoid leakage, a hose clamp should be used to correctly install the outlet hose.
- Suitable hose holders are available as optional accessories.
Fig. 4 Connect the water inlet to the water system (3/4") using the supplied hose and make sure that everything is connected correctly and firmly. The water pressure must be between 0.05 MPa and 1 MPa. A pressure reducing valve must be used if the water pressure exceeds 1 MPa. The correct installation of the water connection should be checked on a regular basis.
Note:
- If the water pipes are new or have not been used for an extended period of time, allow a certain amount of water to drain until you are sure that the water is clear and free of foreign objects.
- If this point is not observed, there is a risk, that the water inlet will become clogged and the unit will be damaged.
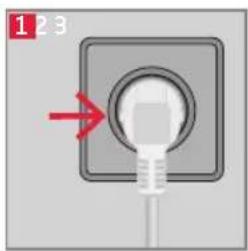
Fig. 5 Plug the mains plug into a suitable socket.
Preparation Before first use
- Make sure the transport restraints on the back of the unit have been removed.
- Remove all accessories and other materials from the washing drum.
- Before washing clothes for the first time, run the appliance without any clothes but some detergent in the "Cotton" program, see Start washing.
Note:
Before using the product for the first time, make sure, that all hydrophilic connections of the product are correctly sealed and connected to both the device as well as the water mains. Check all connections periodically to avoid possible leakage.
Operation
Preparation of the garments

Caution
- Do not wash fabrics, that are not suitable for machine wash. Observe the instructions on the care label of the laundry.
- Hard or pointed foreign objects (eg, nails, coins) can damage laundry and components.
- Never wash laundry soaked with gasoline, thinner, alcohol or solvents.
Fig. 6
- Check the pockets of all laundry and empty them. Make sure, that no lighters, coins etc. are left in the pockets.
- Before washing, remove dirt, stains and hair from the laundry, e.g. by pre-soaking and pre-washing by hand.
- Sort the laundry according to colors and the washing procedures and washing temperatures indicated on the care labels. Do not wash white laundry together with coloured laundry but separate. Newly bought coloured laundry must be washed separately.
- Turn applications, such as buttons and embroideries inwards. If necessary, close zippers, buttons or hooks before washing, and tie loose straps or loops together.
- Wash brassiere in a laundry bag to prevent the steel hangers from loosening. In particular, fine textiles such as curtains, crochet work or small articles (socks, handkerchiefs, neckties, etc.) should be washed in a closed laundry bag.
• Always remove removable parts such as hooks, eyelets, e.g. from curtains.
- During the washing of large and heavy single items, such as bedclothes, covers, bath towels, jeans, lined winter jackets, etc., the drum can become unbalanced especially during spinning. To minimize imbalances always wash several clothes together as one load.
- Linting clothes should be washed separately, otherwise you will have visible lint on all clothes, especially on black clothes.
Fig. 7
Filling the laundry drum
Pull on the handle of the lid and open it. Press the front laundry drum hatch latch until the latch releases and both doors open.
- Untangle the garments and place them neatly into the washing drum.
- If possible use the max. loading capacity recommended for each program. Do not overload the washing machine. Do not cram the laundry in the washing drum but load it in a way that the laundry is still being circulated during the washing process. Different sizes and thicknesses of the laundry influence the loading capacity.
- Close the washing drum hatches. To do this, fold down both hatches, with the rear hatch over the front hatch. Push the rear hatch down until the lock engages.
English

Caution
• Make sure that both hatches are locked correctly. The metal hook must fit correctly in the recess.
• Make sure that no laundry is trapped between the hatches and the drum or between the two hatches.
- Check the drum before each laundry. It must roll smoothly.
Selecting and filling in detergent

Caution
- Keep detergents out of the reach of children!
- Observe the instructions of the detergent regarding dosage and storage.
- Only use detergents suitable for washing machines and make the right selection, taking into account the kinds of laundry to be washed (cotton, colored, white etc.).
- Do not use bleach, as it can damage the washing machine and laundry.
Fig. 8 1. Note the different compartments:
I: Detergent for pre-wash
II: Detergent for main wash
F : Fabric softener for rinsing
- Fill in laundry detergent and fabric softener according to the manufacturer's instructions. Note on foam detection: If too much detergent is used, excessive foam is formed. The foam formation is automatically checked and excessive foam is removed.
Start washing
- Close the lid. Make sure it is correctly engaged.
- Turn on the washing machine with the on/off switch.
-
Use the program selector to select a suitable program and, if necessary, a suitable additional function. Please refer to the following Program table.
-
Use the Temperatur button to change the temperature if the preset temperature does not meet your requirements. The higher the temperature, the more energy is consumed.
- If necessary use the Schleudern button to select a different spin speed if the preset speed does not meet your requirements. The higher the spin speed, the drier but also more creased the laundry will be. High spin speeds also reduce the life of the washing machine.
Note:
Only use low spin speeds for delicate garments.
-
By pressing the Funktion button, select one of the additional functions, pre-wash or extra rinse
-
Press the timer button Startzeit-
Verzögerung to set a later time for the machine to start. By pressing the button several times a delayed start time of 3, 6 or 9 hours can be selected. To do so, follow the steps 1 to 6, then use the Startzeit-Verzögerung button to set the start time and then press the Start/Pause button. When the preset time has elapsed, the washing machine will automatically turn on and the washing time will be shown on the display.
-
You can also create your own program and save it under program point Mein Programm (My cycle). Turn the program selector to your desired program. Set the required temperature, spin speed and special functions. Then press the Temperatur button for 3 seconds to save the settings. The program remains stored and can be changed at any time as described above.
-
Start the washing process by pressing the Start/Pause button.

Caution
The door may only be opened if the appliance is not running and the indicator light is off, e.g. after a washing program is finished. Do not try to open the door while the appliance is running.
Fig. 9 Washing program table
| Program | |
| Program nameShort explanation of the program and for which fabrics it's suitable | Max load in kgTemperature that can be selected in °CSpin speed than can be selected in 1/minOther settings which can be selected with this program |
| CottonHard-wearing fabrics, heat resistant fabrics made of cotton or linen | Max. 8 kgCold/20/30/40/60/900/400/600/800/1000/1200/1300Timer, Prewash, Extra rinse, Steam |
| SyntheticWash synthetic articles, for example: shirts, coats, blending. While washing knitted textiles, detergent quantity shall be reduced due to its loose string construction and easily forming bubbles | Max. 4 kgCold/20/30/40/600/400/600/800/1000/1200/1300Timer, Prewash, Extra rinse |
| Baby Care• Max. 8 kg | Cold/20/30/40/60/900/400/600/800/1000/1200/1300Timer, Prewash, Extra rinse, Steam |
| MixMixed load of cottons and synthetic fabrics | Max. 8 kgCold/20/30/40/60/900/400/600/800/1000/1200/1300Timer, Prewash, Extra rinse, Steam |
| Bed linen• Max. 8 kg | Cold/20/30/40/600/400/600/800/1000/1200/1300Timer, Prewash, Extra rinse, Steam |
| Quick 15Extra short program of approx. 15 minutes, suitable for small items of lightly soiled laundry | Max. 2 kgCold/20/300/400/600/800Timer |
| WoolHand or machine-washable wool or richwool textiles. Especially gentle wash programme to prevent shrinkage, with longer programme pauses (textiles rest in wash liquor)Note:Wool is of animal origin, e.g. Angora, alpaca, llama, sheepUse a detergent that is suitable for machine washing wool | Max. 2 kgCold/20/30/400/400/600/800Timer, Extra rinse |
English
| Program | |
| Spin only • Max. 8 kg | • /• 0/400/600/800/1000/1200/1300• Timer |
| Rinse & SpinExtra rinse or spin with selectable speed | • Max. 8 kg• /• 0/400/600/800/1000/1200/1300• Timer, Extra rinse |
| Drum cleanFor sterilization of the drum | • /• 90• /• Timer |
| eco 40-60*Default 40°C, temperature not selectable, suitable for laundry washing at about 40-60°C | • Max. 8 kg• /• 1300• Timer |
| IntensiveTo increase the washing effects, washing time is increased. | • Max. 8 kg• 40/60• 0/400/600/800/1000/1200/1300• Timer |
| 20°CWashing brightly colored clothes for better protection of colors | • Max. 4 kg• Cold/20• 0/400/600/800/1000/1200• Timer, Extra rinse |
Half load for 8 kg machine: 4 kg
* Standard program: eco 40-60
The eco 40-60 program is able to clean normally soiled cotton laundry declared to be washable at 40^ C or 60^ C, together in the same cycle, and this program is used to assess the compliance with the EU ecodesign legislation (according to (EU) 2019/2023).
Child protection
Fig. 10 Once the child protection is activated, the settings cannot be changed. The washing machine can only be switched off with the on / off switch, whereby settings and wash progress are saved and the washing process can be continued after switching the machine back on. The child protection can only be activated, if the washing machine operation was started or is running either directly or by time delay.
buttons at once for at least 3 seconds until buzzer beep 3 times. The corresponding symbol of the control panel indicates the child protection 🔒.
buttons again at once for at least 3 seconds until buzzer beep 3 times. The corresponding symbol of the control panel turns off.
Mute the buzzer
To permanently deactivate the signal tone, press the Schleudern button for at least 3 seconds while the washing machine is switched on. To turn on the beep, press the Schleudern button again for at least 3 seconds while the washing machine is on.
Cleaning and care

Warning
- When cleaning, never use solvents or abrasive materials, hard brushes, metallic or sharp objects. Solvents are harmful to human health and can attack plastic parts, while abrasive cleaning mechanisms and tools may scratch the surface(s).
- Switch off the washing machine and let it cool down completely before cleaning.
- Clean the exterior surfaces of the product with a slightly damp cloth and dry them well. Make sure that no water enters the product interior (e.g. at the switches).
Fig. 11 Cleaning the detergent box
- Press the tab and lift up the detergent box.
- Wash the chambers with water.
- If necessary, use a soft brush to clean the housing.
- Insert the detergent box.
English
Fig. 12 Clean the filter of the pump

Caution
- Never operate the washing machine without a filter.
- The filter of the lye pump prevents foreign objects from entering and possibly damaging the pumping system.
- Clean or check the filter regularly depending on the frequency of use, approximately once a month.
- Check the filter, if the water is not pumped out or if the noise is increased during pumping.
- Before opening the service flap, place a big cloth in front and below the flap. Large amounts of water may leak when removing the filter.
• Make sure that all water has been pumped out during the previous wash cycle, then turn off the power and unplug the power cord.
- Place a big piece of cloth and a collecting tray in front of the service flap to catch any leaking water.
- Open the maintenance flap.
- Turn the filter cover to the left. Catch leaking water!
- Clean the filter under running water and remove any foreign objects.
- Insert the filter and turn it to the right. Make sure that the filter is properly fastened so that no water can leak.
- Close the maintenance flap.
Fig. 13 Inlet filter

Caution
- Close the water supply!
• After cleaning, always make sure that the water hose is properly installed and no water leaks.
Filter at the tap
Clean the filter if there is an insufficient flow of water when the water tap is open.
- Unscrew the supply hose from the water tap.
- Wash the inlet filter under running water.
- Reconnect the supply hose.
Filter of the washing machine
Clean the filter regularly, approximately every three months.
- Unscrew the supply hose on the back of the unit.
- Clean the filter with a small brush.
- Reconnect the supply hose and ensure it's properly sealed and doesn't leak.
Drum clean
- Use chlorine-free cleaning agents and a soft sponge for cleaning the drum. Do not use abrasive cleaners or means, e.g. steel wool, to clean the drum.
- When washing with low temperatures and / or liquid detergents, there is a risk of germs and odors forming in the washing machine.
- If an odor is an odor is noticeable in the drum, run the program Drum clean (90 °C) without laundry. It's not required to add detergent for this.
- It's recommended to wash the drum every month.
Descaling
Descaling is not necessary if the detergent is dosed correctly. If you want to descale the drum, proceed according to the descaling agent manufacturer's instructions. You can obtain suitable descaling agents from retailers.
Error codes
| Code | Meaning Possible causes Solution | |
| E30 Door is not closed properly | Clothes are stuck and door cannot be closed | Open and close the door again |
| E10 Water injecting problem while washing | Tap is closed or water flows too slow.Inlet valve filter is blocked.Inlet hose is twisted | Open the tap or wait till the water supply becomes normalCheck the inlet valveStraighten the hose |
| E21 Overtime water draining | Drain hose is blocked Check the drain hose and remove the blockage | |
| E12 Water overflow • water | level sensor problem • Please try to re-start and if error code still occurs, contact the service | |
| EXX Others • Not clear • Please try to re-start and if | error code still occurs, contact the service |
Troubleshooting
If there are any problems during operation, please refer to the following table. If the problems cannot be solved as indicated under Solution, or if spare parts for self-repair are necessary, please contact the service center. The respective hotlines are noted in the warranty card, provided with this product. Please note, that improper self-repair can lead to hazards as well as voidance of the warranty and should be refrained from, if in doubt.
| Problem Possible causes Solution | ||
| Product does not work and/or indicator/display does not turn on | Interrupted power supply | Check the power supply |
| Door cannot be opened | Machine's protection mechanism is active | Disconnect from the power |
| Heating fault | NTC is damaged or heating pipe is aging | Contact the service center |
| Water leakage | Connection between inlet pipe or outlet hose and tap or washing machine is not tight.Drain pipe is blocked | Check and fasten the water pipesClean up outlet hose |
| Water is overflowing from the bottom of the machine | The inlet pipe is not connected firmly.Outlet hose has water leakage | Fix the inlet pipeReplace the drain hose |
| Washing result is not satisfying | The clothes are too dirtyInsufficient detergent quantity | Select a proper programAdd proper detergent quantity |
| Abnormal noise, great vibrations | Check if the transport restraints have been removedMachine is not installed on solid floorCheck for loose objects inside drum e.g. detached ornamentsAdjust the feet of the machine | |
English
Recommendations on the type of detergent
Consider below notes, in order to improve the cleaning result, while reducing the energy consumption as well as environmental impact:
- Dose the detergent based on the recommendations / requirements of the supplier, while considering the mass and soiling level of the laundry.
- Do not mix different detergents and / softeners.
- Do you use detergents that are based on solvents or corrosive ingredients.
- Use detergents, that are activated at lower temperatures to save energy.

Attention
Wrong dosing of detergents, softeners or other additives may damage the product.
Below table shall serve as a guideline for the correct choice of the program, temperature and detergent:
| Type of clothing Program | Temperature | of the washing program | Recommended detergent |
| White textiles, made from cotton or other organic fibers | Baumwolle (Cotton) | 20°C – 90°C General purpose laundry detergent | |
| Colored textiles, made from cotton or other organic fibers | Mischprogramm (Mix) | 20°C – 90°C Color-care laundry detergent | |
| Delicate textiles, e.g. silk | Schnell 15min (Quick 15min) | < 20°C Mild detergent | |
| Textiles made from synthetic fibers and mixed textiles | Synthetik (Synthetic) | 20°C – 60°C Specialty laundry detergent | |
| Sports textiles made from micro fibers | Sportprogramm | 20°C – 60°C Specialty laundry detergent | |
| Woolen textiles Wolle | (Wool) | 20°C – 40°C Specialty laundry detergent / mild laundry detergent | |
| Baby clothing Baby-Wäsche | 20°C – 60°C Specialty laundry detergent | ||
| Jeans / Denim Jeans | 20°C – 90°C General purpose laundry | detergent / Specialty laundry detergent |
Note: The table serves only as a reference and a general recommendation. For the correct dosage as well as temperature, always observe the information in your clothing as well as the on the packaging of the detergent.
Program parameters according to (EU) 2019/2023 Annex II No 9, 2
| Program Capacity (kg) | Program Duration (h:min) | Energy consumption (kWh/cycle) | Water consumption (liters/cycle) | Maximum temperature reached* (°C) | Remaining moisture content (%) | Spin Speed (rpm) |
| eco 40-60 8.0 3:3 | 8 0.397 57 38 53.9 | 1250 | ||||
| eco 40-60 1/2 4.0 | 2:48 0.456 | 47 32 | 53.9 1250 | |||
| eco 40-60 1/4 2.0 | 2:48 0.196 38 23 | 53.9 1250 | ||||
| 20°C 4.0 1:01 0.18 | 83 47 20 80070 | |||||
| Cotton ≥60°C 8.0 | 2:40 0.894 71 40 70 | 800 | ||||
| Mixed textiles | 8.0 1:20 0.754 71 | 40 70 | 800 | |||
| Quick 15min | 2.0 | 0:15 | 0.026 | 34 | cold | 70 |
| Intensive | 8.0 3:48 1.013 | 71 | 40 | 70 | ||
| My program 8.0 | 2:40 0.894 | 71 | 40 | 70 | ||
| Synthetics | 4.0 2:20 0.625 44 | 40 70 | 800 | |||
| Baby clothing | 8.0 2:01 1.317 71 | 40 70 | 800 | |||
| Wool | 2.0 1:07 0.410 60 | 40 80 | 600 | |||
| Rinse & spin | 8.0 | 0:20 | 0.045 | 23 | / | 70 |
| Spin only | 8.0 | 0:12 | 0.038 | / | / | 70 |
| Drum clean | - | 1:18 | 0.839 | 20 | 90 | 70 |
Note: The values given for programs other than the "eco 40-60" program are indicative only
* for minimum 5 minutes inside the laundry being treated in the washing cycle
English
Notes concerning the energy- and water consumption of the washing machine
- The most efficient programs in terms of energy consumption, are generally those, that perform at lower temperatures and longer duration.
- Program time as well as energy- and water consumption depend on various factors, such as weight and type of the laundry, chosen functions, characteristics of the water etc.
- For only slightly or normally soiled laundry, decrease the temperature of the program, as the device uses less energy this way.
- Refrain from using the pre-wash function to save water as well as energy.
- Use the maximum spin speed available if the laundry will be dried in a dryer afterwards, as the remaining moisture content will be lower, which in turn saves energy during the later drying process. Note, that noise and remaining moisture content are influenced by the spinning speed: the higher the spinning speed in the spinning phase, the higher the noise and the lower the remaining moisture content.
- Load the household washing machine up to the maximum capacity of each program to reduce the energy- and water consumption.
- KOENIC
- Sicherheitshinweise
- Safety instructions
- Congratulations!
- Intended use
- Before first time use
- Cleaning and care.
- Warranty and spare parts
- Content
- Controls and components
- Technical data
- English
- Installation
- Note:
- Caution
- Preparation Before first use
- Operation
- Preparation of the garments
- Fig. 6
- Fig. 7
- Filling the laundry drum
- Selecting and filling in detergent
- Start washing
- Child protection
- Mute the buzzer
- Cleaning and care
- Warning
- Fig. 11 Cleaning the detergent box
- Fig. 12 Clean the filter of the pump
- Fig. 13 Inlet filter
- Filter at the tap
- Filter of the washing machine
- Drum clean
- Descaling
- Troubleshooting
- Recommendations on the type of detergent
- Attention
- Notes concerning the energy- and water consumption of the washing machine
Brand : Koenic
Model : KWM 8212 A INV
Category : Autres appareils électroménagers