
Raffi - Chaise haute pour enfant Caretero - Free user manual and instructions
Find the device manual for free Raffi Caretero in PDF.


| Product Type | Baby Swing / High Chair |
| Brand | Caretero |
| Model | Raffi |
| Weight Capacity | 3 kg to 12 kg |
| Power Supply | Batteries (not included) or AC adapter (included) |
| Swing Speeds | 5 adjustable speeds |
| Timer Settings | 8, 15, or 30 minutes |
| Music & Sounds | Built-in music player, water flow and bird tweet sound effects |
| Carousel | Rotating carousel with lights |
| Seat Rotation | 3 different angles (90° rotation) |
| Harness Type | 5-point safety harness with buckle |
| Safety Standards | Complies with EN 16232, EN 71, EN 16232 |
| Assembly Required | Yes, adult assembly with screwdriver (not included) |
| Portability | Foldable legs for storage |
| Upholstery | Removable seat upholstery (machine washable? not specified, but likely wipe clean) |
| Intended Use | Floor use only, not on elevated surfaces |
Frequently Asked Questions - Raffi Caretero
User questions about Raffi Caretero
0 question about this device. Answer the ones you know or ask your own.
Ask a new question about this device
Download the instructions for your Chaise haute pour enfant in PDF format for free! Find your manual Raffi - Caretero and take your electronic device back in hand. On this page are published all the documents necessary for the use of your device. Raffi by Caretero.
USER MANUAL Raffi Caretero
IMPORTANT! Please read this manual carefully before the first use of the product.
Keep for future reference.
Thank you for choosing the Caretero Raffi electrical baby swing.
You purchased a modern and high-quality product.
We are sure that it will provide your child with safety and will ensure hir or her proper, harmonous growth.
We encourage you to learn about our full offer by visiting our website www.caretero.pl.
We are also eager to hear your opinions on our products. Should you have any remarks, feel free to share them with us.
Caretero brand Team.
natural_image
Technical line drawing of a mechanical linkage assembly with a close-up inset showing a labeled component (E), no text or symbols present.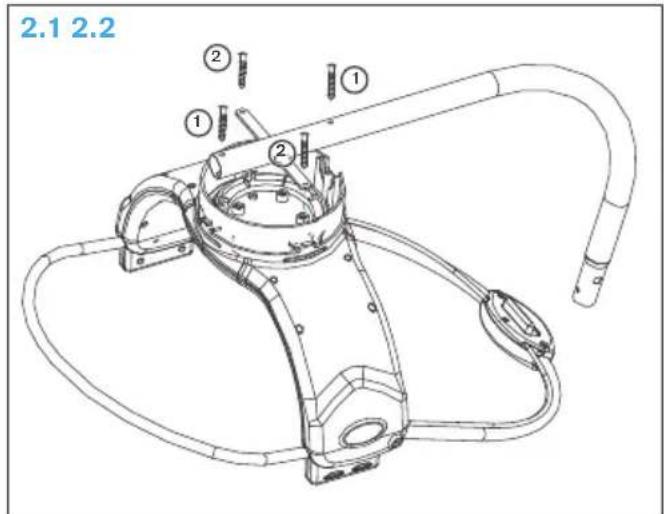
natural_image
Technical line drawing of a mechanical device with hoses and housing (no text or symbols)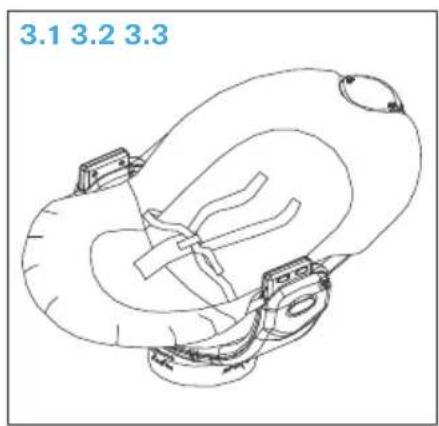
natural_image
Technical line drawing of a mechanical component with no visible text or symbols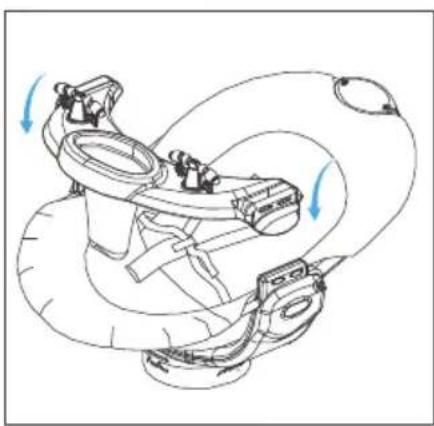
natural_image
Diagram of a mechanical device with rotating arms and blue directional arrows indicating motion (no text or symbols)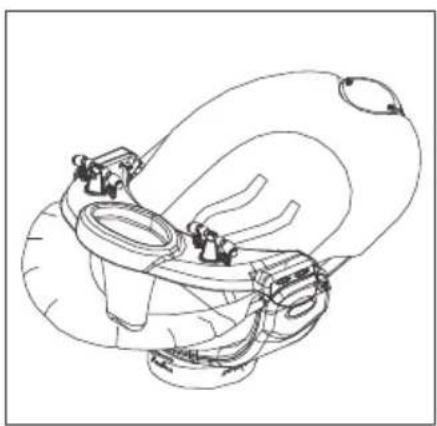
natural_image
Technical line drawing of a mechanical assembly with no visible text or symbols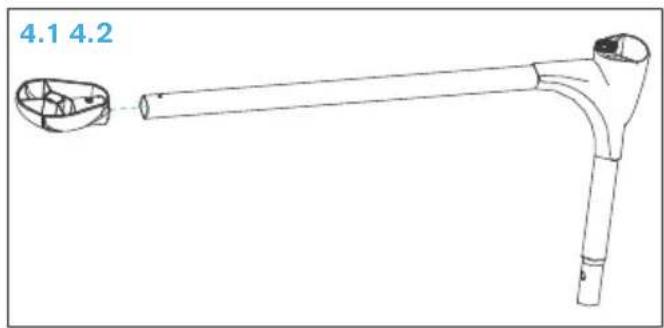
natural_image
Technical line drawing of a mechanical lever with two ports and a handle (no text or symbols)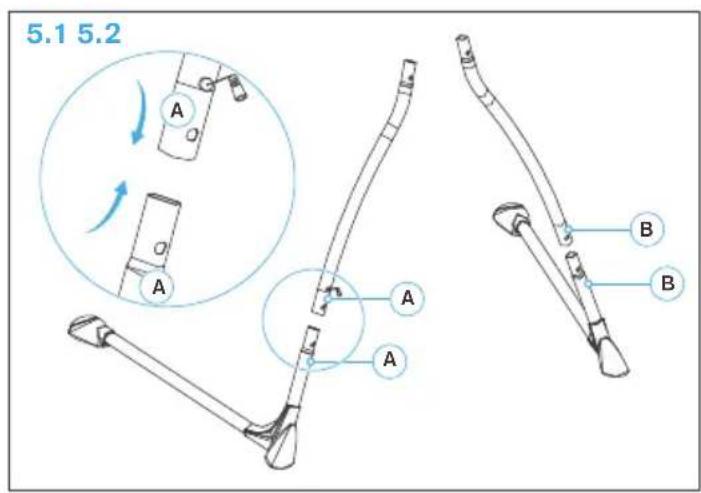
natural_image
Technical line drawing of a mechanical linkage assembly with inset detail (no text or symbols)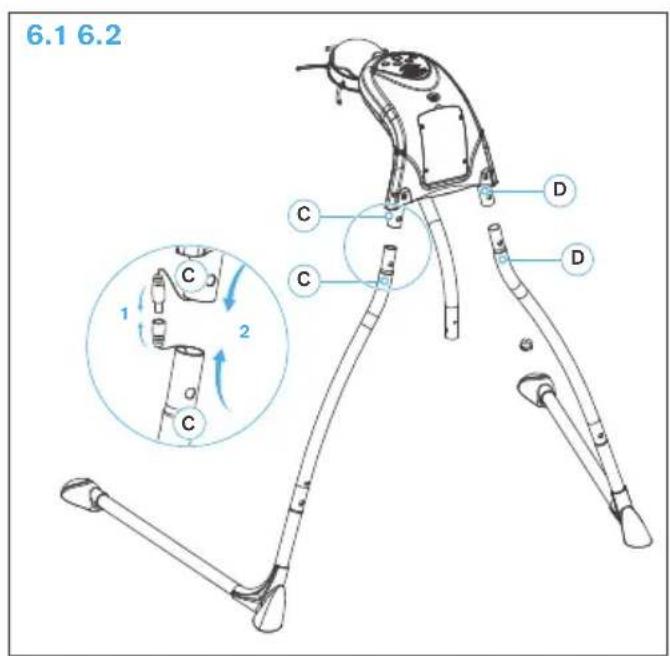
natural_image
Technical line drawing of a robotic device with articulated limbs and a close-up inset showing a detail (no text or symbols)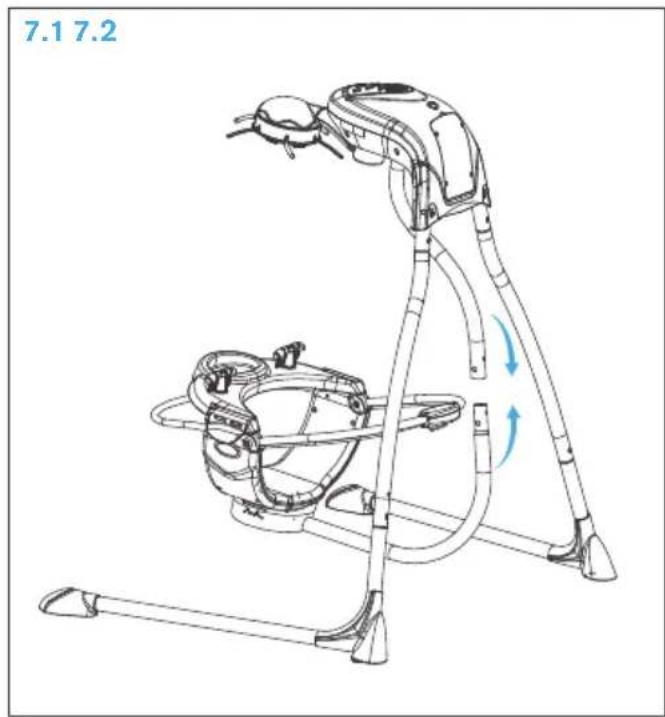
natural_image
Line drawing of a robotic device with a circular base and curved arm, showing motion arrows (no text or symbols)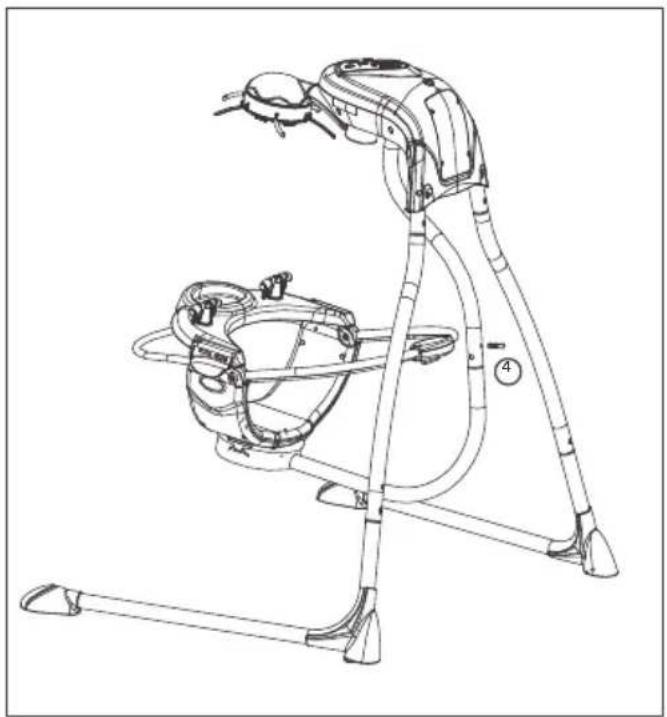
natural_image
Technical line drawing of a robotic device with a circular base and articulated arm (no text or symbols)8.1 8.2
natural_image
Line drawing of a baby in a full-body seatbelt with a blue arrow indicating the seatbelt (no text or symbols present)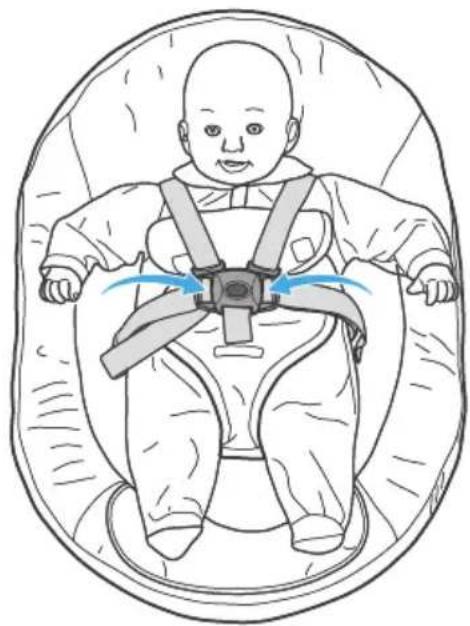
natural_image
Line drawing of a baby wearing a full-body safety harness, enclosed in a circular frame (no text or symbols)9
natural_image
Three identical line-drawn robotic limbs with curved legs and loops, connected by directional arrows, no text or symbols present.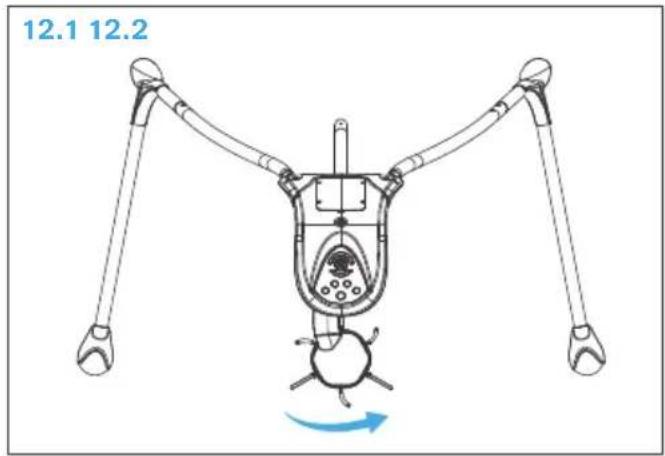
natural_image
Line drawing of a mechanical device with articulated limbs and a central component (no text or symbols)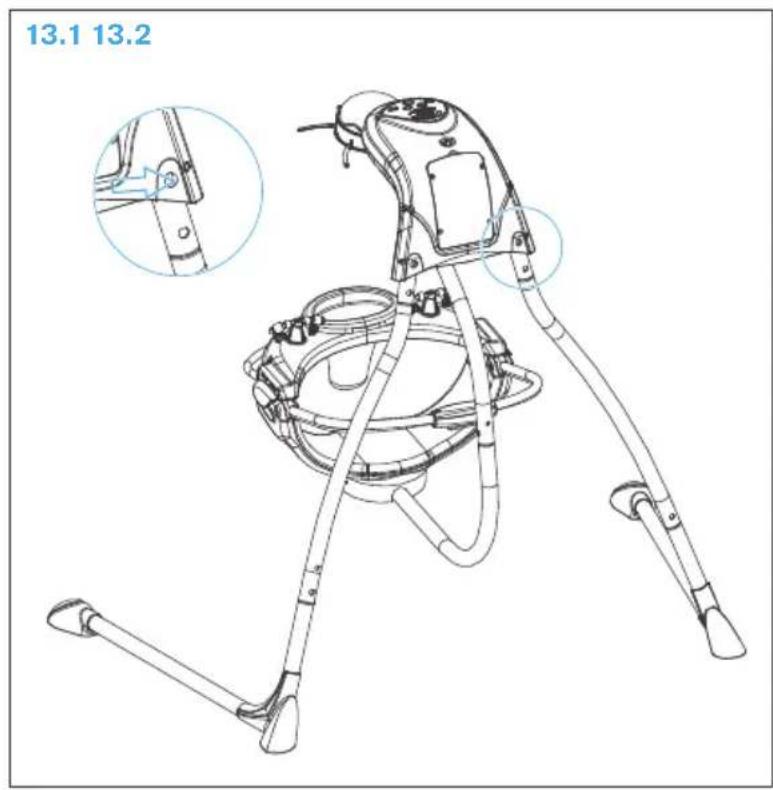
natural_image
Technical line drawing of a mechanical device with two directional arrows indicating movement or force (no text or symbols present)2 WSKAZÓWKI BEZPIECZEŃSTWA
PONIŻSZE INSTRUKCJE OBSŁUGI SĄ WAŻNE.
PRZED UŻYTKOWANIEM NALEŻY PRZECZYTAĆ NINIEJSZĄ INSTRUKCJĘ I ZACHOWAĆ JĄ NA PRZYSZŁOŚĆ. BEZPIECZEŃSTWO DZIECKA MOŻE BYĆ ZAGROŻONE, JEŚLI ZALECENIA NINIEJSZEJ INSTRUKCJI NIE BĘDA STOSOWANE.
2 SAFETY INSTRUCTIONS
INSTRUCTIONS BELOW ARE IMPORTANT.
BEFORE FIRST USE OF THE PRODUCT, PLEASE READ THIS MANUAL CAREFULLY AND KEEP IT FOR FUTURE REFERENCE. YOUR CHILD'S SAFETY MAY BE IN DANGER IF THE FOLLOWING INSTRUCTIONS ARE NOT FOLLOWED.
This electrical swing complies with European standards: EN 16232, EN 71, EN 16232.
WARNING!
TO PREVENT SERIOUS INJURY OR DEATH FROM CHILDREN FALLING OR BEING STRANGLED IN STRAPS:
• NOT INTENDED FOR CARRYING BABY.
- NEVER leave child unattended in the swing.
- ALWAYS use restraint system.
- NEVER use with an active child who may be able to climb out of the seat.
- NEVER place a child under 3 kg or over 12 kg in the swing.
- NEVER lift swing using the toy bar as a handle.
- NEVER move unit while child is in swing.
- NEVER attach any additional strings or straps to product or toy bar.
- NEVER use swing without seat upholstery.
- This product contains small parts. Adult assembly required.
- Examine product frequently for damaged, missing, or loose parts.
- Immediately stop using swing if any parts are missing, damaged, or broken.
- Contact the distributor if spare parts are needed. Never use spare parts other than provided by the manufacturer.
- A screwdriver is needed to assemble the swing properly (not included).
FALL HAZARD!
- NEVER place the swing on countertops, tables, on or near steps or on other elevated surfaces.
- ALWAYS use the swing on the floor.
SUFFOCATION HAZARD!
- NEVER use on soft surface (such as a bed, sofa, or cushion), as swing may tip over and cause suffocation.
- DO NOT place swing in any places with cords, cables nearby.
BATTERIES
- Use a screwdriver to remove the battery lid and insert the batteries as shown on the diagram inside the battery compartment. The included AC adapter may also be used to power the swing. Before using the AC adapter, remove the batteries from the battery compartment first.
- Store batteries in a place out of reach for children.
- Always check whether the batteries are inserted correctly, according to the polarization diagram in the compartment.
- Never charge batteries which are not rechargeable.
- If the battery casing is leaky, dispose of the batteries immediately. The leaking liquid may cause skin burns and other damages to the body.
- Always dispose of the batteries in a battery recycling bin.
- Never use new and used batteries at the same time.
- Never use different types of batteries at the same time (e.g. alcalic, carbon-zinc and rechargeable).
- Always remove batteries from the swing when it is not used over a longer period of time (a month or longer). Leaving batteries inside may damage the swing.
- Battery charging may be performed by adults only.
3 SEAT ASSEMBLY
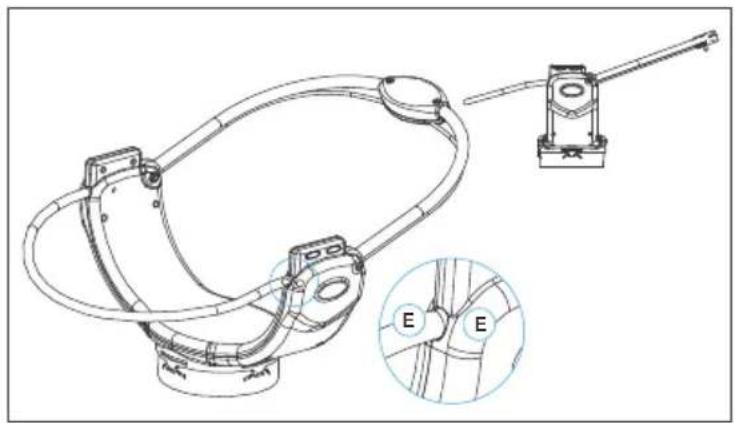
Insert the tips of the front seat frame tubes in the openings on the sides of the seat base (E) until the tubes are locked in place (1.1).
IMPORTANT: After installation, the seat frame tube should face downwards as in the picture to the right (1.2).
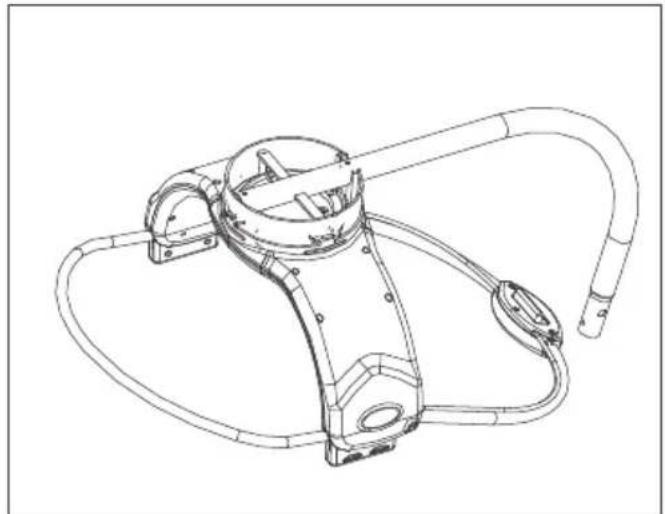
Flip the seat upside-down. Attach the lower part of seat support to the seat base with screws (2.1) (1) - the longer ones should be attached through the support tube and (2) - the shorter ones should be attached through the side plates (2.2).
Put the upholstery on the seat frame (3.1). Then attach the tray onto the seat (3.2), connecting the side locks of the tray to the sides of the seat base (3.3).
4 SWING FRAME ASSEMBLY
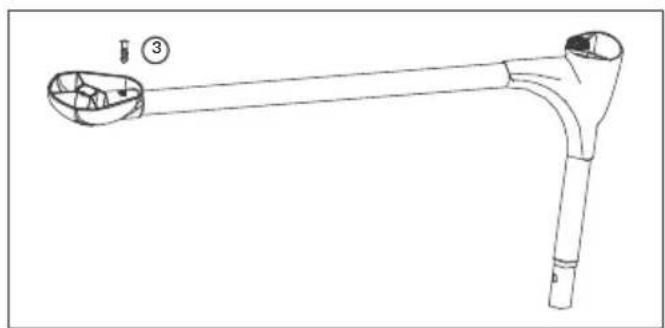
Insert the feet onto the tips of the leg tubes (4.1) and attach them with the screws (3) (4.2).
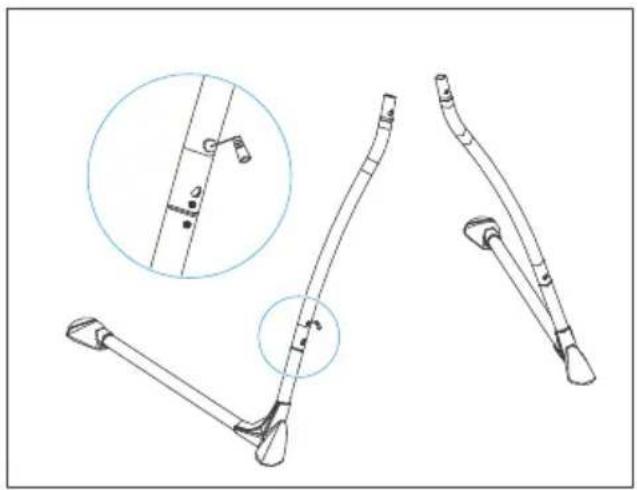
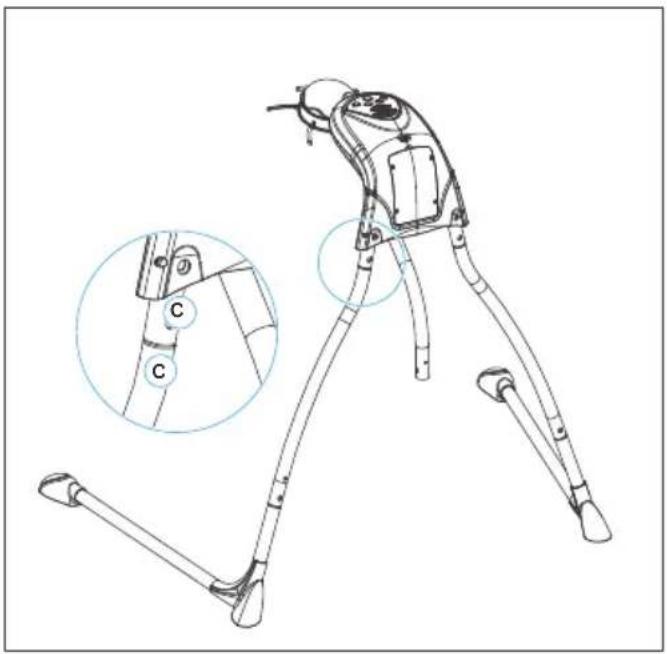
Connect (5.1) the right leg with the right frame tube (A) and the left leg with the left frame tube (B) (5.2). Before attaching the right frame tube with the right tube of the control unit, please connect the cords found in the tubes (C1) (6.1), then connect the tubes (C2) (6.2).
Connect the left frame tube with the left tube of the control unit (D) (6.2).
5 CONNECTING THE SEAT WITH THE CONTROL UNIT
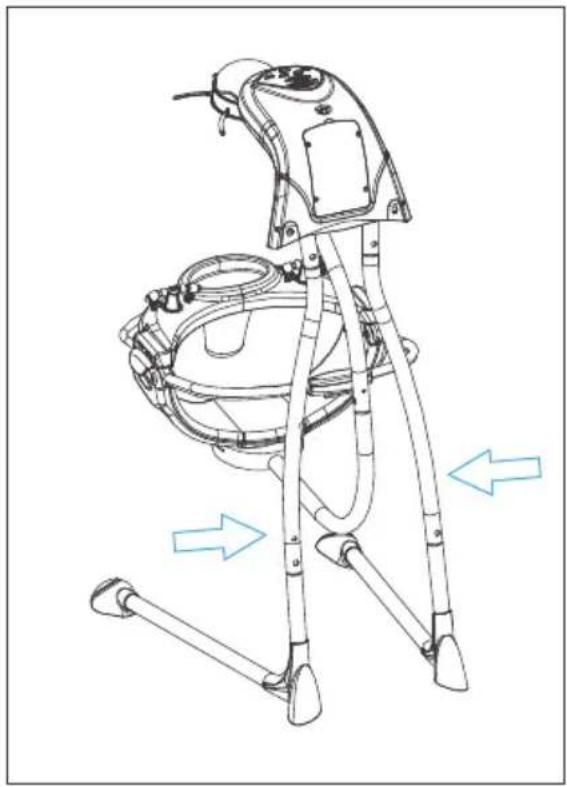
Connect the seat support tube with the central control unit tube (7.1) and attach them with the screw (4) (7.2).
6 PLACING THE CHILD IN THE SWING
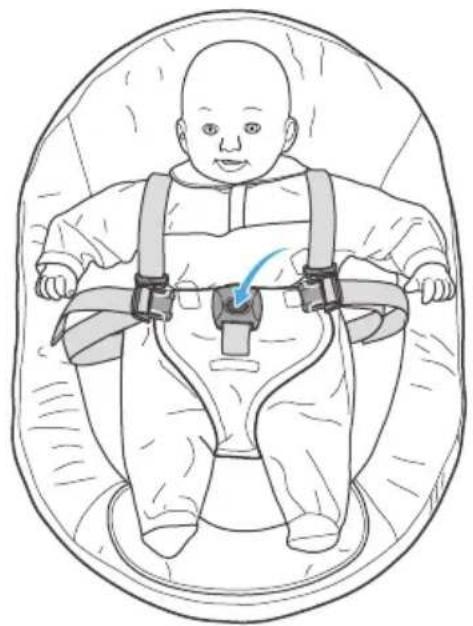
Unfasten the harness by pressing the button on the harness buckle. Move the harness straps to the sides (8.1).
Place the child in the seat as shown in the drawing. Lock the side strap tongues in the harness buckle until you hear a 'click' (8.2). The harness straps length can be adjusted with the adjustment rings on the straps.
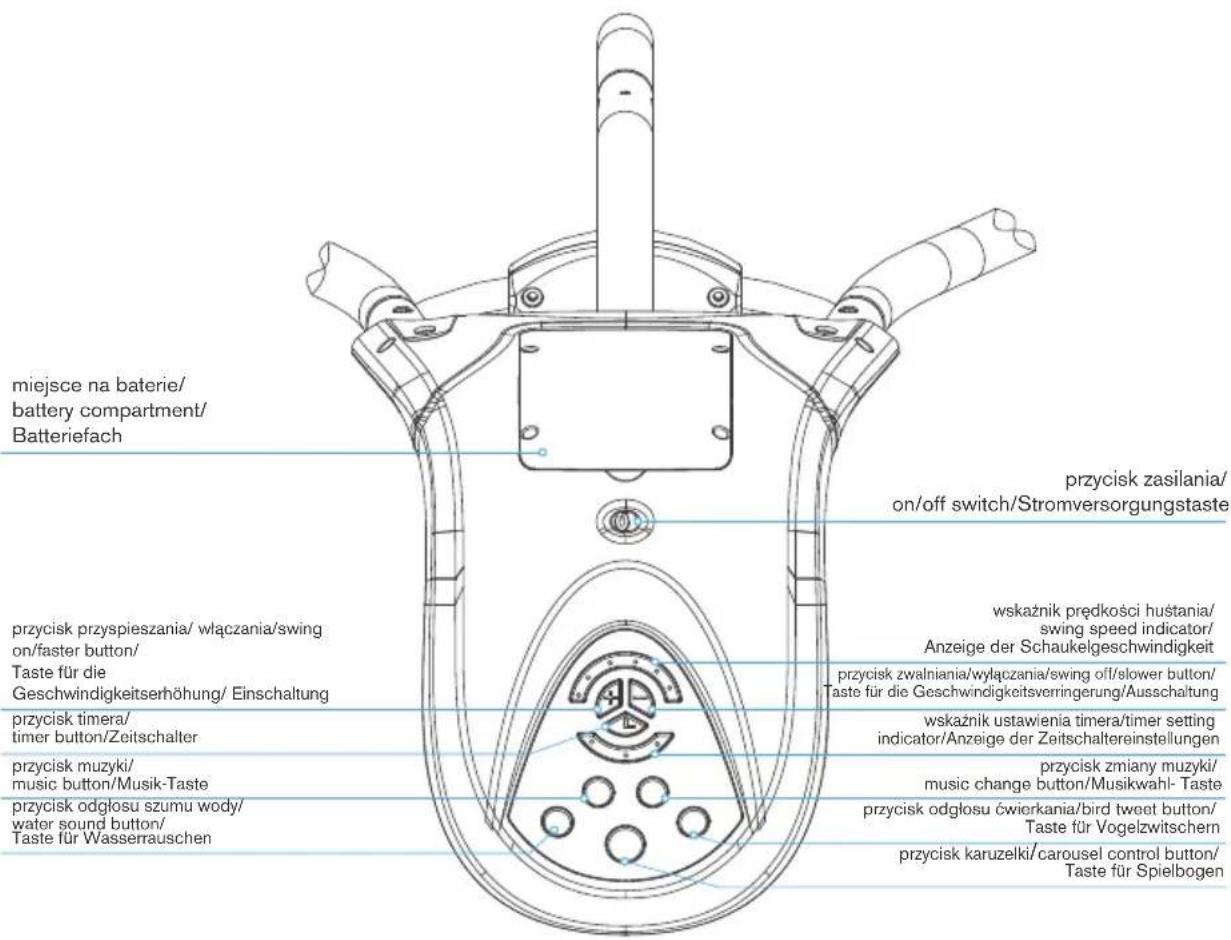
7 CONTROL UNIT FUNCTIONS
SWINGING FUNCTION
There are 5 speeds of swinging available.
The control lamp will light on when the swing on/faster button is pressed. When the same button is pressed repeatedly, next lamps will light on, indicating the increase of swinging speed.
Analogically when the swing off/slower button is pressed repeatedly, the lamps turn off until the swing is brought to full halt.
TIMER
There are 3 timer settings available.
One press of the timer button will set the timer to 8 minutes, two will set the timer to 15 minutes, three will set the timer to 30 minutes. The chosen option is indicated by one, two or three timer lights turned on.
After time measured by the timer ends, the swing will stop to preserve electricity. When the swing is turned on without the timer option, it will continue to work until manually switched off or until the batteries are depleted.
MUSIC
Press the music button to start the music playback. Press the button again to turn the music off.
Press the music change button to play the next tune. This button is also used to change the volume of the music played.
SOUND EFFECTS
There are two additional buttons to turn on/off flowing water and bird tweet sounds. These sounds will help in calming the baby and putting it to sleep.
CAROUSEL
Press the button for the first time to switch the carousel rotation on (the lights will not blink yet).
Press the button again to stop the carousel.
Press the button again to turn the carousel rotation and the lights on.
ON/OFF SWITCH
Move the switch left to set BATTERY power supply.
Move the switch right to set AC adapter power supply.
Remember to set the switch right each time the swing uses batteries and is not in use. This will help extend battery life span.
8 SEAT ROTATION
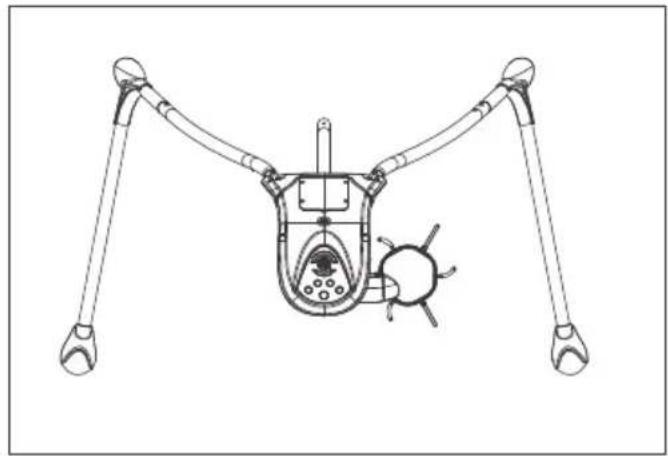
The seat may be used in 3 different angles. To rotate the seat, grab the front and back of the seat and gently rotate it left or right by 90^ (11). The carousel (12.1) may be moved to the side (12.2).
The swing frame legs may be folded for easier storing. To do this, first push in the latch on the back of the control unit (13.1) and move the leg to the center of the swing (13.2).
9 TROUBLESHOOTING
| SolutionProblem | |
| Sudden stop of music playback and swinging | Check whether batteries or AC adapter cable are not loose.Batteries are depleted - check the batteries and replace with new |
| No functions after turning the swing on | Check the AC adapter connection or the batteries installation |
| Long-term storing of the swing | Remove batteries if the swing is not used for more than a month |
| Swing legs are very shaky | Check if the swing legs are fully spread |
Learn more about brand Caretero.
Scan the code QR.
PRODUCER:
IKS 2 - Children's Goods Distribution Centre 9 Rybnicka Street, 43-190 Mikolow, Poland +48 32 226 06 06
e-mail: caretero@caretero.pl, www.caretero.pl
- WSKAZÓWKI BEZPIECZEŃSTWA
- PONIŻSZE INSTRUKCJE OBSŁUGI SĄ WAŻNE.
- SAFETY INSTRUCTIONS
- INSTRUCTIONS BELOW ARE IMPORTANT.
- WARNING!
- FALL HAZARD!
- SUFFOCATION HAZARD!
- BATTERIES
- SEAT ASSEMBLY
- SWING FRAME ASSEMBLY
- CONNECTING THE SEAT WITH THE CONTROL UNIT
- PLACING THE CHILD IN THE SWING
- CONTROL UNIT FUNCTIONS
- SWINGING FUNCTION
- TIMER
- MUSIC
- SOUND EFFECTS
- CAROUSEL
- ON/OFF SWITCH
- SEAT ROTATION
- TROUBLESHOOTING
- PRODUCER:
Brand : Caretero
Model : Raffi
Category : Chaise haute pour enfant