
ColumbiaVac OPC550 - Dehumidifier Eldom - Free user manual and instructions
Find the device manual for free ColumbiaVac OPC550 Eldom in PDF.


| Product Type | Portable Dehumidifier |
| Model | ColumbiaVac OPC550 |
| Brand | Eldom |
| Dimensions (H x W x D) | 48 x 30 x 25 cm |
| Weight | 12.5 kg |
| Power Supply | 220-240 V ~ 50 Hz |
| Power Consumption | 550 W |
| Moisture Removal (30°C, 80% RH) | 20 L/day |
| Water Tank Capacity | 4 L |
| Refrigerant | R290 |
| Humidity Control | Electronic humidistat with adjustable setpoint (40-80% RH) |
| Fan Speeds | 2 speeds (High/Low) |
| Auto Defrost | Yes, automatic at low temperatures |
| Auto Shut-Off | When tank full or set humidity reached |
| Air Filter | Washable pre-filter |
| Noise Level | ≤ 48 dB(A) |
| Continuous Drainage | Yes, via hose connection (not included) |
| Castors | 4 castors for easy mobility |
| Operating Temperature Range | 5°C - 35°C |
| Safety Features | Overheat protection, auto shut-off, child lock |
| Maintenance | Clean filter every 2 weeks; wipe exterior; drain tank regularly |
| Spare Parts Availability | Contact Eldom service center for replacement filters, tank, and castors |
| Repairability | Designed for service; user manual includes troubleshooting guide |
Frequently Asked Questions - ColumbiaVac OPC550 Eldom
User questions about ColumbiaVac OPC550 Eldom
0 question about this device. Answer the ones you know or ask your own.
Ask a new question about this device
Download the instructions for your Dehumidifier in PDF format for free! Find your manual ColumbiaVac OPC550 - Eldom and take your electronic device back in hand. On this page are published all the documents necessary for the use of your device. ColumbiaVac OPC550 by Eldom.
USER MANUAL ColumbiaVac OPC550 Eldom
natural_image
Exterior view of a white cylindrical water heater with digital display and 'COLUMBAN VAC' branding (no other text or symbols)
model: OPC550
Eldom Sp. z o.o.
Tyl
natural_image
Close-up of a mechanical component with a circular feature and an arrow pointing to it (no text or symbols visible)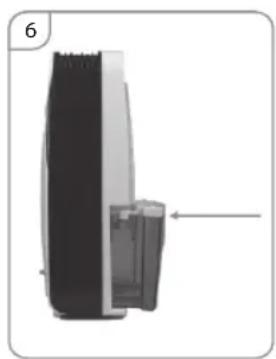
natural_image
Diagram of a device with a black top and white side, showing internal components and an arrow indicating a location (no text or symbols present)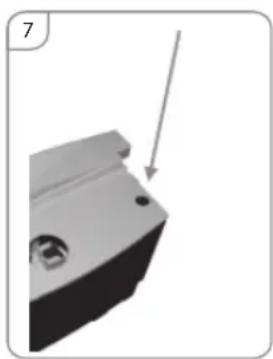
natural_image
Close-up of a mechanical component with a downward arrow indicating a feature (no text or symbols visible)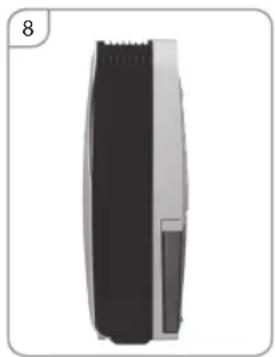
natural_image
Illustration of a hairbrush with black and white body, no text or symbols presentPlease read all these instructions carefully before using this appliance.
-
Only use this appliance for domestic purposes and in the way indicated in these instructions. Never use for any other purposes.
-
Do not use the appliance outside and always place it in a dry environment.
-
The device can be used by children aged 8 and older and by persons with limited physical, sensory or mental capabilities, or persons without sufficient experience and knowledge only under supervision or if previously instructed on the safe use of the appliance and the possible risks. Children shall not play with the appliance. Cleaning and maintenance that are theresponsibility of the user shall not be carried out by children without supervision. Protect the appliance and the power cord against children under 8 years old.
-
From time to time, check the cord. Never use the cord, the plug or the appliance when they show any sign of damage. The cord length of this product has been selected to reduce the possibility of being injured. Do not use your appliance with an extension cord unless it has been checked and tested by a qualified electrician or electrical supplier.
-
Keep the appliance away from hot sources and direct sunlight.
-
Always switch off the appliance before unplugging it.
-
Unplug the appliance before cleaning or changing any parts of the appliance or when it's not in use.
-
Clean the appliance accord to manual.
-
Make sure that the voltage rating on the type plate corresponds to your main voltage. Any error in connecting the appliance invalidates the guarantee.
-
Prevent your children from this danger.
-
Never leave the appliance unsupervised when in use. Switch off the appliance if you have to go away for even a short time.
-
Never pull the cord to unplug or move the appliance.
- Never immerse the appliance in water or any other liquid for any reason.
- Keep the appliance away from water or oil splashes.
- Respect the instructions for cleaning.
- Do not insert sharp metallic objects or fingers in the air swinging fins of the appliance.
- Never repair the appliance yourself. All interventions made by a non-qualified person can be dangerous. As well any changing of the cord must be done by a qualified electrician.
- Never use accessories non-delivered by the supplier. This could be dangerous and could damage the appliance.
Special recommendations:
- Ambient temperature range for the device is 5^ - 50^
- Install the portable dehumidifier on a flat location with a large space, without obstacles. Leave a 50 cm minimum space between the unit and the wall.
- The device must be installed in accordance with national installation regulations.
- The plug shall be always accessible after its installation.
• Always place the appliance in a vertical position - Do not tilt the device in any direction as spilled water can damage the device.
- Do not use the appliance near gas or other inflammable liquids.
- Do not block the air outlet and inlet ventilation. Do not place heavy objects on the device.
- Do not use spray (insecticides, painting) or any other inflammable products near the appliance as the plastic case may be deformed. The unit may sustain electrical damage.
Power sources
- The plug has to be well fixed and should not be damaged.
- Do not plug in the appliance with an adaptor.
- Plug into the wall socket before switching on the appliance then press on the ON/OFF button.
GENERAL DESCRIPTION
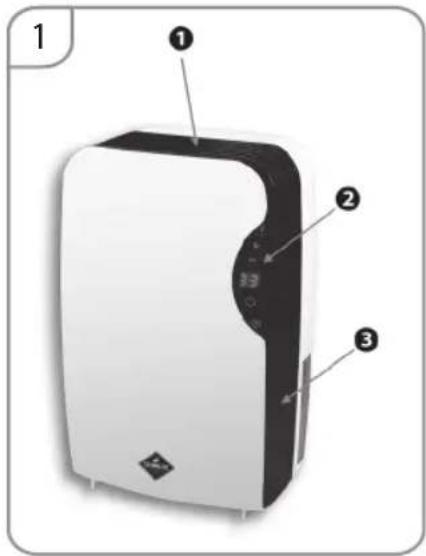
Front
- Air outlet
- Control Panel
- Housing
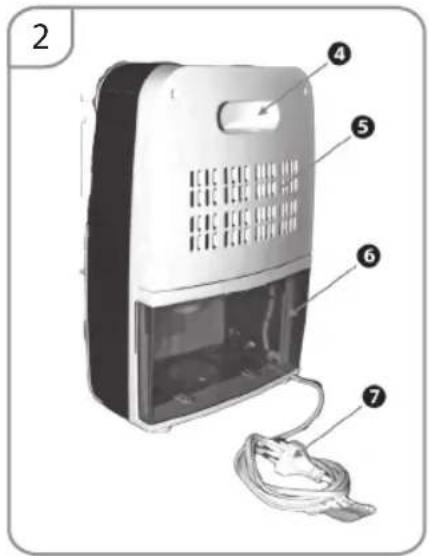
Rear
- Handle
- Air inlet
- Water tank
- Power supply wire
TECHNICAL DATA
| MODEL OPC550 | |
| Dehumidification capacity 500ml/day (30°C RH80%) | |
| Rated voltage 230 V ~ 50HZ | |
| Power consumption 65W | |
| Rated current 0,5A | |
| Water container 2,5 l | |
| UV lamp Yes | |
| Jonizator Yes | |
| Noise level ≤30dB(A) | |
| Net weight 2,5 kg | |
| Dimensions 240*135*363 mm | |
Any changes in settings are signalled by a sound.
The device must be placed vertically on a flat surface, in a dry and spacious location. The room should be ventilated. At least 50 cm of clearance should be left around the device.
CONTROL PANEL
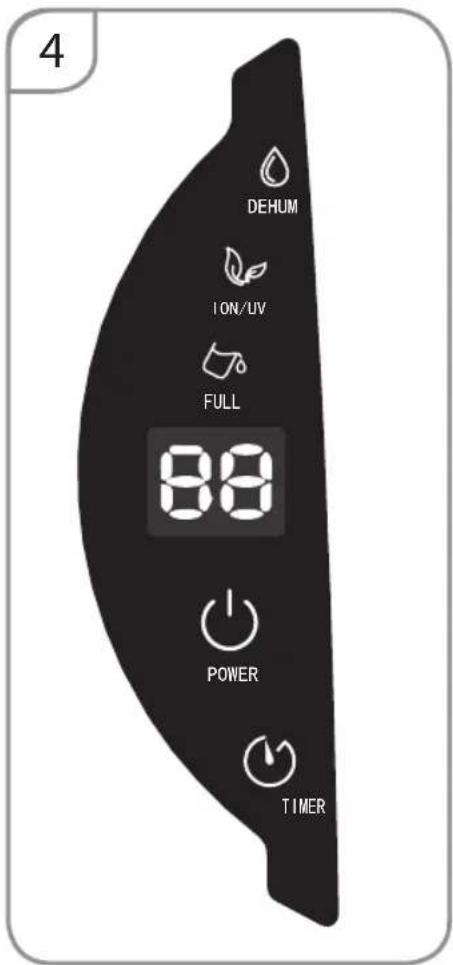
- The button ⏻ - is used to turn the device on / off. Do not remove the power supply cord plug directly to force the device to stop immediately.
• The display - the indicator has 2 functions: - when the device is on, it displays the current humidity in the room,
- when setting the "TIMER" function, it displays values within the range "00-24",
- Dehumidification indicator – diode lights up automatically when the device is started.
-
Cleaning indicator – diode lights up automatically when the device is started.
-
Tank filling indicator (6). The indicator will turn red when the tank is filled. The device will signal it additionally by sound and then switch off. Empty the water tank and put it back in the correct position.
- The TIMER button ⏻ – is used to turn the device on and off automatically. To set the time, press the button, until the display shows the correct value within the range “1-24”. In order to switch off the function, set the value “00” using the button when the device is turned off using the button time setting is cleared. Activation of the function is signalled by the backlight. Pressing and holding the “TIMER” button will display the room temperature on the display.
EMPTYING THE TANK
ATTENTION
Water collected in the dehumidifier tank is not suitable for drinking and must not be allowed to come into contact with food.
Do not put the floater out of water; otherwise the device will not stop working when the water tank fills up. Then, water will overflow, which may cause damage to the floor.
natural_image
Close-up of a mechanical component with a circular feature and an arrow pointing to it (no text or symbols visible)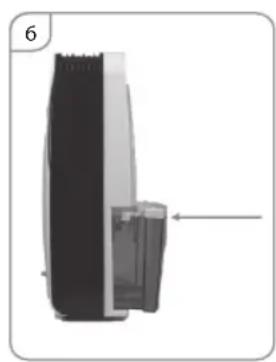
natural_image
Diagram of a device with a black body and gray interior, showing a close-up view of the internal structure (no text or symbols)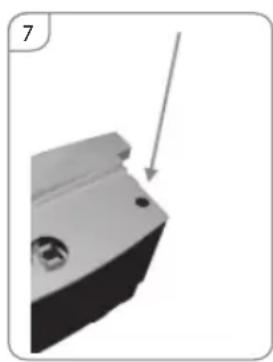
natural_image
3D mechanical component with a downward arrow indicating a feature (no text or symbols visible)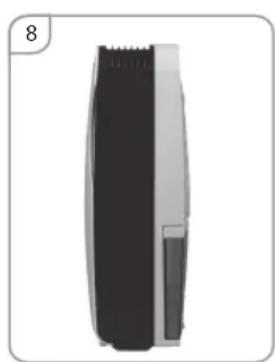
natural_image
Side view of a black and white hairbrush tool (no text or symbols visible)- Pull the tank gently at the back of the device; the tank will slide out (fig. 6).
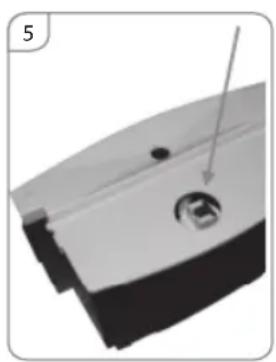
- Pour the water out of the tank through the opening in the lid (fig. 7).
- If the water tank is dirty, clean it with water. Do not use any acrid cleaning agents. Do not use chemical solvent (such as benzene, alcohol, gasoline). The surface may be damaged or even the whole case may be deformed. Do not sprinkle water
- Place the tank in the right position in the device (fig 8). Otherwise, the full tank indicator will still light up red and the device will not be able to work.
MAINTENANCE
Note:
Turn off the unit and unplug it before any maintenance or repair begins to avoid electric shock.
CLEANING
Unplug the unit before any cleaning. Clean the housing with a soft moisture cloth. Do not use chemical solvent (such as benzene, alcohol, gasoline). The surface may be damaged or even the whole case may be deformed. Do not sprinkle water on the unit.
STORING THE DEVICE
If the dehumidifier is not used for a longer period of time:
- Unplug the power cord from the socket and roll it.
- Empty the tank entirely of water and make sure that there is no water inside.
- Store the dehumidifier in a cool, dry place, inaccessible to sun rays, high temperature or excessive dust.
TROUBLE SHOOTING
Before contacting the service centre, you should compare the symptoms given by the device with those listed below. The list includes normal situations which are not caused by a manufacturing defect or defective material.
| Problem Possible cause Solution | ||
| The tank fill indicator lights up in red. | The tank is full. Empty the tank. | |
| The float is filled with water. Empty the float. | ||
| There is no float in the tank. Position the float properly. | ||
| The detector (magnetic element) in the float is not positioned properly. | Position the detector properly. | |
| Insufficient air drying | The air flow is prevented. Leave 50 cm around the device. | |
| The air inlet and outlet are blocked. Restore patency of the inlet and outlet. | ||
| The ambient temperature is very low. Change the ambient temperature. | ||
| The LED display indicates “E1” | Failure of the temperature and humidity sensor. | Contact the manufacturer's customer service. |
| The power supply button is flashing. | The machine defrosts at low temperature. | Normal condition.Wait until the defrosting is completed. |
BEZPEČNOSTNÍ PODMÍNKY
Zadní část
natural_image
Close-up of a mechanical component with a circular feature and an arrow pointing to it (no text or symbols visible)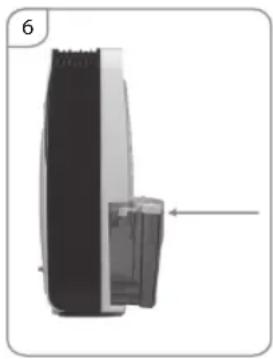
natural_image
Cross-sectional diagram of a device with internal components, no visible text or symbols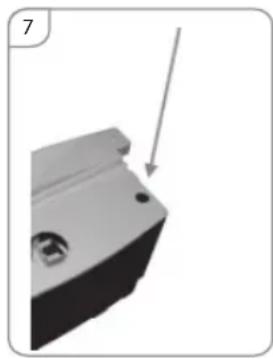
natural_image
Close-up of a mechanical component with a downward arrow indicating a feature (no text or symbols visible)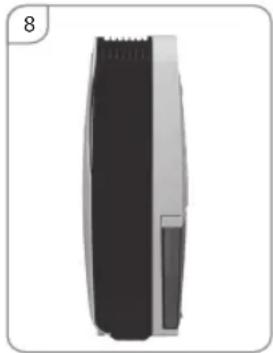
natural_image
Side view of a black and white electronic device with a side panel, labeled with number 8 (no text or symbols on the device itself)Vorne
Hinten
natural_image
Close-up of a mechanical component with a circular feature and an arrow pointing to it (no text or symbols visible)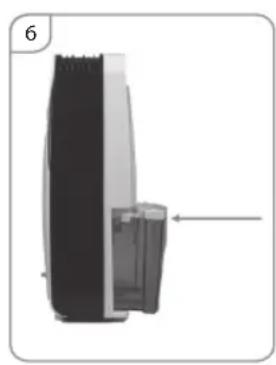
natural_image
Diagram of a device with a black top and gray side, showing internal components and an arrow indicating direction (no text or symbols)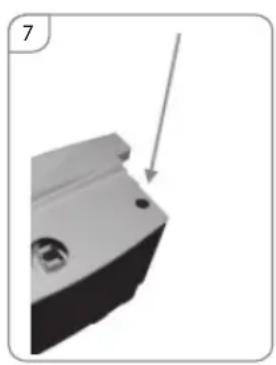
natural_image
3D mechanical component with a downward arrow indicating direction (no text or symbols)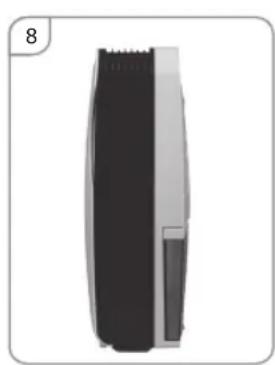
natural_image
Side view of a black and white hairbrush tool (no text or symbols visible)Задняя часть
natural_image
Close-up of a mechanical component with a circular feature and a pointer arrow (no text or symbols visible)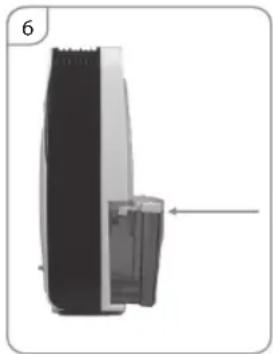
natural_image
Diagram of a device with a black top and gray side, showing internal components and an arrow indicating direction (no text or symbols)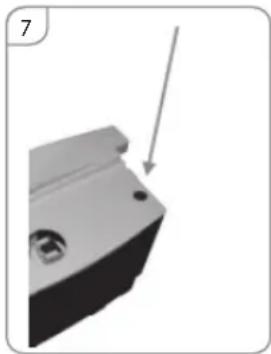
natural_image
3D mechanical component with a downward arrow indicating a feature (no text or symbols visible)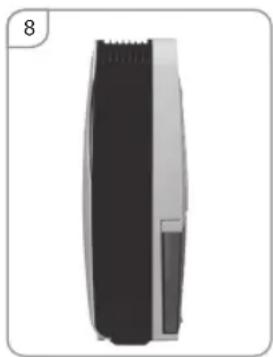
natural_image
Side view of a hairbrush with black and white body, no visible text or symbolsZadná strana
natural_image
Close-up of a mechanical component with a screw and circular feature (no text or symbols visible)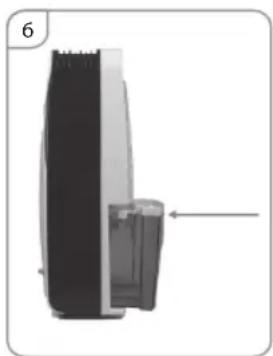
natural_image
Diagram of a device with a black top and gray side, showing internal components and an arrow indicating direction (no text or symbols)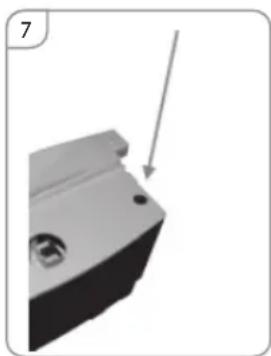
natural_image
3D mechanical component with a downward arrow indicating direction (no text or symbols)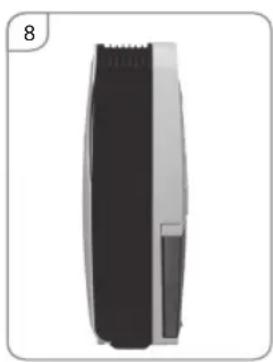
natural_image
Side view of a hairbrush with black and white body, no visible text or symbolsHátsó rész
natural_image
Close-up of a mechanical component with a circular hole and a pointer arrow (no text or symbols visible)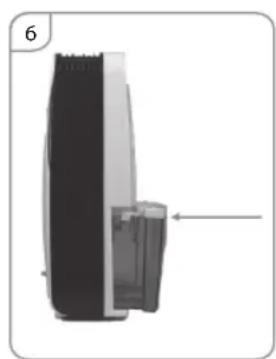
natural_image
Cross-sectional diagram of a device showing internal components and an arrow indicating direction (no text or symbols)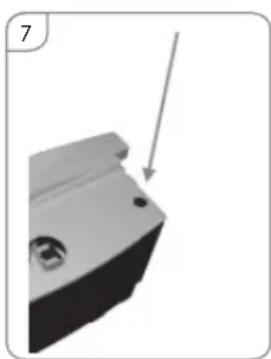
natural_image
3D mechanical component with a downward arrow indicating a feature (no text or symbols)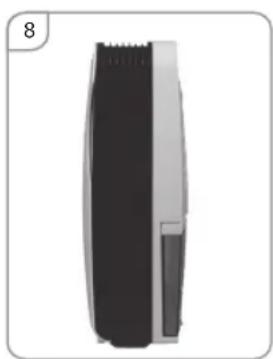
natural_image
Side view of a hairbrush with black and gray body, no visible text or symbolsAtrás
natural_image
Close-up of a mechanical component with a circular feature and an arrow pointing to it (no text or symbols visible)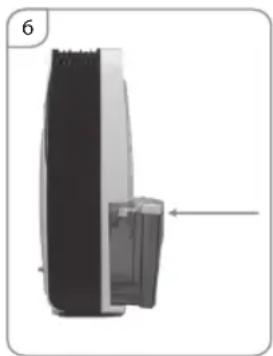
natural_image
Diagram of a device with a black top and gray side, showing internal components and an arrow indicating a specific section (no text or symbols present)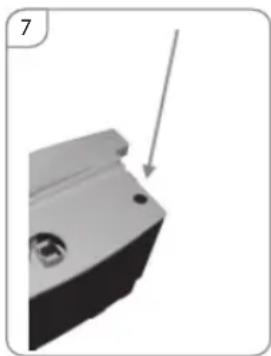
natural_image
3D mechanical component with a downward arrow indicating a feature (no text or symbols)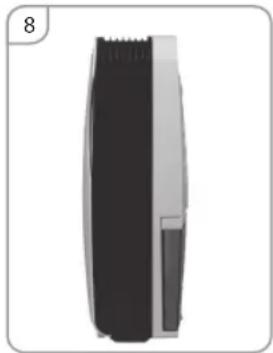
natural_image
Illustration of a black and white cylindrical object with a side panel, resembling a hairbrush or scanner (no text or symbols visible)natural_image
Completely black image with no visible content or text.
natural_image
Blank white image with no visible content, text, or symbols
natural_image
Blank white image with no visible content, text, or symbols.

KARTA GWARANCYJNA
WAŻNA Z DOWODEM ZAKUPU

- Tyl
- Special recommendations:
- Power sources
- GENERAL DESCRIPTION
- Front
- Rear
- Any changes in settings are signalled by a sound.
- CONTROL PANEL
- EMPTYING THE TANK
- ATTENTION
- MAINTENANCE
- Note:
- CLEANING
- STORING THE DEVICE
- If the dehumidifier is not used for a longer period of time:
- TROUBLE SHOOTING
- BEZPEČNOSTNÍ PODMÍNKY
- Zadní část
- Vorne
- Hinten
- Задняя часть
- Zadná strana
- Hátsó rész
- Atrás
- KARTA GWARANCYJNA
Brand : Eldom
Model : ColumbiaVac OPC550
Category : Dehumidifier