
HPY6SGTK - Range hood HOOVER - Free user manual and instructions
Find the device manual for free HPY6SGTK HOOVER in PDF.


| Product Type | Range hood (under-cabinet) |
| Model | HPY6SGTK |
| Brand | Hoover |
| Dimensions (W x D x H) | 525 mm x 275 mm x 202.5 mm |
| Voltage & Frequency | 220-240V AC, 50Hz |
| Total Power | 102W (max) |
| Motor Power | 100W |
| Lighting | 2 x 1W LED modules |
| Control Type | 3-speed slider or electronic touch (depending on version) |
| Air Outlet Diameter | 120 mm |
| Installation Clearance (Electric Cooker) | Minimum 60 cm |
| Installation Clearance (Gas Cooker) | Minimum 65 cm |
| Filter Type | Washable aluminum cassette filter |
| Carbon Filter | Optional (for recirculation mode) |
| Noise Level | Not specified; operates at 3 speeds |
| Special Features | 5-minute auto shutdown timer (electronic control models), remote control (select models) |
| Cleaning | External surfaces with soapy cloth; aluminum filter washable in dishwasher (max 60°C) |
| Lamp Replacement | Contact authorized service; LED module DBR-1-H (IEC 61231) |
| Warranty | 10 years spare parts availability |
| Compliance | WEEE Directive 2012/19/EU |
Frequently Asked Questions - HPY6SGTK HOOVER
User questions about HPY6SGTK HOOVER
0 question about this device. Answer the ones you know or ask your own.
Ask a new question about this device
Download the instructions for your Range hood in PDF format for free! Find your manual HPY6SGTK - HOOVER and take your electronic device back in hand. On this page are published all the documents necessary for the use of your device. HPY6SGTK by HOOVER.
USER MANUAL HPY6SGTK HOOVER
[EN] SAFETY, INSTALLATION and OPERATING MANUAL

IMPORTANT SAFETY INSTRUCTIONS PLEASE READ CAREFULLY AND KEEP IT FOR FUTURE REFERENCE
Please first read this manual!
Dear Customer,
Please read this manual thoroughly prior to using the product and keep it for reference purpose. If you transfer the product to another person, give the manual as well.
The manufacturer will not accept any responsibility for any damage or fire caused by possible problems arising from failure to comply with the instructions given in this manual.
Please contact with the authorized service centre for all questions.
Operating manual help you use the product correctly and safely.
- Read the operating manual prior to setting up and operating the product.
- Comply with the safety-related instructions definitely.
- Please keep the operating manual in a handy place for any possible need.
- Read other documents given together with the product as well.
Please remember that the present operating manual may also apply for other versions. There may be differences among the versions due to different manufacturers, but the cleaning and maintenance conditions are same.
| Symbol Meaning | ||
 | WARNING - CAUTION | |
 | ELECTRIC SHOCK HAZARD | |
 | FIRE HAZARD | |
CONTENT
TECHNICAL SPECIFICATIONS OF THE EQUIPMENT 4
WARNING AND SAFETY PRECAUTIONS....6
INSTALLATION AND ACCESSORIES ....11
OPERATION AND USE OF THE HOOD....15
CLEANING AND MAINTENANCE....18
SERVICE, SPARE PARTS AND WARRANTY ....20
NOTES 23
TECHNICAL SPECIFICATIONS OF THE EQUIPMENT
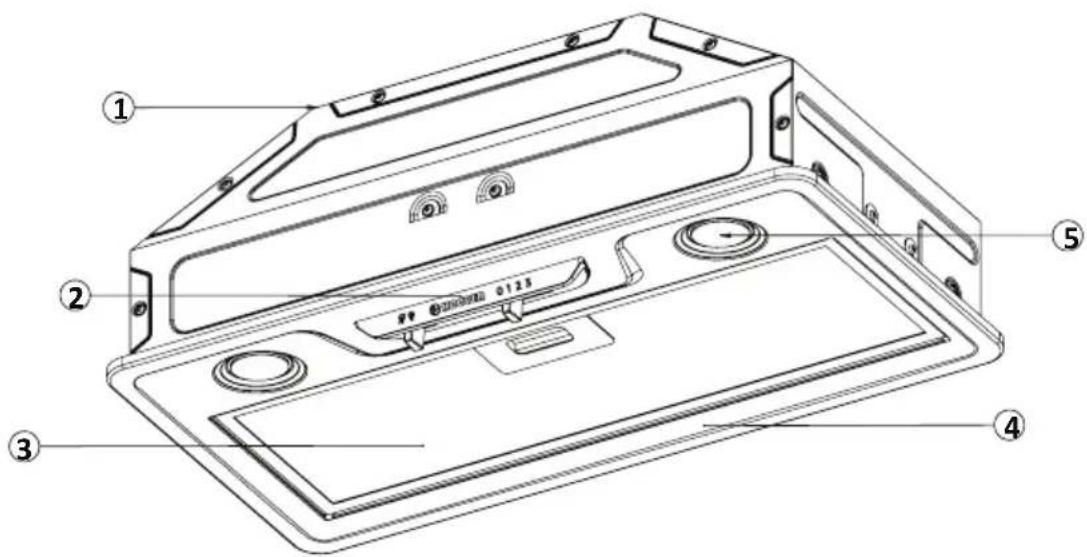
(Figure 1)
- Body
- Control Panel
- Filter
- Front Panel
- Lighting

(Figure 2)
TECHNICAL SPECIFICATIONS
| Product Code D006.52.XXX.XX.Z011 | |
| Voltage & Frequency 220-240VAC 50Hz | |
| Total product power | Min. 2WMax. 102W |
| Motor power 100W | |
| Lamp power 2 x 1W | |
| Control Panel 3 Speed / Slider Switch | |
| Air outlet connection diameter | 120mm |
| Product width 525 mm | |
| Product depth 275 mm | |
| Product height 202,5 mm | |
WARNING AND SAFETY PRECAUTIONS

This product is designed for domestic use as a version to exhaust or filter the air. It is not designed for operating outdoors.

This product may be used for children above 8 years old and by persons with restricted physical, perceptual or mental skills only if they are kept under supervision or given instructions for safety use of the product and they are well aware of the product-related risks. Children should not play with the product. If they are not above 8 years old and under supervision, cleaning and maintenance of the product should not be performed by the children. Keep the product and its cable in a place out of reach of the small children under 8 years old.

When the electric range hood is simultaneously used with other equipment using gas or other fuels, the room should be ventilated well (It may not be applicable for equipment which only recirculate the air in the room).

Keep the packaging materials in places out of reach of the children or destroy them. Access to the packaging materials by the children may lead to dangerous consequences.

Unless there is no supervision and management with respect to use of the product by a person responsible for safety of the product, this product is not intended to be used by persons (including children) who are restricted physical, sensual and metal skills or lack of experience and knowledge.

Assure that the plug is easily accessible in order to switch it off in case of any risk.

Electric products are dangerous for children. When the equipment operates, keep children away from the electric equipment. Do not allow children to play with the equipment.
Mains values should match with those given in the nameplate of the hood. Lift the glass cover and remove the filter in order to have access to the nameplate.

Use “Maximum 6A” fuse in the power installation to which the hood is connected both for your own safety and product safety.

During installation, power cable should not be subject to compression or crush. If the power cable is damaged, it should be replaced by an authorized service centre or a qualified electrician. It also applies to any possible damage of the power cable in future.
Product should be connected to the mains only by an authorized and qualified electrician. Product warranty starts only after correct installation of it.

Do not plug the product before you fix it on the wall.
Grounded plug is installed to the power cable of your product. This cable should definitely be insert into a grounded socket.

Disconnect power connection of the product prior to cleaning and maintenance. (Remove the plug of the product from the socket for disconnection.)

Failure to fix the screws or fastening elements according to the instructions may lead to electric risks.

When installation of the product is completed, leave a distance of 60 cm between the product and electric ranges or minimum 65 cm between the product and ranges using gas or other fuels. If larger distance is specified in the installation instructions of the gas-fueled ranges, you should stick to them.
EN
When the hood is used together with the cooking equipment, the accessible parts may be heated.

Flammable food should not be cooked under the hood.

Bare flame is very harmful for the hood and may lead to fire risk; it should, therefore, be avoided.

In case of flaming, disconnect power of the hood and cooking equipment (Disconnect the power by removing the plug of the product from the socket).

Operate the hood after you put pot, frying pan or cooking containers on the range. Otherwise, high heat may cause deformation of your product.

Switch the range off before you take the cooking containers such as pot or frying pan from the range.

Do not leave the cooking containers such as pot or frying pan on the range when they contain hot oil. Cooking containers with hot oil in them may cause to self-ignition. Especially be careful when you fry. Watch the curtains and cloth covers due to easily flammable character of the oil.

Oils accumulating on the filters, which are not cleaned and/or replaced timely cause fire risk.
If the cleaning is not performed periodically and by proper methods, your product may have fire risk. You should clean inside and outside of the hood by giving due heed to the maintenance instructions (minimum once in a month).

Do not use any filtering materials not resistant to heat and flame instead of the existing filter on the product. Do not operate your product without filter.

Power cable should not run near the ranges because it may melt and cause fire as it would expose to high temperature.

If you operate lamps of the product for a long time, do not touch the lamps. Lamps may burn your hand as they are still hot.

Unless it is specially specified, never use the hood as a supporting surface. Do not place any weight on it.

Use the screw supplied with the product for installation or if they are not supplied then purchase proper type of screws. For installation, use screws with correct diameter and height as specified in the manual.

Regulations related to exhaust of the outlet air should be observed.

Air should never be exhausted into the flue which is intended for exhaust of the smokes emitted from the equipment using gas or other fuels to outside (It may not be applied for the equipment which only recirculates the air in the room). Flue of the hood should be only for the hood. It should not be used with equipment in common.

Exit of the hood should not be connected to the air ducts where flues of other types of equipment are located.

When you connect the hood to the flue, use pipe in diameter of 120 mm. For good performance, the pipe connection should be as short as possible, smooth and with minimum bends.

Discharge pipe is not supplied with the product. It should be purchased separately. Diameter of the discharge pipe should be equal to the diameter of the connection ring.

As the hood expels the air in the room to the outside, other equipment operating with air may be affected. For this reason, when the hood operates, allow entry of fresh air into the house.

In case of use of activated carbon filter without flue connection, never wash the activated carbon filters. Depending on frequency of use of this filter, you are recommended to replace it in 2-4 months in average. When you desire to replace it, please contact with the authorized service centre.

This appliance is labelled in accordance with European Directive 2012/19/EU on Waste Electrical and Electronic Equipment Regulations 2013 regarding electric and electronic appliances (WEEE). The WEEE contain both polluting substances (that can have a negative effect on the environment) and base elements (that can be reused). It is important that the WEEE undergo specific treatments to correctly remove and dispose of the pollutants and recover all the materials. Individuals can play an important role in ensuring that the WEEE do not become an environmental problem; it is essential to follow a few basic rules:
- the WEEE should not be treated as domestic waste;
- the WEEE should be taken to dedicated collection areas managed by the town council or a registered company.
In many countries, domestic collections may be available for large WEEEs.
When you buy a new appliance, the old one can be returned to the vendor who must accept it free of charge as a one-off, as long as the appliance is of an equivalent type and has the same functions as the purchased appliance.
INSTALLATION AND ACCESSORIES
Prior to Unpacking the Product:
Make sure that the electric installation is proper. If you are not certain, call a qualified electrician and cause the required arrangements are performed by him.
Preparation of the installation site as well as the electric installation is for responsibility of the customer.
For installation of the product, the rules related to power as specified by the local standards should be observed.
Control whether the product has any damage prior to installation of it. If the product is defective, do not install it. Otherwise the defective product may pose risk for safety.

The room should be ventilated well for safe operation of the product.
If there is no window for ventilation of the room, you should provide an extra ventilation (vent on the window pane, etc.). If there is vent in your kitchen, never block it. Inspect condition of other materials inside the hood (e.g. installation accessories, operating manual) in the carton box and remove and keep them in a separate place. Never keep them in the hood.
Do not install the product on such surfaces as tile, gloss or silicon. Fix it on the wall only.

Do not allow the children to play with the packaging materials!
INSTALLATION OF THE HOOD
Please follow the following order of actions to install the product.

(Figure 3)

(Figure 4)
Position of the Product:
When installation of the product is completed, there should be a clearance of 60cm between the product and electric ranges and 65 cm between the product and ranges using gas or other fuels. (Figure 3)
1) Attach the mounting template next to the mounting equipment in the product box to the surface where the product will be mounted.
2) Cut the bottom surface of the cabinet where the hood is to be installed to the dimensions specified in the technical drawing of the hood.
(Figure 4)

(Figure 5)
4) Separate the lamp sockets of the product, remove the front panel, and detach the connecting elements of the product. (Figure 6)
(Figure 7)

(Figure 8) (Figure 9)
3) Remove the aluminum cassette filter by pressing the spring latch on the end.
(Figure 5)

(Figure 6)
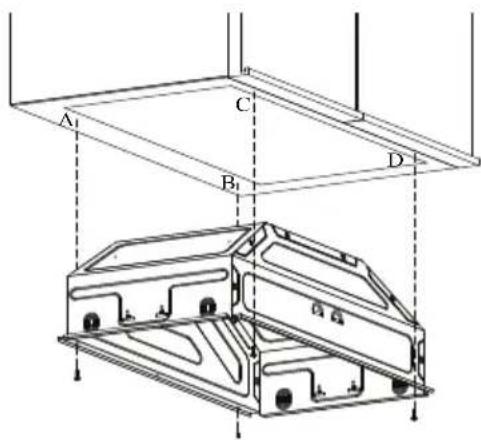
5) Using the 3.5x16 screws supplied with the device, mount the product to the cabinet at points A, B, C, D. After completing the installation of the product to the cabinet, mount the product panel to the body and connect the lamp sockets.
(Figure 7)

6) Connect the hood to the aluminum duct. After placing the flexible aluminum duct over the plastic chimney, secure it with a plastic cable holder or clamp without overtightening. Attach the other end of the duct to the wall chimney hole.
(Figure 8-9)

(Figure 10)
Prior to connecting the hood with the pipe, you should control the plastic flaps at the product air exit point. Before making the pipe connection, operate the hood and make sure the flaps move upwards correctly and allow air exit. Otherwise, change direction of the flaps.
(Figure 10)
Overtightening of the cable holder or clamp when making pipe connection may prevent operation of the flaps. Prior to connecting the pipe with the chimney of your house, you, therefore, control whether the hood operates properly by operating it.
To use the hood efficiently:
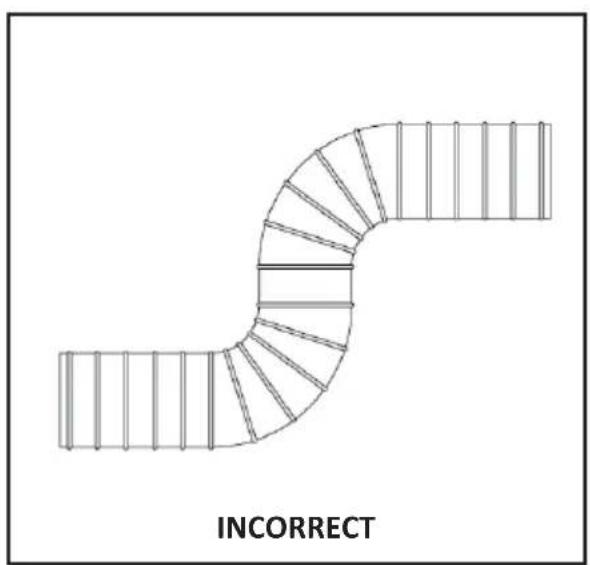
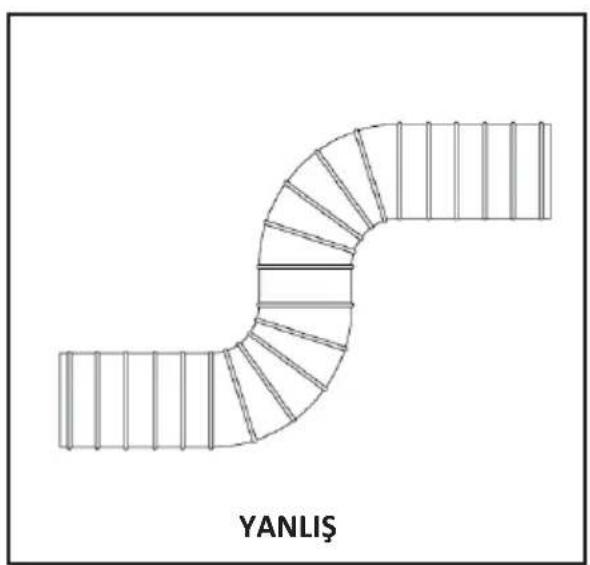
When connecting the hood with the flue, use pipe in diameter of 120 mm and minimum number of bends as far as possible. As the bends and elbows on the aluminum pipe will cause reduction in the air suction power, you should avoid use of much bends and elbows as far as possible
(Figure 11)
Give heed to regular use of the aluminum cartridge filters and replacement times of the carbon filters.

(Figure 11)
Prior to Operating the Hood

Prior to operating the hood, make sure all mechanical and electric connections are completed.

Do not leave any foreign material inside the hood. Make sure there is no packaging material around it.

Make sure you remove blue protection band at the edges of the washable aluminum cartridge filter on the hood. Please remember that if this protective band is not removed, it poses burning risk as it is not of inflammable character.
Selection of Speed
There is 3-speed ventilation on the product. Depending on the steam which occurs during the cooking process, select of the operating speeds, i.e. low (1st speed), medium (2nd speed) and high (3rd speed). After you complete the cooking operation, leave the hood in operation for a while, thus the remaining smell and steam will be sucked.
Mechanical Button Control
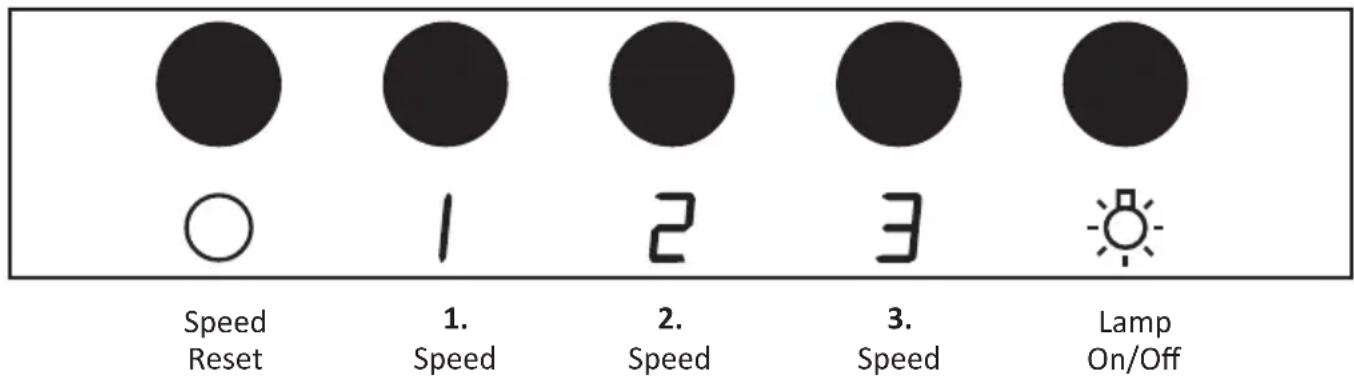
To operate the hood, select and press one of the buttons shown above (1,2 or 3). To stop the operation, press the speed reset button leftmost (O). Press the lamp on-off button rightmost to control the lamp.
Slider Switch Control

- To turn off the lamp, slide the lamp switch to 'A'.
- To turn on the lamp, slide the lamp switch to 'B'.
- To turn off the aspirator fan, slide the fan switch to '0'.
- The aspirator fan is operable between level 1 (the lowest speed) and level 3 (the highest speed), depending on the method of cooking.
Electronic Control
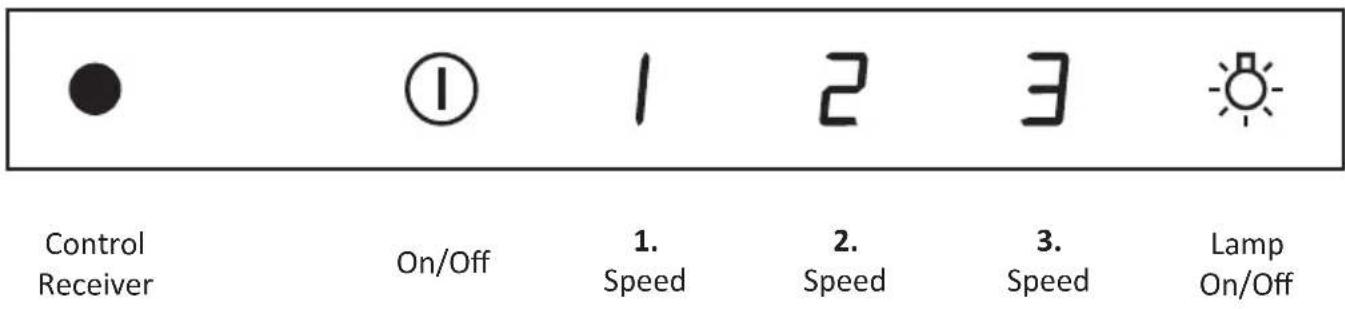
Tough on-off symbol shown above in order to operate the hood. And, depending on the steam density generated during the cooking process, tough one of the symbols (1,2 or 3). To stop the operation, tough on/off symbol again. To control the lamp, touch the lamp on-off symbol rightmost.
Note: In order to operate air traction function of product, it is required for you to make the product become ready by using opening/closing symbol. Without touching this symbol, product engine will not operate. Product lamp can operate as being independent from the engine.
Remote Control
If your product has electronic control, it will come with 1 remote control.
(Figure 12)
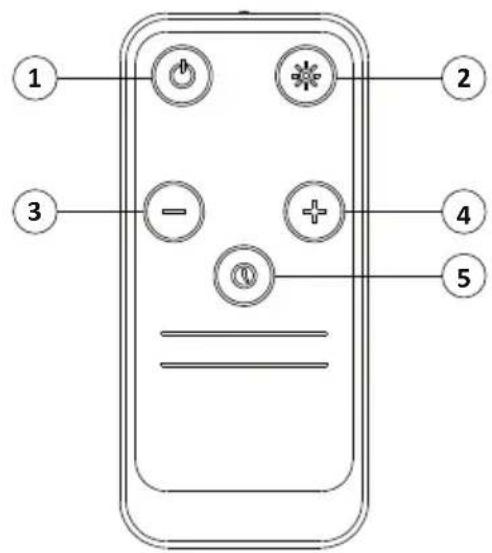
(Figure 12)
- On/Off
- Lamp On/Off
- Speed Reduction
- Speed Increase
- Timer
Timer control (automatic shutdown) 5 min:
If your device is electronically controlled, it has an automatic shutdown function to eliminate unwanted odors and steam in the environment after the cooking process is completed, ensure ventilation for a period, and shut down on its own. To activate the automatic shutdown function, press and hold any loop icon (1, 2, 3) on the control panel for more than 3 seconds to activate the 5-minute timer. If no action is taken, the device will shut down 5 minutes after the timer is activated.
While the automatic shutdown function is active, if you touch the same speed icon, the automatic shutdown function will be disabled, and the device will continue to operate. Additionally, please note that this feature will be disabled when switching to other speed levels. If you want your device to stop automatically, you need to re-enable the automatic shutdown feature.
Device Features:
Hood can be used in kitchens with or without flue.
For use with flue:
In case of use with flue connection, the hood should be connected to a flue to exhaust the air. For efficient use of your hood, you should follow the shortest way of the piping to the flue and the airway should be open
Your product is delivered from the factory as suitable for use with flue.
WARNING!
No other air duct can be connected to the hood's exhaust openings.
For use without flue;

(Figure 13) (Figure 14)

Activated Carbon Filter
In the places without any pipe for connection to outside, you should use activated carbon filter to filter and recirculate the air in the place. You should get the activated carbon filter from your authorized service centre.
(Figure 13)
Replacement of Activated Carbon Filter
You should use 2 carbon filters on the product. In order to put the carbon filter in place, the channels on the motor cover should be brought to alignment with the lugs on the filter and rotate it half turn clockwise. To remove it, you should rotate it anticlockwise by half turn.
(Figure 14)
CLEANING AND MAINTENANCE
Cleaning
Before maintenance and cleaning operations, you should remove the power cable from the socket or switch the hood off.
-External surfaces of the hood should be wiped with a cloth damped with soap water.
- Do not use corrosive and dangerous chemical materials.
-Be careful that water or similar substances should not contact with the electronics.
-For products made of stainless sheet, use of commercially available maintenance and cleaning agents for stainless product will ensure your product to serve longer.
-Aluminum cartridge filters are washable in the dishwashing machines.
-Aluminum cartridge filter should be washed one in several months (after each 40 operating hours in average) depending on frequency of use with hot soapy water or, if possible, individually in the dishwashing machine (maximum 60°C).
-After washing, aluminum cartridge filter and its frame may discolour. This is normal and does not affect function of the filters.
-Remove the aluminum cartridge filter by pushing the spring catch at the end.
After cleaning, allow it to dry. Do not put in un place before it gets dry
(Figure 15)


(Figure 15)
Washable aluminum cassette filters
*If you desire to replace aluminum cartridge filter, consult to the nearest authorized service centre to get it. For this purpose, you should state the version number written on the nameplate of your product. Filters for other brands and versions commercially available are not compliant with your product.
General Information About Lamps and Replacement of Lamps
Hood is equipped with a LED-based lighting system.
When LEDs are compared with ideal lighting and normal lamps, they provide a service time 10 times longer, with energy savings up to 90%.
If you encounter any physical deformation of the lamp of the hood or any problem with its lighting, please contact with the authorized service centre.
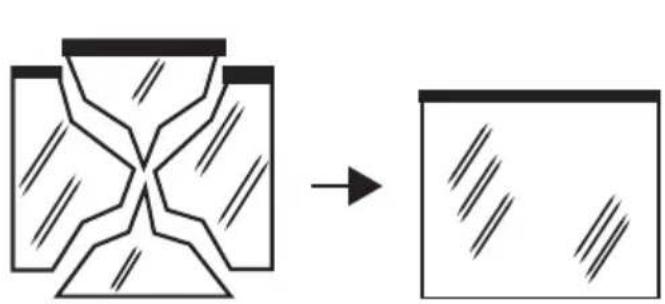
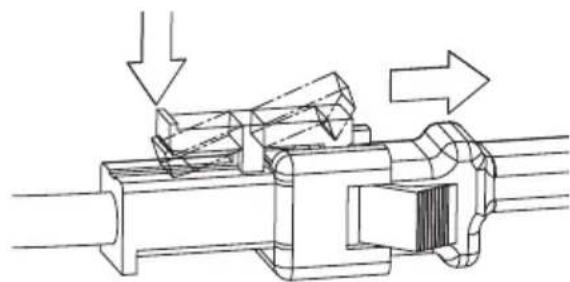
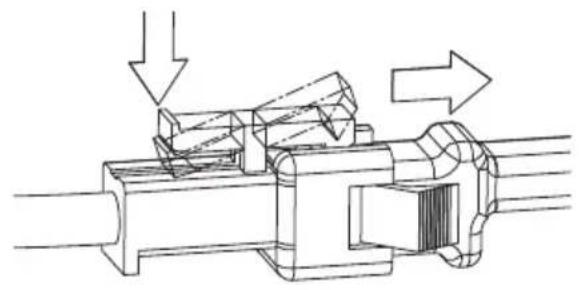
(Figure 16)
If there occurs ay crack or break on the surface of the lamp, contact with the authorized service centre and replace it.
If it is required to replace the lamps, please check the following info and replace it with an alternative having the same technical specifications.
- ILCOS D code: DBR-1-H (ILCOS d code as per standard IEC 61231)
- LED module – semi-transparent plastic
- Rated power of each lamp: 1W
- Maximum lamp potential power for replacement: 2 x 1W
- Voltage range of the lamp: 220 - 240V
- Product sizes: diameter: 35,8 mm / height: 30 mm
If required, you may acquire new lamps from the authorized service centre.
Replacement of the Lamps
Prior to replacement of the lamps, remove power cable of the hood. And then lift the front glass upward and remove the aluminum cartridge filter. Afterwards:
- Disconnect the female and male connectors of the lamps by pushing back part of the plastic lug as shown in the figure at left here to release the locking mechanism. (Figure 16)

(Figure 17)
- Hold the lamp at its body and rotate 2 retaining lugs on the lamp clockwise or anticlockwise to match with the gaps on the lighting panel. After bringing the retaining lugs to align with the gaps, hold the lamp at its body and bring it out. (Figure 17)
SERVICE, SPARE PARTS AND WARRANTY
Matters to be Considered by the Customer Regarding the Warranty;
Keep the product warranty certificate. If the warranty certificate cannot be presented, the product will be treated out of warranty. Auxiliary elements and accessories to be purchased with the product are excluded from the product warranty. The materials specified in the user manual that need to be replaced over time and depending on usage are excluded from the warranty.
The following conditions are excluded from the warranty:
- Damages and malfunctions caused by the installation of the product contrary to what is stated in the manual and usage errors,
- Damages and malfunctions during loading, unloading and transportation after delivery of the product to the customer,
- Low or excessive voltage; faulty electrical installation; damages and malfunctions resulting from the use of the product at a voltage different from the voltage value specified on the type label,
- Damages and malfunctions caused by fire and/or lightning strikes,
- Malfunctions arising from the use of the product contrary to the points in the user manual that the user should pay attention to.
- Glass breakage
- Errors caused by anyone other than authorized persons intervening or attempting to repair the device.
- Problems arising from the installation of any part other than the parts supplied by the manufacturer.
The responsibility of finalizing the warranty certificate and giving it to the consumer belongs to the seller, dealer, agency or representative offices where the consumer purchased the goods. This warranty is invalid if the warranty certificate is falsified, the original serial number on the product is removed or defaced.
The aluminum filters used in the hoods should be cleaned in the time and manner specified in the manual. As a result of use, blackening and discoloration may occur on the filters over time. Such situations are normal, do not prevent the product from fulfilling its duties and functions and are not covered by the warranty. If the warnings specified in the manual are not observed in stainless steel products, blackening, oxidation, fluctuations on the surface may occur. Such cases are not covered by the warranty.
Warnings Regarding Transportation and Handling
- Observe the markings on the parcel during transportation.
If you need transportation;
- Keep the original packaging.
- Transport with the original packaging, follow the transportation signs on the packaging.
If the original packaging is missing;
- Do not place heavy objects on the hood.
AFTER SALES SERVICE:
Please contact the manufacturer for the nearest authorized service agency.
We kindly ask you to observe the following precautions.
- When you receive your product, have the Warranty Certificate approved by your Authorized Dealer.
- When you have a service request for your product, you can call the Consumer Hotline.
- Ask the service technician for the "technician ID card".
- Do not forget to ask the service technician for a "Service Receipt" when you are done. The service receipt you will receive will benefit you in case of any problems that may occur in your product in the future.
- Lifetime: 10 years. During this period, the manufacturer guarantees the availability of the necessary spare parts.
If the cooker hood is not working:
Before contacting the service:
Make sure that the plug is inserted in the socket and that the electrical fuse in the installation is intact.
Do not carry out any work that could damage the product.
Check your hood according to Table 1 before contacting the service.
If the problem persists, contact the nearest authorized service center.
Service and Spare Parts:
If necessary, you can obtain spare parts for your product from your authorized service center. When you contact your service center or dealer, please state the product model name that you can see on the product label in order to request spare parts. You will be able to see the product label when you remove the aluminum cassette filter.
| PROBLEM | CAUSE SOLUTION | METHOD |
| The device is not working. | The plug may not be plugged in. | Make sure the plug is inserted into the socket. |
| The On/Off button may not have been pressed. | Press the On/Off key. | |
| The lighting does not work. | The plug may not be plugged in. | Make sure the plug is plugged in. |
| The product switch may not be working. | Check the switch. | |
| The lamp may be broken. Replace the lamp. | ||
| The performance of the device is insufficient or it makes a loud noise when operating. | If you are using the hood without a chimney, the carbon filters may be more than 4 months old. | Replace carbon filters with new ones. |
| There may not be enough fresh air entering your kitchen to ensure air flow. | Open the kitchen window to ventilate the environment. | |
| The air outlet may be partially or completely blocked. | Check that the air discharge path is open. | |
(Table 1)
If you cannot resolve the problem despite following the instructions in this section, please contact your nearest authorized service center or get support from our call center.
Complies with AEEE Regulation.
If you have any complaints, you can file your complaints and objections to consumer courts and consumer arbitration committees.
![graph TD A["LED"] -->|✓| B["LED"] A <--> B](/content/2026/05/854535/images/d8787b6e1d470b8df3d72d9e6c9ff3032ba8dc254adb8e2a2767ea1701eb5d7a.jpg)

HOOVER
TAM ANKASTRE DAVLUMBAZ
[TR] GÜVENLİK, MONTAJ ve KULLANIM KILAVUZU

(Şekil 1)
- Gövde
- Kontrol Paneli
- Filtre
- Ön Panel
- Aydınlatma

(Şekil 2)
TEKNİK ÖZELLİKLER
(Şekil 5)
(Şekil 8) (Şekil 9)
(Şekil 6)
(Şekil 10)
(Şekil 11)
DAVLUMBAZIN ÇALIŞTIRILMASI VE KULLANIMI
(Şekil 13) (Şekil 14)

Aktif karbon filtresi
(Şekil 15)
(Şekil 16)
(Şekil 17)

- IMPORTANT SAFETY INSTRUCTIONS PLEASE READ CAREFULLY AND KEEP IT FOR FUTURE REFERENCE
- PLEASE FIRST READ THIS MANUAL
- DEAR CUSTOMER
- CONTENT
- TECHNICAL SPECIFICATIONS OF THE EQUIPMENT
- WARNING AND SAFETY PRECAUTIONS
- EN
- INSTALLATION AND ACCESSORIES
- PRIOR TO UNPACKING THE PRODUCT
- INSTALLATION OF THE HOOD
- POSITION OF THE PRODUCT
- (FIGURE 10)
- TO USE THE HOOD EFFICIENTLY
- (FIGURE 11)
- PRIOR TO OPERATING THE HOOD
- SELECTION OF SPEED
- ELECTRONIC CONTROL
- REMOTE CONTROL
- TIMER CONTROL (AUTOMATIC SHUTDOWN) 5 MIN
- DEVICE FEATURES
- FOR USE WITH FLUE
- WARNING
- FOR USE WITHOUT FLUE
- ACTIVATED CARBON FILTER
- (FIGURE 13)
- REPLACEMENT OF ACTIVATED CARBON FILTER
- (FIGURE 14)
- CLEANING AND MAINTENANCE
- CLEANING
- WASHABLE ALUMINUM CASSETTE FILTERS
- GENERAL INFORMATION ABOUT LAMPS AND REPLACEMENT OF LAMPS
- REPLACEMENT OF THE LAMPS
- SERVICE, SPARE PARTS AND WARRANTY
- MATTERS TO BE CONSIDERED BY THE CUSTOMER REGARDING THE WARRANTY
- THE FOLLOWING CONDITIONS ARE EXCLUDED FROM THE WARRANTY
- WARNINGS REGARDING TRANSPORTATION AND HANDLING
- IF YOU NEED TRANSPORTATION
- AFTER SALES SERVICE
- WE KINDLY ASK YOU TO OBSERVE THE FOLLOWING PRECAUTIONS
- IF THE COOKER HOOD IS NOT WORKING
- BEFORE CONTACTING THE SERVICE
- SERVICE AND SPARE PARTS
- COMPLIES WITH AEEE REGULATION
- HOOVER
- TAM ANKASTRE DAVLUMBAZ
- DAVLUMBAZIN ÇALIŞTIRILMASI VE KULLANIMI
- AKTIF KARBON FILTRESI
Brand : HOOVER
Model : HPY6SGTK
Category : Range hood