
CL60 - Light COLBOR - Free user manual and instructions
Find the device manual for free CL60 COLBOR in PDF.


| Product Type | LED Video Light |
| Model | CL60 |
| Brand | COLBOR |
| Light Source | COB LED |
| Power Output | 60W |
| Color Temperature | 3200K-5600K (Bi-color) |
| CRI (Color Rendering Index) | ≥96 |
| TLCI (Television Lighting Consistency Index) | ≥97 |
| Dimming Range | 0-100% |
| Beam Angle | 120° (with reflector) |
| Control Method | Manual, DMX, Smartphone App |
| Wireless Control | 2.4G / Bluetooth |
| Power Supply | AC 100-240V 50/60Hz or DC 15V/4A (V-Mount battery plate optional) |
| Dimensions (Light Head) | Approx. 25 x 15 x 10 cm |
| Weight (Light Head) | Approx. 1.2 kg |
| Mount Type | Standard 5/8" baby pin / 1/4"-20 screw |
| Included Accessories | Reflector, AC adapter, power cord, carry case |
| Cooling System | Active fan cooling (silent mode available) |
| Repairability | Replaceable COB LED and fan; service by authorized centers |
| Safety Certifications | CE, FCC, RoHS |
Frequently Asked Questions - CL60 COLBOR
User questions about CL60 COLBOR
0 question about this device. Answer the ones you know or ask your own.
Ask a new question about this device
Download the instructions for your Light in PDF format for free! Find your manual CL60 - COLBOR and take your electronic device back in hand. On this page are published all the documents necessary for the use of your device. CL60 by COLBOR.
USER MANUAL CL60 COLBOR
Thank you for choosing COLBOR product. Please read this manual
carefully before use and follow all instructions mentioned herein.
Safety Instructions
- Please read and fully understand this manual before using the product.
- Please remove the COB protective film to avoid damage by overheat before first use.
- Please remove the
before every use.
- DO NOT USE THE PRODUCT UNDER MOUST ENVIRONMENT, OR WITH WEL HANDS. DO NOT allow the product to be splashed or soaked in water.
- Keep the product away from corrosive chemicals and liquid to avoid
- Keep the product out of children's work during use. Do not know the
- Keep the product out of children's reach during last. Do not make the product unattended.
- When the product is working, the COB and heat sink will produce high improvements. Do not hide from upside down and brush with hands
- Temperature: Do not block, turn upside down and touch with hands. - To ensure the service life, the cooling system still runs for a while after
- To choose the service line, the opening system will hand for a white border shutdown until the COB is below 45°C.
- Please disconnect the power supply and put away the power cord when it is not in use.
- During use, arrange the power cord in order to avoid tripping and cutting of
- Training data: change the power beds in order to avoid trapping and taking off the power or damaging the product.
- Let the product cool completely before storage. Remove the power cable from the product and put it in the corresponding position of coming in
from the product and put it in the corresponding position of canjing bag after cooling down.
- Do not disassemble the product by yourself, otherwise the warranty will be
Invalid. If any fault occurs, please refer it to an authorized technician for inspection or maintenance.
- Recommend to use the original parts of COLBOR. If the product is damage
due to the use of the non-original parts, it is not included in the warranty of our products.
- Drop or external impact may cause product failure. Artificial damage is not
covered by warranty.
- COLBOR reserves the right of final interpretation of the products. The product design and specifications are subject to change without notice.
Product instructions

| 1 COB Bead | 7 Quick-mount Holder | 8 EFF Rate Option Button |
| 2 Bead Heat Sink | 8 LCD Display Screen | 9 EFF Mode Button |
| 3 Bowen Mount Adapter | 9 Brightness Control Wheel | 10 CCT Mode Button |
| 4 Ejector Pin | ||
| 5 Roll | 10 Color Temperature Control Wheel | 11 Type-C Power Input |
| 6 Vent | ||
| 11 Settings Button | 12 Power Button |
Installation & Disassembly
- Remove COB protective cover
Hold the COB protective cover and pull it out as the arrow shows.
★ Note: Make sure remove the cover before every use
to avoid heat damage.
- Install adapter and reflector
① Align the inner frame of adapter
push the adapter ring into the light from the head. Fasten two marbles on the adapter ring to the crude
When disassembling, push the adapter ring towards the head of the light.
(2)

② Align the reflector with the adapter ring and insert it. The ejector pin is
pinchled by 1 springs back
When disassembling, push the ejector pin and rotate the reflector
in the case of
图 1

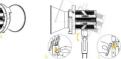
- Fixing of the video light
① Slide the quick-mount holder into the chute under the light and rotate the block a hold.
② install trirod into the quick-mount holder and rotate the knob b tightly.
③ Adjust the light to the desired angle and rotate the knob cightly.
- Multi-light connection & disassembly
Slide the rail of one light into the chute of the other until the pins inlay. Where disrepresenting lights the light out of the chute

- Install VM2
Side VRz into the chute of light, determine the fixed position and adjust the lever to lock.
When removing, adjust the level to unlock and slide out of the light.

- Power supply
(1) DC power supply

(2) Battery power supply
Turn on power after installi

-
Before using the product for
-
Before using the product, for the first time, please be sure to hear on the protective film in front of the COR head.
-
Power On: connect the power cord with the power adapter, plug the
connector of adapter into the fixture's power input, then attach to an
electroly supply. 3. Functiony long press the power button, then the power button lights up. The
- Transient long process to power button, then the power button lights up. The product enters operation interface.
(Factory default mode: OCT)
- Power Off: press the power button.
Status Icon Description

① APP Connection Status Icon
- (1) (2) After selecting wireless connection in Settings menu, the law will be derived differently.
- Can turn be displayed dynamically.
The icon is always on to indicate successful pairing with
6-9 mobile APP. The iron spectrum to infinity, qubit APP existing
The look disappears to indicate mobile APP pairing failure, or the product is unpeined.
② Fan Status Icon
Smart Mode. The product will adjust the fan speed.
59s according to the internal detected temperature to ensure
that it is in optimal working condition.
Quiet Mode. The fan keeps running at low speed for minimum price, and overeating protection will be
Minimally horse, and overheating protection will be activated if the product temperature is higher than the
alarm value.
① Group Status Icon
NONE grouping status. The product defaults to the factory status, and will not be affected by other revenues.
Figure 2. The following table provides the information in English:
A stands for Group A. There are fifteen groups (A–D). T stands for Tx
1.2.3.4.5.6.7.8.9.10.11.12.13.14.15.16.17.18.19.20.21.22.23.24.25.26.27.28.29.30.31.32.33.34.35.36.37.38.39.40.41.42.43.44.45.46.47.48.49.50.51.52.53.54.55.56.57.58.59.60.61.62.63.64.65.66.67.68.69.70.71.72.73.74.75.76.77.78.79.80.81.82.83.84.85.86.87.88.89.90.91.92.93.94.95.96.97.98.99.100
A stands for Group A. There are three groups (AP-D). R stands for Rx.
- 1. Study for Group A: True on 6th grade (4, 6): TD
Astands for Group A. There are mixed groups (A-O): TR stands for TxRx.
⑧ Repeater Status Icon
If the icon is always on, it means that Reporter function
RP if the icon is always on, it means that a special character is turned on, and if the icon disappears, it means the
function is turned off.
⑤ Product: Ovarhasted Alarm icon
If the icon flashes, it means that the internal temperature of the product is too high, and really means too good.
[29] On the product is too high, and cooling measures need to be taken. If the icon disappears, it means that the
operation is normal.
(1) AD = BD = 1
CCT Mode (Short press CCT Mode Button to enter)

Brightness Control Wheel - Roll the wheel upwards or downwards to adjust brightness (DIM) within 0%–100% - Press down the wheel to quickly switch the preset brightness, 0%, 25%, 50%, 75%, and 100%
Color Temperature Control Wheel
Roll the wheel upwards or downwards to adjust color temperature (CCT)
within 2700K-6500K
Press down the wheel to quickly switch the preset color temperature,
2700K, 3200K, 4000K, 5800K, and 6500K
★Rolling the wheel will enlarge the current setting parameter value, and it will automatically return to the main frame offered 5 seconds of so
It will automatically return to the main screen after 1.5 seconds of no operation
•
EFF Mode (Short press EFF Mode Button to enter)

Brightness Control Wheel Roll the wheel upwards or downwards to adjust brightness (DIM) within 0%–100% Press down the wheel to quickly switch the preset brightness, 0%, 25%, 50%, 75%, and 100% Color Temperature Control Wheel
EFF Rate Option Button Roll the wheel upwards or
Press the button to switch effect rate downwards to adjust color
from E.V. to E.V.S. max rate, E.V.S. temperature (oC) within 2700K-6500K
EFF Mode Button Press down the wheel to
Press the button to switch special effect: Eire → CCT Chase → Ruling quickly switch the preset
→ TV → Explosion → Faulty Bulb Color temperature, 2700K, 3200K, 4000K, 5800K, and
→ Welding → Strobe → Lightning → SOS 6500K
| Fire | RATE: Lx 1 - Lv5DIM: 0%-100%CCT: 2700K-6500K | Faulty Bulb | RATE: Lx 1 - Lv5DIM: 0%-100%CCT: 2700K-6500K | |
| EFF | OCT Chest | RATE: Lx 1 - Lv5DIM: 0%-100%CCT: LOCK | Westing | RATE: Lx 1 - Lv5DIM: 0%-100%CCT: 2700K-6500K |
| Pulling Shock | RATE: Lx 1 - Lv5DIM: 0%-100%CCT: 2700K-6500K | Lightning | RATE: Lx 1 - Lv5DIM: 0%-100%CCT: 2700K-6500K | |
| EFF | TV | RATE: Lx 1 - Lv5DIM: 0%-100%CCT: LOCK | RATE: Lx 1 - Lv5DIM: 0%-100%CCT: 2700K-6500K | |
| Expansion | RATE: Lx 1 - Lv5DIM: 0%-100%CCT: 2700K-6500K | SOS | RATE: LOCKDIM: 0%-100%CCT: 2700K-6500K |
Settings
1. Short press Settings Button to enter settings menu.
- Roll the Brightness Control Wheel to choose setting.
- Roll the Color Temperature Control Wheel to adjust corresponding setting (Wireless connection adjust need short press).
| Settings Options | |
| Wireless Connection | RESET |
| Fan Mode | SMART/ QUITSMART—The product will detect the current internal temperature to adjust the fan speed by itself. QUIT—The fan will run all low speed. If the product temperature reaches the alarm value, it will start the power-off protection mechanism. |
| Group | NULL/A-0 (NULL by default) |
| Communication | TX/RV/TRX (TX by default) |
| Repeater ON/OFF (OFF by default) | |
| Curve | ( LINEAR I CURVE, C CURVE,C CURVE will be available soon through upgrades.) |
| Response | SHARP / SMOOTH (SMOOTH by default) |
| Language | ENV CN |
| Product INFO. | Short press the Color Temperature Control Wheel to enter the production information interface.Long press the Color Temperature Control Wheel to settings menu.1 Hardware Version2 Firmware Version3 Protocol Version4 MAC Address |
* When Group function is on, if the product is operated after a period
of time, it takes time to connect between products, so there will be milli-organised risky.
The effective distance of transmitter(TX) receiver (IFX) transmitter
The effective distance in Cartesian (TX), receiver (TX), transverse TReceiver (TXFX) is 10 meters.
★ Repeater (RP) function is the auxiliary function to enhance the signal of
light control and the effective distance of light control. However, too many uses of RR function can affect product response time due to environments
uses on the function can effect product response time due to environmental factors.
If the distance between lights in a group is more than 10 meter, it is
recommended to set a light in the middle as a signal RP point to increase the control distance. In addition, in the state of multi-light connection, the
response of the product can be effectively improved when the RP function
of one light is turned on if connected lights are more than free, the RP function of two lights are turned on if there are more than 100, and so an
- Restore factory settings: long press two wheels together for 5 seconds.
and the product reboots to restore the factory default mode.
Φ≤10m Dist>10m
19^
7a-01e ■ 7b-01e
(1) 12 (TaPa) 12 (TaPa)
TaRx
Ta R=10m____×____×R=10m
Place anywhere within RP function needs to be
the range turned on within this range
Specifications
| Color Handling Index | 97+ |
| Color Temperature Range | 2700K~4200K( 200) |
| Beans Angle | ≈1.5° Perforator ≈1.5° |
| Illumination | See the Form Below |
| COD Output Power | >60W |
| Rated Power | 80W (Max) |
| Light Working Voltage | DC 20V 4A |
| Cooling Mode | SMART/QUET |
| Connector | Type-C, supports PD3.0 20V 4A |
| Body Material | Aluminum Alloy+Al25 |
| Light Dimension [mm] | 140*85*60 Light Base hit included |
| Weight | Light: 550g, Light Base: 160g |
| Operating Environment Temperature | -1.0~50°C |
[Non-Text]
| CLIO Video Light x1 | Camping Bag x1 | Bower Mouth Reflector x1 | Standard Adapter (Bowers Mount) x1 | User Manual x1 |
| Power Adapter x1 | Light Base x1 | COBI protective cover x1 |
About Product
1. After the test, the product with assembly structure has bearing capacity of
4kg. Customers need to use according to actual conditions.
2. It is recommended to use the original power adapter for power supply. The modification will not be involved in the warranty & one other equivalent to
The market will not be included in the warranty if use other equipment to power the product.
3. When more than five lights are assembled into a light matrix, turning
on the RP function in one of them to provide better control stability. If the number of lights receive 10, this is the RP function for two of them, and so
number of lights reaches to, enable the RP function for two or three, and so on.
[Non-Text]
WARRANTY
Warranty Period
Thank you for purchasing COLBOR products.
1. Customers are entitled to free replacement or repair service in case of
quality denict(s) found in the product under normal size within 30 days upon
2. Original COI BOR products are entitled to 12-month limited warranty service
The warranty period begins on the date of purchase of brand now, unused
products by the first-aks-laser.
Within the warranty period, if product defect or failure is attributable to material
within the warning point, if problem does not qualify to discontinue to infectious defecation or technological problem, the defective product or defective part will
be repaired or replaced without charge (service and materials fee).
Warranty Exclusions and Limitations
1. Faults resulted from inappropriate use of a product without following its operation specification
2. Artificial damage, e.g. crash, squeeze, scratch, soaking, exposing to rain
damp
3. Modifications to a product by its user or a third party without prior written consent of COLBOR, e.g. replacement of element or circuit, label alteration
4. The code on product is inconsistent with that of warranty certificate, or th
code on the product or warranty certificate is ordered or torn off
F. All applicable authority attached to a product, like only one
6. Hit consumable accessory accounted to a product, like cable, cover 6. Faults as a result of force majeure, such as fire, flood, lightning, et
Warranty Claim Procedure
1. If failure or any problem occurs to your product after purchase, please
contact: a local agent for assistance, or you can always contact COLBOR's
2. Please retain your sales receipt and warranty certificate as proof of
purchase. If any of these documents is missing, only sales return or charged
service will be provided.
3. If the QOL BOR product is out of the warranty coverage, the service and t
parta cost will be charged.
Form 1
Download COLBOR Studio™ APP
1. Scan the following GB code to install


105
search COLBO
—
COLBOR

| WARRANTY CERTIFICATE | |
| Please register your warranty. Meanwhile, you are welcomed to contact us via Email. | |
| USER INFORMATION | Customer Name: |
| Phone Number: | |
| Email: | |
| Address: | |
| Sales Dates: | |
| SALES INFORMATION | Model: |
| Product Codes: | |
| Dealer: | |
| REPAIR RECORD | Service Dates: |
| Technicians: | |
| Issue: | |
RESULT
□Solved □Unsolved □Returned(Replaced)
Guangzhou Zhiying Technology Co., Ltd
Room 2401, 24/F., South Tower, Liaoning Plaza, No. 68, Huaoli Avenue, Lixuan District.
Guangzhou, China, 51.000
■support@colborlight.com
www.csc.com.cn


Brand : COLBOR
Model : CL60
Category : Light