
Sonix Pro - Alarm system Evolveo - Free user manual and instructions
Find the device manual for free Sonix Pro Evolveo in PDF.


| Product Type | Wi-Fi + GSM Smart Security Alarm System |
| Brand | Evolveo |
| Model | Sonix Pro |
| Central Unit Dimensions | 118 × 118 × 23.8 mm |
| PIR Detector Dimensions | 94 × 54 × 41 mm (without holder) |
| Door Sensor Dimensions (Transmitter) | 50 × 35 × 17 mm |
| Remote Control Dimensions | 69 × 36 × 11 mm |
| Central Unit Power Supply | DC 5V, 1A |
| PIR Detector Battery | DC 3V (2×AAA) |
| Door Sensor Battery | DC 3V (1×CR2032) |
| Remote Control Battery | DC 3V (1×CR2032) |
| Wireless Standards | IEEE 802.11 b/g/n (Wi-Fi), 433.92 MHz (RF) |
| Number of Wireless Zones | 10 (up to 10 sensors per zone) |
| Remote Controls Supported | Up to 8 |
| Alarm Phone Numbers | 6 groups for calls, 6 groups for SMS |
| GSM Network | Yes (SIM card required) |
| Mobile App | Smart Life (iOS/Android) |
| Built-in Battery (Central Unit) | High-capacity lithium battery (backup during power failure) |
| Motion Sensor Detection | Distance: ~7 m, Angle: ~90° |
| RF Range (Open Field) | 70 m |
| Operating Temperature | -10°C to +50°C (central unit), -10°C to +55°C (sensors) |
| Maintenance | Keep surface clean and dry; charge immediately on low battery warning |
| Safety Precautions | Do not install outdoors; avoid heat sources, direct sunlight, and curtains; use only indoors |
| Spare Parts / Repairability | Not specified; contact technical support for issues |
| General Information | Copyright © Abacus Electric, s.r.o.; Made in China; design and specifications subject to change |
Frequently Asked Questions - Sonix Pro Evolveo
User questions about Sonix Pro Evolveo
0 question about this device. Answer the ones you know or ask your own.
Ask a new question about this device
Download the instructions for your Alarm system in PDF format for free! Find your manual Sonix Pro - Evolveo and take your electronic device back in hand. On this page are published all the documents necessary for the use of your device. Sonix Pro by Evolveo.
USER MANUAL Sonix Pro Evolveo
natural_image
Line drawing of a smart home device with control panels and three separate devices (no text or symbols)
Obsah / Content
Česky 6
Slovensky 44
English....82
CZ
SK
EN
Obsah

flowchart
graph LR
    A["Add Manually"] --> B["Reset the device first."]
    B --> C["Enter Wi-Fi Password"]
    C --> D["Connecting..."]
flowchart
graph LR
    A["Connect your mobile phone to the device's hotspot"] --> B["Do not use Wi-Fi"]
    B --> C["WLAN"]
    C --> D["Connecting..."]
    D --> E["Cancel"]

    subgraph Device_1
        A1["Connect the phone to the hotspot below"]
        A2["Smart AI, JOXX"]
        A3["2. Its back to the app and continue to add devices"]
        A4["Disable Software"]
    end

    subgraph Device_2
        B1["Start with Open Start"]
        B2["Start with Open Start"]
        B3["Start with Open Start"]
        B4["Start with Open Start"]
        B5["Start with Open Start"]
        B6["Start with Open Start"]
        B7["Start with Open Start"]
        B8["Start with Open Start"]
        B9["Start with Open Start"]
        B10["Start with Open Start"]
        B11["Start with Open Start"]
        B12["Start with Open Start"]
        B13["Start with Open Start"]
        B14["Start with Open Start"]
        B15["Start with Open Start"]
        B16["Start with Open Start"]
        B17["Start with Open Start"]
        B18["Start with Open Start"]
        B19["Start with Open Start"]
        B20["Start with Open Start"]
        B21["Start with Open Start"]
        B22["Start with Open Start"]
        B23["Start with Open Start"]
        B24["Start with Open Start"]
        B25["Start with Open Start"]
        B26["Start with Open Start"]
        B27["Start with Open Start"]
        B28["Start with Open Start"]
        B29["Start with Open Start"]
        B30["Start with Open Start"]
        B31["Start with Open Start"]
        B32["Start with Open Start"]
        B33["Start with Open Start"]
        B34["Start with Open Start"]
        B35["Start with Open Start"]
        B36["Start with Open Start"]
        B37["Start with Open Start"]
        B38["Start with Open Start"]
        B39["Start with Open Start"]
        B40["Start with Open Start"]
        B41["Start with Open Start"]
        B42["Start with Open Start"]
        B43["Start with Open Start"]
        B44["Start with Open Start"]
        B45["Start with Open Start"]
        B46["Start with Open Start"]
        B47["Start with Open Start"]
        B48["Start with Open Start"]
        B49["Start with Open Start"]
        B50["Start with Open Start"]
        B51["Start with Open Start"]
        B52["Start with Open Start"]
        B53["Start with Open Start"]
        B54["Start with Open Start"]
        B55["Start with Open Start"]
        B56["Start with Open Start"]
        B57["Start with Open Start"]
        B58["Start with Open Start"]
        B59["Start with Open Start"]
        B60["Start with Open Start"]
        B61["Start with Open Start"]
        B62["Start with Open Start"]
        B63["Start with Open Start"]
        B64["Start with Open Start"]
        B65["Start with Open Start"]
        B66["Start with Open Start"]
        B67["Start with Open Start"]
        B68["Start with Open Start"]
        B69["Start with Open Start"]
        B70["Start with Open Start"]
        B71["Start with Open Start"]
        B72["Start with Open Start"]
        B73["Start with Open Start"]
        B74["Start with Open Start"]
        B75["Start with Open Start"]
        B76["Start with Open Start"]
        B77["Start with Open Start"]
        B78["Start with Open Start"]
        B79["Start with Open Start"]
        B80["Start with Open Start"]
        B81["Start with Open Start"]
        B82["Start with Open Start"]
        B83["Start with Open Start"]
        B84["Start with Open Start"]
        B85["Start with Open Start"]
        B86["Start with Open Start"]
        B87["Start with Open Start"]
        B88["Start with Open Start"]
        B89["Start with Open Start"]
        B90["Start with Open Start"]
        B91["Start with Open Start"]
        B92["Start with Open Start"]
        B93["Start with Open Start"]
        B94["Start with Open Start"]
        B95["Start with Open Start"]
        B96["Start with Open Start"]
        B97["Start with Open Start"]
        B98["Start with Open Start"]
        B99["Start with Open Start"]

    end
natural_image
Line drawing of a hand reaching toward a wall-mounted device (no text or symbols)natural_image
Simple line drawing of two geometric shapes with a sun symbol on one side (no text or labels)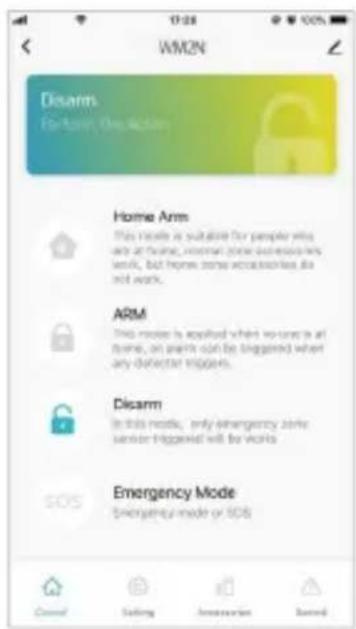
1
Nastavení hesla
flowchart
graph TD
    A["1: Select Identity"] --> B["2: Password Setting"]
    B --> C["3: List of alarm phone number"]
Kontrola záznamů
Pohybové čidlo
natural_image
Simple line drawing of a wall-mounted device mounted on a vertical post (no text or symbols)natural_image
Line drawing of a device with a scroll wheel and two separate views (no text or symbols)2. Návrhy na instalaci
natural_image
Abstract geometric pattern with curved lines and shaded regions, no text or symbols present3. Upozornění
natural_image
Simple line drawing of a door with a circular inset showing a broken door (no text or symbols)

flowchart
graph LR
    A["Add Manually"] --> B["Reset the device first."]
    B --> C["Enter Wi-Fi Password"]
    C --> D["Connecting..."]
Režim pripojenia hotspotu (režim pripojenia AP)
flowchart
graph LR
    A["Connect your mobile phone to the device's hotspot"] --> B["2. Its back to the app and continue to add devices"]
    B --> C["Next Step"]

    subgraph Connection...
        D["Place your store, mobile phone, and devices at close to positive"]
    end

    subgraph Next Step
        E["Cancel"]
    end

    F["Start: Smart & JOXX"] --> G["Next Step: 1. Connect the plan to the hotspot below"]
    G --> H["Next Step: 2. It's back to the app and continue to add devices"]
    H --> I["Next Step: 3. Connect your mobile phone to the device's hotspot"]

    J["Start: Smart & JOXX"] --> K["Next Step: 1. Connect the plan to the hotspot below"]
    K --> L["Next Step: 2. It's back to the app and continue to add devices"]
    L --> M["Next Step: 3. Connect your mobile phone to the device's hotspot"]

    N["Start: Smart & JOXX"] --> O["Next Step: 1. Connect the plan to the hotspot below"]
    O --> P["Next Step: 2. It's back to the app and continue to add devices"]
    P --> Q["Next Step: 3. Connect your mobile phone to the device's hotspot"]

    R["Next Step: Smart & JOXX"] --> S["Next Step: 1. Connect the plan to the hotspot below"]
    S --> T["Next Step: 2. It's back to the app and continue to add devices"]
    T --> U["Next Step: 3. Connect your mobile phone to the device's hotspot"]

    V["Next Step: Smart & JOXX"] --> W["Next Step: 1. Connect the plan to the hotspot below"]
    W --> X["Next Step: 2. It's back to the app and continue to add devices"]
    X --> Y["Next Step: 3. Connect your mobile phone to the device's hotspot"]

    Z["Next Step: Smart & JOXX"] --> AA["Next Step: 1. Connect the plan to the hotspot below"]
    AA --> AB["Next Step: 2. It's back to the app and continue to add devices"]
    AB --> AC["Next Step: 3. Connect your mobile phone to the device's hotspot"]

    AD["Next Step: Smart & JOXX"] --> AE["Next Step: 1. Connect the plan to the hotspot below"]
    AE --> AF["Next Step: 2. It's back to the app and continue to add devices"]
    AF --> AG["Next Step: 3. Connect your mobile phone to the device's hotspot"]

    AH["Next Step: Smart & JOXX"] --> AI["Next Step: 1. Connect the plan to the hotspot below"]
    AI --> AJ["Next Step: 2. It's back to the app and continue to add devices"]
    AJ --> AK["Next Step: 3. Connect your mobile phone to the device's hotspot"]

    AL["Next Step: Smart & JOXX"] --> AM["Next Step: 1. Connect the plan to the hotspot below"]
    AM --> AN["Next Step: 2. It's back to the app and continue to add devices"]
    AN --> AO["Next Step: 3. Connect your mobile phone to the device's hotspot"]

    AP["Next Step: Smart & JOXX"] --> AQ["Next Step: 1. Connect the plan to the hotspot below"]
    AQ --> AR["Next Step: 2. It's back to the app and continue to add devices"]
    AR --> AS["Next Step: 3. Connect your mobile phone to the device's hotspot"]

    AT["Next Step: Smart & JOXX"] --> AU["Next Step: 1. Connect the plan to the hotspot below"]
    AU --> AV["Next Step: 2. It's back to the app and continue to add devices"]
    AV --> AW["Next Step: 3. Connect your mobile phone to the device's hotspot"]

    AX["Next Step: Smart & JOXX"] --> AY["Next Step: 1. Connect the plan to the hotspot below"]
    AY --> AZ["Next Step: 2. It's back to the app and continue to add devices"]
    AZ --> BA["Next Step: 3. Connect your mobile phone to the device's hotspot"]

    BB["Next Step: Smart & JOXX"] --> BC["Next Step: 1. Connect the plan to the hotspot below"]
    BC --> BD["Next Step: 2. It's back to the app and continue to add devices"]
    BD --> BE["Next Step: 3. Connect your mobile phone to the device's hotspot"]

    BF["Next Step: Smart & JOXX"] --> BG["Next Step: 1. Connect the plan to the hotspot below"]
    BG --> BH["Next Step: 2. It's back to the app and continue to add devices"]
    BH --> BI["Next Step: 3. Connect your mobile phone to the device's hotspot"]

    BJ["Next Step: Smart & JOXX"] --> BK["Next Step: 1. Connect the plan to the hotspot below"]
    BK --> BL["Next Step: 2. It's back to the app and continue to add devices"]
    BL --> BM["Next Step: 3. Connect your mobile phone to the device's hotspot"]

    BN["Next Step: Smart & JOXX"] --> BO["Next Step: 1. Connect the plan to the hotspot below"]
    BO --> BP["Next Step: 2. It's back to the app and continue to add devices"]
    BP --> BQ["Next Step: 3. Connect your mobile phone to the device's hotspot"]

    BR["Next Step: Smart & JOXX"] --> BS["Next Step: 1. Connect the plan to the hotspot below"]
    BS --> BT["Next Step: 2. It's back to the app and continue to add devices"]
    BT --> BU["Next Step: 3. Connect your mobile phone to the device's hotspot"]

    BV["Next Step: Smart & JOXX"] --> BW["Next Step: 1. Connect the plan to the hotspot below"]
    BW --> BX["Next Step: 2. It's back to the app and continue to add devices"]
    BX --> BYD["Next Step: 3. Connect your mobile phone to the device's hotspot"]

    CA["Next Step: Smart & JOXX"] --> CB["Next Step: 1. Connect the plan to the hotspot below"]
    CB --> CC["Next Step: 2. It's back to the app and continue to add devices"]
    CC --> CDQ["Next Step: 3. Connect your mobile phone to the device's hotspot"]

    CE["Next Step: Smart & JOXX"] --> CF["Next Step: 1. Connect the plan to the hotspot below"]
    CF --> CG["Next Step: 2. It's back to the app and continue to add devices"]
    CG --> DHQ["Next Step: 3. Connect your mobile phone to the device's hotspot"]

    DI["Next Step: Smart & JOXX"] --> DJ["Next Step: 1. Connect the plan to the hotspot below"]
    DJ --> DK["Next Step: 2. It's back to the app and continue to add devices"]
    DK --> DLQ["Next Step: 3. Connect your mobile phone to the device's hotspot"]

    DV["Next Step: Smart & JOXX"] --> DW["Next Step: 1. Connect the plan to the hotspot below"]
    DW --> DX["Next Step: 2. It's back to the app and continue to add devices"]
    DX --> DYQ["Next Step: 3. Connect your mobile phone to the device's hotspot"]

    DWV["Next Step: Smart & JOXX"] --> DWG["Next Step: 1. Connect the plan to the hotspot below"]
    DWG --> DWH["Next Step: 2. It's back to the app and continue to add devices"]

    DXVW["Next Step: Smart & JOXX"] --> DXVX["Next Step: 1. Connect the plan to the hotspot below"]
    DXVX --> DXVY["Next Step: 2. It's back to the app and continue to add devices"]

    DXVZ["Next Step: Smart & JOXX"] --> DXVZG["Next Step: 1. Connect the plan to the hotspot below"]
    DXVZG --> DXVZH["Next Step: 2. It's back to the app and continue to add devices"]

    DXVYW["Next Step: Smart & JOXX"] --> DXVYXG["Next Step: 1. Connect the plan to the hotspot below"]
    DXVYXG --> DXVYZH["Next Step: 2. It's back to the app and continue to add devices"]

    DXVZW["Next Step: Smart & JOXX"] --> DXVVG
    DXVVG --> DXVVH
Krok 3. Pridat' detektor
natural_image
Line drawing of a hand reaching toward a wall-mounted device (no text or symbols)natural_image
Simple line drawing of two geometric shapes with a sun symbol on one side (no text or labels)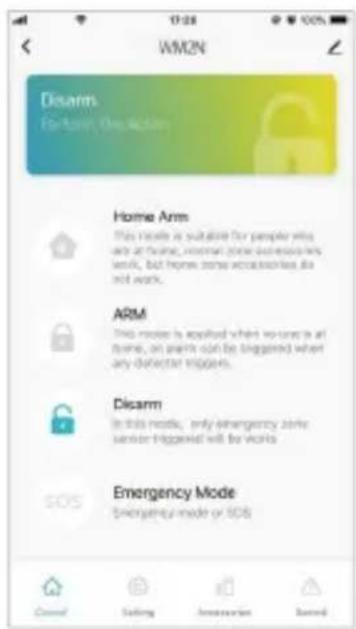
1
1) Prepínač identity
Správa senzorov
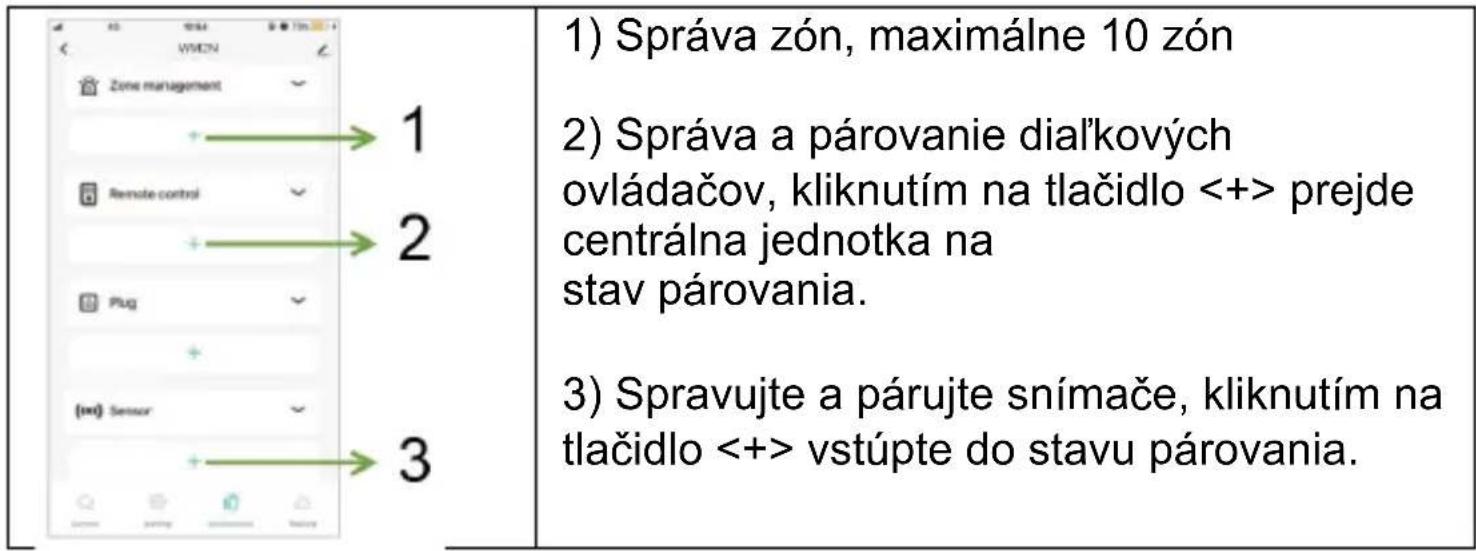
Nastavenia hesla
flowchart
graph LR
    A["Select Identity"] --> B["Administer name/Driver"]
    C["Delay Setting"] --> D["Adding Delay/Main Delay"]
    E["Password Setting"] --> F["Modify Administrator | Upload/User"]
    G["Timing disanning settings"] --> H["Timing calling/Disanning"]
flowchart
graph TD
    A["Smart Security Gateway"] --> B["Select Identify"]
    B --> C["Delay Setting"]
    C --> D["Password Setting"]
    D --> E["Timing Clearing settings"]
    E --> F["Push"]
    F --> G["Phone List"]

    G --> H["List of alarm phone number"]
    H --> I["Press service to address phone number according to the security. Note that the number is not available for this security"]

    I --> J["List of alarm phone number"]
    J --> K["Press service to address phone number according to the security. Note that the number is not available for this security"]

    K --> L["List of alarm phone number"]
    L --> M["Press service to address phone number according to the security. Note that the number is not available for this security"]

    M --> N["List of alarm phone number"]
    N --> O["Press service to address phone number according to the security. Note that the number is not available for this security"]

    O --> P["List of alarm phone number"]
    P --> Q["Press service to address phone number according to the security. Note that the number is not available for this security"]

    Q --> R["List of alarm phone number"]
    R --> S["Press service to address phone number according to the security. Note that the number is not available for this security"]

    S --> T["List of alarm phone number"]
    T --> U["Press service to address phone number according to the security. Note that the number is not available for this security"]

    U --> V["List of alarm phone number"]
    V --> W["Press service to address phone number according to the security. Note that the number is not available for this security"]

    W --> X["List of alarm phone number"]
    X --> Y["Press service to address phone number according to the security. Note that the number is not available for this security"]

    Y --> Z["List of alarm phone number"]
    Z --> AA["Press service to address phone number according to the security. Note that the number is not available for this security"]

    AA --> AB["List of alarm phone number"]
    AB --> AC["Press service to address phone number according to the security. Note that the number is not available for this security"]

    AC --> AD["List of alarm phone number"]
    AD --> AE["Press service to address phone number according to the security. Note that the number is not available for this security"]

    AE --> AF["List of alarm phone number"]
    AF --> AG["Press service to address phone number according to the security. Note that the number is not available for this security"]

    AG --> AH["List of alarm phone number"]
    AH --> AI["Press service to address phone number according to the security. Note that the number is not available for this security"]

    AI --> AJ["List of alarm phone number"]
    AJ --> AK["Press service to address phone number according to the security. Note that the number is not available for this security"]

    AK --> AL["List of alarm phone number"]
    AL --> AM["Press service to address phone number according to the security. Note that the number is not available for this security"]

    AL --> AN["List of alarm phone number"]
    AN --> AO["Press service to address phone number according to the security. Note that the number is not available for this security"]

    AO --> AP["List of alarm phone number"]
    AP --> AQ["Press service to address phone number according to the security. Note that the number is not available for this security"]

    AQ --> AR["List of alarm phone number"]
    AR --> AS["Press service to address phone number according to the security. Note that the number is not available for this security"]

    AR --> AT["List of alarm phone number"]
    AT --> AU["Press service to address phone number according to the security. Note that the number is not available for this security"]

    AU --> AV["List of alarm phone number"]
    AV --> AW["Press service to address phone number according to the security. Note that the number is not available for this security"]

    AV --> AX["List of alarm phone number"]
    AX --> AY["Press service to address phone number according to the security. Note that the number is not available for this security"]

    AX --> AZ["List of alarm phone number"]
    AZ --> BA["Press service to address phone number according to the security. Note that the number is not available for this security"]

    AX --> BB["List of alarm phone number"]
    BB --> BC["Press service to address phone number according to the security. Note that the number is not available for this security"]

    AX --> BD["List of alarm phone number"]
    BD --> BE["Press service to address phone number according to the security. Note that the number is not available for this security"]

    AX --> BF["List of alarm phone number"]
    BF --> BG["Press service to address phone number according to the security. Note that the number is not available for this security"]

    AX --> BH["List of alarm phone number"]
    BH --> BI["Press service to address phone number according to the security. Note that the number is not available for this security"]

    AX --> BJ["List of alarm phone number"]
    BJ --> BK["Press service to address phone number according to the security. Note that the number is not available for this security"]

    AX --> BL["List of alarm phone number"]
    BL --> BM["Press service to address phone number according to the security. Note that the number is not available for this security"]

    AX --> BN["List of alarm phone number"]
    BN --> BO["Press service to address phone number according to the security. Note that the number is not available for this security"]

    AX --> BP["List of alarm phone number"]
    BP --> BQ["Press service to address phone number according to the security. Note that the number is not available for this security"]

    AX --> BR["List of alarm phone number"]
    BR --> BS["Press service to address phone number according to the security. Note that the number is not available for this security"]

    AX --> BT["List of alarm phone number"]
    BT --> BU["Press service to address phone number according to the security. Note that the number is not available for this security"]

    AX --> BV["List of alarm phone number"]
    BV --> BW["Press service to address phone number according to the security. Note that the number is not available for this security"]

    AX --> BX["List of alarm phone number"]
    BX --> BY["Press service to address phone number according to the security. Note that the number is not available for this security"]

    AX --> BZ["List of alarm phone number"]
    BZ --> CA["Press service to address phone number according to the security. Note that the number is not available for this security"]

    AX --> CB["List of alarm phone number"]
    CB --> CC["Press service to address phone number according to the security. Note that the number is not available for this security"]

    AX --> CD["List of alarm phone number"]
    CD --> CE["Press service to address phone number according to the security. Note that the number is not available for this security"]

    AX --> CF["List of alarm phone number"]
    CF --> CG["Press service to address phone number according to the security. Note that the number is not available for this security"]

    AX --> CH["List of alarm phone number"]
    CH --> CI["Press service to address phone number according to the security. Note that the number is not available for this security"]

    AX --> CJ["List of alarm phone number"]
    CJ --> CK["Press service to address phone number according to the security. Note that the number is not available for this security"]

    AX --> CL["List of alarm phone number"]
    CL --> CM["Press service to address phone number according to the security. Note that the number is not available for this security"]

    AX --> CN["List of alarm phone number"]
    CN --> CO["Press service to address phone number according to the security. Note that the number is not available for this security"]

    AX --> CP["List of alarm phone number"]
    CP --> CQ["Press service to address phone number according to the security. Note that the number is not available for this security"]

    AX --> CR["List of alarm phone number"]
    CR --> CS["Press service to address phone number according to the security. Note that the number is not available for this security"]

    AX --> CT["List of alarm phone number"]
    CT --> CU["Press service to address phone number according to the security. Note that the number is not available for this security"]

    AX --> CU
Kontrola záznamov
Snímač pohybu
natural_image
Simple line drawing of a wall-mounted device mounted on a vertical post (no text or symbols)natural_image
Line drawing of a device with a scroll wheel and a separate flat panel (no text or symbols)natural_image
Abstract geometric pattern with curved lines and shaded regions, no text or symbols present3. Oznámenie
- Ďaleko od tepla
- Ďaleko od priameho slnka
- Neinštalujte von
- Neinštalujte v blízkosti záclony
Snímač dverí
Copyright © Abacus Electric, s.r.o.
www.evolveo.com www.facebook.com/EvolveoCZ
Dovozca / Výrobca
Status of the multifunction indicator 84
GSM network settings 85
-
Central unit: SMS control.... 85
-
Alarming process.... 86
-
Alarm SMS language switching 87
Motion sensor....88
Door sensor....89
Remote control....90
Step 1. Download the app and register....91
Step 2. Connecting the central unit via Wi-Fi....92
Step 3. Add detector....97
Application operation....99
Central unit of the device 99
Sensor management 101
Delay settings 102
Password settings.... 103
Setting the alarm number 104
Setting the activation/deactivation timing.... 106
Checking records.... 107
Restore factory settings 108
Central unit 108
Installation 109
Installation of the central unit 109
Motion sensor....109
Method of first installation 110
Door sensor....112
Main technical parameters 112
Security measures 114
Q&A 114
The central unit is the core of the Wi-Fi + GSM smart security alarm system, with motion detector, door sensor, wireless remote control and other accessories to create a smart security system. After simple installation and setup, the device can perform the anti-theft function. The device can also be connected to a smart socket and other smart devices to launch a smart home.
Main functions
- Wi-Fi connection, control via mobile app.
- It supports 6 groups of phone numbers for alarm and 6 groups of numbers for SMS reception.
- Set up a phone number and alerts using the mobile app.
- Wireless communication, no wiring.
- Manage account classification, admin and user.
- Support 10 wireless zones, each zone supports up to 10 sensors, support 8 remotes.
- Low power consumption, very long standby time.
- Sub-device with low voltage warning, status monitoring and disconnection warning.
- Smart scene recognition, reminder of unlocked doors.
- Support switching multiple zone types, adapting to multiple security scenarios.
- Built-in high-capacity lithium battery that is functional during temporary power failure.
Understanding the product Central unit
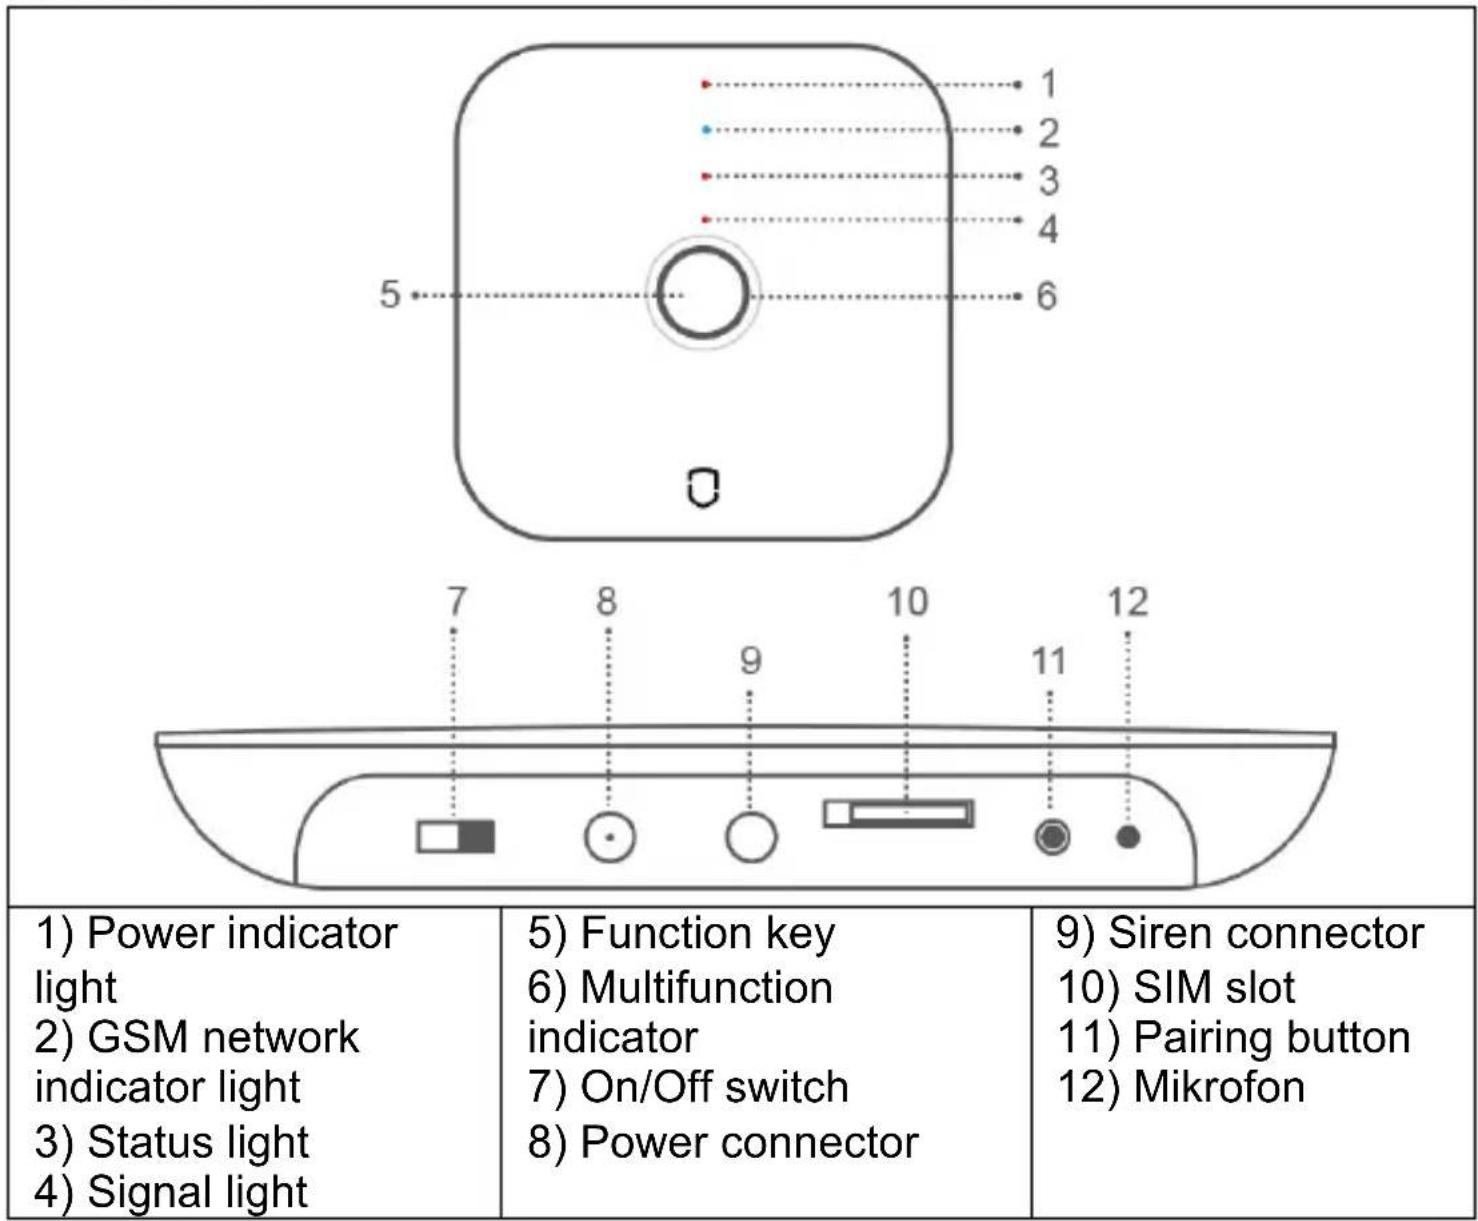
Function key (5): Alarm activation (short press), alarm deactivation (long press).
Encrypted or decrypted: In the total/partial activation state, press the function key briefly 1 time, the system is deactivated after the beep. In the decoded state, briefly press the function key 1 time, after the beep the system will be encoded into total activation.
Alarm deactivation: When the alarm is activated, press the function key briefly, then you can deactivate the alarm.
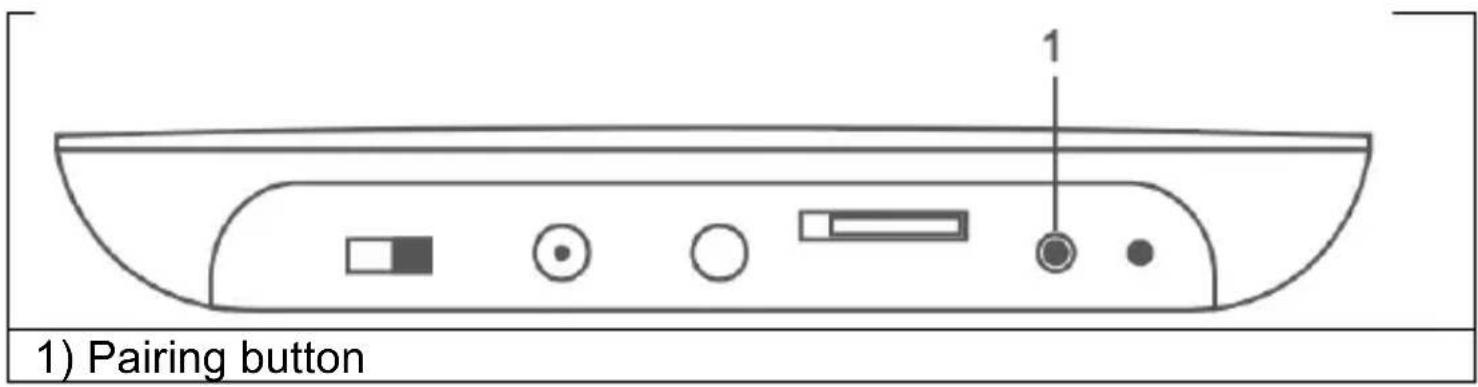
Pairing button (11):
Sensor pairing: Press and hold for 0.5-2 sec, alarm panel sounds 1 time, then release the button, the indicator flashes green, enter the sensor pairing state; in the pairing state, briefly press 1 time to exit.
Wi-Fi EZ connection mode: long press the button for 3-5 seconds, the alarm panel will sound 1 time, then release the button, the indicator light will flash rapidly and enter Wi-Fi fast connection mode.
Remark: If the fast connection fails, the control panel automatically switches to Wi-Fi hot spot mode (the indicator light flashes slowly).
Wi-Fi AP connection mode: long press the function key and the setup key simultaneously for 3 seconds, the indicator light will flash slowly and enter AP connection mode.
Restore factory settings: Long press the button for 10 seconds, the alarm panel will sound 3 times, then release the button and the central unit will return to factory settings.
Status light
| Off | Flicker | On | |
| POWER (red) | Battery power supply | Low power | DC power supply |
| GSM (Blue) | / | / | GSM connection fine |
| STATUS (blue) | Decoded | Partial activation | Total activation |
| SIGNAL (blue) | / | RF signal reception | / |
Status of the multifunction indicator
| Fast flashing | Slow blinking | On | |
| Red | Triggering the alarm | / | / |
| Yellow | / | Network off | / |
| Green | Pairing sensors | / | / |
| Turquoise | Connection mode EZ | AP connection mode | Network Connection OK |
GSM network settings
Install the SIM card when the central unit is switched off, connect the correct DC-5V power adapter and switch the central unit power switch to the ON position. Default password (Admin: 123123; User: 123456)
1. Central unit: SMS control
| SMS commands | Password#0# | Password#1# | Password#2# |
| Description | Partial activation | Total activation | Alarm deactivation |
Manual phone number and SMS number settings: by sending a message to the alarm, you can set up 6 groups of phone numbers and 6 groups of SMS numbers to send SMS alerts and calls in the event of an alarm.
6 groups of alarm numbers: password #31phone number# to #36phone number#. Example: 123123#3100420123456789#
6 groups of SMS messages: password#41phone number# to #46 phone number#. Example: 123123#4100420123456789#
Note: Enter the number in the format "00420123456789"!
Telephone call control: dial the telephone number of the central unit: after the double "di" sound enter the password, the triple "di" sound is an error tone.
Operation commands:
| Commands | 0# | 1# | 2# | 3# | 4# |
| Description | Partial activation | Total activation | Alarm deactivation | Wiretap | Intercom |
Remark: If the system is alarmed and a telephone number is connected, you can also control the central unit by following the instructions in the table.
2. Alarming process
When the host triggers an alarm, the system sends an SMS text to the 6 preset SMS number groups and also automatically dials the 6 alarm phone number groups, passing all preset phone numbers through the loop three times.
Six groups of phone numbers can be set when the alarm is triggered, the default setting is to cycle through all preset phone numbers three times. In the event of an alarm, the following sequence is used: telephone 1, telephone 2, telephone 3, telephone 4, telephone 5, telephone 6 and a maximum of 3 times in succession. If during an alarm call the called phone answers and turns off the siren, the user hears the "di" sound four times and enters the command: 1# alarm activation, 2# alarm deactivation, 3# listening, 4# intercom. If the called user has not deactivated the central unit, the central unit automatically dials the next group of telephone numbers. If the dialed user deactivates the central
unit, the system automatically stops the alarm call. Return to standby mode.
3. Alarm SMS language switching
Send SMS text to change language, SMS commands below:
| SMS content | Language |
| Password#50# | Chinese |
| Password#51# | English |
| Password#52# | Russian |
| Password#55# | German |
| Password#57# | Italian |
| Password#58# | Danish |
Motion sensor
| 1) Indicator light 2) Detection window 3) Holder | 4) Mode switch T: Test mode S: Smart Mode (factory default setting) |
Normal mode (T): After one effective trigger, the next trigger is not used after 1 minute, the second trigger works only after 1 minute. This mode is suitable for home and not very large use.
Smart Mode (S): After one effective detection, if you run it again within 1 minute, the detection timer will reset and the timer will run again within 1 minute, after 1 minute the detection will be activated. This mode is suitable for places with many people to save energy.
Remark: The motion sensor is intended for indoor use only, it does not have a pet protection function.
Door sensor
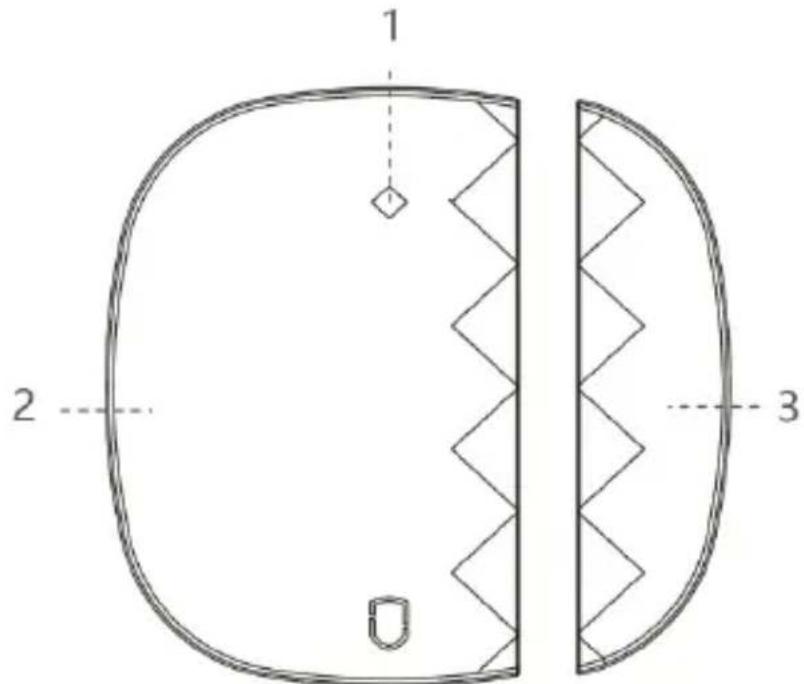
1) Indicator light
2) Transmitter housing
3) Magnetic rod
Remark: This door sensor is designed for indoor use only, do not install it on iron/steel doors or windows which are easily magnetized and affect its use.
Remote control
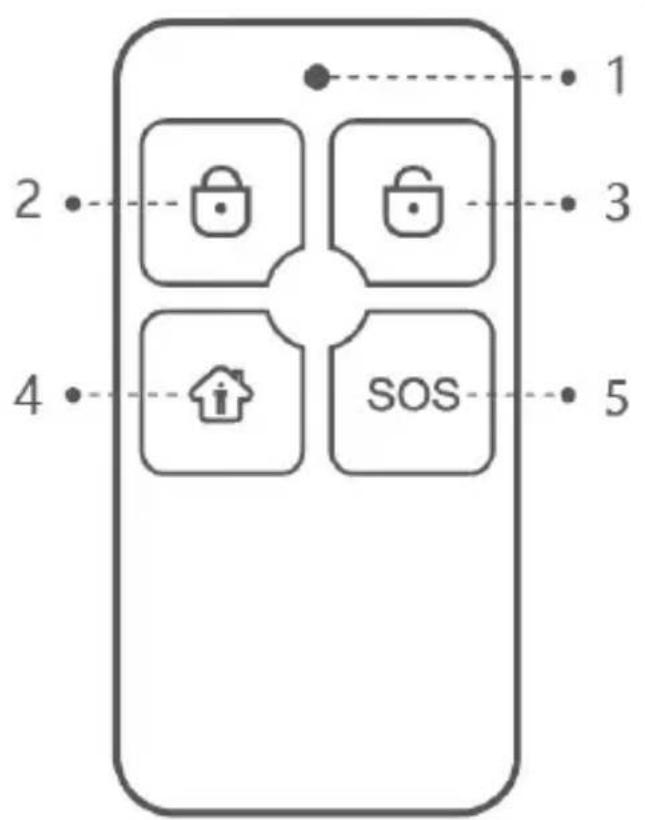
1) Indicator light
2) Total activation
3) Alarm deactivation
4) Partial activation
5) SOS
Pairing with a mobile app
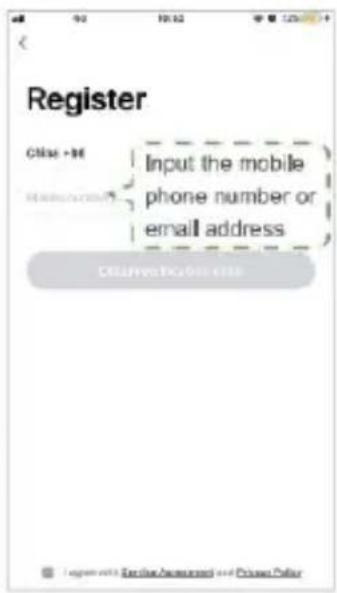
Step 1. Download the app and register
Search for the "Smart Life" app in the App Store or Google Play and download it; or scan the QR code below.

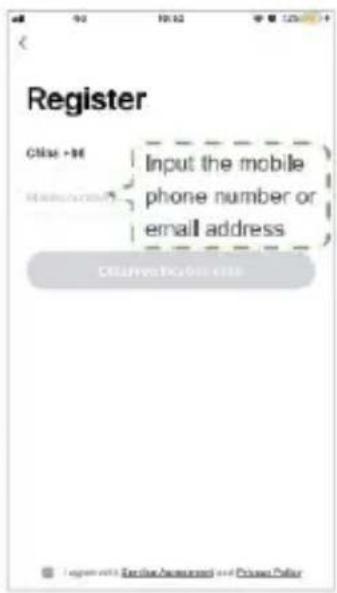
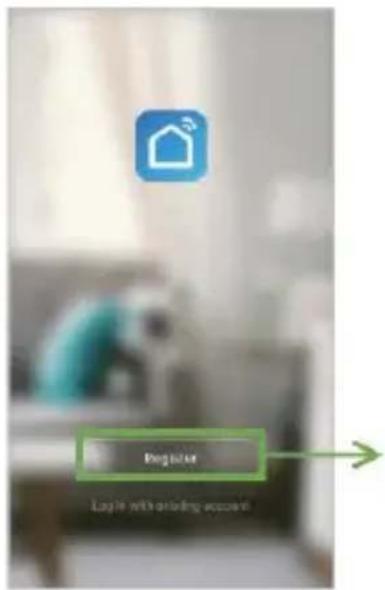
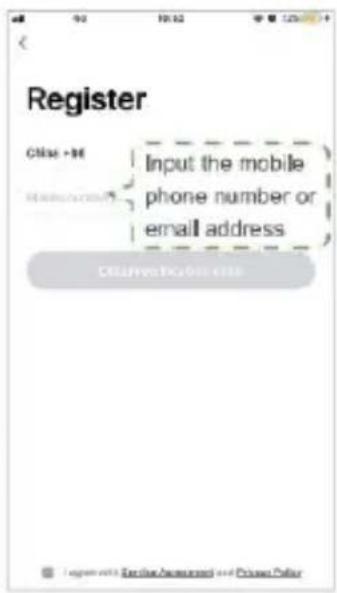
After downloading the app, register using the interface and log in. Open the app, click
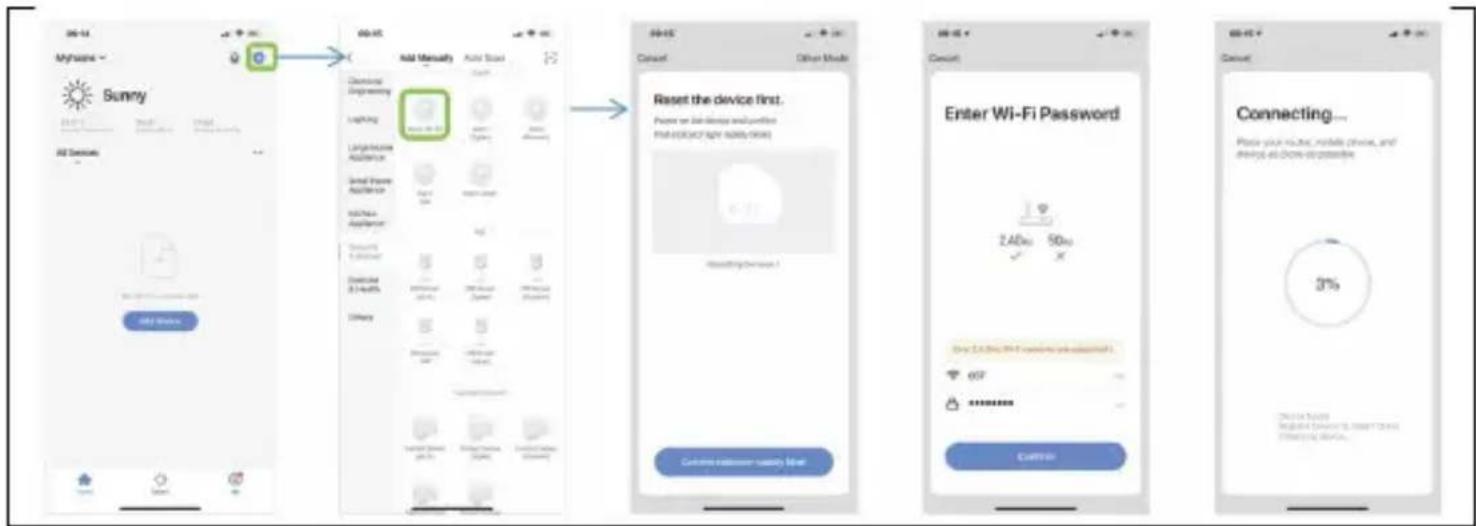
Step 2. Connecting the central unit via Wi-Fi Wi-Fi Quick Connect Mode (EZ Connect Mode)
1) Make sure your mobile phone is connected to a Wi-Fi network (only supports 2.4GHz Wi-Fi network)
2) Open the app, click <+> in the top right corner, then
3) Switch the central unit to EZ connection mode. First turn on the central unit, long press the pairing button for 3-5 seconds, release the button and after 2 beeps the multifunction indicator light will flash turquoise rapidly. This puts you in fast Wi-Fi mode.
4) Select your Wi-Fi 2.4 GHz network, enter your Wi-Fi network password, click
Remark: It is better to place the smart alarm panel close to the router. Currently, the panel does not support 5GHz Wi-Fi.
flowchart
graph LR
    A["Add Manually"] --> B["Add Start"]
    B --> C["Reset the device first. <br>Please run holiday and resume <br>first click any 50% or less"]
    C --> D["Enter Wi-Fi Password"]
    D --> E["3% Connection to your website <br>Regulate device, switch down <br>Connecting Device"]
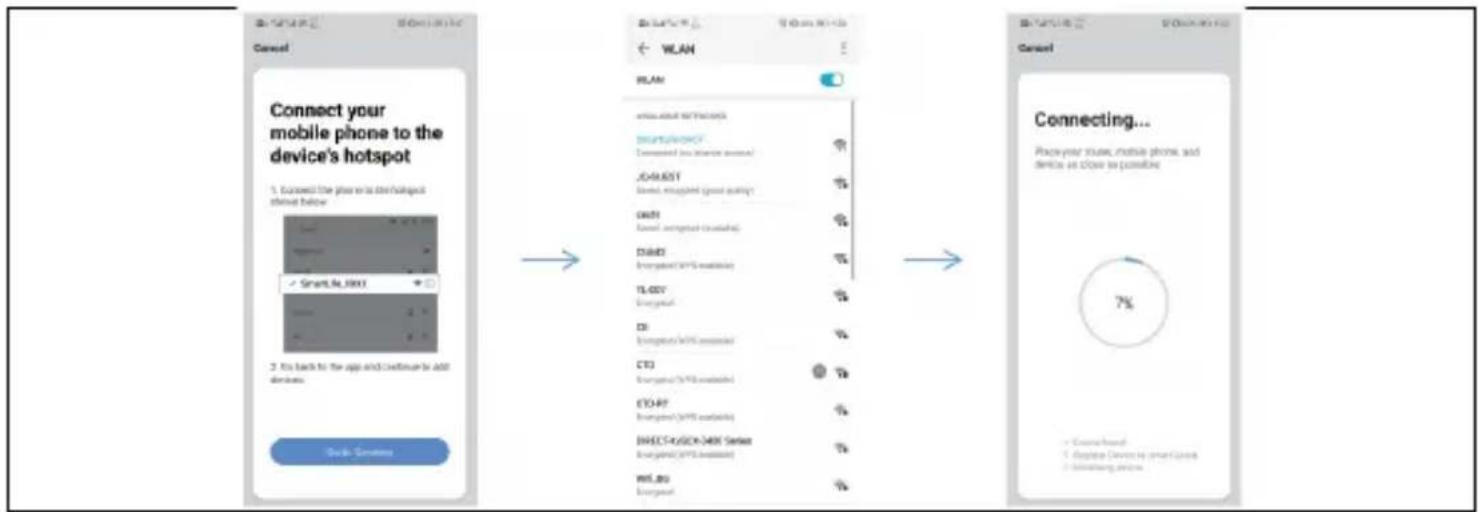
Hotspot connection mode (AP connection mode)
If the fast connection failed, we can select "AP connection mode" to connect to the Wi-Fi network.
1) Make sure your mobile phone is connected to a Wi-Fi network (only supports 2.4GHz Wi-Fi network)
2) Open the app, click on <+> in the top right corner and then
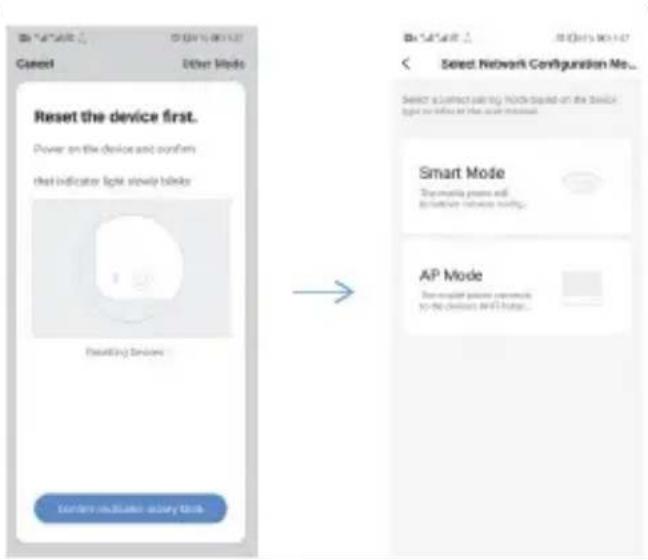
3) Put the central unit into Wi-Fi hotspot connection mode; first turn on the central unit, long press the function key and pairing button for 3s simultaneously. The turquoise light flashes slowly and you have switched the central unit to AP connection mode.
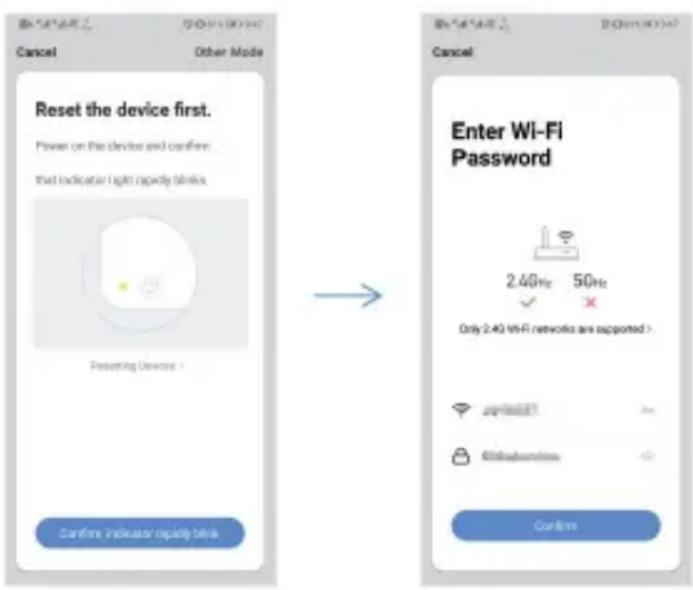
5) Find "SmartLife-xxxx" and click connect, then go back after connecting. The "SmartLife" app connects the central unit to the Wi-Fi network, the turquoise light is on normally and this means that the device has successfully connected to Wi-Fi.
flowchart
graph LR
    A["Connect your mobile phone to the device's hotspot"] --> B["2. Its back to the app and continue to add devices"]
    B --> C["Next Step"]

    subgraph Connection...
        D["Place your store, mobile phone, and devices at close to positive"]
    end

    subgraph Next Step
        E["Cancel"]
    end

    F["Start: Smart & JOXX"] --> G["Next Step: 1. Connect the plan to the hotspot below"]
    G --> H["Next Step: 2. It's back to the app and continue to add devices"]
    H --> I["Next Step: 3. Connect your mobile phone to the device's hotspot"]

    J["Start: Smart & JOXX"] --> K["Next Step: 1. Connect the plan to the hotspot below"]
    K --> L["Next Step: 2. It's back to the app and continue to add devices"]
    L --> M["Next Step: 3. Connect your mobile phone to the device's hotspot"]

    N["Next Step: Smart & JOXX"] --> O["Next Step: 1. Connect the plan to the hotspot below"]
    O --> P["Next Step: 2. It's back to the app and continue to add devices"]
    P --> Q["Next Step: 3. Connect your mobile phone to the device's hotspot"]

    R["Next Step: Smart & JOXX"] --> S["Next Step: 1. Connect the plan to the hotspot below"]
    S --> T["Next Step: 2. It's back to the app and continue to add devices"]
    T --> U["Next Step: 3. Connect your mobile phone to the device's hotspot"]

    V["Next Step: Smart & JOXX"] --> W["Next Step: 1. Connect the plan to the hotspot below"]
    W --> X["Next Step: 2. It's back to the app and continue to add devices"]
    X --> Y["Next Step: 3. Connect your mobile phone to the device's hotspot"]

    Z["Next Step: Smart & JOXX"] --> AA["Next Step: 1. Connect the plan to the hotspot below"]
    AA --> AB["Next Step: 2. It's back to the app and continue to add devices"]
    AB --> AC["Next Step: 3. Connect your mobile phone to the device's hotspot"]

    AD["Next Step: Smart & JOXX"] --> AE["Next Step: 1. Connect the plan to the hotspot below"]
    AE --> AF["Next Step: 2. It's back to the app and continue to add devices"]
    AF --> AG["Next Step: 3. Connect your mobile phone to the device's hotspot"]

    AH["Next Step: Smart & JOXX"] --> AI["Next Step: 1. Connect the plan to the hotspot below"]
    AI --> AJ["Next Step: 2. It's back to the app and continue to add devices"]
    AJ --> AK["Next Step: 3. Connect your mobile phone to the device's hotspot"]

    AL["Next Step: Smart & JOXX"] --> AM["Next Step: 1. Connect the plan to the hotspot below"]
    AM --> AN["Next Step: 2. It's back to the app and continue to add devices"]
    AN --> AO["Next Step: 3. Connect your mobile phone to the device's hotspot"]

    AP["Next Step: Smart & JOXX"] --> AQ["Next Step: 1. Connect the plan to the hotspot below"]
    AQ --> AR["Next Step: 2. It's back to the app and continue to add devices"]
    AR --> AS["Next Step: 3. Connect your mobile phone to the device's hotspot"]

    AT["Next Step: Smart & JOXX"] --> AU["Next Step: 1. Connect the plan to the hotspot below"]
    AU --> AV["Next Step: 2. It's back to the app and continue to add devices"]
    AV --> AW["Next Step: 3. Connect your mobile phone to the device's hotspot"]

    AX["Next Step: Smart & JOXX"] --> AY["Next Step: 1. Connect the plan to the hotspot below"]
    AY --> AZ["Next Step: 2. It's back to the app and continue to add devices"]
    AZ --> BA["Next Step: 3. Connect your mobile phone to the device's hotspot"]

    BB["Next Step: Smart & JOXX"] --> BC["Next Step: 1. Connect the plan to the hotspot below"]
    BC --> BD["Next Step: 2. It's back to the app and continue to add devices"]
    BD --> BE["Next Step: 3. Connect your mobile phone to the device's hotspot"]

    BF["Next Step: Smart & JOXX"] --> BG["Next Step: 1. Connect the plan to the hotspot below"]
    BG --> BH["Next Step: 2. It's back to the app and continue to add devices"]
    BH --> BI["Next Step: 3. Connect your mobile phone to the device's hotspot"]

    BJ["Next Step: Smart & JOXX"] --> BK["Next Step: 1. Connect the plan to the hotspot below"]
    BK --> BL["Next Step: 2. It's back to the app and continue to add devices"]
    BL --> BM["Next Step: 3. Connect your mobile phone to the device's hotspot"]

    BN["Next Step: Smart & JOXX"] --> BO["Next Step: 1. Connect the plan to the hotspot below"]
    BO --> BP["Next Step: 2. It's back to the app and continue to add devices"]
    BP --> BQ["Next Step: 3. Connect your mobile phone to the device's hotspot"]

    BR["Next Step: Smart & JOXX"] --> BS["Next Step: 1. Connect the plan to the hotspot below"]
    BS --> BT["Next Step: 2. It's back to the app and continue to add devices"]
    BT --> BU["Next Step: 3. Connect your mobile phone to the device's hotspot"]

    BV["Next Step: Smart & JOXX"] --> BW["Next Step: 1. Connect the plan to the hotspot below"]
    BW --> BX["Next Step: 2. It's back to the app and continue to add devices"]
    BX --> BYD["Next Step: 3. Connect your mobile phone to the device's hotspot"]

    BQ --> BQ
Step 3. Add detector
If you purchase our smart alarm kit, the sensors and remotes are already paired with the central unit, there is no need to add them again.
If you want to add new sensors or new devices to the control panel, select the addition method below.
First method (application): Open the application and go to the alarm configuration, in the main interface go to the
The second way (local pairing with the central unit): Long press the pairing button for 0.5-2s, the central unit will give 1 beep and then release the button, the indicator light will flash green quickly, the control panel will enter the pairing state and start pairing the sensor with the unit.
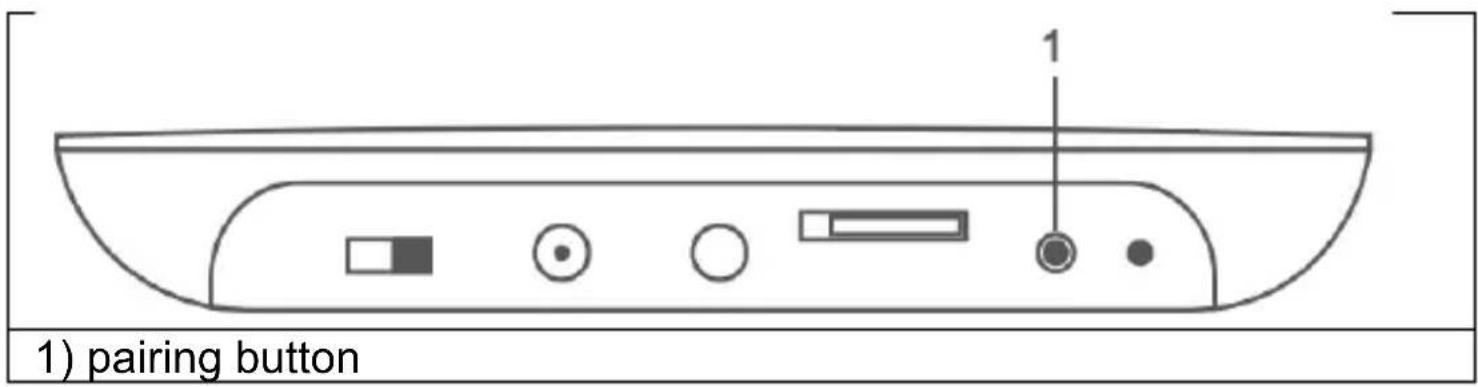
Remark: After a successful pairing, the control panel emits one sound signal; if the pairing is repeated, the control panel emits two sound signals.
In the smart alarm kit, the sensors are already paired with the central unit. Motion sensor pairing: Insert the batteries into the motion sensor.

natural_image
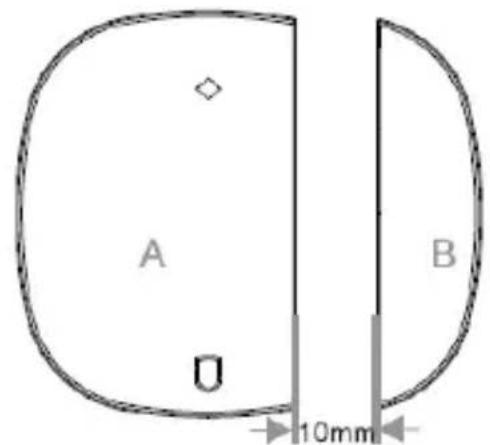
Line drawing of a hand holding a small electronic device and a wall-mounted device (no text or symbols)Pairing the door sensor: separate the transmitter box and the magnetic bar by more than 10 mm.

natural_image
Simple line drawing of a bear-like shape with a sun symbol on its side, partially cut out by an arrow (no text or symbols)To pair the remote control: press any button on the remote control.
Application operation Central unit of the device
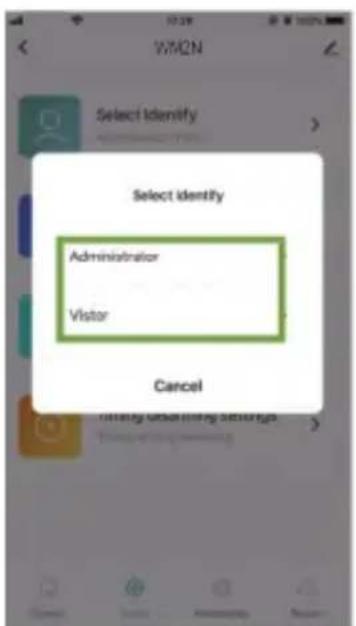
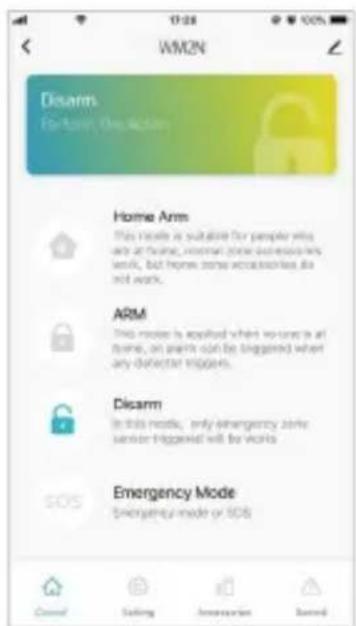
The first time you add a device, you must enter an admin password or user password to access the device control interface. By clicking on the
Partial activation: This mode is suitable for home use. Triggering the sensors of the normal defence zone will not cause an alarm; triggering the sensors of the special zone will cause an alarm.
Total activation: This scheme is designed for people who are not at home. Any sensors in the defence zone will be triggered, causing an alarm.
Deactivation: This mode is for system deactivation, only the 24-hour zone sensor causes an emergency alarm.
SOS: This mode for SOS alarm.
Remark:
Default admin password: 123123
Default user password: 123456
Visitor: The device can only be controlled.
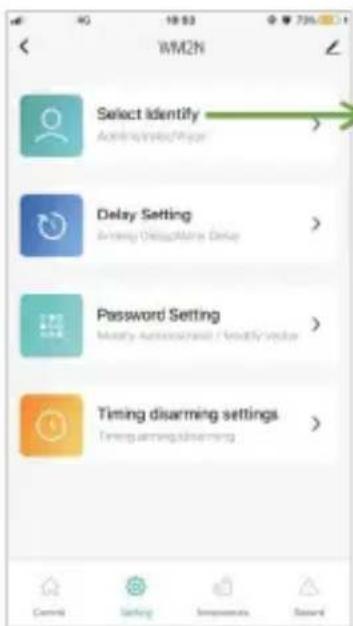
1
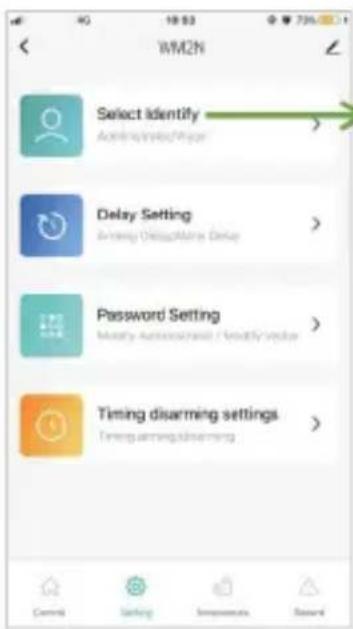
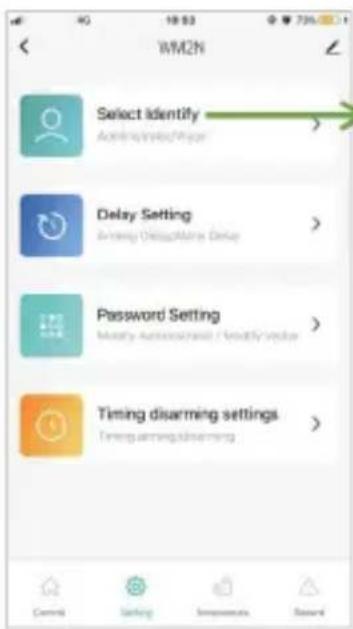
1) Identity switch
Sensor management
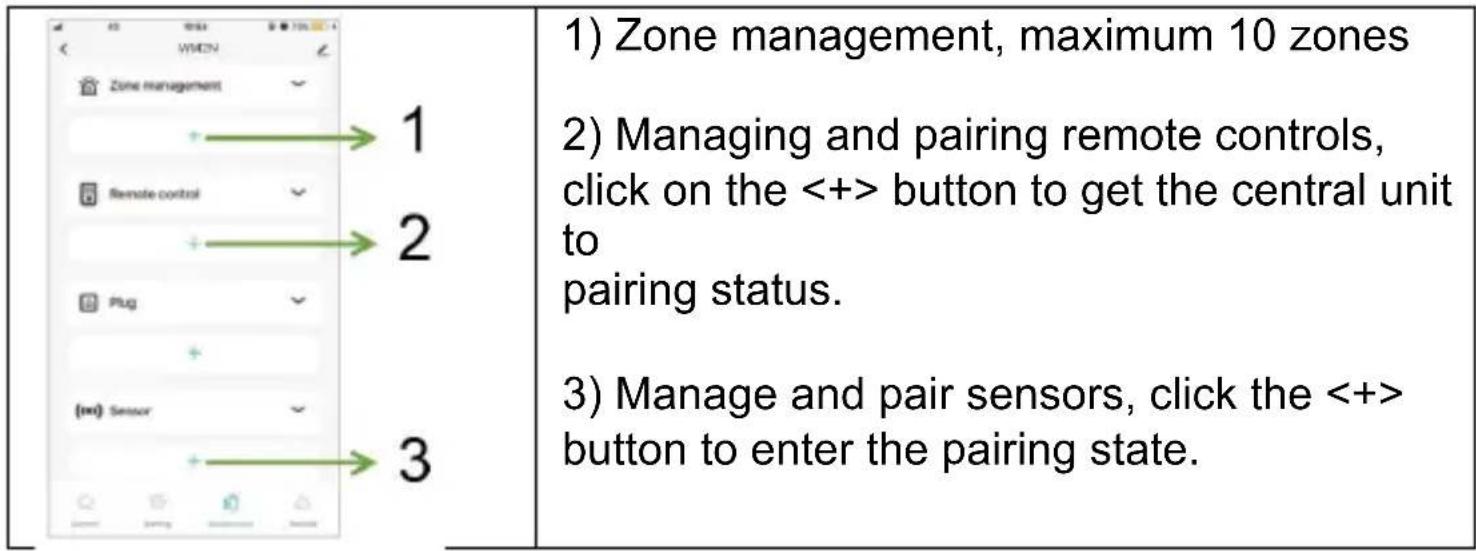
Zone management
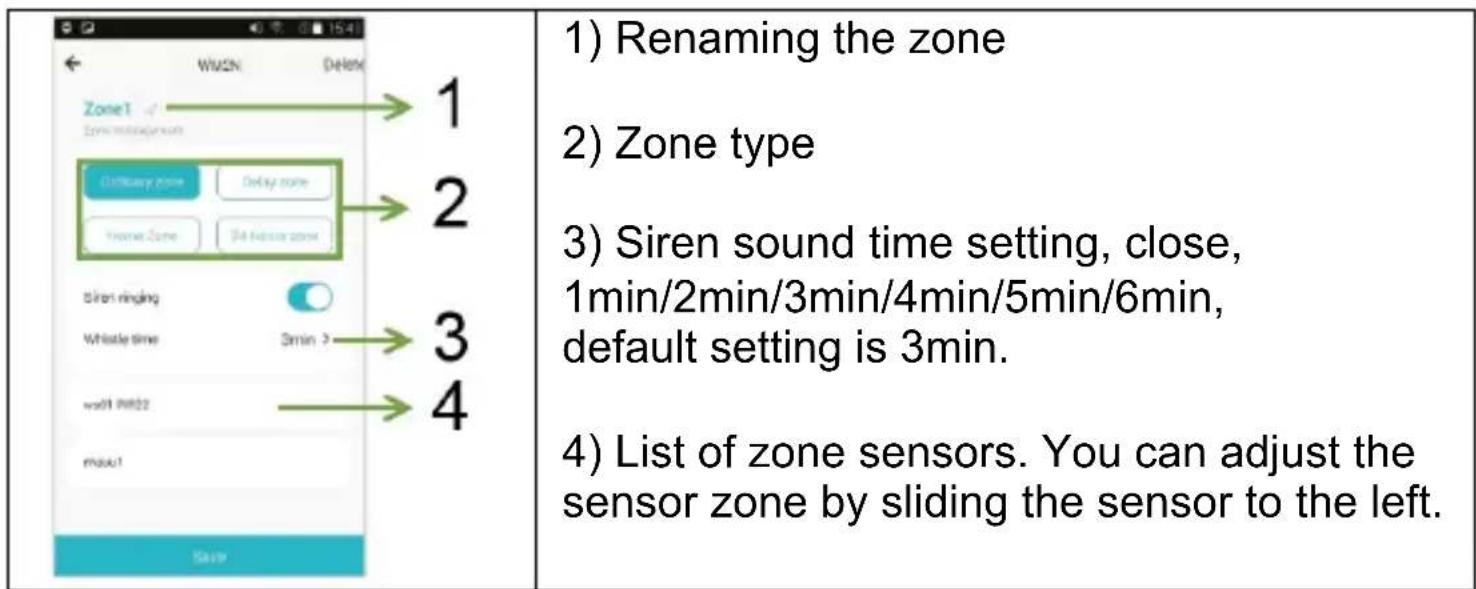
| Type of defence zone | Total activation | Partial activation | Deactivation |
| 24-hour zone | Alarm | Alarm | Alarm |
| Ordinary zone | Alarm | No alarm | No alarm |
| Home Zone | Alarm | Alarm | No alarm |
| Delayed alarm | Delayed alarm | Delayed alarm | No alarm |
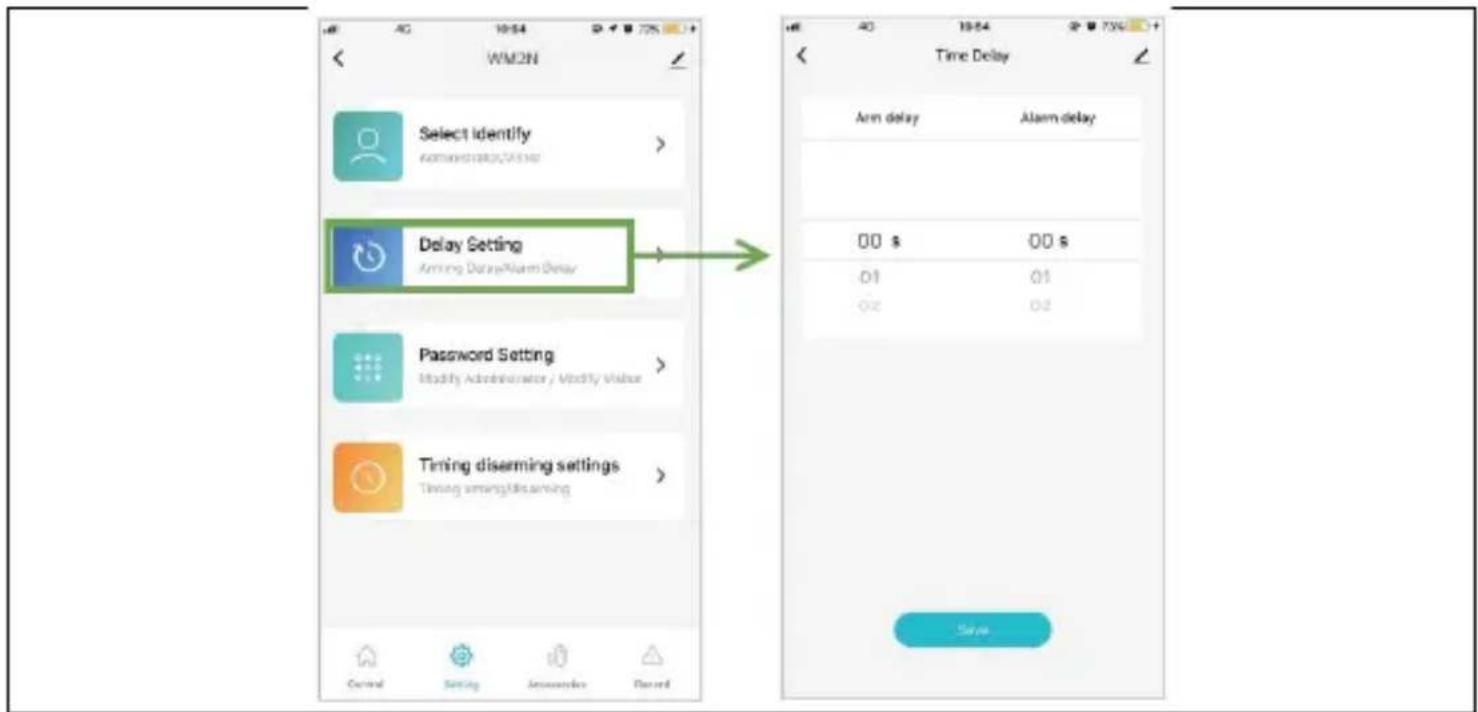
Delay settings
Select
Alarm trigger delay: when a system alarm is triggered, the zone will be alarmed at the set time. 0-60s optional. 00 means no alarm delay. It works only for the delay zone.
Alarm activation delay: 0-60s selectable, 00 means no alarm delay. The alarm is activated after the set time interval.
Note: set the zone to delay zone only, then the alarm will be delayed, default alarm delay time is 10 sec.
Password settings
Select
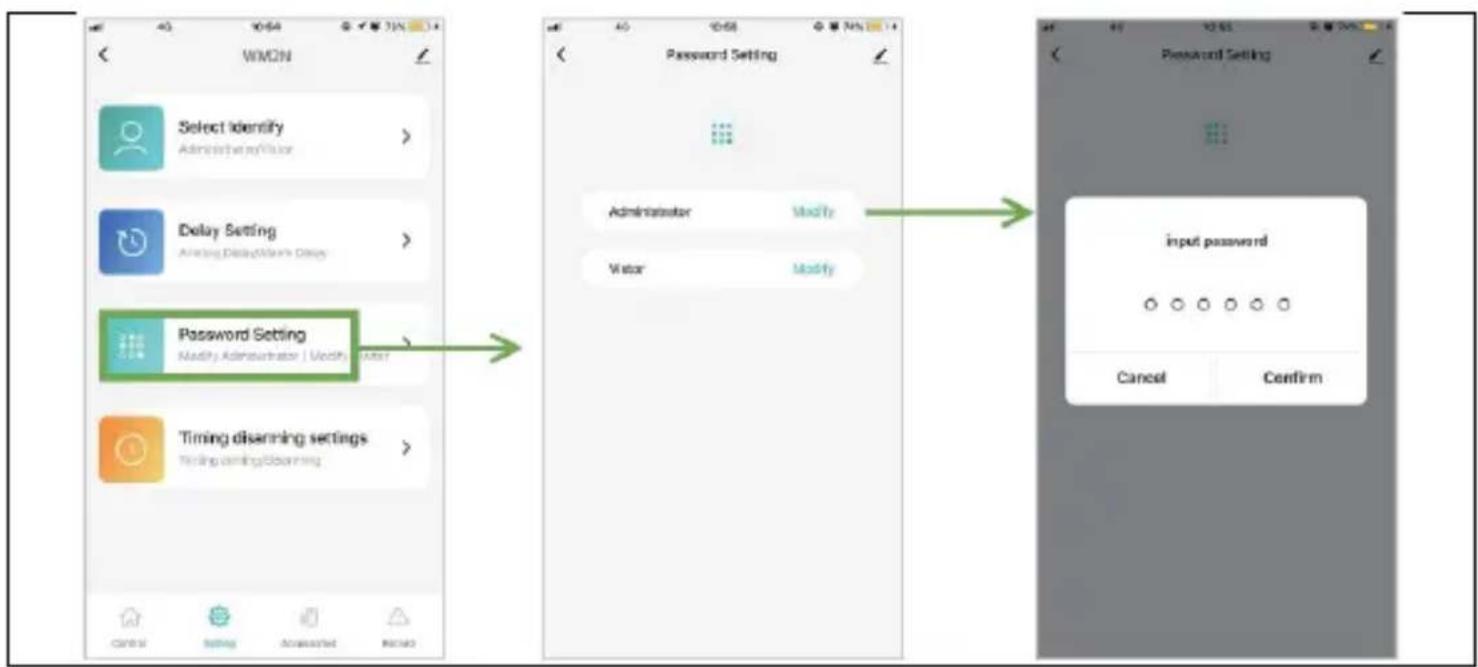
Setting the alarm number
In the main interface, go to
Note: Enter the number in the format "00420123456789"!
Adjusting the alarm number: Select the appropriate input field and scroll to the left, click on , follow the interface instructions to edit the alarm number.
Deleting the alarm number: Select the appropriate input field and scroll to the left, click on , follow the interface instructions to delete the alarm number.
Note: Alarm phone number: Use to call the alarm when the system alarm is triggered, set the alarm number according to the priority of the application call.
SMS number: Use to send alarm SMS when the system alarms.
Depending on the priority of the call, set the order of the SMS number in the app.
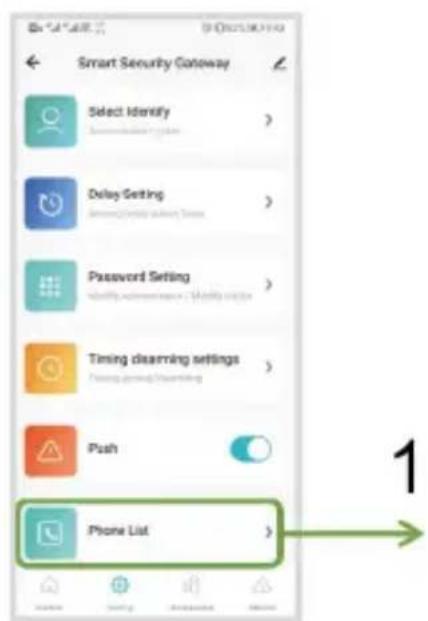
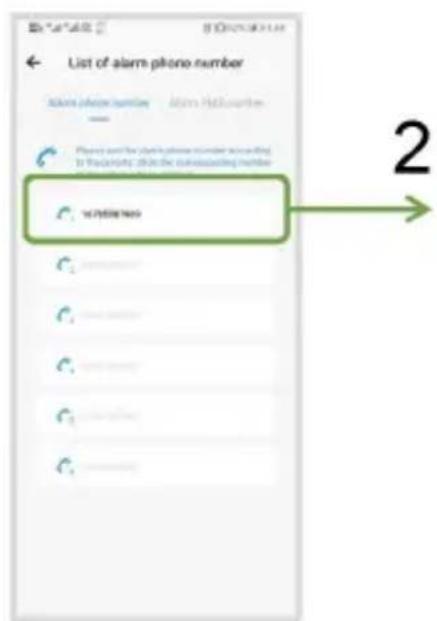
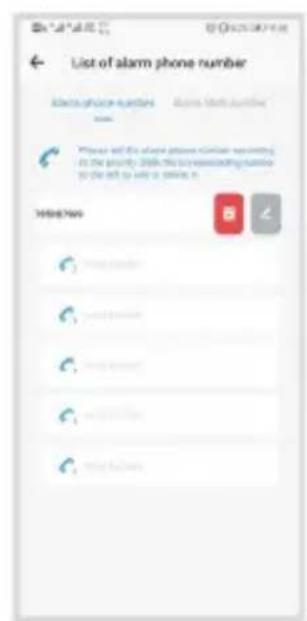
3
1) Click on the phone book
2) Move to the left
3) Modifying/removing a phone number
Setting the activation/deactivation timing
In the main interface, go to
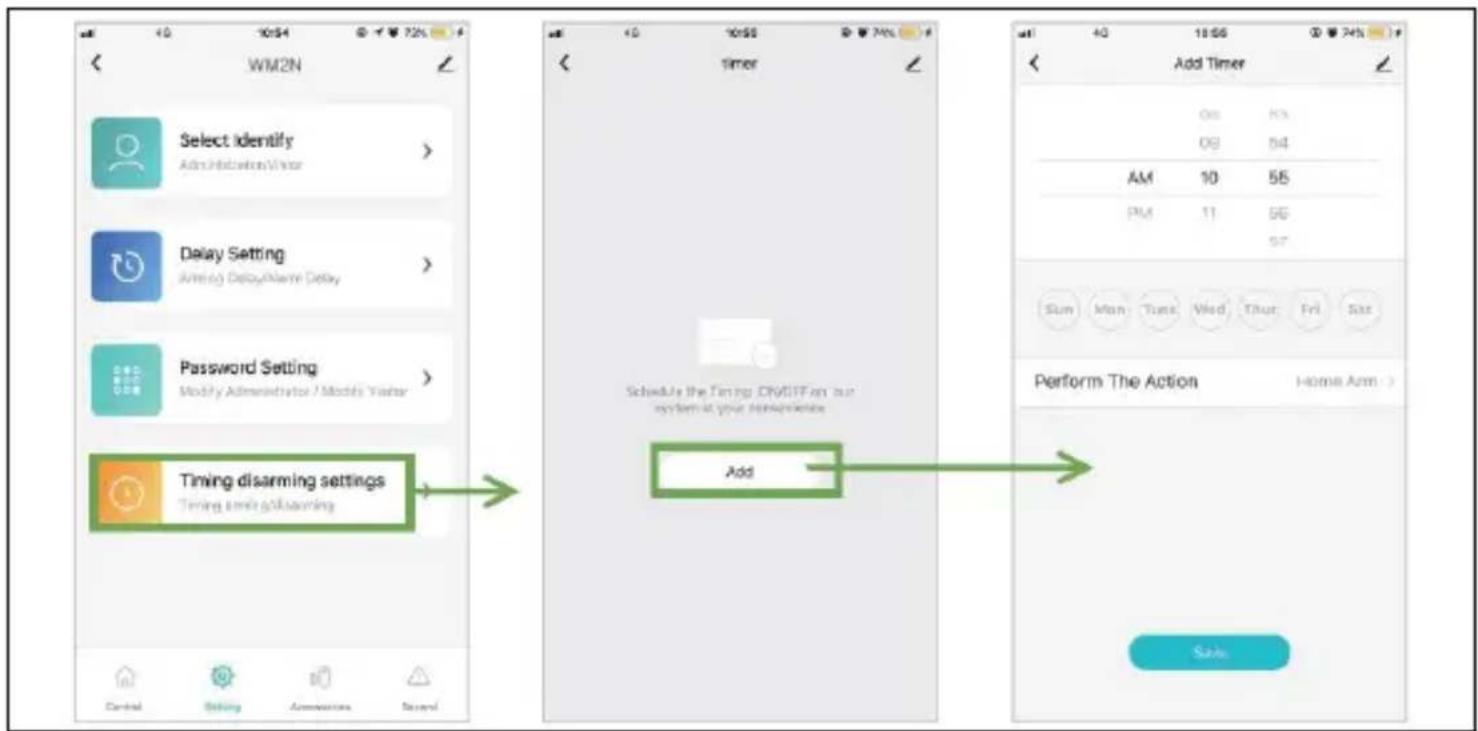
Checking records
In the main interface, go to the
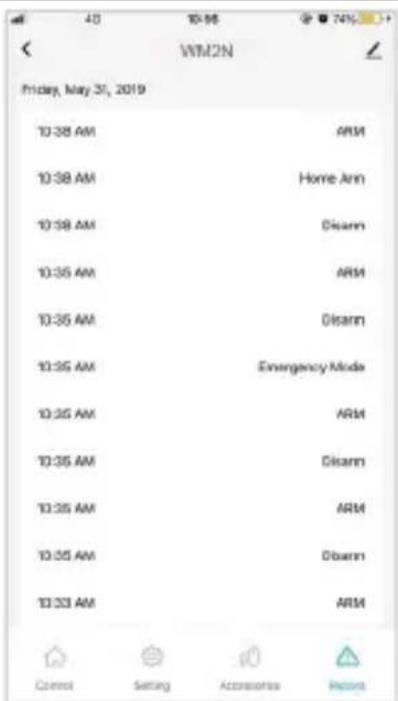
Restore factory settings
Central unit
Long press the pairing button for 10 seconds, the control panel will emit 3 beeps, then release the button and the control panel will return to factory settings.
Remark: After factory reset, all sensors will be deleted and all settings will return to factory settings, please pay attention to this.
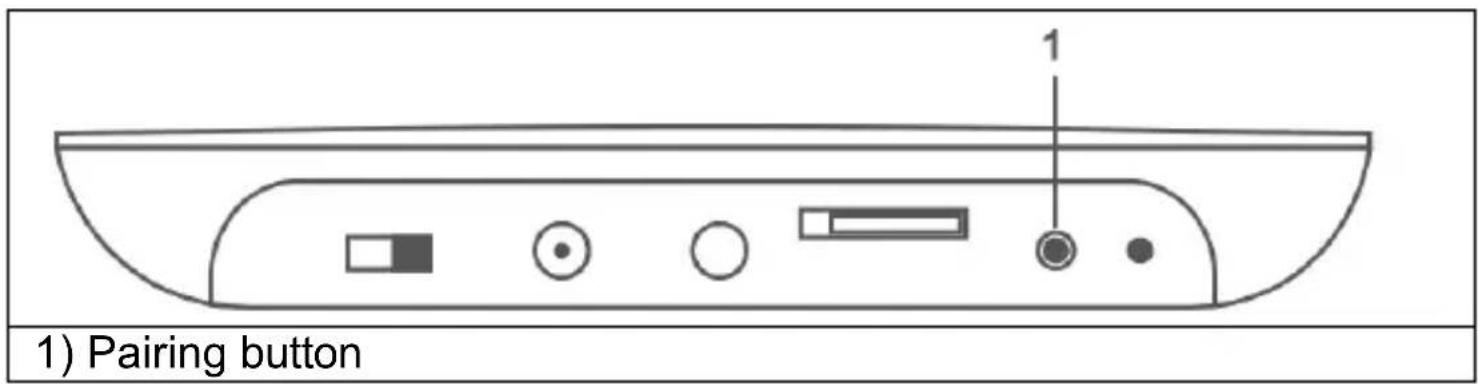
Installation
Installation of the central unit
Do not place the alarm panel and router too far away, better 2-5 m.
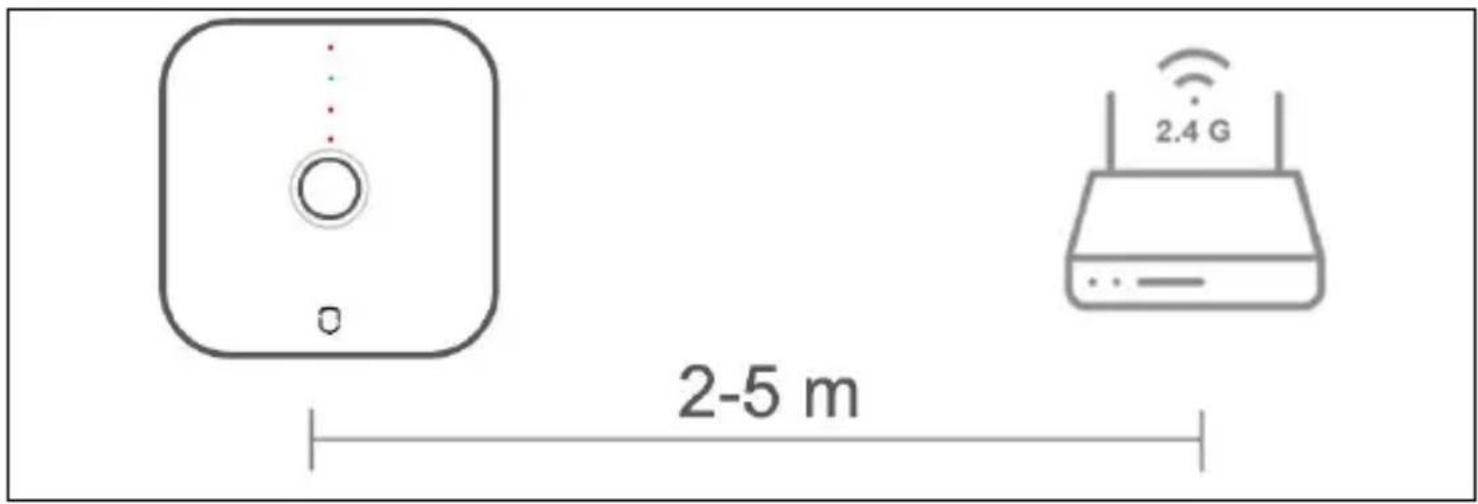
Motion sensor
- Install on the wall at a height of about 1.8 to 2 m above the floor.

natural_image
Simple line drawing of a wall-mounted device mounted on a vertical post (no text or symbols)Method of first installation
Use 3M double-sided tape to attach the motion sensor to the wall. This method is suitable for smooth and hard walls;
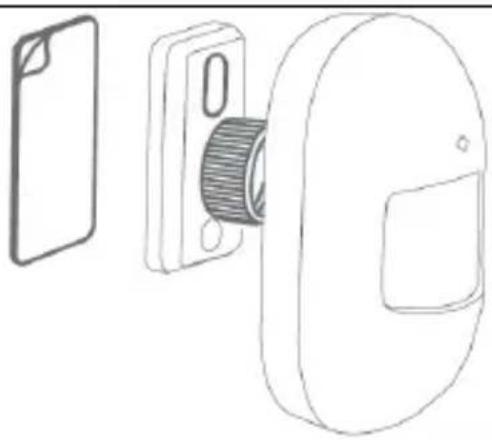
natural_image
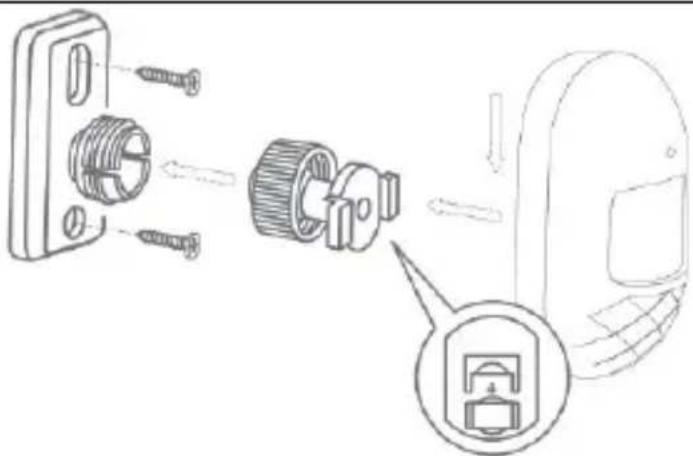
Line drawing of a device with a scroll wheel and two separate views (no text or symbols)Second installation method
Use the screws to fix the motion sensor holder. This method is suitable for most walls and is recommended.
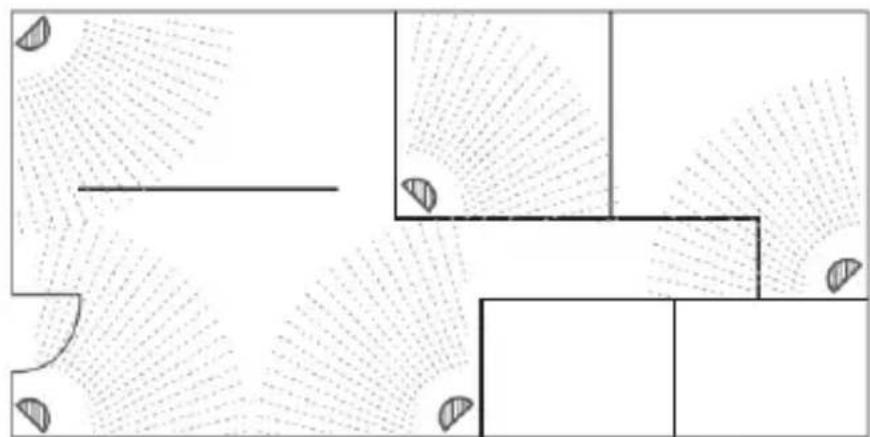
2. Suggestions for installation
Remark: This is the detection angle of the motion sensor (detection distance ≈ 7m / detection angle ≈ 90°)
natural_image
Abstract geometric pattern with curved lines and shaded regions, no text or symbols present3. Notice
- Away from the heat
• Away from the direct sun - Do not install out
- Do not install near the curtain
Door sensor
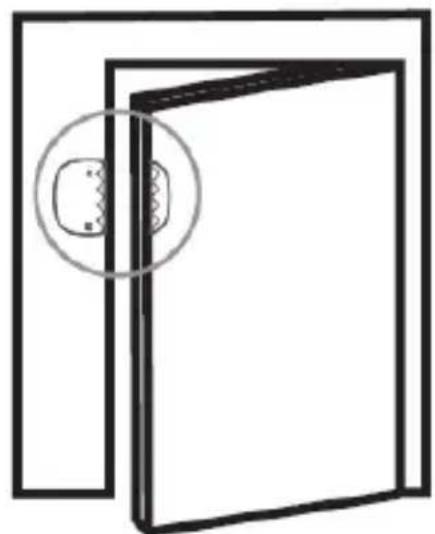
Use double-sided tape to attach the door sensor to the door or window.
natural_image
Simple line drawing of a door with a circular inset showing internal components (no text or symbols)If the battery needs to be replaced, remove the back cover with a screwdriver and replace the battery.
Main technical parameters
Central unit
Power supply: DC 5V, current: 1A
Wireless standard: IEEE 802.11 b/g/n, 433.92 MHz (transmitter, receiver)
RF distance: 70 m (without obstacles)
Modulation: AM
Working environment - temperature -10^^ + 50^
Working environment - relative humidity ≤ 90%RH
Size: 118*118*23.8 mm
PIR detector
Batteries: DC 3V(2*AAA)
Standby current: ≤20UA
Alarm current: ≤20mA
Wireless standard: 433MHz
Wireless distance: 70 m (without obstacles)
Distance/angle detection: 7m/90°
Working environment: temperature -10°C\~+50°C
5% \~ 95% relative humidity (non-condensing)
Size: 94*54*41 mm (without holder)
Door sensor
Batteries: DC 3V(1*CR2032)
Standby current: ≤3UA
Alarm current: ≤15mA
Wireless standard: 433MHz
Working environment: temperature -10°C\~+55°C
≤80% (non-condensing)
Size: 50*35*17 mm (broadcast); 48*13*17 mm (magnetic strip)
Remote control
Batteries: DC 3V(1*CR2032)
Standby current: ≤3UA
Alarm current: ≤15mA
Wireless standard: 433MHz
Wireless distance: 70 m (without obstacles)
Working environment: temperature -10°C\~+55°C
≤80% (non-condensing)
Size: 69*36*11 mm
Security measures
- Make sure the device is working well and charge the panel immediately when you receive a low power warning.
- Better smaller distance between sensors and control panel.
- Avoid hard walls and appliances between the sensors and the alarm panel.
- Do not press the host button (function key).
- Do not use in damp environments.
- Do not work in flammable or explosive environments.
- Keep the product surface clean and dry.
Q&A
Q1: If the control panel failed to connect to the network?
A: Check whether the WIFI network is working normally or not.
Q2: Forgot your default administrator password?
A: Reset to factory settings.
Q3: If the cell phone couldn't get an alarm?
A: Make sure your mobile phone has made the setting: receive push.
Q4: If the APP shows that the sensors are offline?
A: Check if the sensor is powerful enough or working normally.
Q5: If the system triggers an alarm, the alarm panel cannot dial the user's mobile phone?
A: Check that the control panel has stored the alarm phone number and also check that the SIM card is inserted correctly?
Technical support
If the "Frequently Asked Questions" section did not help you, please contact EVOLVEO Technical Support:
https://eshop.evolveo.com/helpdesk/.

Disposal
The crossed-out container symbol on the product, in literature or on the packaging means that in the EU, all electrical and electronic equipment, batteries and accumulators must be put into separate waste at the end of their useful life. Do not dispose of these products in unsorted municipal waste.

Declaration of conformity
Abacus Electric, s.r.o. hereby declares that the EVOLVEO Sonix PRO meets the requirements of the standards and regulations applicable to this type of equipment.
The full text of the Declaration of Conformity can be found at http://ftp.evolveo.com/CE/.
Copyright © Abacus Electric, s.r.o.
www.evolveo.com
www.facebook.com/EvolveoCZ
Importer / Producer
Abacus Electric, s.r.o.
Planá 2, 370 01, Czech Republic
Made in China
All rights reserved.
Design and specifications are subject to change without notice.


- Obsah / Content
- Obsah
- Nastavení hesla
- Kontrola záznamů
- Pohybové čidlo
- Návrhy na instalaci
- Upozornění
- Režim pripojenia hotspotu (režim pripojenia AP)
- Krok 3. Pridat' detektor
- Správa senzorov
- Nastavenia hesla
- Kontrola záznamov
- Snímač pohybu
- Oznámenie
- Snímač dverí
- Dovozca / Výrobca
- Main functions
- Pairing button (11):
- GSM network settings
- Central unit: SMS control
- Note: Enter the number in the format "00420123456789"!
- Alarming process
- Alarm SMS language switching
- Motion sensor
- Door sensor
- Remote control
- Pairing with a mobile app
- Step 1. Download the app and register
- Step 2. Connecting the central unit via Wi-Fi Wi-Fi Quick Connect Mode (EZ Connect Mode)
- Hotspot connection mode (AP connection mode)
- Step 3. Add detector
- Application operation Central unit of the device
- Sensor management
- Zone management
- Delay settings
- Password settings
- Setting the alarm number
- Setting the activation/deactivation timing
- Checking records
- Restore factory settings
- Central unit
- Installation
- Installation of the central unit
- Method of first installation
- Second installation method
- Suggestions for installation
- Notice
- Main technical parameters
- PIR detector
- Security measures
- Q&A
- Technical support
- Disposal
- Declaration of conformity
- Importer / Producer
Brand : Evolveo
Model : Sonix Pro
Category : Alarm system