
UNI-NMS-LITE - Uncategorized Planet - Free user manual and instructions
Find the device manual for free UNI-NMS-LITE Planet in PDF.


| Product Type | Universal Network Management Software (UNI-NMS-LITE) |
| Platform | Runs on Oracle VM VirtualBox |
| Maximum Scalability | Up to 20 nodes |
| Dashboard | Provides at-a-glance view of system, device summary, traffic, PoE status |
| Wizard Setup | Step-by-step guidance for initial configuration |
| Node Discovery | Detects PLANET managed devices and allows AP grouping |
| Topology Viewer | Displays network topology compliant with SNMP, ONVIF, Smart Discovery, LLTD |
| Event Reports | Network alarm and system log reporting |
| Alarm System | Popup and email alerts via SMTP (HW version) |
| Batch Provisioning | Configure and upgrade multiple APs using profiles |
| Coverage Heat Map | Real-time signal coverage on user-defined floor map |
| Customized Profiles | Create and maintain multiple SSID and radio profiles |
| Auto Provisioning | One-click multi-AP provisioning |
| Cluster Management | Simplifies high-density AP management |
| Zone Plan | Optimize AP deployment with actual signal coverage |
| Authentication | Built-in RADIUS server (HW version) |
| Supported Protocols | SNMP, ONVIF, Smart Discovery, LLTD, MQTT |
| Web UI Access | Default IP: 192.168.1.100:8888 (supports Chrome/Firefox) |
| Default Login | Username: admin, Password: admin |
| System Requirements | Oracle VM VirtualBox, 976 MB OVA file, network adapter on local network |
| Maintenance | System upgrade, backup/restore, factory default, event/log management |
| Language Support | Multilingual via translation service |
Frequently Asked Questions - UNI-NMS-LITE Planet
User questions about UNI-NMS-LITE Planet
0 question about this device. Answer the ones you know or ask your own.
Ask a new question about this device
Download the instructions for your Uncategorized in PDF format for free! Find your manual UNI-NMS-LITE - Planet and take your electronic device back in hand. On this page are published all the documents necessary for the use of your device. UNI-NMS-LITE by Planet.
USER MANUAL UNI-NMS-LITE Planet
Software Installation Guide & Quick User Guide
PLANET UNI-NMS-LITE
Universal Network Management Software

PLANET
Networking & Communication

flowchart
graph LR
    A["Dashboard"] --> B["Node Discovery"]
    B --> C["Topology View"]
    C --> D["Event Report"]
    D --> E["Floor Map"]
    E --> F["RunonVBox"]
Sections

PLANET
Networking & Communication
a) Overview.... 3\~4
b) Installing Oracle VM VirtualBox.... 5\~6
c) Installing UNI-MNS-LITE.... 7\~13
d) Before First Login.... 14\~19
e) Setup Wizard.... 20\~24
f) Main UI Introduction.... 25\~27
g) Dashboard Introduction.... 28\~32
h) Footer Introduction.... 33\~34
i) System Menu - Domain.... 35\~40
j) System Menu - AP Control.... 41\~58
k) System Menu - Refresh.... 59\~60
I) System Menu - System Configuration.... 61\~68
m) System Menu - Network Services 69\~80
n) System Menu - Maintenance.... 81\~90
o) System Menu - Exit.... 91\~94
p) Appendix.... 95\~98

PLANET
Networking & Communication
OVERVIEW
Overview

PLANET
Networking & Communication
Main Features:
| Dashboard | Providing the at-a-glance view of system, device summary, traffic, PoE network status |
| Wizard setup | Easy to use step-by-step guidance |
| Node Discovery | To detect PLANET managed devices available and allow AP grouping to accelerate AP management |
| Topology Viewer | A topology of network devices compliant with SNMP, ONVIF, Smart Discovery and LLTD Protocol |
| Event Reports | The status of a network can be reported via network alarm and system log |
| Alarm System | Popup alerts and email alerts for the administrator via the SMTP server (*only HW version supported) |
| Batch Provisioning | Enabling multiple APs to be configured and upgraded at one time by using the designated profile |
| Coverage Heat Map | Real-time signal coverage of APs on the user-defined floor map to optimize Wi-Fi field deployment |
| Customized Profile | Allowing the creation and maintenance of multiple wireless profiles |
| Auto Provisioning | Multi-AP provisioning with one click |
| Cluster Management | Simplifying high-density AP management |
| Zone Plan | Optimizing AP deployment with actual signal coverage |
| Authentication | Built-in RADIUS server seamlessly integrated into the enterprise network(*only HW version supported) |
| Scalability | Free system upgrade and AP firmware bulk upgrade capability |
| Maximum Scalability | 20 nodes |

Installing Oracle VM VirtualBox
Installing Oracle VM VirtualBox

PLANET
Networking & Communication
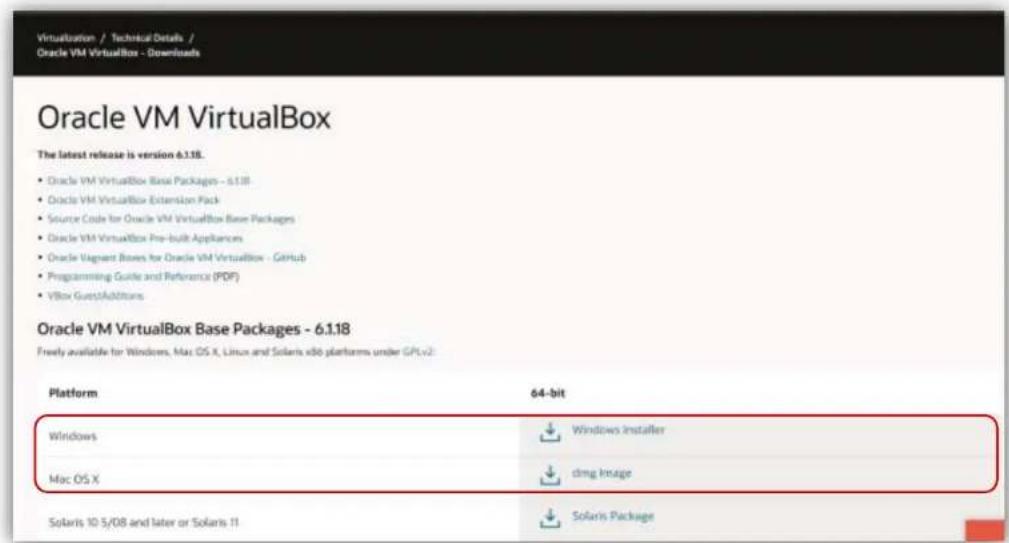
Download the Oracle VM VirtualBox from Internet to install by clicking the link below:
https://www.oracle.com/virtualization/technologies/vm/downloads/virtualbox-downloads.html

PLANET
Networking & Communication
Installing UNI-MNS-LITE
Installing UNI-MNS-LITE

PLANET
Networking & Communication
Select items from the menu to download UNI-NMS-LITE (UNI-NMS-LITE_v1.0b210226.ova.zip).
Download Link:
ftp://wireless:ba7qsc6@ftp.planet.com.tw/Public//UNI-NMS/UNI-NMS-Lite_v1.0b210426.zip
※ If the file cannot be downloaded in the Chrome browser, try IE.
-
Press or copy link address
-
Paste address to IE URL field
-
Save file to folder.

Do you want to open or save UNI-NMS-Lite_v1.0b210426.zip (976 MB) from ftp.planet.com.tw?

Importing UNI-NMS Software

PLANET
Networking & Communication
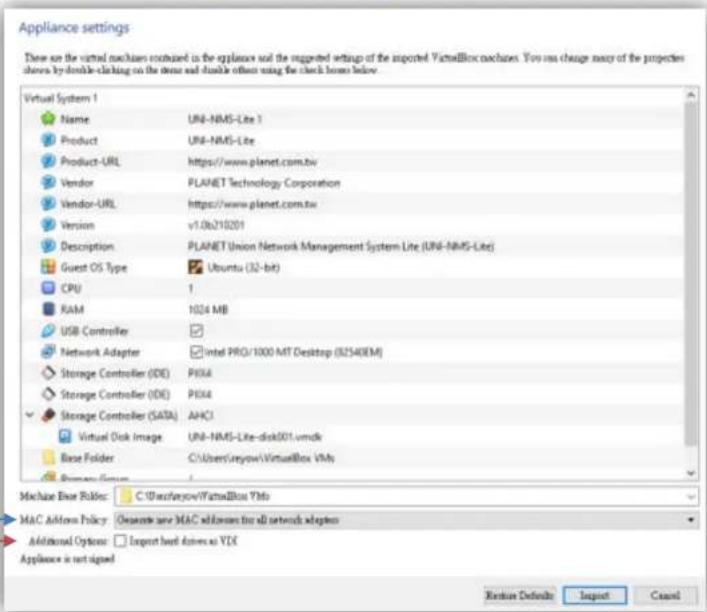
Double-click "UNI-NMS-LITE_v1.0b210226.ova" to import (or import it through the VM VirtualBox
Manager).
Select

UNI-NMS-Lite_v1.0b210426.ova
Open Virtualization Format Archive
0.97 GB
√ Generate new MAC...
◆ Uncheck the following items if existed.
√ Import hard drives as VDI
How to Set Up the Software

PLANET
Networking & Communication
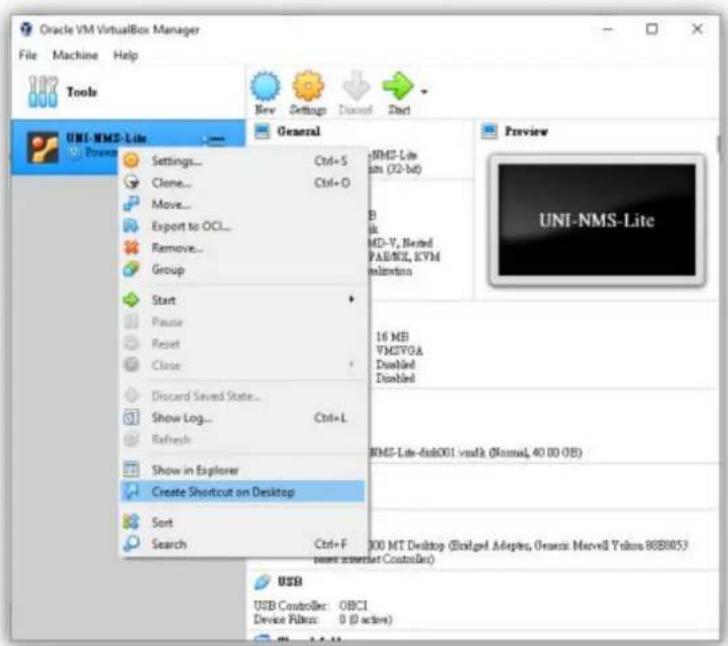
Right-click "UNI-NMS-LITE".
Select "Create Shortcut on Desktop".
Setting Up VM Network Adapter

PLANET
Networking & Communication
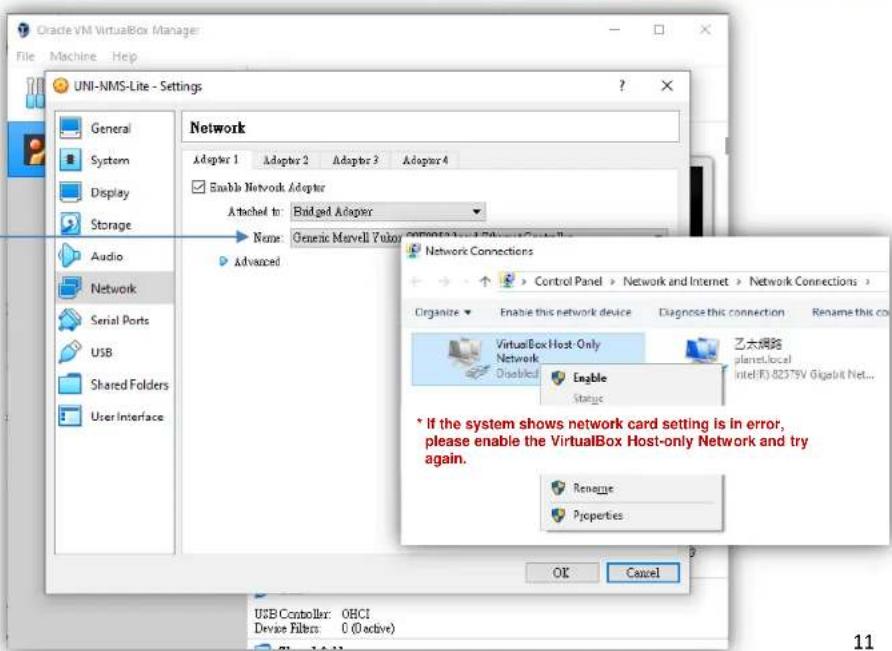
- Select VM
- Click Settings
- Choose Network
- Choose Adapter Name
- Press OK to Apply
★ Please ensure your Network Adapter is connected to the local network (Managed devices included).
Running UNI-NMS Application

PLANET
Networking & Communication
Select the UNI-NMS-LITE VM.
- Press "Start" to run the UNI-NMS-LITE.
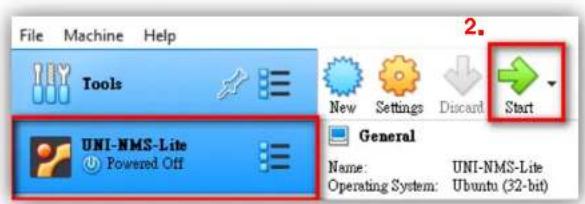
*Press the setting button to define the General Name of VM.
![UNI-NMC_Agent [Running] - Oracle VM VisualBox File Machine View Input Devices Help K OK I Started ACPI event daemon. K OK Starting LSB: daemon to balance interrupts for SMP systems... K OK Starting LSB: HPA's tftp server... K OK Starting Accounts Server... K OK Starting LSB: start Console NetBIOS nanoserver (mbbl)... K OK Starting .retce Local Compatibility... K OK Starting LSB: Apache2 web server... K OK I Started D-Bus System Message Bus... K OK I Started Regular background program processing daemon... K OK I Started Deferred execution scheduler... K OK I Started Daily Cleaning of Temporary Directories... K OK I Monched target Tinsurs... K OK Starting LSB: Set the CPU Frequency Scaling governor to "download". K OK Starting Login Service... K OK Starting System Logging Service... K OK I Started HSPF FISIPSystem for LXC K OK I Started An object/document-oriented database... K OK Starting LSB: MD monitoring daemon... K OK I Started Permit User Sessions... K OK I Started System Logging Service... K OK I Started Login Service... K OK I Started LSB: Set the CPU Frequency Scaling governor to "download". K OK Starting Authenticate and Authorize Users to Run Privileged Tasks... K OK I Started LSB: Record successful boot for GRU, K OK I Started LSB: HPA's tftp server... K OK I Started LSB: daemon to balance interrupts for SMT systems... K OK I Started LSB: MD monitoring daemon... K OK I Started Authenticated and Authorize Users to Run Privileged Tasks... K OK I Started Accounts Service... K OK I Started LSB: Apache2 web server... K OK I Stopping LSB: HPA's tftp server... K OK I Stopped LSB: HPA's tftp server... K OK I Started LSB: HPA's tftp server...](/content/2026/05/853097/images/c8e76d2189650efc894ede89c7e3859078b60b4961399f101f642a50b290c4fe.jpg)
Running UNI-NMS Application

PLANET
Networking & Communication
When the “UNI-NMS-LITE login” appears, please enter user login account “adminuser”, and password “adminuser”.
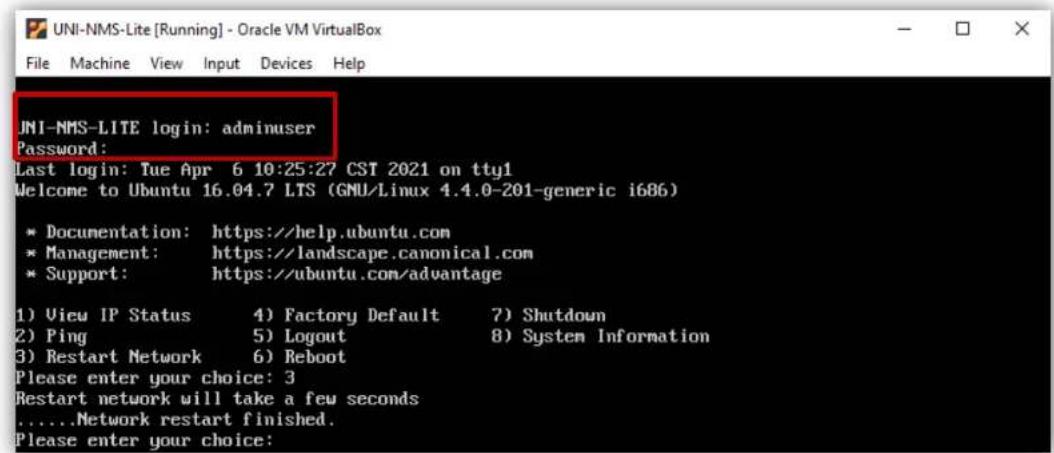
When the "preferred command" appears, please enter "No.3" to restart network command. (It will be necessary if you cannot be connected to UNI-NMS-LIET Web UI.)

PLANET
Networking & Communication
BEFORE FIRST LOGIN
Device Setting

PLANET
Networking & Communication
flowchart
graph TD
    A["Local Management System"] --> B["Industrial Router"]
    B --> C["POE Switch"]
    C --> D["IP Camera"]
    C --> E["AP"]
    C --> F["VSP"]
    C --> G["NAS"]
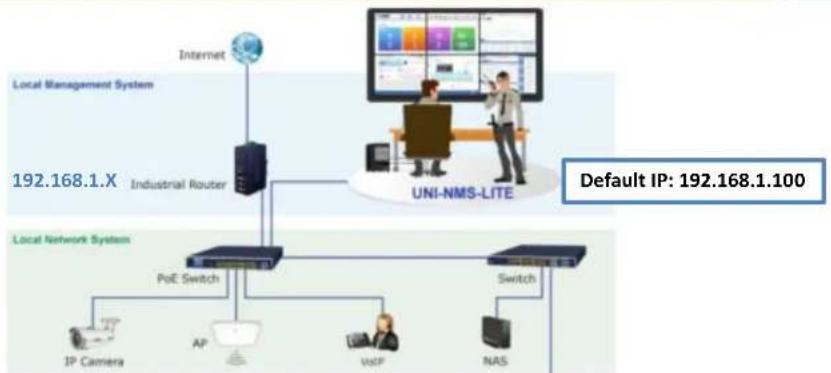
    H["UNI-NMS-LITE"] --> I["Default IP: 192.168.1.100"]
    style A fill:#f9f,stroke:#333
    style H fill:#ccf,stroke:#333
    style B fill:#cfc,stroke:#333
    style C fill:#fcc,stroke:#333
    style D fill:#cff,stroke:#333
    style E fill:#ffc,stroke:#333
    style F fill:#cfc,stroke:#333
    style G fill:#fcc,stroke:#333
Switch: Log in to the Switch's Web User Interface and refer to the picture below to enable the SNMP, LLDP and Remote Management as shown in Figures 1, 2 and 3.
AP: Log in to the AP's Web User Interface and refer to Figure 3 below to configure the AP to "Managed AP". Then, click "Apply Change". To support SNMP AP, enable the SNMP function.
IP Cam: The ONVIF function is enabled by default.
Device Setting - Switch

PLANET
Networking & Communication
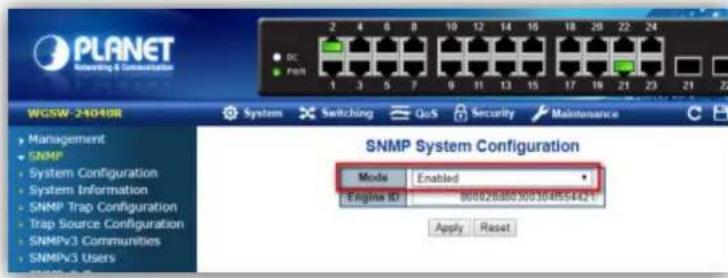
(Figure 1)
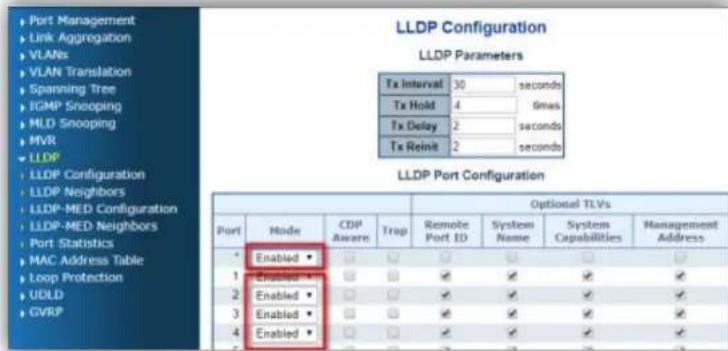
(Figure 2)
Device Setting – Switch/Router

PLANET
Networking & Communication
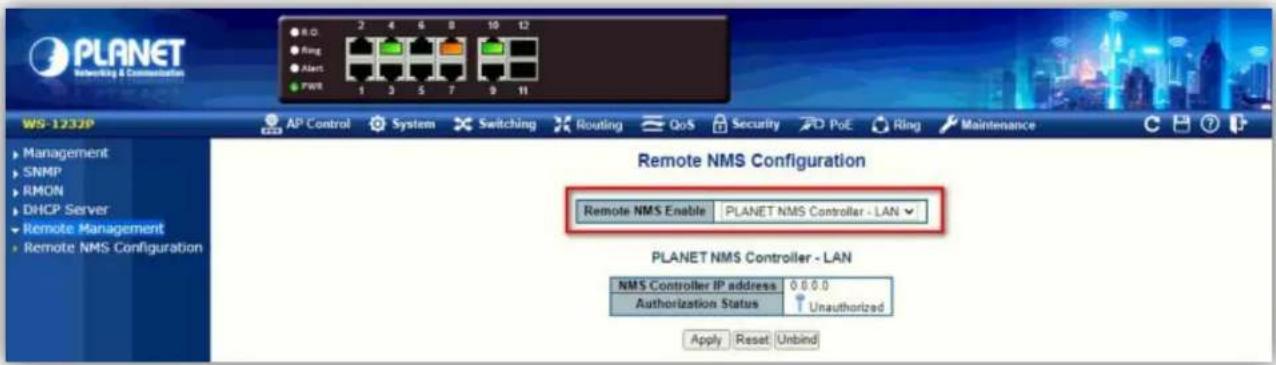
(Figure 3)
Remote Logging in NMS

PLANET
Networking & Communication
Open Chrome/Firefox to log in the NMS. (Default IP: https://192.168.1.100:8888)
Please use Chrome/Firefox to get fully supported. (UI Resolution 1280 x 768)
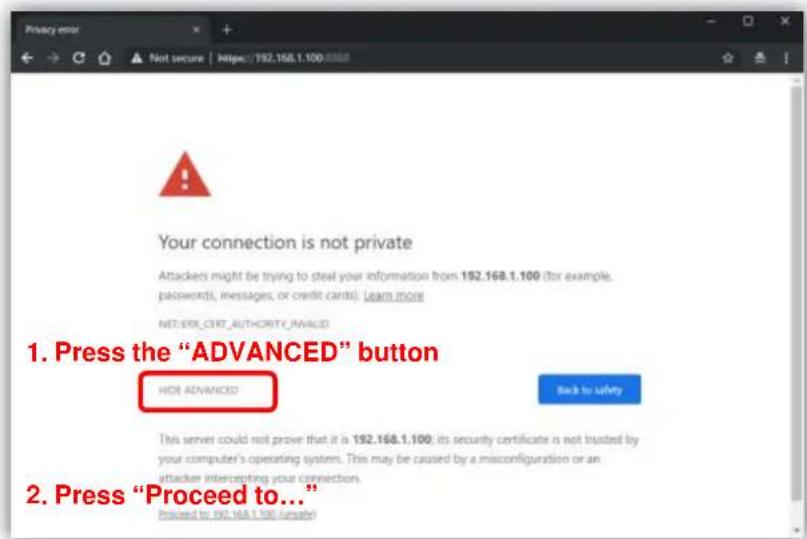
Logging in NMS

PLANET
Networking & Communication
Username: admin
◆ Password: admin
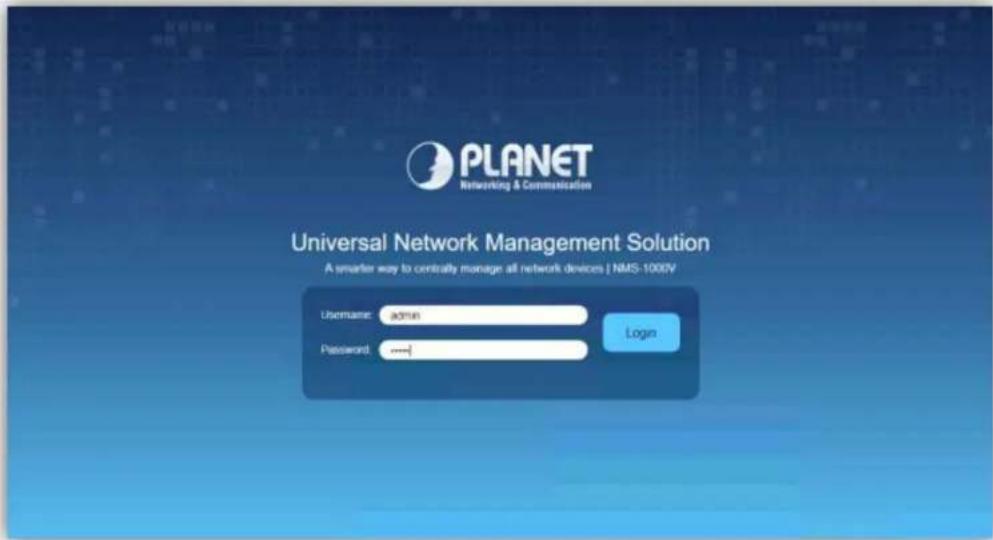

SETUP WIZARD
Account Modification

PLANET
Networking & Communication
Steps to modifying account:
- Please key in a new account, except "admin".
- New Password must include at least 1*[a\~z], 1*[A\~Z], 1*[0\~9], 1*[\~, !, @, ..., w/o "?"] and must contain at least 8 characters.
![Account Modification Configuration User Name admin123 Password 1qazlQAZ Retype Password ............+ *Please key in a new account, except using "admin" New Password must be included at least 1°[a-z], 1°[A-z], 1°[0-8], 1°[-, -, @, ..., w/o ??] Next](/content/2026/05/853097/images/59c201ec3e74ee8b2307acf7c1cdf11772e20db008b4178b6ae51798c0555add.jpg)
IP Configuration Setting

PLANET
Networking & Communication
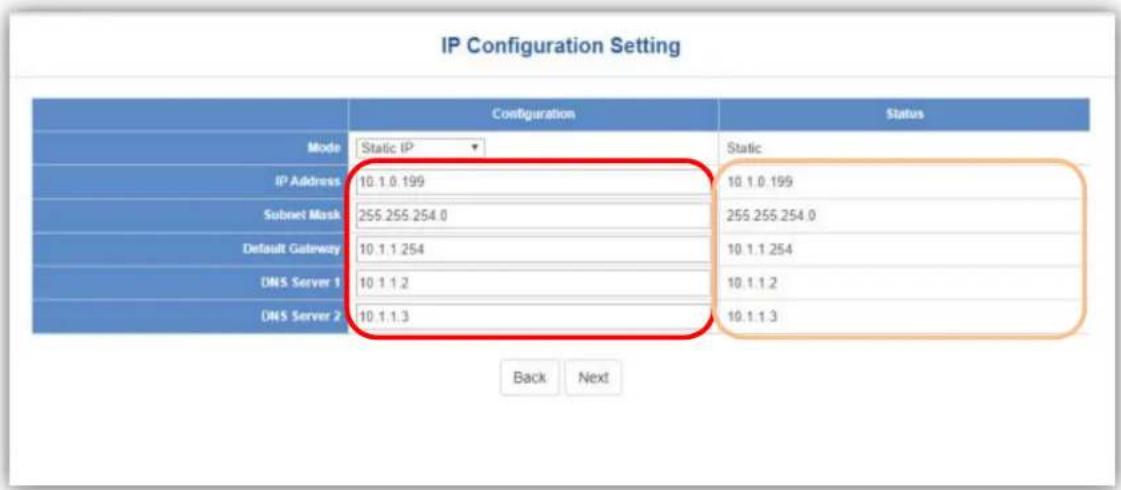
- Select "Static IP" or "DHCP Client" for IP configuration setting.
- IP status is shown in real time.
*If you want to use the SMTP Alarm function, you must at least enter one DNS server.
SNMP Preference Setting

PLANET
Networking & Communication
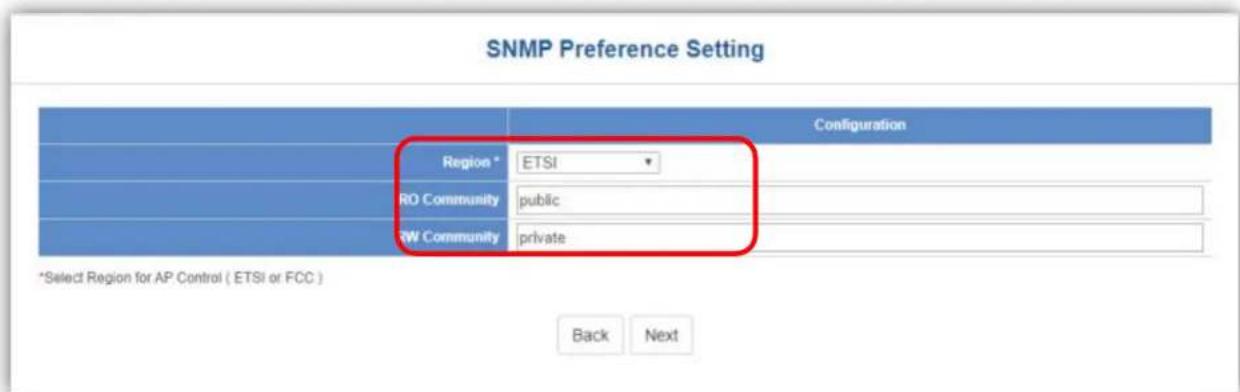
- Select Region for AP Control (ETSI or FCC).
- And enter the RO/RW Community for AP's SNMP.
Devices Discovery

PLANET
Networking & Communication
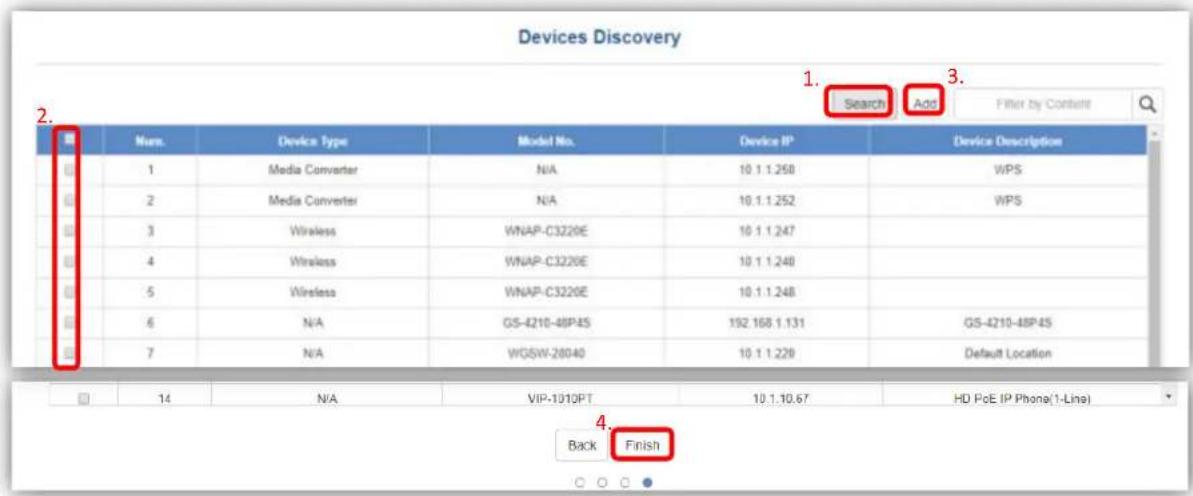
- Press the Search button to discover PLANET devices.
- Give a check to a box and press the "Add" button to add a device to the NMS system.
- Press the Finish button to leave the Wizard mode and finish the start-up setting.
MAIN UI INTRODUCTION
Home Page - Dashboard UI Structure

PLANET
Networking & Communication
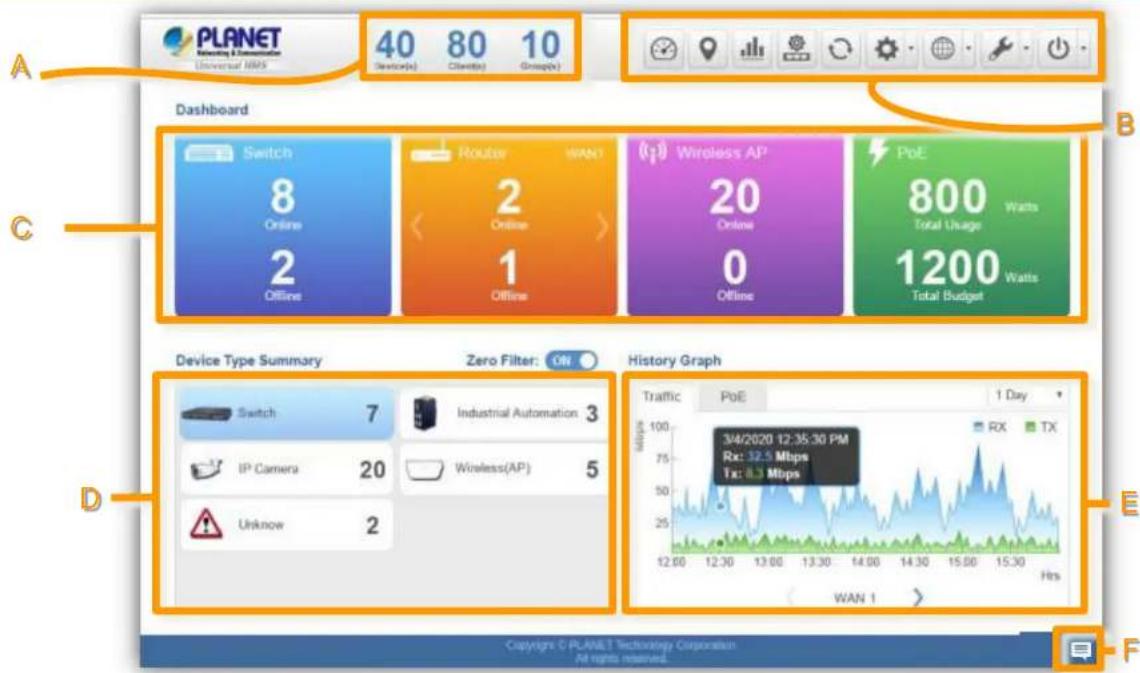
Main Dashboard - Description

PLANET
Networking & Communication
| Item | Description Remarks | |
| A | Device Status Summary | 1. Roughly shows the system status:Current devices online (total online), clients (total active clients), device groups (total groups)2. Click the PLANET Logo to connect to PLANET Web site. |
| B | System Menu | From left to right:1. Dashboard: Provides the whole system view and wireless network status2. Domain: Discovery / Device List / Topology View3. Advanced Graph: future feature4. AP Control: 1. Preference, 2. Profiles, 3. Control, 4. Map It and 5. Statistics5. Refresh6. System Configuration: Alert configuration, Date and Time, Interface, IP, Account, Wizard setting7. Network Services: *only HW version supported8. Maintenance: System upgrade, backup and restoration, factory default, system setting, event and syslog.9. Exit: Click to opt for the logout, reboot or shutting down of the system |
| C | Local Site Information | 1. Switch status, 2. Router status, 3. Access Point status and 4. Total PoE status,*Click Device type button to filter each type of device via device list. |
| D | Device Type Summary | Show the real-time total quantity of devices under different types |
| E | History Graph | Show the history graph of WAN traffic / total PoE usage and budget |
| F | Popup Alert Message Window | *only HW version supported |
DASHBOARD INTRODUCTION
Dashboard - Local Site Information

PLANET
Networking & Communication
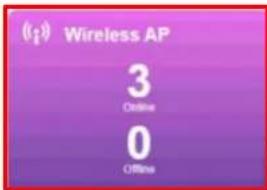
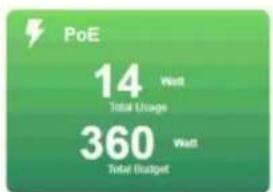
Local Site Information: In this area, you can view 1. Switch, 2. Router, 3. Access Point online/off status and 4. Total PoE usage and budget status.
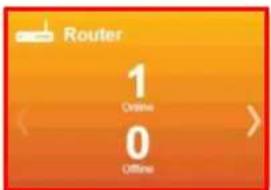
Click Router “>” button to see the WAN real-time traffic throughput of Mbps, Kbps... . Click Router “<” button to go back to status.


other
| Device | Usage Metric | Value | | :--- | :--- | :--- | | Switch | Online | 2 | | Switch | Offline | 0 | | Router | Upload | 13 KBytes | | Router | Download | 132 KBytes | | Wireless AP | Online | 3 | | Wireless AP | Offline | 0 | | PoE | Wall Total Usage | 12 | | PoE | Wall Total Budget | 360 | The chart displays four distinct data panels with values for each device. The first panel includes a red arrow indicating a specific point of interest.Dashboard (Home)

PLANET
Networking & Communication
Click the Device type button to filter each type of device via device list.
Dashboard
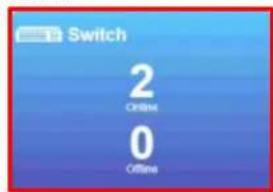
Switch: Click the "Switch Button" to filter the type of Switch, Industrial Switch, and Media Converter.
Router: Click the "Router Button" to filter the type of Router.
Wireless AP: Click the "Wireless AP Button" to filter the type of Wireless (AP).
Dashboard - Device Type Summary

PLANET
Networking & Communication
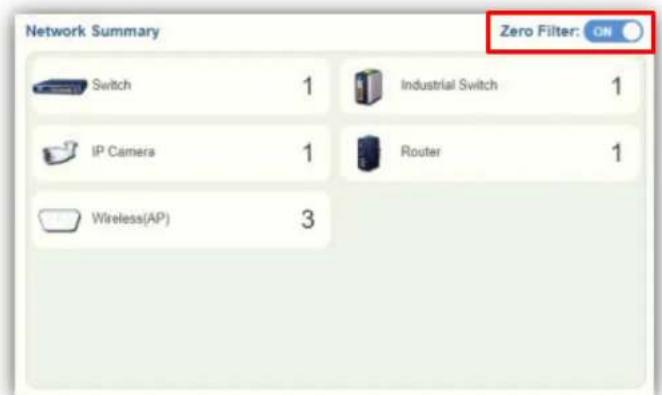
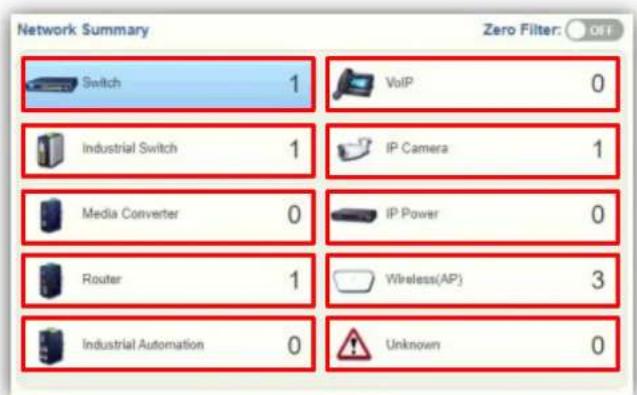
Device Type Summary: Show the real-time total quantity of devices under different types.
Open the "Zero Filter Button" to filter the 0 quantity of devices type not shown. If this function is closed, you can see all types that NMS can manage.
Click the Device type button to filter each type of device via device list.
Dashboard - History Graph

PLANET
Networking & Communication
History Graph: Show the history graph of WAN traffic / total PoE usage and budget.
Press the "WAN" or "PoE" sheet button to change the type of history graph. Press the "Interval Button" to change the interval for day, week, or month. Then you can see the WAN traffic / total PoE usage and budget.
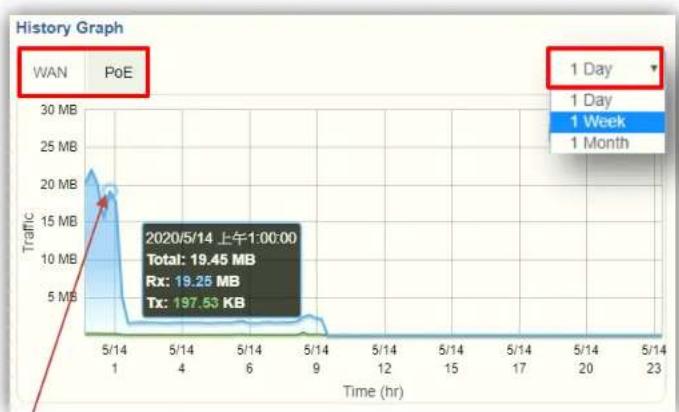
line
| Time (hr) | Traffic (MB) | | --------- | ------------ | | 5/14 | 20.0 | | 2020/5/14 | 19.45 | | Total | 19.25 | | Rx | 197.53 |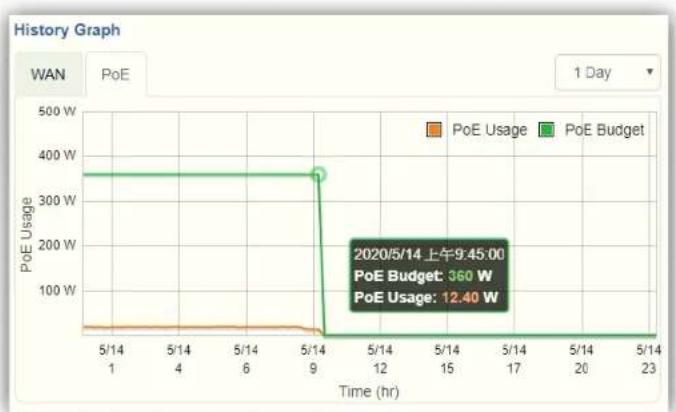
line
History Graph | Time (hr) | PoE Usage (W) | PoE Budget (W) | |---|---|---| | 5/14 | ~20 | 360 | | 9 | ~20 | 360 | | 2020/5/14 上午9:45:00 | ~20 | 12.40 | | 23 | ~20 | ~0 |*Moving finger or mouse cursor on graph can let you see the detailed information.

PLANET
Networking & Communication
FOOTER INTRODUCTION
Footer - Popup Alert Message

PLANET
Networking & Communication
Popup Alert Message: Click the "Message" icon (No. 1) to show the last 30 system events in popup window.
The last event will be shown on the top page; press the "X" icon (No. 2) to close each message.
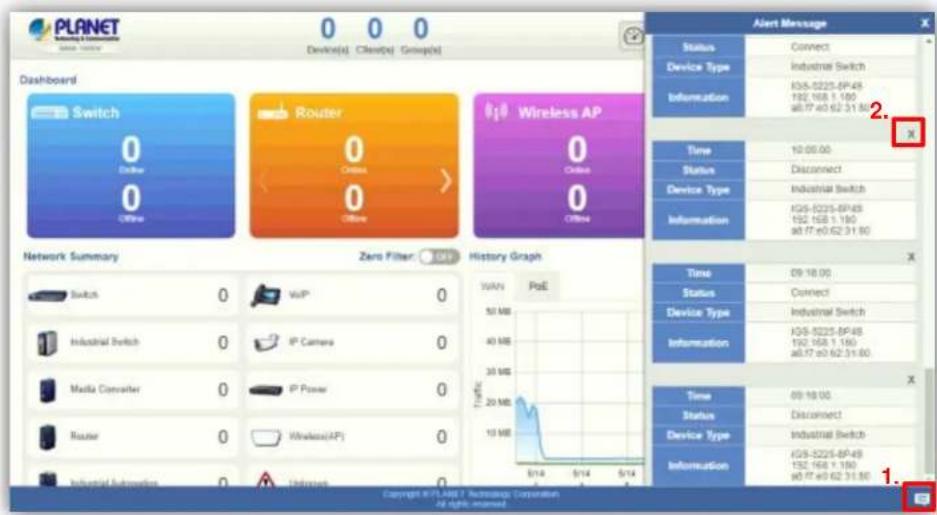
(*only HW version supported)
SYSTEM MENU - DOMAIN
Discovery

PLANET
Networking & Communication
Press the "Domain" icon (No. 1), and then press Discovery (No. 2) and Search (No. 3) to find the managed APs and continue other settings.
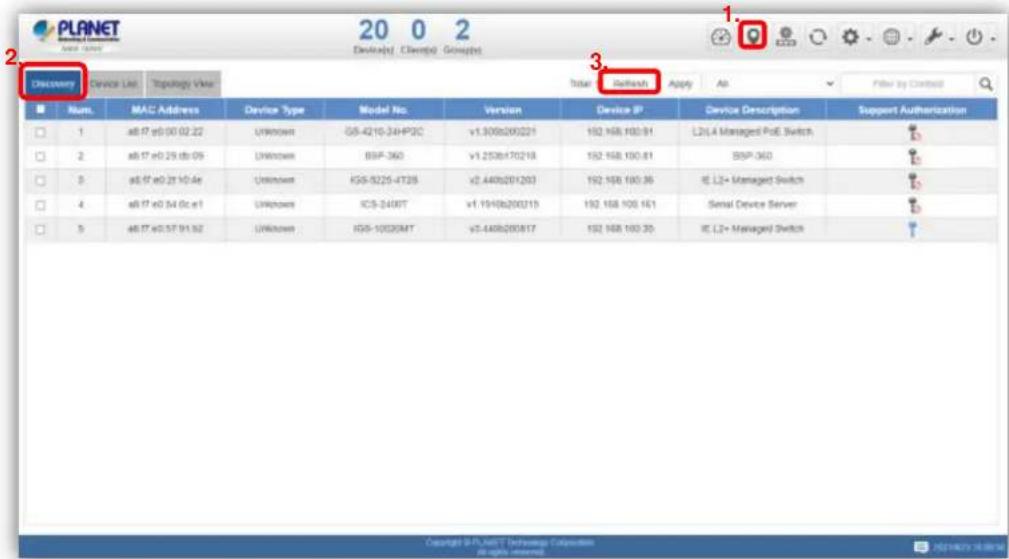
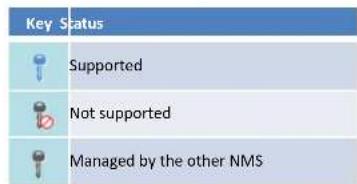
Support Authorization: If the devices support MQTT protocol, the status will show "Blue Key".
Adding Devices to List

PLANET
Networking & Communication
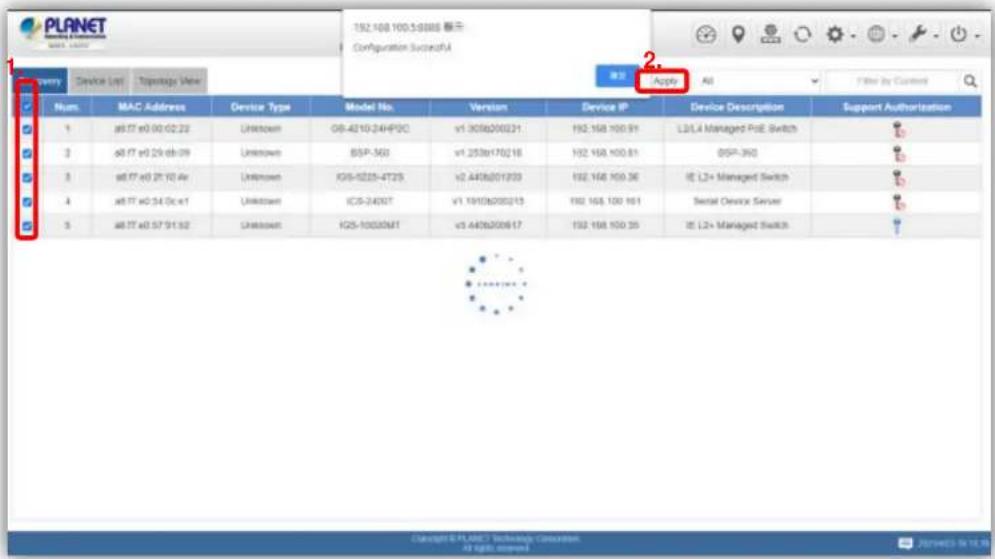
Select devices (No. 1) by checking the boxes, and then press the "Apply" icon (No. 2) to add devices to management list.
Device List and Topology View

PLANET
Networking & Communication
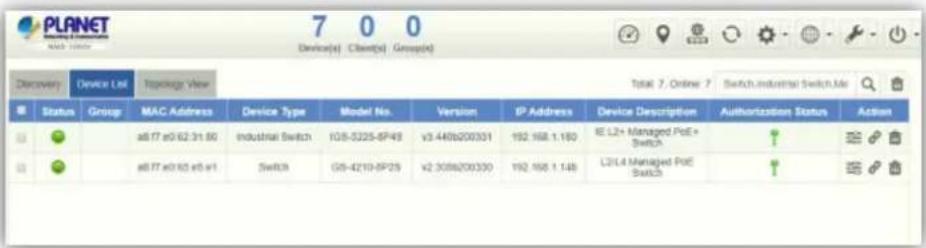
- Press "Device List" to see the device status.
| Status | Group | MAC Address | Device Type | Model No. | Version | IP Address | Device Description | Action |
| 3c 6151 02 c4 c5 | Camera | PCamera | N/A | 192.168.100.19 | PLANET | |||
| ad 17 e0 00 02 22 | EV/OS | C8-4210-24P2C | v1 3039200221 | 192.168.100.91 | L2 L4 Managed PUE++ Switch | |||
| ad 17 e0 28 d8 c9 | Industrial Switch | BSP-365 | v1 2339173218 | 192.168.100.81 | BSP-365 | |||
| ad 17 e0 27 13 a4 | Industrial Switch | IC8-5225-4T2S | v2 4436204203 | 192.168.100.36 | IE L2+ Manager Switch | |||
| ad 17 e0 48 24 c9 | Wireless | HDAP-C7000E | WDAP-C7000E-AH-5T5R-V3.5-Bulk20205032143626 | 192.168.100.161 | 1IF Demo Roloh_C7000E | |||
| ad 17 e0 54 Dc x1 | Industrial Automation | ICS-2405T | v1 1510b200315 | 192.168.100.163 | Serial Device Server | |||
| ad 17 e0 57 91 b2 | Industrial Switch | ICS-1030A4T | v3 443b200817 | 192.168.100.35 | IE L2+ Manager Switch | |||
| ad 17 e0 58 94 16 | Industrial Automation | IAG-2290T | v1 1910b230407 | 192.168.100.162 | Modbus Gateway | |||
| ad 17 e0 59 A4 bc | Industrial Switch | VQ8-5225-8T25V | v1 368b200722 | 192.168.100.41 | IE L2+ Manager Switch | |||
| ad 17 e0 58 4e 54 | Industrial Switch | VQ8-5225-8T25V | v1 368b200723 | 192.168.100.22 | IE L2+ Manager Switch | |||
| ad 17 e0 59 92 3X | Router | VR-399 | v1 19078270219 | 192.168.100.1 | PLANET V6-399 VPN Router | |||
| ad 17 e0 3790 99 | Industrial Switch | ICS-5225-4JP172S | v4 443b200331 | 192.168.100.11 | ICS-5225-ALPPT72S Industrial PUE Manager Switch | |||
| ad 17 e0 57 54 17 | Industrial Switch | VQ8-5225-8F25V | v1 368b200722 | 192.168.100.54 | IE L2+ Manager PUE Switch | |||
| ad 17 e0 57 7a 77 | Industrial Switch | VQ8-5225-8F25V | v1 368b200723 | 192.168.100.21 | IE L2+ Manager PUE Switch | |||
| ad 17 e0 67 k4 b1 | Industrial Switch | VQ8-5225-8F25V | v1 368b200723 | 192.168.100.67 | IE L2+ Manager PUE Switch |
Authorization Status: If the devices support MQTT protocol and are managed currently with NMS, the authorization status will show "Green Key".
| Key Status | |
| Managed | |
| Not supported | |
| Managed Fail | |
| Managed by the other NMS | |
Device List and Topology View

PLANET
Networking & Communication
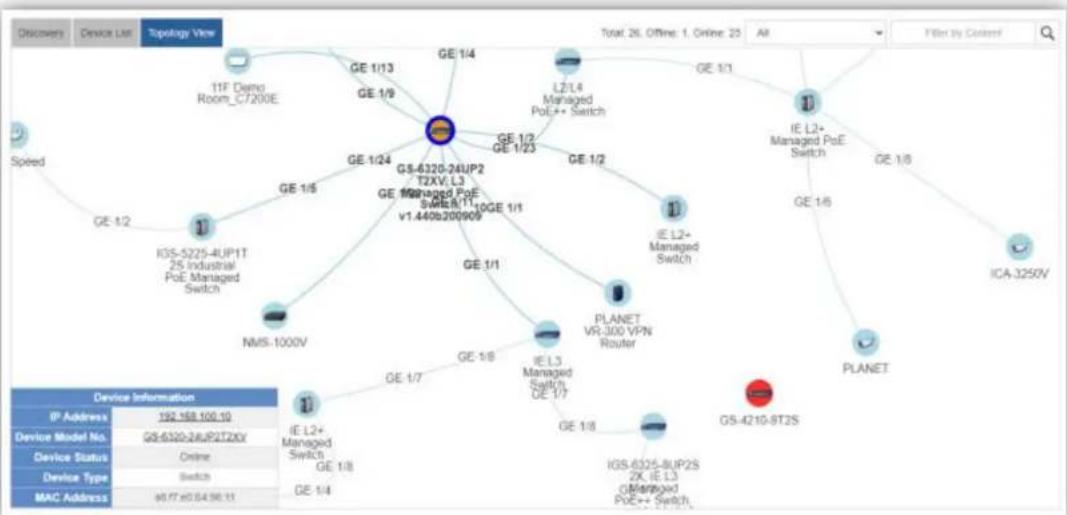
- Press "Topology View" to see the domain network topology after one minute.
※If you do not see the topology, please check devices to enable SNMP and LLDP function.
flowchart
graph TD
    A["Speed"] --> B["IGS-5225-4UP1T 25 Industrial PoE Managed Switch"]
    B --> C["NMS-1000V"]
    C --> D["IE L2+ Managed Switch"]
    D --> E["GE 1/7"]
    E --> F["GE 1/8"]
    F --> G["GE 1/9"]
    G --> H["GE 1/13"]
    H --> I["GS-6320-24UP2 T2XV, L3 GE Managed PoE Switch, V1.440b200909"]
    I --> J["GE 1/4"]
    J --> K["GE 1/2"]
    K --> L["GE 1/23"]
    L --> M["GE 1/2"]
    M --> N["GE 1/2"]
    N --> O["GE 1/2"]
    O --> P["IE L2+ Managed Switch"]
    P --> Q["GE 1/6"]
    Q --> R["IC4-325V"]
    R --> S["PLANET"]
    S --> T["GS-4210-8T2S"]
    T --> U["IGS-6325-8UP2S 2K, IE L3 GE Managed PoE++ Switch"]
    U --> V["GE 1/8"]
    V --> W["GE 1/7"]
    W --> X["GE 1/8"]
    X --> Y["GE 1/9"]
    Y --> Z["GE 1/13"]
    Z --> AA["GE 1/2"]
    AA --> AB["GE 1/23"]
    AB --> AC["GE 1/2"]
    AC --> AD["GE 1/2"]
    AD --> AE["GE 1/2"]
    AE --> AF["GE 1/2"]
    AF --> AG["GE 1/2"]
    AG --> AH["GE 1/2"]
    AH --> AI["GE 1/2"]
    AI --> AJ["GE 1/2"]
    AJ --> AK["GE 1/2"]
    AK --> AL["GE 1/2"]
    AL --> AM["GE 1/2"]
    AM --> AN["GE 1/2"]
    AN --> AO["GE 1/2"]
    AO --> AP["GE 1/2"]
    AP --> AQ["GE 1/2"]
    AQ --> AR["GE 1/2"]
    AR --> AS["GE 1/2"]
    AS --> AT["GE 1/2"]
    AT --> AU["GE 1/2"]
    AU --> AV["GE 1/2"]
    AV --> AW["GE 1/2"]
Device Identification

PLANET
Networking & Communication
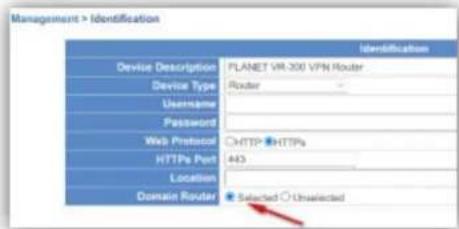
Press the "Identification" icon to modify the device description, type, and web protocol information.
If there are VR series router in the network, please select one from them to define to domain router of the network.
| Status | Group | MAC Address | Device Type | Model No. | Version | IP Address | Device Description | Action |
| 3x 40/51/02 c4:c8 | Camera | IPCamera | N/A | 192.168.100.19 | PLANET | |||
| a6.17 a6.00.02 22 | Switch | QS-4210-24HP2C | v1.300x200221 | 192.168.100.31 | L2/L4 Managed PUE++ Switch | |||
| a6.17 a6.29 db 09 | Industrial Switch | BSP-360 | v1.2538/170218 | 192.168.100.81 | BSP-360 | |||
| a6.17 a6.27 10.3e | Industrial Switch | QS-5225-4T2S | v2.480x201203 | 192.168.100.36 | IE L2+ Managed Switch | |||
| a6.17 a6.48.24 09 | Wireless | WDAP-C7200E | WDAP-C7200E-API, ETS6 V3-D BAG00000033143626 | 192.168.100.151 | IFP Demo-Room_C7200E | |||
| a6.17 a6.54 0x v1 | Industrial Automation | ICS-3430T | v1.1910x200215 | 192.168.100.161 | Serial Device Server | |||
| a6.17 a6.57 31:52 | Industrial Switch | ICS-1030XMT | v3.440x200817 | 192.168.100.33 | IE L2+ Managed Switch | |||
| a6.17 a6.58 54: 16 | Industrial Automation | IAG-225HT | v1.1910x205457 | 192.168.100.162 | Modbus Gateway | |||
| a6.17 a6.59:43 9C | Industrial Switch | WGQ-5225-8T25V | v1.368x205723 | 192.168.100.47 | IE L2+ Managed Switch | |||
| a6.17 a6.58:4e 34 | Industrial Switch | WGQ-5225-8T25V | v1.368x205723 | 192.168.100.23 | IE L2+ Managed Switch | |||
| a6.17 a6.59:52 2c | Routier | VR-300 | v1.190752/3219 | 192.168.100.1 | PLANET VR-305 VTHs Router | |||
| a6.17 a6.57 93:39 | Industrial Switch | ICS-5225-4JPY72S | v4.440x203331 | 192.168.100.11 | ICS-5225-4JPY72S Industrial PUE Managed Switch | |||
| a6.17 a6.61 5a 1Y | Industrial Switch | WGQ-5225-8F25V | v1.368x205723 | 192.168.100.34 | IE L2+ Managed PUE Switch | |||
| a6.17 a6.67 5a 77 | Industrial Switch | WGQ-5225-8F25V | v1.368x205723 | 192.168.100.21 | IE L2+ Managed PUE Switch | |||
| a6.17 a6.67 A4 b4t | Industrial Switch | WGQ-5225-8F35V | v1.368x205723 | 192.168.100.67 | IE L2+ Managed PUE Switch |
Support Authorization: If the devices support MQTT protocol, the domain WAN traffic function will show on dashboard.
SYSTEM MENU- AP CONTROL
AP Control UI – Structure & Description

PLANET
Networking & Communication
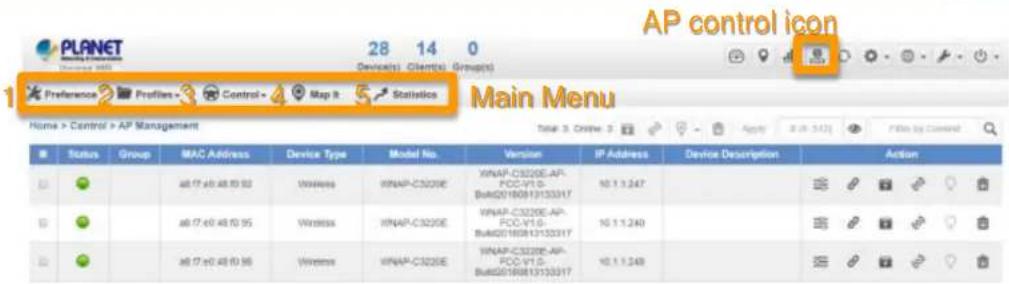
| Item | Description | Remarks |
| 1 | Preference | Edit region, RO community, RW community |
| 2 | Profiles | Set up SSID, Radio ( 2.4G, 5G ) Profiles |
| 3 | Control | AP and AP group management |
| 4 | Map It | Edit the map of AP location and coverage |
| 5 | Statistics | Show the statuses of managed APs and active clients |
Main Menu – Preference

PLANET
Networking & Communication
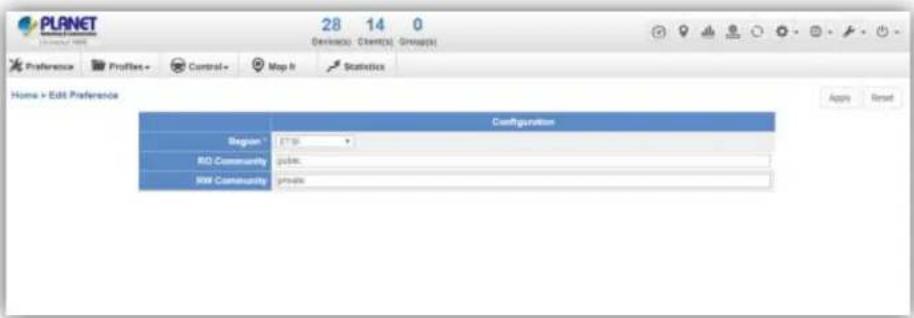
[Preference]
Preference: On this page, you can choose the device region of FCC or ETSI.
Then edit RO community and RW community for public or private use.
Select Apply or Reset.
Noted: Device of FCC and device of ETIS cannot be shown at the same time.
Main Menu – Profiles

PLANET
Networking & Communication
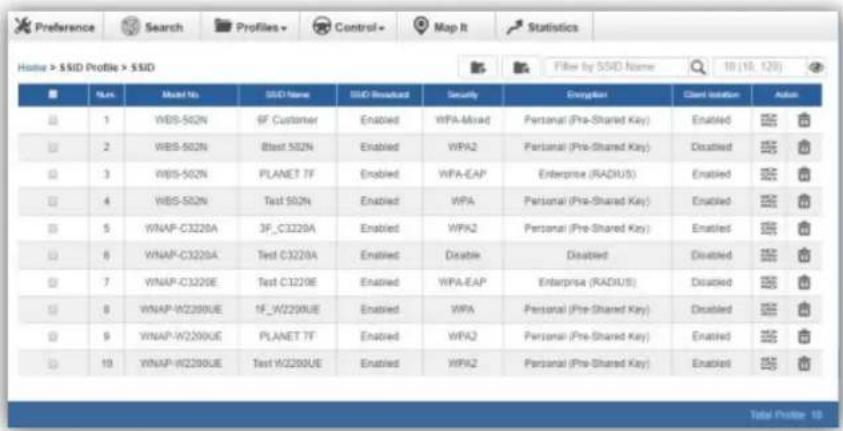
[Profiles]
Profiles: On this page, you can create the SSID and 2.4GHz/5GHz profiles for further AP provisioning.
SSID Profiles: Click the "Add new profile" button to add a new SSID profile.
Radio Profiles: Click the "Add new profile" button to add a new 2.4GHz radio profile or 5GHz radio profile.
You can create up to 32 profiles for each type of profiles (SSID, 2.4G radio, 5G radio).
Main Menu – Profiles

PLANET
Networking & Communication
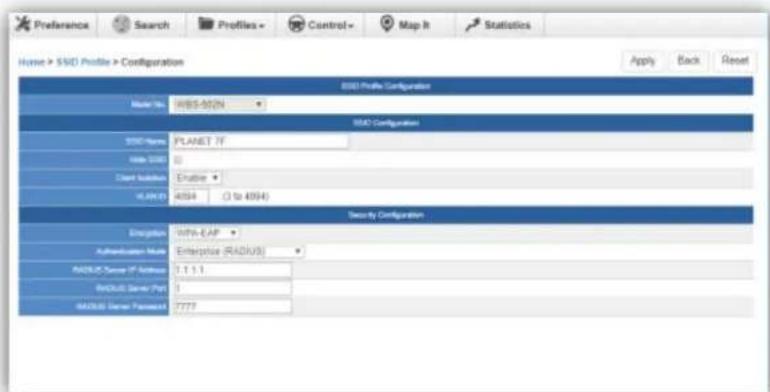
[SSID Profile Configuration]
On the SSID profile configuration page, enter the value that you preferred and then click "Apply" to save the profile.
Add new profile: Click it to add a new profile.
Delete selected item: Click it to delete the selected profile.
Edit: Click it to edit the profile.
Delete: Click it to delete the single profile.
Filter: You can filter the search result by entering the keywords in the field next to the magnifier icon. The keywords include: SSID Name
Main Menu – 3/Profiles

PLANET
Networking & Communication
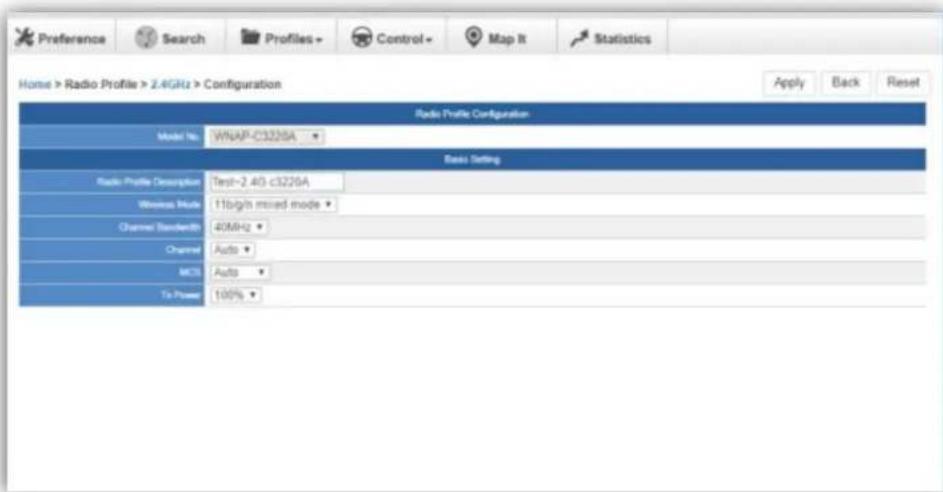
[2.4GHz Radio Profile Configuration]
On the Radio profile configuration page, enter the value that you preferred and then click "Apply" to save the profile.
Apply: Click this button to save the settings.
Back: Click this button to return to the previous page.
Reset: Click this button to reset all fields to default value.
Main Menu – 3/Profiles

PLANET
Networking & Communication
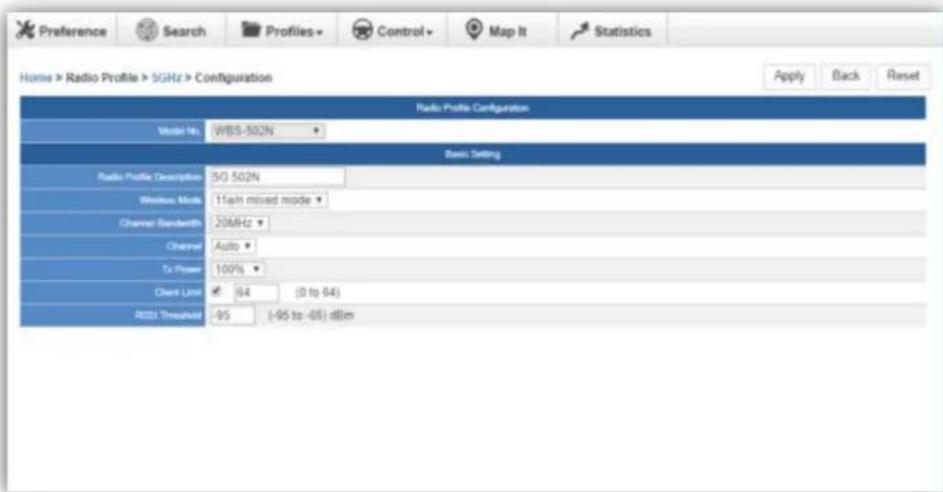
[5GHz Radio Profile Configuration]
Remarks:
- Strongly suggest you to keep the values as default except the fields like Channel, Network Mode, Channel Bandwidth, Tx Power, IAPP, and Tx/Rx to prevent any unexpected error or impact on the performance.
- WMM Capable is not allowed to be disabled.
Main Menu – Control

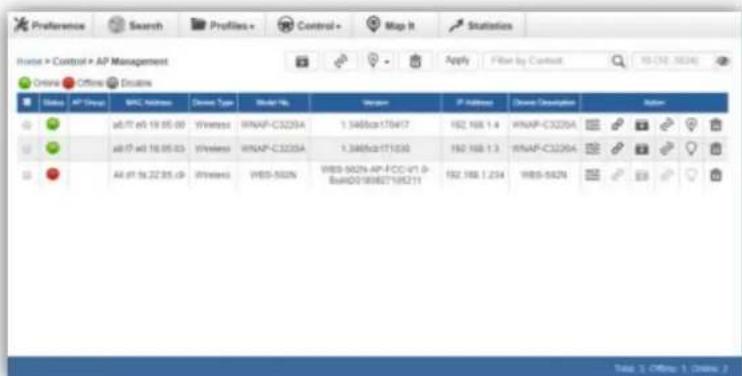
[Control - AP Management]
Control: On this page, the system allows you to control the AP or AP group with specific actions.
AP Management: Go to this page to control single AP or multiple APs.
AP Group Management: Go to this page to create multiple APs as a group or control AP group.
Filter: You can filter the AP list by entering the keyword in the field next to the magnifier icon. The keyword should be in any context that belongs to the fields like AP Group, MAC Address, Model, Version, IP Address, and Name.
Apply: Click this button to apply the setting. The profile setting will not take effect until you click the "Apply" button on the Control's main page.
Main Menu – Control

PLANET
Networking & Communication
Status:
Connection status: online, offline, Wi-Fi disabled
In progress: action in progress
√ Finished/Successful: action finished and successful.
✗ Failed: action failed.
Action:
Setting: edit setting and allocate profile to AP
Link: link to the AP's web page
Firmware Update: Upgrade AP's firmware
Reboot: Reboot the AP
Delete: Delete the AP from the control list
LED Control: Control the AP's LED. Mouse-click in a sequential order: LED blink-> LED off-> LED on
Remarks:
To configure multiple APs at one time, select multiple APs and then choose one of the action icons on the top of the page. The "Link" action is not allowed for multiple APs.
Main Menu – Control

PLANET
Networking & Communication
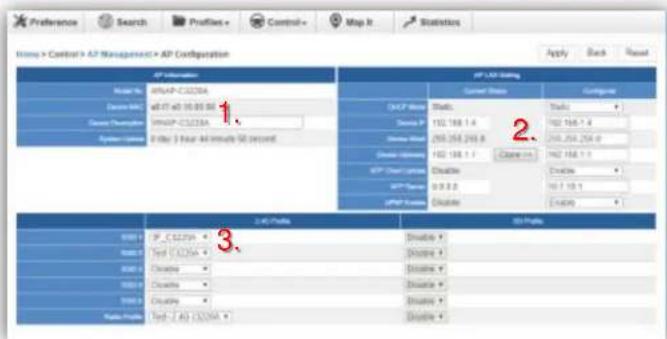
[AP Configuration]
Procedure of configuring AP's setting:
- Edit the basic AP Information.
- Click the "Clone >>" button if you want to use the same IP configuration as the previous LAN settings. Otherwise, please enter the preferred LAN setting.
- If there are already profiles created, you can designate the SSID profile and Radio profile to this AP. You can do this step later once AP's basic setting is done
On the AP Group Configuration page, you can create an AP group with the same model of AP.
Save: Click this button to save the group/setting.
Back: Click this button to return to the previous page.
Reset: Click this button to reset all fields to default value.
Remarks: The system allows to create up to 32 AP groups.
Main Menu – Control

PLANET
Networking & Communication
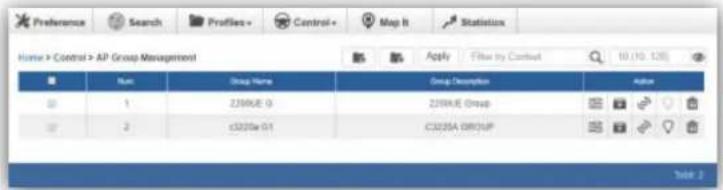
[3/Control - AP Group Management]
On the AP Group Management page, you can create AP group and control one or more AP groups.
Add new group: Click it to add an AP group.
Delete selected item: Click it to delete the selected AP group.
Apply: Click this button to apply the setting. The profile setting will not take effect to a group until you click the "Apply" button.
Remarks:
To do profile provisioning to multiple AP groups at one time, select multiple AP groups, and then click the "Apply" button.
The "Link" action is not allowed for multiple APs or AP group.
Main Menu – Control

PLANET
Networking & Communication
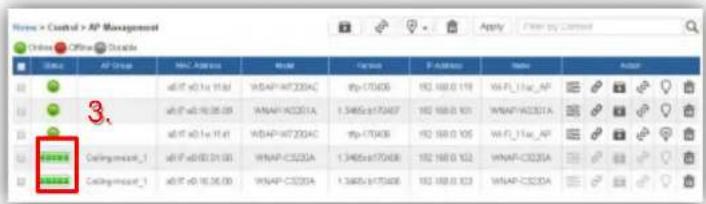
Procedure of profile provisioning to AP groups:
- Select the AP group.
- Click the "Apply" button.
- Go to "3/Control->AP Management" to check whether the status is becoming "In progress". Wait until the status comes "Online".
Action:
Setting: Edit setting and allocate profile to group
Firmware Update: Upgrade AP group's firmware
Reboot: Reboot the AP group
Delete: Delete the AP group from the control list
LED Control: Control the AP group's LED.
Mouse-click in a sequential order:
LED blink-> LED off-> LED on
Main Menu – Map It

PLANET
Networking & Communication
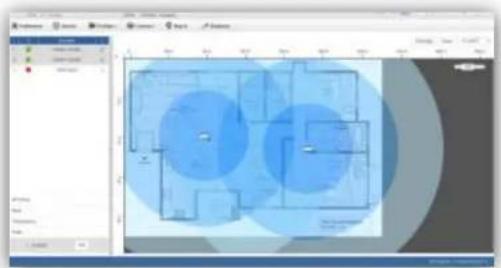
[Map It]
Map It: On this page, the system allows you to upload your floor map to the system and you can add managed APs to the actual position against the floor map. This is convenient to user to view and adjust the actual deployment by reference to its real transmission power and channel allocation.
The system allows user to upload up to 10 floor maps.
A system message will prompt to remind you to edit map first if there is no other map available in the system. Click "OK" to continue.
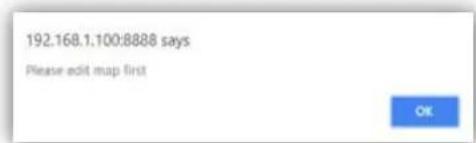
On the Edit Map page, click "Choose File" and enter the map's description. Then click "Apply" to upload the map.
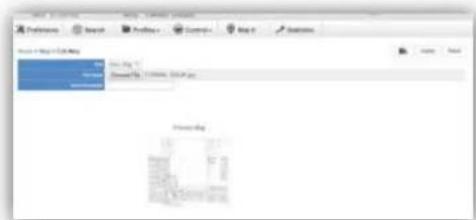
Main Menu – Map It

PLANET
Networking & Communication
After finishing map uploading, you can click the sidebar at the left-side of the window to expand the AP list.
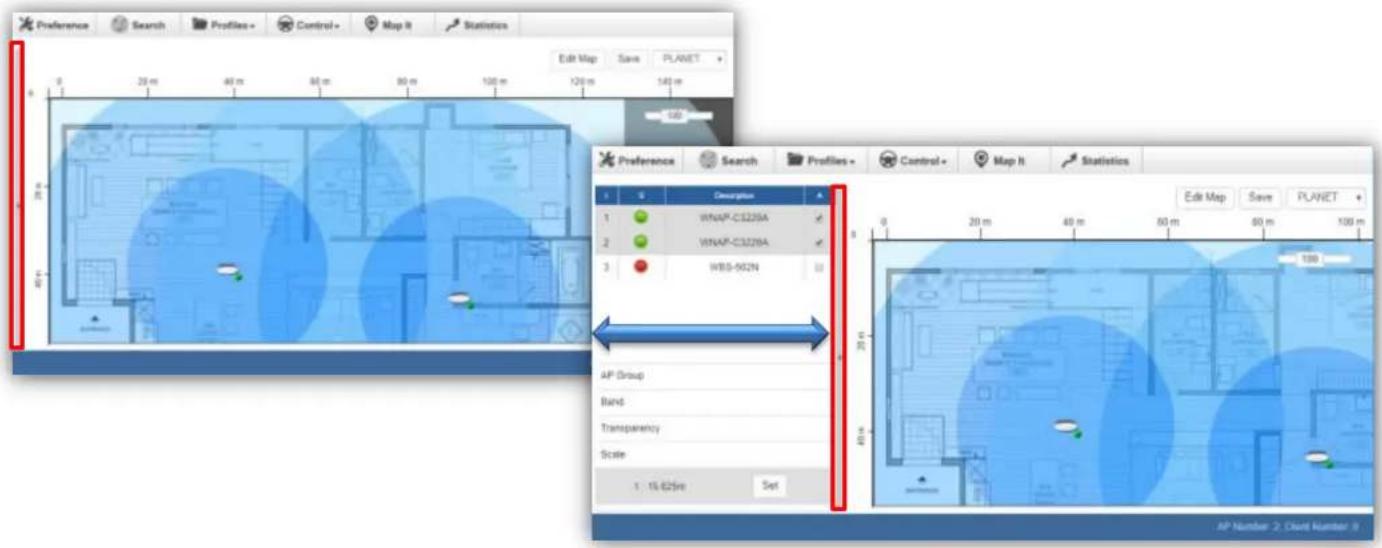
Main Menu – Map It

PLANET
Networking & Communication
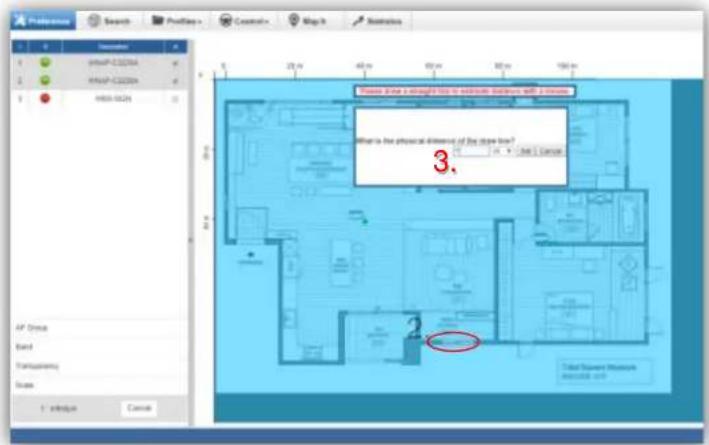
Setting Scale: 1. Click "Scale" to start to reset the map scale.
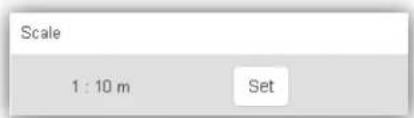
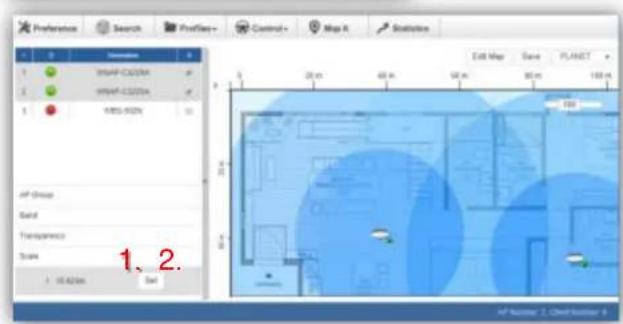
Press the "Set" button to draw a line on the map. Fill its physical distance in the blank and press "Set" or "Cancel". For example, in the graph below, set the door width to 0.8 m.
Main Menu – Map It

PLANET
Networking & Communication
Drag and drop the AP onto the map or select multiple APs by clicking the checkbox.
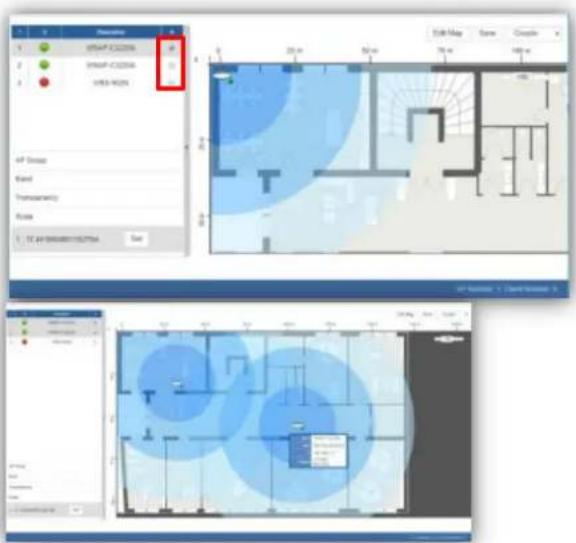
Once the allocation is done, click "Save" to save the setting.
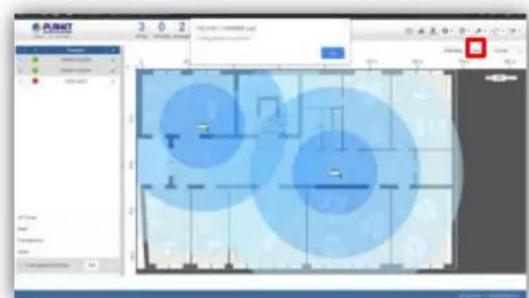
To upload more maps or edit current map, click the "Edit Map" button to re-enter the Edit Map page.
Main Menu – Map It

PLANET
Networking & Communication
The lower-left side area provides map control options.
AP Group: To filter the managed APs shown on the map, the selected AP group is displayed.
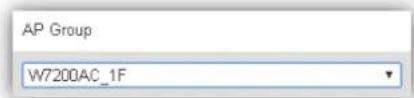
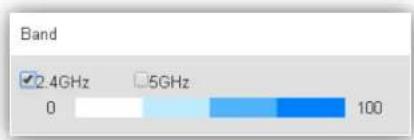
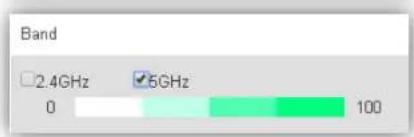
Band: Select "2.4GHz" to show APs with 2.4GHz frequency or select "5GHz" to show APs with 5GHz frequency.
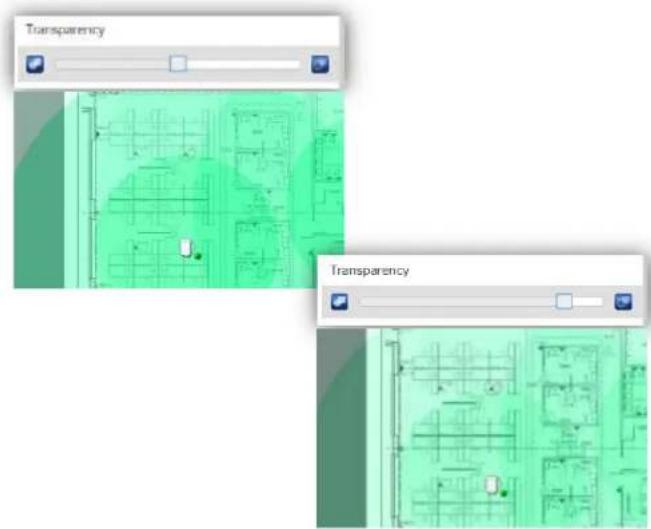
Transparency: Slide the bar to adjust the transparency of the map.
Main Menu – Statistics

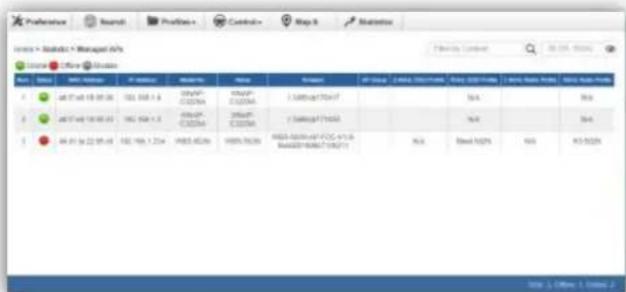
[Statistics – Managed APs]
Managed APs: On this page, you can observe the current configuration of all managed APs.
Filter: You can filter the AP list by entering the keyword in the field next to the magnifier icon. The keyword should be in any context that belongs to the fields of this page.
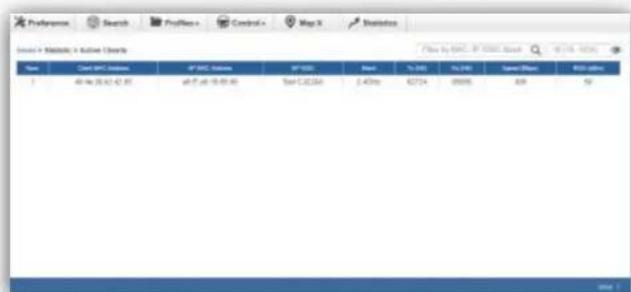
[Statistics – Active Clients]
Active Clients: On this page, you can observe the statuses of all associated clients including traffic statistics, transmission speed and RSSI signal strength.
Filter: You can filter the search result by entering the keywords in the field next to the magnifier icon. The keywords include MAC Address, IP Address, SSID and Band.
SYSTEM MENU – REFRESH
System Menu – Refresh

PLANET
Networking & Communication
[System Menu – Refresh]
Refresh: The page content will be updated every 1 minute automatically by default. If you require the system to update immediately, you may click "Manually" to refresh the page content.
[System Menu – System Configuration]
Alert Configuration: On this page, you can configure the system event notice enable or disable by Popup Alert Message and SMTP function.
After configuration is done, click "Apply" to apply the setting.
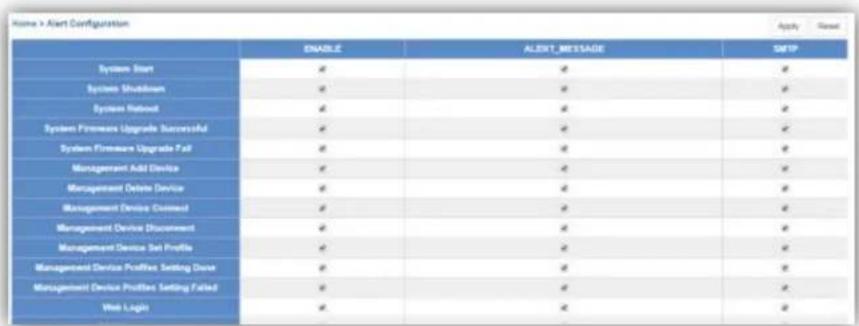
[Alert Configuration]
System Menu – System Configuration
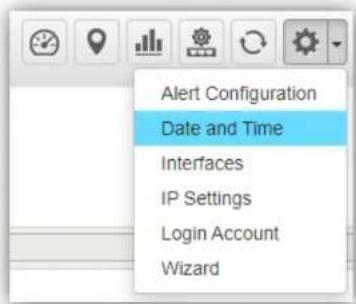
[System Menu – System Configuration]
Date and Time: On this page, you can configure the Date and Time by NTP server or manual setting.
After configuration is done, click "Apply" to apply the setting.
(*Manual function only HW version supported)
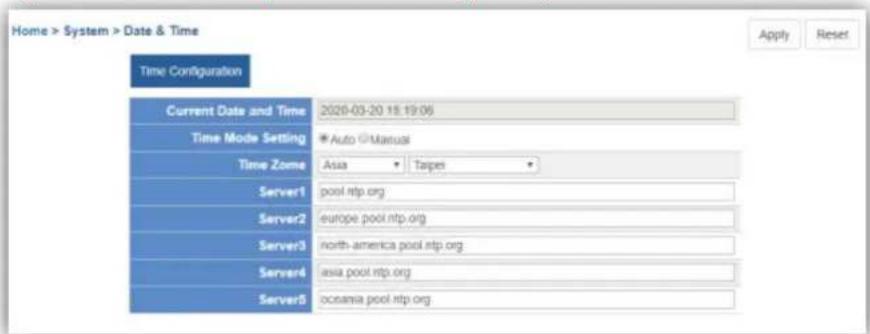
[Date and Time configuration]
System Menu – System Configuration
[System Menu – System Configuration]
Interface: On the PORT page, you can see each Port status and you can configure the speed for down, auto, 10/100 Mbps HDX/FDX, and 1GMbps FDX on the Port Statistics page.
Click "Apply" to apply the setting.
| Port Configuration | Port Statistics | |||
| Port | Port Description | Link | Speed | |
| Current | Configuration | |||
| 1 | 1Gbps FDX | Auto | ||
[Port Settings]
System Menu – System Configuration
Port Configuration
Port Statistics
| Port | Packets | Bytes | Errors | Drops | ||||
| Received | Transmitted | Received | Transmitted | Received | Transmitted | Received | Transmitted | |
| 1 | 0 | 0 | 0 | 0 | 0 | 0 | 0 | 0 |
| 2 | 478835 | 169696223 | 156746461 | 23195 | 0 | 420366 | 5201 | 0 |
[Port Statistics information]
System Menu – System Configuration
[System Menu – System Configuration]
IP Settings: On this page, you can configure the static ID of SAPC or choose it as DHCP client.
After configuration is done, click "Apply" to apply the setting. The window will prompt you to change network setting that will cause the system to restart.
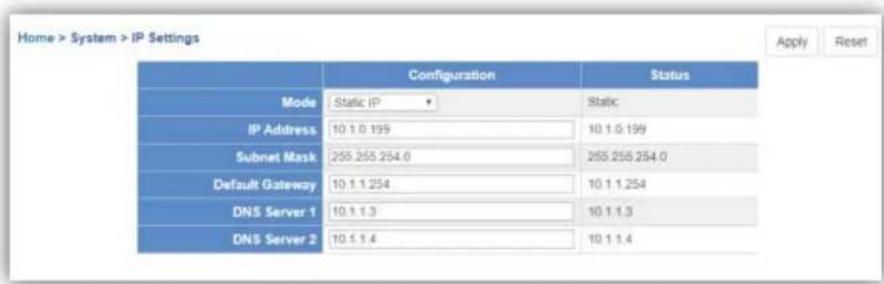
[IP Settings]
System Menu – System Configuration
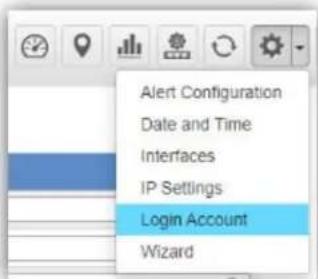
[System Menu – System Configuration]
Login Account: On this page, you can modify the login user name and password.
Enter the new user name and new password directly in the corresponding fields, and then click "Apply" to apply the setting. The login window will be prompted to ask you to enter the new account to re-log in the system.
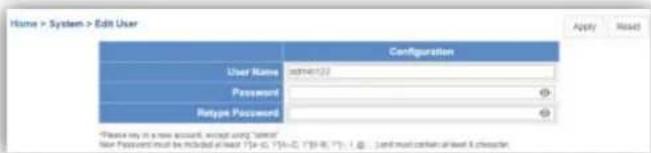
[Login Account]
*Please key in a new account, except using "admin"
New Password must include at least 1*[a\~z], 1*[A\~Z], 1*[0\~9], 1*[\~, !, @, ...] and must contain at least 8 characters.
System Menu – System Configuration
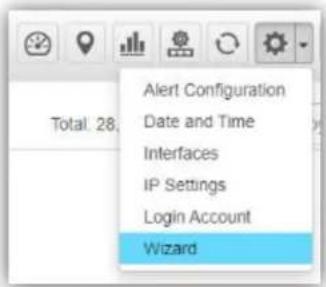
[System Menu – System Configuration]
Wizard: Select Wizard for setup wizard again.

SYSTEM MENU - NETWORK SERVICES
System Menu – Network Services

PLANET
Networking & Communication
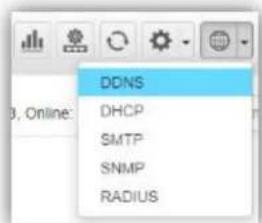
[System Menu - DDNS]
Network Services: On this page, you can set up DDNS, DHCP, SMTP, SNMP, and RADIUS of the system.
DDNS: Click "DDNS" to use PLANET Easy DDNS services or Dynamic DDNS. (Supports PLANET DDNS/Easy DDNS)
Click "Apply" to apply the setting.
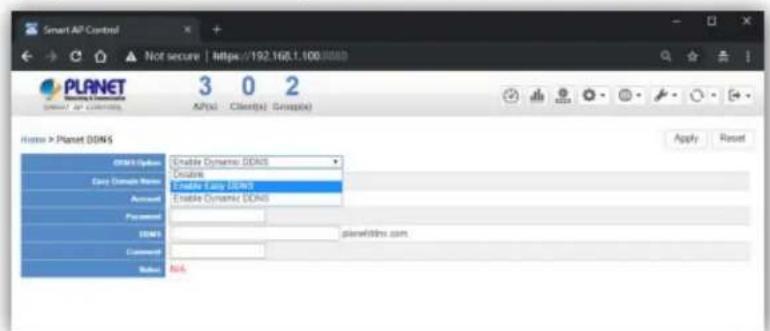
[DDNS Setting]
(*only HW version supported)
System Menu – Network Services
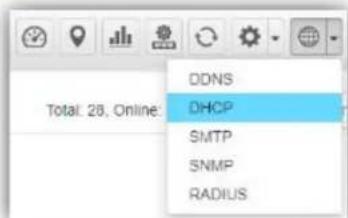
Network Services: On this page, you can set up DDNS, DHCP, SMTP, SNMP, and RADIUS of the system.
DHCP: On the DHCP Server page, choose "Enable" to use DHCP server service. On Client list page, you can see the Client detailed information.
Click "Apply" to apply the setting.
(*only HW version supported)
System Menu – Network Services

PLANET
Networking & Communication
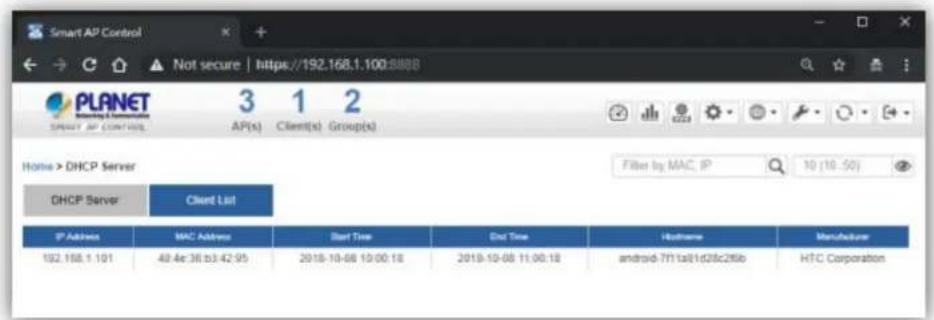
[Client List Information]
(*only HW version supported)
System Menu – Network Services

PLANET
Networking & Communication
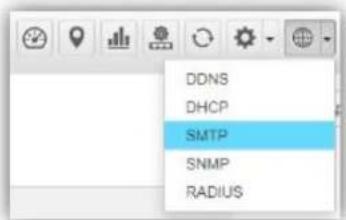
[System Menu - SMTP]
Network Services: On this page, you can set up DDNS, DHCP, SMTP, SNMP, and RADIUS of the system.
SMTP: On the SMTP page, choose "Enable" to use SMTP service.
Click "Apply" to apply the setting.
![Home > SMTP Configuration SMTP Configuration SMTP Email Alarm Enable * External SMTP Server DNS or IP Address http://domain.com or 152.956.0.1 Port: 267 Authentication Username Password Password Email Subject Prefix [NATS-503] Mail To 1.](/content/2026/05/853097/images/cfb057873b0a3591232d7852aeded9f62e7e6ba36b7102cc5feff1e31b6eba45.jpg)
[SMTP Setting]
(*only HW version supported)
System Menu – Network Services
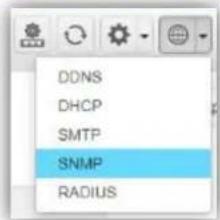
[System Menu - SNMP]
Network Services: On this page, you can set up DDNS, DHCP, SMTP, SNMP, and RADIUS of the system.
SNMP: On the SNMP Agent page, choose "Enable" to use SNMP v1, v2c, v3 service. On the SNMP Trap page, you can set up the SNMP Trap Configuration.
Click "Apply" to apply the setting.
![SmartAPI Control 3 1 2 PLANET Source: [SNMP Setting] [SNMP Setting]](/content/2026/05/853097/images/4209b0504df336fdd5d75e6e86a8b414d70489368b9eafeaa3f0eb330eed0bad.jpg)
(*only HW version supported)
System Menu – Network Services
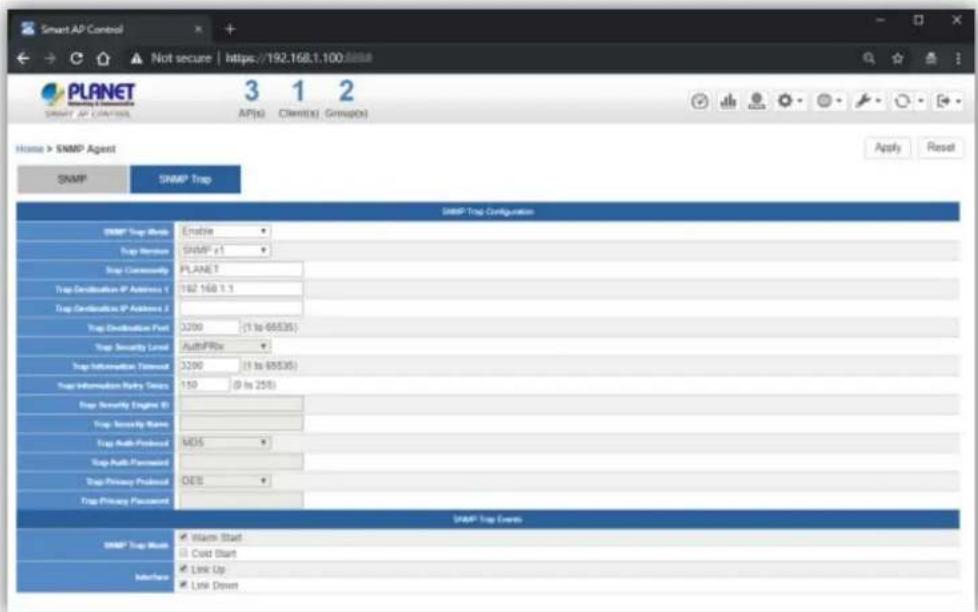
[SNMP Trap Configuration] (*only HW version supported)
System Menu – Network Services

PLANET
Networking & Communication
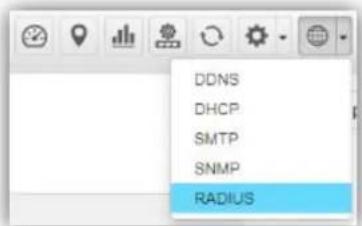
[System Menu - RADIUS]
Network Services: On this page, you can set up DDNS, DHCP, SMTP, SNMP, and RADIUS of the system.
RADIUS: On the RADIUS page, choose "Enable" to use RADIUS service. On RADIUS Client page and RADIUS User Account page, you can see the detailed information of them.
Click "Apply" to apply the setting.
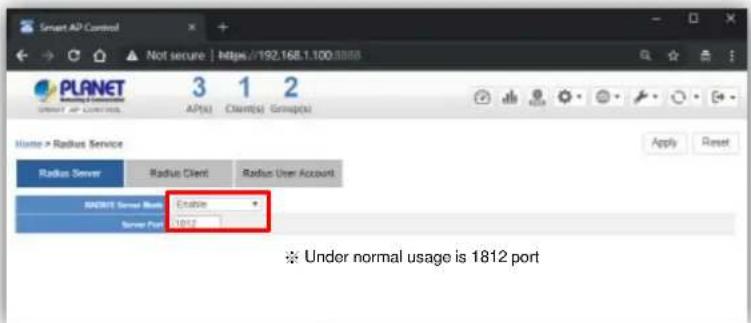
[RADIUS Setting]
(*only HW version supported)
System Menu – Network Services

PLANET
Networking & Communication
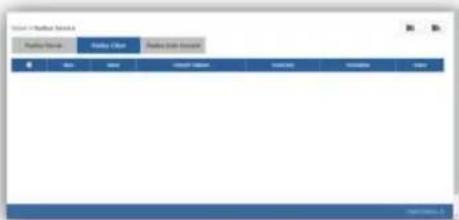
[System Menu – RADIUS Client]
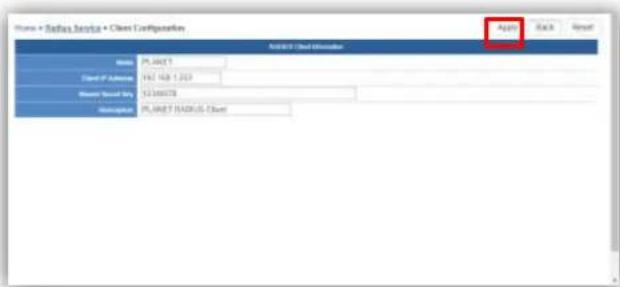
[RADIUS Client Setting]
Add Radius Client Configuration: On this page, you can set up Name, Client IP, Shared Secret Key, and Description of the system.
Click "Apply" to apply the setting.
AP RADIUS Setup: You should go to AP's Web UI to RADIUS page to set up Radius Server IP, Password and Server Port (1812), and enable the function.
(*only HW version supported)
System Menu – Network Services

PLANET
Networking & Communication
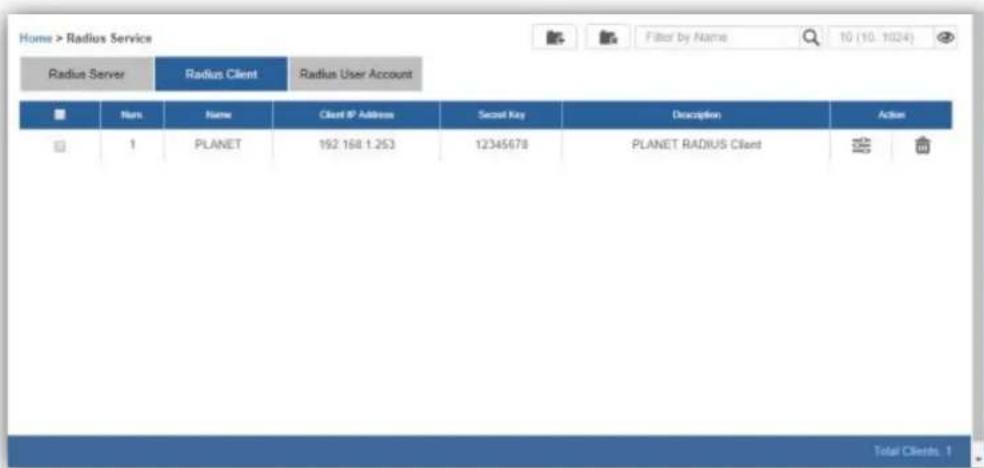
[RADIUS Client Setting Finished]
(*only HW version supported)
System Menu – Network Services

PLANET
Networking & Communication
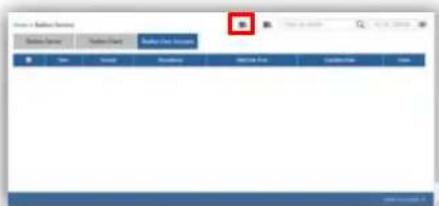
[System Menu - RADIUS]
Add RADIUS User Account: On this page, you can set up Account Name, Password, Description, and Validation Period information of the system.
Click "Apply" to apply the setting.
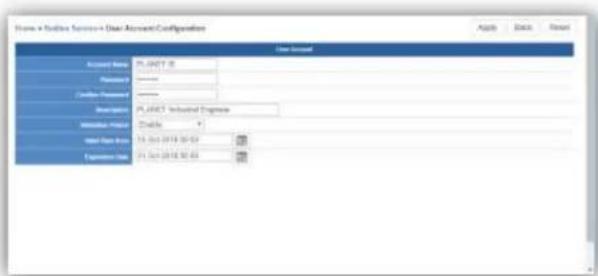
[RADIUS User Account Setting]
(*only HW version supported)
System Menu – Network Services

PLANET
Networking & Communication
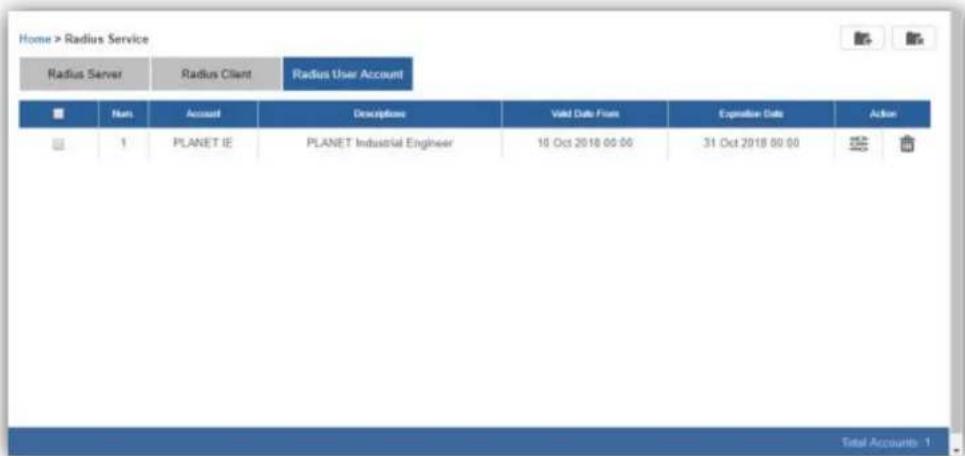
[RADIUS User Account Setting Finished]
(*only HW version supported)
Networking & Communication
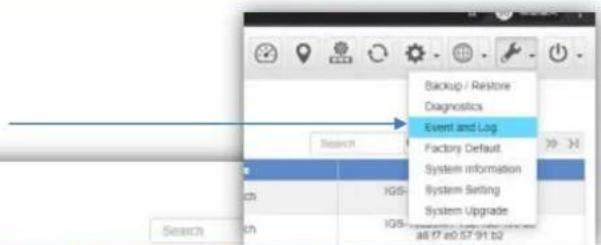
- Press the "Event" icon (No. 1) to see the full system event by day.
Press the “<<”&“>>” icon (No. 2) to select daily report. - Press the "Event" icon (No. 1) to see the full system event by day.
Press the “<<”&“>>” icon (No. 2) to select daily report.
Home > Maintenance > Event and Log

Syslog

| ID | Type | Time | Source | Status | Device Type | Information |
| 1 | System | 16:10:21 | 192.168.100.5 | Add | Industrial Switch | IGS-10020MT 192.168.100.35a8.f7.e0.57.91.b2 |
| 2 | System | 16:10:20 | 192.168.100.5 | Add | Industrial Switch | IGS-10020MT 192.168.100.35a8.f7.e0.57.91.b2 |
| 3 | System | 16:10:18 | 192.168.100.5 | Add | Switch | GS-4210-24HP2C 192.168.100.91a8.f7.e0.00.02:22 |
| 4 | System | 16:10:18 | 192.168.100.5 | Add | Unknown | BSP-360 192.168.100.81 a8.f7.e0.29:db.09 |
| 5 | System | 16:10:18 | 192.168.100.5 | Add | Industrial Switch | IGS-5225-4T2S 192.168.100.36a8.f7.e0.2f.10.4e |
| 6 | System | 16:10:18 | 192.168.100.5 | Add | Management System | ICS-2400T 192.168.100.161 a8.f7.e0.54.0c:e1 |
| 7 | System | 16:09:45 | 192.168.100.5 | Delete | Switch | GS-4210-24HP2C 192.168.100.91a8.f7.e0.00.02:22 |
| 8 | System | 16:09:45 | 192.168.100.5 | Delete | Industrial Switch | BSP-360 192.168.100.81 a8.f7.e0.29:db.09 |
| 9 | System | 16:09:45 | 192.168.100.5 | Delete | Industrial Switch | IGS-5225-4T2S 192.168.100.36a8.f7.e0.2f.10.4e |
| 10 | System | 16:09:45 | 192.168.100.5 | Delete | Management System | ICS-2400T 192.168.100.161 a8.f7.e0.54.0c:e1 |
System Event

PLANET
Networking & Communication
Use “search” to choose the information you want by entering the key word.
Home > Maintenance > Event and Log
| ID | Type | Time | Source | Status | Device Type | Information |
| 1 | System | 16.10:21 | 192.168.100.5 | Add | Industrial Switch | IGS-10020MT 192.168.100.35a8.f7 e0.57.91 b2 |
| 2 | System | 16.10:20 | 192.168.100.5 | Add | Industrial Switch | IGS-10020MT 192.168.100.35a8.f7 e0.57.91 b2 |
| 3 | System | 16.10:18 | 192.168.100.5 | Add | Switch | GS-4210-24HP2C 192.168.100.91a8.f7 e0.00.02.22 |
| 4 | System | 16.10:18 | 192.168.100.5 | Add | Unknown | BSP-360 192.168.100.81 a8.f7 e0.29 db.09 |
| 5 | System | 16.10:18 | 192.168.100.5 | Add | Industrial Switch | IGS-5225-4T2S 192.168.100.36a8.f7 e0.2f.10.4e |
| 6 | System | 16.10:18 | 192.168.100.5 | Add | Management System | ICS-2400T 192.168.100.161 a8.f7 e0.54.0c.e1 |
| 7 | System | 16.09:45 | 192.168.100.5 | Delete | Switch | GS-4210-24HP2C 192.168.100.91a8.f7 e0.00.02.22 |
| 8 | System | 16.09:45 | 192.168.100.5 | Delete | Industrial Switch | BSP-360 192.168.100.81 a8.f7 e0.29 db.09 |
| 9 | System | 16.09:45 | 192.168.100.5 | Delete | Industrial Switch | IGS-5225-4T2S 192.168.100.36a8.f7 e0.2f.10.4e |
| 10 | System | 16.09:45 | 192.168.100.5 | Delete | Management System | ICS-2400T 192.168.100.161 a8.f7 e0.54.0c.e1 |
System Menu – Maintenance Syslog Server

PLANET
Networking & Communication
Press the "Syslog" icon (No. 1) to see the full syslog by day (Open the devices remote syslog function.).
Press the “<<”& “>>” icon (No. 2) to select daily report.
- Press the "Drop-down" menu (No. 3) to select severity and device ID.
![Home > Maintenance > Event and Log 1. 2. 3. Event Syslog << 2021-04-23 >> Severity Any Device Any ID Severity Time Source Information 1 Notice 16:21:30 192.168.100.151 Apr 23 16:18:28 root. ntpscript log periodic 2 Notice 16:09:48 192.168.100.151 Apr 23 16:06:46 root. ntpscript log periodic 3 Notice 14:59:42 192.168.100.151 Apr 23 14:56:44 root. ntpscript log periodic 4 Notice 13:48:53 192.168.100.151 Apr 23 13:46:00 root. ntpscript log periodic 5 Notice 12:48:48 192.168.100.151 Apr 23 12:45:59 root. ntpscript log periodic 6 Notice 12:37:46 192.168.100.151 Apr 23 12:34:58 root. ntpscript log periodic 7 Notice 11:37:41 192.168.100.151 Apr 23 11:34:57 root. ntpscript log periodic 8 Notice 11:25:32 192.168.100.151 Apr 23 11:22:49 root. ntpscript log periodic 9 Notice 10:15:25 192.168.100.151 Apr 23 10:12:46 root. ntpscript log periodic 10 Informational 09:08:29 ( GS-6320-24UP2T2XV, L3 Managed PoE Switch, v1.440b200909) 192.168.100.10 2021-04-23 Fri 09:05:53+08:00 [GS-6320-24UP2T2XV] LINK-UPDOWN Interface GigabitEthernet 1/12, changed state to up.](/content/2026/05/853097/images/bc4db37405075e8fee4355996845e572bc84abeec015b8efc310c4aac094196e.jpg)
Syslog Server

PLANET
Networking & Communication
Use Search to choose the information you want by entering the key word.
Use Clear Syslog button to delete all syslog.
Home > Maintenance > Event and Log
| ID | Severity | Time | Source | Information |
| 1 | Notice | 16:21:30 | 192.168.100.151 | Apr 23 16:18:28 root: ntpscript log periodic |
| 2 | Notice | 16:09:48 | 192.168.100.151 | Apr 23 16:06:46 root: ntpscript log periodic |
| 3 | Notice | 14:59:42 | 192.168.100.151 | Apr 23 14:56:44 root: ntpscript log periodic |
| 4 | Notice | 13:48:53 | 192.168.100.151 | Apr 23 13:46:00 root: ntpscript log periodic |
| 5 | Notice | 12:48:48 | 192.168.100.151 | Apr 23 12:45:59 root: ntpscript log periodic |
| 6 | Notice | 12:37:46 | 192.168.100.151 | Apr 23 12:34:56 root: ntpscript log periodic |
| 7 | Notice | 11:37:41 | 192.168.100.151 | Apr 23 11:34:57 root: ntpscript log periodic |
| 8 | Notice | 11:25:32 | 192.168.100.151 | Apr 23 11:22:49 root: ntpscript log periodic |
| 9 | Notice | 10:15:25 | 192.168.100.151 | Apr 23 10:12:46 root: ntpscript log periodic |
| 10 | Informational | 09:08:29 | 192.168.100.10(GS-6320-24UP2T2XV, L3 Managed PoE Switch,v1.440b200909) | 2021-04-23 Fri 09:05 53+08:00 [GS-6320-24UP2T2XV] LINK-UPDOWN Interface GigabitEthernet 1/12, changed state to up. |
System Menu – Maintenance

PLANET
Networking & Communication
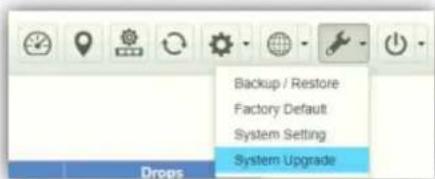
[System Menu - Maintenance]
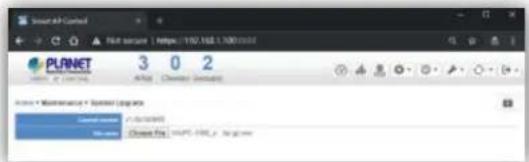
[System Upgrade]
System Upgrade: On this page, you can upgrade the system to the latest version with new patch.
Click "Choose File" to designate the system patch file for upgrade. Then, click the upgrade icon at the upper-right corner to start the system upgrade.
Please regularly check PLANET official website for the system upgrade file.
*Remote login must be used for the NMS-1000V to do firmware upgrade.
System Menu – Maintenance

PLANET
Networking & Communication
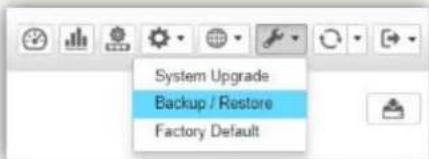
[System Menu – Maintenance]
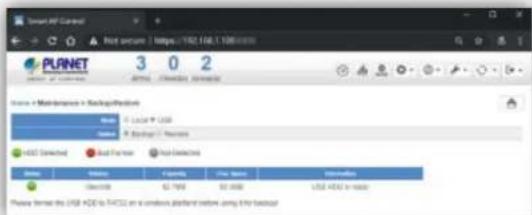
[Backup]
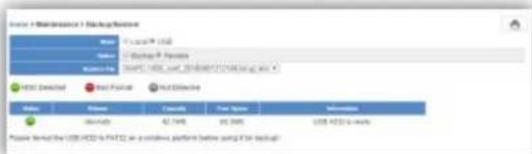
[Restore]
Backup/Restore: On this page, you can back up and restore the system profiles with the system file (*.tar.gz.enc).
Click "backup" to start backing up the system profiles file in HDD or USB.
Use the "Choose File" button to choose the right system profiles file and click "restore" to start restoring the system.
Please use the system default file name to restore system, or it may fail.
System Menu – Maintenance

PLANET
Networking & Communication
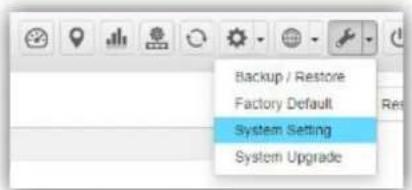
[System Menu – Maintenance]
System Setting: Click "System Setting" to set up Logout Time for manual or selection tree.
![PLANET 28 13 0 Device(s) Client(s) Group(s) Home > Maintenance > System Setting Apply Reset Auto Logout Time Manual 5 hour [Auto Logout Time] Auto Logout Time Manual 5 hour 1 minute 2 minutes 3 minutes 4 minutes 5 minutes 6 minutes 7 minutes 8 minutes 9 minutes 10 minutes 11 minutes 12 minutes 13 minutes 14 minutes 15 minutes 16 minutes 17 minutes 18 minutes 19 minutes 20 minutes 21 minutes 22 minutes 23 minutes 24 minutes 25 minutes 26 minutes 27 minutes 28 minutes 29 minutes 30 minutes 31 minutes 32 minutes 33 minutes 34 minutes 35 minutes 36 minutes 37 minutes 38 minutes 39 minutes 40 minutes 41 minutes 42 minutes 43 minutes 44 minutes 45 minutes 46 minutes 47 minutes 48 minutes 49 minutes 50 minutes](/content/2026/05/853097/images/4b66cfe4aae48419a8193dd02aa52d369587392ecccbc9a5aa6bce94d7a833ce.jpg)
System Menu – Maintenance

PLANET
Networking & Communication
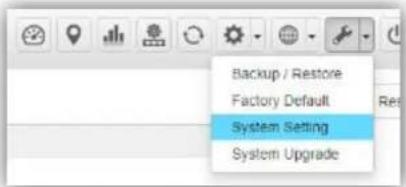
[System Menu – Maintenance]
System Setting: Click "System Setting" to adjust the Brightness of touch screen.
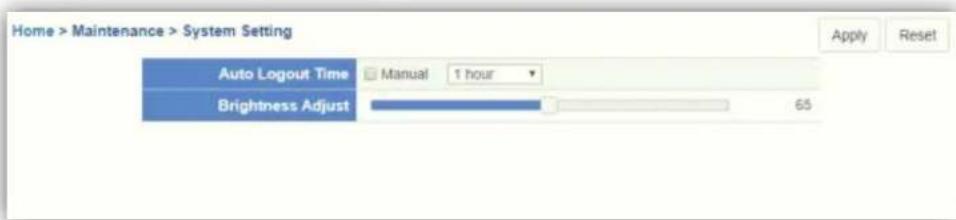
[Brightness Adjust]
System Menu – Maintenance

PLANET
Networking & Communication
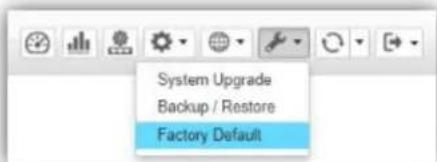
[System Menu – Factory Default]
Factory Default: Click "Factory Default" to reset the system to factory default. Once clicked, the warning window will prompt you to reset system to default.
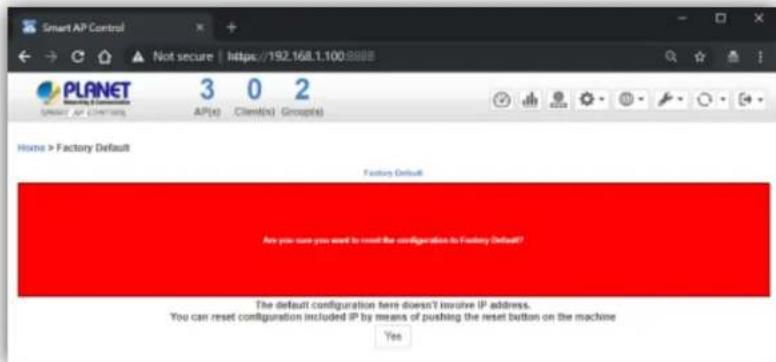
[Factory Default Warning]

SYSTEM MENU - EXIT
System Menu – Exit

PLANET
Networking & Communication
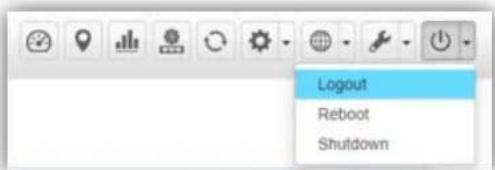
[System Menu - Logout]
Exit: On this page, you can log out, reboot, or shut down the system.
Logout: Click "Logout" to log out the system.
Once clicked, the login window will prompt you to re-log in the system.
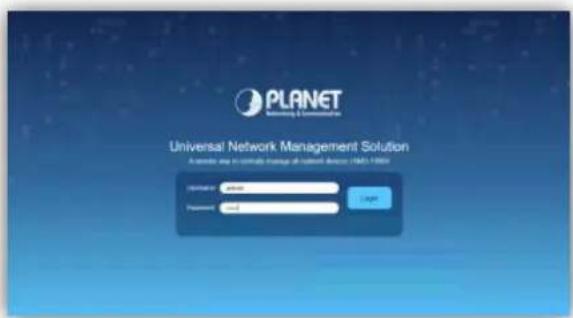
[Login Window]
System Menu – Exit

PLANET
Networking & Communication
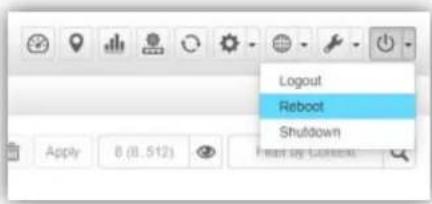
[System Menu - Reboot]
Logout: On this page, you can log out, reboot, or shut down the system.
Reboot: Click "Reboot" to restart the system.
Shutdown: Click "Shutdown" to close the system and shut down the MV.
Once clicked, the warning window will prompt you to reboot or shut down the system.
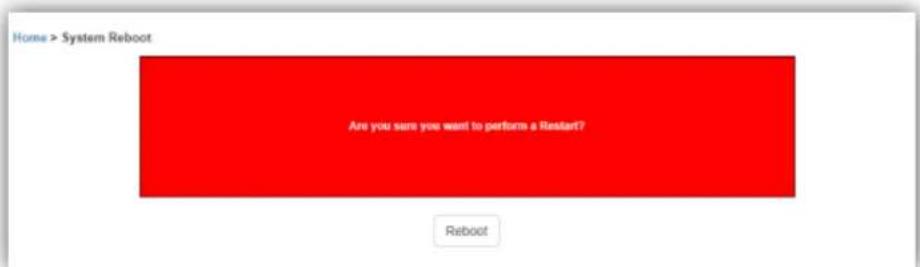
[Reboot Warning]
Using VM to Shut Down the System

PLANET
Networking & Communication
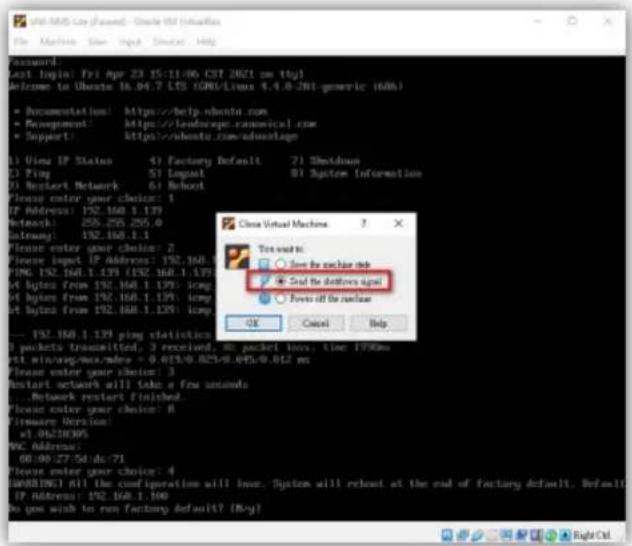
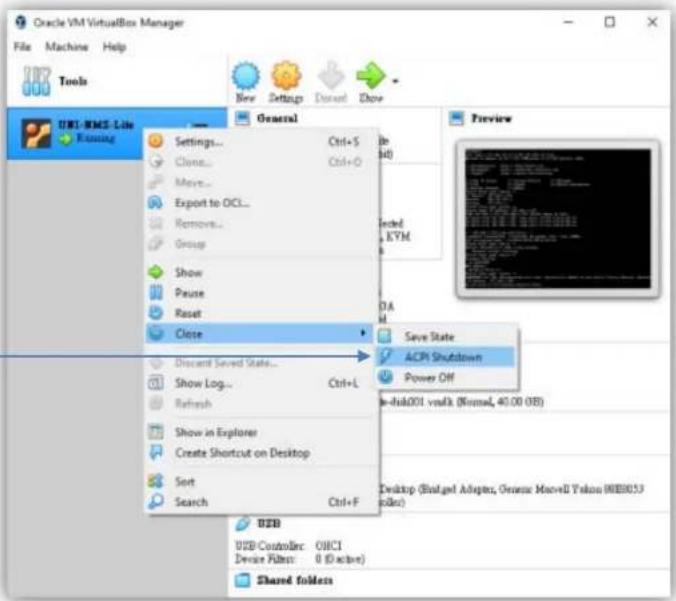
Do Not select "Power Off" to shut down the VM; otherwise, it may cause the system to be abnormal at the next restart.
Please select the "ACPI Shutdown" to close the VM.

PLANET
Networking & Communication
APPENDIX
VM Main Command Introduction

PLANET
Networking & Communication
![Password: Last login: Fri Apr 23 15:11:06 CST 2021 on tty1 Welcome to Ubuntu 16.04.7 LTS (GNU/Linux 4.4.0-201-generic i606) * Documentation: https://help.ubuntu.com * Management: https://landscope.canonical.com * Support: https://ubuntu.com/advantage 1) View IP Status 4) Factory Default 7) Shutdown 2) Ping 5) Logout 8) System Information 3) Restart Network 6) Reboot Please enter your choice: 1 IP Address: 192.168.1.139 Netmask: 255.255.255.0 Gateway: 192.168.1.1 Please enter your choice: 2 Please input IP Address: 192.168.1.139 PING 192.168.1.139 (192.168.1.139) 56(84) bytes of data. 64 bytes from 192.168.1.139: icmp_seq=1 ttl=64 time=0.019 ns 64 bytes from 192.168.1.139: icmp_seq=2 ttl=64 time=0.045 ns 64 bytes from 192.168.1.139: icmp_seq=3 ttl=64 time=0.025 ns --- 192.168.1.139 ping statistics --- 3 packets transmitted, 3 received, 0% packet loss, time 1998ms ptt min/avg/max/dev = 0.019/0.025/0.045/0.012 ms Please enter your choice: 3 Restart network will take a few seconds ...Network restart finished... Please enter your choice: 0 Firmware Version: v1.0b210305 Mac Address: 08:00:27:5d:dc:71 Please enter your choice: 4 [WARNING] All the configuration will lose, System will reboot at the end of factory default. Default IP Address: 192.160.1.100 Do you wish to run factory default? IN/yl_ Command 1.: Show UNI-NMS-LITE IP. Command 2.: Test to ping any IP address in the same network segment. Command 3.: Restart network. Command 8.: Show NMS system FW version and MAC. Command 4.: Reset database. [WARNING]](/content/2026/05/853097/images/79dbe154cb84b373b626ba66672ffe04791b7038dc4bbf26e6f240c4d648846e.jpg)
Right Ctrl


THANK YOU


- Software Installation Guide & Quick User Guide
- Sections
- PLANET
- OVERVIEW
- Installing Oracle VM VirtualBox
- Installing UNI-MNS-LITE
- Importing UNI-NMS Software
- How to Set Up the Software
- Setting Up VM Network Adapter
- Running UNI-NMS Application
- BEFORE FIRST LOGIN
- Device Setting
- Device Setting - Switch
- Device Setting – Switch/Router
- Remote Logging in NMS
- Logging in NMS
- SETUP WIZARD
- Account Modification
- Steps to modifying account:
- IP Configuration Setting
- SNMP Preference Setting
- Devices Discovery
- MAIN UI INTRODUCTION
- Main Dashboard - Description
- DASHBOARD INTRODUCTION
- Dashboard - Local Site Information
- Dashboard (Home)
- Dashboard - Device Type Summary
- Dashboard - History Graph
- FOOTER INTRODUCTION
- Footer - Popup Alert Message
- SYSTEM MENU - DOMAIN
- Discovery
- Adding Devices to List
- Device List and Topology View
- Device Identification
- SYSTEM MENU- AP CONTROL
- AP Control UI – Structure & Description
- Main Menu – Preference
- Main Menu – Profiles
- Main Menu – 3/Profiles
- Remarks:
- Main Menu – Control
- Status:
- Action:
- [AP Configuration]
- Procedure of profile provisioning to AP groups:
- LED Control: Control the AP group's LED.
- Main Menu – Map It
- Main Menu – Statistics
- SYSTEM MENU – REFRESH
- # #
- #
- System Menu – System Configuration
- SYSTEM MENU - NETWORK SERVICES
- System Menu – Network Services
- System Event
- System Menu – Maintenance Syslog Server
- Syslog Server
- System Menu – Maintenance
- SYSTEM MENU - EXIT
- System Menu – Exit
- Using VM to Shut Down the System
- APPENDIX
- VM Main Command Introduction
- THANK YOU
Brand : Planet
Model : UNI-NMS-LITE
Category : Uncategorized