
UT332+ - Mètre Uni-T - Free user manual and instructions
Find the device manual for free UT332+ Uni-T in PDF.


| Type de produit | Digital Multimeter |
| Marque | Uni-T |
| Modèle | UT332+ |
| Dimensions (approx.) | 180 x 80 x 50 mm |
| Poids (approx.) | 300 g |
| Alimentation | 9V battery (6F22) |
| Afficheur | LCD, 6000 counts |
| Tension AC | 600V |
| Tension DC | 600V |
| Courant AC | 10A |
| Courant DC | 10A |
| Résistance | 60 MΩ |
| Capacité | 60 mF |
| Fréquence | 10 MHz |
| Test diode et continuité | Oui |
| Sécurité | CAT II 600V |
| Fonction Data Hold | Oui |
| Rétroéclairage | Oui |
| Entretien et nettoyage | Essuyer avec un chiffon doux et sec; ne pas utiliser de solvants |
| Pièces détachées et réparabilité | Piles et fusibles remplaçables; contacter le service client pour autres réparations |
Frequently Asked Questions - UT332+ Uni-T
User questions about UT332+ Uni-T
0 question about this device. Answer the ones you know or ask your own.
Ask a new question about this device
Download the instructions for your Mètre in PDF format for free! Find your manual UT332+ - Uni-T and take your electronic device back in hand. On this page are published all the documents necessary for the use of your device. UT332+ by Uni-T.
USER MANUAL UT332+ Uni-T
UT331+/UT332+ Digital Temperature Humidity Meters
Overview
UT330+ series temperature humidity meters (hereafter referred to as "Meters") adopts high precision sensor and super-low power consumption microprocessor in its design, featuring high accuracy, manual and auto-storage, USB data transfer, USB power supply, backlight alarm, real-time display, low power consumption, etc. These Meters can be used in factories, laboratories, research institutes, food and health, environmental protection and other fields.
Unpacking Inspection
Operating Manual 1 piece Battery 4 pieces USB Data Cable 1 piece
Safety Information
Warning
A warning identifies conditions and actions that pose hazards to the user to avoid electrical shock or personal injury, follow these guidelines:
- Inspect the case before using Meters. Do not use Meters if it appears damaged. Look for cracks or missing plastic. Pay particular attention to the insulation around the connectors.
- Replace the batteries as soon as the battery indicator "☐" appears.
- Do not use Meters if it operates abnormally. Protection may be impaired. When in doubt, have Meters serviced.
- Donot operate Meters around explosive gas, vapor, or dust.
- When servicing Meters, use only specified replacement parts.
- Do not use Meters with any part of the case or cover removed.
- Do not clean the sensor with water. Turn to dose the protective sensor cover when not in use. To avoid damage to the device, please use with care.
● Never charge the battery.
- Use the approved alkaline battery (AAA 1.5V) only.
- Pay attention to "+" and "-" marks when installing the batteries.
- Close the sensor cover and remove the batteries if Meters is not used for a long time.
Meter Description
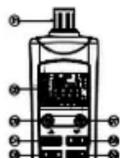
Meter Structure (See Figure 1)
| No. | Description |
| 1 | Protective cover of sensor (burn to open or dose) |
| 2 | Display screen |
| 3 | Power on/off |
| 4 | Press to display Max/Min value among current readings. Long press to exit the function (also used as ▲ button). |
| No. | Description | No. | Description |
| 1 | HI: Upper limit, LO: Lower limit | 10 | Auto power off |
| 2 | Dew-point temperature | 11 | Low battery/USB power supply |
| 3 | Wet-bulb temperature | 12 | Alarm |
| 4 | Storage group number | 13 | Humidity icon |
| 5 | Maximum value | 14 | Temperature icon |
| 6 | Minimum value | 15 | Celsius unit |
| 7 | Humidity display zone | 16 | Temperature display zone |
| 8 | Data hold | 17 | Fahrenheit unit |
| 9 | Humidity unit | 18 | Time display zone |
Setting Meters
- SETUP Options
Short press SETUP button to enter into setting mode, first enter into unit setting page, and then press recyclable to switch the setting state until the setting is storage and exit. On any setting page, the setting mode will exit and be back to measuring page if no any button is pressed for 15 seconds. The cycle sequence:
Measuring state→Temperature unit setup→Time interval setup→Temperature &
Humidity Upper Limit Alarm Setup→Temperature & Humidity Lower Limit Alarm Setup→Sleep time setup→System time setup→Temperature & Humidity Offset setup→Measuring state.
● Performing the Setups
1. Setting Temperature Unit
Short press SETUP to access temperature unit setup mode. press ▼(HOLD)▲(MAX/MIN) to select °C or °F unit.
2. Setting Time Unit
Short press SETUP to switch to time interval mode, "int" shows on LCD. Press ▼▲ to change the interval for automatic data storage. Long press ▼▲ to increase /decrease the time quickly. The interval can be set up to 09:59 and down to 00:00 (auto-data storage disabled at 00:00).
3. Upper-limit temperature & humidity setting
Short press SETUP for 3 times to access upper limit setup mode, "Hi" shows on LCD, short press ENTER/DP to switch upper-limit temperature & humidity, upper-limit dew-point temperature, upper-limit wet-bulb temperature, press ▼▲ to change the value.
4. Lower-limit temperature & humidity setting
Short press SETUP for 4 times to switch to lower limit setup mode, "LO" shows on LCD, short press ENTER/DP to switch following setups: lower-limit temperature & humidity, lower-limit dew-point temperature, lower-limit wet-bulb temperature, press ▼▲to change the value.
- Turn on/off Backlight
Short press backlight button to turn on the backlight, press again to turn it off. Long press backlight button to activate alarm, the alarm icon 🔒 appears, long press backlight button again to inactivate alarm, the alarm icon disappears.
With the alarm function activated, the red backlight will flash every 500ms if Meters alarms due to upper limit, the blue backlight will flash every 500ms if Meters alarms due to lower limit. If Meters alarms due to upper & lower limit, the red/blue backlight will flash every 500ms in turn and the corresponding icon will light up, for example, if Meters alarms due to upper temperature limit, the red backlight, temperature icon and upper icon (HI) will flash at the same time.
• View Max/Min Reading
- Short press MAX/MIN button to check Maximum reading, minimum reading and normal test value.
- Long press MAX/MIN to exit the mode.
- View dew-point temperature and wet bulb temperature
Short press ENTER to view dew point temperature, wet bulb temperature and normal temperature. For dew point temperature, “DEW POINT” is displayed on the screen, for wet bulb temperature, “WET BULB” is displayed on the screen.
- Use offset value to adjust Meters error.
Users can compensate the error in temperature & humidity offset setting of SETUP.
- Data Access
Store Data
Manual storage: time interval is set at 00:00, in test page, short press ST ORE to store data manually, Meters flashes and show the storage area. Take LOG 001 as an example, it represents the data is stored at 001. UT331+ can store 299 groups of data, UT332+can store 999 groups of data, the record data is the data shown in the main display screen.
Auto storage: time interval is not set at 00:00, in test page, short press STORE to store data manually, long press STORE to store data automatically, the storage area, i.e. LOG 001, will flash at intervals, Meters will automatically save data in circle at the set interval, the record data is the data shown in the main display screen.
- Recall Data
Short press RECALL to check recorded data, press again to exit.
- Short press RECALL to check recorded data, the screen displays the storage area, i.e. LOG 001, press ▼▲o scroll through recorded readings, Meters defaults at the reading saved last time you exit the STORE mode.
- Short pressing ENTER under RECALL mode can quickly review from 01 to 299/999 data and also allow you to transfer data to PC through USB, after quick review, the number stops at 299/999. On data reviewing status, short press RECALL to exit and go back to main display screen.
- Long press RECALL under RECALL MODE to clear the recorded data, the screen will keep displaying dELE until the data is completely cleared, and then go back to main display screen.
Note: The data will be completely cleared once the function is enabled. Step-by-Step clearing is not allowed. To avoid any data loss, please think it twice before you use the function.
• Transfer Data
Meters will transfer data to PC under following two circumstances:
1. Enter into RECALL status, short pressing ENTER button will not only allow you to review the data quickly but also transfer the data automatically to PC.
2. When PC is running the supplied software and has been already connected to Meters, the measured data will be automatically transferred to PC.
- USB power supply
Connect USB cable to PC USB interface or 5V DC adaptor, Meters will automatically switch to USB power supply. Disconnect the USB cable to switch to battery power supply.
Note: The DC voltage of USB power supply is 5V, voltage over 5V may damage Meters.
USB Communication
- Please download PC software according to the attached general file, and install step by step.
- After running the master computer software, connect the USB cable to the computer.
- Browse and analyze data through the master computer software, for the usage of master computer software, please refer "Software Manual" from the Help Option of Operation Page.
Maintenance
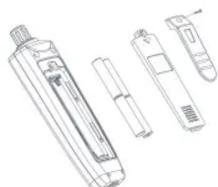
● Replacing the battery (See Figure 3)
When Meters indicates “☐”, please replace the battery timely. Follow the steps as below:
- Unscrew the battery cover and remove it from Meters.
- Replace the batteries with new 4×AAA batteries.
- Rejoin the battery cover and tight up the screw.
- Cleaning the casing
When it becomes necessary to clean the surface of Meters, clean it with soft cloth or sponge dampened with just a little of water, soap water or mild detergent. Prohibit washing Meters with water directly, which may damage the circuits inside.
natural_image
Technical line drawing of a mechanical device with multiple views (no text or symbols)Figure 3
Technical Index
| Function | UT 331+ UT 332- | ||
| Measurement range | Measurement accuracy | Measurement accuracy | |
| Temperature | -20.0°C~70.0°C | ±0.5°C | ±0.3°C |
| Dew point temperature | -78.2°C ~70.0°C | ±1°C | ±0.8°C |
| Wet bulb temperature | -21.6°C ~70.0°C | ±0.5°C | ±0.3°C |
| Humidity | 0~99.9%RH | 10%~90%RH, ±3%RH.For others: ±3.5%RH. | 10%~80%RH, ±2%RH.For others: ±2.5%RH. |
| Resolution | Temperature: 0.1°C, Humidity: 0.1%RH | ||
| Temperature measurement | Measurement temperature/Dew point temperature/Wet bulb temperature | ||
| Manual storage | √ | ||
| Auto storage | Users can turn on/off auto storage(It defaults at "turn off") and adjust the storage interval 0s~60min. | ||
| Storage group number | 299 groups | 999 groups | |
| Data viewing | View storage data | ||
| Unit setting | °C or °F | ||
| Alarm setting | Users can turn on/off the alarm (It defaults at "turn off"). Backlight alarm (For upper-limit alarm, the red light flashes every 500ms. For lower-limit alarm, the blue light flashes every 500ms.) | ||
| Max./Min. value measurement | √ | ||
| Data hold | √ | ||
| Data export | Users can view the real-time data through the software of master computer and export the storage data. | ||
| Auto power off | Users can turn on/off the function of auto power off (It defaults at "turn on") and adjust the auto power off time (5min~60min). | ||
| Real time | Set the real time of system. | ||
| Offset setting | Temperature, dew point temperature, wet bulb temperature, humidity offset value (-6~6). | ||
| Backlight | Users can turn it on/off (It defaults at "turn off"). | ||
| USB power supply | Connect USB and switch to USB power supply, USB voltage is 5V. | ||
EMC Standard: EN61326-1 2013
Reference Standard:
JJG205-2005 Mechanical Hygro-Thermometer
JJF1076-2001 Calibration Specification of Humidity Sensor
UNI-T®
UNI-TREND TECHNOLOGY (CHINA) CO., LTD.
No. 6, Gong Ye Bei 1st Road,
Songshan Lake National High-Tech Industrial
Development Zone, Dongguan City,
Guangdong Province, China





- UT331+/UT332+ Digital Temperature Humidity Meters
- Overview
- Unpacking Inspection
- Safety Information
- Warning
- Meter Description
- Setting Meters
- - SETUP Options
- ● Performing the Setups
- Setting Temperature Unit
- Setting Time Unit
- Upper-limit temperature & humidity setting
- Lower-limit temperature & humidity setting
- - Turn on/off Backlight
- • View Max/Min Reading
- - View dew-point temperature and wet bulb temperature
- - Use offset value to adjust Meters error.
- - Data Access
- Store Data
- - Recall Data
- • Transfer Data
- - USB power supply
- USB Communication
- Maintenance
- ● Replacing the battery (See Figure 3)
- - Cleaning the casing
- Reference Standard:
- UNI-T®
- UNI-TREND TECHNOLOGY (CHINA) CO., LTD.
Brand : Uni-T
Model : UT332+
Category : Mètre