
DH-3RP1 - Chauffe-eau et ballon d'eau chaude PANASONIC - Free user manual and instructions
Find the device manual for free DH-3RP1 PANASONIC in PDF.

| Product Type | Electric Home Shower (instantaneous water heater) |
| Model | DH-3RP1 |
| Brand | Panasonic |
| Power Consumption | 3600 W |
| Power Control | Stepwise (Off, 1000 W - 3600 W) |
| Voltage / Frequency | 240 V a.c., 50 Hz |
| Min. Water Pressure | 4.9 kPa (0.05 kgf/cm² / 0.71 psi) |
| Max. Water Pressure | 380 kPa (3.87 kgf/cm² / 55 psi) |
| Dimensions (H x W x D) | 380 mm x 190 mm x 93 mm |
| Weight | 2.7 kg |
| Outlet System | Single Point (Open Outlet) |
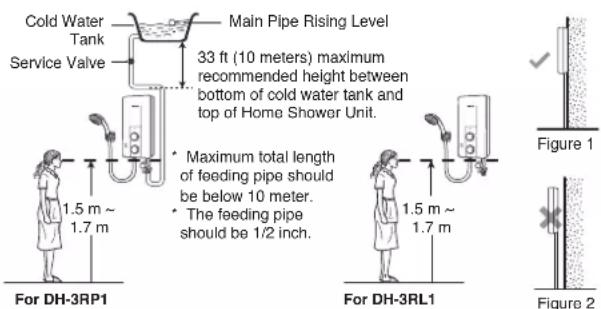
| Water Supply | Gravity storage tank only (not main water) |
| Safety Device | Earth Leakage Breaker (ELB) with test button |
| Thermal Cut-out | Automatic reset |
| Earthing Required | Yes (earth rod recommended, resistance <100 Ω) |
| Water Flow Adjustment | Via main water valve and unit knob |
| Shower Head | Detachable with rubber packing; clean holes weekly |
| Filter Unit | Clean weekly; removable filter knob |
| Installation Height | 1.5 - 1.7 m above floor |
| Electrical Connection | Permanent to DP switch (3 mm contact gap); 2.5 mm² 3-core cable |
| Warranty | 12 months (additional 12 months if registered online) |
| Country of Origin | Malaysia |
Frequently Asked Questions - DH-3RP1 PANASONIC
User questions about DH-3RP1 PANASONIC
0 question about this device. Answer the ones you know or ask your own.
Ask a new question about this device
Download the instructions for your Chauffe-eau et ballon d'eau chaude in PDF format for free! Find your manual DH-3RP1 - PANASONIC and take your electronic device back in hand. On this page are published all the documents necessary for the use of your device. DH-3RP1 by PANASONIC.
USER MANUAL DH-3RP1 PANASONIC
PEMBERITAHUAN PENTING:
Please retain the warranty card printed on the last page of this booklet and ensure to register the warranty online at www.panasonic.com.my
重要通知
Operating Instructions (Installation Instructions included) 12 - 21
中文
Thank you for purchasing the Panasonic Electric Home Shower. For optimum performance and safety, please carefully read this manual and keep this documentation in a safe place for future reference. 感谢您购买Panasonic电热花酒器。为了确保正确使用及维护您的安全,请详细阅读此说明书,并保持在安全的地方以供未来参考。
KANDUNGAN
SEBELUM MENGGUNAKAN PANCURAN MANDI ELEKTRIK
No. Muka surat
- LANGKAH-LANGKAH KESELAMATAN 2
- MENGENALI BAHAGIAN-BAHAGIAN 4
- AKSESORI 4
CARA-CARA MENGGUNAKAN PANCURAN MANDI ELEKTRIK
5
- CARA-CARA MENGGUNAKANNYA 5
- CARA MENYELARASKAN KADAR ALIRAN AIR 5
- PENYENGGARAAN 6
- PANDUAN KEROSAKAN 7
- SPESIFIKASI 7
CARA MEMASANG PANCURAN MANDI ELEKTRIK
8
- SEBELUM PEMASANGAN DIBUAT 8
- CARA MEMASANG 8
- CARA-CARA MENGUJI 11
KAD JAMINAN PERKHIDMATAN
Muka Surat Akhir
SEBELUM MENGGUNAKAN PANCURAN MANDI ELEKTRIK
1. LANGKAH-LANGKAH KESELAMATAN
LANGKAH-LANGKAH KESELAMATAN
natural_image
Illustration of a hand holding a small object with a cross mark, alongside a close-up of a handheld device with a handle and arrow (no text or symbols)2. CARA MENYELARASKAN KADAR ALIRAN AIR
Nota (model DH-3RP1)
4. Pendawaian elektrik
! AMARAN
- HOW TO USE 15
- WATER FLOW RATE ADJUSTMENT 15
- MAINTENANCE 16
- TROUBLESHOOTING 17
- SPECIFICATIONS 17
HOW TO INSTALL ELECTRIC HOME SHOWER
- BEFORE INSTALLATION 18
- HOW TO INSTALL 18
- TEST OPERATION 21
WARRANTY CARD
Last Page
BEFORE USING ELECTRIC HOME SHOWER
1. SAFETY INSTRUCTIONS
SAFETY INSTRUCTIONS
To be followed absolutely
Before operating, please read the following "Safety Instructions" carefully.
To prevent personal injury, injury to others and property damage, the following instructions must be followed.
Incorrect operation caused by failure to follow instructions will cause harm or damage, the seriousness of which is classified as follow:

WARNING
This sign warns of death or serious injury.

CAUTION
This sign warns of injury to users or damage to property.
The instructions to be followed are classified by the following symbols:

This symbol (with a white background) denotes an action that is PROHIBITED.


This symbol (with a black background) denote action that is COMPULSORY.

WARNING

Stop using the Unit when any abnormality/failure occurs and turn "OFF" the Miniature Circuit Breaker (MCB). (Risk of smoke/fire/electric shock/scalding)
The ELB Reset Lever cannot be reset. Please refer to item no. 3. TEST OPERATION at page 21.
Example of Burrit odor, or smoke is detected during operation.
abnormally. The Front Plate/Back Plate is deformed or abnormally hot.
- The outlet water temperature become extremely hot and cannot be controlled using the Power Control Knob. Contact your authorized dealer immediately for maintenance/repair.

The Unit must be earthed.
Improper grounding could cause electric shock.

Switch off the Miniature Circuit Breaker (MCB) before any service to avoid electric shock hazards.

In time of lightning/ thunder, switch "OFF" the Miniature Circuit Breaker (MCB) in advance to protect the Electric Home Shower Unit against possible damage.

Inspect on the built-in ELB (once a month) to avoid a hazard to users such as damage to property, serious injury or death. Please refer to item no. 3. TEST OPERATION at page 21.

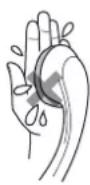
Each time shower water is turned 'ON', check the water temperature by hand before showering.

When the Electric Home Shower is used by someone such as child, old person, sick person and physically handicapped person, the person responsible for their safety is kindly requested to pay attention and check the shower temperature by using hand from time to time.

Pay attention to the shower temperature when reducing the volume of water. The shower temperature will become very hot if the water flow rate is too low.

This appliance is not intended for use by persons (including children) with reduced physical, sensory or mental capabilities, or lack of experience and knowledge, unless they have been given supervision or instruction concerning use of the appliance by a person responsible for their safety. Children should be supervised to ensure that they do not play with the appliance.

- If the ELB Reset Lever cannot be reset even if you push it up or if it soon slides down during operation, please do not use the Unit and contact the authorized dealer immediately to avoid a hazard to users such as damage to property, serious injury or death. Never fix the ELB Reset Lever forcibly with tape, and such.

- Do not insert finger or other objects into the Electric Home Shower Unit to avoid physical and electric shock hazards.

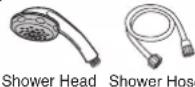
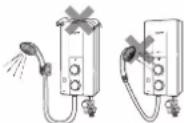
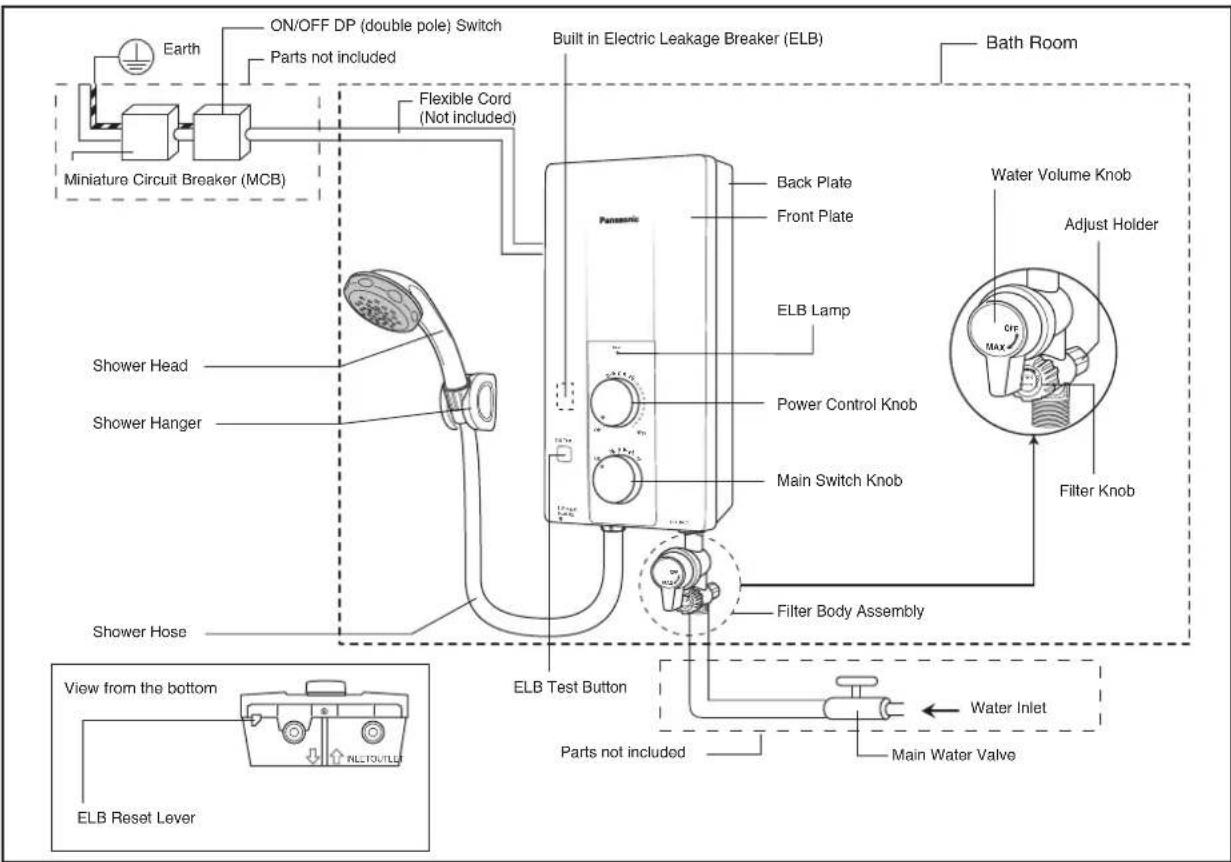
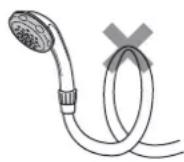
- Do not replace the Shower Head, Shower Hose or any other parts of the Unit with spare parts other than genuine parts. Parts for other models will not fit to this model and may cause hazardous condition to user.

- Do not spray water to the Unit, nor put wet towels on it to avoid from coming into contact with any live parts and such, in order to prevent smoke emission, ignition, fire and electric shock hazards.

- Metallic/chrome hose and conductive valve shall not be used.

CAUTION

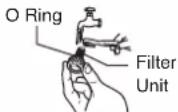
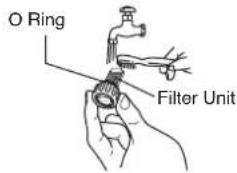
Please make sure the O Ring is not removed and shall be free from foreign particle to avoid water leaking.

Never use benzene, thinner, bleaching agent, and such for cleaning purpose to avoid smoke emission, ignition, fire and electric shock hazards.


Avoid using dirty water as it may affect heater performance and other components.

- Do not block the Shower Head with hand, towel or bend the Shower Hose. The water flow rate will drop and water temperature may become very hot.


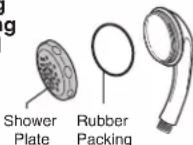
• Take care not to damage the holes of the Shower Plate during the cleaning. The Rubber Packing shall be set on the Shower Head before fixing back the Shower Plate to Shower Head. Do not remove part other than Shower Plate and Rubber Packing.

- In order to avoid a hazard due to inadvertent resetting of the thermal cut-out, this appliance must not be supplied through an external switching device, such as a timer, or connected to a circuit that is regularly switched on and off by the utility.
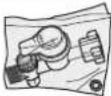
- PARTS IDENTIFICATION
- ACCESSORIES
| Description: | Items: | ||
 Shower Head Packing Shower Head Packing |  Shower Head (1 set) Shower Head (1 set) | ||
 Shower Hanger Packing Shower Hanger Packing |  Shower Hose (1 set) Shower Hose (1 set) |  Shower Hanger (1 set) Shower Hanger (1 set) | |
 Filter Body Packing Filter Body Packing | 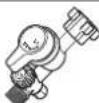 Filter Body Assembly (1 set) Rubber Packing (1 pc) Filter Body Assembly Caution Sheet (1 pc) Filter Body Assembly (1 set) Rubber Packing (1 pc) Filter Body Assembly Caution Sheet (1 pc) |  | |
 Installation Packing Installation Packing | 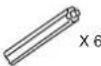 |  X 2 X 6Rubber Packing (2 pcs) Screws (6 pcs)Wall Plug (6 pcs) X 2 X 6Rubber Packing (2 pcs) Screws (6 pcs)Wall Plug (6 pcs) | |
HOW TO USE ELECTRIC HOME SHOWER
1. HOW TO USE
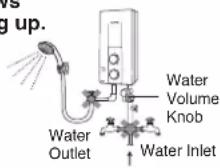
- Turn the Water Volume Knob clockwise to turn on the water (make sure the Main Water Valve is on). (Water will flow out from Shower Head at inlet water temperature).
- Switch on the Miniature Circuit Breaker (MCB) and ON/OFF DP (double pole) Switch.
- Push the ELB Reset Lever if it is down.
- Turn the Main Switch Knob to "On" (ELB Lamp will light). Use the Main Switch Knob before and after bathing. This knob control the flow of electricity to the unit.
- The shower temperature can be gradually controlled by turning the Power Control Knob. If the Power Control Knob is turned clockwise, the shower temperature will increase, reaching the highest temperature at "High".
- If the Water Volume Knob is turned clockwise the volume of water will increase thus the water temperature will decrease.
- If the Water Volume Knob is turned anticlockwise the volume of water will decrease thus the water temperature will increase. (Please refer WATER FLOW RATE ADJUSTMENT below).
- After using this Unit, please turn off the Main Switch Knob and turn off the water supply by turning the Water Volume Knob anticlockwise until the water flow is completely stop.
Note: In case of no water supply, close the Water Volume Knob by turn it anticlockwise and make sure the Main Switch Knob and the Power Knob is in "Off" condition (ELB light is off). This to prevent unnecessary water flow from the Shower Head after the water supply recovered.
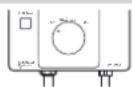
ELB: On condition
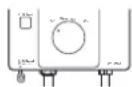
ELB: Off condition

CAUTION

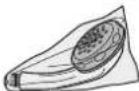
Do not block the Shower Head with hand, towel or bend the Shower Hose. The water flow rate will drop and water temperature may become very hot.
2. WATER FLOW RATE ADJUSTMENT
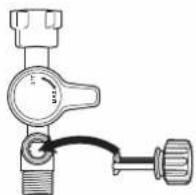
(1) Maximum water flow rate can be adjusted by using the Main Water Valve.
Step 1: Turn "OFF" the Main Water Valve.
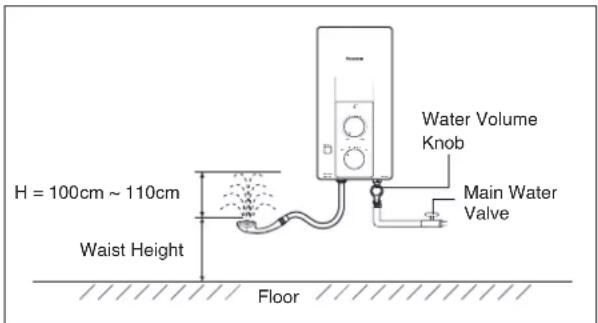
Step 2: Turn the Shower Head upward at waist height.
Step 3: Turn the Water Volume Knob clockwise to maximum volume position.
Step 4: Gradually turn "ON" the Main Water Valve and adjust the splashing height (H) of the shower.
It is recommended to adjust the water splashing height (H) at 100 cm \~ 110cm (approximately 3L/min).
Note: 1. After setting maximum flow rate, please use Water Volume Knob to turn on and turn off the water supply.
- Pay attention to shower temperature when reducing the volume of water.
The shower temperature will become very hot if the water flow rate is too low. - In case of continuous usage at high temperature setting, water temperature will increase and the control device will activate temporary resulting the water temperature to drop.
3. MAINTENANCE

WARNING

Switch off the Miniature Circuit Breaker (MCB) before any service to avoid electric shock hazards.
(1) Main Body cleaning.
Make sure to switch "OFF" the Miniature Circuit Breaker (MCB) beforehand.
1) Clean it with moist cloth.
2) Never use benzene, thinner, detergent, bleach and such.
3) Do not spray water to the Unit nor put wet towels on it.
4) Make sure to use suitable cloth to clean the Front Plate surface to avoid scratch.
(2) Shower Head Cleaning.
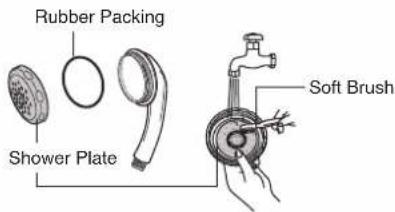
Turn the Shower Plate anticlockwise and remove it from the Shower Head with hand. Clean the Shower Head's holes by using a soft brush from time to time. (Recommended once a week).

CAUTION

Take care do not damage the holes of the Shower Head during the cleaning. The Rubber Packing shall be set on the Shower Head before fixing back the Shower Plate to Shower Head. Do not remove other parts other than Shower Plate and Rubber Packing.
(3) Filter Unit Cleaning (Filter Unit is fixed to Filter Knob)
Clean the Filter of the Filter Unit with water once a week. Clean the Filter Unit when hot water is not drawn normally.
Dismantle, cleaning and assemble of the Filter Unit
① Close the Main Water Valve.
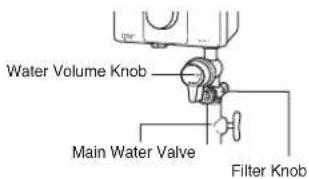
② Turn the Filter Knob anticlockwise and pull it out.

③ Clean the Filter Unit.
CAUTION
Please make sure the O Ring is not removed and shall be free from foreign particle to avoid water leaking.
④ Insert the Filter Unit and tighten it properly (clockwise).
⑤ Turn the Water Volume Knob to its original position based on WATER FLOW RATE ADJUSTMENT at page 15.
4. TROUBLESHOOTING
(1) Check the following points before asking for repair.
| Symptom Points to | be checked |
| Water is not drawn normally. | 1. Check the Filter Unit. Clean the Filter if it is clogged by stain and dirt (refer to Filter Unit Cleaning at page 16).2. Check the Shower Head. Clean the Shower Head if it is clogged by dirt (refer to Shower Head Cleaning at page 16). |
| No hot water comes out from the outlet (no electric supply to the Unit) | 1. Make sure the Main Switch Knob is at “On” position.2. Make sure the ELB Reset Lever is not slide down.Push up the ELB Reset Lever to reset the ELB ( refer to TEST OPERATION at page 21).3. Make sure to switch on the ON/OFF DP (double pole) Switch.4. Make sure to switch on the Miniature Circuit Breaker (MCB) |
| No water flows out from the Shower Head at all. | 1. Check the Water Volume Knob. Turn the Water Volume Knob clockwise if it is closed.2. Check the Main Water Valve. Turn “On” the Main Water Valve if it is closed (refer to HOW TO USE at page 15). |
| Water not hot enough. | 1. Check the WATER FLOW RATE ADJUSTMENT as in page 15. |
(2) If abnormalities as mentioned below are found during use, please do not use the Unit and contact your authorized dealer immediately.
- Water leakage.
- No Water Flow.
• Water temperature cannot be controlled.
• ELB lamp does not light up.
(3) Special skill is required for repairing. Never try to repair the Unit by yourself.
5. SPECIFICATIONS
| Model No. | DH-3RL1 | DH-3RP1 |
| Voltage | 240 V a.c. 50 Hz | |
| Power Consumption | 3600 W | |
| Electric Power Control | Inlet Water Temp. (Off), 1000 W ~ 3600 W | |
| Min. Water Pressure | 9.8 kPa / 0.1 kgf/cm2 / 1.42 psi | 4.9 kPa / 0.05 kgf/cm2 / 0.71 psi |
| Max. Water Pressure | 380 kPa / 3.87 kgf/cm2 / 55 psi | |
| Dimension | 380(H) mm x 190(W) mm x 93(D) mm | |
| Weight | 1.6 kg | 2.7 kg |
| Outlet System | Single Point System (Open Outlet) | |
HOW TO INSTALL ELECTRIC HOME SHOWER

WARNING

- Proper size of the Flexible Cord and electric wiring must be installed to avoid smoke emission and fire hazards.
- Make sure to turn off electric and water supply during installation process.
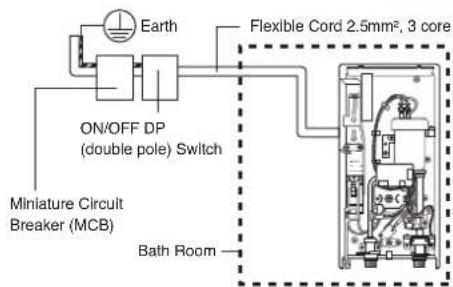
- The Home Shower must be permanently connected to the electric supply through the ON/OFF DP (double pole) Switch having a contact separation of at least 3 mm in all poles incorporated in the fixed wiring. This switch must be clearly identifiable but out of reach of a person using a fixed bath or shower.

The Unit must be earthed.
Improper grounding could cause electric shock.

- Never install the Filter Body Assembly at the outlet, inlet water cannot be filtered and allows foreign particles to enter the Unit. It will cause the Heater Unit and the Shower Head to clog up.
- Do not install, remove and reinstall the Unit by yourself.
Improper installation will cause leakage, electric shock or fire. Installation and wiring must be done by competent personnel.
- Do not share the inlet and outlet pipe of the Home Shower Unit with other outlets.
The pressure may drop due to water being drawn off at other point. The shower temperature may become very hot.

CAUTION

Flexible Cord must enter the Unit thru designated point only (do not make additional holes).
1. BEFORE INSTALLATION
(1) Make sure the water flow pressure.
Min. water pressure 9.8 kPa / 0.1 kgf/cm² / 1.42 psi (DH-3RL1)
4.9 kPa / 0.05 kgf/cm² / 0.71 psi (DH-3RP1)
Max. water pressure 380 kPa / 3.87 kgf/cm² / 55 psi
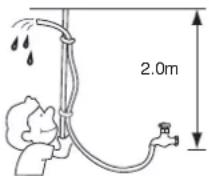
- How to measure the water pressure as illustrated. Water should flow out of the Hose 2.0 m above the Main Water Valve.
Note (model DH-3RP1)
Ensure that the water feeding into the inlet connection is drawn from the household gravity water storage tank and not from the main water supply.
Note: When removing the Unit from package, some water may be found inside.
This is normal as the Unit is tested during the manufacturing process.
2. HOW TO INSTALL

WARNING

Make sure to turn off electric and water supply during installation process.
- Where to install the unit.
- Be sure to install the Unit on the wall as illustrated in Figure 1 (vertical position with the water fittings pointing downward).
- Do not install the Unit away from wall surface as shown in Figure 2.
- The Unit must be installed at 1.5 m \~ 1.7 m above the floor.
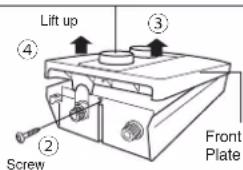
- How to remove the Front Plate
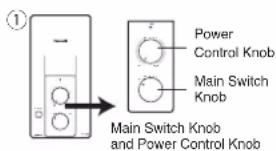
①Make sure the Main Switch Knob and Power Control Knob are at "Off" condition.
②Remove the screw at the bottom of the Unit.
③ Lift up the Main Switch Knob and Power Control Knob to make it free (Main Switch Knob and Power Control Knob are attached to Rotary Shaft and VR Shaft inside the Unit). Make sure the Main Switch Knob and Power Control Knob are not detached from the Front Plate.
④Remove the Front Plate by lifting up the bottom side and then unhook the top side.
Note:
Main Switch Knob and Power Control Knob are attached to Front Plate. Do not remove the Main Switch Knob and the Power knob from the Front Plate.
3. How to fix Electric Home Shower.
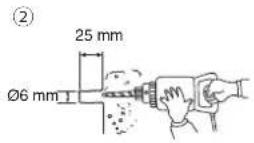
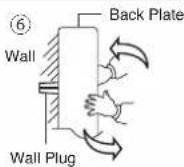
① The distance of the Unit should be more than 250 mm from right and left of the wall.
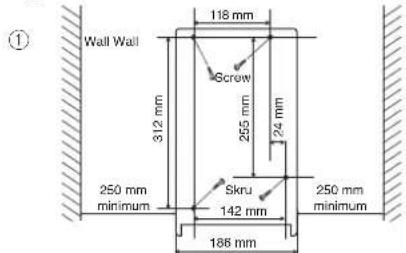
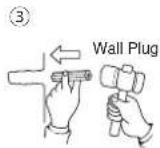
② Make 4 holes at the wall by using a drill. ③ Insert a Wall Plug into the hole.
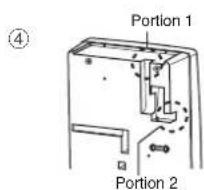
④ Lead the Flexible Cord to the set thru Portion 1 or 2 as shown below for electric wiring process.
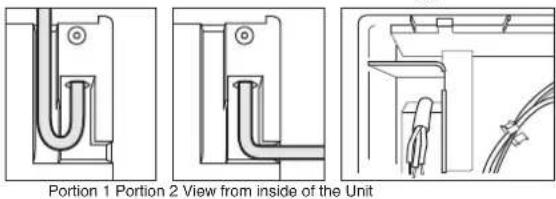
CAUTION
Flexible Cord must enter the Unit thru designated point only (do not make additional holes).
⑤ · Mount the Unit on the wall with 4 screws.
- Drive each Screw into the two upper Wall Plugs through the screw holes on the Back Plate.
• After tighten up the two upper Screws, tighten up the remaining two Screws.
⑥ Please ensure that the set fixed tightly on wall by shaking it left and right.

Note: The Back Plate must be mounted with 4 Screws.
4. Electric wiring
WARNING
Proper size of Flexible Cord and electric wiring must be installed to avoid smoke emission and fire hazards.
! WARNING
The Home Shower must be permanently connected to the electric supply through the ON/OFF DP (double pole) Switch having a contact separation of at least 3 mm in all poles incorporated in the fixed wiring. This switch must be clearly identifiable but out of reach of a person using a fixed bath or shower.
① Lead the Flexible Cord connected to ELB terminal inside the Unit: 2.5 mm ^2 , 3 core Flexible Cord.
② Unscrew the Cord Holder and fix the Flexible Cord. Strip the lead wire (coating). Fasten the life wire (L) and neutral wire (N) to the ELB (L,N) and earth wire to the Ground Point with 1 N·m (10kgf.cm) torque. Fix back the Cord Holder to its position to clamp the Flexible Cord.
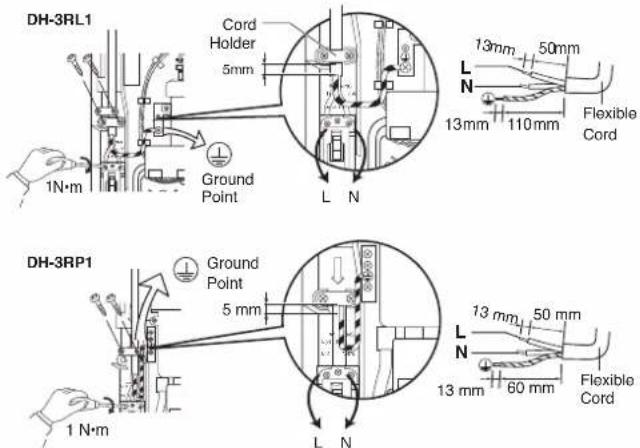
③ Connect wires in correct polarity (L,N).
- Connecting the wires in wrong polarity (L,N) causes an abnormal condition which may lead to electric leaking, burning and such.
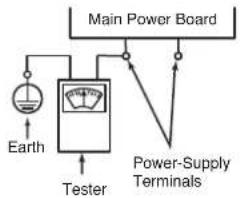
- Before wiring, please check polarity (L,N) with voltage range of a tester or voltmeter by connecting one terminal of the meter to earth while the other to one of the Power-Supply Terminals.
- When the needle of the meter deflects greatly, the polarity of the Power-Supply Terminals is 'L'.
④ Earth Rod

WARNING

The Unit must be earthed.
Improper grounding could cause electric shock.
• The Unit must be earthed.
- Select suitable place to bury the optional Earth Rod (DQ-6H) for at least 70 cm below ground surface.
- Ensure that the ground resistance is less than 100 Ω. If it is not, drive the Earth Rod deeper into ground surface or use 2 or 3 Earth Rods.

5. Piping Installation Procedure

! WARNING

Do not share the inlet or outlet pipe of Home Shower Unit with other outlets.
The pressure may drop due to water being drawn off at other point. The shower water temperature may become very hot.

! CAUTION

Avoid using dirty water as it may affect heater performance and other components.
NOTE:
• Make sure no water leaks from pipe connection.
- When glue is used for external piping connection, must wait for the glue to dry before proceed to test run with water.
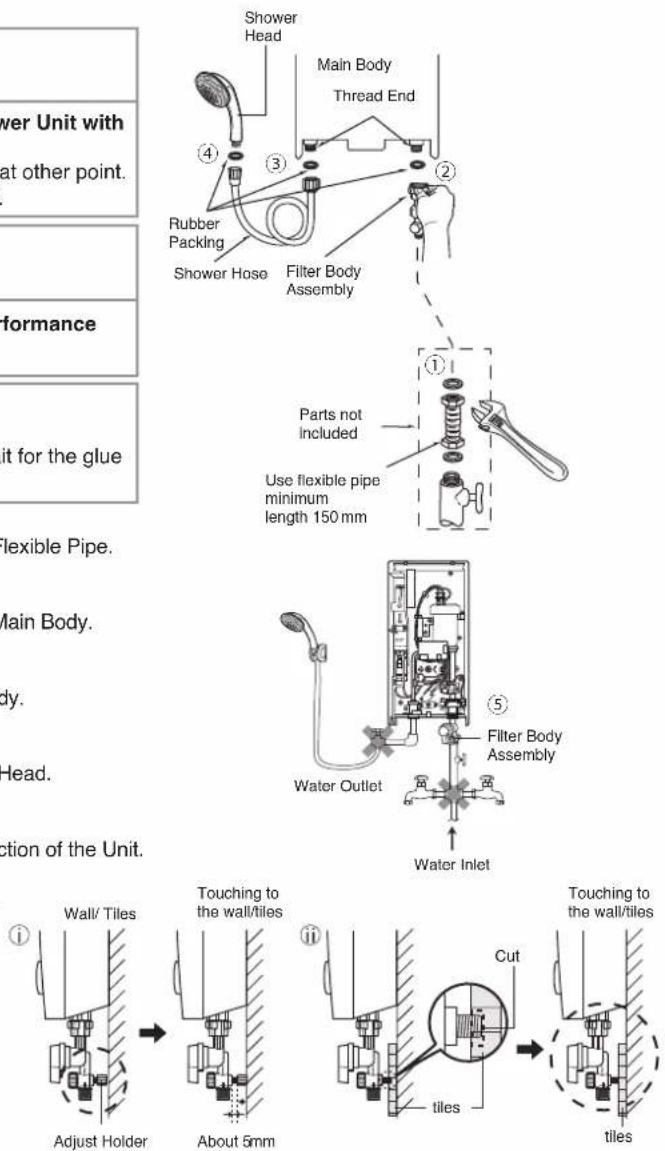
① Place Rubber Packing between Filter Body Assembly and Flexible Pipe. Do not use piping tape. Tighten it by Spanner firmly.
② Place Rubber Packing between Filter Body Assembly and Main Body. Do not use piping tape. Tighten it by hand firmly.
③ Place Rubber Packing between Shower Hose and Main Body. Do not use piping tape. Tighten it by hand firmly.
④ Place Rubber Packing between Shower Hose and Shower Head. Do not use piping tape. Tighten it by hand firmly.
⑤ The Filter Body Assembly should be placed in the front direction of the Unit.
⑥ Adjust Holder Adjustment. (Behind Filter Body Assembly). Set the Adjust Holder behind the Filter Body Assembly by turning it anti-clockwise or clockwise. Make sure the Adjust Holder is touching to the wall or tiles.
If the Adjust Holder needs to be cut due to different wall height make sure the Adjust Holder is touching to the wall or tiles to prevent possibility of water leakage at the Filter Body Assembly.
6. How to fix the Front Plate
① Make sure the Main Switch Knob and the Power Control Knob on Front Plate and it is at "Off" position.
Main Switch Knob and Power Control Knob
② Make sure the "D-Cut" position of the Rotary Shaft and VR Shaft are located as shown.

③ Close the Front Plate of the Unit according to the sequence as illustrated.
④ Push in the Main Switch Knob and Power Control Knob until it is fully inserted
Note:
- Do not push the ELB Test Button during fixing the Front Plate. - Do not apply extreme force to insert the Main Switch Knob and Power Control Knob during fixing the Front Plate because it will damage the switch inside the Unit. 7. Shower Hanger Installation
- Mount the Shower Hanger on the wall with 2 Screws. - Drive each Screws into the 2 Wall Plugs through the screw holes. - Make sure the Shower Head top is not higher than the Unit top when installing the Shower Hanger. 3. TEST OPERATION
1. • Before switch "ON" electricity supply, please check the electrical wiring connection to the Unit. - Switch "ON" the Miniature Circuit Breaker (MCB) and ON/OFF DP (double pole) Switch. - Set the ELB of the Unit to "On". (Push up the ELB Reset Lever if it is down) - Push the ELB Test Button. - It is normal if the ELB turns "Off" (the ELB Reset Lever falls) push the ELB Reset Lever up. Refer figure as shown. - Inspect the built-in ELB (once a month) to avoid a hazard to users such as damage to property, serious injury or death.! WARNING
 If the ELB Reset Lever cannot be reset even if you push it up or if it soon slides down during operation, please do not use the Unit and contact the authorized dealer immediately to avoid a hazard to users such as damage to property, serious injury or death. Never fix the ELB Reset Lever forcibly with tape and such.  2. · Turn "ON" the Main Water Valve. - Turn the Water Volume Knob clockwise and water will flow out from the Shower Head. - Check if water leaks from Pipe Line. 3. • Turn the Main Switch Knob "On" (ELB lamp will lights). - Turn the Power Control Knob clockwise and hot water will flow out from the Shower Head. (Adjust to suitable water temperature). 4. • Refer detail for HOW TO USE and WATER FLOW RATE ADJUSTMENT on page 15.目录
使用电热花洒器前
页次 22 1. 安全注意事项 22 2. 零件名称 24 3. 配件 24 如何使用电热花洒器 25 1. 使用方法 25 2.流水量调整 25 3. 维修 26 4. 发生故障时 27 5.规格 27 电热花洒器的安装法 28 1. 安装之前 28 2. 安装法 28 3. 测试法 31 保修卡 末页使用电热花洒器前
1. 安全注意事项
安全注意事项 须严格遵守 操作之前,请仔细阅读以下安全注意事项。 请严守以下说明,以避免任何个人损伤、他人损伤或财物毁坏的发生。 ■不正确之操作方式将引起伤亡或毁坏,其影响程度可列为: 警告
此符号警示死亡或严重损伤 注意
此符号警示发生受伤或财物毁坏 必须遵守之说明可分为以下几类:  此符号(背景为白色)表示被禁止之举动   此符号(背景为黑色)表示必须遵守之举动 警告
 当此装置发生任何异常/故障时请停止使用及把电流回路断开器关上。(冒烟 / 火灾 / 触电 / 烫伤) · ELB的复原棒不能还原即使你把它推上去或在操作时落下。请参阅第31页,3.测试法。 ·操作期间发现燃烧的气味或冒烟。 .可湿/后箱变形或异常热。 · 出水口水温变得非常热及无法使用电量调整钮。 请马上通知授权经销商以进行维修/修理。  装置必须连接地线。 不正确之安装法可能会引起触电。  进行任何维修前,先关掉电流回路断开器以避免触电。  闪电/打雷时,请将电流回路断开器关掉,以避免电热花洒器受损。  检查内藏接地漏电断开器(ELB)(每月一次),以避免用户受伤例如财产损失,重伤或死亡。 请参阅第31页,3.测试法。  每次淋浴水打开时,在淋浴前用手检查水温。  当一些特定人士如小孩、老人、病人或残障者使用此电热花洒器时,请多留意及时时刻刻用手测试水温。   当减少流水量时,请多留意水温。若流水量过低水温将会过热。  此产品不适合身体、感官或思维有缺陷者或缺乏经验与知识者使用(包括儿童)。 除非他们的安全监护人给予他们关于产品使用适当的监督与指示。 必需监督儿童以确保他们不会将产品当成玩具。  \- 假如你把ELB的复原棒推上去或在操作时落下它还不能还原,请停止使用此装置并马上把此事件通知有关的经销商以避免对使用者造成财物毁坏、严重损伤或死亡。绝对不能用线带把它强迫固定。  \- 不要将手指或其他物品插入电热花洒器,以避免电击危险。  \- 除了专属的配件外,切勿以其他的配件更换花洒头、花洒喉或任何其他单位的部位。 其他型号的配件将不适合此品,并可能导致危险情况。  花洒头  花洒喉  \- 不要用水喷射花洒器或把湿毛巾放在上面,以避免水分进入到其他带电的部位等,这是为了防止出烟、着火、火灾和触电的危险。   · 不得使用金属/铭软管及导电阀。 注意
 确保O环不被移除及无异物/无杂质以避免漏水。  过滤器组件  请不要使用汽油、稀释剂、漂白剂等来清洗,以避免出烟、着火、火灾和触电的危险。   避免使用不干净的水。因为它可能会影响花洒器的性能和其他部件。  \- 千万不可用手掌或毛巾等阻挡花洒头部位,或折曲花洒喉。 水压会因此而下降导致花洒水温变得非常热。   \- 当清洗时,请谨慎不要损坏花酒头的洞孔。 在还没把花酒头盖固定在花酒头之前,确定橡胶衬垫已放置在花酒头。   · 为了避免无意中重置接地漏电断开器而造成的危险,此花洒器禁止使用外加调节器,如定时器或连接至定时开关的电路。 2. 零件名称  3. 配件| 说明: | 物品: | ||
 花洒头包装 花洒头包装 |  花洒头(1套) 花洒头(1套) | ||
 花洒架包装 花洒架包装 | 花洒喉(1套) |  花洒头吊架(1套) 花洒头吊架(1套) | |
 过滤器包装 过滤器包装 | 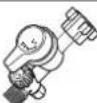 过滤器装配(1套) 过滤器装配(1套) |  橡胶衬垫A(1片) 橡胶衬垫A(1片) |  过滤器装配惯用表(1张) 过滤器装配惯用表(1张) |
 安装包装 安装包装 | 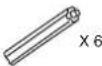 螺栓(6枝) 螺栓(6枝) | X2X6橡胶衬垫A(2片) | [3WGD]螺丝(6枝) |
如何使用电热花洒器
1. 使用方法
1. 以顺时针的方向将水量调整钮以打开流水(确保打开水管的主水阀)。(水会以入口水温从花洒头流出)。 2. 启开电流回路断开器及ON/OFF关闭挚。 3. 推动ELB复原控制棒如果它滑下。 4. 转动总开关钮至“On”的位置。(ELB灯点亮)。 请在沐浴之前或之后,利用总开关钮。这个按钮是控制此花洒器的电源供应。 5. 旋转电量调整钮,使淋浴的温度逐步被控制。 如果以顺时针的方向转动电量调整钮,沐浴的温度将会增加,而达到最高的温度“High”。 \- 如果以顺时针方向转动水量调整钮,水量将增加,从而导致水温下降 \- 如果以逆时针方向转动水量调整钮,水量将减少而导致水温上升。(请参阅以下的流水量调整。) 6. 在使用后,请关闭总开关钮和逆时针方向转动水量调整钮直至水流完全停止。 摘要:在无水供应的情况下,以逆时针的方向将水量调整钮关闭,确保总开关钮和电量调整钮呈现“Off”的状态(ELB灯将显示关闭)。这是为了防止多于的水从花洒头流出(当水的供应已恢复正常)。  ELB: On 状态  ELB: Off 状态 注意
 千万不可用手掌或毛巾等阻挡花洒头部位,或折曲花洒喉。 水压会因此而下降导致花洒水温变得非常热。 natural_image
Illustration of a hand holding a showerhead and a cord with a cross mark, no text or symbols present2. 流水量调整
(1) 可使用水管的主水阀调整最高流水量。 第一步骤:转关水管的主水阀。 第二步骤:转移花洒头向上在腰部位置的高度如图示例。 第三步骤:将水量调整钮顺时针方向转动至最高流水量的位置。 第四步骤:逐渐的转开水管的主水阀和调整花洒器喷水的飞溅高度,H。 建议调整喷水的高度(H)在100 cm \~ 110 cm (约每分钟3 公升)。 摘要:1) 在设置最高流水量后,请使用水量调整钮转动“开”和“关闭”流水的供应。 2) 当减少流水量时,请多留意水温。水温会变得太热若流水量过低。 3) 在持续使用高温设置的情况下,水的温度将会增加,并可能导致暂时性的控制装置引起水温下降。 3. 维修
警告
 进行任何维修前,先关掉电流回路断开器以避免触电。(1) 清理机身。
先要确认电流回路断开器是否关掉。 1) 用沾湿棉布来擦净。 2) 决不可使用挥发油、信纳水、洗涤剂、漂白剂等等。 3) 不可向机身喷水或挂上湿毛巾。 4) 为了避免刮痕,请确保使用合适的布料来清洁机箱表面。(2) 清洗花洒头
用手把花洒盖从花洒头向反时针方向旋转取出, 每隔一段时间,用柔软的刷子清洗花洒头的洞孔(推荐每个星期一次)。  注意
 当清洗时,请谨慎不要损坏花洒盖的洞孔。 在还没把花洒盖固定在花洒头之前,确定橡胶衬垫已放置在花洒头。 除了花洒盖及橡胶衬垫,请不要移动任何组件(参考图2)。(3) 清洗过滤器组件(过滤器组件安装于过滤器钮)
每星期用水清洗过滤器组件的过滤网一次,清洗它当您感觉到热水流出来有点异常。拆除,清洗和组装过滤器组件
① 关上水管的主水阀。  ② 以逆时针方向旋转过滤器钮然后取出。  ③ 清洗过滤器组件。 注意
 确保O环不被移除及没有外来微粒以避免漏水。 ④ 将过滤器组件放入,然后拧紧(顺时针)。 ⑤ 将水量调整钮旋转至原来的位置,依照第25页调整水的流量所示。 4. 发生故障时
(1) 在还没有询问给予修理,请检查下列重点。| 特徵 检查事项 | 检查事项 |
| 水流出来有点异常。 | 1. 请检查过滤器组件。清洗过滤网假如已被污染或阻塞(参阅第26页清洗过滤器组件)。2. 请检查花洒头和花洒盖。清洗花洒头的洞孔假如已被污染或阻塞(参阅第26页清洗花洒头)。 |
| 没有热水从出水口流出来。(花洒器无电力供应) | 1. 确保总开关钮处于“On”的位置。2. 确保ELB 测试按钮没有滑下。将ELB 测试按钮推上以重新设置ELB (参阅第31页测试法)。3. 确保打开ON/OFF关闭挚。4. 确保打开电流回路断开器。 |
| 没有水从花洒头流出来。 | 1. 检查水量调整钮。顺时针方向转动水量调整钮如已被关上。2. 检查水管主水阀。拧开主水阀如已被关上。(参阅第25页使用方法)。 |
| 水温不足。 | 1. 查看流水量调整,第25页。 |
5. 规格
| 型号 | DH-3RL1 | DH-3RP1 |
| 电源电压 | 240 V a.c. 50 Hz | |
| 消耗电量 | 3600 W | |
| 转换等级 | 入口水温(断开), 1000 W ~ 3600 W | |
| 最小水压 | 9.8 kPa / 0.1 kgf/cm2 / 1.42 psi | 4.9 kPa / 0.05 kgf/cm2 / 0.71 psi |
| 最大水压 | 380 kPa / 3.87 kgf/cm2 / 55 psi | |
| 呎吋 | 380(H) mm x 190(W) mm x 93(D) mm | |
| 重量 | 1.6 kg | 2.7 kg |
| 排水系统 | 单头型(开放式排水) | |
电热花洒器安装法
警告
 ·为了防止冒烟火灾,必须安装适合的电线尺寸和正确的电线安装法。 · 在安装过程中确保电力和供水要转向“OFF”。 - 花酒器须永固的连接至ON/OFF关闭挚。电线的接点间隔须有3 mm以上。开关必须清晰地被使用者识别,但触碰不到的地方。 装置必须连接地线。
不正确之安装法可能会引起触电。  · 千万不要把过滤器装配安装在出水口。 这会导致入水口不能进行过滤,这会使杂质进入本体。这将导致加热装置及花洒头堵塞。 · 不可擅自安装,拆开或重新安装此电器。 不正确的安装方式将引起漏电,触电或火患。安装和接线必须由专业人员操作。 · 不可将本体的入水口和出水口与其它出水口衔接。水压会因此而下降,导致花洒水温变得非常热。 注意
 电线必须由指定洞孔进入花洒器而已(不可额外添加洞孔)。1. 安装之前
(1) 确定水压
最小水压 9.8 kPa / 0.1 kgf/cm² / 1.42 psi (DH-3RL1) 4.9 kPa / 0.05 kgf/cm² / 0.71 psi (DH-3RP1) 最大水压 380 kPa / 3.87 kgf/cm² / 55 psi \- 确定水压法如图表说明。自来水腾到水管的主水阀2.0 m高的另一端,即可使用。 摘要 (DH-3RP1):
确定流水至本机体是从储水箱,而不是从主水道。 摘要:当从包裹取出机体时,一些水也许还留在里面。这是正常的因为机体在制造过程期间被测试过。2. 安装法
警告
 确保电力和供水在安装过程中要转向“OFF”。1. 在什么地方安装花洒器。
- 确保花洒器安装在墙壁上如图1所示(与流水配件朝下垂直状态)。 - 不可将花洒器安装远离于墙面,如图2所示。 - 花洒器必须安装于离地面1.5 m~1.7 m。  2. 取出花洒器的机箱。
① 确保电量调整钮处于“Off”的位置。 ② 松开机箱底下的螺丝。 ③ 往上拉起总开关钮和电量调整钮,让它悬着(总开关钮和电量调整钮附属于旋转轴和VR轴里面的单位)。 确保总开关钮和电量调整钮没有从机箱被拆卸。 ④ 拉起机箱的底部,然后把机箱上面的部份松开。  摘要: 总开关钮及电量调整钮是安装于机箱。 不要将总开关钮及电量调整钮从机箱移开。 3. 花酒器的安装法。
① 花洒器必须安装在墙壁,左右距离必须超过250 mm。 ② 在螺栓的孔位置上,使用钻头把混凝土打穿。 ③ 把螺栓打入混凝土里面。    ④ 如图所示将电线贯穿第1或第2部分以进行电线安装过程。    注意
 电线必须由指定洞孔进入花洒器而已(不可额外添加洞孔)。 ⑤ · 使用所提供的螺丝,共四支。 - 通过后箱上两个螺丝洞把螺丝扭进混凝土里面的螺栓,并将螺丝扭紧。 \- 之后将其余的螺丝扭紧。  ⑥ 将机体向左右摇摆以确保机体稳定地装置在墙上。 摘要:后箱必须用4枚螺丝装置。 4. 电线安装法
警告
 为了防止冒烟和火灾,必须安装适合的电线尺寸和正确的电线安装法。警告
 花洒器须永久的连接至ON/OFF关闭挚。电线的接点间隔须有3 mm以上。开关必须清晰地被使用者识别,但触碰不到的地方。 ① 将电线连接至电热花洒器内的ELB端子:2.5 mm²,3核心电线。  ② 松开电线柄然后将电线固定好。剥去引线(涂层)如图1所示。然后用以 N · m(10kgf.cm) 的力量将生命线(L)和中性线(N)绑至ELB(L,N)和接地线扣紧在接地上。再将电线柄固定回原位以将电线夹紧紧。  ③ 连接电线时,可要精确连接极性(L,N)
- 极性(L,N)连接错误,将发生反常现象,会使到漏电、烧伤等事故发生。 - 在接线前,必须确认极性(L,N)。 可用电压测距(range)或电压计来测定。 将电压计的一边端子连接于地线,另一端子接触到电源端子。 - 此时,见到电压计的指针振幅较大,其电源端子的极性是‘L’。④ 接地棒
 警告
装置上必须连接地线。
不正确之安装法可能会引起触电。 - 装置上必须连结地线。 - 接地线操作次序,选择较湿润的地点打进接地棒(DQ-6H)。接地棒要打进土里70 cm深度以上。 · 检查接地电阻为100 Ω(欧姆)以下。如电阻不在100 Ω以下时,应把接地棒打深,或需要多打进2\~3条接地棒。   5. 水管安装法
警告
 不可将本体的入水口或出水口与其它出水口衔接。水压会因此而下降导致花洒水温升高。 注意
 避免使用不干净的水,因为它可能会影响花洒器的性能和其他部件。摘要:
- 确保水管衔接处没有漏水。 - 如在连接额外的水管时有使用到胶水,那么在用水测试之前须确保胶水已完全干透。 ① 把橡胶衬垫置放于易弯曲管及过滤器装配之间后以螺旋钳拧紧。不可使用白胶带。 ② 把橡胶衬垫置放于机身之螺纹端点及过滤器装配之间后以手拧紧不可使用白胶带。 ③ 把橡胶衬垫置放于花洒喉及机体间后以手拧紧,不可使用白胶带。 ④ 把橡胶衬垫置放于花洒喉及花洒头间后以手拧紧,不可使用白胶带。 ⑤ 过滤器装配应调至此机的正前方。 ⑥ 水量调整钮垫拴之设定。(过滤器装配后面) 将过滤器装配后部之垫拴向时针方向或逆时针方向钮转以确保垫拴触及墙面或瓷砖。 ⑪ 如果垫拴需要因为不同的高度而切割,必须确保垫拴是依附着墙壁或瓷砖,以防止过滤器装备漏水的可能性。   i  ⑪ 6. 盖上机箱
① 确保总开关钮及电量调整钮在机箱上是处于“Off”的状态。 ①  总开关钮及电量调整钮 ② 确保旋转轴和VR轴的“D-Cut”位置如图所示。  ③ 依照如图所示的顺序将机箱盖上。 ④ 按入总开关钮及电量调整钮至完全嵌进妥当。 <如果没有进行上述步骤①和②,便无法嵌入总开关钮及电量整钮> ⑤ 将机箱底部的螺丝拴紧。摘要:
- 确勿在安装机箱时按下ELB测试按钮。 - 不要在安装机箱期间将总开关钮及电量调整钮强行置入因为这将破坏花洒器内的开关钮。   7. 花洒头吊架安装程序
- 使用两粒螺丝将安装于墙上。 - 通过螺丝孔将螺丝各自转动至两个螺栓。 - 确保在安装花洒头吊架时花洒头顶部不高于花洒器顶端。 花洒头吊架   3. 测试法
1. 在还没有接通电流时,检查接线。 - 启开电流回路断开器及ON/OFF关闭挚。 - 将ELB的开关转换于"On"(将ELB复原控制棒推上)。 - 按下ELB的测试按钮。 - 如ELB复原控制棒跌下,则为正常状态。把ELB复原控制棒推上。 - 检查内藏ELB (每个月一次) 以避免对用户造成财产损失,严重受伤或死亡。警告
 假如你把ELB的复原棒推上去或在操作时落下它还不能还原,请停止使用此装置并马上把此事件通知有关的经销商以避免对使用者造成财物毁坏、严重损伤或死亡。绝对不能用线带把它强迫固定。  2. · 拧开水管的主水阀。 - 顺时针方向旋转水量调整钮,跟着水将从花洒头流出来。 - 检验配管是否有漏水。 3. 将总开关钮旋转至"On"位置(ELB灯点亮)。 - 将电量调整钮顺时针旋转,跟着热水将从花洒头流出来。(调至适合的温度) 4. · 请参阅第25页使用方法及流水量调整。MEMO
MEMO
Panasonic Manufacturing Malaysia Berhad. (196501000304) No. 3, Jalan Sesiku 15/2, Section 15, Shah Alam Industrial Site, 40200 Shah Alam, Selangor Darul Ehsan, Malaysia. http://www.panasonic.comTERMS AND CONDITIONS OF WARRANTY
This Warranty entitles the customer to a guaranteed free service on Panasonic products within a period of 12 months from the date of purchase. \*An additional warranty of 12 months also provided for DIGITAL STILL / VIDEO / SLR CAMERA, if the warranty is being registered via online at http://club.panasonic.com.my either directly by purchaser or by Panasonic Authorized Dealer and approved by Panasonic Malaysia Sdn Bhd. The above shall be subject to the terms and conditions listed below: 1. This warranty applies to each new product purchased for domestic use in Malaysia from Panasonic Authorized Dealers supplied by Panasonic Malaysia Sdn Bhd ("Panasonic Malaysia") 2. Validity of warranties registered online evidenced in printouts shall be subject to approval by Panasonic Malaysia pursuant to applicable Panasonic policies, rules, discretion or otherwise. 3. Customer is required to present the original warranty card or warranty registration certificate together with the original purchase receipt for your free warranty service, failing which Panasonic Malaysia or Panasonic Authorized Service Dealers reserves the right to decline any warranty claim. 4. This warranty applies to ascertained manufacturing defects arising from normal usage within the warranty period. Panasonic Malaysia or Panasonic Authorized Service Dealers will at their discretion not to impose charges for any repair and/or replacement of defective components or parts of the product. Any spare parts replaced under this warranty shall become the property of Panasonic Malaysia. 5. This warranty card is not replaceable in the event of loss, theft and/or defacement. 6. Panasonic Malaysia reserve the right to refuse to attend to any product installed in locations which are deemed inaccessible, inappropriate and/or hazardous to the safety and wellbeing of its service agents. 7. To the extent permitted by law, no other warranties, whether express or implied, including warranties of merchantable quality and fitness for a particular purpose, shall apply to the product, Panasonic Malaysia shall not be liable for loss of profits, human injury, special, indirect or consequential damages sustained in any whatsoever proceeding, claim and/or demand resulting or attributed to the product or services rendered to it. 8. All express and implied conditions herein or otherwise are subject to Panasonic Malaysia authority and discretion where and when deemed appropriate. 9. Panasonic Malaysia reserves the right to bring back the product for further investigation or diagnosis and shall not reliable for any compensation claims due to whatsoever inconvenience caused to Customer. 10. Customer shall pay for a minimum checking/service fees and transportation fee for any non-manufacturing defect service request to be determined by Panasonic Malaysia (if any). 11. For non-Panasonic online platform purchase, customer must refer the original selleragent for 3rd party defect coverage. 12. Products which do not carry valid model and serial/batch number, warranty of the product is void. 13. Home service only applicable for BUILT-IN-KITCHEN (BIK) / RANGE HOOD / HOME SHOWER / CEILING FAN / VENTILATION FAN / WATER PUMP (for Ground installation only), other than this product indication, additional fees will be imposed.(A) What is NOT covered in this warranty:
A.1. Defects caused by the attack of household pests, pets, fire, lightning, natural disasters, flood, corrosion, rusting, cosmetic damage, dent, crack, pollution, abnormal voltage or usage of generator, tampering, alteration or repair by unauthorized person, misuse, negligence, riots, accident or operation of the products contrary to the instructions contained in the products' Operating and Installation Instruction, commercial usage, including abnormal long usage hours; or, under extreme usage environmental conditions, improper testing, demonstration, maintenance, installation, product serial/batch number has been removed or made illegible or has been tempered with, usage of non-genuine spare parts, adjustment or alteration of any kind. A.2. Consumable items and accessories packaged with Panasonic products. A.3. If the customer authorizes Panasonic Malaysia to repair the Product(s) which is not covered under the warranty (refer A.1.), the Customer must pay all the charges for all parts, shipping, and labour for the repair and return of the Product. A.4. The content and continuity of the services through Apps are operated by respective service providers and such service may be discontinued either temporally or permanently without notice.(B) Conditional Warranty:
B.1. DVD/VCD/Blu-ray Player: Only one replacement of Optical Pick-up Head within warranty period upon confirmation of fault. Subsequent replacement will be charged accordingly. B.2. Range Hood: No warranty for bulb. The English language version will be the official version for the purpose of interpretation of this warranty. Users are advised to install a lightning-resistant tool on their product. For further information, please contact our Authorize dealer.TERMA DAN SYARAT JAMINAN
Jaminan ini memberi hak kepada pengguna Panasonic Malaysia untuk mendapatkan perkhidmatan percuma pada produk Panasonic dalam tempoh 12 bulan dari tarikh pembelian. \*Jaminan tambahan selama 12 bulan juga disediakan untuk DIGITAL STILL / VIDEO / CAMERA SLR, sekiranya produk didaftarkan secara dalam talian di http://dlub.panasonic.com.my sama ada secara langsung oleh pembeli atau oleh Pengedar Panasonic yang bertaulah dan diluluskan oleh Panasonic Malaysia Sdn Bhd. Jaminan diatas adalah tertakluk kepada terma dan syarat yang disenaraikan di bawah: 1. Jaminan ini diguna pakai bagi setiap produk baru yang dibel untuk kegunaan domestik di Malaysia daripada pengedar Panasonic yang sah yang mana produk tersebut diedarkan oleh Panasonic Malaysia Sdn Bhd ("Panasonic Malaysia") 2. Pengesehan Jaminan yang didaftarkan dalam tafan yang dibuktikan dalam cetakan hendaklah tertakluk kepada kelulusan oleh Panasonic Malaysia menurut polisi, peraturan, budi bicara atau sebaliknya. 3. Pelanggan dikehendaki mengemukakan sijil pendaftaran jaminan asal atau kad jaminan berserta dengan resit pembelian yang asal untuk perkhidmatan jaminan secara percuma, jika gagal, yang mana Panasonic Malaysia atau wakil servis Panasonic bertauliah oleh Panasonic mempunyai hak untuk menolak sebarang luntutan jaminan. 4. Jaminan ini meliputi sebarang kerosakan dari segi pembuatan dan juga kerosakan yang berlaku berpunca dari kegunaan biasa dalam tempoh jaminan. Panasonic Malaysia atau Wakil Servis Panasonic akan mengikut budi bicara mereka untuk tidak mengenakan caj untuk sebarang pembalikan dan / atau penggantian komponen atau bahagian produk yang rosak. Sebarang bahagian yang diganti di bawah jaminan ini akan menjadi milik Panasonic Malaysia. 5. Kad jaminan ini tidak boleh diganti sekiranya bertaku kehilangan, kecurian dan / atau kerosakan, 6. Panasonic Malaysia berhak menolak untuk menchadiri mana-mana produk vano dipasang di lokasi vano diangoap tidak dapat diakses, tidak sesuai dan / atau berbahaya kepada keselamatan eien servisnya. 7. Setakat yang dibenarkan oleh undang-undang, tiada jaminan lain, sama ada nyata atau tersirat, termasuk jaminan kualiti dan kesesuzian yang boleh diperdagangkan untuk tujuan tertentu, diguna pakai bagi produk tersebut. Panasonic Malaysia tidak akan bertanggungjawab ke atas kehilangan keuntungan, kecederaan manusia, ganti rugi khusus/khas, tidak langsung atau berbangkit dalam apa jua cara yang berlaku, tuntutan dan / atau tuntutan yang terhasil atau dikaitkan dengan produk atau perkhidmatan yang diberikan kepadanya. 8. Semua syarat-syarat yang nyata dan tersirat di sini atau selainnya adalah tertakluk kepada kuasa dan budi bicara Panasonic Malaysia di mana dan bila dianggap sesuai. 9. Panasonic Malaysia bernak untuk membawa baik produk tersebut untuk pembalkan atau diagnosis yang lebih lanjut dan tidak akan dikenakan apa-apa tuntutan pampasan disebabkan oleh apa jua kesulitan yang disebabkan oleh pengguna. 10. Pelanggan hendaklah membayar caj pemeriksaan / perkhidmatan minimum dan bayaran pengangkutan untuk sebarang permintaan perkhidmatan pembaukan yang bukan disebatkan kerosakan pembuatan yang ditentukan oleh Panasonic Malaysia, 11. Untuk pembelian melalui laman web yang bukan dari laman web Panasonic, pelanggan mestli merujuk kepada penjual / ejen asal untuk sebarang bentuk produk jaminan. 12. Jaminan ini tidak sah sekiranya produk tersebut tidak tertera penyataan model dan nombor siri atau nombor siri berkumpulan. 13. Perkhidmatan servis kerumah hanya untuk produk BUILT-IN-KITCHEN (BIK) / RANGE HOOD / PANCURAN MANDI ELEKTRIK / KIPAS SILING / KIPAS PENGUDARAAN / PAM AIR (untuk pemasangan dibawah sahaja) selain daripada produk ini, caj tambahan akan dikenakan sekiranya pengguna ingin Panasonic Malaysia menghantar ejen servis ke rumah.(A) Apa yang TIDAK diliputi dalam jaminan ini:
A.1. Kerosakan yang disebakkan oleh serangan perosak rumah langa, binatang pelfiharaan, kebakaran, bilik, bencana alam, banjir, hakisan, karat, kerosakan kosmetik, leku k, retakan, pencemaran, voltan tidak normal atau penggunaan penjana, gangguan, pengubahan atau pembakaan oleh orang yang tidak dibenarkan, penyelahgunaan, kecaulan, rusuhan, kamalangan atau pengendalian produk yang bertentangan dengan arahan yang terkandung dalam arahan operasi dan pemasangan produk, penggunaan komersil, termasuk tempoh waktu penggunaan yang tidak normal; atau, di bawah keadaan persekitaran penggunaan yang melampau. ujan, demonstrasi, penyelenggsaan. pemasangan, nombor bersiri / nombor produk telah dihapuskan atau dibuat tidak dapat ACA atau diganggu, penggunaan alat ganli bukan asli, penyesuaian atau penbahan apa-apa jenis. A.2. Aksesori yang dilengkapi/bekalkan bersama produk Panasonic. A.3. Jika pelanggan mengarahkan kepada Panasonic Malaysia/wakil ejen servisnya untuk membaiki Produk yang tidak dilindungi di bawah jaminan itu (rujuk A.1.). Pelanggan hendaktah membayar semua caj untuk alat ganti, pengangkutan, dan caj servis untuk membaki Produk tersebut. A.4. Kandungan dan kesinambungan perkhidmatan melalui Apps yang dikendalkan oleh pembekal perkhidmatan masing-masing dan perkhidmatan sedemikian boleh dihentikan sama ada secara sementara atau secara kekal tanpa notis.(B) Jaminan bersyarat:
B.1. Alat pemain DVD/VCD/Blu-ray: Optical Pick-up Head akan diganti sekali sahaja dalam tempoh jaminan apabila disahkan rosak. Bayaran akan dikenakan untuk penggantian berikutnya. B.2. Range Hood: Tiada jaminan ke atas mentol. Jika terdapat sebarang perbezaan diantara terma dan syarat diantara Bahasa English dan Melayu. Terma dan syarat Bahasa English akan diutamakan. Pengguna dinasihatkan memasang alat penghalang kilat ke atas produk tersebut. Untuk keterangan lanjut, sila hubungi wakil pengedar yang sah.WARRANTY CARD Panasonic Service Centre / Pusat Servis Panasonic
Panasonic Malaysia Sdn Bhd
Registration No. 197601000977 (26975-W) Customer Care Centre Tel:03 7953 7600 Fax:03 7953 7606 E-mail: ccc@my.panasonic.comService Centre
Selangor / Kuala Lumpur Lot 10, Jalan 13/2, 46200 Petaling Jaya, Selangor Darul Ehsan Tel:03 7953 7600 Fax:03 7953 7606 Pulau Pinang / Kedah / Perlis No. 117, Jalan Macalister, 10400 Pulau Pinang. Tel: 04-227 4070 Fax: 04-227 8411 Johor 2, 2A, 2B, Jalan Impian Emas 7, 81300 Skudai, Johor Bahru. Tel: 07-554 3531 / 07-558 3561 Fax: 07-557 3506Collection Centre
Kelantan Lot 1854, Paya Bemban, Jalan Hospital, 15400 Kota Bahru, Kelantan Tel: 09-748 1578 Fax: 09-743 6605 Pahang / Terengganu A303m Jalan Air Putih, 25700 Kuantan, Pahang. Tel:09-560 5120 Fax:09-560 5212 Sabah Lot. 6, Lrg Mangga 1, BDC/Milek Perkasa Ind. Estate, Kolombong, 88450 Kota Kinabalu, Sabah. Tel:088-428 713 Fax:088-437 543 Sarawak Lot 3293, Jalan Kwong Lee Bank. Lorong Sebor, 93450 Kuching Tel: 082-336 126 / 336 326 Fax:082-482 660 Negeri Sembilan/Perak/Melaka, visit our website: http://www.panasonic.com/my/support/service-center.html for our nearest Authorised Service Centre.| THIS WARRANTY CARD IS TO BE RETAINED BY CUSTOMER. FOR WARRANTY SERVICE, PRESENT THIS WARRANTY CARD WITH ORIGINAL PURCHASE RECEIPT | ||
| Customer's Name :Address :E-mail Address : | Date of PurchaseDate Month Year(To be completed by dealer) | |
| Tel No. | House : | Dealer's name and address (Stamp) |
| Handphone : | ||
| Product | ||
| Model | (5-year warranty on built-in pump only) | |
| Serial No. / BatchNo. | ||
- 中文
- KANDUNGAN
- SEBELUM MENGGUNAKAN PANCURAN MANDI ELEKTRIK
- CARA-CARA MENGGUNAKAN PANCURAN MANDI ELEKTRIK
- CARA MEMASANG PANCURAN MANDI ELEKTRIK
- LANGKAH-LANGKAH KESELAMATAN
- LANGKAH-LANGKAH KESELAMATAN
- CARA MENYELARASKAN KADAR ALIRAN AIR
- Pendawaian elektrik
- ! AMARAN
- HOW TO INSTALL ELECTRIC HOME SHOWER
- BEFORE USING ELECTRIC HOME SHOWER
- SAFETY INSTRUCTIONS
- SAFETY INSTRUCTIONS
- WARNING
- CAUTION
- Stop using the Unit when any abnormality/failure occurs and turn "OFF" the Miniature Circuit Breaker (MCB). (Risk of smoke/fire/electric shock/scalding)
- The Unit must be earthed.
- HOW TO USE ELECTRIC HOME SHOWER
- HOW TO USE
- WATER FLOW RATE ADJUSTMENT
- MAINTENANCE
- Main Body cleaning.
- Shower Head Cleaning.
- Filter Unit Cleaning (Filter Unit is fixed to Filter Knob)
- Dismantle, cleaning and assemble of the Filter Unit
- TROUBLESHOOTING
- SPECIFICATIONS
- BEFORE INSTALLATION
- HOW TO INSTALL
- How to fix Electric Home Shower.
- Electric wiring
- ! WARNING
- ④ Earth Rod
- Piping Installation Procedure
- ! CAUTION
- NOTE:
- How to fix the Front Plate
- Shower Hanger Installation
- TEST OPERATION
- 目录
- 使用电热花洒器前
- 安全注意事项
- 警告
- 注意
- 如何使用电热花洒器
- 使用方法
- 流水量调整
- 维修
- 清理机身。
- 清洗花洒头
- 清洗过滤器组件(过滤器组件安装于过滤器钮)
- 拆除,清洗和组装过滤器组件
- 发生故障时
- 规格
- 电热花洒器安装法
- 装置必须连接地线。
- 安装之前
- 确定水压
- 摘要 (DH-3RP1):
- 安装法
- 在什么地方安装花洒器。
- 取出花洒器的机箱。
- 花酒器的安装法。
- 电线安装法
- ③ 连接电线时,可要精确连接极性(L,N)
- ④ 接地棒
- 装置上必须连接地线。
- 水管安装法
- 摘要:
- 盖上机箱
- 花洒头吊架安装程序
- 测试法
- MEMO
- TERMS AND CONDITIONS OF WARRANTY
- What is NOT covered in this warranty:
- Conditional Warranty:
- TERMA DAN SYARAT JAMINAN
- Apa yang TIDAK diliputi dalam jaminan ini:
- Jaminan bersyarat:
- WARRANTY CARD Panasonic Service Centre / Pusat Servis Panasonic
- Panasonic Malaysia Sdn Bhd
- Service Centre
- Collection Centre
Brand : PANASONIC
Model : DH-3RP1
Category : Chauffe-eau et ballon d'eau chaude