
KM2006 - Car radio Krüger&Matz - Free user manual and instructions
Find the device manual for free KM2006 Krüger&Matz in PDF.


| Product Type | Car Stereo |
| Brand | Krüger&Matz |
| Model | KM2006 |
| Form Factor | Single DIN |
| Dimensions (W x H x D) | 178 x 50 x 100 mm |
| Weight | 0.5 kg |
| Power Supply | 12V DC (car battery) |
| Power Output | 4 x 50W max |
| Radio Bands | FM, AM |
| Playback Sources | USB, AUX, SD card (if applicable), Bluetooth |
| Bluetooth | Hands-free calling and audio streaming |
| Display | LCD with backlight |
| Remote Control | Included (wireless) |
| Audio Features | Equalizer, bass/treble adjustment |
| Additional Functions | Clock, steering wheel control compatible (wired adapter) |
| Maintenance | Clean with dry cloth; avoid liquids |
| Safety | Fuse protection; do not disassemble |
| Spare Parts & Repairability | Contact Krüger&Matz service; use only original parts |
| General Information | ISO connector; compatible with most vehicles |
Frequently Asked Questions - KM2006 Krüger&Matz
User questions about KM2006 Krüger&Matz
0 question about this device. Answer the ones you know or ask your own.
Ask a new question about this device
Download the instructions for your Car radio in PDF format for free! Find your manual KM2006 - Krüger&Matz and take your electronic device back in hand. On this page are published all the documents necessary for the use of your device. KM2006 by Krüger&Matz.
USER MANUAL KM2006 Krüger&Matz
natural_image
Abstract wavy line pattern with no text or symbols, rendered in grayscale (no readable labels or symbols)BEDIENUNGSANLEITUNG
OWNER'S MANUAL
INSTRUKCJA OBSŁUGI
MANUAL DE UTILIZARE
Deutsch
- This unit is designed to operate on 9 - 15 V DC power supply. If your vehicle does not have this system, a voltage inverter is required. The device also requires connecting to negative of the car.
-
Choose the mounting location where the unit will not interfere with the normal driving function of the driver. Install the unit where it does not get in the driver's way and cannot injure the passenger if there is a sudden stop. DO NOT install the unit or any cable in a location where:
-
it may obstruct the steering wheel and gearshift lever operations,
- it may obstruct the operation of safety devices such as air bags
-
it may obstruct visibility
there is not enough ventilation provided -
Avoid installing the unit where it would be subject to high temperature, such as from direct sunlight, hot air, or a heater, or where it would be subject to dust, dirt or excessive vibration. Do not expose this equipment to rain or moisture nor use near strong magnetic fields. Do not handle this appliance with wet hands.
- Make sure all the connections are executed in a proper manner. Reversed connection will cause short circuit and damage.
- If installation angle exceeds 30 from horizontal, the unit might not give its optimum performance.
- Before finally installing the unit, connect the wiring temporarily and make sure it is all connected up properly and the unit and the system work properly.
- If the fuse blows, check the power connection and replace the fuse with one of the same specified rating. If the fuse blows frequently, consult an authorized service point for check-up/repair.
- It is recommended to connect speakers with impedance of 4Ω .
- To prevent short circuits, cover the terminals of the UNUSED leads with insulating tape.
• Make sure that the ignition is off before connecting the device. - Make sure to connect the yellow and red power supply cables after all other cables are already connected.
- The heat sink becomes very hot after use. Be careful not to touch it when removing this unit.
- At the time of installation, be sure to fix all wires (wires both from this unit and from the car itself) in a way that any wires cannot come into contact with heat sinks on the rear and side of the unit.
• Installation illustrations show a typical installation. However, you should make adjustments corresponding to your specific car. If you have any questions or require information regarding installation kits, consult your car dealer. - If you are not sure how to install this unit correctly, have it installed by a qualified technician. Producer does not claim liability of incorrect mounting/installation nor for inappropriate handling and use disregarding this user's manual.
- When mounting the unit, be sure to use the screws provided, as instructed. If other screws are used, parts could become loose or damaged. Use only the parts included with the unit to ensure proper installation. The use of unauthorized parts can cause malfunctions.
- When tightening screws or bolts, be careful not to pinch any connection cord.
• Make sure not to block the ventilation outlets. - DO NOT connect the speaker leads of the power cord to the car battery; otherwise, the unit will be seriously damaged.
- BEFORE connecting the speaker leads, check the speaker wiring in your car.
-
Consult with your nearest dealer if installation requires the drilling of holes or other modifications of the vehicle. In case of any doubts concerning place of installation, contact your vehicle's dealer. Before drilling the holes in vehicle's body, make sure it will not damage any electrical cables or other components. During installation keep in mind, that any loose parts may pose danger in case of an accident – make sure to install every piece properly to ensure safety.
-
Do not remove the housing/disassemble the device. The device has no user-serviceable parts inside.
- In case of damage, contact an authorized service point for check-up/repair.
Temperature
- If the vehicle has been parked for a long time in hot or cold environment, wait until the temperature in the vehicle becomes normal before operating the unit.
- When installing, to ensure proper heat dispersal when using this unit, make sure to leave some space behind the rear panel and wrap any loose cables so they are not blocking the ventilation outlets.
Safety instructions
- DO NOT operate this device while driving, as this may lead to a traffic accident.
- The driver must not watch the monitor while driving.
- Stop the car before performing any operations! Do not perform any activities that may distract from cautious driving, such as managing playlist.
- Do not raise the volume level too much, as this will block outside sounds, making driving dangerous.
- Clean with soft, slightly damp cloth only.
- When inserting batteries, please note the correct polarity.
- If the remote is not used for an extended period of time, remove the battery to prevent possible damage from battery leakage.
Hearing safety
- Listen at a moderate volume. Sound can be deceiving. Over time your hearing "comfort level" adapts to higher volumes of sound. So after prolonged listening, what sounds "normal" can actually be loud and harmful to your hearing. To guard against this, set your volume to a safe level before your hearing adapts and leave it there.
- Listen for reasonable periods of time:
- Prolonged exposure to sound, even at normally "safe" levels, can also cause hearing lose.
- Be sure to use your equipment reasonably and take appropriate breaks.
Notes on external memory
- Use the memory drive only as indicated in its user's manual
- Do not touch USB port / plug with bare hand; do not touch with metal objects.
- Do not expose memory drive to shocks.
- Do not bend, drop, disassemble, modify the memory drive. Protect from water and humidity.
- Do not store memory drive inside the vehicle where it will be exposed to direct sunlight, high temperatures, high humidity or corrosive substances.
- Make sure the connected USB drive does not obstruct unhindered vehicle driving.
- Memory drive may not function properly in extremely high/low temperature environments.
- Use only authorized memory drives. Please note, the producer does not guarantee compatibility with every external memory.
- Files protected against copying (copyright protection) may not be played.
- In some cases, start of the playback may be delayed, but does not constitute of any malfunction or damage.
- Producer does not claim any liability for any data loss.
- Do not unplug external memory while playback. Change the sound source before disconnecting the memory drive from this device.
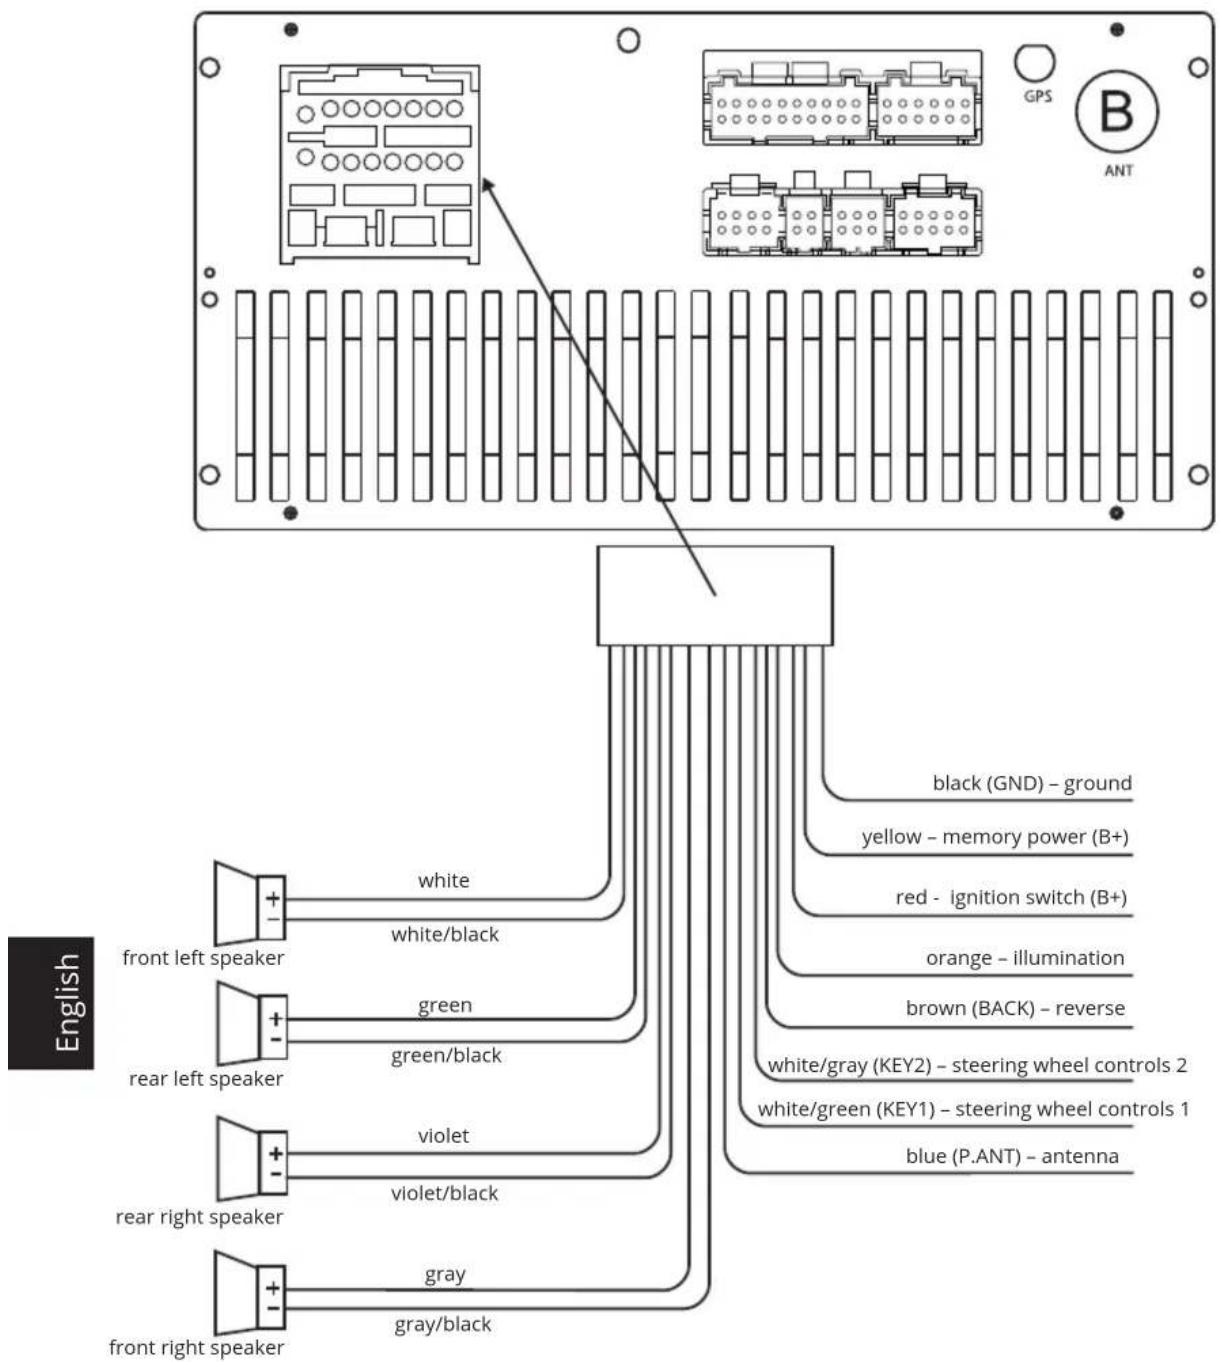
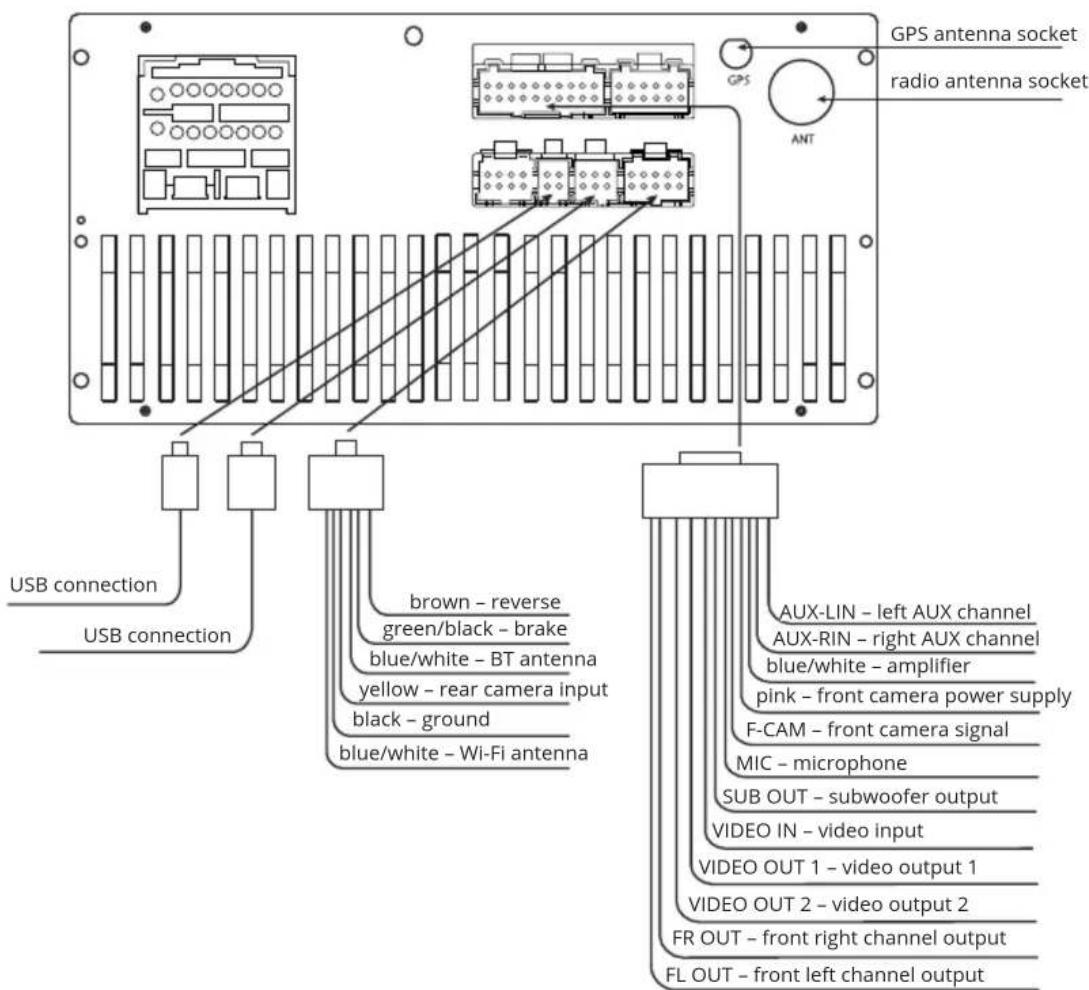
Wiring diagram
Front panel
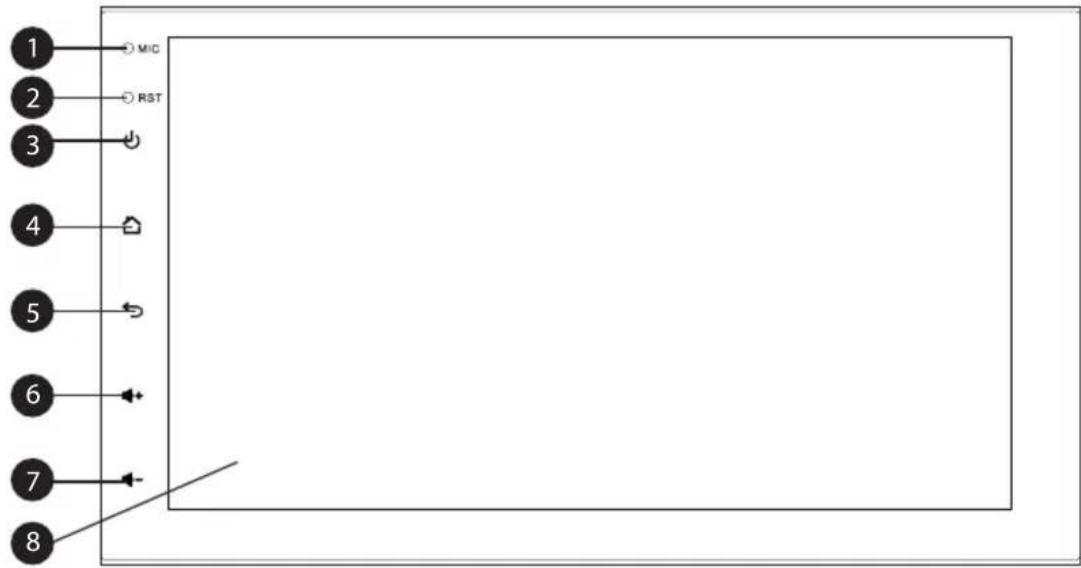
- Microphone
- Reset button (to press it, use thin object, e.g. a paper clip)
- Power button
- Home button
- Back button
- Volume up
- Volume down
- Touch screen
Operation
To use the touchscreen, touch it with your finger. After startup of the device, the home screen will appear. To switch between pages of home screen, swipe left and right.

English
- Press and hold for about 3 seconds, to enable sleep mode. Press it again to wake up. Press it to mute the sound.
- Press on touchpad, or on touchscreen to go back to the main screen.
- Press on touchpad, or on touchscreen to go back.
- Press to turn off backlight. Press screen to turn the backlight on.
- Press or to control volume level.
- Press to view last applications.
- Pull down the notification bar to view notifications. Press go to Settings.
Navigation
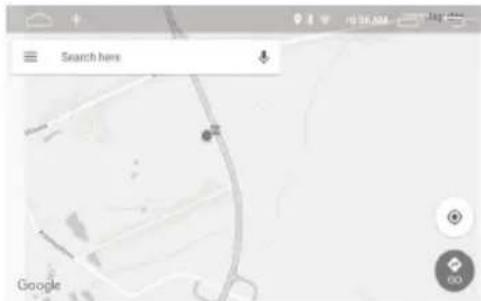
- Press the Navigation button on the main screen to run navigation application. Default application is Google Maps.
- To use the map, internet connection is required.
- To search for address, press Search here area.
- To set route, after searching the address, press Directions, then Set route, and Begin.
Radio

• To turn on the radio, press Radio button on the main screen.
- To set frequency manually, use the slider. To overwrite saved stations, press and hold one of the buttons from P1 to P6.
• To play saved station, press it's button.
- Press to show volume level.
- Press threnable or disable stereo sound.
- Press the FM button to change frequency to FM, and to switch between saved stations. 18 save slots are available.
- Press the AM button to change frequency to AM, and to switch between saved stations. 12 save slots are available.
- Press to search for radio stations.
- Press to go to equalizer.
- Press K to start automatic decrease stations search. Press and hold to go 0,5 MHz down. - Press >I to start automatic increase stations search. Press and hold to go 0,5 MHz up.
- Press the PTY button to choose program type.
- Press the TA button to turn on or off traffic advice.
- Press the RDS button to go to RDS settings.
Music
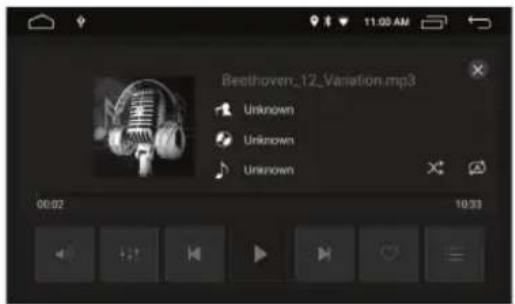
• To go to the music player, press Music on the main screen.
- Press to show volume level.
- Press go to equalizer.
- Press to go to previous track.
- Press to go to next track.
- Press ▶ play or pause track.
- Press to add played track to favorites.
- Press :to view track list, favorite tracks and playing history.
- Press to change playing mode (repeat one, repeat folder, repeat all)
- Press to turn on or off random playing.
Bluetooth

English
Before first use, the radio must be paired with external Bluetooth device. To do this, follow these steps:
- Go to Bluetooth mode.
- Turn on Bluetooth on external device. Set visibility to on.
- Pair the device with the radio. If necessary, confirm the code on the external device.
After connection, press one of these icons:
- Dial menu.
- phone book. By default, phone book is not synchronized with the radio. To synchronize, press ↓ if necessary, confirm synchronization on the device. Press to search for contact. Press ↓ delete contacts from radio's memory.
- Call list. Use buttons to switch between outgoing, received and missed calls. Press erase call list from radio's memory.
- BT Music. Press to enter audio streaming interface. Please note, you have to start music playback from external device first to manage the playback.
Settings

Press the Settings button on the main screen to go to settings menu. Press one of the icons to go to different settings menus:
• Network and internet (Wi-Fi settings and access point).
- Car Media (Common, display, volume, sound, video, navigation, Bluetooth, steering wheel controls, about device).
- Apps and notifications (Managing and deleting apps and notifications).
• Storage (Available internal storage).
• Memory (Available RAM memory).
- Users and accounts (Managing accounts).
• Google (Google services settings).
- System (System info, time and date settings).
Video
To go to video player, press Video on the main screen.
- Press to fit the video to screen size.
- Press to change playing mode.
- Press to go to previous video file.
- Press to play or pause video.
- Press to go to next video file.
- Press to add video to favorites.
- Press to go to video files list.
- Press ☐ to play video while using the device. To go back to the player, press played video.
Easy Connection app
Attention:
- App is compatible with Android OS, version 5.0 or later.
-
USB debugging mode should be enabled on the external device.
-
Download and install Easy Connection app from Google Play store.
- Go to Google Play store on the external device to download the app.
- Open Easy Connection app on the device.
- Attention: If installation failed, check security settings on the external device.
- Go to Google Play store on the external device to download the app. - Open Easy Connection app on the device. - Attention: If installation failed, check security settings on the external device.
- Connect the device to the radio:
- USB Connection: Connect the device to the radio with USB cable. In Easy Connection app press Android USB button. On the external device, notification will appear: "Allow USB debugging?". Press OK to confirm. User can also turn on default use.
- Wi-Fi connection: Set Wi-Fi hotspot on the external device. Connect radio to Wi-Fi hotspot. In Easy Connection app press Android Wi-Fi.
-
On the external device a message will appear: "EasyCon will start capturing everything that's displayed on your screen". Confirm it to proceed.
-
The radio receiver screen will display what's on your external device's screen.
Steering wheel controls

-
To change steering wheel controls, go to Settings menu.
-
Go to Car Media menu.
-
Go to Steering wheel controls (SWC) menu.
-
To reset saved settings, press Clear all.
-
To change function of the button, press desired button on the device (button will start flashing), then press button on the steering wheel.
Changing display language
-
To change display language, go to Settings menu.
-
Go to System.
-
Go to Languages and input.
-
Go to Languages.
-
Press Add a language.
-
Select language from list.
-
Selected language will be added. To activate it, move it to the top of the list.
-
Display language will be changed.
Changing wallpaper
-
To change wallpaper, press and hold empty space on the main screen.
-
Choose wallpaper source.
-
Choose wallpaper and press Set wallpaper.
Changing boot screen
-
To change startup screen, go to Settings menu.
-
Go to Car Media menu.
-
Go to Common menu.
-
Go to Boot logo menu.
-
Input code 5678.
-
Press selected startup screen, then press OK button.
Wiring operation for steering wheel control
Single wiring for steering wheel control: connect KEY1 (brown) and KEYGND (black) in the wire bundle of power cord of the system with KEY1 (brown) and KEYGND (black) in steering wheel of cars. The schematic diagram is as the following:
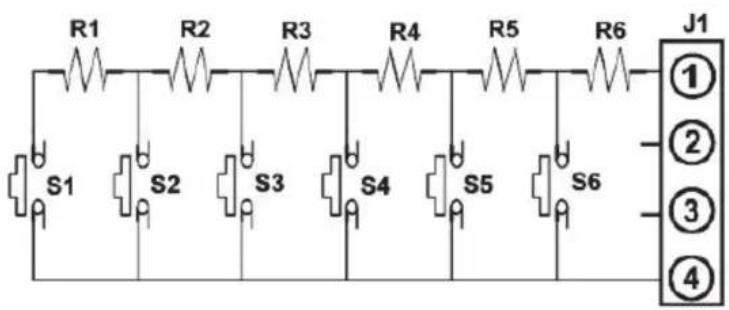
Steering wheel control KEY1
Steering wheel control GND
Double wiring for steering wheel control: connect KEY1 (brown) KEY2 (brownish black), KEYGND (black) in the wire bundle of power cord with KEY1 (brown), KEY2 (brownish black) and KEYGND (black) in steering wheel of cars. The schematic diagram is as the following:

Specification
Technical parameters
Max. power: 4 x 45 W
RMS power: 4 x 35 W
SNR: 60 dB
Channel separation: ≥ 30 dB
Power supply: 9-15 V DC
Load impedance: 4 Ohm
Fuse: <10 A
Display
Size: 7"
Panel: TN
Resolution: 1024x600 px
Aspect ratio: 16:9
Touchscreen: Capacitive, 5-point
Display brightness: Adjustable
Main features
Size: 2 DIN
Supported formats
• Audio: MP3, WMA, AAC, RM, FLAC
• Video: MPEG, H264, H263, VC1, RV, RMVB, DivX
• Picture: JPG, BMP, JPED, GIF, PNG
Equalizer: Pop/Rock/Classic/Flat/Jazz/User
Loudness: Yes
GPS: Yes
Supported standard: PAL/NTSC
Steering wheel control: Yes (analogue)
Microphone: Yes
Distance scale: Yes
Keys backlight: RGB
App control: EasyConnection
App compatibility: Android 5.0 and later
System and main parameters
Operating system: Android Oreo 8.1
CPU: ARM Cortex-A7, Quad Core, 32-bit
Chipset: MT8227L
GPU: PowerVR Series6, 600 MHz
CPU frequency: 4x 1,2 GHz
RAM: 2 GB DDR3
Internal memory: 16 GB
Communication
GPS
Wi-Fi: 802.11 a/b/g/n
Bluetooth 4.0
Phone call management: Yes
Phonebook synchronization: Yes
Audio streaming: Yes
Analogue radio tuner
FM frequency range: 87,5 - 108 MHz
AM frequency range: 522 - 1620 kHz
FM preset memory: 18
AM preset memory: 12
RDS: Yes (AF/TP/TA/PTY)
Frequency search: automatic / manual
Stereo separation: >54 dB
I/O
GPS socket
Radio antenna socket
6x Output sockets
Set includes
Main unit
Wiring harness with ISO plug
External microphone (cable length 3 m)
External GPS antenna
Reversing camera plug
RCA plug
2x USB plug
Mounting holder with screws
Environmental
Operating temperature: -20\~60°C
Storage temperature: -20\~70°C
Operating humidity: <80%
Mounting depth: 5 cm
IMPORTANT: The producer allows the possibility for minor variations in display brightness and color between individual devices. There may be visible light or dark spots on the display. Up to 5 defective pixels are acceptable to be present on the display of the device. Above mentioned cases concerning device's display are not covered under warranty nor statutory warranty rights.
Producer reserves rights to change product overview and specifications without prior notice.
Please note: illustrations and descriptions concerning operating system are for reference only, and may vary from actual software on your device! Any information included in this manual are subject to change without prior notice. Interfering with device software will void the warranty.
Lechpol Electronics Sp. z o.o. Sp.k. hereby declares that car receiver KM2006 is consistent with directive 2014/53/UE. Full text of the EU Declaration of Conformity is available at following Internet address: www.lechpol.eu.
Google and Android are trademark of Google LLC; Oreo is a trademark of Mondelez International, Inc. group.

English
Correct Disposal of This Product
(Waste Electrical & Electronic Equipment)


(Applicable in the European Union and other European countries with separate collection systems) This marking shown on the product or its literature, indicates that it should not be disposed with other household wastes at the end of its working life. To prevent possible harm to the environment or human health from uncontrolled waste disposal, please separate this from other types of wastes and recycle it responsibly to promote the sustainable reuse of material resources. Household users should contact either the retailer where they purchased this product, or their local government office, for details of where and how they can take this item for environmentally safe recycling. Business users should contact their supplier and check the terms and conditions of the purchase contract. This product should not be mixed with other commercial wastes for disposal.
Made in China for LECHPOL ELECTRONICS Sp. z o.o. Sp.k., ul. Garwolińska 1, 08-400 Miętne.
KWESTIE BEZPIECZEŃSTWA
CPU: ARM CortexβA7, Quad Core, 32-bit
Chipset: MT8227L
GPU: PowerVR Series6, 600 Mhz
Tuner radio analogic
natural_image
Abstract wavy line pattern with no text or symbols
www.krugermatz.com
Krüger&Matz is a registered trademark
- Deutsch
- Temperature
- Safety instructions
- Hearing safety
- Notes on external memory
- Front panel
- Operation
- Navigation
- Radio
- Music
- Bluetooth
- English
- Settings
- Video
- Easy Connection app
- Attention:
- Steering wheel controls
- Changing display language
- Changing wallpaper
- Changing boot screen
- Wiring operation for steering wheel control
- Specification
- Technical parameters
- Display
- Main features
- System and main parameters
- Communication
- Analogue radio tuner
- I/O
- Set includes
- Environmental
- KWESTIE BEZPIECZEŃSTWA
- Tuner radio analogic
Brand : Krüger&Matz
Model : KM2006
Category : Car radio