
3LVF-434.1IT - Dishwasher FAGOR - Free user manual and instructions
Find the device manual for free 3LVF-434.1IT FAGOR in PDF.


| Product Type | Built-In Dishwasher |
| Model | 3LVF-434.1IT |
| Brand | Fagor |
| Capacity | 10 place settings |
| Width | 448 mm (45 cm model) |
| Depth | 550 mm |
| Height | 820 - 970 mm (adjustable feet) |
| Weight | Approximately 35 kg |
| Power Supply | 220-240 V ~ 50 Hz |
| Current | 10-16 A |
| Water Pressure | 0.03 - 1 MPa |
| Programs | Auto, Intensive, ECO, Glass, 90 min, Rapid |
| Functions | Half Load, Extra Drying, Delay Start (up to 24h) |
| Water Softener | Adjustable hardness levels H1-H6 |
| Rinse Aid Dispenser | Adjustable settings D1-D5 (default D3) |
| Detergent Dispenser | Max 30 g, main wash and pre-wash compartments |
| Filter System | Strainer, main filter, fine filter |
| Spray Arms | Upper and lower, removable for cleaning |
| Cutlery Basket | Removable, with separate compartments |
| Upper Basket | Height-adjustable, foldable shelves |
| Lower Basket | Foldable spikes for larger items |
| Extra Features | Glass holder, baking tray holder (select models) |
| Child Safety | Child lock (select models) |
| Energy Efficiency | ECO program compliant with EU standards |
| Noise Level | Approximately 44 dB (estimated) |
| Spare Parts Availability | 7-10 years minimum per EU regulation |
Frequently Asked Questions - 3LVF-434.1IT FAGOR
User questions about 3LVF-434.1IT FAGOR
0 question about this device. Answer the ones you know or ask your own.
Ask a new question about this device
Download the instructions for your Dishwasher in PDF format for free! Find your manual 3LVF-434.1IT - FAGOR and take your electronic device back in hand. On this page are published all the documents necessary for the use of your device. 3LVF-434.1IT by FAGOR.
USER MANUAL 3LVF-434.1IT FAGOR
SAFETY INSTRUCTIONS FOR USE 8
BEFORE YOU INSTALL THE APPLIANCE 8
BEFORE FIRST USE 8
CHILD SAFETY 8
DAILY MAINTENANCE 9
IN CASE OF PROBLEMS 9
RECOMMENDATIONS 9
DISHES AND UTENSILS THAT ARE NOT SUITABLE FOR DISHWASHERS. 10
UNPACKING 11
DISPOSAL OF OLD APPLIANCE 12
INSTALL THE APPLIANCE 13
PLACE YOUR APPLIANCE 13
WATER SUPPLY CONNECTION 13
WATER SUPPLY HOSE 13
THE DRAIN HOSE 14
ELECTRICAL CONNECTION 14
PREPARE THE APPLIANCE FOR OPERATION 15
BEFORE FIRST USE 15
THE IMPORTANCE OF WATER DESCALING 15
ADD SPECIAL SALT 15
THE TEST STRIP 16
MULTI-COMPONENT (MULTITAB) DETERGENTS (EG. 2-IN-1, 3-IN-1, ETC.) 16
WATER HARDNESS TABLE 17
THE USE OF DETERGENTS 17
STANDARD LOADING AND TEST RESULTS: 18
INFORMATION FOR COMPARABILITY TEST IN ACCORDANCE WITH EN 60436 18
CUTLERY BASKET 19
CUTLERY RACK 19
LOAD DISHES INTO DISHWASHER 20
UPPER BASKET 20
FOLD THE MUGS AND CUPS SHELVES 20
FOLD THE DISHWASHER BASKET SPIKES 21
TIPS FOR USING THE DISHWASHER BASKET: 21
LOWER BASKET 22
FILL THE DETERGENT DISPENSER 23
ADD RINSE AID TO THE DISPENSER AND ADJUST SETTING 24
TURN ON THE APPLIANCE AND SELECT PROGRAMME 27
TURN ON THE APPLIANCE 27
CHANGE PROGRAMME 27
ADD DISHES DURING THE PROGRAMME: 27
GLASS HOLDER (SELECT MODELS ONLY) 30
Glass rack (select models only) 30
BAKING TRAY HOLDER (SELECT MODELS ONLY) 31
BLUE DOT (SELECT MODELS ONLY) 31
CLEANING AND MAINTENANCE 32
CLEAN EXTERNAL SURFACES 32
CLEAN INTERNAL SURFACES 32
SPRAY ARMS 33
CLEAN THE DISHWASHER 33
PROBLEM SOLVING GUIDE 35
INSTALL THE APPLIANCE 37
IN A CABINET 37
- PLACE YOUR APPLIANCE 37
BUILT-ON INSTALLATION 39
WARRANTY AND AFTER SALES SERVICE 44
WARRANTY 44
CS - OBSAH
POKYNY K BEZPEČNÉMU POUŽÍVÁNÍ 46
PŘED INSTALACÍ 46
PRED PRVNİM POUŽITİM 46
BEZPEČNOST DĚTÍ 46
KAŽDODENNÍ OBSLUHA 47
V PRIPADE PROBLEMÜ 47
DOPORUCENI 48
NÁDOBÍ, KTERÉ NENÍ VHODNÉ PRO MYTÍ V MYČCE 48
VYBALENI 50
LIKVIDACE OPOTREBOVANYCH ZARIZENÍ 51
INSTALACE ZARIZENI 52
UMISTENI ZARIZENI 52
PRIPOJKA VODY 52
HADICE PRIVADEJICI VODU 52
ODTOKOVA HADICE 53
ELEKTRICKA PRIPOJKA 53
PRIPRAVA ZARIZENI DK PROVOZU 54
PRED PRVNIM POUZITIM MYCKY 54
VYZNAM ODVAPNOVANI VODY 54
NAPLNOVANI SOLI 54
TESTOVACÍ PROUŽEK 55
VICESLOŽKOVE DETERGENTY (NAPR.: "2 V 1", "3 V 1" ATP.) 55
TABULKA TVRDOSTI VODY 56
SPOTREBA DETERGENTÜ 57
NAPLŇOVÁNÍ MYČKY NÁDOBÍM 60
HORNI KOS 60
SKLADANI POLIC NA HRNICKY/SALKY 60
SKLADANI STOJANÜ KOSE 60
POKYNY K POUŽIVANÍ KOŠE: 61
SPODNI KOS 62
NAPLNOVANI DAVKOVACE DETERGENTU 63
NAPLÑOVÁNÍ DÁVKOVACE LESTICÍHO PROSTREDKU A VYBĚR NASTAVENÍ 64
ZAPNUTÍ ZARÍZENÍ A VÝBĚR PROGRAMU 67
ZAPNUTI ZARIZENİ 67
ZMĚNA PROGRAMU 67
PRIDÁVÁNÍ NÁDOBÍ V PRŮBĚHU PROGRAMU 67
PO UKONČENÍ MYCIHO CYKLU 68
DRŽAK NA SKLENICKY (JEN VYBRANE MODELY) 71
STOJANEK NA SKLENICKY (JEN VYBRANE MODELY) 71
DRZAK NA PECICI PLECH (JEN VYBRANE MODELY) 72
BLUE DOT (JEN VYBRANE MODELY) 72
ČISTĚNÍ A ÚDRŽBA 73
ČISTĚNÍ VNEJSÍCH POVRCHŮ 73
ČISTĚNÍ VNITŘNÍCH POVRCHŮ 73
POSTRIKOVACI RAMENA 74
CISTENI MYCKY 74
ZJISTOVANI ZAVAD 76
MONTAŽ ZARIZENI DO NÁBYTKOVĚ SESTAVY 78
UMISTENI ZARIZENI 78
MONTAZ DO NABYTKU 80
ZÁRUKA, POPRODEJNÍ SERVIS 85
ZARUKA 85
SK - OBSAH
POKYNY TÝKAJÚCE SA BEZPEČNÉHO POUŽÍVANIA 87
PRED MONTÁŽOU 87
PRED PRVYM POUZITIM 87
BEZPEČNOST DETÍ 88
KAŽDODENNĚ POUŽÍVANIE 88
V PRIPADE PROBLEMOV 89
ODPORUCANIA 89
RIAD, KTORY NIE JE URCENY NA UMYVANIE V UMYVACKE 89
ROZBALENIE 91
LIKVIDÁCIA ZARIADENÍ 92
INSTALÁCIA ZARIADENIA 93
UMIESTNENIE ZARIADENIA 93
PRIPOJKA VODY 93
PRÍTOKOVA HADICA 93
ODTOKOVA HADICA 94
PRIPOJENIE K EL. NAPATIU 94
PRÍPRAVA ZARIADENIA NA POUŽÍVANIE 95
PRED PRVYM POUZITIM UMYVACKY 95
VYZNAM ODSTRANOVANIA VODNEHO KAMENA 95
NAPLNOVANIE SOLOU 95
TESTUJÚCA PÁSKA 96
From now on, your daily housework will be easier than ever before. Your appliance is exceptionally easy to use and extremely efficient. After reading these Operating Instructions, operating the appliance will be easy.
Before being packaged and leaving the manufacturer, the appliance was thoroughly checked with regard to safety and functionality.
Before using the appliance, please carefully read these Operating Instructions. By following these instructions carefully you will be able to avoid any problems in using the appliance. It is important to keep these Operating Instructions and store them in a safe place so that they can be consulted at any time.
Follow these instructions carefully in order to avoid possible accidents.
Sincerely,
FAGOR

ELECTRODOMÉSTICO
SAFETY INSTRUCTIONS FOR USE
Before you install the appliance
- Check the appliance for transport damage. Never install or use a damaged appliance. If in doubt, contact your seller.
- Carefully read the operating instructions before plugging dishwasher to a power outlet and using the appliance. Operating instruction include tips that will help you avoid the risk of injury and damage to the appliance. Keep dishwasher documentation in a safe place for possible future use.
- These operating instructions have been prepared for a range of appliances and some features described herein may not apply to your appliance.
Before first use
• See installation notes (below).
- Refer the grounding system installation to a qualified electrician.
- The manufacturer shall not be liable for any damage arising from the use of a non-grounded appliance.
- Before using the appliance, verify that the data given on the rating plate matches that of local power outlets.
- Do not plug in the appliance before and during installation.
• Always use the original plug that came with the appliance.
- Do not use an extension cord to connect the appliance to the wall outlet. Extension cords are not sufficiently safe (e.g. they may overheat).
- Make sure the plug is easily accessible after installing the appliance.
Child safety
- This appliance can be used by children aged 8 years and older or persons with physical, mental or sensory handicaps, or those who are inexperienced or unfamiliar with the appliance, provided they are supervised or have been instructed how to safely use the appliance and are familiar with the associated risks. Ensure that children do not play with the appliance. Children should not be allowed to clean or maintain the appliance.
- Children less than 3 years of age shall be kept away unless continuously supervised.
- Do not allow children to play with the appliance.
- Dishwashing detergents can be caustic and irritate the eyes, mouth and throat. Read the safety notes from deter-
gent manufacturer.
- Never leave children unsupervised when the appliance is open. It can contain residue detergent.
- Dishwasher water is not suitable for drinking. Danger of injury from the caustic chemicals.
- When you open the door during a programme, be careful as water temperature is high.
- To avoid injury always place long and sharp/pointed items (e.g. forks, knives) in the cutlery basket, pointing down, or flat on the top basket.
Daily maintenance
- Use the appliance for household dishwashing only.
- Do not use solvents in the appliance as there is a risk of explosion.
- Do not sit or stand on the open door and do not place any objects on it. The device may overturn.
- Do not open the door when the appliance is operating. Hot water or steam can be released.
- Do not leave the door open, because they it can pose a hazard.
- Washing tableware in a household dishwasher usually uses less energy and water than washing up by hand.
In case of problems
• Refer repair and modifications of the appliance to qualified technicians only.
- In the event of problèmes or repairs, unplug the appliance from the wall outlet:
- Unplug the appliance by pulling the plug,
- Turn off the circuit breaker.
- Do not pull the power cord, pull the plug only. Close the water supply.
Recommendations
- Loading the dishwasher to the capacity indicated by the manufacturer will save energy and water.
- To save energy and water, rinse food residue of the dishes before loading the dishes into the dishwasher. Run the dishwasher with full load.
- Do not put dishes with food leftovers in the appliance.
- Use pré-wash programme only when needed.
- Load bowls, cups and mugs bottom facing up.
- Do not load in the appliance any dishes that are not dishwasher safe and do not load too many dishes.
- It is not recommended to pre-rinse the tableware, as this leads to an increase in water and energy consumption.
Dishes and utensils that are not suitable for dishwashers.
- Ashtrays, candles, cleaning pastes, paints, chemicals, ferro-alloys;
- Forks, spoons and knives with a handle made of wood, ivory or Nacre, glued items, items contaminated with abrasive powders, acid or base
- Plastic dishes that are not resistant to high temperature, containers made of copper or tin;
- Aluminium and silver items (may be stained or loose lustre)
- Some delicate types of glass, porcelain with decorative prints, as prints may fade even after the first wash; some crystal dishes as they may lose their transparency, glued silverware sensitive to high temperatures, lead crystal glass, chopping boards, items made with synthetic fibres;
- Absorbent objects such as a sponge or kitchen cloths are not suitable for the dishwasher.
- Before buying dishes in the future make sure they are dishwasher safe.
- Pursuant to Commission Regulation (EU) 2019/2022, the minimum availability period for spare parts necessary to repair the appliance is 7 or 10 years depending on the type and purpose of the spare part.
- The list of spare parts and the ordering procedure are available on the websites of the manufacturer, importer or an authorized representative.
- For more information about the product, please refer to the EU EPREL Product Database at https://eprel.ec.europa.eu. For more information, please use your mobile device to scan the QR code on the energy label or enter the product model listed on the energy label in the EPREL search engine https://eprel.ec.europa.eu/
UNPACKING

During transportation, protective packaging was used to protect the appliance against any damage. After unpacking, please dispose of all elements of packaging in a way that will not cause damage to the environment.
All materials used for packaging the appliance are environmentally friendly; they are 100% recyclable and are marked with the appropriate symbol.
Important! Packaging materials (bags, polyethylene, polystyrene, etc.) should be kept away from children during unpacking.
DISPOSAL OF OLD APPLIANCE
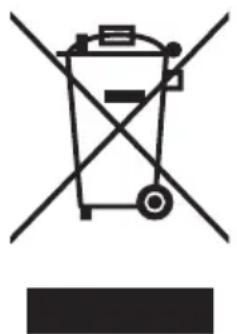
In accordance with European Directive 2012/19/EU and local legislation regarding used electrical and electronic goods, this appliance is marked with the symbol of the crossed-out waste container. This marking indicates that the appliance must not be disposed of together with other household waste after it has been used.
The user is obliged to hand it over to waste collection centre collecting used electrical and electronic goods. The collectors, including local collection points, shops and local authority departments provide recycling schemes.
Proper handling of used electrical and electronic goods helps avoid environmental and health hazards resulting from the presence of dangerous components and the inappropriate storage and processing of such goods.
INSTALL THE APPLIANCE
Place your appliance
- When choosing the place of installation, make sure you will be able to easily load and remove dishes and utensils from the dishwasher.
- Do not place the appliance in a room where the temperature can fall below 0°C.
- Before installing 'unpack the appliance following the instructions on the packaging.
- When you move the appliance do not handle it by the door or control panel.
- Leave some room on all sides to have convenient access to the dishwasher when cleaning.
- Make sure that when you set the dishwasher you do not crush the water supply and drain hose. Also, make sure that the appliance is not places on the power cord.
- Level the appliance using the adjustable legs. Proper level ensures trouble-free opening and closing the dishwasher doors.
- If the dishwasher door will not close properly, check that the appliance stands firmly on the floor, if not, adjust using the adjustable legs.
Water supply connection
Make sure that domestic water supply system is suitable for the dishwasher. It is recommended to install a filter in the water supply line to avoid damage to the appliance due to impurities (such as sand, clay, rust, etc.) that occasionally occur in water. This will also prevent accumulation of sediment after dishwashing.
Water supply hose
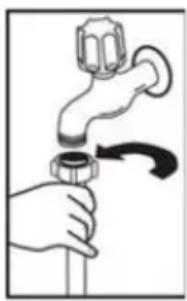
Do not use the water supply hose from the old dishwasher. Use the new water supply hose provided with the appliance. Before connecting, rinse the hose with water. Connect the water supply hose directly to the water feed valve. The domestic water system pressure should be at least 0.03 MPa and up to 1 MPa. If the water pressure exceeds 1 MPa, install pressure reducing valve.
When the connection is ready, open the valve completely and check for leaks.
For safety reasons, close the water supply tap after every wash.


NOTE: Aquastop water supply is used in some dishwasher models. Dangerous voltage could occur with Aquastop. Do not cut the Aquastop water supply. Do not allow it to bend or twist.
Note: For safety reasons, close the water tap after every wash
The drain hose
The drain hose can be connected directly to a water drain or kitchen sink stub pipe. You can also drain the water directly into the sink using the special bracket (if available), placing the drain hose outlet on the kitchen sink edge. The drain hose connection should be made at least 50 cm and up to 110 cm from the floor.

If the drain hose is longer than 4m, dishes may not be washed properly. The manufacturer will not be held responsible.
Electrical connection
Grounded plug must be connected to a grounded power outlet with a proper voltage. If there is no grounding, refer this to a qualified electrician. If you operate the appliance without proper grounding, the manufacturer does not assume any liability for the possible resulting damage.

- Domestic electrical system must be protected with a 10-16A fuse.
- The appliance must be supplied with 220-240V/50Hz AC.
- Always use the plug provided with the appliance. When you operate the appliance at lower voltage the dishwashing efficiency will deteriorate and may damage the appliance.
- The power cord may only be replaced by authorized service or a qualified electrician. Failure to comply with these rules may lead to an accident.
- For safety reasons, you should always unplug the appliance after you have finished using it.
- In order not to avoid electric shock, do not remove the plug from the wall outlet with wet hands.
- When you plug the appliance from the wall outlet, always pull the plug. Never pull the power cord.
PREPARE THE APPLIANCE FOR OPERATION
Before first use
- Before using the appliance, verify that the data given on the rating plate matches that of local power outlets.
- Remove all packing materials from inside of the appliance.
• Prepare special salt (water softener). - Pour water into the special salt dispenser and then add about 1.5 kg of special salt (dishwasher salt).
- Pour rinse aid into the dispenser.
The importance of water descaling
A dishwasher requires soft water (with low calcium content) to operate efficiently. Otherwise, white residue main remain on the dishes and inside the appliance. This has a negative impact on the quality of dishwashing, rinsing and drying. When the water flows through the softener, ions responsible for the water hardness are removed, and the water becomes soft, for best dishwashing results. Depending on the degree of water hardness, the ions responsible for water hardness accumulate quickly inside the water softener. Therefore, the water softener must be regenerated to operate with the same efficiency during the next wash. This is why special salt is used in the dishwasher.
Add special salt
Only use special salt intended for dishwashers.
Any other type of salt that is not intended for use in a dishwasher, especially regular kitchen salt, will damage the water softener. In the event of damage caused by the use of the wrong salt, the manufacturer's warranty is void and we will not be liable for damage.
Fill with special salt before running the washing programme.
This will prevent spilled special salt or salty water from remaining on the bottom of the device, which may cause corrosion.
![graph LR A["Hand holding a cup with a lid"] --> B["Add salt to a container"] B --> C["Salt being added to the cup"] C --> D["Hearts pouring liquid into a container"] D --> E["Backfill or replace"]](/content/2026/05/850312/images/ab32a4b813149638f2f3b50c70d491fcb95855b18313564d8a810d7c4363c238.jpg)
- Remove the lower basket from the appliance and unscrew the special salt dispenser cap.
- Place the end of the funnel (included) in the hole and pour about 1.5 kg of salt.
- Pour water into the dispenser until full. It is normal that a small amount of water spills out of the special salt dispenser.
- After you fill the dispenser, screw the cap on.
- When you fill the dispenser with special salt, the add salt indicator goes out.
- Start the washing programme immediately after filling the dispenser with special salt (the quick wash is recommended). Otherwise, salty water can damage the filters, the pump or other important appliance components This is not covered by the warranty.
NOTE:
- Fill the special salt dispenser when the special salt indicator ( ) on the control panel lights up. Depending on the rate of salt dissolution, the special salt indicator may still be on even after filling the dispenser.
- If there is no special salt indicator on the control panel (on some models), you can estimate when to top up the dispenser based on the number of wash cycles performed.
- If some special salt spills, run the soaking programme or a quick wash programme.
- Use only the special salt intended for dishwashers!
The test strip
The dishwashing effectiveness is linked to water hardness. Therefore, the appliance is equipped with a system to reduce the hardness of the water supply. The dishwashing effectiveness is improved when the system is set correctly. To check water hardness contact the municipal water company or determined the water hardness using test strip (if available).
![graph LR A["Cutting: 1 min"] --> B["Cutting: 1 sec"] B --> C["Drawing: 1 min"] C --> D["Drawing: 1 sec"] D --> E["Drawing: 1 min"] E --> F["Drawing: 1 sec"] F --> G["Drawing: 1 min"]](/content/2026/05/850312/images/ce73281aee5817dfdfddf6aa7a88283911620a0fcf6502a6f373fd8861091fe8.jpg)
Multi-component (multitab) detergents (eg. 2-in-1, 3-in-1, etc.)
There are three types of detergents:
- Containing phosphates and chlorine,
- Containing phosphates and no chlorine,
- Containing no phosphates and no chlorine.
The latest tablets are generally phosphate-free. Since phosphates have water softening properties, we recommend adding salt to the container even if the water hardness is only 6° dH. If you use phosphate-free detergent where water is hard, white residue may be visible on the dishes.
You can prevent this by increasing the amount of detergent. Chlorine-free detergents have less bleaching effect. Stains may not be entirely removed. Select the programme with a higher wash temperature.
Generally, using multi-component detergents suitable results are obtained only under certain conditions. Such detergents contain rinse aid and/or special salt in a specific amount. It is recommended to use special salt when using multi-component tablets.
What you should pay attention to when using these tablets.
- Always check the type of detergent used and whether it is a multi-component product.
- Make sure that the detergent used is appropriate for tap water hardness.
- Follow the instructions on the product packaging.
- If the detergent is in the form of tablets, never place it the cutlery basket. Always place the tablet in the detergent dispenser compartment.
- The use of these detergents yields good results only in certain applications. Using this type of detergent you should contact the manufacturer for information about proper use.
- If you use the detergent properly and dishwasher settings are correct you can save on salt and/or rinse aid.
- If dishwashing results while using 2-in-1 or 3-in-1 detergents are not satisfactory (traces of lime scale on the dishes), please contact the detergent manufacturer. The warranty does not cover complaints due to the use of multi-component detergents.
Recommended use: For best results using multi-component cleaning agents, add special salt and rinse aid in the dishwasher and set the water hardness and amount of rinse aid to the lowest setting.
The solubility of the detergent tablets made by different manufacturers can vary with regard to temperature and time. It is therefore not recommended to use detergent tablets in quick programmes. It is recommended to use powder detergents in quick programmes.
Always store detergents in a dry, cool place, out of reach of children. Add detergent to the dispenser immediately before using the appliance.
Warning: If encounter another problem when using a multi-component detergent, please contact the detergent manufacturer.
Stop using multi-component detergents
- Add special salt and rinse aid to dispensers.
- Set the water hardness to the highest level (6) and run an empty dishwasher.
- Adjust the water hardness.
- Adjust rinse aid setting.
Warning: Use only rinse aid designed for domestic dishwashers. Wipe up spilled rinse aid with a cloth as it will cause the formation of large amounts of foam, and thus will reduce the dishwashing effectiveness.
Water hardness table
| Water hardness | German degrees [dH] | French degrees [dF] | British degrees [dE] | Water hardness level indicator | Special salt consumption [g/cycle] |
| 1 0~5 0~9 0~6 H1 0 | |||||
| 2 6-11 10-20 7-14 H2 9 | |||||
| 3 12-17 21-30 15-21 H3 12 | |||||
| 4 18-22 31-40 22-28 H4 20 | |||||
| 5 23-34 41-60 29-42 H5 30 | |||||
| 6 35-55 61-98 43-69 H6 60 | |||||
If the water hardness is higher than the maximum values given in the table above, or if you use water from a deep well, it is recommended to use filters and water treatment equipment.
NOTE: The factory settings are for the water hardness level 3.
Switch on the appliance;
Press the Start/Pause button for more than 5 seconds to start the water softener set model within 60seconds after the appliance was switched on;
Press the Start/Pause button to select the proper set according to your local environment, the sets will change in the following sequence:
H1->H2->H3->H4->H5->H6;
Press the Power button to end the set up model.
The use of detergents
Use a detergent for domestic dishwashers. On the market you can find detergent intended for dishwashers in the form of powder, gel and tablets. The detergent must be placed in the dispenser before starting the dishwasher. Store detergent in a cool and dry place, out of reach of children.
Do not overfill the detergent dispenser, otherwise the detergent may not dissolve completely and leave streaks on the dishes.
If you need more information on the detergent used, please contact the manufacturer directly.
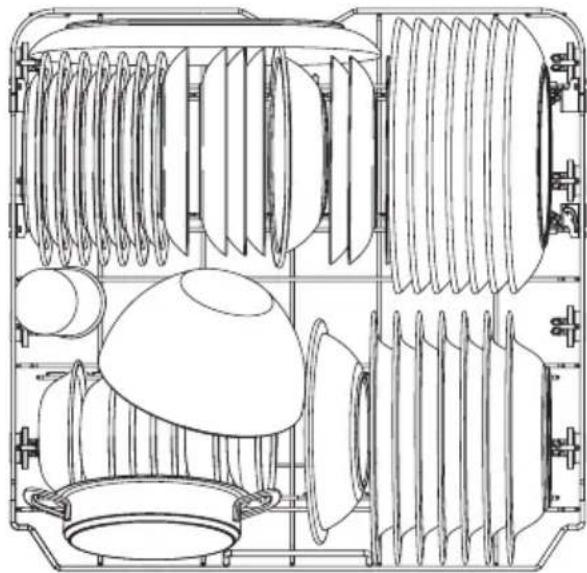
Standard loading and test results:
Upper basket

| 1 Cups |
| 2 Saucers |
| 3 Glasses |
| 4 Mugs |
| 5 Dessert bowls |
| 6 Glass bowl |
| 7 Dessert plates |
| 8 Dinner plates |
| 9 Soup plates |
| 10 Melamine dessert plates |
| 11 Melamine bowl |
| 12 Oval platter |
| 13 Small pot |
| 14 Cutlery basket |
Lower basket
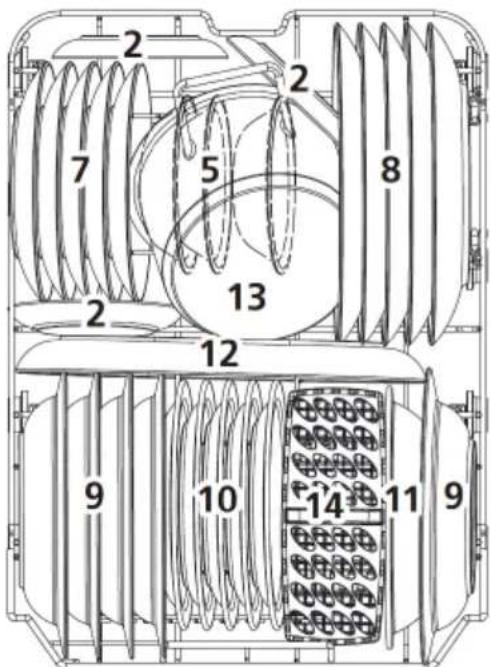
Information for comparability test in accordance with EN 60436
Capacity: 10 place settings
Position of the upper basket: lower position
Program: ECO
Rinše aid setting: MAX
Softener setting: H3
Cutlery basket
Place knives and forks separately from each other, and make sure they do not touch as this may cause poor washing results. For best washing results place knives and forks in the cutlery basket, and make sure: they do not touch and place objects in the middle.

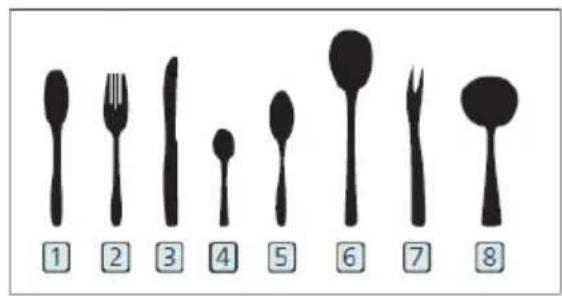
| Item Cutlery |
| 1 Soup spoons |
| 2 Forks |
| 3 Knives |
| 4 Tea spoons |
| 5 Dessert spoons |
| 6 Serving spoons |
| 7 Serving forks |
| 8 Gravy ladles |
Cutlery rack

LOAD DISHES INTO DISHWASHER
Upper basket
The upper basket is designed for washing delicate dishes such as glasses, cups, plates, etc. Dishes that are placed in the upper basket should be less soiled than dishes in the lower basket.
You can place long forks, knives and spoons horizontally on shelves so as not to obstruct the spray arms.
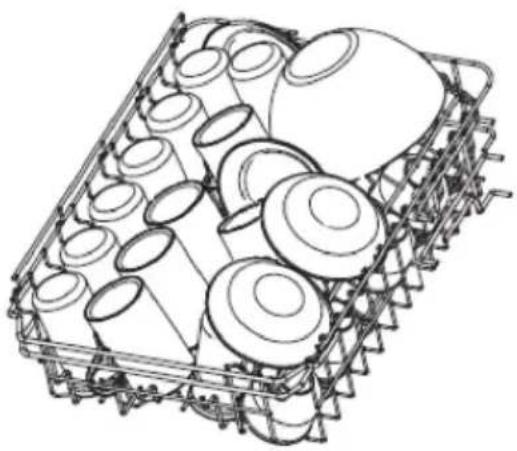

Fold the mugs and cups shelves
Fold the shelves to increase the capacity of the upper basket. You can place the glasses and mugs on the shelves. Raise the cup shelf to make more space in the basket for taller items. You can then lean the taller glasses against the shelf. It can also be removed if it is not needed.
![graph TD A["Multi-layered Frame"] --> B["Final Structure"] B --> C["Arrow to Final Panel"] style A fill:#f9f,stroke:#333 style B fill:#bbf,stroke:#333 style C fill:#dfd,stroke:#333](/content/2026/05/850312/images/f55c76ce5230ae49b7b19511e718a36014597e781d73705554258e76d2cc13f8.jpg)
Fold the dishwasher basket spikes
The spikes of the lower basket are used for holding plates and a platter. They can be lowered to make more room for large items.
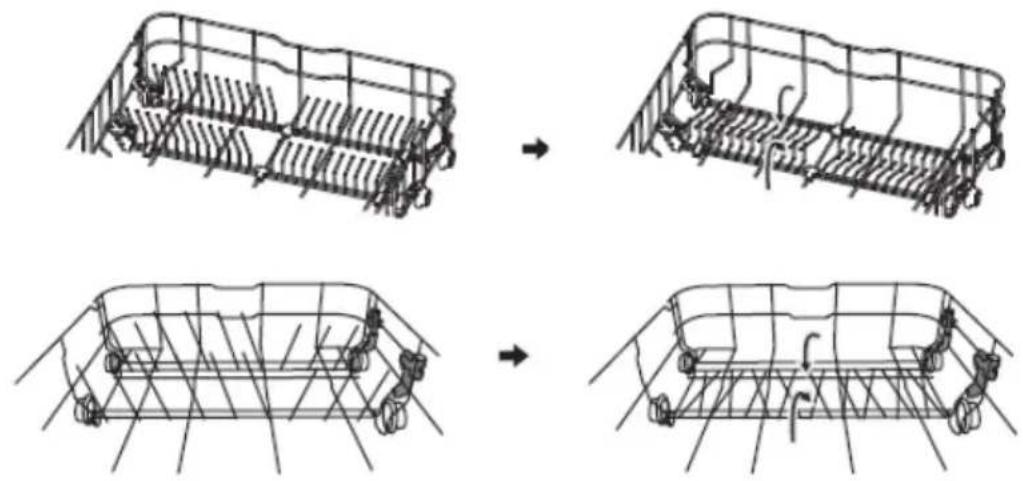
raise upwards fold backwards
Tips for using the dishwasher basket:
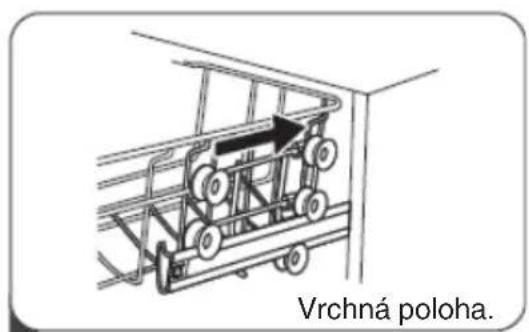
Adjust the upper basket
Type 1:
The height of the upper basket can be easily adjusted to accommodate tall pots and pans in the upper or lower basket.
To adjust the height of the upper basket:


- Extend the upper basket.
- Remove the upper basket.
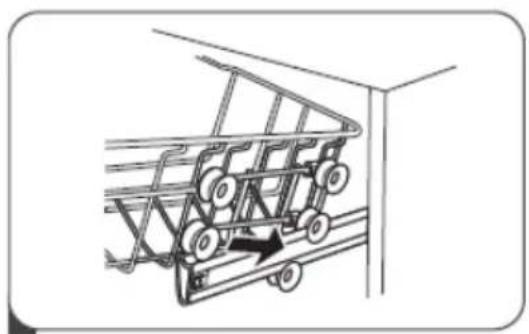

- Mount the basket on the upper or lower rollers.
- Insert the upper basket
Type 2:


- To raise the basket to the upper position, raise it until it is at the same height on both sides. Make sure it is securely attached to the rails.
- To lower the basket, push down and release the handles.
Lower basket
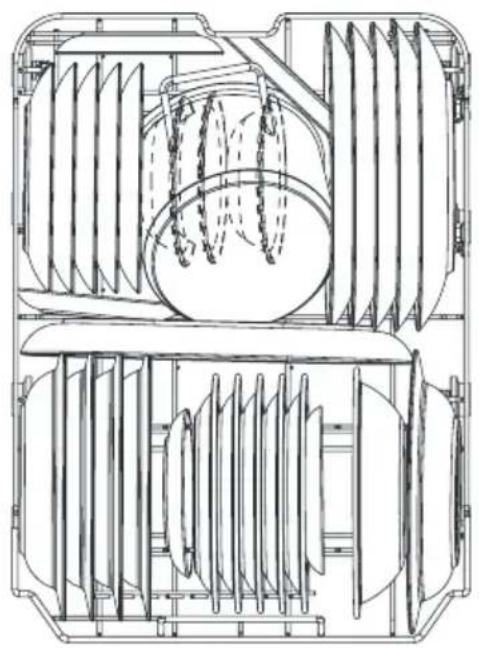
Put plates, bowls, pots, etc. in the lower basket. Make sure that dishes in the lower basket do not block the spray arm and it can rotate freely. Place large pans and heavily soiled items such as pots, pans, lids, dishes, etc. in the lower basket. Place dishes upside down, so that water does not collect inside.
Place the dishes in such a way that they do not block the spray arm.

Fill the detergent dispenser
Open the detergent dispenser flap by pressing the detergent dispenser tab to release the lock as shown in the figure.
The detergent dispenser features volume marking. Using these markings (lines) you can measure the correct amount of detergent. The dispenser can accommodate a maximum of 30g of detergent.
Open the pack with dishwasher detergent and in the case of heavily soiled dishes pour 25 cm 3 detergent into the main wash compartment (A) or 15 cm 3 for less soiled dishes (B). Depending on the amount of soil and the water hardness you may need to add more detergent.
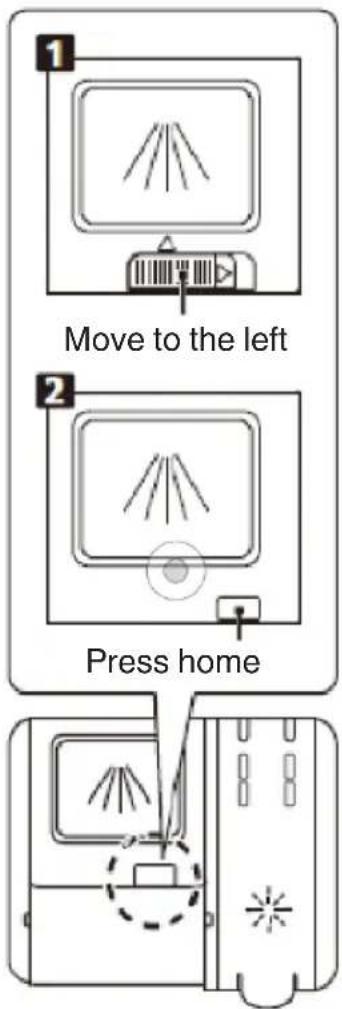
- Open the lid by moving the release lever.
- Open the lid by pressing the release lever.
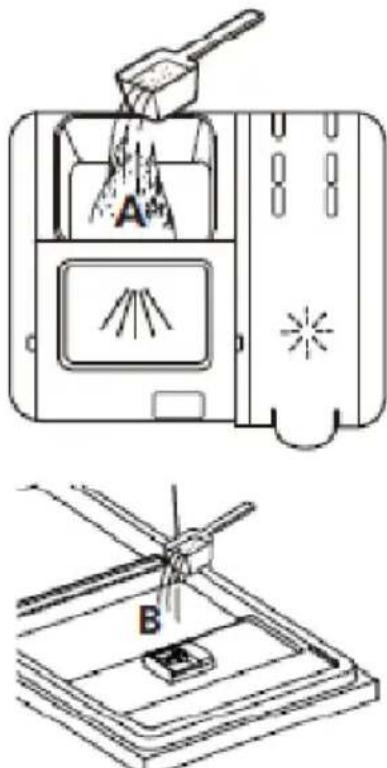
Pour the detergent into the larger chamber (A) for the main cycle.
For a better washing result, especially in the case of heavily soiled dishes, pour a small amount of detergent on the door.
The extra detergent will be used during the pre-wash.
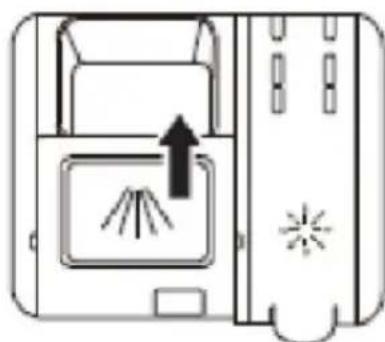
Close the lid by moving it forward and pressing it.
Please note that the setting may be different depending on the water contamination. Follow the manufacturer's instructions on the detergent packaging.
Add rinse aid to the dispenser and adjust setting
Use rinse aid to prevent the formation of white water drops, lime scale spots, white streaks that may occur on the dishes, as well as to improve the drying process. Contrary to popular belief, it not only serves to obtain a shiny dishes, but also to facilitate drying. For this reason, make sure there is always sufficient amount of rinse aid in the dispenser.

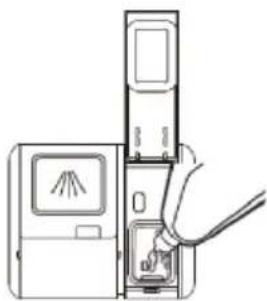
Open the dispenser lid by lifting the tab. Pour the rinse aid into the dispenser, take care not to overfill.

Close the lid when finished.
Note: When closing the detergent dispenser, press marked location on the lid!
Adjust the rinse aid dispenser
To achieve better drying results you can adjust how much rinse aid is used. Follow these steps.
- Connect the appliance to the wall power outlet
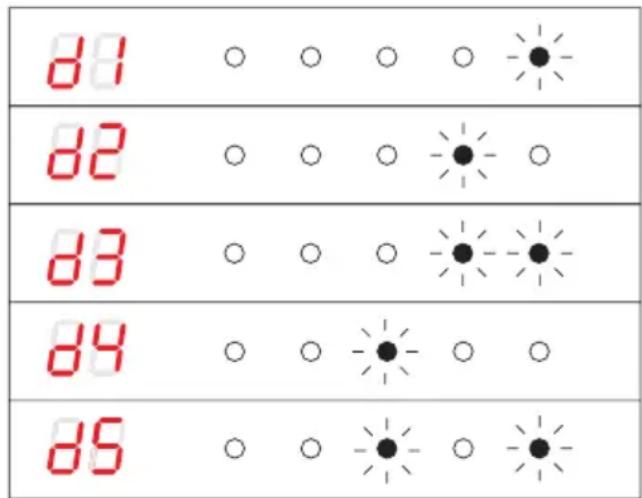
- Within 60 seconds after step 1, press and hold the „Rapid" button for more than 5 seconds, then press the delay button to enter the desired setting. The rinse aid indicator blinks once every second.
- Press the "Rapid" button to select the desired setting according to your local requirements. The following settings are available: D1->D2->D3->D4->D5->D1, The most rinse aid is dispensed with the D5 setting The default setting is D3.
Wait 5 seconds or press the power button to save the new setting and exit the rinse aid dispenser adjustment mode.
TURN ON THE APPLIANCE AND SE- LECT PROGRAMME
Turn on the appliance
- Draw out the lower and upper basket, load the dishes and push them back. It is commended to load the lower basket first, then the upper one.
- Pour in the detergent.
- Insert the plug into the socket. Make sure that the water supply is turned on to full pressure.
- Open the door, press the Power button.
- Choose a program, the response light will turn on. Then close the door, the dishwasher will start its cycle.
Change programme
You can change the programme only if it runs for a short time. Otherwise the detergent is already dissolved in water and the water could be pumped out. In this case, refill the dispenser with detergent and start the washing program from the beginning. To reset your dishwasher, please follow the instructions below:
-
Open the door a little to stop the dishwasher, after the spray arm stop working, you can open the door completely.
-
Press Program button for more 3 seconds to cancel the current program and the machine goes into standby state.
-
You can change the program to the desired cycle setting.
Add dishes during the programme:
You can add extra dishes at any time before detergent is released. In this case, follow the instructions below:
- Open the door a little to stop the washing.
- After the spray arms stop working, you can open the door completely.
- Add the forgotten dishes.
- Close the door, the dishwasher will continued to run after 10 seconds.
WARNING!
Be careful when opening the door during the dish-washing programme as hot steam can be released and cause scalding.
DISPLAY AND CONTROL PANEL

| Operation (Button) | |
| 1. Power Press | this button to turn on your dishwasher, the screen lights up. |
| 2. Half load When you have about or less than half of full place settings dishware to wash, you can choose this function to save energy and water. (It can only be used with Intensive, ECO, Glass and 90 min.) | |
| 3. Extra Drying | To dry dishes more completely. (It can only be used with Intensive, ECO, Glass and 90 min.) |
| 4. Delay Press | this button to set the delayed hours for washing. You can delay the start of washing up to 24 hours. One press on this button delays the start of washing by one hour. |
| 5. Program Select the appropriate washing program, the selected program indicator will be lit.AutoAUTOAuto sensing wash, lightly, normally or heavily soiled crockery, with or with out dried-on food.IntensiveHeavily soiled items include pots and pans. With dried on food.ECO ECOThis is the standard program suitable for normally soiled loads, such as pots, plates, glasses and lightly soiled pans.GlassFor lightly soiled crockery and glass.90 minFor normally soiled loads that need quick wash.RapidA shorter wash for lightly soiled loads that do not need drying. | |
| 6. Screen To show the reminding time and delay time,error codes etc. | |
| 7. Warning indicator | Rinse AidIf the indicator is lit, it means the dishwasher is 7 low on dishwasher rinse aid and requires a refill.SaltIf the indicator is lit, it means the dishwasher is low on dish-washer salt and needs to be refilled. |
ERROR CODE
| ERROR CODE | DESCRIPTION OF THE FAULT | ACTION |
| E1 Longer inlet time. | Faucets is not opened, or water intake is restricted,or water pressure is too low. | |
| E3 | Not reaching required temperature. | Malfunction of heating element. |
| E4 Overflow | Some dishwasher element leaks. | |
| E8 | The non-return valve is not aligned. | Changeover valve break or open. |
| Ec | Washing control system fail | PCB or motor fail. |
| Ed | Failure of communication between main PCB with display pcb. | Open circuit or break wiring for the communication. |
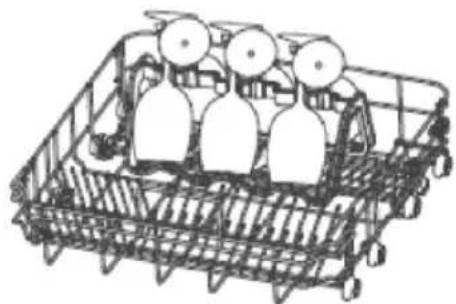
Glass holder (select models only)
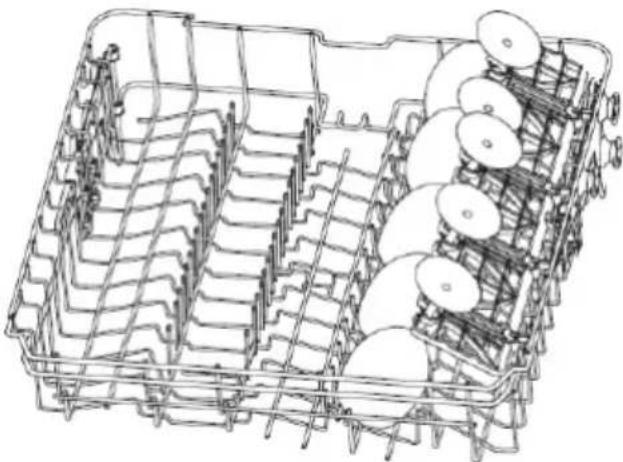
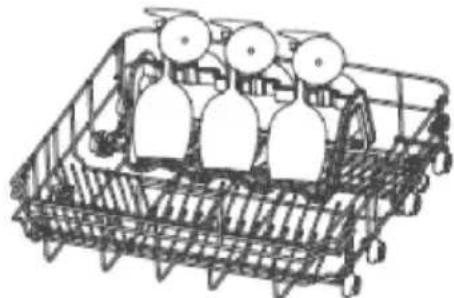
You can place glasses in the upper basket. Hang the wine glasses on the holders. Choose the holder position according to the glass height.

Small glass up to 120 mm in height

Medium glasses up to 180 mm in height (when the appliance is equipped with an additional cutlery shelf), or glasses up to 250 mm in height (when the appliance does not have an additional shelf)
Place small and medium glasses in the upper basket holder
Glass rack (select models only)
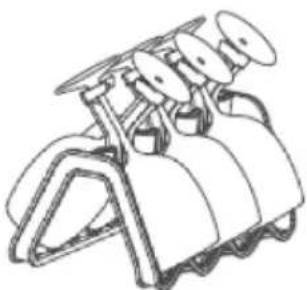

Glass rack Large glasses can also be placed on a glass rack designed for washing glasses. The glasses are slightly tilted to make the best use of the space.
The rack is placed in the lower basket. When the glasses are positioned, remove the cup rack from the lower basket, fold the two rows of spikes and place the rack in the basket
Baking tray holder (select models only)
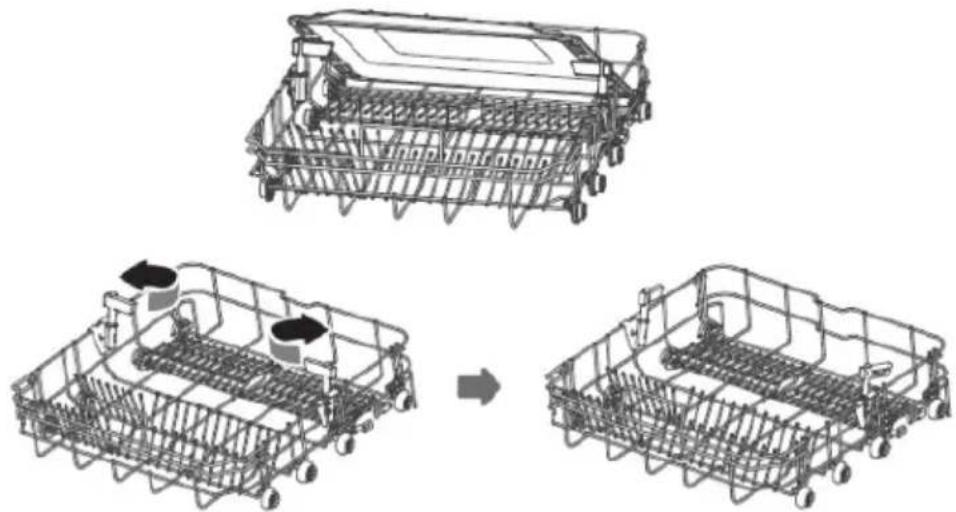
You can wash the baking tray by placing it in the holder, which makes the dishwashing more effective. When there is no need to use the holder, you can pivot it outward on both sides so as not to affect the normal positioning of other tableware.
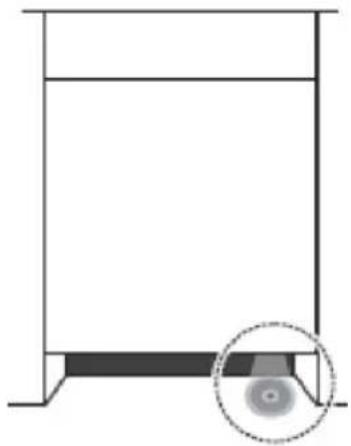
Blue Dot (select models only)
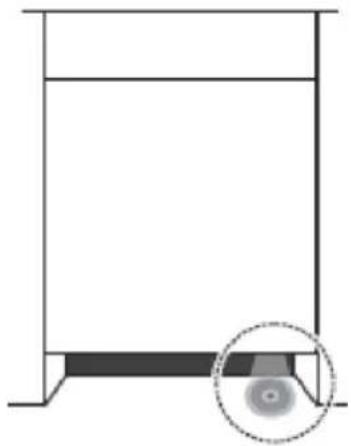
Floor display and add dishes function:
- At the beginning of the wash, before the main wash temperature is reached, the add dishes indicator will flash. This means that you can open the appliance door and add the dishes to be washed.
- The floor display will then stop flashing until the end of the dishwashing programme and during this time it is not advisable to add any dishes.
- Finally, at the end of the programme it will flash for 5 minutes and then stop.
CLEANING AND MAINTENANCE
Clean external surfaces
Door and door seal: To remove food residue, clean the door gasket regularly with a soft, moist cloth.
When loading dishes into the dishwasher, food and drink residue may deposit on the sides of the dishwasher door. These surfaces are outside the dishwasher compartment and the water from the spray arms does not reach them. Remove any residue before closing the door.
Control Panel
Wipe the control panel ONLY with a soft, damp cloth.
WARNING: Do NOT use any spray cleaner to prevent water ingress into the door lock and electrical components.
Do not use any abrasive detergents or sharp cleaners on external surfaces. Some paper towels may also leave scratches or marks on the surface.
Clean internal surfaces
Filter system
The filter system at the bottom of the dishwasher compartment stops coarse residue during wash cycle. This residue can cause clogging of the filters. Regularly check the condition of the filters and rinse them under running water, if necessary. Clean the filters as follows.

- Hold the strainer and turn it counter clockwise to unscrew. Lift the filter up and remove it from the dishwasher.
- The fine filter can be removed from the bottom of the filter assembly. The strainer can be disengaged from the main filter by gently squeezing the edges and pulling.
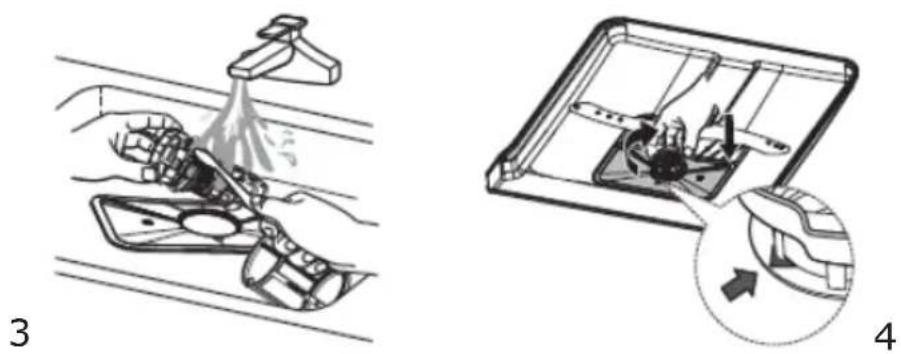
- Larger residues can be rinsed under running water. Clean the filter completely with a soft, clean brush.
- Install the filters in reverse order, place the filter insert and turn clockwise as indicated by the arrow.
WARNING: Do not overtighten the filters. Carefully replace the filters and install in place. Otherwise, contaminants can enter the dishwasher's systems and cause clogging.
NEVER: use the dishwasher without the filter assembly. Incorrect filter replacement can reduce the appliance effectiveness and cause damage to the dishes and cutlery.
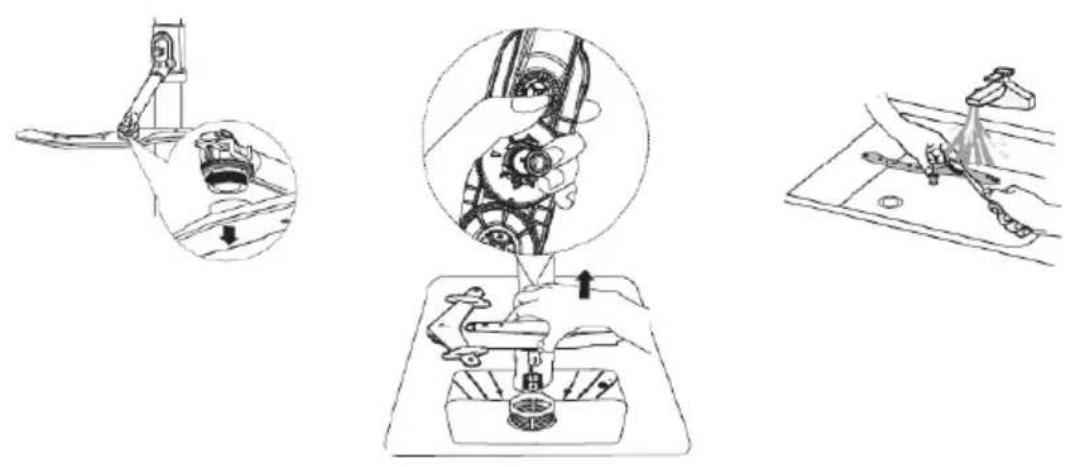
Spray arms
It is necessary to clean the spray arms regularly for hard water chemicals will clog the spray arm jets and bearings.
To clean the spray arms, follow the instructions below:
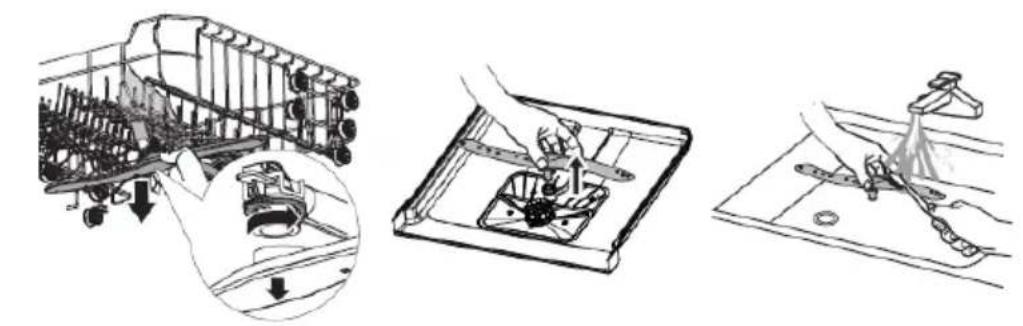

- To remove the upper spray arm, hold the nut in the centre still and rotate the spray arm counter-clockwise to remove it.
- To remove the lower spray arm, pull out the spray arm upward.
- Wash the arms in soapy and warm water and use a soft brush to clean the jets. Replace them after rinsing them thoroughly.
Clean the dishwasher
Frost protection
In winter, the dishwasher must be protected against freezing temperature. After each wash:
- Disconnect the dishwasher from power.
- Turn off the water supply and disconnect the water inlet hose from the water valve.
- Drain the water from the inlet hose and the water valve. (Collect the water in a bowl)
-
Réconnect the water inlet hose to the water valve.
-
Remove the filter and use a sponge to collect the water from the bottom of the dishwasher.
After each wash
After each wash, close the water supply to the appliance and leave the door slightly ajar, so that moisture and odours are not trapped inside.
Unplug the appliance
Unplug the appliance from the wall outlet before any cleaning and maintenance.
Do not use solvents or abrasive detergents.
Do not use solvents or abrasive detergents to clean the outer parts and the rubber seals of the dishwasher. Use only cloths and warm soapy water.
To remove stains from the inside use a cloth dampened with water and a little vinegar or cleaning detergent intended specifically for dishwashers.
If the dishwasher is not used for a long time
It is recommended to run the washing programme with an empty dishwasher, then unplug the appliance from power, close the water supply and leave the door slightly ajar. This protects the gaskets and prevents the formation of unpleasant odours in the appliance.
Move the appliance
If the appliance needs to be moved, try to keep it in an upright position. If absolutely unavoidable, you can rest the appliance on the back wall.
PROBLEM SOLVING GUIDE
Problem Possible cause Solution
| The dishwasher will not start | The appliance is not connected to the mains power | Connect to the power supply |
| Child lock is on (selected models) | Turn off the Child Lock | |
| The dishwasher does not start | The Delay start function is selected | Wait for the programme to start |
| The dishwasher door is open. Close the door. | ||
| The temperature of water supplied to the dishwasher exceeds 70°C | Reduce the temperature of the supplied water or wait until the water temperature is lower. | |
| The appliance does not fill with water | Check that the water tap is open | |
| The wash cycle takes too long | The duration of the wash programme varies depending on how soiled the dishes are | When heavy soil is detected, Auto and Optimal programmes automatically extend the wash cycle duration |
| Self-cleaning option (selected models) is selected | When you select the self-cleaning option, the wash cycle time will be extended to reach the disinfection temperature | |
| The dishes are not clean enough | The detergent is used incorrectly | Use the amount of detergent suitable for the water hardness and the selected wash programme or use a different detergent |
| The dishes are arranged too close together. | Rearrange the dishes in accordance with the instructions. | |
| The selected wash programme is not suitable for the level of soil on the dishes | Select a different programme | |
| The spray arm rotation is blocked | Arrange the dishes again so that they do not block the spray arm. | |
| The dishes are not dry enough | The rinse aid dispenser is empty | Fill the rinse aid dispenser or increase the dispensed amount |
| Dishes placed incorrectly in the dishwasher | Rearrange the dishes in accordance with the instructions. | |
| The selected programme dose not include the drying stage | Select the wash program that includes drying | |
| Stains and deposits on dishes | Water too hard | Change the water hardness set- tings according to the relevant points in the manual. |
| The rinse aid dispenser is empty | Fill the rinse aid dispenser or increase the dispensed amount | |
| Incorrect amount of detergent | Change the water hardness and rinse aid settings according to the relevant points in the manual. | |
| The detergent was not fully released from the dispenser | The detergent may be past the use-by date or may not be suitable | Use a different detergent |
| The 3 in 1 detergent container is blocked by dishes | Rearrange the dishes in accord- ance with the instructions. | |
| The water was not drained from the dishwasher | The previous programme was not completed or was interrupted | For information on how to select a suitable wash programme, please refer to the operating instructions |
| Leftover food or glass has blocked the pump. | Remove the cause of the blockage. | |
| The dishwasher does drain the water properly | The drain is clogged Check the air trap. | |
| The drain hose is bent | Make sure that the drain hose is correctly connected to the drain | |
| Foam in the dishwasher The wrong detergent was used | Make sure that the detergent used is suitable for dishwashers | |
| Sediment on the walls of the dishwasher compartment | The use of the wrong detergent resulted in a deposit | Make sure that the detergent used is suitable for dishwashers |
| Black or grey streaks on the dishes | The aluminium dishes rubbed against the plates. | It is not recommended to wash dishes and cutlery made of aluminum. |
| The interior of the dishwasher is stained | Coffee and tea grounds | Use a certified stain removal agent |
| Noise | Noise of the detergent dispenser lid opening or water drain pump operating | This is normal. |
| Water leaks during operation The dishwasher is not levelled Level the dishwasher | ||
INSTALL THE APPLIANCE IN A CABINET
Place your appliance
Place the appliance in the desired location. The back should rest against the wall and the sides should be against adjacent cabinets or walls. The dishwasher is equipped with water supply and drainage hoses, which can be placed on the right or left side to facilitate the installation.
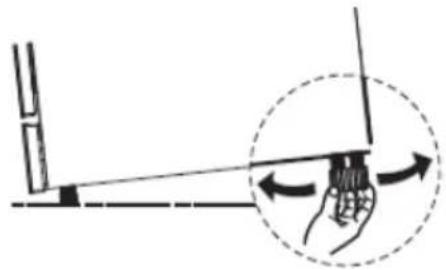
Level the appliance
When you place the appliance you can use the adjustable feet to level the appliance.
![Dd [mm] Wd [mm] 820-970mm Min.580mm Wf [mm] 115mm(+50) 48mm Min.95mm(+50) 460mm 815mm(+50) Hd [mm]](/content/2026/05/850312/images/16f57d6a21979dc12aeb0452299781556cf2211ffa5652c3ad0fcd31c0dec702.jpg)
 5cm60cm 5cm60cm |  |  |  | |
| Wd 448 598 448 598 | ||||
| Wf min 450 min 600 min 450 min 600 | ||||
| Dd 550 550 570 570 | ||||
| Hd max 720 max 720 max 605 max 605 |
Recommended weight of front panel:
*For appliances 45 cm in width with completely covered front door panel - ≤3,2-5kg *For appliances 45 cm in width with revealed front control panel - ≤3,2-5kg
Recommended weight of front panel:
*For appliances 60 cm in width with completely covered front door panel - ≤3,2-7kg *For appliances 60 cm in width with revealed front control panel - ≤3,2-6kgs
Please note that for appliances with sliding door, recommended weight of front panel - ≤ 3,2-10kgs
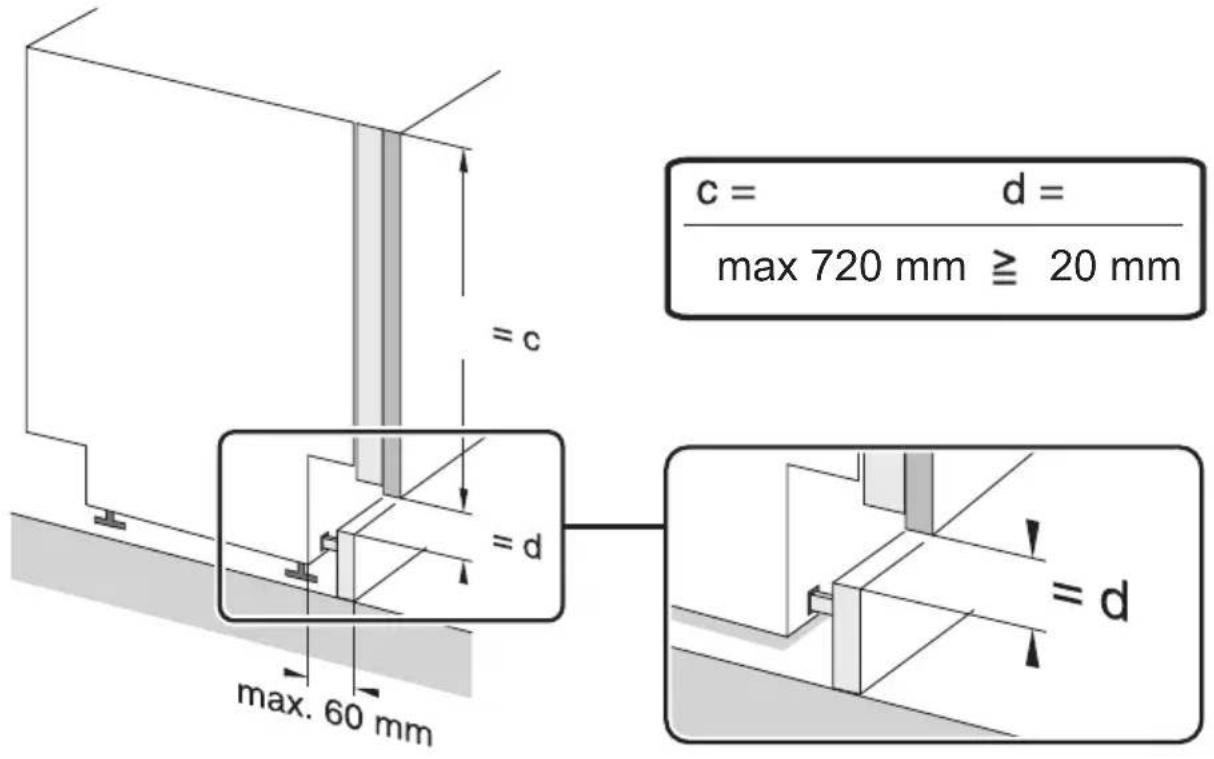

NOTE: Due to the design of some built-in furniture you may need to trim the base strip.
Built-on installation
Step 1. Choose the optimal location for your dishwasher
The best location to install the dishwasher is near the water tap, the drainage inlet and an electrical wall socket.
For details, please see the figure presenting cabinet dimensions and dishwasher place of installation.
- A clearance of 5 mm between the top of the dishwasher and the cabinet, and the door flush the cabinet.

- When installing the dishwasher in the corner cupboard, leave room for the door to open.
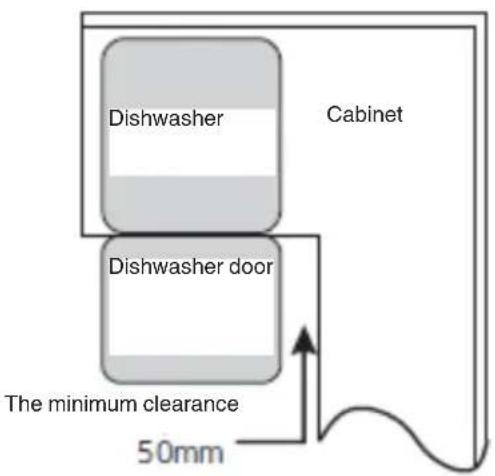
*NOTE:
Depending on the location of the wall electrical socket, you may need to cut the opening in the cabinet rear wall.
Step 2. The cabinet door dimensions, install cabinet door (Available on selected models)
The cabinet door should be installed in accordance with the installation drawing.
* Semi-built-in model
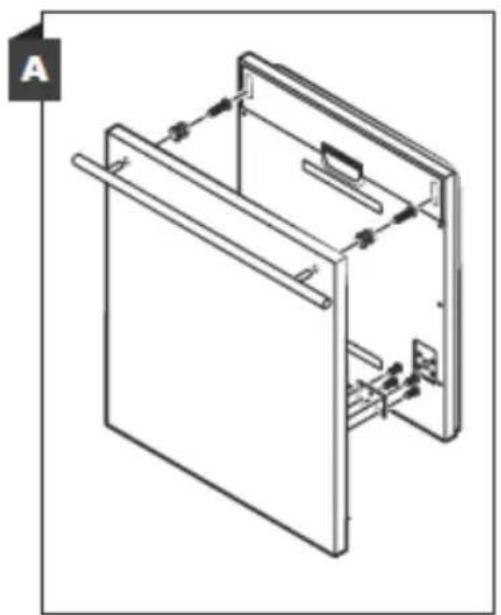
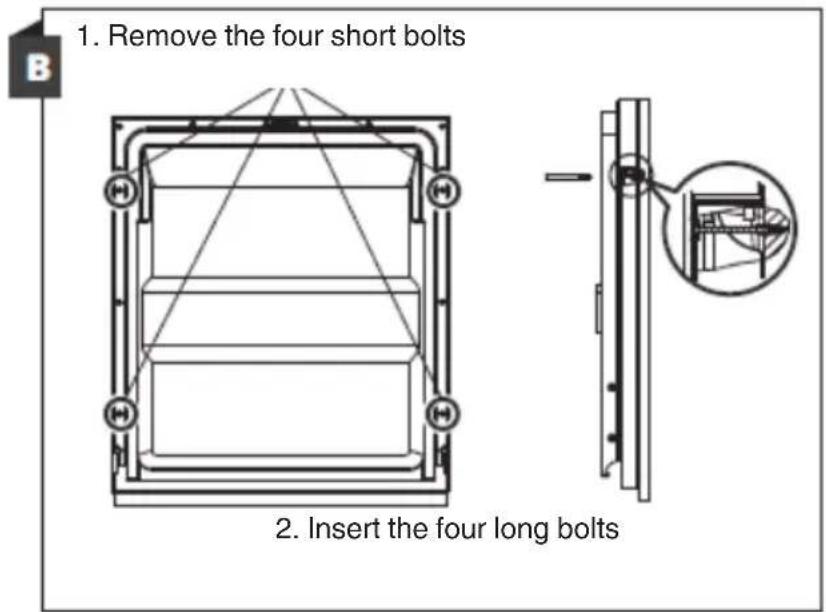
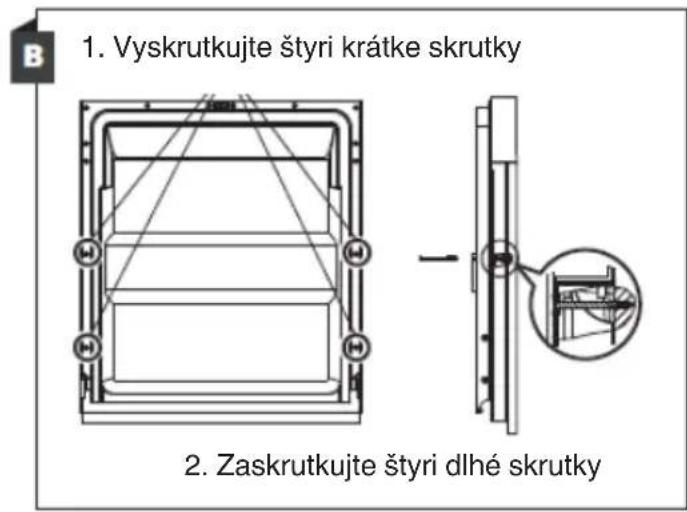
Tapes A and B should be separated. Tape A on the wooden door and felt tape B on the dishwasher door (see figure A). After adjusting the wooden door, fasten it to the dishwasher door using screws and bolts (see figure B)


Install the hook on the decorative wooden panel (see figure 4A) and place the hook in the socket on the dishwasher door (see Figure 4B). When the panel is aligned, press it from the top so that the plastic hooks snap shut.


*Built-in model
Install the hook on the decorative wooden panel and place the hook in the socket on the dishwasher door (see Figure A). After adjusting the wooden door, fasten it to the dishwasher door using screws and bolts (see figure B).
*Step 3. Adjust the door spring tension
- The dishwasher door spring tension is factory-set. After installing the decorative wooden panel, adjust the door spring tension.
Turn the 'adjusting' bolt to loosen' or tension the steel cable. - The door spring tension is optimal when the door is horizontal after opening, but it can easily be lifted with your finger.

Step 4. Dishwasher installation steps
For other installation steps please see the installation instruction drawings
-
Place the condensation strip under the cabinet worktop. Make sure that the condensation strip is flush with the edge of the worktop. (Step 2).
-
Connect the water supply hose to the cold water tap.
-
Connect the water drainage hose.
-
Connect the power supply cord.
-
Place the dishwasher in place. (Step 4)
-
Level the dishwasher. The rear feet can be adjusted from the front of the dishwasher by using the wrench to turn the hex screw in the centre of the dishwasher base. In order to adjust the front feet, use a flat head screwdriver and rotate the front feet until the dishwasher is level.
-
Attach the furniture door to the dishwasher door.
-
Adjust the tension of the door springs using the Allen key. Tighten the spring to the left. Failure to make the adjustments can damage the dishwasher.
-
The dishwasher must be fixed. This can be done in two ways:
A. MDF Worktop: Insert the mounting hook into the hole on the side panel and fix it to the worktop with screws.
B. Worktop made of marble or granite: Attach the side with the screw.
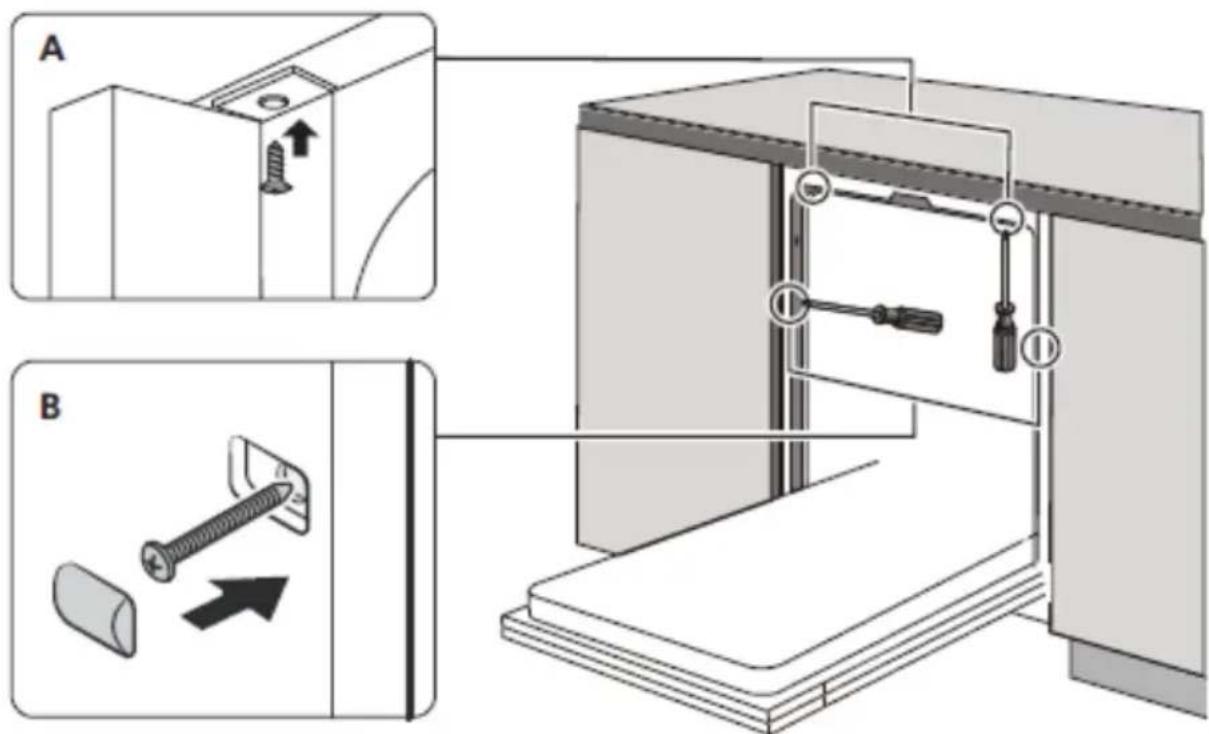
*In selected dishwasher models there are gaskets to be installed around the appliance (optional).
NOTE: Always ensure that there is a sufficient gap between metal furniture components such as handles, fittings, furniture fronts and the surface of the control panel buttons. If the gap is insufficient, functions may be triggered inadvertently and the dishwasher may malfunction.
Step 5. Level the dishwasher
The dishwasher must be properly levelled to operate correctly.
Place the spirit level on the door and the basket guides inside the dish washer to ensure the unit is level.
Level the dishwasher by adjusting the three levelling feet separately.
Be careful not to topple the dishwasher when levelling.

NOTE:
The height adjustment range of the feet is 50 mm.
WARRANTY AND AFTER SALES SERVICE
Warranty
Warranty service as stated on the warranty card. The manufacturer shall not be held liable for any damage caused by improper use of the product.
Service
- The manufacturer recommends that all repairs and adjustments be carried out by the Factory Service Technician or the Manufacturer's Authorized Service Point. For safety reasons, repairs should be referred to professionals.
- Repairs carried out by unqualified persons may seriously endanger the appliance user.
- The minimum warranty period for the appliance offered by the manufacturer, importer or authorized representative is given in the warranty card.
- The warranty shall be void if you make any independent adaptations or alterations, tamper with seals or other appliance safety devices or its parts or interfere with the appliance contrary to operating instructions.
In the event of appliance malfunction, request assistance or repair.
If your appliance needs repair, please contact the service centre. Please see warranty card for address and contact details of our service centre. Before contacting us, please have ready the appliance serial number, which can be found on the identification sticker: For your convenience, please write it down below:
Manufacturer's Declaration
The manufacturer hereby declares that this product meets the requirements of the following European directives:
• Low Voltage Directive 2014/35/EC
• Electromagnetic Compatibility (EMC) Directive 2014/30/EC
• ErP Directive 2009/125/EC
• Directive RoHS 2011/65/EC
and has thus been marked with the symbol and been issued with a declaration of compliance made available to market regulators.
Vážený kliente,


NAPLŇOVÁNÍ MYČKY NÁDOBÍM
Horní koš
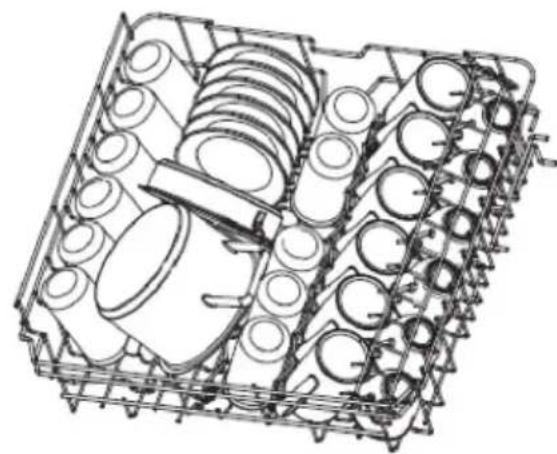
Zvednout Spustit


Blue Dot (jen vybrané modely)
![Dd [mm] Wd [mm] 820-870mm Min.560mm Wf [mm] 115mm(+50) 48mm Min.95mm(+50) 460mm 815mm(+50) Hd [mm]](/content/2026/05/850312/images/5c8b0f155f8742a84170686396fb1f0cadf0ed80bb33e09ab51ac896be1b551d.jpg)
 5cm60cm 5cm60cm |  |  |  | |
| Wd | 448 598 448 598 | |||
| Wf min | 450 min 600 min | 450 min 600 | ||
| Dd | 550 550 570 | 570 | ||
| Hd | max 720 | max 720 | max 605 | max 605 |


*Zabudovaný model


NAPLŇOVANIA UMÝVAČKY RIADOM
Horný kôš
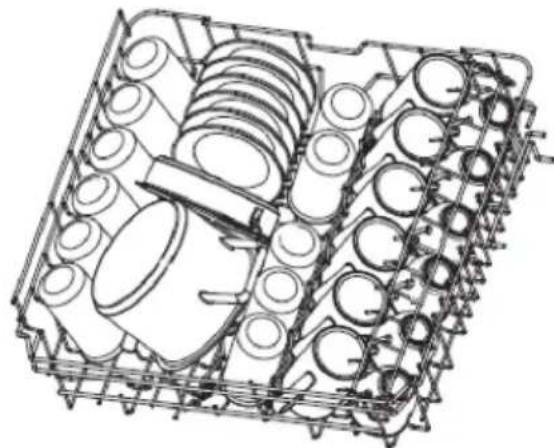

Po skončení zatvorte veko.
Stojan na poháre

4

45cm 60cm 45cm 60cm
Wd 448 598 448 598
Wf min 450
min 600
min 450
min 600
Dd
550 550 570 570
Hd
max 720
max 720
max 605
max 605


*Zastavaný model


AZ EDÉNYEK BEHELYEZÉSE
Felső kosár


Pohár állvány.


* 60 cm-re lăthato panellel - ≤ 3,2-6 kg


ELECTRODOMÉSTICO
- SAFETY INSTRUCTIONS FOR USE 8
- UNPACKING 11
- DISPOSAL OF OLD APPLIANCE 12
- INSTALL THE APPLIANCE 13
- PREPARE THE APPLIANCE FOR OPERATION 15
- LOAD DISHES INTO DISHWASHER 20
- TURN ON THE APPLIANCE AND SELECT PROGRAMME 27
- GLASS RACK (SELECT MODELS ONLY) 30
- CLEANING AND MAINTENANCE 32
- PROBLEM SOLVING GUIDE 35
- INSTALL THE APPLIANCE 37
- IN A CABINET 37
- WARRANTY AND AFTER SALES SERVICE 44
- CS - OBSAH
- POKYNY K BEZPEČNÉMU POUŽÍVÁNÍ 46
- VYBALENI 50
- LIKVIDACE OPOTREBOVANYCH ZARIZENÍ 51
- INSTALACE ZARIZENI 52
- PRIPRAVA ZARIZENI DK PROVOZU 54
- NAPLŇOVÁNÍ MYČKY NÁDOBÍM 60
- ZAPNUTÍ ZARÍZENÍ A VÝBĚR PROGRAMU 67
- ČISTĚNÍ A ÚDRŽBA 73
- ZJISTOVANI ZAVAD 76
- MONTAŽ ZARIZENI DO NÁBYTKOVĚ SESTAVY 78
- ZÁRUKA, POPRODEJNÍ SERVIS 85
- SK - OBSAH
- POKYNY TÝKAJÚCE SA BEZPEČNÉHO POUŽÍVANIA 87
- ROZBALENIE 91
- LIKVIDÁCIA ZARIADENÍ 92
- INSTALÁCIA ZARIADENIA 93
- PRÍPRAVA ZARIADENIA NA POUŽÍVANIE 95
- SAFETY INSTRUCTIONS FOR USE
- BEFORE YOU INSTALL THE APPLIANCE
- BEFORE FIRST USE
- CHILD SAFETY
- DAILY MAINTENANCE
- IN CASE OF PROBLEMS
- RECOMMENDATIONS
- DISHES AND UTENSILS THAT ARE NOT SUITABLE FOR DISHWASHERS
- UNPACKING
- DISPOSAL OF OLD APPLIANCE
- INSTALL THE APPLIANCE
- PLACE YOUR APPLIANCE
- WATER SUPPLY CONNECTION
- WATER SUPPLY HOSE
- THE DRAIN HOSE
- ELECTRICAL CONNECTION
- PREPARE THE APPLIANCE FOR OPERATION
- THE IMPORTANCE OF WATER DESCALING
- ADD SPECIAL SALT
- NOTE
- THE TEST STRIP
- MULTI-COMPONENT (MULTITAB) DETERGENTS (EG. 2-IN-1, 3-IN-1, ETC.)
- THE USE OF DETERGENTS
- STANDARD LOADING AND TEST RESULTS
- INFORMATION FOR COMPARABILITY TEST IN ACCORDANCE WITH EN 60436
- CUTLERY BASKET
- LOAD DISHES INTO DISHWASHER
- UPPER BASKET
- FOLD THE MUGS AND CUPS SHELVES
- FOLD THE DISHWASHER BASKET SPIKES
- TIPS FOR USING THE DISHWASHER BASKET
- LOWER BASKET
- FILL THE DETERGENT DISPENSER
- ADD RINSE AID TO THE DISPENSER AND ADJUST SETTING
- ADJUST THE RINSE AID DISPENSER
- TURN ON THE APPLIANCE AND SE- LECT PROGRAMME
- TURN ON THE APPLIANCE
- CHANGE PROGRAMME
- ADD DISHES DURING THE PROGRAMME
- WARNING
- ERROR CODE
- GLASS HOLDER (SELECT MODELS ONLY)
- GLASS RACK (SELECT MODELS ONLY)
- BAKING TRAY HOLDER (SELECT MODELS ONLY)
- BLUE DOT (SELECT MODELS ONLY)
- CLEANING AND MAINTENANCE
- CLEAN EXTERNAL SURFACES
- CLEAN INTERNAL SURFACES
- SPRAY ARMS
- CLEAN THE DISHWASHER
- FROST PROTECTION
- PROBLEM SOLVING GUIDE
- INSTALL THE APPLIANCE IN A CABINET
- BUILT-ON INSTALLATION
- BUILT-IN MODEL
- STEP 3. ADJUST THE DOOR SPRING TENSION
- STEP 4. DISHWASHER INSTALLATION STEPS
- STEP 5. LEVEL THE DISHWASHER
- WARRANTY AND AFTER SALES SERVICE
- WARRANTY
- SERVICE
- MANUFACTURER'S DECLARATION
- VÁŽENÝ KLIENTE
- NAPLŇOVÁNÍ MYČKY NÁDOBÍM
- HORNÍ KOŠ
- NAPLŇOVANIA UMÝVAČKY RIADOM
- HORNÝ KÔŠ
- AZ EDÉNYEK BEHELYEZÉSE
- FELSŐ KOSÁR
- POHÁR ÁLLVÁNY
Brand : FAGOR
Model : 3LVF-434.1IT
Category : Dishwasher