
VC 004 - Vacuum Cleaner HYUNDAI - Free user manual and instructions
Find the device manual for free VC 004 HYUNDAI in PDF.

| Product Type | Canister Vacuum Cleaner |
| Brand | Hyundai |
| Model | VC 004 |
| Power Consumption | 2000 W |
| Power Supply | 220-240 V, 50/60 Hz |
| Dimensions (L x W x H) | 40 x 30 x 25 cm |
| Weight | 5 kg |
| Dust Capacity | 1.5 L |
| Filtration System | Cyclonic + HEPA Medium Filter |
| Bagless | Yes |
| Cord Length | 5 m |
| Noise Level | 78 dB |
| Suction Control | Manual (on body) |
| Floor Type | Hard floors and carpets |
| Accessories Included | Crevice tool, dusting brush, upholstery tool |
| Filter Maintenance | Washable medium filter; replace every 6 months |
| Overheat Protection | Automatic shut-off |
| Spare Parts Available | Filters, brush roll, bags (not needed) |
| Certification | CE, RoHS |
Frequently Asked Questions - VC 004 HYUNDAI
User questions about VC 004 HYUNDAI
0 question about this device. Answer the ones you know or ask your own.
Ask a new question about this device
Download the instructions for your Vacuum Cleaner in PDF format for free! Find your manual VC 004 - HYUNDAI and take your electronic device back in hand. On this page are published all the documents necessary for the use of your device. VC 004 by HYUNDAI.
USER MANUAL VC 004 HYUNDAI
natural_image
Exterior view of a Hyundai vacuum cleaner with attached hose and body (no text or symbols visible)NÁVOD K POUŽITÍ / NÁVOD NA POUŽITIE INSTRUKCJA OBSŁUGI / INSTRUCTION MANUAL HASZNÁLATÍ ÚTMUTATÓ
PODLAHOVÝ VYSAVAČ / PODLAHOVÝ VYSÁVAČ ODKURZACZ PODŁOGOWY / VACUUM CLEANER HÁZTARTÁSI PORSZÍVÓ
CE
CZ I. VŠEOBECNÉ BEZPEČNOSTNÍ POKYNY 3
II. POPIS OVLÁDACÍCH PRVKŮ 5
III. POKYNY K POUŽITÍ 6
IV. OVLÁDÁNÍ 7
V. ČIŠTENÍ A ÚDRŽBA 8
VI. ODSTRAŇOVÁNÍ PORUCH 10
VII. TECHNICKÁ SPECIFIKACE 12
VIII. LEGISLATIVA A EKOLOGIE 12
SK I. BEZPEČNOSTNÉ POKYNY 13
II. POPIS OVLÁDACÍCH PRVKŮ 15
III. POKYNY K POUŽITIU 17
IV. OVLÁDANIE 18
V. ČISTENIE A ÚDRŽBA 19
VI. ODSTRAŇOVANIE PORÚCH 20
VII. TECHNICKÁ ŠPECIFIKÁCIE 21
VIII. LEGISLATÍVA A EKOLÓGIA 21
PL I. OGÓLNE INSTRUKCJE BEZPIECZEŃSTWA 23
II. OPIS ELEMENTÓW ODKURZACZA 25
III. INSTRUKCJA OBSŁUGI 28
IV. DZIAŁANIE 28
V. CZYSZCZENIE I KONSERWACJA 29
VI. USUWANIE USTEREK 31
VII. SPECYFIKACJA TECHNICZNA 32
VIII. PRAWODAWSTWO I EKOLOGIA 32
EN I. GENERAL SAFETY INSTRUCTIONS 33
II. DESCRIPTION OF THE CONTROLS 35
III. INSTRUCTIN FOR USE 37
IV. OPERATION 38
V. CLEANING AND MAINTENANCE 39
VI. TROUBLE-SHOOTING 40
VII. TECHNICAL SPECIFICATIONS 41
VIII. LEGISLATIVE & ECOLOGY 41
HU I. ÁLTALÁNOS BIZTONSÁGI UTASÍTÁSOK 43
II. A KÉSZÜLÉK ELEMEINEK LEÍRÁSA 45
natural_image
Line drawing of a mechanical component with a handle and base (no text or symbols)
natural_image
Diagram of a foot stepping on a wooden plank with a valve, showing no text or symbolsnatural_image
Diagram of a hand using a tool to press or install a component on a grid-patterned surface (no text or symbols)natural_image
Close-up of a hand inserting a plastic hose into a car air vent (no visible text or symbols)Odpojení hadice
natural_image
Illustration of two hand positions: one using a flexible tube with a handle, the other holding a syringe (no text or symbols present)natural_image
Diagram of a mechanical device with a lever and handle, showing an arrow indicating motion (no text or symbols present)IV. OVLÁDÁNÍ
natural_image
Line drawing of a hand holding a flexible hose with a black arrow indicating direction (no text or symbols)Regulace výkonu
natural_image
Hand holding a camera lens on a surface (no text or symbols visible)
natural_image
Close-up of hands installing a circular component on a black mechanical base (no visible text or symbols)Obr. 1 Obr. 2
natural_image
Close-up of a hand placing a component into a plastic appliance casing (no visible text or symbols)Obr. 4
Výstupní filtr
natural_image
Hand placing a white grille into a gray industrial machine component (no visible text or symbols)
natural_image
Hand holding a small electronic device with a grid of buttons, placed on carpet (no visible text or symbols)Obr. 5 Obr. 6
VI. ODSTRAŇOVÁNÍ PORUCH
natural_image
Diagram of a mechanical or hydraulic component with a valve and foot, no visible text or symbolsnatural_image
Diagram of a hand using a tool to press or install a component on a grid-patterned surface (no text or symbols)natural_image
Close-up of a hand inserting a plastic hose into a car interior (no visible text or symbols)Odpojenie hadice
natural_image
Illustration of two hand positions: one holding a flexible hose, the other holding a syringe with a handle (no text or symbols)natural_image
Diagram of a vacuum cleaner with a lever and handle, showing a step to press or attach (no text or symbols present)natural_image
Line drawing of a hand holding a flexible hose with a black arrow indicating direction (no text or symbols)Regulácia výkonu
natural_image
Hand holding a camera lens on a white electronic device (no visible text or symbols)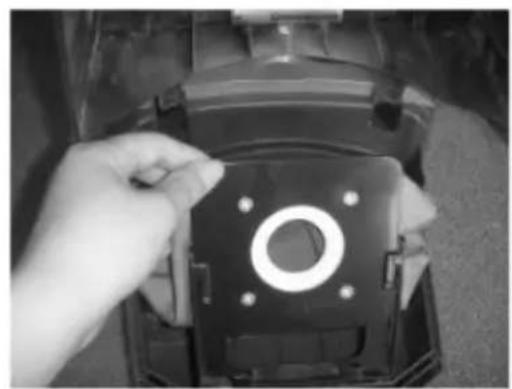
natural_image
Close-up of a hand adjusting a black mechanical component with a circular bolt, no visible text or symbolsObr.1 Obr.2
natural_image
Hand placing a component into a transparent plastic container (no visible text or symbols)Obr.4
Výstupní filtr
natural_image
Hand placing a grille into a car air vent (no visible text or symbols)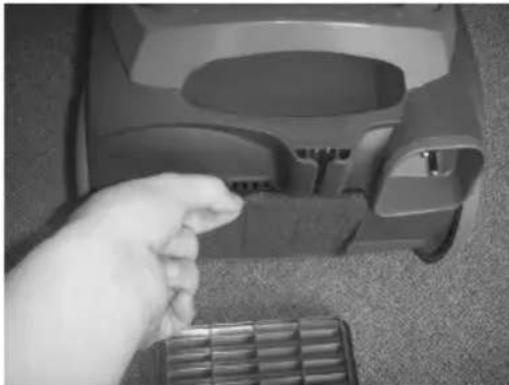
natural_image
Hand placing a small object into a device component (no visible text or symbols)Obr.5 Obr.6
VI. ODSTRAŇOVANIE PORÚCH
natural_image
Line drawing of a mechanical component with a handle and base (no text or symbols)
natural_image
Diagram of a foot stepping on a wooden plank with a valve, showing no text or symbolsnatural_image
Diagram of a hand using a tool to press or install a component on a grid-patterned surface (no text or symbols)Ssawka szczotkowa
natural_image
Close-up of a hand inserting a plastic hose into a car air vent (no visible text or symbols)Odłączanie węża
natural_image
Line drawing of hands holding a flexible hose with an arrow indicating direction (no text or symbols)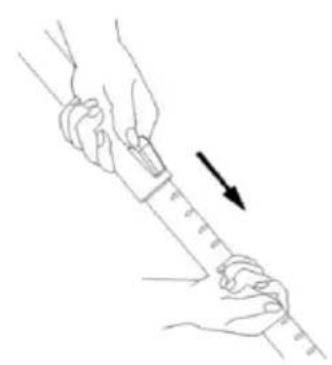
natural_image
Line drawing of two hands holding a syringe with an arrow indicating measurement direction (no text or symbols)natural_image
Diagram of a mechanical device with a lever and handle, showing an arrow indicating motion (no text or symbols present)natural_image
Line drawing of a hand holding a flexible hose with a black arrow indicating direction (no text or symbols)Regulacja mocy
natural_image
Hand holding a white cylindrical device with a circular lens, placed on a textured surface (no visible text or symbols)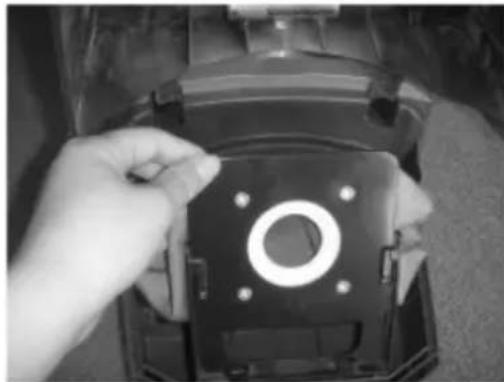
natural_image
Close-up of hands installing a circular component on a mechanical base (no visible text or symbols)Obr. 1 Obr. 2
natural_image
Close-up of a hand placing a plastic component into a plastic tray (no visible text or symbols)Rys. 4
natural_image
Hand placing a white vent on a car air conditioner cover (no text or symbols visible)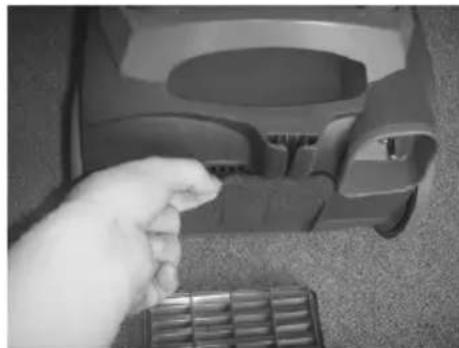
natural_image
Hand placing a button into a car seat cover, with a keyboard partially visible (no text or symbols)Rys.5 Rys.6
VI. USUWANIE USTEREK
VIII. PRAWODAWSTWO I EKOLOGIA
Dear customer, thank you for purchasing our product. Please read the operating instructions carefully before putting the appliance into operation and keep these instructions including the warranty, the receipt and, if possible, the box with the internal packing.
I. GENERAL SAFETY INSTRUCTIONS

- Before the first use, read the instructions for use carefully, look at the picture and store the instructions for use for the future. Consider the instructions for use as a part of the appliance and pass them on to any other user of the appliance.
- Check whether the data on the type label correspond with the voltage in your socket. The power cord plug has to be connected to the properly connected and grounded socket according to the national standard.
- This appliance can be used by children aged from 8 years and above and persons with reduced physical, sensory or mental capabilities or lack of experience and knowledge if they have been given supervision or instruction concerning use of the appliance in a safe way and understand the hazards involved. Children shall not play with the appliance. Cleaning and user maintenance shall not be made by children without supervision. Children younger than 8 years must be kept out of reach of the appliance and its power cord.
- If the power cord of the appliance is corrupted, it has to be replaced by the manufacturer, its service technician or a similarly qualified person so as to prevent dangerous situations.
- Before replacing accessories or accessible parts, which move during operation, before assembly and disassembly, before cleaning or maintenance, turn off the appliance and disconnect it from the mains by pulling the power cord from the power socket!
- Always unplug the appliance from power supply if you leave it unattended and before assembly, disassembly or cleaning.
- Never use the appliance if its power cord or plug is damaged, if it does not work properly, if it fell down and was damaged or if it fell to water. In this case take the appliance to a special service to check its safety and proper function.
- After finishing work and before cleaning, always switch off the appliance and disconnect it from power supply by taking the power cord connector out of the electric socket.
- The product is intended for home use and similar (in shops, offices and similar workplaces, in hotels, motels and other residential environments, in facilities providing accommodation with breakfast). It is not intended for commercial use!
- Do not put the suction nozzle or the tube end or accessories close to eyes and ears and do not insert them into body orifices!
- Never use the vacuum cleaner with wet hands or feet!
- When you vacuum a staircase, never leave the vacuum cleaner higher than you stand yourself!
- Never leave the product unattended when in operation!
- Never immerse the vacuum cleaner into water (even its parts)!
- Never vacuum without a properly inserted filtration system and micro-filters.
- It is not allowed to modify the surface of the appliance in any way (e.g. using a selfadhesive wallpaper, foils, etc.)!
- Do not place any objects on the appliance.
- If the appliance was stored in lower temperatures, acclimatize it first.
- Before you start using the vacuum cleaner, please check that all the locking mechanisms are in the right position.
- Do not vacuum wet or moist floor coverings, do not use the vacuum cleaner for outdoor areas! When moisture gets into the aggregate, there is a risk of its damage and disabling it. This defect is not covered by the warranty.
- Vacuum cleaning of some carpet types may result in generating static electricity. No static electricity discharge is dangerous to health.
- Do not vacuum sharp objects (e.g. glass, shatter), hot, flammable, explosive items (e.g. ash, hot cigarette butts, gasoline, thinners and aerosol vapours) or greases (e.g. fats, oils), caustic agents (e.g. acids, solvents). Vacuuming these objects may lead to damage of the dust filters or the vacuum cleaner.
- Do not put fingers or other things to input and output vents of the appliance. If the vents/elements for air flow are clogged (e.g. the hose), turn the appliance off and remove the clogging.
- When handling, do not pull the hose applying excessive force and avoid rough handling of the vacuum cleaner!
– The vacuum cleaner is not suitable for vacuuming substances that can harm human health.
- Pores of the dust filter may be clogged when vacuum cleaning very fine dust. Thus, air permeability will be reduced and the suction performance will decrease. In this case the dust filter must be changed and clean micro-filters, even if the dust filter is not full yet. Do not use the vacuum cleaner to vacuum dirt produced during/after construction such as plasterboard dust, fine sand, cement, dust from construction, parts of plaster etc. If this dirt / loose construction materials / loose construction materials into the aggregate, it poses a danger of damage. The warranty repair does not cover this.
- Never leave the vacuum cleaner exposed to weather conditions (rain, frost, direct sun radiation, etc.).
- The power cord is marked with colour codes. The yellow strip indicates the ideal cord length, the red strip indicates the maximum cord length. Do not apply force to unwind the cord beyond the red mark.
- Do not run over the power supply cord when using the vacuum cleaner and do not unplug it from the socket by pulling the power cord.
- When winding the cord, hold the plug to prevent lashing of the cord around and to prevent possible injury.
- The power cord must not be damaged with sharp or hot objects, open fire, it must not be sunk into water or bent over sharp edges.
- If you need to use an extension cord, it has to be uncorrupted and it has to comply with the valid standards.
- Check the condition of the power cord of the appliance regularly.
- In order to ensure safety and proper function of the appliance, use only original spare parts and accessories approved by the manufacturer.
- Use this appliance only for the purpose for which it was designed as specified in this user's manual. Never use the appliance for any other purpose.
- The pictures are only illustrative, the supplied accessory and cleaner may differ.
- All text in other languages and pictures shown on the packaging, or the product itself, are translated and explained at the end of this language mutation.
- The manufacturer is not responsible for damage caused by improper use of the appliance and the accessories and its warranty for the appliance does not apply in situations when the safety warnings above are not complied with. Failure to replace or maintain all filters regularly according to the instructions and also using non-original filters, the properties of which resulted in failure or damage of the vacuum cleaner, is also understood to be improper use of the appliance.
II. DESCRIPTION OF THE CONTROLS
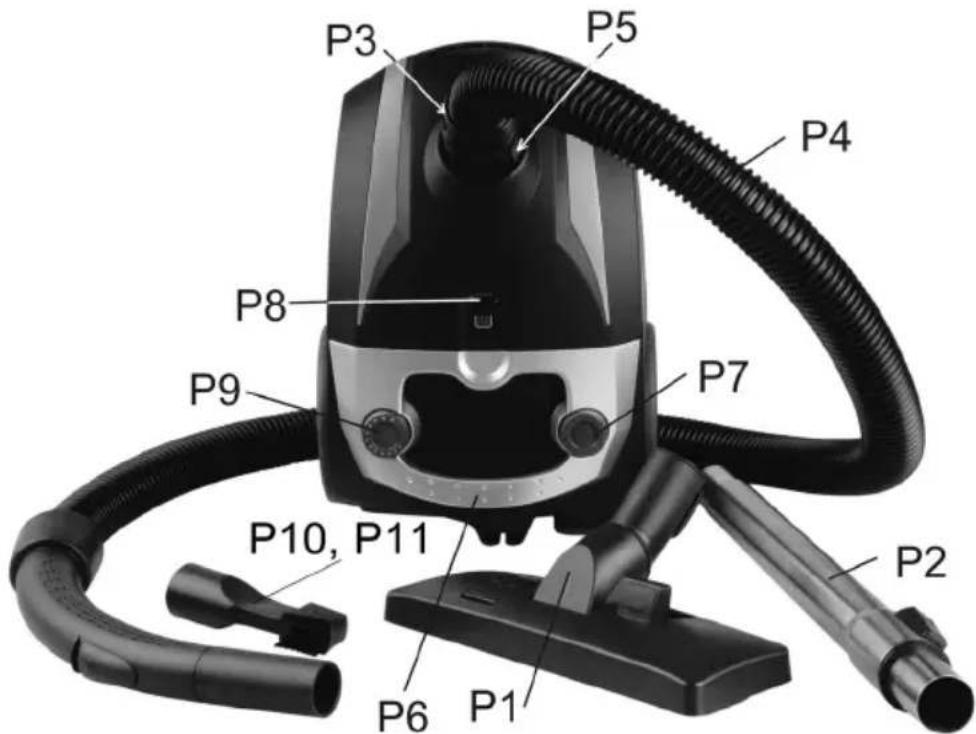
P1 Floor nozzle
P2 Telescopic tube
P3 Suction hose connection
P4 Suction hose
P5 Hose grip button
P6 Carrying handle
P7 Cord rewind foot switch
P8 Full dust bag indicator
P9 ON/OFF switch power control + power control
P10 Brush
P11 Crevice nozzle
ACCESSORIES
Your vacuum cleaner comes equipped with three attachments intended for different applications. Each individual attachment can either be fitted onto the telescopic tube or directly onto the handle of the suction hose, as required.
Floor nozzle
You will probably work most frequently with the floor nozzle. This is suitable for cleaning wide areas. The floor nozzle is fitted with a practical 360^ joint. This ensures that you can reach easily into any corner.
- Clean carpets and wall-to-wall carpets without using the brush. Press the tip switch marked with the carpet symbol and the brush is raised.
- Smooth floors such as PVC, parquet or tiles are best cleaned and cared for suing the brush. To do so press the tip switch with the symbol for smooth floors and the brush will come out.
Brush and crevice nozzle
Brush nozzle can use this to clean the dust from books or sensitive objects such as picture frames etc.
Nozzle crevice is suitable for sucking clean the folds in cloth, joint cracks and corners or niches that cannot be reached with the floor nozzle.
III. INSTRUCTIN FOR USE
Fitting the Flexible Hose
Insert the flexible hose into the hose socket on the front of the appliance. Press the flexible hose into the hose socket until the hose clicks into place.
natural_image
Close-up of a hand inserting a plastic hose into a vacuum cleaner's air vent (no text or symbols visible)Removing the FlexibleHose
To remove the flexible hose, press the locking buttons on the base of either side of the flexible hose to release the lock. Pull the flexible hose out of the hose socket.
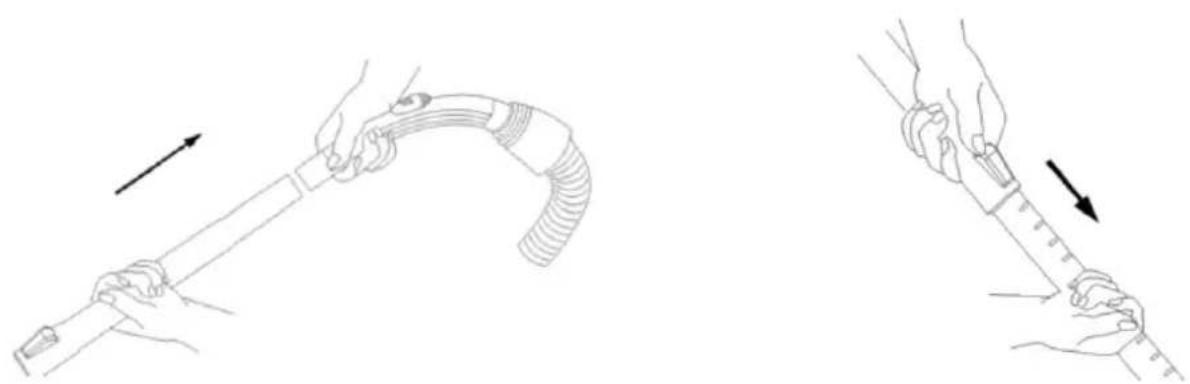
Fitting the Telescopic Tubes and Accessories
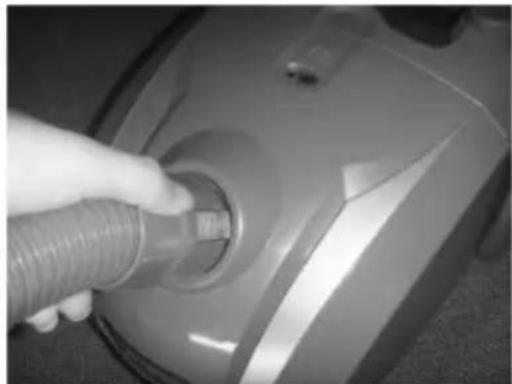
Attach the telescopic tubes to the curved handle of the flexible hose. To extend the tubes, push on the button at the centre join and pull the inner tube outward.
natural_image
Illustration of two hands holding a flexible hose and a measuring tool, with directional arrows indicating movement (no text or symbols)Attach the preferred cleaning accessory to the end of the telescopic tube.

natural_image
Diagram showing a mechanical device with a lever and a separate component, no text or symbols presentRemoving the Telescopic Tubes and Accessories
To remove the telescope tube and accessories, hold each piece tightly and pull firmly apart.
IV. OPERATION
Unwind the length of power cord required, then position the power cord so that it is not likely to be walked on or pinched by things placed on or against it, finally insert the plug into the power socket. A YELLOW mark on the power cord indicates the maximal cable length. Do no extend the power cord beyond the RED mark. To retract the cord, press the cord rewinder button P7.
ON / OFF Switch
1) Press the On/Off Switch button (P9) to switch the appliance ON.
2) To stop the machine, press the button P9 again.
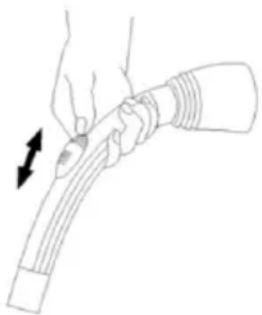
Suction control
Adjust the Suction control knob on the curved handle to control the suction. The suction will be reduced with a larger air opening.
natural_image
Line drawing of a hand holding a flexible hose with a black arrow indicating direction (no text or symbols)Suction power
The suction power can also be regulated through power control knob P9.
Low vacuum power: For curtains and delicate fabrics
Medium vacuum power: For long-pile velour carpets and textile flooring
High vacuum power: For sturdy rugs and floors etc
After vacuum cleaning
Switch off the device when you have finished cleaning:
1) To do this press the foot button P9 on the device with your foot or by hand.
2) After this pull the mains plug from the socket.
3) To roll in the cable press foot pedal and hold it in position. The cable will be rolled back automatically onto the installed cable drum and disappear completely into the device up to the plug.
4) The floor nozzle can be kept attached to the vacuum cleaner for ease of storage after use.
Motor thermostat
This motor is equipped with a motor protective thermostat. If for some reason the vacuum cleaner should overheat, the thermostat will automatically turn the unit off. Should this occur unplug the vacuum cleaner from the wall outlet and turn off switch. Change the dust bag or filter. Allow the unit to cool for approximately 45 minutes. To restart, replug into wall outlet and turn switch back on.
V. CLEANING AND MAINTENANCE
Always remove the power plug from the wall outlet before carrying out any maintenance. If the suction power of your machine is getting lower, you must change the dust bag and clean the filter. To do so, please follow the instruction below.
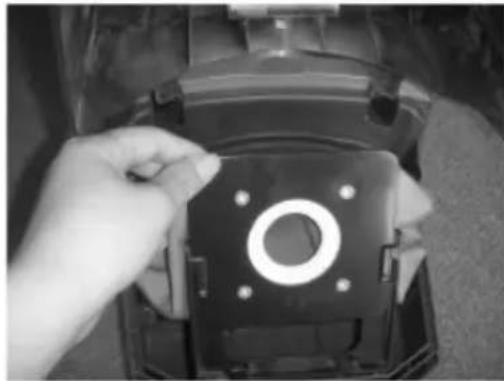
1) Open the front cover fig. 1.
2) Remove the dust filter bag holder fig. 2 (the accessorie=dust filter bag its not included in box with this product, it is possible to buy).
3) Clean the cloth bag or change new bust filter bag.
natural_image
Hand holding a camera lens on a flat surface (no text or symbols visible)Fig. 1
natural_image
Close-up of a hand adjusting a black mechanical component with a circular hole (no visible text or symbols)Fig. 2
- When you use dust-filter bag (cloth). Draw out plastic holder. Open the dust bag and clean dust (for sanitary reasons we recommend emptying the dust filter bag outside housing premises). Then insert plastic holder into bag opening fig. 3.
- If the case you use a paper dust bag, dispose of the paper dust bag with common municipal waste. Push the new paper dust bag into the plastic holder and secure by slight pushing. Close the vacuum cleaner lid by snapping it shut. You will hear a clicking sound.
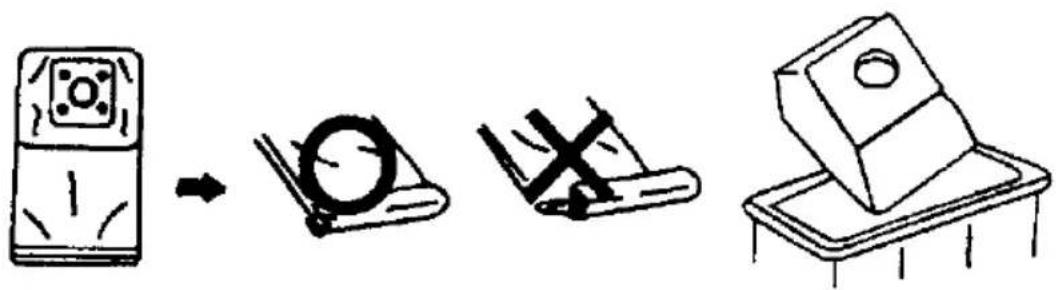
Fig. 3
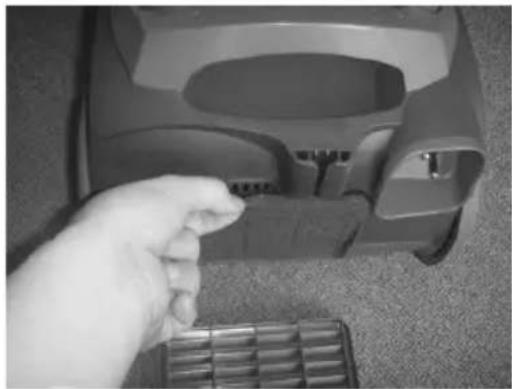
Motor protection filter
The motor protection filter cleans the air that is sucked in before it enters the motor. The air is cleaned of fine dusts, mites, bacteria and viruses. This prevents dirt or dust particles from getting into the motor or the surrounding air.
1) Take out the dust filter bag
2) Take out enter air filter piece fig. 4.
3) Pressing and washing the filter. Pat it gently and remove water. Dry it in the shade Replace it in.
natural_image
Close-up of a hand placing a small component into a plastic enclosure (no visible text or symbols)Fig. 4
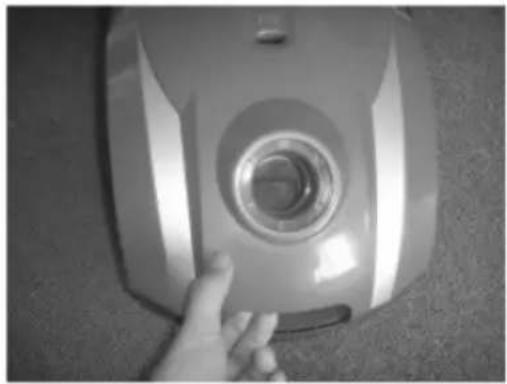
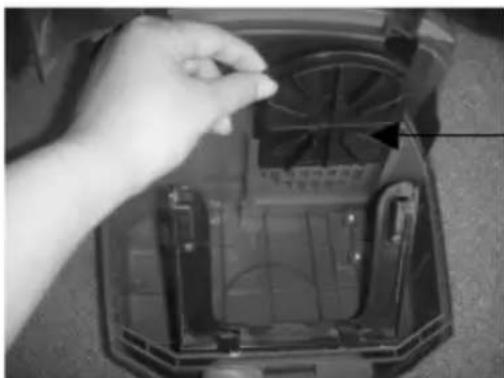
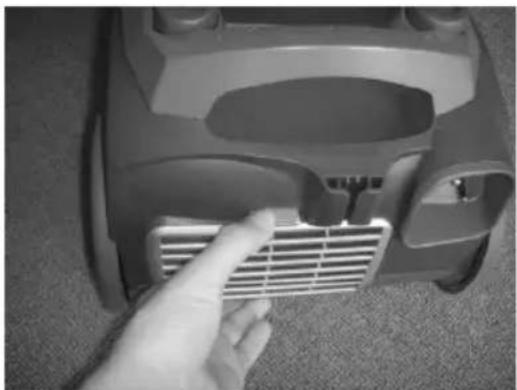
Cleaning the outlet air filter
The outlet air filter cleans the air a final time before it leaves the vacuum cleaner. You can clean the outlet air filter as follows:
1) Switch off the vacuum cleaner and disconnect the plug from the mains. To do this always pull on the plug and not on the cable.
2) Open the exhaust air grill Fig. 5 (this is at the rear of the vacuum cleaner).
3) The air filter is visible when the grill has been opened Fig. 6.
4) Rinse the filter under cold running water and allow dry.
5) Put the outlet air filter back into place (or replace with a new one) and place in the grill.
6) Close the outlet air filter grill.
natural_image
Close-up of a hand inserting a fan into a small appliance with a grille (no visible text or symbols)
natural_image
Hand placing a small object into a device component (no visible text or symbols)Fig. 5 Fig. 6
VI. TROUBLE-SHOOTING
Faults can occur on all electrical equipment. This must not necessarily be due to a defect in the device itself. So check first with table if the fault can be dealt with.
| Problem Possible causes Solutions / tips | ||
| Weak suction | The secondary valve is open. | Close the secondary valve |
| An object is blocking the suction pipe | Check the suction tube, the handle area, suction pipe and the nozzle in use for blockages. | |
| Filters are not fitted properly or are blocked | Fit a new filter | |
| Device does not work. | Device is not properly plugged into the mains | Check that the mains plug has been inserted properly.Also check whether the power socket is in order (e.g. use an electric torch). Check the fusels!Automatic fuses in the fuse box |
| Thermostat automatic turned off the unit | Follow instructions on page 38, section Motor thermostat | |
| Don’t close front cover | Isn’t the filter bag placed in the body. Isn’t the sitting corrected | Please replace correctly the filter bag |
| The cord can not be retrated | Isn’t the core tangled? | After unfastening tangled cord.Pull out the by 1 or 2 meter and push button to wind it again. |
VII. TECHNICAL SPECIFICATIONS
- Bag vacuum cleaner
• Power efficient ECO motor
• Energy-efficient high suction power motor - Dust bag volume 2 l
• Electronic regulation of suction power - Dust bag full indicator
- Simple operation and easy maintenance
-
8 m radius
• Automatic cable reel -
Accessories: universal floor nozzle with telescopic brush, crevice nozzle, brush, metal telescopic tube
- Input 1200 W
• Power supply: 230 V \~ 50 Hz
• Size: 32 x 20.5 x 23.5 cm - Weight netto 4.3 kg
Input in off mode is 0.00 W.
VIII. LEGISLATIVE & ECOLOGY
The manufacturer reserves the right to change the technical specifications and accessories for the respective models.
WARNING: Do not use this product near water, in wet areas to avoid fire or injury of electric current. Always turn off the product when you don't use it or before a revision. There aren't any parts in this appliance which are reparable by consumer. Always appeal to a qualified authorized service. The product is under a dangerous tention.
Old electrical appliances, used batteries and accumulators disposal
This symbol appearing on the product, on the product accessories or on the product packing means that the product must not be disposed as household waste. When the product/ battery durability is over, please, deliver the product or battery (if it is enclosed) to the respective collection point, where the electrical appliances or batteries will be recycled. The places, where the used electrical appliances are collected, exist in the European Union and in other European countries as well. By proper disposal of the product you can prevent possible negative impact on environment and human health, which might otherwise occur as a consequence of improper manipulation with the product or battery/ accumulator. Recycling of materials contributes to protection of natural resources. Therefore, please, do not throw the old electrical appliances and batteries/ accumulators in the household waste. Information, where it is possible to leave the old electrical appliances for free, is provided at your local authority, at the store where you have bought the product. Information, where you can leave the batteries and accumulators for free, is provided to you at the store, at your local authority.
HOUSEHOLD USE ONLY.
DO NOT IMMERSE IN WATER OR OTHER LIQUIDS.


TO AVOID DANGER OF SUFFOCATION, KEEP THIS PLASTIC BAG AWAY FROM BABIES AND CHILDREN. DO NOT USE THIS BAG IN CRIBS, BEDS, CARRIAGES OR PLAYPENS. THIS BAG IS NOT A TOY.

NOTICE
natural_image
Diagram of a foot stepping on a wooden plank with a valve, showing no text or symbolsnatural_image
Diagram showing a hand using a tool to press or install a component on a grid-patterned surface (no text or symbols)natural_image
Close-up of a hand inserting a plastic hose into a car air vent (no visible text or symbols)natural_image
Illustration of two hands holding a flexible tube with a handle, showing motion and measurement instructions (no text or symbols)natural_image
Diagram of a mechanical device with a lever and handle, showing an arrow indicating motion (no text or symbols present)natural_image
Line drawing of a hand holding a flexible hose with a black arrow indicating direction (no text or symbols)natural_image
Hand holding a small cylindrical device with a circular lens on a textured surface (no visible text or symbols)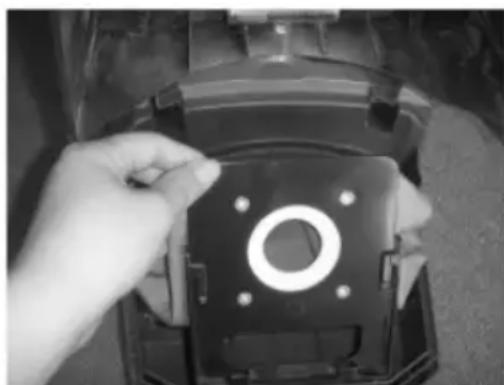
natural_image
Close-up of a hand adjusting a circular mechanical component with mounting holes (no visible text or symbols)Ábra. 1 Ábra. 2
natural_image
Close-up of a hand placing a fan into a plastic appliance casing (no visible text or symbols)Ábra. 4
Kimeneti szűrő
natural_image
Hand inserting a grille into a car air vent (no text or symbols visible)Ábra. 5
natural_image
Hand placing a small object into a car interior (no visible text or symbols)Ábra. 6
VI. HIBAELHÁRÍTÁS
Licensed by Hyundai Corporation, Korea.