RAC 481 PLLBR - Alarm clock radio HYUNDAI - Free user manual and instructions
Find the device manual for free RAC 481 PLLBR HYUNDAI in PDF.

| Product Type | Alarm Clock Radio with Projector |
| Brand | Hyundai |
| Model | RAC 481 PLLBR |
| Power Supply | AC 230V ~ 50Hz, 5W |
| Battery Backup | 2 x 1.5V AAA (not included) |
| AM Frequency Range | 522 – 1620 kHz |
| FM Frequency Range | 87.5 – 108 MHz |
| Preset Stations | Up to 10 FM + 10 AM |
| Alarm Modes | Buzzer or Radio (2 independent alarms) |
| Snooze Duration | Approx. 9 minutes |
| Sleep Timer | 10 – 90 minutes (adjustable in 10 min steps) |
| Projector | Yes, with focus thumbwheel and angle adjustment |
| Display Dimmer | Bright / Dim settings |
| Clock Format | 12-hour or 24-hour (assumed 12-hour with AM/PM) |
| Dimensions (Approx.) | 150 x 80 x 80 mm (estimated) |
| Weight (Approx.) | 0.5 kg |
| Antenna | FM: extendable wire aerial; AM: built-in ferrite |
| Care Instructions | Wipe with soft damp cloth, unplug before cleaning |
| Safety Features | No user-serviceable parts; do not expose to moisture |
Frequently Asked Questions - RAC 481 PLLBR HYUNDAI
User questions about RAC 481 PLLBR HYUNDAI
0 question about this device. Answer the ones you know or ask your own.
Ask a new question about this device
Download the instructions for your Alarm clock radio in PDF format for free! Find your manual RAC 481 PLLBR - HYUNDAI and take your electronic device back in hand. On this page are published all the documents necessary for the use of your device. RAC 481 PLLBR by HYUNDAI.
USER MANUAL RAC 481 PLLBR HYUNDAI
SPRAWDZANIE CZASU ALARMU
To turn off the radio before the sleep time has elapsed, press POWER.

PROJECTOR
TO PREVENT FIRE OR SHOCK HAZARD DO NOT EXPOSE THIS APPLIANCE TO RAIN OR MOISTURE.

LIGHTNING FLASH WITH ARROWHEAD SYMBOL – within an equilateral triangle, is intended to alert the user to the presence of uninsulated dangerous voltage within the products enclosure that may be of sufficient magnitude to constitute a risk of electric shock to persons.

EXCLAMATION POINT – within an equilateral triangle, is used to indicate that a specific component shall be replaced only by the component specified in that documentation for safety reason.
SAFETY INSTRUCTIONS:
1) READ INSTRUCTIONS – All the safety and operating instructions should be read before the appliance is operated.
2) RETAIN INSTRUCTIONS – The safety and operating instruction should be retained for future reference.
3) HEED WARNINGS – All warnings on the appliance and in the operating instructions should be adhered to.
4) FOLLOW INSTRUCTIONS – All operating instructions should be followed.
5) WATER AND MOISTURE – The appliance should not be used near water, for example, near a bathtub, washbowl, kitchen sink, laundry tub, swimming pool or in a wet basement.
6) VENTILATION – The appliance should be situated so that its location or position does not interfere with its proper ventilation. Do not place on bed, sofa, rug or similar surface that may block the ventilation openings, in a built-in installation, such as a bookcase or cabinet that may impede the flow of air through the ventilation openings.
7) HEAT – The appliance should be situated away from heat sources such as radiators, stoves, or other appliances (including amplifiers) that produce heat.
8) POWER SOURCE – The appliance should be connected to power supply only of the type described in the operating instructions or as marked on the appliance.
9) POWER CORD PROTECTION – Power supply cords should be routed so that they are not likely to be walked on or pinched by items placed upon or against them.
10) POWER LINES – An outdoor antenna should be located away from power lines.
11) OBJECT and LIQUID ENTRY – Care should be taken so that objects do not fall and liquids are not spilled into the enclosure through openings.
12) ESD WARNING – The display does not function properly or no reaction to operation of any the control may due to the electrostatic discharge.
Switch off and unplug the set. Reconnect after a few seconds.
13) This appliance is intended for domestic household use only and should not be used for any other purpose or in any other application, such as for non-domestic use or in a commercial environment.
14) No naked flame sources, such as lighted candles, should be placed on the apparatus.
15) Never place the projector clock close to electric motors or other equipment generating strong electromagnetic fields. Exposure to strong magnetic fields may cause malfunctions or corrupt image.
16) Do not look directly into the projector lens as doing this may permanently damage your sight.
17) Attention should be drawn to the environmental aspects of battery disposal.
18) Danger of explosion if battery is incorrectly replaced. Replace only with the same or equivalent type.
19) Batteries shall not be exposed to excessive heat such as sunshine, fire or the like.
20) DAMAGE REQUIRING SERVICE – The appliance should be serviced by qualified service personnel when:
a. The power-supply cord or plug has been damaged.
b. Objects have fallen into, or liquid has been spilled into the appliance enclosure.
c. The appliance has been exposed to rain.
d. The appliance has been dropped, or the enclosure damaged.
e. The appliance does not appear to operate normally.
21) SERVICING – The user should not attempt to service the appliance beyond that described in the user operating instructions. All other servicing should be referred to qualified service personnel.
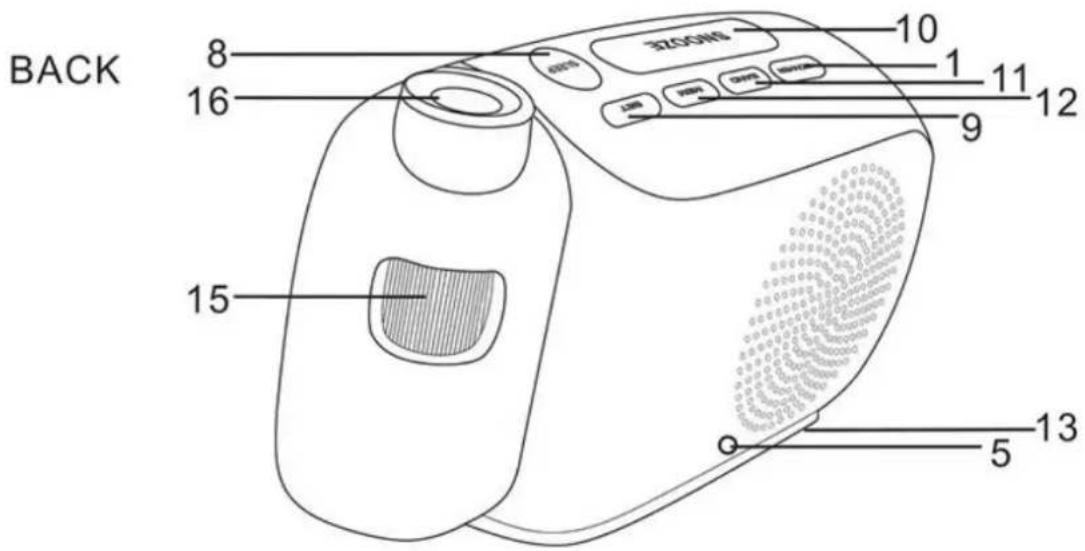
LOCATION OF CONTROL
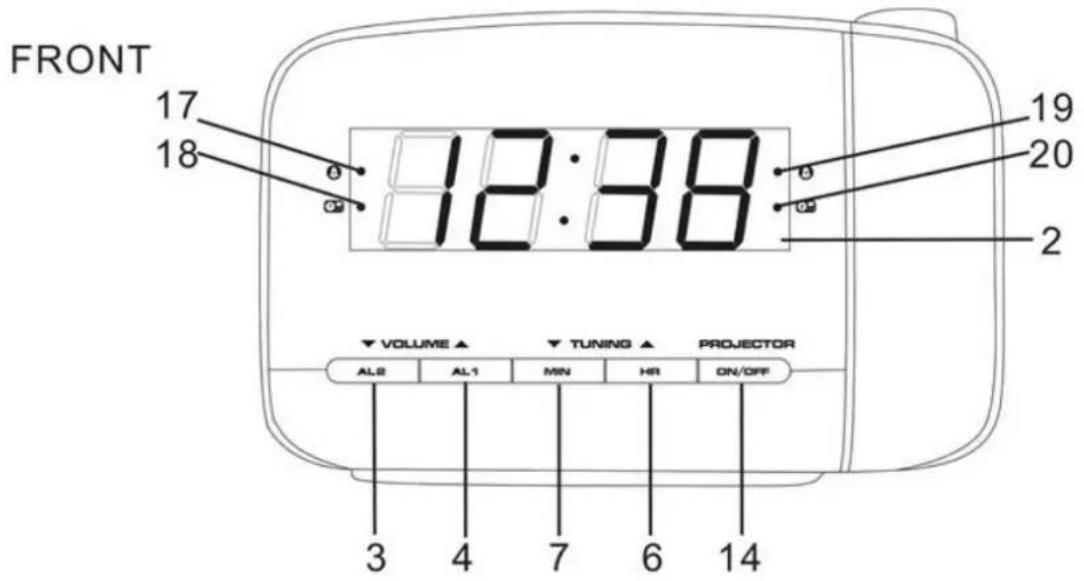
1) POWER
11) BAND (AM/FM selector)
2) DISPLAY
12) MEM (Preset radio station)
3) VOLUME ▽ / AL2
13) BATTERY COVER
4) VOLUME △ / AL1
14) PROJECTION ON/OFF
5) FM AERIAL
15) FOCUS THUMBWHEEL
6) TUNING △ / HR
16) PROJECTION LENS
7) TUNING ▽ / MIN
17) Alarm 1 buzzer indicator
8) SLEEP
18) Alarm 1 radio indicator
9) SET
19) Alarm 2 buzzer indicator
10) SNOOZE/DIMMER
20) Alarm 2 radio indicator
BATTERY BACKUP:
The clock, alarm and preset stations settings can be protected against AC power failure with the batteries for a short period of time. If no backup batteries are installed or the power failure is prolonged, you will need to set the clock again.
Battery handling and usage
Only adults should handle battery. Do not allow a child to use this apparatus unless the battery cover is securely attached to the unit.
STANDBY MODE
- Place the unit on a flat stable surface and plug the power cord into the mains socket.
- The unit is in standby mode and "0:00" will flash on the display.
SETTING THE CLOCK
1) In standby mode, press and hold SET until the display flashes.
2) Repeatedly press HR to set the hours.
3) Repeatedly press MIN to set the minutes.
4) Press SET to confirm.
- The hour and minute digits will stop flashing.
POWER ON/RADIO MODE
- Press POWER to switch the unit on and enters the radio mode.
- The radio frequency will briefly appear on the display and then return to clock time.
RADIO OPERATION:
-
Press POWER to turn on the radio.
-
The default FM frequency or the last frequency you tune the radio to will show on display.
-
The default FM radio frequency is 87.5 MHz.
-
Press BAND once to enter the AM radio mode.
- The default AM radio frequency is 522 kHz.
- Repeatedly press BAND to select the desired radio band.
- Adjust the volume by repeatedly pressing VOLUME / .
- Repeatedly press TUNING / to tune into the desired station.
- Press and hold TUNING / for auto forward or backward radio station searching.
NOTE:
- For the best FM reception, extend the FM aerial to its full length.
- For the best AM reception, rotate the unit to the position giving best reception.
PRESETTING YOUR FAVOURITE RADIO STATION
Up to 10 FM and 10 AM radio stations can be preset.
- Follow steps in "RADIO OPERATION" and tune into the station that you wish to preset.
- Press and hold SET for about 2 seconds, "P01" will flash on the display.
- Press SET again to store the station.
- Repeat steps 1 to 3 to store desired stations.
- To listen to preset radio stations, press MEM repeatedly to select the desired radio station.

Before setting the alarm time, make sure the Clock has been set.
SETTING ALARM 1 OR ALARM 2
- In standby mode, press and hold AL1 or AL2 for 2 seconds.
• The hour and minute digits will flash. - Set the alarm time by repeatedly pressing HR and MIN respectively.
- Press and hold HR and MIN respectively for fast advance.
- Press AL1 or AL2 again to select the alarm sound (OFF>BUZZER>RADO) in cycle.
CHECKING ALARM TIME
Press and hold AL1 or AL2 for 2 seconds, the alarm time will flash on the display.
To turn off the alarm, press POWER and the alarm will come on again at the set time on the following days.
To cancel the alarm, repeatedly press AL1 or AL2 until the alarm indicator light goes out on the display.
SNOOZE FUNCTION
This function can be used to stop the alarm temporarily for about 9 minutes once the alarm is activated. When the snooze button is pressed, the buzzer or radio alarm sounds will stop and sound again after about 9 minutes.
The sleep function is designed to automatically turn off the Radio.
SETTING SLEEP TIMER
- Press SLEEP.
- "90" will illuminate on the display.
- Repeatedly press SLEEP to select the desired sleep time from 90, 80, 70, 60, 50, 40, 30, 20 or 10 minutes.
- The radio will be turned off after the selected time has elapsed.
To check remaining sleep time, press SLEEP.
To cancel sleep timer, press SLEEP until "OFF" is selected.
To turn off the radio before the sleep time has elapsed, press POWER.


PROJECTOR
Switch on the projection clock with the Projection On/Off Selector (14).
Rotate : Scroll for setting the best projection clock viewing angle.
Focus Thumbwheel (15): Scroll for setting the best projection clock image.
DIMMER CONTROL
Repeatedly press DIMMER to adjust the brightness of display (bright or dim).
CARE AND MAINTENANCE
Wipe external surfaces with a soft cloth. If the cabinet is very dirty, unplug from the mains supply and use a damp cloth soaked in a weak solution of washing up liquid and water. Allow to dry thoroughly before reusing.
SPECIFICATIONS:
Power source: AC 230V\~50Hz, 5W
AM: 522-1620 kHz
FM: 87.5 – 108 MHz
Power consumption (clock only) : < 1W
Clock backup: 2 x 1.5V AAA size batteries (not included)
WE RESERVE THE RIGHT TO CHANGE TECHNICAL SPECIFICATIONS.

WARNING: DO NOT USE THIS PRODUCT NEAR WATER, IN WET AREAS TO AVOID
FIRE OR INJURY OF ELECTRIC CURRENT. ALWAYS TURN OFF THE PRODUCT
WHEN YOU DON'T USE IT OR BEFORE A REVISION. THERE AREN'T ANY PARTS IN
THIS APPLIANCE WHICH ARE REPARABLE BY CONSUMER. ALWAYS APPEAL TO A
QUALIFIED AUTHORIZED SERVICE. THE PRODUCT IS UNDER A DANGEROUS TENTION.


TO AVOID DANGER OF SUFFOCATION, KEEP THIS PLASTIC BAG AWAY FROM BABIES AND CHILDREN. DO NOT USE THIS BAG IN CRIBS, BEDS, CARRIAGES OR PLAYPENS. THIS BAG IS NOT A TOY.
Disposal of old Electrical & Electronic Equipment (Applicable in the European Union and other European countries with separate collection systems).

This symbol on the product or on its packaging indicates that this product shall not be treated as household waste. Instead it shall be handed over to the applicable collection point for the recycling of electrical and electronic equipment. By ensuring this product is disposed of correctly, you will help prevent potential negative consequences for the environment and human health, which could otherwise be caused by inappropriate waste handling of this product. The recycling of materials will
help to conserve natural resources. For more detailed information about recycling of this product, please contact your local Civic Office, your household waste disposal service or the shop where you purchased the product.
Hereby, ETA a.s. declares that the radio equipment type RAC481PLL is in compliance with Directive 2014/53/EU. The full text of the EU declaration of conformity is available at the following internet address: http://www.hyundai-electronics.cz/declaration_of_conformity
FIGYELMEZTETÉS:

A TÜZ ÉS ÁRAMÜTÉS ELKERÜLÉSE ÉRDEKÉBEN NE TEGYE KI A KÉSZÜLÉKET VÍZNEK, VAGY NEDVESSÉGNEK!