
ZN1261CF4411 İSP - Washing machine Becken - Free user manual and instructions
Find the device manual for free ZN1261CF4411 İSP Becken in PDF.


| Product Type | Freestanding Washing Machine |
| Brand | Becken |
| Model | ZN1261CF4411 İSP |
| Dimensions (H x W x D) | 845 x 597 x 582 mm |
| Power Supply | 220-240 V, 50 Hz, 10 A |
| Total Power | 2200 W |
| Maximum Dry Laundry Capacity | 9 kg |
| Maximum Spin Speed | 1200 rpm |
| Number of Washing Programs | 15 |
| Water Pressure Range | 0.1 - 1 MPa |
| Control Panel | Knob and electronic display with auxiliary buttons |
| Detergent Drawer Compartments | Main wash, pre-wash, fabric softener; liquid detergent cartridge included |
| Half Load Detection | Yes, automatic for selected cycles |
| Child Safety Lock | Yes, programmable via buttons |
| Delayed Start Timer | 1-23 hours |
| Anti-Allergy Function | Yes, extra rinse cycle |
| Easy Ironing Function | Yes |
| Water Inlet | Single cold water inlet (twin inlet optional depending on model) |
| Drain Hose | Minimum height 60 cm, maximum 100 cm from floor |
| Pump Filter | Accessible, clean every 2 months |
| Water Inlet Filters | On faucet and machine side, clean periodically |
| Transport Bolts | 4 bolts to be removed before first use |
Frequently Asked Questions - ZN1261CF4411 İSP Becken
User questions about ZN1261CF4411 İSP Becken
0 question about this device. Answer the ones you know or ask your own.
Ask a new question about this device
Download the instructions for your Washing machine in PDF format for free! Find your manual ZN1261CF4411 İSP - Becken and take your electronic device back in hand. On this page are published all the documents necessary for the use of your device. ZN1261CF4411 İSP by Becken.
USER MANUAL ZN1261CF4411 İSP Becken
Thank you for purchasing this product.
The quality of this appliance has been certified by several laboratory tests. This instructions manual is provided to simplify the use of the appliance as well as to guarantee a safe use.
Please read carefully the instructions and safety measures described in this manual.
We sincerely hope you will be satisfied when using your new appliance.
INDEX
1. SAFETY INSTRUCTIONS 4
1.1. Power Supply 4
1.2. Power Cord and Other Cables 5
1.3. Humidity and Water 5
1.4. Cleaning 5
1.5. General Precautions 5
2. USE AND OPERATION 7
2.1. Product Description 7
2.2. Using the Product 8
2.2.1. Installing the Machine 8
2.2.1.1. Leveling the Washing Machine 9
2.2.1.2. Electricity Supply 9
2.2.1.3. Connecting the Inlet Hose 9
2.2.1.4. Drain Hose Connection 10
2.2.1.5. Presentation of the Control Panel 11
2.2.1.6. Detergent Drawer 11
2.2.1.6.1. Compartments 12
2.2.1.7. Washing Cycle Selector 12
2.2.1.8. Electronic Display 13
2.2.2. Preparing to Wash your Laundry 13
2.2.2.1. Sorting your Laundry 13
2.2.2.2. Loading the Machine 15
2.2.2.3. Putting Detergent into the Machine 16
2.2.2.4. Running your Machine 16
2.2.2.4.1. Select the Washing Cycle 16
2.2.2.4.2. Auxiliary Functions 16
2.2.2.4.3. Half Load Detection System 17
2.2.2.5. Auxiliary Laundry Functions 17
2.2.2.5.1. Temperature Selection 17
2.2.2.5.2. Selecting the Spin Speed 17
2.2.2.5.3. Delayed Wash Timer 18
2.2.2.5.4. Easy Ironing 18
2.2.2.6.Start/Pause Button 18
2.2.2.7. Child Safety Lock 18
2.2.2.8. Cancel a Washing Cycle 19
2.2.2.9. Washing Cycle Completion 19
2.2.2.10. Washing Cycle Tables 19
2.2.2.11. Practical Information 23
2.2.2.11.1. Energy rating and Energy Saving Label 24
2.3. Maintenance 25
2.3.1. Water Inlet Filters 25
2.3.2. Pump Filter 25
2.3.3. Detergent Drawer 26
2.3.3.1. Liquid Detergent Compartment* 27
2.3.4. Flow Lock 27
2.3.5. Body 27
2.3.6.Drum 27
2.4. Troubleshooting 28
-
TECHNICAL SPECIFICATIONS 30
-
POST-SALE SERVICE 31
-
ENVIRONMENTAL PROTECTION 31
1. SAFETY INSTRUCTIONS
 | ATTENCION |  |
| RISK OF ELECTRIC SHOCK.DO NOT OPEN | ||
| Attention: to avoid the risk of electric shock, do not remove the cover. The interior does not contain any parts that may be repaired by the user. Ask for assistance to qualified personnel. | ||
Important Warnings
Before using your appliance read this instructions manual carefully and keep it in a safe place as you may need to consult it in the future.
Before turning on your appliance, and to ensure a safe and correct operation, do not use if:
- It has fallen to the ground;
- You notice any evidence of damage;
- Any anomaly occurs during its operation.
To avoid hazards or deterioration of your appliance through incorrect use it is advisable to read these instructions thoroughly.
Your appliance may not be used for other purposes than the ones intended and solely for household use. Any damage resulting from using the appliance outside this scope, any incorrect use, as well as any manual modifications to the product will not be covered and automatically voids the warranty.
Assistance
In case of malfunction, take your appliance to a qualified technician for assistance.
This appliance can be used by children from the age of 8 and by people with reduced physical, sensorial or mental capabilities and/or lack of experience and knowledge if they have been given instructions on using the appliance safely and if they understand the hazards involved. Children may not play with the appliance. Cleaning and maintenance must not be carried out by children without supervision.
These instructions are also available at www.suporteworten.pt
1.1. Power Supply
Make sure the main voltage is compatible with the appliance's. If this is not the case please consult the Customer Support Service.
1.2. Power Cord and Other Cables
Do not tangle the cord or pull it to disconnect the appliance. Also, keep the cord away from warm surfaces.
Never use the appliance if it has a damaged cable or socket.
Take it to the Technical Support Service for replacement.
1.3. Humidity and Water
Do not use your appliance in humid places. Do not allow the appliance to become wet under any circumstances as this may be dangerous. To avoid fire hazard or electric shock do not expose your appliance to humidity or water. Furthermore, do not place your appliance under water (e.g. for cleaning).
1.4. Cleaning
Before cleaning, be sure to switch off the appliance and remove the plug from the main power supply.
Always allow the unit to cool down before cleaning.
1.5. General Precautions
- Please follow the instructions in the user manual which help to properly install and operate this product and enjoy its advanced features. Please keep the instructions for future reference.
- Read all instructions before using the product.
- Maintenance and service operations are only to be carried out by authorized professionals.
- Any damage caused by manual modifications to the product is not covered by the warranty.
- If this product is used for other purposes than the ones originally intended, or if it is not correctly connected, the product may become damaged and the warranty will be voided.
- This washing machine is for indoor use only. If the washing machine is used for professional purposes, the warranty will be voided.
- Do not allow pets near the machine.
- Check the packaging of your machine before opening it and check the machine's outer surface condition once it has been unpacked. Do not use the machine if it is damaged or if the packaging was not intact on delivery.
- Your machine should only be installed by qualified professionals. Any work carried out on your machine by an unqualified person will cause the warranty to be voided.
- Only wash laundry that can be machine washed as indicated on its label. Do not wash laundry that is not machine-washable.
- Before using the washing machine, remove the 4 transport bolts and the rubber spacers at the back of the machine. If the bolts are not removed before use, the warranty will be voided. Failure to remove the bolts causes significant vibration and noise as well as damage to the washing machine.
- Your machine is not covered by the warranty in the event of failures caused by external factors (pesticides, fire, etc.).
- The room temperature for the best use of your washing machine is 15-25°C (59-77°F).
- Frozen hoses may burst. Temperatures below freezing point may cause the electronic control board to become a safety hazard.
- Make sure you empty all items from pockets (nails, needles, loose change, lighters, matches, clips, etc.) before putting your laundry in the washing machine. These loose items could damage the machine.
- You can contact your nearest authorized customer service to request free help with the installation, operation and use of your machine.
- We recommend running the 90°C cotton cycle (194°F) using a 12 dose of detergent in the second detergent drawer with the machine empty.
- As detergent or fabric softener may cause deposits if left exposed to air for long periods, only put the detergent or fabric softener in the drawers immediately before the start of each wash.
- If the machine is not used for extended periods of time, we recommend powering it off and shutting the water supply.
- Keeping the washing machine door open when not in use will help prevent bad smells caused by damp.
- The quality controls and test procedures may have left some water in your machine. This does not damage the machine.
- Packaging materials may be a safety hazard for children. Please keep all packaging material away from children or discard it properly.
- Keep the small parts in the document packing out of the reach of children and babies.
- Only use pre-wash cycles for very dirty laundry.
- Never open the detergent drawer while the machine is running.
- If a malfunction were to occur, first unplug the machine and then shut off the machine's water supply. Do not attempt to repair the malfunction yourself. Always contact the authorized customer service.
- The amount of laundry you put in your washing machine must not exceed the maximum indicated quantity.
- Never force the door open when the machine is running.
- Washing laundry in your machine with flour will damage it. Do not wash laundry in your machine with flour.
- When using detergent / fabric softener, always follow the manufacturer's instructions.
- Install your machine where the door can be fully opened. (Do not install your machine in a place where the door will not fully open.)
• Install your machine in a place that can be well ventilated and where there is constant air circulation.
- Scalding hazard! Do not touch the drain hose as the water coming out of it can reach very high temperatures.
• There is a risk of death by electrocution!
- Do not use multi-plugs or extension leads.
- Do not connect the machine to damaged wall sockets.
- Never pull the cord to disconnect the machine - always hold the plug.
- Do not plug or unplug the machine with wet hands, to avoid risks of electric shocks!
- Never touch the plug with wet hands or feet.
- Contact your nearest customer service to obtain a replacement if your power cord is damaged or malfunctions.
- Risk of flooding! Check that the sink waste is not clogged before connecting the drain hose to the sink.
• Take all necessary precautions to prevent the drain hose from moving.
- If the drain hose is not correctly fixed, the water pressure may dislodge it. Make sure the sink is not plugged when using the machine.
- Fire hazard! Do not store flammable liquids near your machine.
- Paint strippers may cause corrosion. Therefore, never use paint strippers on your machine.
- Never use solvent-based products (such as flushing gas) in your machine.
- Remove all items from pockets (needles, clips, lighters, matches, etc.) before putting your laundry in the machine. Any loose items in the machine increase the risk of fire and explosions.
- Burn and injury hazard! Do not climb onto the machine. The top of the machine may break causing injury.

natural_image
Illustration of a hand using a tool to clean or inspect a surface with a funnel (no text or symbols)
natural_image
Illustration of a hand using a tool to clean or inspect a surface with a funnel (no text or symbols)- When installing the machine, make sure the machine power cord and hoses are correctly laid out to prevent any risk of tripping or falling.
- Do not overturn the machine or place it on its side.
- Do not hold moving parts to move the machine (detergent drawer, door). They may break and cause injury.
- If the hoses and power cords are not correctly placed when the machine is installed, there is a risk of tripping over them causing injury.
• The machine must be handled by at least 2 people. - Child safety! Do not leave children unsupervised near the machine. Children may become trapped inside the machine with fatal consequences.
- The glass and the surface of the door may become extremely hot when the machine is running. This may cause burns to children if they touch the door.
- Keep the packaging materials out of the reach of children.
- If detergent or cleaning products are swallowed, there is a risk of poisoning. The eyes and skin may become irritated in contact with detergents and cleaning products. Keep cleaning products out of the reach of children.
2. USE AND OPERATION
2.1. Product Description
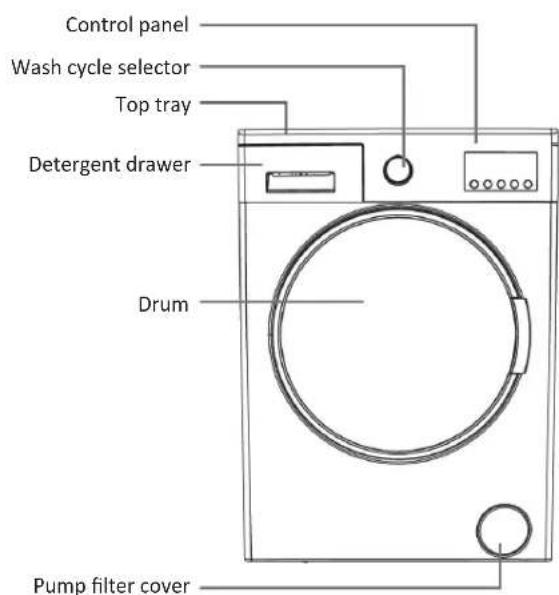
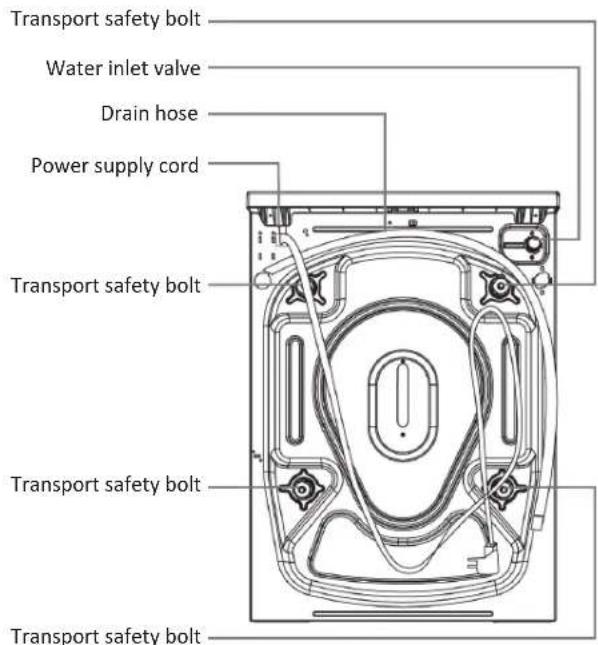
2.2. Using the Product
Before using the product
1- Removing the packaging:
The packaging protects the machine from damage during transport. The packaging material is recyclable and therefore environmentally friendly.
Recyclable materials save raw materials and reduce waste.
2- Disposing of your old machine:
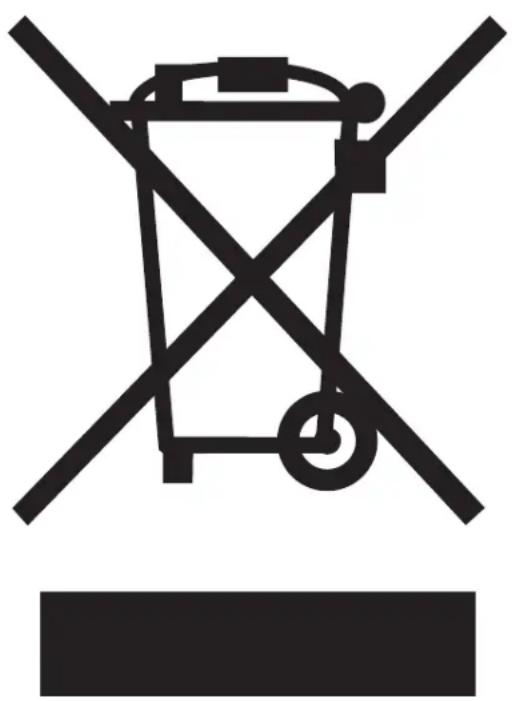
Old electric and electronic appliances may contain reusable parts. This is why you should not dispose of these appliances with household waste.
Make sure the parts of your old electric and electronic appliances are reused by disposing of them at authorized waste recycling centers.
Before taking old appliances to a recycling center, make sure they are stored in a suitable location out of the reach of children.
Savings tips
Here are some tips to get more efficient use of your machine:
- The amount of laundry that you put in your washing machine must not exceed the maximum indicated quantity.
- This means that the machine will run as economically as possible.
- Not using the pre-wash function for small loads or normally dirty laundry will save electricity and water.
2.2.1. Installing the Machine
Before using the washing machine, remove the 4 transport bolts and rubber spacers located at the back of the machine. If the bolts are not removed, they will cause strong vibrations, noise and damage to the product (voiding the warranty). Loosen the transport bolts by turning them anticlockwise using a suitable wrench.
When loose, pull the transport bolts out.
Insert the caps from the accessory bag to cover the holes left by the removal of the transport bolts.
Keep the transport bolts as you will need them in the future if you transport your machine.
NOTE:
It is imperative to remove the transport bolts from the machine before using it for the first time. Machines that suffer damage because they have been used with the transport bolts still in place are not covered by the warranty.

2.2.1.1. Leveling the Washing Machine
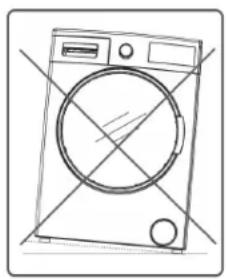
- Do not install washing machines on a carpet or on surfaces that prevent the base from being ventilated.
- To guarantee that the washing machine runs silently and does not vibrate, it should be installed on a solid, non-slip surface.
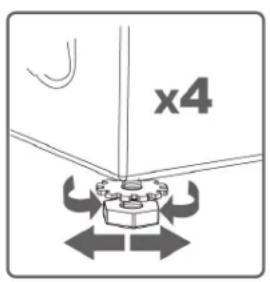
- The machine is fitted with adjustable leveling feet.
- Loosen the plastic counter-nut.
- Turn the feet to raise or lower each corner until the machine is level.
- When the machine is level, re-tighten the plastic counter-nut.
- Never use cardboard, wood or similar materials underneath the feet to level the machine.
- Be careful not to change the position of the feet when cleaning the floor around the machine.

natural_image
Line drawing of a washing machine with no text or symbols2.2.1.2. Electricity Supply
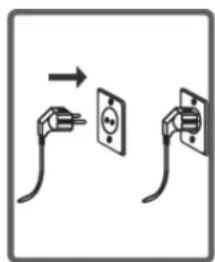
- Your washing machine is set to use a 220-240 V, 50 Hz power supply.
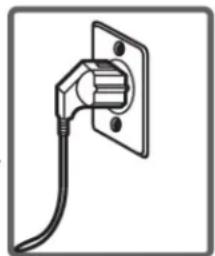
- The power supply cord on your machine is fitted with an earthed plug. The machine should always be plugged into a 10 amp earthed wall socket.
- The fuse must be 10 amps rated. The fuse on the mains power supply circuit must also be 10 amps rated. If you do not have a compatible circuit in your home you should contact a qualified electrician to have one installed.
- We decline any liability for damage resulting from the use of an un-earthed power outlet.
natural_image
Diagram showing two electrical plugs connected to a socket, with an arrow indicating direction (no text or symbols)NOTE:
Running your machine at a lower voltage will reduce its service life and deteriorate its performance.
2.2.1.3. Connecting the Inlet Hose
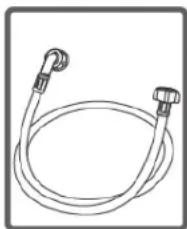
- Your machine may have a single inlet (cold water) or twin water inlets (hot and cold), depending on its specifications. The hose with the white top should be connected to the cold water inlet and the hose with the red top to the hot water inlet (for machines with two water inlets).
natural_image
Simple line drawing of a coiled hose with two connectors (no text or symbols)- In order to prevent leakage at the inlet connections, a washer is provided in the hose pack (or 2 washers for models with two inlets). This/these washer(s) are to be fitted to the ends of the inlet hose(s) that are connected to the water supply faucet.
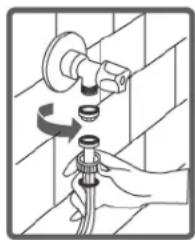
- The new 34'' inlet hoses must be connected to a threaded faucet.

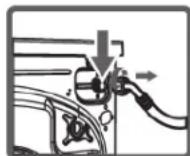
Connect the white right-angled end of the inlet hose to the white filtered inlet valve at the back of the machine and the red right-angled end to the red filtered inlet (on machines with two inlets). Tighten the plastic parts of the connections by hand. If in doubt, ask a qualified plumber to connect the machine.

- Your machine will be at its best if connected to a 0.1-1 Mpa water supply. (0.1 Mpa pressure means water flowing at more than 8 liters per minute at the faucet.)
- Make sure the connections do not leak and turn off the water supply when the connections are complete.
natural_image
Illustration of a hand using a valve to install a wall-mounted component (no text or symbols present)- Make sure the inlet hoses are neither bent, nor broken, crushed or distorted.
- If your machine has two inlets, the temperature of the hot water supply should not be higher than 70^ (158°F).
Note:
Use only the new inlet hoses that were delivered with the machine to connect to the water supply. Never use old, used or damaged inlet hoses.
2.2.1.4. Drain Hose Connection
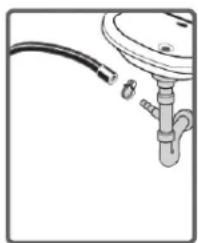
- The drain hose can be directly connected to a wastewater drainage outlet or to an external connection on the sink trap.
- Never attempt to lengthen the drain hose using joints.
- Do not place the drain hose for your washing machine in a container, bucket or sink.
- Check that the drain hose is not bent, burst, crushed or stretched. Remember:
- The drain hose should be installed at a minimum height of 60 cm and a maximum of 100 cm from the floor.
natural_image
Simple line drawing of a pipe fitting with a coiled cable (no text or symbols)
natural_image
Diagram showing a pipe connection with an inset close-up of a curved pipe opening (no text or symbols)
2.2.1.5. Presentation of the Control Panel

natural_image
Line drawing of a washing machine front panel with control knob and display (no text or symbols)Detergent drawer Wash cycle selector Electronic display and
additional functions
2.2.1.6. Detergent Drawer
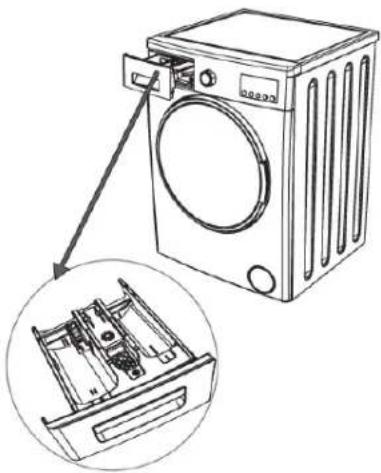
Use the liquid detergent cartridge if you are washing your laundry with liquid detergent. Liquid detergents can be used for all cycles without a pre-wash. Place the liquid detergent cartridge in the second compartment of the detergent drawer* and pour in the detergent. (Use the amounts recommended by the liquid detergent manufacturer). Do not exceed the MAX level. Only use this liquid detergent cartridge. When using washing powder, remove the cartridge first.
natural_image
Line drawing of a washing machine with an inset showing internal components (no text or symbols)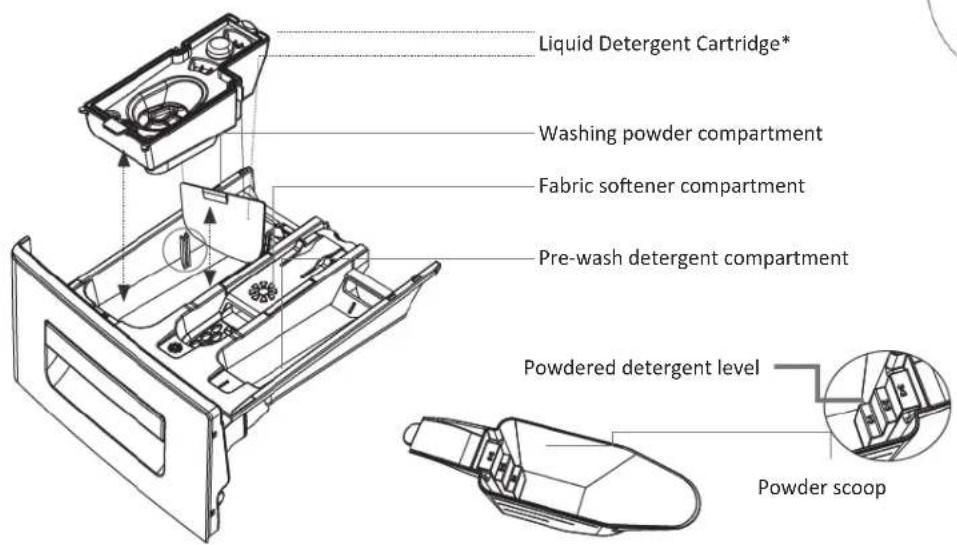
* The machine specifications may vary depending on the product.
2.2.1.6.1. Compartments
Main detergent compartment:
This compartment is only for detergent (liquid or powder), water softeners and similar products.
The liquid detergent compartment is inside your machine when it is first delivered*.

natural_image
Technical line drawing of a device with an inset close-up showing internal components (no text or symbols)Fabric softener, tablet, detergent compartment:
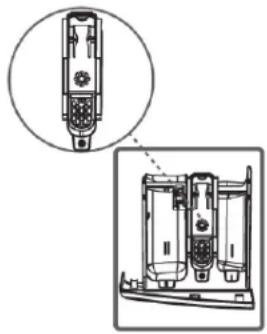
Fabric softener can be used with your laundry (follow the manufacturer's recommended doses). Sometimes fabric softeners may remain in the compartment after the cycle has finished. This occurs when the fabric softener is too thick. To avoid this, we recommend using thinner fabric softener or diluting the fabric softener before use.
natural_image
Technical line drawing of a mechanical device with an inset close-up showing internal components (no text or symbols)Pre-wash detergent compartment:
This compartment should only be used when the pre-wash function is used. The pre-wash function is recommended for very dirty laundry.
* The machine specifications may vary depending on the product.

natural_image
Technical line drawing of a mechanical device with an inset close-up view (no text or symbols)2.2.1.7. Washing Cycle Selector
- The washing cycle selector is used to choose the cycle you require.
- Washing cycles are selected by turning the selector in either direction.
- Make sure that the selector is directly on the cycle and not between two positions.

2.2.1.8. Electronic Display

The electronic display shows the water temperature for the washing cycle, the spin, indicates when the cycle is complete, the auxiliary functions you have selected and the current phase of the selected wash cycle (pre-wash/wash, rinse, spin)→
The electronic display will also display error symbols if your machine suffers a fault and displays “END” as soon as the washing cycle you selected has finished.
2.2.2. Preparing to Wash your Laundry
2.2.2.1. Sorting your Laundry
- There are labels on each item of laundry giving cleaning information. Wash and dry your laundry according to the instructions indicated on the labels.
- Sort your laundry according to its type (cotton, synthetic, delicate, wool, etc.), according to its washing temperature (cold, 30°C (86°F), 40°C (104°F), 60°C (140°F), 90°C (194°F)) and according to how dirty it is (slightly dirty, dirty, very dirty).

natural_image
Three-panel illustration showing a shirt, stacked documents with arrows, and a crossed-out saw (no text or symbols)- Never wash colored and white laundry together.
- Wash colored items on their own when washing them for the first time as the colors may not be fast
- Make sure that there are no metal objects mixed with the laundry or in the pockets.
CAUTION:
Damage caused by loose items in the washing machine is not covered by the warranty.

natural_image
Four-panel line drawing showing different types of clothing and accessories: rope, bucket, T-shirt, and umbrella (no text or symbols)- Close and button your laundry before washing.
- Remove metal or plastic hooks from net curtains or drapes, or place them in a net or mesh bag and tie it shut.
- Turn garments such as trousers, pullovers, t-shirts and sportswear inside out.
- Wash socks, handkerchiefs and small items in a washing bag.

2.2.2.2. Loading the Machine

natural_image
Line drawing of a washing machine (no text or symbols)
natural_image
Illustration of a washing machine with a handle inserting into it (no text or symbols)- Open the machine door. • Spread the laundry evenly in the drum.
NOTE:
The maximum load may vary depending on the type of laundry to be washed, how dirty it is and the selected washing cycle. Do not exceed the maximum dry load indicated in the table for the washing cycles.
The following table can be used as an example.
| TYPE OF LAUNDRY WEIGHT (gr) | |
| Towels 200 | |
| Linen 500 | |
| Bathrobes 1200 | |
| Bedding 700 | |
| Duvets 200 | |
| Underwear 100 | |
| Tablecloths 250 | |
- Load each item separately.
• Make sure no items are trapped between the door and the door seal when you close the machine. - Push the machine door until you hear the lock click shut.
- If the machine door is not properly closed, the machine will not start.

2.2.2.3. Putting Detergent into the Machine
The quantity of detergent used depends on the following criteria:
- Detergent depends on how dirty the laundry is. Laundry which is only slightly dirty does not need pre-washing and only needs a small amount of detergent in the second compartment of the detergent drawer.
- If the laundry is very dirty, choose a washing cycle with a pre-wash and put 14 of the detergent you use into the first compartment of the detergent drawer and the remaining 34 in the second compartment.
- Use machine-washing detergents. The amount of detergent to be used is indicated on the packaging.
- The harder your water supply, the more detergent will be needed.
- The amount of detergent needed increases proportionally to the amount of laundry.
- Place fabric softener in the fabric softener compartment of the detergent drawer. Do not exceed the MAX level or the fabric softener will overflow into the washing water through the inlet hose.
- Concentrated fabric softeners should be diluted before being placed in the compartment. Concentrated fabric softeners can clog the outlet and block the flow of fabric softener into the machine.
- Liquid detergents can be used for all washing cycles without a pre-wash. Use the liquid detergent cartridge from the accessory bag or in the drawer* and place it in the second compartment of the detergent drawer. Use the quantities indicated on the cartridge. Remember to remove the liquid cartridge after use.
* The machine specifications may vary depending on the product.
2.2.2.4. Running your Machine
- Switch your machine on.
- Open the water faucet.
- Open the machine door.
- Spread the laundry in the drum.
- Push the door shut until you hear the lock click.
natural_image
Simple line drawing of an electric plug with a socket and cable (no text or symbols)
natural_image
Line drawing of a hand using a tool to clean or adjust a circular component (no text or symbols)2.2.2.4.1. Select the Washing Cycle
Select the most suitable cycle for your laundry from the cycle table.
2.2.2.4.2. Auxiliary Functions
Before starting the washing cycle, you can select an auxiliary function.
- Press the button for the auxiliary function you want to use.
- If the auxiliary function symbol on the electronic display lights, the function you selected has been activated.
- If the auxiliary function symbol on the electronic display flashes, the auxiliary function you selected will be deactivated.

The functions may not be activated because:
- The function you want to use is not available for the washing cycle you selected.
- Your washing cycle has already gone further than the phase in which the function would be used.
- The function you want is not compatible with another function you already selected.
2.2.2.4.3. Half Load Detection System
Your machine has a half load detection system.
If the laundry load is half or less than half your machine's maximum capacity, for certain washing cycles the machine will run to save washing time, water and energy consumption. When the half load function is activated, the machine will complete the washing cycle you defined, but in a shorter time.
2.2.2.5. Auxiliary Laundry Functions
2.2.2.5.1. Temperature Selection
The washing cycle temperature can be selected using the temperature setting button.
When you choose a new washing cycle, the maximum temperature for the cycle is shown on the temperature display.
You can reduce the washing cycle temperature from the originally displayed value down to cold (- - C) by pressing the temperature setting button.
If you overshoot the temperature you want, press the temperature setting button and keep it pressed until the temperature you want is displayed.
2.2.2.5.2. Selecting the Spin Speed
You can set the spin speed for your washing cycle.
When you choose a new washing cycle, its maximum spin speed is shown on the spin speed display.
You can reduce the spin speed down to zero (- -) and up to the maximum washing cycle spin speed, by pressing the spin speed setting button.
If you overshoot the spin speed setting you want, you can reset the spin speed by keeping the spin speed setting button pressed.


BECKEN
2.2.2.5.3. Delayed Wash Timer
By using this auxiliary function, you can program your machine to start the wash after a delay of between 1 and 23 hours.
To use the Delayed wash timer:
- Press the delay timer button once.
- The display will show "1 h". The ⏻ symbol on the electronic display will flash.

flowchart
graph TD
    A["Device Panel"] --> B{Check Point}
    B --> C["Battery Icon"]
    C --> D["100% Display Icon"]
Press the delay timer button until you reach the time after which you want the washing cycle to start.
- To activate the count-down you have defined for the delay, press any auxiliary function button except for "Start/Pause".
If you have overshot the delay you want to set, you can reset the delay by keeping the delay time button pressed down.
If you want to cancel the delay timer, press the delay timer button once.
The ⏻ symbol on the electronic display will stop flashing.
To activate the delay timer function, you must press the Start/Pause button.
2.2.2.5.4. Anti-allergici
In the programmes where this auxiliary function is active, your machine will perform an extra rinsing operation on your laundries prior to latest rinsing operation.
When you press on the Anti allergic auxiliary function, the 📄 symbol on the electronic display will flash.
2.2.2.6. Start/Pause Button
Pressing the Start/Pause button either starts or cancels the selected washing cycle or pauses a washing cycle that is running. If you pause your machine, the Start/Pause LED on the electronic display will flash.
2.2.2.7. Child Safety Lock
To prevent the washing cycle from being altered by the buttons being pressed at random or the washing cycle selector being turned when the machine is running, a child safety lock function is available.
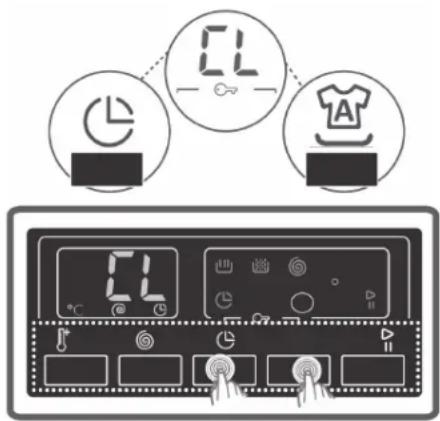
The child safety lock is activated by pressing auxiliary functions 3 and 4 at the same time for more than 3 seconds.
The "CL" symbol will flash on the electronic display when it is activated.
If any buttons are pressed while the child safety lock is active, the "CL" symbol will flash on the electronic display.
If the washing cycle selector is moved to the CANCEL position and another washing cycle is selected while a washing cycle is running with the child safety lock activated, the previously selected cycle continues from the point at which it stopped.
To disable it, just press the same buttons again for more than 3 seconds. When the child safety lock is disabled, the "CL" symbol on the electronic display will turn off.

2.2.2.8. Cancel a Washing Cycle
If you want to cancel a washing cycle while it is running:
1 - Turn the washing cycle selector to the "CANCEL" position.
2 - The machine will stop the current washing cycle and then cancel it.
3 - To drain the water still in the machine, turn the washing cycle selector to any cycle.
4 - The machine will drain and then cancel the cycle.
5 - You can then choose a new washing cycle.
2.2.2.9. Washing Cycle Completion
The machine will stop automatically when the cycle completes.
- The "END" message will flash on the electronic display.

- You can then open the machine door and remove the laundry.
• Leaving the machine door open will let the interior dry. - Turn the washing cycle selector to the "CANCEL" position.
- Switch off the machine.
- Close the water faucet.
2.2.2.10. Washing Cycle Tables
NOTE:
The cycle duration may vary depending on the quantity of laundry, tepid water, room temperature and any additional selected functions.
| COTTON 90 °C | |
| Wash temperature (°C) 90° (194°F) | |
| Maximum dry laundry capacity (kg) 9.0 | |
| Detergent compartment 2 | |
| Cycle duration (Min.) 193 | |
| Laundry type/description Very dirty fabrics, cottons and linens (underwear, sheets, tablecloths (maximum 4,5 kg), bedclothes, etc.) | |
| COTTON PRE-WASH | |
| Wash temperature (°C) 60° (140°F) | |
| Maximum dry laundry capacity (kg) 9.0 | |
| Detergent compartment 1 & 2 | |
| Cycle duration (Min.) 185 | |
| Laundry type/description Dirty cotton and linen fabrics | (underwear, sheets, tablecloths (maximum 4,5 kg), bedclothes, etc.) |
| COTTON ECO | |
| Wash temperature (°C) 60° (140°F) | |
| Maximum dry laundry capacity (kg) 9.0 | |
| Detergent compartment 2 | |
| Cycle duration (Min.) 240 | |
| Laundry type/description Dirty cotton and linen fabrics | (underwear, sheets, tablecloths (maximum 4,5 kg), bedclothes, etc.) |
| ECO 20 °C | |
| Wash temperature (°C) 20° (68°F) | |
| Maximum dry laundry capacity (kg) 4.5 | |
| Detergent compartment 2 | |
| Cycle duration (Min.) 100 | |
| Laundry type/description Less dirty cotton and linen fabrics (underwear, sheets, tablecloths (maximum 2 kg), bedclothes, etc.) | |
| EASY CARE | |
| Wash temperature (°C) 40° (104°F) | |
| Maximum dry laundry capacity (kg) 3.5 | |
| Detergent compartment 2 | |
| Cycle duration (Min.) 89 | |
| Laundry type/description Very dirty or synthetic fabrics (nylon socks, shirts, blouses, synthetics—including trousers, etc.) | |
| WOOL | |
| Wash temperature (°C) 30° (86°F) | |
| Maximum dry laundry capacity (kg) 2.5 | |
| Detergent compartment 2 | |
| Cycle duration (Min.) 52 | |
| Laundry type/description Wool garments with machine wash label. | |
| RINSING | |
| Wash temperature (°C) - | |
| Maximum dry laundry capacity (kg) 9.0 | |
| Detergent compartment - | |
| Cycle duration (Min.) 40 | |
| Laundry type/description If you also want to rinse your clothing after washing, you can use this cycle for any kind of clothing. | |
| ALLERGY SAFE | |
| Wash temperature (°C) 60° (140°F) | |
| Maximum dry laundry capacity (kg) 4.5 | |
| Detergent compartment 2 | |
| Cycle duration (Min.) 215 | |
| Laundry type/description Baby clothes. | |
| SPIN | |
| Wash temperature (°C) - | |
| Maximum dry laundry capacity (kg) 9.0 | |
| Detergent compartment - | |
| Cycle duration (Min.) 17 | |
| Laundry type/description If you want to spin dry your laundry after washing, you can use this cycle for any kind of laundry. | |
| HAND WASH / DELICATE CLOTHING | |
| Wash temperature (°C) 30° (86°F) | |
| Maximum dry laundry capacity (kg) 2.5 | |
| Detergent compartment 2 | |
| Cycle duration (Min.) 100 | |
| Laundry type/description Clothing recommended to be h hand washed or delicate clothing. | |
| SPORTSWEAR | |
| Wash temperature (°C) 30° (86°F) | |
| Maximum dry laundry capacity (kg) 3.5 | |
| Detergent compartment 2 | |
| Cycle duration (Min.) 72 | |
| Laundry type/description Sportswear. | |
| IhsId | |
| Wash temperature (°C) 40° (104°F) | |
| Maximum dry laundry capacity (kg) 2.5 | |
| Detergent compartment 2 | |
| Cycle duration (Min.) 114 | |
| Laundry type/description You can wash your fiber blanket | that has the machine wash label in this program. (max. 2,5 kg) |
| BLOUSES / SHIRTS | |
| Wash temperature (°C) 60° (140°F) | |
| Maximum dry laundry capacity (kg) 4.5 | |
| Detergent compartment 2 | |
| Cycle duration (Min.) 114 | |
| Laundry type/description Dirty shirts and blouses, cotton, | synthetics and synthetic blends can be washed together. |
| DAILY 60 min. | |
| Wash temperature (°C) 60° (140°F) | |
| Maximum dry laundry capacity (kg) 4.0 | |
| Detergent compartment 2 | |
| Cycle duration (Min.) 60 | |
| Laundry type/description Dirty cotton, colored and linen fabrics at 60°C (140°F) can be washed in 60 minutes. | |
If the machine has an auxiliary quick wash function and if you load 2 kg or less of laundry in the machine, a 30 minute cycle will be run automatically.
| QUICK WASH 12 min. | |
| Wash temperature (°C) 30° (86°F) | |
| Maximum dry laundry capacity (kg) 2.0 | |
| Detergent compartment 2 | |
| Cycle duration (Min.) 12 | |
| Laundry type/description You can wash slightly dirty cotton, colored fabrics and linen in just 12 minutes. | |
NOTE:
As the wash time is short, less detergent is needed than for the other cycles. The cycle time will increase if your machine detects an unstable load. The machine door can be opened 2 minutes after the wash has finished. (The 2 minutes wait before you can open the door is not included in the washing time).
2.2.2.11. Practical Information
Alcoholic beverages: The stained area should first be washed in cold water and then rubbed with glycerin and water and rinsed with a mixture of vinegar and water.
Shoe polish: The stained area should be gently rubbed using detergent without damaging the fabric and then rinsed. If the stain does not come out, it should be rubbed with a mixture of one part alcohol (96%) and two parts water, and then washed in hot water.
Tea and Coffee: Stretch the stained area of fabric over the plughole of a sink and pour water as hot as the type of fabric can withstand through it.
If the garment can be bleached, wash it with bleach.
Chocolate and Cocoa: After soaking the fabric in cold water and rubbing it using soap or detergent, wash it at a temperature that the type of fabric can withstand. If there are visible oil stains, wash using hydrogen peroxide (3%).
Tomato sauce: After having scrubbed the dried substances without damaging the fabric, soak in water for 30 minutes and then rinse and wash with detergent.
Cooked egg: Remove the dry egg residue from the fabric and then wash using a sponge or a damp soft cloth. Rub with detergent, wash with diluted bleach.
Grease and oil stains: First, remove any residue. Rub the stain with detergent and wash it with hot water and soap.
Mustard: Apply glycerin to the stained area. Rub with detergent and wash. If the stain does not come out, wash with alcohol. (For synthetic and colored fabrics, a mixture of one part alcohol to two parts water should be used.)
Fruit: Stretch the stained fabric over the opening of a container and pour cold water over it. Do not pour hot water on the stain. Wash with cold water and apply glycerin. Leave to rest for 1-2 hours with a few drops of white vinegar and wash.
Grease stain: Wash the stained area with detergent. If the fabric allows the use of bleach, wash with bleach. Wash woolens with alcohol. (For colored fabrics, a mixture of 1 part pure alcohol to 2 parts water)

natural_image
Vertical sequence of nine black-and-white line drawings representing various objects or items, arranged in a grid (no text or symbols)Oil paint: The stain should be removed by applying thinner before it dries. Then it should be cleaned with detergent and washed.
Scorch marks: If the use of bleach is permitted on the fabric, add bleach to the washing water. For wool, soak a cloth in hydrogen peroxide and cover the stain, place a dry cloth on the first cloth and iron. Wash after rinsing thoroughly.
Blood Stains: Soak the fabric in cold water for 30 minutes. If the stain does not come out, put it in a mixture of water and ammonia (3 tablespoons of ammonia in 4 liters of water) for 30 minutes.
Cream, ice-cream and milk: Soak the fabric in cold water and rub the stained area with detergent. If the stain does not come out, apply bleach as required. (Do not use bleach on colored fabrics)
Food residue: Food stains should be removed as soon as possible. The stain should be washed with water and detergent and, if it does not come out, it should be rubbed with hydrogen peroxide (3%).
Paint: The stained area should be held under running water until the water flow is no longer colored by the paint. Then, wash with lemon water and detergent and wash again after 5 minutes.
2.2.2.11.1. Energy rating and Energy Saving Label
Water consumption may vary depending on water pressure, water hardness, water temperature, room temperature, the quantity of laundry, the use of additional functions and voltage fluctuations. You will reduce energy and water consumption if you use your machine with the recommended load for the selected washing cycle; by washing slightly dirty or everyday clothes using short cycles; carrying out cleaning and preventive maintenance regularly and using the machine at the off-peak periods, as indicated by the electricity supplier.


natural_image
Two black-and-white icons: a paintbrush above and a flame symbol below (no text or labels)
natural_image
Two black-and-white illustrations: top shows a splash with droplets, bottom shows a waffle cone (no text or symbols)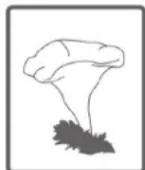

2.3. Maintenance
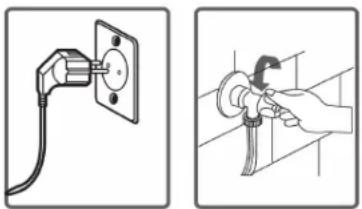
Disconnect your machine before starting maintenance or cleaning your machine.
Close the water faucet before starting maintenance or cleaning your machine.
WARNING:
Some machine parts may be damaged by cleaning products containing solvents.
Do not use solvent based cleaning products.
natural_image
Two-step diagram showing a plug inserted into a socket and a hand using a tool to clean the socket (no text or symbols present)2.3.1. Water Inlet Filters
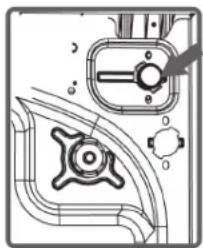
There are filters to prevent dirt and foreign objects in the water from entering the machine, both on the faucet side and on the water valves, as well as on the machine's inlet hose.
If your machine does not have a sufficient water supply despite the faucet being open, these filters must be cleaned.
(It is recommended that the pump filter be cleaned every 2 months.)
- Disconnect the water inlet hoses.
- Remove the water inlet valve filters using tweezers and then clean them with a brush and water.
- Remove the filters at the faucet end of the water inlet hoses manually and clean them.
- Once the filters are clean, refit them into their previous position.
natural_image
Technical line drawing of a mechanical component with no visible text or symbols
WARNING:
The inlet valve filters may become clogged due to a contaminated water faucet or lack of necessary maintenance, or the valves may be broken, causing continual water leaks into the machine.
Malfunctions that occur for these reasons are not covered by the warranty.
2.3.2. Pump Filter
A filter system is installed that prevents residue from your laundry and small particles from entering the pump during draining after completing the wash, thereby extending your machine's service life. It is recommended to clean the pump filter every 2 months.

natural_image
Illustration of a hand holding a pen and a circular object with a downward arrow, no text or symbols presentTo clean the pump filter:
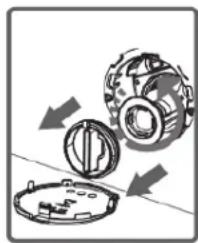
- To open the pump cover. You can use the powdered detergent scoop* or the liquid detergent level tray that was delivered with your machine.
- Insert the tip of the plastic part into the slot on the pump cover and lever it out. This will open the cover.
- Before opening the filter cap, place a container in front of it to prevent any residual water inside from spilling onto the floor.
natural_image
Mechanical assembly diagram showing gear and housing components with directional arrows (no text or labels)- Loosen the filter cap in an anticlockwise direction and then empty out any water.
Note:
You may need to empty the collected water several times depending on the amount of water in the machine.
* The machine specifications may vary depending on the product.
- Clean foreign materials from the filter using a brush.
• After cleaning the filter, replace the filter cap and tighten it in a clockwise direction. - When you close the pump cover, make sure that the parts inside the cover align with the holes on the side of the front panel.
• Refit the pump cover in its initial position.

natural_image
Illustration of a hand holding a small object with tassels, being handled by a funnel (no text or symbols)
natural_image
Technical line drawing of a mechanical component with two views: top shows internal gear assembly, bottom shows circular housing (no text or symbols)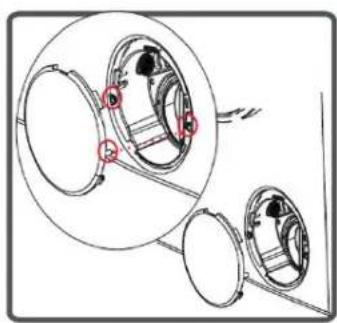
natural_image
Diagram of mechanical components with highlighted parts and directional arrows (no text or symbols)
natural_image
Simple line drawing of a mechanical component with a warning triangle and circular features (no text or symbols)WARNING!
The water in the pump may be hot, wait until it has cooled down.
2.3.3. Detergent Drawer
Over time, detergents may form a deposit in the detergent drawer and its compartments.
To clean the deposits, remove and clean the detergent drawer often. It is recommended to clean the pump filter every 2 months.
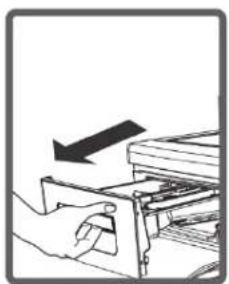
To remove the detergent drawer:
- Open the drawer and pull it out completely
- Continue to pull while pressing the section in the detergent drawer as shown below, and while pressing, slide out the detergent drawer.
natural_image
Illustration of a hand using a tool to press documents or files (no text or symbols visible)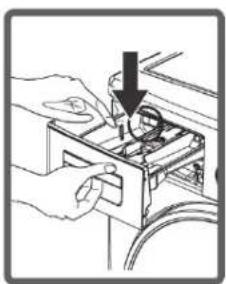
natural_image
Illustration of hands operating a device with a downward arrow indicating action (no text or symbols present)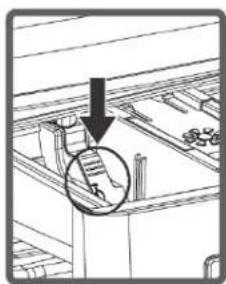
natural_image
Technical diagram showing a mechanical assembly with a circled component and an arrow pointing to a feature (no text or symbols present)[you can trust]
- Wash it using a brush.
• Collect the deposit from the detergent compartment of the drawer without letting it fall into the machine. - Re-install the detergent drawer after drying it using a towel or dry cloth.
- Do not wash the detergent drawer in a dish-washer.
2.3.3.1. Liquid Detergent Compartment\*
Remove the liquid detergent compartment and level to clean and maintain it as shown in the image, and completely remove any detergent residue. Put the compartment back in place. Check that there is no residue left inside.

natural_image
Technical line drawing of a mechanical device with internal components (no text or symbols)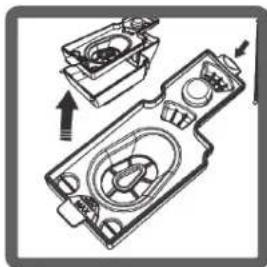
natural_image
Technical line drawing of a mechanical component with no visible text or symbols* The machine specifications may vary depending on the product.
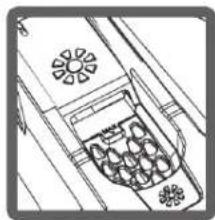
2.3.4. Flow Lock
Remove the detergent drawer. Remove the flow lock and completely clean any fabric softener residue. Replace the flow lock after cleaning. Check that it is correctly fitted.
natural_image
Line drawing of a cabinet interior with decorative fans and a tray (no text or symbols)
natural_image
Line drawing of a mechanical device with a lever and handle (no text or symbols)
natural_image
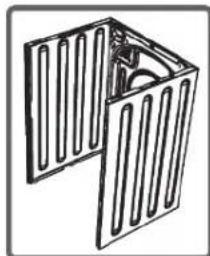
Diagram of a mechanical lever system with an upward arrow indicating motion (no text or symbols present)2.3.5. Body
Clean the exterior of your machine with hot water and a non-flammable detergent that will not scratch the body. After rinsing it with a little water, dry it using a soft, dry cloth.
natural_image
Simple line drawing of a folded panel or vent with internal structure (no text or symbols)2.3.6. Drum
Do not leave metal objects, such as needles, clips, coins, etc., in your machine. These objects will cause rust stains to form in the drum. To clean these rust stains, use a detergent that does not contain chlorine and follow the detergent manufacturer's instructions. Never use wire products or abrasive pads to clean rust stains.

natural_image
Technical illustration of a cylindrical mechanical component with flanged ends and internal grooves (no text or symbols)2.4. Troubleshooting
All repairs should be carried out by our authorized services. If your machine needs to be repaired or if you cannot solve a malfunction using the following suggestions:
- Switch off the machine.
- Close the water faucet
| FAILURE PROBABLE CAUSE PROBLEM | SOLUTION | |
| Your machine does not start. It is not switched on. Switch it on. | ||
| Blown fuses. Replace the fuses. | ||
| Power cut. Check the electricity supply. | ||
| Start/Pause button not pressed. Press the Start/Pause button. | ||
| "STOP" position on the cycle selector. Turn the selector to the required position. | ||
| The machine door is not properly shut. Shut the door properly. | ||
| Your machine is not getting any water. | The water faucet is closed. Open the faucet. | |
| The inlet hose is twisted. Check the inlet hose and remove any kinks. | ||
| The inlet hose is blocked. Clean the inlet hose filters.* | ||
| Clogged inlet valve filter. Clean the inlet hose filters.* | ||
| The machine door is not properly shut. Shut the door properly. | ||
| Your machine does not drain. | Drain hose blocked or twisted. Check the drain hose, then clean or free it. | |
| Pump filter clogged. Clean the pump filter.* | ||
| Items unevenly distributed in the machine. Distribute the items evenly in your machine. | ||
| The machine vibrates. | The feet on your machine are not adjusted. Adjust the feet on your machine.** | |
| Transport bolts not removed. Remove the transport bolts from your machine.** | ||
| Reduced quantity of laundry in machine. This will not prevent your machine from running. | ||
| Your machine is overloaded with laundry or the laundry is unevenly distributed. Do not overload the machine. Distribute the laundry evenly in your machine. | ||
| The machine is placed on a hard surface. Avoid placing your machine on hard surfaces. | ||
| Excessive suds are formed in the detergent drawer. | Excess quantity of detergent. Press the Start/Pause button. To eliminate the formation of suds, mix a spoonful of fabric softener with a half-liter of water and pour the mixture in the detergent drawer. After 5-10 minutes, press the Start/ Pause button. On your next wash operation, adjust the detergent dose accordingly. | |
| Wrong detergent used. Only use detergent for washing machines. | ||
| Unsatisfactory washing results. The dirtiness of the laundry does not correspond to the chosen cycle. | tiness of the laundry does not correspond to the chosen cycle. | Choose the appropriate cycle for the dirtiness of your laundry. (See the washing cycle tables.) |
| Insufficient quantity of detergent used. | Adjust the quantity of detergent based on the dirtiness of the laundry. | |
| The laundry weight exceeds the maximum machine capacity. | Load your machine without exceeding the maximum load. | |
| Hard water. (Contaminated, water containing calcium, etc.) | Adjust the quantity of detergent based on the manufacturer's instructions. | |
| Uneven distribution of laundry in the machine. | Distribute the laundry evenly in the machine. | |
| The machine drains as soon as it fills with water. | The end of the drain hose is too low compared to the machine position. | Place the drain hose at a suitable height.** |
| No water appears in the drum during washing. | Normal.The water is hidden in the lower part of the drum. | ---- |
| The laundry contains detergent residue. | Un-dissolved particles from certain detergents may adhere to your laundry leaving white stains. | Carry out an extra rinse by setting the “RINSE” cycle on your machine, or clean the stains using a brush after drying the laundry. |
| Gray stains appear on the laundry. | These stains could be caused by oil, cream or ointment. | Apply the maximum quantity of detergent in accordance with its manufacturer's instructions at the next wash. |
| The spin dry does not occur or is delayed. | No malfunction. The unbalanced load control system was activated. | The unbalanced load control system will try to distribute your clothing evenly.Spinning will begin once your laundry has been re-distributed. Place the laundry in the machine more evenly the next time. |
* See the chapter on machine maintenance and cleaning.
** See the chapter on machine installation.
2.4.1. Automatic Malfunction Warnings and What to Do
Your machine is equipped with systems that have the capability of both taking necessary preventive action and warning you of any malfunction by continually self-testing during washing cycles.
| ERROR CODE POSSIBLE MALFUNCTION | WHAT TO DO | |
| E1 Your machine door has been left | open. | Close the machine door. If the machine continues to indicate a malfunction, switch it off and immediately contact your nearest authorized customer service. |
| E2 The water pressure or water level | inside the machine is low. | Open the faucet.The water supply may have been cut off. If the problem continues, your machine will stop automatically after a while. Switch off the machine, close the faucet and contact your nearest authorized customer service. |
| E3 The pump is malfunctioning, the | pump filter is clogged, or the pump's power supply is faulty. | Clean the pump filter. If the problem persists, contact the nearest authorized customer service.* |
| E4 Your machine contains too much | water. | Your machine drains by itself. Switch the machine off during the draining operation. Close the faucet and contact the nearest authorized customer service. |
* See the chapter on machine maintenance and cleaning.
3. TECHNICAL SPECIFICATIONS
| Operating voltage/frequency (V/Hz) | 220-240 V/50 Hz |
| Total current (A) | 10 |
| Water pressure (Mpa) | Maximum: 1 MpaMinimum: 0.1 Mpa |
| Total power (W) | 2200 |
| Maximum dry laundry capacity (kg) | 9 |
| Spin speed (rpm) | 1200 |
| Number of washing cycles | 15 |
| Dimensions(Height x Length x Depth) (mm) | 845 x 597 x 582 |
4. POST-SALE SERVICE
Becken has designed this appliance in order to guarantee maximum reliability. However, if a problem occurs do not attempt to open the appliance - there is a risk of electrical shock. If you are not able to solve the problem, please contact the Costumer Support Service of any Worten, Modelo or Continente store in order to be assisted. Worten Equipamentos para o Lar provides a 2-year warranty for manufacturing defects from the date of purchase of the appliance.
WARNING:
Any attempt to repair the appliance without contacting the manufacturer or seller will void the warranty.
All users must be familiar with these instructions. Knowing what could go wrong can help prevent problems from occurring.
5. ENVIRONMENTAL PROTECTION
In order to protect the environment we strive to reduce the volume of packaging used, limiting it to three easily sorted materials: cardboard, paper and plastic. The appliance is manufactured using recyclable materials after disassembled by a specialized company. Please comply with local regulations concerning the recycling of all materials.
natural_image
Symbol of a trash bin crossed with no visible text or numbers, accompanied by a black prohibition sign below (no text or numbers present)Estimado cliente:
natural_image
Illustration of a hand using a tool to clean or inspect a component, no text or symbols present
natural_image
Illustration of a hand using a tool to clean or inspect a surface with a funnel (no text or symbols)natural_image
Line drawing of a washing machine with a close-up inset showing the blade and handle (no text or symbols)natural_image
Line drawing of a washing machine with no text or symbolsnatural_image
Two electrical plugs with connectors, one holding a socket and the other holding a socket (no text or symbols)NOTA:
natural_image
Simple line drawing of a coiled hose with two connectors (no text or symbols)

natural_image
Illustration of a hand using a tool to lift a wall-mounted pipe onto a brick wall (no text or symbols)Nota:
natural_image
Simple line drawing of a pipe fitting with a handle and outlet (no text or symbols)
natural_image
Diagram showing a pipe connection with an inset magnified view of a curved pipe or arch structure (no text or symbols)natural_image
Line drawing of a washing machine with an inset showing internal components (no text or symbols)
natural_image
Technical line drawing of a mechanical device with an inset close-up showing internal components (no text or symbols)
natural_image
Technical line drawing of a mechanical device with an inset close-up view (no text or symbols)
natural_image
Technical line drawing of a mechanical device with an inset close-up showing internal components (no text or symbols)2.2.1.7. Selector de programas
natural_image
Three-panel illustration showing a shirt, stacked boxes with arrows, and a crossed-out saw (no text or symbols)ADVERTENCIA:
natural_image
Five black-and-white illustrations of different household items: a rope tied with string, a bucket with a brush, a T-shirt, and a hairdryer (no text or symbols)natural_image
Two illustrations of a washing machine, one open and one inserted with a handle (no text or symbols)natural_image
Simple line drawing of an electrical outlet with a plug and cable (no text or symbols)
natural_image
Line drawing of a hand using a tool to clean or adjust a circular component (no text or symbols)natural_image
Two-step diagram showing a plug inserted into a socket and a hand using a tool to clean the socket (no text or symbols present)Precaución:
natural_image
Technical diagram of a mechanical component with no visible text or symbolsnatural_image
Illustration of a hand holding a pen with a circular arrow pointing downward (no text or symbols)
natural_image
Mechanical assembly diagram showing a disassembled gear and housing with directional arrows indicating motion (no text or symbols)Nota:
natural_image
Illustration of hands performing a medical procedure with a tool (no text or symbols visible)
natural_image
Technical line drawing of a mechanical component with two views: top shows internal gear-like structure, bottom shows circular housing (no text or symbols)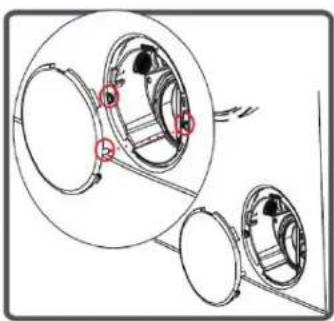
natural_image
Diagram of mechanical components with no visible text or symbols
natural_image
Simple line drawing of a mechanical assembly with a gear and warning triangle (no text or symbols)¡ADVERTENCIA!
natural_image
Illustration of a hand inserting a card into a file with an arrow indicating the direction (no text or symbols present)
natural_image
Illustration of hands installing a component into a device with a downward arrow (no text or symbols)
natural_image
Technical diagram showing a mechanical assembly with a circular arrow pointing to a component (no text or symbols present)natural_image
Technical line drawing of a mechanical device with internal components and a handle (no text or symbols)
natural_image
Technical illustration of a mechanical component with internal parts and directional arrows (no text or symbols)natural_image
Line drawing of a mechanical component with fan and gear-like elements (no text or symbols)
natural_image
Line drawing of a cabinet with a handle and an arrow indicating motion (no text or symbols)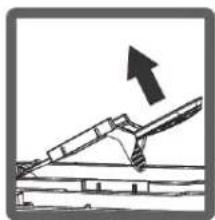
natural_image
Diagram of a mechanical lever system with an upward arrow indicating motion (no text or symbols present)2.3.5. Cuerpo
natural_image
Simple line drawing of a folded panel or vent with slots and a central circular element (no text or symbols)2.3.6. Tambor
natural_image
Technical line drawing of a cylindrical mechanical component with internal channels (no text or symbols)natural_image
Symbolic illustration of a trash bin crossed with no text or symbols, accompanied by a black horizontal bar (no text or numbers present)Caro(a) cliente,
natural_image
Illustration of a hand using a tool to clean or wash a surface with a tool, no text or symbols present
natural_image
Illustration of a hand holding a pen and drawing on a notepad (no text or symbols)[you can trust]

natural_image
Line drawing of a washing machine with no text or symbolsNOTA:
natural_image
Simple line drawing of a coiled hose with two connectors (no text or symbols)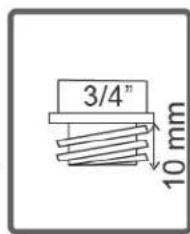


natural_image
Illustration of a hand holding a pipe fitting through a tiled wall, with no visible text or symbols.
natural_image
Pure diagram of a pipe fitting with a coiled cable, no text or symbols present
natural_image
Technical diagram showing a mechanical assembly with an inset close-up of a curved pipe or channel (no text or symbols present)natural_image
Line drawing of a washing machine with an inset showing internal components (no text or symbols)
natural_image
Technical line drawing of a mechanical device with two views: top shows internal components, bottom shows assembly or assembly (no text or symbols)
natural_image
Technical line drawing of a mechanical device with an inset close-up showing internal components (no text or symbols)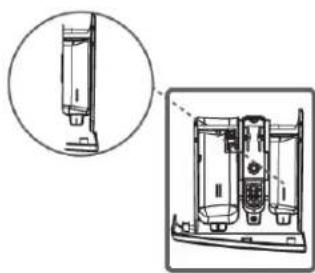
natural_image
Technical line drawing of a mechanical device with an inset close-up showing internal components (no text or symbols)2.2.1.7. Seletor de programas
natural_image
Three-panel illustration showing a shirt, stacked documents with arrows into a basket, and a crossed-out saw (no text or symbols)CUIDADO:
natural_image
Five black-and-white illustrations showing different types of clothing and accessories: rope, bucket, shirt, pants, and umbrella (no text or symbols)natural_image
Two illustrations of a washing machine, one open and one inserted into the air (no text or symbols)natural_image
Line drawing of a washing machine with 'clic' label above it (no other text or symbols)2.2.2.3. Adicionar detergente na máquina
natural_image
Simple line drawing of an electric shock plug (no text or symbols)natural_image
Illustration of a hand using a tool to clean or adjust a circular component (no text or symbols visible)natural_image
Two simple line drawings: a wine bottle and a boots, both without any text or symbols.natural_image
Four-panel illustration showing different types of objects: a splash, ice cream in a waffle cone, a mushroom-shaped object, and a pen (no text or symbols)natural_image
Two technical diagrams showing a plug and a hand holding a tool, both without any text or symbols.natural_image
Technical line drawing of a mechanical component with no visible text or symbols
natural_image
Illustration of a hand holding a device with a circular arrow pointing downward (no text or symbols)
natural_image
Mechanical assembly diagram showing a gear and housing with directional arrows indicating motion (no text or symbols)Nota:
natural_image
Illustration of hands performing a manual procedure with tassels and a funnel (no text or symbols)
natural_image
Technical line drawing of a mechanical component with two views: top shows a flanged circular part, bottom shows a circular housing with mounting holes (no text or symbols)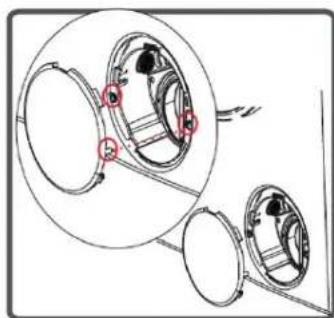
natural_image
Diagram of mechanical components with highlighted parts and motion arrows (no text or symbols)
natural_image
Simple line drawing of a mechanical assembly with a gear and warning triangle (no text or symbols)ADVERTÊNCIA!
natural_image
Simple line drawing of a folded panel or vent with slots and a central circular element (no text or symbols)2.3.6. Tambor
natural_image
Technical illustration of a cylindrical mechanical component with internal channels and mounting flanges (no text or symbols)natural_image
Symbol of a trash bin crossed with no text or numbers, representing waste sorting or disposal (no text present)BECKEN
Importado, produzido e distribuído por: Importado, producido y distribuido por: Imported, produced and distributed by:
- INDEX
- SAFETY INSTRUCTIONS 4
- USE AND OPERATION 7
- SAFETY INSTRUCTIONS
- Important Warnings
- Assistance
- These instructions are also available at www.suporteworten.pt
- Power Supply
- Power Cord and Other Cables
- Humidity and Water
- Cleaning
- General Precautions
- USE AND OPERATION
- Product Description
- Using the Product
- Before using the product
- 1- Removing the packaging:
- 2- Disposing of your old machine:
- Savings tips
- Installing the Machine
- NOTE:
- Leveling the Washing Machine
- Electricity Supply
- Connecting the Inlet Hose
- Drain Hose Connection
- Presentation of the Control Panel
- Detergent Drawer
- Compartments
- Main detergent compartment:
- Fabric softener, tablet, detergent compartment:
- Pre-wash detergent compartment:
- Washing Cycle Selector
- Electronic Display
- Preparing to Wash your Laundry
- Sorting your Laundry
- CAUTION:
- Loading the Machine
- Putting Detergent into the Machine
- Running your Machine
- Select the Washing Cycle
- Auxiliary Functions
- Half Load Detection System
- Auxiliary Laundry Functions
- Temperature Selection
- Selecting the Spin Speed
- BECKEN
- Delayed Wash Timer
- To use the Delayed wash timer:
- Anti-allergici
- Start/Pause Button
- Child Safety Lock
- Cancel a Washing Cycle
- Washing Cycle Completion
- Washing Cycle Tables
- Practical Information
- Energy rating and Energy Saving Label
- Maintenance
- WARNING:
- Water Inlet Filters
- Pump Filter
- To clean the pump filter:
- WARNING!
- Detergent Drawer
- To remove the detergent drawer:
- Liquid Detergent Compartment\*
- Flow Lock
- Body
- Drum
- Troubleshooting
- Automatic Malfunction Warnings and What to Do
- TECHNICAL SPECIFICATIONS
- POST-SALE SERVICE
- ENVIRONMENTAL PROTECTION
- NOTA:
- Selector de programas
- ADVERTENCIA:
- Precaución:
- ¡ADVERTENCIA!
- Cuerpo
- Tambor
- Seletor de programas
- CUIDADO:
- Adicionar detergente na máquina
- ADVERTÊNCIA!
Brand : Becken
Model : ZN1261CF4411 İSP
Category : Washing machine