
25-KMI-01 - Microwave MPM - Free user manual and instructions
Find the device manual for free 25-KMI-01 MPM in PDF.


| Product Type | Built-in Microwave Oven |
| Brand | MPM |
| Model | 25-KMI-01 |
| Product Dimensions (WxHxD) | 595 x 390 x 351 mm |
| Required Cabinet Opening (WxHxD) | 600 x 378 x 550 mm |
| Control Type | Touch buttons and touch wheel |
| Display Type | LCD with icons (time, power level, lock, operating modes) |
| Functions | Microwave, Grill, Combi (Grill+Microwave), Defrost, Auto Cooking (8 programs), Variable Power, Delayed Start, Keyboard Lock |
| Microwave Power Levels | 100P (100%), 80P (80%), 60P (60%), 40P (40%), 20P (20%) |
| Grill/Combi Modes | G (Grill only), C.1 (30% microwave + 70% grill), C.2 (55% microwave + 45% grill) |
| Auto Cooking Programs | A.1 Popcorn, A.2 Reheat, A.3 Beverages, A.4 Pizza, A.5 Potatoes, A.6 Vegetables, A.7 Meat, A.8 Fish |
| Defrost Range | 0.1 kg to 2.0 kg (with preset times) |
| Maximum Cooking Time | 60 minutes per stage |
| Turntable | Glass turntable on rotating ring and axis |
| Cavity Lighting | Yes (oven lamp) |
| Cooling Fan | Yes (rear ventilation) |
| Installation Accessories Included | Installation supports (2), metal feet (2), self-tapping screws (8), setting screw (1), opening cover (1) |
| Power Cord Length | 0.80 m |
| Cleaning & Maintenance | Wipe exterior with damp cloth; clean interior with damp cloth; wash turntable, rotating ring, and axis with mild soap; do not remove waveguide cover; use lemon slices or orange peel to remove odors |
| Safety Features | Door interlock, child lock (keyboard lock), auto power reduction, overheat protection, warning against operating empty |
| Repairability | Only qualified personnel should repair; high voltage components (magnetron, transformer, capacitor) require discharge |
| Intended Use | Household and similar (staff kitchens, farm houses, hotels, B&B) |
| Manual Languages | EN, PL, RU and others via translation request |
Frequently Asked Questions - 25-KMI-01 MPM
User questions about 25-KMI-01 MPM
0 question about this device. Answer the ones you know or ask your own.
Ask a new question about this device
Download the instructions for your Microwave in PDF format for free! Find your manual 25-KMI-01 - MPM and take your electronic device back in hand. On this page are published all the documents necessary for the use of your device. 25-KMI-01 by MPM.
USER MANUAL 25-KMI-01 MPM
natural_image
Black MPM microwave oven with digital display and control buttons (no visible text or symbols on main body)KUCHENKA MIKROFALOWA DO ZABUDOWY MPM-25-KMI-01
natural_image
Pure technical line drawing of two mechanical components with no text or symbols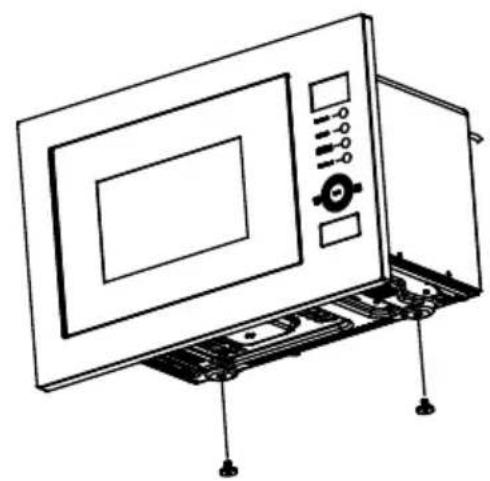
natural_image
Line drawing of a microwave oven mounted on a base with mounting feet and control panel (no text or symbols)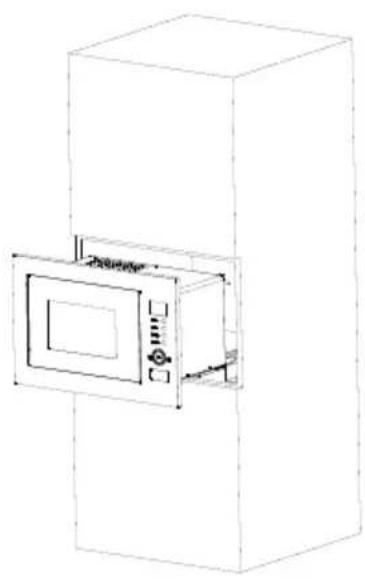
natural_image
Line drawing of a mechanical device with a central square component and a rectangular housing (no text or symbols)
natural_image
Line drawing of a laboratory oven with an open lid and control panel (no text or symbols)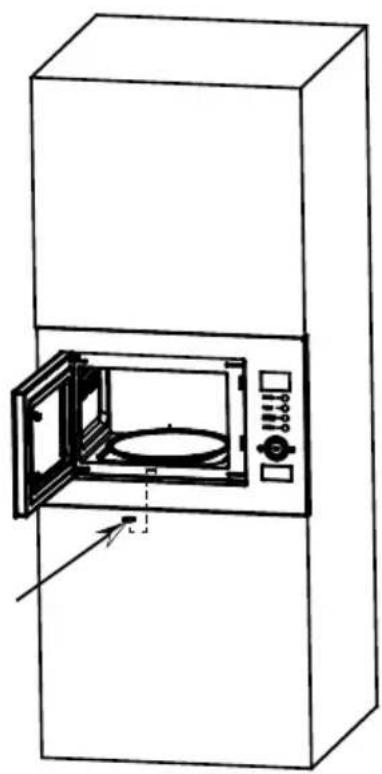
natural_image
Line drawing of a microwave oven with open door and control panel (no text or symbols)PODSTAWOWE WYMIARY
IMPORTANT SAFETY INSTRUCTIONS
READ CAREFULLY AND KEEP FOR FUTURE REFERENCE
The following basic precautions should always be followed when using electrical appliance:
- Make sure the voltage in your living area corresponding to the one shown on the rating label of the appliance. And the wall socket is properly grounded.
-To reduce the risk of fire in the oven cavity:
a. Do not overcook the food.
b. Remove wire twist -ties from paper or plastic bags before placing bags in the oven.
c. Do not heat oil or fat for deep drying as the temperature of oil cannot be controlled.
d. After use wipe the waveguide cover with a damp cloth, followed by dry cloth to remove any food splashes and grease. Built -up grease may overheat and begin to cause smoke or catch fire.
e. If materials inside the oven should smoke or ignite, keep oven door closed, turn oven off and disconnect the power supply.
f. When heating food in plastic or paper containers, keep an eye on the oven due to the possibility of ignition
-To reduce the risk of explosion and sudden boiling:
a. WARNING: Liquids and other foods must not be heated in sealed container since they are liable to explode; Baby bottles fitted with a screw cap or teat are considered to be sealed containers.
b. Use the wide -mouthed container to cook liquid, and the cooked liquid should not be removed out immediately. Several moments should be waited before removing. In order to avoid possible hazards caused by delayed eruptive boiling of liquids.
c. Potatoes, sausage and chestnut should be peeled or pierced before cooking. Eggs in their shell, whole hard -boiled eggs should not be heated in microwave ovens since they may explode, even after microwave heating has ended.
d. The contents of feeding bottles and baby food jars are to be stirred or shaken and the temperature is to be checked before consumption, in order to avoid burns.
-If the supply cord is damaged, it must be replaced by the manufacturer or its service agent or a qualified technician in order to avoid a shock hazard.
-After cooking, the container is very hot. Using gloves to take out the food and avoid steam burns by directing steam away from the face and hands.
-Slowly lift the furthest edge of dishes cover and microwave plastic wrap and carefully open popcorn and oven cooking bags away from the face.
-To prevent the turntable from breaking:
a. Let the turntable cool down before cleaning.
b. Do not place hot foods or utensils on the cold turntable.
c. Do not place frozen foods or utensils on the hot turntable.
-Make sure the utensils do not touch the interior walls during cooking.
- Only use utensils that are suitable for use in microwave ovens.
-Do not store food or any other things inside the oven. - Do not operate the oven without any liquid or food inside the oven. This would do damage the oven.
WARNING: When the appliance is operated in the combination mode, children should only use the oven under adult supervision due to the temperatures generated.
-Any accessories not recommended by the manufacturer may cause injuries to persons.
-Do not use outdoors.
-Save these instructions. The microwave oven must not be placed in a cabinet.
WARNING: If the door or door seals are damaged or the oven is malfunctioned, the oven must not be operated until it has been repaired by a competent person;
WARNING: It is hazardous for anyone other than a competent person to carry out any service or repair operation that involves the removal of a cover which gives protection against exposure to microwave energy.
WARNING! Source of microwave and high voltage radiation. Do not remove the housing.
-If smoke is emitted, switch off or unplug the appliance and keep the door closed in order to stifle any flames;
-Microwave heating of beverages can result in delayed eruptive boiling; therefore care must be taken when handling the container;
- Do not use harsh abrasive cleaners or sharp metal scrapers to clean the oven door glass since they can scratch the surface, which may result in shattering of the glass.
-The lamp of microwave oven is not intended for other purposes.
-The appliances are not intended to be operated by means of an external timer or separate remote -control system.
-This appliance is intended to be used in household and similar applications, such as:
- Staff kitchen areas in shops, offices and other working environments;
- Farm houses;
- By clients in hotels, motels and other residential environments;
- Bed and breakfast type environments.
-The microwave oven is intended for heating food and beverages. Drying of food or clothing and heating of warming pads, slippers, sponges, damp cloth and similar may lead to risk of injury, ignition or fire. It is not intended for industrial use of laboratory.
-This appliance can be used by children aged from 8 years and above and persons with reduced physical, sensory or mental capabilities or lack of experience and knowledge if they have been given supervision or instruction concerning use of the appliance in a safe way and understand the hazards involved. Children shall not play with the appliance. Cleaning and user maintenance shall not be made by children unless they are older than 8 and supervised. Keep the appliance and its cord out of reach of children less than 8 years.
-This appliance is not intended for use by persons (including children) with reduced physical, sensory or mental capabilities, or lack of experience and knowledge, unless they have been given supervision or instruction concerning use of the appliance by a person responsible for their safety.
- Children should be supervised to ensure that they do not play with the appliance.
-A steam cleaner is not to be used.
-The door or the outer surface may get hot when the appliance is operating.
WARNING: Accessible parts may become hot during use. Young children should be kept away.
WARNING: Only allow children to use the oven without supervision when adequate instructions have been given so that the child is able to use the oven in a safe way and understands the hazards of improper use.
-During use the appliance becomes hot. Care should be taken to avoid touching heating elements inside the oven.
-The surfaces are liable to get hot during use.
- Do not block the ventilation openings on the microwave oven.
- The minimum height of free space necessary above the top surface of the oven.
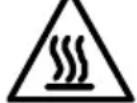
CAUTION: HOT SURFACE
Household use only
- Never place the appliance near other electrical appliances, burners, cookers, ovens, etc.
-Always make sure that all parts of the appliance have been properly attached before turning on the power.
-Do not operate the oven with the door open
-The oven should be cleaned regularly and any food deposits removed.
-Failure to maintain the oven in a clean condition could lead to deterioration of the surface that could adversely affect the life of the appliance and possibly result in a hazardous situation.
-Do not plug the power cord with wet hands. - Do not hang the cord on any sharp edges and prevent any contact with hot surfaces.
- Do not remove the plug from the mains by pulling by the cord.
- In order to ensure your children's safety, please keep all packaging (plastic bags, boxes, polystyrene etc.) out of their reach.
- Do not use cable extenders and multi-point adapters. Do not connect the device to a remotely controlled or time programmed socket.
- Any installation or maintenance jobs should be performed by a specialized technician, according to the manufacturer's instructions and local safety regulations. Unless expressly permitted by the operating manual, do not repair or replace any parts of the device.
- The device must be held and installed by at least two people.
-Disconnect the device from power before attempting any installation works. - The device is designed to be built in. Do not use it as a free-standing unit or in regular cabinets with doors.
- The temperature of surfaces may be higher when the appliance is in use.
- Do not immerse the appliance, its cord and plug in water or any other fluids!
WARNING! Do not allow small children to play with the foil as there is a danger of suffocation!
- Unpack the device. If the microwave oven is covered in plastic film, remove it before operation. Carefully inspect the device for any signs of damage. If the device is damaged, promptly report it to the seller or deliver the device to the manufacturer's service centre.
- Store the microwave oven in a dry, non-corrosive place, away from heat and moisture that may be generated by gas burners or water tanks.
- Place the microwave oven away from TV and radio receivers or antennas, which may generate interferences. The distance from such devices should be over 5 m.
- Install the microwave oven near an accessible, earthed power socket.
INSTALLATION OF A BUILT-IN MICROWAVE OVEN
NOTE! Due to limited space inside the cabinet, the microwave oven must be installed as described below, in order to avoid any risks. The distances indicated in the drawings must be maintained in order to ensure that the appliance operates correctly through its proper ventilation and cooling in the cabinet. Furniture walls in which the appliance is installed should be heat-resistant, particularly if the furniture walls are made of coated chipboard. The coating should be able to withstand the temperature of up to 120^ C. Adhesive coatings or plastic coatings which are not resistant to this temperature may be subject to deformation and damage. The support for the microwave oven should be able to withstand its weight. For safety reasons, avoid direct contact between the appliance and electrical parts after the installation is completed.
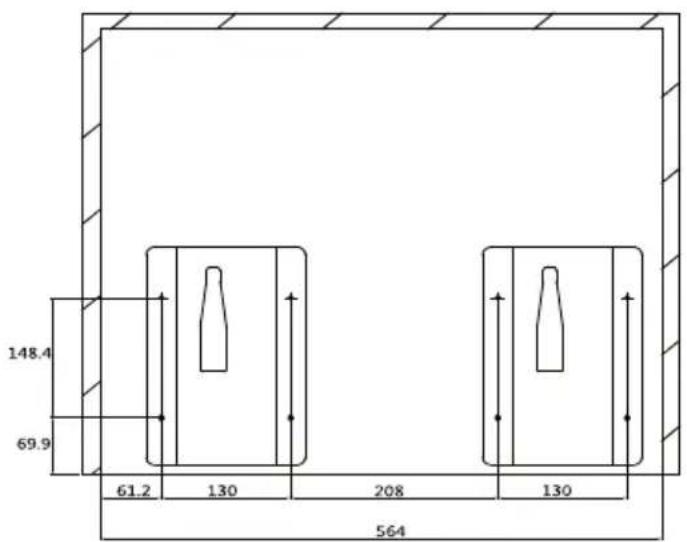
Drill openings for installation supports in locations shown in Fig. 1. Strictly observe the specified dimensions.
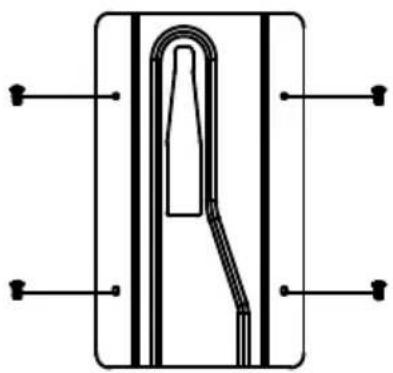
Use the supplied screws (8 pcs) to attach the installation supports (Fig. 2)
Attach two metal feet to the bottom of the microwave oven (Fig.3).
natural_image
Pure diagram of a U-shaped pipe or channel inside a rectangular frame with four corner markers (no text or symbols)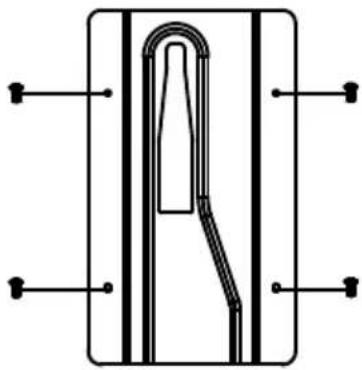
natural_image
Pure technical diagram of a mechanical component without any text, numbers, or symbols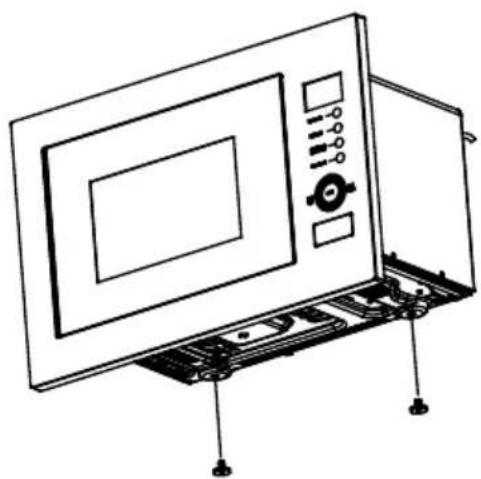
natural_image
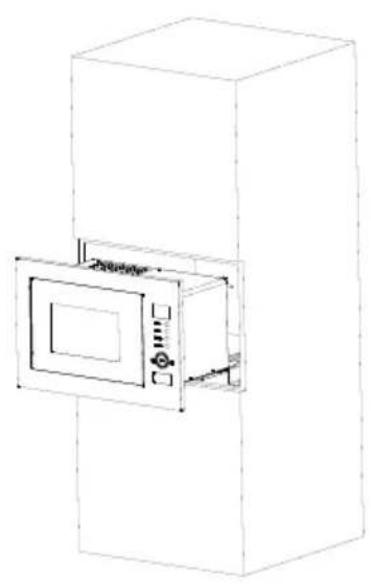
Line drawing of a microwave oven with control panel and mounting base (no text or symbols)Place the microwave oven inside the cabinet so its feet are placed in the specified places (Fig. 4).
Open the microwave oven's door and attach the setting rod under the door, as shown in Fig. 5.
natural_image
Line drawing of a cabinet with an open door and internal components (no text or symbols)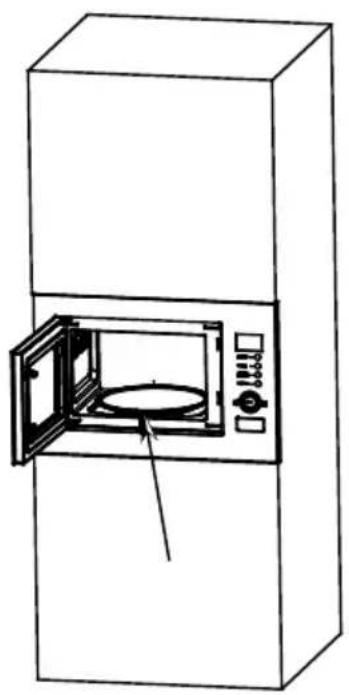
natural_image
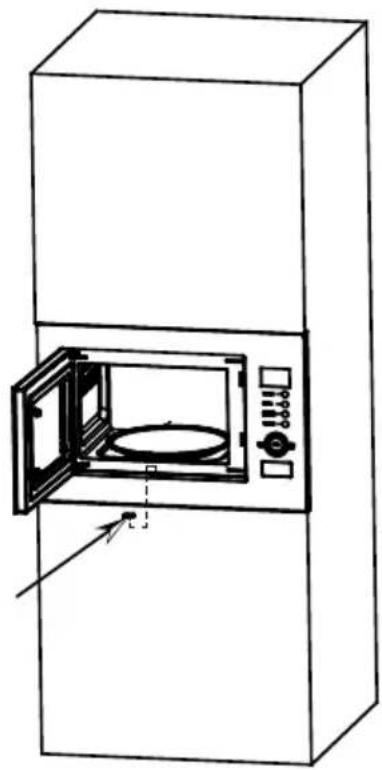
Line drawing of a laboratory oven with an open lid and control panel (no text or symbols)Install the opening cover as shown in Fig. 6.
natural_image
Line drawing of a microwave oven with open door and control panel (no text or symbols)CABINET DETAILS:
Product size: (W)595x(H)390x(D)351 (mm)
Opening size: (W)600x(H)378x(D)550(mm) as shown in Fig.7“D”, “E”, “F”.
G (the thickness of board) : 18mm
I (the thickness of board) : 8mm
H (the deepness of wrong layer): 21mm
CLEANING
MICROWAVE OVEN CARE

CAUTION
The oven should be cleaned regularly and any food deposits removed.

WARNING
- Remove the power cord from the wall outlet before cleaning. Don't immerse the appliance in water or other fluids when cleaning.
- Failure to maintain the oven in a clean condition could lead to deterioration of the surface that could adversely affect the life of the appliance and possibly result in a hazardous situation.
- Never use hard detergent, gasoline, abrasive powder or metal brush to clean any part of the appliance.
- Do not remove the waveguide cover.
- When the microwave oven has been used for a long time, there may be some strange odors exist in oven. Following 3 methods can get rid of them:
a. Place several lemon slices in a cup, then heat with high Micro Power for 2-3 min.
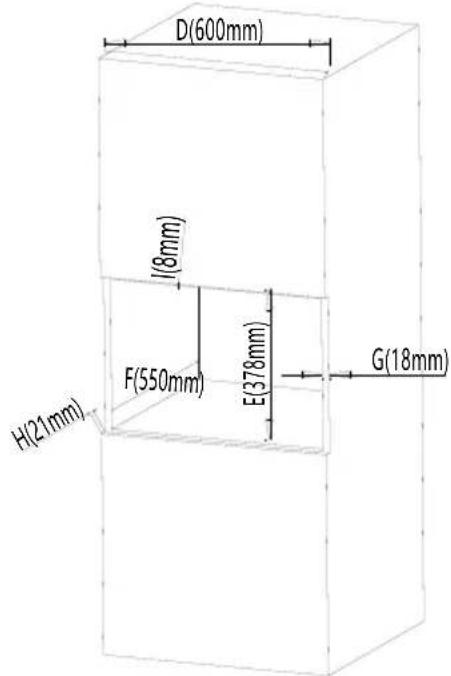
Fig. 7
b. Place a cup of red tea in oven, then heat with high micro power.
c. Put some orange peel into oven, and then heat them with high Micro Power for 1 minute.
TIPS FOR CLEANING
Details for cleaning door seals, cavity and adjacent parts:
Exterior:
Wipe the enclosure with a dampened soft cloth
Door:
Using a dampened soft cloth, wipe clean the door and window Wipe the door seals and adjacent parts to remove any spill or spatter Wipe the control panel with a slightly dampened soft cloth
Interior walls:
Wipe clean the cavity with a dampened soft cloth Wipe clean the waveguide cover to remove any food splashed
Turntable/ Rotation ring/ Rotation axis:
Wash with mild soap water Rinse with clean water and allow drying thoroughly
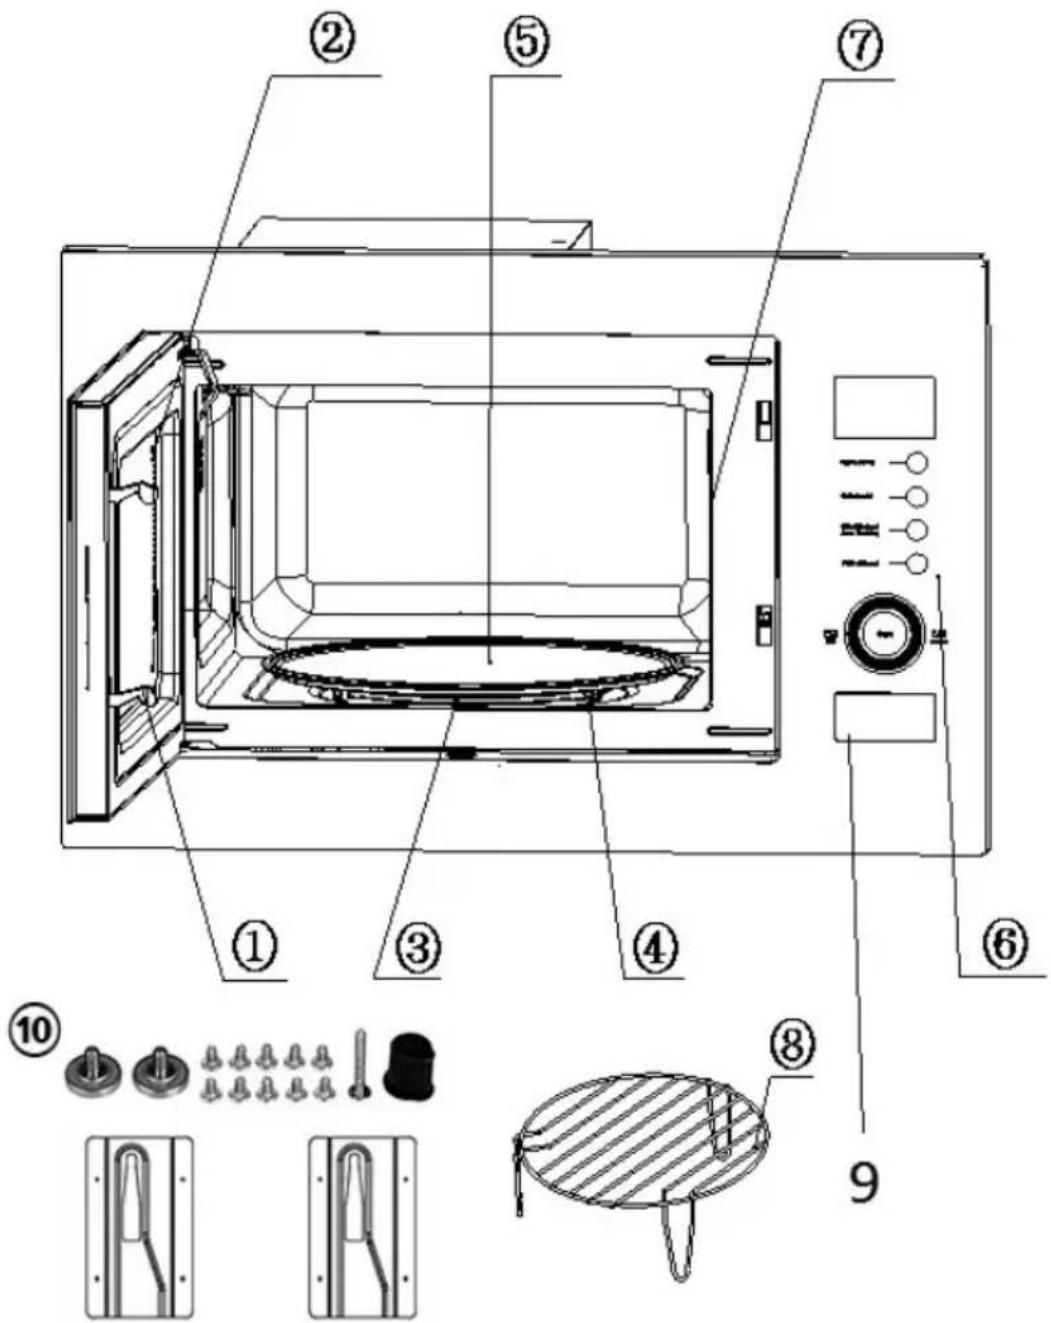
- Door lock
Microwave oven door must be properly closed in order for it to operate
- Viewing window
Allow user to see the cooking status
- Rotating axis
The glass turntable sits on the axis; the motor underneath it drives the turntable to rotate
- Rotating ring
The glass turntable sits on its wheels; it supports the turntable and helps it to balance when rotating
- Turntable
The food sits on the turntable, its rotation during operation helps to cook food evenly

CAUTION
- Place the rotating ring first
-
Fit the turntable onto the rotating axis and make sure that it is geared in properly
-
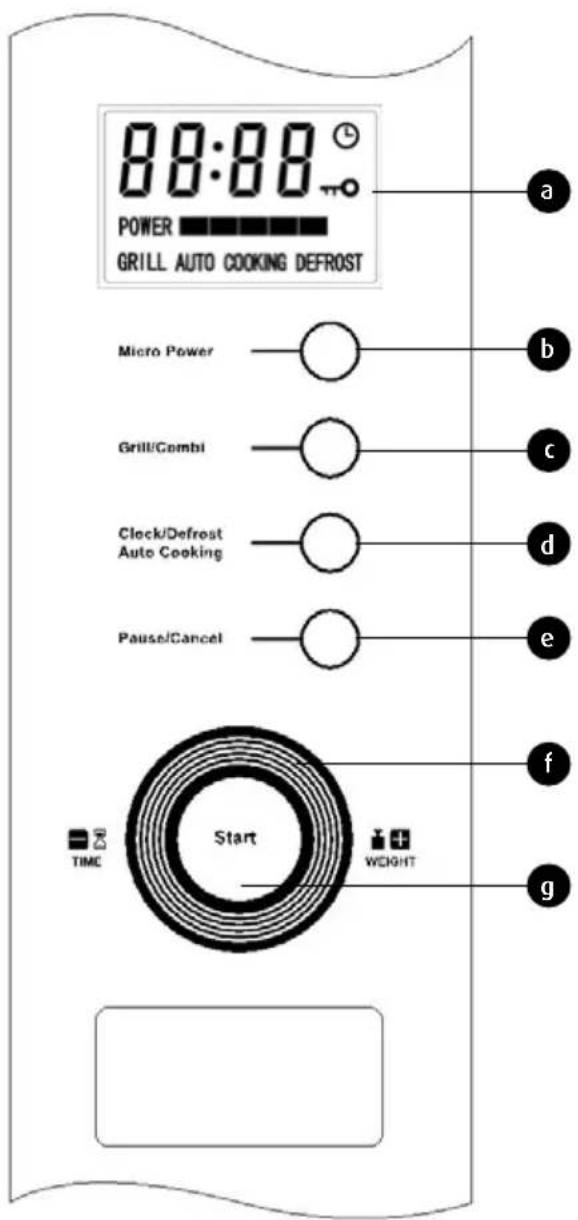
Control panel
See below in details (the control panel is subject to change without prior notice)
- Waveguide cover
It is inside the microwave oven, next to the wall of control panel.
- Grill grate
Supports products to be grilled
-
Microwave oven door button
-
Installation accessories kit
-installation supports (2 pcs)
-metal feet (2 pcs)
-self-tapping screw ST4x12 (8 pcs)
-self-tapping screw ST4x33 - setting (1 pc)
-opening cover (1 pc)

WARNING
Never remove the waveguide cover
a. LCD display (with icons for real time clock, keyboard lock, heating power and operating modes)
b. touch button "MICRO POWER" - heating power selection
c. touch button "GRILL / COMBI" - grilling / com - bined mode selection
d. touch button "CLOCK / DEFROST / AUTO COOKING" - clock settings, defrost function, automated program selection
e. button "PAUSE / CANCEL" - pause or stop (double push) of current process
f. touch wheel "-/+ TIME / WEIGHT" - increase or decrease process time or product weight (hour and minute adjustment)
g. touch button "START" - process start
| Example: setting time at 12:30 | ||
| Actions Display | ||
| 1 | Connecting the device to the mains 1:00 | |
| 2 | Press and hold Clock/Defrost/Auto Cooking for 3 seconds | 1:00 |
| 3 | Use the touch wheel Time/ Weight to set the correct time | 12:00 |
| 4 | Press Clock/Defrost/Auto Cooking once | 12:00 |
| 5 | Use the touch wheel Time/ Weight to set the correct time | 12:30 |
| 6 | Press Clock/Defrost/Auto Cooking once to save the new time (hours and minutes) | |
BEFORE COOKING
After connecting the power, the LCD displays flashes 3 times and shows 1:00. Set the correct time by pressing and holding "CLOCK / DEFROST / AUTO COOKING" for 3 seconds. Use the turn wheel "-/+" to set the time (hour) and confirm by pressing "CLOCK / DEFROST / AUTO COOKING". Repeat the step for minutes and again confirm by pressing "CLOCK / DEFROST / AUTO COOKING".
REMINDER SIGNAL
Once the programmed cooking procedure is over, the LCD display will show "End" and 3 acoustic signals will be played to remind you to remove the dish from the microwave oven. If you do not press "PAUSE / CANCEL" or open the door, the signal will be repeated every 3 minutes.
PAUSE/CANCEL
Pressing the button once while programming cancels the configured programs and reverts the microwave oven to the previous stage.
Pressing the button once while cooking pauses the process (press "START" to continue) and pressing it twice cancels the program.
MICROWAVING
The function is used for cooking and heating up food. Repeatedly press “MicroPower” to select the desired setting.
| High power (100P) 100% microwaving power. For quick and thorough cooking. | |
| Higher average power (80P) 80% microwaving power. For quick cooking. | |
| Average power (60P) 60% microwaving power. For steaming. | |
| Low average power (40P) 40% microwaving power. For defrosting. | |
| Low power (20P) | 20% microwaving power. For heating up. |
Quick cooking is also available. When the device is ready, press "Start" and the microwave oven will begin quick cooking at high power; the default cooking time is 1 minute. Use the touch wheel to extend or reduce the cooking time.

WARNING
a. After selecting the power, use the touch wheel (- / + ) to set the process time. The maximal time that can be set is 60 minutes.
b. Never start the microwave oven empty.
c. If maximal power is selected, the microwave oven will automatically reduce the power after some time to prolong its life.
d. If you wish to remove the dish from the microwave oven before the set time is up, press "Pause / Cancel" to cancel the programmed procedure and avoid any errors when using the microwave oven next time.
| Example: Cooking with average power for 10 minutes. | ||
| Actions Display | ||
| 1Start the microwave oven 0:00 | ||
| 2 | Select the heating power by pressing “MicroPower” the right number of times. | 60P |
| 3Use the touch wheel (-/+) to set the time. 10:00 | ||
| 4 | Pressing Start will begin the countdown on the LCD display. | |
DEFROSTING
Used for defrosting food. Activated by pressing “Clock / Defrost / Auto Cooking” (the LCD display will show “def”). The permitted wight of products for defrosting ranges from 0.1 kg to 2.0 kg. Use the touch wheel (TIME /WEIGHT) to select the weight. Factory preset time is applied to every selected weight.
| Example: Defrosting 0.4 kg of poultry | ||
| Actions Display | ||
| 1Start the microwave oven 0:00 | ||
| 2 | PressClock/Defrost/Auto Cooking. | dEF |
| 3 | Turn the touch wheelTime/Weightto select the weight of the defrosted product. | 0.4 |
| 4 | PressStartto start heating up the food. | 5:16 |
| 5 | An acoustic signal will be played in the middle of defrosting, reminding you to turn over the food.Open the door and turn over the food. Close the door and pressStartagain to continue defrosting. | |

WARNING
a. Turning over the food is necessary to ensure it defrosts evenly.
b. Defrosting usually takes more time than cooking.
c. If the products can be cut with a knife, defrosting may be considered completed.
d. Microwaves can penetrate most foods to 4 cm.
e. Defrosted food should be consumed as soon as possible. It should not be re-frozen.
GRILL / COMBI
Used for grilling. Pressing Grill/Combi repeatedly shows G - C.1- C.2 in the LCD display.
| G | Grill, the heating element will be powered during operation. For roasting thinly cut meat, pork, sausages, chicken wings, resulting in gently browned food. |
| C.1 | Combination of grilling and microwave cooking. 30% microwaving time and 70% grilling time. |
| C.2 | Combination of grilling and microwave cooking. 55% microwaving time and 45% grilling time. |

WARNING
In Grill / Combi mode, all parts of the oven, including the grate and cookware, may be very hot. Be careful when taking any items from the microwave oven. Use cookware holders or kitchen gloves to protect yourself from SCALDING AND BURNS.
| Example: Grilling food in C.2 mode for 10 minutes | ||
| Actions Display | ||
| 1 Star | the microwave oven 1:00 | |
| 2 | Press Grill/Combi repeatedly, until the right mode is selected | C.2 |
| 3 | Use the touch wheel Time/ Weight to set the correct time | 10:00 |
| 4 Press | Start to begin the process | |
AUTOMATIC COOKING
The microwave oven features a preconfigured cooking menu for simple processes. In ready mode, press “Clock / Defrost / Auto Cooking” repeatedly until the right program is selected, A.1 - A.8. Use the touch wheel “Time / Weight” to select the weight of the processed food.
Select a position from the menu that matches the food and its weight, strictly following the instructions in the table below. Otherwise, the cooking outcome may be imperfect. Each menu position has a pre-set time.
| Display Type Method | ||
| A.1 | Popcorn | For heating up commercially available popcorn bags, 100 g. |
| A.2 | Reheating food | Reheating food weighing 0.2, 0.4, 0.6, 0.8, 1.0 kg |
| A.3 | Beverages | Heating up 1-3 cups with beverages, with original temperature of 5-10 °C. Use a large, open cup. |
| A.4 | Pizza | Heating up 1-2 cold pizza slices. |
| A.5 | Potatoes | Cooking diced potatoes, 5 mm cubes. The total weight is 0.45 kg or 0.65 kg. Place the diced potatoes on a large plate and cover with plastic film, to prevent water evaporation. |
| A.6 | Vegetables | Places 0.1, 0.2 - 0.5 kg vegetables in a microwave safe bowl. |
| A.7 | Meat | Cut the meat (0.1, 0.2 - 0.5 kg) into small pieces, place on a plate, season to taste and mix. |
| A.8 | Fish | For steam cooking fish weighing 0.1, 0.2 - 0.5 kg. Once the fish is cleaned and descaled, make shallow cuts to its skin. Place the fish on a flat plate, 22 - 27 cm in diameter, sprinkle with seasoning and cover with aluminium foil to prevent water evaporation. Leave for 2 minutes after cooking. |

WARNING
a. The temperature of food before cooking should be 20–25°C. The heating time in the microwave oven should be extended or reduced if the temperature of the food is, respectively, lower or higher. b. Cooking is largely affected by the temperature, weight and shape of the food. If the factors specified above deviate from the standard, cooking time must be adjusted accordingly, in order to achieve best results.
| Example: Cooking 0.65 kg of potatoes | ||
| Actions Display | ||
| 1 Start | the microwave oven. 1:00 | |
| 2 | Press “Clock / Defrost / Auto Cooking” to select mode A.5. | A.5 |
| 3 Turn | the touch wheel Czas/Waga to select weight - 0.65 kg. 0.65 | |
| 4 | Press Start to start heating up the food. | 10:12 |
KEYBOARD LOCK
Use this function to lock the control panel when cleaning or to prevent unsupervised use of the microwave oven, e.g. by children. No button work when the keyboard is locked. Press and holed "Pause/Cancel" for 3 seconds to lock and unlock the keyboard. A key icon is shown on the LCD display if the keyboard is locked.
COOKING WITH VARIABLE POWER
To achieve the best cooking results, some recipes require the use of different modes and variable cooking time. To customized your own menu follow the steps below:
| Example: Cooking with 100% power for 3 minutes,followed by cooking with 20% power for 9 minutes | ||
| Activity Display | ||
| 1 100% | for 3 minutes | |
| 1.1 | Press Micro Power to select 100% power | 100P |
| 1.2 | Turn the touch wheel Time/ Weight to set the time for 3 minutes | 3:00 |
| 2 20% | for 9 minutes | |
| 2.1 | Press Micro Power to select 20% power | 20P |
| 2.2 | Turn the touch wheel Time / Weight to set the time for 9 minutes | 9:00 |
| 3 Press | START to start the process. | |

WARNING
a. Once cooking with 100% power is completed, the next operation will start immediately. b. Up to 4 sequential actions can be configured within a single process.
DELAYED START FUNCTION
Heating up can be configured to start at a specific time. This process involves two steps:
- Setting the current time;
- Setting the menu and cooking time.
| Example: The current time is 12.30. The microwave oven is supposed to start cooking at 14.20, with 100% power for 9 minutes and 30 seconds. | ||
| Actions Display | ||
| 1 Start the microwave oven 1:00 | ||
| 1.1 | Press and holdClock / Defrost / Auto Cookingfor 3 seconds | 1:00 |
| 1.2 | Use the touch wheelTime / Weightto set the current hour | 12:00 |
| 1.3 | PressClock / Defrost / Auto Cookingto select configuration by minutes | 12:00 |
| 1.4 | Use the touch wheelTime / Weightto set the current minute | 12:30 |
| 1.5 | PressClock / Defrost / Auto Cookingto save the configured time | 12:30 |
| 2 Setting the heating power and duration | ||
| 2.1 | PressMicro Powerto set the heating power | 100P |
| 2.2 | Use the touch wheelTime / Weightto set the heating duration | 9:30 |
| 2.3 | Press and holdClock / Defrost / Auto Cookingfor 3 seconds | |
| 3 Set the starting time. Repeat steps in points 1.2, 1.3, 1.4 | ||
| 4 | PressClock / Defrost / Auto Cookingto confirm the setting. The program is now configured and the microwave oven will start working at 14.20. | |
| 5 | PressClock / Defrost / Auto Cookingto view the configured starting time. | |
UTENSILS GUIDELINE
It is strongly recommended to use the containers which are suitable and safe for microwave cooking. Generally speaking, the containers which are made of heat-resistant ceramic, glass or plastic are suitable for microwave cooking. Never use the metal containers for microwave cooking and combination cooking as spark is likely to occur. You can take the reference of below table.
| Material of container | Microwave | Grill | Tryb kombinowany (Combi) | Notes |
| Heat-resistant ceramic | Yes | YES | YES | Never use the ceramics which are decorated with metal rim or glazed |
| Heat-resistant plastic | Yes | NO | NO | Can not be used for long time microwave cooking |
| Heat-resistant glass | Yes | YES | YES | |
| Plastic film Yes NONO | It should not be used when cooking meat or chops as the over-temperature may do damage to the film | |||
| Grill rack No YESYES | ||||
| Metal container No NONO | It should not be used in microwave oven. Microwave can not penetrate through metal | |||
| Iacquer No NONO | Poor heat-resistant. Can not be used for high-temperature cooking | |||
| Bamboo wood and paper | No NONO | Poor heat-resistant. Can not be used for high-temperature cooking |
COOKING TIPS
The following factors may affect the cooking result:
Food arrangement
Place thicker areas towards outside of dish, the thinner part towards the centre and spread it evenly. Do not overlap if possible.
Cooking time length
Start cooking with a short time setting, evaluate it after it times out and extend it according to the actual need. Over cooking may result in smoke and burns.
Cooking food evenly
Food such as chicken, hamburger or steak should be turned once during cooking.
Depending on the type of food, if applicable, stir it from outside to centre of dish once or twice during cooking.
Allow standing time
After cooking times out, leave the food in the oven for an adequate length of time, this allows it to complete its cooking cycle and cooling it down in a gradual manner.
Whether the food is done
Color and hardness of food help to determine if it is done, these include:
- Steam coming out from all parts of food, not just the edge
- Joints of poultry can be moved easily
- Pork or poultry shows no signs of blood
- Fish is opaque and can be sliced easily with a fork
Browning dish
When using a browning dish or self-heating container, always place a heat-resistant insulator such as a porcelain plate under it to prevent damage to the turntable and rotating ring.
Microwave safe plastic wrap
When cooking food with high fat content, do not allow the plastic wrap come into contact with food as it may melt
Microwave safe plastic cookware
Some microwave safe plastic cookware might not be suitable for cooking foods with high fat and sugar content. Also, the preheating time specified in the dish instruction manual must not be exceeded.
MAINTENANCE
SERVICING
Please check the following before calling for services.
- Place one cup of water (approx. 150ml) in a glass measure in the oven and close the door securely. Oven lamp should go off if the door is closed properly. Let the oven work for 1 min.
- Does the oven lamp light?
- Does the cooling fan work?
(Put your hand over the rear ventilation openings.) - Does the turntable rotate?
(The turntable can rotate clockwise or counter clockwise. This is quite normal.) - Is the water inside the oven hot?
If "NO" is the answer to any of the above questions, please check your wall socket and the fuse in your meter box.
If both the wall socket and the fuse are functioning properly, CONTACT YOUR NEAREST SERVICE CENTER APPROVED.
SERVICING SAFEGUARDS
Caution: MICROWAVE RADIATION
- The high voltage capacitor remains charge after disconnection; short the negative terminal of H. V capacitor to the oven chassis (use a screwdriver) to discharge before touching.
- During servicing below listed parts are liable to be removed and give access to potentials above 250V to earth.
- Magnetron
- High voltage transformer
- High voltage capacitor
- High voltage diode
- High voltage fuse
- The following conditions may cause undue microwave exposure during servicing
- Improper fitting of magnetron;
- Improper matching of door interlock, door hinge and door;
- Improper fitting of switch support;
- Door, door seal or enclosure has been damaged.
The technical parameters are given on the data plate of the product.
Power cord lenght: 0,80 m

NOTE! MPM agd S.A. reserves its right to modify the technical data.
Proper disposal of the product (waste electrical and electronic equipment)
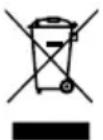
Marking on the product indicates that after the service-life of the product expires, it should not be disposed with other type of municipal waste. Used equipment may have a negative impact on the environment and health of people due to potentially containing hazardous substances, mixtures and components.
Mixing electric waste with other types of waste or disassembling those in an unprofessional manner may cause a release of substances that are hazardous to the environment and health. Used equipment should
be handed-over to a point for collection of electric waste. In order to obtain detailed information regarding the electric waste collection points, the user should contact the municipal point of electric waste collection or used equipment processing department.
МЕРЫ БЕЗОПАСНОСТИ
natural_image
Pure technical line drawing of two mechanical components with no text or symbols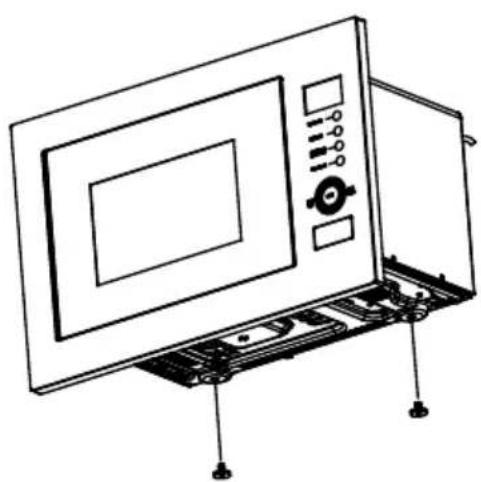
natural_image
Line drawing of a microwave oven with control panel and mounting base (no text or symbols)natural_image
Line drawing of a mechanical device with a central square component and a rectangular housing (no text or symbols)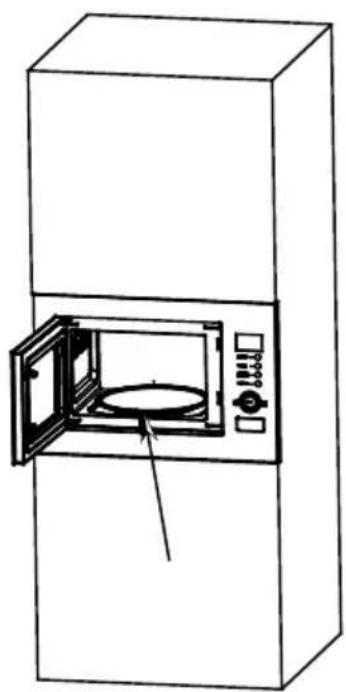
natural_image
Line drawing of a cabinet with an open oven and control panel (no text or symbols)natural_image
Line drawing of a microwave oven with open door and control panel (no text or symbols)ОСНОВНЫЕ РАЗМЕРЫ:
- Блокировка дверцы
We wish you satisfaction from using the product and invite you to check a wide range of other MPM appliances
natural_image
Line drawing of a vacuum cleaner with a cat silhouette and bulb (no text or symbols)MPM agd S.A.

- KUCHENKA MIKROFALOWA DO ZABUDOWY MPM-25-KMI-01
- PODSTAWOWE WYMIARY
- IMPORTANT SAFETY INSTRUCTIONS
- READ CAREFULLY AND KEEP FOR FUTURE REFERENCE
- WARNING: When the appliance is operated in the combination mode, children should only use the oven under adult supervision due to the temperatures generated.
- WARNING: If the door or door seals are damaged or the oven is malfunctioned, the oven must not be operated until it has been repaired by a competent person;
- WARNING: It is hazardous for anyone other than a competent person to carry out any service or repair operation that involves the removal of a cover which gives protection against exposure to microwave energy.
- WARNING! Source of microwave and high voltage radiation. Do not remove the housing.
- WARNING: Accessible parts may become hot during use. Young children should be kept away.
- WARNING: Only allow children to use the oven without supervision when adequate instructions have been given so that the child is able to use the oven in a safe way and understands the hazards of improper use.
- CAUTION: HOT SURFACE
- Household use only
- WARNING! Do not allow small children to play with the foil as there is a danger of suffocation!
- INSTALLATION OF A BUILT-IN MICROWAVE OVEN
- CABINET DETAILS:
- CLEANING
- MICROWAVE OVEN CARE
- CAUTION
- WARNING
- TIPS FOR CLEANING
- Exterior:
- Door:
- Interior walls:
- Turntable/ Rotation ring/ Rotation axis:
- BEFORE COOKING
- REMINDER SIGNAL
- PAUSE/CANCEL
- MICROWAVING
- DEFROSTING
- GRILL / COMBI
- AUTOMATIC COOKING
- KEYBOARD LOCK
- COOKING WITH VARIABLE POWER
- DELAYED START FUNCTION
- UTENSILS GUIDELINE
- COOKING TIPS
- Food arrangement
- Cooking time length
- Cooking food evenly
- Allow standing time
- Whether the food is done
- Browning dish
- Microwave safe plastic wrap
- Microwave safe plastic cookware
- MAINTENANCE
- SERVICING
- SERVICING SAFEGUARDS
- Caution: MICROWAVE RADIATION
- Proper disposal of the product (waste electrical and electronic equipment)
- МЕРЫ БЕЗОПАСНОСТИ
- ОСНОВНЫЕ РАЗМЕРЫ:
Brand : MPM
Model : 25-KMI-01
Category : Microwave