
KT3123 - Uncategorized Emos - Free user manual and instructions
Find the device manual for free KT3123 Emos in PDF.


| Product Type | Programmable Thermostat |
| Brand | Emos |
| Model | KT3123 |
| Dimensions (W x H x D) | 120 x 80 x 25 mm |
| Weight | 150 g |
| Power Supply | 2 x AA batteries (not included) |
| Display Type | LCD backlit |
| Temperature Range | 5°C to 35°C |
| Temperature Accuracy | ±0.5°C |
| Control Type | Digital with touch buttons |
| Programming | 7-day programmable, 4 time periods per day |
| Override Function | Temporary and permanent hold |
| Battery Backup | Retains settings during power loss |
| Compatible Systems | Gas, oil, electric, heat pump (up to 2 stages) |
| Fan Control | Auto/On |
| Filter Change Reminder | Programmable |
| Mounting | Wall mount (screws included) |
| Color | White |
| Warranty | 2 years |
| Cleaning | Wipe with dry cloth; no liquids |
| Safety | Overheat protection, child lock |
| Spare Parts | Batteries only |
Frequently Asked Questions - KT3123 Emos
User questions about KT3123 Emos
0 question about this device. Answer the ones you know or ask your own.
Ask a new question about this device
Download the instructions for your Uncategorized in PDF format for free! Find your manual KT3123 - Emos and take your electronic device back in hand. On this page are published all the documents necessary for the use of your device. KT3123 by Emos.
USER MANUAL KT3123 Emos
natural_image
Mechanical device with four arms and mounting bracket (no text or symbols visible)GBV Wall Mount Installation Instructions
Caution:
- It is recommended for this product to be installed by at least two persons, of which at least one person should be physically fit enough to handle heavy loads and technically skilled.
- Before installing, please read this manual and make sure that there are no electrical cords, gas or water pipes in the place designated for mounting the holder.
- We are not responsible for any damage incurred during installation, improper installation or subsequent use.
- If in doubt, contact your nearest dealer and ask for assistance with installation.
- For installation it is necessary to use safe and appropriate tools. Disregarding the instructions may cause property damage or injury.
- If you intend to remove the TV from the wall, always make sure all electrical cords are unplugged.
- If you are unsure of your wall load, select a different location for your installation or carrying capacity and increase the strength of the wall with renovation.
- The product can be installed only for flat screen televisions or televisions containing mounting holes and have a flat back wall.
Tools necessary for installation (not included):
Philips Head Screw Driver
Electric or Portable Drill
Drill bit with 8mm in Diameter (for Wood, Concrete, or as needed)
Plaster Board or Chipboard Anchors (as needed)
Pencil
Level (if not included)
Included:
(A) M8×63 Lag Bolt 2 pcs (L) M5 Lock Washer 4 pcs
(B) Concrete Anchor or 2 pcs (M) M6×12 Bolt 4 pcs
(C) Lag Bolt Washer M8, 2 pcs (N) M6×30 Bolt 4 pcs
(D) Small Spacer 4 pcs (0) M6 Lock Washer 4 pcs
(E) Large Spacer 4 pcs (P) M8×12 Bolt 4 pcs
(F) M6 Washer 4 pcs (Q) M8×30 Bolt 4 pcs
(G) M4×12 Bolt 4 pcs (R) MB Lock Washer 4 pcs
(H) M4×25 Bolt 4 pcs (S) M8×20 Bolt 4 pcs
(I) M4 Lock Washer 4 pcs (T) adapter A7 + 4×M4 Bolt
(J) M5×12 Bolt 4 pcs +4×M4 Nut
(K) M5×25 Bolt 4 pcs
natural_image
Mechanical device with four arms and a black mounted bracket (no text or symbols visible)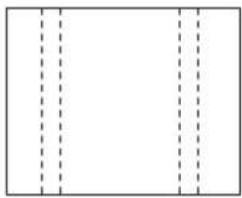
natural_image
Simple geometric diagram with three vertical dashed lines dividing a rectangle (no text or symbols)natural_image
Technical line drawing of a mechanical clamp or bracket assembly (no text or symbols)Make sure it is level. Use a pen to mark off the locations. / Ujistěte se, že je v rovině. Body označte tužkou / Uistite sa, že je v rovine. Body označte ceruzkou. / Sprawdzamy ustawienie w poziomie. Punkty zaznaczamy ołówkiem. / Győződjön meg róla, hogy vizszintben van-! Egy ceruzával jelölje be a lyukak helyét. / Preverite, ali je v ravninil. Točke označite s svinčnikom. / Uvjerite se da je vodoravan. Mjesta označite olovkom. / Vergewissern Sie sich, dass er gerade liegt die Punkte mit Bleistift markieren. / Переконайтеся, чијрівно. Контури значіть олівцем. / Verificați să fie la nivel. Marcați punctele cu creion. / Patikrinkite, ar jis lygus. Naudokite pieštuką reikiamoms vietoms pasižymėti. / Pärliecinieties, ka tas ir līdzens. Izmantojiet pildspalvu, lai atzīmētu atrašanās vietas.
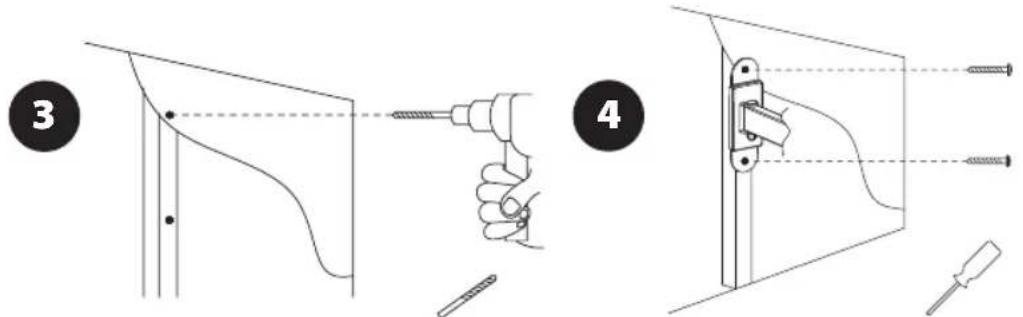
Fix the wall plate to the wall using the Lag Bolt (A) provided. / K uchycení nástěnné desky ke zdi, použijte šroub s částečným závitem (A). / Na uchytenie nástennej dosky k stene, použite skrutku s čiastočným závitom (A). / Do umocowania płyty do ćsiany, wykorzystujemy šruby z gwintem niepełnym (A). / Rögzítse a fali panelt a falra a termékhez csomagolt négyszögletes fejü facsavarral (A). / Za pritrditev stenske plošče na steno uporabite vijak z delnim navojem (A). / Za pričvršćivanje zidne ploče na zid, uporabite vijak s djelomičnim navojem (A). / Zur Befestigung der Wandplatte die Schrauben (A) benutzen. / Для prikríplenня nastínnoї doшки do stíni, використовуйте гвинт з частичною різьбою (A). / Fixați placa de perete pe zid, folosind şurub cu filet partial (A). / Pritvirtinkite sienos plokštelę prie sienos naudodami pridėt varzą tu kvadratine galvute (A). / Piestipriniet sienas pläksni pie sienas, izmantojot komplektāciją iekļauto koka skrūvi (A).
natural_image
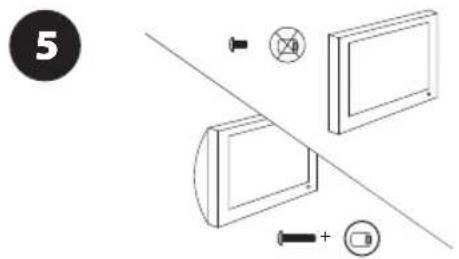
Diagram showing two rectangular components with a diagonal line and circular symbols, no readable text or labelsChoose the proper bolts for installation. / Pro instalaci zvolte správný typ šroubů. / Pre inštaláciu vyberte správny typ skrutiek. / Do instalacji wybieramy odpowiedni typ śrub. / A szereléshez használja a megfelelő típusú és méretű csavarokat. / Za instalacijo izberite primeren tip vijakov. / Za montažu odabrati odgovarajuću vrstu vijaka. / Für die Befestigung die richtigen Schrauben auswählen. / Для установки виберіть правильний тип гвинтів. / Pentru instalare alegeți tipul adecvat de şuruburi. / Pasirinkite montavimui reikiamus varžtus. / Izvēlieties uzstādīšanai piemērotas bultskrūves.
natural_image
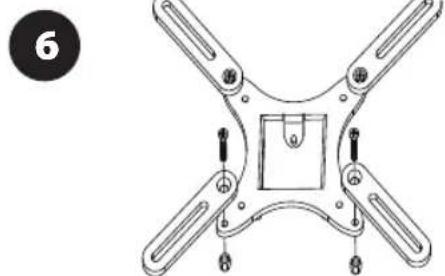
Technical line drawing of a four-angle mechanical component with mounting holes and a central square (no text or symbols)Install the screen on the display plate. / Pro instalaci zvolte správný typ šroubů. / Pre inštaláciu vyberte správny typ skrutiek. / Do instalacji wybieramy odpowiedni typ śrub. / Helyezze fel a képernyőt a képernyő panelre. / Za instalacijo izberite primeren tip vijakov. / Za montažu odabrati odgovarajuću vrstu vijaka. / Für die Befestigung die richtigen Schrauben wählen. / Для установki виберіть правильний тип гвинтів. / Pentru instalare alegeti tipul adecvat de şuruburi. / Sumontuokite ekraną ant plokštės. / Uzstădiet ekrānu uz ekrāna pläksnes.
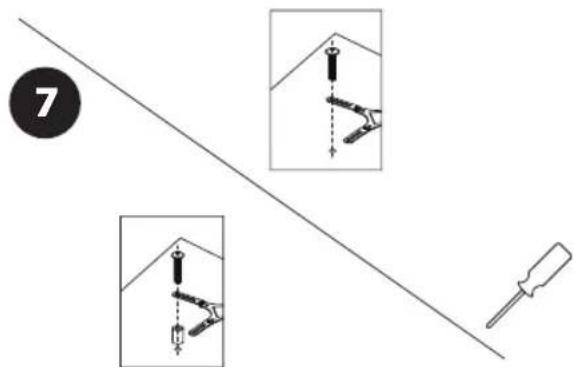
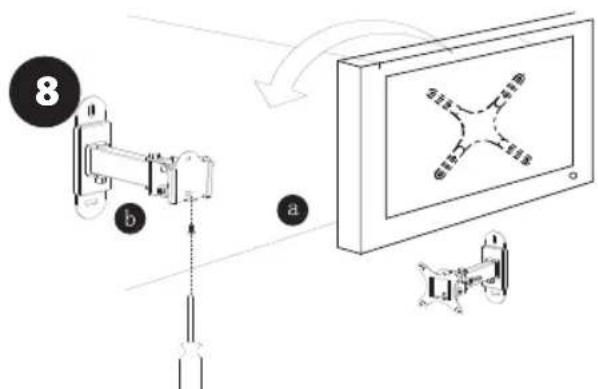
Tighten the screw to lock the display plate on the wall plate. / Utáhněte šrouby pro uzamčení monitoru k nástěnné desce. / Utahnite skrutky pre uzamknutie monitora k nástennej doske. / Dokręcamy śruby mocujące odbiornik do plyty naściennej. / Húzza meg a csavart, hogy a képernyő panel a fali panelre szoruljo. / Za zaklenitev položaja monitorja na stenski plošči privijte vijake. / Zategnite vijke kako bi fiksirali televizor (monitor) u odnosu na zidnu ploču. / Die Schrauben für das Verschließen des Bildschirms an der Wandplatte festziehen. / Затягніть гвинти, щоб зафіксувати монітор до дошки на стіні. / Strångeti şuruburile pentru blocarea poziției ecranului la placa de perete. / Priveržkite varztą ir užfiksuokite ekrano plokštę prie sieninės plokštės. / Pievelciet skrūvi, lai nostiprinātu ekrāna plāksni pie sienas plāksnes.
natural_image
Mechanical device with four arms and a black mounted bracket (no text or symbols visible)
natural_image
Pure brick wall pattern with no text, numbers, or symbolsConcrete – Brick Installation / Instalace – zděná stavba / Inštalácia – murovaná stavba / Instalacja – ściana murowana / Beton – téglafalra való szerelvény / Instalacija – zidana gradnja / Montaža – zidani objekt / Installation – gemauerter Bau / Монтаж – цегляна конструкция / Instalare – construcție zidită / Montavimas ant betono – plytu sienos / Uzstādīšana pie betona – kieğeliem
natural_image
Diagram of a brick wall with a dashed oval symbol, no text or labels present
natural_image
Diagram of a toggle switch mounted on a brick wall, no text or symbols present

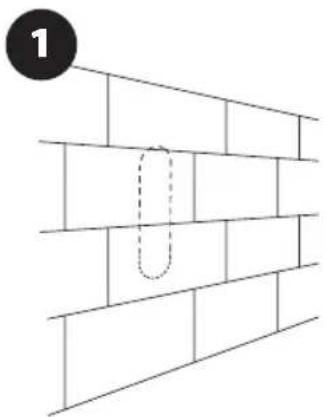
Make sure it is level. Use a pen to mark off the locations. / Ujistěte se, že je v rovině. Body označte tužkou / Ulistite sa, že je v rovine. Body označte ceruzkou. / Sprawdzamy ustawienie w poziomie. Punkty zaznaczamy ołówkiem. / Győződjön meg róla, hogy vizszintben van-e! Egy ceruzával jelölje be a lyukak helyét. / Preverite, ali je v ravninil. Točke označite s svinčnikom. / Uvjerite se da je vodoravan. Mjesta označite olovkom. / Vergewissern Sie sich, dass er gerade liegt die Punkte mit Bleistift markieren. / Переконайтеся, чијрівно. Контури значіть олівцем. / Verificați să fie la nivel. Marcați punctele cu creion. / Patikrinkite, ar jis lygus. Naudokite pleštuką reikiamoms vietoms paslżyměti. / Pärliecinieties, ka tas ir līdzens. Izmantojiet pildspalvu, lai atzīmētu atrašanās vietas.
natural_image
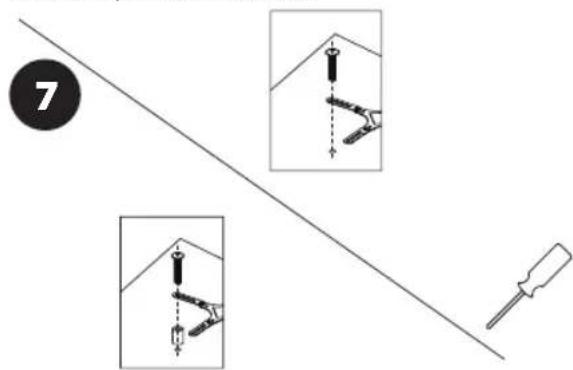
Diagram showing two rectangular components with screw holes and a diagonal line, no text or symbols presentChoose the proper bolts for installation. / Pro instalaci zvolte správný typ šroubů. / Pre instaláciu vyberte správny typ skrutiek. / Do instalacji wybieramy odpowiedni typ śrub. / A szereléshez használja a megfelelő típusú és méretű csavarokat. / Za instalacijo izberite primeren tip vijakov. / Za montażu odabrati odgovarajuću vrstu vijaka. / Für die Befestigung die richtigen Schrauben auswählen. / Для установки виберіть правильний тип гвинтів. / Pentru instalare alegeți tipul adecvat de şuruburi. / Pasirinkite montavimui reikiamus varztus. / Izvēlieties uzstādīšanai piemērotas bultskrūves.
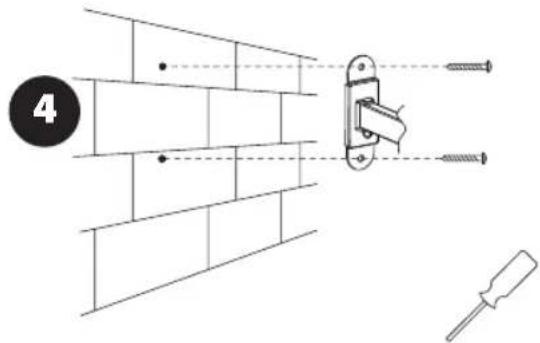
Tighten the screw to lock the display plate on the wall plate. / Utáhněte šrouby pro uzamčení monitoru k nástěnné desce. / Utiahnite skrutky pre uzamknutie monitora k nástennej doske. / Dokrećamy šruby mocujace odbiornik do płyty naściennej. / Húzza meg a csavart, hogy a képernyő panel a fali panelre szoruljo. / Za zaklenitev položaja monitorja na stenski plošči privijte vijake. / Zategnite vijke kako bi fiksirali televizor (monitor) u odnosu na zidnu ploču. / Die Schrauben für das Verschließen des Bildschirms an der Wandplatte festziehen. / Затягніть гвинти, щоб зафіксувати монітор до дошки на стіні. / Strângeți şuruburile pentru blocarea poziției ecranului la placa de perete. / Priveržkite varztą ir užfiksuokite ekrano plokštę prie sieninės plokštės. / Pievelciet skrūvi, lai nostiprinātu ekrāna plăksni pie sienas plăksnes.
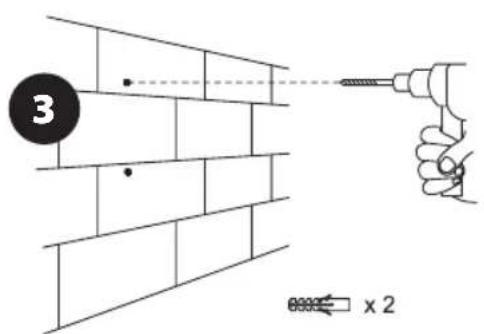
Fix the wall plate to the wall using the Lag Bolt (A) provided. / K uchycení nástěnné desky ke zdi, použijte šroub s částečným závitem (A). / Na uchytenie nástennej dosky k stene, použite skrutku s čiastočným závitom (A). / Do umocowania płyty do ściany, wykorzystujemy šruby z gwintem niepełnym (A). / Rögzítse a fali panelt a falra a termékhez csomagolt négyszógletes fejů facsavarral (A). / Za pritrdítev stenske plošče na steno uporabite vijak z delnim navojem (A). / Za pričvršćivanje zidne ploče na zid, uporabite vijak s djelomičnim navojem (A). / Zur Befestigung der Wandplatte die Schrauben (A) benutzen. / Для prikríplenня настінної дошки до стіни, використовуйте гвинт з частичною різьбою (A). / Fixați placa de perete pe zid, folosind şurub cu filet partial (A). / Pritvirtinkite sienos plokšteľę prie sienos naudodami pridėt varžtą su kvadratine galvute (A). / Piestipriniet sienas pláksni pie sienas, izmantojot komplektácijă iekļauto koka skrūvi (A).
natural_image
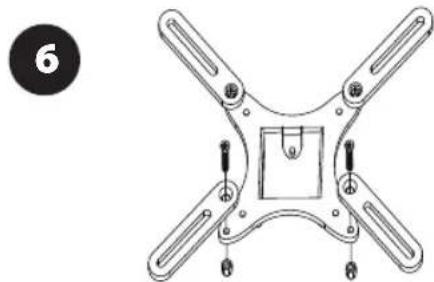
Technical line drawing of a four-angle mechanical component with mounting holes and a central square (no text or symbols)Install the screen on the display plate. / Pro instalaci zvolte správný typ šroubů. / Pre inštaláciu vyberte správny typ skrutiek. / Do instalacji wybieramy odpowiedni typ šrub. / Helyezze fel a képernyőt a képernyő panelre. / Za instalacijo izberite primeren tip vijakov. / Za montažu odabrati odgovarajuću vrstu vijaka. / Für die Befestigung die richtigen Schrauben wählen. / Для установki виберіть правильний тип гвинтів. / Pentru instalare alegeți tipul adecvat de şuruburi. / Sumontuokite ekraną ant plokštės. / Uzstädiet ekrānu uz ekrāna plāksnes.
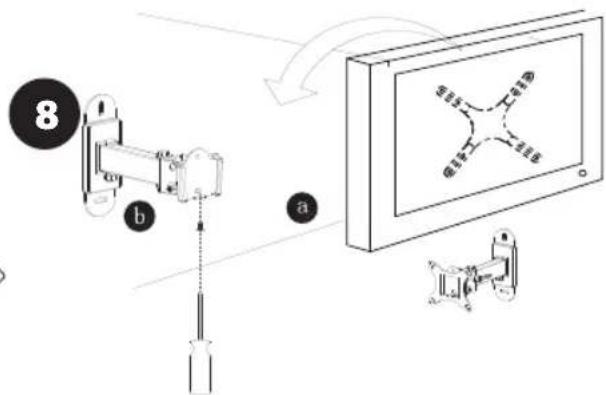
Put the display plate on the wall plate. / Zasuňte monitor do nástěnné desky. / Zasuňte monitor do nástennej dosky. / Odbiornik wkładamy do plyty nošne. / Helyezze a képernyő panelt a fali panelre. / Monitor vtaknite v stensko ploščo. / Postavite televizor (monitor) na zidnu ploču. / Den Bildschirm in die Wandplatte schieben. / Вставте монітор в стінну дошку. / Glisați ecranul pe plăcile de perete. / Uždėkite ekrano plokštę ant sieninės plokštės. / Uzlieciet ekrāna plăksni uz sienas plăksnes.
SI ARANCIJSKA IZJAVA


Brand : Emos
Model : KT3123
Category : Uncategorized