
HK-122941 - Lawn Mower Accessory Emerio - Free user manual and instructions
Find the device manual for free HK-122941 Emerio in PDF.


| Product Type | Lawn Mower Grass Collection Bag |
| Brand | Emerio |
| Model | HK-122941 |
| Material | Woven Polypropylene with PVC Coating |
| Bag Capacity | 50 Liters |
| Dimensions (L x W x H) | 24 x 16 x 14 inches (61 x 41 x 36 cm) |
| Weight | 1.5 lbs (0.68 kg) |
| Compatibility | Most walk-behind lawn mowers with universal rear discharge |
| Attachment Type | Hooks onto mower frame or bracket |
| Features | Easy-emptying design, Reinforced seams, UV-resistant |
| Installation | No tools required; slides onto mounting pins |
| Maintenance | Clean with mild soap and water; dry thoroughly before storage |
| Storage | Store in a dry, cool place away from direct sunlight |
| Safety | Keep hands clear of mower discharge; wear gloves when emptying |
| Spare Parts / Repairability | Replacement bags and mounting hardware available from Emerio |
| Warranty | 2 years limited warranty |
Frequently Asked Questions - HK-122941 Emerio
User questions about HK-122941 Emerio
0 question about this device. Answer the ones you know or ask your own.
Ask a new question about this device
Download the instructions for your Lawn Mower Accessory in PDF format for free! Find your manual HK-122941 - Emerio and take your electronic device back in hand. On this page are published all the documents necessary for the use of your device. HK-122941 by Emerio.
USER MANUAL HK-122941 Emerio
natural_image
Product photo of a hair styling tool including a straight-tailed hairbrush, multiple black hair blisters, and scissors (no text or symbols visible)Hair Clipper (EN)
Instruction manual – English ...... - 2 -
Before use make sure to read all of the below instructions in order to avoid injury or damage, and to get the best results from the appliance. Make sure to keep this manual in a safe place. If you give or transfer this appliance to someone else make sure to also include this manual.
In case of damage caused by user failing to follow the instructions in this manual the warranty will be void. The manufacturer/importer accepts no liability for damages caused by failure to follow the manual, a negligent use or use not in accordance with the requirements of this manual.
- This appliance can be used by children aged from 8 years and above and persons with reduced physical, sensory or mental capabilities or lack of experience and knowledge if they have been given supervision or instruction concerning use of the appliance in a safe way and understand the hazards involved.
- Children shall not play with the appliance.
- Cleaning and user maintenance shall not be made by children without supervision.
- If the supply cord is damaged, it must be replaced by the manufacturer, its service agent or similarly qualified persons in order to avoid a hazard.
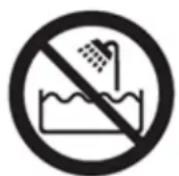
-
Keep the device away from water and moisture such as bath tubs, showers areas or even persons taking a bath! Such situations constitute a DANGER TO LIFE! through electric shock. WARNING: Do not use this appliance near bathtubs, showers, basins or other vessels containing water.
-
WARNING: Keep the appliance dry.
- This appliance can be used by children aged from 3 years under supervision.
- Before inserting the plug into the mains socket, please check that the voltage and frequency comply with the specifications on the rating label.
- Disconnect the mains plug from the socket when the appliance is not in use and before cleaning.
- Ensure that the mains cable is not hung over sharp edges and keep it away from hot objects and open flames.
- Do not immerse the appliance or the mains plug in water or other liquids. There is danger to life due to electric shock!
- To remove the plug from the plug socket, pull the plug. Do not pull the power cord.
- Do not touch the appliance if it falls into water. Remove the plug from its socket, turn off the appliance and send it to an authorized service center for repair.
- Do not plug or unplug the appliance from the electrical outlet with a wet hand.
- Never attempt to open the housing of the appliance, or to repair the appliance yourself. This could cause electric shock.
- Never leave the appliance unattended during use.
- This appliance is not designed for commercial use.
- Do not use the appliance for other than intended use.
- Do not wind the cord around the appliance and do not bend it.
- Keep the device and the cable away from heat, direct sunlight, moisture, sharp edges and suchlike.
- Never leave the device unsupervised! Switch off the device whenever you are not using it, even if this is only for a moment.
-
Never drop or insert any object into any opening on this appliance.
-
Before using, make sure blades are aligned properly.
- Do not place appliance on any surface while it is operating.
- Do not use this appliance with a damaged comb nor with teeth missing from the blades as injury may occur.
- Use only original accessories.
- Do not use the device outdoors.
- Do not operate your hair clipper without oiling the blades.
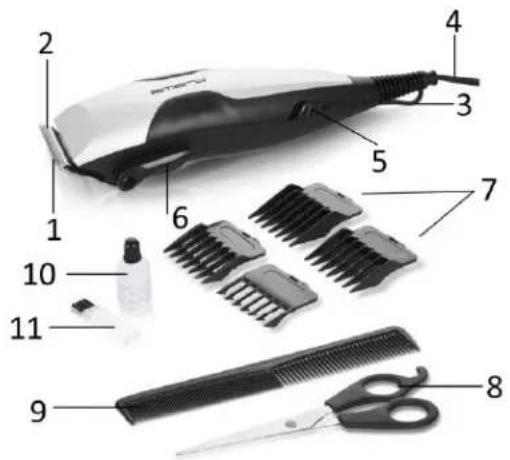
PARTS DESCRIPTION
- Station blades
- Moving blades
- Hanging loop
- Power cord
- ON/OFF switch
- Blade lever
- Attachment comb (3/6/9/12 mm)
- Scissor
- Comb
- Oil
- Brush
BEFORE USE
- Make sure that your clipper is clean, properly oiled and in perfect working condition.
- Seat the person so their head is approximately at your eye level. This allows ease of visibility while cutting and a relaxed control of the unit.
- Place a towel around the neck and shoulders of the person having the haircut.
- Before cutting always first comb the hair so it is tangle free.
- Never use the product to cut wet hair. It is designed to work in dry condition only.
USE
-
Hold the desired attachment comb with teeth up and snap the attachment comb onto the clipper blades. Make sure the attachment comb is firmly attached. The attachment combs have 4 sizes (marked on the combs):
-
Attachment Comb #1 leaves about 3mm (1/8 inch) hair length.
- Attachment Comb #2 leaves about 6mm (1/4 inch) hair length.
- Attachment Comb #3 leaves about 9mm (3/8 inch) hair length.
- Attachment Comb #4 leaves about 12mm (1/2 inch) hair length.
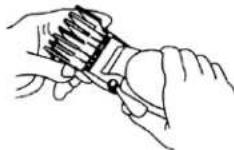
- Plug in the appliance, then slide the ON/OFF switch to turn on the appliance.
- Hair must be clean, dry and combed. You have to start from the highest length of hair, and then reduce gradually to prevent cutting more hair than requested.
- Hold the clipper lightly against the head with the comb teeth pointing upward. Gradually and slowly lift the clipper through the hair, trimming just a little at one time and often comb hair in order to obtain the requested hair style.
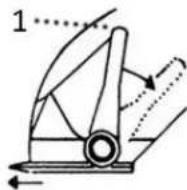
- The lever is conveniently located near your thumb (if you're right-handed) so it can be adjusted easily while the clipper is in your hand. The lever adds versatility to your clipper by allowing you to gradually change the closeness of your cut without an attachment comb.
When the lever is in the uppermost position, the blades will give you the closest cut (1).
Pushing the lever downward gradually increases the length of hair left.
In addition, if heavy hair jammed the blades, it will help remove hair by turning the lever.
- After using, slide the ON/OFF switch to turn off the appliance. Unplug the power cord.
CUT EXAMPLE
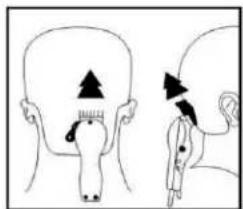
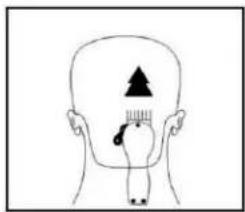
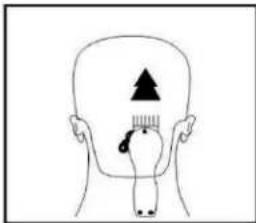
- Attach comb attachment 3mm or 6mm.
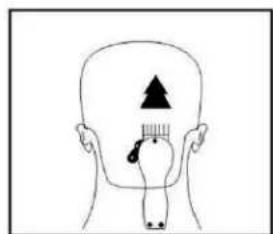
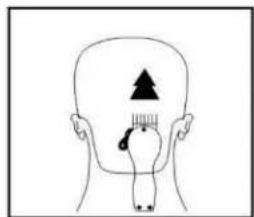
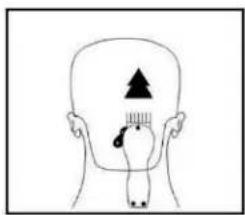
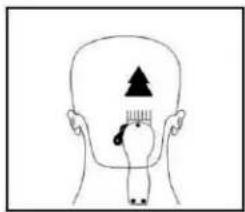
Starting from the center bottom of the back head, gradually lift the clipper upwards and outwards through the hair, trimming just a little at one time.
natural_image
Simple line drawing of a human head with a triangular pointer and curved line, no text or symbols present-
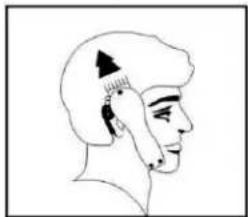
Change to the comb attachment 9mm or 12mm and cut at the back of the head.
-
Change to one of the shorter combs 3mm or 6mm to trim sideburns. Then change to longer comb 9mm or 12mm, and continue to cut at the top of the head.
natural_image
Side profile line drawing of a human head with earphones and surgical cap (no text or symbols)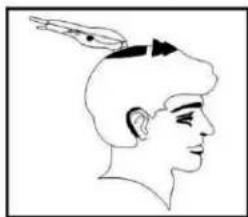
natural_image
Side profile illustration of a person wearing a head with an antenna (no text or symbols)- Use attachment comb 9mm or 12mm to cut at the top of head from back to front against the direction in which the hair normally grows. Attachment comb 3mm or 6mm are used to achieve a close crew cut. For longer hair on top, use the comb provided and lift the hair on the top of the head. With the hair lifted, cut the hair to the desired length.
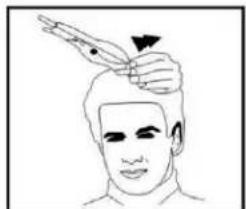
natural_image
Line drawing of a person receiving a finger massage or acupressure (no text or symbols)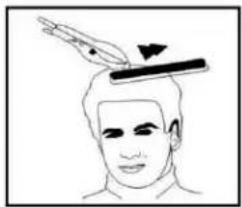
natural_image
Illustration of a person applying a hairpin to their forehead (no text or symbols)- Finally, use the clipper without an attachment comb for close trimming around the ears and back of neck.
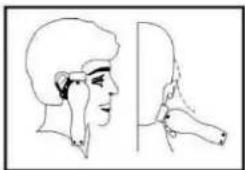
natural_image
Side-view anatomical line drawing of human head and neck (no text or labels)The four basic areas and their corresponding comb attachments illustrated below are for your reference.
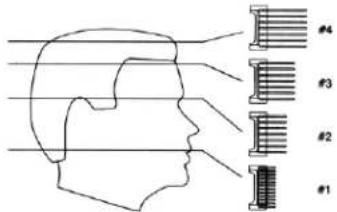
CLEANING AND MAINTANENCE
-
Ensure that the hair clipper is disconnected from the mains supply before cleaning.
-
Never immerse the hair clipper in water or any other liquids. Never rinse the appliance either. Always ensure that the plug is kept dry.
-
Use the provided brush to take off hair from the clipper.
-
Clean the outside of the appliance with a slightly wet cloth. Dry it up before use.
-
Oil and Alignment:
• You clipper was carefully examined to ensure the blades were oiled and aligned before leaving the factory.
- Blades must be realigned if they have been removed for cleaning or replacement.
- To realign the blades, match the station and moving blades teeth up, point to point. End of the station blade teeth should be approximately 1.2mm back from moving blades. Compare the clipper blades with the sketch.
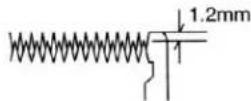
- If the blades alignment is incorrect, add a few drops of oil to the blades, turn the cilpper on for a while, then turn it off and unplug it. Loosen the screws slightly and make adjustment. Tighten the screws after the blades are aligned.
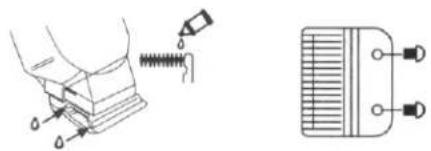
- To maintain your clipper in peak conditions, the blades should be oiled every a few haircuts. Do not use hair oil, grease, oil mixed with kerosene or any solvent. As the solvent will evaporate and leave the thick oil which may slow down the motion of blades.
TECHNICAL DATA
Operating voltage: 220-240V \~ 50/60Hz
Power consumption: 15W
GUARANTEE AND CUSTOMER SERVICE
Before delivery our devices are subjected to rigorous quality control. If, despite all care, damage has occurred during production or transportation, please return the device to your dealer. In addition to statutory legal rights, the purchaser has an option to claim under the terms of the following guarantee:
For the purchased device we provide 2 years guarantee, commencing from the day of sale. If you have a defective product, you can directly go back to the point of purchase.
Defects which arise due to improper handling of the device and malfunctions due to interventions and repairs by third parties or the fitting of non-original parts are not covered by this guarantee. Always keep your receipt, without the receipt you can't claim any form of warranty. Damage caused by not following the instruction manual, will lead to a void of warranty, if this results in consequential damages then we will not be liable. Neither can we hold responsible for material damage or personal injury caused by improper use if the instruction manual is not properly executed. Damage to accessories does not mean free replacement of the whole appliance. In such case please contact our service department. Broken glass or breakage of plastic parts is always subject to a charge.
Defects to consumables or parts subjected to wearing, as well as cleaning, maintenance or the replacement of said parts are not covered by the warranty and are to be paid.
ENVIRONMENT FRIENDLY DISPOSAL
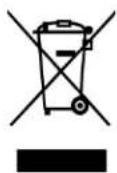
Recycling – European Directive 2012/19/EU
This marking indicates that this product should not be disposed with other household wastes. To prevent possible harm to the environment or human health from uncontrolled waste disposal, recycle it responsibly to promote the sustainable reuse of material resources. To return your used device, please use the return and collection systems or contact the retailer where the product was purchased.
They can take this product for environmental safe recycling.
SICHERHEITSHINWEISE
VOR DER VERWENDUNG
natural_image
Simple line drawing of a human head with an upward arrow and a small object inside, no text or symbols present.natural_image
Side profile line drawing of a human head with a triangular head and ear (no text or symbols)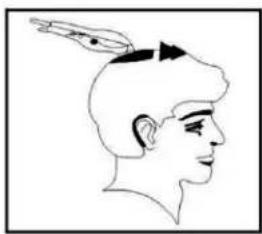
natural_image
Side profile illustration of a person with an antenna inserted, showing head and neck (no text or symbols)natural_image
Line drawing of a person receiving a hand massage or acupressure technique (no text or symbols)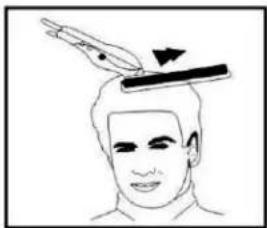
natural_image
Line drawing of a person applying a hairpin to their forehead (no text or symbols)natural_image
Side-view anatomical line drawing of human head and neck (no text or labels)FÖ RE ANVÄNDNING
natural_image
Simple line drawing of a human head with an arrow pointing upward and a mouth marking the nose (no text or symbols)natural_image
Side profile illustration of a human head with facial features and earphones (no text or symbols)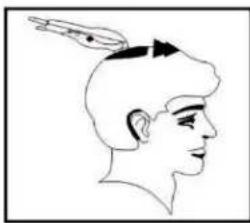
natural_image
Side profile illustration of a person with a bird perched on their head (no text or symbols)natural_image
Line drawing of a person receiving a neck massage or acupressure technique (no text or symbols)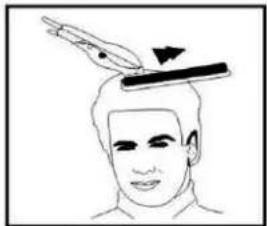
natural_image
Illustration of a person applying a pencil to their forehead (no text or symbols)natural_image
Side-view anatomical line drawing of human head and neck, showing profile views (no text or labels)RENGÖ RING OCH UNDERHÅLL
VOOR GEBRUIK
natural_image
Line drawing of two hands holding a tool, no text or symbols present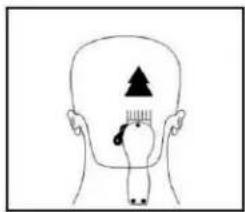
natural_image
Side profile illustration of a human head with ear and earpin (no text or symbols)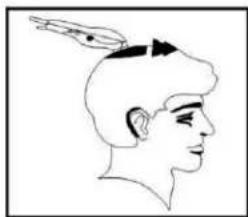
natural_image
Side profile illustration of a person wearing a head with an antenna (no text or symbols)natural_image
Line drawing of a person receiving a hand massage or acupressure technique (no text or symbols)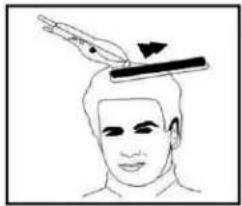
natural_image
Illustration of a person applying a hairpin to their forehead (no text or symbols)natural_image
Side-view anatomical line drawing of human head and neck (no text or labels)REINIGING EN ONDERHOUD
ENNEN KÄYTTÖ Ä
natural_image
Simple line drawing of a human head with a triangular pointer and a curved arrow pointing upward (no text or symbols)natural_image
Side profile illustration of a human head with facial features and earphones (no text or symbols)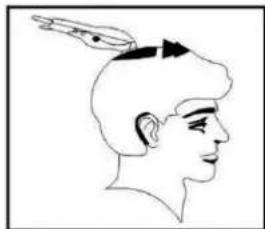
natural_image
Side profile illustration of a person with an arrow pointing upward, no text or symbols presentnatural_image
Line drawing of a person receiving a finger massage or acupressure (no text or symbols)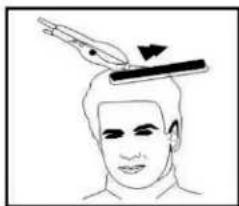
natural_image
Line drawing of a person's head with a tool above their head, showing a hand holding a pen (no text or symbols)natural_image
Side-view anatomical line drawing of human head and neck (no text or labels)PUHDISTUS JA KUNNOSSAPITO
F∅ R BRUK
natural_image
Simple line drawing of a human head with a triangular head and a small mouth, no text or symbols present.natural_image
Side profile line drawing of a human head with facial features (no text or symbols)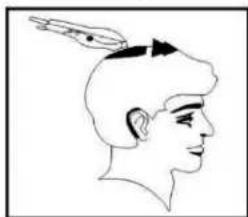
natural_image
Side profile illustration of a person wearing a head with an arrow pointing upward (no text or symbols)natural_image
Line drawing of a person receiving a finger massage or acupressure (no text or symbols)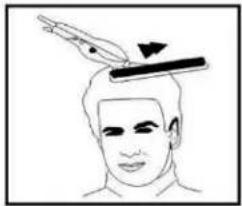
natural_image
Illustration of a person receiving a hand massage or pressure technique on their head (no text or symbols)natural_image
Side-view anatomical line drawing of human head and neck (no text or labels)RENGJ∅ RING OG VEDLIKEHOLD
F∅ R ANVENDELSE
natural_image
Simple line drawing of a human head with a triangular pointer and a curved arrow pointing upward (no text or symbols)natural_image
Side profile illustration of a human head with earphones and surgical pins (no text or symbols)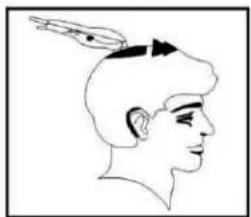
natural_image
Side profile illustration of a person wearing a head with an antenna (no text or symbols)natural_image
Line drawing of a person receiving a hand massage or pressure technique (no text or symbols)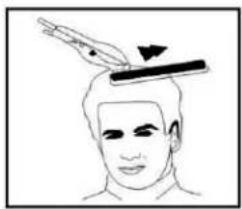
natural_image
Illustration of a person's head with a hand holding a tool above their head, showing a motion indicator (no text or symbols)natural_image
Side-view anatomical line drawing of human head and neck (no text or labels)RENG∅ RING OG VEDLIGEHOLDELSE
natural_image
Technical diagram showing mechanical assembly with spring and pin, alongside a 3D schematic of a component with three terminals (no text or labels)- PARTS DESCRIPTION
- BEFORE USE
- USE
- CUT EXAMPLE
- CLEANING AND MAINTANENCE
- TECHNICAL DATA
- GUARANTEE AND CUSTOMER SERVICE
- ENVIRONMENT FRIENDLY DISPOSAL
- SICHERHEITSHINWEISE
- VOR DER VERWENDUNG
- FÖ RE ANVÄNDNING
- RENGÖ RING OCH UNDERHÅLL
- VOOR GEBRUIK
- REINIGING EN ONDERHOUD
- ENNEN KÄYTTÖ Ä
- PUHDISTUS JA KUNNOSSAPITO
- F∅ R BRUK
- RENGJ∅ RING OG VEDLIKEHOLD
- F∅ R ANVENDELSE
- RENG∅ RING OG VEDLIGEHOLDELSE
Brand : Emerio
Model : HK-122941
Category : Lawn Mower Accessory