Aquawelt 919.0 SP - Vacuum Cleaner Zelmer - Free user manual and instructions
Find the device manual for free Aquawelt 919.0 SP Zelmer in PDF.

User questions about Aquawelt 919.0 SP Zelmer
0 question about this device. Answer the ones you know or ask your own.
Ask a new question about this device
Download the instructions for your Vacuum Cleaner in PDF format for free! Find your manual Aquawelt 919.0 SP - Zelmer and take your electronic device back in hand. On this page are published all the documents necessary for the use of your device. Aquawelt 919.0 SP by Zelmer.
USER MANUAL Aquawelt 919.0 SP Zelmer
zelmer


Aquawelt
natural_image
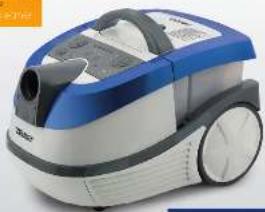
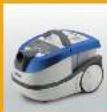
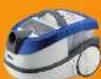
Exterior view of a blue and white vacuum cleaner (no visible text or symbols)021018462
| C. | 1-10 | D. | 31-39 | F. | 52-56 |
| C. | 15-22 | E. | 38-44 | G. | 57-61 |
| C. | 21-28 | H. | 42-48 | I. | 62-66 |
| C. | 25-32 | J. | 47-50 | K. | 67-71 |
zelmer
golden service
Aquawelt
Odkurzcz


2014年1月1日
zelmer
WAN ZHIH
A

Saanomi Klond!
Pomie a suuca marcellana rinnas in situ: disag. Sustepia suga diny cava: vora wana haw bapu- sna, including cladu waling zhenval, the negli Fortano trangy sna, wana haw bapu- sna, the negli
The following table is provided in the image:
Mie urochanial urocania, of i provoz azolicky on a rityy zhi roboz oztov a qodih azol- ry ozolicky. Olojav viozau anadu a dopanka 50% 30/80.
Jah's proad and agyag a bubiyaty a chytea mordade, a pionan in le pramnity spolcyty k. n. spomnigcaya zedate sponenzte ale proad hawry ocele wca a tujek y zogodne. Ampie aracuata in rce chang and jupine proabody prorin. fipomnity spolny a muzia niz apomnity prorin zegonze de spomnity in rce spomnity a muzia mordady zoceli si spomnity prorin pumisus uag 2013E.
de document de asunción y sujíd personal
2017年1月1日
[Unreadable]
The following table is a table with two columns: the first column contains an empty string, and the second column contains an empty string. The values for the first column are 100.
TYPY 004182307 Y 93
| Cross-sectional (in € million) | AUM / Burs. | Equity in equity | ||||||||||||
| Wolfgang | ||||||||||||||
| Finanzielle finanzielle | ||||||||||||||
| 2015-3-27 | EUR/€ 2,7 | 167% | + | + | + | - | + | + | + | + | + | + | + | - |
| 2015-3-27 | EUR/€ 2,8 | 167% | + | + | + | - | + | + | + | - | + | + | + | - |
| 2015-3-28 | EUR/€ 2,9 | 167% | + | + | + | - | + | + | - | - | + | + | + | - |
Mietzajy odojomczi zopak negej-nypok tom rucuzang joloa Ubiq drosim kiyal pukrakis Mietzajy lutech joloa je nga anal gao
korey bank korey bank lie wogy do kurey bank wiatny, teleprzych banzyski na pachy banka zaduany wiatny. UNI351 People's Bank of the Bank, gry a rlebnia pachy bankery go rojna go rerom pachy bankery go rojna. Ago Bank Bank of the bank payant.
In zonepoty na donszerja od wartovka ob 23 lins ofurzava voda, Ile zynsna, obrazna na dink in con lde
10.2.2023年1月1日
A. 100% of the people are a very small group of people who are in the country, and there is no other person who is a large group of people.
1993.07: Deltzerer wite precast (the a palatina) was a type of 1-poly carbonyl water colorified by polkolor.
Characteristics of the
the following table is a series of 100 items.
SCIWINESTERH
In art. and the versus capes of the
handshub are a doctor.
① Det Sino refer to Hagen school as we can
□Pacifinovastatin (Heterocritics, China)
The Vok the SHIPCHEEN to the level
erberan
(5) The 5 yrs at Handover on (using the U
The SW (W) is to develop the 2015-2017
LES STALEAUEN VIT SAPRAS SEUTEL Donan
Fig.10.2.1.1
MILKONLESHEN, INC. RIMELIS-TELLER
⑤ The Vasternian sense be evicted
(4) E. al. (2), An HERAP and An Chal
or t kand de Fliy elinozol evdva.
The following changes in the European
In order to show the following:
Unstige - Sustent de Environ Devel.
Jawler van de we is to a line of
H. 1970 (the English and/or are as
S. 2017, 1963, 1964, 1965, 1966, 1967, 1968, 1969, 1970, 1971, 1972, 1973, 1974, 1975, 1976, 1977, 1978, 1979, 1980, 1981, 1982, 1983, 1984, 1985, 1986, 1987, 1988, 1989, 1990, 1991, 1992, 1993, 1994, 1995, 1996, 1997, 1998, 1999, 2000, 2001, 2002, 2003, 2004, 2005, 2006, 2007, 2008, 2009, 2010, 2011, 2012, 2013, 2014, 2015, 2016, 2017, 2018, 2019, 2020, 2021,
The following table is in English:
Dr.Ning Lin, Martin, 1945
(1) 2017年1月1日星期六
21
lkyn.
2017年1月1日
[Unreadable]
图
The image is too blurry to recognize any text content.
-
In Mio. 1980, we were in the following: (1) We were in the first year of the year, and (2) We were in the second year of the year, and (3) We were in the third year of the year, and (4) We were in the fourth year of the year,
The following table provides the information in a specific format:
Dane techniczne
Please read this instruction manual carefully. Pay special attention to important safety instructions. Keep this instruction manual for future reference.
Important safety instructions
Connect the vacuum cleaner only to a 230 V mains supply equipped with a 16 A fuse.
Do not unplug by pulling on cord.
Do not operate the appliance if it has a damaged cord or if the housing is visibly damaged.
If the supply cord is damaged, it must be replaced by the manufacturer, a service agent or a qualified person in order to avoid a hazard.
The appliance can only be repaired by qualified service personnel. Improper servicing may cause a serious hazard to the user. In case of defects please contact a qualified service center.
Do not allow the plug to have contact with water.
Do not touch the appliance with wet hands when it is connected to the mains supply.
Do not run the vacuum cleaner or the brushes over the cord, it may cause damage to the cord insulation.
Always unplug the appliance before cleaning, assembling or dismantling.
Switch off the appliance before changing attachments or before contact with movable parts.
Do not use the vacuum cleaner to clean people or animals, pay special attention to keep the nozzles away from eyes and ears.
Do not pick up: matches, cigarette butts, hot ash. Avoid picking up sharp objects.
Do not vacuum fine dust such as: flour, cement, gypsum, toners for printers and copy machines etc.
Do not pick up corrosive and toxic materials, petrol, kerosene and other flammable or explosive liquids.
ATTENTION! The pump may only be switched on when the cleaning liquid container is filled with the solution of cleaning liquid and water. The lack of cleaning liquid is manifested in a loud operation of the pump.
During operation pay attention not to knock the vacuum cleaner over or to spill water on the appliance.
Do not expose the vacuum cleaner to atmospheric conditions (rain, frost).
Do not use the vacuum cleaner without the foam filter installed in the filter unit.
Do not leave a switched on and operating vacuum cleaner unattended.
This appliance is not intended for use by persons (including children) with reduced physical, sensory or mental capabilities, or lack of experience and knowledge, unless they have been given supervision or instruction concerning use of the appliance by a person responsible for their safety.
Children should be supervised to ensure that they do not play with the appliance.
ATTENTION! The vacuum cleaner may only operate in a natural position i.e. when it is placed with four wheels on the surface.
Technical parameters
The type of the vacuum cleaner and the technical parameters are indicated on the rating label. Mains protection 16 A.
Does not interfere with radio and TV reception.
Does not require grounding ☐
ZELMER vacuum cleaners meet the requirements of the applicable norms.
The appliance is in conformity with the requirements of the directives:
Low voltage appliance (LVD) - 2006/95/EC. -
Electromagnetic compatibility (EMC) - 2004/108/EC.
Noise level: 80 dB/A.
The appliance was marked by a CE sign on the rating label.
VACUUM CLEANER 919 TYPES
| Workmanship and equipment option: Type | Dust bag / amount | Outlet filter | Suction hose | Telescopic suction tubes | Combination brush with small item separator | Small nozzle | Crevice nozzle | Small brush | Parquet brush | Turbo brush | Large atomizing nozzle | Small atomizing nozzle | Water pick up nozzle | Electronic power control |
| 1 | 2 | 3 | 4 | 5 | 6 | 7 | 8 | 9 | 10 | 11 | 12 | 13 | 14 | 15 |
| 919.0 ST | SAFBAG 2 pcs. | HEPA | + | + | + | + | + | + | + | + | + | + | + | + |
| 919.0 SP | SAFBAG 2 pcs. | HEPA | + | + | + | + | + | + | + | - | + | + | + | + |
| 919.5 SK | SAFBAG 2 pcs. | HEPA | + | + | + | + | + | + | - | - | + | + | + | - |
Appliance features
The vacuum cleaner 919 is intended to pick up dirt from floors, carpets, ceramic tiles, slots in wood paneling, skirting boards, heaters. The vacuum cleaner is also used to vacuum furniture, curtains, to pick up liquids and to wet clean tiles, floorings, carpets, fitted carpets and upholstery.
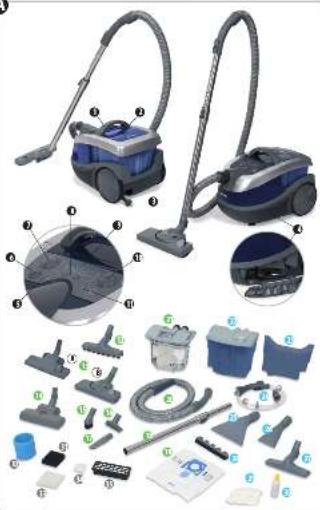
Appliance elements

1 Handle
2 Container lid opening button
3 Plug and cord
4 Accessory compartment
5 Pump operation indicator
6 Pump switch
7 ON/OFF button
8 Power adjustment button +/- (type 919.0)
9 Power level indicator (type 919.0)
10 Cord rewind button
11 Clogged air inlet indicator (type 919.0)
12 Parquet brush (type 919.0)
13 The vacuum cleaner is equipped with only one type of suction brush (A or B)
A Suction-brush
B Combination brush with small item separator
14 Turbo brush (type 919.0 ST)
15 Small brush
16 Small nozzle
17 Crevice nozzle
18 Telescopic suction tube
19 SAFBAG dust bag
20 Suction hose
21 Dry filtration module with SAFBAG dust bag
22 Water filter module (filtration unit + partition)
23 Cleaning liquid container
24 Spray unit – suction hose handle attachment
25 Large atomizing nozzle
26 Small atomizing nozzle
27 Water pick up nozzle
28 Rubber slat to the large atomizing nozzle
29 Cleaning powder
30 Anti-foam agent
31 Foam filter I
32 Foam filter II
33 Inlet filter
34 Motor filter
35 HEPA outlet filter
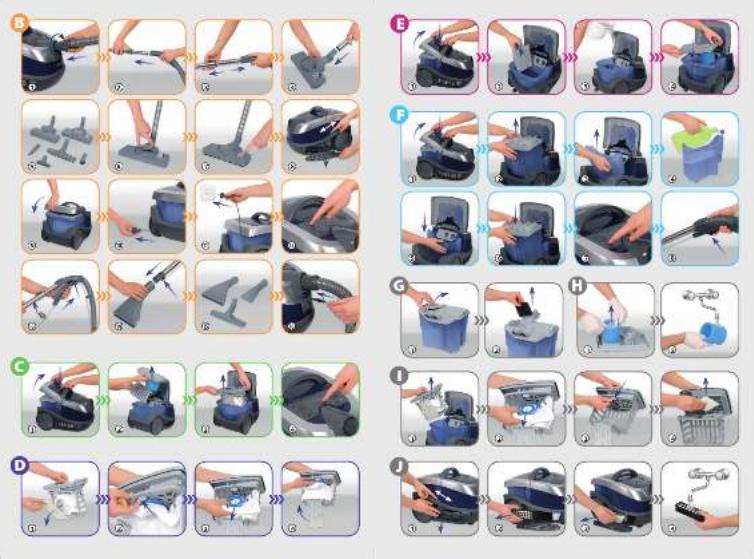
Preparing the vacuum cleaner for operation

① Insert the end of the suction hose to the vacuum cleaner opening so that the markings on the hose end and on the vacuum cleaner housing are opposite each other and turn the hose clockwise to the position
② Connect the other end of the hose (handle) with the telescopic suction tube.
③ Adjust the length of the telescopic suction tube by sliding the slider according to the arrow and pull out/ pull the tube together.
④ Assemble the appropriate nozzle or brush to the other end of the suction tube.
⑤ Use the following nozzles and brushes for traditional vacuum cleaning with the SAFBAG dust bag and vacuum cleaning with the use of the water filter module: combination brush with small item separator, small nozzle, small brush, crevice nozzle, parquet brush or turbo brush.
⑥ You may assemble a basket for picking up small objects in the combination brush with small item separator. In order to do so remove the basket cover and insert the basket.
⑦ To clean hard surfaces – wooden floors, plastic floors, ceramic tiles etc. pull out the brush by pressing the switch on the nozzle according to the figure
⑧ The vacuum cleaner is equipped with an accessory compartment. The compartment opens/closes with the use of a slider. To open/close the compartment side the slider downwards/upwards and take out/ put away the desired nozzle.
⑨ Close the lid.
⑩ Grab the plug (3) and pull the cord out of the vacuum cleaner.
ATTENTION! While pulling out the cord pay attention to the yellow stripe which signals the end of the cord. Further attempts (pulling on cord) may result in damaging the cord.
⑪ Plug in the appliance.
ATTENTION! Before switching on the vacuum cleaner with the on/off button (7), make sure that the appropriate module is installed in the container (see section C, E, or F).
⑫ Switch on the vacuum cleaner by pressing the "on/off" button (7).
In order to prepare the vacuum cleaner for wet operation additionally:
⑬ Assemble the spray unit – the suction hose handle attachment (24).
attach the hose fastenings to the suction hose and the telescopic suction tube.
⑭ Attach the end of the hose (sleeve) to the telescopic suction tube and insert the other end of the hose in the small
atomizing nozzle or the large atomizing nozzle until you hear a characteristic click.
⑮ Use the following nozzles for the wet vacuuming and wet cleaning function or to pick up water: large atomizing nozzle, small atomizing nozzle or the water pick up nozzle.
⑯ Slide the stub pipe valve plug downwards.
Insert the stub pipe of the hose to the valve in the vacuum cleaner housing.
Make sure the stub pipe fastenings snap shut.
ATTENTION! In case of difficulties in connecting the above mentioned elements moisten the gaskets e.g. with technical vaseline, water, etc.
Vacuum cleaner functions
TRADITIONAL CLEANING WITH SAFBAG DUST BAG
① Press and hold the container lid opening button (2) and lift the container lid.
② Remove the water filter module from the container (filtration unit and partition).
③ Insert the dry filtration module with the SAFBAG (21) dust bag to the container.
Prepare the vacuum cleaner for operation according to section B.
④ The vacuum cleaner will by default begin operation at the medium power range. 3 diodes will light on the power level indicator (9). Set the desired power value (this function is only available in vacuum cleaners type 919.0) by pressing the power adjustment buttons +/- (8).
ATTENTION! The vacuum cleaner is equipped with a power limiting function should the inlet opening be clogged or the SAFBAG dust bag full. It is manifested by a pulsing limitation of the motor power and the lighting up of the clogged air inlet indicator (11) while the vacuum cleaner is operating at full power (type 919.0). In such a case switch off the vacuum cleaner by pressing the on/off button (7), unplug the appliance and clear the tubes or replace the SAFBAG dust bag.
SAFBAG dust bag disassembly/assembly

Remove the dry filtration module with the SAFBAG (21) dust bag from the container.
① Pull the SAFBAG dust bag interlock fastening and pull the interlock aside.
② Pull the fastening which attaches the SAFBAG dust bag to the basket to release the dust bag plate.
③ Remove the dust bag.
④ Insert the SAFBAG dust bag according to the arrow printed on the bag so that the lower part of the bag plate is in the slot of the housing. Press the upper part of the bag plate to the fastening until you hear a characteristic click and close the SAFBAG dust bag interlock.
Insert the dry filtration module with the SAFBAG(21) dust bag to the container.
VACUUM CLEANING WITH THE USE OF THE WATER FILTER MODULE

① Press and hold the container lid opening button (2) and lift the container lid.
② Insert the partition to the grooves in the container so that the shutters are directed downwards. Make sure the partition is correctly mounted in the container i.e. the partition fins should cover the protrusion in the container.
③ Fill the container with 1,3–1,5 liter of water. The water level should be in the range marked on the wall of the container.
ATTENTION! Do not operate the appliance with an empty container while vacuum cleaning with the use of the water filter module.
④ Cover the container with the filter unit.
Prepare the vacuum cleaner for operation according to section B.
The vacuum cleaner will by default begin operation at the medium power range. 3 diodes will light on the power level indicator (9). Set the desired power value (this function is only available in vacuum cleaners type 919.0) by pressing the power adjustment buttons +/- (8).
ATTENTION! Do not operate the appliance for too long without replacing the water in the container.
WET VACUUMING AND WET CLEANING

Before using the wet cleaning function thoroughly vacuum the surface to be cleaned.
Before operating the vacuum cleaner make sure the container is empty and the water filter module and the filters are clean.
① Press and hold the container lid opening button (2) and lift the container lid.
② Remove the container together with the water filter module (filter unit and partition) from the vacuum cleaner.
③ Remove the cleaning liquid container (23) by pulling it by the handle and lifting it upwards.
④ Open the inlet plug and fill the cleaning liquid container (23) with the cleaning liquid (the solution of cleaning powder and water) in the amount indicated below:
Dissolve the content of the bag in a separate container in 1,5 l of warm water with the maximum temperature of 50°C. The maximum capacity of the cleaning liquid container is 1,7 l.
- lose the inlet plug of the cleaning liquid container
⑤ Insert the cleaning liquid container (23) back to the previous position and press the container to fix it correctly (proceed in the reverse order as in case of removing the container).
⑥ Insert the container together with the water filter module (filter unit and partition) to the vacuum cleaner.
In order to protect from the foam formation or if foam forms during the cleaning process, use the anti-foam
agent recommended by ZELMER S.A. in the amount and manner indicated on the label.
„G 478 Entschäumer D“ manufactured by the company – BUZIL, Germany.
Prepare the vacuum cleaner for operation according to section B.
ATTENTION! Use only the large or small atomizing nozzle for wet vacuum cleaning.
The vacuum cleaner will by default begin operation at the medium power range. 3 diodes will light on the power level indicator (9). Set the desired power value (this function is only available in vacuum cleaners type 919.0) by pressing the power adjustment buttons +/- (8).
⑦ Press the pump switch (6).
ATTENTION! The pump may only be switched on when the cleaning liquid container is filled with the solution of cleaning liquid and water. The lack of cleaning liquid manifests in a loud operation of the pump.
If the nozzle does not atomize water although the pump is switched on, check if the following items are correctly installed: the cleaning liquid container (press the container), the fastening of the stub pipe in the valve in the base of the vacuum cleaner or the fastening of the hose end in the atomizing nozzle, check if the atomizing nozzle is not clogged.
⑧ Press the button adjusting the inflow of water to the nozzle on the hose handle.
If you press the button in a pulsating manner, the water shall temporarily flow in a slower manner to the nozzle, if you press and slide the button backwards, the water shall be continuously supplied to the nozzle.
The handle is also equipped with a slider to adjust the suction power. Do not uncover this opening while picking up water or using the wet cleaning function.
ATTENTION! Do not spray the cleaning liquid in one place on the carpet for too long in order not to soak the carpet.
After cleaning one part of the carpet stop the spraying process and dry the carpet by sliding the nozzle back and forth. Repeat until the whole surface of the carpet is dried.
After ending the spraying process switch off the pump and press the button adjusting the water inflow to the nozzle for a moment to "release the pressure".
ATTENTION! The vacuum cleaner is equipped with a float which will automatically block the suction if the foam filter II (32) is heavily dirty or the liquid exceeds the maximum level. It is manifested by a pulsing limitation of the motor power and the lighting up of the clogged air inlet indicator (11) (type 919.0). In such a case switch off the vacuum cleaner by pressing the on/off button (7), unplug the appliance, clean the filter and empty the container.
In case of dirt which is difficult to remove moisten the surface with the washing agent recommended by ZELMER S.A. until
foam is formed. Leave for some time and vacuum with the vacuum cleaner.
ATTENTION! Make sure the carpet is not soaked. It may lead to a permanent deformation of the carpet (folding).
PICKING UP WATER
If you want to use the vacuum cleaner to vacuum liquid in the container, the vacuum cleaner should be prepared as in the case of vacuum cleaning with the use of the water filter module except that:
- The container should be empty (without water).
- You are to use atomizing nozzles (large or small), large atomizing nozzle with the gathering attachment or the nozzle for picking up water.
ATTENTION! Do not operate the vacuum cleaner with a full container! Do not vacuum large amounts of liquid at a time (e.g. with the hose immersed into water).
If the water exceeds the maximum level during vacuuming, the float will automatically block the suction. The maximum capacity of the container is about 5 l. In such a case proceed in the manner described above in the part concerning the blocking of suction caused by a dirty foam filter (pulsating motor speed).
END OF OPERATION CLEANING AND MAINTENANCE
- switch off the vacuum cleaner by pressing the on/off button (7) and unplug the appliance.
Wind the cord by pressing the cord rewind button (10). While doing this hold the cord to make sure it is not tangled and the plug does not hit the vacuum cleaner housing.
Turn the end of the hose until the tops of the marks on the end of the hose end and on the vacuum cleaner housing are in the same position and pull the hose out of the opening.
Remove the stub pipe of the hose by pressing the red button on the valve and pull the stub pipe.
Disconnect the telescopic tube from the hose and the nozzle or brush.
Pour the dirty water out of the container.
is recommended to wash the container, filters (disassembly below) and partition thoroughly after each use – changing water several times.
After using the wet cleaning function thoroughly wash all attachments used in this process (hose, tubes, accessories).
ATTENTION! If you do not clean the above-mentioned parts or clean them insufficiently it may lead to the loss of the filtration capabilities of the inserts and foam and cause the formation of bacteria and mites.
Dry all the cleaned parts thoroughly before reassembly.
FILTER DISASSEMBLY

FOAM FILTER I
① Open the lid of the filter unit by pulling the handle upwards.
② Take out the filter, wash it under running water, dry and reinsert.
Close the filter unit lid by pressing it until you hear a characteristic click.
FOAM FILTER II

It is recommended to wear rubber protective gloves while dismantling the filter.
① Grab the foam filter with your fingers and remove it from the filter unit body.
② Wash under running water, dry and reinsert.
ATTENTION! Do not hand wash the filter foam, do not wring it, do not wash it in washing machines. Avoid crumpling, stretching and deforming. After cleaning dry the foam in room temperature. Never dry the foam on heaters, stoves, etc.
INLET FILTER

① Remove the SAFBAG (21) dust bag module from the container.
② Take out the SAFBAG dust bag from the module (see chapter TRADITIONAL CLEANING WITH SAFBAG DUST BAG -disassembly/assembly of the SAFBAG dust bag).
③ Release the fastening hook which fixes the lid of the SAFBAG dust bag module with the basket and pull the basket aside.
④ Take out the filter, wash it under running water, dry and reinsert.
Close the basket of the SAFBAG dust bag module by pressing it until you hear a characteristic click.
Insert SAFBAG dust bag (see chapter TRADITIONAL CLEANING WITH SAFBAG DUST BAG –disassembly/assembly of the SAFBAG dust bag).
HEPA OUTLET FILTER AND COOLING AIR FILTER

The HEPA outlet filter should be replaced after about 30 hours of operation (6 months) or earlier in case of heavy dirt.
① Slide the slider of the filter cover interlock downwards and open the filter cover.
② Remove and replace the HEPA filter with a new one when the filter becomes dirty.
③ Remove and replace the motor filter with a new one when the filter becomes dirty.
④ It is possible to rinse the HEPA filter and the cooling air filter under running water. Remember to dry the above mentioned filters before reassembly.
- close the filter cover and slide the interlock slider upwards.
Ecology – environment protection
Each user can protect the natural environment. It is neither difficult nor expensive.
In order to do it: put the cardboard packing into recycling paper container; put the polyethylene (PE) bags into container for plastic.
When worn out, dispose the appliance to particular disposal centre, because of the dangerous elements of this appliance, which can be hazardous for natural environment.
Do not dispose into the domestic waste disposal!!!
The manufacturer does not accept any liability for any damages resulting from unintended use or inappropriate handling. The manufacturer reserves his rights for modifying the product any time in order to adjust it to law regulations, norms, directives, or due to construction, trade aesthetic or other reasons, without notifying it in advance.