
SRID 14 A2 - Radio SILVERCREST - Free user manual and instructions
Find the device manual for free SRID 14 A2 SILVERCREST in PDF.


| Product Type | Stereo Internet Radio with DAB+ and FM reception |
| Model | SilverCrest SRID 14 A2 (also known as SIRD 14 A2) |
| Dimensions (W x H x D) | Approx. 21.8 x 11.8 x 15.1 cm |
| Weight (incl. power adapter) | Approx. 1575 g |
| Power Supply | External power adapter: 12V, 2A (Model PSED120200V W) |
| Power Consumption (max) | 20 W |
| Standby Power Consumption | WiFi off: <1 W; WiFi on: <2 W |
| Frequency Bands | FM 87.5 - 108 MHz; DAB+ Band III 170 - 240 MHz; Internet Radio via WiFi/LAN |
| Output Power | 2 x 7 W RMS |
| WiFi Standard | 802.11 a/b/g/n |
| WiFi Encryption | WEP, WPA, WPA2 |
| Connectivity | Ethernet (RJ-45), USB 2.0, AUX IN (3.5mm), LINE OUT (3.5mm), Headphones (3.5mm) |
| Remote Control Battery | 3V CR2025 button cell |
| Operating Temperature | 5°C to 35°C |
| Operating Humidity | Max. 85% RH |
| Storage Conditions | -10°C to +50°C, max. 85% RH |
| Included Accessories | Remote control, CR2025 battery, audio cable, power adapter, user manual |
| Safety Notices | Use only supplied adapter; keep away from water, heat, and magnetic fields; supervise children |
| Warranty | 3 years from date of purchase (by TARGA GmbH) |
| Maintenance/Cleaning | Use dry cloth; do not use aggressive liquids; never open housing |
Frequently Asked Questions - SRID 14 A2 SILVERCREST
User questions about SRID 14 A2 SILVERCREST
0 question about this device. Answer the ones you know or ask your own.
Ask a new question about this device
Download the instructions for your Radio in PDF format for free! Find your manual SRID 14 A2 - SILVERCREST and take your electronic device back in hand. On this page are published all the documents necessary for the use of your device. SRID 14 A2 by SILVERCREST.
USER MANUAL SRID 14 A2 SILVERCREST
STEREO-INTERNET-RADIO SIRD 14 A2
TARGA GMBH
Coosterweg 45 82494 80667
3948 30151
DEUTSCHLAND / CERMAN?
User manual and service information
IAN 106203
IAN 106203
DE

Deutsch 2
English 50
Inhaltsverzeichnis
Warenzeichen 4
Einleitung 4
natural_image
Black plastic container with ventilation slots and a small protrusion (no visible text or symbols)Internetverbindung
Einen Sender wählen
natural_image
Symbol of a trash bin crossed with no text or labels, accompanied by a solid black rectangle below (no text or symbols present)Safety instructions.... 55
Copyright 58
Overview 59
Before you start 62
Inserting the battery into the remote control....62
Internet connection....62
Getting started 63
Switching the Internet Radio on/off....63
First-time setup 63
Selecting the menu language....64
Setting date and time....64
Keep network connected....66
Selecting the WLAN region....67
Network 67
WPS-encrypted network - the easiest way to connect....67
Configuration menu 72
Navigating the configuration menu 72
Menu structure....73
INFO button - show information....74
Operating modes....74
Internet Radio 74
Music player (Shared media / USB playback) 77
DAB Radio 79
Receiving FM Radio 81
AUX in....82
Sleep timer 82
Connecting the headphones....83
LINE OUT jack....83
DLNA streaming (DMR) 84
SilverCrest IR Control App 85
System settings 87
Equalizer 87
Network 87
Time/Date 88
Language 89
Factory Reset....89
Software update....89
Setup wizard....89
Info 89
Display brightness 89
Main menu....90
Sleep timer....90
Alarm....91
Switching the alarm off 92
Troubleshooting 92
Environmental regulations and disposal information 93
Conformity notes....93
Warranty and Service Information....94
Trademarks
Apple ^® , iPhone ^® and iPad ^® are trademarks, App Store is a service mark of Apple Inc., registered in the USA and other countries.
Google ^® and Android ^® are trademarks of Google Inc.
Windows ^® is a registered trademark of Microsoft Corporation.
USB is a registered trademark.
Other names and products can be the trademarks or registered trademarks of their respective owners.
Introduction
Thank you for buying a SilverCrest product.
The Internet Radio SilverCrest SIRD 14 A2, hereinafter called "Internet Radio", is easy to operate, comes in a modern design and delivers excellent sound. Its multiple reception modes and connection options mean it can receive Internet, DAB+ and FM radio stations. It also allows the connection of an MP3 player, another external audio device or USB storage device. It can even play contents from other media like network hard drives. You can use a network cable or the built-in WiFi antenna to establish a connection to the Internet.
Intended use
This Internet Radio is a consumer electronics device and has been designed for receiving and playing back audio data from the Internet or a network. It can also receive DAB+/FM radio stations. The playback of audio files from external audio devices such as MP3 players (via the AUX input) or USB storage devices (via the USB port) is also possible. The Internet Radio may be used only for private purposes, and not for industrial or commercial purposes. The device may not be used outdoors or in tropical climates. This device fulfils all that relates to CE Conformity, relevant norms and standards. The manufacturer is not liable for any damage or problems caused by unauthorised modifications. Only use the accessories recommended by the manufacturer. Observe the regulations and laws in the country of use.
Please note that country-specific regulations may exist with respect to the frequency bands that can be received. Any information received from frequency bands outside those that are explicitly free for public use may not be used, nor may its contents be forwarded to any third parties.
Package contents

A Internet Radio SilverCrest SIRD 14 A2
B Remote control
C 3V button cell battery CR2025
D Audio cable
E Power adapter
F These operating instructions (line-art illustration)
Technical specifications
Internet Radio
| FM frequency band FM 87.5 - 108 MHz | |
| DAB+ Band III 170 - 240 MHz | |
| Output power 2 x 7W RMS | |
| Power consumption max. 20W | |
| Standby power consumption WiFi off: <1W | WiFi on: <2W |
| Power supply Power adapter: 12V, 2A | — |
| Remote control power supply 1x 3V button cell battery CR2025 | |
| WiFi standard 802.11a/b/g/n | |
| WiFi encryption WEP, WPA, WPA2 | |
| Connectors and sockets | 10/100 Ethernet (LAN): RJ-45Headphones: 3.5mm stereo jacksUSB 2.0AUX IN: 3.5mm stereo jacksLINE OUT: 3.5mm stereo jacks |
| Dimensions (W x H x D) approx. 21.8 x 11.8 x 15.1cm | |
| Weight incl. power adapter approx. 1575g | |
| Operating temperature 5°C to 35°C | |
| Operating humidity 85% rel. humidity | |
| Storage conditions -10°C to +50°C, max. 85% RH | |
Power adapter
| Manufacturer | PSE |
| Type | PSED120200V W |
| Input | 100 - 240 VAC, 50/60Hz |
| Output | 12V, 2A, ⊖⊕ |
| Safety Class | II |
The technical specifications and design can be changed without prior notice.
Safety instructions
Before you use this device for the first time, please read the following notes and heed all warnings, even if you are familiar with handling electronic devices. Keep these operating instructions in a safe place for future reference. If you sell the device or give it away, pass on the operating instructions at the same time. The User Manual is part of the product.

CAUTION! This icon alerts you about a potential dangerous situation. Ignoring it can lead to severe injury or even death.

WARNING! This symbol denotes important information for the safe operation of the product and user safety.

WARNING! This symbol denotes danger for human health and risk of death and/or risk of damage to equipment due to electric shock.

Please only use the supplied power adapter (manufacturer: PSE / Model number: PSED120200V W) to power your Internet radio.

This symbol denotes further information on the topic.

Always make sure that
- no direct heat sources (e.g. radiators) can affect the device;
- the device is not exposed to direct sunlight or bright artificial light;
- contact with water sprays or drops and corrosive liquids is avoided and the device is never operated near water; in particular the device may never be immersed in liquids (do not place any objects containing liquids, such as vases or drinks, on or near the device);
• the device is never placed near magnetic fields (e.g. speakers); - no naked flames(e.g. burning candles) are placed on or near the device;
-
no foreign bodies are introduced into the device;
-
the device is not exposed to any extreme temperature fluctuations as this can cause moisture through condensation and cause short-circuits; If the device is exposed to strong temperature fluctuations, wait (approx. 2 hours) until it has reached ambient temperature before turning it on.
• the device is not subjected to excessive shocks or vibrations; - the device is not covered. When covered devices can cause overheating and a fire risk.
Failure to heed the warnings above may result in damage to the device or injury.

CAUTION! Children and persons with disabilities
Electrical devices are not suitable for children. People with disabilities should only use electrical devices within the limits of their abilities. Do not allow children or persons with disabilities to use electrical devices when not under supervision, unless they are instructed accordingly and supervised by a competent person responsible for their safety. Children should always be supervised to ensure that they do not play with the product. Small parts can represent choking hazards.
Keep the packaging away from children and persons with disabilities too.

There is a risk of suffocation!

WARNING! Risks associated with high volumes
Be careful when using headphones. Listening to high-volume audio can damage your auditory system. Adjust the volume to the lowest setting before putting on the headphones.

CAUTION! Power adapter


Please only use the supplied power adapter for the product.
Only plug the power adapter into a suitable and every time easily accessible power socket. Do not touch the power adapter with wet hands as this could cause an electric shock.
To unplug the power adapter from the power socket, always hold its casing and never pull from the cable. Unplug the power adapter from the mains under the following circumstances:
• in any dangerous situation
- if the power adapter makes an unusual noise or gives off smoke
• before a storm and/or thunderstorm
- if the power adapter is damaged
- if the power adapter has been exposed to rain, liquids or high levels of humidity
• before a prolonged absence, e.g. holiday
- when you wish to clean it
- The power adapter consumes electricity even in Standby mode. In order to completely disconnect the device from the mains, the power adapter must be pulled out from the wall outlet.
Please follow these instructions to avoid risk of potential fatal injury or fire! Never cover the power adapter, otherwise there is a risk of fire. Do not attempt to open the housing of the power adapter. This could result in potentially fatal electrocution.

WARNING! Cables
Unplug all cables by holding the plugs and never pull on the cables themselves. Never place pieces of furniture or other heavy objects on the cables and take care that they do not become damaged, especially at the plugs and sockets. Never install the cable around hot or sharp objects to avoid damaging them. Never tie knots in cables and do not tie them to other cables. All cables should be laid so that nobody can trip over them or be obstructed by them.

CAUTION! Battery
Insert the battery with the correct polarity. Refer to the diagram inside the battery compartment. Do not attempt to recharge the batteries and do not dispose of the batteries in a fire. Remove the battery when the remote control is not in use for an extended period. Improper use could cause explosions or leaks.
Batteries must never be opened or deformed, as this could result in chemicals leaking out which could cause injuries. If the battery fluid becomes in contact with the skin or eyes, rinse immediately with plenty of water and seek medical aid.
If a battery is swallowed, seek medical help immediately.

CAUTION! Radio interface
Turn the device off when on board an aircraft, in a hospital, in an operating theatre or in the vicinity of electronic medical equipment. The RF signals may interfere with the functionality of sensitive devices. Keep the device at least 20 cm (8 inches) away from pacemakers, as the RF signals could
interfere with the functionality of the pacemaker. The RF signals transmitted can interfere with hearing aids. If the wireless mode is switched on, do not place the near flammable gases or in a potentially explosive area (e.g. a paint shop), as the RF signals transmitted could cause explosions or fire. The range of the radio wave signals depends on environmental conditions. If data is transmitted via a wireless connection, it can also be received by unauthorised parties. Targa GmbH is not liable for any interference caused to RF or TV signals through unauthorised modification to this device. Furthermore, Targa accepts no liability for replacing any cables or devices that have not been specifically approved by Targa GmbH. The user is solely responsible and liable for remedying any interference caused by such unauthorised modification of this device and for replacing appliances.

Maintenance / cleaning
Repairs are required if this device is damaged in any way, for example, if the power adapter or device housing is damaged, if liquids or objects have entered the device or if the product has been exposed to rain or moisture. Repairs are also necessary if the product is not performing normally or if it has been dropped. If you notice any smoke, unusual noise or strange smells, switch off the device immediately and pull the power adapter out of the power supply. If this occurs, do not continue to use the device and have it checked by an expert. All repairs must be carried out by qualified service personnel. Never open the housing of the device. Only use a clean, dry cloth for cleaning. Never use aggressive liquids. Do not attempt to open the housing of the device, this voids your warranty.
Operating environment
The device is not designed for use in environments with high humidity (e.g. bathrooms), and must be kept free of dust. Operating temperature and operating humidity: 5 °C to 35 °C, max. 85 % RH.
Copyright
All the contents of this user manual are protected by copyright and provided to the reader for information only. Copying data and information without the prior explicit written consent of the author is strictly forbidden. This also applies to any commercial use of the contents and information. All texts and diagrams are up to date as of the date of printing. Subject to change without notice.
Overview
An additional illustration of the items and controls and their corresponding numbers can be found on the inside page of the fold-out cover of this user manual. You can keep this page folded out whilst reading the different chapters of this user manual. This allows you to refer to the corresponding items at any time.
Front panel:
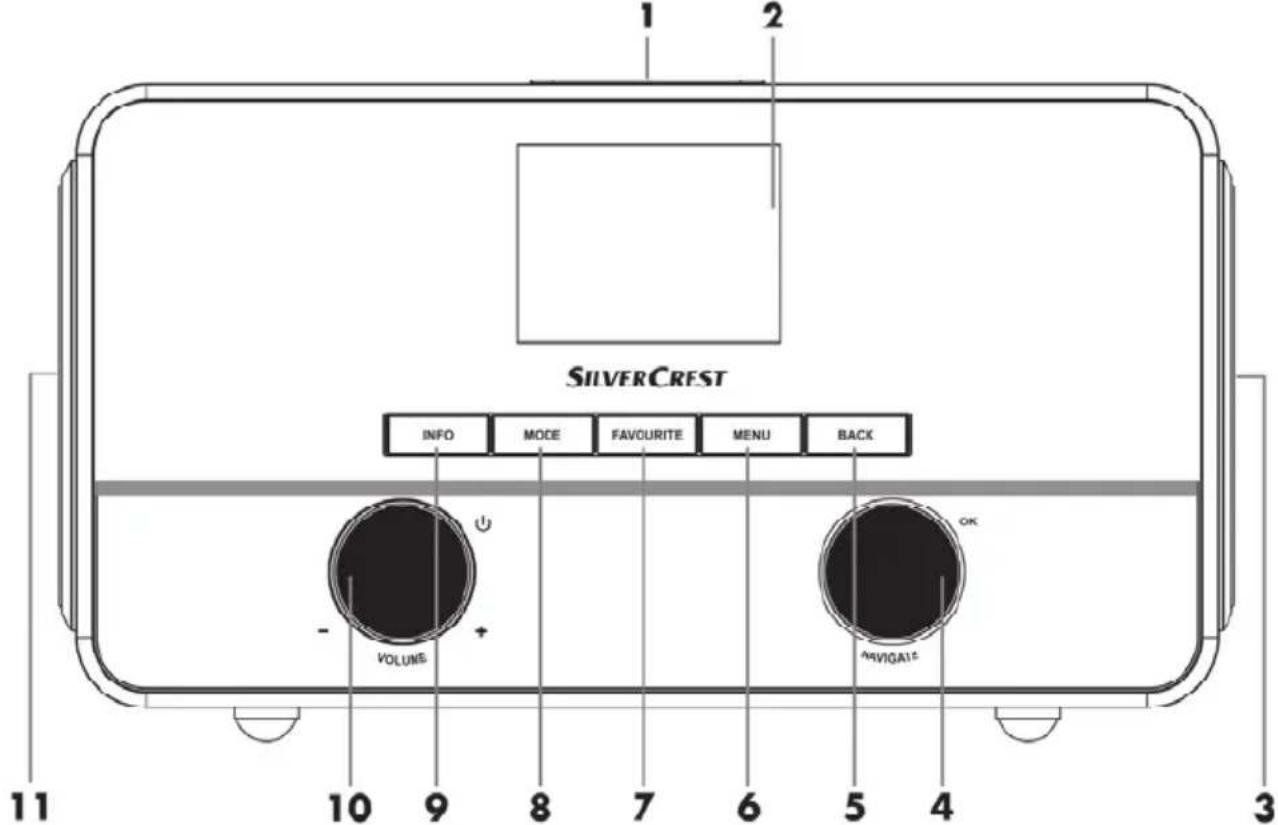
1 Snooze button
2 Display
3 Right speaker
4 NAVIGATE knob (menu navigation / manual station search / OK)
5 BACK button (back one menu level)
6 MENU button (open the configuration menu)
7 FAVOURITE button
8 MODE button (operating mode selection)
9 INFO button (display contents selection)
10 VOLUME knob (volume / on / standby)
11 Left speaker
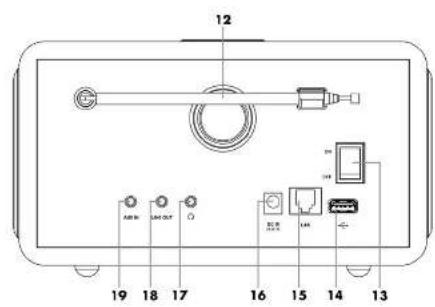
Rear panel:

12 Telescopic antenna (DAB+/FM reception)
13 Main power switch
14 USB port
15 LAN port (network port, RJ-45)
16 DC IN socket (power adapter connection, polarity) ⊖ ⊕ ⊕
17 Headphones jack
18 LINE OUT jack
19 AUX IN jack
Remote control:
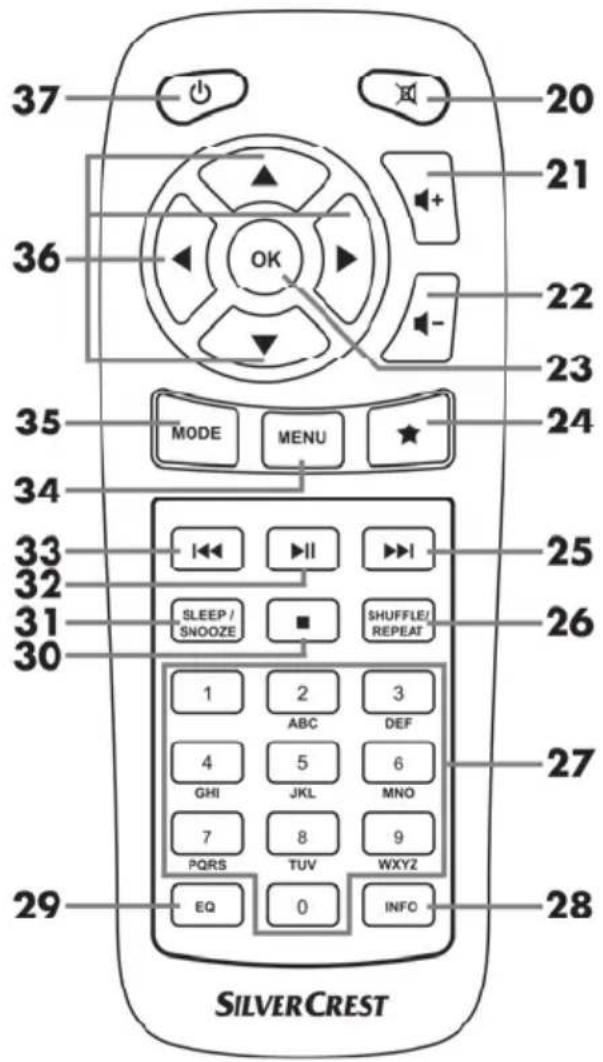
20 Mute
21 Increase volume
22 Reduce volume
23 OK
24 Favourites
25 Next title
26 SHUFFLE/REPEAT (random/repeat playback)
27 Numeric Keypad
28 INFO
29 EQ (Equalizer)
30 Stop
31 SLEEP/SNOOZE (sleep timer/snooze alarm)
32 Play / Pause
33 Previous title
34 MENU (display menu)
35 MODE (operating mode selection)
36 Navigation buttons
37 On/Standby
Before you start
- Remove all protective films from the device and accessories.
- Connect the connector of the power adapter supplied into the DC IN socket [16] on the back of the Internet Radio.
- Plug the power adapter into an every time easily accessible wall outlet.

When laying the power adapter cable, make sure it cannot cause a trip hazard.
Inserting the battery into the remote control
Open the battery compartment on the bottom of the remote control by sliding the battery compartment cover in the direction of the arrow. Insert the 3V CR2025 button cell battery all the way into the battery compartment. Fit the battery the right way round, with the + sign facing up. This is shown on a diagram in the battery compartment. Next slide the battery compartment cover back to its original position.
Replacing the battery
When you need to change the battery, replace it with a new 3V CR2025 button cell battery. Proceed as described in the previous section.


natural_image
Black rectangular object with a small protrusion on top, resembling a stylized container or device (no visible text or symbols)Internet connection
There are 2 ways to establish an Internet connection for your Internet Radio:
- In WLAN mode, the RF signals from your router are received through the built-in WLAN antenna.
- In LAN mode, the signals are transferred via a network cable. In this mode, you need to connect a network cable to your router and the Internet Radio LAN port [15].
Of course, it is more flexible to use the wireless WLAN mode for your Internet Radio. This requires a wireless 802.11a/b/g/n-compliant network.
Getting started
Switching the Internet Radio on/off
Toggle the main power switch [13] located on the back panel of the Internet Radio to "ON" to power the Internet Radio on. You can turn the device off by toggling the main power switch [13] to "OFF". As soon as the main power switch [13] has been moved to "ON", you can press the VOLUME knob [10] to power the Internet Radio on or switch to standby mode. You can also use the On/Standby button [37] on the remote control.

Before connecting anything to the Internet Radio, toggle the main power switch [13] to power it off completely. Once powered off, you can connect all the cables you want (network cable, etc.).
First-time setup
When powering the Internet Radio on for the first time, the following shows on the display:

Then you can rotate the NAVIGATE knob [4] to make a selection. Select "YES" and press the NAVIGATE knob [4] to confirm your selection and launch the setup wizard.

If you select "NO", the next window lets you choose if you want to start the setup wizard again next time you power the device on.
Selecting the menu language
Rotate the NAVIGATE knob [4] to select the menu language you want from the list and press the NAVIGATE knob [4] to confirm your selection.

The *con indicates the current setting.
Setting date and time
Rotate the NAVIGATE knob [4] to select "12" for 12-hour display format or "24" for 24-hour display format and press the NAVIGATE knob [4] to confirm your selection.

The *con indicates the current setting.
If you select the 12-hour format, the display [2] shows "AM" in the morning or "PM" in the afternoon after the time.
After this, the following options are available:
- Update from DAB* Synchronise the time automatically from a DAB station
- Update from FM* Synchronise the time automatically from an FM station
- Update from Network Synchronise the time automatically over the network
- Do not update
* The station currently tuned-in must support this function for it to work.

The *con indicates the current setting.

If you choose "Update from Network" you must indicate your time zone in the next window. Select "UTC+01:00" for Central Europe. Next choose "On" for summer time, otherwise select "Off".

The *con indicates the current setting.

The *con indicates the current setting.
If you choose "No update", you will have to enter the date and time manually.
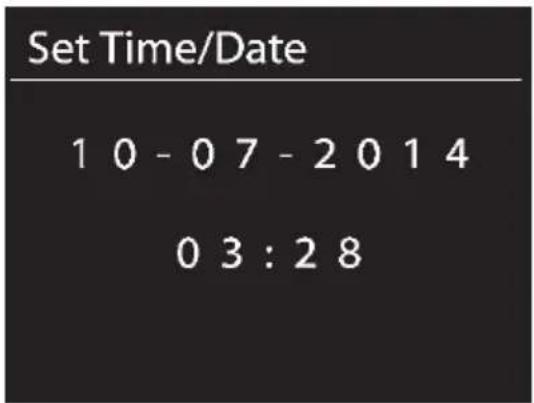
- The day flashes. Rotate the NAVIGATE knob [4] to set the day and press the NAVIGATE knob [4] to confirm.
- The month flashes. Rotate the NAVIGATE knob [4] to set the month and press the NAVIGATE knob [4] to confirm.
- The year flashes. Rotate the NAVIGATE knob [4] to set the year and press the NAVIGATE knob [4] to confirm.
- The hour flashes. Rotate the NAVIGATE knob [4] to set the hour and press the NAVIGATE knob [4] to confirm.
- The minute flashes. Rotate the NAVIGATE knob [4] to set the minute and press the NAVIGATE knob [4] to confirm.
- "AM" will flash only if you have chosen the 12-hour time format. Rotate the NAVIGATE knob [4] to select "AM" for the morning hours or "PM" for the afternoon hours and press the NAVIGATE knob [4] to confirm your selection.
Keep network connected

The *con indicates the current setting.
The default setting is "NO". Controlling it from the app in the (Standby, AUX-IN, FM, DAB, USB) operating modes is not possible by default. If you want to control the Internet radio in all operating modes via the app, select "YES". Press the NAVIGATE knob [4] to confirm your selection.
Selecting the WLAN region
Here, the only available option is "Most of Europe". Press the NAVIGATE knob [4] to confirm. This launches a search for available wireless networks.
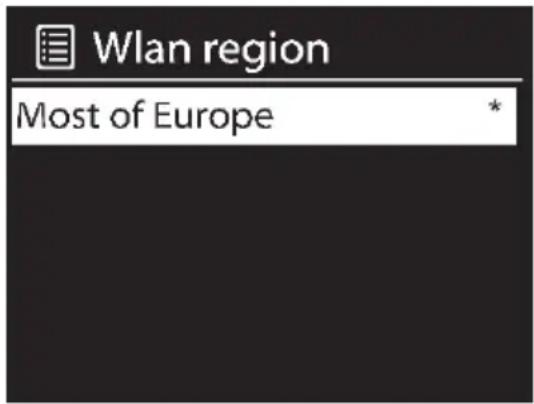
The *con indicates the current setting.
Network
Any WLAN networks found are listed on the display [2], along with their names.
After selecting the desired WLAN, proceed as described in the chapter "WPS-encrypted network - the easiest way to connect".
If you don't want to establish a connection via WPS, the list of available WLAN network offers you the following choices:
[Rescan] This re-launches a search for available wireless networks.
[Wired] Choose this option if you don't want to connect your Internet Radio to your router via wireless and would prefer a wired connection. The connection is then established immediately.
[Manual config] Manual input of connection details.
WPS-encrypted network - the easiest way to connect
If your router supports WPS you can use this user-friendly function for easy setup. This is the easiest way to establish a connection between your Internet Radio and your router. When searching for wireless networks, the device will detect any WPS-compatible routers and show them in the list with a "[WPS]" in front of the network name. First, make sure that your router supports WPS. It may be necessary to enable WPS on your router first. Please consult the technical documentation that came with your router.
Rotate the NAVIGATE knob [4] to select the wireless network you want from the list and press the NAVIGATE knob [4] to confirm it. Next, the following options are available for WPS-compliant:

If the router does not support WPS you are prompted for the network key once you have selected the wireless network. See the chapter "Skip WPS".
Push Button (establish WPS connection via button)

The Internet Radio prompts you to press the connection (WPS) button on your router.

(Diagram for illustration only, the connection (WPS) button may be positioned and labelled differently depending on the router model)
Next, press the NAVIGATE knob [4] to continue. The Internet Radio now attempts to establish a connection with your router. After the connection has been established, the display [2] shows the following for a few seconds:

Then the display [2] shows the following:
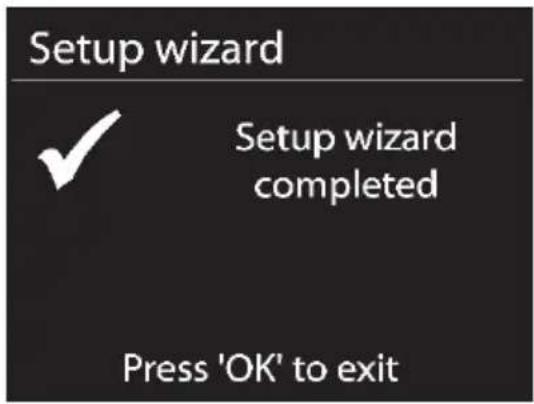
The setup wizard is complete. Next, press the NAVIGATE knob [4] to quit the setup wizard.

In the DAB, FM and AUX operating modes, the "Push Button (establish WPS connection via button)" can be selected directly without opening the configuration menu first. To do this, press and hold the INFO button [9] for at least 1 second.
PIN (establish WPS connection by entering the PIN)
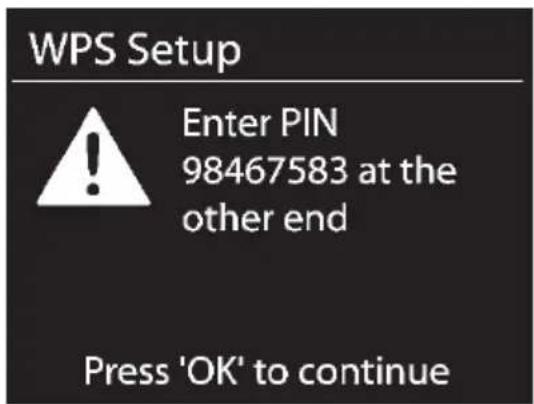
The Internet Radio generates a PIN code. This PIN is only valid for the current task. If the task is repeated, a new PIN is generated. Enter the PIN on your router that appears on the display [2]. Please consult the technical documentation that came with your router. Next, press the NAVIGATE knob [4] to continue. The Internet Radio now attempts to establish a connection with your router. After the connection has been established, the display [2] shows the following for a few seconds:

Then the display [2] shows the following:

The setup wizard is complete. Next, press the NAVIGATE knob [4] to quit the setup wizard.
Skip WPS (establish WLAN connection by entering a network key)

Enter the network key for your encrypted network:
- Rotate the NAVIGATE knob [4] to select a character and press the NAVIGATE knob [4] to confirm it. You can also use the numeric keypad [27] or the navigation buttons [36] and the OK button [23] of the remote control.
- After you have entered the entire network key in this way, rotate the NAVIGATE knob [4] to select "OK" and press the NAVIGATE knob [4] to confirm.
- The Internet Radio now attempts to establish a connection with your router. After the connection has been established, the display [2] shows the following for a few seconds:

Then the display [2] shows the following:
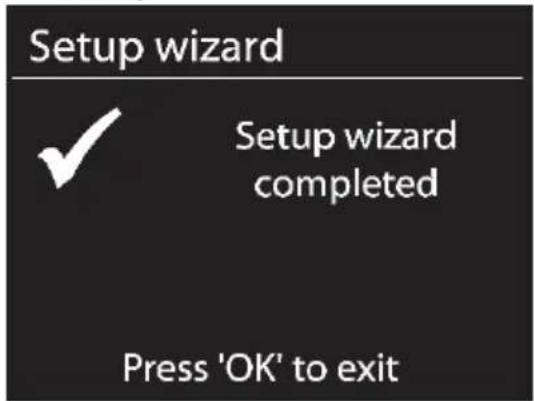
The setup wizard is complete. Next, press the NAVIGATE knob [4] to quit the setup wizard.
Your Internet Radio stores the network key entered, so it is not necessary to input it again. Your Internet Radio is now connected to the network and ready for use. If there is an Internet connection, it is possible to receive Internet Radio stations.
[Wired]
If your Internet Radio is connected to the router via a network cable, rotate the NAVIGATE knob [4] to select the "[Wired]" option from the list. Press the NAVIGATE knob [4] to confirm your selection. The Internet Radio now attempts to establish a connection with your router. After the connection has been established, the display [2] shows the following for a few seconds:

Then the display [2] shows the following:
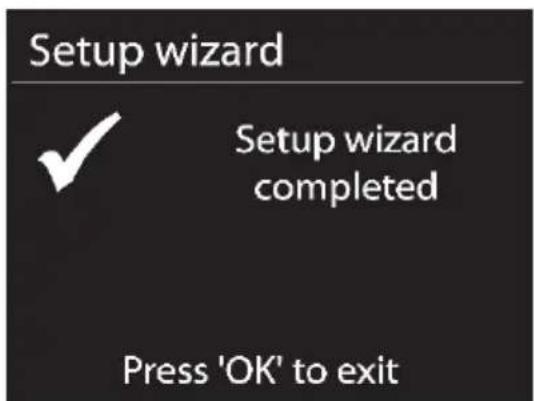
The setup wizard is complete. Next, press the NAVIGATE knob [4] to quit the setup wizard.
[Manual config]
This option should only be used by experienced users. It allows you to adjust network-specific parameters (Connection type, DHCP, IP settings, Gateway address, DNS, SSID, Authentication, Encryption type, key).
We cannot provide any further descriptions at this stage, as the individual settings for each network are very specific.
Configuration menu
The different operating modes of your Internet Radio are configured via a multi-level menu.
Navigating the configuration menu
- To select an operating mode, press the MODE button [8]. The 5 available operating mode appear on the display. The currently enabled operating mode reads slightly larger.
- Rotate the NAVIGATE knob [4] to select an operating mode. Press the NAVIGATE knob [4] to confirm your selection. You can also use the navigation buttons [36] and the OK button [23] on the remote control to perform these steps.
- Press the MENU button [6] to display the main menu of the operating mode selected.
- To return one menu level up, press the BACK button [5] or the navigation button ◀ [36] on the remote control.
Menu structure

flowchart
graph TD
    A["Main Menu"] -->|OK| B["Internet radio"]
    B -->|MODE| C["Music player"]
    C -->|MODE| D["DAB"]
    D -->|MODE| E["FM"]
    E -->|MODE| F["AUX IN"]
    F -->|MODE| G["Main menu >"]
    H["System settings"] -->|OK| I["Equalizer"]
    H -->|OK| J["Network"]
    H -->|OK| K["Time/Date"]
    H -->|OK| L["Language"]
    H -->|OK| M["Factory Reset"]
    H -->|OK| N["Software update"]
    H -->|OK| O["Setup wizard"]
    H -->|OK| P["Info"]
    H -->|OK| Q["Backlight"]
    R["Last listened Station list > System settings > Main menu >"] -->|OK| S["Submenus *"]
    R -->|OK| T["Submenus *"]
    U["Shared media > USB playback"] -->|MODE| C
    V["Shared media > USB playback"] -->|MODE| C
    W["Shared media > USB playback"] -->|MODE| C
    X["Shared media > USB playback"] -->|MODE| C
    Y["Shared media > USB playback"] -->|MODE| C
    Z["Shared media > USB playback"] -->|MODE| C
    AA["Shared media > USB playback"] -->|MODE| C
    AB["Shared media > USB playback"] -->|MODE| C
    AC["Shared media > USB playback"] -->|MODE| C
    AD["Shared media > USB playback"] -->|MODE| C
    AE["Shared media > USB playback"] -->|MODE| C
    AF["Shared media > USB playback"] -->|MODE| C
    AG["Shared media > USB playback"] -->|MODE| C
    AH["Shared media > USB playback"] -->|MODE| C
    AI["Shared media > USB playback"] -->|MODE| C
    AJ["Shared media > USB playback"] -->|MODE| C
    AK["Shared media > USB playback"] -->|MODE| C
    AL["Shared media > USB playback"] -->|MODE| C
    AM["Shared media > USB playback"] -->|MODE| C
    AN["Shared media > USB playback"] -->|MODE| C
    AO["Shared media > USB playback"] -->|MODE| C
    AP["Station list > Scan"] -->|MODE| D
    AP -->|MODE| E
    AP -->|MODE| F
    AP -->|MODE| G
    AP -->|MODE| H
    AP -->|MODE| I
    AP -->|MODE| J
    AP -->|MODE| K
    AP -->|MODE| L
    AP -->|MODE| M
    AP -->|MODE| N
    AP -->|MODE| O
    AP -->|MODE| P
    AP -->|MODE| Q
    AP -->|MODE| R
    AP -->|MODE| S
    AP -->|MODE| T
    AP -->|MODE| U
    AP -->|MODE| V
    AP -->|MODE| W
    AP -->|MODE| X
    AP -->|MODE| Y
    AP -->|MODE| Z
    AP -->|MODE| AA
    AP -->|MODE| AB
    AP -->|MODE| AC
    AP -->|MODE| AD
    AP -->|MODE| AE
    AP -->|MODE| AF
    AP -->|MODE| AG
    AP -->|MODE| AH
    AP -->|MODE| AI
    AP -->|MODE| AJ
    AP -->|MODE| AK
    AP -->|MODE| AL
    AP -->|MODE| AM
    AP -->|MODE| AN
    AP -->|MODE| AO
    AP -->|MODE| AP1
    AP -->|MODE| AP2
    AP -->|MODE| AP3
    AP -->|MODE| AP4
    AP -->|MODE| AP5
    AP -->|MODE| AP6
    AP -->|MODE| AP7
    AP -->|MODE| AP8
    AP -->|MODE| AP9
    AP -->|MODE| AP10
* The submenus may appear differently, depending on your individual configuration. You can find further information concerning the submenus in the "Operating modes" chapter.
INFO button - show information
This function allows you to show further information on the current playback. The type of information depends on the operating mode. Press the INFO button [9] several times to show all available information in sequence.
During menu navigation you can press the INFO button [9] at any time to return to the current playback.
Operating modes
To select an operating mode, start pressing the MODE button [8] once, select the operating mode by rotating the NAVIGATE knob [4] and then press the NAVIGATE knob [4] to confirm your selection.
Internet Radio
Rotate the NAVIGATE knob [4] in the main menu to select "Internet radio" and press the NAVIGATE knob [4] to confirm. Your Internet Radio now connects to the Internet to load a list of radio stations.

As well as the "System settings" and "Main menu" options, the following entries are available:
"Last listened": Shows a list of the last radio stations, podcasts, etc. listened to.
"Station list": Opens a list of available stations in the following categories:
- My Favourites (lists the favourites you have set on the Internet radio portal. They are available for all Internet Radios registered under the same account. You have to register to save any stations on the Internet radio portal.)
- Local Germany (contains a list of German radio stations sorted by categories)
• Stations (shows a list of all available stations sorted by further categories) - Podcasts (shows a list of available podcasts)
- My Added Stations (shows a list of added radio stations. This requires that you register, please also read the "Registering on the Internet radio portal" chapter.)
- Help (here, you can generate an access code to register your Internet Radio on the Internet radio portal. You will also find a FAQ section.)
Rotate the NAVIGATE knob [4] in the main menu to select "Station list" and then "Stations" and press the NAVIGATE knob [4] to confirm.

The station list is divided into the following submenus that help you search for a specific station:
- Location (stations sorted by country)
• Genre (stations sorted by genre) - Search stations (search for a station)
- Popular stations (shows a list of popular stations)
• New stations (shows a list of new stations)
Depending on the category selected, further search criteria can be specified. Once a station has been selected and confirmed by pressing the NAVIGATE knob [4], it is played immediately.
Saving favourites
This feature lets you create a list of up to 10 favourite radio stations without having to register your Internet Radio on the Internet radio portal. Proceed as follows:
- To save the current radio station, hold the FAVOURITE button [7] down for approx. 2 seconds until the favourite list appears.
- Use the NAVIGATE knob [4] to select which one of the 10 station presets you want.
- Press the NAVIGATE knob [4] to save the radio station on the selected station preset. Please note that any station presets used will be overwritten.

Please note that this favourite list is saved locally on your Internet Radio so no of Internet radios can access it.
Recalling favourites
To recall a radio station from the favourite list, proceed as follows:
- Press the FAVOURITE button [7] briefly so the favourite list appears.
- Use the NAVIGATE knob [4] to select which one of the 10 station presets you want.
- Press the NAVIGATE knob [4] to recall the selected radio station.
- When playing a station from the favourite list, a yellow star and the station preset number (1 to 10) appear at the bottom of the display [2].
Registering on the Internet radio portal
If you register on the Internet radio portal, you can create and manage favourite lists. You can also add radio stations manually. To register the Internet Radio on the Internet radio portal, you first need to generate an access code. Select the "Internet Radio" operating mode. Next, from the Internet Radio menu go to [Station list > Help > Get access code].


If the error message "Network timeout" appears when generating the access code, press the NAVIGATE knob [4] to restart the process, or try it again later.
This error message does not mean that your Internet radio is defective.
- Then register on the website www.wifiradio-frontier.com
- Follow the instructions on the website. The following information is required for registration: access code, e-mail address, password and Radio ID.
- You can query the Radio ID from the menu [System settings > Info]. Enter the Radio ID on the website www.wifiradio-frontier.com in the "Wi-Fi radio model" field.
- Once registered, you can manage your favourite lists on the website www.wifiradio-frontier.com. Now you can also save the radio station currently playing on the Internet radio portal by holding the NAVIGATE knob [4] (for approx. 2 seconds). The saved radio stations can be found on your Internet Radio in the menu [Station list > My Favourites > Stations].
- You can add more radio stations from the website www.wifiradio-frontier.com After this, you can recall them on your device in "Internet radio" operating mode under [Station list > My Added Stations].

If you have more than one Internet Radio, you can manage them from a single account. This allows you to use the same station and favourite lists for all your Internet radios.
Music player (Shared media / USB playback)
Music player allows you to play MP3 music files. The music source can be a local network, a computer or a USB storage device. As well as the "System settings" and "Main menu" options, you can choose one of the following options:
[Shared media] Select this option to play music files from your local network. Please note that the music files have to be shared for streaming on your network first. Please read the documentation for the device (computer, router, etc.) you wish to use as playback source.

If you have set up "Shared media" on your local network, select this menu item by r NAVIGATE knob [4] and then pressing the NAVIGATE knob [4] to confirm your selection. The shared media created is now displayed. Rotate the NAVIGATE knob [4] to select the desired shared media and press the NAVIGATE knob [4] to confirm your selection. The following submenus are generated by the shared media server. You should find a list of file types and folders names such as Music, Video, Pictures and Playlists. Please note that your Internet Radio only supports playback of music files and playlists.

As with the "Internet radio" operating mode, there are different search functions for finding titles. So, you can search for Album, Genre, Title, Artist or Playlist. You can also enter a search keys under the "Search" menu item and search for it in the title, artist and album names. Once you have found the title you want, press the NAVIGATE knob [4] to play it.

[USB playback] If you have connected a USB storage device to the USB port [14], a message appears that a USB device has been connected. When asked for if you want to open the folder, select "YES" by rotating the NAVIGATE knob [4] and then press the NAVIGATE knob [4] to confirm your selection.
The menus displayed are generated from the USB storage device's folder structure. Use the NAVIGATE knob [4] and the BACK button [5] to browse through the folders. The display [2] shows the folder and file names, but not necessarily the title names.
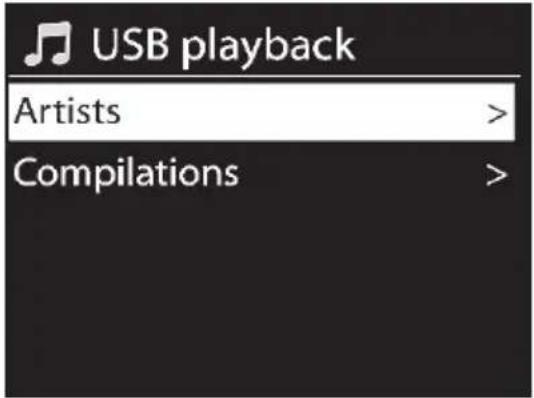
Once you have found the title you want to play, press the NAVIGATE knob [4] to confirm your selection. The title is played. "USB" appears at the bottom of the display [2].


Use the Next title [25] and Previous title [33] buttons to skip through the titles in the current folder.
[My Playlist] Displays the playlist for your Internet Radio. Rotate the NAVIGATE knob [4] to select a title. Press the NAVIGATE knob [4] to start playback of the selected title.
Please note that you have to create a playlist first. To do this, while a title is playing, hold the NAVIGATE knob [4] for approx. 2 seconds to add the current title to the playlist. You can also add the current title to the playlist by holding the NAVIGATE knob [4] for approx. 2 seconds.
[Repeat play: Off] Here, you can set if you want a title to be played repeatedly. Press the NAVIGATE knob [4] to toggle between "Repeat play: Off" and "Repeat play: On". While this function is enabled, reads on the bottom of the display [2].
[Shuffle play: Off] Here you can enable or disable shuffle playback for the current playlist or the current folder. Press the NAVIGATE knob [4] to toggle between "Shuffle play: Off" and "Shuffle play: On". While this function is enabled, reads on the bottom of the display [2].
[Clear My playlist] Lets you clear the playlist entries on your Internet Radio. To do this, press the NAVIGATE knob [4]. Rotate the NAVIGATE knob [4] to select "YES" or "NO" and press the NAVIGATE knob [4] to confirm.
[Prune servers] The Internet Radio saves UPnP servers it finds via your network connection. If some UPnP servers are no longer available, you can use this option to remove them from the UPnP server list. To remove all inactive UPnP servers, select this option and confirm the following prompt with "YES".
DAB Radio
This operating mode allows DAB/DAB+ (Digital Audio Broadcasting) standard-compliant radio stations to be received. Extract the telescopic antenna [12] fully to get good reception. “A station search is carried out automatically when you select the “DAB” option for the first time.


If no stations are found during the station search, move the telescopic antenna into a different position or move the device to optimise reception. If stations are still not found, make sure that DAB/DAB+ is being broadcast in your area.
A list of DAB radio stations found appears. Now, you can rotate the NAVIGATE knob [4] to select a station. Press the NAVIGATE knob [4], to confirm your selection and to play the station.

Depending on the radio station, the display [2] may show further information like the Station Name, Title and Artist of the current song or the latest news.
Rotate the NAVIGATE knob [4] to show the station list; press the NAVIGATE knob [4] to select a different radio station.
Saving/recalling favourite stations
Proceed as follows to save a station as a favourite:
- To save the current radio station, hold the FAVOURITE button [7] down for approx. 2 seconds until the favourite list appears.
• Use the NAVIGATE knob [4] to select which one of the 10 station presets you want. - Press the NAVIGATE knob [4] to save the radio station on the selected station preset. Please note that any station presets used will be overwritten.
- To recall a previously saved stations, briefly press the FAVOURITE button [7] and use the NAVIGATE knob [4] to select the station from the list. Press the NAVIGATE knob [4] to play the selected station.
If you press the MENU button [6], you can choose one of the following options as well as the "System Settings" and "Main menu" options:
[Station list] Opens the station list.
[Scan] Starts a new station search. The current station list will not be deleted. Any stations that can no longer be received are labelled with a “?” in front of them.
[Manual tune] This option lets you add the stations in a group (ensemble) to the station list manually. If you do not know the station ensemble, use the "Scan" option.
[Prune invalid] Any invalid stations or stations that can no longer be received are labelled as "?". in the station list. You can use this option to remove them from the list. Rotate the NAVIGATE knob [4] to select "YES" or "NO" and press the NAVIGATE knob [4] to confirm.
[DRC] This allows you to reduce the dynamic range between low and high-volume sounds. The following options are available:
- DRC high
- DRC low
- DRC off
Rotate the NAVIGATE knob [4] to select and press the NAVIGATE knob [4] to confirm. The selected setting is marked with a *
[Station order] You can sort the station list using the following options:
• Alphanumeric (sort from A to Z)
- Ensemble (sort by ensemble channel number)
- Valid (sort from high to low signal strength)
Rotate the NAVIGATE knob [4] to select and press the NAVIGATE knob [4] to confirm. The selected setting is marked with a *
Receiving FM Radio
Use this operating mode to listen to FM radio stations.

Selecting a station
Proceed as follows to select a station:
• Extract the telescopic antenna [12] fully.
- Rotate the NAVIGATE knob [4] to tune to the frequency you want manually. To search for a station automatically, press the NAVIGATE knob [4]. You can stop the station search by pressing the NAVIGATE knob [4] again. The display [2] indicates the current frequency in MHz. As soon as a station has detected, the display [2] shows its name instead of the frequency. If required, move the telescopic antenna into a different position or move the device to optimise reception of the current station.

Depending on the direction of rotation of the NAVIGATE knob [4] the station search starts increasing or decreasing the frequency.
Saving/recalling stations
Proceed as follows to save a station:
- To save the current radio station, hold the FAVOURITE button [7] down for approx. 2 seconds until the favourite list appears.
• Use the NAVIGATE knob [4] to select which one of the 10 station presets you want. - Press the NAVIGATE knob [4] to save the radio station on the selected station preset. Please note that any station presets used will be overwritten. Only the frequency is saved, not the station name.
- To recall a previously saved stations, briefly press the FAVOURITE button [7] and use the NAVIGATE knob [4] to select the station from the list. Press the NAVIGATE knob [4] to play the selected station.
If you press the MENU button [6], you can choose one of the following options as well as the "System Settings" and "Main menu" options:
[Scan setting] This option lets you choose if the device searches for "strong" stations only or also for "weak" stations. Rotate the NAVIGATE knob [4] to select and press the NAVIGATE knob [4] to confirm. The selected setting is marked with a *
[Audio setting] This lets you define that "weak" stations are to be received in Mono only. This can help to reduce noise. Rotate the NAVIGATE knob [4] to select and press the NAVIGATE knob [4] to confirm. The selected setting is marked with a *
AUX in
Use this operating mode to play music from an external audio source on your Internet Radio. Proceed as follows:
- Connect one end of the audio cable [D] to the headphones jack of your external audio source.
- Next, connect the other end of the audio cable [D] to the AUX IN jack [19] of your Internet Radio.
- Start playing on the external audio source.
- If necessary, you can set the desired volume with the VOLUME knob [10] and on your external audio source.
If you press the MENU button [6], the "System settings" and "Main menu" options are available.
Sleep timer
The sleep timer powers the device off automatically after a set time. The sleep timer is available in all operating modes.
- While the device is powered on or off, press the Snooze button [1] to toggle between the following options: "Sleep OFF", "15 Minutes", "30 Minutes", "45 Minutes" and "60 Minutes". The time is the remaining time until the device will power off

After you have pressed the Snooze button [1], you can also toggle between the previous options by using the NAVIGATE knob [4] as long as these options are still showing on the display.

The "Music player" and "AUX in" operating modes require playback to be started manually on the Internet Radio or the external audio source.
- Select "Sleep OFF" to disable the sleep timer. The device stays on and you can set the countdown again by pressing the Snooze button [1] once more.

While the sleep timer countdown is running, you can power the Internet Radio off at any time by pressing the VOLUME button [11].

Press the Snooze button [1] during the countdown to show the remaining countdown time on the display [2]. This also permanently appears smaller on the bottom of the display [2].
Connecting the headphones

Set the volume to the lowest level before connecting headphones in order to avoid damaging your hearing. You can then set the volume to the level you want.

Be careful when using headphones. Listening to high-volume audio can damage your auditory system.
The headphones jack [17] is used to connect headphones. If the headphones are plugged in, the speakers [3 and 11] are automatically muted.
LINE OUT jack
The LINE OUT jack [18] lets you connect your Internet Radio to a hi-fi amplifier to play the Internet Radio sound via the amplifier. If a cable is plugged into the LINE OUT jack [18], the speakers [3 and 11] are automatically muted.
DLNA streaming (DMR)

Another way to play music is DLNA (Digital Living Network Alliance) streaming. DLNA allows devices from different manufacturers to communicate with each other. The audio source is the only control device, so playback control is not on the Internet Radio. Possible sources are computers, Android ^® smartphones, Android ^® tablets or Apple ^® iPhone ^® /iPad ^® devices.
Computer source device:
The system requirements for DLNA streaming are Windows ^® 7 and an up-to-date Windows ^® Media Player.
Please note that your computer and Internet Radio have to be logged into the same network. Power your Internet Radio on in the "Internet radio" operating mode. Configure, for instance, Windows® Media Player 12 as follows:
- Open Windows ^ Media Player.
- Click on "Stream" on the top menu bar.
- Click on "Turn on media streaming" or "More streaming options...".
- Next, turn on media streaming for your Internet Radio SilverCrest SIRD 14 A2 by following the on-screen instructions.
Now you can play a title on your Internet Radio. Right-click on the title you want and select "Play to" and "SilverCrest SIRD 14 A2". The connection with your Internet Radio is now established and playback starts. You can now control the playback from your computer. If you select a different operating mode on your Internet Radio, playback is cancelled. Playback can only be restarted from the computer.
Smartphone/Tablet PC source device:
The system requirements for DLNA streaming are a smartphone/Tablet PC with a DLNA streaming app.
Please note that your smartphone/Tablet PC and Internet Radio have to be logged into the same network. Install a DLNA streaming app on your smartphone/Tablet PC and power your Internet Radio on in the "Internet radio" operating mode.
Now you can play a title on your Internet Radio via the DLNA streaming App installed previously. Please consult the documentation for your DLNA streaming App. You can now control the playback from your smartphone/Tablet PC. If you select a different operating mode on your Internet Radio, playback is cancelled. Playback can only be restarted from the smartphone/Tablet PC.
SilverCrest IR Control App
This app lets you control your Internet Radio conveniently from your smartphone or Tablet PC. You can download the "SilverCrest IR Control" application from the Apple® App Store and from the Google® Play Store.
The SilverCrest IR Control App allows you to navigate between the different functions, tune-in a different radio station, set the volume, etc.
The app supports the following functions:
- Access to Internet radio stations and podcasts
- Digital DAB/DAB+ radio stations
- FM radio stations
- Music playback from UPnP and USB storage devices
- Internet radio control
Using the SilverCrest IR Control App:
First, install the SilverCrest IR Control App. Please note that your smartphone or Tablet PC and the Internet Radio have to be logged into the same WLAN network. Power your Internet Radio on in the "Internet radio" operating mode and launch the app. When first launched, the app displays all available Internet Radios. Select the Internet Radio you want from the list to use the app. When prompted, enter the current PIN code. The default PIN is "1234". You can view and edit the current PIN on the Internet Radio in the menu [System settings > Network > NetRemote PIN Setup].
NOTE:
By default, controlling your device with the SilverCrest IR Control App is possible in "Internet radio" operating mode only
Controlling it from the app in the (Standby, AUX-IN, FM, DAB, USB) operating modes is not possible by default. If you want to control the Internet Radio in all operating modes via the app, in the Internet Radio menu you must select "YES" in [System settings > Network > Keep network connected]. After this use your Internet Radio in the "Internet radio" operating mode once to establish the WLAN connection.
Controlling more Internet radios
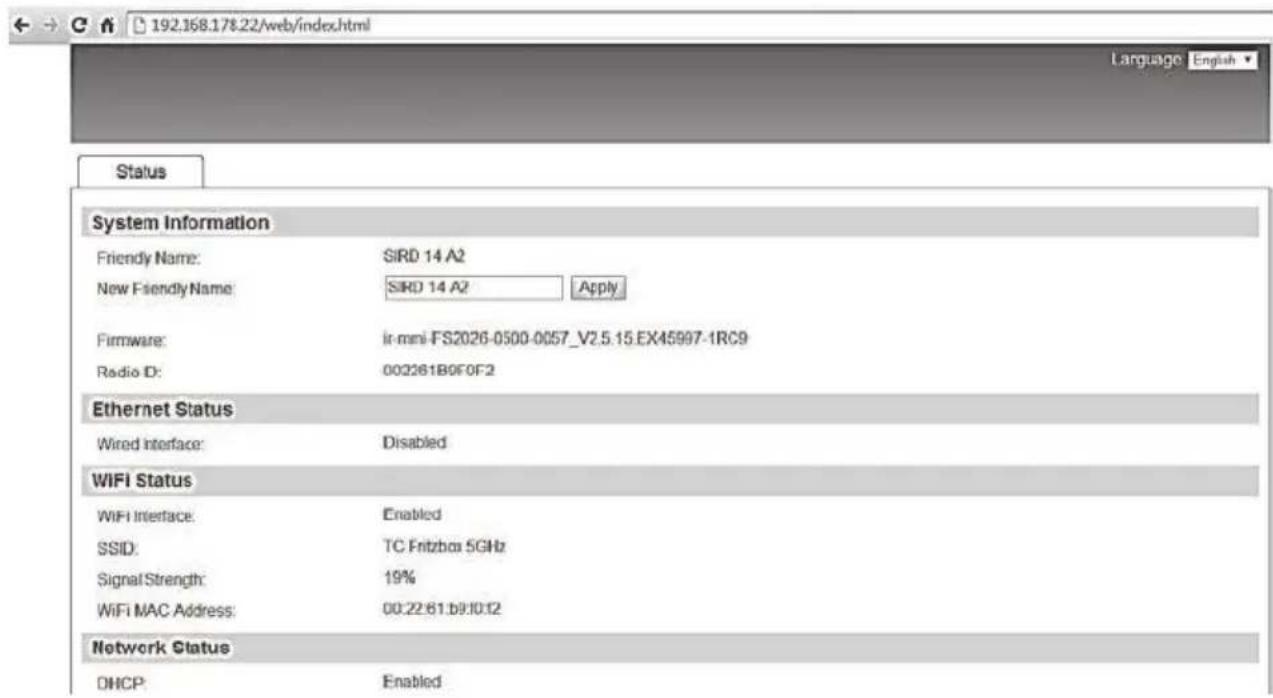
If you want to use the IR Control App to control multiple Internet radios installed in the same WLAN, it is recommended to assign them unique names so you can identify them easily on the network. Changing the "Friendly Name" is only possible from a PC installed on the same network and not from the Internet radio itself. For this, you need the IP address of the Internet radio. You can find it under:
System settings / Network / View settings

Then proceed as follows:
- Type the IP address (numbers separated by dots) of your radio in the Internet Browser address bar and press "Enter" to confirm.
• The page that appears shows the current Internet radio name under the "Friendly Name" field.
- Enter the new name into the "New friendly Name" field, for example "Kitchen", and click "Apply" to confirm it.
Now you can easily identify the Internet radio with its new name from the IR Control App. This ensures that you choose the correct device to be controlled from the IR Control App.
System settings
This menu contains more settings options for your Internet Radio.
Equalizer
Here you can change the equalizer settings. The following preset sound options are available: "Normal", "Flat", "Jazz", "Rock", "Movie", "Classic", "Pop" and "News". The "My EQ" option lets you set your own custom equalizer settings. You can adjust the different options under "My EQ profile setup". Adjust Bass, Treble and Loudness as desired. After you have adjusted all the settings, press the BACK button [5]. When prompted if you want to save, select "YES" to apply the changes or select "NO" to cancel.
Network
Here you can change the Internet settings for your Internet Radio. The following options are available:
[Network wizard] Use this option to search for available wireless networks. For more information, please read the „Network“ chapter on page 67.
[PBC Wlan setup] This lets you connect your Internet Radio with a WPS-compliant router by pressing a button on the router. For more information, please read the „Network“ chapter on page 67.
[View settings] Displays information about the network.
[Wlan region] Enter the WLAN region where you wish to use your Internet Radio. The only available option is "Most of Europe".
[Manual settings] This option should only be used by experienced users. It allows you to adjust network-specific parameters (Connection type, DHCP, IP settings, Gateway address, DNS, SSID, Authentication, Encryption type, key).
We cannot provide any further descriptions at this stage, as the individual settings for each network are very specific.
[NetRemote PIN Setup] Here you can view and edit the NetRemote PIN. The default NetRemote PIN is: 1234. The NetRemote PIN is required when you want to connect a smartphone or Tablet PC to your Internet Radio. To establish a connection to the Internet Radio with a smartphone or Tablet PC, you need the SilverCrest IR Control App. This app lets you control your Internet Radio conveniently from your smartphone or Tablet PC. You can download the "SilverCrest IR Control" application from the Apple® App Store and from the Google® Play Store.
[Network profile] Select this option to show a list of the most recently connected wireless networks. Up to four recent wireless networks are displayed.

The Internet Radio will attempt to automatically establish a connection with available wireless networks from this list. To remove a wireless network from the list, select it by rotating the NAVIGATE knob [4] and then press the NAVIGATE knob [4] to confirm your selection. Select "YES" to delete the wireless network from the list or select "NO" to cancel. Please note that it is not possible to remove the current wireless network from the list. The current wireless network is marked with a # icon.
[Keep network connected] By default WLAN is not enabled in Standby, AUX-IN, FM, DAB and USB operating modes. Therefore you cannot control the device via the SilverCrest IR Control App or DLNA streaming. However, if you wish to control the Internet Radio in all operating modes via the SilverCrest IR Control App or DLNA streaming, select "YES". After this, use your Internet Radio in "Internet radio" operating mode once to establish a permanent WLAN connection.
Time/Date
This menu lets you set the date and time.
[Set Time/Date] Here you can set the date and time manually. For more information, please read the "Setting date and time" chapter on page 64.
[Auto update] Here you can set the date and time to be synchronised automatically. For more information, please read the "Setting date and time" chapter on page 64.
[Set format] Rotate the NAVIGATE knob [4] to select "12" for 12-hour display format or "24" for 24-hour display format and press the NAVIGATE knob [4] to confirm your selection. If you select the 12-hour format, the display [2] shows "AM" in the morning or "PM" in the afternoon after the time.
The next two menu items will only be available if you have selected "Update from Network" for the [Auto update] menu item.
[Set timezone] This lets you set the time zone. Select "UTC+01:00" for Central Europe.
[Daylight savings] Choose "On" for summer time, otherwise choose "Off".
Language
Rotate the NAVIGATE knob [4] to select the menu language you want from the list and press the NAVIGATE knob [4] to confirm your selection.
Factory Reset
With this option you can restore the factory-default settings for your Internet Radio. Please note that all custom settings and favourites saved locally will be lost. Press the NAVIGATE knob [4] to execute the selected option. A safety prompt appears. Select "YES" to the safety prompt to restore the factory defaults. Or select "No" to cancel.
Software update
This menu allows you to adjust software update settings.
[Auto-check setting] This option automatically checks for new updates from time to time. Automatic updating is enabled by default. To disable it, select "NO". To enable it again, select "YES".
[Check now] Use this option to search for available updates immediately.
If an update is available, it is shown on the display [2]. Follow the instructions on the display [2].

Do not power the device off or disconnect it from the mains during the update! This could result in a complete device failure.
Setup wizard
With this function, you can start the setup wizard at any time. Any parameters or stations entered already are not deleted. For more information, please read the „First-time setup“ chapter on page 63.
Info
This menu item shows the software version (SW version), Radio ID and Friendly Name (model name) of your Internet Radio.
Display brightness
You can change the display brightness settings here.
[Timeout] This lets you set the timeout after which the display [2] is dimmed in standby mode. Selecting "ON" keeps the display backlight switched on in standby mode.
[Power-on Level] This lets you set the display [2] brightness to "High", "Medium" or "Low".
The *con indicates the current setting.
Main menu
Here, you can select the different operating modes and set the sleep timer and alarm.
You can choose the following operating modes:
Internet radio, Music player, DAB, FM, AUX in, Sleep, Alarms and System Settings
Sleep timer
The sleep timer powers the device off automatically after a set time. The sleep timer is available in all operating modes.
- While the device is powered on or off, press the Snooze button [1] to toggle between the following options: "Sleep OFF", "15 Minutes", "30 Minutes", "45 Minutes" and "60 Minutes". The time is the remaining time until the device will power off

After you have pressed the Snooze button [1], you can also toggle between the previous options by using the NAVIGATE knob [4] as long as these options are still showing on the display [2].

The "Music player" and "AUX in" operating modes require playback to be started manually on the Internet Radio or the external audio source.
- Select "Sleep OFF" to disable the sleep timer. The device stays on and you can set the countdown again by pressing the Snooze button [1] once more.

While the sleep timer countdown is running, you can power the Internet Radio off at any time by pressing the VOLUME button [11].

Press the Snooze button [1] during the countdown to show the remaining countdown time on the display [2]. This also permanently appears smaller on the bottom of the display [2].
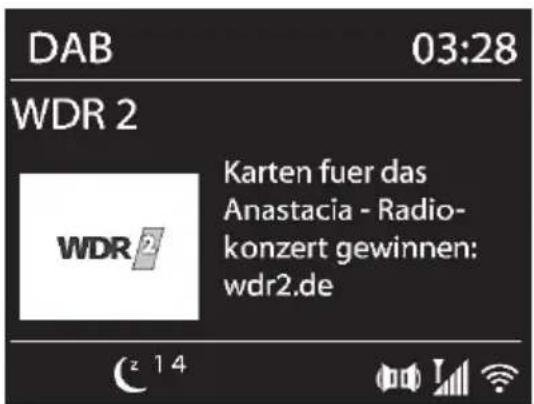
This option lets you set two alarm times. First, verify that the clock is displaying the correct time.
Choose between "Alarm 1" and "Alarm 2". Then the following options are available:
[Enable:] Now select one of the following options: "Off" (alarm disabled), "Daily", "Once", "Weekends" (Saturday and Sunday), "Weekdays" (Monday to Friday).
If you select "Once", you need to enter the date and time for the alarm.
[Time:] This lets you set the alarm time. The hour flashes. Rotate the NAVIGATE knob [4] to set the hour and press the NAVIGATE knob [4] to confirm. The minute flashes. Rotate the NAVIGATE knob [4] to set the minute and press the NAVIGATE knob [4] to confirm.
"AM" will flash only if you have chosen the 12-hour time format. Rotate the NAVIGATE knob [4] to select "AM" for the morning hours or "PM" for the afternoon hours and press the NAVIGATE knob [4] to confirm your selection.
[Mode:] This let you set how you want to be woken up. The following options are available: "Buzzer", "Internet radio", "DAB" and "FM".

If no Internet connection is available, the buzzer will sound.
[Preset:] This lets you select the radio station you would like to wake you up. You can select the "Last listened" option or choose a station from your favourite list. Please note that this function is not available if the "Buzzer" option has been selected.
[Volume:] Rotate the NAVIGATE knob [4] to set the wake-up volume you want. Press the NAVIGATE knob [4] to confirm.
[Save] Select this option and press the NAVIGATE knob [4] to save the settings. After an alarm has been enabled, the display [2] shows a bell icon 1 (Alarm 1) or 2 (Alarm 2). In standby mode, the alarm time set is also shown on the display [2].

Switching the alarm off
When the alarm starts, you can disable it as follows.
- Press the Snooze button [1] several times to delay the alarm for 5, 10, 15 or 30 minutes. After this period, the alarm starts again. The remaining snooze time before alarm reactivation appears at the bottom of the display [2].
- Press the VOLUME knob [10] to disable the alarm.
Troubleshooting
The Internet Radio will not switch on.
- Check that the power adapter has been firmly inserted into the wall socket and that the plug of the power adapter cable has been inserted into the DC IN socket [16]. Plug the power adapter into a different wall outlet, if possible.
- Check that the main power switch [13] located on the back panel of the Internet Radio is switched to "ON".
No WLAN connection
- The distance to the router is too high, reduce it.
- Check that the network key has been entered correctly.
No LAN connection
- Check that the network cable has been inserted correctly into the LAN port [15] of your Internet Radio and into the LAN port of your router.
- Try a different network cable in case the existing one is damaged.
No reception in Internet radio operating mode
- The radio station selected may be unavailable. Please try a different radio station.
- Check if there is a connection to the router/Internet.
Poor DAB/FM reception
- Extract the telescopic antenna [12] fully and/or move it to a different position.
Device switched on but no sound.
- Check the volume setting.
- Please check if you have connected headphones and, if so, disconnect them.
- Check if a cable has been connected to the LINE OUT jack [18] and, if so, disconnect it.
- Please check if the correct operating mode has been selected.
The remote control does not work.
- Point the remote control directly at the Internet Radio.
- The battery is low or empty. Replace it with a new one of the same type. See also the chapter "Inserting the battery into the remote control".
The alarm does not work
- Check that all settings for the alarm time are correct.
Environmental regulations and disposal information

natural_image
Symbol of a trash bin with crossed lines indicating no waste or discharge, and a solid black rectangle below (no text or labels)Devices marked with this symbol are subject to the European Directive 2012/19/EU. All electrical and electronic devices must be disposed of separately from household waste at official disposal centres. Avoid damage to the environment and risks to your personal health by disposing of the device properly. For further information about proper disposal, contact your local government, disposal bodies or the shop where you bought the device.
Dispose of all packaging in an environmentally-friendly manner. Cardboard packaging can be taken to paper recycling containers or public collection points for recycling. Any film or plastic contained in the packaging should be taken to your public collection points for disposal.
Respect the environment. Old batteries must not be disposed of with domestic waste. They must be handed in at a collection point for waste batteries. Please note that batteries must be disposed of fully discharged at appropriate collection points for old batteries. If disposing of batteries which are not fully discharged, take precautions to prevent short circuits.
Conformity notes

This device has been approved for compliance with the basic and other relevant requirements of the EMC Directive 2004/108/EC, the Low-voltage Directive 2006/95/EC, the ErP Directive 2009/125/EC, the R&TTE Directive 1999/5/EC, and the RoHS Directive 2011/65/EU. The corresponding Declaration of Conformity can be found at the end of this User Manual.
Warranty and Service Information
Warranty of TARGA GmbH
Dear Customer,
This device is sold with three years warranty from the date of purchase. In the event of product defects, you have legal rights towards the seller. These statutory rights are not restricted by our warranty as described below.
Warranty conditions
The warranty period commences upon the date of purchase. Please keep the original receipt in a safe place as it is required as proof of purchase. If any material or manufacturing faults occur within three years of purchase of this product, we will repair or replace the product free of charge as we deem appropriate.
Warranty period and legal warranty rights
The warranty period is not extended in the event of a warranty claim. This also applies to replaced and repaired parts. Any damage or defects discovered upon purchase must be reported immediately when the product has been unpacked. Any repairs required after the warranty period will be subject to charge.
Scope of warranty
The device was carefully manufactured in compliance with stringent quality guidelines and subjected to thorough testing before it left the works. The warranty applies to material and manufacturing faults. This warranty does not cover product components which are subject to normal wear and which can therefore be regarded as wearing parts, or damage to fragile components such as switches, rechargeable batteries or components made of glass. This warranty is void if the product is damaged, incorrectly used or serviced. To ensure correct use of the product, always comply fully with all instructions contained in the user manual. The warnings and recommendations in the user manual regarding correct and incorrect use and handling of the product must always be observed and complied with. The product is solely designed for private use and is not suitable for commercial applications. The warranty is rendered void in the event of incorrect handling and misuse, if it is subjected to force, and also if any person other than our authorised service technicians interfere with the device. No new warranty period commences if the product is repaired or replaced.
Submitting warranty claims
To ensure speedy handling of your complaint, please note the following:
Before using your product for the first time, please read the enclosed documentation carefully. Should any problems arise which cannot be solved in this way, please call our hotline.
- Always have your receipt, the product article number as well as the serial number (if available) to hand as proof of purchase.
- If it is not possible to solve the problem on the phone, our hotline support staff will initiate further servicing procedures depending on the fault.

Service

Phone: 0207 - 36 50 744
E-Mail: service.GB@targa-online.com

Phone: 01 - 242 15 83
E-Mail: service.IE@targa-online.com

Phone: 800 - 62 175
E-Mail: service.MT@targa-online.com

Phone: 800 - 92 496
E-Mail: service.CY@targa-online.com
IAN: 106203

Manufacturer
Please note that the following address is not a service address. First contact the service point stated above.
TARGA
GmbH
Coesterweg 45
59494 SOEST
GERMANY
CE
EU-Declaration of Conformity
Address:
Targa GmbH
Coesterweg 45
59494 Soest, Germany
Product:
Internet Radio
Model:
SilverCrest SIRD 14 A2
Identification number:
IAN 106203
The product complies with the requirements of the following European directives:
2004/108/EC
Electromagnetic Compatibility
2006/95/EC
Low Voltage
2009/125/EC
Energy Relating Products
1999/5/EC
R&TTE
2011/65/EU
Restriction of the use of certain hazardous
substances in electrical and electronic equipment
Compliance was proved by the application of the following standards:
EMC:
ETSI EN 301 489-1 V1.9.2
ETSI EN 301 489-17 V2.2.1
EN 55013:2001+A1:2003+A2:2006
EN 55020:2007+A11:2011
EN 55022:2010 (class B)
EN 55024:2010
EN 61000 3 2:2006+A1:2009+A2:2009
EN 61000-3-3:2008
Safety:
EN 60950-1:2006+A11:2009+A1:2010
+A12:2011
EN 62479:2010
ERP:
EN 50564:2011 with Regulation 1275/2008
EN 50563:2011 with Regulation 278/2009
R&TTE
EN 300 328 V1.8.1
RoHS:
EN 50581:2012
Year of CE marking:
2014
Soest, 1 ^st of October 2014

Matthias Klauke, Managing Director


- STEREO-INTERNET-RADIO SIRD 14 A2
- Inhaltsverzeichnis
- Internetverbindung
- Einen Sender wählen
- System settings 87
- Main menu....90
- Troubleshooting 92
- Environmental regulations and disposal information 93
- Conformity notes....93
- Warranty and Service Information....94
- Trademarks
- Introduction
- Intended use
- Package contents
- Technical specifications
- Safety instructions
- Always make sure that
- CAUTION! Children and persons with disabilities
- There is a risk of suffocation!
- WARNING! Risks associated with high volumes
- CAUTION! Power adapter
- WARNING! Cables
- CAUTION! Battery
- CAUTION! Radio interface
- Maintenance / cleaning
- Operating environment
- Copyright
- Overview
- Before you start
- Inserting the battery into the remote control
- Replacing the battery
- Internet connection
- Getting started
- Switching the Internet Radio on/off
- First-time setup
- Selecting the menu language
- Setting date and time
- Keep network connected
- Selecting the WLAN region
- Network
- WPS-encrypted network - the easiest way to connect
- Push Button (establish WPS connection via button)
- PIN (establish WPS connection by entering the PIN)
- Skip WPS (establish WLAN connection by entering a network key)
- [Wired]
- [Manual config]
- Configuration menu
- Navigating the configuration menu
- INFO button - show information
- Operating modes
- Internet Radio
- Saving favourites
- Recalling favourites
- Registering on the Internet radio portal
- Music player (Shared media / USB playback)
- DAB Radio
- Saving/recalling favourite stations
- Receiving FM Radio
- Selecting a station
- Saving/recalling stations
- AUX in
- Sleep timer
- Connecting the headphones
- LINE OUT jack
- DLNA streaming (DMR)
- Computer source device:
- Smartphone/Tablet PC source device:
- SilverCrest IR Control App
- Using the SilverCrest IR Control App:
- NOTE:
- Controlling more Internet radios
- System settings
- Equalizer
- Time/Date
- Language
- Factory Reset
- Software update
- Setup wizard
- Info
- Display brightness
- Main menu
- Switching the alarm off
- Troubleshooting
- The Internet Radio will not switch on.
- No WLAN connection
- No LAN connection
- No reception in Internet radio operating mode
- Poor DAB/FM reception
- Device switched on but no sound.
- The remote control does not work.
- The alarm does not work
- Environmental regulations and disposal information
- Conformity notes
- Warranty and Service Information
- Warranty of TARGA GmbH
- Warranty conditions
- Warranty period and legal warranty rights
- Scope of warranty
- Submitting warranty claims
- Service
- Manufacturer
- CE
- EU-Declaration of Conformity
- Address:
- Product:
- Model:
- Identification number:
Brand : SILVERCREST
Model : SRID 14 A2
Category : Radio