
T-4555 - Audio tuner ONKYO - Free user manual and instructions
Find the device manual for free T-4555 ONKYO in PDF.


| Product Type | Multi-Platform Tuner |
| Brand | Onkyo |
| Model | T-4555 |
| Dimensions (W x H x D) | 435 x 81 x 311 mm (17.1 x 3.2 x 12.2 in) |
| Weight | 4.8 kg (10.6 lbs) |
| Power Supply | AC 120 V, 60 Hz |
| Power Consumption | 33 W (Standby: 0.2 W) |
| Supported Radio Bands | AM, FM, XM Satellite Radio, SIRIUS Satellite Radio, HD Radio |
| Presets | 40 (AM/FM/XM/SIRIUS) |
| Antenna Inputs | FM 75Ω, AM loop, XM antenna, SIRIUS antenna |
| Audio Output | 1 analog stereo (RCA) |
| Control Ports | 12V Trigger In/Out, IR In/Out, RS232, RI (Remote Interactive) |
| Remote Control | RC-671T with batteries included |
| Display | Multifunction display with dimmer |
| Memory Backup | Battery-less system retains presets for several weeks when unplugged |
| Accessories Included | Remote controller, AA batteries (2), audio cable, RI cable, indoor FM antenna, AM loop antenna, power cord |
| Safety Certifications | FCC Class B, ICES-003 (Canada) |
| Care and Cleaning | Dry soft cloth; avoid solvents, abrasives, thinners, alcohol |
| Spare Parts & Repairability | No user-serviceable parts; refer servicing to qualified personnel |
| Additional Features | RDS (Radio Data System), HD Radio with multicast channels, parental lock for satellite radio |
Frequently Asked Questions - T-4555 ONKYO
User questions about T-4555 ONKYO
0 question about this device. Answer the ones you know or ask your own.
Ask a new question about this device
Download the instructions for your Audio tuner in PDF format for free! Find your manual T-4555 - ONKYO and take your electronic device back in hand. On this page are published all the documents necessary for the use of your device. T-4555 by ONKYO.
USER MANUAL T-4555 ONKYO
Multi-Platform Tuner
T-4555
(North American model)
Instruction Manual
Introduction...... 2
Connections 11
Enjoying Audio Sources...... 16
Troubleshooting.... 32
Specifications 34
Thank you for purchasing an Onkyo Multi-Platform Tuner. Please read this manual thoroughly before making connections and plugging in the unit.
Following the instructions in this manual will enable you to obtain optimum performance and listening enjoyment from your new Tuner.
Please retain this manual for future reference.
WARNING:
TO REDUCE THE RISK OF FIRE OR ELECTRIC SHOCK, DO NOT EXPOSE THIS APPARATUS TO RAIN OR MOISTURE.
CAUTION:
TO REDUCE THE RISK OF ELECTRIC SHOCK, DO NOT REMOVE COVER (OR BACK). NO USER-SERVICEABLE PARTS INSIDE. REFER SERVICING TO QUALIFIED SERVICE PERSONNEL.

WARNING RISK OF ELECTRIC SHOO DO NOT OPEN
AVIS RISQUE DE CHOC ELECTRIQUE NE PAS OUVRIR


The lightning flash with arrowhead symbol, within an equilateral triangle, is intended to alert the user to the presence of uninsulated “dangerous voltage” within the product’s enclosure that may be of sufficient magnitude to constitute a risk of electric shock to persons.

The exclamation point within an equilateral triangle is intended to alert the user to the presence of important operating and maintenance (servicing) instructions in the literature accompanying the appliance.
Important Safety Instructions
- Read these instructions.
- Keep these instructions.
- Heed all warnings.
- Follow all instructions.
- Do not use this apparatus near water.
-
Clean only with dry cloth.
-
Do not block any ventilation openings. Install in accordance with the manufacturer's instructions.
-
Do not install near any heat sources such as radiators, heat registers, stoves, or other apparatus (including amplifiers) that produce heat.
-
Do not defeat the safety purpose of the polarized or grounding-type plug. A polarized plug has two blades with one wider than the other. A grounding type plug has two blades and a third grounding prong. The wide blade or the third prong are provided for your safety. If the provided plug does not fit into your outlet, consult an electrician for replacement of the obsolete outlet.
-
Protect the power cord from being walked on or pinched particularly at plugs, convenience receptacles, and the point where they exit from the apparatus.
-
Only use attachments/accessories specified by the manufacturer.
-
Use only with the cart, stand, tripod, bracket, or table specified by the manufacturer, or sold with the apparatus. When a cart is used, use caution when moving the cart/ apparatus combination to avoid injury from tip-over.
PORTABLE CART WARNING

- Unplug this apparatus during lightning storms or when unused for long periods of time.
-
Refer all servicing to qualified service personnel. Servicing is required when the apparatus has been damaged in any way, such as power-supply cord or plug is damaged, liquid has been spilled or objects have fallen into the apparatus, the apparatus has been exposed to rain or moisture, does not operate normally, or has been dropped.
-
Damage Requiring Service
Unplug the apparatus from the wall outlet and refer servicing to qualified service personnel under the following conditions:
A. When the power-supply cord or plug is damaged,
B. If liquid has been spilled, or objects have fallen into the apparatus,
C. If the apparatus has been exposed to rain or water,
D. If the apparatus does not operate normally by following the operating instructions. Adjust only those controls that are covered by the operating instructions as an improper adjustment of other controls may result in damage and will often require extensive work by a qualified technician to restore the apparatus to its normal operation,
E. If the apparatus has been dropped or damaged in any way, and
F. When the apparatus exhibits a distinct change in performance this indicates a need for service. -
Object and Liquid Entry
Never push objects of any kind into the apparatus through openings as they may touch dangerous voltage points or short-out parts that could result in a fire or electric shock.
The apparatus shall not be exposed to dripping or splashing and no objects filled with liquids, such as vases shall be placed on the apparatus.
Don't put candles or other burning objects on top of this unit.
-
Batteries Always consider the environmental issues and follow local regulations when disposing of batteries.
-
If you install the apparatus in a built-in installation, such as a bookcase or rack, ensure that there is adequate ventilation.
Leave 20 cm (8") of free space at the top and sides and 10 cm (4") at the rear. The rear edge of the shelf or board above the apparatus shall be set 10 cm (4") away from the rear panel or wall, creating a flue-like gap for warm air to escape.
-
Recording Copyright —Unless it's for personal use only, recording copyrighted material is illegal without the permission of the copyright holder.
-
AC Fuse —The AC fuse inside the unit is not user-serviceable. If you cannot turn on the unit, contact your Onkyo dealer.
-
Care —Occasionally you should dust the unit all over with a soft cloth. For stubborn stains, use a soft cloth dampened with a weak solution of mild detergent and water. Dry the unit immediately afterwards with a clean cloth. Don't use abrasive cloths, thinners, alcohol, or other chemical solvents, because they may damage the finish or remove the panel lettering.
4. Power
WARNING
BEFORE PLUGGING IN THE UNIT FOR THE FIRST TIME, READ THE FOLLOWING SECTION CAREFULLY.
AC outlet voltages vary from country to country. Make sure that the voltage in your area meets the voltage requirements printed on the unit's rear panel (e.g., AC 230 V, 50 Hz or AC 120 V, 60 Hz).
The power cord plug is used to disconnect this unit from the AC power source. Make sure that the plug is readily operable (easily accessible) at all times.
For American Models
Pressing the [STANDBY/ON] button to select Standby mode does not fully shutdown the unit. If you do not intend to use the unit for an extended period, remove the power cord from the AC outlet.
- Never Touch this Unit with Wet Hands — Never handle this unit or its power cord while your hands are wet or damp. If water or any other liquid gets inside this unit, have it checked by your Onkyo dealer.
6. Handling Notes
- If you need to transport this unit, use the original packaging to pack it how it was when you originally bought it.
- Do not leave rubber or plastic items on this unit for a long time, because they may leave marks on the case.
- This unit's top and rear panels may get warm after prolonged use. This is normal.
- If you do not use this unit for a long time, it may not work properly the next time you turn it on, so be sure to use it occasionally.
Memory backup
The T-4555 uses a battery-less memory backup system in order to retain radio presets and other settings when it's unplugged or in the case of a power failure. Although no batteries are required, the T-4555 must be plugged into an AC outlet in order to charge the backup system.
Once it has been charged, the T-4555 will retain the settings for several weeks, although this depends on the environment and will be shorter in humid climates.
For U.S. models
FCC Information for User
CAUTION:
The user changes or modifications not expressly approved by the party responsible for compliance could void the user's authority to operate the equipment.
NOTE:
This equipment has been tested and found to comply with the limits for a Class B digital device, pursuant to Part 15 of the FCC Rules. These limits are designed to provide reasonable protection against harmful interference in a residential installation.
This equipment generates, uses and can radiate radio frequency energy and, if not installed and used in accordance with the instructions, may cause harmful interference to radio communications. However, there is no guarantee that interference will not occur in a particular installation. If this equipment does cause harmful interference to radio or television reception, which can be determined by turning the equipment off and on, the user is encouraged to try to correct the interference by one or more of the following measures:
- Reorient or relocate the receiving antenna.
- Increase the separation between the equipment and receiver.
- Connect the equipment into an outlet on a circuit different from that to which the receiver is connected.
- Consult the dealer or an experienced radio/TV technician for help.
For Canadian Models
NOTE: THIS CLASS B DIGITAL APPARATUS COMPLIES WITH CANADIAN ICES-003.
For models having a power cord with a polarized plug:
CAUTION: TO PREVENT ELECTRIC SHOCK, MATCH WIDE BLADE OF PLUG TO WIDE SLOT, FULLY INSERT.
☐ 12V trigger IN/OUT
IR IN/OUT
☐ RS232 port for interface control
□ Hi-rigidity, anti-resonant chassis
□ Aluminum front panel
☐ RI (Remote Interactive) capable
HD Radio and Satellite Radio Capability
☐ HD Radio reception
XM Satellite Radio
Sirius Satellite Radio
☐ RDS (Radio Data System)
□ Automatic AM/FM/XM/Sirius tuning
☐ 40 AM/FM/XM/Sirius presets
□ Preset auto scan
Direct tuning
☐ Ground isolation circuit for digital/analog

Radio
HD Radio™ Technology Manufactured Under License From iBiquity Digital Corporation.
“iBiquity Digital” and the “HD Radio” and “HD” Symbols are registered trademarks of iBiquity Digital Corporation. “HD Radio” is a trademark of iBiquity Digital Corporation. U.S. and Foreign Patents.
The XM name and related logos are registered trademarks of XM Satellite Radio Inc.

XM Ready®, XM Public Radio™ are trademarks of XM Satellite Radio Inc. ©2006 XM Satellite Radio Inc. All rights reserved. All other trademarks are the property of their respective owners.
"SIRIUS" and the SIRIUS dog logo are registered trademarks of SIRIUS Satellite Radio Inc.

Supplied Accessories
Make sure you have the following accessories:

Remote controller and two batteries (AA/R6)

Audio cable (1)

RI cable (1)
To use Rile T-4555 must be connected with an cable and an audio cable.
RI
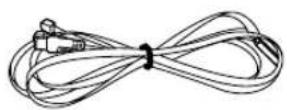
Indoor FM antenna
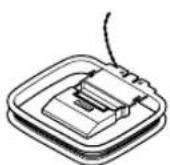
AM loop antenna

Power cord
(Plug type varies from country to country.)
Introduction
Important Safety Instructions......2
Precautions ....3
Features......4
Supplied Accessories ....4
Getting to Know the T-4555 6
Front Panel....6
Display 7
Rear Panel 8
Remote Controller 9
Remote Controller 9
Before Using the T-4555....10
Connecting the Supplied Power Cord ..10
Installing the Batteries....10
Aiming the Remote Controller ....10
Connections
Connecting Antennas....11
Connecting the Indoor FM Antenna .....11
Connecting the AM Loop Antenna .....11
Connecting the T-4555 ....13
Connecting to an Amplifier 13
About the System Functions .....13
Connecting the 12V Trigger Jacks .....14
Controlling Components That Are Out of Range ....15
Enjoying Audio Sources
Turning On and Listening to AM and FM
Radio 16
Turning On the T-4555....16
Listening to AM and FM Radio......16
Tuning into Stations by Frequency......17
Listening to XM Satellite Radio .....18
Listening to XM Satellite Radio®......18
Setting the Satellite Radio Mode......19
Selecting XM Satellite Radio....19
Signing Up for XM Satellite Radio.....19
Selecting XM Radio Channels .....20
Displaying XM Radio Information......21
Positioning the XM antenna .....21
Listening to SIRIUS Satellite Radio.....22
Listening to SIRIUS Satellite Radio® ...22
Setting the Satellite Radio Mode......23
Selecting SIRIUS Satellite Radio .....23
Signing Up for SIRIUS Satellite Radio .23
Selecting SIRIUS Satellite Radio Channels....24
Displaying SIRIUS Satellite Radio Information 25
Positioning the SiriusConnect Home Tuner 25
Parental Lock.... 26
Changing the PIN Number...... 27
Listening to HD Radio™ Stations ..... 28
About HD Radio Stations.... 28
Selecting Multicast Channels.... 28
Selecting the Audio Format (Blend Mode) 29
Displaying HD Radio Information...... 29
Using RDS.... 29
Displaying RDS Information.... 29
Using Presets 30
Presetting Your Favorite Stations ..... 30
Selecting Presets.... 30
Deleting Presets 30
Changing the Remote ID.... 31
Others
Troubleshooting 32
If you can't resolve an issue, try resetting the T-4555 by holding down the [MEMORY] button and pressing the [STANDBY/ON] button.
Specifications 34
Front Panel
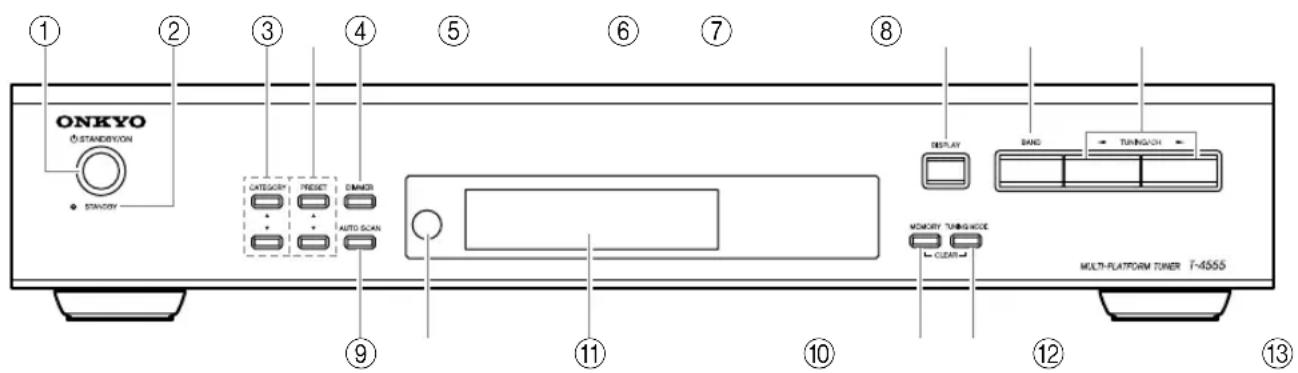
For detailed information, refer to the pages in parentheses.
① STANDBY/ON button (16)
Sets the T-4555 to On or Standby.
② STANDBY indicator (16)
Lights up when the T-4555 is on Standby.
③ CATEGORY [A]/[ ]buttons (20, 24, 29)
Used to select categories for satellite radio. With HD Radio stations, they're used to select multicast channels.
④ PRESET [√][▼buttons (30)
Used to select radio presets.
⑤ DIMMER button (7)
Adjusts the display brightness.
⑥ DISPLAY button (21, 25, 29)
Used to view various information on the display.
⑦ BAND button (16, 19, 23)
Used to select radio bands, AM, FM, and so on.
⑧ TUNING/CH [ ] buttons (16, 20, 24)
With AM and FM, these buttons are used for tuning. With Satellite Radio, they're used to select stations.
⑨ AUTO SCAN button (29, 30)
Starts the Auto Scan function, which selects and outputs each radio preset in turn for 5 seconds.
⑩ Remote control sensor (10)
Receives control signals from the remote controller.
⑪ Display
See the next page.
⑫ MEMORY button (30)
Used to store and delete radio presets.
⑬ TUNING MODE button (16, 20, 24)
With AM and FM, this button selects the Auto or Manual tuning mode. With Satellite Radio, it selects the search modes.
Display
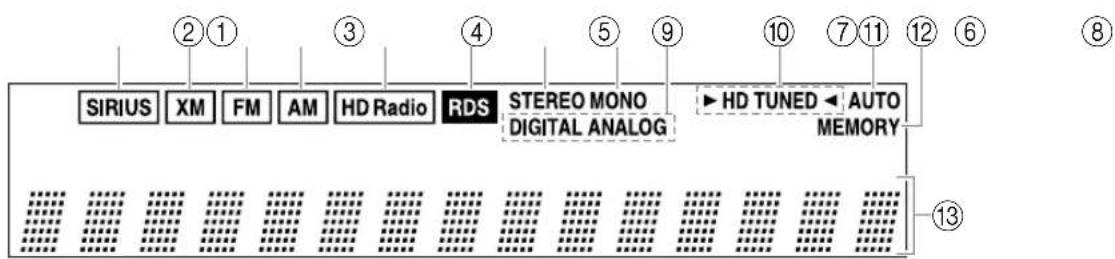
① SIRIUS
A box appears around this indicator when SIRIUS Satellite Radio is selected.
② XM
A box appears around this indicator when XM Satellite Radio is selected.
③ FM
A box appears around this indicator when FM is selected.
④ AM
A box appears around this indicator when AM is selected.
⑤ HD Radio
A box appears around this indicator when the HD Radio band is selected.
⑥ RDS
Lights up when tuned to an FM radio station that supports RDS (Radio Data System).
⑦ STEREO
Lights up when radio reception is in stereo.
⑧ MONO
Lights up when radio reception is in mono.
⑨ HD Radio indicators
DIGITAL: Lights up when a digital HD Radio transmission is being received.
ANALOG: Lights up when an analog HD Radio transmission is being received.
⑩ ▶ HD TUNED ◀
The ▶ TUNED indicator lights up when properly tuned to a radio station. During Auto Tuning, the Tuning Arrows flash. When tuned to an HD Radio station, the indicator appears as ▶ HD TUNED
⑪ AUTO
Lights up when Auto Tuning mode is selected.
⑫ MEMORY
Lights up when presetting radio stations.
⑬ Message area
Various information is displayed here, including radio preset numbers, tuning frequency, and so on.
Setting the Display Brightness
With this function, you can adjust the brightness of the display.

Press the [DIMMER] button repeatedly to select: dim, dim-mer, or normal brightness.
Alternatively, you can use the [DIM-MER] button on the tuner.
Rear Panel

For detailed information, refer to the pages in parentheses.
① SIRIUS ANTENNA (22)
This jack is for connecting the SiriusConnect receiver (not supplied).
② XM ANTENNA (18)
This jack is for connecting the XM Mini-Tuner (not supplied).
③ FM 75Ω ANTENNA (11)
This jack is for connecting the supplied indoor FM antenna or an outdoor FM antenna.
④ AM ANTENNA (11)
These terminals are for connecting the supplied AM loop antenna or an outdoor AM antenna.
⑤ AUDIO OUTPUT (13)
Using the supplied audio cable, connect these output jacks to an analog audio input on your amp.
⑥ RI REMOTE CONTROL (13)
These two identical Remote Interactive) jacks can be connected to the jacks on your other Onkyo components for interactive control. To use RI, the T-4555 must be connected with an RI cable and an audio cable.
⑦ 12V TRIGGER IN/OUT (14)
The 12V TRIGGER IN jack can be connected to the 12-volt trigger output on another component, so that when the other component is turned on, the T-4555 turns on as well.
The 12V TRIGGER OUT jack can be connected to the 12-volt trigger input on another component, so that when the T-4555 is turned on, the other component turns on as well.
⑧ IR IN/OUT (15)
A commercially available IR receiver can be connected to the IR IN jack, allowing you to control the T-4555 while you're in another room, or control it when it's out of sight, for example, installed in a cabinet.
A commercially available IR emitter can be connected to the IR OUT jack to pass IR (infrared) remote control signals through to other components.
⑨ RS232
This port is for connecting the T-4555 to home automation equipment and external controllers.
⑩ Power cord (4)
The power cord should be connected to a suitable wall outlet.
Remote Controller

① STANDBY/ON button (16)
Sets the T-4555 to On or Standby.
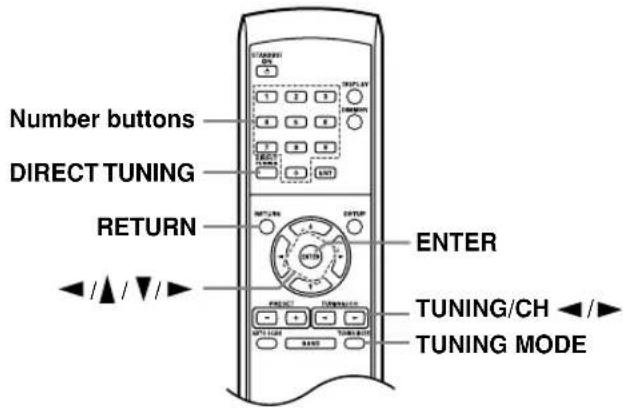
② Number buttons (17, 20, 24, 31)
Used to select radio presets by number, and to enter AM/FM station frequencies and Satellite Radio channel numbers in Direct Tuning mode.
③ DIRECT TUNING button (17, 20, 24)
Selects the Direct Tuning mode. With AM and FM, you can select a station directly by entering its frequency. With Satellite Radio, you can select a station directly by entering its channel number.
④ RETURN button
Returns to the previous display.
⑤ Arrow [A][M]/[k] buttons (19–28, 31)
With AM and FM, the Up and Down [▲]/[▼]buttons are used for tuning. With Satellite Radio, the Up and Down [▲]/[▼]buttons are used to select channels.
The Left and Right [◀/[▶buttons are used to select category.
⑥ PRESET [+]/[-] buttons (30)
Used to select radio presets.
⑦ AUTO SCAN button (29, 30)
Starts the Auto Scan function, which selects and outputs each radio preset in turn for 5 seconds.
⑧ BAND button (16, 19)
Used to select radio bands, AM, FM, and so on.
⑨ DISPLAY button (21, 25, 29)
Used to view various information on the display.
⑩ DIMMER button (7)
Adjusts the display brightness.
⑪ ENT and ENTER buttons (19–28, 31)
Used to confirm various functions and settings. Also used to select secondary multicast channels with HD Radio stations.
⑫ SETUP button (19, 21, 23, 25–27, 31)
Selects Setup mode.
⑬ TUNING/CH [◀/▶buttons (16)
With AM and FM, these buttons are used for tuning. With Satellite Radio, they're used to select stations.
⑭ TUNING MODE button (16, 20, 24)
With AM and FM, this button selects the Auto or Manual tuning mode. With Satellite Radio, it selects the search modes.
Connecting the Supplied Power Cord
Plug the supplied power cord into this AC INLET.
- Do not use a power cord other than the one supplied with this tuner. It's designed exclusively for use with this tuner and should not be used with any other component.
- N ever disconnect the power cord from the tuner while the other end is still plugged into a wall outlet. Doing so may cause an electric shock. Always disconnect the power cord from the wall outlet first.

Installing the Batteries
1 Open the battery compartment, as shown.

2 Insert the two supplied batteries (AA) in accordance with the polarity diagram inside the battery compartment.
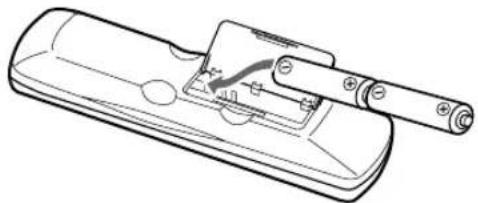
3 Close the battery compartment.

Notes:
- If the remote controller doesn't work reliably, try replacing the batteries.
- Don't mix new and old batteries or different types of batteries.
- If you intend not to use the remote controller for a long time, remove the batteries to prevent damage from leakage and corrosion.
- Flat batteries should be removed as soon as possible to prevent damage from leakage and corrosion.
Aiming the Remote Controller
When using the remote controller, point it toward the T-4555's remote control sensor, as shown below.

Notes:
- The remote controller may not work reliably if the T-4555 is subjected to bright light, such as direct sunlight or inverter-type fluorescent lights. Keep this in mind when installing.
- If another remote controller of the same type is used in the same room, or the T-4555 is installed close to equipment that uses infrared rays, the remote controller may not work reliably.
- Don't put anything, such as a book, on the remote controller because the buttons may be pressed inadvertently, thereby draining the batteries.
- The remote controller may not work reliably if the T-4555 is installed in a rack behind colored glass doors. Keep this in mind when installing.
- The remote controller will not work if there's an obstacle between it and the T-4555's remote control sensor.
This section explains how to connect the supplied indoor FM antenna and AM loop antenna, and how to connect commercially available outdoor FM and AM antennas.

Connecting the Indoor FM Antenna
The supplied indoor FM antenna is for indoor use only.
1
Attach the FM antenna, as shown.
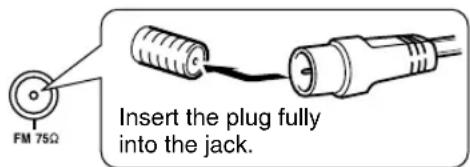
Once the T-4555 is ready for use, you'll need to tune into an FM radio station and adjust the position of the FM antenna to achieve the best possible reception.
2
Use thumbtacks or something similar to fix the FM antenna into position.

Caution: Be careful that you don't injure yourself when using thumbtacks.
If you cannot achieve good reception with the supplied indoor FM antenna, try using a commercially available outdoor FM antenna instead.
Connecting the AM Loop Antenna
The supplied indoor AM loop antenna is for indoor use only.
1
Assemble the AM loop antenna, inserting the tabs into the base, as shown.
![graph TD A["Start Screen"] --> B["Close-up Display"] B --> C["Insert Display"] C --> D["Screen with Computer"]](/content/2026/05/847246/images/53aaf62596380d8514e2aa65e2662b60003878390d0a8ef7afb7234a2f7c9416.jpg)
2
Connect both wires of the AM loop antenna to the AM terminals, as shown.
(The antenna's wires are not polarity sensitive, so they can be connected either way around).
Make sure that the wires are attached securely and that the terminals are gripping the bare wires, not the insulation.
![graph TD A["1. Open the lever."] --> B["2. Insert the wire."] B --> C["3. Close the lever."] C --> D["Output"]](/content/2026/05/847246/images/7d8339e37f5e096dbe7a13301cd024f432ae7d384a3b7d4abf2de548b69475b1.jpg)
Once the T-4555 is ready for use, you'll need to tune into an AM radio station and adjust the position of the AM antenna to achieve the best possible reception.
Keep the antenna as far away as possible from the T-4555, TV, speaker cables, and power cords.
If you cannot achieve good reception with the supplied indoor AM loop antenna, try using it with a commercially available outdoor AM antenna.
Connecting an Outdoor FM Antenna
If you cannot achieve good reception with the supplied indoor FM antenna, try a commercially available outdoor FM antenna instead.

Notes:
- Outdoor FM antennas work best outside, but usable results can sometimes be obtained when installed in an attic or loft.
- F or best results, install the outdoor FM antenna well away from tall buildings, preferably with a clear line of sight to your local FM transmitter.
- Outdoor antenna should be located away from possible noise sources, such as neon signs, busy roads, etc.
- F or safety reasons, outdoor antenna should be situated well away from power lines and other high-voltage equipment.
- Outdoor antenna must be grounded in accordance with local regulations to prevent electrical shock hazards.
■ Using a TV/FM Antenna Splitter
It's best not to use the same antenna for both FM and TV reception, as this can cause interference problems. If circumstances demand it, use a TV/FM antenna splitter, as shown.

To T-4555 To TV (or VCR)
Connecting an Outdoor AM Antenna
If good reception cannot be achieved using the supplied AM loop antenna, an outdoor AM antenna can be used in addition to the loop antenna, as shown.

Outdoor AM antennas work best when installed horizontally outside, but good results can sometimes be obtained indoors by mounting horizontally above a window. Note that the AM loop antenna should be left connected.
Outdoor antenna must be grounded in accordance with local regulations to prevent electrical shock hazards.
Before Making Any Connections
• Refer to the instructions that came with the component you are connecting.
- Do not plug in the power cord until all other connections are complete.
- Do not bind audio cables with power cords and speaker cables. Doing so may adversely affect the sound quality.
- To prevent interference, keep power cords and speaker cables as far away as possible from the antennas.
RCA Audio Connection Color Coding
- Red plugs are used for the right channel, white plugs are used for the left channel.

- Push each plug in all the way to make a good connection (loose connections can cause noise or malfunctions).

Connecting to an Amplifier
Use the supplied audio cable to connect the T-4555's AUDIO OUTPUT L/R jacks to the TUNER IN jacks on your amplifier, as shown.
To use the system functions, use the supplied cable to make an connection (see the next column).
![graph TD A["Supplied audio cable"] --> B["AUDIO OUTPUT"] B --> C["TUNER"] C --> D["Amplifier"] D --> E["RI"] F["T-4555"] --> G["AUDIO OUTPUT"] G --> H["RI"] H --> I["TUNER"] I --> J["AMplifier"] J --> K["RI"] L["Cable"] --> M["RI"] N["Audio"] --> O["LI"] P["12V THI#X"] --> Q["MI"] R["RI"] --> S["MI"…](/content/2026/05/847246/images/070ef823e1beda644a71876122fa6ab0a644acb3934476ef3020bffaaa7fd621.jpg)
Note:
- If the T-4555 is used with another Onkyo component, such as the A-9555, refer to its instruction manual as well.
About the System Functions
If you connect the T-4555 to another Onkyo Rupable component with the supplied Rable and audio cable, you can use the following system functions. RI cables are special cables solely for use with Onkyo products.
Auto Power On
When you turn on the T-4555, your Onkyo amplifier will turn on automatically. (The amplifier's POWER switch must be set to ON for this to work.)
Direct Change
When you select a radio preset or change the band (AM, FM, etc.), your Onkyo amplifier will automatically select the T-4555 as the input source.
Remote Control Operation
You can control the T-4555 by using your Onkyo amplifier's remote controller. See the amplifier's instruction manual for details.
With RRemote Interactive), you can control your RI-capable Onkyo CD player, T-4555, and so on with your amp's remote controller.
- To us, you must make an analog audio connection between your amplifier and each audio component.
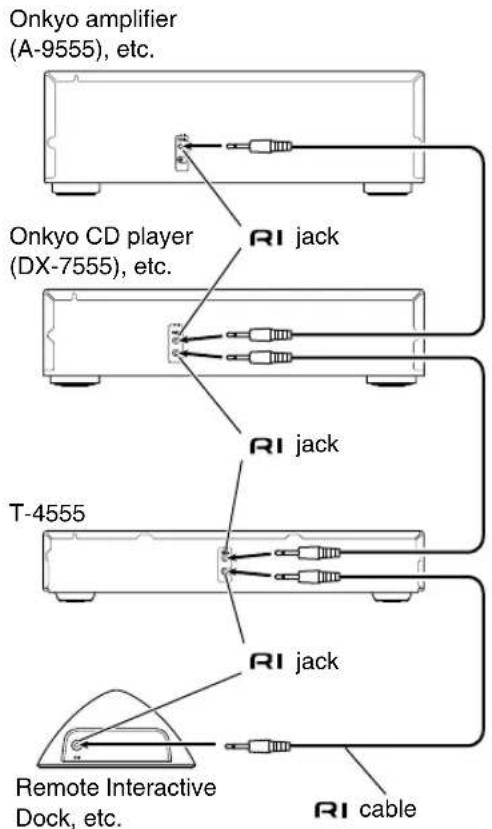
Notes:
- Push each plug in all the way to make a good connection.
- Use only dedicated cables for connections. RI cables are supplied with Onkyo tuners and players (DVD, CD, etc.).
- Some components, including the T-4555, have two RI jacks. They're both the same, so use either one.
- R1 jacks should be connected only to Onkyo components. Connecting them to another manufacturer's component may cause a malfunction.
- Some components may not support all functions. See the manuals supplied with your other Onkyo components for more information.
Connecting the 12V Trigger Jacks
To have the T-4555 turn on automatically when another component is turned on, connect the T-4555's 12V TRIGGER IN jack to a 12-volt trigger output on the other component with a miniplug cable.
Likewise, to have another component turn on automatically when the T-4555 is turned on, connect the T-4555's 12V TRIGGER OUT jack to a 12-volt trigger input on the other component with a miniplug cable.
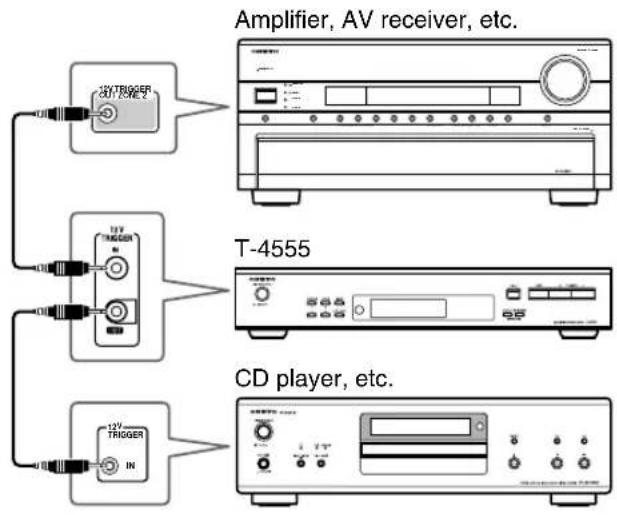
Controlling Components That Are Out of Range
You can use the following multiroom kits to control the T-4555 when it's out of range of the remote controller:
- Multiroom kits such as those made by Niles ® and Xantech ® .

Controlling the T-4555 When It's Out of Range
If the T-4555 is located in another room, installed in a cabinet, or out of range of its remote controller, you can use a commercially available IR receiver to pickup the remote controller signals and feed them to the T-4555, as shown below.
![graph TD A["IR IN"] --> B["T-4555"] B --> C["Connecting block"] C --> D["IR Receiver"] D --> E["Remote controller"] E --> F["Signal flow"] style A fill:#f9f,stroke:#333 style B fill:#ccc,stroke:#333 style C fill:#fff,stroke:#333 style D fill:#fff,stroke:#333 style E fill:#fff,stroke:#333 style F fil…](/content/2026/05/847246/images/2d6da60fc31de84204d2f71bb05cfa47df0cd981caef0abd6e3da5dcba065d19.jpg)
Connect the IR receiver to the T-4555 as shown below.
From the connecting block
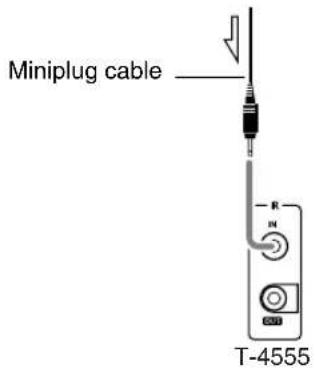
Controlling Other Out-of-range Components
If another component is out of range of its remote controller, you can use a commercially available IR emitter to retransmit the remote controller signals received at the T-4555's IR IN, as shown below.
![graph TD A["IR IN"] --> B["T-4555"] C["IR OUT"] --> B B --> D["IR Emitter"] D --> E["Remote controller"] E --> F["IR Receiver"] G["Other component"] --> D H["Connecting block"] --> B I["Signal flow"] --> A I --> C I --> G](/content/2026/05/847246/images/77417a1fb35be6e2d7eefe33ca01b457afe9d322c7a0aa4ad37e9c5d2e8c0145.jpg)
Connect the IR emitter to the T-4555's IR OUT, and place the IR emitter in front of the other component's remote control sensor (usually located on its front panel), as shown below. See the instructions supplied with the IR emitter.
![graph TD A["IR Emitter"] --> B["Remote control sensor"] B --> C["Other component"] D["T-4555"] --> E["Miniplug cable"] E --> F["IR Emitter"] G["Signal flow"] --> H["→"] I["From the connecting block"] --> J["→"]](/content/2026/05/847246/images/e0c6155f2aa23e307e2fe68b0b44b421fc764bcd170ea0fae0fb694ac865f323.jpg)
Only remote controller signals received by the T-4555's IR IN are fed through to the IR OUT. Signals picked up by the T-4555's remote control sensor are not output.
Turning On and Listening to AM and FM Radio

Turning On the T-4555
| 1 | Connect the power cord to a suitable wall outlet. |
2 | Press the [STANDBY/ON] button on the T-4555 or remote controller.The T-4555 turns on, and the STANDBY indicator goes off. |
Remote controller | To turn off the T-4555, press the [STANDBY/ON] button. The T-4555 will enter Standby mode.Note that the T-4555 is not completely shutdown in Standby mode. |
Listening to AM and FM Radio
1 Remote controller Remote controller | Press the [BAND] button repeatedly to select AM or FM.The indicator lights up. |
2 Remote controller Remote controller | Press the [TUNING MODE] button repeatedly to select Auto or Manual Tuning mode.A uto Tuning ModeThe AUTO indicator appears and stereo radio reception is possible.Manual Tuning ModeThe AUTO indicator disappears and radio reception will be in mono.AUTO indicator[IMAGE] |
3 Remote controller Remote controller | Use the TUNING/CH [◀] buttons to tune into a station.In Auto Tuning mode, once a station is found, tuning stops automatically.This model changes FM frequency in 0.2 MHz steps, 10 kHz steps for AM.In Manual Tuning mode, the frequency stops changing when you release the buttons. Press the buttons repeatedly to change the frequency one step at a time.When tuned into a station, the▶ TUNED ◀indicator appears.▶ TUNED◀[ ] |
3 Use the TUNING/CH [◀] buttons to tune into a station.
Tuning into weak stereo FM stations
If the signal from a stereo FM station is weak, it may be impossible to get good reception. In this case, switch to Manual Tuning mode and listen to the station in mono.

Tuning into Stations by Frequency
You can tune into AM and FM stations directly by entering the appropriate frequency.
1Remote controller | Press the [DIRECT TUNING] button.[IMAGE](Actual display depends on country.) |
2Remote controller    | Within 8 seconds, use the number buttons to enter the frequency of the radio station.For example, to tune into an FM station at 87.5 MHz, press [8], [7], and [5]. |
2
Adjusting the Antennas
Adjusting and installing the FM antenna
Choose a location for the FM antenna while listening to an FM station.

Change the direction of the antenna to achieve the best possible reception.

Affix the antenna with a thumbtack. (Do not push the thumbtack through the antenna.)
Caution: Be careful not to prick your finger!
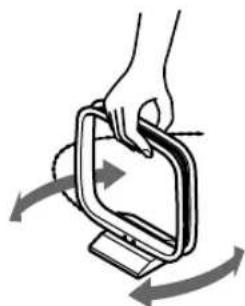
Adjusting the AM antenna
Adjust the location and position of the AM antenna while listening to an AM station to achieve the best possible reception.
Listening to XM Satellite Radio®
Important XM Radio Information
XM Satellite Radio offers an extraordinary variety of commercial-free music, plus the best in sports, news, talk and entertainment. XM is broadcast in superior digital audio from coast to coast. From rock to reggae, from classical to hip hop, XM has something for every music fan. XM's dedication to playing the richest selection of music is matched by its passion for live sporting events, talk radio, up-to-the-minute news, stand-up comedy, children's programming, and much more. For U.S. customers, information about XM Satellite Radio is available online at www.xmradio.com. For Canadian customers, information about XM Canada is online at www.xmradio.ca.
Note:
Hardware and required monthly subscription sold separately. Other fees and taxes, including a one-time activation fee may apply. Subscription fee is consumer only. All fees and programming subject to change. Channels with frequent explicit language are indicated with an XL. Channel blocking is available for XM radio receivers by calling 1-800-XMRADIO (US residents) and 1-877-GET-XMSR (Canadian residents).
For a full listing of the XM commercial-free channels and advertising-supported channels, visit lineup.xmradio.com (US residents) or xmradio.ca (Canadian residents).
Subscriptions subject to Customer Agreement available at xmradio.com (US residents) and xmradio.ca (Canadian residents). Only available in the 48 contiguous United States and Canada. ©2006 XM Satellite Radio Inc. All rights reserved. All other trademarks are the property of their respective owners
A warning against reverse engineering:
It is prohibited to copy, decompile, disassemble, reverse engineer, or manipulate any technology incorporated in receivers compatible with the XM Satellite Radio system. Furthermore, the AMBE® voice compression software included in this product is protected by intellectual property rights including patent rights, copyrights, and trade secrets of Digital Voice Systems, Inc. The user of this or any other software contained in an XM Radio is explicitly prohibited from attempting to copy, decompile, reverse engineer, or disassemble the object code, or in any other way convert the object code into human-readable form. The software is licensed solely for use within this product.
Connecting the XM Mini-Tuner and Home Dock
To receive XM Satellite Radio, you need an XM Mini-Tuner and Home Dock, which includes a home antenna. These are sold separately. For connection information, refer to the instruction manual supplied with the XM Mini-Tuner and Home Dock.
XM antenna jack

Setting the Satellite Radio Mode
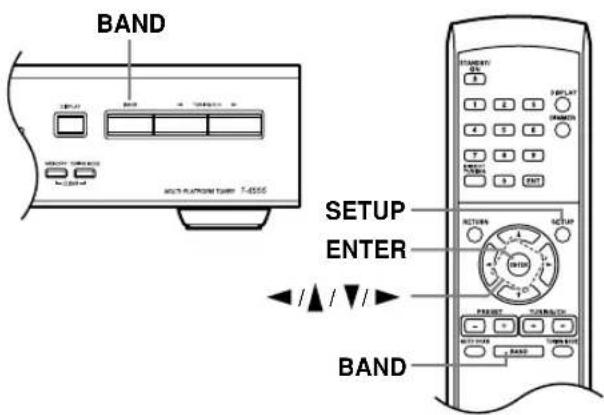
1Remote controller | Press the [SETUP] button. |
2Remote controller | Use the Up and Down Arrow [√][ ]▼buttons to select “SAT Radio Mode,” and then press [ENTER]. |
3Remote controller | Use the Left and Right Arrow [√][ ]▼buttons to select “XM.”If you’ve not using satellite radio, select None. |
4Remote controller | Press the [SETUP] button. |
Selecting XM Satellite Radio
1

Remote controller

Press the [BAND] button repeatedly to select XM.
If "CHECK ANTENNA" appears on the display, make sure the XM Mini-Tuner is connected properly.
Signing Up for XM Satellite Radio
Once you have installed the XM Mini-Tuner and Home Dock, you are ready to subscribe to XM Satellite Radio. You'll need a major credit card and your XM Radio ID. There are three places you can find your 8-character XM Radio ID:
- On the XM Mini-Tuner
- On the XM Mini-Tuner packaging
- On XM Channel 0, as explained below
1
Remote controller

Use the Up and Down Arrow
[√] Buttons to select "RADIO ID."
Alternatively, press the [DIRECT TUNING] button, followed within 8 seconds by the [0] button and [ENTER] button.
Your XM Satellite Radio ID number is displayed. Write it below.

2
To sign up, go to:
http://activate.xmradio.com
Or call: 1-800-XM-RADIO (1-800-967-2346)
For XM Canada, go to: http://xmradio.ca
Or call: 1-877-GET-XMSR (1-877-438-9677)
Notes:
- RADIO ID cannot be selected in Category Search mode. You must select Channel Search mode (see page 20).
• The following letters are not used in XM Satellite Radio IDs: I, O, S, F. - XM Satellite Radio will transmit a special signal to the T-4555 to activate the full channel lineup. Activation normally takes between 10 and 15 minutes, but during busy peak periods, you may need to leave the T-4555 turned on for up to an hour.

Selecting XM Radio Channels
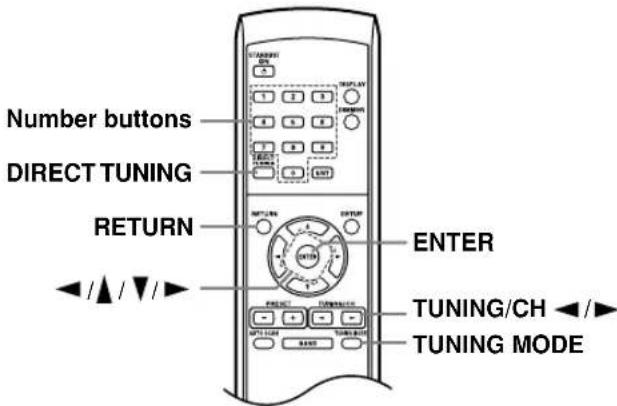
There are three ways to select XM Radio channels:
• Channel Search mode: select any channel.
- Category Search mode: select channels by category.
- Direct tuning: enter channel number.
Channel Search Mode
| 1 TUNING MODE Remote controller TUNING MODE | Press the [TUNING MODE] button to select Channel Search mode. |
| Channel Search | |
| 2 Remote controller | Use the T-4555's TUNING/CH [→] button, or remote controller's Up and Down Arrow [→] buttons to select a channel. You can also use the remote controller's Left and Right Arrow [→] buttons to select a category. |
Category Search Mode
![1 TUNING MODE Press the [TUNING MODE] button to select Category Search mode. Remote controller TUNING MODE Category Search](/content/2026/05/847246/images/0242028ed91264a07a02ef833010ffbcc00ac9761d8b96a266946bb23a45239e.jpg)
![2 CATEGORY TURNSCH Remote controller Use the T-4555's [CATEGORY] [◀] Buttons, or remote con- troller's Left and Right [◀][ ]▶ buttons to select a category, and use the T-4555's TUNING/CH [◀] Button, or remote con- troller's Up and Down Arrow [◀] Buttons to select a chan- nel in that category.](/content/2026/05/847246/images/0699f09044b19109d5f0f33f5e121b5d19b5e6a31d79b39135ed43aa076c3e7a.jpg)
Direct Tuning
You can select an XM Radio channel directly by entering its number with the remote controller.
| 1 Remote controller | Press the [DIRECT TUNING] button. |
| XM | |
| 2 Remote controller | Within 8 seconds, use the number buttons to enter the channel number. For example, to select channel #20, press [0], [2], and [0], or press [2], [0], and [ENTER]. |
Selecting the Previous Channel
To listen to the previously selected XM channel, press the [RETURN] button.

Displaying XM Radio Information
Press the [DISPLAY] button repeatedly to cycle through the available information.
![graph TD A["Channel name\nXM The Loft"] --> B["Channel number"] C["Channel number & preset number\nXM 050 5"] --> D["Preset number"] E["Category\nCAT >Rock"] --> F G["Artist name\nNAME>Coldplay"] --> H I["Song title\nTITL>Clocks"] --> J](/content/2026/05/847246/images/f33b66651b96b278c12e195eb69418b9c4a4079bd777e3bc8093b1f2cfe5c488.jpg)
Note:
If the category, artist, or song title is not available, “- - -” will be displayed instead.
■ XM Radio Messages
The following messages may appear while using XM Radio.
CHECK ANTENNA
The XM Mini-Tuner and/or antenna is not connected properly. Check the connection.
UPDATING
The XM user encryption code is being updated. Please wait.
NO SIGNAL
The signal is too weak. Check the XM Mini-Tuner and/or antenna connection and reposition it for the best reception.
LOADING
The T-4555 is tuning or decoding audio or text data. Please wait.
OFF AIR
The XM channel you selected is not currently broadcasting. Select another channel.
Positioning the XM antenna
You can check the signal strength of the XM Radio signal and adjust the position of the XM antenna accordingly.
1Remote controller | Press the [SETUP] button. |
2Remote controller | Use the Up and Down Arrow[X] Buttons to select“Antenna Aiming,” and then press [ENTER]. |
| 3 | Adjust the position of the XM antenna so that the satellite (SAT) signal strength bar is as long as possible. If you can’t receive the satellite (SAT) signal, adjust your XM antenna so that the terrestrial (TER) signal strength bar is as long as possible.Press the Down Arrow [▼button to display the terrestrial (TER) signal bar. Terrestrial signals are only available in certain areas. If you can’t receive the satellite (SAT) signal, adjust your XM antenna so that the terrestrial (TER) signal strength bar is as long as possible.Press the Down Arrow [▼button to display the terrestrial (TER) signal bar. Terrestrial signals are only available in certain areas. So long as the signal strength is good, you can enjoy XM Radio by using either satellite or terrestrial reception. So long as the signal strength is good, you can enjoy XM Radio by using either satellite or terrestrial reception. |
3
Listening to SIRIUS Satellite Radio®
Important SIRIUS Satellite Radio Information
SIRIUS is available in the US for subscribers with addresses in the continental US and is available in Canada for subscribers with a Canadian address. To Get SIRIUS Satellite Radio a subscription and compatible tuner and antenna are required and sold separately. Visit sirius.com for the most complete and up-to-date channel lineup and information.
Note:
Hardware and required basic monthly subscription sold separately. Installation costs and other fees and taxes, including a one-time activation fee may apply. Subscription fee is consumer only. All fees and programming subject to change.
What is SIRIUS Satellite Radio?
Simply The Best Radio on Radio TM with all your favorite entertainment including 100% commercial-free music, plus superior sports coverage, uncensored talk and comedy, world-class entertainment, news, weather and more for your car, home or office. For more information visit sirius.com or siriuscanada.ca
A warning against reverse engineering:
It is prohibited to copy, decompile, disassemble, reverse engineer, or manipulate any technology incorporated in receivers compatible with the SIRIUS Satellite Radio system.
"SIRIUS" and the SIRIUS dog logo are registered trademarks of SIRIUS Satellite Radio Inc.

Setting Up the SiriusConnect™ Home Tuner
The optional SiriusConnect Home tuner kit includes everything for easy home installation, including the SiriusConnect receiver, indoor/outdoor antenna with 21-foot cable, 8-pin mini DIN connector cable, and an AC power adapter. See the SiriusConnect Home tuner's instructions for more information.
Use the 8-pin mini DIN connector cable to connect the SiriusConnect receiver to the SIRIUS antenna jack on the rear of the T-4555.
![graph TD A["Indoor/outdoor antenna with 21-foot cable"] --> B["SiriusConnect receiver"] B --> C["AC power"] B --> D["8-pin mini DIN connector cable"] D --> E["SIRIUS antenna jack"] E --> F["T-4555"]](/content/2026/05/847246/images/ea4900163d297e996ce2df7a9d0047a7f65b2307684767aeda776981f2b686b9.jpg)
To use the included antenna indoors, you must place it at a north-, west-, or east-facing window, depending on where you live. If this isn't possible, you'll need to install it outside, away from any overhead obstructions.
Positioning the Antenna
For a consistent satellite signal, the antenna must be positioned correctly. Use the following map to determine which area you are in and position the antenna accordingly.
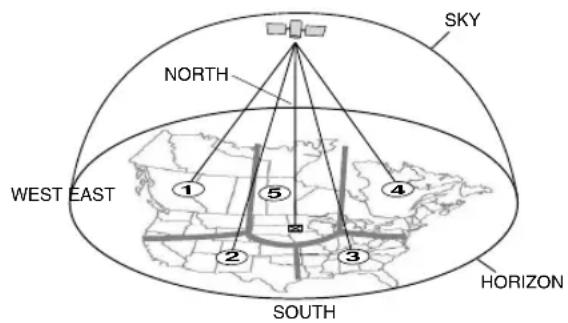
Area 1: Point the antenna toward the sky in the east, northeast, or southeast, either through a window or outside.
Area 2: Point the antenna toward the sky in the north or northeast, either through a window or outside.
Area 3: Point the antenna toward the sky in the north or northwest, either through a window or outside.
Area 4: Point the antenna toward the sky in the west, northwest, or southwest, either through a window or outside.
Area 5: Put the antenna outside and point it straight up. The antenna cannot be used indoors.

Setting the Satellite Radio Mode
1Remote controller | Press the [SETUP] button. |
2Remote controller | Use the Up and Down Arrow [√][ ]▼buttons to select “SAT Radio Mode,” and then press [ENTER]. |
3Remote controller | Use the Left and Right Arrow [√][ ]▼buttons to select “SIR-IUS.”If you’ve not using satellite radio, select None. |
4Remote controllerSETUP | Press the [SETUP] button. |
Selecting SIRIUS Satellite Radio
1
Remote controller

Press the [BAND] button repeatedly to select SIRIUS.
If "CHECK SR TUNER" appears on the display, make sure the SiriusConnect Receiver is connected properly.
Signing Up for SIRIUS Satellite Radio
Before you can use SIRIUS Satellite Radio, you must first sign up for an account. You'll need a major credit card and your SIRIUS Satellite Radio ID, which you can get from the T-4555, as explained below, or from the SiriusConnect Home tuner package.
1
Remote controller

Use the Up and Down Arrow [√] Buttons to select "RADIO ID."
Alternatively, press the [DIRECT TUNING] button, followed within 8 seconds by the [0] button and [ENTER] button.
Your SIRIUS Satellite Radio ID number is displayed. Write it below.
ID: □□□□□□□□□□
2
To sign up, go to: http://activate.siriusradio.com Or call: 1-888-539-SIRIUS (7474)
Note:
- After you've activated your subscription with SIRIUS Satellite Radio, your SIRIUS Satellite Radio ID number will no longer be displayed when you select channel 0. To check your ID, you'll need to; press the [SETUP] button, select "SiriusID" with the Up and Down [▲] buttons, and then press [ENTER]. Press the [SETUP] button when you've finished.

Selecting SIRIUS Satellite Radio Channels
There are three ways to select SIRIUS Satellite Radio channels:
• Channel Search mode: select any channel.
- Category Search mode: select channels by category.
- Direct tuning: enter channel number.
Channel Search Mode
 | Press the [TUNING MODE] button to select Channel Search mode. |
| Remote controllerTUNING MODE | Channel Search |
 | Use the T-4555's TUNING/CH [◀] ▶button, or remote controller's Up and Down Arrow [◀] ▶buttons to select a channel. |
| Remote controller | You can also use the remote controller's Left and Right Arrow [◀] ▶buttons to select a category. |
 |
Category Search Mode
| 1TUNING MODERemote controllerTUNING MODE | Press the [TUNING MODE] button to select Category Search mode. |
| Category Search | |
 Remote controller Remote controller | Use the T-4555's [CATEGORY][ ][ ] buttons, or remote controller's Left and Right [ ][ ]▶ buttons to select a category, and use the T-4555's TUNING/CH [ ][ ] button, or remote controller's Up and Down Arrow [ ][ ] buttons to select a channel in that category. |
Direct Tuning
You can select a SIRIUS Satellite Radio channel directly by entering its number with the remote controller.
Remote controller | Press the [DIRECT TUNING] button. |
Remote controller[1 17T20] 34 16T20] 67 17T20] 9  | Within 8 seconds, use the number buttons to enter the channel number.For example, to select channel #20, press [0], [2], and [0], or press [2], [0], and [ENTER]. |
Selecting the Previous Channel
To listen to the previously selected SIRIUS Satellite channel, press the [RETURN] button.
Displaying SIRIUS Satellite Radio Information
Press the [DISPLAY] button repeatedly to cycle through the available information.
![graph TD A["Channel name"] --> B["SR Hot Jamz"] B --> C["Channel number & preset number"] C --> D["SR 050 5"] D --> E["Preset number"] F["Category"] --> G["CAT >R & B"] G --> H["Artist/Composer name"] H --> I["NAME>Bobuen"] I --> J["Song title"] J --> K["TITL>On The Pia"]](/content/2026/05/847246/images/0e53bf6f67ab6207efd48985301da47b22885a5828b16f4b7c83ec597ad69efe.jpg)
Note:
If the category, artist, or song title is not available, “- - -” will be displayed instead.
■ SIRIUS Satellite Radio Messages
The following messages may appear while using SIRIUS Satellite Radio.
ACQUIRING
The SiriusConnect receiver is acquiring the signal or no signal is present. Make sure the SiriusConnect Home tuner is connected properly and that there are no obstacles close by.
ANTENNA ERROR
Make sure the SiriusConnect Home tuner is connected properly.
SUB UPDATED
Displayed while your subscription is being updated. No operations can be performed until this message has cleared.
UPDATING XXX%
Displayed while the channel map is being updated. Wait until the updating is complete.
UPDATING
Displayed while the SiriusConnect receiver's firmware is being updated.
INVALID CHANNEL
Displayed if you select an unavailable channel.
CALL SIRIUS
Displayed when you select a channel to which you are not subscribed. Call SIRIUS if you want to subscribe.
CHECK SR TUNER
Displayed if the SiriusConnect receiver is not connected. Make sure the SiriusConnect receiver is connected properly, and make sure its AC adapter is plugged in.
Positioning the SiriusConnect Home Tuner
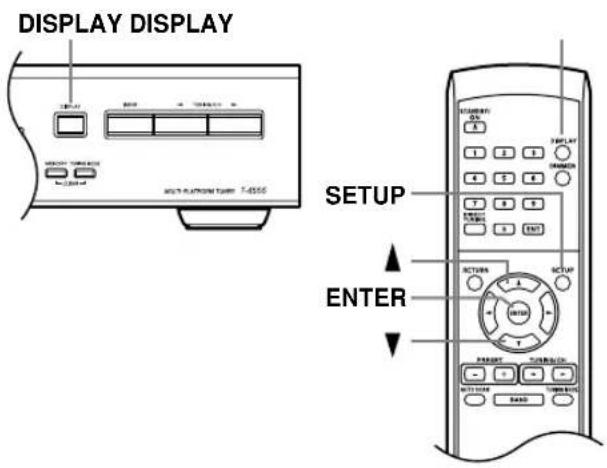
You can check the signal strength of the SIRIUS Satellite Radio signal and adjust the position of the Sirius-Connect Home antenna accordingly.
| 1Remote controllerSETUP | Press the [SETUP] button. |
2Remote controller | Use the Up and Down Arrow[×] Buttons to select“Antenna Aiming,” and then press [ENTER].2.ANT Aiming |
| 3 | Adjust the position of the indoor/outdoor antenna connected to the SiriusConnect receiver so that the satellite (SAT) signal strength bar is as long as possible.SAT:[] |
If you cannot receive a satellite signal, press the Down [▼button to display the terrestrial (TER) signal strength meter and adjust your antenna so that the bar is as long as possible.
Terrestrial signals are only available in certain areas.
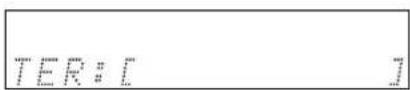
So long as the signal strength is good, you can enjoy SIRIUS Satellite Radio by using either satellite or terrestrial reception.

Parental Lock
You can lock out channels that you do not want to receive.
1
Remote controller

Press the [SETUP] button.
2
Remote controller

Use the Up and Down Arrow
[ ] Buttons to select
"Parental Lock," and then press [ENTER].
"Lock : <0>" appears on the display.

3
Remote controller



Press the [DIRECT TUNING] button, and then use the number buttons to enter the PIN number.
Or
Use the Left and Right [◀]▶ buttons to change the number displayed between the angle brackets < >, and then press [ENTER]. Repeat this for each digit in the PIN number.*
4
Remote controller

Use the Up and Down Arrow [A] Buttons to select the channel that you want to lock out, for example:
2016 2017 2018 2019 2020 2021 2022 2023 2024 2025 2026 2027 2028 2029 2030 2031 2032 2033 2034 2035 2036 2037 2038 2039 2040 2041 2042 2043 2044 2045 2046 2047 2048 2049 2050 2051 2052 2053 2054 2055 2056 2057 2058 2059 2060
5
Remote controller

Press the Left and Right Arrow [+] buttons so that an asterisk appears next to the name, as shown below, and then press [ENTER]:
000 00000 000 x y z = x + x x x y z = x + x x x y z = x + x x x y z = x + x x x y z = x + x 000 00000 000 x x y z = x + x x x y z = x + x x x y z = x + x x x y z = x + x x x y z = x + x x x y z = x + x x x y z = x + x x x y z = x + x x x y z = x + x x x y z = x + x x x y z = x + x x x y z = x + x
The message "Locked" will appear on the display.
6
Remote controller

Press the [SETUP] button.
Setup closes.
* The default number is "0000." If you want to change the default setting, see "Changing the PIN Number" shown below.
To unlock a previously locked channel, select the locked channel (see step 1–4), press the Left and Right
[◀] ▶attons so that the asterisk disappears (see step 5), and then press [ENTER]. The message
"Unlocked" will appear on the display.

Changing the PIN Number
1Remote controllerSETUP | Press the [SETUP] button. |
2Remote controller | Use the Up and Down Arrow [X[ ] Buttons to select “Parental Lock,” and then press [ENTER]. |
3Remote controller | Use the Up and Down Arrow [X[ ] Buttons to select “Edit Code,” and then press [ENTER].“Enter : <0>” appears on the display.Enter : <0> |
4Remote controller     | Press the [DIRECT TUNING] button, and then use the number buttons to enter the old PIN number.If you enter the wrong PIN number,“Wrong Code!” appears on the display.You’ll be returned to step 2, “8. Parental Lock,” and will need to start again.“New : <0>” appears on the display. |
| 5Remote controller1 2 34 5 67 8 90 | Use the number buttons to enter the new PIN number.“Confirm: <0>” appears on the display. |
| 6 | Enter the new PIN number again.If you enter the wrong PIN number,“Wrong Code!” appears on the display.You’ll be returned to step 2, “Parental Lock,” and will need to start again. |
| 7Remote controllerSETUP | Press the [SETUP] button.Setup closes. |
| 5 Remote controller | Use the number buttons to enter the new PIN number. "Confirm: <0>" appears on the display. |
| 6 | Enter the new PIN number again. |
| If you enter the wrong PIN number, "Wrong Code!" appears on the display. You'll be returned to step 2, "Parental Lock," and will need to start again. |
| 7Remote controllerSETUP | Press the [SETUP] button. Setup closes. |
HD Radio technology brings digital radio to conventional analog AM and FM radio stations, with improved sound quality, better reception, and new data services. HD Radio technology provides CD-quality sound for FM stations, and FM-quality sound for AM stations. In addition, FM HD Radio stations can transmit multiple programs on the same frequency by using multicast channels. Text data display includes station name, song title, artist name, and so on.
For more information about HD Radio technology, visit:
www.ibiquity.com
www.hdradio.com
About HD Radio Stations
HD Radio stations broadcast on the same AM and FM frequencies they've always used, and you can receive them by tuning into your favorite station as normal (see pages 16, 17). If the current AM or FM station supports HD Radio technology, the HD Radio indicator lights up. When an HD Radio transmission is received, a box appears around the HD Radio indicator, and "HD" appears in the right corner of the message area.

- If the current AM or FM station supports HD Radio technology, the station's name will be displayed instead of the band and frequency.
- When music data is received, song title and artist name information will be displayed next to the HD indicator.
- If the current HD Radio station supports multicast channels, the currently selected multicast channel will be displayed to the right of the HD indicator.


Selecting Multicast Channels
FM HD Radio stations can transmit multiple programs on the same frequency by using what are called multi-cast channels.
■ Using the remote controller:
1 Remote controller

Use the Up and Down Arrow [A] Buttons to select a multi-cast channel.
If you select a multicast channel that is not currently broadcasting, a plus [+] symbol will appear next to the HD indicator, indicating that the channel has been reserved. When broadcasting commences, hat channel will be selected automatically.

Note: Multicast channels are not available on AM.
Listening to HD Radio™ Stations—Continued
■ Using the T-4555:
1

Press the [CATEGORY] [▼]▼ buttons.
Selecting the Audio Format (Blend Mode)
HD Radio stations transmit both analog and digital versions of their programs and you can choose which one you want to listen to.

Use the [AUTO SCAN] button to select Auto or Analog.


Auto: Select to use the digital signal when available.
Anlg (Analog): Select to use the analog signal.
Note:
- Multicast channels 2 through 8 only carry a digital signal, so to select an audio format, you must select multicast channel #1 first.
Displaying HD Radio Information
Press the [DISPLAY] button repeatedly to cycle through the available information.
![graph TD A["Frequency & HD Radio channel number"] --> B["FM 88.90MHz HD2"] B --> C["HD Radio channel number"] C --> D["Scrolling station information"] D --> E["Station information"] E --> F["INFOX"] F --> G["Artist name"] G --> H["Artist information"] H --> I["NAME>John and"] I --> J["Song title"] J…](/content/2026/05/847246/images/10d3c7874ddd1dde1881c86bcdfd90d08c871bc851be2fc6406b557450f146f8.jpg)
Using RDS
RDS stands for Radio Data System and is a method of transmitting data in FM radio signals. RDS is approved by the National Radio Systems Committee (NRSC) and is available in North America.
Many FM stations use it these days. In addition to displaying text information, RDS can also help you find radio stations by type (e.g., news, sport, rock, etc.).
This product supports the following types of RDS information: Program Service Name (PS), Radio Text (RT), and Program Type (PTY).
Displaying RDS Information
The RDS indicator lights up when tuned to an FM radio station that supports RDS.
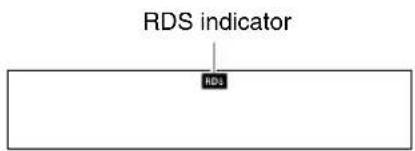
Press the [DISPLAY] button repeatedly to cycle through the available information.
1. Program Service Name
When tuned to an RDS station that's broadcasting PS information, the station's name will be displayed.
2. Radio Text
When tuned to an RDS station that's broadcasting RT text information, the text will be shown on the display.
3. Program Type
When tuned to an RDS station that's broadcasting PTY information, the type of program will be displayed.
Note:
If the signal from an RDS station is weak, RDS data may be displayed intermittently or not at all.


Presetting Your Favorite Stations
You can store any combination of up to 40 of your favorite AM, FM, and XM/SIRIUS Satellite radio stations as presets.
■ Using the T-4555:
| 1 | Tune into the station that you want to store as a preset. |
2 | Press the [MEMORY] button.The MEMORY indicator appears and the preset number flashes. |
3[PRFSFT ] ] | While the MEMORY indicator is displayed (about 8 seconds), use the PRESET [A/ [ ] buttons to select a preset from 1 through 40. |
4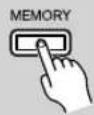 | Press the [MEMORY] button again to store the station or channel.The station or channel is stored and the preset number stops flashing.Repeat this procedure for all of your favorite radio stations. |
Selecting Presets
■ Using the PRESET buttons:
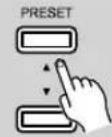
Remote controller
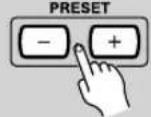
To select a preset, use the T-4555's PRESET [A]/[ ] buttons, or the remote controller's PRESET [+]/[-] buttons.
■ Using the Auto Scan function:
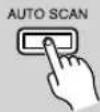
Remote controller

Press the [AUTO SCAN] button.
The Auto Scan function automatically selects and outputs each radio preset in turn for 5 seconds.
When you hear the station that you want to listen to, press the [AUTO SCAN] button again to stop auto scanning.
Deleting Presets
■ Using the T-4555:
| 1 | Select the preset that you want to delete.See the previous section. |
 | While holding down the [MEM-ORY] button, press the [TUNING MODE] button.The preset is deleted and its number disappears from the display. |
Changing the Remote ID
If the T-4555's remote controller interferes with other Onkyo components located in the same room, you can change the remote control ID. You can select remote control ID #1, #2, or #3. By default, the remote control ID is set to #1. If you change the ID, you must also change the ID on the remote controller to match, as explained below, otherwise, the remote controller won't work.

Changing the T-4555's Remote ID
1Remote controller | Press the [SETUP] button. |
2Remote controller | Press the [ENTER] button. |
3Remote controller | Use the Up and Down Arrow [A[ ] Buttons to select “Remote ID.” |
4Remote controller | Use the Left and Right Arrow [H[ ] buttons to change the remote ID.You can select ID #1 (default), #2, or #3. |
5Remote controllerSETUP | Press the [SETUP] button.Once you’ve changed the T-4555’s remote ID, the remote controller will no longer control the T-4555, so you must change the remote controller’s ID to match, as explained below. |
Changing the Remote Controller's ID
| 1 | Before changing the remote controller's ID, change the T-4555's ID first (see above). |
2Remote controllerRETURN | Press the remote controller's [RETURN] button. |
3Remote controllerRETURN  | While pressing and holding down the remote controller's [RETURN] button, press number button [1], [2], or [3] for 3 seconds to select ID #1, #2, or #3 respectively. |
| 4 | Check whether the remote controller operates the T-4555 properly. |
Note:
- The remote controller and T-4555 must be set to the same remote control ID. Otherwise, you won't be able to control the T-4555 with the remote controller.
If you have any trouble using the T-4555, look for a solution in this section.
If you can't resolve the issue yourself, try resetting the T-4555 before contacting your Onkyo dealer.
To reset the T-4555 to its factory defaults, turn it on and, while holding down the [MEMORY] button, press the [STANDBY/ON] button. "Clear" will appear on the display and the T-4555 will enter Standby mode.
Note that resetting the T-4555 will delete your radio presets and custom settings.

Power
Can't turn on the T-4555.
- Make sure that the power cord is properly plugged into the wall outlet. And also, make sure that the other end of the power cord is properly connected to the T-4555's AC INLET (see page 10).
- Unplug the power cord from the wall outlet, wait 5 seconds or more, then plug it in again.
Audio
There's no sound.
- Make sure your amplifier's volume control is not set to minimum.
- Check all connections and correct as necessary (see pages 11 to 15).
Tuner
Reception is noisy, stereo FM reception suffers from hiss, or the STEREO indicator doesn't light up when tuned to a stereo FM station.
- Check the antenna connections (see page 11).
- Change the position of the antenna (see page 17).
- M ove the T-4555 away from a nearby TV or computer.
• Cars or airplanes can cause noisy interference. - The radio signal will be weakened if it has to pass through a concrete wall before reaching the antenna.
- Try selecting Manual Tuning mode (see page 16).
- Move power cords and speaker cables as far away as possible from the antenna.
- When listening to an AM station, noise may be heard when you operate the remote controller.
- If none of the above improves the reception, install an outdoor antenna (see page 12).
If a power outage occurs or the power cable is disconnected:
- If the preset stations are lost, preset them again (see page 30).
Can't adjust the frequency of the radio.
- Use the TUNING/CH [ ]/[ ] buttons to change the frequency of the radio (see page 16).
RDS doesn't work.
- The FM station you are tuned to doesn't support RDS.
- Install an outdoor FM antenna (see page 12).
- Change the position or direction of your outdoor FM antenna (see page 12).
- Move the FM antenna as far away as possible from fluorescent lights (see page 12).
Remote Controller
The remote controller doesn't work properly.
- Make sure the batteries have been installed with the correct polarity (+/-) (see page 10).
- Replace both batteries with new ones. (Do not mix different types of batteries or new and old batteries.)
- The remote controller is too far away from the T-4555, or there's an obstacle between them (see page 10).
- The T-4555's remote control sensor is being subjected to bright light (inverter-type fluorescent light or sunlight).
- The T-4555 is located behind the glass doors of a audio rack or cabinet.
- The T-4555 and remote controller may be set to different remote control IDs. Set the T-4555's remote control ID first, and then set the remote controller to the same ID (see page 31).
Others
Interactive control with other Onkyo Capable components is not working.
- Make sure the RI cables and analog audio cables are connected correctly (see page 13). Connecting only an RI cable won't work.
The T-4555 contains a microcomputer for signal processing and control functions. In very rare situations, severe interference, noise from an external source, or static electricity may cause it to lock up. In the unlikely event that this should happen, unplug the power cord, wait at least 5 seconds, and then plug it again.
Specifications
| General | |
| Power Supply: AC 120 V, 60Hz | |
| Power Consumption: 33 W | |
| Stand-by Power Consumption: 0.2 W | |
| Dimensions (W × H × D): 435 | ×81 × 311 mm (17-1/8" × 3-3/16" × 12-1/4") |
| Weight: 4.8 kg (10.6 lbs.) | |
| Analog Outputs: 1 | |
| RS232 Control: 1 | |
| IR Input/Output: 1/1 | |
| 12V Trigger Out: 1 | |
| FM | |
| Tuning frequency range: 87.5–107.9MHz | |
| Usable sensitivity: Stereo: 22.2 dBf (IHF) Mono: 15.2 dBf (IHF) | |
| Signal-to-noise ratio: Stereo: 67 dB (IHF-A) Mono: 73 dB (IHF-A) | |
| THD (total harmonic distortion): analog | Stereo: 0.5% (1kHz) Mono: 0.3% (1kHz) |
| THD (total harmonic distortion): digital | Stereo: 0.01% (1kHz) |
| Stereo separation: | 40 dB (1kHz) |
| AM | |
| Tuning frequency range: | 530–1710kHz |
| Usable sensitivity: 300 μV | |
| Signal-to-noise ratio: 40 dB | |
| THD (total harmonic distortion): | 0.7% |
Specifications and features are subject to change without notice.
ONKYO CORPORATION
Sales & Product Planning Div. : 2-1, Nisshin-cho, Neyagawa-shi, OSAKA 572-8540, JAPAN Tel: 072-831-8023 Fax: 072-831-8124
Suite 1, Gregories Court, Gregories Road, Beaconsfield, Buckinghamshire, HP9 1HQ UNITED KINGDOM Tel: +44-(0)1494-681515 Fax: +44(0)-1494-680452
ONKYO CHINA LIMITED
Unit 1&12, 9/F, Ever Gain PlazaTower 1, 88, Container Port Road, Kwai Chung, N.T., HONG KONG Tel: 852-2429-3118 Fax: 852-2428-9039 http://www.ch.onkyo.com/
http://www.onkyo.com/
10803-1

- MULTI-PLATFORM TUNER
- T-4555
- (NORTH AMERICAN MODEL)
- INSTRUCTION MANUAL
- WARNING
- CAUTION
- WARNING RISK OF ELECTRIC SHOO DO NOT OPEN
- AVIS RISQUE DE CHOC ELECTRIQUE NE PAS OUVRIR
- IMPORTANT SAFETY INSTRUCTIONS
- POWER
- FOR AMERICAN MODELS
- HANDLING NOTES
- MEMORY BACKUP
- FOR U.S. MODELS
- FCC INFORMATION FOR USER
- NOTE
- FOR CANADIAN MODELS
- HD RADIO AND SATELLITE RADIO CAPABILITY
- RADIO
- SUPPLIED ACCESSORIES
- INTRODUCTION
- CONNECTIONS
- ENJOYING AUDIO SOURCES
- OTHERS
- FRONT PANEL
- DISPLAY
- SETTING THE DISPLAY BRIGHTNESS
- REAR PANEL
- REMOTE CONTROLLER
- CONNECTING THE SUPPLIED POWER CORD
- INSTALLING THE BATTERIES
- NOTES
- AIMING THE REMOTE CONTROLLER
- CONNECTING THE INDOOR FM ANTENNA
- 1
- 2
- CONNECTING THE AM LOOP ANTENNA
- CONNECTING AN OUTDOOR FM ANTENNA
- USING A TV/FM ANTENNA SPLITTER
- CONNECTING AN OUTDOOR AM ANTENNA
- BEFORE MAKING ANY CONNECTIONS
- RCA AUDIO CONNECTION COLOR CODING
- CONNECTING TO AN AMPLIFIER
- ABOUT THE SYSTEM FUNCTIONS
- AUTO POWER ON
- DIRECT CHANGE
- REMOTE CONTROL OPERATION
- CONNECTING THE 12V TRIGGER JACKS
- CONTROLLING COMPONENTS THAT ARE OUT OF RANGE
- CONTROLLING THE T-4555 WHEN IT'S OUT OF RANGE
- CONTROLLING OTHER OUT-OF-RANGE COMPONENTS
- TURNING ON AND LISTENING TO AM AND FM RADIO
- 3 USE THE TUNING/CH [◀] BUTTONS TO TUNE INTO A STATION
- TUNING INTO WEAK STEREO FM STATIONS
- TUNING INTO STATIONS BY FREQUENCY
- ADJUSTING THE ANTENNAS
- ADJUSTING AND INSTALLING THE FM ANTENNA
- ADJUSTING THE AM ANTENNA
- LISTENING TO XM SATELLITE RADIO®
- IMPORTANT XM RADIO INFORMATION
- A WARNING AGAINST REVERSE ENGINEERING
- CONNECTING THE XM MINI-TUNER AND HOME DOCK
- SELECTING XM SATELLITE RADIO
- SIGNING UP FOR XM SATELLITE RADIO
- SELECTING XM RADIO CHANNELS
- CHANNEL SEARCH MODE
- CATEGORY SEARCH MODE
- DIRECT TUNING
- SELECTING THE PREVIOUS CHANNEL
- DISPLAYING XM RADIO INFORMATION
- XM RADIO MESSAGES
- CHECK ANTENNA
- UPDATING
- NO SIGNAL
- LOADING
- OFF AIR
- POSITIONING THE XM ANTENNA
- 3
- LISTENING TO SIRIUS SATELLITE RADIO®
- IMPORTANT SIRIUS SATELLITE RADIO INFORMATION
- WHAT IS SIRIUS SATELLITE RADIO
- SETTING UP THE SIRIUSCONNECT™ HOME TUNER
- POSITIONING THE ANTENNA
- SELECTING SIRIUS SATELLITE RADIO
- SIGNING UP FOR SIRIUS SATELLITE RADIO
- SELECTING SIRIUS SATELLITE RADIO CHANNELS
- DISPLAYING SIRIUS SATELLITE RADIO INFORMATION
- SIRIUS SATELLITE RADIO MESSAGES
- ACQUIRING
- ANTENNA ERROR
- SUB UPDATED
- UPDATING XXX
- INVALID CHANNEL
- CALL SIRIUS
- CHECK SR TUNER
- POSITIONING THE SIRIUSCONNECT HOME TUNER
- PARENTAL LOCK
- ABOUT HD RADIO STATIONS
- SELECTING MULTICAST CHANNELS
- 1 REMOTE CONTROLLER
- USE THE UP AND DOWN ARROW [A] BUTTONS TO SELECT A MULTI-CAST CHANNEL
- LISTENING TO HD RADIO™ STATIONS—CONTINUED
- SELECTING THE AUDIO FORMAT (BLEND MODE)
- DISPLAYING HD RADIO INFORMATION
- USING RDS
- DISPLAYING RDS INFORMATION
- PROGRAM SERVICE NAME
- RADIO TEXT
- PROGRAM TYPE
- PRESETTING YOUR FAVORITE STATIONS
- SELECTING PRESETS
- DELETING PRESETS
- CHANGING THE REMOTE ID
- CAN'T TURN ON THE T-4555
- AUDIO
- THERE'S NO SOUND
- TUNER
- RECEPTION IS NOISY, STEREO FM RECEPTION SUFFERS FROM HISS, OR THE STEREO INDICATOR DOESN'T LIGHT UP WHEN TUNED TO A STEREO FM STATION
- IF A POWER OUTAGE OCCURS OR THE POWER CABLE IS DISCONNECTED
- CAN'T ADJUST THE FREQUENCY OF THE RADIO
- RDS DOESN'T WORK
- THE REMOTE CONTROLLER DOESN'T WORK PROPERLY
- INTERACTIVE CONTROL WITH OTHER ONKYO CAPABLE COMPONENTS IS NOT WORKING
- SPECIFICATIONS
- ONKYO CORPORATION
- ONKYO CHINA LIMITED
Brand : ONKYO
Model : T-4555
Category : Audio tuner