
C4DS - Bike computer VDO - Free user manual and instructions
Find the device manual for free C4DS VDO in PDF.


| Product Type | Bike Computer |
| Brand | VDO |
| Model | C4DS |
| Category | Wireless Digital Cycle Computer |
| Dimensions (Computer) | Approx. 45 x 52 x 16 mm |
| Weight (Computer) | 45 g |
| Weight (Handlebar Holder) | 15 g |
| Weight (Transmitter) | 20 g |
| Battery Type | 3V CR2032 (computer and transmitter) |
| Battery Life (Speed Only) | 300 hours, approx. 6000 km |
| Battery Life (Speed + Cadence) | 250 hours, approx. 5000 km |
| Speed Range | 2.5 – 120 km/h (1.55 – 74 mph) |
| Riding Time Range | 0:00:00 to 23:59:59 hh:mm:ss |
| Trip Distance Range | 0.00 to 999.99 km or mi |
| Odometer per Bike | Up to 99,999 km or mi |
| Total Odometer | Up to 199,999 km or mi |
| Navigator Range | 0.00 to 999.99 km or mi |
| Wheel Size Setting Range | 100 – 3999 mm (3.9 – 157.4 in) |
| Transmission | Digital wireless, range up to 150 cm |
| Display Type | 4-line LCD with icons and text |
| Number of Languages | 7 |
| Operating Temperature | -15°C to +60°C (5°F to 140°F) |
| Warranty | 5 years |
| Main Functions | Trip distance, odometer, ride time, average speed, max speed, stopwatch, timer, countdown, navigator, clock, service interval, cadence (optional) |
Frequently Asked Questions - C4DS VDO
User questions about C4DS VDO
0 question about this device. Answer the ones you know or ask your own.
Ask a new question about this device
Download the instructions for your Bike computer in PDF format for free! Find your manual C4DS - VDO and take your electronic device back in hand. On this page are published all the documents necessary for the use of your device. C4DS by VDO.
USER MANUAL C4DS VDO
Setting the wheelsize(s)
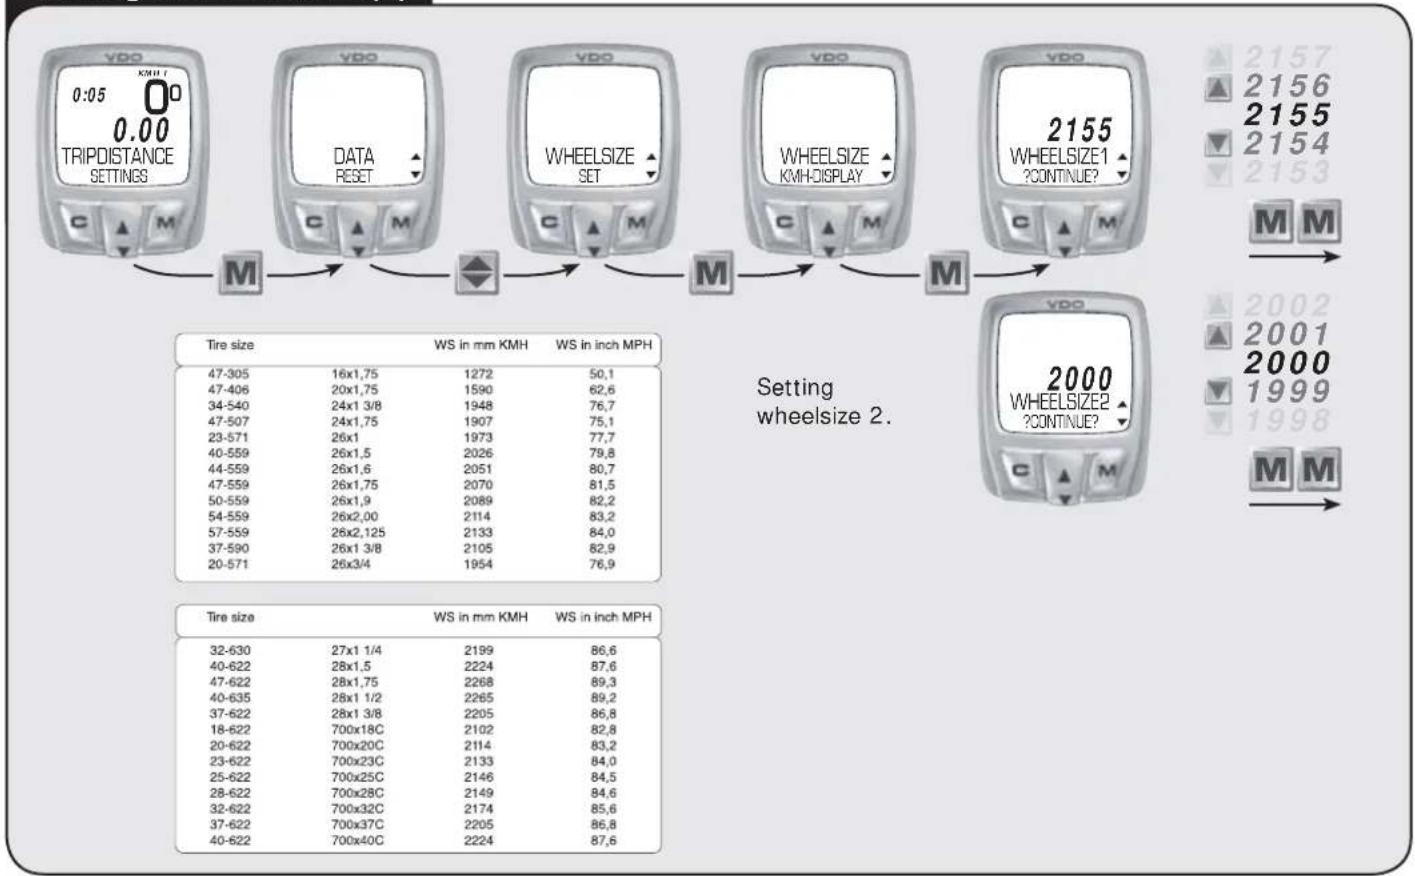
flowchart
Motor control system diagram showing trip distance settings and wheel size configuration for VDO devicesClock Set
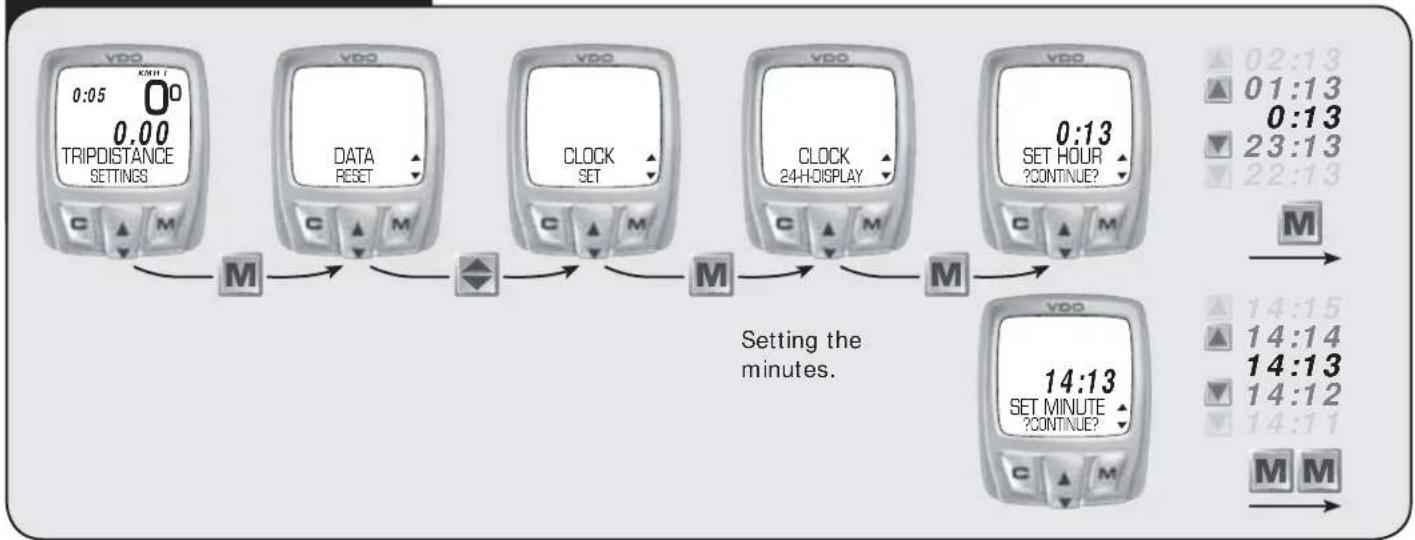
flowchart
graph LR
    A["TRIPDISTANCE SETTINGS"] --> B["M"]
    B --> C["DATA RESET"]
    C --> D["M"]
    D --> E["CLOCK SET"]
    E --> F["M"]
    F --> G["CLOCK 24-HOISPLAY"]
    G --> H["M"]
    H --> I["VDO"]
    I --> J["14:13 SET MINUTE ?CONTINUE?"]
    J --> K["M"]
    style A fill:#f9f,stroke:#333
    style K fill:#ccf,stroke:#333
Initial Operation
- First install the battery in the transmitter
natural_image
Simple line drawing of a computer monitor with two buttons at the base (no text or symbols)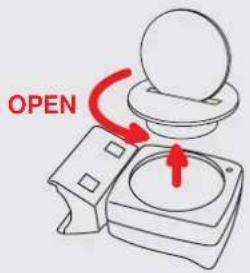

Absolutely stick with this order. Don't have another DS transmitter running!

natural_image
Diagram of a mechanical component with a red arrow pointing to a circular feature labeled with a plus sign (no text or symbols present)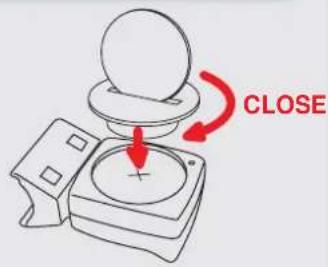
- Install the battery in the computer

natural_image
Simple line drawing of a square frame with rounded corners (no text or symbols)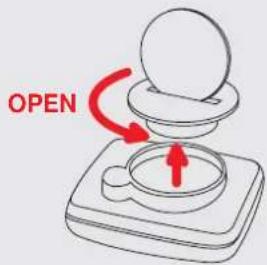

natural_image
Simple line drawing of a button with a red arrow pointing downward (no text or symbols)
- Function Check
natural_image
Illustration of a hand holding a small object with red arrows indicating direction (no text or symbols)
Any speed readout,
= OK

Zero speed readout

run
DIGI
CONNECT
RESET
DIGI CONNECT RESET

flowchart
graph LR
    A["TRIPDISTANCE SETTINGS"] --> B["DATA RESET"]
    B --> C["DIGI CONNECT RESET RESET"]
    C --> D["CIGI CONNECT RESET ? RESET?"]
    D --> E["DIGI CONNECT RESET ? RESET?"]
    E --> F["DIGI CONNECT RESET RESET DONE"]
    F --> G["DIGI CONNECT RESET RESET DONE"]
    G --> H["M"]
    H --> I["M"]
    I --> J["M"]
    J --> K["M"]
    K --> L["M"]
    L --> M["M"]
    M --> N["M"]
    N --> O["M"]
    O --> P["M"]
    P --> Q["M"]
    Q --> R["M"]
    R --> S["M"]
    S --> T["M"]
    T --> U["M"]
    U --> V["M"]
    V --> W["M"]
    W --> X["M"]
    X --> Y["M"]
    Y --> Z["M"]
    Z --> AA["M"]
    AA --> AB["M"]
VDO
CYCLECOMPUTING
BEDIENUNGSANLEITUNG
INSTRUCTION MANUAL
MANUEL D'INSTALLATION ET D'UTILISATION
natural_image
Simple geometric shape: a square with rounded corners, no text or symbols present.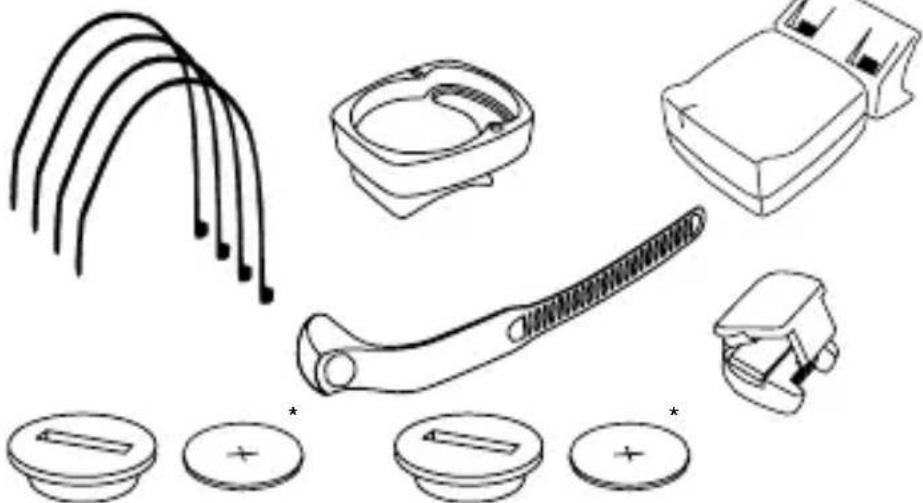
natural_image
Technical line drawings of mechanical components including rods, a bracket, and a tool (no text or symbols)*Watch out: old batteries require special disposal

PO2
flowchart
graph LR
    A["Device 1"] -->|CLOSEC| B["Battery"]
    C["Device 2"] -->|CLOSEO| D["Battery"]
    B -->|Close| E["Switch"]
    D -->|Close| E

P04
natural_image
Diagram of a mechanical lever with a red arrow indicating force or direction (no text or symbols)
P05
PO6

P07

P08
| Tire size | WS in mm KMH | WS in inch MPH |
| 47-305 16x1,75 1272 50,1 | ||
| 47-406 20x1,75 1590 62,6 | ||
| 34-540 24x1 3/8 1948 76,7 | ||
| 47-507 24x1,75 1907 75,1 | ||
| 23-571 26x1 1973 77,7 | ||
| 40-559 26x1,5 2026 79,8 | ||
| 44-559 26x1,6 2051 80,7 | ||
| 47-559 26x1,75 2070 81,5 | ||
| 50-559 26x1,9 2089 82,2 | ||
| 54-559 26x2,00 2114 83,2 | ||
| 57-559 26x2,125 2133 84,0 | ||
| 37-590 26x1 3/8 2105 82,9 | ||
| 20-571 26x3/4 1954 76,9 |
| Tire size | WS in mm KMH | WS in inch MPH | |||
| 32-630 | 27x1 1/4 | 2199 | 86,6 | ||
| 40-622 | 28x1,5 | 2224 | 87,6 | ||
| 47-622 | 28x1,75 | 2268 | 89,3 | ||
| 40-635 | 28x1 1/2 | 2265 | 89,2 | ||
| 37-622 | 28x1 3/8 | 2205 | 86,8 | ||
| 18-622 | 700x18C | 2102 | 82,8 | ||
| 20-622 | 700x20C | 2114 | 83,2 | ||
| 23-622 | 700x23C | 2133 | 84,0 | ||
| 25-622 | 700x25C | 2146 | 84,5 | ||
| 28-622 | 700x28C | 2149 | 84,6 | ||
| 32-622 | 700x32C | 2174 | 85,6 | ||
| 37-622 | 700x37C | 2205 | 86,8 | ||
| 40-622 | 700x40C | 2224 | 87,6 | ||
GB
IMPORTANT!
This information will help you understand how the digital transmission of your VDO computer works. You really must follow the initial set-up steps in the order described below.
ATTENTION:
At a break during your ride the receiver will be switched off after 30 minutes (battery consumption). Before continuing your ride you need to switch on the receiver again = press M-button

IMPORTANT HINT for cell (mobile) phone brackets on the handlebar. The digital wireless transmission of you VDO DS computer is likely to be disturbed if you are operating a cell (mobile) phone too close to the computer. We highly recommend not mounting your phone on the handlebar.

IMPORTANT: General hint to read this manual:
This manual is valid for all VDO Series-C models. Some functions and features are not available with all models. The “flag” icon on the beginning of a chapter indicates which model this chapter is relevant for.

= valid for models C1DS, C2DS, C3DS & C4DS

= valid for models C3DS & C4DS
GB
Contents
P01
Please check package contents for its completeness:
1 VDO computer
1 VDO digital transmitter
2 Battery 3V CR2032 for the computer and transmitter
2 Battery door for the computer and transmitter
1 Handle bar mount
1 Fixing clamp
1 Spoke magnet
4 Cable ties to fix transmitter
GB
Preface
Congratulations!
With your choice of a VDO cycle computer, you have decided to own the most advanced technology available.
To enjoy the full potential of your computer and benefit from all the technical features, we recommend you thoroughly study this manual. You will find crucial hints for its operation as well as many more tips.
We wish you many enjoyable rides and trips on your bike with your VDO cycle computer.
CYCLE PARTS GMBH
GB
Index part I
1.0 VDO DIGITAL SYTEM
1.1 Welcome to the club: your VDO-USER-CARD
1.2 Functions
1.3 Optional features
2. Installation
2.1 Battery installation (computer and transmitter)
2.2 Mounting sensor and magnet
2.3 Mounting cable and VDO any-size handlebar mount
2.4 TWIST-CLICK mounting of the computer
2.5 The 4-line VDO display
2.6 The VDO EMC-operating-system (Easy-Menu-Control)
2.7 Functions / menu structure
Fundamental instructions to read this manual
3. Initial operation, AC-"auto-clear"
3.1 Manual Transmitter Search - DIGI CONNECT RESET
GB
4 Basic settings
4.1 Language selection
4.2 Measuring and setting the wheel size(s)
4.3 Setting the clock
4.4 Setting the odometer
4.5 Changing wheel sizes from bike 1 to bike 2
4.6 Reset functions
5. Service-Interval-Indicator
6. Sleep-Mode
7. Cadence (optional)
Index part II
- Stopwatch
Important hint:
„>>> P04“ links at the beginning of a chapter are related to the respective picture in the picture book!
GB
Index part III
C3DS C4DS
- NAVIGATOR functions
C4DS
Index part IV
- Timing functions
10.1 Selecting timing functions
10.2 Timer/countdown programming
10.3 Timer/countdown/stop watch start/stop/reset
10.4 Additional countdown functions
Index part V
C1DS C2DS C3DS C4DS
- Troubleshooting
- Warranty disclaimer
- Technical specifications

1.0 VDO DIGITAL SYTEM
Your VDO cycle computer operates on digitally coded, wireless transmission. Different from analogue radio transmission, data is digitally transmitted (data packages step-by-step). With your actual speed varying, the reading will change stepwise. Individual coding of the signals ensures that only data coming from your transmitter is processed. No interference with signals coming from transmitters other than yours. Very rarely, even digital transmission may be interfered by high-voltage power lines, mobile phone poles, remote controls (car doors openers, garage door openers).
What happens when digital transmission is interfered with?
- speed display will read zero (0)
- trip distance stops counting
- ride timer stops counting
The digital VDO transmitter features an internal memory, that stores up to 45 sec of data at a speed of 20 KMH (12,5 MPH). At a rare interference, no data is lost! The related data pack-
GB
ages are sent after, once the interference is over.
Following data is immediately updated when the re-send data is received :
- trip distance
- riding time
- average speed
- maximum speed
- odometer
Hence, your current data may change erratically after a interference = Update of your computer.
After a battery change, a new coding is automatically generated in the transmitter. The computer must learn this new coding. Therefore, you have to activate the manual transmitter search DIGI CONNECT RESET (3.1. Manual Transmitter Search – DIGI CONNECT RESET)
GB
1.1 The VDO-USER-CARD
Welcome to the Club. With the purchase of this product, you have become a member of the VDO-USER Club. The VDO-USER-CARD gives you three advantages:
A. The white boxes allow you to write down your personal wheel size settings, if you have several bikes or if you use different tires.
B. The VDO-User-ID allows you access to the restricted VDO-User area on the VDO Homepage www.vdocyclecomputer.com.
Here you can find many useful information and additional hints.
C. The quick-reference manual helps you if you have not used your computer for a while and can't remember how to use it.
1.2 Functions
Information-Functions C1DS, C2DS, C3DS, C4DS:
TRIPDISTANCE trip distance
ODO BIKE1/2 total odometer for bike 1/2
ODO TOTAL total odometer for bike 1+2
RIDE TIME trip ride timer
GB
AVG SPEED average speed
Information-Functions C2DS, C3DS, C4DS:
MAX SPEED maximum speed
STOPWATCH stop watch
Information-Functions C3DS, C4DS:
SUM RIDE TM1/2 total ride timer (bike 1 / bike 2)
TOT RIDE TM total ride time for bikes 1 + 2
NAVIGATOR second, programmable trip counter
Information-Functions C4DS:
TIMER 1/2 Timer 1 / Timer 2
COUNTDOWN countdown timer
FORECAST KM(MI) trip distance prediction (at countdown)
REMAIN KM(MI) trip distance remainder (at countdown)
Additional Functions C1DS, C2DS, C3DS, C4DS:
DIGI CONNECT RESET - Manual Transmitter Search
CLOCK time display in 12 or 24 h mode
GB
comparison between actual and average speed by indicators
WS1/2 - 2 wheel sizes programmable for bike 1 + bike 2
7 languages selectable, full text display
Service-Interval-Indicator (wrench symbol)
Additional Function C2DS, C3DS, C4DS: Timing Indicator
Additional Function C4DS: Audible signal (beeper) for timing-functions
1.3 Optional features
C1DS
C2DS
C3DS
C4DS
The following genuine VDO parts are available at your Bike Shop
- set transmitter/magnet/handlebar mount
- cadence set
- stem mount
GB
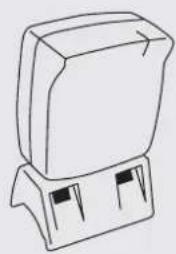
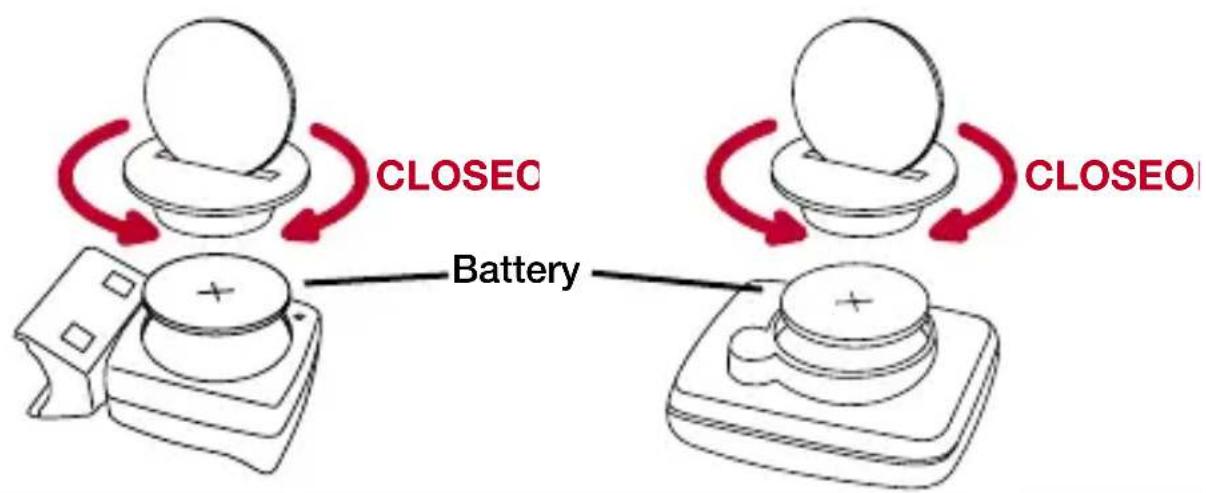
2.1 Installing the batteries in the digital transmitter and the computer >>> P02
Both, your VDO computer and your VDO transmitter are coming with a 3 V battery (type 2032).
A. First install the battery in the digital transmitter
Step 1. Place the battery into the transmitter housing, +pole face-up.
Step 2. Make sure the battery is not edged over.
Step 3. Check if the rubber washer is flatly positioned on the battery door.
Step 4. Place the battery door on the compartment, take a coin and twist it to the right until detent (approx. 1/3 turn).
B. Install the battery in the computer immediately after the installation of the battery in the transmitter.
At the initial putting into operation, the computer is automatically trying to find the transmitter. By this, the computer also learns the transmitters coding

IMPORTANT: On inserting the battery into the transmitter, the coding of the digital signals is automatically generated. The computer is only able to find the coded signal at the initial putting into operation. After a battery change, a new coding is generated in the transmitter. In this case, the computer won't find the coded signal and a manual transmitter search is required (DIGI CONNECT RESET) – see chapter 3.1.
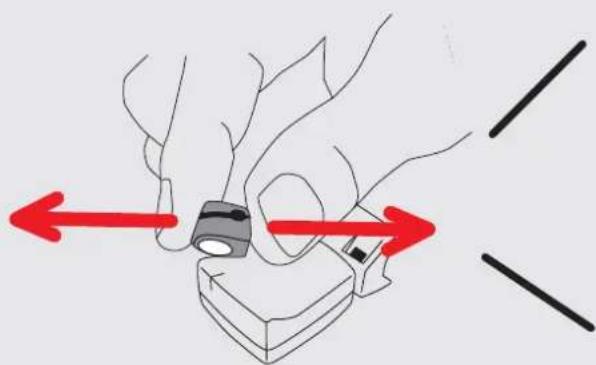
After every start a green LED at the transmitter flashes for 20 sec. only The flashing LED indicates a working transmitter.
TIP for battery change: VDO recommends an annual battery change. Buy a spare battery in due time to avoid unwanted loss of data. When changing the battery, all basic settings are reset to default values. Note your individual wheel sizes and accumulated mileages (odometer WS 1 / odometer WS 2) for both bikes before you remove the battery. Reprogram this data after the new battery has been installed.
GB
2.2 Mounting transmitter and magnet >>> P03
important mounting instructions:
a) maximum distance transmitter - computer = 150 cm (59 in)
b) distance transmitter - magnet: 3 to max 10 mm (up to 0.04 in)
c) mount the transmitter on the fork leg, same side where you want the computer to be on the handlebar. (not applicable for stem mounting with optional stem holder).
Step 1 Prefix the transmitter on the fork leg with cable ties (do not tighten yet)
Step 2 Put the magnet around a spoke, do not fix
Step 3 Direct the magnet to the marking on the transmitter at a distance of around 3 mm and shut the clip-mechanism
Step 4 Align transmitter and magnet and tighten the transmitter's cable ties. Clip off the cable tie ends not needed.
GB
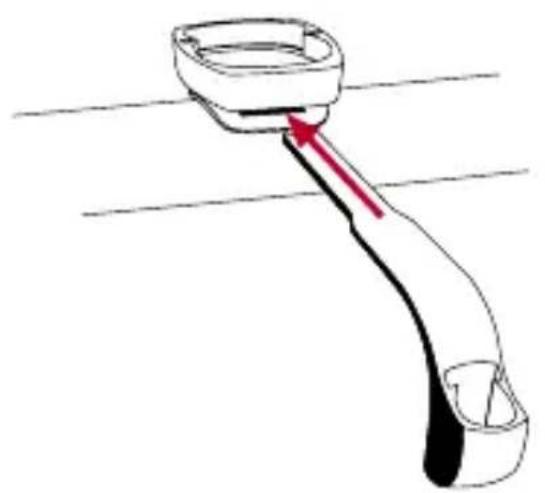
2.3 Mounting the VDO any-size handlebar holder >>> P04
Step 1 Position the holder socket on the handlebar (stem optionally).
Step 2 Feed the fixing clamp through the slot below the holder socket, pass the clamp around the handlebar (stem optionally) and tighten it with a little screw driver. Do not overstress, the plastic screw might be damaged.
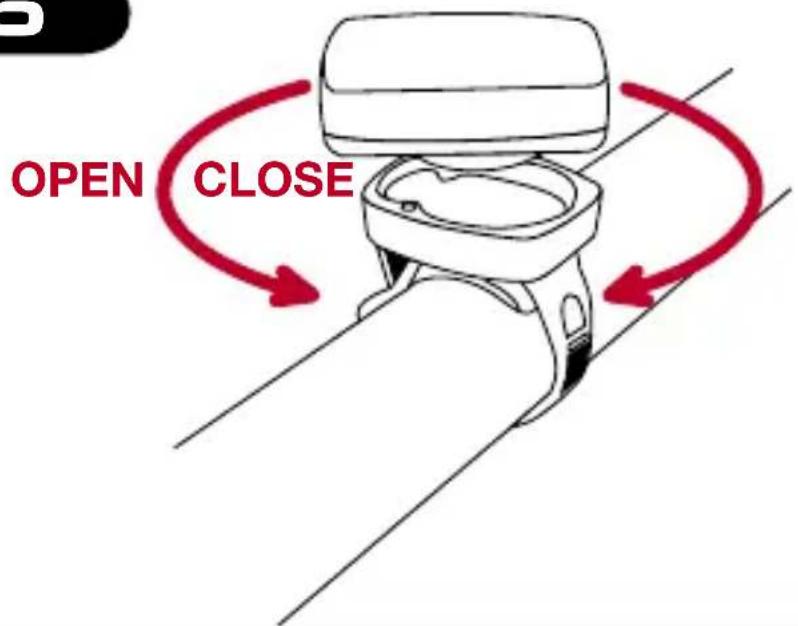
2.4 Twist-Click mounting of the computer >>> P05
The VDO Twist-Click-System securely connects the computer with the handlebar holder.
step 1 Hold the computer in the 10 O'clock position (approx. 45° to the left) and place it into the socket.
step 2 turn the computer to the right "twist" until it engages in the socket.
step 3 for removal turn the computer to the left (do not press or yank)
GB
2.5 The new 4-line VDO display
Indicator elements (Icons)
Service Indicator, TIMING Indicator, Indicator Bike 1/Bike 2 and measuring system (km or mi), comparison of actual and average speed, Menu control indicator (flashes for further menu options selectable)
Digit elements
Time (clock), Speed, Chosen display function
Text lines
Upper text line: full text description of the information displayed or in set-up menu: description of set-up function Lower text line: indicates the sub-menu to enter by pushing the M-key or in set-up menu: indicates available set-up menus to be Entered.


GB
2.6 The VDO EMC-operating system
EMC = Easy Menu Control

EMC eases operating the computer by a full text menu control well known from most cellular phones. 4 keys combined with the 4-line display provide comfortable and user-friendly operation.
Menu indicators will always show further menu options by flashing.
In fact, you do not need the manual any more form here. Your VDO computer leads you step by step through all the menus.
Enjoy navigating!

The 4 keys and their functions:

enu navigation upwards
or in SET-mode (number flashes): increase number

enu navigation downwards
or in SET-mode (number flashes): decrease number

pose/accept option displayed (enter next menu level)

(ish once) cancel last entry / go back one menu level
(hold) return to main menu
2.7 Functions / menu structure
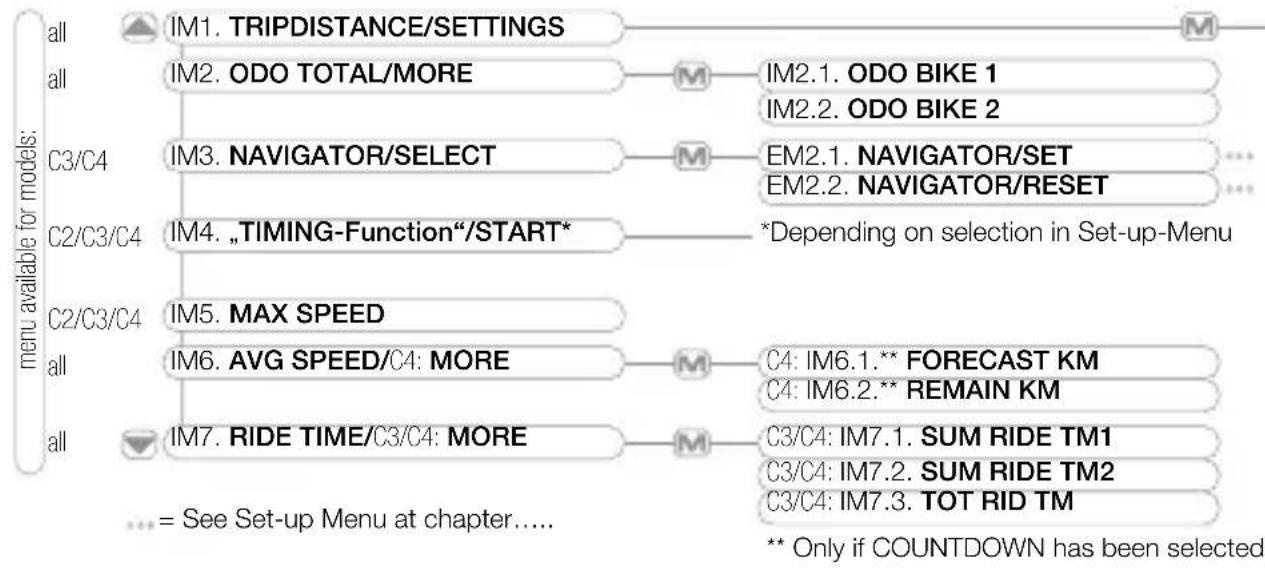
IMPORTANT: In information menu (IM1 to IM7, see below)
the lower text line indicates the entry to a sub-menu.
Within such a sub-menu the upper text line indicates the chosen information while the lower text line may offer available options (START/STOP/RESET).
IM = Information Menu • EM = Set- or sub-menu
GB
2.7.1 Information Menus
flowchart
graph TD
    A["all"] --> B["IM1. TRIPDISTANCE/SETTINGS"]
    A --> C["IM2. ODO TOTAL/MORE"]
    C --> D["M"]
    D --> E["IM2.1. ODO BIKE 1"]
    D --> F["IM2.2. ODO BIKE 2"]
    G["C3/C4"] --> H["IM3. NAVIGATOR/SELECT"]
    G --> I["EM2.1. NAVIGATOR/SET"]
    G --> J["EM2.2. NAVIGATOR/RESET"]
    K["C2/C3/C4"] --> L["IM4. „TIMING-Function“/START*"]
    K --> M["*Depending on selection in Set-up-Menu"]
    N["C2/C3/C4"] --> O["IM5. MAX SPEED"]
    N --> P["IM6. AVG SPEED/C4: MORE"]
    P --> Q["M"]
    Q --> R["C4: IM6.1.** FORECAST KM"]
    Q --> S["C4: IM6.2.** REMAIN KM"]
    T["all"] --> U["IM7. RIDE TIME/C3/C4: MORE"]
    T --> V["C3/C4: IM7.1. SUM RIDE TM1"]
    T --> W["C3/C4: IM7.2. SUM RIDE TM2"]
    T --> X["C3/C4: IM7.3. TOT RID TM"]
    Y["..."] --> Z["= See Set-up Menu at chapter...."]
    AA["..."] --> AB["... Only if COUNTDOWN has been selected"]
2.7.2 Set Menus
menu available for models:
all EM1. DATA/RESET
all EM2. DIGI CONNECT/RESET
all EM3. LANGUAGE/SELECT
all EM4. WHEELSIZE/SET
all EM5. ODOMETER/SET
all EM6. CLOCK/SET
all EM7. WHEELSIZE/SELECT
C4 EM8. TIMING/SELECT
C3/C4 EM9. NAVIGATOR/SELECT
EM1.1. TOUR DATA/RESET
EM1.2. ODO TOTAL/RESET
C3/C4: EM1.3. TOT RID TM/RESET
EM8.1. TIMING/?SELECT?
EM8.1.1. TIMER 1/?SELECT?
EM8.1.2. TIMER 2/?SELECT?
EM8.1.3. TIMER 1+2/?SELECT?
EM8.1.4. COUNTDOWN/?SELECT?
EM8.1.4. STOPWATCH/?SELECT?
EM8.2. TIMING/?SET?
EM8.2.1. TIMER1/?SET?
EM8.2.2. TIMER2/?SET?
EM8.2.3. COUNTDOWN/?SET?
EM9.1. NAVIGATOR/SET
EM9.2. NAVIGATOR/RESET
GB
General hint to read the following chapters:
In the following you will often see this icon. Whenever you see this


icon, use the UP/DOWN keys to find the relevant menu option and accept it by pushing the M-key.
- Initial operation, AC-(“Auto clear”)-button >>> P06
After installing the battery, your VDO computer brings up an English main menu.
Select your language to begin with.
M "TRIPDISTANCE / SETTINGS"
M "LANGUAGE / SELECT"
choose your language
The computer then automatically returns to the main menu TRIPDISTANCE/SETTINGS (in your selected language).
GB
Should your computer not function properly after installing the battery or you want to reset it to default values, push the AC-button on the rear of the housing.
3.1 Manual Transmitter Search – DIGI CONNECT RESET
After a battery change, a new coding is automatically generated in the transmitter. The computer must learn this new coding. Therefore, you have to activate the manual transmitter search DIGI CONNECT RESET:
← M call SETTINGS and accept
call DIGI CONNECT and accept ?RESET? appears in display
M accepts
Now, an additional check back secures that you really want to reset the digital coding of your computer (?RESET? flashes), ☑ accepts.
If you start riding or turn the front wheel now, the computer automatically learns the transmitters new coding. This procedure may take a few seconds.
GB
4. Basic settings
Basic settings are settings crucial to data measuring and operating the computer. Such as language, wheel size(s), clock.
WATCH OUT: Any SET procedure must be completed (menu question ?SET OK? gets accepted by pushing ☐). Should a SET procedure not be completed, any data entered is not stored.
4.1 Language selection
In case you want to change the language at any time, proceed as described under chapter 3.
GB
4.2 Measuring and setting the wheel size(s) >>>P07
In order for your VDO computer to precisely calculate speed and distance, you have to measure the circumference of your wheels With an incorrect wheel size set, all related values like speed, trip distance, odometer etc. come out false. To make the use of your VDO computers possible on 2 bikes, i.e. Mountain Bike and Road Bike, you are able to set up 2 different wheel sizes.
Measuring both wheel circumferences:
step 1 Place the front wheel valve perpendicular to the ground
step 2 Mark this spot on the ground for example with chalk
step 3 Turn the wheel forward for one full circle until the valve is perpendicular to the ground again
step 4 Also mark this spot.
step 5 Measure the distance between the two spots (markings)
This is your wheel size.
step 6 Set-up your wheel size in your VDO computer as described below.
GB
If you have selected the Metric system (KM) you have to enter your wheel size/s in millimeters. If you have selected English system (MI) you have to enter your wheel size/s in inches.
TIP: Write down your wheel sizes on your VDO-User-Card for easy reference. The values listed in the chart >>>P08 are approximate. Depending on the tire brand, it is possible that these numbers deviate from your real tire circumference since height and tread pattern are likely to be different.
Setting the wheel sizes :
M "TRIPDISTANCE/SETTINGS"
M "WHEELSIZE/SET"
M "KMH-DISPLAY" or "MPH-DISPLAY" to be selected
<
set wheel size 1 in [mm] or [in]
(Press up/down key briefly for 1 mm, keep pressing key for fast forward run)
“?SET OK?” accept or return by pressing ☐ and correct your entries. “WHEELSIZE 1 / SET DONE” pops up briefly, to indicate data storage.
Your computer now wants you to set wheel size 2.

If applicable, enter wheel size 2 as described above
If you don't need to enter the second wheel size, hold the ☐ key until the computer returns to main menu TRIPDISTANCE/SETTINGS.
Watch out: Default settings for the wheel sizes are as follows: Bike 1 = 2155 mm and Bike 2 = 2000 mm. In case you don't set your individual wheel sizes, the computer works with default values. Readings for speed therefore are likely to deviate significantly from the actual values.
GB
4.3 Setting the clock
M "TRIPDISTANCE / SETTINGS"
M "CLOCK / SET"
"CLOCK 24-H-DISPLAY" or "CLOCK 12-H-DISPLAY"
<
set hours
M “?CONTINUE?” for minutes
M set minutes
M “?SET OK?” accept (or ☐ to return and correct entries)
Your VDO-Computer automatically returns to main menu TRIPDISTANCE/SETTINGS.

4.4 Setting the odometers
You can set odometers anytime or after a battery change. Note the odometer readings for bike 1 and 2 before changing the battery
M "TRIPDISTANCE/SETTINGS"
M "ODOMETER / SET"
"ODO BIKE 1 / SET" or "ODO BIKE 2 / SET"
<
set value
M “?NEXT DIGIT?”
After you have set the last number on the left = first of your value
M “?SET OK?” accept “SET DONE”
Your VDO-Computer automatically returns to main menu TRIPDISTANCE/SETTINGS.
GB
4.5 Changing wheel sizes from bike 1 to bike 2
If you have programmed 2 wheel sizes for 2 bikes you have to adjust your computer accordingly prior to your trip.
M „TRIPDISTANCE/SETTINGS“
M „WHEELSIZE/SELECT“, accepted by M
M „WHEELSIZE 1“ or „WHEELSIZE 2“
M accept / select
Change of wheel size is confirmed by WHEELSIZE 1-2 DONE.
WATCH OUT: Changing to the other wheel size automatically results in resetting / deleting all data of your last tour (trip distance, ride time, average and maximum speed) of the previous wheel size setting.


4.6 Reset functions
To reset / delete certain or all tour data
M "TRIPDISTANCE/SETTINGS"
M "DATA / RESET"
"TOUR DATA / RESET"
or "ODO TOTAL / RESET"
or "TOT RIDE TM / RESET" (only C3DS, C4DS)
M accept / select "RESET"
Safety check back: Are you sure you want to reset?
M accepts “?RESET?” and deletes
NOTE: Accepting the reset by pressing Ⓜ deletes the respective data. This step can not be made undone.
"RESET DONE" appears briefly and your VDO-Computer automatically returns to main menu TRIPDISTANCE/SETTINGS.
GB
Following data is deleted by these corresponding reset modes:
TOUR DATA RESET: trip distance, ride time, average speed, maximum speed.
ODO TOTAL RESET: odo total, km/mi bike 1, km/mi bike 2
TOT RID TM RESET: total ride time, ride time bike 1, ride time bike 2 (C3DS, C4DS)
5. Service-Interval-Indicator
Your VDO computer features a Service-Interval-Indicator for bike 1 and bike 2. Like the indicator in some cars, the Service-Interval-Indicator reminds you to have your bike checked and serviced in a shop.
When you reach 750 km/mi on one bike:
- The Service-Interval symbol (wrench) flashes in the display
- The information line displays "BIKE CHECK"
Now it is suggested to either service your bike yourself or take it to a pro shop of your choice to have it checked.
Press any key. The text "BIKE CHECK" will disappear again
GB
After further 50 km/mi the Service-Interval-Indicator symbol (wrench) will also disappear.
6. Sleep-Mode
Your VDO-Computer features a sleep mode function to save battery power. During Sleep Mode the major portion of your display is shut down to save battery power. Only the clock, the Service-Interval-Indicator (if applicable) and the TIMER symbol (if activated) are displayed.
a. The computer will go into Sleep-Mode when no speed impulses have been processed for 5 minutes and no key has been pressed during that time.
b. Sleep-Mode is cancelled once speed impulses are processed (you start riding) or any key is pressed.
ATTENTION:
At a break during your ride the receiver will be switched off after 30 minutes (battery consumption). Before continuing your ride you need to switch on the Computer again = press ☑-button
GB
7. Cadence (optional)
Your VDO computer is prepared for cadence measuring. To make use of these functions, you need to purchase the optional CADENCE KIT (Articlecode: 4402) at your Bike-Dealer.
Operating instructions for cadence functions are described in detail in the CADENCE KIT's extra manual.
Contents of the optional kit "CADENCE" (Articlecode: 4402): Cadence transmitter and mounting parts, cadence-magnet, mounting parts
8. Stopwatch
Manual stop watch to measure riding time of certain trip sections. Starting Stopwatch Select STOPWATCH in your information display:
"STOPWATCH /START"
M "START" / "STOP"

Indicator Symbol << >>
Resetting Stopwatch:
STOPWATCH select the appropriate menu.
M Hold for 3 seconds
After 3 seconds the STOPWATCH is reset to zero.
9. NAVIGATOR functions
Your VDO computer features a NAVIGATOR function that makes it possible to follow route (Road-Book) instructions. Road-books are trip maps outlining mileage values based on certain landmarks.
Your VDO-Navigator is a further independent trip counter, it either counts forward or backwards. Mileage can be set at any point of the trip. You might as well get in on a trip or adjust your mileage in case you have gotten lost.
GB
Setting the NAVIGATOR
M "NAVIGATOR / SELECT"
M "NAVIGATOR / SET"
“FORWARD” or “BACKWARD” to be selected
<
enter / set
M “?NEXT DIGIT?” accept or return by C
continue with next digit or correct previous entry
At the end of the set procedure you will be asked
M “?SET OK?” accept
"SET DONE" appears briefly and your VDO-Computer automatically returns to main menu TRIPDISTANCE/SETTINGS.
Note: the NAVIGATOR is always counting, even if you don't set it.

Reset NAVIGATOR to zero.
M "NAVIGATOR / SELECT"
M "NAVIGATOR / RESET"
Check back: "NAVIGATOR ?RESET?"
M accept
"RESET DONE" appears briefly and your VDO-Computer automatically returns to main menu TRIPDISTANCE/SETTINGS.
10. Timing functions
C4DS
Your VDO-Computer features 5 individual timing functions. With any of the functions selected the TIMING indicator << >> is activated in the upper left part of the display.
Set-/measuring range for all timing functions:
0:00:00 h to 24:00:00 h
TIMER 1: You can program a time window, i.e. for interval training. TIMER 1 counts on from zero. A single beep indicates the end of TIMER 1.
GB
TIMER 2: You can program another time window, i.e. for a break in your interval training TIMER 2 counts on from zero. A double beep indicates the end of TIMER 2.
TIMER 1+2: With this TIMING-function selected, TIMER 1 and TIMER 2 time windows are continuously cycled one after the other. A single beep indicates the end of TIMER 1, a double beep indicates the end of TIMER 2. TIMER 1+2 is activated, until you stop TIMER 1+2 by pressing the M-key
COUNTDOWN: You can program a time window from which is counted backwards. A single beep indicates the end of the COUNTDOWN timer. Only with COUNTDOWN selected and started you have access to additional functions MORE in AVG SPEED menu. See also 10.4.
STOPWATCH: manual stop watch to measure riding time of certain trip sections.


10.1 Selecting timing functions
M "TRIPDISTANCE / SETTINGS
“TIMING / SELECT”
M "TIMING / ?SELECT?"
Note: By accepting “?SELECT?” either default setting STOPWATCH or last selected timing function is displayed.
"STOPWATCH" / "COUNTDOWN" / TIMER 1" / "TIMER 2" or "TIMER 1+2"
M SELECTION to be confirmed / accepted
"DONE" appears briefly and your VDO-Computer automatically returns to main menu TRIPDISTANCE/SETTINGS. The TIMER function of your choice is then displayed in your information menu IM4.
With TIMER or COUNTDOWN selected, you have to program your time window, otherwise your information menu displays the hint "TIMER ERROR" or "COUNTDOWN ERROR".
GB
C4DS
10.2 TIMER/COUNTDOWN programming
While the STOPWATCH does not need any further presetting, for the TIMER and COUNT-DOWN functions the time windows have to be programmed in the first place
M "TRIPDISTANCE / SETTINGS
M "TIMING / SELECT"
"M"TIMING / ?SET?"
"TIMER 1" or "TIMER 2" or "COUNTDOWN"
M accept / select
<
←M hours ←M minutes ←M seconds
M „?SET OK?“ accept
"TIMER1/TIMER2/COUNTDOWN SET DONE" appears briefly and your VDO-Computer automatically returns to main menu TRIPDISTANCE/SETTINGS.
10.3 Timer/Countdown/Stopwatch start, stop and reset / Beep
Starting Timer/Countdown/Stopwatch
Select the timing-function of your choice in your information display:
☑ “TIMER 1 /START” or “TIMER 2/START” or “TIMER1+2/START” or “COUNTDOWN /START” or “STOPWATCH /START”
M "START" / "STOP"
Resetting Timer/Countdown/Stopwatch
Timer and Countdown feature a "fast reset" function:
TIMER1/TIMER2/TIMER1+2/COUNTDOWN/STOPWATCH select the appropriate menu.
M Hold for 3 seconds
After 3 seconds the TIMER is reset to zero or the COUNTDOWN is reset to the previously programmed START time.
GB
Check back COUNTDOWN
With COUNTDOWN-time elapsed an automatic check back appears: ?RESET?.
If you accept this by pressing M, the previously programmed COUNTDOWN time is displayed.
The COUNTDOWN is now ready to be started again.
10.4 Additional Countdown Functions
In COUNTDOWN mode you get to FORECAST KM/MI and REMAIN KM/MI by information menu AVG SPEED:
M "AVG SPEED/MORE"
"FORECAST KM or MI"
“REMAIN KM or MI”
Note: The forecasted km/mi reflect your computers projection for the distance you accomplish at the end of your countdown time. This information is determined by your actual average speed during the countdown time period. Respective data is updated
GB
every 10 seconds. Remaining km/mi is your estimated distance left in the remaining count-down time. Here also, respective data is updated every 10 seconds. As long as you have not reset your COUNTDOWN by ?RESET?, you are able to review the projected FORECAST KM/MI of your last COUNTDOWN by the "FORECAST KM/MI" menu option.
11. Troubleshooting
Here's a listing of possible malfunctions, the probable causes and suggested solutions.
| Malfunction Probable Cause Remedy / Repair | ||
| Partial text segments in display (i.e. after battery change | Computer-software is not running smoothly after bat-tery change | Reset the software by pressing the AC-button on the rear housing |
| No speed reading in display | Transmitter and magnet are too far apart | Readjust position of trans-mitter and magnet |
GB
| No speed reading in display | Transmitter battery has been changed | Activate manual transmitter search (DIGI CONNECT RESET) see chapter 3.1 |
| No speed reading in display | Wheel size is not correctly set up = Wheel size is ZERO | Program your wheel size |
| Display fades Battery | is weak Check battery, and replace eventually | |
| Display fades Temperatures below 5°C (41°F) make your LCD display fade | Higher temperatures will make your display work properly | |
12. Warranty disclaimer
VDO Cycle Parts warrants your VDO-Computer for 5 years from date of purchase. This war-

ranty covers defects in material and workmanship. Defects on cables, senders, transmitters and mounting materials resulting from normal wear and tear, improper care, accidents, abuse or alteration are not covered by our warranty. Opening the computer housing (except for the battery door) is considered abuse, thus not covered by our 5 year warranty.
Please keep your sales receipt to prove that your computer is covered under the warranty in case of legitimate complaints.
In case of legitimate complaints you are entitled to have your computer either repaired or replaced with a comparable model. Due to possible model changes, your model might have been discontinued.
In the event that you should have a complaint, please first contact the retailer where you purchased your VDO computer. If the retailer is unable to help, you can return your computer to:
In case of technical queries, please contact our customer-service-hotline: +49-6349-9635-10.
Further technical information is available on our website: http://www.vdocyclecomputer.com
Technical specifications of our computers are subject to change without notice.
GB
13. Technical Specifications
Computer: approx. 45 x 52 x 16 mm, weight 45 g
Handlebar holder: weight 15 g
Transmitter: weight20 g
Battery: 3V, Type 2032 (Computer), 3V Type 2032 (Transmitter)
Battery life: 300 hours of use, approx. 6000 km (3940 mi) only speedtransmitter use
250 hours of use, approx. 5000 km (3106 mi) speed plus cadence-transmitter use. Digital speed transmitter: 600 h
Operating temperature of LCD display: -15 °C to +60 °C (5° F to 140° F)
Speed reading range: at wheel size 2155 mm (84.8 in) min 2.5 km/h (1.55 mi) / max 120 km/h (74 mi)
Riding Time Measuring Range: up to 23:59:59 HH:MM:SS
Stop Watch Measuring Range (only C2DS, C3DS, C4DS): up to 23:59:59 HH:MM:SS
Trip Distance Counter Measuring Range: up to 999.99 km or mi
NAVIGATOR Measuring Range (only C3DS, C4DS): up to 999.99 km or mi
Total odometer either Bike 1 or 2 Measuring Range: Up to 99.999 km or mi
Total Odometer measuring Range: up to 199.999 km or mi
Wheel size Set Range: 100 mm (3.9 in) minimum / 3999 mm (157.4 in) maximum

- Initial Operation
- VDO
- CYCLECOMPUTING
- PO2
- P05
- PO6
- P07
- IMPORTANT!
- ATTENTION:
- IMPORTANT: General hint to read this manual:
- GB
- Contents
- Preface
- Index part I
- Index part II
- Important hint:
- Index part III
- Index part IV
- Index part V
- VDO DIGITAL SYTEM
- What happens when digital transmission is interfered with?
- Following data is immediately updated when the re-send data is received :
- The VDO-USER-CARD
- Functions
- Optional features
- Installing the batteries in the digital transmitter and the computer >>> P02
- First install the battery in the digital transmitter
- Install the battery in the computer immediately after the installation of the battery in the transmitter.
- After every start a green LED at the transmitter flashes for 20 sec. only The flashing LED indicates a working transmitter.
- Mounting transmitter and magnet >>> P03
- Mounting the VDO any-size handlebar holder >>> P04
- Twist-Click mounting of the computer >>> P05
- The new 4-line VDO display
- Indicator elements (Icons)
- Digit elements
- Text lines
- The VDO EMC-operating system
- Functions / menu structure
- Information Menus
- Set Menus
- menu available for models:
- Manual Transmitter Search – DIGI CONNECT RESET
- Basic settings
- Language selection
- Measuring and setting the wheel size(s) >>>P07
- Measuring both wheel circumferences:
- Setting the wheel sizes :
- Setting the clock
- Setting the odometers
- Changing wheel sizes from bike 1 to bike 2
- Reset functions
- Safety check back: Are you sure you want to reset?
- Service-Interval-Indicator
- Sleep-Mode
- Cadence (optional)
- Stopwatch
- NAVIGATOR functions
- Setting the NAVIGATOR
- Reset NAVIGATOR to zero.
- Timing functions
- Selecting timing functions
- C4DS
- TIMER/COUNTDOWN programming
- Timer/Countdown/Stopwatch start, stop and reset / Beep
- Check back COUNTDOWN
- Additional Countdown Functions
- Troubleshooting
- Warranty disclaimer
- Please keep your sales receipt to prove that your computer is covered under the warranty in case of legitimate complaints.
- Technical Specifications
Brand : VDO
Model : C4DS
Category : Bike computer