
Previa (2016) - Automobile TOYOTA - Free user manual and instructions
Find the device manual for free Previa (2016) TOYOTA in PDF.


| Product Type | Automobile (Minivan) |
| Brand | Toyota |
| Model | Previa (2016) |
| Engine | 2.4L Inline-4 or 3.5L V6 Petrol |
| Transmission | 4-speed or 5-speed Automatic |
| Drivetrain | Front-Wheel Drive or All-Wheel Drive |
| Seating Capacity | 7 or 8 Passengers |
| Length | 4,750 mm (approx.) |
| Width | 1,800 mm (approx.) |
| Height | 1,730 mm (approx.) |
| Curb Weight | 1,600–1,800 kg (approx.) |
| Fuel Type | Unleaded Petrol |
| Fuel Tank Capacity | 60 L (approx.) |
| Safety Features | Airbags (front, side, curtain), ABS, VSC, Traction Control |
| Key Functions | Power sliding doors, cruise control, rear climate control, navigation system (optional) |
| Maintenance | Oil change every 10,000 km, tire rotation, brake inspection |
| Cleaning | Interior: vacuum, mild detergent; Exterior: car wash soap |
| Spare Parts | Available via Toyota dealerships or certified online stores |
| Reparability | Moderate; many repairs possible DIY with service manual |
| Manual Language | English (original), translations available upon request |
Frequently Asked Questions - Previa (2016) TOYOTA
User questions about Previa (2016) TOYOTA
0 question about this device. Answer the ones you know or ask your own.
Ask a new question about this device
Download the instructions for your Automobile in PDF format for free! Find your manual Previa (2016) - TOYOTA and take your electronic device back in hand. On this page are published all the documents necessary for the use of your device. Previa (2016) by TOYOTA.
USER MANUAL Previa (2016) TOYOTA
Owner's Manual
For your safety and comfort, read carefully and keep in the vehicle.
TARAGO
PREVIA
Not for Reproduction
©2016 TOYOTA MOTOR CORPORATION
All rights reserved. This material may not be reproduced or copied, in whole or in part, without the written permission of Toyota Motor Corporation.
TABLE OF CONTENTS
| 1 | Before driving | Adjusting and operating features such as door locks, mirrors, and steering column. | |
| 2 | When driving | Driving, stopping and safe-driving information. | |
| 3 | Interior features | Air conditioning and audio systems, as well as other interior features for a comfortable driving experience. | |
| 4 | Maintenance and care | Cleaning and protecting your vehicle, performing do-it-yourself maintenance, and maintenance information. | |
| 5 | When trouble arises | What to do if the vehicle needs to be towed, gets a flat tire, or is involved in an accident. | |
| 6 | Vehicle specifications | Detailed vehicle information. | |
| 7 | Index | Alphabetical listing of information contained in this manual. |
1 Before driving
1-1. Key information
Keys.... 24
1-2. Opening, closing and locking the doors
Smart entry & start system ... 27
Push-button start system..... 37
Wireless remote control..... 43
Front doors 46
Sliding doors.... 48
Back door.... 61
1-3. Adjustable components (seats, mirrors, steering wheel)
Front seats....67
Rear seats 70
Head restraints 79
Seat arrangement...... 81
Seat belts.... 109
Steering wheel.... 117
Anti-glare inside rear view mirror 118
Outside rear view mirrors.... 119
1-4. Opening and closing the windows and moon roofs and sunshades
Power windows.... 121
Moon roofs.... 124
Sunshades.... 126
1-5. Refueling
Opening the fuel tank cap 129
1-6. Theft deterrent system
Engine immobilizer system.... 132
1-7. Safety information
Correct driving posture...... 133
SRS airbags.... 135
Child restraint systems..... 145
Installing child restraints..... 154
2 When driving
2-1. Driving procedures
Driving the vehicle.... 170
Engine (ignition) switch ..... 180
Continuously variable transmission.... 185
Automatic transmission..... 190
Turn signal lever.... 196
Parking brake.... 197
Horn 199
2-2. Instrument cluster
Gauges and meters...... 200
Indicators and warning lights.... 204
Multi-information display .... 208
2-3. Operating the lights and wipers
Headlight switch.... 214
Fog light switch.... 218
Windshield wipers and washer.... 219
Rear window wiper and washer.... 222
Headlight cleaner switch..... 223
2-4. Using other driving systems
Cruise control.... 224
Toyota parking assist-sensor 228
Driving assist systems ..... 235
2-5. Driving information
Cargo and luggage 241
Winter driving tips 244
Trailer towing 248
3 Interior features
3-1. Using the air conditioning system and defogger
Front automatic air conditioning system...... 258
Rear air conditioning system 272
Rear cooler system.... 275
Rear window defogger..... 277
3-2. Using the audio system
Audio system types...... 278
Using the radio.... 280
Using the CD player...... 282
Playing back MP3 and WMA discs.... 288
Optimal use of the audio system.... 295
Using the steering wheel audio switches 298
3-3. Using the rear seat entertainment system
Rear seat entertainment system features.... 301
Playing a Blu-ray Disc™ (BD) and DVD disc...... 315
Playing an audio CD and MP3/WMA discs.... 340
Playing an SD card 345
Using the video mode ..... 352
3-4. Using the interior lights
Interior lights list 354
• Personal lights 355
- Interior light 355
3-5. Using the storage features
List of storage features ..... 357
- Glove box 359
- Console box.... 359
• Cup holders 361 - Bottle holders.... 362
• Auxiliary boxes ...... 364
3-6. Other interior features
Sun visors.... 366
Vanity mirrors.... 367
Conversation mirror ...... 368
Clock.... 369
Outside temperature display 370
Power outlets...... 371
Seat heaters 373
Armrest 375
Assist grips 377
Floor mat.... 378
Luggage compartment features.... 380
4 Maintenance and care
4-1. Maintenance and care
Cleaning and protecting the vehicle exterior .... 384
Cleaning and protecting the vehicle interior .... 388
4-2. Maintenance
Maintenance requirements.... 391
4-3. Do-it-yourself maintenance
Do-it-yourself service precautions 393
Hood.... 396
Positioning a floor jack ..... 398
Engine compartment...... 401
Tires 416
Tire inflation pressure...... 420
Wheels 422
Air conditioning filter...... 424
Electronic key battery...... 427
Rear seat entertainment system controller battery.... 429
Checking and replacing fuses 431
Light bulbs.... 447
5 When trouble arises
5-1. Essential information
Emergency flashers ..... 474
If your vehicle needs to be towed 475
If you think something is wrong 481
Fuel pump shut off system.... 482
5-2. Steps to take in an emergency
If a warning light turns on or a warning buzzer sounds.... 483
If a warning message is displayed 488
If you have a flat tire 498
If the engine will not start.... 516
If you lose your keys...... 518
If the electronic key does not operate properly ..... 519
If the vehicle battery is discharged .... 522
If your vehicle overheats..... 528
If the vehicle becomes stuck 531
If your vehicle has to be stopped in an emergency.... 533
6 Vehicle specifications
6-1. Specifications
Maintenance data (fuel, oil level, etc.)...... 536
Fuel information.... 550
6-2. Customization
Customizable features...... 551Items to initialize ...... 553
Index
Abbreviation list...... 556
Alphabetical index...... 557
What to do if.... 568
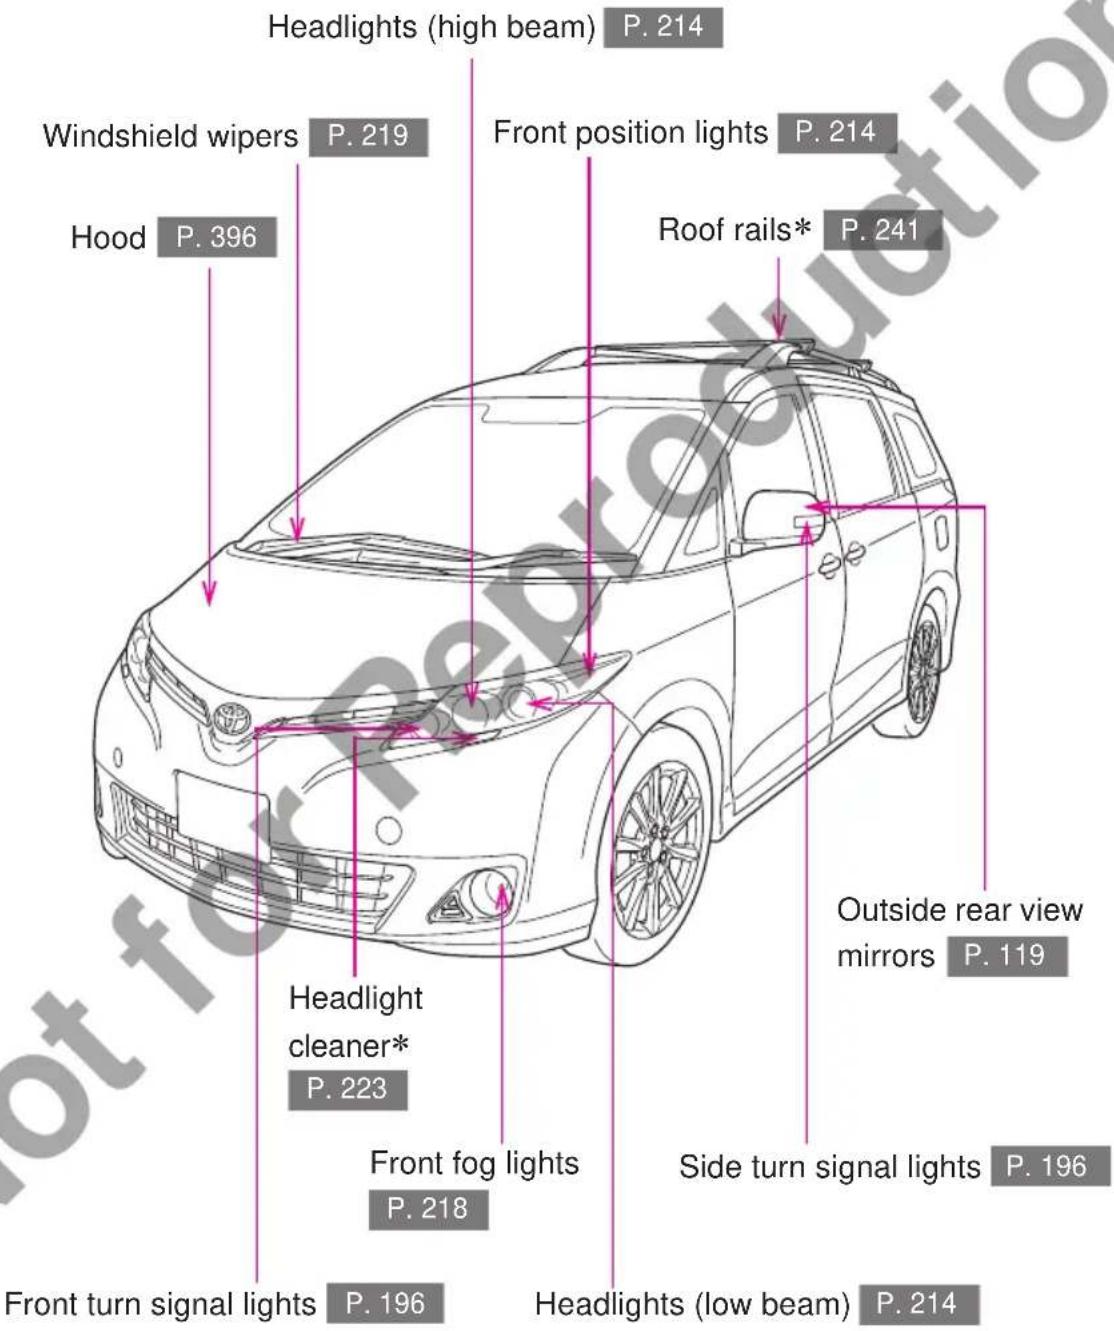
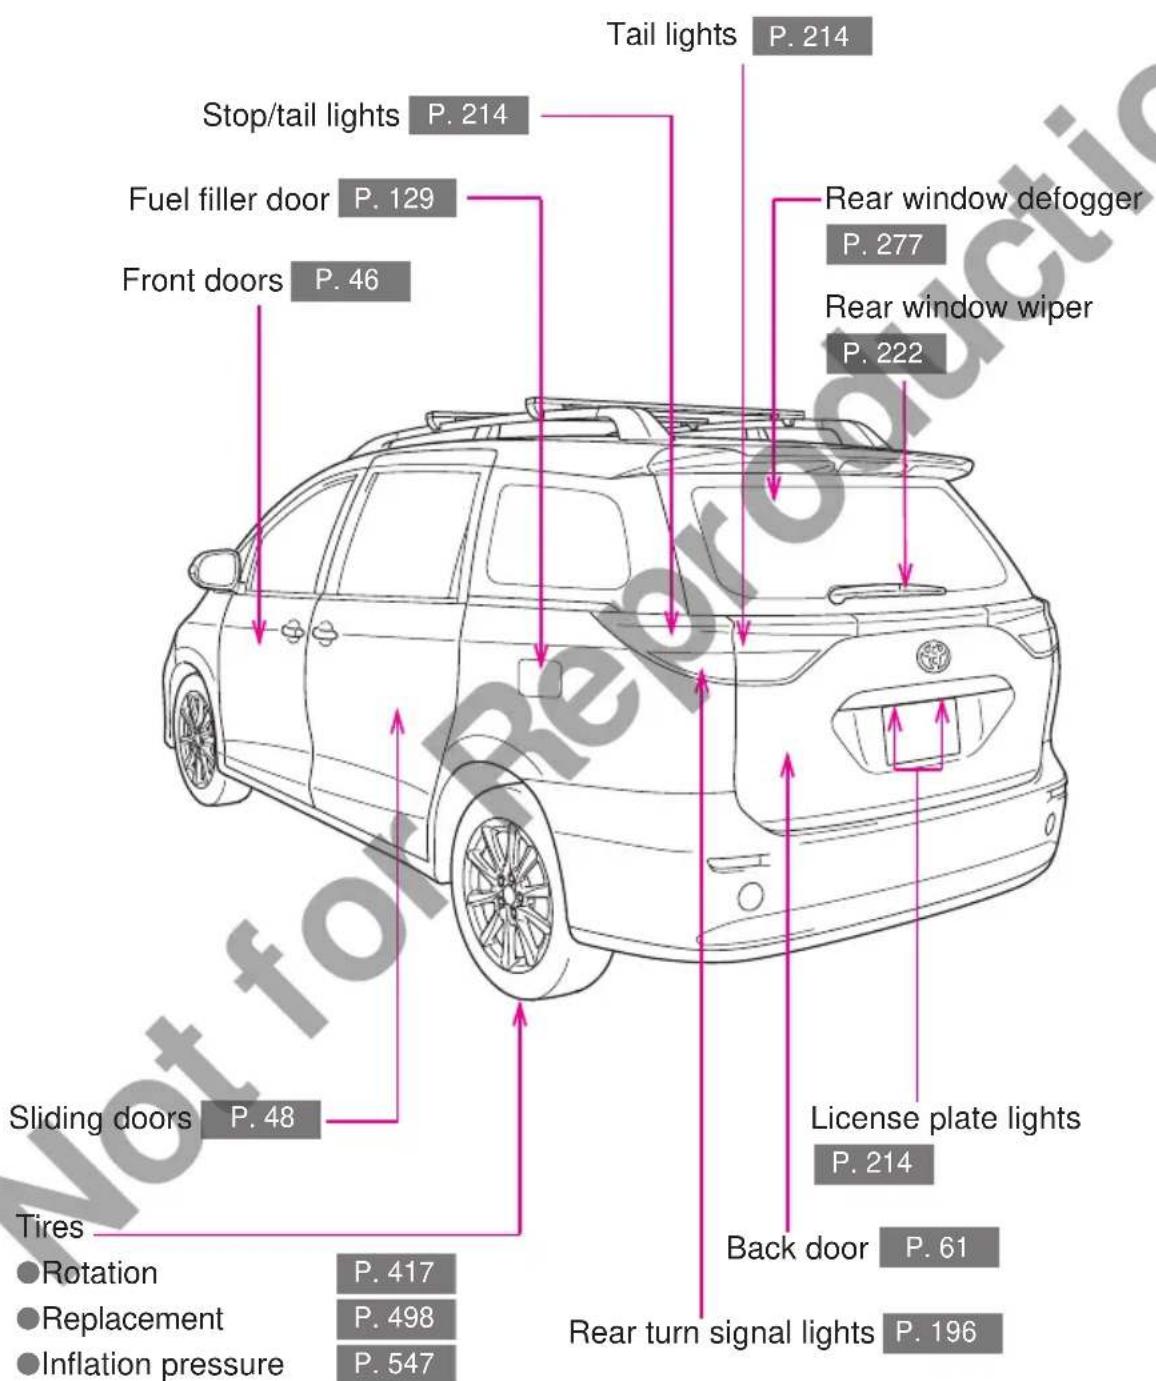
*: If equipped
Pictorial index
Interior
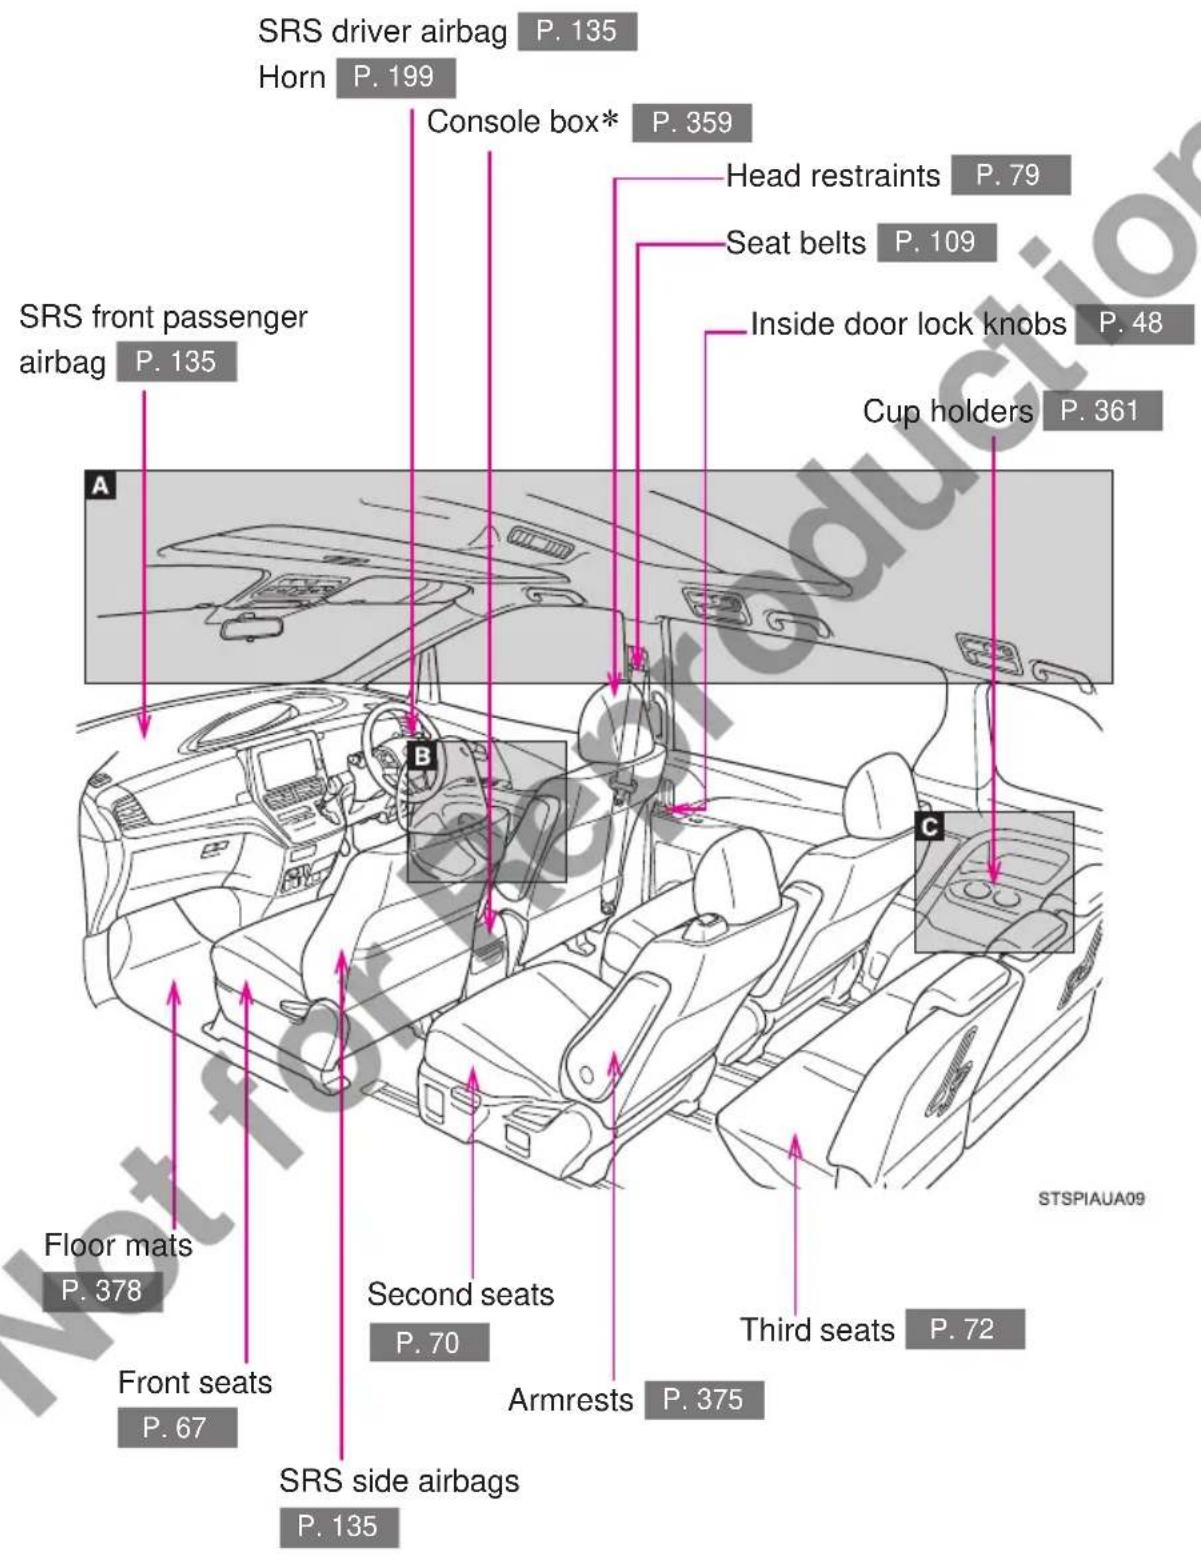
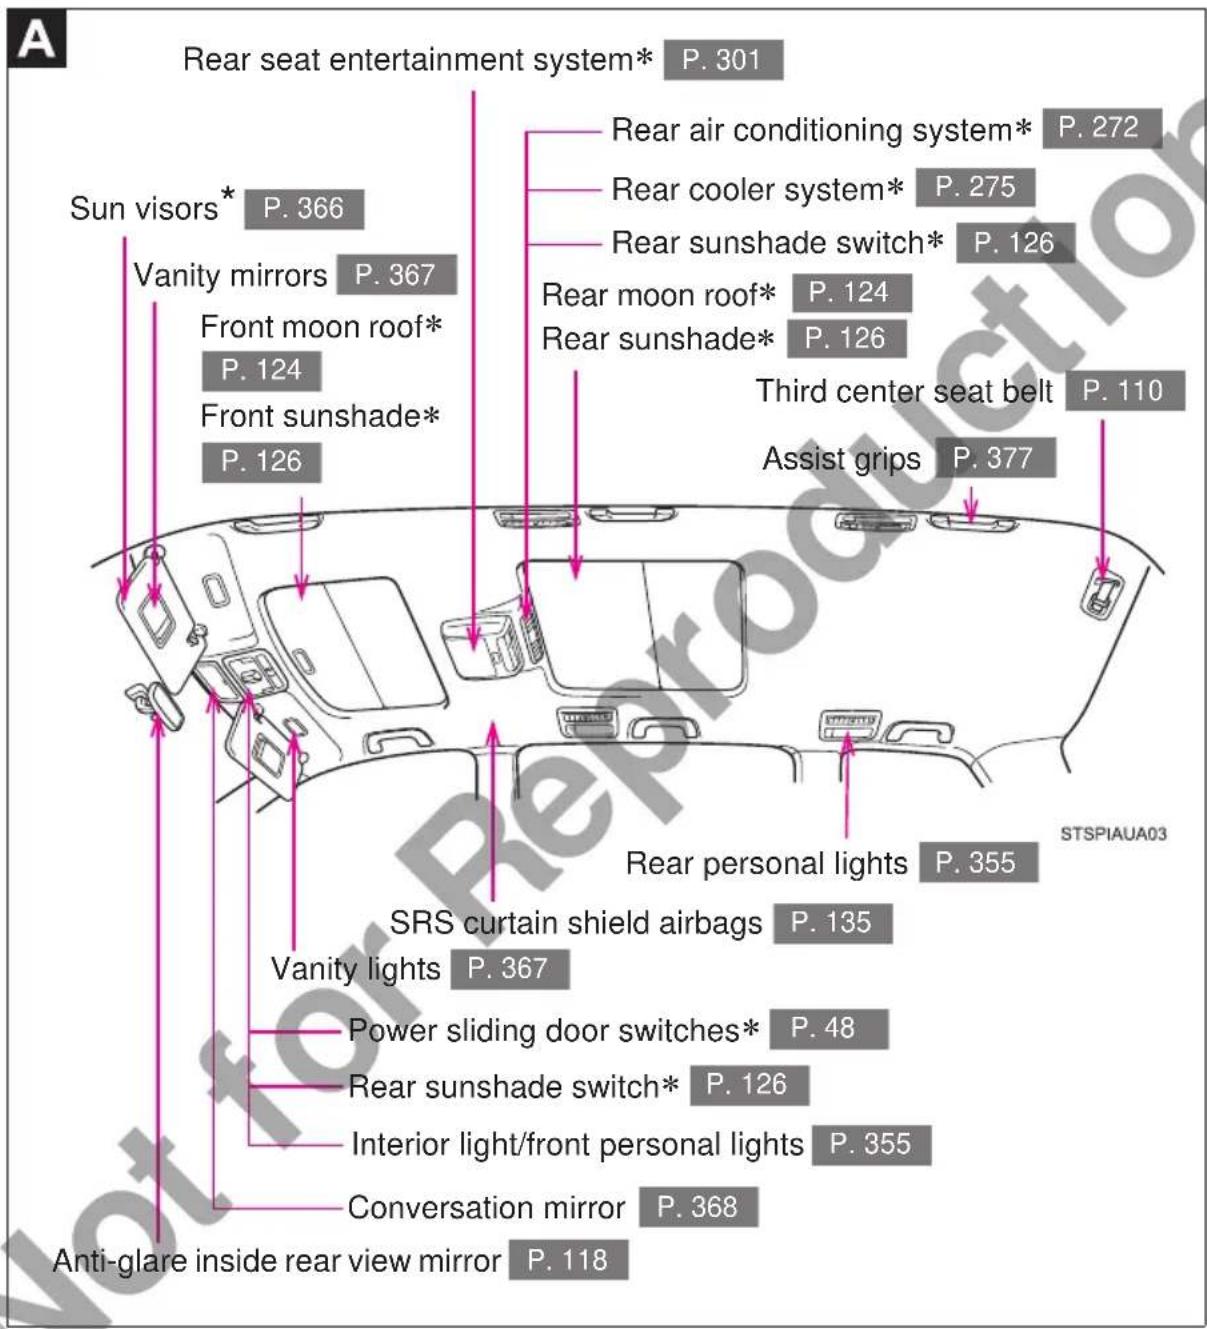
*: If equipped
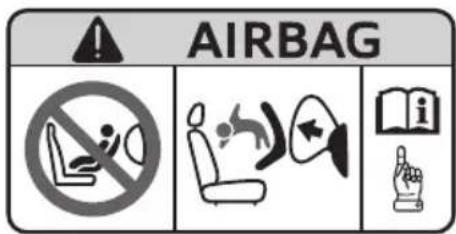
*: NEVER use a rearward facing child restraint on a seat protected by an ACTIVE AIRBAG in front of it, DEATH or SERIOUS INJURY to the CHILD can occur. (→P. 166)
Pictorial index
Interior
B
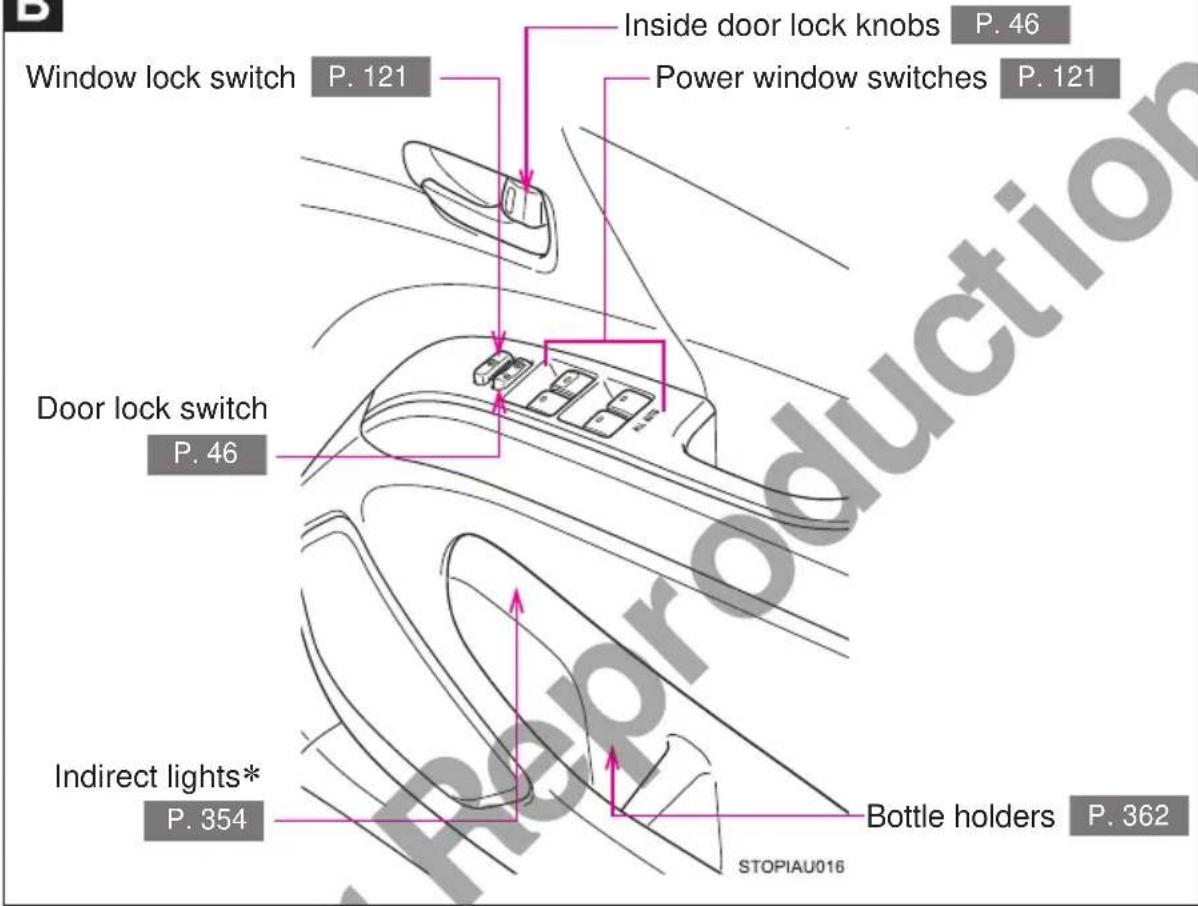
C
Left side
A/V input port*
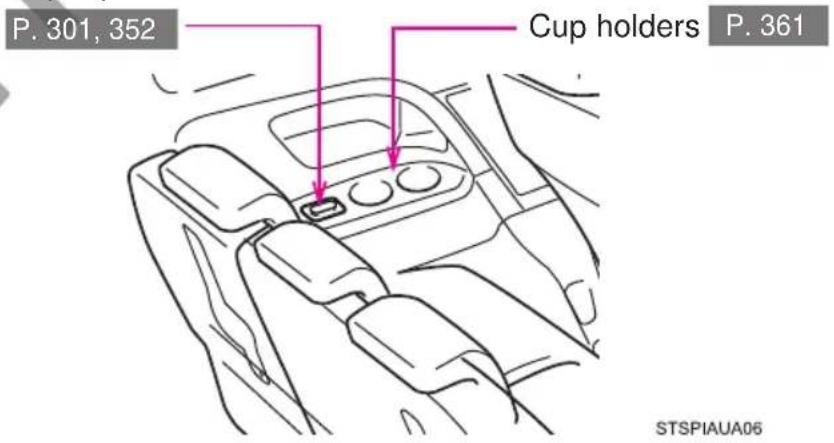
*: If equipped
Pictorial index
Instrument panel
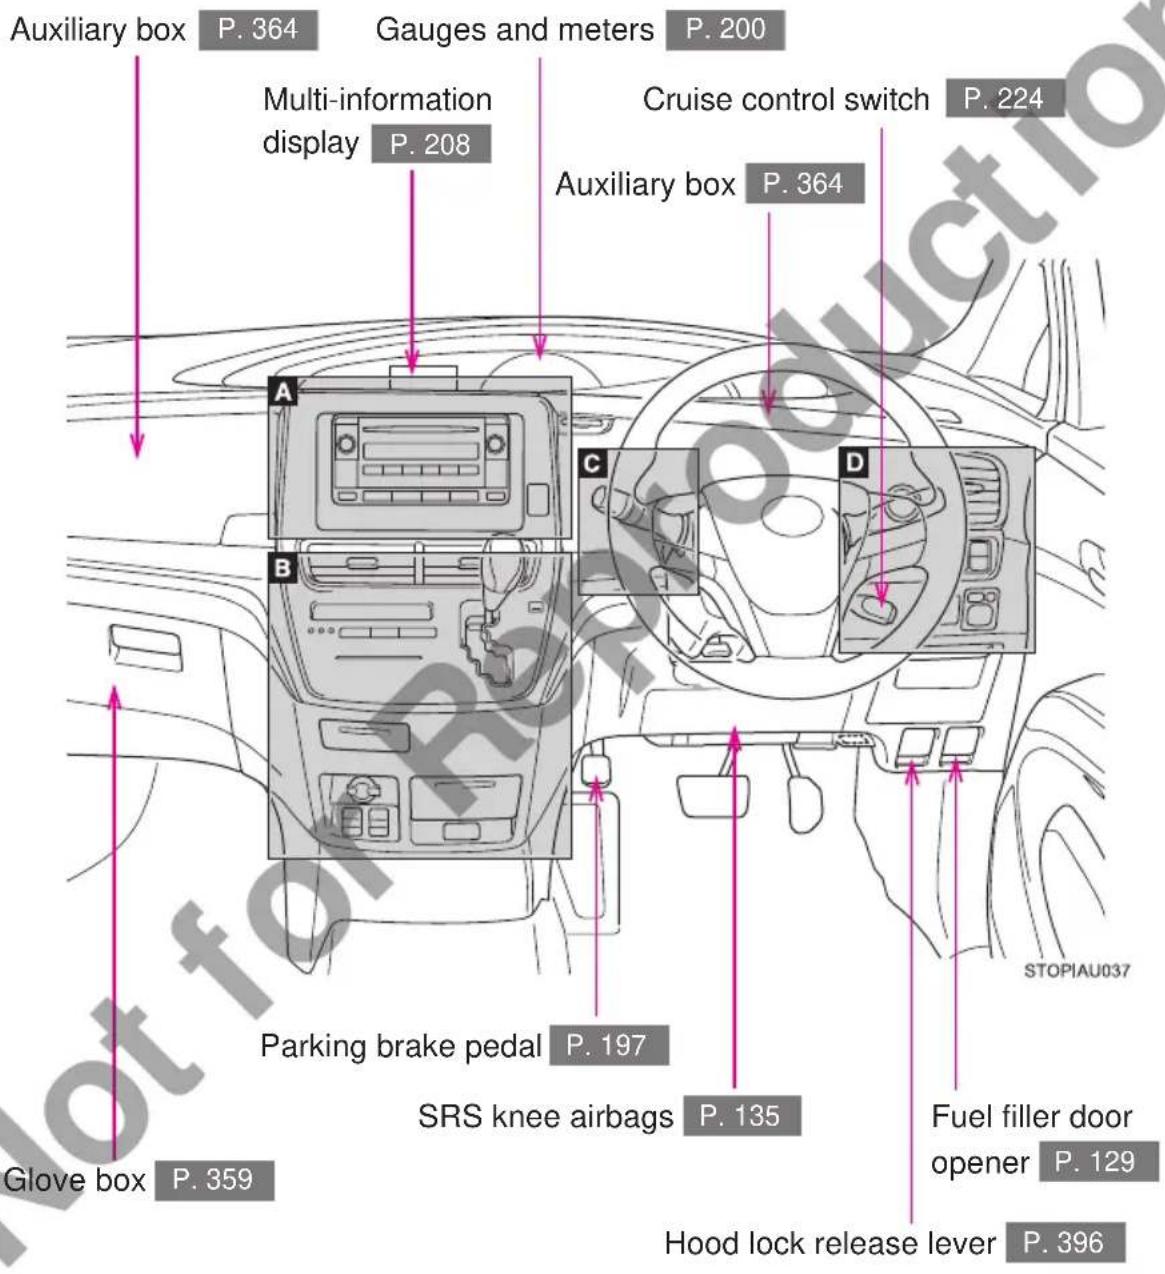
A
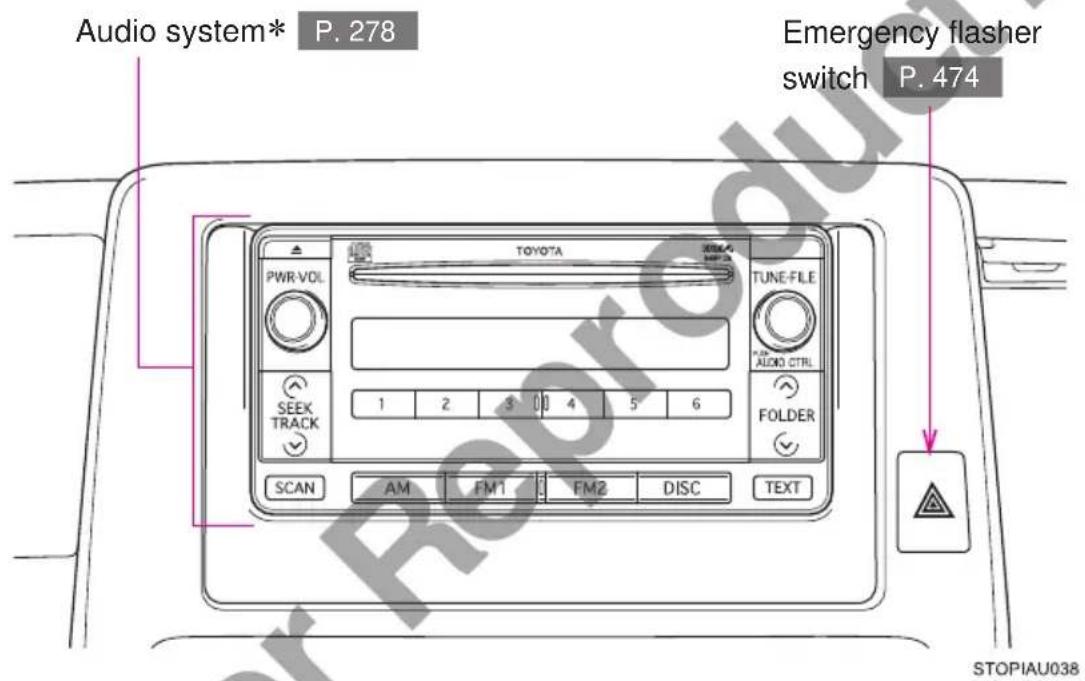
B
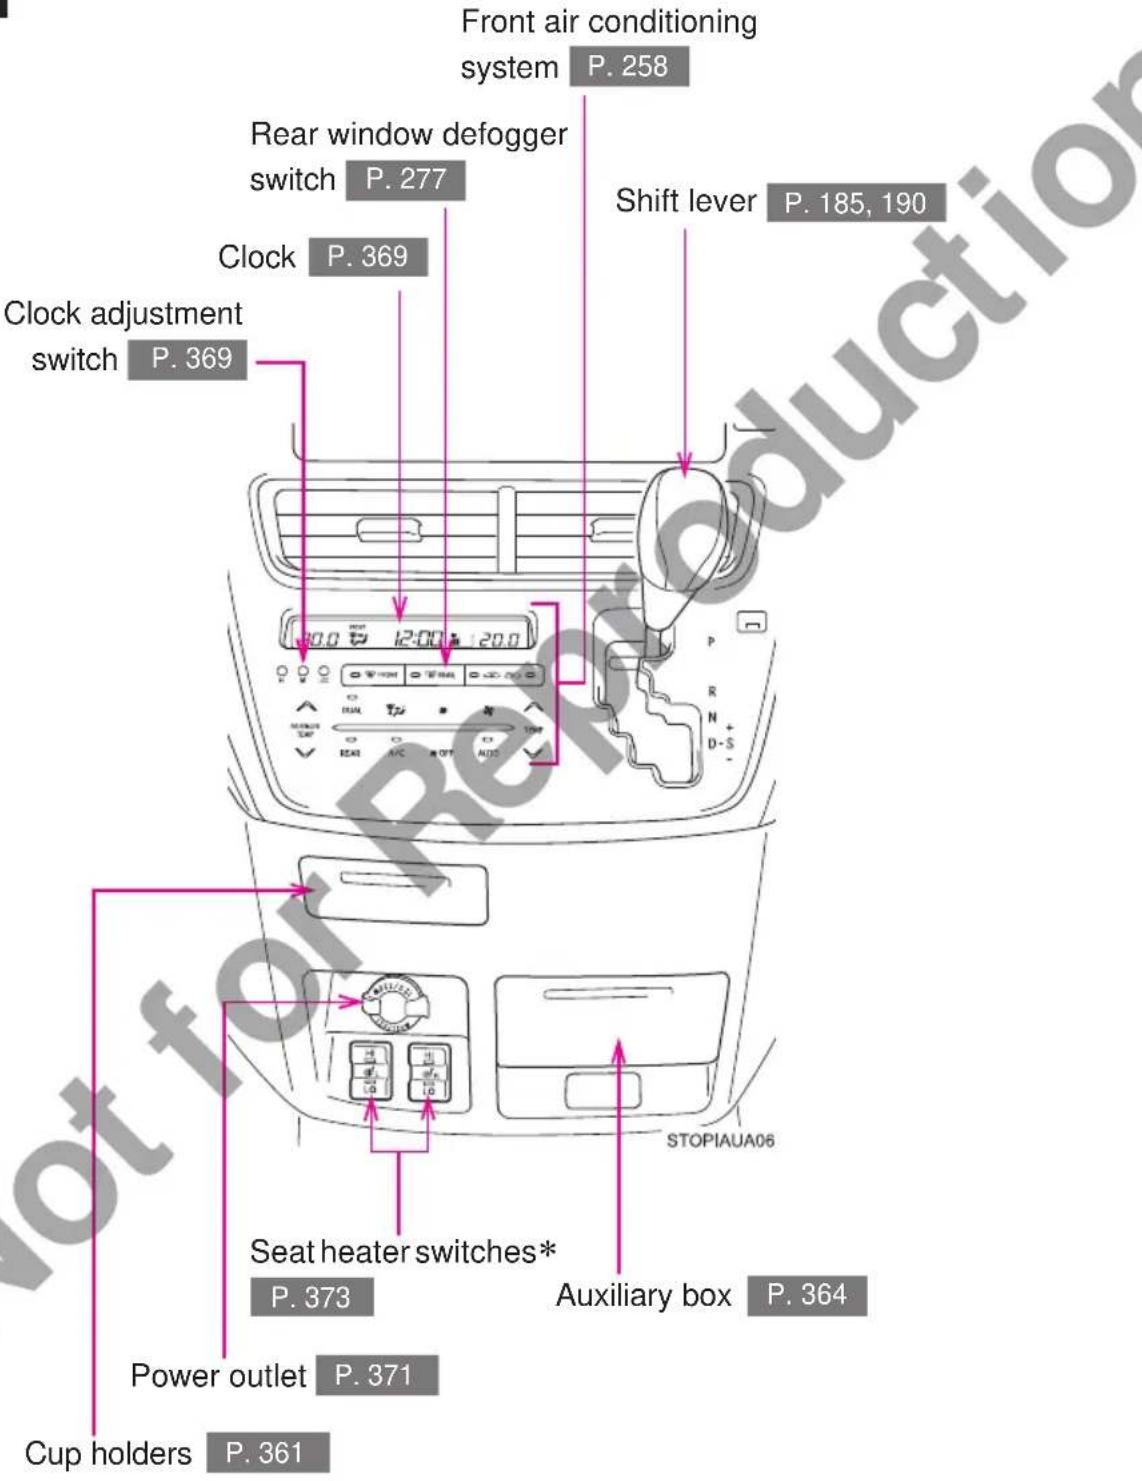
*: If equipped
C
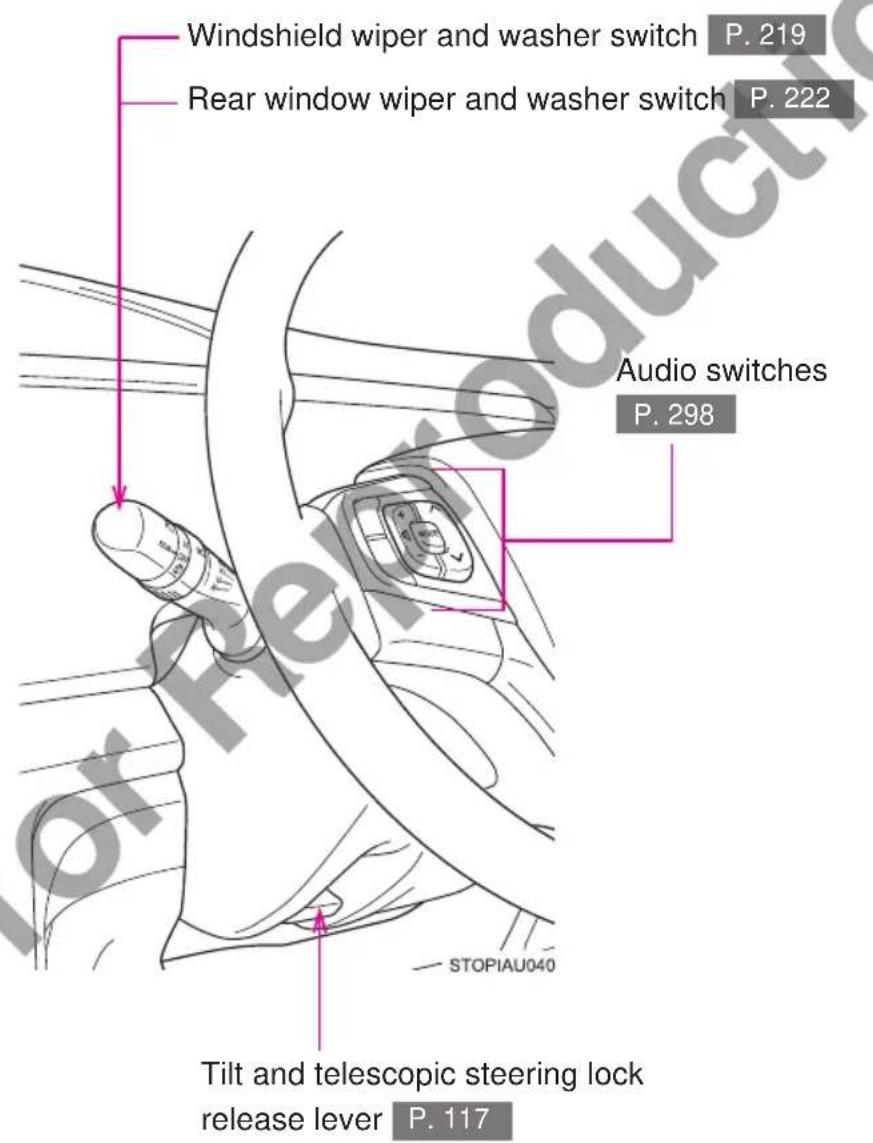
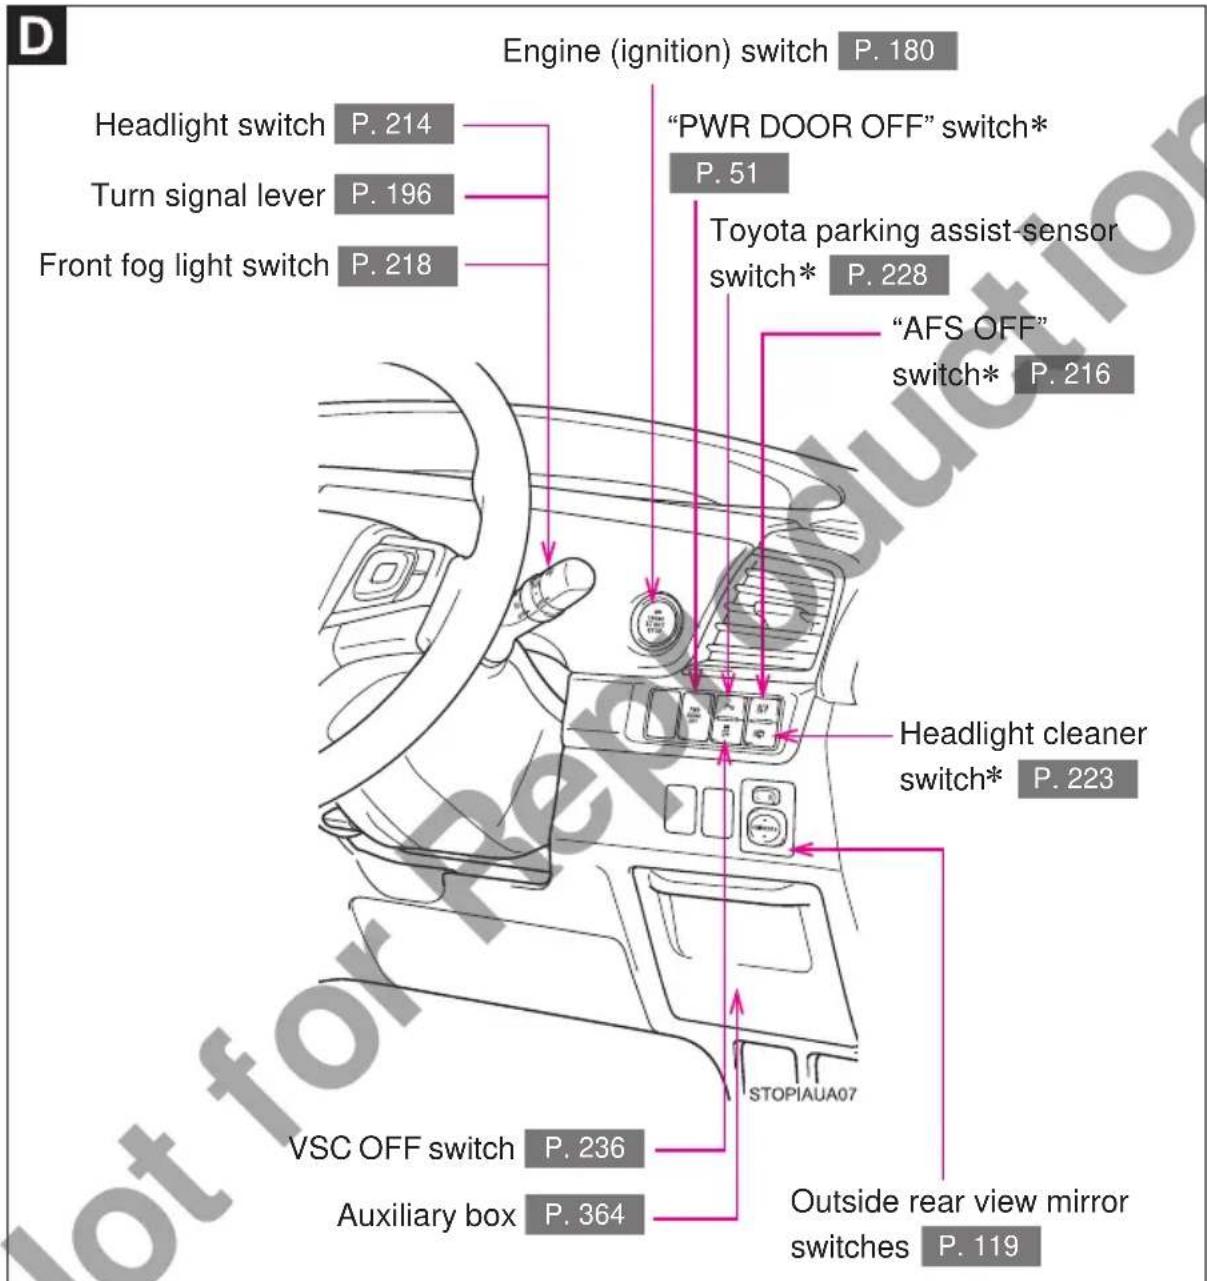
*: If equipped
Pictorial index
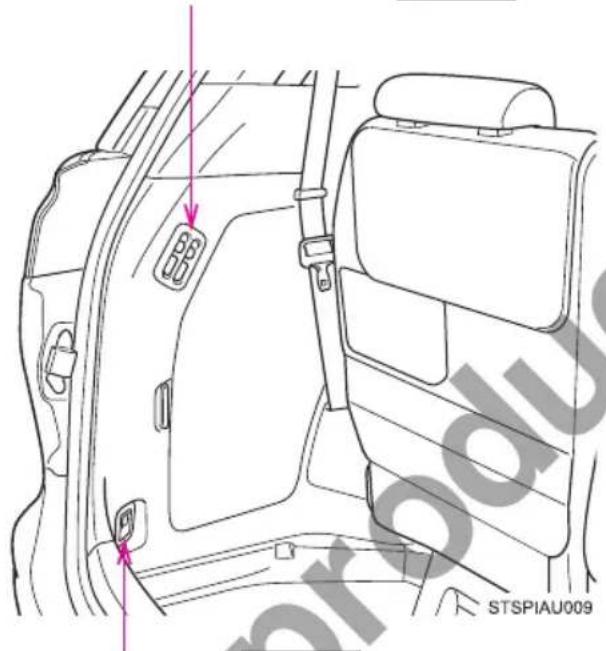
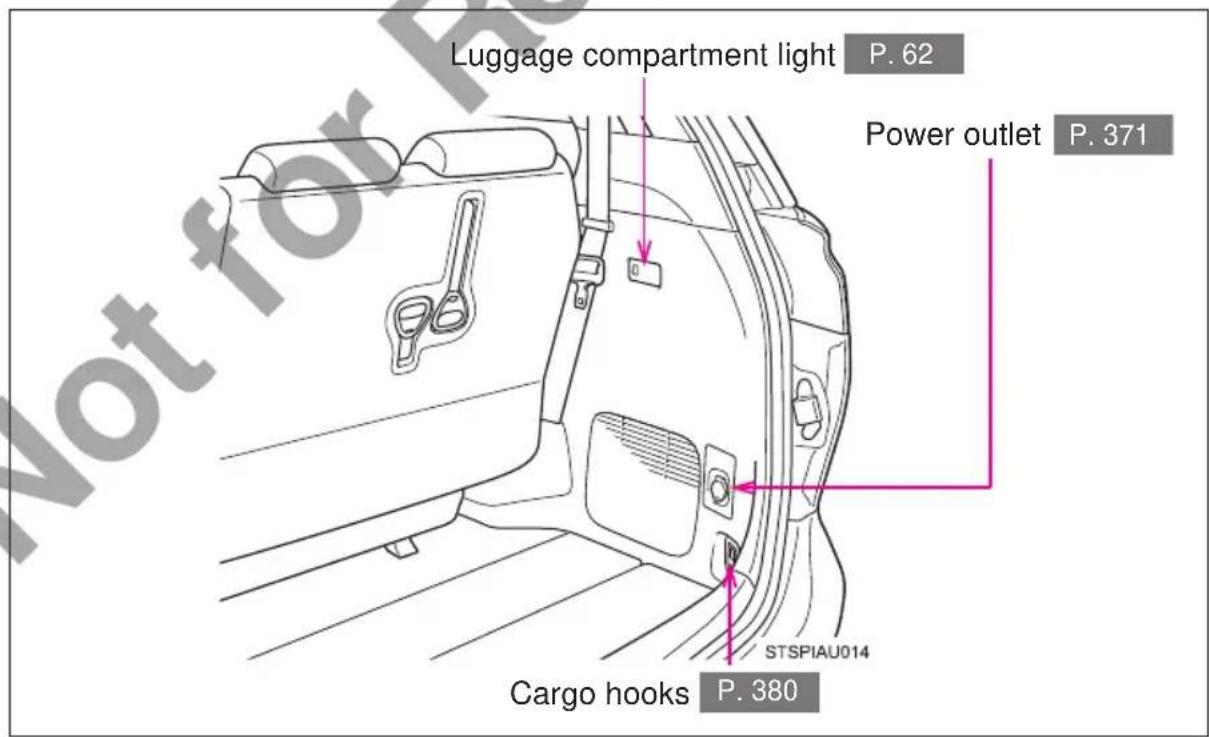
Luggage compartment
Power third seats switches*
P. 90
natural_image
Technical line drawing of a car interior showing door, seat, and window (no text or symbols)Cargo hooks P. 380
*: If equipped
For your information
Main Owner's Manual
Please note that this manual applies to all models and all equipment, including options. Therefore, you may find some explanations for equipment not installed on your vehicle.
All specifications provided in this manual are current at the time of printing. However, because of the Toyota policy of continual product improvement, we reserve the right to make changes at any time without notice.
Depending on specifications, the vehicle shown in the illustrations may differ from your vehicle in terms of equipment.
Accessories, spare parts and modification of your Toyota
A wide variety of non-genuine spare parts and accessories for Toyota vehicles are currently available in the market. Using these spare parts and accessories which are not genuine Toyota products may adversely affect the safety of your vehicle, even though these parts may be approved by certain authorities in your country. Toyota Motor Corporation therefore cannot accept any liability or guarantee spare parts and accessories which are not genuine Toyota products, nor for replacement or installation involving such parts.
This vehicle should not be modified with non-genuine Toyota products. Modification with non-genuine Toyota products could affect its performance, safety or durability, and may even violate governmental regulations. In addition, damage or performance problems resulting from the modification may not be covered under warranty.
Installation of an RF-transmitter system
The installation of an RF-transmitter system in your vehicle could affect electronic systems such as:
● Multiport fuel injection system/sequential multiport fuel injection system
●Cruise control system
●Anti-lock brake system
●SRS airbag system
- Seat belt pretensioner system
Be sure to check with your Toyota dealer for precautionary measures or special instructions regarding installation of an RF-transmitter system.
Further information regarding frequency bands, power levels, antenna positions and installation provisions for the installation of RF-transmitters, is available on request at your Toyota dealer.
Vehicle data recordings
Your Toyota equipped with several sophisticated computers that will record certain data, such as:
- Engine speed
- Accelerator status
- Brake status
- Vehicle speed
- Shift position
The recorded data varies according to the vehicle grade level and options with which it is equipped. Furthermore, these computers do not record conversations, sounds or pictures.
●Data usage
Toyota may use the data recorded in these computers to diagnose malfunctions, conduct research and development, and improve quality.
Toyota will not disclose the recorded data to a third party except:
- With the consent of the vehicle owner or with the consent of the lessee if the vehicle is leased
- In response to an official request by the police, a court of law or a government agency
- For use by Toyota in a lawsuit
- For research purposes where the data is not tied to a specific vehicle or vehicle owner
Scrapping of your Toyota
The SRS airbag and seat belt pretensioner devices in your Toyota contain explosive chemicals. If the vehicle is scrapped with the airbags and seat belt pretensioners left as they are, this may cause an accident such as fire. Be sure to have the systems of the SRS airbag and seat belt pretensioner removed and disposed of by a qualified service shop or by your Toyota dealer before you scrap your vehicle.
Event data recorder
This vehicle is equipped with an event data recorder (EDR). The main purpose of an EDR is to record, in certain crash or near crash-like situations, such as an air bag deployment or hitting a road obstacle, data that will assist in understanding how a vehicle's systems performed. The EDR is designed to record data related to vehicle dynamics and safety systems for a short period of time, typically 30 seconds or less.
The EDR in this vehicle is designed to record such data as:
- How various systems in your vehicle were operating;
- How far (if at all) the driver was depressing the accelerator and/or brake pedal; and,
- How fast the vehicle was traveling.
These data can help provide a better understanding of the circumstances in which crashes and injuries occur.
NOTE: EDR data are recorded by your vehicle only if a non-trivial crash situation occurs; no data are recorded by the EDR under normal driving conditions and no personal data (e.g., name, gender, age, and crash location) are recorded. However, other parties, such as law enforcement, could combine the EDR data with the type of personally identifying data routinely acquired during a crash investigation.
To read data recorded by an EDR, special equipment is required, and access to the vehicle or the EDR is needed. In addition to the vehicle manufacturer, other parties, such as law enforcement, that have the special equipment, can read the information if they have access to the vehicle or the EDR.
●Disclosure of the EDR data
Toyota will not disclose the data recorded in an EDR to a third party except when:
- An agreement form the vehicle's owner (or the lessee for a leased vehicle) is obtained
- In response to an official request by the police, a court of law or a government agency
- For use by Toyota in a law suit
However, if necessary, Toyota may:
- Use the data for research on vehicle safety performance
- Disclose the data to a third party for research purposes without disclosing information about the specific vehicle or vehicle owner

WARNING
■General precautions while driving
Driving under the influence: Never drive your vehicle when under the influence of alcohol or drugs that have impaired your ability to operate your vehicle. Alcohol and certain drugs delay reaction time, impair judgment and reduce coordination, which could lead to an accident that could result in death or serious injury.
Defensive driving: Always drive defensively. Anticipate mistakes that other drivers or pedestrians might make and be ready to avoid accidents.
Driver distraction: Always give your full attention to driving. Anything that distracts the driver, such as adjusting controls, talking on a cellular phone or reading can result in a collision with resulting death or serious injury to you, your occupants or others.
■General precaution regarding children's safety
Never leave children unattended in the vehicle, and never allow children to have or use the key.
Children may be able to start the vehicle or shift the vehicle into neutral. There is also a danger that children may injure themselves by playing with the windows, the moon roof, or other features of the vehicle. In addition, heat build-up or extremely cold temperatures inside the vehicle can be fatal to children.
Symbols used throughout this manual
Warnings & Notices

WARNING
This is a warning against something which, if ignored, may cause death or serious injury to people. You are informed about what you must or must not do in order to reduce the risk of death or serious injury to yourself and others.

NOTICE
This is a warning against something which, if ignored, may cause damage to the vehicle or its equipment. You are informed about what you must or must not do in order to avoid or reduce the risk of damage to your Toyota and its equipment.
Symbols used in illustrations

Safety symbol
The symbol of a circle with a slash through it means "Do not", "Do not do this", or "Do not let this happen".
natural_image
Medical illustration showing two steps of a shoulder replacement device, one with a highlighted section and arrow indicating motion (no text or symbols)Arrows indicating operations

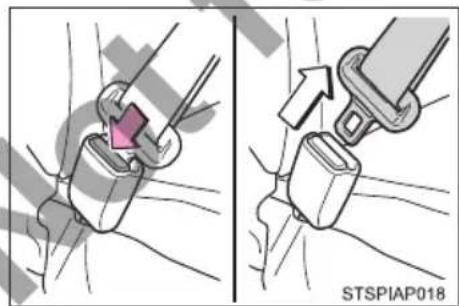
Indicates the action (pushing, turning, etc.) used to operate switches and other devices.

Indicates the outcome of an operation (e.g. a lid opens).
Before driving
1
1-1. Key information
Keys....24
1-2. Opening, closing and locking the doors
Smart entry & start system.... 27
Push-button start system.... 37
Wireless remote control..... 43
Front doors 46
Sliding doors.... 48
Back door 61
1-3. Adjustable components (seats, mirrors, steering wheel)
Front seats.... 67
Rear seats 70
Head restraints 79
Seat arrangement...... 81
Seat belts.... 109
Steering wheel...... 117
Anti-glare inside rear view mirror.... 118
Outside rear view mirrors 119
1-4. Opening and closing the windows and moon roofs and sunshades
Power windows.... 121
Moon roofs.... 124
Sunshades.... 126
1-5. Refueling
Opening the fuel tank cap.... 129
1-6. Theft deterrent system
Engine immobilizer system 132
1-7. Safety information
Correct driving posture ..... 133
SRS airbags.... 135
Child restraint systems ..... 145
Installing child restraints ... 154
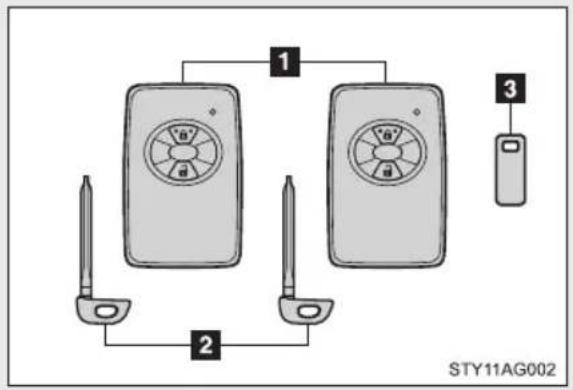
The following keys are provided with the vehicle.
Type A
flowchart
graph TD
    A["Device 1"] --> B["Device 2"]
    C["Device 2"] --> D["Device 3"]
    style A fill:#f9f,stroke:#333
    style C fill:#ccf,stroke:#333
    style B fill:#cfc,stroke:#333
    style D fill:#fcc,stroke:#333
1 Electronic keys
- Operating the push-button start system (→P. 37)
- Operating the wireless remote control function (→P. 43)
2 Mechanical keys
3 Key number plate
Type B
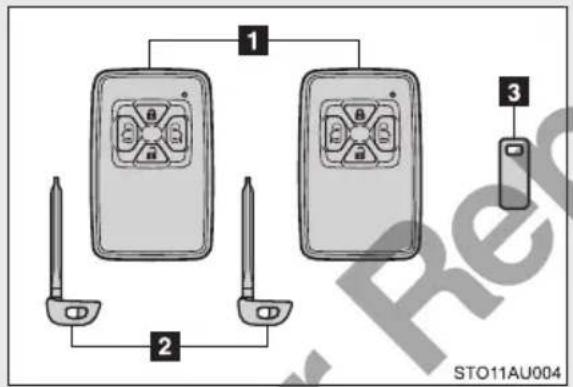
1 Electronic keys
- Operating the smart entry & start system (→P. 27)
- Operating the wireless remote control function (→P. 43)
2 Mechanical keys
3 Key number plate
Using the mechanical key
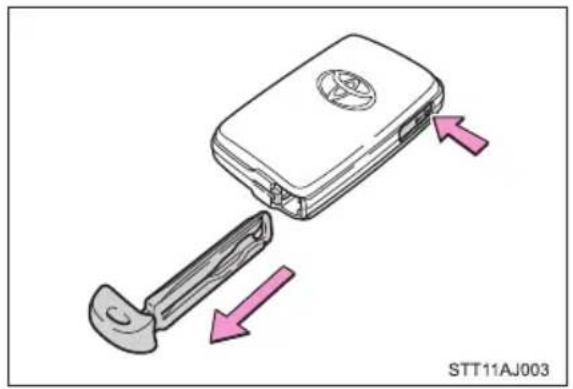
natural_image
Diagram of a device with a handle and internal components, showing directional arrows (no text or symbols)To take out the mechanical key, push the release button and take the key out.
After using the mechanical key, store it in the electronic key. Carry the mechanical key together with the electronic key. If the electronic key battery is depleted or the entry function (if equipped) does not operate properly, you will need the mechanical key.
(→P. 519)
When required to leave the vehicle's key with a parking attendant
Lock the glove box as circumstances demand. (→P. 359)
Remove the mechanical key for your own use and provide the attendant with the electronic key only.
■Key number plate
Keep the plate in a safe place such as your wallet, not in the vehicle. In the event that a mechanical key is lost, a new key can be made at your Toyota dealer using the key number plate. (→P. 518)
■When riding in an aircraft
When bringing electronic key onto an aircraft, make sure you do not press any buttons on the electronic key while inside the aircraft cabin. If you are carrying an electronic key in your bag, etc. ensure that the buttons are not likely to be pressed accidentally. Pressing a button may cause the key to emit radio waves that could interfere with the operation of the aircraft.

NOTICE
■To prevent key damage
Observe the following:
- Do not drop the keys, subject them to strong shocks, or bend them.
- Do not expose the keys to high temperatures for a long period of time.
- Do not get the keys wet or wash them in an ultrasonic washer, etc.
- Do not attach metallic or magnetic materials to the keys or place the keys close to such materials.
- Do not disassemble the keys.
- Do not attach a sticker or anything else to the surface of the key.
- Do not place the keys near objects that produce magnetic fields, such as TVs, audio systems and induction cookers, or medical electrical equipment, such as low-frequency therapy equipment.
In case of a smart entry & start system malfunction or other key-related problems
Take your vehicle with all the electronic keys provided with your vehicle to your Toyota dealer.
■When a vehicle key is lost
If the key remains lost, the risk of vehicle theft increases significantly. Visit your Toyota dealer immediately with all remaining electronic keys that was provided with your vehicle.
1-2. Opening, closing and locking the doors Smart entry & start system\*
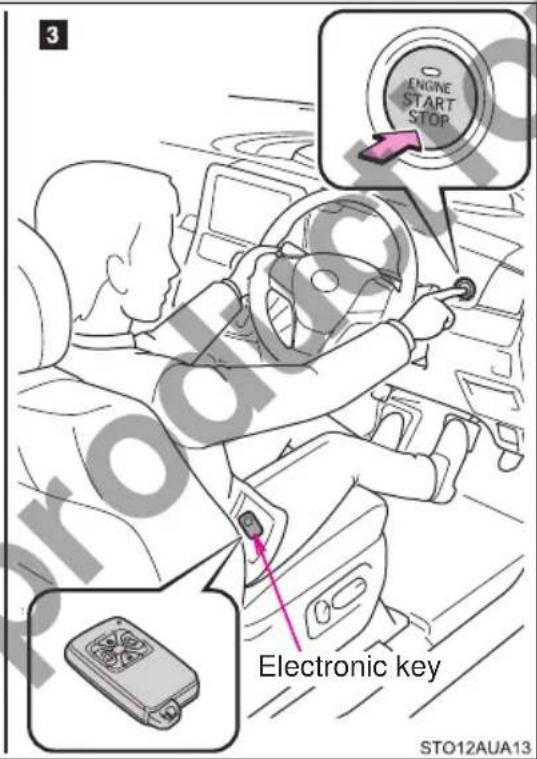
The following operations can be performed simply by carrying the electronic key on your person, for example in your pocket. (The driver should always carry the electronic key.)
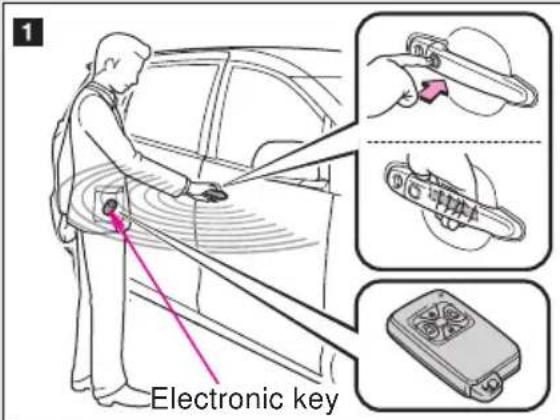
1 Unlocks and locks the all doors ( P. 28)
2 Unlocks and locks the all doors ( P. 29)
3 Starts and stops the engine ( P. 180)
Unlocking and locking the doors
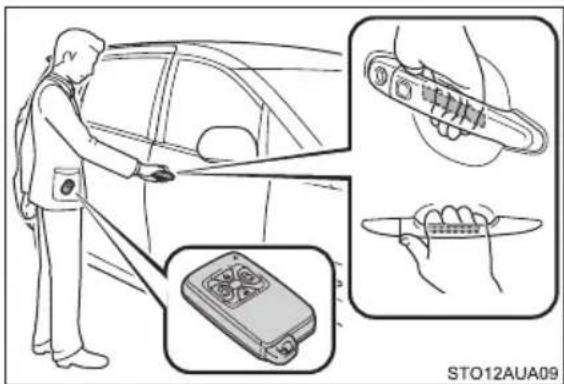
Grip the handle to unlock the all doors.
Make sure to touch the sensor on the back of the handle.
The doors cannot be unlocked for 3 seconds after the doors are locked.
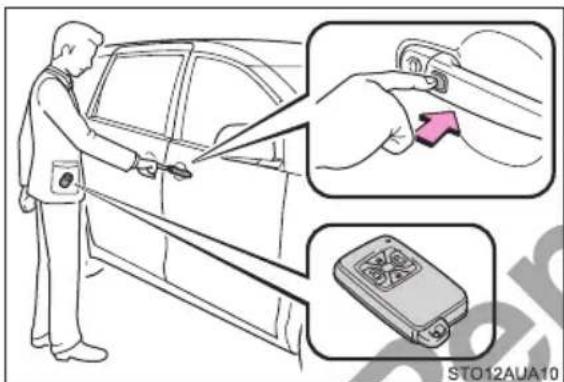
Press the lock button to lock the all doors.
Check that the door is securely locked.
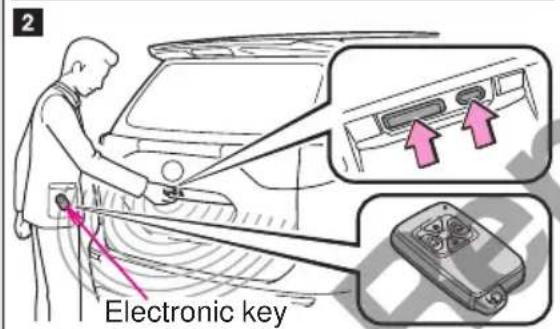
Unlocking and locking the back door
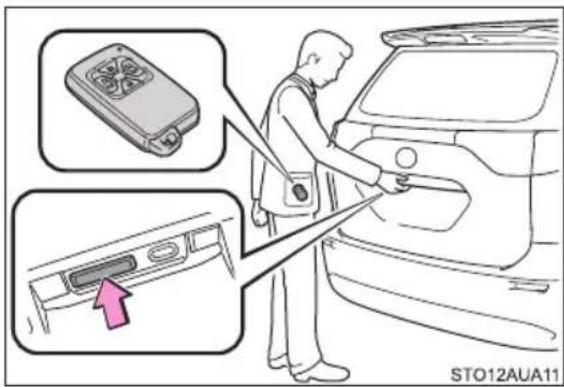
Press the button to unlock the all doors.
The door cannot be unlocked for 3 seconds after the door is locked.
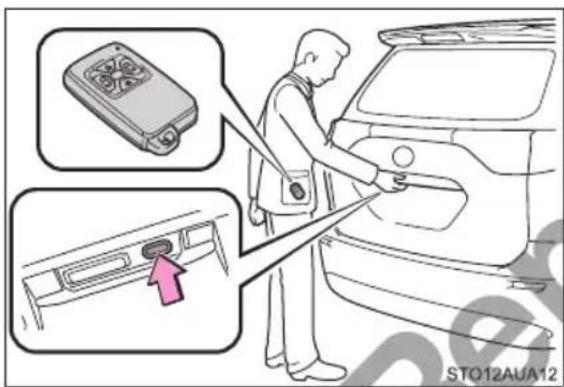
Press the button to lock the all doors.
Check that the door is securely locked.
Antenna location and effective range
Antenna location
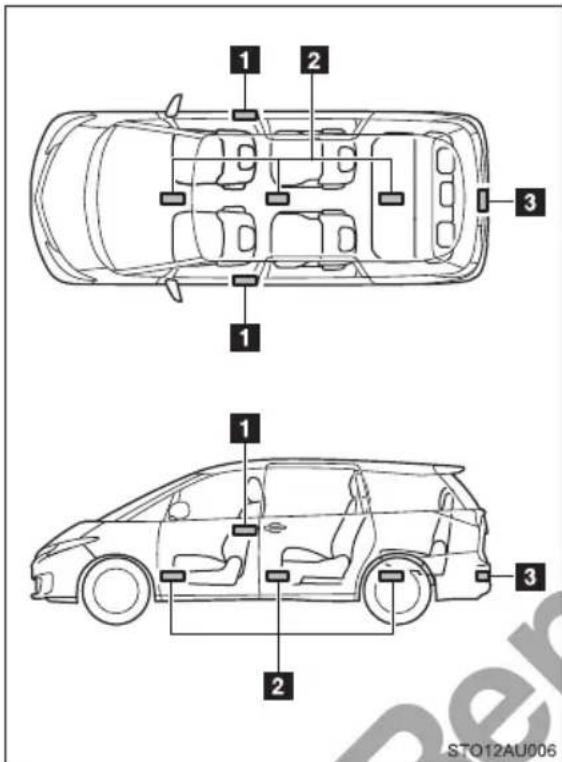
1 Antennas outside the cabin
2 Antennas inside the cabin
3 Antennas outside the luggage compartment
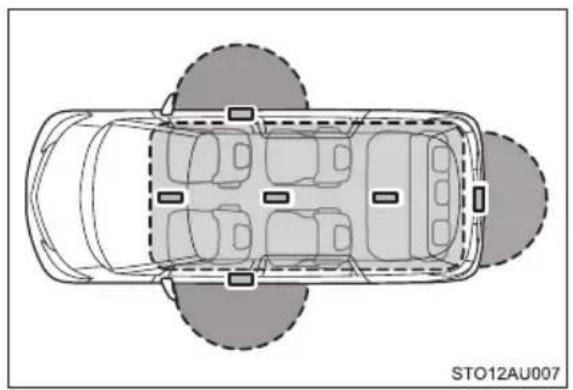
■ Effective range (areas within which the electronic key is detected)
natural_image
Top-down schematic of a car showing front, rear, and side views with no text or symbols
When locking or unlocking the doors
The system can be operated when the electronic key is within about 0.7 m (2.3 ft.) either of the outside front door handles and back door. (Only the doors detecting the key can be operated.)

When starting the engine or changing "ENGINE START STOP" switch modes
The system can be operated when the electronic key is inside the vehicle.
■ Operation signals
A buzzer sounds and the emergency flashers flash to indicate that the doors have been locked/unlocked. (Locked: once; Unlocked: twice)
■ Alarms and warning messages
A combination of exterior and interior alarms as well as warning message shown on the multi-information display are used to prevent theft of the vehicle and unforeseeable accidents resulting from erroneous operation. Take appropriate measures in response to any warning message on the multi-information display. (→P. 494)
The following table describes circumstances and correction procedures when only alarms are sounded.
| Alarm Situation | Correction procedure | |
| Interior alarm sounds continuously | The driver's door was opened and a shift position other than P was selected without turning off the “ENGINE START STOP” switch. | Shift the shift lever to P. |
| The engine was stopped with the shift lever in a position other than P. | ||
| Interior alarm sounds repeatedly | The “ENGINE START STOP” switch was turned to ACCESSORY mode while the driver's door was open (or the driver's door was opened while the “ENGINE START STOP” switch was in ACCES-SORY mode). | Turn the “ENGINE START STOP” switch off and close the driver's door again. |
| The driver's door was opened when the “ENGINE START STOP” switch is off and steering lock is unlocked. | ||
| The engine was stopped while driving. | Stop the vehicle in a safe place such as the shoulder of a road. | |
| Exterior alarm sounds once for 60 seconds | An attempt was made to exit the vehicle and lock the door's, using the smart entry & start system, without first turning the “ENGINE START STOP” switch to off. | Turn the “ENGINE START STOP” switch off and lock the doors again. |
| Exterior alarm sounds once for 5 seconds | An attempt was made to lock the vehicle, using the smart entry & start system while a door was open. | Close all of the doors and lock the doors again. |
| Interior alarm sounds once | The electronic key battery is low. | Replace the electronic key battery. |
| Exterior alarm sounds once for 2 seconds | An attempt was made to exit the vehicle and lock the doors using the smart entry & start system while the electronic key was still inside the vehicle. | Retrieve the electronic key from the vehicle and lock the doors again. |
■Security feature
If a door is not opened within approximately 30 seconds after the vehicle is unlocked, the security feature automatically locks the vehicle again.
Battery-saving function
In the following circumstances, the entry function is disabled in order to prevent the vehicle battery from discharging and the electronic key battery from depleting:
When the entry function has not been used for 2 weeks or more
When the electronic key has been left within approximately 2 m (6 ft.) of the vehicle for 10 minutes or more
The system will resume operation when...
●The vehicle is locked using the door handle and back door lock switches when carrying the electronic key on your person.
●The vehicle is locked/unlocked using the wireless remote control. (→P. 43)
● The vehicle is locked/unlocked using the mechanical key. (→P. 519)
■Conditions affecting operation
→P. 44
■Notes for the entry function
● Even when the electronic key is within the effective range (detection areas), the system may not operate properly in the following cases:
- The electronic key is too close to the window or outside door handle, near the ground, or in a high place when the doors are locked or unlocked.
- The electronic key is near the ground or in a high place, or too close to the rear bumper center when the back door is locked or unlocked.
-
The electronic key is on the instrument panel, floor or in the auxiliary boxes or glove box when the engine is started or “ENGINE START STOP” switch modes are changed.
-
Do not leave the electronic key on top of the instrument panel or near the door pockets when exiting the vehicle. Depending on the radio wave reception conditions, it may be detected by the antenna outside the cabin and the door will become lockable from the outside, possibly trapping the electronic key inside the vehicle.
- As long as the electronic key is within the effective range, the doors may be locked or unlocked by anyone.
● Even if the electronic key is not inside the vehicle, it may be possible to start the engine if the electronic key is near the window. - The doors may unlock if a large amount of water splashes on the door handle, such as in the rain or in a car wash when the electronic key is within the effective range. (The door will automatically be locked after approximately 30 seconds if the doors are not opened and closed.)
Gripping the door handle when wearing a glove may not unlock the door.
- If the wireless remote control is used to lock the doors when the electronic key is near the vehicle, there is a possibility that the door may not be unlocked by the entry function. (Use the wireless remote control to unlock the doors.)
● A sudden approach to the effective range or door handle may prevent the doors from being unlocked. In this case, return the door handle to the original position and check that the doors unlock before pulling the door handle again.
■When the vehicle is not driven for extended periods
- To prevent theft of the vehicle, do not leave the electronic key within 2 m (6 ft.) of the vehicle.
The smart entry & start system can be deactivated in advance. (→P. 551)
■To operate the system properly
Make sure to carry the electronic key when operating the system. Do not get the electronic key too close to the vehicle when operating the system from the outside of the vehicle.
Depending on the position and holding condition of the electronic key, the key may not be detected correctly and the system may not operate properly. (The alarm may go off accidentally, or the door lock prevention function may not operate.)
If the smart entry & start system does not operate properly
- Locking and unlocking the doors: Use the mechanical key. (→P. 519)
Starting the engine: →P. 520
Electronic key battery depletion
The standard battery life is 1 to 2 years. (The battery becomes depleted even if the electronic key is not used.) If the smart entry & start system or the wireless remote control function does not operate, or the detection area becomes smaller, the battery may be depleted. Replace the battery when necessary. (→P. 427)
- If the battery becomes low, an alarm will sound in the cabin when the engine stops. (→P. 31)
To avoid serious deterioration, do not leave the electronic key within 1 m (3 ft.) of the following electrical appliances that produce a magnetic field:
• TVs
- Personal computers
- Cellular phones, cordless phones and battery chargers
- Recharging cellular phones or cordless phones
- Induction cookers
- Table lamps
■When the electronic key battery is fully depleted
→P. 427
If the smart entry & start system has been deactivated in a customized setting
- Locking and unlocking the doors: Use the wireless remote control or mechanical key. (→P. 43, 519)
- Starting the engine and changing “ENGINE START STOP” switch modes: →P. 520
- Stopping the engine: →P. 181
- Customization that can be configured at Toyota dealer
Settings (e. g. smart entry & start system) can be changed. (Customizable features: →P. 551)

WARNING
■Caution regarding interference with electronic devices
● People with implantable cardiac pacemakers, cardiac resynchronization therapy-pacemakers or implantable cardioverter defibrillators should maintain a reasonable distance between themselves and the smart entry & start system antennas. (→P. 30)
The radio waves may affect the operation of such devices. If necessary, the entry function can be disabled. Ask your Toyota dealer for details, such as the frequency of radio waves and timing of the emitted radio waves. Then, consult your doctor to see if you should disable the entry function.
- Users of any electrical medical device other than implantable cardiac pacemakers, cardiac resynchronization therapy-pacemakers or implantable cardioverter defibrillators should consult the manufacturer of the device for information about its operation under the influence of radio waves.
Radio waves could have unexpected effects on the operation of such medical devices.
Ask your Toyota dealer for details on disabling the entry function.
1-2. Opening, closing and locking the doors Push-button start system\*
Starting and stopping the engine can be performed simply by carrying the electronic key on your person, for example in your pocket. (The driver should always carry the electronic key.)
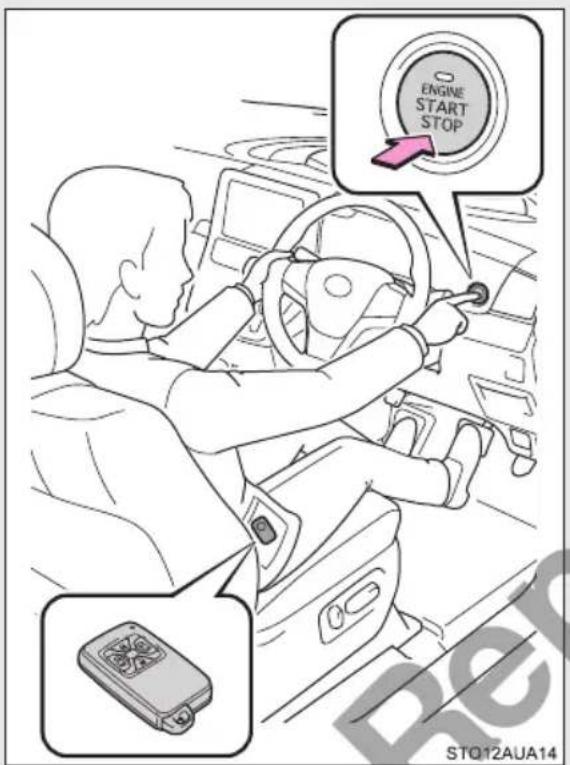
Starts and stops the engine (→P. 180)
Antenna location and effective range
Antenna location
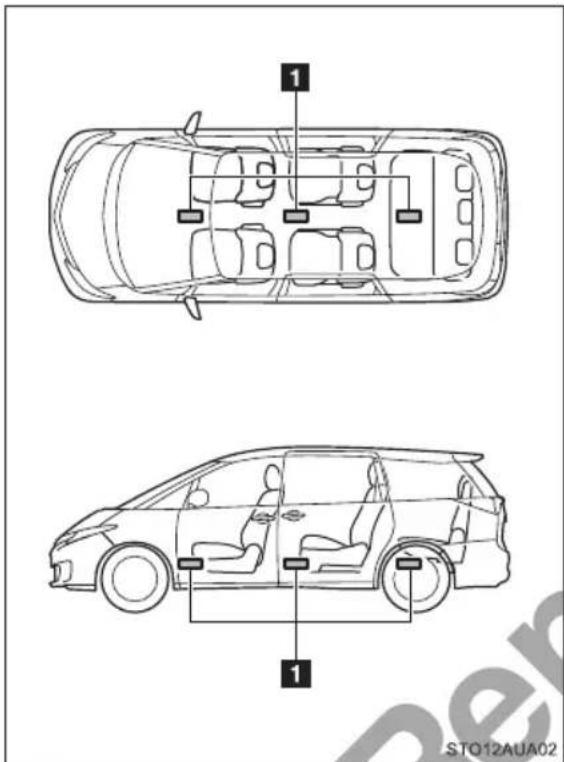
1 Antennas inside the cabin
■Effective range (areas within which the electronic key is detected)
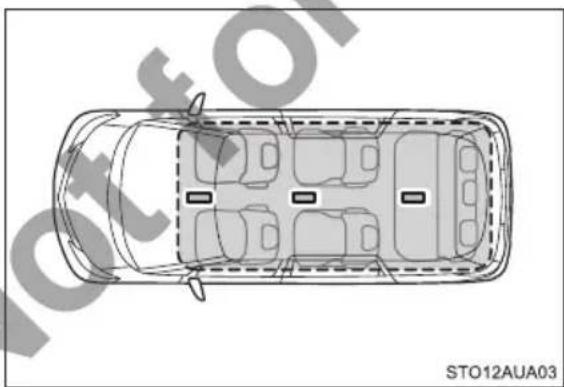
natural_image
Top-down schematic of a car showing front, rear, and side views with no text or symbolsWhen starting the engine or changing "ENGINE START STOP" switch modes
The system can be operated when the electronic key is inside the vehicle.
■Alarms and warning messages
A combination of exterior and interior alarms as well as warning message shown on the multi-information display are used to prevent theft of the vehicle and unforeseeable accidents resulting from erroneous operation. Take appropriate measures in response to any warning message on the multi-information display. ( P. 494)
The following table describes circumstances and correction procedures when only alarms are sounded.
| Alarm Situation Correction procedure | ||
| Interior alarm sounds continuously | The driver's door was opened and a shift position other than P was selected without turning off the “ENGINE START STOP” switch. | Shift the shift lever to P. |
| The engine was stopped with the shift lever in a position other than P. | ||
| Interior alarm sounds repeatedly | The “ENGINE START STOP” switch was turned to ACCESSORY mode while the driver's door was open (or the driver's door was opened while the “ENGINE START STOP” switch was in ACCESSORY mode). | Turn the “ENGINE START STOP” switch off and close the driver's door again. |
| The driver's door was opened when the “ENGINE START STOP” switch is off and steering lock is unlocked. | ||
| The engine was stopped while driving. | Stop the vehicle in a safe place such as the shoulder of a road. | |
| Interior alarm sounds once | The electronic key battery is low. | Replace the electronic key battery. |
■Conditions affecting operation
→P. 44
Notes for the push-button start system
● Even when the electronic key is within the effective range (detection areas), the system may not operate properly.
For example, the electronic key is on the instrument panel, floor or in the auxiliary boxes or glove box when the engine is started or “ENGINE START STOP” switch modes are changed.
● Even if the electronic key is not inside the vehicle, it may be possible to start the engine if the electronic key is near the window.
■To operate the system properly
Make sure to carry the electronic key when operating the system.
Depending on the position and holding condition of the electronic key, the key may not be detected correctly and the system may not operate properly. (The alarm may go off accidentally.)
If the push-button start system does not operate properly
Starting the engine: →P. 520
Electronic key battery depletion
- The standard battery life is 1 to 2 years. (The battery becomes depleted even if the electronic key is not used.) If the push-button start system or the wireless remote control function does not operate, or the detection area becomes smaller, the battery may be depleted. Replace the battery when necessary. ( P. 427)
- If the battery becomes low, an alarm will sound in the cabin when the engine stops. (→P. 39)
- To avoid serious deterioration, do not leave the electronic key within 1 m (3 ft.) of the following electrical appliances that produce a magnetic field:
• TVs
- Personal computers
- Cellular phones, cordless phones and battery chargers
- Recharging cellular phones or cordless phones
- Glass top ranges
- Table lamps
■When the electronic key battery is fully depleted
$$ \rightarrow \mathrm{P}. 4 2 7 $$
If the push-button start system has been deactivated in a customized setting
Starting the engine and changing “ENGINE START STOP” switch modes: →P. 520
- Stopping the engine: →P. 181
■ Customization that can be configured at Toyota dealer
Settings (e.g. push-button start system) can be changed.
■Caution regarding interference with electronic devices
- People with implantable cardiac pacemakers, cardiac resynchronization therapy-pacemakers or implantable cardioverter defibrillators should maintain a reasonable distance between themselves and the push-button start system antennas. (→P. 38) The radio waves may affect the operation of such devices. If necessary, the push-button start system can be disabled. Ask your Toyota dealer for details, such as the frequency of radio waves and timing of the emitted radio waves. Then, consult your doctor to see if you should disable the push-button start system.
- Users of any electrical medical device other than implantable cardiac pacemakers, cardiac resynchronization therapy-pacemakers or implantable cardioverter defibrillators should consult the manufacturer of the device for information about its operation under the influence of radio waves. Radio waves could have unexpected effects on the operation of such medical devices.
Ask your Toyota dealer for details on disabling the push-button start system.
1-2. Opening, closing and locking the doors
Wireless remote control
The wireless remote control can be used to lock and unlock the vehicle. It also opens and closes the power sliding door.
Type A
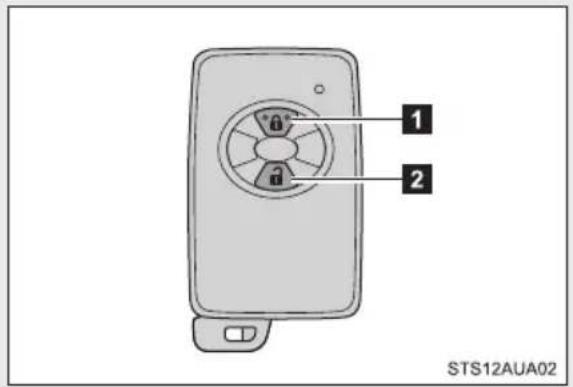
1 Locks all the doors
Check that the door is securely locked.
Press and hold to close the windows*
2 Unlocks all the doors
Press and hold to open the windows*
*: These settings must be customized at your Toyota dealer.
Type B
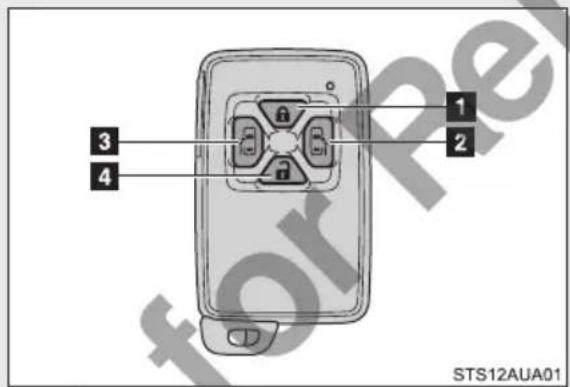
1 Locks all the doors
Check that the door is securely locked.
Press and hold to close the windows*
2 Opens and closes the right side power sliding door (press and hold)
3 Opens and closes the left side power sliding door (press and hold)
4 Unlocks all the doors
Press and hold to open the windows*
*: These settings must be customized at your Toyota dealer.
Operation signals
Doors: A buzzer sounds and the emergency flashers flash to indicate that the doors have been locked/unlocked. (Locked: Once; Unlocked: Twice)
Power sliding doors: A buzzer sounds to indicate that the power sliding doors are operating. (Starting operation: Once; Closing operation: continuously)
■Door lock buzzer
If an attempt to lock the doors is made when a door is not fully closed, a buzzer sounds continuously. Fully close the door to stop the buzzer, and lock the vehicle once more.
■Security feature
→P. 33
The power sliding door can be operated when (if equipped)
→P.52
■Reversing the operation of the power sliding door (if equipped)
Pressing the wireless remote control switch again while the door is operating will cause the operation to reverse. However, the reverse operation cannot be performed for the first second after automatic operation starts, even if the wireless remote control switch is pressed again.
■ Conditions affecting operation
The smart entry & start system (if equipped), push-button start system (if equipped), wireless remote and engine immobilizer system uses weak radio waves. In the following situations, the communication between the electronic key and the vehicle may be affected, preventing the smart entry & start system, push-button start system, wireless remote control and engine immobilizer system from operating properly. (Way of coping →P. 519)
When the electronic key battery is depleted
● Near a TV tower, electric power plant, gas station, radio station, large display, airport or other facility that generates strong radio waves or electrical noise
- When the electronic key has come into contact with, or is covered by a metallic object
- When other wireless keys (keys that emit radio waves) is being used nearby
-
When carrying the electronic key together with the following devices that emit radio waves
-
A portable radio, cellular phone, cordless phone or other wireless communication device
- Another vehicle's electronic key or a wireless key that emits radio waves
- Personal computers or personal digital assistants (PDAs)
• Digital audio players - Portable game systems
- If window tint with a metallic content or metallic objects are attached to the rear window
If the wireless remote control does not operate properly
Locking and unlocking the doors: Use the mechanical key. (→P. 519)
Electronic key battery depletion
→P.35
■When the electronic key battery is fully depleted
→P. 427
■ Customization that can be configured at Toyota dealer
Settings (e.g. wireless remote control) can be changed.
(Customizable features → P. 551)

WARNING
■When using the wireless remote control and operating the power windows
Operate the power window after checking to make sure that there is no possibility of any passenger having any of their body parts caught in the window.
Also, do not allow children to operate the wireless remote control. It is possible for children and other passengers to get caught in the power window.
1-2. Opening, closing and locking the doors
Front doors
The vehicle can be locked and unlocked using the entry function (if equipped), wireless remote control or door lock switch.
■Entry function (if equipped)
→P.28
■ Wireless remote control
→P. 43
■Door lock switch
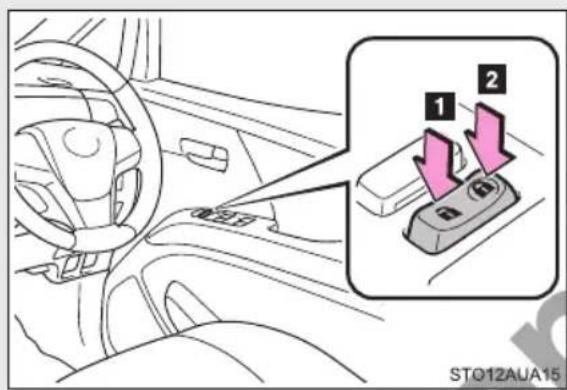
1 Unlocks all the doors
2 Locks all the doors
The driver's door can be opened by pulling the inside handle even if the lock knob is in the lock position.
Locking the front doors from the outside without a key
STEP 1 Move the inside door lock knob to the lock position.
STEP 2 Close the door while pulling the door handle.
The door cannot be locked if the “ENGINE START STOP” switch is in ACCESSORY or IGNITION ON mode, or the electronic key is left inside the vehicle.
The mechanical key may not be detected correctly and the door may be locked.
■ Using the mechanical key
The door can also be locked and unlocked with the mechanical key. ( P. 519)
If the smart entry & start system has been deactivated in a customized setting (if equipped)
Use the wireless remote control or mechanical key. ( P. 43, 519)

WARNING
■To prevent an accident
Observe the following precautions while driving the vehicle.
Failing to do so may result in a door opening and an occupant falling out, resulting in death or serious injury.
●Always use a seat belt.
●Always lock all the doors.
● Ensure that all the doors are properly closed.
- Do not pull the inside handle of the doors while driving.
The doors may be opened and the passengers are thrown out of the vehicle and it may result in death or serious injury.
Be especially careful for the driver's door, as the door may be opened even if the inside lock knobs are in locked position.
1-2. Opening, closing and locking the doors
Sliding doors
Vehicles without power sliding doors
The sliding doors can be opened and closed using the sliding door handles. The sliding doors can be locked and unlocked using the entry function, wireless remote control, door lock switch or inside door lock knobs.
Vehicles with power sliding doors
The power sliding doors can be opened and closed using the sliding door handles, power sliding door switches or wireless remote control. The power sliding doors can be locked and unlocked using the entry function, wireless remote control, door lock switch or inside door lock knobs.
■Locking and unlocking the sliding doors
Entry function (if equipped)
→P.28
Wireless remote control
→P. 43
Door lock switch
→P. 46
■ Opening and closing the sliding doors
Wireless remote control (vehicles with power sliding doors)
→P. 43
Power sliding door switches (if equipped)
→P.50
Outside door handles
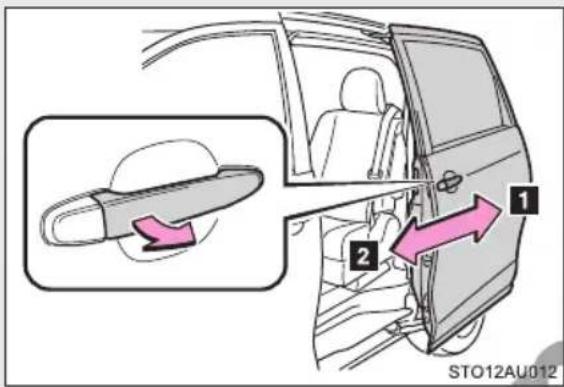
1 Open
2 Close
Vehicles with power sliding doors: When the handle is pulled, a buzzer sounds and the sliding door will be automatically and completely opened and closed. A buzzer will sound intermittently while closing.
Inside door handles
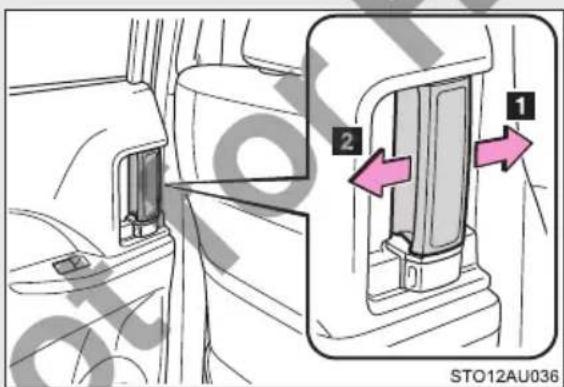
1 Close
2 Open
Vehicles with power sliding doors: When the handle is pulled, a buzzer sounds and the sliding door will be automatically and completely opened and closed. A buzzer will sound intermittently while closing.
■Power sliding door switches (vehicles with power sliding doors)
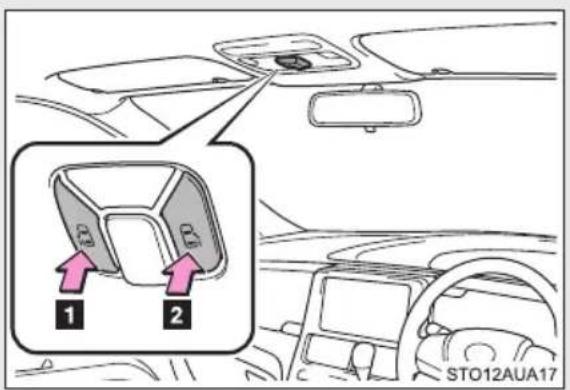
Press the power sliding door switch for 1 second to open/close the following door.
When pressing the power sliding door switch again while the power sliding door is opening/closing, the sliding door automatically reverse direction. It takes 1 second for this function to activate after the sliding door begin opening or closing.
A buzzer sounds when the power sliding door switch is pressed. A buzzer will sound intermittently while closing.
Canceling the power sliding door system (vehicles with power sliding doors)
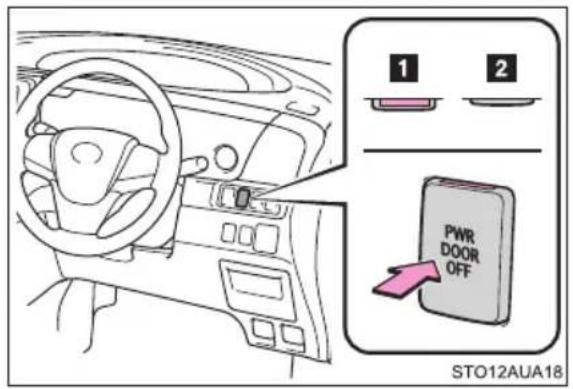
Turn the "PWR DOOR OFF" switch off to disable the power sliding door system.
1 On\*
The power sliding door can be opened and closed with the sliding door handles, the power sliding door switches or wireless remote control. If the sliding door child protectors are set to lock, the inside door handles will not open the closed door.
*: Orange mark on the switch should be visible when the switch is on.
2 Off
The sliding doors can only be opened and closed manually.
Locking the sliding doors from the outside without the wireless remote control
STEP 1 Move the inside door lock knob to the lock position.
STEP 2 Close the sliding door.
Sliding door child-protector locks
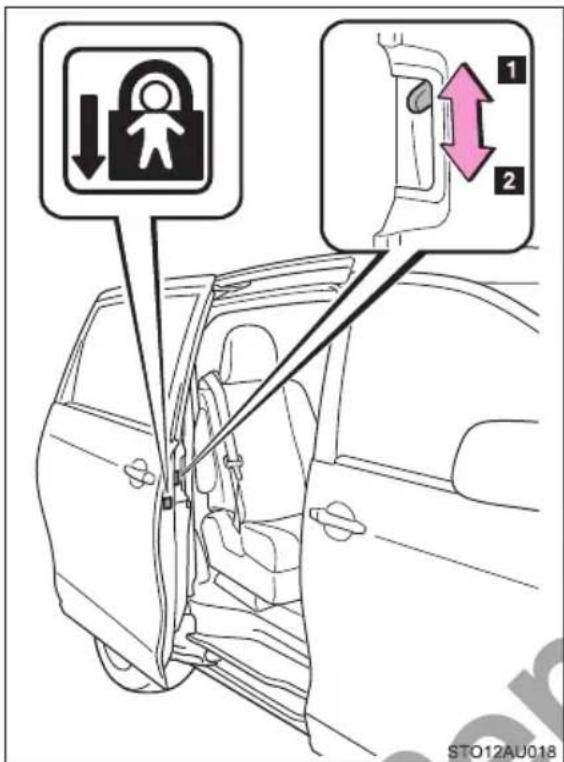
The sliding door cannot be opened from inside the vehicle when the lock is set.
1 Unlock
2 Lock
These locks can be set to prevent children from opening the sliding doors. Push down on each sliding door switch to lock both sliding door.
The power sliding door can be operated when (if equipped)
When all the following conditions are satisfied, the power sliding door automatic operation can open/close.
●The power sliding door system is turned on.
●The sliding door is unlocked. (except when closing)
●The fuel lid is closed. (left side sliding door only)
The "ENGINE START STOP" switch is off. (wireless remote control only)
The shift lever is in P.
When the power sliding door does not satisfy the above conditions, while the power sliding door is opening and closing, a buzzer sounds for about 2 seconds. In the case of manual operation, the power sliding door brake activates for about 8 seconds, to reducing the sliding door speed.
■Power sliding doors (if equipped)
- If the power sliding door opening/closing operation is activated, while the power sliding door is opening or closing, the door will reverse its operation direction.
●During opening operation:
Stroking the power sliding door handle forward will reverse the direction and start closing.
Stroking the handle backward will continue opening.
During closing operation:
Stroking the power sliding door handle backward will reverse the direction and start opening.
Stroking the handle forward will continue closing.
- If the opening/closing operation is activated 3 times, while in the middle of opening/closing, a buzzer will sound for about 2 seconds, the sliding door will stop at that position and the power sliding door system will be automatically canceled. The power sliding door brake activates to reduce the power sliding door speed for about 8 seconds. To operate the power sliding door again, turn the “PWR DOOR OFF” switch off and fully open/close the power sliding door manually.
- The power sliding doors can be opened/closed manually when the power sliding door system is canceled with the "PWR DOOR OFF" switch.
- The power sliding doors reverse automatically and a buzzer sounds when the sensor detects an obstacle. However, the power sliding doors may stop moving if they are within 20 cm (7.87 in.) from the fully-open position.
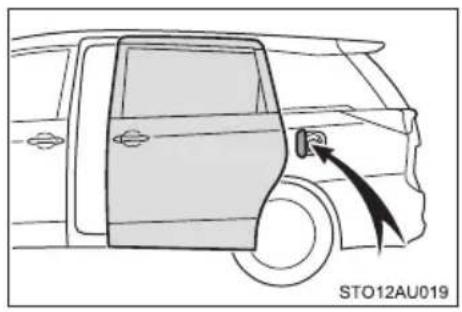
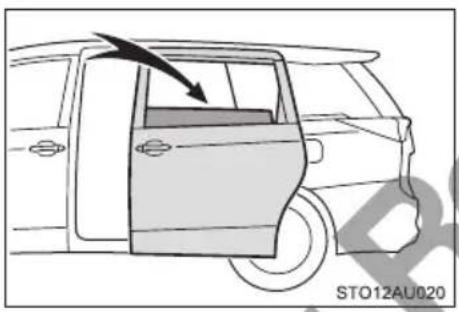
■The situations in which the sliding door does not open completely
natural_image
Line drawing of a car door with a plug inserted, showing no text or symbols on the diagram itself- When the fuel filler door is opened, the left side sliding door will remain halfway opened. To full open the sliding door, close the fuel filler door securely and then operate the sliding door.
Vehicles with power sliding doors: If the fuel lid is opened while the left side power sliding door is opening, a buzzer will sound for about 2 seconds. The power sliding door then changes to manual operation and sliding door brake activates for about 8 seconds, to reducing the sliding door speed.
natural_image
Diagram of a car door opening with an arrow pointing to the side panel, no text or symbols present- When the sliding door window is wide opened, the sliding door will remain halfway opened position for safety reasons. To fully open the sliding door, close the window and then operate the sliding door.
Vehicles with power sliding doors: When the slide door has maintained the halfway position for 30 minutes, the maintain condition is released. The sliding door brake activates for about 8 seconds, to prevent sudden closing if stopped on a downward slope.
■Jam protection function (vehicles with power sliding doors)
- If anything obstructs the power sliding door while it is closing or opening, the power sliding door will automatically operate in the opposite direction.
- If the jam protection function operates more than twice when the door is opening/closing, a buzzer will sound for about 2 seconds, the sliding door will stop at that position and the power sliding door system will be automatically canceled. The power sliding door brake activates to reduce the power sliding door speed for about 8 seconds. To operate the power sliding door again, turn the “PWR DOOR OFF” switch off and fully open/close the power sliding door manually.
In the event that the sliding door is left slightly open, the sliding door closer will automatically close it to the fully closed position.
If the battery is disconnected (vehicles with power sliding doors)
The power sliding doors must be initialized. To initialize, fully close the power sliding doors manually.

WARNING
■While driving
Observe the following precautions while driving.
Failure to do so may cause a door to open unexpectedly and an occupant to fall out of the vehicle, resulting in death or serious injury.
●Ensure that all doors are properly closed.
●Always lock the doors.
- Set the sliding door child-protector locks when children are seated in the vehicle.
●Always use a seat belt.
- Do not operate the inside handle of the doors while driving.
■When children are in the vehicle
Observe the following precautions.
Failure to do so may result in death or serious injury.
- Do not leave children alone in the vehicle.
If a child is accidentally locked in the vehicle, they could have heat exhaustion or other injuries.
- Do not allow a child to open or close the sliding door.
Doing so may cause the sliding door to move unexpectedly, or cause the child's hands, head, or neck to be caught by the closing sliding door.
■Operating the sliding doors
Observe the following precautions.
Failure to do so may cause parts of the body to be caught, resulting in death or serious injury.
- When opening or closing a sliding door, thoroughly check to make sure the surrounding area is safe.
- When opening or closing the sliding doors with windows open, keep all body parts clear of the windows.
- If anyone is in the vicinity, make sure they are safe and let them know that the sliding door is about to open or close.
- Do not leave the sliding door at half-opened position because the sliding door is not latched at this position. The sliding door may move unexpectedly on an incline.

WARNING
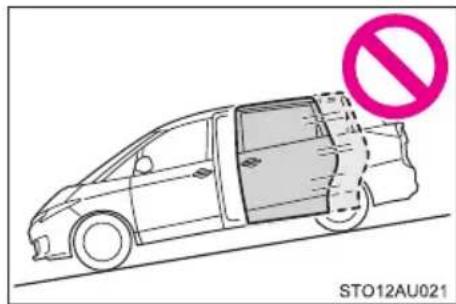
- When the vehicle is stopped on a slope, the door will slide faster when opening or closing, so be especially careful that the passengers do not get hit or pinched by the door.
- Open the sliding door fully while passengers are getting on or off on a downward slope. Do not operate the outside handle or inside handle while the door is open as the door could suddenly close by itself causing injury.
● Vehicles with power sliding doors: Do not leave the sliding door at half-opened position because the power slide function will be canceled after 30 minutes. If the vehicle is stopped on a downward slope, it may move. - When closing the sliding door, take extra care to prevent your fingers, etc. from being caught.
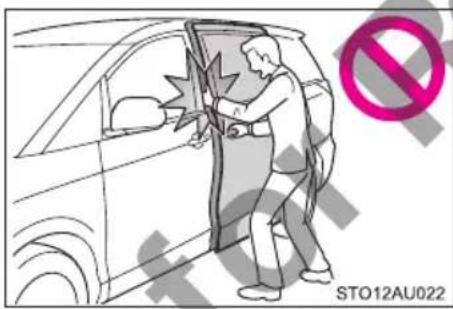
In the event that the sliding door is left slightly open, the sliding door closer will automatically close it to the fully closed position. It takes several seconds before the sliding door closer begins to operate. Be careful not to catch fingers or anything else in the sliding door, as this may cause bone fractures or other serious injuries.

WARNING
●Use caution when using the sliding door closer. The sliding door closer operates even when the power sliding door system is canceled.
- Use caution when the inside door lock knob or the child protector is locked, as the door closer will not stop operating even if the inside door handle is operated. Be careful not to catch fingers or anything else in the sliding door, as this may cause bone fractures or other serious injuries.
■Power sliding doors (if equipped)
Observe the following precautions when the power sliding door system is on. Failure to do so may cause death or serious injury.
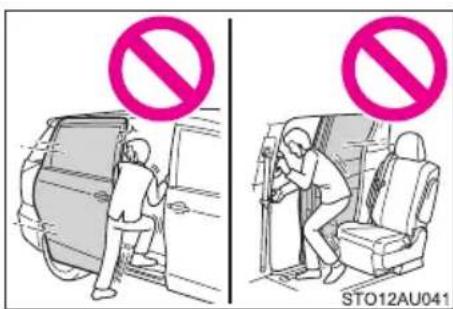
- Do not get in and out of the vehicle while the power sliding door is being operated.
- When using the door handle to open or close the power sliding door, remove your hand from the door handle immediately after activating the sliding door. If you leave your hand on the door handle during operation, your hand, fingers, wrist, etc. may be subjected to an excessive amount of force.
- Check the safety of the surrounding area to make sure there are no obstacles or anything that could cause any of your belongings to get caught.
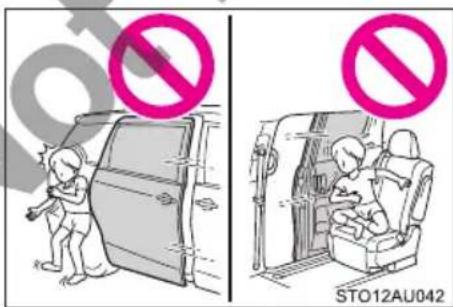
- If anyone is in the vicinity, make sure they are safe and let them know that the sliding door is about to open or close. Also, do not operate the power sliding door if anyone inside or outside the vehicle is leaning against the vehicle in the area around the sliding door.

WARNING
- If the power sliding door system is turned off with the "PWR DOOR OFF" switch while the sliding door is operating automatically, the automatic operation is stopped. The sliding door then has to be operated manually. Take extra care when on an incline, as the sliding door may open or close unexpectedly.
- If the operating conditions of the power sliding door (→P. 52) are no longer met, a buzzer may sound and the sliding door may stop opening or closing. The sliding door then has to be operated manually. Take extra care when on an incline, as the sliding door may open or close abruptly.
- On an incline, a sliding door may close by itself after it opens automatically. Make sure the sliding door is fully open and secure.
- In the following situations, the power sliding door may detect an abnormality and automatic operation may be stopped. In this case, the sliding door has to be operated manually. Take extra care when on an incline, as the sliding door may open or close abruptly.
- When the sliding door contacts an obstacle
- When the battery voltage suddenly drops, such as when the “ENGINE START STOP” switch is turned to IGNITION ON mode or the engine is started during automatic operation
- When the child-protector locks are set, make sure to turn off the power sliding door system with the “PWR DOOR OFF” switch in order to totally disable the system.
■Jam protection function (vehicles with power sliding doors)
Observe the following precautions.
Failure to do so may cause death or serious injury.
● Never use any part of your body to intentionally activate the jam protection function.
The jam protection function may not work if something gets caught just before the power sliding door fully closes. Be careful not to catch fingers or anything else.
●The jam protection function may not work depending on the shape of the object that is caught. Be careful not to catch fingers or anything else.

NOTICE
■To prevent damage to your vehicle
● Vehicles with power sliding doors:
- Do not apply excessive force when the sliding door is operating.
- Avoid forcibly opening the left side sliding door fully when the fuel filler door is opened. Otherwise, the fuel filler door may be damaged.
- Take care not to damage the sensors (installed on the front edge of the power sliding door) with a knife or other sharp object.
- When your vehicle goes through an automatic car wash, make sure the power sliding door system is off.
● Make sure there is nothing in the doorway before closing.
- Do not close the sliding door by applying the brakes. Doing so could cause the sliding door to be damaged.
■To prevent battery discharge
Do not leave the sliding door halfway opened.
1-2. Opening, closing and locking the doors
Back door
Vehicles without a smart entry & start system
The back door can be locked and unlocked using the wireless remote control or door lock switch.
Vehicles with a smart entry & start system
The back door can be locked and unlocked using the entry function, wireless remote control or door lock switch.
■Locking and unlocking the back door
Wireless remote control
→P. 43
Door lock switch
→P. 46
Entry function (if equipped)
→P.29
Opening/closing the back door from outside the vehicle
Back door opener (opening operation only)
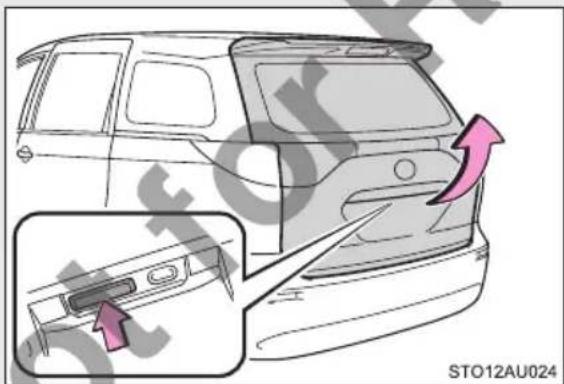
Raise the back door while pushing up the back door opener switch.
The back door cannot be closed immediately after the back door opener switch is pushed.
Back door handle (closing operation only)
→P.62
When closing the back door
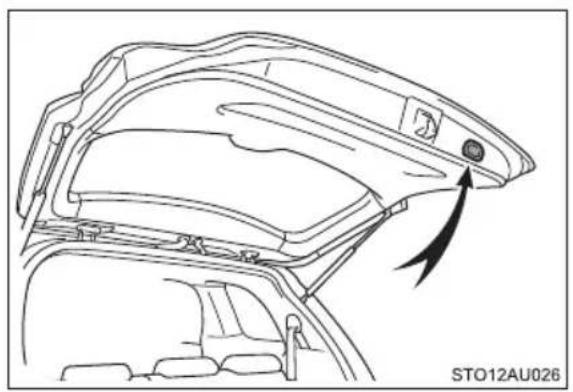
natural_image
Technical line drawing of a car trunk panel with an arrow indicating direction (no text or symbols)Lower the back door using the back door handle, and make sure to push the back door down from the outside to close it.
Luggage compartment light
The luggage compartment light turns on when the back door is opened with the luggage compartment light switch on.
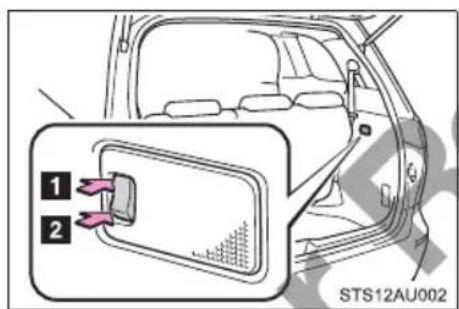
1 Off
2 On
■ After the back door has been opened and then closed
Lock the back door again as the back door will not lock automatically.
■If the back door opener is inoperative
The back door can be operated from the inside.
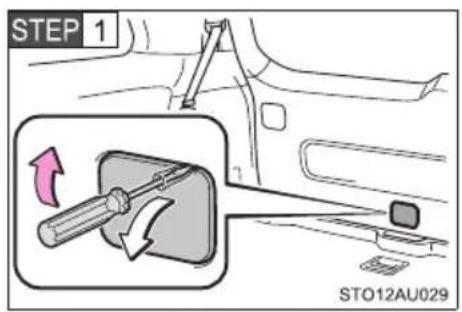
Remove the cover.
To protect the cover, place a rag between the flathead screwdriver and the cover as shown in the illustration.
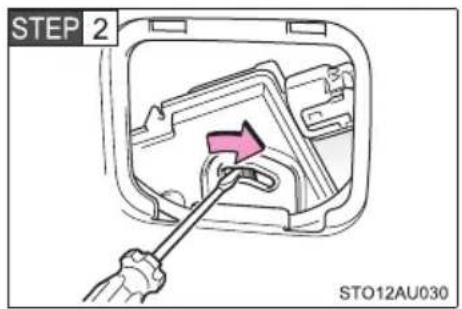
Move the lever.

WARNING
While driving
- Keep the back door closed while driving.
If the back door is left open, it may hit near-by objects while driving or luggage may be unexpectedly thrown out, causing an accident.
In addition, exhaust gases may enter the vehicle, causing death or a serious health hazard. Make sure to close the back door before driving.
Before driving the vehicle, make sure that the back door is fully closed. If the back door is not fully closed, it may open unexpectedly while driving, causing an accident.
●Never let anyone sit in the luggage compartment. In the event of sudden braking or a collision, they are susceptible to death or serious injury.

WARNING
■When children are in the vehicle
Observe the following precautions.
Failure to do so may result in death or serious injury.
- Do not allow children to play in the luggage compartment.
If a child is accidentally locked in the luggage compartment, they could have heat exhaustion or other injuries. - Do not allow a child to open or close the back door.
Doing so may cause the back door to move unexpectedly, or cause the child's hands, head, or neck to be caught by the closing back door.
■Operating the back door
Observe the following precautions.
Failure to do so may cause parts of the body to be caught, resulting in death or serious injury.
- Remove any heavy loads, such as snow and ice, from the back door before opening it. Failure to do so may cause the back door to suddenly shut again after it is opened.
- When opening or closing the back door, thoroughly check to make sure the surrounding area is safe.
- If anyone is in the vicinity, make sure they are safe and let them know that the back door is about to open or close.
- Use caution when opening or closing the back door in windy weather as it may move abruptly in strong wind.

WARNING
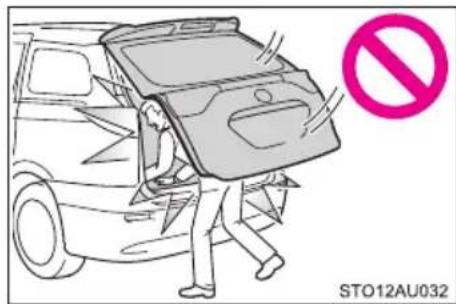
The back door may suddenly shut if it is not opened fully. It is more difficult to open or close the back door on an incline than on a level surface, so beware of the back door unexpectedly opening or closing by itself. Make sure that the back door is fully open and secure before using the luggage compartment.
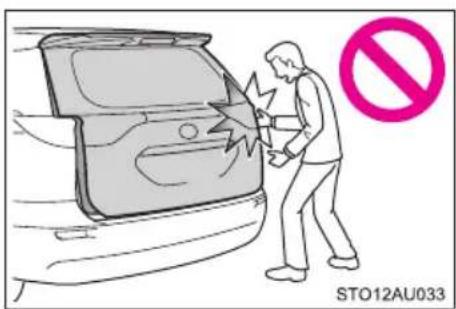
- When closing the back door, take extra care to prevent your fingers, etc. from being caught.
- When closing the back door, make sure to press it lightly on its outer surface. If the back door handle is used to fully close the back door, it may result in hands or arms being caught.
- Do not pull on the back door damper stay to close the back door, and do not hang on the back door damper stay.
Doing so may cause hands to be caught or the back door damper stay to break, causing an accident. - If a bicycle carrier or similar heavy object is attached to the back door, it may suddenly shut again after being opened, causing someone's hands, head or neck to be caught and injured. When installing an accessory part to the back door, using a genuine Toyota part is recommended.

NOTICE
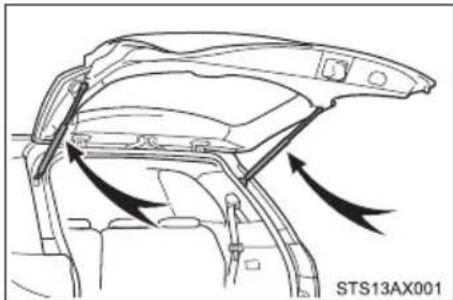
■Back door damper stays
The back door is equipped with damper stays that hold the back door in place.
Observe the following precautions.
Failure to do so may cause damage to the back door damper stay, resulting in malfunction.
natural_image
Technical line drawing of a car rearview structure with directional arrows indicating movement (no text or symbols)- Do not attach any foreign objects, such as stickers, plastic sheets, or adhesives to the damper stay rod.
- Do not touch the damper stay rod with gloves or other fabric items.
- Do not attach any accessories other than genuine Toyota parts to the back door.
- Do not place your hand on the damper stay or apply lateral forces to it.
1-3. Adjustable components (seats, mirrors, steering wheel) Front seats
Manual seat
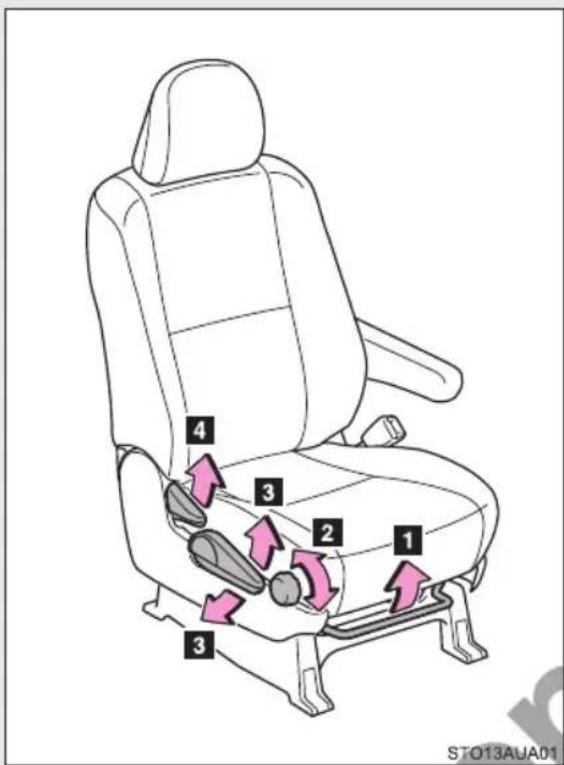
1 Seat position adjustment lever
2 Seat cushion (front) angle adjustment knob (driver's side only)
3 Vertical height adjustment lever (driver's side only)
4 Seatback angle adjustment lever
Power seat (driver's side only)
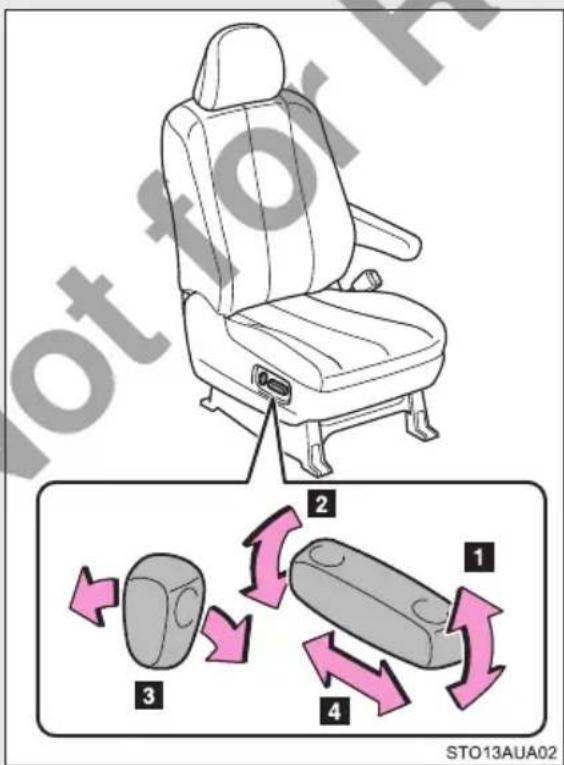
1 Seat cushion (front) angle adjustment switch
2 Vertical height adjustment switch
3 Seatback angle adjustment switch
4 Seat position adjustment switch
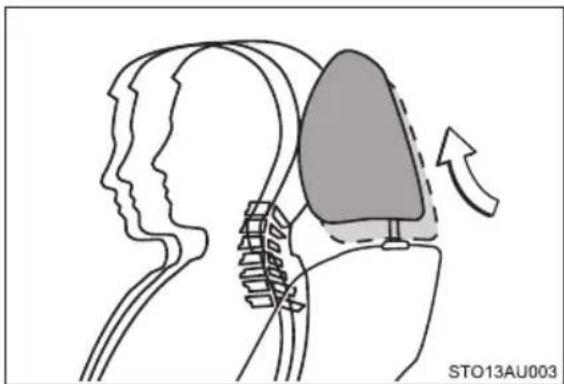
Active head restraints
natural_image
Diagram of a human head and neck with a shaded anatomical structure, showing structural components (no text or symbols)When the occupant's lower back presses against the seatback during a rear-end collision, the head restraint moves slightly forward and upward to help reduce the risk of whiplash on the seat occupant.
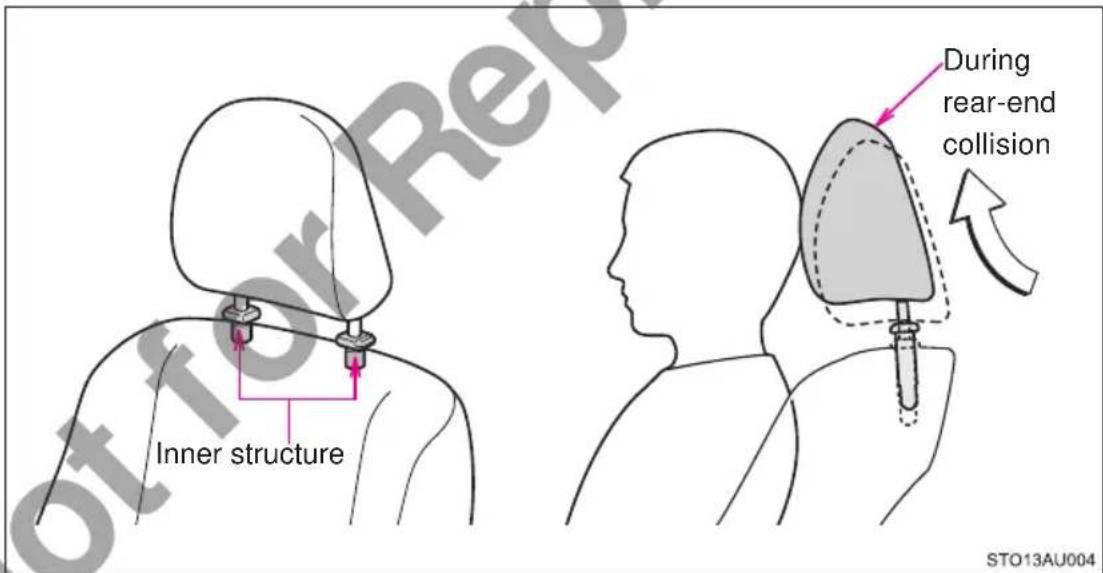
■Active head restraints
Even small forces applied to the seatback may cause the head restraint to move. When a locked head restraint is pushed up forcibly, the head restraint inner structure may appear. This does not indicate a problem.

WARNING
■Seat adjustment
●Be careful that the seat does not hit passengers or luggage.
● To reduce the risk of sliding under the lap belt during a collision, do not recline the seat more than necessary.
If the seat is too reclined, the lap belt may slide past the hips and apply restraint forces directly to the abdomen, or your neck may contact the shoulder belt, increasing the risk of death or serious injury in the event of an accident.
Adjustments should not be made while driving as the seat may unexpectedly move and cause the driver to lose control of the vehicle.
●Manual seat only: After adjusting the seat, make sure that the seat is locked in position.
1-3. Adjustable components (seats, mirrors, steering wheel) Rear seats
Second seats
Captain seat
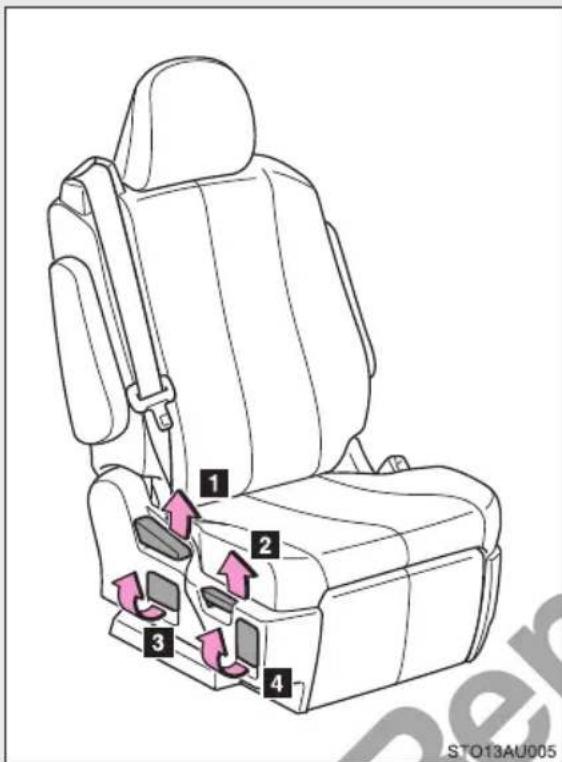
1 Seatback angle adjustment lever
2 Seat position (forward/backward) adjustment lever
3 Seat position (sideways) adjustment lever
4 Ottoman angle adjustment lever
Bench seat
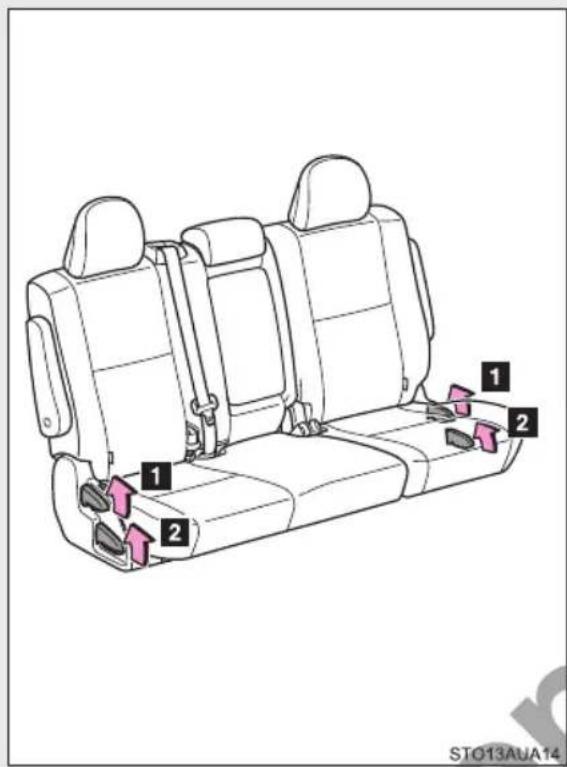
1 Seatback angle adjustment lever
2 Seat position (forward/backward) adjustment lever
Third seats
Manual seat
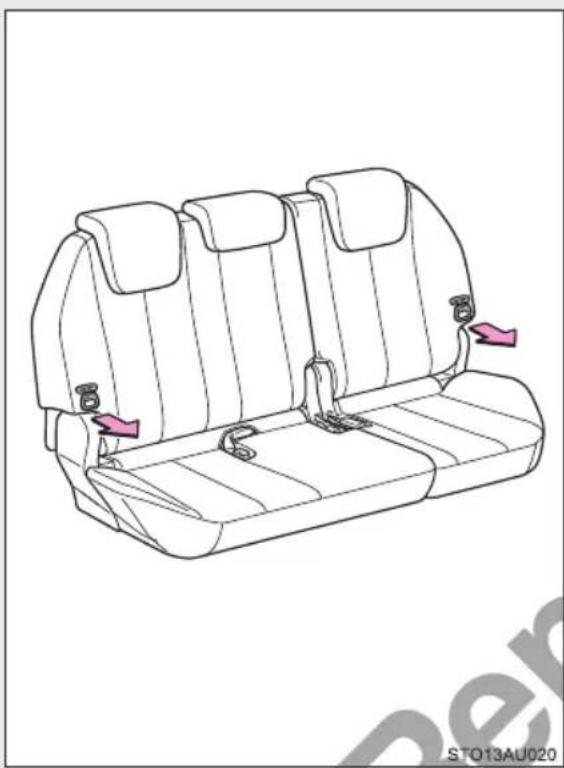
natural_image
Line drawing of a car backseat with seat covers and side seats (no text or symbols)Seatback angle adjustment strap
Power seat
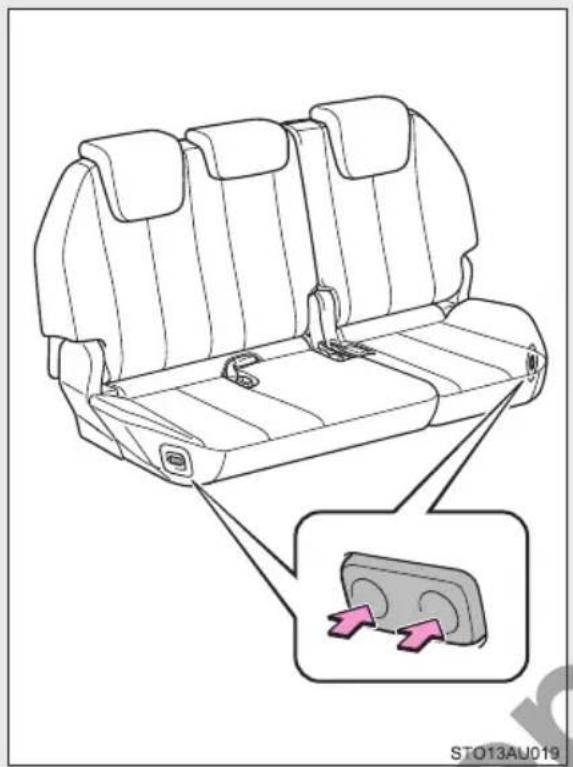
natural_image
Line drawing of a car backseat with seat covers and a close-up inset showing a plug device (no text or symbols)Seatback angle adjustment switch
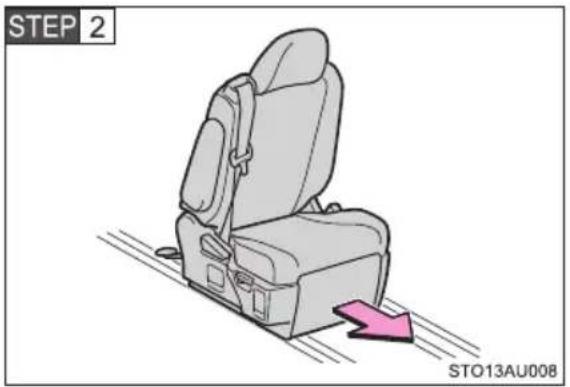
When getting in and out of the vehicle from third seats
Second captain seats
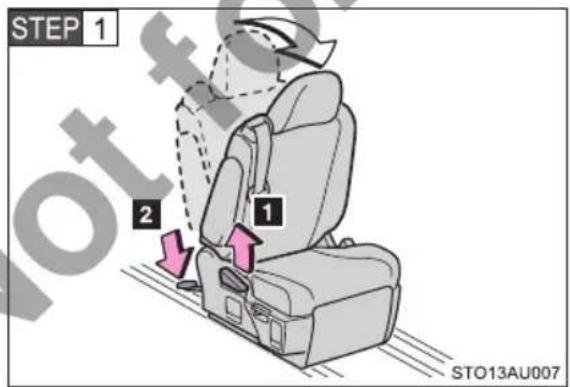
Pull the seatback angle adjustment lever (1) or depress the release pedal (2)
The seatback are folded and the seats can be slide forward.
Second bench seats
Move the seat to the front-most position.
After passengers are in, return the seat until it locks.
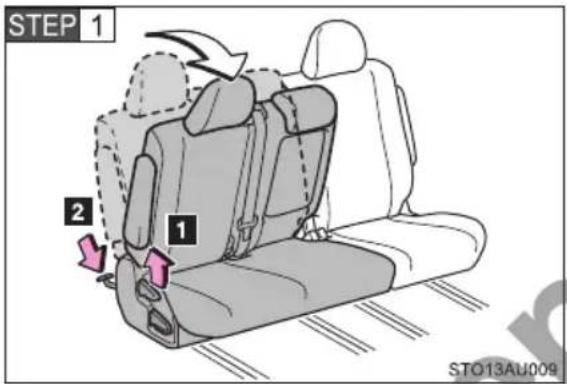
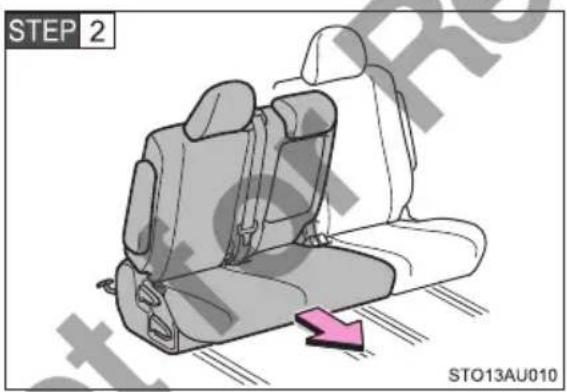
Pull the seatback angle adjustment lever (1) or depress the release pedal (2)
If the bottom cushion is lifted up, depress the release pedal harder than usual.
Move the seat to the front-most position.
After passengers are in, return the seat until it locks.
Using and stowing the ottoman (second captain seats only)
■Using the ottoman
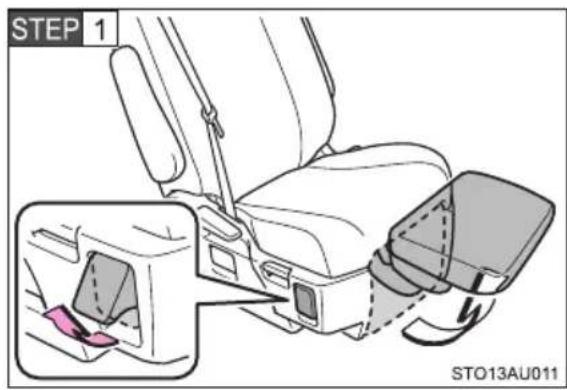
Pull the ottoman angle adjustment lever and adjust the ottoman to the desired angle.
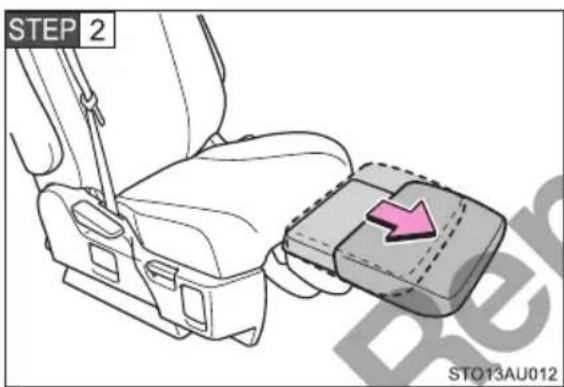
Slide the ottoman cushion to the desired position.
■ Stowing the ottoman
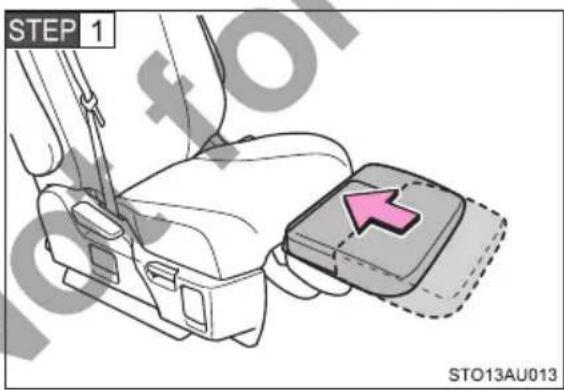
Slide the ottoman cushion to the most rearward position.
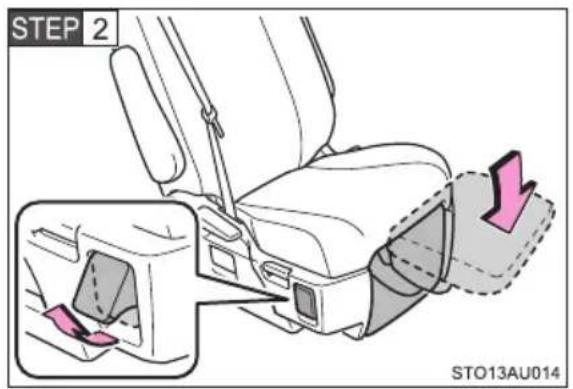
Push the ottoman under the seat while pulling the ottoman angle adjustment lever.
Make sure that the ottoman cushion is slid to the most rearward position before stowing the ottoman.
When sliding the second seats to the rear-most position (second captain seats only)
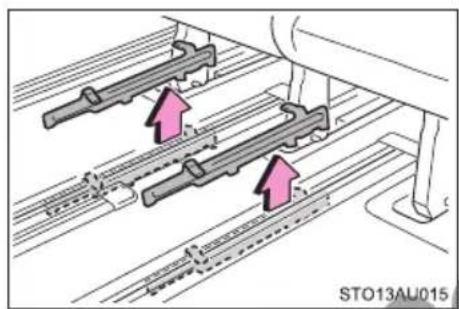
natural_image
Diagram of three parallel mechanical components mounted on a rail track, with pink arrows indicating movement or assembly (no text or symbols present)Remove the stoppers between the third seat and the second seat.
Stow the removed stoppers in the tool bag. (→P. 498)
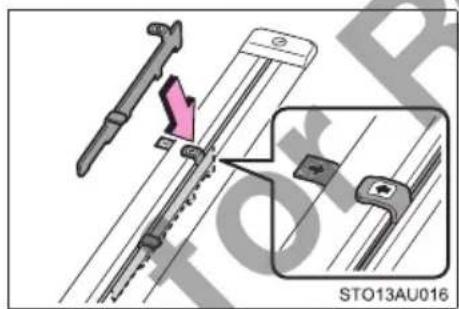
Install the stoppers by aligning their arrow marks with the arrow marks on the floor mat.

WARNING
Seat adjustment
●Be careful that the seat does not hit passengers or luggage.
●To reduce the risk of sliding under the lap belt during a collision, do not recline the seat more than necessary.
If the seat is too reclined, the lap belt may slide past the hips and apply restraint forces directly to the abdomen, or your neck may contact the shoulder belt, increasing the risk of death or serious injury in the event of an accident.
Adjustments should not be made while driving as the seat may unexpectedly move and cause the driver to lose control of the vehicle.
■When getting in and out of the vehicle from the third seats
● Make sure the second seats are securely locked after returning the second seats.
●Be careful that the seat does not hit passengers or luggage.
●Be careful not to get your hands or feet caught in the second seats.
●Never allow anyone to rest their foot on the release pedal while the vehicle is moving.
■After returning the rear seatback to the original position
Observe the following precautions. Failure to do so may result in death or serious injury.
● Make sure the seatback is securely locked by pushing it forward and rearward.
- Check that the seat belts are not twisted or caught in the seatback.
■When adjusting the seat positions or the ottoman (second captain seats only)
Make sure to leave enough space around the feet so as not to get them caught.

WARNING
■When using the ottoman (second captain seats only)
- Do not adjust the ottoman position while the vehicle is moving. It could result in serious injuries in a sudden braking, sudden swerving or an accident.
●Never stand on the ottoman, as it could move causing injury. - Do not sit on the ottoman. Seat belts may not be properly worn which may cause serious injury or death in the event of sudden braking or a collision.
● Stow the ottoman when you get in and out of the vehicle or when the ottoman is not in use to avoid stumbling over it.

NOTICE
■Sliding the second seats
Do not place any objects, such as floor mats, on the slide rails. Doing so may damage the floor mats or rails when the seat is slid.
■To prevent an ottoman malfunction (second captain seats only)
- Do not place any objects in the second passenger footwell that could prevent the operation of the ottoman.
- Do not place heavy luggage on the ottoman.
- Do not place anything under the ottoman when in use.
There is a possibility that something may get caught and cause damages when stowing the ottoman.
1-3. Adjustable components (seats, mirrors, steering wheel) Head restraints
Front seats, second center seat (bench seat) and third seats
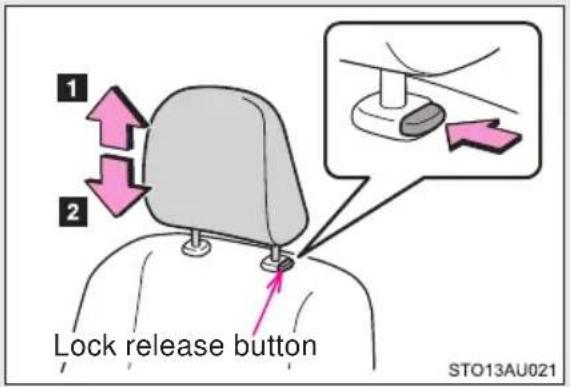
1 Up
Pull the head restraint up.
2 Down
Push the head restraint down while pushing the lock release button.
Second seats (captain seat) and second outer seats (bench seat)
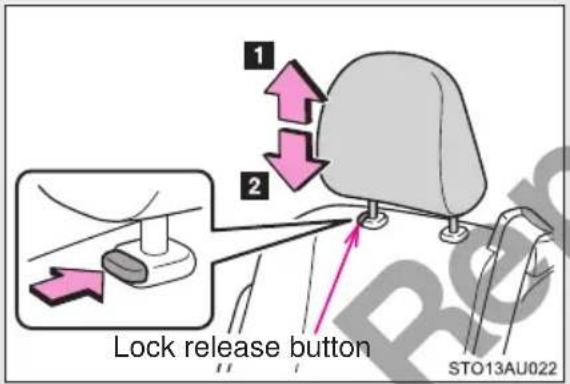
1 Up
Pull the head restraint up.
2 Down
Push the head restraint down while pushing the lock release button.
■Removing the head restraints
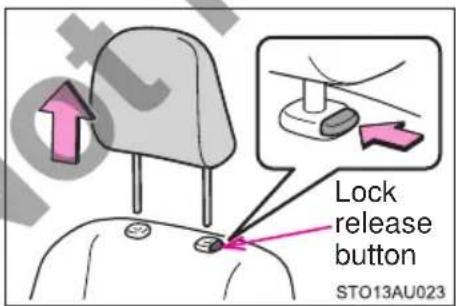
Pull the head restraint up while pressing the lock release button.
■ Adjusting the height of the front seats, second seats (captain seat) and second outer seats (bench seat) head restraints
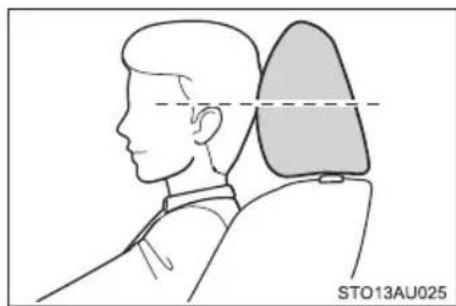
natural_image
Side profile illustration of a person with shoulder and neck anatomy, no text or symbols presentMake sure that the head restraints are adjusted so that the center of the head restraint is closest to the top of your ears.
■Adjusting the second center seat (bench seat) and third seats head restraints
Always raise the head restraint one level from the stowed position when using.

WARNING
■Head restraint precautions
Observe the following precautions regarding the head restraints. Failure to do so may result in death or serious injury.
● Use the head restraints designed for each respective seat.
- Adjust the head restraints to the correct position at all times.
●After adjusting the head restraints, push down on them and make sure they are locked in position.
- Do not drive with the head restraints removed.
1-3. Adjustable components (seats, mirrors, steering wheel) Seat arrangement
The seats can be arranged to fit your needs. Please follow the instructions when arranging them.
Flattening the seats
Flattening the front seats and second seats and stowing the third seats (if equipped) ( P. 84)
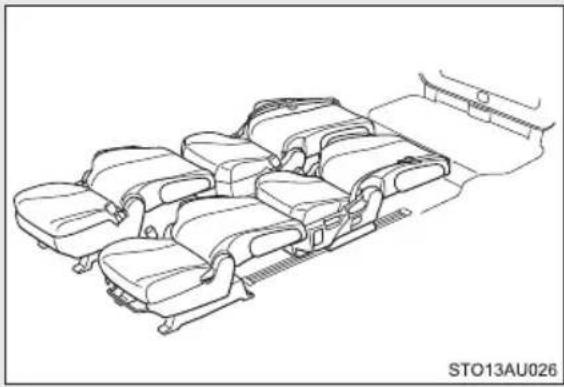
natural_image
Line drawing of a multi-level vehicle chassis with no text or symbolsFlattening the second seats and third seats ( P. 85)
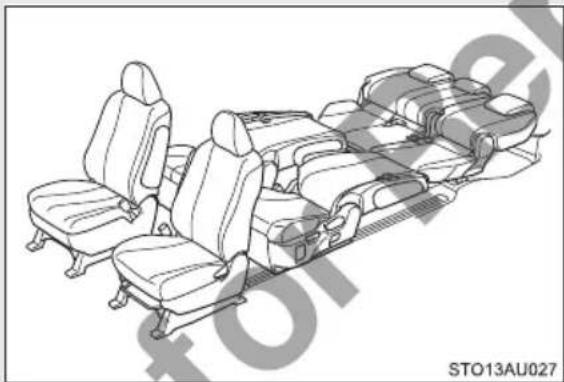
natural_image
Line drawing of a multi-level vehicle seat assembly with no text or symbolsLuggage mode
Tip-up the second seats (second bench seats only) (→P.87)
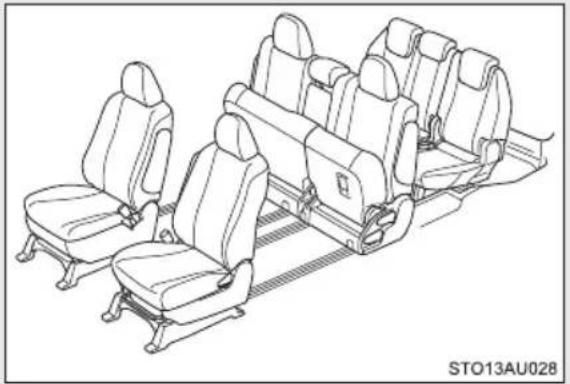
natural_image
Line drawing of an airplane cabin with multiple seats and seat compartments (no text or symbols)Folding the third seats ( P. 89, 90)
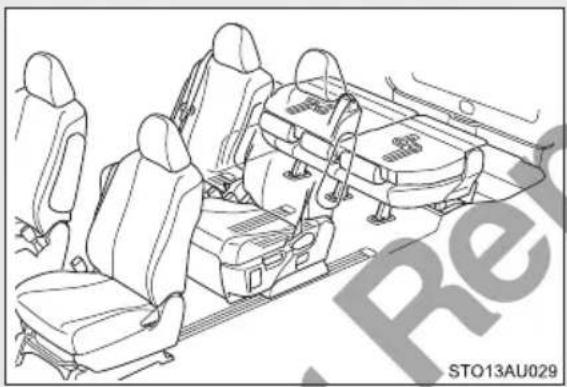
natural_image
Line drawing of an automotive seat assembly with multiple seats and a central platform (no text or symbols)Stowing the third seats (if equipped) ( P. 93, 96)
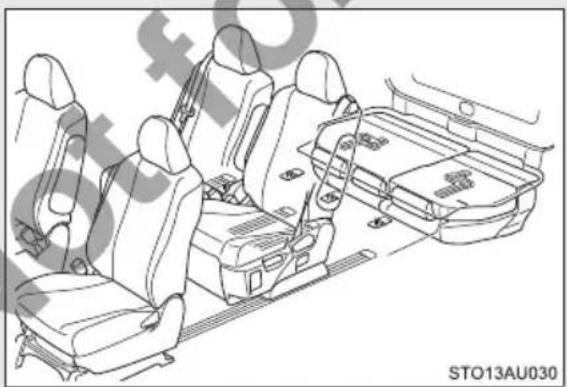
natural_image
Line drawing of a car interior with seats and dashboard (no text or symbols)Tumbling the third seats (if equipped) ( P. 98)
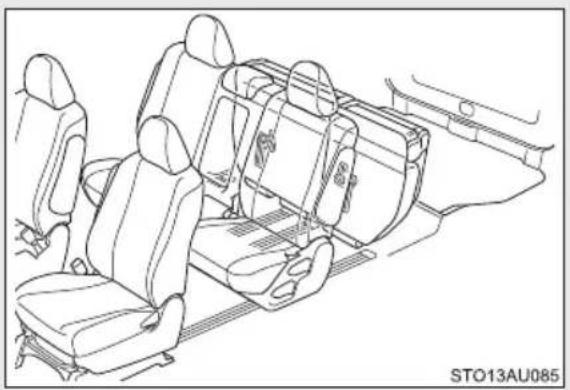
natural_image
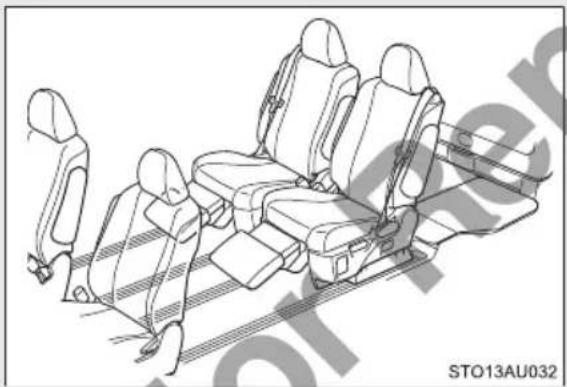
Line drawing of a car interior showing seat, dashboard, and rear seats (no text or symbols)Super relax mode (vehicles with second captain seats and stowable third seats)
Comfortable space for the occupants of the second seats ( P. 102)
natural_image
Line drawing of a car interior with seats and seatbelt, no text or symbols presentFlattening the front seats and second seats and stowing the third seats (if equipped)
STEP 1 Make sure to stop the vehicle and apply the parking brake.
STEP 2 Stow the third seats. ( P. 93, 96)
STEP 3 Slide the second seats rearward. (→P. 70)
STEP 4 7-passenger models: Slide the console box to the front-most position. (→P. 360)
STEP 5 Slide the front seats to the front-most position. (→P. 67)
STEP 6 Remove the head restraints from the front seats. (→P. 79)
Return the front seat armrests to its original position, if lowered. (→P. 375)
STEP 7 Flatten the seatbacks of the front seats. (→P. 67)
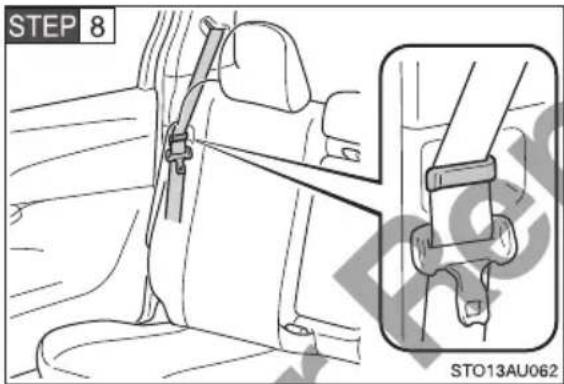
8-passenger models: Pass each seat belt on the second outer seats through the seat belt hanger clips.
STEP 9 7-passenger models: Slide both of the second seats sideways to the center. (→P. 70)
Return the second seat armrests to its original position, if lowered. (→P. 375)
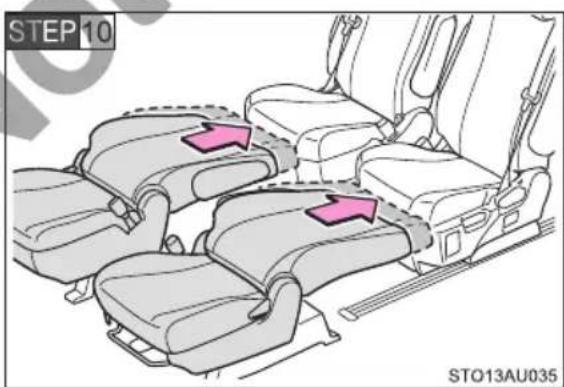
Adjust the front seats and the second seats to close the opening between the seats.
STEP11 Flatten the seatbacks of the second seats.
Remove the head restraints from the second seats, if necessary. (→P. 79)
■When returning the seats
STEP 1 Make sure the seats are securely locked by pushing them forward and reward.
STEP 2 Remove the secured seat belts from the seat belt hangers.
When using the seat belt for the third center seat. (→P. 110)
Flattening the second seats and third seats
STEP 1 Make sure to stop the vehicle and apply the parking brake.
STEP 2 7-passenger models: Slide the console box to the front-most position. (→P. 360)
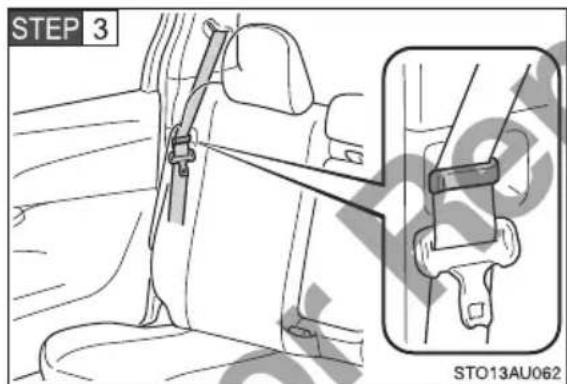
8-passenger models: Pass the each seat belt on the second side seats through the seat belt hanger clips.
STEP 4 Slide the second seats to the front-most position. (→P. 70)
STEP 5 7-passenger models: Slide both of the second seats sideways to the center. (→P. 70)
Return the second seat armrests to its original position, if lowered. (→P. 375)
STEP 6 Remove the head restraints from the second seats. (→P. 79)
STEP 7 Flatten the seatback of the second seats. (→P. 70)
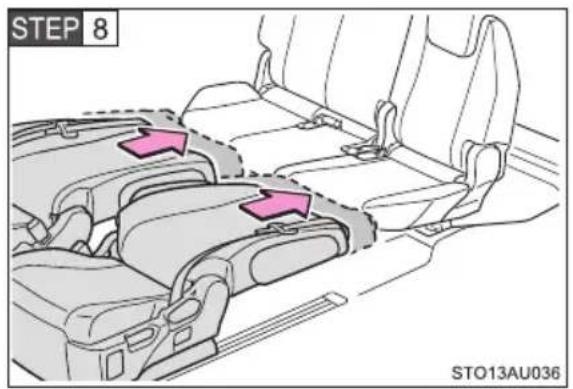
Adjust the position of the second seats and the third seats to close the opening between the seats.
STEP 9 Lower the third seat head (→P. 79)
restraints to the lowest position.
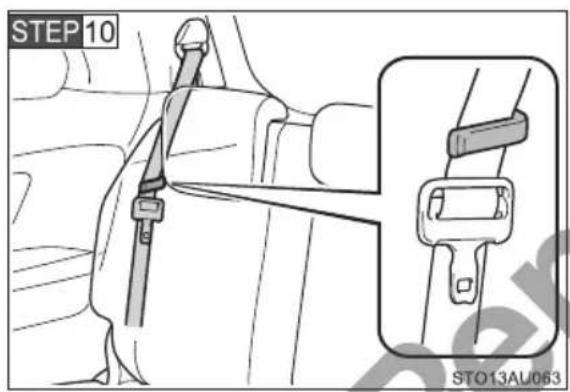
Pass each seat belt on the third outer seats through the seat belt hanger clips.
STEP11 Stow the third center seat belt. (→P. 111)
STEP12 Flatten the seatback of the third seats. (→P. 72)
■When returning the seats
STEP 1 Make sure the seats are securely locked by pushing them forward and reward.
STEP 2 Remove the secured seat belts from the seat belt hangers. When using the seat belt for the third center seat. (→P. 110)
Tip-up the second seats (second bench seats only)
■Before tip-up the second seats
STEP 1 Make sure to stop the vehicle and apply the parking brake.
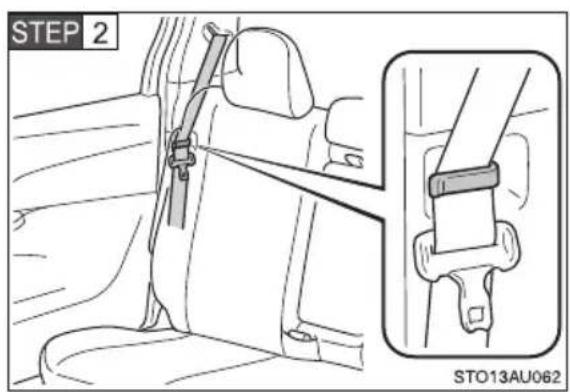
Pass each seat belt on the second outer seats through the seat belt hanger clips.
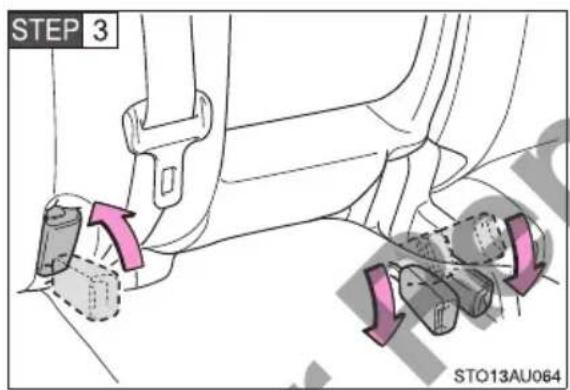
Stow the seat belt buckles for the second seats.
■Tip-up the second seats
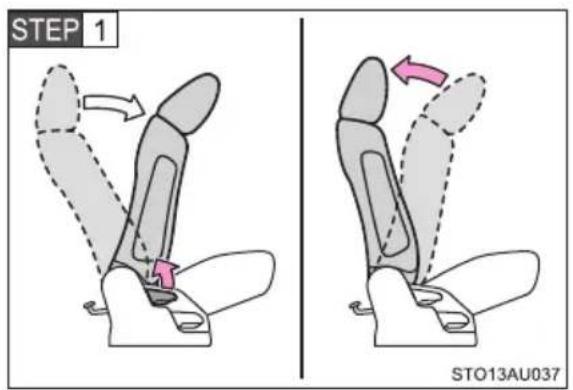
Fold the seatback forward while pulling the seatback adjustment lever and push the seat back rearward until it locks.
Make sure it is securely locked.
Return the second seat armrests to its original position, if lowered. (→P. 375)
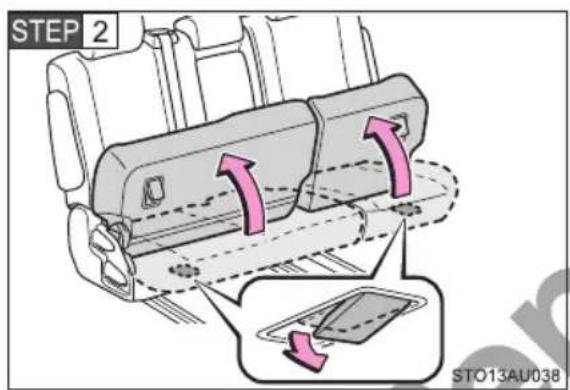
Pull the tip-up lever and lift the seat cushion until it locks.
When returning the second seat, pull the tip-up lever and push the seat cushion downward until it locks.
■When returning the seats
STEP 1 Make sure the seats are securely locked by pushing them forward and reward.
STEP 2 Remove the secured seat belts from the seat belt hangers.
Folding the third seats (manual seat)
Before folding the third seats
STEP 1 Make sure to stop the vehicle and apply the parking brake.
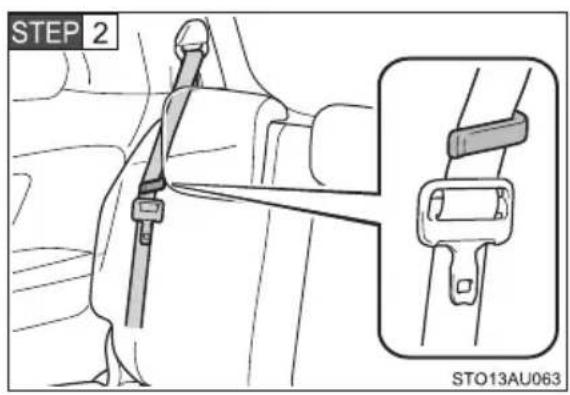
Pass each seat belt on the third outer seats through the seat belt hanger clips.
STEP 3 Stow the third center seat belt. (→P. 111)
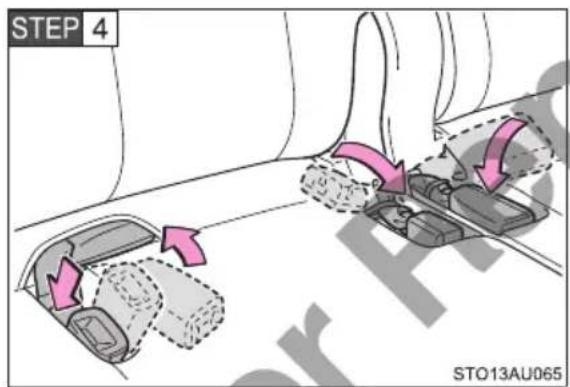
Stow the seat belt buckles for the third seats.
STEP 5 Lower the third seat head restraints to the lowest position. (→P. 79)
STEP 6 Adjust the second seats so they are not hit by the third seats when folded.
■Folding the third seatbacks
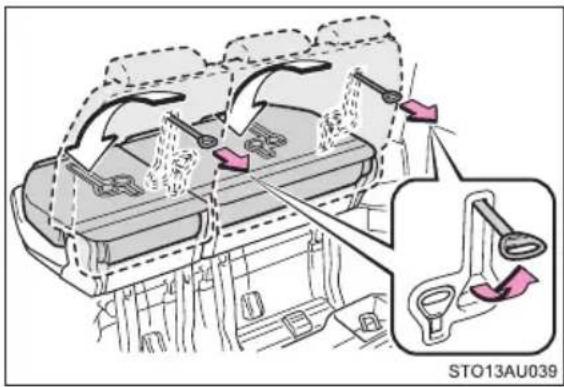
Unlock the seatback by pulling the seatback angle adjustment strap and fold it down.
■Returning the third seatbacks
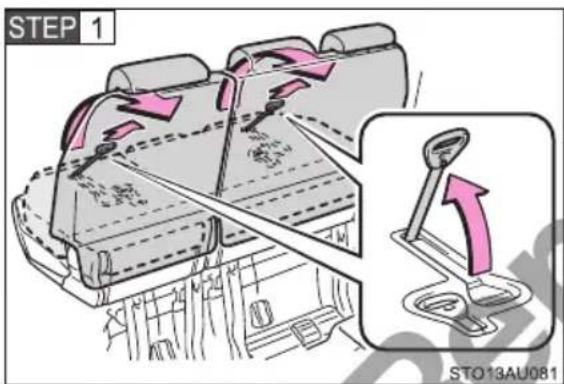
Lift up the seatbacks until they lock.
STEP 2 Make sure the seats are securely locked by pushing them forward and reward.
STEP 3 Remove the secured seat belts from the seat belt hangers. When using the seat belt for the third center seat. (→P. 110)
Folding the third seats (power seat)
Before folding the third seats
STEP 1 Make sure to stop the vehicle and apply the parking brake.
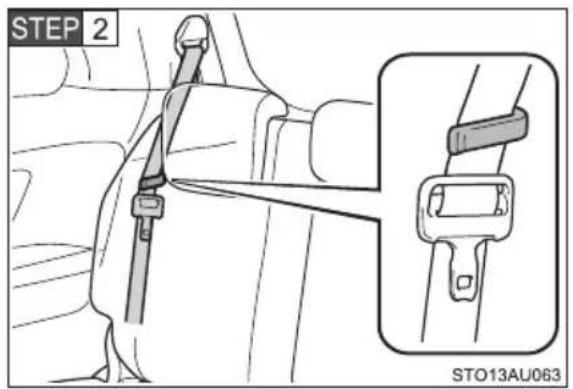
Pass each seat belt on the third outer seats through the seat belt hanger clips.
STEP 3 Stow the third center seat belt. (→P. 111)
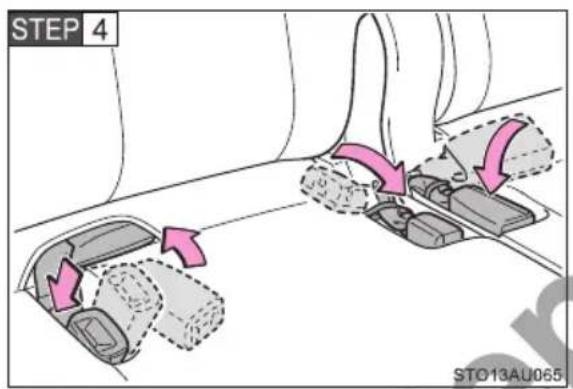
Stow the seat belt buckles for the third seats.
STEP 5 Lower the third seat head restraints to the lowest position. (→P. 79)
STEP 6 Adjust the second seats so they are not hit by the third seats when folded.
■ Folding the third seatbacks
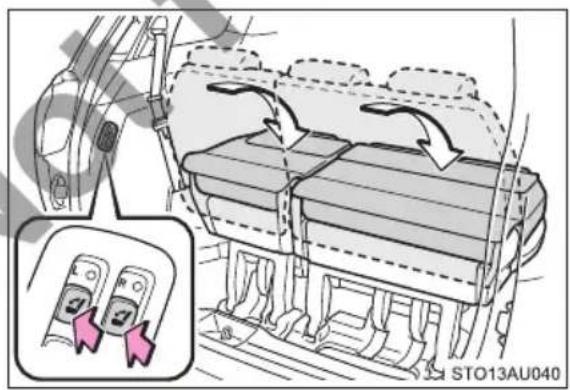
Press the folding/returning switch.
■Returning the third seatbacks
Operation from outside
STEP 1 Adjust the second seats so they are not hit by the third seats when returned.
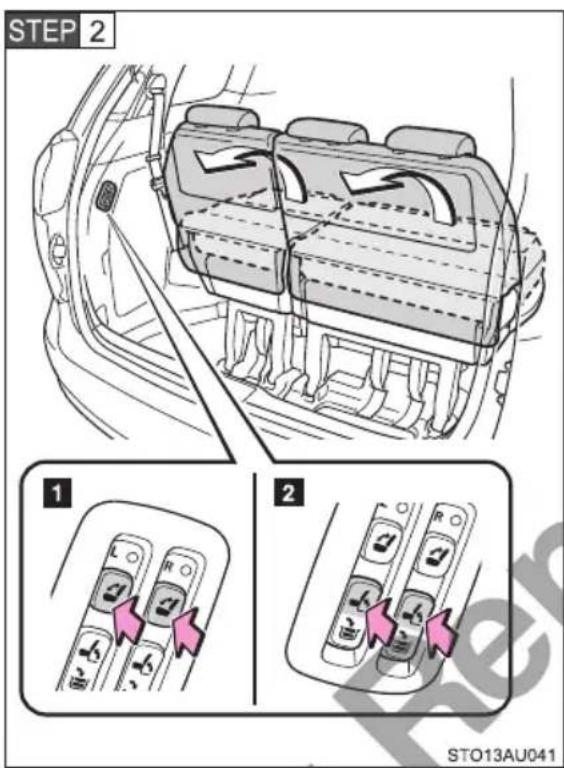
Press the folding/returning switch (1) or returning switch (2).
STEP 3 Make sure the seats are securely locked by pushing them forward and reward.
STEP 4 Remove the secured seat belts from the seat belt hangers. When using the seat belt for the third center seat. (→P. 110)
Operation from inside
Press the seatback angle adjustment switch. ( P. 72)
Stowing the third seats (manual seat)
Before stowing the third seats
STEP 1 Make sure to stop the vehicle and apply the parking brake.
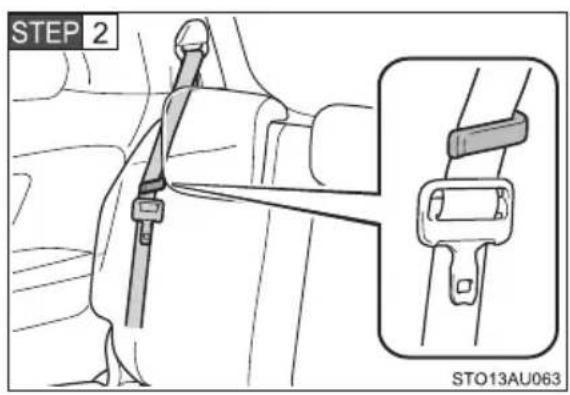
Pass each seat belt on the third outer seats through the seat belt hanger clips.
STEP 3 Stow the third center seat belt. (→P. 111)
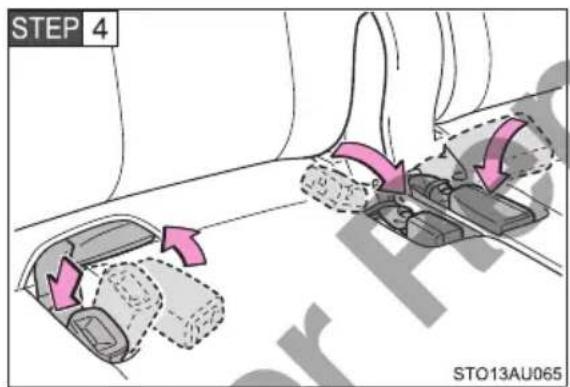
Stow the seat belt buckles for the third seats.
STEP 5 Lower the third seat head restraints to the lowest position. (→P. 79)
STEP 6 Stow the cargo hooks. ( P. 380)
STEP 7 Adjust the second seats so they are not hit by the third seats when stowed.
■ Stowing the third seats
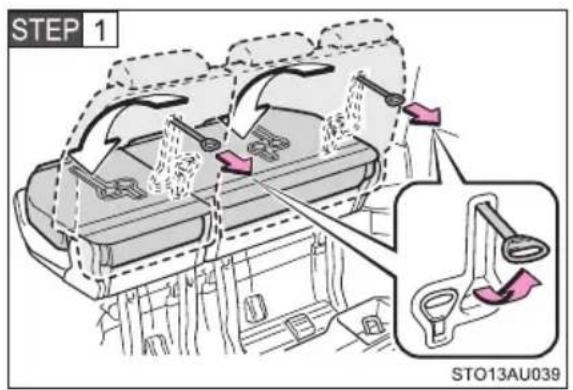
Fold the seatback forward while pulling the seatback angle adjustment strap. Then, push the seatback downward until it locks.
If the third seats cannot be lift up. ( P.103)
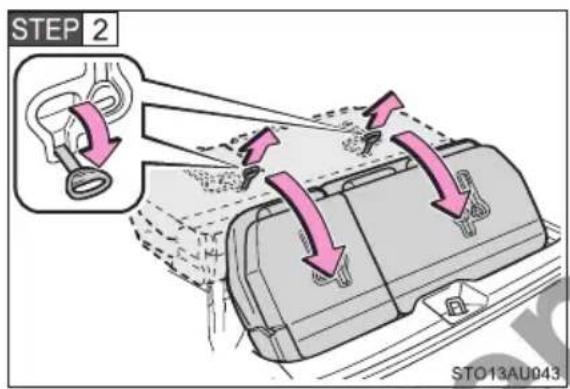
Pull and hold the seat lock release strap and lift up the seat rearward.
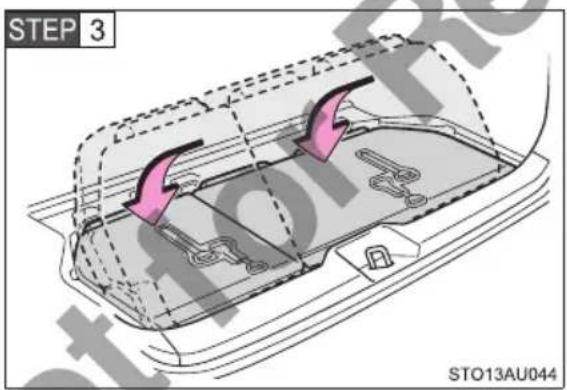
Push the seat against the floor and make sure it is locked securely.
■Returning the third seats
STEP 1 Adjust the second seat so they are not hit by the third seats when returned.
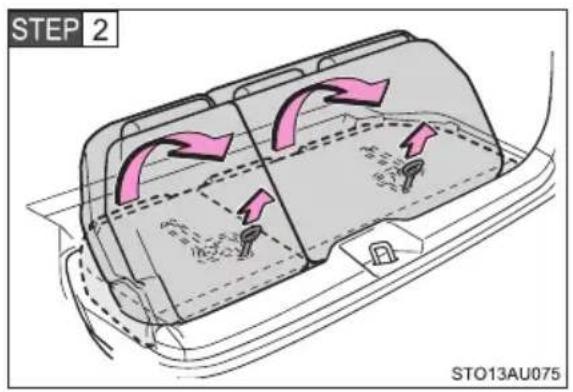
Pull and hold the seat lock release strap, then lift up the seat rearward.
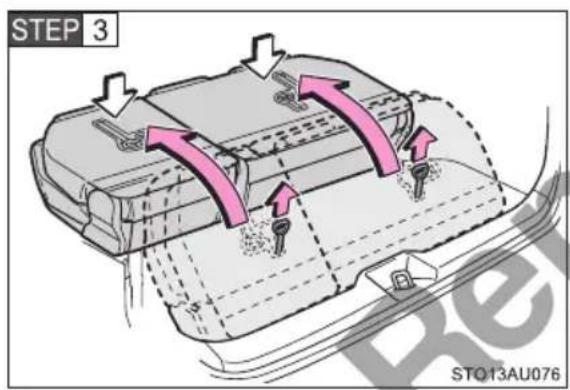
Push the seat forward and then engage the front leg locks.
Make sure the front legs are locked securely.
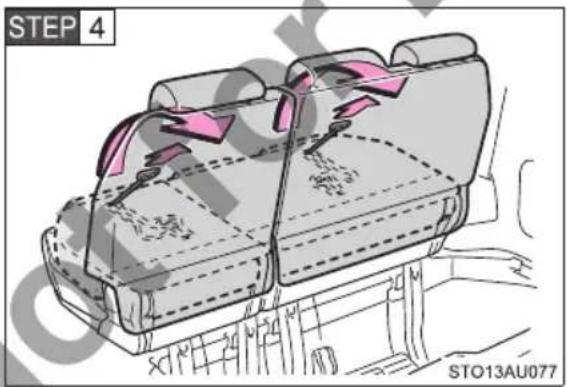
Pull the seatback angle adjustment strap and raise the seatback.
STEP 5 Make sure the seats are securely locked by pushing them forward and reward.
STEP 6 Remove the secured seat belts from the seat belt hangers. When using the seat belt for the third center seat. (→P. 110)
Stowing the third seats (power seat)
Before stowing the third seats
STEP 1 Make sure to stop the vehicle and apply the parking brake.
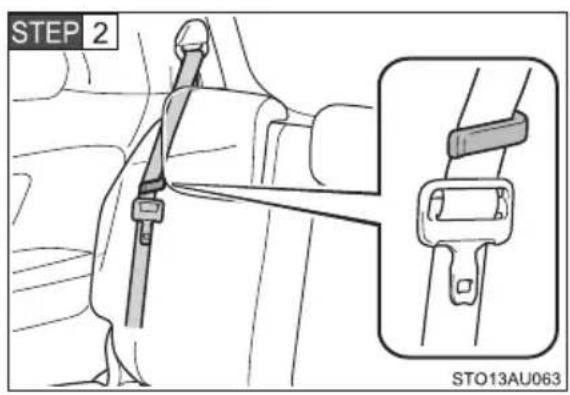
Pass each seat belt on the third outer seats through the seat belt hanger clips.
STEP 3 Stow the third center seat belt. (→P. 111)
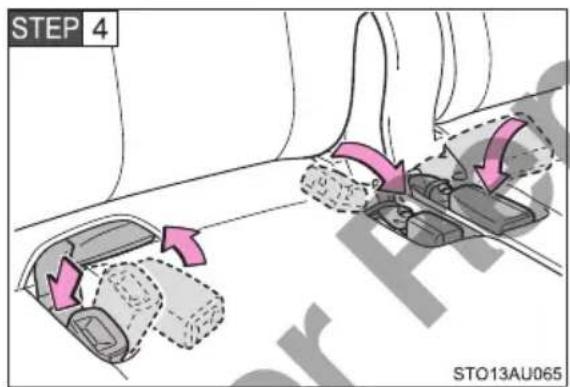
Stow the seat belt buckles for the third seats.
STEP 5 Lower the third seat head restraints to the lowest position. (→P. 79)
STEP 6 Stow the cargo hooks. ( P. 380)
STEP 7 Adjust the second seats so they are not hit by the third seats when stowed.
■ Stowing the third seats
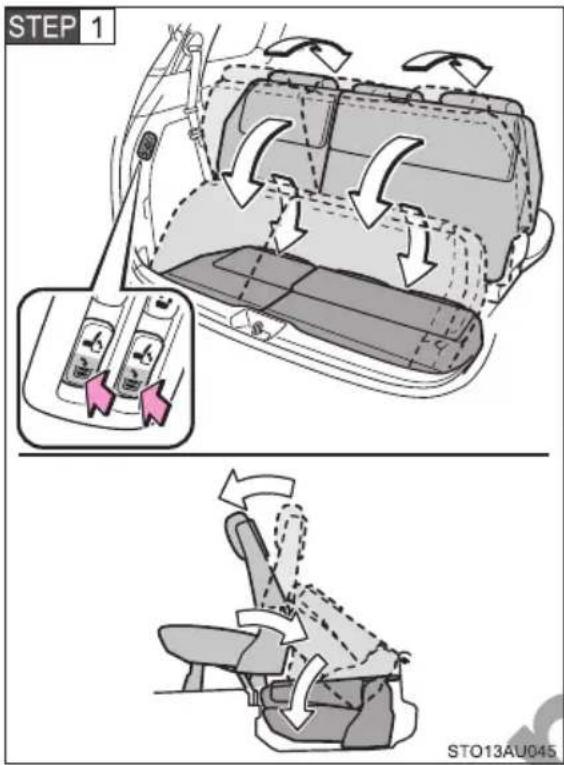
Press and hold the stowing switch.
A beep sounds twice to indicate the start of the operation. The beep sounds twice again when the operation is completed.
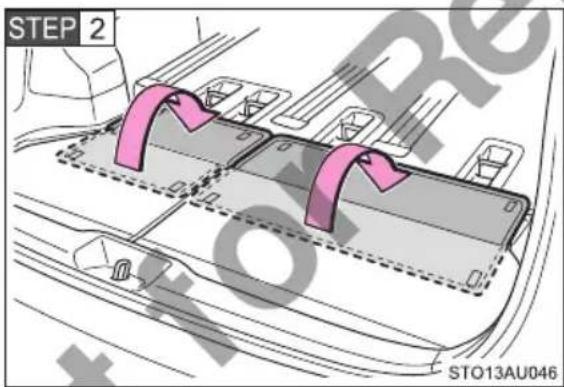
Open the flaps.
■Returning the third seats
STEP 1 Adjust the second seats so they are not hit by the third seats when returned.
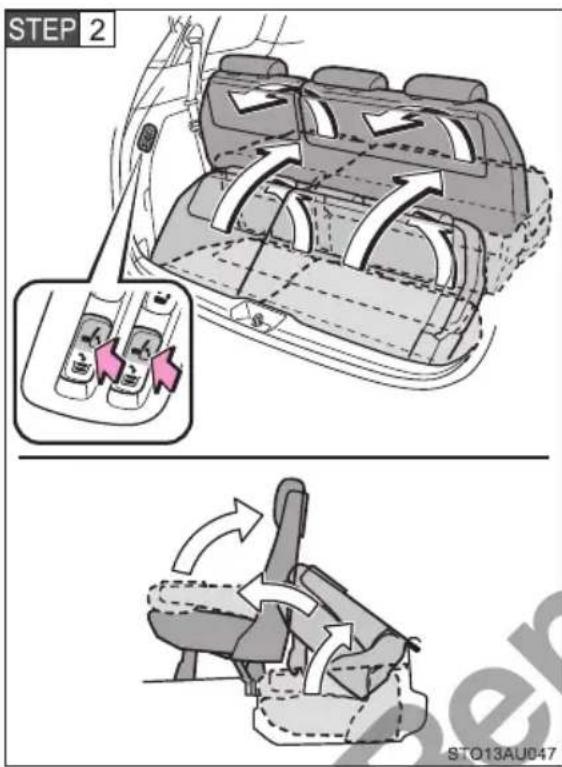
Press and hold the returning switch until the seat legs are locked.
The beep sounds twice to indicate the start of the operation. Release the switch when the beep sounds twice again. The seatback returns to its original position.
■When returning the seats
STEP 1 Make sure the seats are securely locked by pushing them forward and reward.
STEP 2 Remove the secured seat belts from the seat belt hangers. When using the seat belt for the third center seat. (→P. 110)
Tumbling the third seats (if equipped)
■ Before tumbling the third seats
STEP 1 Make sure to stop the vehicle and apply the parking brake.
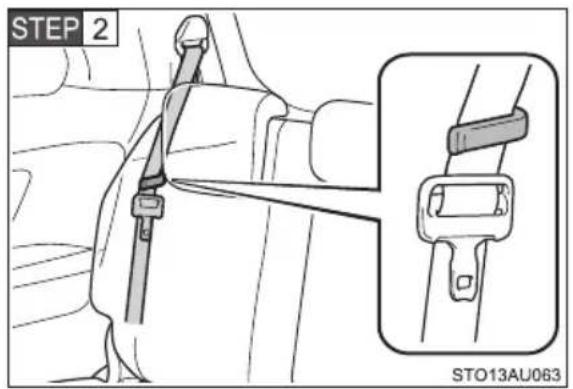
Pass each seat belt on the third outer seats through the seat belt hanger clips.
STEP 3 Stow the third center seat belt. (→P. 111)
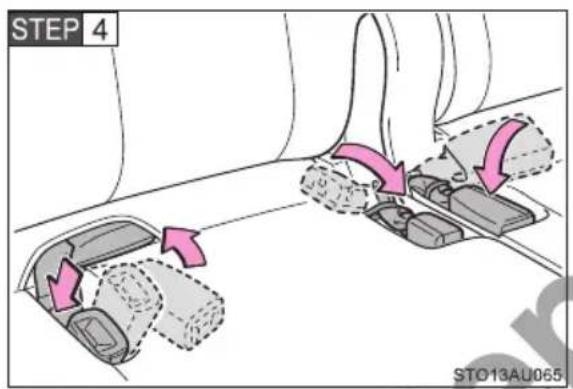
Stow the seat belt buckles for the third seats.
STEP 5 Lower the third seat head restraints to the lowest position. (→P. 79)
STEP 6 Adjust the second seats so they are not hit by the third seats when tumbled. (→P. 70)
■Tumbling the third seats
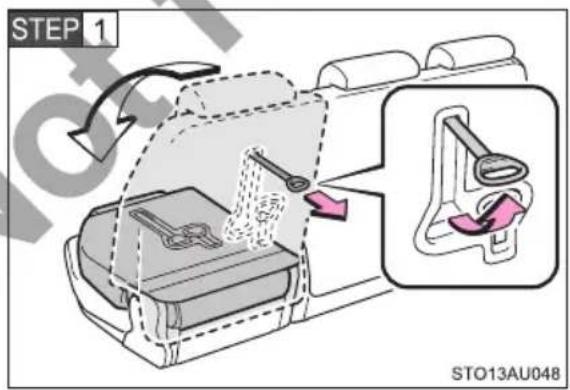
Unlock the seatback by pulling the seatback angle adjustment strap and fold it down.
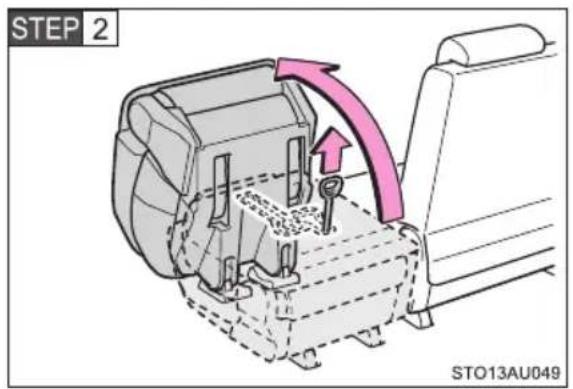
Unlock the seat cushion by pulling the seat lock release strap. Swing the whole seat up and forward.
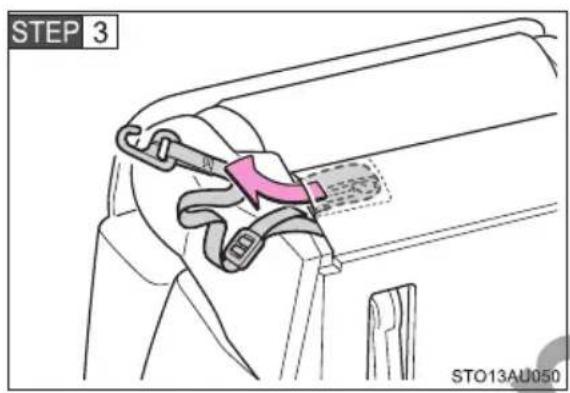
Take the holding strap out of the pocket.
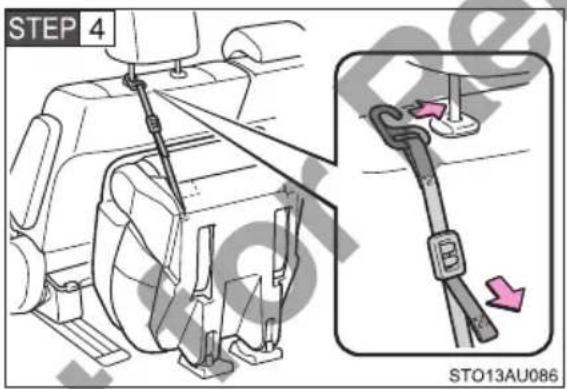
Latch the hook onto the head restraint of the second seat and tug the holding strap to securely fasten it.
When sliding the second seat, be sure to adjust the length of the holding strap until fasten it securely.
Before returning the seat to its original position, be sure to return the holding strap to its pocket.
■Returning the third seats
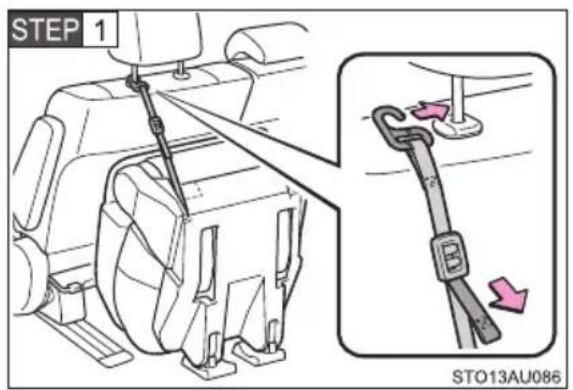
Remove the hook, and stow the strap in the pocket.
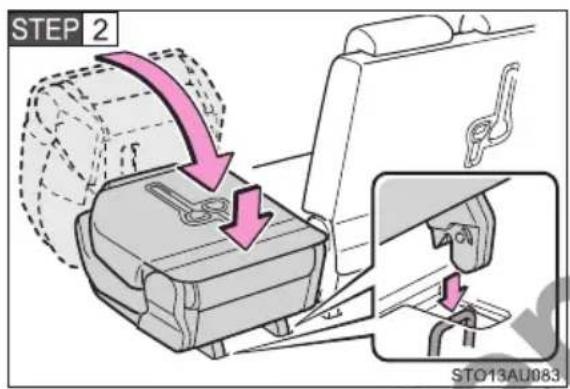
Lower the seats until they lock.
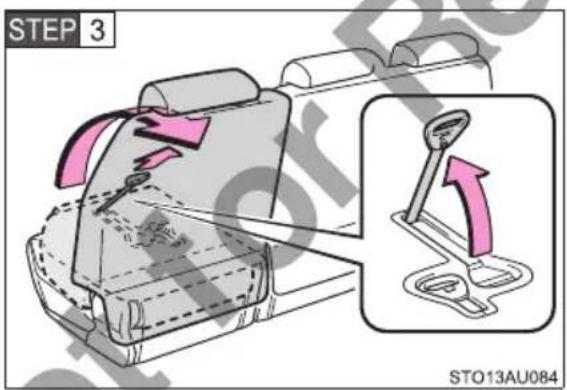
Lift up the seatbacks until they lock.
STEP 4 Make sure the seats are securely locked by pushing them forward and reward.
STEP 5 Remove the secured seat belts from the seat belt hangers.
When using the seat belt for the third center seat. (→P. 110)
Super relax mode (if equipped)
STEP 1 Make sure to stop the vehicle and apply the parking brake.
STEP 2 Stow the third seats. ( P. 93, 96)
STEP 3 Slide both of the second seats sideways to the center. (→P. 70)
STEP 4 Remove the seat slide stoppers. ( P. 76)
STEP 5 Slide back the second seats to the rear-most position. (→P. 70)
STEP 6 Pull up the ottomans. ( P. 75)
When returning the seats
STEP 1 Make sure the seats are securely locked by pushing them forward and reward.
STEP 2 Remove the secured seat belts from the seat belt hangers. When using the seat belt for the third center seat (→P. 110)
■Slide the second seats (vehicles with second captain seats and stowable third seats)
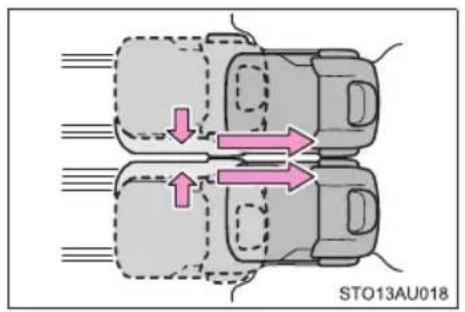
When the third seats are stored and the second seats are in the most center position, the second seats can be moved rearward as shown in the illustration.
If the third seats cannot be lifted up when stowed (manual third seats only)
If the seat does not lift up when the seat lock release strap is pulled, reset in accordance with the following procedure.
STEP 1 Lift the seatback by pulling on the seatback angle adjustment strap.
STEP 2 Push the seatback down again.
■ Folding/stowing the third seats (power third seats only)
The seat operation stops in the following situations. The indicator may flash or come on and the buzzer may sound.
- Folding operation: If the indicator light above the switches flashes three times when the folding/returning switch is pressed, the folding operation will not start.
Make sure the "ENGINE START STOP" switch is set at ACCESSORY mode, set off or the shift lever is in P position then press the folding/returning switch.
- Unfolding operation: If the indicator light above the switches flashes three times when the folding/returning switch, returning switch, or seatback angle adjustment switch is pressed, the returning operation will not start.
Operation from outside only: Make sure the "ENGINE START STOP" switch is set at ACCESSORY mode, set off or the shift lever is in P position then lock the seat legs and press any switch other than the stowing switch.
Folding/unfolding operation: To continue the folding operation, the seatback must be returned to its original position first.
● Stowing operation: If the indicator light above the switches flashes when the stowing switch is pressed, the stowing operation will not start.
Make sure the “ENGINE START STOP” switch is set at ACCESSORY mode, set off or the shift lever is in P position then press and hold the stowing switch.
- Unstowing operation: If the indicator light above the switches flashes when the returning switch is pressed, the returning operation will not start.
Make sure the “ENGINE START STOP” switch is set at ACCESSORY mode, set off or the shift lever is in P position then press and hold the returning switch.
If the engine is started during the operation, the seat operation may also stop.
- If any of the following conditions occur while the seat is operating, the seat operation will stop. The indicator light above the switches will come on and a beep will sound for about 10 seconds.
- Folding/unfolding operation: Any one of the power third seat switch is pressed while operating the folding switch.
- Unstowing operation: When the returning switch is released before the seat legs are securely locked.
- Stowing/unstowing operation: Other power third seats switch is pressed while operating the stowing switch.
- Stowing/unstowing operation: The shift lever is moved from P when the "ENGINE START STOP" switch is in IGNITION ON mode.
- Stowing operation: When the stowing switch is released.
- If any of the following conditions occur while the seat is operating, the seat operation will stop. The indicator light above the switches will flashes and a beep will sound for about 10 seconds.
- Stowing/folding operation: An object is caught between the seatback and seat cushion. Remove the object before operating the seat again. If the indicator light above the switches flashes even though there are no objects between the seatback and seat cushion, contact your Toyota dealer.
- Stowing/unstowing operation: If an object is caught between the seat and floor, the object prevents the seat from moving. Do not continue the operation. Remove the object before operating the seat again. When the seat is already folded, the seat can be stowed using the same procedure. If an object is caught between the seatback and seat cushion, the stowing operation will not start.
If "3rd SEAT" is displayed on the multi-information display
→P. 492

WARNING
■Seat arrangement
Observe the following precautions. Failure to do so may result in death or serious injury.
- Do not arrange the seat positions while driving.
- Stop the vehicle on level ground, set the parking brake and shift the shift lever to P.
- Do not arrange the seat positions when passengers are seated.
- Be careful not to get your hands or feet caught in the movable parts or the connected parts.
- Be careful that the seat does not hit a passenger or luggage.
● Make sure the seat is securely locked by pushing it forward and rearward. - Check that the seat belts and the buckles are not twisted or caught in the seats after arranging the seat positions.
●Tumbling the third seats: After tumbling the third seats, be sure to hold it by the holding strap.

WARNING
- Do not allow anyone to sit on a folded seatback, on tumbled seats (if equipped) or in the luggage compartment while driving.
- Do not allow passengers to ride or put any luggage on a flattened seat while driving.
- Do not allow children to enter the luggage compartment.
- Second captain seats only: Do not remove the stoppers unless sliding the seat.
■When seat are flatted
Do not allow driver and passengers to ride on the flattened seat.
■Tip-up the second seats (second bench seats only)
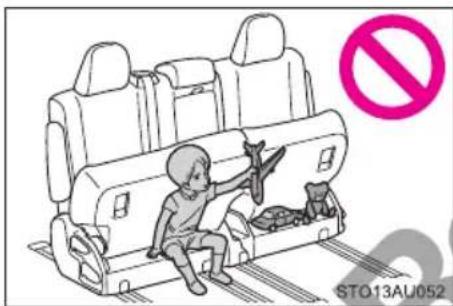
natural_image
Illustration of a child sitting inside a car seat with a switch, no text or symbols presentDo not sit on or place any objects on the edge of the seat base when the seat cushion is lifted up. Doing so may cause personal injury or damage the objects.
■Stowing the third seats (if equipped)
- Do not stow or return the seats when you are inside the vehicle in order to prevent pinching your hands or feet in the seat. Be sure to stow and return the seats from outside the vehicle.
●Power third seats only: When the indicator above the stowing switch and returning switch come on or flash, do not continue the operation. An object or a person may be caught in the seat. If a person is caught, serious injury may result.
● Power third seats only: Do not shift the shift lever out of P with the "ENGINE START STOP" switch set at IGNITION ON mode during the operation. Doing so may cause the vehicle to move and result in death or serious injury. - Do not sit in the third center seat when the left third seat is stowed. Otherwise, it may cause death or severe injury in the event of sudden braking, sudden swerving or an accident.

WARNING
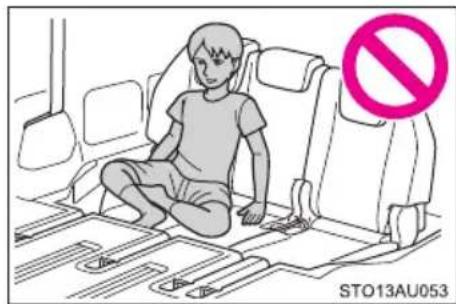
●Manual third seats only: Do not sit on the third seats when it is the stowed position as shown in the illustration. Otherwise, it may cause death or severe injury in the event of sudden braking, sudden swerving or an accident.
■Folding the third seats
- Do not fold or return (except for the seatback angle adjustment switch) the seats when you are inside the vehicle in order to prevent pinching your hands or feet in the seat. Be sure to fold and return the seats from outside the vehicle.
●Power third seats only: When the indicator above the stowing switch and returning switch come on or flash, do not continue the operation. An object or a person may be caught in the seat. If a person is caught, serious injury may result.
●Power third seats only: Do not shift the shift lever out of P with the "ENGINE START STOP" switch set at IGNITION ON mode during the operation. Doing so may cause the vehicle to move and result in death or serious injury.
■Tumbling the third seats (if equipped)
- Do not tumble or return the seats when you are inside the vehicle in order to prevent pinching your hands or feet in the seat. Be sure to tumble and return the seats from outside the vehicle.
●Operate the seat lock release strap while pushing down on the seatback to prevent the seat from springing up and causing injury.
■After returning the seat to the original position
Observe the following precautions. Failure to do so may result in death or serious injury.
Make sure the seat is securely locked by pushing it forward and rearward.
- Check that the seat belts and the buckles are not twisted or caught in the seats.
● Be certain to replace the head restraint.

NOTICE
■Seat arrangement
Make sure that there are no objects, such as cushions, on the seat cushion.
- Do not place any objects, such as floor mats, on the slide rails. Doing so may damage the floor mats or rails when the seat is slid.
■ Stowing the seat belt
The seat belts and the buckles must be stowed before you fold down the rear seatbacks.
■Third seats arrangement operation
- Confirm that the area behind the vehicle is safe before starting the operation.
Before closing the back door, make sure the third seat does not interfere with the back door. - If the seat is pushed down before it is locked securely, the seat may interfere with and damage the floor or floor mat.
● Make sure that there are no objects on the floor of the luggage compartment. If the objects interfere with the seats, the objects may be damaged.
● Make sure that the seat path is clear before arranging or returning the seat. Otherwise, the seat cushion and seat legs may be damaged.
1-3. Adjustable components (seats, mirrors, steering wheel) Seat belts
Make sure that all occupants are wearing their seat belts before driving the vehicle.
■ Correct use of the seat belts
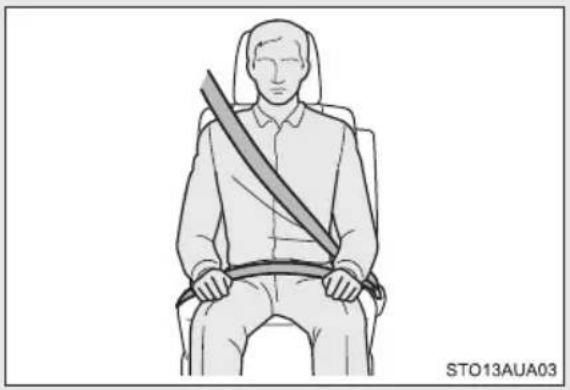
natural_image
Illustration of a person sitting in a seat with a belt, no text or symbols present- Extend the shoulder belt so that it comes fully over the shoulder, but does not come into contact with the neck or slide off the shoulder.
- Position the lap belt as low as possible over the hips.
- Adjust the position of the seatback. Sit up straight and well back in the seat.
●Do not twist the seat belt.
Fastening and releasing the seat belt
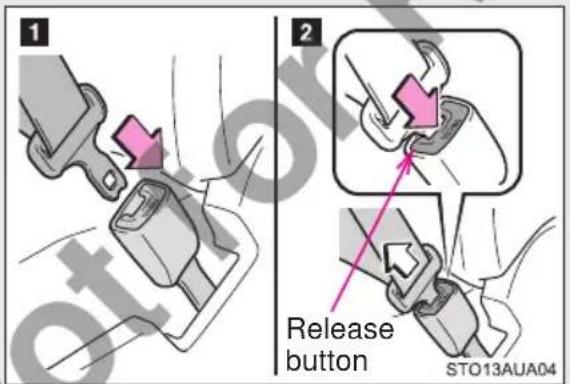
1 To fasten the seat belt, push the plate into the buckle until a click sound is heard.
2 To release the seat belt, press the release button.
■Adjusting the seat belt shoulder anchor height (front seats)
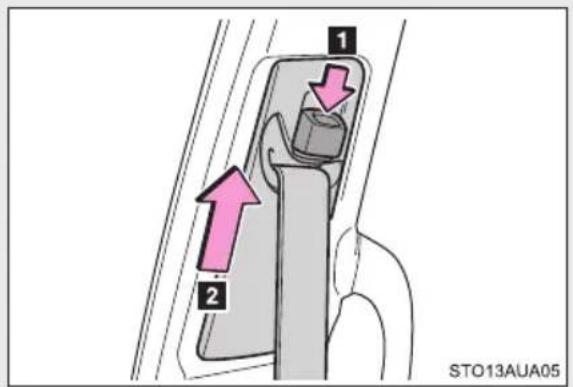
1 Push the seat belt shoulder anchor down while pressing the release button.
2 Push the seat belt shoulder anchor up.
Move the height adjuster up and down as needed until you hear a click.
Third center seat belt
The third center seat belt is a 3-point type restraint with 2 buckles. Both seat belt buckles must be correctly located and securely latched for proper operation.
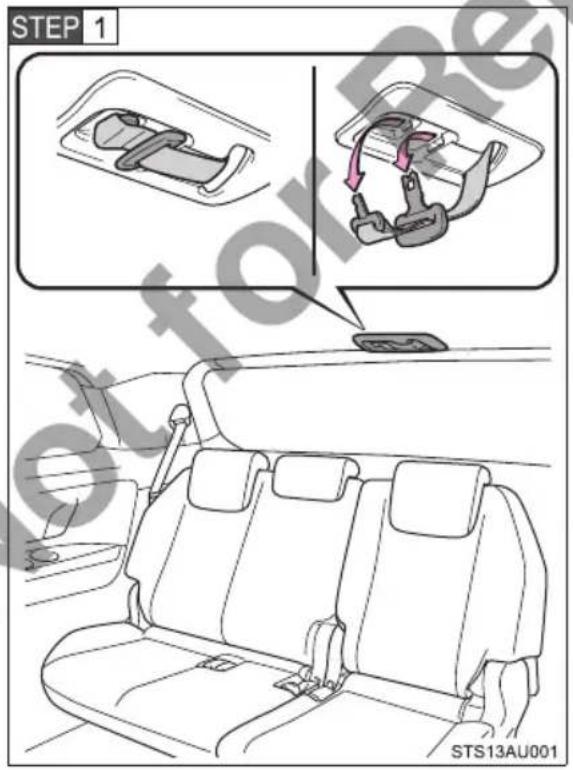
Remove the tabs from the cover.
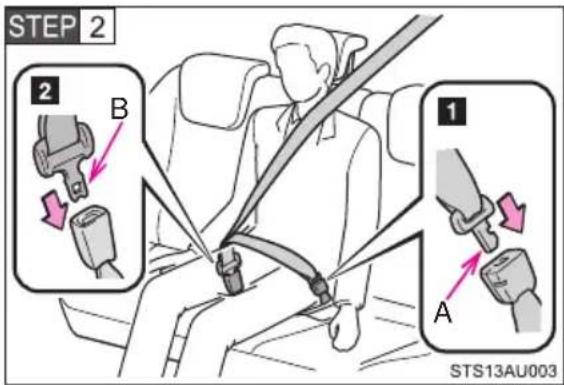
Insert tabs into the buckles.
Make sure that the buckle 1's securely latched ready for use of the center seat belt.
1 Matches the tab with hooked end (tab "A").
2 Matches the tab with concave end (tab "B").
■Releasing and stowing the seat belt
The third center seat belt can be completely released only when necessary such as when folding down the third seat.
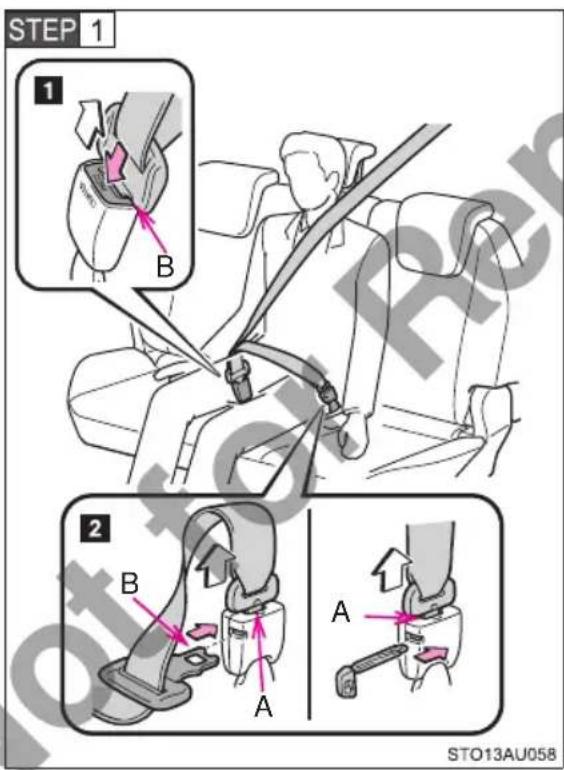
1 To release the tab "B", press the release button.
2 To release the tab "A", insert the mechanical key or tab "B" into the hole on the buckle.
Retract the belt slowly when releasing and stowing the seat belt.
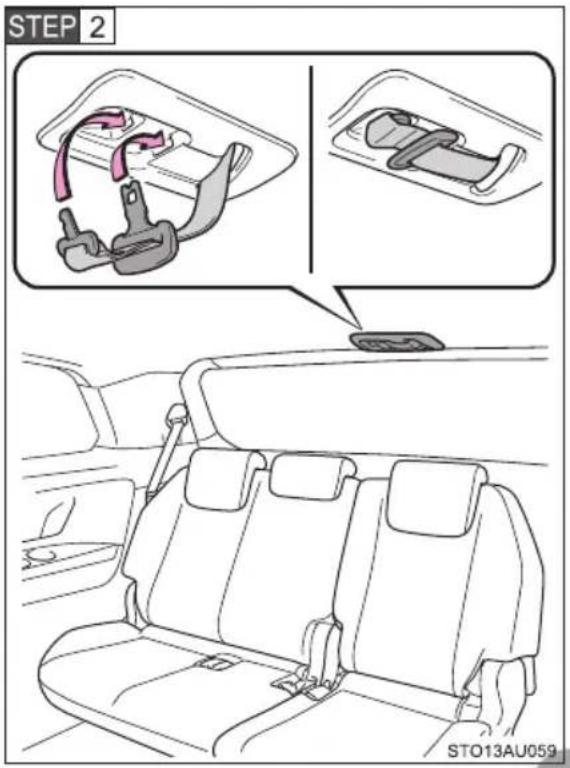
Stow the seat belt tabs in the cover set in the roof as shown.
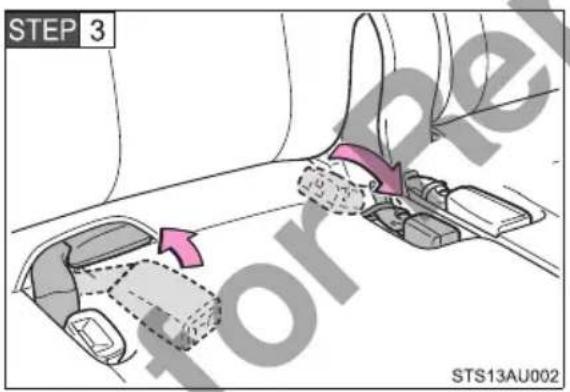
Stow the seat belt buckles for the third seats.
Seat belt pretensioners (front seats)
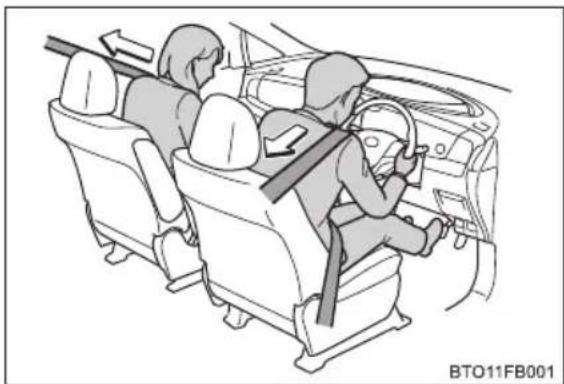
natural_image
Interior view of a car showing a person seated in the seat with a driver's seatbelt, no text or symbols visibleThe pretensioners help the seat belts to quickly restrain the occupants by retracting the seat belts when the vehicle is subjected to certain types of severe frontal collision.
Emergency locking retractor (ELR)
The retractor will lock the belt during a sudden stop or on impact. It may also lock if you lean forward too quickly. A slow, easy motion will allow the belt to extend so that you can move around fully.
■Child seat belt usage
The seat belts of your vehicle were principally designed for persons of adult size.
- Use a child restraint system appropriate for the child, until the child becomes large enough to properly wear the vehicle's seat belt. (→P. 145)
- When the child becomes large enough to properly wear the vehicle's seat belt, follow the instructions on P. 109 regarding seat belt usage.
■Replacing the belt after the pretensioner has been activated
If the vehicle is involved in multiple collisions, the pretensioner will activate for the first collision, but will not activate for the second or subsequent collisions.
Seat belt regulations
If seat belt regulations exist in the country where you reside, please contact your Toyota dealer for seat belt replacement or installation.

WARNING
Observe the following precautions to reduce the risk of injury in the event of sudden braking, sudden swerving or an accident.
Failure to do so may cause death or serious injury.
■Wearing a seat belt
●Ensure that all passengers wear a seat belt.
●Always wear a seat belt properly.
● Each seat belt should be used by one person only. Do not use a seat belt for more than one person at once, including children.
●Toyota recommends that children be seated in the rear seat and always use a seat belt and/or an appropriate child restraint system.
●To achieve a proper seating position, do not recline the seat more than necessary. The seat belt is most effective when the occupants are sitting up straight and well back in the seats.
●Do not wear the shoulder belt under your arm.
●Always wear your seat belt low and snug across your hips.
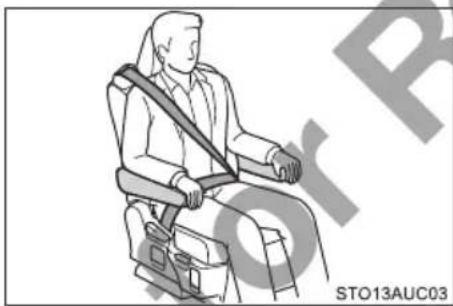
natural_image
Illustration of a person seated in a chair using a seatbelt device (no text or symbols visible)● Always wear the belt with the shoulder portion over the outside armrest and the lap portion under the outside arm-rest.

WARNING
■ Pregnant women
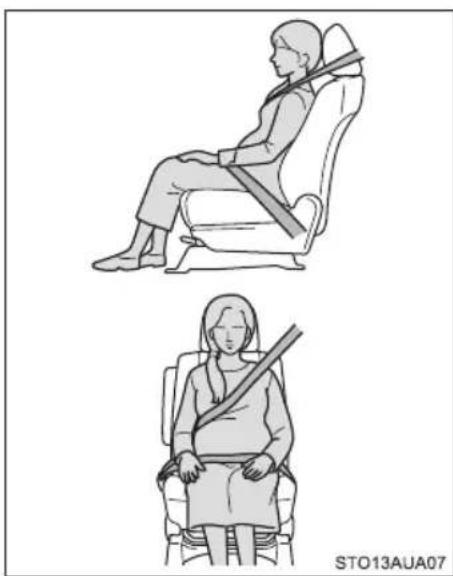
natural_image
Illustration of two individuals seated in a chair, one using a seatbelt and the other holding a shoulder (no text or symbols)Obtain medical advice and wear the seat belt in the proper way. (→P. 109)
Women who are pregnant should position the lap belt as low as possible over the hips in the same manner as other occupants. Extend the shoulder belt completely over the shoulder and position the belt across the chest. Avoid belt contact over the rounding of the abdominal area.
If the seat belt is not worn properly, not only the pregnant woman, but also the fetus could suffer death or serious injury as a result of sudden braking or a collision.
■People suffering illness
Obtain medical advice and wear the seat belt in the proper way. (→P. 109)
■When children are in the vehicle
Do not allow children to play with the seat belt. If the seat belt becomes twisted around a child's neck, it may lead to choking or other serious injuries that could result in death.
If this occurs and the buckle cannot be unfastened, scissors should be used to cut the belt.
■Seat belt pretensioners
If the pretensioner has activated, the SRS warning light will come on. In that case, the seat belt cannot be used again and must be replaced at your Toyota dealer.

WARNING
■Adjustable shoulder anchor
Always make sure the shoulder belt is positioned across the center of your shoulder. The belt should be kept away from your neck, but not falling off your shoulder. Failure to do so could reduce the amount of protection in an accident and cause death or serious injuries in the event of a sudden stop, sudden swerve or accident. (→P. 110)
■Seat belt damage and wear
- Do not damage the seat belts by allowing the belt, plate, or buckle to be jammed in the door.
- Inspect the seat belt system periodically. Check for cuts, fraying, and loose parts. Do not use a damaged seat belt until it is replaced. Damaged seat belts cannot protect an occupant from death or serious injury.
- Ensure that the belt and plate are locked and the belt is not twisted. If the seat belt does not function correctly, immediately contact your Toyota dealer.
- Replace the seat assembly, including the belts, if your vehicle has been involved in a serious accident, even if there is no obvious damage.
- Do not attempt to install, remove, modify, disassemble or dispose of the seat belts. Have any necessary repairs carried out by your Toyota dealer. Inappropriate handling of the pretensioner may prevent it from operating properly, resulting in death or serious injury.
■When using the third center seat belt
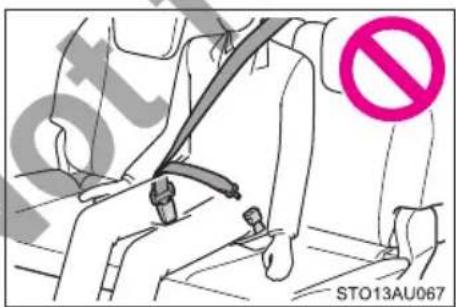
Do not use the third center seat belt with either buckle released.
Fastening only one of the buckles may result in death or serious injury in case of sudden braking or a collision.
1-3. Adjustable components (seats, mirrors, steering wheel) Steering wheel
The steering wheel can be adjusted to a comfortable position.
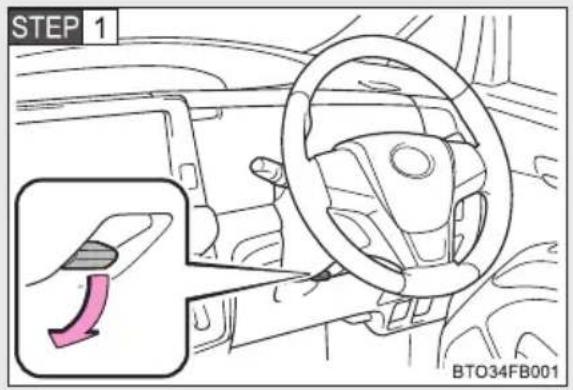
Hold the steering wheel and push the lever down.
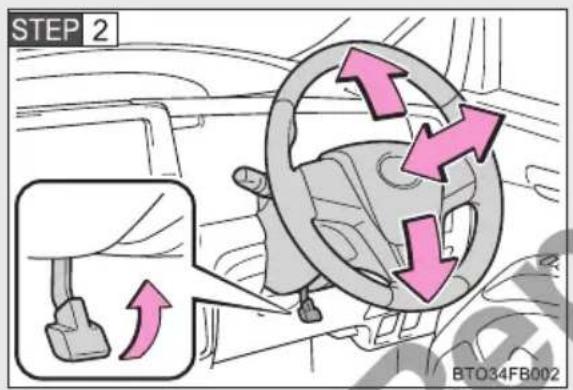
Adjust to the ideal position by moving the steering wheel horizontally and vertically.
After adjustment, pull the lever up to secure the steering wheel.

WARNING
■While driving
Do not adjust the steering wheel while driving.
Doing so may cause the driver to mishandle the vehicle and cause an accident, resulting in death or serious injury.
■After adjusting the steering wheel
Make sure that the steering wheel is securely locked.
Otherwise, the steering wheel may move suddenly, possibly causing an accident, resulting in death or serious injury.
1-3. Adjustable components (seats, mirrors, steering wheel) Anti-glare inside rear view mirror
The rear view mirror's position can be adjusted to enable sufficient confirmation of the rear view in accordance with the driver's seating posture.
Adjusting the height of rear view mirror
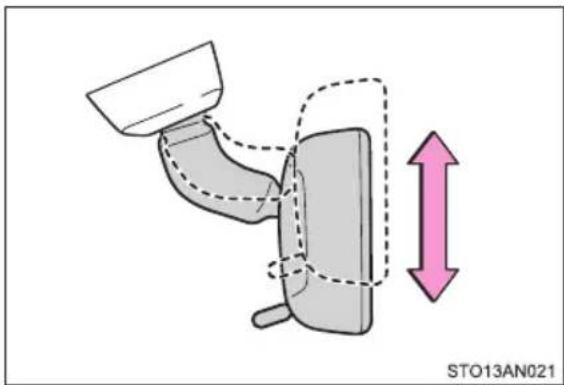
Adjust the height of the rear view mirror by moving it up and down.
Anti-glare function
Reflected light from the headlights of vehicles behind can be reduced by operating the lever.
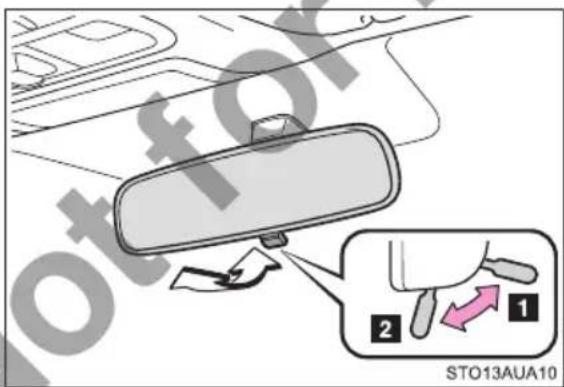
1 Normal position
2 Anti-glare position

WARNING
■While driving
Do not adjust the position of the mirror while driving. Doing so may lead to mishandling of the vehicle and cause an accident, resulting in death or serious injury.
1-3. Adjustable components (seats, mirrors, steering wheel) Outside rear view mirrors
Mirror angle can be adjusted using the switch.
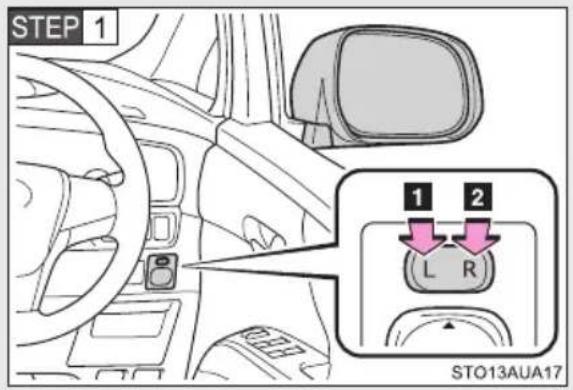
To select a mirror to adjust, press the switch.
1 Left
2 Right
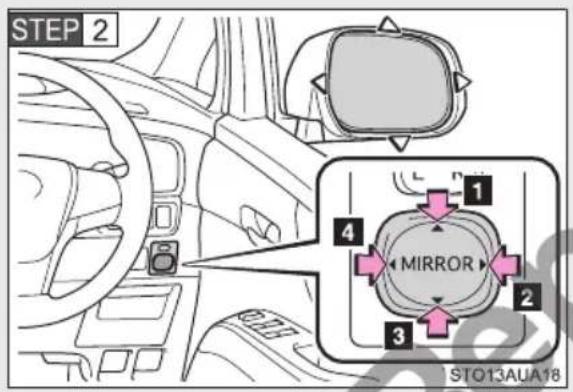
To adjust the mirror, press the switch.
1 Up
2 Right
3 Down
4 Left
Folding the mirrors
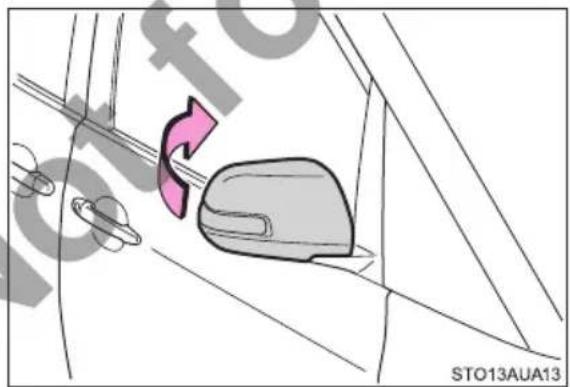
natural_image
Diagram showing a car door with a highlighted seat and directional arrow, no text or symbols presentPush the mirror back in the direction of the vehicle's rear.
■Mirror operating conditions
The “ENGINE START STOP” switch is in ACCESSORY or IGNITION ON mode.

WARNING
■When driving the vehicle
Observe the following precautions while driving.
Failure to do so may result in loss of control of the vehicle and cause an accident, resulting in death or serious injury.
- Do not adjust the mirrors while driving.
●Do not drive with the mirrors folded.
● Both the driver and passenger side mirrors must be extended and properly adjusted before driving.
■When a mirror is moving
To avoid personal injury and mirror malfunction, be careful not to get your hand caught by the moving mirror.
1-4. Opening and closing the windows and moon roofs and sunshades Power windows
The power windows can be opened and closed using the switches.
Operating the switch moves the windows as follows:
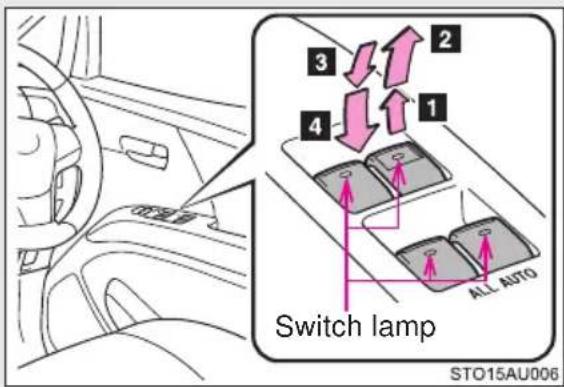
1 Closing
2 One-touch closing*
3 Opening
4 One-touch opening*
*: To stop the window partway, operate the switch in the opposite direction.
When the “ENGINE START STOP” switch is in IGNITION ON mode, the switch lamp comes on. When the “ENGINE START STOP” switch is turned to ACCESSORY mode or turned off, the switch lamp turns off.
Window lock switch
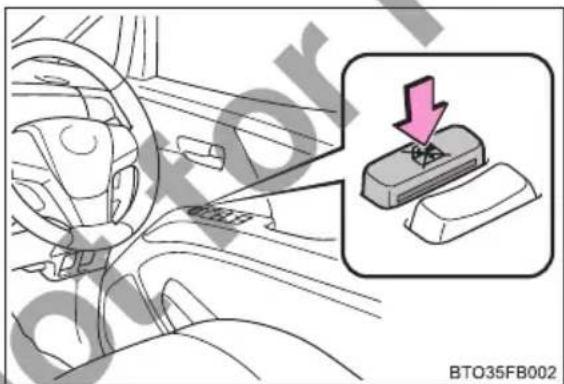
Press the switch down to lock the passenger window switches and the rear sunshade switch (if equipped).
Use this switch to prevent children from accidentally opening or closing the passenger windows and the rear sunshade (if equipped).
■The power windows can be operated when
The "ENGINE START STOP" switch is in IGNITION ON mode.
- Operating the power windows after turning the engine off
The power windows can be operated for approximately 43 seconds even after the “ENGINE START STOP” switch is turned to ACCESSORY mode or turned off. They cannot, however, be operated once either front door is opened.
At this time, the switch lamp does not turn on.
Jam protection function
If an object becomes caught between the window and the window frame, window travel is stopped and the window is opened slightly.
If the battery is disconnected when opening and closing the window
The power windows must be initialized in order to ensure proper operation. (Perform for each window with the switch for each seat.)
STEP 1 Turn the "ENGINE START STOP" switch to IGNITION ON mode.
STEP 2 Fully close the window by pulling the switch up and continue holding the switch for 1 second.
The indicator on the switch changes from a flashing pattern to being on when initial settings are complete.
WARNING
■Closing the windows
Observe the following precautions.
Failure to do so may result in death or serious injury.
The driver is responsible for all the power window operations, including the operation for the passengers. In order to prevent accidental operation, especially by a child, do not let a child operate the power windows. It is possible for children and other passengers to have body parts caught in the power window. Also, when riding with a child, it is recommended to use the window lock switch. (→P. 121)
- Check to make sure that all passengers do not have any part of their body in a position where it could be caught when a window is being operated.
- When using the wireless remote control or mechanical key and operating the power windows, operate the power window after checking to make sure that there is no possibility of any passenger having any of their body parts caught in the window. Also do not let a child operate window by the wireless remote control or mechanical key. It is possible for children and other passengers to get caught in the power window.
- When exiting the vehicle, turn the “ENGINE START STOP” switch off, carry the key and exit the vehicle along with the child. There may be accidental operation, due to mischief, etc., that may possibly lead to an accident.
Jam protection function
●Never use any part of your body to intentionally activate the jam protection function.
●The jam protection function may not work if something gets caught just before the window fully closes.
1-4. Opening and closing the windows and moon roofs and sunshades Moon roofs\*
The front moon roof is operated manually to tilt up and down. However, the rear moon roof cannot be operated.
■Tilting up the front moon roof
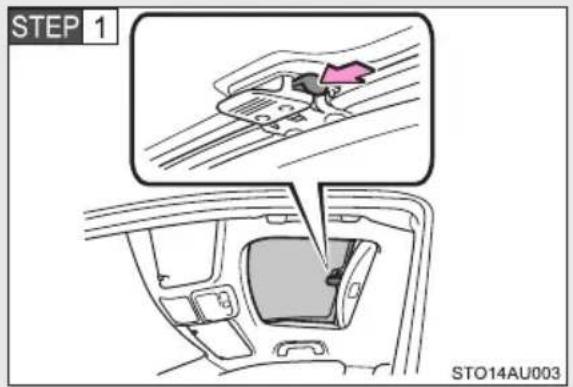
Push the button.
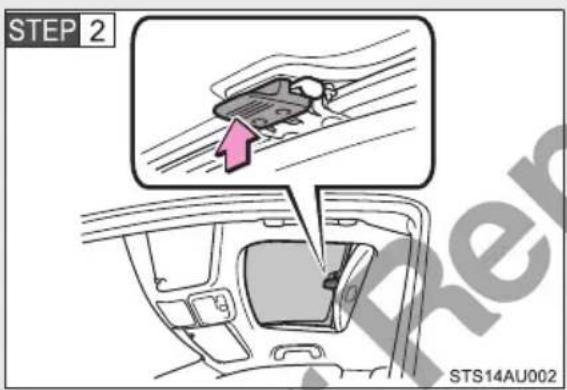
Push the handle up.
- Tilting down the front moon roof
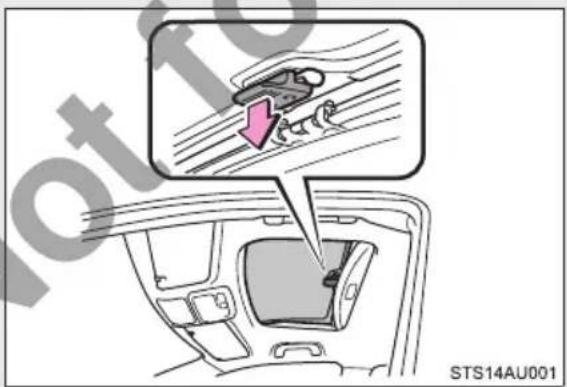
Pull down the handle until it locks.
Sunshades
The front sunshade is opened and closed manually. However, the rear sun-shade is operated automatically. ( P. 126)

WARNING
■Tilting up the front moon roof
Do not allow any passengers to put their hands outside the vehicle while it is moving. Failure to do so may result in death or serious injury.
■Tilting down the front moon roof
Observe the following precautions.
Failure to do so may result in death or serious injury.
- Check to make sure that all passengers do not have any part of their body in a position where it could be caught when the front moon roof is being operated.
- Do not allow children to operate the front moon roof.
Closing the front moon roof on someone can cause death or serious injury. The driver is responsible for instructing children not to operate the moon roofs.
1-4. Opening and closing the windows and moon roofs and sunshades Sunshades\*
The front sunshade can be opened and closed manually. The rear sunshade can be opened and closed by operating the rear sunshade switches.
Front sunshade
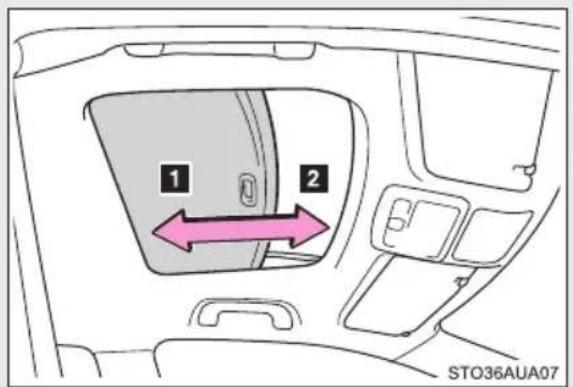
1 Open
2 Close
Rear sunshade
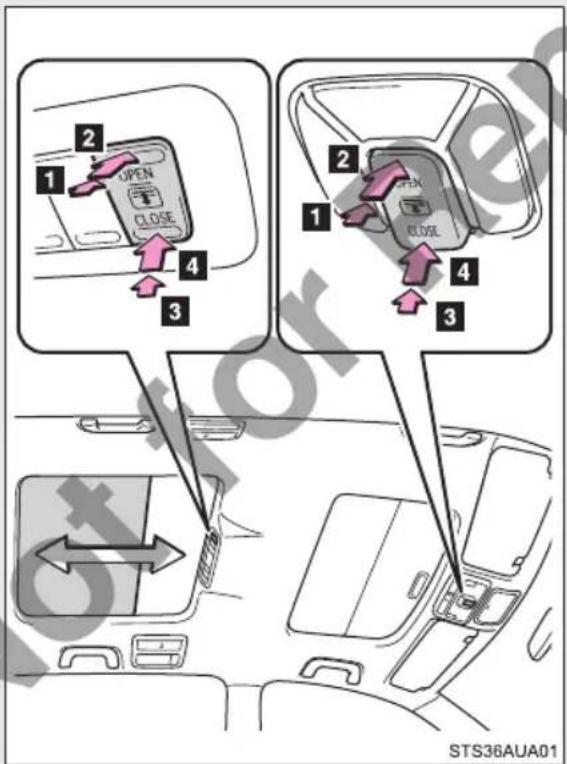
1 Opening
2 Automatic full-opening (press and hold)*
3 Closing
4 Automatic full-closing (press and hold)*
*: Pressing either side of the switch will stop the rear sun-shade travel partway.
■The rear sunshade can be operated when
The "ENGINE START STOP" switch is IGNITION ON mode.
However, the rear sunshade cannot be operated if the window lock switch is pressed.
Jam protection function
If an object is detected between the rear sunshade and the frame while closing, travel is stopped and the rear sunshade opens slightly.
■When the rear sunshade does not close normally
Perform the following procedure:
STEP 1 Stop the vehicle.
STEP 2 Press and hold the "CLOSE" switch.*
The rear sunshade will repeat the opening/closing operation.
STEP 3 Check to make sure that the rear sunshade is completely closed and then release the switch.
*: If the switch is released at the incorrect time, the procedure will have to be performed again from the beginning.
If the rear sunshade does not fully close even after performing the above procedure correctly, have the vehicle inspected by your Toyota dealer.

WARNING
■Closing the sunshade
Observe the following precautions.
Failure to do so may result in death or serious injury.
- Check to make sure that all passengers do not have any part of their body in a position where it could be caught when the rear sunshade is being operated.
- Do not allow children to operate the rear sunshade.
Closing the rear sunshade on someone can cause death or serious injury. The driver is responsible for instructing children not to operate the sun-shades.

WARNING
Jam protection function
●Never use any part of your body to intentionally activate the jam protection function.
●The jam protection function may not work if something gets caught just before the rear sunshade fully closes.

NOTICE
■To prevent battery discharge
Do not operate the rear sunshade when the engine is not running.
■To ensure normal operation of the sunshade
Observe the following precautions:
- Do not place excessive load on the motor or other components.
- Do not place objects where they may hinder opening and closing operations.
- Do not attach items to the rear sunshade.
- Keep the opening clean and clear of obstructions.
- Do not operate the rear sunshade continuously for long periods of time.
1-5. Refueling
Opening the fuel tank cap
Perform the following steps to open the fuel tank cap:
■Before refueling the vehicle
●Turn the “ENGINE START STOP” switch off and ensure that all the doors and windows are closed.
- Confirm the type of fuel. (→P. 550)
■ Opening the fuel tank cap
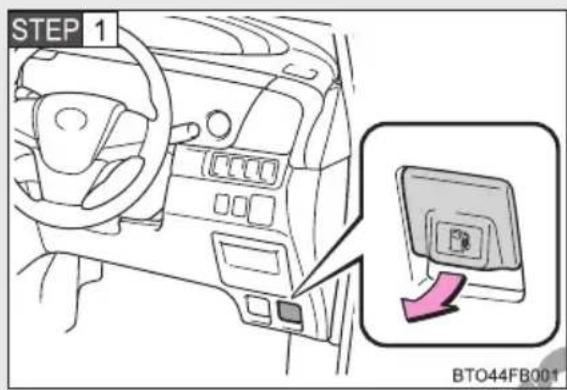
Pull up the opener to open the fuel filler door.
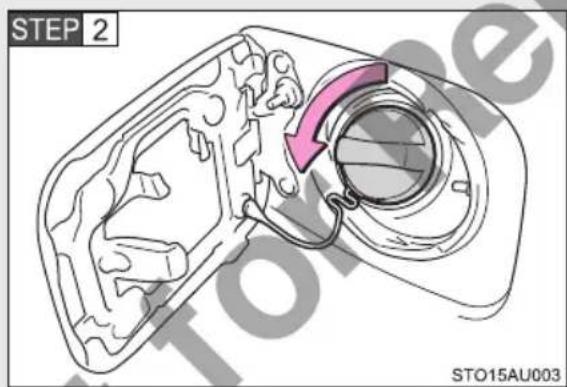
Turn the fuel tank cap slowly to open.
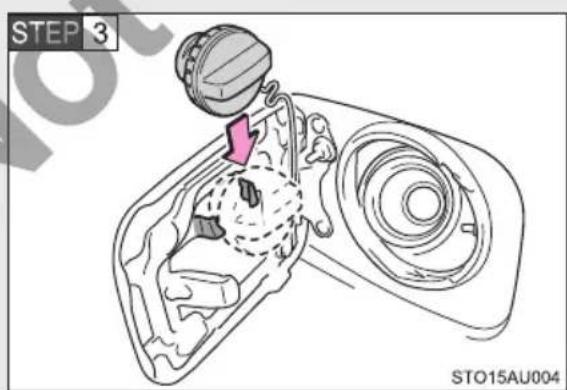
Hang the fuel tank cap on the back of the fuel filler door.
Closing the fuel tank cap
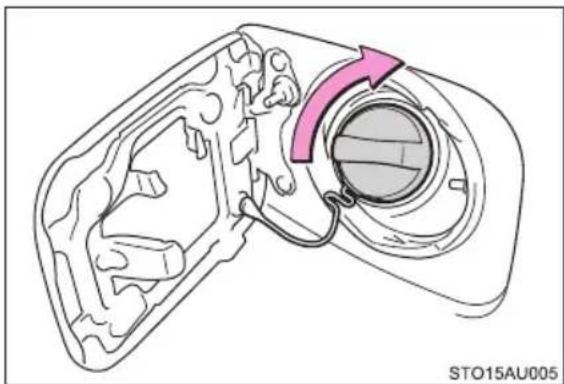
natural_image
Diagram of a mechanical component with a highlighted circular feature and arrow indicating rotation (no text or symbols)After refueling, turn the fuel tank cap until you hear a click. Once the cap is released, it will turn slightly in the opposite direction.
Fuel types
→P. 550
■Fuel tank opening for unleaded gasoline
To help prevent incorrect fueling, your vehicle has a fuel tank opening that only accommodates the special nozzle on unleaded fuel pumps.

WARNING
■When refueling the vehicle
Observe the following precautions while refueling the vehicle. Failure to do so may result in death or serious injury.
●After exiting the vehicle and before opening the fuel door, touch an unpainted metal surface to discharge any static electricity. It is important to discharge static electricity before refueling because sparks resulting from static electricity can cause fuel vapors to ignite while refueling.
●Always hold the grips on the fuel tank cap and turn it slowly to remove it. A whooshing sound may be heard when the fuel tank cap is loosened. Wait until the sound cannot be heard before fully removing the cap. In hot weather, pressurized fuel may spray out the filler neck and cause injury.

WARNING
- Do not allow anyone that has not discharged static electricity from their body to come close to an open fuel tank.
- Do not inhale vaporized fuel.
Fuel contains substances that are harmful if inhaled. - Do not smoke while refueling the vehicle.
Doing so may cause the fuel to ignite and cause a fire. - Do not return to the vehicle or touch any person or object that is statically charged.
This may cause static electricity to build up, resulting in a possible ignition hazard.
When refueling
Observe the following precautions to prevent fuel overflowing from the fuel tank:
- Securely insert the fuel nozzle into the fuel filler neck.
- Stop filling the tank after the fuel nozzle automatically clicks off.
●Do not top off the fuel tank.
■When replacing the fuel tank cap
Do not use anything but a genuine Toyota fuel tank cap designed for your vehicle. Doing so may cause a fire or other incident which may result in death or serious injury.

NOTICE
Refueling
Do not spill fuel during refueling.
Doing so may damage the vehicle, such as causing the emission control system to operate abnormally or damaging fuel system components or the vehicle's painted surface.
■ Opening the fuel filler door
Avoid opening the fuel filler door when the left side sliding door is fully opened. Otherwise, the fuel filler door may be damaged.
1-6. Theft deterrent system
Engine immobilizer system
The vehicle's keys have built-in transponder chips that prevent the engine from starting if a key has not been previously registered in the vehicle's on-board computer.
Never leave the keys inside the vehicle when you leave the vehicle.
This system is designed to help prevent vehicle theft but does not guarantee absolute security against all vehicle thefts.
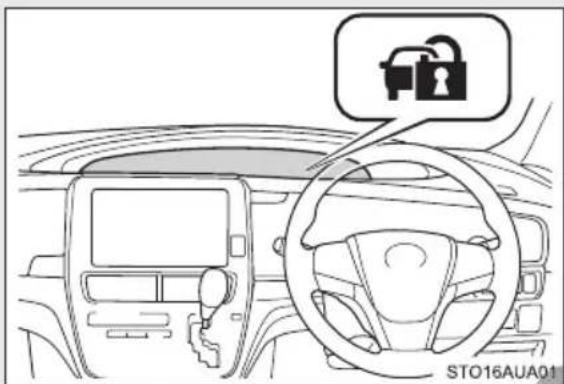
The indicator flashes after the "ENGINE START STOP" switch has been turned off to indicate that the system is operating.
The indicator stops flashing after the “ENGINE START STOP” switch has been turned to ACCESSORY or IGNITION ON mode to indicate that the system has been canceled.
System maintenance
The vehicle has a maintenance-free type engine immobilizer system.
■ Conditions that may cause the system to malfunction
- If the grip portion of the key is in contact with a metallic object
If the key is in close proximity to or touching a key to the security system (key with a built-in transponder chip) of another vehicle

NOTICE
■To ensure the system operates correctly
Do not modify or remove the system. If modified or removed, the proper operation of the system cannot be guaranteed.
1-7. Safety information
Correct driving posture
Drive with a good posture as follows:
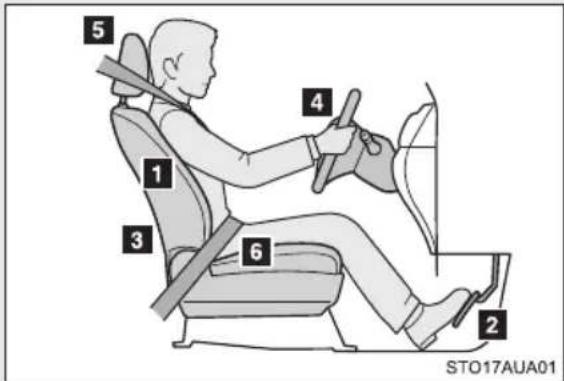
1 Sit upright and well back in the seat. (→P. 67)
2 Adjust the position of the seat forward or backward to ensure the pedals can be reached and easily depressed to the extent required. (→P. 67)
3 Adjust the seatback so that the controls are easily operable. (→P. 67)
4 Adjust the tilt and telescopic positions of the steering wheel downward so the airbag is facing your chest. (→P. 117)
5 Lock the head restraint in place with the center of the head restraint closest to the top of your ears. (→P. 79)
6 Wear the seat belt correctly.
(→P. 109)

WARNING
While driving
- Do not adjust the position of the driver's seat.
Doing so could cause the driver to lose control of the vehicle. - Do not place a cushion between the driver or passenger and the seatback.
A cushion may prevent correct posture from being achieved, and reduce the effectiveness of the seat belt and head restraint, increasing the risk of death or serious injury to the driver or passenger. - Do not place anything under the front seats.
Objects placed under the front seats may become jammed in the seat tracks and stop the seat from locking in place. This may lead to an accident, resulting in death or serious injury. The adjustment mechanism may also be damaged.
■Adjusting the seat position
●Take care when adjusting the seat position to ensure that other passengers are not injured by the moving seat.
- Do not put your hands under the seat or near the moving parts to avoid injury.
Fingers or hands may become jammed in the seat mechanism.
1-7. Safety information
SRS airbags
The SRS airbags inflate when the vehicle is subjected to certain types of severe impacts that may cause significant injury to the occupants. They work together with the seat belts to help reduce the risk of death or serious injury.
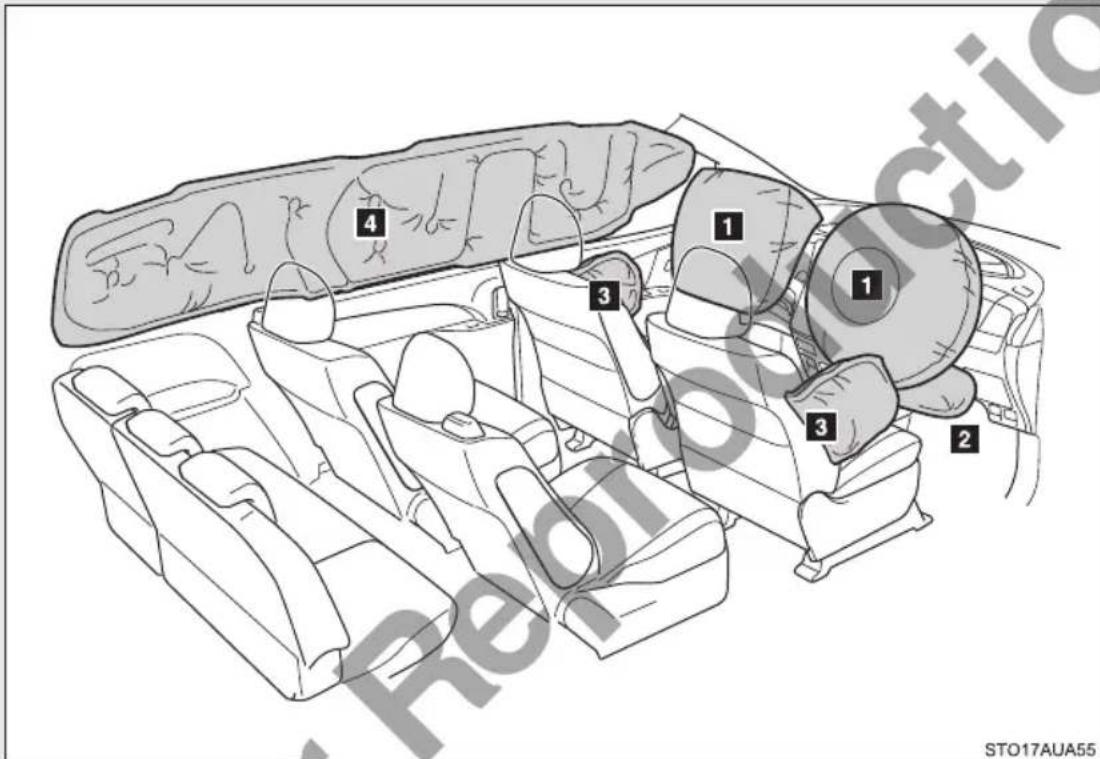
SRS front airbags
1 SRS driver airbag/front passenger airbag
Can help protect the head and chest of the driver and front passenger from impact with interior components
2 SRS driver knee airbag
Can help provide driver protection
SRS side and curtain shield airbags
3 SRS side airbags
Can help protect the torso of the front seat occupants
4 SRS curtain shield airbags
Can help protect primarily the head of occupants in the outer seats
SRS airbag system components
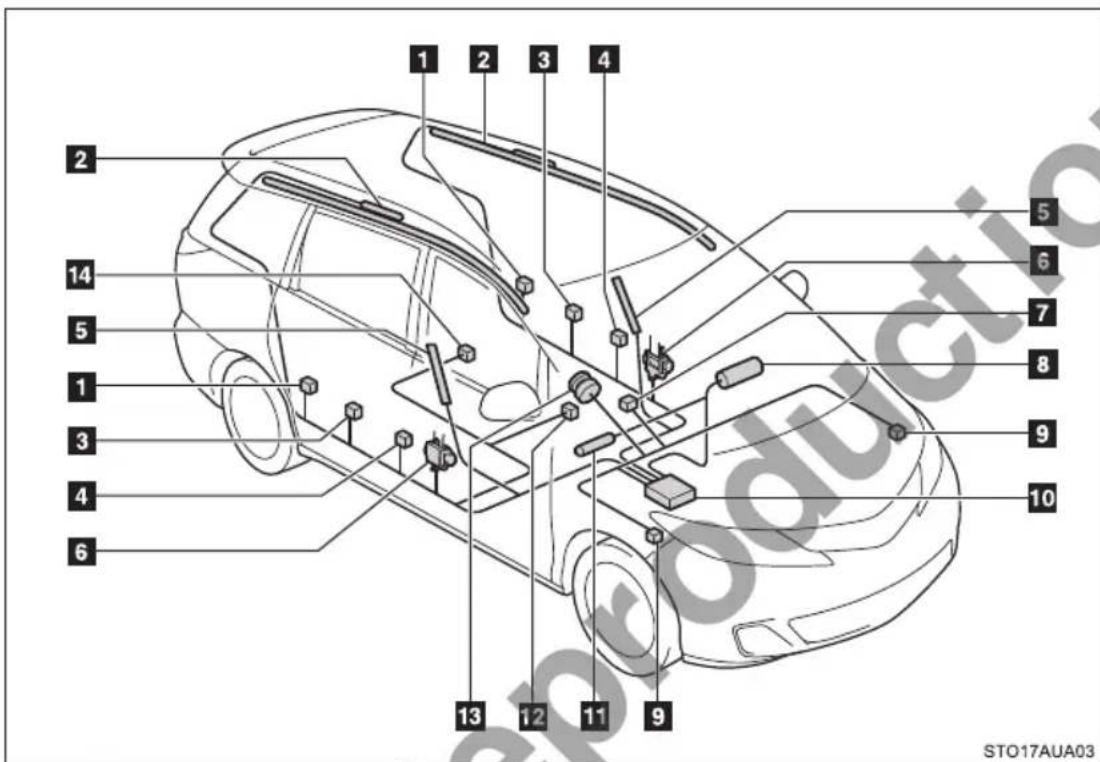
1 Side impact sensors (rear)
2 Curtain shield airbags
3 Side impact sensors (sliding door)
4 Side impact sensors (front)
5 Side airbags
6 Seat belt pretensioners and force limiters
7 SRS warning light
8 Front passenger airbag
9 Front impact sensors
10 Airbag sensor assembly
11 Driver knee airbag
12 Safing sensor (front)
13 Driver airbag
14 Safing sensor (rear)
The main SRS airbag system components are shown above. The SRS airbag system is controlled by the airbag sensor assembly. As the airbags deploy, a chemical reaction in the inflators quickly fills the airbags with non-toxic gas to help restrain the motion of the occupants.
■If the SRS airbags deploy (inflate)
- Slight abrasions, burns, bruising etc., may be sustained from SRS airbags, due to the extremely high speed deployment (inflation) by hot gases.
●A loud noise and white powder will be emitted.
Parts of the airbag module (steering wheel hub, airbag cover and inflator) as well as the front seats, parts of the front and rear pillars, and roof side rails, may be hot for several minutes. The airbag itself may also be hot.
●The windshield may crack.
■ SRS airbag deployment conditions (SRS front airbags)
- The SRS front airbags will deploy in the event of an impact that exceeds the set threshold level (the level of force corresponding to an approximately 20 - 30 km/h [12 - 18 mph] frontal collision with a fixed wall that does not move or deform).
However, this threshold velocity will be considerably higher in the following situations:
- If the vehicle strikes an object, such as a parked vehicle or sign pole, which can move or deform on impact
- If the vehicle is involved in an underride collision, such as a collision in which the front of the vehicle “underrides”, or goes under, the bed of a truck
● Depending on the type of collision, it is possible that only the seat belt pretensioners will activate.
■ SRS airbag deployment conditions (SRS side and curtain shield airbags)
The SRS side and curtain shield airbags will deploy in the event of an impact that exceeds the set threshold level (the level of force corresponding to the impact force produced by an approximately 1500 kg [3300 lb.] vehicle colliding with the vehicle cabin from a direction perpendicular to the vehicle orientation at an approximate speed of 20 - 30 km/h [12 - 18 mph]).
■Conditions under which the SRS airbags may deploy (inflate), other than a collision
The SRS front airbags may also deploy if a serious impact occurs to the underside of your vehicle. Some examples are shown in the illustration.
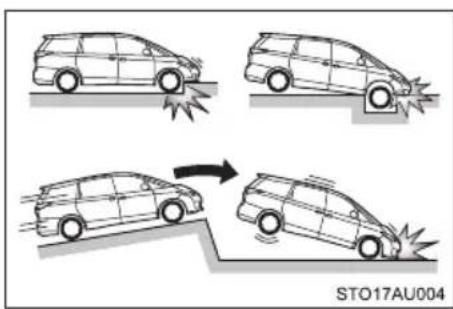
●Hitting a curb, edge of pavement or hard surface
●Falling into or jumping over a deep hole
● Landing hard or falling
■ Types of collisions that may not deploy the SRS airbags (SRS front airbags)
The SRS front airbags do not generally inflate if the vehicle is involved in a side or rear collision, if it rolls over, or if it is involved in a low-speed frontal collision. But, whenever a collision of any type causes sufficient forward deceleration of the vehicle, deployment of the SRS front airbags may occur.
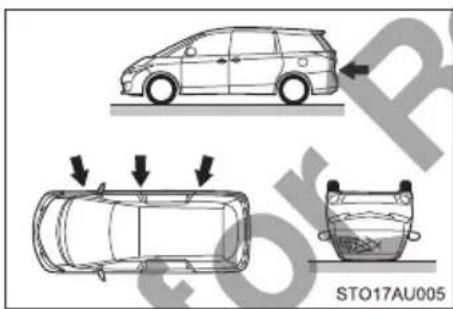
Collision from the side
Collision from the rear
● Vehicle rollover
■Types of collisions that may not deploy the SRS airbags (SRS side and curtain shield airbags)
The SRS side and curtain shield airbags may not activate if the vehicle is subjected to a collision from the side at certain angles, or a collision to the side of the vehicle body other than the passenger compartment.
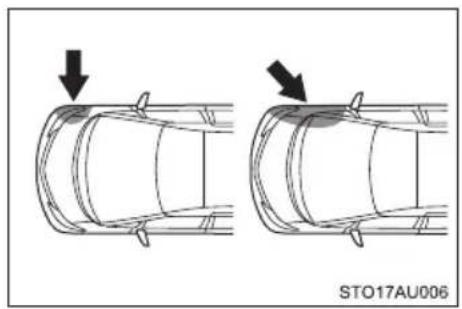
natural_image
Technical line drawing of a cylindrical mechanical component with two views showing internal structure and arrows indicating direction (no text or symbols)- Collision from the side to the vehicle body other than the passenger compartment
- Collision from the side at an angle
The SRS side and curtain shield airbags do not generally inflate if the vehicle is involved in a frontal or rear collision, if it rolls over, or if it is involved in a low-speed side collision.
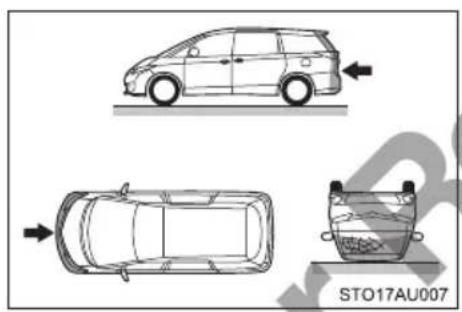
natural_image
Top-down line drawing of a car with three views: front, side, and rear (no text or symbols)Collision from the front
Collision from the rear
Vehicle rollover
■When to contact your Toyota dealer
In the following cases, the vehicle will require inspection and/or repair. Contact your Toyota dealer as soon as possible.
● Any of the SRS airbags have been inflated.
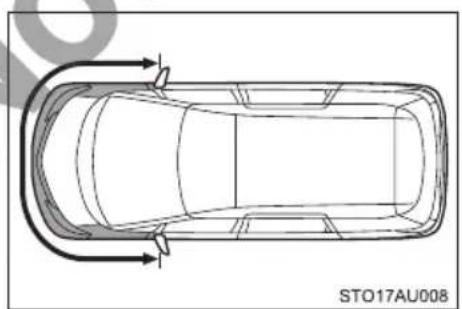
natural_image
Top-down schematic of a car showing airflow or traffic flow around the roof (no text or symbols)●The front of the vehicle is damaged or deformed, or was involved in an accident that was not severe enough to cause the SRS front airbags to inflate.
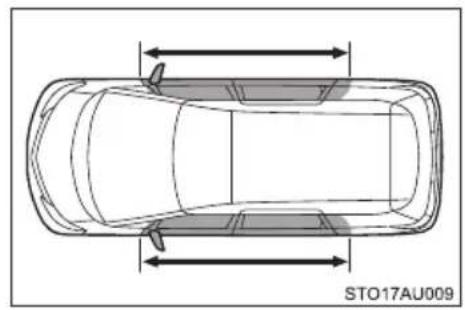
natural_image
Top-down schematic of a car with two horizontal arrows indicating vertical motion or movement, labeled STO17AU009 (no text or symbols on the diagram itself)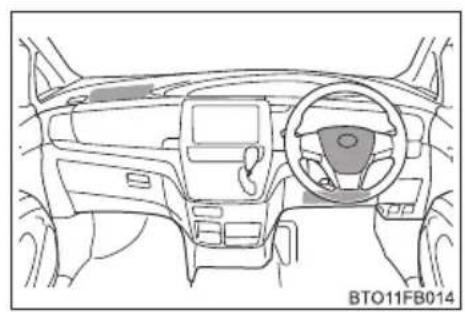
natural_image
Front view line drawing of a car dashboard and steering wheel (no text or symbols)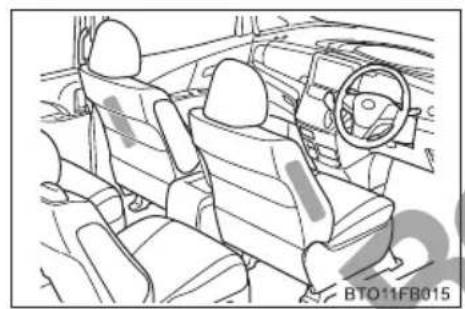
natural_image
Interior view of a car showing three seats and dashboard (no text or symbols visible)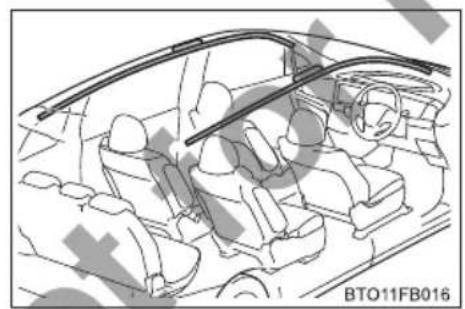
natural_image
Interior view of a car cockpit with visible seats and dashboard lines (no text or symbols)- A portion of a door or its surrounding area is damaged or deformed, or the vehicle was involved in an accident that was not severe enough to cause the SRS side and curtain shield airbags to inflate.
●The pad section of the steering wheel, dashboard near the front passenger airbag or lower portion of the instrument panel is scratched, cracked, or otherwise damaged.
●The surface of the seats with the side airbag is scratched, cracked, or otherwise damaged.
●The portion of the front pillars, rear pillars or roof side rail garnishes (padding) containing the curtain shield airbags inside is scratched, cracked, or otherwise damaged.

WARNING
■SRS airbag precautions
Observe the following precautions regarding the SRS airbags.
Failure to do so may cause death or serious injury.
● The driver and all passengers in the vehicle must wear their seat belts properly.
The SRS airbags are supplemental devices to be used with the seat belts.
●The SRS driver airbag deploys with considerable force, and can cause death or serious injury especially if the driver is very close to the airbag.
Since the risk zone for the driver's airbag is the first 50 - 75 mm (2 - 3 in.) of inflation, placing yourself 250 mm (10 in.) from your driver airbag provides you with a clear margin of safety. This distance is measured from the center of the steering wheel to your breastbone. If you sit less than 250 mm (10 in.) away now, you can change your driving position in several ways:
- Move your seat to the rear as far as you can while still reaching the pedals comfortably.
- Slightly recline the back of the seat. Although vehicle designs vary, many drivers can achieve the 250 ~mm (10 in.) distance, even with the driver seat all the way forward, simply by reclining the back of the seat somewhat. If reclining the back of your seat makes it hard to see the road, raise yourself by using a firm, non-slippery cushion, or raise the seat if your vehicle has that feature.
- If your steering wheel is adjustable, tilt it downward. This points the airbag toward your chest instead of your head and neck.
The seat should be adjusted as recommended above, while still maintaining control of the foot pedals, steering wheel, and your view of the instrument panel controls.
The SRS front passenger airbag also deploys with considerable force, and can cause death or serious injury especially if the front passenger is very close to the airbag. The front passenger seat should be as far from the airbag as possible with the seatback adjusted, so the front passenger sits upright.

WARNING
■SRS airbag precautions
- Improperly seated and/or restrained infants and children can be killed or seriously injured by a deploying airbag. An infant or child who is too small to use a seat belt should be properly secured using a child restraint system. Toyota strongly recommends that all infants and children be placed in the rear seats of the vehicle and properly restrained. The rear seats are safer for infants and children than the front passenger seat. (→P. 145)
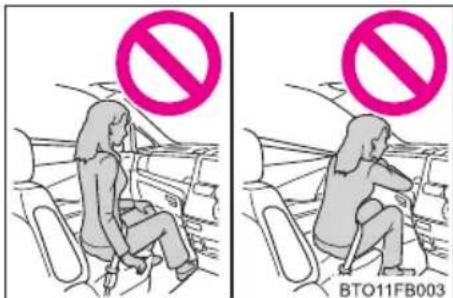
- Do not sit on the edge of the seat or lean against the dashboard.
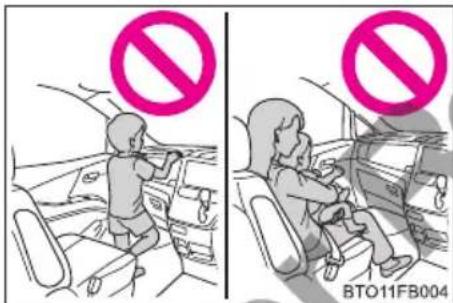
- Do not allow a child to stand in front of the SRS front passenger airbag unit or sit on the knees of a front passenger.
- Do not allow the front seat occupants to hold items on their knees.
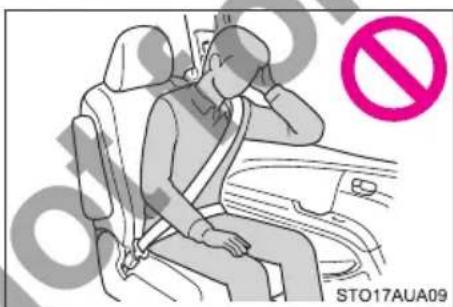
- Do not lean against the door, the roof side rail or the front, side and rear pillars.

WARNING
■SRS airbag precautions
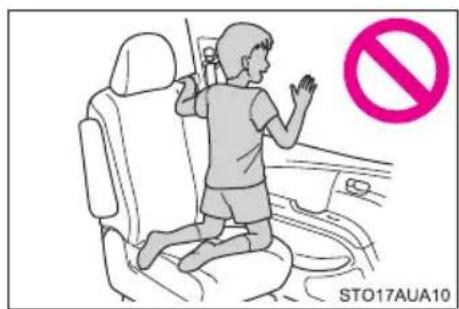
- Do not allow anyone to kneel on the passenger seat toward the door or put their head or hands outside the vehicle.
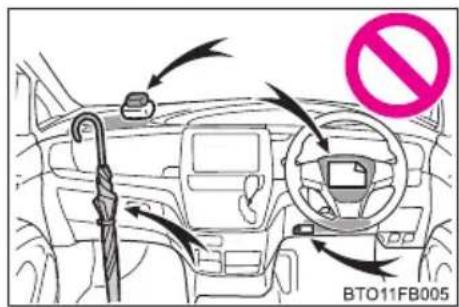
- Do not attach anything to or lean anything against areas such as the dashboard, steering wheel pad and lower portion of the instrument panel. These items can become projectiles when the SRS driver, front passenger and driver knee airbags deploy.
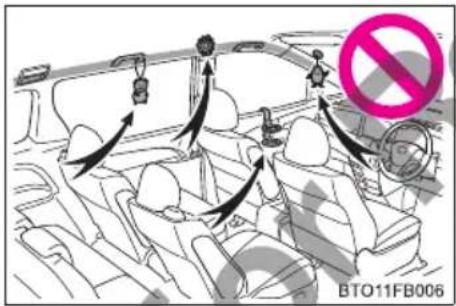
- Do not attach anything to areas such as a door, windshield glass, front door glass, sliding door glass, front or rear pillar, roof side rail and assist grip.
- If a vinyl cover is put on the area where the SRS driver knee airbag will deploy, be sure to remove it.
- Do not use seat accessories which cover the parts where the SRS side airbags inflate as they may interfere with inflation of the airbags. Such accessories may prevent the side airbags from activating correctly, disable the system or cause the side airbags to inflate accidentally, resulting in death or serious injury.
- Do not strike or apply significant levels of force to the area of the SRS airbag components.
Doing so can cause the SRS airbags to malfunction.

WARNING
■SRS airbag precautions
- Do not touch any of the component parts immediately after the SRS airbags have deployed (inflated) as they may be hot.
- If breathing becomes difficult after the SRS airbags have deployed, open a door or window to allow fresh air in, or leave the vehicle if it is safe to do so. Wash off any residue as soon as possible to prevent skin irritation.
- If the areas where the SRS airbags are stored, such as the steering wheel pad and front and rear pillar garnishes, are damaged or cracked, have them replaced by your Toyota dealer.
■Modification and disposal of SRS airbag system components
Do not dispose of your vehicle or perform any of the following modifications without consulting your Toyota dealer. The SRS airbags may malfunction or deploy (inflate) accidentally, causing death or serious injury.
●Installation, removal, disassembly and repair of the SRS airbags
● Repairs, modifications, removal or replacement of the steering wheel, instrument panel, dashboard, seats or seat upholstery, front, side and rear pillars or roof side rails
● Repairs or modifications of the front fender, front bumper, or side of the occupant compartment
● Installation of a grille guard (bull bars, kangaroo bar, etc.), snow plows or winches
Modifications to the vehicle's suspension system
● Installation of electronic devices such as mobile two-way radios (RF-transmitter) and CD players
Toyota strongly urges the use of child restraint systems.
Points to remember
Studies have shown that installing a child restraint on a rear seat is much safer than installing one on the front passenger seat.
- Choose a child restraint system that suits your vehicle and is appropriate to the age and size of the child.
- For installation details, follow the instructions provided with the child restraint system.
General installation instructions are provided in this manual. (→P. 154)
- If child restraint system regulations exist in the country where you reside, please contact your Toyota dealer for the child restraint system installation.
●Toyota recommends that you use a child restraint system which conforms to the regulation ECE No.44.
Types of child restraints
Child restraints systems are classified into the following 5 groups according to the regulation ECE No.44:
Group 0: Up to 10 kg (22 lb.) (0 - 9 months)
Group 0+: Up to 13 kg (28 lb.) (0 - 2 years)
Group I: 9 to 18 kg (20 to 39 lb.) (9 months - 4 years)
Group II: 15 to 25 kg (34 to 55 lb.) (4 years - 7 years)
Group III: 22 to 36 kg (49 to 79 lb.) (6 years - 12 years)
In this owner's manual, the following 3 types of popular child restraint systems that can be secured with the seat belts are explained:
Baby seat (infant seat)
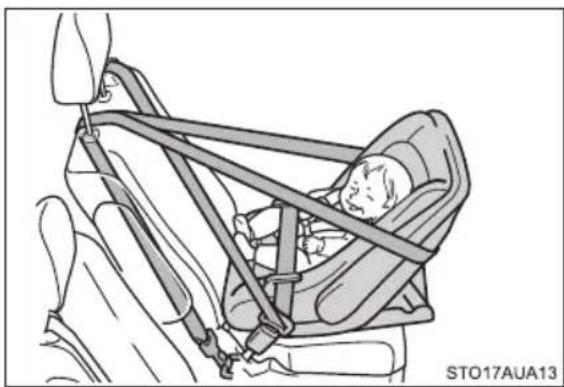
natural_image
Illustration of a baby car seatbelt being lifted by adult hands, no text or symbols presentEqual to Group 0 and 0^+ of ECE No.44
Child seat (convertible seat)
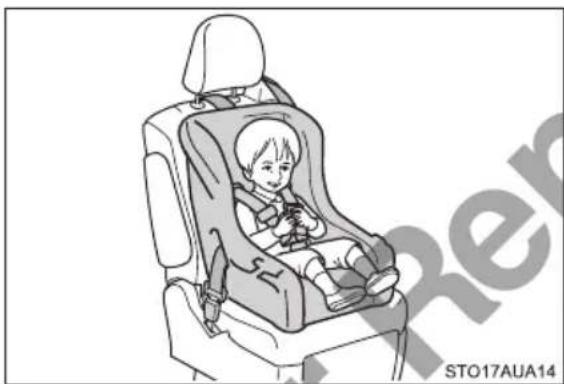
natural_image
Illustration of a child wearing a car seatbelt, no text or symbols presentEqual to Group 0 ^+ and I of ECE No.44
Junior seat (booster seat)
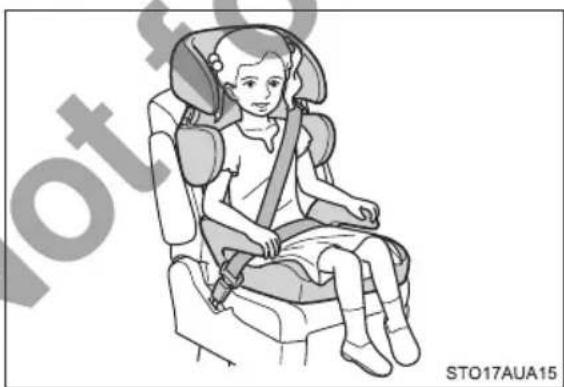
natural_image
Illustration of a child wearing a car seatbelt and holding a belt, seated in a compact car seat (no text or symbols on the diagram itself)Equal to Group II and III of ECE No.44
Child restraint system suitability for various seating positions
Information provided in the table shows your child restraint system suitability for various seating positions.
| Mass groups\Seating position | Front passenger seat | Second seat | Third seat | |||
| Captain seat | Bench seat | |||||
| Outside | Outside | Center | Outside | Center | ||
| 0Up to 10 kg(22 lb.)(0 - 9 months) | X | U^*4 | U^*4 | U^*4 | U^*5 | X |
| 0^+ Up to 13 kg(28 lb.)(0 - 2 years) | X | U^*4 | U^*4 | U^*4 | U^*5 | X |
| I9 to 18 kg(20 to 39 lb.)(9 months -4 years) | Rear-facing X | U^*2,4 | U^*2,4 | U^*2,4 | U^*2,5 | X |
| Forward-facing UF^*1,2 | ||||||
| II, III15 to 36 kg(34 to 79 lb.)(4 - 12 years) | UF^*1,3 | U^*3,4 | U^*3,4 | U^*3,4 | U^*3,5 | X |
Key of letters inserted in the above table:
U: Suitable for “universal” category child restraint system approved for the use in this mass group.
UF: Suitable for forward-facing “universal” category child restraint system approved for the use in this mass group.
X: Not suitable seat position for children in this mass group.
*1: Adjust the front seatback to the most upright position. Move the front seat cushion to the fully rearward.
*2: When you use the child restraint system in this position, adjust the head restraint to the highest lock position.
*3: When you use the child restraint system in this position, remove the head restraint.
*4: Adjust the second seat seatback to the most upright position. Move the second seat cushion to the fully rearward.
*5: Recline the third seat seatback to install the child restraint system. After installing the child restraint system, raise the third seat seatback so as to settle the child restraint system.
Other child restraint systems different from the systems mentioned in the table can be used, but the suitability of the systems must be carefully checked with the child restraint system manufacturer and retailer.
When securing some types of child restraint systems in rear seat, it may not be possible to properly use the seat belts in positions next to the child restraint without interfering with it or affecting seat belt effectiveness. Be sure your seat belt fits snugly across your shoulder and low on your hips. If it does not, or if it interferes with the child restraint, move to a different position. Failure to do so may result in death or serious injury.
Child restraint system suitability for various seating positions (with ISOFIX rigid anchors)
Information provided in the table shows your child restraint system suitability for various seating positions.
| Mass groups Size | class Fixture | Vehicle ISOFIX positions | |
| Second seat | |||
| Carrycot | F | ISO/L1 | X |
| G | ISO/L2 | X | |
| Group 0Up to 10 kg(22 lb.) | E | ISO/R1 | IL* |
| Group 0+Up to 13 kg(28 lb.) | E | ISO/R1 | IL* |
| D | ISO/R2 | X | |
| C | ISO/R3 | X | |
| Group I9 to 18 kg(20 to 39 lb.) | D | ISO/R2 | X |
| C | ISO/R3 | X | |
| B | ISO/F2 | IUF* | |
| B1 | ISO/F2X | IUF* | |
| A | ISO/F3 | IUF* | |
| Group II15 to 25 kg(34 to 55 lb.) | (1) X | ||
| Group III22 to 36 kg(49 to 79 lb.) | (1) X |
(1) For the CRS which do not carry the ISO/XX size class identification (A to G), for the applicable mass group, the car manufacturer shall indicate the vehicle specific ISOFIX child restraint system(s) recommended for each position.
Key letters inserted in the above table:
IUF: Suitable for ISOFIX forward-facing child restraint systems of universal category approved for use in this mass group.
IL: Suitable for ISOFIX child restraint systems of the categories for “specific vehicles”, “restricted”, or “semi-universal”, approved for use in this mass group.
X: ISOFIX position not suitable for ISOFIX child restraint systems in this mass group and/or this size class.
*: When installing a child restraint system, remove the head rest.
Recline the seatback of the second seat to point where the child restraint system can be equipped.
In the reclined state, equip the child restraint system and then raise the seatback until it is stabilized.
The child restraint system mentioned in the table may not be available outside of the EU area.
Other child restraint systems different from the systems mentioned in the table can be used, but the suitability of the systems must be carefully checked with the child restraint system manufacturer and retailer.
When securing some types of child restraint systems in rear seat, it may not be possible to properly use the seat belts in positions next to the child restraint without interfering with it or affecting seat belt effectiveness. Be sure your seat belt fits snugly across your shoulder and low on your hips. If it does not, or if it interferes with the child restraint, move to a different position. Failure to do so may result in death or serious injury.
■When installing a child restraint system on the front passenger seat
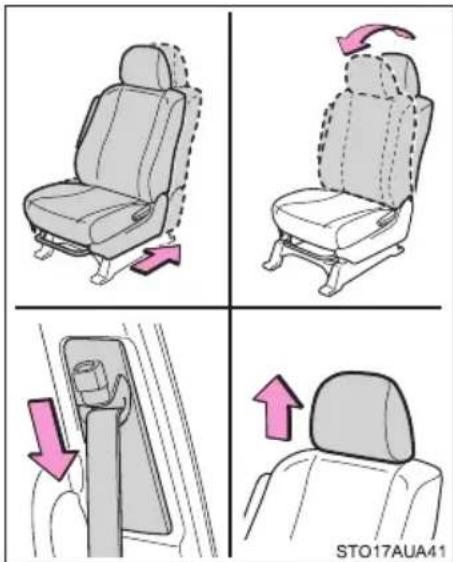
When you have to use a child restraint system on the front passenger seat, adjust the following:
●The seat to the fully rearward position
●The seatback to the most upright position
●The seat belt shoulder anchor height to the lowest position
●Child seat (convertible seat): The head restraint height to the highest lock position
- Junior seat (booster seat): The head restraint removed from the seat
■Selecting an appropriate child restraint system
- Use a child restraint system appropriate for the child until the child becomes large enough to properly wear the vehicle's seat belt.
- If the child is too large for a child restraint system, sit the child on a rear seat and use the vehicle's seat belt. (→P. 109)

WARNING
■Using a child restraint system
The use of a child restraint system not suitable for the vehicle may not properly secure the infant or child. It may result in death or serious injury (in the event of sudden braking or an accident).
■Child restraint precautions
For effective protection in automobile accidents and sudden stops, a child must be properly restrained, using a seat belt or child restraint system depending on the age and size of the child. Holding a child in your arms is not a substitute for a child restraint system. In an accident, the child can be crushed against the windshield, or between you and the vehicle's interior.
Toyota strongly urges the use of a proper child restraint system that conforms to the size of the child, installed on the rear seat. According to accident statistics, the child is safer when properly restrained in the rear seat than in the front seat.
●Never install a rear-facing child restraint system on the front passenger seat. In the event of an accident, the force of the rapid inflation of the front passenger airbag can cause death or serious injury to the child if the rear-facing child restraint system is installed on the front passenger seat.
● A forward-facing child restraint system may be installed on the front passenger seat only when it is unavoidable. A child restraint system that requires a top tether strap should not be used in the front passenger seat since there is no top tether strap anchor for the front passenger seat. Adjust the seatback as upright as possible and always move the seat as far back as possible because the front passenger airbag could inflate with considerable speed and force. Otherwise, the child may be killed or seriously injured.
- Do not allow the child to lean his/her head or any part of his/her body against the door or the area of the seat, front and rear pillars or roof side rails from which the SRS side airbags or SRS curtain shield airbags deploy even if the child is seated in the child restraint system. It is dangerous if the SRS side airbags and curtain shield airbags inflate, and the impact could cause death or serious injury to the child.

WARNING
■Child restraint precautions
Make sure you have complied with all installation instructions provided by the child restraint manufacturer and that the system is properly secured. If it is not secured properly, it may cause death or serious injury to the child in the event of a sudden stop, sudden swerve or an accident.
■When children are in the vehicle
Do not allow children to play with the seat belt. If the seat belt becomes twisted around a child's neck, it may lead to choking or other serious injuries that may result in death.
If this occurs and the buckle cannot be unfastened, scissors should be used to cut the belt.
■When the child restraint system is not in use
- Keep the child restraint system properly secured on the seat even if it is not in use. Do not store the child restraint system unsecured in the passenger compartment.
- If it is necessary to detach the child restraint system, remove it from the vehicle or store it securely in the luggage compartment. This will prevent it from injuring passengers in the event of a sudden stop, sudden swerve or accident.
1-7. Safety information
Installing child restraints
Follow the child restraint system manufacturer's instructions. Firmly secure child restraints to the seats using a seat belt or ISOFIX rigid anchors. Attach the top strap when installing a child restraint.
7-passenger models
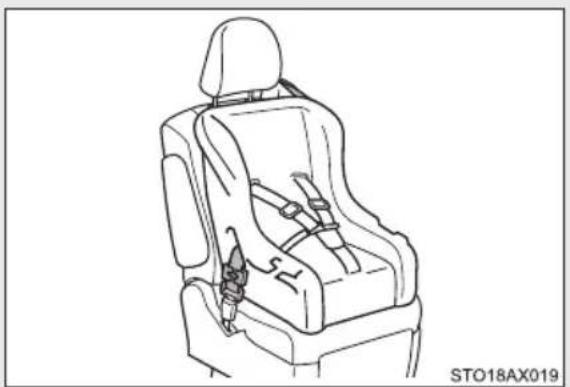
natural_image
Line drawing of a car safety seat with visible seatbelt and seatbelt connector (no text or symbols)Seat belts (An ELR belt requires a locking clip) ( P. 109)
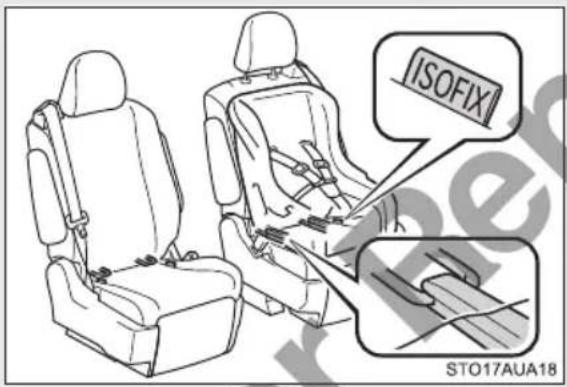
ISOFIX rigid anchors (ISOFIX child restraint system)
Lower anchors are provided for second seats. (Tags displaying the location of the anchors are attached to the seats.)
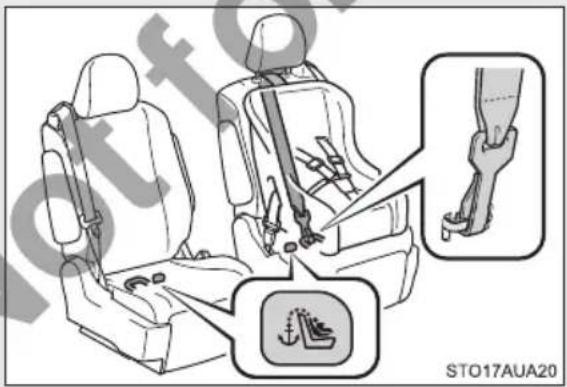
Child restraint anchor fittings
Anchor fittings are provided for second seats.
8-passenger models
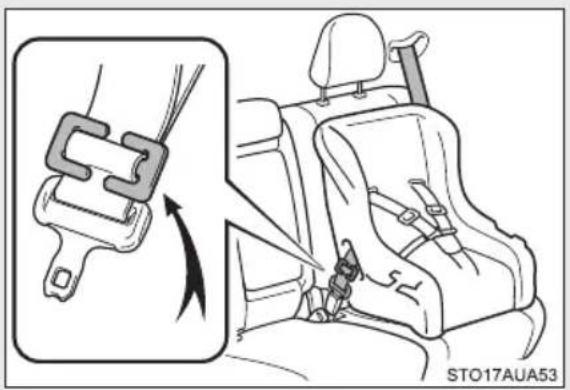
natural_image
Diagram showing a car seatbelt buckle being adjusted for a person's seatbelt, with no text or symbols present.Seat belts (An ELR belt requires a locking clip) ( P.109)
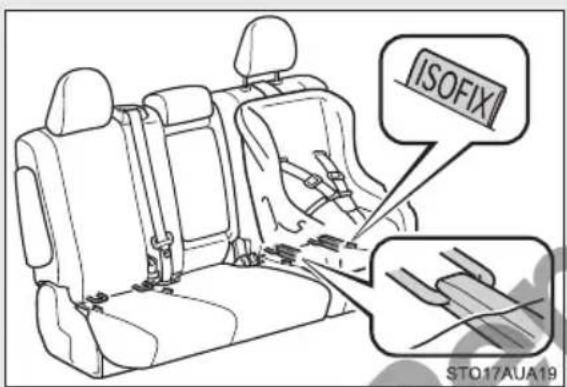
ISOFIX rigid anchors (ISOFIX child restraint system)
Lower anchors are provided for second outer seats. (Tags displaying the location of the anchors are attached to the seats.)
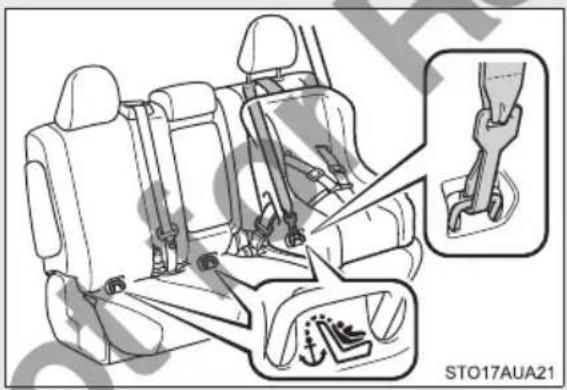
Child restraint anchor fittings
Anchor fittings are provided for second seats.
Installing child restraints using a seat belt
■ Rear-facing — Baby seat (infant seat)/child seat (convertible seat)
Second seats
STEP 1 Adjust the seatback to the most upright position. (→P.70)
STEP 2 Slide the seat to the rear-most position. (→P. 70)
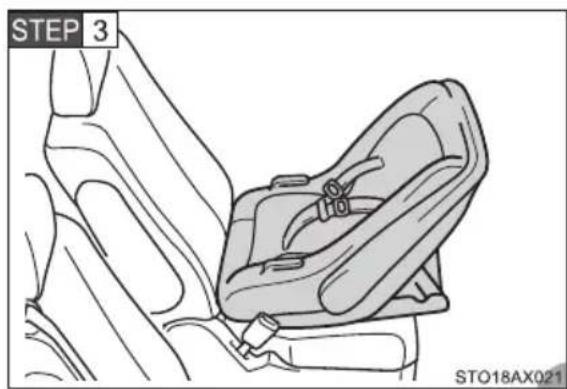
natural_image
Line drawing of a car seatbelt with labeled step number 3 (no text or symbols on the diagram itself)Place the child restraint system on the seat facing the rear of the vehicle.
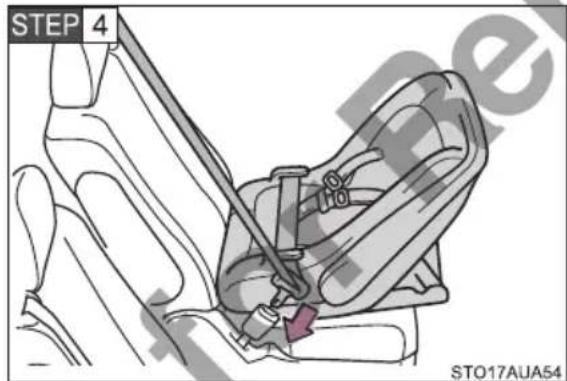
Run the seat belt through the child restraint system and insert the plate into the buckle. Make sure that the belt is not twisted.
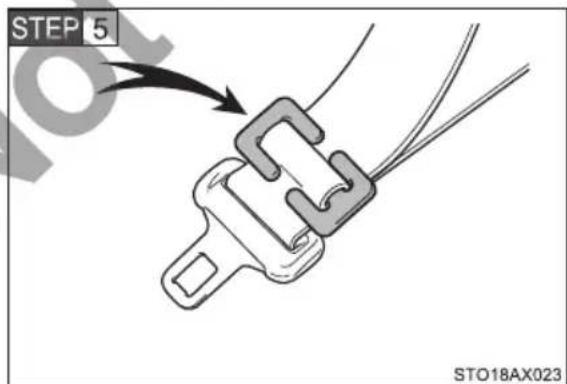
Install a locking clip near the tab of the lap and shoulder belt by inserting the lap and shoulder webbing through the recesses of the locking clip. Buckle the belt again. If the belt has any slack, release the buckle and reinstall the locking clip.
Third outer seats
STEP 1 Recline the seatback to the rearward position. ( P. 72)
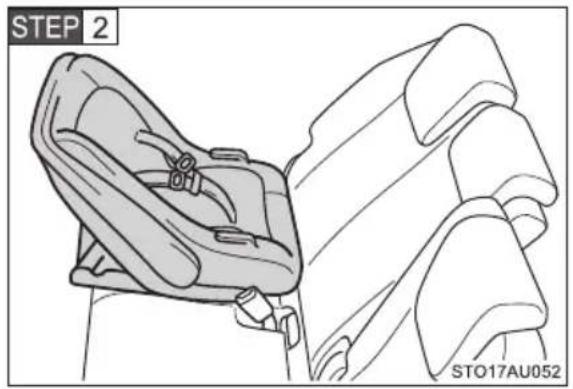
natural_image
Line drawing of a car seat assembly with labeled steps (STEP 2 and STO17AU052), no text or symbols on the diagram itself.Place the child restraint system on the seat facing the rear of the vehicle.
STEP 3 Raise the seatback to settle the child restraint system. (→P. 72)
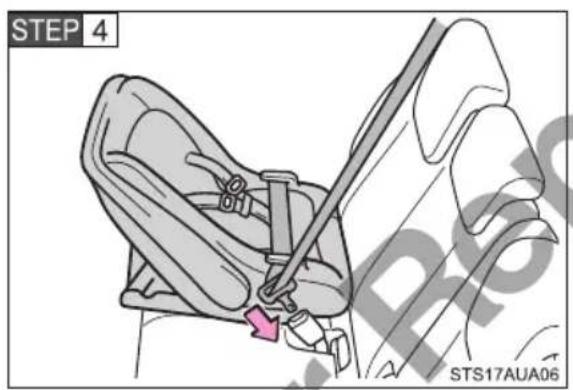
Run the seat belt through the child restraint system and insert the plate into the buckle. Make sure that the belt is not twisted.
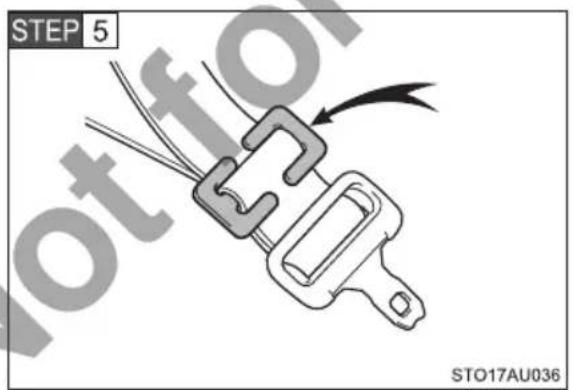
Install a locking clip near the tab of the lap and shoulder belt by inserting the lap and shoulder webbing through the recesses of the locking clip. Buckle the belt again. If the belt has any slack, release the buckle and reinstall the locking clip.
■ Forward-facing — Child seat (convertible seat)
Second seats
STEP 1 Adjust the head restraint to the highest lock position. (→P. 79) If the head restraint interferes with the child restraint system installation and the head restraint can be removed, remove the head restraint. (→P. 79)
STEP 2 Adjust the seatback to the most upright position. (→P.70)
STEP 3 Slide the seat to the rear-most position. (→P. 70)
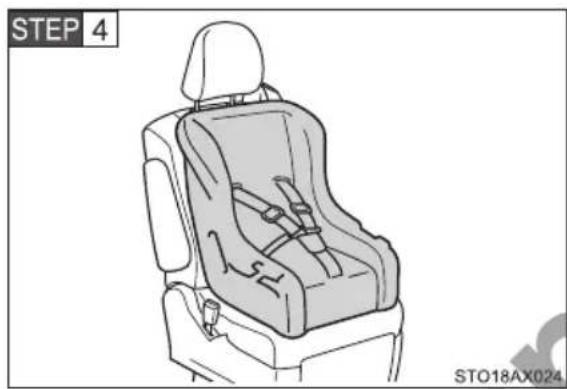
natural_image
Line drawing of a car seat with labeled STEP 4 (no text or symbols on the diagram itself)Place the child restraint system on the seat facing the front of the vehicle.
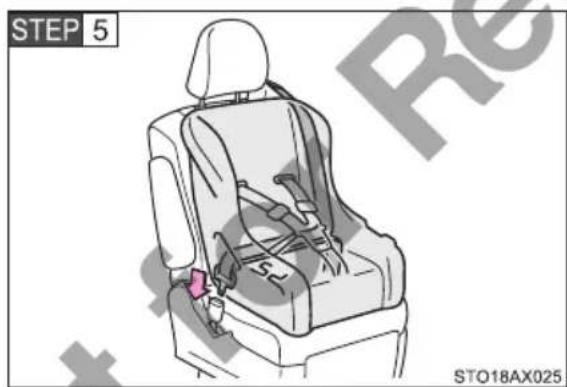
Run the seat belt through the child restraint system and insert the plate into the buckle. Make sure that the belt is not twisted.
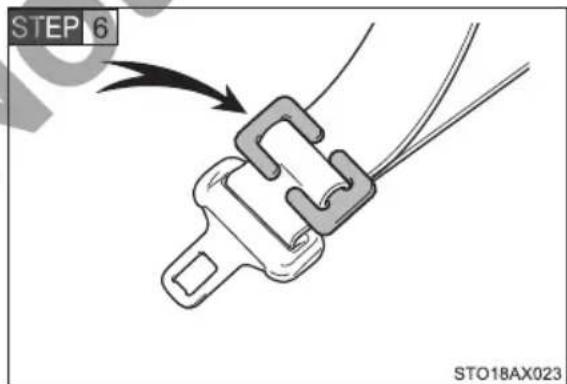
Install a locking clip near the tab of the lap and shoulder belt by inserting the lap and shoulder webbing through the recesses of the locking clip. Buckle the belt again. If the belt has any slack, release the buckle and reinstall the locking clip.
Third outer seats
STEP 1 Adjust the head restraint to the highest lock position. (→P. 79) If the head restraint interferes with the child restraint system installation and the head restraint can be removed, remove the head restraint. (→P. 79)
STEP 2 Recline the seatback to the rearward position. (→P. 72)
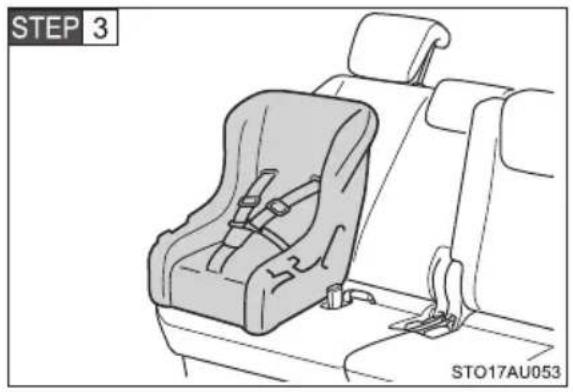
natural_image
Line drawing of a car seat assembly with no text or symbols on the diagram itselfPlace the child restraint system on the seat facing the front of the vehicle.
STEP 4 Raise the seatback to settle the child restraint system. (→P. 72)
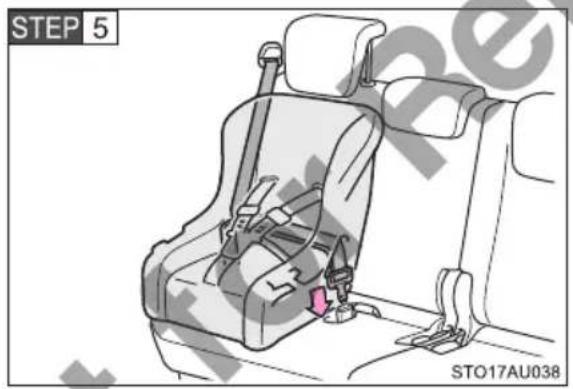
Run the seat belt through the child restraint system and insert the plate into the buckle. Make sure that the belt is not twisted.
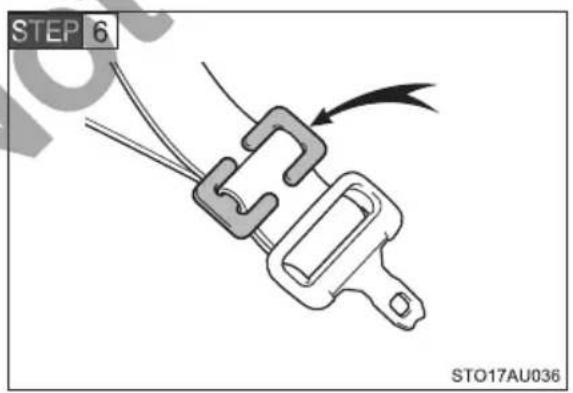
Install a locking clip near the tab of the lap and shoulder belt by inserting the lap and shoulder webbing through the recesses of the locking clip. Buckle the belt again. If the belt has any slack, release the buckle and reinstall the locking clip.
■Junior seat (booster seat)
Second seats
STEP 1 Remove the head restraint. ( P. 79)
STEP 2 Adjust the seatback to the most upright position. (→P. 70)
STEP 3 Slide the seat to the rear-most position. (→P. 70)
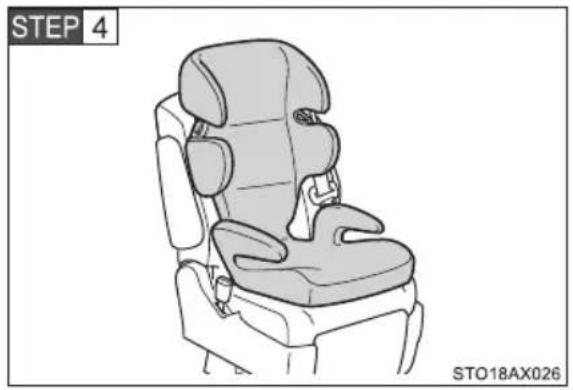
natural_image
Line drawing of a car comfort seat with labeled STEP 4 and STO18AX026 (no text or symbols on the diagram itself)Place the child restraint system on the seat facing the front of the vehicle.
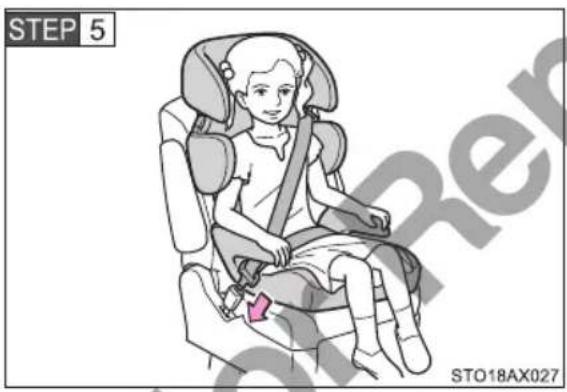
Sit the child in the child restraint system. Fit the seat belt to the child restraint system according to the manufacturer's instructions and insert the plate into the buckle. Make sure that the belt is not twisted.
Check that the shoulder belt is correctly positioned over the child's shoulder and that the lap belt is as low as possible.
(→P. 109)
Third outer seats
STEP 1 Remove the head restraint. (→P. 79)
STEP 2 Recline the seatback to the rearward position. ( P. 72)
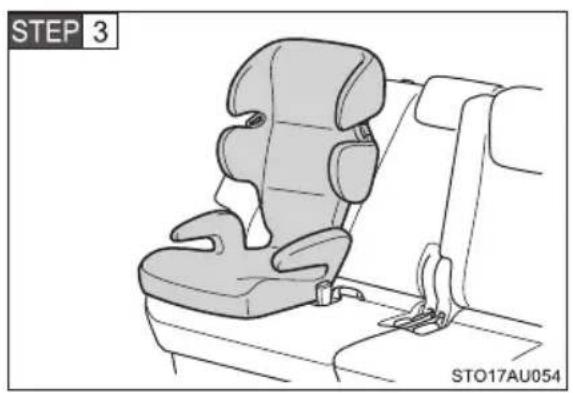
natural_image
Line drawing of a car seat assembly with no text or symbolsPlace the child restraint system on the seat facing the front of the vehicle.
STEP 4 Raise the seatback to settle the child restraint system. (→P. 72)
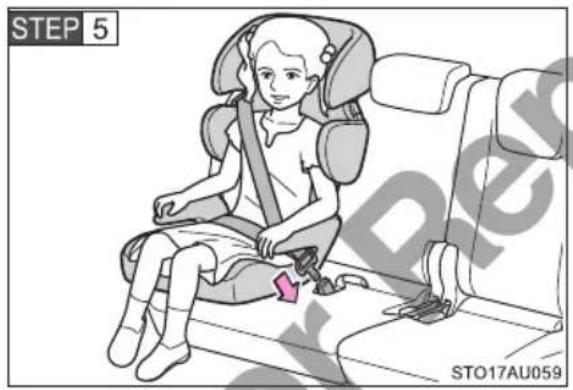
Sit the child in the child restraint system. Fit the seat belt to the child restraint system according to the manufacturer's instructions and insert the plate into the buckle. Make sure that the belt is not twisted.
Check that the shoulder belt is correctly positioned over the child's shoulder and that the lap belt is as low as possible.
(→P. 109)
Removing a child restraint installed with a seat belt
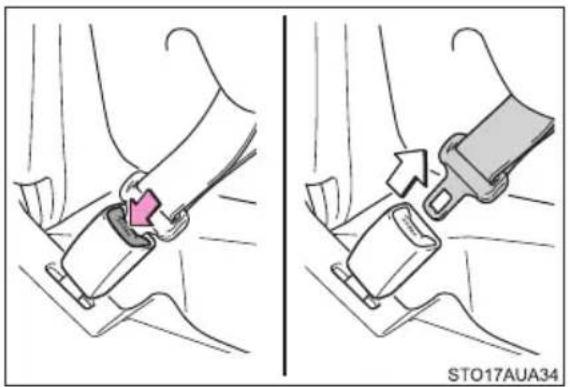
natural_image
Illustration of a car seatbelt buckle being adjusted for a seatbelt, showing two states (no text or symbols)Push the buckle release button and fully retract the seat belt.
Installation with ISOFIX rigid anchors (ISOFIX child restraint system)
7-passenger models
STEP 1 Remove the head restraint. ( P. 79)
STEP 2 Slide the second seat to the rear-most position. (→P. 70)
If necessary, also slide the front seat forward. (→P. 67)
STEP 3 Recline the seatback to the rearward position. (→P. 70)
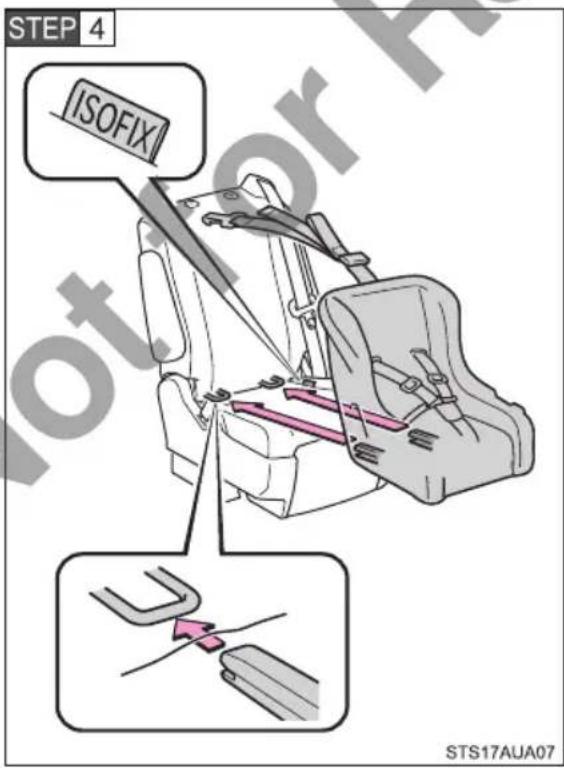
Widen the gap between the seat cushion and seatback slightly, latch the buckles onto the exclusive fixing bars.
STEP 5 Adjust the seatback angle to settle the child restraint system.
$$ (\rightarrow \mathrm{P}. 7 0) $$
Make sure that the child restraint system is securely fixed.
If the child restraint has a top strap, the top strap should be latched onto the anchor fitting.
8-passenger models
STEP 1 Remove the head restraint. ( P. 79)
STEP 2 Slide the second seat to the rear-most position. (→P.70)
If necessary, also slide the front seat forward. (→P. 67)
STEP 3 Recline the seatback to the rearward position. (→P. 70)
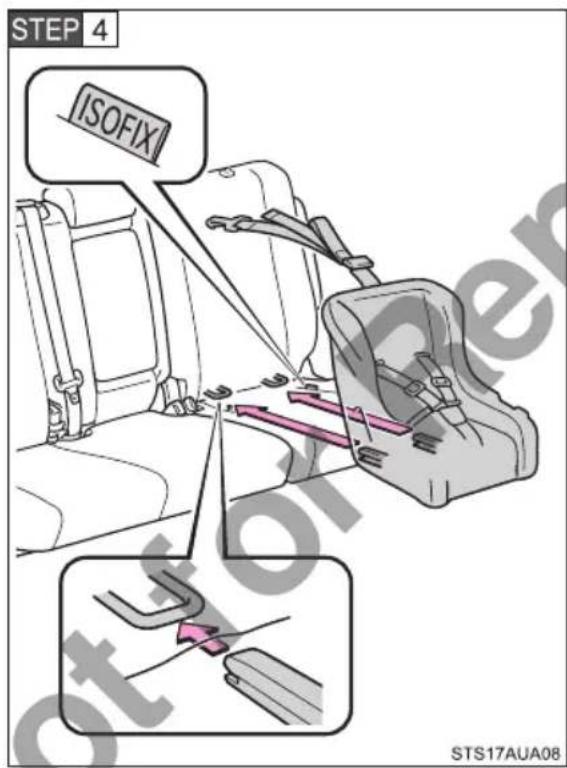
Widen the gap between the seat cushion and seatback slightly, latch the buckles onto the exclusive fixing bars.
STEP 5 Adjust the seatback angle to settle the child restraint system.
Make sure that the child restraint system is securely fixed.
If the child restraint has a top strap, the top strap should be latched onto the anchor fitting.
Child restraint systems with a top strap
STEP 1 Remove the head restraint. ( P. 79)
STEP 2 Secure the child restraint system using a seat belt or ISOFIX rigid anchors.
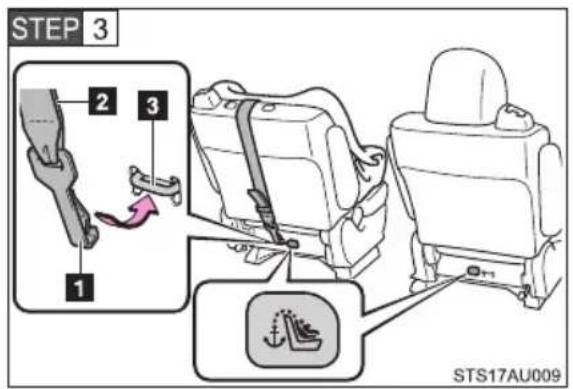
Latch the hook onto the anchor fitting and tighten the top strap.
Make sure the top strap is securely latched.
1 Attaching clip
2 Upper anchorage strap
3 Anchor fitting
■ When installing a child restraint system in the seat with ELR belt ( P. 154)
You need a locking clip to install the child restraint system. Follow the instructions provided by the manufacturer of the system. If your child restraint system does not provide a locking clip, you can purchase the following item from your Toyota dealer.
Locking clip for child restraint system
(Part No. 73119-22010)

WARNING
■When installing a child restraint system
Follow the directions given in the child restraint system installation manual and fix the child restraint system securely in place.
If the child restraint system is not correctly fixed in place, the child or other passengers may be seriously injured or even killed in the event of sudden braking, sudden swerving or an accident.
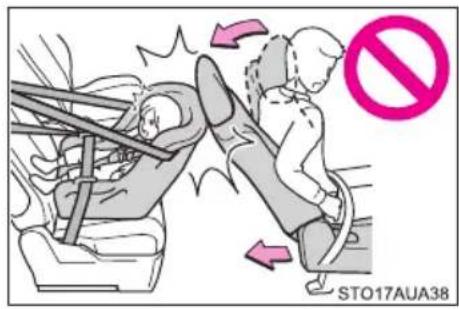
- If the driver's seat interferes with the child restraint system and prevents it from being attached correctly, attach the child restraint system to the left-hand second seat.
- Adjust the front passenger seat or second seats so that it does not interfere with the child restraint system.
- Do not install a child restraint system to the third center seat. This seat is not designed to hold a child restraint system.
Installing a child restraint system to this seat may result in death or serious injury in the event of sudden braking, sudden swerving or an accident.
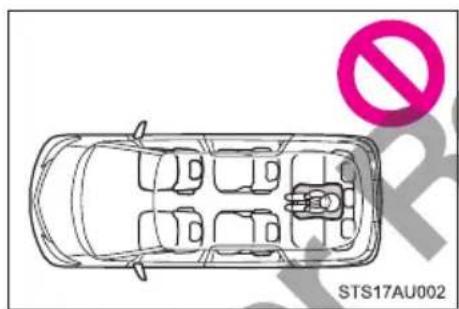
- Only put a forward-facing child restraint system on the front seat when unavoidable. When installing a forward-facing child restraint system on the front passenger seat, move the seat as far back as possible.
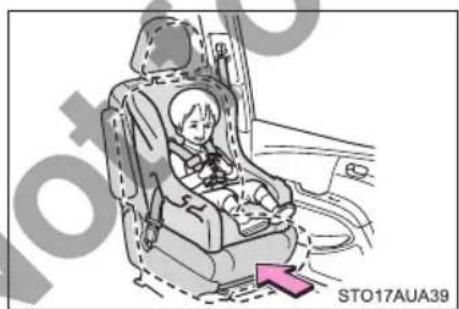
natural_image
Illustration of a child seated in a car seat, with no visible text or symbols on the diagram itself.Failure to do so may result in death or serious injury if the airbags deploy (inflate).

WARNING
■When installing a child restraint system
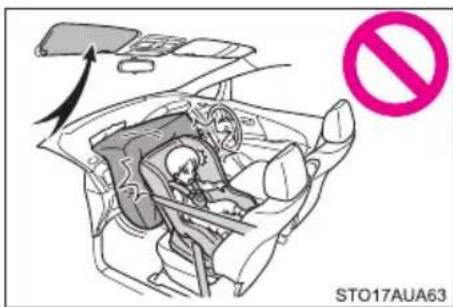
●Extreme Hazard! Do not use a rearward facing child restraint on a seat protected by an airbag in front of it! This is because the force of the rapid inflation of the front passenger airbag can cause death or serious injury to the child.
There is a label(s) on the passenger side sun visor, indicating it is forbidden to attach a rear-facing child restraint system to the front passenger seat.
Details of the label(s) are shown in the illustration below.

AIRBAG
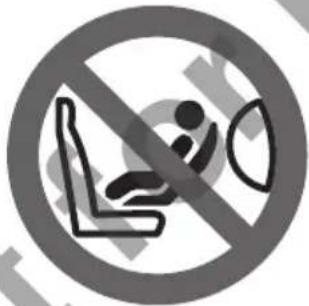
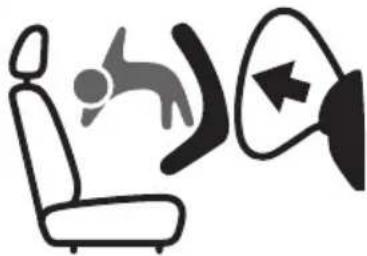
natural_image
Silhouette of a person inside a car seat and a directional arrow with a play button (no text or symbols)
STS17AN021
- If child restraint system regulations exist in the country where you reside, please contact your Toyota dealer for the child restraint system installation.

WARNING
■When installing a child restraint system
- When a junior (booster) seat is installed, always ensure that the shoulder belt is positioned across the center of the child's shoulder. The belt should be kept away from the child's neck, but not so that it could fall off the child's shoulder. Failure to do so may result in death or serious injury in the event of sudden braking, sudden swerving or an accident.
- Ensure that the belt and plate are securely locked and the seat belt is not twisted.
● Shake the child restraint system left and right, and forward and backward to ensure that it has been securely installed.
●After securing a child restraint system, never adjust the seat. - Follow all installation instructions provided by the child restraint system manufacturer.
■To correctly attach a child restraint system to the anchors
When using the lower anchors, be sure that there are no foreign objects around the anchors and that the seat belt is not caught behind the child restraint system. Make sure the child restraint system is securely attached, or it may cause death or serious injury to the child or other passengers in the event of sudden braking, sudden swerve or an accident.
■ Using child restraint anchorages
WARNING: child restraint anchorages are designed to withstand only those loads imposed by correctly fitted child restraints. Under no circumstances are they to be used for adult seatbelts, harnesses, or for attaching other items or equipment to the vehicle.
Not for Reproduction
When driving
2
2-1. Driving procedures
Driving the vehicle ..... 170
Engine (ignition) switch..... 180
Continuously variable transmission .... 185
Automatic transmission .... 190
Turn signal lever.... 196
Parking brake 197
Horn....199
2-2. Instrument cluster
Gauges and meters...... 200
Indicators and warning lights.... 204
Multi-information display... 208
2-3. Operating the lights and wipers
Headlight switch...... 214
Fog light switch.... 218
Windshield wipers and washer.... 219
Rear window wiper and washer.... 222
Headlight cleaner switch.... 223
2-4. Using other driving systems
Cruise control.... 224
Toyota parking assist-sensor 228
Driving assist systems ..... 235
2-5. Driving information
Cargo and luggage...... 241
Winter driving tips...... 244
Trailer towing 248
2-1. Driving procedures
Driving the vehicle
The following procedures should be observed to ensure safe driving:
■ Starting the engine
→ P. 180
Driving
STEP 1 With the brake pedal depressed, shift the shift lever to D. (→P. 185, 190)
STEP 2 Release the parking brake. ( P. 197)
STEP 3 Gradually release the brake pedal and gently depress the accelerator pedal to accelerate the vehicle.
Stopping
STEP 1 With the shift lever in D, depress the brake pedal.
STEP 2 If necessary, set the parking brake.
If the vehicle is to be stopped for an extended period of time, shift the shift lever to P or N. ( P. 185, 190)
Parking the vehicle
STEP 1 With the shift lever in D, depress the brake pedal.
STEP 2 Set the parking brake ( P. 197), and shift the shift lever to P ( P. 185, 190).
If parking on a hill, block the wheels as needed.
STEP 3 Press the "ENGINE START STOP" switch to stop the engine.
STEP 4 Lock the door, making sure that you have the electronic key on your person.
Starting off on a steep uphill
STEP 1 Make sure that the parking brake is set and shift the shift lever to D.
STEP 2 Gently depress the accelerator pedal.
STEP 3 Release the parking brake.
■When starting off on a uphill
The hill-start assist control is available. ( P. 235)
■Driving in the rain
- Drive carefully when it is raining, because visibility will be reduced, the windows may become fogged-up, and the road will be slippery.
- Drive carefully when it starts to rain, because the road surface will be especially slippery.
- Refrain from high speeds when driving on an expressway in the rain, because there may be a layer of water between the tires and the road surface, preventing the steering and brakes from operating properly.
■Engine speed while driving
In the following conditions, the engine speed may become high while driving. This is due to automatic up-shifting control or down-shifting implementation to meet driving conditions. It does not indicate sudden acceleration.
●The vehicle is judged to be driving uphill or downhill
- When the accelerator pedal is released
■Breaking in your new Toyota
To extend the life of the vehicle, observing the following precautions is recommended:
●For the first 300 km (186 miles): Avoid sudden stops.
●For the first 800 km (500 miles): Do not tow a trailer.
●For the first 1000 km (621 miles):
- Do not drive at extremely high speeds.
- Avoid sudden acceleration.
- Do not drive continuously in low gears.
- Do not drive at a constant speed for extended periods.
■Drum-in-disc type parking brake system
Your vehicle has a drum-in-disc type parking brake system. This type of brake system needs bedding-down of the brake shoes periodically or whenever the parking brake shoes and/or drum are replaced. Have your Toyota dealer perform the bedding down operation.
■Operating your vehicle in a foreign country
Comply with the relevant vehicle registration laws and confirm the availability of the correct fuel. ( P. 538)

WARNING
■When starting the vehicle
Always keep your foot on the brake pedal while stopped with the engine running. This prevents the vehicle from creeping.
■When driving the vehicle
- Do not drive if you are unfamiliar with the location of the brake and accelerator pedals to avoid depressing the wrong pedal.
- Accidentally depressing the accelerator pedal instead of the brake pedal will result in sudden acceleration that may lead to an accident that could result in death or serious injury.
- When backing up, you may twist your body around, leading to difficulty in operating the pedals. Make sure to operate the pedals properly.
- Make sure to keep a correct driving posture even when moving the vehicle only slightly. This allows you to depress the brake and accelerator pedals properly.
- Depress the brake pedal using your right foot. Depressing the brake pedal using your left foot may delay response in an emergency, resulting in an accident.
- Do not drive the vehicle over or stop the vehicle near flammable materials. The exhaust system and exhaust gases can be extremely hot. These hot parts may cause a fire if there is any flammable material nearby.
- Do not let the vehicle roll backward while the shift lever is in a driving position, or roll forward while the shift lever is in R.
Doing so may cause the engine to stall or lead to poor brake and steering performance, resulting in an accident or damage to the vehicle. - If the smell of exhaust is noticed inside the vehicle, open the windows and check that the back door is closed. Large amounts of exhaust in the vehicle can cause driver drowsiness and an accident, resulting in death or a serious health hazard. Have the vehicle inspected by your Toyota dealer immediately.

WARNING
- Do not shift the shift lever to P while the vehicle is moving.
Doing so can damage the transmission and may result in a loss of vehicle control. - Do not shift the shift lever to R while the vehicle is moving forward.
Doing so can damage the transmission and may result in a loss of vehicle control. - Do not shift the shift lever to a driving position while the vehicle is moving backward.
Doing so can damage the transmission and may result in a loss of vehicle control. - Moving the shift lever to N while the vehicle is moving will disengage the engine from the transmission. Engine braking is not available when N is selected.
During normal driving, do not turn off the engine. Turning the engine off while driving will not cause loss of steering or braking control, but the power assist to these systems will be lost. This will make it more difficult to steer and brake, so you should pull over and stop the vehicle as soon as it is safe to do so.
However, in the event of an emergency, such as if it becomes impossible to stop the vehicle in the normal way: →P. 533 - Use engine braking (downshift) to maintain a safe speed when driving down a steep hill.
Using the brakes continuously may cause the brakes to overheat and lose effectiveness. ( P. 185, 190) - When stopped on an inclined surface, use the brake pedal and parking brake to prevent the vehicle from rolling backward or forward and causing an accident.
- Do not adjust the positions of the steering wheel, the seat, or the inside or outside rear view mirrors while driving.
Doing so may result in a loss of vehicle control that can cause accidents, resulting in death or serious injury.
●Always check that all passengers' arms, heads or other parts of their body are not outside the vehicle, as this may result in death or serious injury.

WARNING
■When driving on slippery road surfaces
●Sudden braking, acceleration and steering may cause tire slippage and reduce your ability to control the vehicle, resulting in an accident.
● Sudden acceleration, engine braking due to shifting, or changes in engine speed could cause the vehicle to skid, resulting in an accident.
● After driving through a puddle, lightly depress the brake pedal to make sure that the brakes are functioning properly. Wet brake pads may prevent the brakes from functioning properly. If the brakes on only one side are wet and not functioning properly, steering control may be affected, resulting in an accident.
■When shifting the shift lever
Be careful not to shift the shift lever with the accelerator pedal depressed. Shifting the shift lever to a gear other than P or N may lead to unexpected rapid acceleration of the vehicle that may cause an accident and result in death or serious injury.
If you hear a squealing or scraping noise (brake pad wear indicators)
Have the brake pads checked and replaced by your Toyota dealer as soon as possible.
Rotor damage may result if the pads are not replaced when needed.
It is dangerous to drive the vehicle when the wear limits of the brake pads and/or those of the brake discs are exceeded.
■When the vehicle is stopped
- Do not race the engine.
If the vehicle is in any gear other than P or N, the vehicle may accelerate suddenly and unexpectedly, causing an accident. - Do not leave the vehicle with the engine running for a long time.
If such a situation cannot be avoided, park the vehicle in an open space and check that exhaust fumes do not enter the vehicle interior. - In order to prevent accidents due to the vehicle rolling away, always keep depressing the brake pedal while the engine is running, and apply the parking brake as necessary.

WARNING
- If the vehicle is stopped on an incline, in order to prevent accidents caused by the vehicle rolling forward or backward, always depress the brake pedal and securely apply the parking brake as needed.
- Avoid revving or racing the engine. Running the engine at high speed while the vehicle is stopped may cause the exhaust system to overheat, which could result in a fire if combustible material is nearby.
■When the vehicle is parked
- Do not leave glasses, cigarette lighters, spray cans, or soft drink cans in the vehicle when it is in the sun.
Doing so may result in the following:
- Gas may leak from a cigarette lighter or spray can, and may lead to a fire.
- The temperature inside the vehicle may cause the plastic lenses and plastic material of glasses to deform or crack.
-
Soft drink cans may rupture, causing the contents to spray over the interior of the vehicle, and may also cause a short circuit in the vehicle's electrical components.
-
Do not leave cigarette lighters in the vehicle. If a cigarette lighter is in a place such as the glove box or on the floor, it may be lit accidentally when luggage is loaded or the seat is adjusted, causing a fire.
- Do not attach adhesive discs to the windshield or windows. Do not place containers such as air fresheners on the instrument panel or dashboard. Adhesive discs or containers may act as lenses, causing a fire in the vehicle.
- Do not leave a door or window open if the curved glass is coated with a metallized film such as a silver-colored one. Reflected sunlight may cause the glass to act as a lens, causing a fire.
● Always apply the parking brake, shift the shift lever to P, stop the engine and lock the vehicle.
Do not leave the vehicle unattended while the engine is running.
When the vehicle is left without applying the parking brake even if the shift lever is in P, it may start to move, leading to an accident.

WARNING
- Do not touch the exhaust pipes while the engine is running or immediately after turning the engine off.
Doing so may cause burns. - Do not leave the engine running in an area with snow build-up, or where it is snowing. If snowbanks build up around the vehicle while the engine is running, exhaust gases may collect and enter the vehicle. This may lead to death or a serious health hazard.
Exhaust gases
Exhaust gases contain harmful carbon monoxide (CO), which is colorless and odorless. Inhaling exhaust gases may lead to death or a serious health hazard.
- If the vehicle is in a poorly ventilated area, stop the engine. In a closed area, such as a garage, exhaust gases may collect and enter the vehicle. This may lead to death or a serious health hazard.
●The exhaust system should be checked occasionally. If there is a hole or crack caused by corrosion, damage to a joint or abnormal exhaust noise, be sure to have the vehicle inspected and repaired by your Toyota dealer. Failure to do so may allow exhaust gases to enter the vehicle, resulting in death or a serious health hazard.
■When taking a nap in the vehicle
Always turn the engine off. Otherwise, if you accidentally move the shift lever or depress the accelerator pedal, this could cause an accident or fire due to engine overheating. Additionally, if the vehicle is parked in a poorly ventilated area, exhaust gases may collect and enter the vehicle, leading to death or a serious health hazard.
When braking
- When the brakes are wet, drive more cautiously.
Braking distance increases when the brakes are wet, and this may cause one side of the vehicle to brake differently than the other side. Also, the parking brake may not securely hold the vehicle.

WARNING
- If the power brake assist function does not operate, do not follow other vehicles closely and avoid hills or sharp turns that require braking.
In this case, braking is still possible, but the brake pedal should be depressed more firmly than usual. Also, the braking distance will increase. Have your brakes fixed immediately. - Do not pump the brake pedal if the engine stalls.
Each push on the brake pedal uses up the reserve for the power-assisted brakes.
●The brake system consists of 2 individual hydraulic systems; if one of the systems fails, the other will still operate. In this case, the brake pedal should be depressed more firmly than usual and the braking distance will increase.
Have your brakes fixed immediately.

NOTICE
■When driving the vehicle
- Do not depress the accelerator and brake pedals at the same time during driving, as this may restrain driving torque.
- Do not use the accelerator pedal or depress the accelerator and brake pedals at the same time to hold the vehicle on a hill.
■When parking the vehicle
Always set the parking brake, and shift the shift lever to P. Failure to do so may cause the vehicle to move or the vehicle may accelerate suddenly if the accelerator pedal is accidentally depressed.
■Avoiding damage to vehicle parts
Do not turn the steering wheel fully in either direction and hold it there for an extended period of time.
Doing so may damage the power steering motor.
- When driving over bumps in the road, drive as slowly as possible to avoid damaging the wheels, underside of the vehicle, etc.

NOTICE
■If you get a flat tire while driving
A flat or damaged tire may cause the following situations. Hold the steering wheel firmly and gradually depress the brake pedal to slow down the vehicle.
- It may be difficult to control your vehicle.
●The vehicle will make abnormal sounds or vibrations.
●The vehicle will lean abnormally.
Information on what to do in case of a flat tire (→P. 498)
■When encountering flooded roads
Do not drive on a road that has flooded after heavy rain, etc. Doing so may cause the following serious damage to the vehicle:
Engine stalling
●Short in electrical components
●Engine damage caused by water immersion
In the event that you drive on a flooded road and the vehicle is flooded, be sure to have your Toyota dealer check the following:
●Brake function
● Changes in quantity and quality of engine oil, transmission fluid, etc.
● Lubricant condition for the bearings and suspension joints (where possible), and the function of all joints, bearings, etc.
2-1. Driving procedures
Engine (ignition) switch
Performing the following operations when carrying the electronic key on your person starts the engine or changes “ENGINE START STOP” switch modes.
■ Starting the engine
STEP 1 Check that the parking brake is set.
STEP 2 Check that the shift lever is set in P.
STEP 3 Firmly depress the brake pedal.
The "ENGINE START STOP" switch indicator will turn green. If the indicator does not turn green, the engine cannot be started.
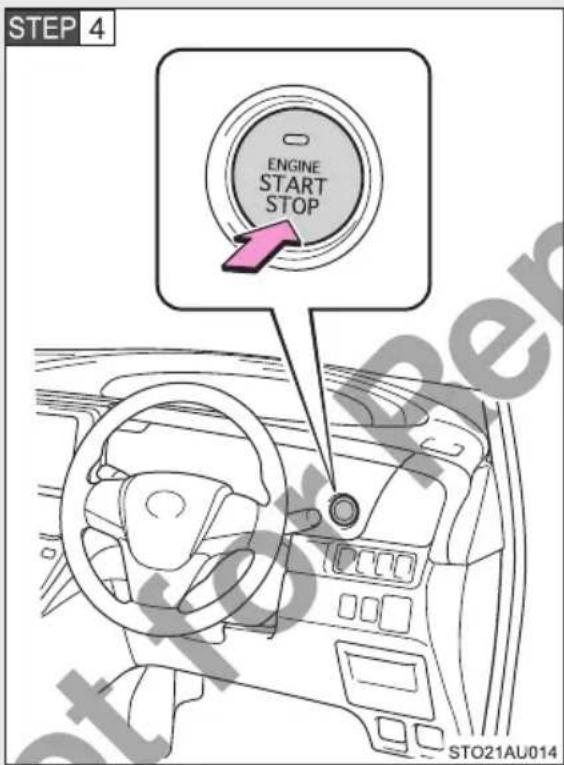
Press the "ENGINE START STOP" switch shortly and firmly.
When operating the "ENGINE START STOP" switch, one short, firm press is enough.
It is not necessary to press and hold the switch.
The engine will crank until it starts or for up to 30 seconds, whichever is less.
Continue depressing the brake pedal until the engine is completely started.
The engine can be started from any "ENGINE START STOP" switch mode.
■Stopping the engine
STEP 1 Stop the vehicle.
STEP 2 Set the parking brake ( P. 197), and shift the shift lever to P.
STEP 3 Press the "ENGINE START STOP" switch.
STEP 4 Release the brake pedal.
STEP 5 Check that the indicator on the "ENGINE START STOP" switch is off.
■Changing "ENGINE START STOP" switch mode
Modes can be changed by pressing the “ENGINE START STOP” switch with the brake pedal released. (The mode changes each time the switch is pressed.)
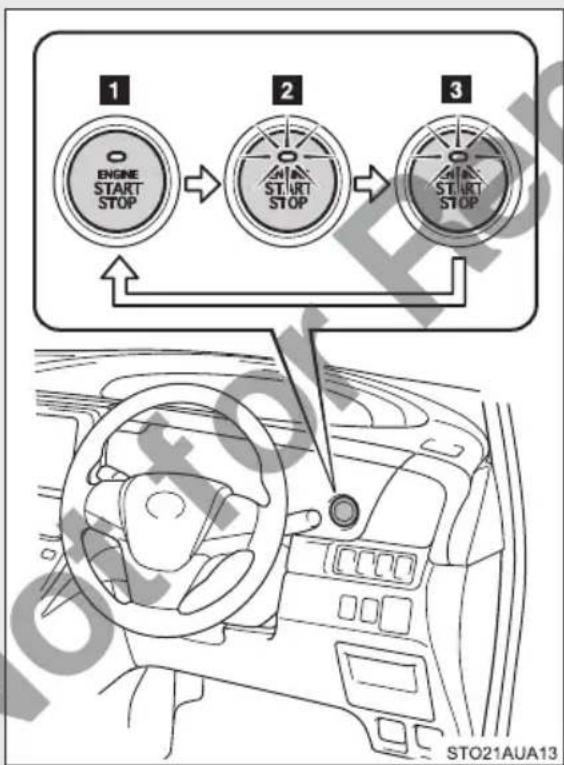
flowchart
graph TD
    A["1 ENGINE START STOP"] --> B["2 START STOP"]
    B --> C["3 START STOP"]
1 Off\*
The emergency flashers can be used.
2 ACCESSORY mode
Some electrical components such as the audio system can be used.
The "ENGINE START STOP" switch indicator turns amber.
3 IGNITION ON mode
All electrical components can be used.
The "ENGINE START STOP" switch indicator turns amber.
*:If the shift lever is in a position other than P when turning off the engine, the "ENGINE START STOP" switch will be turned to ACCESSORY mode, not to off.
■ Auto power off function
If the vehicle is left in ACCESSORY mode for more than 20 minutes with the shift lever in P, the "ENGINE START STOP" switch will automatically turn off.
Electronic key battery depletion
→P.35
■ Conditions affecting operation
→P.44
■ Notes for the entry function
→P. 34
■If the engine does not start
The engine immobilizer system may not have been deactivated. (→P. 132) Contact your Toyota dealer.
Steering lock
After turning the “ENGINE START STOP” switch off and opening and closing the doors, the steering wheel will be locked due to the steering lock function. Operating the “ENGINE START STOP” switch again automatically cancels the steering lock.
■When the steering lock cannot be released
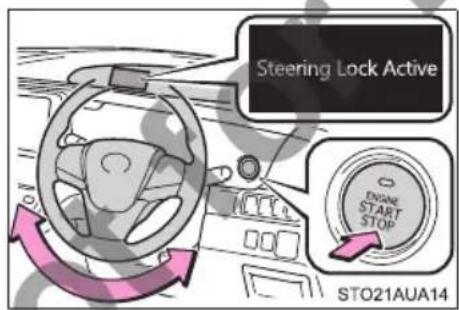
The green indicator light on the “ENGINE START STOP” switch will flash and a message will be shown on the multi-information display. Press the “ENGINE START STOP” switch again while turning the steering wheel left and right.
When the "ENGINE START STOP" switch indicator flashes in amber
The system may be malfunctioning. Have the vehicle inspected by your Toyota dealer immediately.
■If the electronic key battery is depleted
→P. 427
Operation of the "ENGINE START STOP" switch
If the switch is not pressed shortly and firmly, the "ENGINE START STOP" switch mode may not change or the engine may not start.
If the smart entry & start system or push-button start system has been deactivated in a customized setting
→P. 551

WARNING
■When starting the engine
Always start the engine while sitting in the driver's seat. Do not depress the accelerator pedal while starting the engine under any circumstances. Doing so may cause an accident resulting in death or serious injury.
■While driving
If engine failure occurs while the vehicle is moving, do not lock or open the doors until the vehicle reaches a safe and complete stop. The steering lock function will activate and this may lead to an accident, resulting in death or serious injury.
■Stopping the engine in an emergency
If you want to stop the engine in an emergency while driving the vehicle, press and hold the “ENGINE START STOP” switch for more than 2 seconds, or press it briefly 3 times or more in succession. (→P. 533)
However, do not touch the “ENGINE START STOP” switch while driving except in an emergency. Turning the engine off while driving will not cause loss of steering or braking control, but the power assist to these systems will be lost. This will make it more difficult to steer and brake, so you should pull over and stop the vehicle as soon as it is safe to do so.

NOTICE
■To prevent battery discharge
- Do not leave the “ENGINE START STOP” switch in ACCESSORY or IGNITION ON mode for long periods of time without the engine running.
- If the indicator on the “ENGINE START STOP” switch is illuminated, the “ENGINE START STOP” switch is not off. When exiting the vehicle, always check that the “ENGINE START STOP” switch is off.
- Do not stop the engine when the shift lever is in a position other than P. If the engine is stopped in another shift lever position, the “ENGINE START STOP” switch will not be turned off but instead be turned to ACCESSORY mode. If the vehicle is left in ACCESSORY mode, battery discharge may occur.
■When starting the engine
- Do not race a cold engine.
- If the engine becomes difficult to start or stalls frequently, have your vehicle checked by your Toyota dealer immediately.
■To avoid damaging the "ENGINE START STOP" switch
- Avoid touching the "ENGINE START STOP" switch with greasy hands.
Take care not to spill drinks or other fluids over the “ENGINE START STOP” switch.
■Symptoms indicating a malfunction with the “ENGINE START STOP” switch
If the “ENGINE START STOP” switch seems to be operating somewhat differently than usual, such as the switch sticking slightly, there may be a malfunction. Contact your Toyota dealer immediately.
2-1. Driving procedures
Continuously variable transmission\*
Select a shift position appropriate for the driving conditions.
■Shifting the shift lever
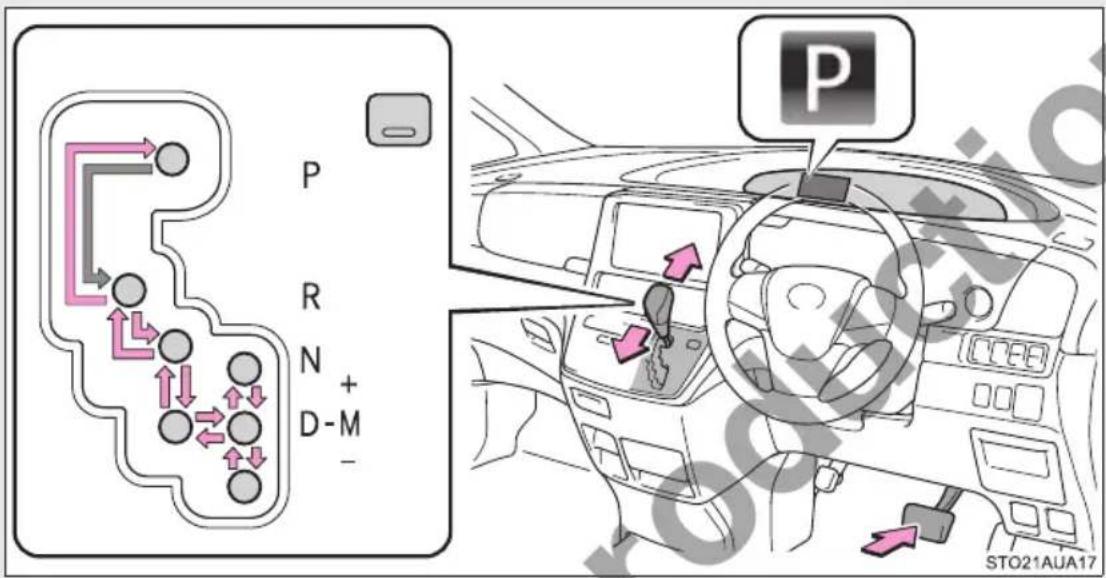
flowchart
graph TD
    A["Top Panel"] --> B["Directional Control Path"]
    B --> C["P"]
    B --> D["R"]
    B --> E["N"]
    B --> F["D-M"]
    B --> G["-"]
    H["Left Panel"] --> I["Car Window"]
    I --> J["Sto21AUA17"]
    K["Top Panel"] --> L["Directional Control Path"]
    L --> M["P"]
    L --> N["R"]
    L --> O["N"]
    L --> P["D-M"]
    L --> Q["-"]

While the “ENGINE START STOP” switch is in IGNITION ON mode, move the shift lever with the brake pedal depressed.
When shifting the shift lever between P and D, make sure that the vehicle is completely stopped.
Shift position purpose
| Shift position Function | |
| P Parking the vehicle/starting the engine | |
| R Reversing | |
| N Neutral | |
| D Normal driving*1 | |
| M | 7-speed sport sequential shiftmatic mode driving*2(→P. 187) |
*1: To improve fuel consumption and reduce noises, set the shift lever in the D position for normal driving.
*2: Selecting gear step using the M position achieves suitable engine braking forces by operating shift lever.
Changing gear steps in 7-speed sport sequential shiftmatic mode
Shift the shift lever to the M position and operate the shift lever.
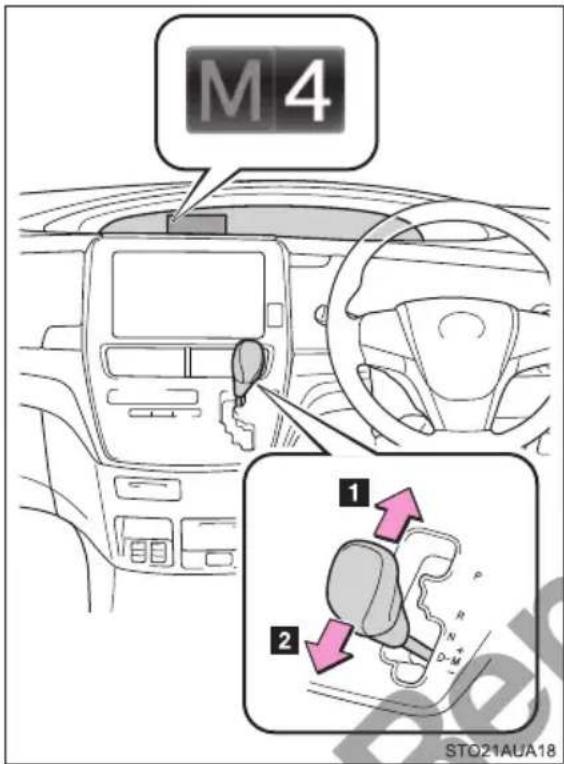
1 Upshifting
2 Downshifting
The gear step changes once every time the shift lever is operated.
The selected gear step, from 1 to 7, will be displayed in the instrument cluster.
However, even when in the M position, the gear steps will be automatically changed if the engine speed is too high, or too low.
Gear step functions
●You can choose from 7 levels of engine braking force.
●A lower gear step will provide greater engine braking force than a higher gear step, and the engine speed will also increase.
AI-SHIFT
AI-SHIFT automatically selects the suitable gear according to the driver performance and driving conditions.
AI-SHIFT automatically operates when the shift lever is in the D position. (Shifting the shift lever to the M position cancels the function.)
■When driving with cruise control activated
Even when performing the following actions with the intent of enabling engine braking, engine braking will not activate while driving in 7-speed sport sequential shiftmatic mode and downshifting to 6, 5 or 4 because cruise control will not be canceled. (→P. 224)
Shift lock system
The shift lock system is a system to prevent accidental operation of the shift lever in starting.
The shift lever can be shifted from P only when the "ENGINE START STOP" switch is in IGNITION ON mode and the brake pedal is being depressed.
When the vehicle comes to a stop with the shift lever in the M position
●The transmission will automatically downshift to M1 once the vehicle is stopped.
●After a stop, the vehicle will start off in M1.
- When the vehicle is stopped, the transmission is set at M1.
If the shift lever cannot be shifted from P
First, check whether the brake pedal is being depressed.
If the shift lever cannot be shifted with your foot on the brake pedal, there may be a problem with the shift lock system. Have the vehicle inspected by your Toyota dealer immediately.
The following steps may be used as an emergency measure to ensure that the shift lever can be shifted.
Releasing the shift lock:
STEP 1 Set the parking brake.
STEP 2 Turn the "ENGINE START STOP" switch off.
STEP 3 Depress the brake pedal.
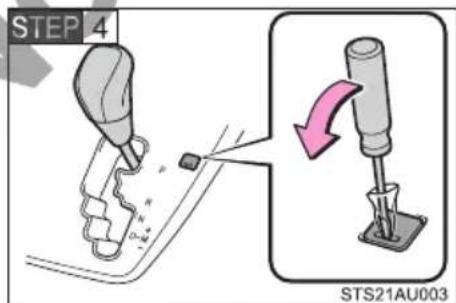
Pry the cover up with a flathead screw-driver or equivalent tool.
To prevent damage to the cover, cover the tip of the screwdriver with a rag.
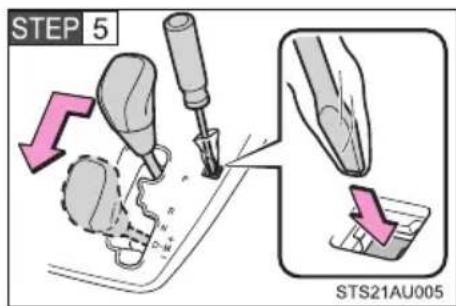
Press the shift lock override button.
The shift lever can be shifted while the button is pressed.
To prevent damage to the button, cover the tip of the screwdriver with a rag.
If the 7-speed sport sequential shiftmatic mode indicator does not come on even after shifting the shift lever to M
This may indicate a malfunction in the continuously variable transmission system. Have the vehicle inspected by your Toyota dealer immediately.
(In this situation, the transmission will operate in the same manner as when the shift lever is in D.)
■ Downshift restriction warning buzzer (in 7-speed sport sequential shift-matic mode)
To help ensure safety and driving performance, downshifting operation may sometimes be restricted. In some circumstances, downshifting may not be possible even when the shift lever is operated. (A buzzer will sound twice.)

WARNING
■When driving on slippery road surfaces
Do not accelerate or shift gear steps suddenly.
Sudden changes in engine braking may cause the vehicle to spin or skid, resulting in an accident.
■To prevent an accident when releasing the shift lock
Before pressing the shift lock override button, make sure to set the parking brake and depress the brake pedal.
If the accelerator pedal is accidentally depressed instead of the brake pedal when the shift lock override button is pressed and the shift lever is shifted out of P, the vehicle may suddenly start leading to an accident which may result in death or serious injury.
2-1. Driving procedures
Automatic transmission\*
Select a shift position appropriate for the driving conditions.
■Shifting the shift lever
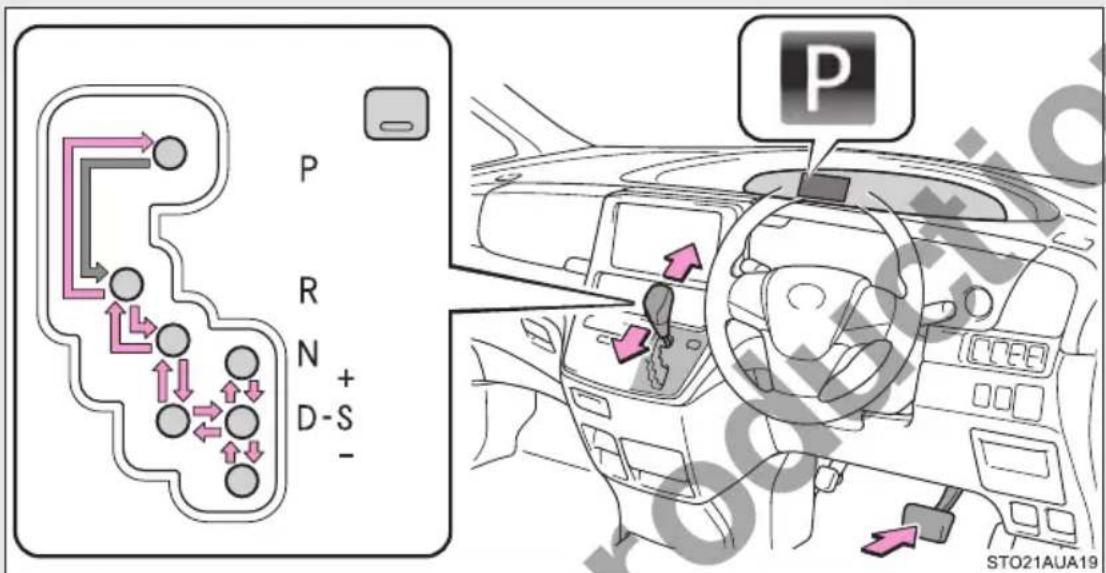

While the “ENGINE START STOP” switch is in IGNITION ON mode, move the shift lever with the brake pedal depressed.
When shifting the shift lever between P and D, make sure that the vehicle is completely stopped.
Shift position purpose
| Shift position Function | |
| P Parking the vehicle/starting the engine | |
| R Reversing | |
| N Neutral | |
| D Normal driving* | 1 |
| S S mode driving* | 2(→P. 192) |
*1: Shifting to the D position allows the system to select a gear suitable for the driving conditions. Setting the shift lever to the D position is recommended for normal driving.
*2: Selecting shift ranges using S mode restricts the upper limit of the possible gear ranges, controls engine braking forces, and prevents unnecessary upshifting.
Changing shift ranges in S mode
Shift the shift lever to the S position and operate the shift lever.
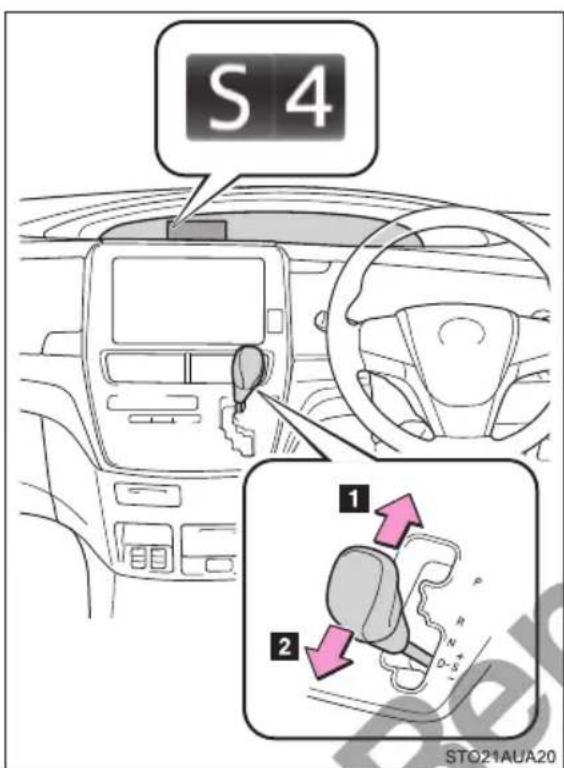
1 Upshifting
2 Downshifting
The initial shift range in S mode is automatically set to 5 or 4 according to the vehicle's speed. However, the initial shift range may be set to 3 if AI-SHIFT has operated while the shift lever was in the D position. (→P. 193)
Shift ranges and their functions
- Automatically selecting gears between 1 and 6 according to vehicle's speed and driving conditions. But, the gear is limited according to selected shift range.
●You can choose from 6 levels of engine braking force.
●A lower shift range will provide greater engine braking force than a higher shift range, and the engine speed will also increase.
S mode
- When the shift range is 5 or lower, holding the shift lever toward “+” sets the shift range to 6.
- To prevent excessive engine speed, a function was adopted that automatically selects a higher shift range before engine speed becomes too high.
- To protect the automatic transmission, a function is adopted that automatically selects a higher shift range when the fluid temperature is high.
AI-SHIFT
AI-SHIFT automatically selects the suitable gear according to the driver performance and driving conditions.
AI-SHIFT automatically operates when the shift lever is in the D position.
(Shifting the shift lever to the S position cancels the function.)
■When driving with cruise control activated
Even when performing the following actions with the intent of enabling engine braking, engine braking will not activate while driving in S mode and downshifting to 5 or 4 because cruise control will not be canceled. ( P. 224)
Shift lock system
The shift lock system is a system to prevent accidental operation of the shift lever in starting.
The shift lever can be shifted from P only when the “ENGINE START STOP” switch is in IGNITION ON mode and the brake pedal is being depressed.
If the shift lever cannot be shifted from P
First, check whether the brake pedal is being depressed.
If the shift lever cannot be shifted with your foot on the brake pedal, there may be a problem with the shift lock system. Have the vehicle inspected by your Toyota dealer immediately.
The following steps may be used as an emergency measure to ensure that the shift lever can be shifted.
Releasing the shift lock:
STEP 1 Set the parking brake.
STEP 2 Turn the "ENGINE START STOP" switch off.
STEP 3 Depress the brake pedal.
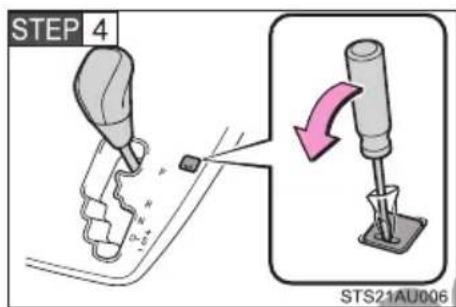
Pry the cover up with a flathead screw-driver or equivalent tool.
To prevent damage to the cover, cover the tip of the screwdriver with a rag.
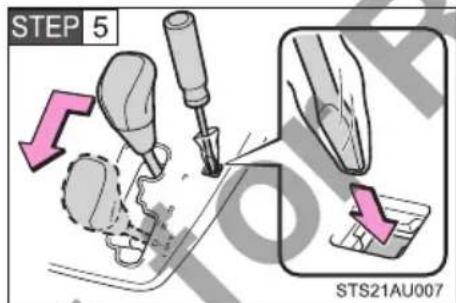
Press the shift lock override button.
The shift lever can be shifted while the button is pressed.
To prevent damage to the button, cover the tip of the screwdriver with a rag.
If the “S” mode indicator does not come on even after shifting the shift lever to S
This may indicate a malfunction in the automatic transmission system. Have the vehicle inspected by your Toyota dealer immediately.
(In this situation, the transmission will operate in the same manner as when the shift lever is in D.)
■Downshifting restrictions warning buzzer (in S mode)
To help ensure safety and driving performance, downshifting operation may sometimes be restricted. In some circumstances, downshifting may not be possible even when the shift lever is operated. (A buzzer will sound twice.)

WARNING
■When driving on slippery road surfaces
Do not accelerate or shift gears suddenly.
Sudden changes in engine braking may cause the vehicle to spin or skid, resulting in an accident.
■To prevent an accident when releasing the shift lock
Before pressing the shift lock override button, make sure to set the parking brake and depress the brake pedal.
If the accelerator pedal is accidentally depressed instead of the brake pedal when the shift lock override button is pressed and the shift lever is shifted out of P, the vehicle may suddenly start leading to an accident which may result in death or serious injury.
2-1. Driving procedures
Turn signal lever
The turn signal lever can be used to show the following intentions of the driver:
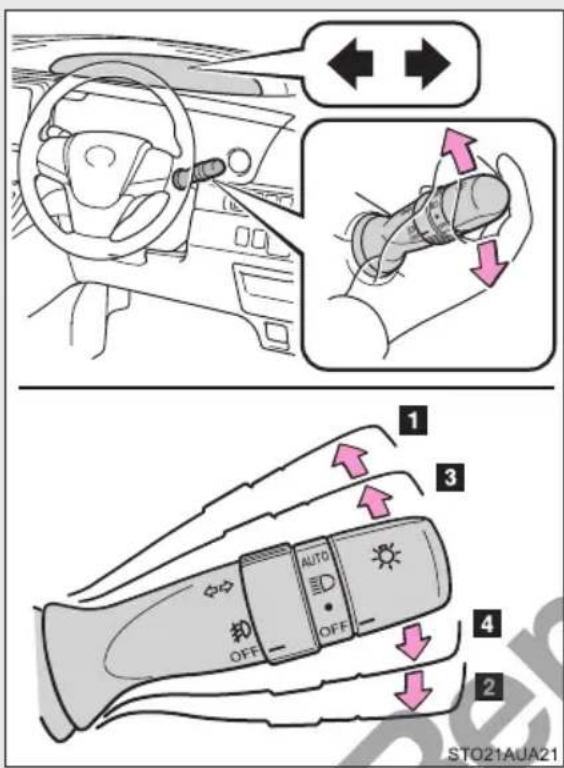
1 Left turn
2 Right turn
3 Lane change to the left (push and hold the lever partway)
The left hand signals will flash until you release the lever.
4 Lane change to the right (push and hold the lever partway)
The right hand signals will flash until you release the lever.
■Turn signals can be operated when
The "ENGINE START STOP" switch is in IGNITION ON mode.
If the indicator flashes faster than usual
Check that a light bulb in the front or rear turn signal lights has not burned out.
2-1. Driving procedures
Parking brake
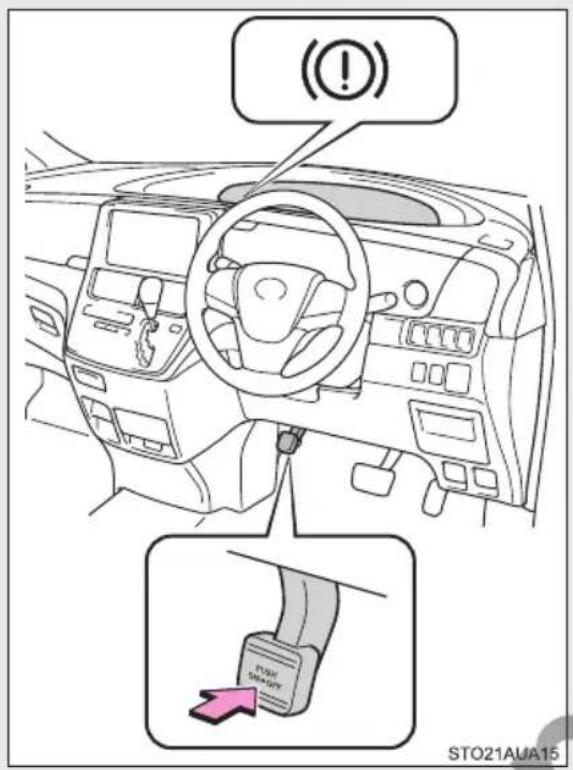
To set the parking brake, fully depress the parking brake pedal with your left foot while depressing the brake pedal with your right foot.
(Depressing the parking brake pedal again releases the parking brake.)
Parking the vehicle
→P. 170
■Parking brake engaged warning buzzer
A buzzer will sound if the vehicle is driven with the parking brake engaged. "Release Parking Brake" is displayed on the multi-information display (with the vehicle having reached a speed of 5 km/h [3 mph]).
■ Usage in winter time
→P.244

NOTICE
Before driving
Fully release the parking brake.
Driving the vehicle with the parking brake set will lead to brake components overheating, which may affect braking performance and increase brake wear.
2-1. Driving procedures
Horn
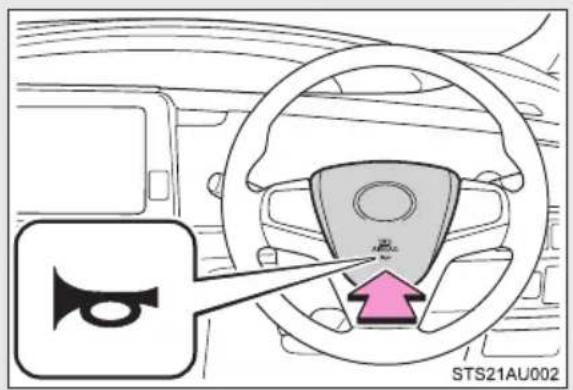
To sound the horn, press on or close to the mark.
■After adjusting the steering wheel
Make sure that the steering wheel is securely locked.
The horn may not sound if the steering wheel is not securely locked.
(→P. 117)
2-2. Instrument cluster
Gauges and meters
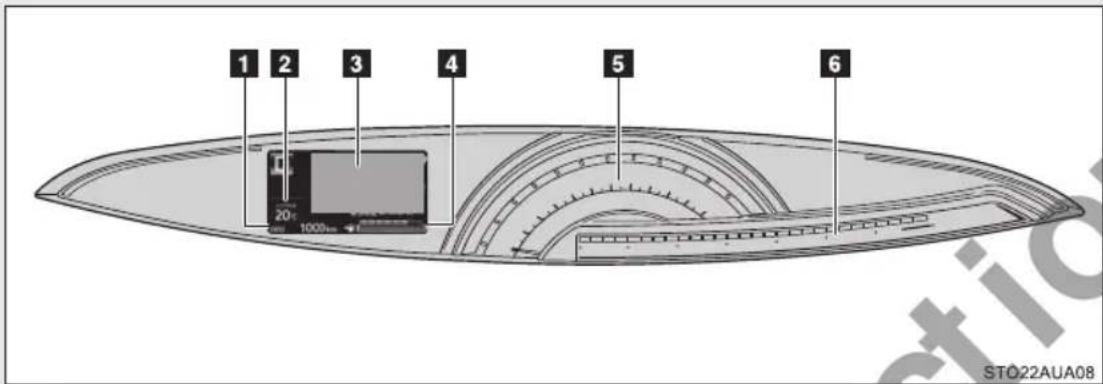
1 Odometer and trip meter display
Odometer: Displays the total distance the vehicle has been driven.
Trip meter: Displays the distance the vehicle has been driven since the meter was last reset. Trip meters A and B can be used to record and display different distances independently.
2 Outside temperature
Displays the outside temperature within the range of -40^ ( -40^ ) to 50^ ( 122^ ). Low outside temperature indicator comes on when the ambient temperature is 3^ ( 37^ ) or lower.
3 Multi-information display
Presents the driver with a variety of vehicle data.
Displays warning messages in case of a malfunction. (P. 488)
4 Fuel gauge
Displays the quantity of fuel remaining in the tank.
5 Speedometer
Displays the vehicle speed.
6 Tachometer
Displays the engine speed in revolutions per minute.
Changing the odometer/trip meter display
Pressing the "TRIP" switch switches between the odometer, the trip meters and the instrument cluster light control display.
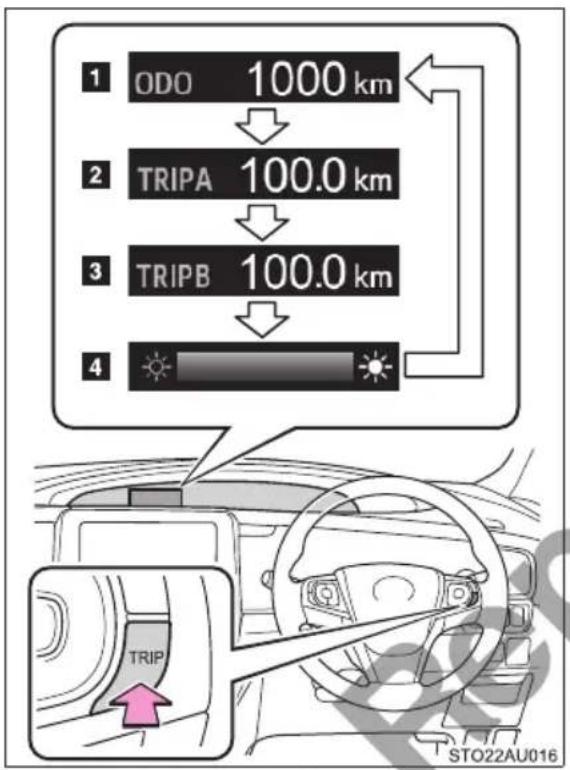
1 Odometer
2 Trip meter A *
3 Trip meter B*
4 Instrument cluster light control display
*: Pressing and holding the "TRIP" for more than 1 second will reset the trip meter that is currently displayed.
Instrument cluster light control
The brightness of the instrument cluster light can be adjusted.
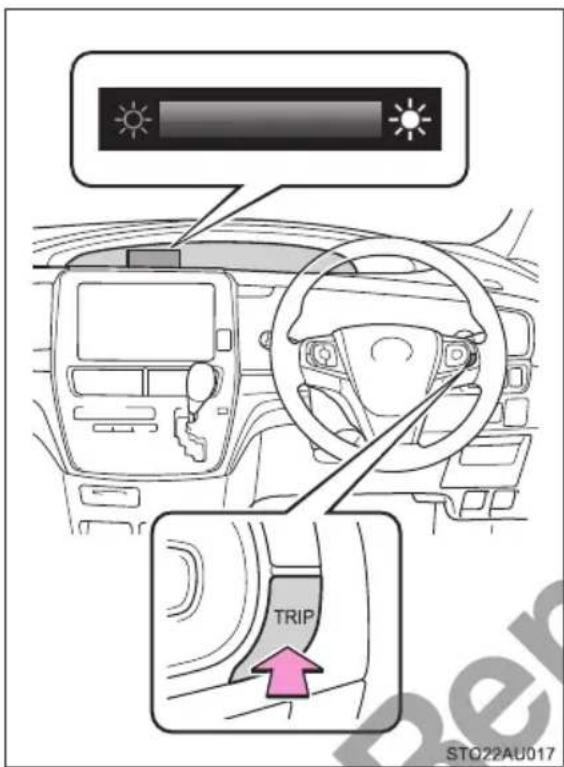
Press the switch.
When the instrument cluster light control display is displayed, pressing and holding the "TRIP" switch will adjust the brightness of the instrument cluster lights.
■The meters and display operate when
The "ENGINE START STOP" switch is in IGNITION ON mode.
■The brightness of the instrument cluster light
When the tail lights are turned on, the brightness will be reduced slightly unless the brightness level adjustment is set to the brightest setting.
If the tail lights are turned on when the surroundings are dark, the brightness will reduce slightly. However, when the surroundings are bright, such as during the daytime, the brightness will not be reduced even if the tail lights are turned on.
When disconnecting and reconnecting battery terminals
The trip meter data will be reset.

NOTICE
■To prevent damage to the engine and its components
- Do not let the indicator needle of the tachometer enter the red zone, which indicates the maximum engine speed.
- This vehicle is equipped with high engine coolant temperature warning light (→P. 484), instead of, coolant temperature gauge.
The engine may be overheating if the high engine coolant temperature warning light comes on. In this case, immediately stop the vehicle in a safe place, and check the engine after it has cooled completely. ( P. 528)
2-2. Instrument cluster
Indicators and warning lights
The indicators and warning lights on the instrument cluster and center panel inform the driver of the status of the vehicle's various systems.
For the purpose of explanation, the following illustration displays all indicators and warning lights illuminated.
Instrument cluster
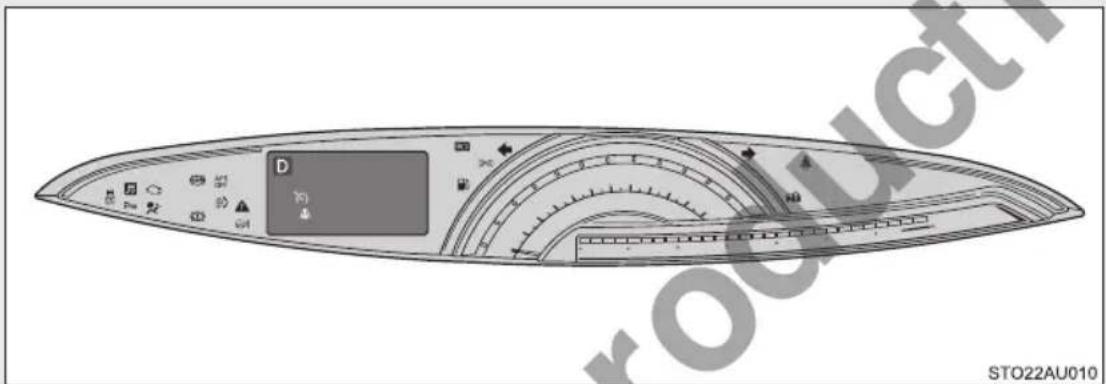
Indicators
The indicators inform the driver of the operating state of the vehicle's various systems.
Turn signal indicator ( P. 196)

Headlight high beam indicator ( P. 214)
*3

(vehicles with an automatic transmission)
Shift position and shift range indicators ( P. 190)
Tail light indicator ( P. 214)
(vehicles with an automatic transmission)
“S” mode indicator ( P. 192)
Front fog light indicator ( P. 218)
(if equipped)
*3
Engine immobilizer system indicator ( P. 132)
Low outside temperature indicator ( P. 200)

(vehicles with
*3
(if equipped)
Cruise control indicator ( P. 224)
a continuously variable transmission)
1,2
Toyota parking assist-sensor indicator (→P. 228)
(vehicles with a continuously variable transmission)
*1
Slip indicator ( P. 236)
VSC OFF indicator ( P. 237)
*1: These lights turn on when the “ENGINE START STOP” switch is turned to IGNITION ON mode to indicate that a system check is being performed. They will turn off after the engine is started, or after a few seconds. There may be a malfunction in a system if a light does not come on, or turn off. Have the vehicle inspected by your Toyota dealer.
^*2 : The light flashes to indicate that the system is operating.
*3: This light illuminates on the multi-information display.
Warning lights
Warning lights inform the driver of malfunctions in any of the vehicle's systems. (→P. 483)
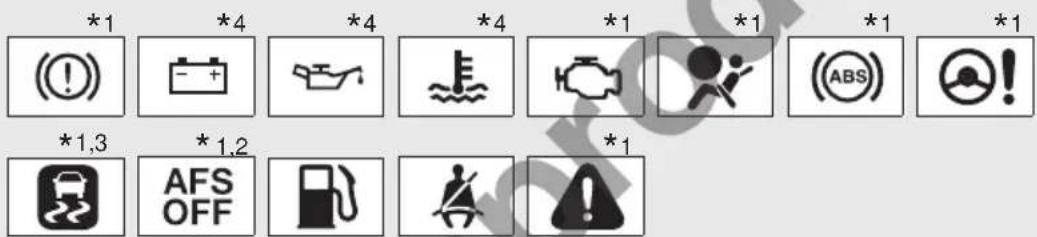
*1: These lights turn on when the "ENGINE START STOP" switch is turned to IGNITION ON mode to indicate that a system check is being performed. They will turn off after the engine is started, or after a few seconds. There may be a malfunction in a system if a light does not come on, or turn off. Have the vehicle inspected by your Toyota dealer.
^2 : The light flashes to indicate a malfunction.
^3 : The light turns on to indicate a malfunction.
*4: This light illuminates on the multi-information display.

WARNING
If a safety system warning light does not come on
Should a safety system light such as the ABS and SRS warning light not come on when you start the engine, this could mean that these systems are not available to help protect you in an accident, which could result in death or serious injury. Have the vehicle inspected by your Toyota dealer immediately if this occurs.
2-2. Instrument cluster
Multi-information display
The multi-information display presents the driver with a variety of driving-related data including the current outside air temperature.
Display contents
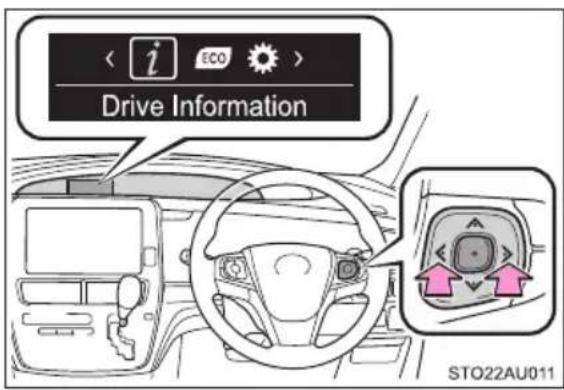
Menu icons:
Displays the following information when an icon is selected.
(→P. 208)
Drive Information
Select to display various drive data. ( P. 209)

ECO
Displays the fuel consumption information. (→P. 210)

Settings
Select to change the meter display settings. (→P. 211)
Operating the steering wheel switches
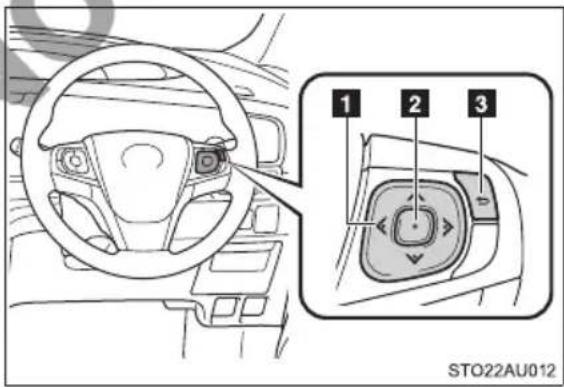
The multi-information display is operated using the steering wheel switches.
1 Select an item/change pages
2 Enter/Set
3 Return to the previous step
Drive Information
To toggle through the items, press
switches (→P. 208), select [i]ve Information] on the multi-information display, and press /or . √
(average fuel consumption) *1, 2
Displays the average fuel economy, since the engine was started or since the function was last reset.
■ (Elapsed time) *1, 2
Displays the elapsed time, since the engine was started or since the function was last reset.
(average vehicle speed) *1, 2
Displays the average vehicle speed, since the engine was started or since the function was last reset. This item can be displayed using the “Settings” screen. (→P. 211)
(Driving range)
Displays the estimated approximate distance that can be driven with the quantity of fuel remaining
- This distance is computed based on your average fuel consumption. As a result, the actual distance that can be driven may differ from that displayed.
- When only a small amount of fuel is added to the tank, the display may not be updated.
- When refueling, turn the “ENGINE START STOP” switch off. If the vehicle is refueled without turning the “ENGINE START STOP” switch off, the display may not be updated.
Digital Speed Meter
Displays the vehicle speed.
*1: When the odometer is displayed, the drive information since the engine was started, is displayed.
*2: When the trip meter “A” or “B” is displayed, the drive information for each trip meters since the trip meter was reset, is displayed.
ECO
To toggle through the items, press
■Past Record (Monthly Avg.)
Displays average fuel consumption by the month.
STEP 1 Press and hold to display an option screen.
STEP 2 Select "Yes" or "No" for resetting.
Ranking
Displays the best 3 fuel consumption records and the current fuel consumption ranking.
- When the odometer is displayed: Displays the ranking since the engine was started.
- When the trip meter “A” or “B” is displayed: Displays the ranking for each trip meters since the trip meter was reset.
Displays the ranking within 100th and the ranking 100th or lower is displayed as outside the ranking.
If the driving distance is too short after the engine was started, the ranking may not be updated.
STEP 1 Press and hold to display an option screen.
STEP 2 Select "Yes" or "No" for resetting.
5min Consumption
Displays the fuel consumption history since the engine was started in intervals of 5 minutes. Current fuel consumption is simultaneously displayed, enabling it to be compared with fuel consumption of up to the last 30 minutes.
STEP 1 Press and hold to display an option screen.
STEP 2 Select the display of "5 min" or "1 min".
Settings
To toggle through the items, press <or of the meter control switches (→P. 208), select [Settings] on the multi-information display, and press /or .
Drive Information
The upper or lower part display can be selected from among the “Average Speed”, “Average Fuel Economy” and “Elapsed Time”
Date and Time
Date and clock can be adjusted.
■Pop-Up Guidance
Display or non-display of guidances for menu icons can be selected.
■ Trip Summary Display
Display or non-display of travelling results can be selected.
■ Initialization
Select to reset all setup items below.
- Drive Information
- Pop-Up Guidance
- Trip Summary Display
■When the battery is disconnected
The following information data will be reset:
Clock
●Ranking (4th ranking or under)
●Average fuel consumption
- Driving range
●Average vehicle speed
● Elapsed time
■Setting display automatic cancelation
In the following situations, setting display in which the settings can be changed through the steering wheel switches will automatically be turned off.
- When a warning message appears while the setting display is displayed
- When the vehicle begins to move while the setting display is displayed except for operation of "Adjust Light"
Liquid crystal display
Small spots or light spots may appear on the display. This phenomenon is characteristic of liquid crystal displays, and there is no problem continuing to use the display.

WARNING
■The information display at low temperatures
Allow the interior of the vehicle to warm up before using the liquid crystal information display. At extremely low temperatures, the information display monitor may respond slowly, and display changes may be delayed.
For example, there is a lag between the driver's shifting and the new gear number appearing on the display. This lag could cause the driver to downshift again, causing rapid and excessive engine braking and possibly an accident resulting in personal death or injury.
■Cautions during setting up the display
As the engine needs to be running during setting up the display, ensure that the vehicle is parked in a place with adequate ventilation. In a closed area such as a garage, exhaust gases including harmful carbon monoxide (CO) may collect and enter the vehicle. This may lead to death or a serious health hazard.

NOTICE
■During setting up the display
To prevent battery discharge, ensure that the engine is operating while setting up the display features.
2-3. Operating the lights and wipers
Headlight switch
The headlights can be operated manually or automatically.
Turning the end of the lever turns on the lights as follows:
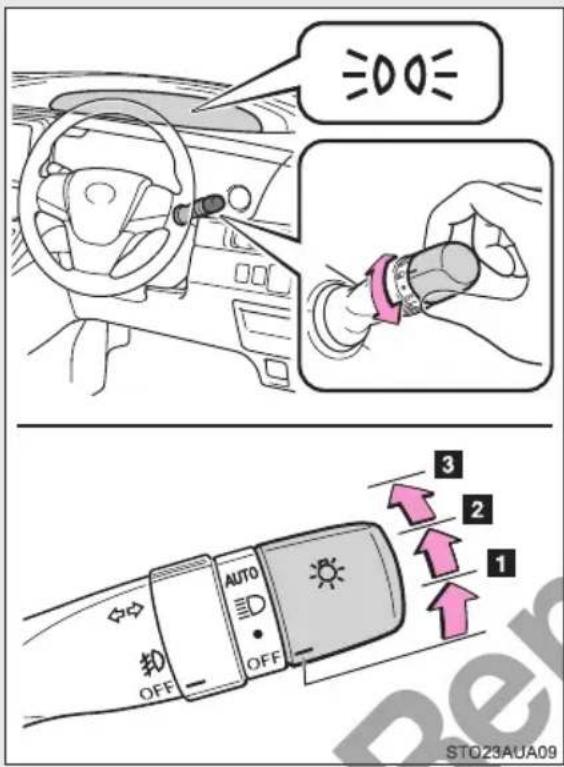
The front position, tail, license plate and instrument panel lights turn on.
2 The headlights and all the lights listed above turn on.
3 AUTO The headlights, front position lights and so on turn on and off automatically (when the "ENGINE START STOP" switch is in IGNITION ON mode.)
Turning on the high beam headlights
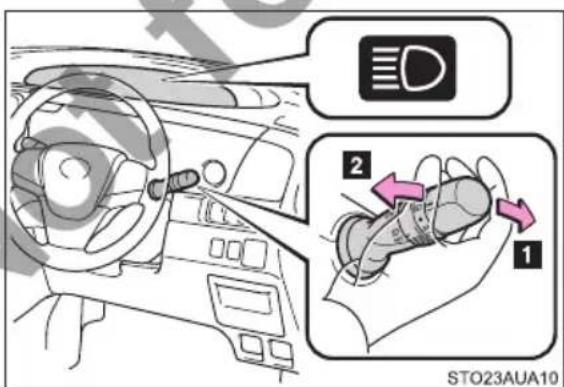
1 With the headlights on, push the lever away from you to turn on the high beams.
Pull the lever toward you to the center position to turn the high beams off.
2 Pull the lever toward you and release it to flash the high beams once.
You can flash the high beams with the headlights on or off.
Manual headlight leveling dial (if equipped)
The level of the headlights can be adjusted according to the number of passengers and the loading condition of the vehicle.
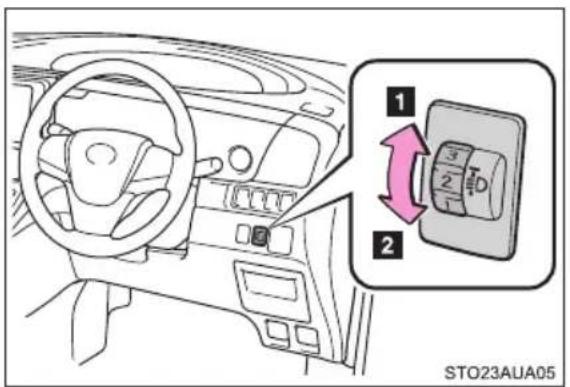
1 Raises the level of the headlights
2 Lowers the level of the headlights
■Guide to dial settings
| Loading condition Control switch position | |
| Driver only, orDriver + one passenger in the front seat | 0 |
| Driver + one passenger in the front seat,and all passengers in the rear seats farthest to the rear | 1.5 |
| All passengers 2 | |
| All passengers + full luggage loading tothe luggage room | 2.5 |
| Driver + full luggage loading tothe luggage room | 3.5 |
AFS (Adaptive Front-lighting System) (if equipped)
AFS (Adaptive Front-lighting System) secures excellent visibility at intersections and on curves by automatically adjusting the direction of the light axis of the headlights according to vehicle speed and the degree of the tire's angle as controlled by steering input.
AFS operates at speeds of 10 km/h (6 mph) or higher.
■Deactivating AFS
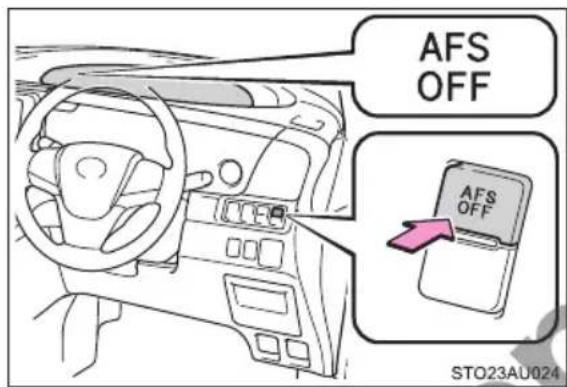
Turns the AFS on/off
The indicator turns on when the AFS is deactivated.
■Headlight control sensor
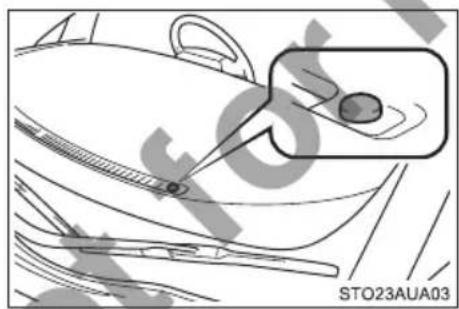
natural_image
Technical line drawing of a car interior with a magnified inset showing a spherical object (no text or symbols)The sensor may not function properly if an object is placed on the sensor, or anything that blocks the sensor is affixed to the windshield.
Doing so interferes with the sensor detecting the level of ambient light and may cause the automatic headlight system to malfunction.
■Automatic light off system
The headlights and tail lights turn off automatically if the “ENGINE START STOP” switch is turned to ACCESSORY mode or turned off and any door except the back door is opened.
To turn the lights on again, turn the “ENGINE START STOP” switch to IGNITION ON mode, or turn the light switch off once and then back to
• or ≡D .
■Automatic headlight leveling system (vehicles with discharge headlights)
The level of the headlights is automatically adjusted according to the number of passengers and the loading condition of the vehicle to ensure that the headlights do not interfere with other road users.
If the “AFS OFF” indicator flashes (vehicles with discharge headlights)
It may indicate a malfunction in the system. Contact your Toyota dealer.
Light reminder buzzer
With the "ENGINE START STOP" switch turned off, if the driver's door is opened while the lights are turned on, a buzzer will sound.
- Customization that can be configured at Toyota dealer
Settings (e.g. light sensor sensitivity) can be changed. (Customizable features → P. 551)
NOTICE
■To prevent battery discharge
Do not leave the lights on longer than necessary when the engine is not running.
2-3. Operating the lights and wipers
Fog light switch
The fog lights secure excellent visibility in difficult driving conditions, such as in rain and fog.
■Front fog light switch
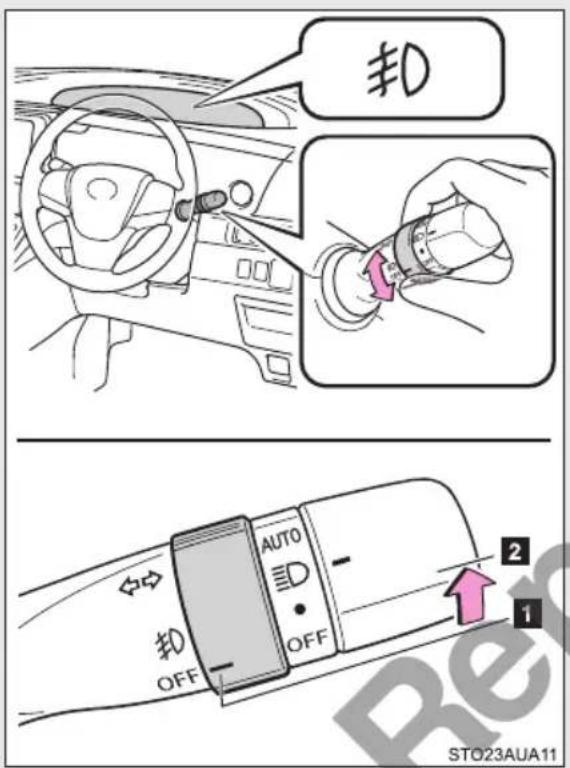
1 OFF Turns the front fog lights off
2 扁 Turns the front fog lights on
■Fog lights can be used when
The headlights or front position lights are turned on.
2-3. Operating the lights and wipers
Windshield wipers and washer
When "INT" is selected, the wiper interval can be adjusted for intermittent operation.
The wiper operation is selected by moving the lever as follows:
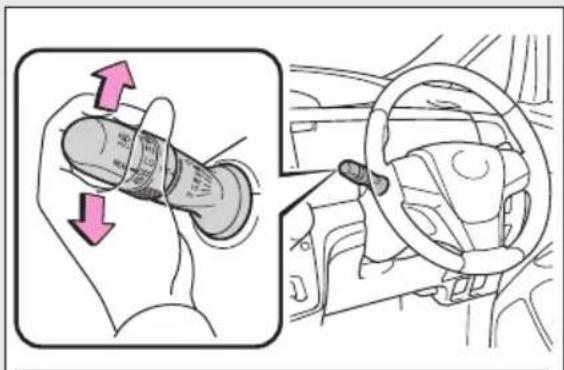
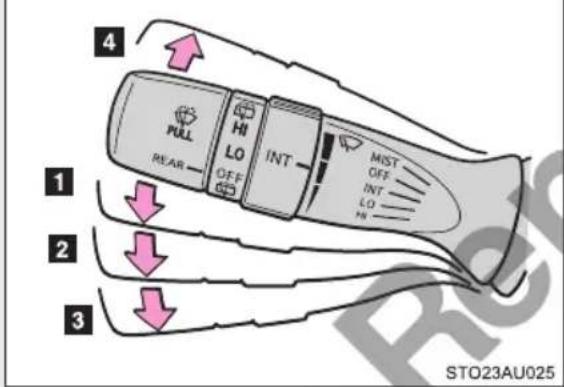
1 INT Intermittent wind-shield wiper operation
2 LO Low speed wind-shield wiper operation
3 HI High speed wind-shield wiper operation
4 MIST Temporary operation
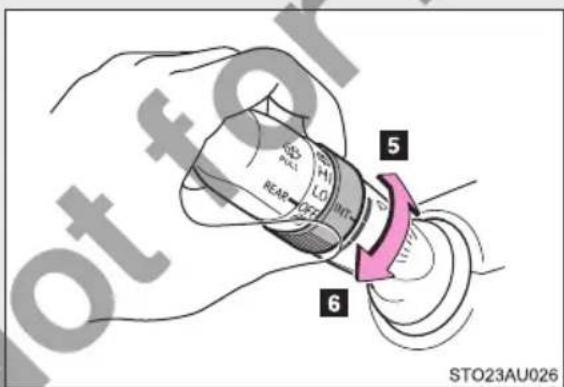
5 Increases the intermittent windshield wiper frequency
6 Decreases the intermittent windshield wiper frequency
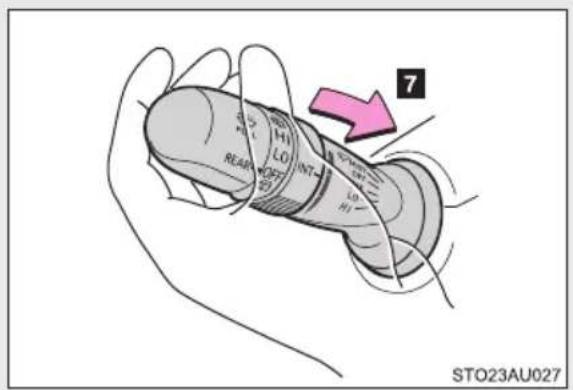
7 Washer/wiper dual operation
The wipers will automatically operate a couple of times after the washer squirts.
The wipers will automatically operate a couple of times after the washer squirts.
The windshield wipers and washer can be operated when
The "ENGINE START STOP" switch is in IGNITION ON mode.
■If no windshield washer fluid sprays
Check that the washer nozzles are not blocked if there is washer fluid in the windshield washer fluid reservoir.

WARNING
■Caution regarding the use of washer fluid
When it is cold, do not use the washer fluid until the windshield becomes warm. The fluid may freeze on the windshield and cause low visibility. This may lead to an accident, resulting in death or serious injury.

NOTICE
■When the windshield is dry
Do not use the wipers, as they may damage the windshield.
■When the washer fluid tank is empty
Do not operate the switch continually as the washer fluid pump may overheat.
■When a nozzle becomes blocked
In this case, contact your Toyota dealer.
Do not try to clear it with a pin or other object. The nozzle will be damaged.
2-3. Operating the lights and wipers
Rear window wiper and washer
The wiper operation is selected by moving the lever as follows:
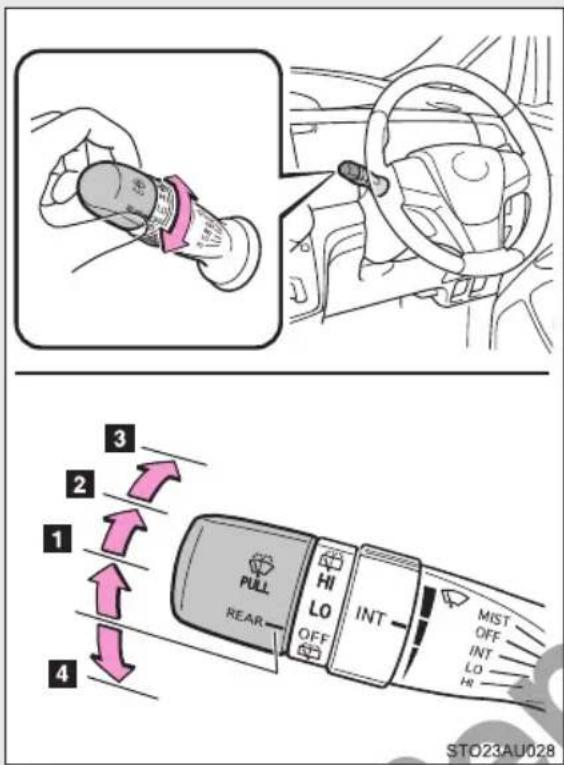
1 LO Intermittent window wiper operation
2 HI Normal window wiper operation
3 Washer/wiper dual operation
4 Washer/wiper dual operation
The rear window wiper and washer can be operated when
The "ENGINE START STOP" switch is in IGNITION ON mode.
If no washer fluid sprays
Check that the washer nozzle is not blocked if there is washer fluid in the washer fluid reservoir.
NOTICE
■When the rear window is dry
Do not use the wiper, as it may damage the rear window.
■When the washer fluid tank is empty
Do not operate the switch continually as the washer fluid pump may overheat.
2-3. Operating the lights and wipers
Headlight cleaner switch\*
Washer fluid can be sprayed on the headlights.
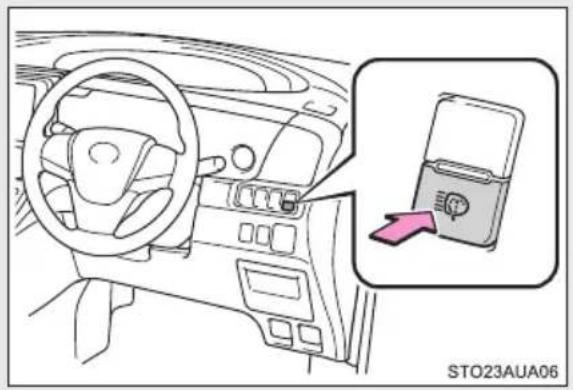
natural_image
Interior view of a car dashboard with steering wheel and dashboard, showing a close-up of the rear seatbelt device (no text or symbols visible)Press the switch to clean the headlights.
■The headlight cleaners can be operated when
The "ENGINE START STOP" switch is in IGNITION ON mode and the head-light switch is turned on.
■Windshield washer linked operation
Only for the first time when the windshield washer is operated with the "ENGINE START STOP" switch in IGNITION ON mode and the headlights on, the headlight cleaners will operate once. (→P. 219)

NOTICE
■When the washer fluid tank is empty
Do not press the switch continually as the washer fluid pump may overheat.
2-4. Using other driving systems
Cruise control
Use the cruise control to maintain a set speed without depressing the accelerator pedal.
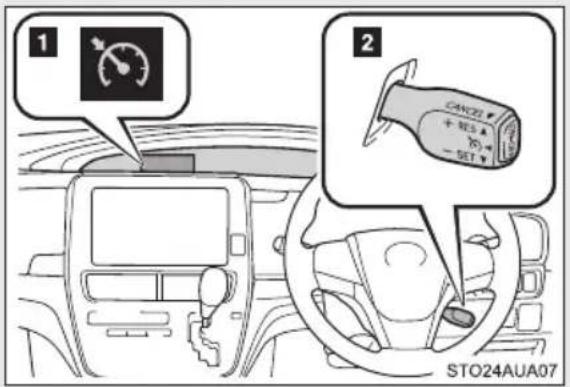
1 Indicator
2 Cruise control switch
Setting the vehicle speed
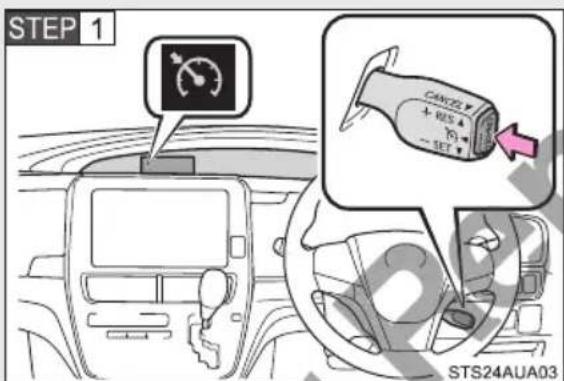
Press the "ON-OFF" button to activate the cruise control.
Cruise control indicator will come on.
Press the button again to deactivate the cruise control.
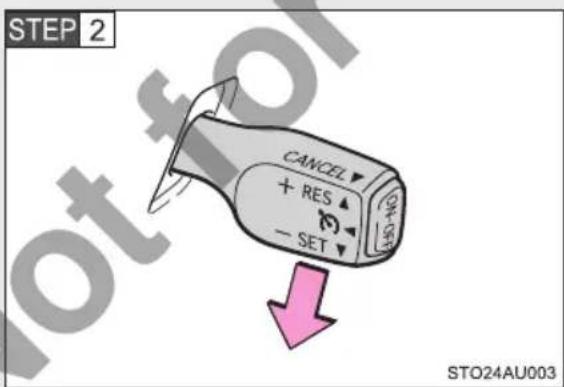
Accelerate or decelerate the vehicle to the desired speed, and push the lever down to set the speed.
The vehicle speed at the moment the lever is released becomes the set speed.
■Adjusting the set speed
To change the set speed, operate the lever until the desired set speed is obtained.

1 Increases the speed
2 Decreases the speed
Fine adjustment: Momentarily move the lever in the desired direction.
Large adjustment: Hold the lever in the desired direction.
The set speed will be increased or decreased as follows:
Fine adjustment: By approximately 1.6 km/h (1 mph) each time the lever is operated.
Large adjustment: The set speed can be increased or decreased continually until the lever is released.
■ Canceling and resuming the constant speed control
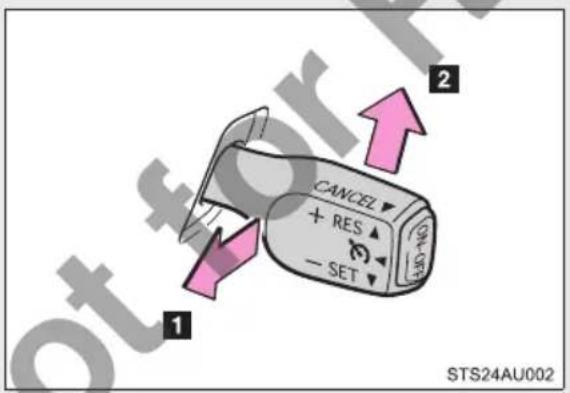
1 Pulling the lever toward you cancels the constant speed control.
The speed setting is also canceled when the brakes are applied.
2 Pushing the lever up resumes the constant speed control.
Resuming is available when the vehicle speed is more than approximately 40 km/h (25 mph).
■ Cruise control can be set when
● Vehicles with a continuously variable transmission: The shift lever is in the D or gear step 4 or higher of M has been selected.
● Vehicles with an automatic transmission: The shift lever is in the D or range 4 or higher of S has been selected.
● Vehicle speed is above approximately 40 km/h (25 mph).
■Accelerating after setting the vehicle speed
●The vehicle can be accelerated normally. After acceleration, the set speed resumes.
● Even without canceling the cruise control, the set speed can be increased by first accelerating the vehicle to the desired speed and then pushing the lever down to set the new speed.
■Automatic cruise control cancellation
Cruise control will stop maintaining the vehicle speed in any of the following situations.
● Actual vehicle speed falls more than approximately 16 km/h (10 mph) below the preset vehicle speed.
At this time, the memorized set speed is not retained.
● Actual vehicle speed is below approximately 40 km/h (25 mph).
●VSC is activated.
If the warning message for the cruise control is shown on the multi-information display
Press the "ON-OFF" button once to deactivate the system, and then press the button again to reactivate the system.
If the cruise control speed cannot be set or if the cruise control cancels immediately after being activated, there may be a malfunction in the cruise control system. Have the vehicle inspected by your Toyota dealer.

WARNING
■To avoid operating the cruise control by mistake
Switch the cruise control off using the "ON-OFF" button when not in use.
■Situations unsuitable for cruise control
Do not use cruise control in any of the following situations.
Doing so may result in loss of control and could cause an accident resulting in death or serious injury.
In heavy traffic
●On roads with sharp bends
●On winding roads
●On slippery roads, such as those covered with rain, ice or snow
●On steep hills
Vehicle speed may exceed the set speed when driving down a steep hill.
- When your vehicle is towing a trailer
2-4. Using other driving systems
Toyota parking assist-sensor\*
The distance from your vehicle to nearby obstacles when parallel parking or maneuvering into a garage is measured by the sensors and communicated via an indicator and a buzzer. Always check the surrounding area when using this system.
■Types of sensors
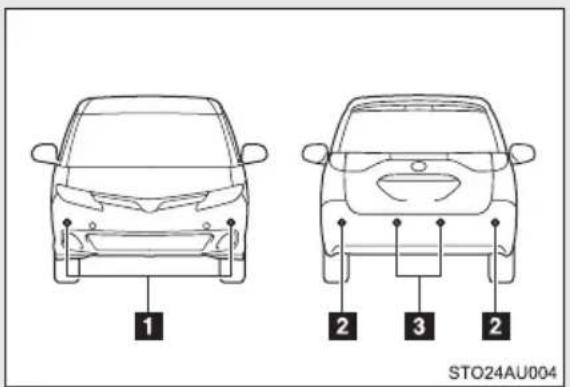
1 Front corner sensors
2 Rear corner sensors
3 Rear center sensors
Toyota parking assist-sensor switch
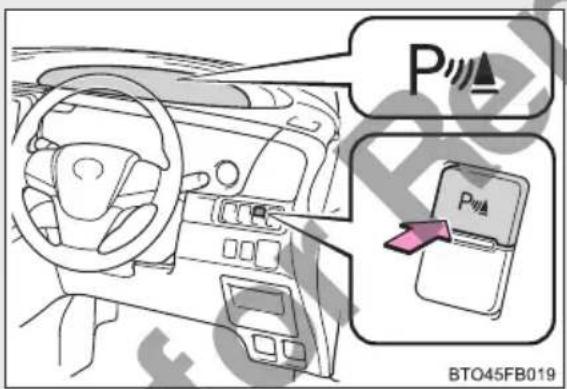
Turns the Toyota parking assist-sensor on/off
When on, the indicator light comes on and the buzzer sounds to inform the driver that the system is operational.
Multi-information display
When the sensors detect an obstacle, the following displays inform the driver of the position and distance to the obstacle.
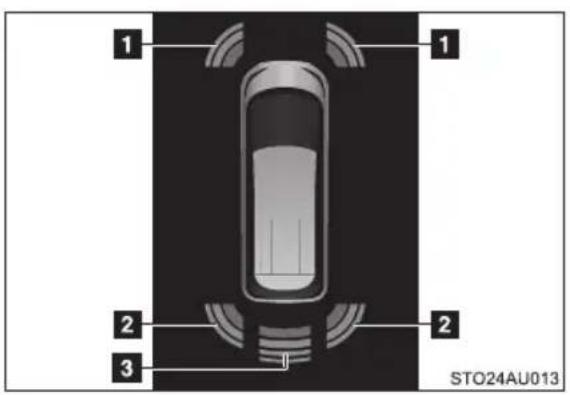
1 Front corner sensor operation
2 Rear corner sensor operation
3 Rear center sensor operation
The distance display and buzzer
When a sensor detects an obstacle, the direction of and the approximate distance to the obstacle are displayed and the buzzer sounds.
■Sensor operation and distance to an obstacle
The system operates when the vehicle approaches an obstacle, as shown by the following table.
| Multi-information display | Buzzer | Approximate distance to obstacle | |
| Front and rear corner sensor | Rear center sensor | ||
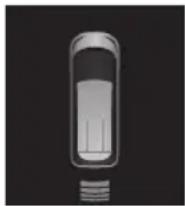 (continuous) (continuous) | Intermittent | 150 cm(4.9 ft.) to60 cm(2.0 ft.) | |
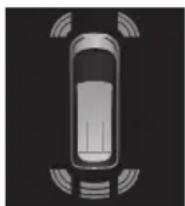 (continuous) (continuous) | Intermittent^*1Fast intermittent^*2 | 60 cm(2.0 ft.) to45 cm(1.5 ft.) | 60 cm(2.0 ft.) to45 cm(1.5 ft.) |
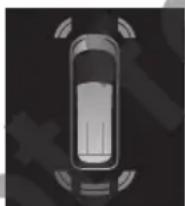 (continuous) (continuous) | Fast intermittent^*1Very fast intermittent^*2 | 45 cm(1.5 ft.) to30 cm(1.0 ft.) | 45 cm(1.5 ft.) to35 cm(1.1 ft.) |
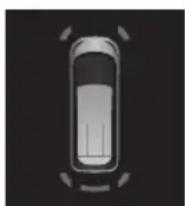 (blinking) (blinking) | Continuous | Less than30 cm(1.0 ft.) | Less than35 cm(1.1 ft.) |
*1: Front and rear corner sensor
*2: Rear center sensor
■Buzzer operation and distance to an obstacle
A buzzer sounds when the corner sensors and center sensors are operating.
●The buzzer beeps faster as the vehicle approaches an obstacle. When the vehicle comes within the following distance of the obstacle, the buzzer sounds continuously.
- Front corner sensors: Approximately 30 cm (1.0 ft.)
- Rear corner sensors: Approximately 30 cm (1.0 ft.)
- Rear center sensors: Approximately 35 cm (1.1 ft.)
- When obstacles are simultaneously detected in front and to the rear:
- The buzzer sounds in response to the nearest obstacle.
- When an obstacle either in front or to the rear is extremely close, the buzzer will alternate between sounding continuously and sounding intermittently.
- When obstacles both in front and to the rear are extremely close, the buzzer will alternate between sounding continuously and sounding intermittently, with a shorter interval.
■ Sensors that operate
Forward Backward
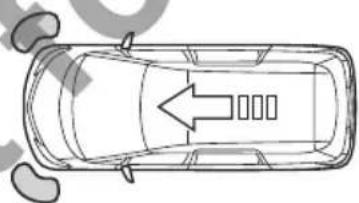
natural_image
Top-down line drawing of a car viewed from the side, showing no text or symbols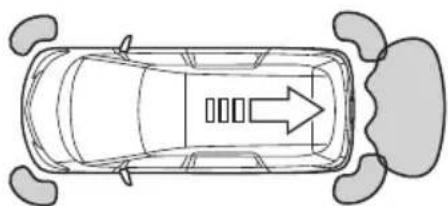
natural_image
Top-down line drawing of a car viewed from the side, showing front wheel and rear wheels (no text or symbols)STO24AU008
Detection range of the sensors
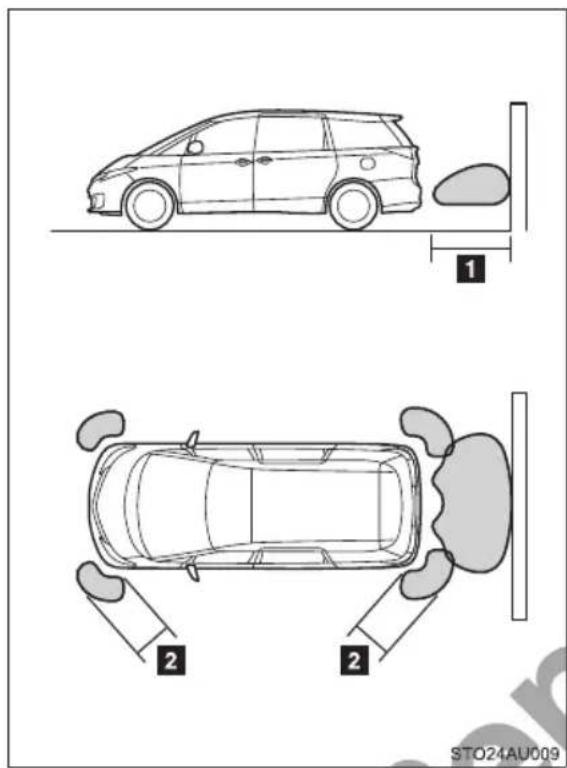
1 Approximately 150 cm (4.9 ft.)
2 Approximately 60 cm (2.0 ft.)
The diagram shows the detection range of the sensors. Note that the sensors cannot detect obstacles that are extremely close to the vehicle.
The range of the sensors may change depending on the shape of the object, etc.
■The Toyota parking assist-sensor can be operated when
The Toyota parking assist-sensor switch is on.
The "ENGINE START STOP" switch is in IGNITION ON mode.
- Front corner sensors:
• The shift lever is in a position other than P.
• The vehicle speed is less than about 10 km/h (6 mph).
- The shift lever is in a position other than P.
- The vehicle speed is less than about 10 ~km / h (6 mph).
- The shift lever is in a position other than P.
- The vehicle speed is less than about 10 ~km / h (6 mph).
- The shift lever is in a position other than P.
- The vehicle speed is less than about 10 ~km / h (6 mph).
- The shift lever is in a position other than P.
- The vehicle speed is less than about 10 ~km / h (6 mph).
- The shift lever is in a position other than P.
- The vehicle speed is less than about 10 ~km / h (6 mph).
- The shift lever is in a position other than P.
- The vehicle speed is less than about 10 ~km / h (6 mph).
- The shift lever is in a position other than P.
- The vehicle speed is less than about 10 ~km / h (6 mph).
- The shift lever is in a position other than P.
- The vehicle speed is less than about 10 ~km / h (6 mph).
- The shift lever is in a position other than P.
- The vehicle speed is less than about 10 ~km / h (6 mph).
■Sensor detection information
● Certain vehicle conditions and the surrounding environment may affect the ability of a sensor to correctly detect an obstacle. Particular instances where this may occur are listed below.
- There is dirt, snow or ice on a sensor. (Wiping the sensors will resolve this problem.)
- The sensor is frozen. (Thawing the area will resolve this problem.) In especially cold weather, if a sensor is frozen the screen may show an abnormal display, or obstacles may not be detected.
- The sensor is covered in any way.
- The vehicle is leaning considerably to one side.
- On an extremely bumpy road, on an incline, on gravel, or on grass.
- The vicinity of the vehicle is noisy due to vehicle horns, motorcycle engines, air brakes of large vehicles, or other loud noises producing ultrasonic waves.
- There is another vehicle equipped with parking assist sensors in the vicinity.
- The sensor is coated with a sheet of spray or heavy rain.
- The vehicle is equipped with a fender pole or radio antenna.
- Towing eyelet is installed.
- The bumper or sensor receives a strong impact.
- The vehicle is approaching a tall or right-angled curb.
- In harsh sunlight or intense cold weather.
- The area directly under the bumpers is not detected.
- If obstacles draw too close to the sensor.
- A non-genuine Toyota suspension (lowered suspension, etc.) is installed.
In addition to the examples above, there are instances in which, because of their shape, signs and other objects may be judged by a sensor to be closer than they are.
●The shape of the obstacle may prevent a sensor from detecting it. Pay particular attention to the following obstacles:
- Wires, fences, ropes, etc.
- Cotton, snow and other materials that absorb sound waves
- Sharply-angles objects
- Low obstacles
- Tall obstacles with upper sections projecting outwards in the direction of your vehicle
- A person near the vehicle (depending on the type of clothers worn)
■When to contact your Toyota dealer
In the following cases, have your Toyota dealer check the system.
●When the bumper is damaged.
- When the indicator is continuously on.

WARNING
■Caution when using the Toyota parking assist-sensor
Observe the following precautions.
Failing to do so may result in the vehicle being unable to be driven safely and possibly cause an accident.
- Do not use the sensor at speeds in excess of 10 km/h (6 mph).
- Do not attach any accessories within the sensor range.

NOTICE
Notes when washing the vehicle
Do not apply intensive bursts of water or steam to the sensor area.
Doing so may result in the sensor malfunctioning.
2-4. Using other driving systems
Driving assist systems
To help enhance driving safety and performance, the following systems operate automatically in response to various driving situations. Be aware, however, that these systems are supplementary and should not be relied upon too heavily when operating the vehicle.
■ABS (Anti-lock Brake System)
Helps to prevent wheel lock when the brakes are applied suddenly, or if the brakes are applied while driving on a slippery road surface
Brake assist
Generates an increased level of braking force after the brake pedal is depressed when the system detects a panic stop situation
■VSC (Vehicle Stability Control)
Helps the driver to control skidding when swerving suddenly or turning on slippery road surfaces
Provides cooperative control of the ABS, TRC, VSC and EPS.
Helps to maintain directional stability when swerving on slippery road surfaces by controlling steering performance.
■TRC (Traction Control)
Helps to maintain drive power and prevent the drive wheels from spinning when starting the vehicle or accelerating on slippery roads
Hill-start assist control
Helps to prevent the vehicle from rolling backward when starting on an incline slippery slope
■EPS (Electric Power Steering)
Employs an electric motor to reduce the amount of effort needed to turn the steering wheel
Emergency brake signal
When the brakes are applied suddenly, the emergency flashers automatically flash to alert the vehicle behind.
When the TRC/VSC systems are operating
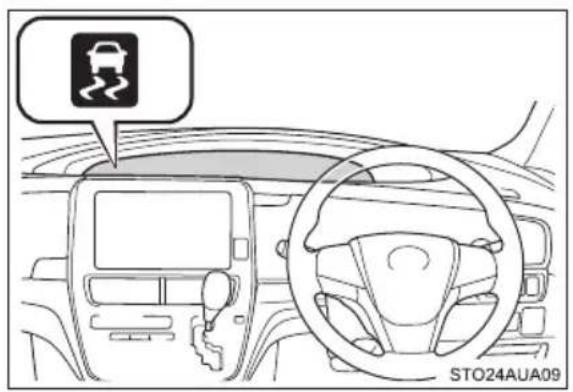
The slip indicator light will flash while the TRC/VSC systems are operating.
Disabling the TRC systems
If the vehicle gets stuck in mud, dirt or snow, the TRC system may reduce power from the engine to the wheels. Pressing to turn the system off may make it easier for you to rock the vehicle in order to free it.
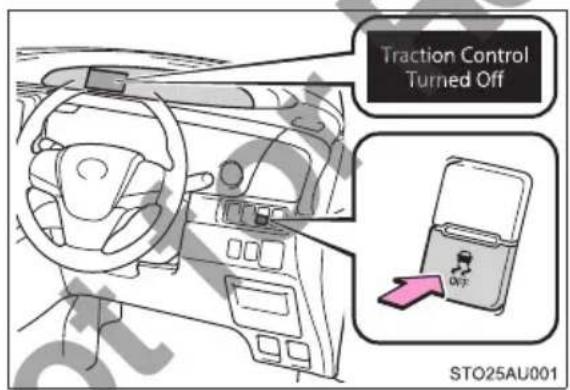
To turn the TRC system off, quickly press and release . OFF
The "Traction Control Off" will be shown on the multi-information display.
Press again to turn the system back on.
■Turning off both TRC and VSC systems
To turn the TRC and VSC systems off, press and hold for more than 3 seconds while the vehicle is stopped.
The VSC OFF indicator light will come on and the “Traction Control Turned Off” will be shown on the multi-information display.
Press again to turn the systems back on.
When the "TRC OFF" indicator light comes on even if has not been pressed
TRC cannot be operated. Contact your Toyota dealer.
■ Sounds and vibrations caused by the ABS, brake assist, TRC, VSC and hill-start assist control systems
- A sound may be heard from the engine compartment when the brake pedal is depressed repeatedly, when the engine is started or just after the vehicle begins to move. This sound does not indicate that a malfunction has occurred in any of these systems.
-
Any of the following conditions may occur when the above systems are operating. None of these indicates that a malfunction has occurred.
-
Vibrations may be felt through the vehicle body and steering.
- A motor sound may be heard after the vehicle comes to a stop.
- The brake pedal may pulsate slightly after the ABS is activated.
- The brake pedal may move down slightly after the ABS is activated.
EPS operation sound
When the steering wheel is operated, a motor sound (whirring sound) may be heard. This does not indicate a malfunction.
■ Automatic reactivation of TRC and VSC systems
After turning the TRC and VSC systems off, the systems will be automatically re-enabled in the following situations:
- When the "ENGINE START STOP" switch is turned off
- If only the TRC system is turned off, the TRC will turn on when vehicle speed increases
If both the TRC and VSC systems are turned off, automatic re-enabling will not occur when vehicle speed increases.
■Operating conditions of hill-start assist control
When the following four conditions are met, the hill-start assist control will operate:
●The shift lever is in a position other than P or N (when starting off forward/backward on an upward incline).
●The vehicle is stopped.
●The accelerator pedal is not depressed.
●The parking brake is not engaged.
■Automatic system cancelation of hill-start assist control
The hill-start assist control will turn off in any of the following situations:
●The shift lever is moved to P or N.
●The accelerator pedal is depressed.
●The parking brake is engaged.
- Approximately 2 seconds elapse after the brake pedal is released.
■Reduced effectiveness of the EPS system
The effectiveness of the EPS system is reduced to prevent the system from overheating when there is frequent steering input over an extended period of time. The steering wheel may feel heavy as a result. Should this occur, refrain from excessive steering input or stop the vehicle and turn the engine off. The EPS system should return to normal within 10 minutes.
If the slip indicator light comes on...
It may indicate a malfunction in the driving assist systems. Contact your Toyota dealer.
■ Operating conditions of emergency brake signal
When the following three conditions are met, the emergency brake signal will operate:
The emergency flashers are off.
●Actual vehicle speed is over 55 km/h (35 mph).
●The brake pedal is depressed in a manner that cause the system to judge from the vehicle deceleration that this is a sudden braking operation.
■Automatic system cancelation of emergency brake signal
The emergency brake signal will turn off in any of the following situations:
●The emergency flashers are turned on.
●The brake pedal is released.
●The system judges from the vehicle deceleration that is not a sudden braking operation.

WARNING
■The ABS does not operate effectively when
●The limits of tire gripping performance have been exceeded (such as excessively worn tires on a snow covered road).
●The vehicle hydroplanes while driving at high speed on wet or slick roads.
■Stopping distance when the ABS is operating may exceed that of normal conditions
The ABS is not designed to shorten the vehicle's stopping distance. Always maintain a safe distance from the vehicle in front of you, especially in the following situations:
- When driving on dirt, gravel or snow-covered roads
●When driving with tire chains
●When driving over bumps in the road - When driving over roads with potholes or uneven surfaces
■TRC may not operate effectively when
Directional control and power may not be achievable while driving on slippery road surfaces, even if the TRC system is operating.
Drive the vehicle carefully in conditions where stability and power may be lost.

WARNING
■Hill-start assist control does not operate effectively when
- Do not overly rely on the hill-start assist control. The hill-start assist control may not operate effectively on steep inclines and roads covered with ice.
●Unlike the parking brake, hill-start assist control is not intended to hold the vehicle stationary for an extended period of time. Do not attempt to use hill-start assist control to hold the vehicle on an incline, as doing so may lead to an accident.
■When the VSC is activated
The slip indicator light flashes. Always drive carefully. Reckless driving may cause an accident. Exercise particular care when the indicator light flashes.
■When the TRC/VSC systems are turned off
Be especially careful and drive at a speed appropriate to the road conditions. As these are the systems to help ensure vehicle stability and driving force, do not turn the TRC/VSC systems off unless necessary.
■Replacing tires
Make sure that all tires are of the specified size, brand, tread pattern and total load capacity. In addition, make sure that the tires are inflated to the recommended tire inflation pressure level.
The ABS, TRC and VSC systems will not function correctly if different tires are installed on the vehicle.
Contact your Toyota dealer for further information when replacing tires or wheels.
■Handling of tires and the suspension
Using tires with any kind of problem or modifying the suspension will affect the driving assist systems, and may cause a system to malfunction.
2-5. Driving information
Cargo and luggage
Take notice of the following information about storage precautions, cargo capacity and load:
●Stow cargo and luggage in the luggage compartment whenever possible.
●Be sure all items are secured in place.
●To maintain vehicle balance while driving, position luggage evenly within the luggage compartment.
●For better fuel economy, do not carry unnecessary weight.
■Roof luggage carrier (if equipped)
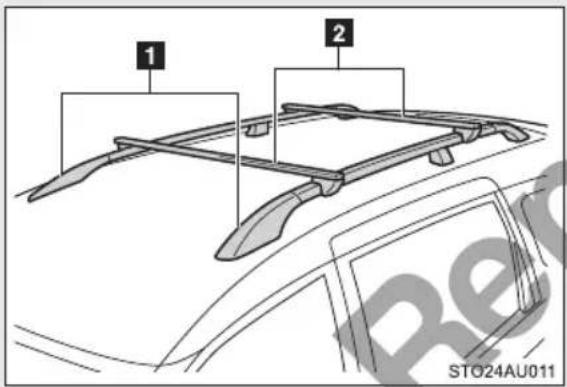
1 Roof rails
2 Cross rails
To use the roof rails as a roof luggage carrier, you must fit the roof rails with two or more genuine Toyota cross rails or their equivalent.
Follow the manufacturer's instructions and precautions when installing the cross rails or their equivalent.

WARNING
■Things that must not be carried in the luggage compartment
The following things may cause a fire if loaded in the luggage compartment:
●Receptacles containing gasoline
Aerosol cans
■Storage precautions
Observe the following precautions.
Failure to do so may result in death or serious injury.
●Stow cargo and luggage in the luggage compartment whenever possible.
- Do not stack anything in the luggage compartment higher than the seatbacks.
Such items may be thrown about and possibly injure people in the vehicle in the event of sudden braking or in an accident.
- Do not place cargo or luggage in or on the following locations as the item may get under the brake or accelerator pedal and prevent the pedals from being depressed properly, block the driver's vision, or hit the driver or passengers, causing an accident:
- At the feet of the driver
- On the front passenger or rear seats (when stacking items)
- On the instrument panel
-
On the dashboard
-
Secure all items in the occupant compartment, as they may shift and injure someone during sudden braking, sudden swerving or an accident.
- When you fold down the rear seats, long items should not be place directly behind the front seats.
● Never allow anyone to ride in the luggage compartment. It is not designed for passengers. They should ride in their seats with their seat belts properly fastened. Otherwise, they are much more likely to suffer death or serious bodily injury, in the event of sudden braking, sudden swerving or an accident.

WARNING
■Load and distribution
- Do not overload your vehicle.
- Do not apply loads unevenly. Improper loading may cause deterioration of steering or braking control which may cause death or serious injury.
■Roof luggage carrier precautions
Observe the following precautions:
- Place the cargo so that its weight is distributed evenly between the front and rear axles.
- If loading long or wide cargo, never exceed the vehicle overall length or width. (→P. 536)
●Before driving, make sure the cargo is securely fastened on the roof luggage carrier. - Loading cargo on the roof luggage carrier will make the center of the vehicle gravity higher. Avoid high speeds, sudden starts, sharp turns, sudden braking or abrupt maneuvers, otherwise it may result in loss of control or vehicle rollover due to failure to operate this vehicle correctly and result in death or serious injury.
- If driving for a long distance, on rough roads, or at high speeds, stop the vehicle now and then during the trip to make sure the cargo remains in its place.
- Do not exceed 75 kg (165 lb.) cargo weight on the roof luggage carrier.

NOTICE
When loading cargo (vehicles with moon roofs)
Be careful not to scratch the surface of the moon roofs.
Carry out the necessary preparations and inspections before driving the vehicle in winter. Always drive the vehicle in a manner appropriate to the prevailing weather conditions.
■Pre-winter preparations
- Use fluids that are appropriate to the prevailing outside temperatures.
- Engine oil
- Engine coolant
- Washer fluid
●Have a service technician inspect the condition of the battery.
●Have the vehicle fitted with four snow tires or purchase a set of tire chains for the front tires.
Ensure that all tires are the same size and brand, and that their wear level is not noticeably different with each other. Also make sure that chains match the size of the tires.
■Before driving the vehicle
Perform the following according to the driving conditions:
- Do not try to forcibly open a window or move a wiper that is frozen. Pour warm water over the frozen area to melt the ice. Wipe away the water immediately to prevent it from freezing.
●To ensure proper operation of the climate control system fan, remove any snow that has accumulated on the air inlet vents in front of the windshield. - Check for and remove any excess ice or snow that may have accumulated on the exterior lights, vehicle's roof, chassis, around the tires or on the brakes.
- Remove any snow or mud from the bottom of your shoes before getting in the vehicle.
■When driving the vehicle
Accelerate the vehicle slowly, keep a safe distance between you and the vehicle ahead, and drive at a reduced speed suitable to road conditions.
■When parking the vehicle
●Park the vehicle and move the shift lever to P without setting the parking brake. The parking brake may freeze up, preventing it from being released. If the vehicle is parked without setting the parking brake, make sure to block the wheels. Failure to do so may be dangerous because it may cause the vehicle to move unexpectedly, leading to an accident.
- If the vehicle is parked without setting the parking brake, confirm that the shift lever cannot be moved out of P^* .
*: The shift lever will be locked if it is attempted to be shifted from P to any other position without depressing the brake pedal. If the shift lever can be shifted from P, there may be a problem with the shift lock system. Have the vehicle inspected by your Toyota dealer immediately.
Selecting tire chains
Use the correct tire chain size when mounting the tire chains. Chain size is regulated for each tire size.
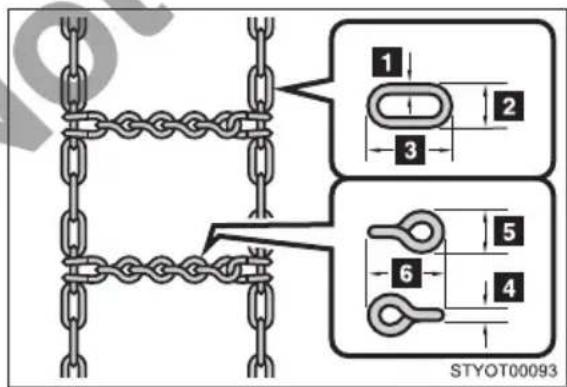
Side chain
13 mm (0.12 in.) in diameter
2 10 mm (0.39 in.) in width
3 30 mm (1.18 in.) in length
Cross chain
4 mm (0.16 in.) in diameter
5 14 mm (0.55 in.) in width
6 25 mm (0.98 in.) in length
Regulations on the use of tire chains
Regulations regarding the use of tire chains vary depending on location and type of road. Always check local regulations before installing chains.
■Tire chain installation
Observe the following precautions when installing and removing chains:
● Install and remove tire chains in a safe location.
- Install tire chains on the front tires only. Do not install tire chains on the rear tires.
- Install tire chains on front tires as tightly as possible. Retighten chains after driving 0.5 — 1.0 km (1/4 — 1/2 mile).
- Install tire chains following the instructions provided with the tire chains.
- If wheel ornaments are used, they will be scratched by the chain band, so remove the ornaments before putting on the chains. (→P. 504)

WARNING
■Driving with snow tires
Observe the following precautions to reduce the risk of accidents.
Failure to do so may result in a loss of vehicle control and cause death or serious injury.
● Use tires of the specified size.
●Maintain the recommended level of air pressure.
- Do not drive at speeds in excess of the speed limit or the speed limit specified for the snow tires being used.
●Use snow tires on all, not just some wheels.
- Do not use tires of noticeably different wear level.
■Driving with tire chains
Observe the following precautions to reduce the risk of accidents.
Failure to do so may result in the vehicle being unable to be driven safely, and may cause death or serious injury.
- Do not drive in excess of the speed limit specified for the tire chains being used, or 50 km/h (30 mph), whichever is lower.
●Avoid driving on bumpy road surfaces or over potholes.
● Avoid sudden acceleration, abrupt steering, sudden braking and shifting operations that cause sudden engine braking.
● Slow down sufficiently before entering a curve to ensure that vehicle control is maintained.
Your vehicle is designed primarily as a passenger carrying vehicle. Towing a trailer will have an adverse effect on handling, performance, braking, durability, and fuel consumption. Your safety and satisfaction depend on the proper use of correct equipment and cautious driving habits. For your safety and the safety of others, do not overload the vehicle or trailer.
To tow a trailer safely, use extreme care and drive the vehicle in accordance with the trailer's characteristics and operating conditions.
Toyota warranties do not apply to damage or malfunction caused by towing a trailer for commercial purposes.
For towing purposes, when the total trailer weight is greater than the vehicle weight, we recommend use of a sway control device.
Weight limits
Confirm that the total trailer weight, gross vehicle weight, gross axle weight and trailer tongue load are all within the limits.
■ Gross vehicle weight
The gross vehicle weight must not exceed the following.
2AZ-FE engine: 2430 kg (5357 lb.)
2GR-FE engine: 2500 kg (5512 lb.)
The gross vehicle weight is the sum weight of the unloaded vehicle, driver, passengers, luggage, hitch and trailer tongue load. Also included is the weight of any special equipment installed on your vehicle.
Gross axle weight
The load on either the front or rear axle resulting from distribution of the gross vehicle weight on both axles must not exceed the following:
Front: 1270 kg (2799 lb.)
Rear: 1340 kg (2954 lb.)
Trailer tongue load
The trailer cargo load should be distributed so that the tongue load is 9 to 11% of the total trailer weight, not exceeding 160 kg (352 lb.).
(Tongue load/Total trailer weight × 100 = 9 to 11%)
The total trailer weight and tongue load can be measured with platform scales found at highway weighing stations, building supply companies, trucking companies, junk yards, etc.
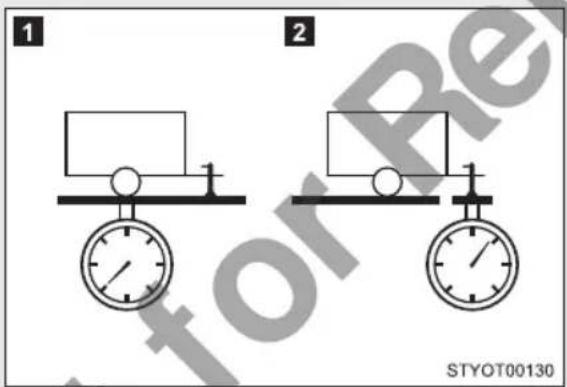
1 Total trailer weight
2 Tongue load
Towing a trailer
Contact your Toyota dealer for further information about additional requirements such as a towing kits, etc.
Hitch
Trailer hitch assemblies have different weight capacities established by the hitch manufacturer. Even though the vehicle may be rated for towing a higher weight, the operator must never exceed the maximum weight rating specified for the trailer hitch.
Before towing
Check that the following conditions are met:
The vehicle's tires are properly inflated. (→P. 547)
- Trailer tires are inflated according to the trailer manufacturer's recommendation.
●All trailer lights work.
● All lights work each time you connect them.
●The trailer ball is set up at the proper height for the coupler on the trailer.
●The trailer is level when it is hitched.
Do not drive if the trailer is not level, and check for improper tongue weight, overloading, worn suspension, or other possible causes.
●The trailer cargo is securely loaded.
- The rear view mirrors conform to all applicable federal, state/provincial or local regulations. If they do not, install rear view mirrors appropriate for towing purposes.
Break-in schedule
Toyota recommends that you do not use a new vehicle or a vehicle with any new power train components (engine, transmission, differential, wheel bearings, etc.) to tow a trailer for the first 800 km (500 miles) of driving.
Maintenance
- If you tow a trailer, your vehicle will require more frequent maintenance due to the additional load. (See “Warranty and Service Booklet”.)
- Retighten the fixing bolts of the towing ball and bracket after approximately 1000 km (600 miles) of trailer towing.

WARNING
■To avoid accident or injury
●The total trailer weight (trailer weight plus the weight of cargo) must not exceed 1600 kg (3527 lb.).
- Do not exceed the trailer hitch assembly weight, gross vehicle weight, gross axle weight and trailer tongue load capacities.
●Never load more weight in the back than in the front of the trailer. About 60% of the load should be in the front half of the trailer, and the remaining 40% in the rear.
- Do not use cruise control when you are towing.
- Do not tow a trailer when the compact spare tire is installed on your vehicle.
Hitches
- Use only a hitch that conforms to the total trailer weight requirement.
●Follow the directions supplied by the hitch manufacturer.
● Depending on the type of trailer coupler you use, the trailer ball may need to be coated with grease. If so, apply grease to the trailer ball in accordance with the instructions of the manufacturer of the trailer coupler. - Remove the trailer hitch whenever you are not towing a trailer. After removing the hitch, seal any mounting holes in the vehicle body to prevent entry of any substances into the vehicle.
■When towing a trailer
- If the total trailer weight exceeds 600 kg (1323 lb.), trailer brakes are required.
- Never tap into your vehicle's hydraulic system, as this will lower the vehicle's braking effectiveness.
● Never tow a trailer without using a safety chain securely attached to both the trailer and the vehicle. If damage occurs to the coupling unit or hitch ball, there is a risk of the trailer wandering into another lane.

NOTICE
■When installing a trailer hitch
- Use only the position recommended by your Toyota dealer. Do not install the trailer hitch on the bumper; this may cause body damage.
- Do not use axle-mounted hitches, as they can cause damage to the axle housing, wheel bearings, wheels or tires.
Brakes
Toyota recommends trailers with brakes that conform to all applicable federal and state/provincial regulations.
■Do not directly splice trailer lights
Directly splicing trailer lights may damage your vehicle's electrical system and cause a malfunction.
Trailer towing tips
Your vehicle will handle differently when towing a trailer. In order to avoid accident, death or serious injury, keep the following in mind when towing:
●Before starting out, check the trailer lights and the vehicle-trailer connections. Recheck after driving a short distance.
●Practice turning, stopping and reversing with the trailer attached in an area away from traffic until you become accustomed to the feel of the vehicle.
●Reversing with a trailer attached is difficult and requires practice. Grip the bottom of the steering wheel and move your hand to the left to move the trailer to the left. Move your hand to the right to move the trailer to right. (This is generally opposite to reversing without a trailer attached.) Avoid sharp or prolonged turning. Have someone guide you when reversing to reduce the risk of an accident.
●As stopping distance is increased when towing a trailer, vehicle-to-vehicle distance should be increased. For each 16 km/h (10 mph) of speed, allow at least one vehicle and trailer length.
●Avoid sudden braking as you may skid, resulting in jackknifing and loss of control. This is especially true on wet or slippery surfaces.
●Avoid jerky starts or sudden acceleration.
●Avoid jerky steering and sharp turns, and slow down before making turns.
●Note that when making a turn, the trailer wheels will be closer than the vehicle wheels to the inside of the turn. Compensate by making a larger than normal turning radius.
●Crosswinds and rough roads will adversely affect handling of your vehicle and trailer, causing sway. Periodically check the rear to prepare for being passed by large trucks or buses, which may cause your vehicle and trailer to sway. If swaying occurs, firmly grip the steering wheel, reduce speed immediately but gradually, and steer straight ahead. Never increase speed. If you make no extreme correction with the steering or brakes, your vehicle and trailer will stabilize.
●Take care when passing other vehicles. Passing requires considerable distance. After passing a vehicle, do not forget the length of your trailer, and be sure you have plenty of room before changing lanes.
●Vehicles with a continuously variable transmission: To maintain engine braking efficiency and charging system performance when using engine braking, do not use the transmission in D, must be in M and select gear step 4 or lower. (→P. 187)
●Vehicles with an automatic transmission: To maintain engine braking efficiency and charging system performance when using engine braking, do not use the transmission in D. Transmission shift range position must be in 4 or 5, in S mode. (→P. 193)
- Due to the added load of the trailer, your vehicle's engine may overheat on hot days (at temperatures over 30^ [85°F]) when driving up a long or steep grade. If the high engine coolant temperature warning light comes on, immediately turn off the air conditioning (if in use), pull your vehicle off the road and stop in a safe spot. ( P. 528)
●Always place wheel blocks under both the vehicle and the trailer wheels when parking. Apply the parking brake firmly, and put the transmission in P. Avoid parking on a slope, but if unavoidable, do so only after performing the following:
STEP 1 Apply the brakes and keep them applied.
STEP 2 Have someone place wheel blocks under both the vehicle and trailer wheels.
STEP 3 When the wheel blocks are in place, release the brakes slowly until the blocks absorb the load.
STEP 4 Apply the parking brake firmly.
STEP 5 Shift into P and turn off the engine.
●When restarting after parking on a slope:
STEP 1 With the transmission in P depressed, start the engine. Be sure to keep the brake pedal depressed.
STEP 2 Shift into a forward gear. If reversing, shift into R.
STEP 3 Release the parking brake (also brake pedal), and slowly pull or back away from the wheel blocks. Stop and apply the brakes.
STEP 4 Have someone retrieve the blocks.

WARNING
■To avoid an accident
- Observe the legal maximum speeds for trailer towing.
- Slow down and downshift before descending steep or long downhill grades. Do not make sudden downshifts while descending steep or long downhill grades.
- Avoid holding the brake pedal down too long or applying the brakes too frequently. This could cause the brakes to overheat and result in reduced braking efficiency.
3-1. Using the air conditioning system and defogger
Front automatic air conditioning system...... 258
Rear air conditioning system 272
Rear cooler system...... 275
Rear window defogger..... 277
3-2. Using the audio system
Audio system types...... 278
Using the radio.... 280
Using the CD player...... 282
Playing back MP3 and WMA discs.... 288
Optimal use of the audio system 295
Using the steering wheel audio switches.... 298
Interior features
3
3-3. Using the rear seat entertainment system
Rear seat entertainment system features.... 301
Playing a Blu-ray Disc™ (BD) and DVD disc...... 315
Playing an audio CD and MP3/WMA discs.... 340
Playing an SD card...... 345
Using the video mode..... 352
3-4. Using the interior lights
Interior lights list.... 354
• Personal lights...... 355
- Interior light 355
3-5. Using the storage features
List of storage features..... 357
•Glove box 359
- Console box 359
• Cup holders...... 361
- Bottle holders 362
• Auxiliary boxes ...... 364
3-6. Other interior features
Sun visors.... 366
Vanity mirrors.... 367
Conversation mirror...... 368
Clock 369
Outside temperature display 370
Power outlets...... 371
Seat heaters 373
Armrest 375
Assist grips 377
Floor mat.... 378
Luggage compartment features.... 380
3-1. Using the air conditioning system and defogger Front automatic air conditioning system
Air outlets and fan speed are automatically adjusted according to the temperature setting.
Type A
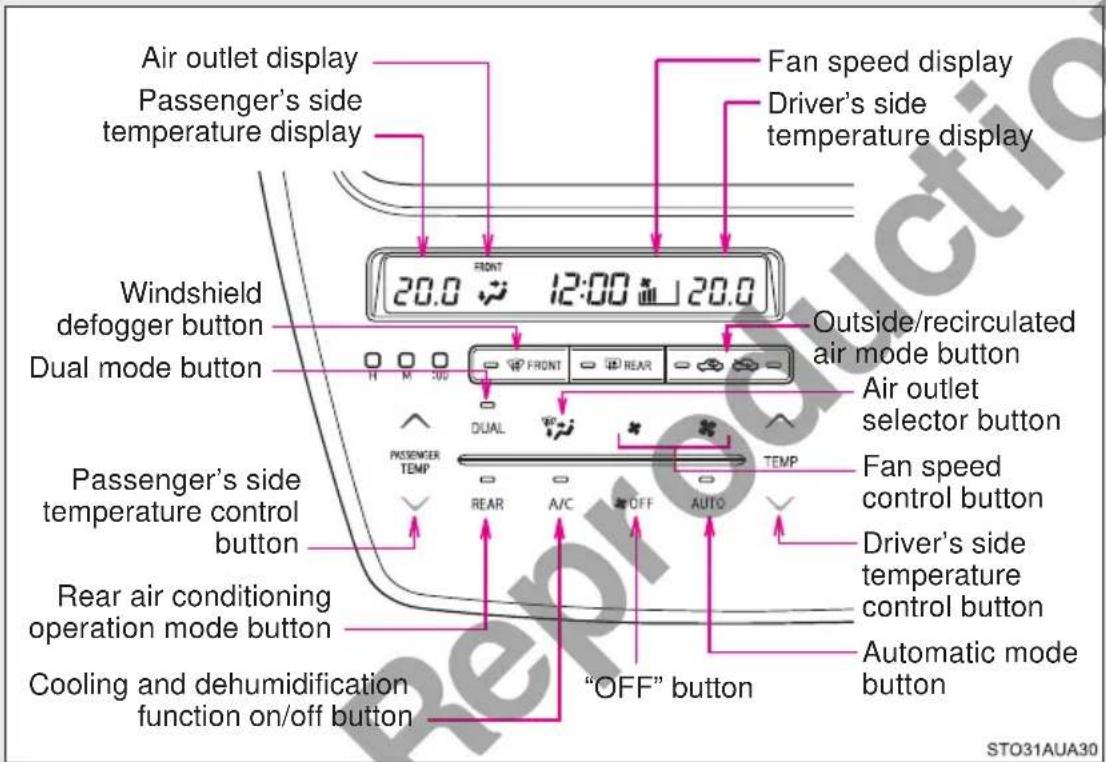
Type B
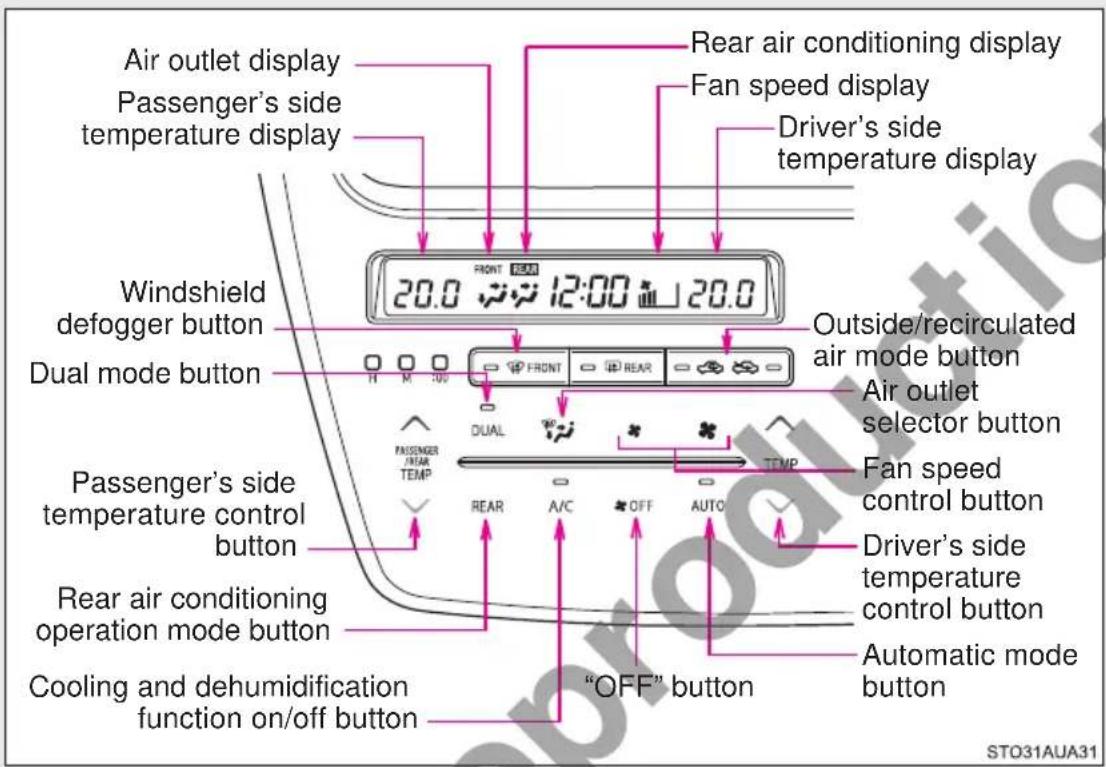
Using the automatic mode
STEP 1 Touch
AUTO
The air conditioning system begins to operate. Air outlets and fan speed are automatically adjusted according to the temperature setting.
STEP 2 Touch “^” on

to increase the temperature and "v" to
decrease the temperature.
When is touched (the indicator on is on) or the passenger's side temperature control button is touched, the temperature for the driver and passenger seats can be adjusted separately.
■Automatic mode indicator
If the fan speed setting or air flow modes are operated, the automatic mode indicator goes off. However, automatic mode for functions other than that operated are maintained.
Adjusting the settings manually
STEP 1 To adjust the fan speed, touch (increase) to increase the fan speed and (decrease) to decrease the fan speed.
Touch to turn the fan off.
STEP 2 To adjust the temperature setting, touch “^” on to
increase the temperature and “√” to decrease the temperature.
When is touched (the indicator on is on) or the passenger's side temperature control button is touched, the temperature for the driver and passenger seats can be adjusted separately.
STEP 3 To change the air outlets, touch .
The air outlets used are switched each time is touched.
Defogging the windshield
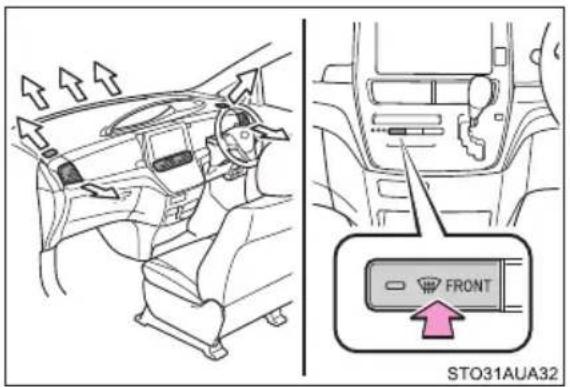
Press FRONT.
The dehumidification function operates and fan speed increases.
Set the outside/recirculated air mode button to the outside air mode if the recirculated air mode is used. (It may switch automatically.)
To defog the windshield and the side windows early, turn the air flow and temperature up.
To return to the previous mode, press again when the windshield is defogged.
Air outlets and air flow
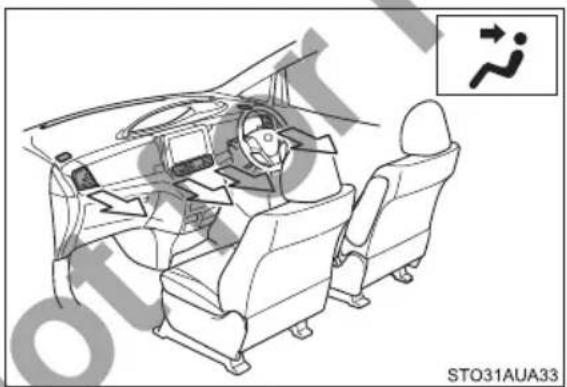
natural_image
Interior view of a car dashboard and steering wheel (no text or symbols visible)Air flows to the upper body.
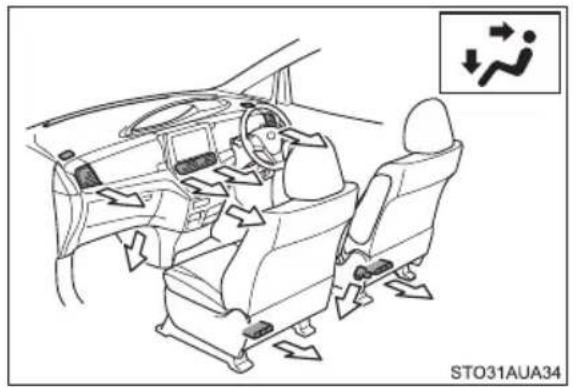
natural_image
Interior view of a car showing steering wheel, dashboard, and seatbelt (no text or symbols)Air flows to the upper body and feet.
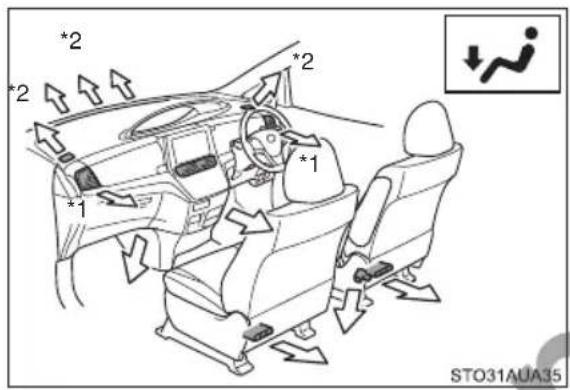
Air flows mainly to the feet.
*1: When the warming function is operating, air flows to the upper body as well to warm the upper body effectively.
*2: Automatic mode only.
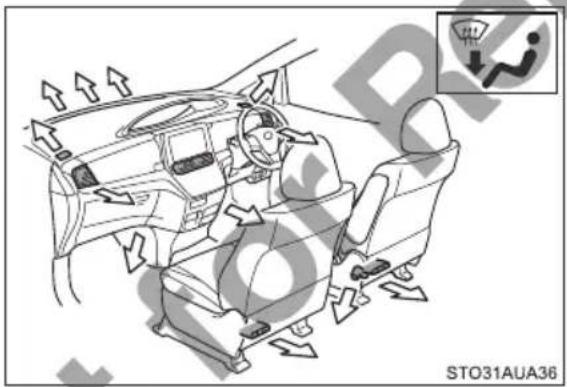
Air flows to the feet and the windshield defogger operates.
Switching between outside air and recirculated air modes
Press
The mode switches between (recycles air inside the vehicle) and
(introduces air from outside the vehicle) modes each time the button is pressed.
Changing the rear seat settings from the front seat (vehicles with a rear air conditioning system)
To change the rear seat settings, touch and "REAR" appears on the rear air conditioning display.
To return to the front seat settings, touch again.
STEP 1 To adjust the fan speed, touch (increase) to increase the fan speed and (decrease) to decrease the fan speed.
Touch to turn the fan off.
STEP 2 To adjust the temperature setting, touch “^” on TEMP to increase the temperature and “√” to decrease the temperature.
STEP 3 To change the air outlets, touch .
The air outlets used are switched each time is touched (→P. 272).
Adjusting the position of the air outlets
Front center outlets
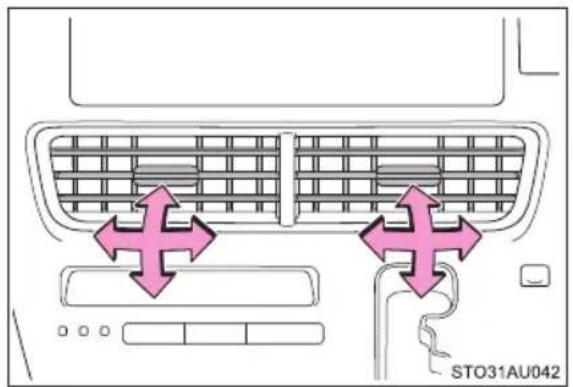
Direct air flow to the left or right, up or down.
Front side outlets
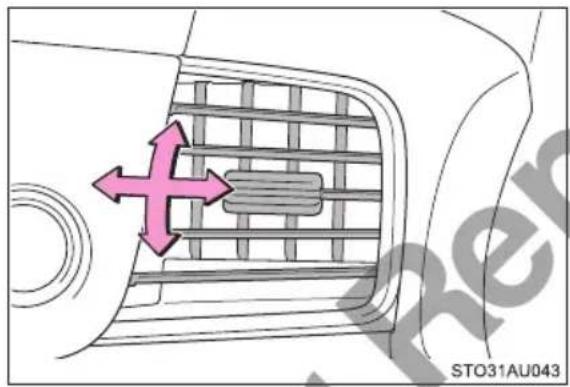
Direct air flow to the left or right, up or down.
Opening and closing the air outlets
Right side outlet
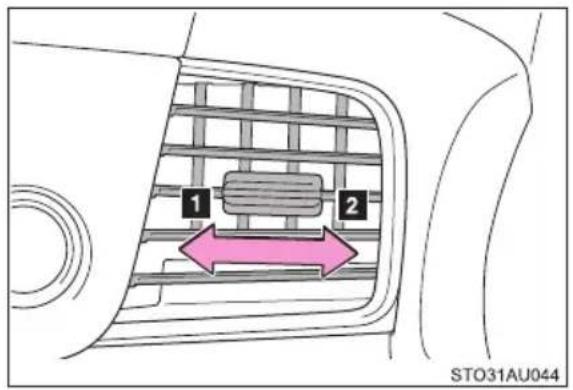
1 Open the vent
2 Close the vent
Move the knob until a click is heard to close the vent.
Left side outlet
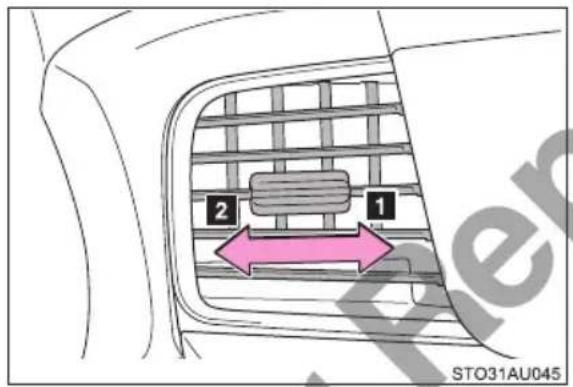
1 Open the vent
2 Close the vent
Move the knob until a click is heard to close the vent.
■ Using automatic mode
Fan speed is adjusted automatically in according to the temperature setting and the ambient conditions.
Therefore, the fan may stop for a while until warm or cool air is ready to flow immediately after is touched.
Fogging up of the windows
●The windows will easily fog up when the humidity in the vehicle is high.
Turning on will dehumidify the air from the outlets and defog the windshield effectively.
- If you turn off, the windows may fog up more easily.
●The windows may fog up if the recirculated air mode is used.
■Outside/recirculated air mode
- When driving on dusty roads such as tunnels or in heavy traffic, set the outside/recirculated air mode button to the recirculated air mode. This is effective in preventing outside air from entering the vehicle interior. During cooling operation, setting the recirculated air mode will also cool the vehicle interior effectively.
● Outside/recirculated air mode may automatically switch depending on the temperature setting or the inside temperature.
■ When the outside temperature falls to nearly 0°C (32°F)
The dehumidification function may not operate even when touched.

■Switch operation sounds
Switches other than touch switches (push switches and clock switches) do not produce any operation sounds.
Notes on touch switch operation
- Operate using a finger (the pad of the finger).
- If a coating, film, etc. is applied to the surface of the air conditioning control panel, non-response may occur.
- If a pen, etc. is used to operate the system, the system will not respond.
- Touch operations cannot be performed on the monitor section.
- When performing a touch operation, make sure that other fingers, etc. do not touch the air conditioning control panel.
When performing a series of touch operations, withdraw the finger completely before performing the next operation. - Do not forcefully press the air conditioning control panel.
- If the air conditioning control panel is dirty or has liquid attached to it, incorrect operation may occur. Wipe the control panel clean before performing any touch operations.
■Situations when non-response may occur from normal touch switch operation
●Gloves, etc. are worn.
● A coating, film, etc. is applied to the surface of the air conditioning control panel.
●The air conditioning control panel is dirty or has liquid attached to it.
- The vehicle is in an area where strong electrical waves or noise are emitted, such as near a television tower, power plant, gasoline station, broadcasting station, large display, airport, etc.
● Wireless devices such as radios, cell phones, etc. are carried.
●The air conditioning control panel is in contact with, or covered by, a metallic object such as the following:
- A card that has metal on it, such as aluminum foil, etc.
- A pack of cigarettes that use aluminum foil
- A wallet or bag that is made of metal
- Coins
- A heating pad
• CDs, DVDs or other media
- If your hand is near or touching the air conditioning control panel when the engine switch is turned to ACCESSORY or IGNITION ON mode, nonresponse may occur. If so, withdraw your hand from the air conditioning control panel and wait approximately 10 seconds before touching the air conditioning control panel again.
■Times when non-response from touch switch operation
When the air conditioning control panel is dirty, non-response may occur. Please clean the touch panel frequently.
■ When cleaning the air conditioning control panel
Touch switches may respond when cleaning. Turn the engine switch off before proceeding with cleaning.
■Ventilation and air conditioning odors
● To let fresh air in, set the air conditioning system to the outside air mode.
● During use, various odors from inside and outside the vehicle may enter into and accumulate in the air conditioning system. This may then cause odor to be emitted from the vents.
●To reduce potential odors from occurring:
- It is recommended that the air conditioning system be set to outside air mode prior to turning the vehicle off.
- The start timing of the blower may be delayed for a short period of time immediately after the air conditioning system is started in AUTO mode.
■ Using the rear air conditioning system (vehicles with a rear air conditioning system)
- The rear air conditioning system can be operated from the front air conditioning control panel by touching
- If the system is left untouched for approximately 6 seconds after changing to the rear air conditioning system, the control mode in the front control panel returns to the front.
Air conditioning filter
→P. 424
■Changing the response of the switch for the air conditioning operation panel
The reaction time, from when the switch is touched, can be changed by the following operations.
The air conditioning cannot be operated during following operation.
STEP 1 Touch both and for about 3 seconds.
“01” \~ “05” is displayed in the monitor on the passenger side of the temperature display.
STEP 2 Each time is pressed, the reaction time switches over as follows.
For temperature control switch and fan speed switch.
01 (about 0.04 sec.) → 02 (about 0.06 sec.) → 03 (about 0.08 sec.)
→ 04 (about 0.10 sec.) → 05 (about 0.12 sec.)
For switches other than the temp, control or fan speed.
01 (about 0.04 sec.) → 02 (about 0.06 sec.) → 03 (about 0.10 sec.)
→ 04 (about 0.14 sec.) → 05 (about 0.16 sec.)
If touch operations are not performed for approximately 5 seconds after the desired setting are set, the screen returns to the normal passenger-side temperature display and the setting change is completed.
After the setting change completes, all displays in the monitor section will illuminate for a short time. Do not turn off the engine switch during this time.
Otherwise, the setting changes will be erased.
■Turning ON/OFF the switch operation sound for the air conditioning operation panel
The operation sounds, when the switch is touched, can be turned ON/OFF by the following operations.
The air conditioning cannot be operated during following operation.
STEP 1 Touch both and for about 3 seconds.
"On" or "OFF" is displayed in the monitor on the passenger side of the temperature display.
STEP 2 Each time is pressed, the monitor switches over between ON/OFF.
If touch operations are not performed for approximately 5 seconds with "On" or "OFF" displayed, the screen returns to the normal temperature display and the setting change is completed.
After the setting change completes, all displays in the monitor section will illuminate for a short time. Do not turn off the engine switch during this time.
Otherwise, setting the changes will be erased.
Customization
Settings (e.g. A/C automatic mode switch operation) can be changed. (Customizable features → P. 551)

WARNING
■To prevent the windshield from fogging up
Do not use during cool air operation in extremely humid weather.
The difference between the temperature of the outside air and that of the windshield can cause the outer surface of the windshield to fog up, blocking your vision.

NOTICE
■To prevent battery discharge
Do not leave the air conditioning system on longer than necessary when the engine is stopped.
3-1. Using the air conditioning system and defogger Rear air conditioning system\*
Air outlets and fan speed are automatically adjusted according to the temperature setting.
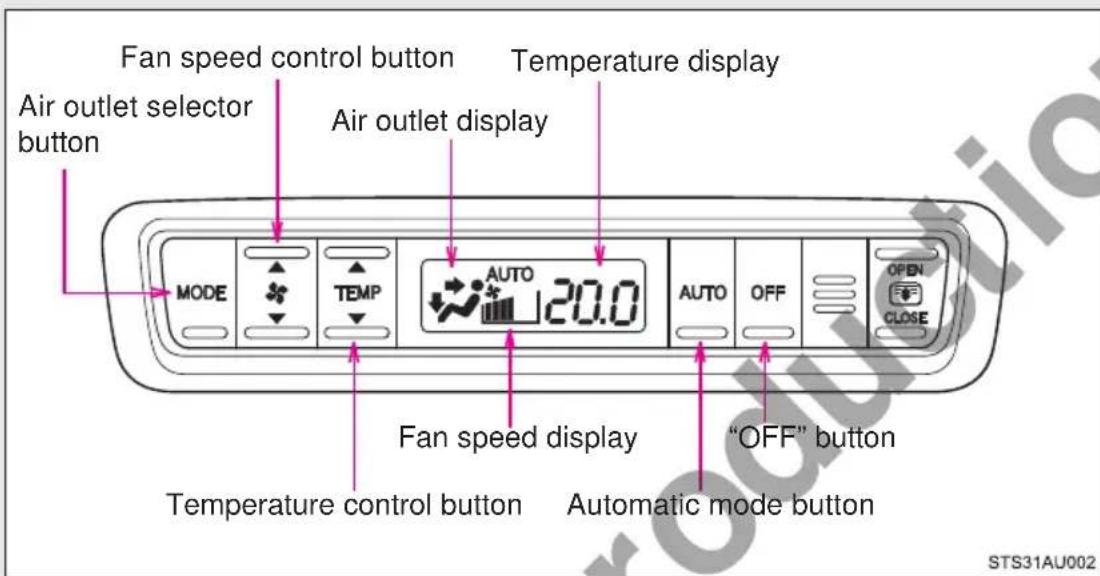
Using the automatic mode
STEP 1
Press
The dehumidification function begins to operate. Air outlets and fan speed are automatically adjusted according to the temperature setting.
STEP 2
Press “ ” to increase the temperature and “ ” to decrease
STEP 3
Press on the front air conditioning control panel.
The cooling and dehumidification function turns on and off each time is pressed.
Adjusting the settings manually
STEP 1 To adjust the fan speed, press “▲” on to increase the fan speed and “▼” to decrease the fan speed.
Press to turn the fan off.
STEP 2 To adjust the temperature settings, press “▲” on to increase the temperature and “▼” to decrease the temperature.
STEP 3 To change the air outlets, press MODE.
The air outlets used are switched each time is pressed.
Air outlets and air flow
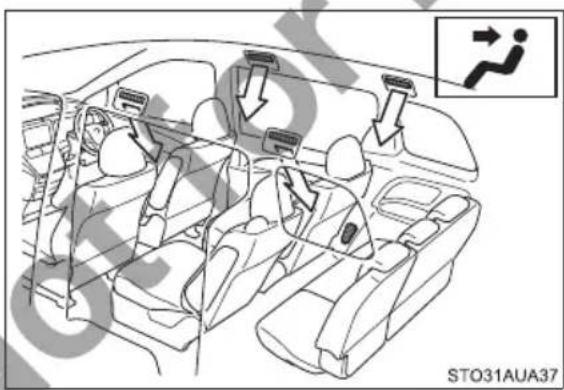
natural_image
Interior view of a car showing driver seatbelt and passenger seatbelt with directional arrows (no text or symbols)Air flows to the upper body.
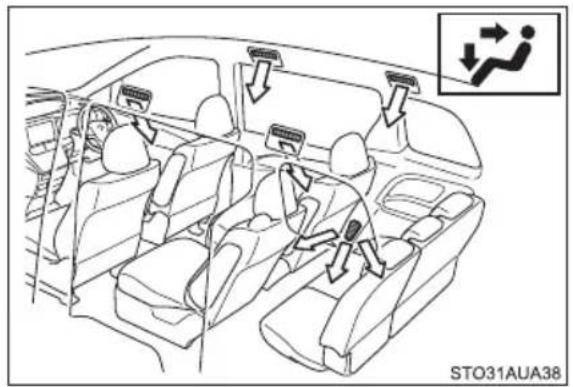
Air flows to the upper body and feet.
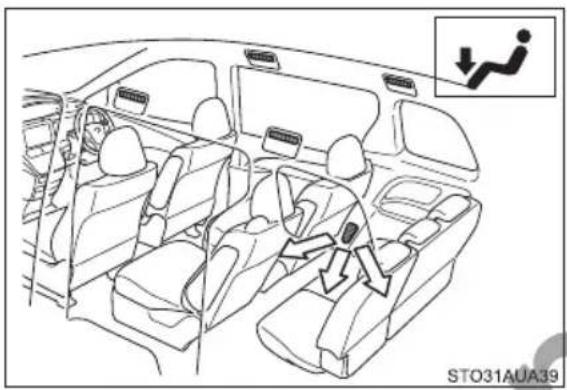
natural_image
Interior view of a car showing the seatbelt and dashboard, with an inset diagram of a person walking down (no text or symbols present)Air flows to the feet.
Adjusting the position and opening and closing the air outlets
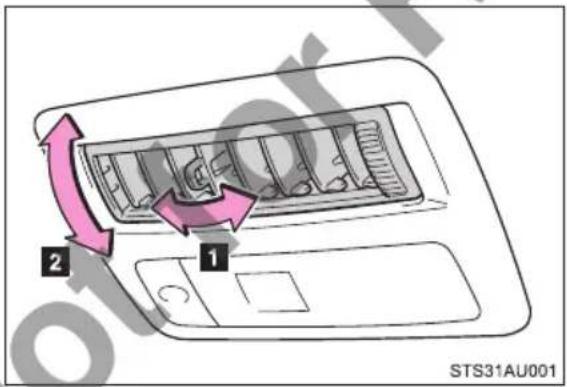
1 Direct air flow to the left or right and turn the knob to open or close the vent.
2 Direct air flow up or down.
NOTICE
■To prevent battery discharge
Do not leave the air conditioning system on longer than necessary when the engine is stopped.
3-1. Using the air conditioning system and defogger Rear cooler system\*
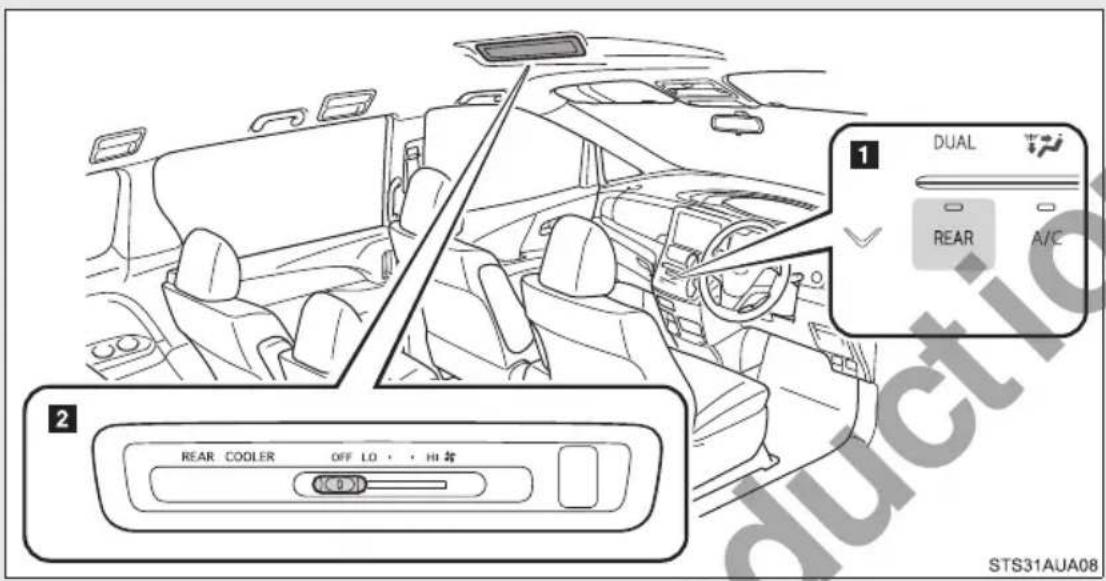
1 Rear cooler operation mode button
2 Rear fan speed control lever
Using the rear cooler system
Touch on the front air conditioning control panel.
Adjusting the fan speed
To adjust the fan speed, slide the rear fan speed control lever to the right (increase) or to the left (decrease).
Sliding the lever to "OFF" turns off the fan.
Adjusting the position and opening and closing the air outlets
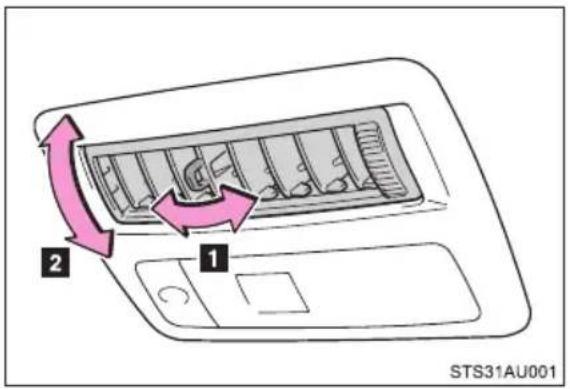
1 Direct air flow to the left or right and turn the knob to open or close the vent.
2 Direct air flow up or down.

NOTICE
■To prevent battery discharge
Do not leave the rear cooler system on longer than necessary when the engine is stopped.
3-1. Using the air conditioning system and defogger Rear window defogger
Defogger is used to defog the rear window.
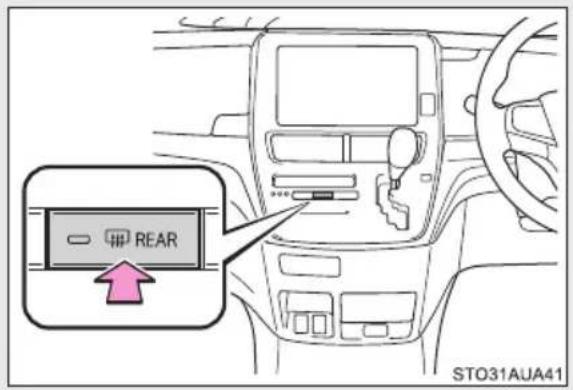
Turns the defogger on/off
The defoggers will automatically turn off after approximately 15 minutes.
■The defoggers can be operated when
The "ENGINE START STOP" switch is in IGNITION ON mode.
3-2. Using the audio system
Audio system types\*
CD player with external CD changer controller and AM/FM radio.
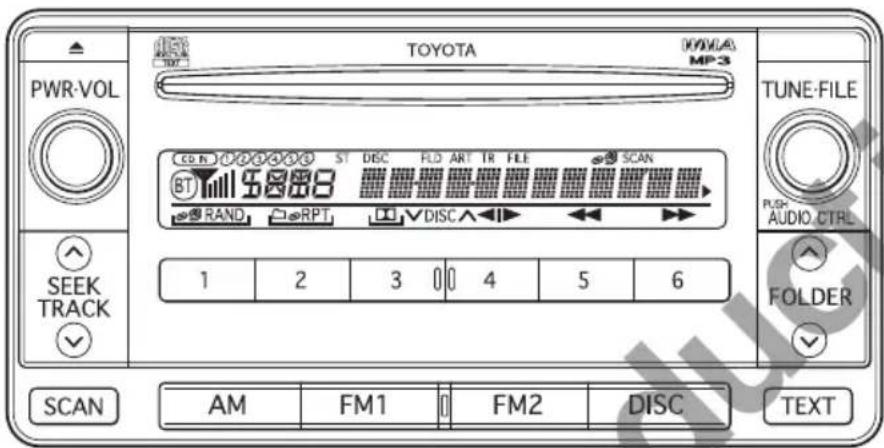
STO32AU002
| Title Page | |
| Using the radio P. 280 | |
| Using the CD player P. 282 | |
| Playing back MP3 and WMA discs P. 288 | |
| Optimal use of the audio system P. 295 | |
| Using the steering wheel audio switches P. 298 |
Using cellular phones
Interference may be heard through the audio system's speakers if a cellular phone is being used inside or close to the vehicle while the audio system is operating.

NOTICE
■To prevent battery discharge
Do not leave the audio system on longer than necessary when the engine is stopped.
■To avoid damaging the audio system
Take care not to spill drinks or other fluids over the audio system.
3-2. Using the audio system
Using the radio
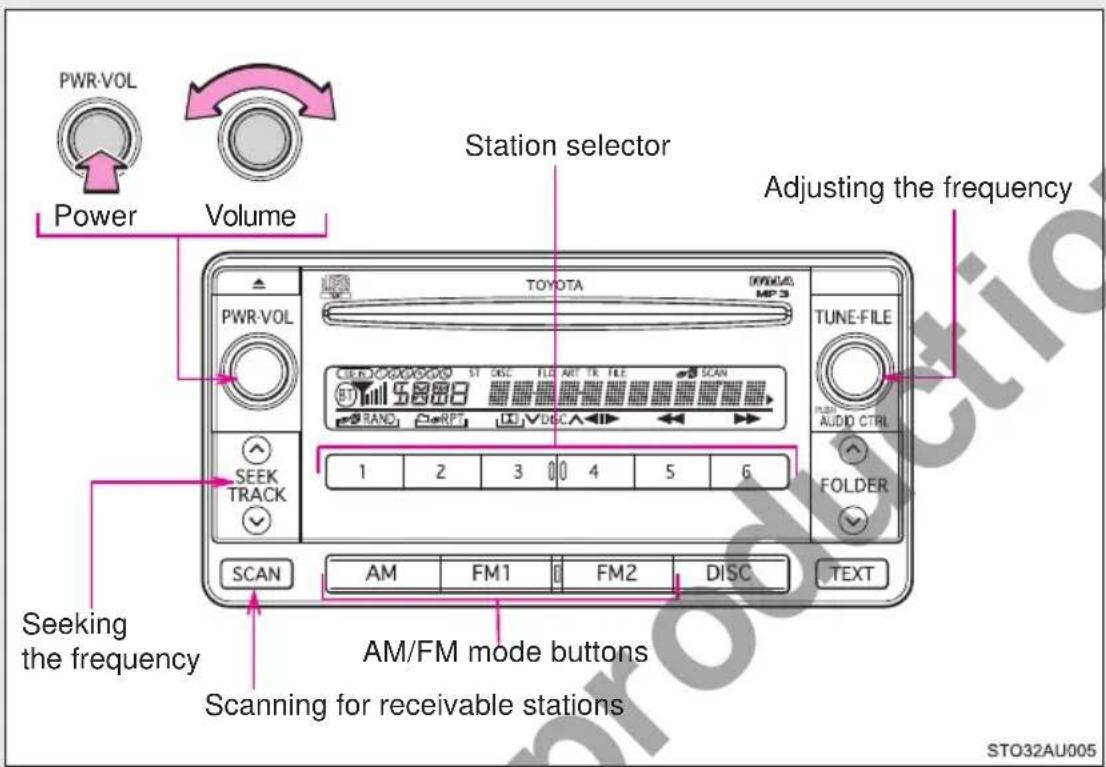
Setting station presets
STEP 2 Press and hold the button (from to) the station is to be set to until you hear a beep.
☐: If equipped
Scanning radio stations
■ Scanning the preset radio stations
STEP 1 Press and hold until you hear a beep.
Preset stations will be played for 5 seconds each.
STEP 2 Press the button again when the desired station is reached.
■Scanning all the radio stations within range
STEP 1 Press SCAN.
All the stations with reception will be played for 5 seconds each.
STEP 2 Press the button again when the desired station is reached.
■When the battery is disconnected
Station presets are erased.
■Reception sensitivity
- Maintaining perfect radio reception at all times is difficult due to the continually changing position of the antenna, differences in signal strength and surrounding objects, such as trains, transmitters, etc.
- The radio antenna is mounted inside the rear quarter window. To maintain clear radio reception, do not attach metallic window tinting or other metallic objects to the antenna wire mounted inside the rear quarter window.
3-2. Using the audio system
Using the CD player\*
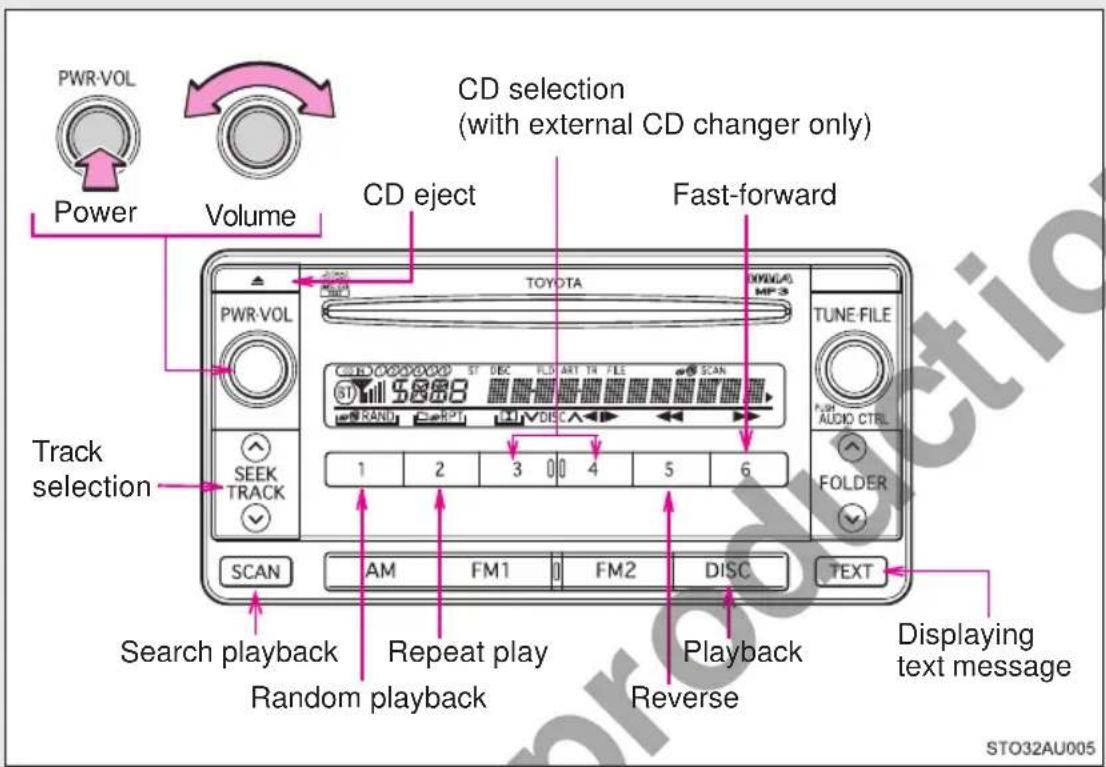
Loading CDs
Insert a CD.
Ejecting CDs
Press and remove the CD.
Selecting and scanning a track
Selecting a track
Press “^” to move up or “∨” to move down using desired track number is displayed.
until the
*: If equipped
■Scanning tracks
STEP 1 Press SCAN.
The first 10 seconds of each track will be played.
STEP 2 Press the button again when the desired track is reached.
Fast-forwarding and reversing tracks
To fast-forward or reverse, press and hold (6) or (◀◀).
Selecting a CD (with external CD changer only)
■Selecting the desired CD
Press 3 0 (N)4or (^).
■ Scanning loaded CDs
STEP 1 Press and hold until you hear a beep. The first 10 seconds of the first track on each CD will be played. STEP 2 Press the button again when the desired CD is reached.
Random playback
Current CD
Press (RAND).
To cancel, press (RAND) again.
■ All CDs (with external CD changer only)
Press and hold (RAND) until you hear a beep.
To cancel, press (RAND) again.
Repeat play
■Repeating a track
Press 2 (RPT).
To cancel, press (RPT) again.
■Repeating all of the tracks on a CD (with external CD changer only)
Press and hold (RPT) until you hear a beep.
To cancel, press (RPT) again.
Switching the display
Press TEXT.
Each time the button is pressed, the display changes in the order of Elapsed time → CD title → Track name.
■Display
Up to 12 characters can be displayed at a time.
If there are 13 or more characters, pressing and holding for x1 second or more enables to display the remaining characters.
A maximum of 24 characters can be displayed.
If is pressed for more than 1 second again or has not been operated for more than 6 seconds, the display will return to the first 12 characters.
Depending on the contents recorded, the characters may not be displayed properly or may not be displayed at all.
Error messages
"ERROR1": The CD may be dirty or inserted up-side down.
"ERROR3": This indicates a problem in the audio system or CD changer.
"ERROR4": This indicates that there is an over-current.
"CD OPEN": This indicates that the CD changer lid of the separate unit is open.
"NO DISC": This indicates that the CD changer of the separate unit is empty.
"WAIT": Operation has stopped due to a high temperature inside the player. Wait for a while and then press . If the CD still cannot be played back, contact your Toyota dealer.
■Discs that can be used
Discs with the marks shown below can be used.
Playback may not be possible depending on recording format or disc features, or due to scratches, dirt or deterioration.




CDs with copy-protect features may not be used.
■ CD player protection feature
To protect the internal components, playback is automatically stopped when a problem is detected while the CD player is being used.
If a CD is left inside the CD player or in the ejected position for extended periods
The CD may be damaged and may not play properly.
Lens cleaners
Do not use lens cleaners. Doing so may damage the CD player.

WARNING
■Certification for the CD player
This product is a class I laser product.
- Do not open the cover of the player or attempt to repair the unit yourself. Refer servicing to qualified personnel.
●Laser power: No hazardous

NOTICE
■ CDs and adapters that cannot be used
Do not use the following types of CDs.
Also, do not use 8 cm (3 in.) CD adapters, DualDiscs or printable discs. Doing so may damage the CD player and/or the CD insert/eject function.
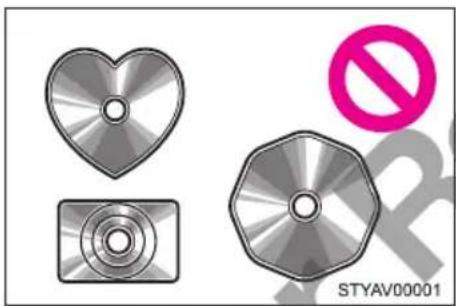
natural_image
Three metallic discs with heart-shaped and octagonal designs, one marked with a pink prohibition symbol (no text or labels on discs)- CDs that have a diameter that is not 12 cm (4.7 in.)
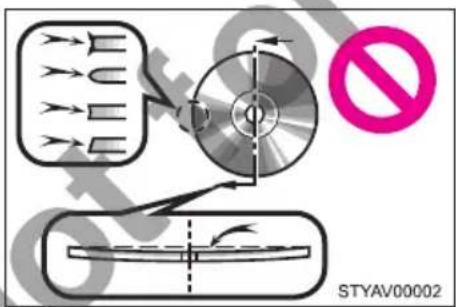
●Low-quality and deformed CDs

NOTICE
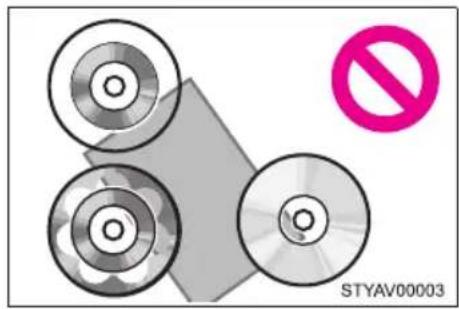
natural_image
Diagram showing three circular discs with a diagonal arrow and a pink prohibition symbol (no text or labels on discs)- CDs with a transparent or translucent recording area
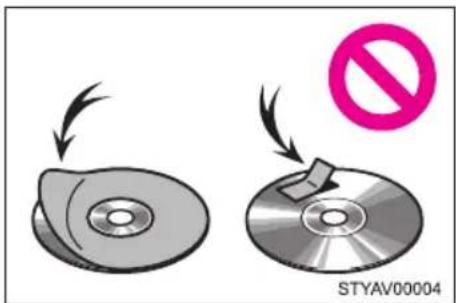
- CDs that have had tape, stickers or CD-R labels attached to them, or that have had the label peeled off
■ CD player precautions
Failure to follow the precautions below may result in serious damage to the CDs or the player itself.
- Do not insert anything other than CDs into the CD slot.
- Do not apply oil to the CD player.
● Store CDs away from direct sunlight.
●Never try to disassemble any part of the CD player.
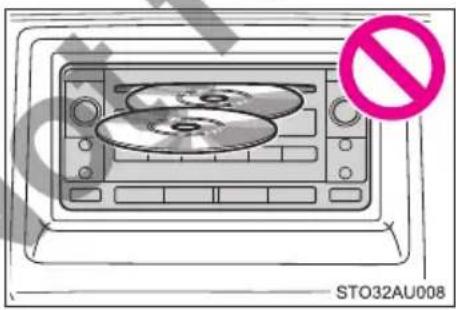
- Do not insert more than one CD at a time.
3-2. Using the audio system
Playing back MP3 and WMA discs\*
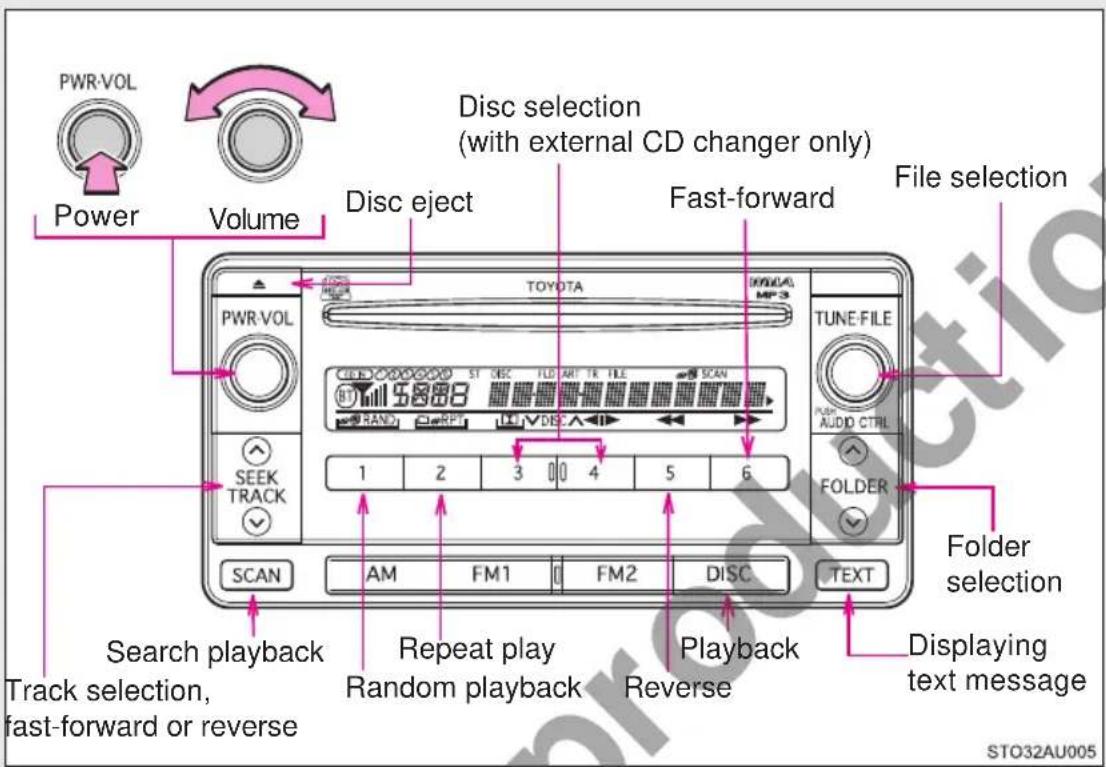
Loading and ejecting MP3 and WMA discs
→P.282
Selecting and scanning a folder
■Selecting a folder one at a time
Press “^” or “∨” on
to select the desired folder.
■ Returning to the first folder
Press and hold the "∨" on
you hear a beep.
■ Scanning the first file of all the folders
STEP 1 Press and hold until you hear a beep.
The first 10 seconds of the first file in each folder will be played.
STEP 2 Press the button again when the desired folder is reached.
Selecting and scanning files
■Selecting a file
^” or “∨” on
to select the desired file.
■ Scanning the files in a folder
Press SCAN.
The first 10 seconds of each file will be played.
Press the button again when the desired file is reached.
Fast-forwarding and reversing files
To fast-forward or reverse, press and hold (6) or ▶▶▶ 5
Selecting MP3 and WMA discs (with external CD changer only)
→P.283
Random playback
■Playing files from a folder in random order
Press 1 (RAND).
To cancel, press (RAND) again.
■Playing all the files from a disc in random order
Press and hold (RAND) until you hear a beep.
To cancel, press (RAND) again.
Repeat play
■Repeating a file
Press 2 (RPT).
To cancel, press (RPT) again.
■Repeating all the files in a folder
Press and hold (RPT) until you hear a beep.
To cancel, press (RPT) again.
Switching the display
Press TEXT.
Each time the button is pressed, the display changes in the order of Elapsed time → Folder name → File name → Album title → Track title → Artist name.
■Display
→P. 284
Error messages
"ERROR1": The CD may be dirty or inserted up-side down.
"ERROR3": This indicates a problem in the audio system or CD changer.
"ERROR4": This indicates that there is an over-current.
"CD OPEN": This indicates that the CD changer lid of the separate unit is open.
"NO DISC": This indicates that the CD changer of the separate unit is empty.
"NO MUSIC": This indicates that the MP3 file is not included in the CD.
"WAIT": Operation has stopped due to a high temperature inside the player. Wait for a while and then press . If the CD still cannot be played back, contact your Toyota dealer.
■Discs that can be used
Discs with the marks shown below can be used.
Playback may not be possible depending on recording format or disc features, or due to scratches, dirt or deterioration.


■ CD player protection feature
→P.285
If a CD is left inside the CD player or in the ejected position for extended periods
→P. 285
Lens cleaners
→P. 285
■MP3 and WMA files
MP3 (MPEG Audio LAYER3) is a standard audio compression format.
Files can be compressed to approximately 1/10 of their original size by using MP3 compression.
WMA (Windows Media Audio) is a Microsoft audio compression format.
This format compresses audio data to a size smaller than that of the MP3 format.
There is a limit to the MP3 and WMA file standards and to the media/formats recorded by them that can be used.
●MP3 file compatibility
- Compatible standards MP3 (MPEG1 LAYER3, MPEG2 LSF LAYER3)
- Compatible sampling frequencies MPEG1 LAYER3: 32, 44.1, 48 (kHz) MPEG2 LSF LAYER3: 16, 22.05, 24 (kHz)
- Compatible bit rates (compatible with VBR) MPEG1 LAYER3: 64, 80, 96, 112, 128, 160, 192, 224, 256, 320 (kbps) MPEG2 LSF LAYER3: 64, 80, 96, 112, 128, 144, 160 (kbps)
- Compatible channel modes: stereo, joint stereo, dual channel and monaural
●WMA file compatibility
- Compatible standards WMA Ver. 7, 8, 9
- Compatible sampling frequencies 32, 44.1, 48 (kHz)
- Compatible bit rates (only compatible with 2-channel playback) Ver. 7, 8: CBR 48, 64, 80, 96, 128, 160, 192 (kbps) Ver. 9: CBR 48, 64, 80, 96, 128, 160, 192, 256, 320 (kbps)
Compatible media
Media that can be used for MP3 and WMA playback are CD-Rs and CD-RWs.
Playback in some instances may not be possible, depending on the status of the CD-R or CD-RW. Playback may not be possible or the audio may jump if the disc is scratched or marked with fingerprints.
●Compatible disc formats
The following disc formats can be used.
• Disc formats: CD-ROM Mode 1 and Mode 2
CD-ROM XA Mode 2, Form 1 and Form 2
- File formats: ISO9660 Level 1, Level 2, (Romeo, Joliet) MP3 and WMA files written in any format other than those listed above may not play correctly, and their file names and folder names may not be displayed correctly.
Items related to standards and limitations are as follows.
• Maximum directory hierarchy: 8 levels
• Maximum length of folder names/file names: 32 characters
• Maximum number of folders: 192 (including the root)
• Maximum number of files per disc: 255
- File names
The only files that can be recognized as MP3/WMA and played are those with the extension .mp3 or .wma.
●Multi-sessions
As the audio system is compatible with multi-sessions, it is possible to play discs that contain MP3 and WMA files. However, only the first session can be played.
ID3 and WMA tags
ID3 tags can be added to MP3 files, making it possible to record the track title, artist name, etc.
The system is compatible with ID3 Ver. 1.0, 1.1, and Ver. 2.3 ID3 tags. (The number of characters is based on ID3 Ver. 1.0 and 1.1.)
WMA tags can be added to WMA files, making it possible to record the track title and artist name in the same way as with ID3 tags.
MP3 and WMA playback
When a disc containing MP3 or WMA files is inserted, all files on the disc are first checked. Once the file check is finished, the first MP3 or WMA file is played. To make the file check finish more quickly, we recommend you do not write in any files other than MP3 or WMA files or create any unnecessary folders.
If the discs contain a mixture of music data and MP3 or WMA format data, only music data can be played.
• Extensions
If the file extensions .mp3 and .wma are used for files other than MP3 and WMA files, they will be mistakenly recognized and played as MP3 and WMA files. This may result in large amounts of interference and damage to the speakers.
●Playback
- To play MP3 files with steady sound quality, we recommend a fixed bit rate of 128 kbps and a sampling frequency of 44.1 kHz.
- CD-R or CD-RW playback may not be possible in some instances, depending on the characteristics of the disc.
- There is a wide variety of freeware and other encoding software for MP3 and WMA files on the market, and depending on the status of the encoding and the file format, poor sound quality or noise at the start of playback may result. In some cases, playback may not be possible at all.
- When files other than MP3 or WMA files are recorded on a disc, it may take more time to recognize the disc and in some cases, playback may not be possible at all.
- Microsoft, Windows, and Windows Media are the registered trademarks of Microsoft Corporation in the U.S. and other countries.

NOTICE
■ CDs and adapters that cannot be used ( P. 286)
■ CD player precautions (→P. 287)
3-2. Using the audio system
Optimal use of the audio system\*
1 Displays the current mode
2 Changes the following setting
Sound quality and volume balance ( P. 296)
The sound quality and balance setting can be changed to produce the best sound.
Using the audio control function
■Changing sound quality modes
Pressing selects the mode to be changed in the following order.
$$ \mathrm{BAS} \rightarrow \mathrm{TRE} \rightarrow \mathrm{FAD} \rightarrow \mathrm{BAL} \rightarrow \mathrm{RSE} ^ {*} $$
*: If equipped
■Adjusting sound quality
Turning
adjusts the level.
| Sound quality mode | Mode displayed | Level | Turn to the left | Turn to the right |
| Bass* “BAS” -5 to 5 | Low High | |||
| Treble* “TRE” -5 to 5 | ||||
| Front/rear volume balance | “FAD” | F7 to R7 | Shifts to front | Shifts to rear |
| Left/right volume balance | “BAL” | L7 to R7 | Shifts to left | Shifts to right |
*: The sound quality level is adjusted individually in each audio mode.
■Turning on/off the rear system lock (if equipped)
→P. 308
■Trademark owned by SRS Labs, Inc.


The audio systems utilize SRS FOCUS™ and SRS TruBass® audio enhancement technologies, under license from SRS Labs, Inc., in all modes except AM radio mode.
FOCUS, TruBass, SRS and Inc.

symbol are trademarks of SRS Labs,
FOCUS and TruBass technologies are incorporated under license from SRS Labs, Inc.
SRS FOCUS™ raises the audio image from non-optimally placed speakers up to the natural listening height at ear level.
SRS TruBass ^® enhances the perception of bass frequencies to provide deep, rich bass response from any size speaker.
■Trademark owned by New Transducers Limited

This vehicle incorporates NXT flat panel speaker technology by New Transducers Limited, UK. nis a registered trademarks of New Transducers Limited.
3-2. Using the audio system
Using the steering wheel audio switches
Some audio features can be controlled using the switches on the steering wheel.
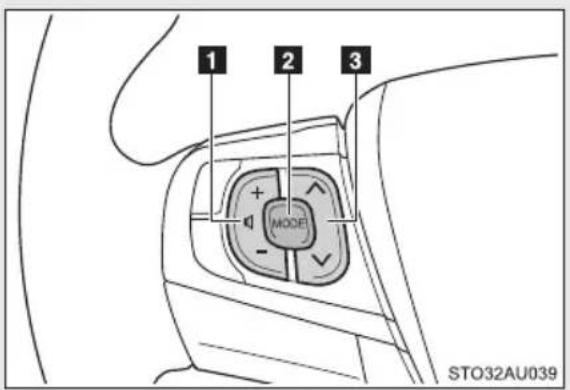
1 Volume
2 Power on, select audio source
3 Radio mode: Select radio stations
CD mode: Select tracks and files (MP3 and WMA)
Turning on the power
Press when the audio system is turned off.
The audio system can be turned off by holding the switch down.
Changing the audio source
Press when the audio system is turned on. The audio source changes as follows each time is pressed. If a mode cannot be used, it will be skipped.
$$ \mathrm{AM} \rightarrow \mathrm{FM1} \rightarrow \mathrm{FM2} \rightarrow \mathrm{CDmode} \rightarrow \mathrm{RSE} ^ {*} $$
*: If equipped
Adjusting the volume
Press “+” on to increase the volume and “-” to decrease the volume.
Hold down “+” or “-” on to continue increasing or decreasing the volume.
Selecting a radio station
STEP 1 Press to select the radio mode.
STEP 2 Press “^” or “∨” on 📋 to select a preset station.
To scan for receivable stations, press and hold “^” or “∨” on until you hear a beep.
Selecting a track/file or song
STEP 1 Press MODE to select the CD mode.
STEP 2 Press “^” or “∨” on 📋 to select the desired track/file or song.
Selecting a disc in the CD player (with external CD changer only)
STEP 1 Press MODE to select the CD mode.
STEP 2 Press and hold “^” or “∨” on √ until you hear a beep.

WARNING
■To reduce the risk of an accident
Exercise care when operating the audio switches on the steering wheel.
3-3. Using the rear seat entertainment system Rear seat entertainment system features\*
The rear seat entertainment system is designed for the rear passengers to enjoy video such as Blu-ray Disc™ (BD) and DVD disc separately from the front audio system.
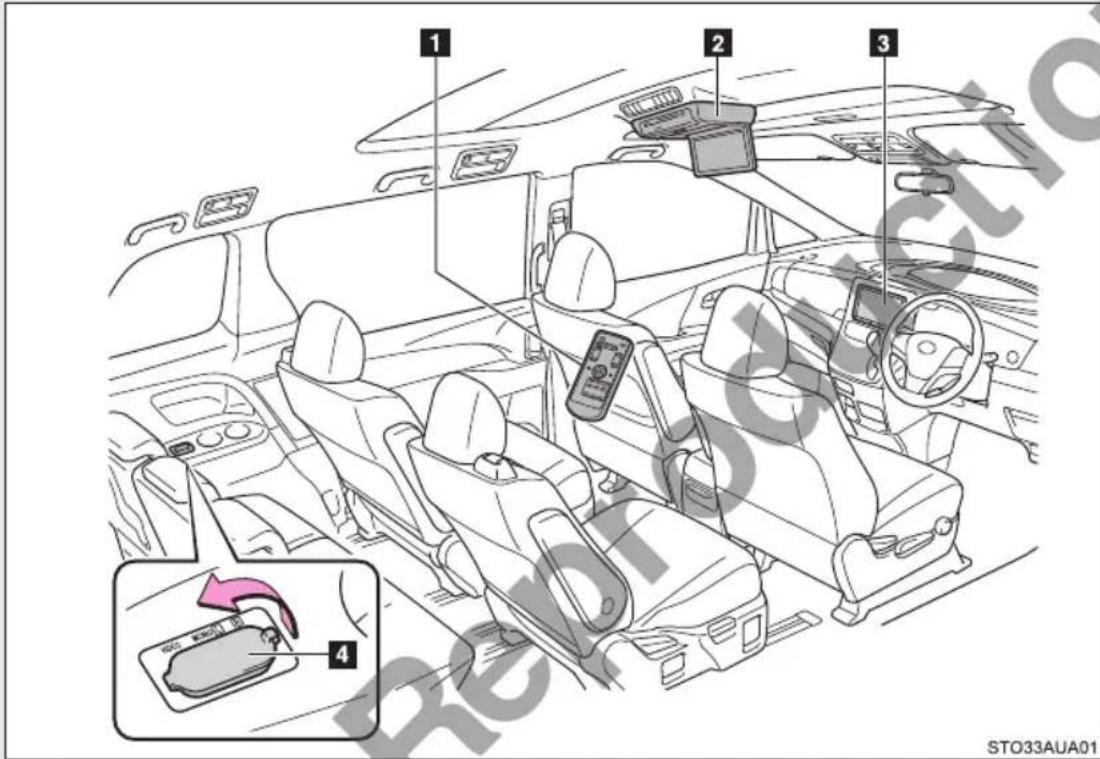
1 Remote controller
2 Rear seat entertainment system
3 Front audio system
4 A/V input port
Opening and closing the display
■ Opening the display
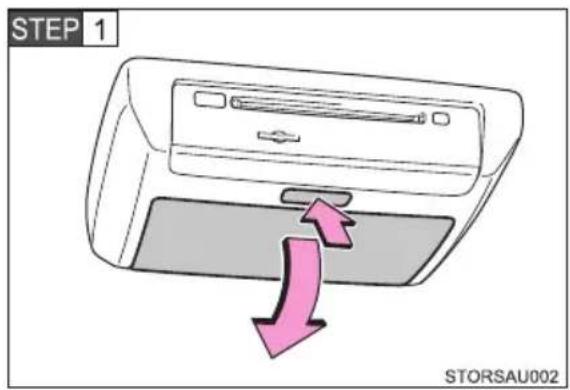
Press the lock release button to open the display.
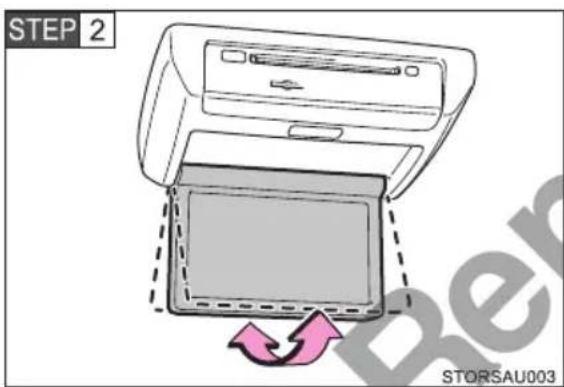
Pull the display down to an easily viewable angle.
Closing the display
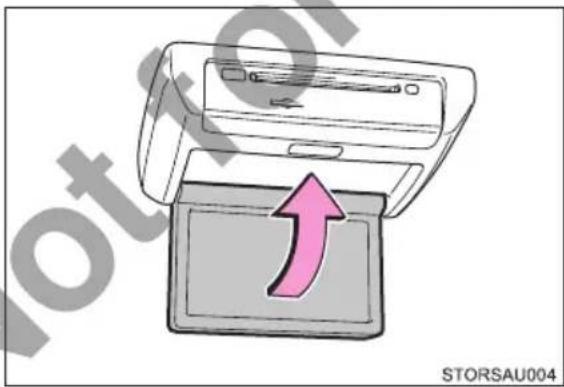
natural_image
Illustration of a computer monitor with an upward arrow, no text or symbols presentPush the display up until a click is heard.
The illumination of the screen automatically turns off when the display is closed. However, the rear seat entertainment system is not turned off. (The sound is not turned off.)
Loading and ejecting a disc
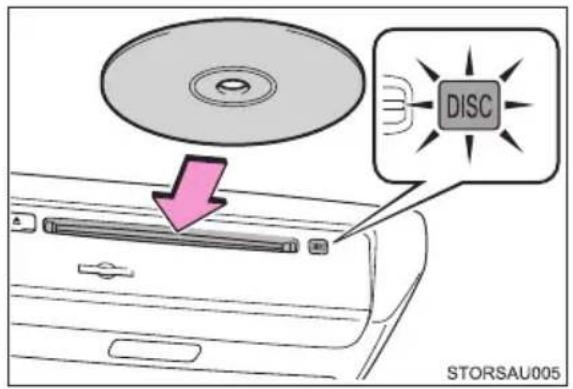
Insert the disc into the slot with the label side up.
The "DISC" indicator light turns on while the disc is loaded. The player will start to play the disc automatically.
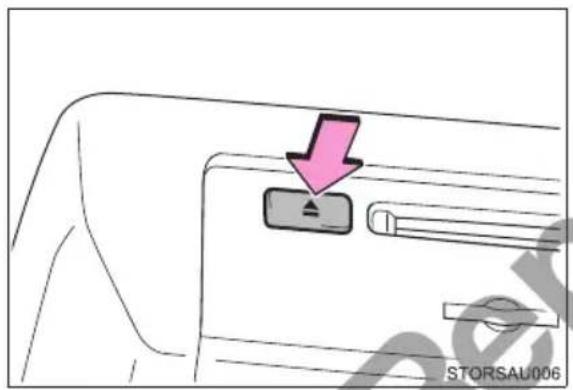
Press □ and remove the disc.
If a disc cannot be ejected, do not forcibly take out the disc. Keep pressing ▲ for approximately 10 seconds and release it.
If the ejected disc remains in the slot for 15 seconds, the player will automatically reload the disc.
Inserting and ejecting an SD card
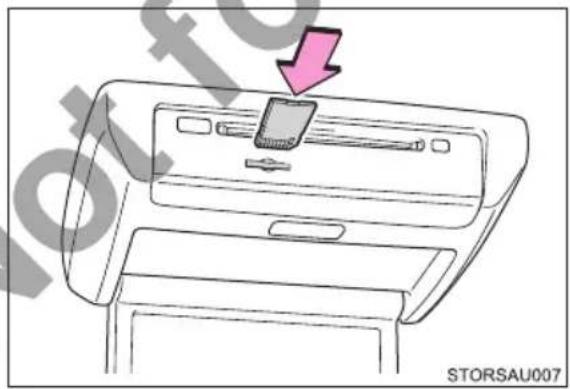
natural_image
Diagram of a device with a pink arrow pointing to a component, no text or symbols presentInsert the SD card with the label side up, positioning the cut off corner to the right.
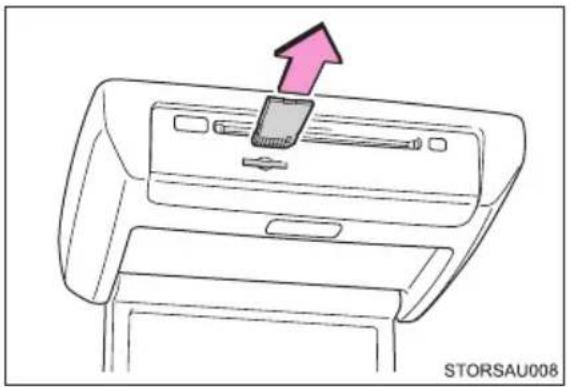
natural_image
Diagram of a car back panel with an arrow indicating upward motion, no text or symbols presentTo eject the SD card, push on the center of the SD card. When it ejects slightly pull it straight out.
Remote controller
The rear seat entertainment system can be operated with the remote controller. The system cannot be operated by touching the switches on the screen directly.
■Before using the remote controller (for new vehicle owners)
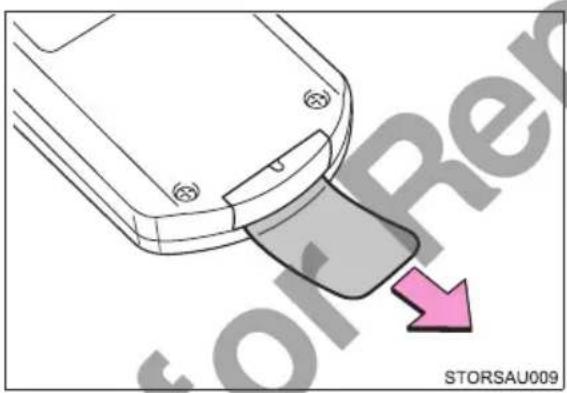
natural_image
Diagram of a mobile phone plug inserted into a slot, with a pink arrow indicating the insertion direction (no text or symbols on the diagram itself)Remove the insulating sheet.
An insulating sheet is set to prevent the batteries from being discharged.
■Remote controller
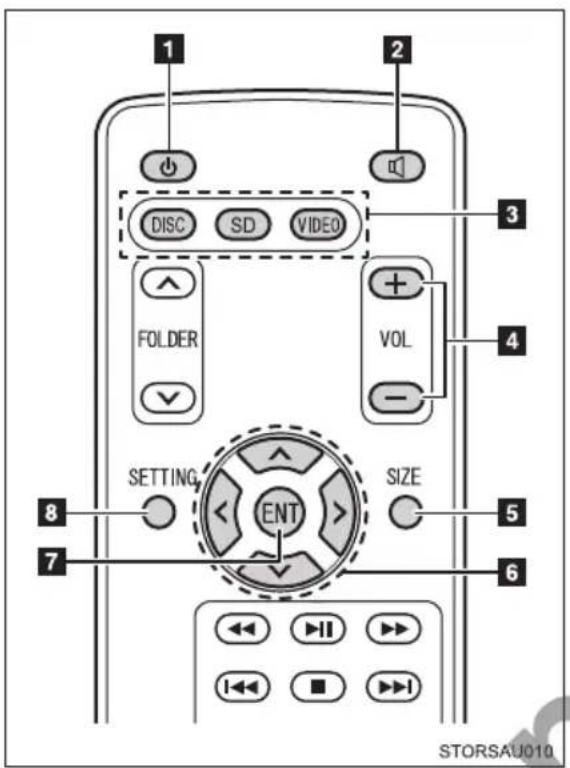
1 Turning on/off the rear seat entertainment system
2 Turning on/off the speaker output
3 Selecting the media mode
4 Adjusting the volume
5 Changing the screen size
6 Selecting a control icon
7 Inputting the selected control icon
8 Adjusting the screen settings
Turning on/off the rear seat entertainment system
Press to turn on the rear seat entertainment system.
Press once again to turn off the system.
Adjusting the volume
Press of "VOE" to adjust the volume.
When the speaker output is off, the volume cannot be adjusted.
Turning on/off the speaker output
Press to turn on/off the speaker output.
On: The sound is available from the vehicle speakers.
Off: The sound is muted.
Selecting a control icon
Press “”, “”, “” or “>” on to select the control icon on the screen.
Then press toenter.
Changing the screen size
Each time is pressed, the screen size changes in the following order:
Normal: Displays the screen at the original ratio
Wide 1: Widens the 4:3 aspect screen horizontally to fill the screen
Wide 2: Widens the screen vertically and horizontally, at the same ratio, to fill the entire screen
The screen size can be changed for each media mode individually.
Adjusting the screen settings
You can adjust the color, contrast, tone and brightness of the screen. The screen setting levels can be adjusted for day mode and night mode individually.
STEP 1 Press SETTING
STEP 2 The screen settings can be adjusted. After adjustments, select "OK".
“DISC”/“SD” mode
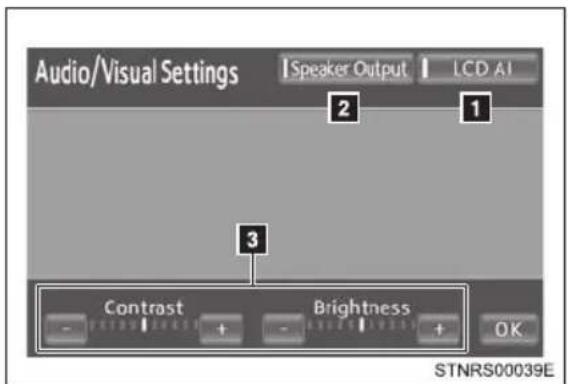
"VIDEO" mode
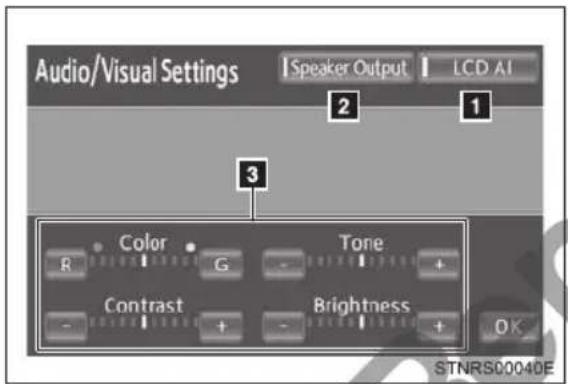
1 Turning on/off the "LCD AI"
The “LCD AI” automatically determines the tone of the video image and sets the contrast to an optimum level, displaying a sharp image.
2 Turning on/off the speaker output
On: The sound is available from the vehicle speakers.
Off: The sound is muted.
3 Adjusting the screen settings
| Screen button Function | ||
| “Color” | “R” Strengthens the red color | |
| “G” Strengthens the green color | ||
| “Tone” | “-” Weakens the tone | |
| “+” Strengthens the tone | ||
| “Contrast” | “-” Strengthens the contrast | |
| “+” Weakens the contrast | ||
| “Brightness” | “-” Darkens the screen | |
| “+” Brightens the screen | ||
Operating from the front seats
The rear seat entertainment system can be operated from the front seats.
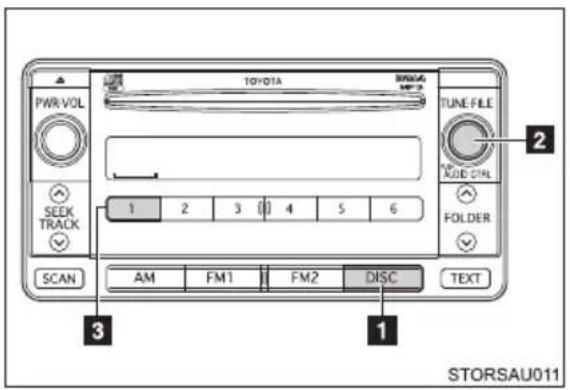
1 Selecting the rear seat entertainment system mode
Press the "DISC" button repeatedly until rear seat entertainment system mode is displayed.
2 Turning on/off the rear system lock
3 Selecting the rear seat entertainment system's media mode
■Turning on/off the rear system lock
The operation lock on the rear seat entertainment system can be turned on or off.
STEP 1 Press the "TUNE-FILE" knob repeatedly until "RSE LOCK" is displayed.
STEP 2 Turn the "TUNE-FILE" to select "ON" or "OFF".
STEP 3 Press the "TUNE·FILE" knob to enter.
■ Notice for rear seat entertainment system
The rear seat entertainment system will not operate normally with audio systems (including navigation system) other than the factory installed system.
■The rear seat entertainment system can be used when
The "ENGINE START STOP" switch is in ACCESSORY or IGNITION ON mode.
■Discs that can be used
Discs with the marks shown below can be used.
Playback may not be possible depending on recording format or disc features, or due to scratches, dirt or deterioration.

The following discs cannot be used on this system:
BDXL™ disc
BD-RE with the cartridge
HD DVD
- DVD audio
Video CD
SACD
■ SD cards that can be used
● Memory cards are restricted to the following conditions based on SD standards.
• SD memory card (from 512MB to 2GB)
• SDHC memory card (from 4GB to 32GB)
• SDXC memory card (from 48GB to 64GB)
●Mini SD cards and Micro SD cards can be used, but must be used with an adaptor card.
●MultiMedia Card (MMC) cannot be used.
SD card functions
●This system can play JPEG pictures and AVCHD video images that are stored in an SD card. It does not support music playback.
- Local storage
- Some BD videos have a feature to memorize disc information, such as a resume point, in a local storage. The rear seat entertainment system uses an SD card as a local storage device. To use this function, insert an SD card into the SD card slot.
- The SD card memory function may differ depending on the BD videos played.
- When an SD card that contains any kind of data is inserted, BD video disc information will not be stored into the SD card to protect the existing data in the card. To use an SD card as a local storage, use another SD card that does not contain any data.
■ Remote controller holder
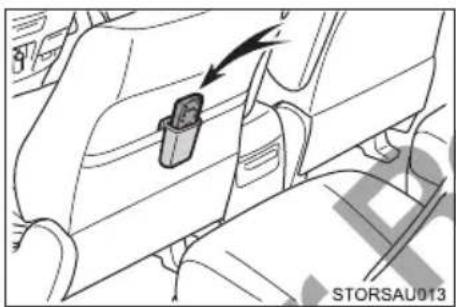
natural_image
Diagram of a car interior showing a car seatbelt and directional arrow (no text or symbols)The remote controller can be stowed in the holder when it is not in use. The holder can be hooked on the back of the front passenger's seatback.
When the remote controller batteries are fully depleted (→P. 429)
■Copyrights and trademarks
- Blu-ray Disc™, Blu-ray™, BD-Live™, BDXL™, and the logos are trademarks of the Blu-ray Disc Association.

● Java is a registered trademark of Oracle and/or its affiliates.

- "AVCHD" and the "AVCHD" logo are trademarks of Panasonic Corporation and Sony Corporation.

● “DVD Logo” is a trademark of DVD Format/Logo Licensing Corporation.



- SDXC Logo is a trademark of SD-3C, LLC.

● Manufactured under license from Dolby Laboratories. Dolby and the double-D symbol are trademarks of Dolby Laboratories.

DOLBY. DIGITAL
●Manufactured under license under U.S. Patent Nos: 5,956,674; 5,974,380; 6,487,535 & other U.S. and worldwide patents issued & pending. DTS, the Symbol, & DTS and the Symbol together are registered trademarks & DTS 2.0 Channel is a trademark of DTS, Inc. Product includes software. © DTS, Inc. All Rights Reserved.

dts®
2.0 Channel
This product is licensed under the AVC patent portfolio license and the VC-1 patent portfolio license for the personal use of a consumer or other uses in which it does not receive remuneration to (i) encode video in compliance with the AVC Standard and the VC-1 Standard ("AVC/VC-1 Video") and/or (ii) decode AVC/VC-1 Video that was encoded by a consumer engaged in a personal activity and/or was obtained from a video provider licensed to provide AVC/VC-1 Video. No license is granted or shall be implied for any other use. Additional information may be obtained from MPEG LA, LLC.
See http://www.mpegla.com.
Cinavia Notice
This product uses Cinavia technology to limit the use of unauthorized copies of some commercially-produced film and videos and their soundtracks. When a prohibited use of an unauthorized copy is detected, a message will be displayed and playback or copying will be interrupted.
More information about Cinavia technology is provided at the Cinavia Online Consumer Information Center at http://www.cinavia.com. To request additional information about Cinavia by mail, send a postcard with your mailing address to: Cinavia Consumer Information Center, P.O. Box 86851, San Diego, CA, 92138, USA.
This product incorporates proprietary technology under license from Verance Corporation and is protected by U.S. Patent 7,369,677 and other U.S. and worldwide patents issued and pending as well as copyright and trade secret protection for certain aspects of such technology. Cinavia is a trademark of Verance Corporation. Copyright 2004-2010 Verance Corporation. All rights reserved by Verance. Reverse engineering or disassembly is prohibited.
●WMA (Windows Media Audio), Microsoft, Windows, and Windows Media are the registered trademarks of Microsoft Corporation in the U.S. and other countries.
●This item incorporates copy protection technology that is protected by U.S. patents and other intellectual property rights of Rovi Corporation. Reverse engineering and disassembly are prohibited.
●This product incorporates the following software:
(1) the software developed independently by or for Panasonic Corporation,
(2) the software owned by third party and licensed to Panasonic Corporation,
(3) the software licensed under the GNU General Public License, Version 2 (GPL V2),
(4) the software licensed under the GNU LESSER General Public License, Version 2.1 (LGPL v2.1) and/or,
(5) open sourced software other than the software licensed under the GPL v2 and/or LGPL v2.1
For the software categorized as (3) and (4), please refer to the terms and conditions of GPL v2 and LGPL v2.1, as the case may be at
http://www.gnu.org/licenses/old-licenses/gpl-2.0.html and
http://www.gnu.org/licenses/old-licenses/lgpl-2.1.html.
In addition, the software categorized as (3) and (4) are copyrighted by several individuals. Please refer to the copyright notice of those individuals at http://car.panasonic.jp/oss/c8u23ZXg/
The GPL/LGPL software is distributed in the hope that it will be useful, but WITHOUT ANY WARRANTY, without even the implied warranty of MERCHANTABILITY or FITNESS FOR A PARTICULAR PURPOSE.
At least three (3) years from delivery of products, we will give to any third party who contacts us at the contact information provided below, for a charge no more than our cost of physically performing source code distribution, a complete machine-readable copy of the corresponding source code covered under GPL v2/LGPL v2.1.
[Contact address]
GPL Manager Panasonic Corporation 4261 Ikonobe-cho, Tsuzuki-ku, Yokohama City 224-8520, Japan
Source code is also freely available to you and any other member of the public via our website bellow.
http://car.panasonic.jp/oss/c8u23ZXg/
For the software categorized as (5) includes as follows.
- This product includes software developed by the OpenSSL Project for use in the OpenSSL Toolkit. (http://www.openssl.org/)
- This product includes software developed by the University of California, Berkeley and its contributors.
- Free Type code.
- The Independent JPEG Group's JPEG software.
- Vera Fonts. (http://www.gnome.org/fonts/)

WARNING
■When the rear seat entertainment system is not used
Keep the display closed. In the event of an accident or sudden braking, the opened display may hit an occupant's body, resulting in injury.
■To prevent accidents and electric shock
Do not disassemble or modify the remote controller.
■When the remote controller is not used
Stow the remote controller.
Injuries may result in the event of an accident or sudden braking.

NOTICE
■Cleaning the display
Wipe the display with a dry soft cloth. If the screen is wiped with a rough cloth, the surface of the screen may be scratched.
■ Opening and closing the display
When opening or closing the display, hold the bottom center of the display outer frame. Holding or pressing the LCD panel could result in display problems or LCD deterioration.
To prevent damage to the remote controller
- Keep the remote controller away from direct sunlight, heat and high humidity.
- Do not drop or strike the remote controller against hard objects.
- Do not sit on or place heavy objects on the remote controller.
3-3. Using the rear seat entertainment system
Playing a Blu-ray Disc™ (BD) and DVD disc\*
This system can play Blu-ray Disc™ (BD) videos with digital sound. In addition to commercial BD and DVD titles, AVCHD and BDAV videos can be played on this system, so digital TV recorded by home digital video recorders and BD/DVD home videos recorded by home digital video cameras can also be played on this system.
Press DISC if a disc has already been loaded in the disc slot.
■ Remote controller
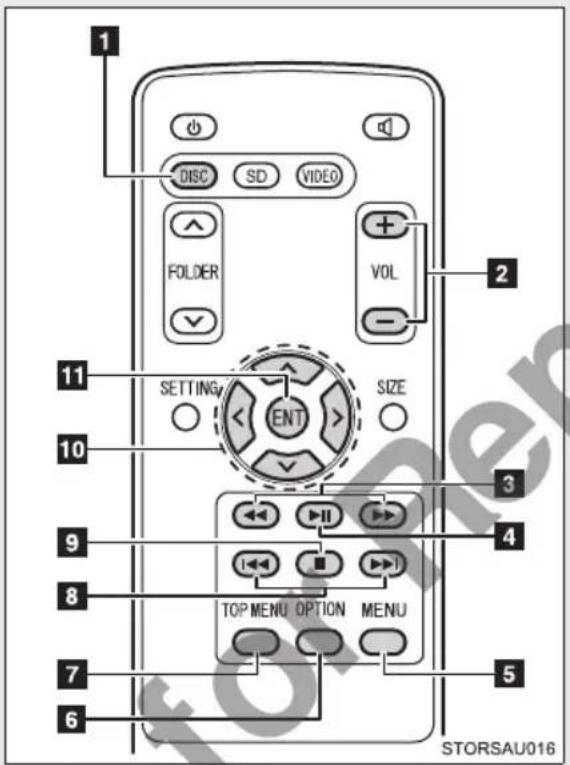
1 Turning on the BD/DVD mode
2 Volume up/down
3 Fast-forward/rewind
4 Play/pause
5 Displaying the menu screen
6 Displaying the option screen
7 Displaying the top menu screen
8 Selecting a chapter
9 Stop
10 Selecting a control icon
11 Inputting the selected control icon
Option screen
Press OPTION while watching a BD/DVD video, the following screen appears.
●Top page
BD video
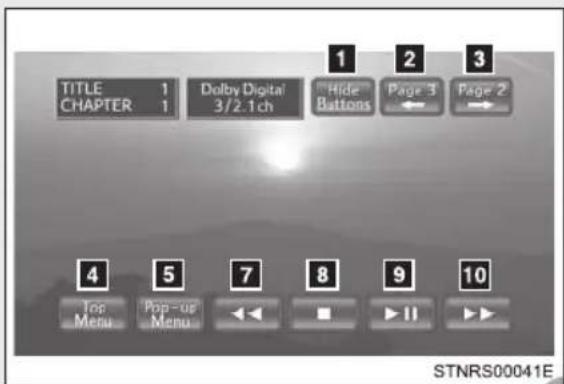
DVD video
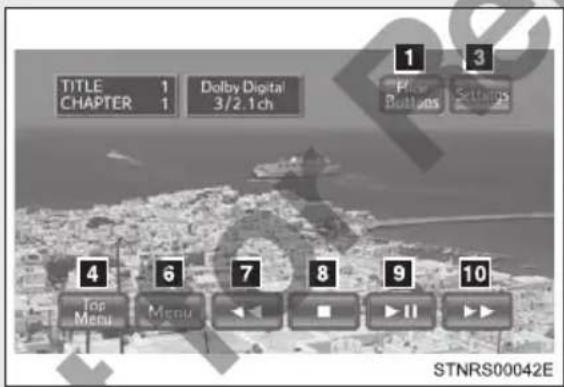
1 Turning off the option screen
2 Displaying the third page
3 Displaying the second page
4 Displaying the top menu screen
5 Displaying the pop-up menu
6 Displaying the menu screen
7 Rewind
8 Stop
9 Play/pause
10 Fast-forward
AVCHD
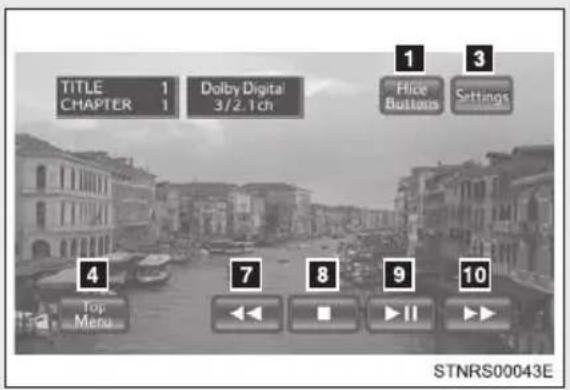
BDAV
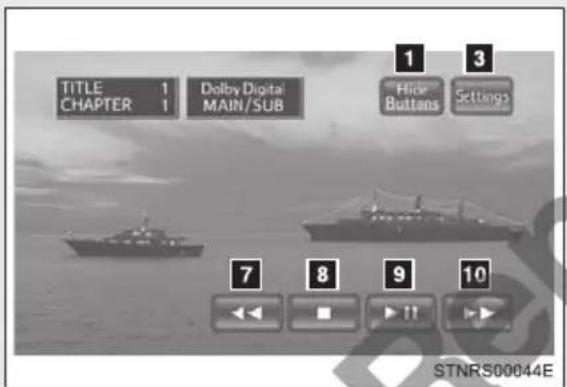
●Second page
BD video
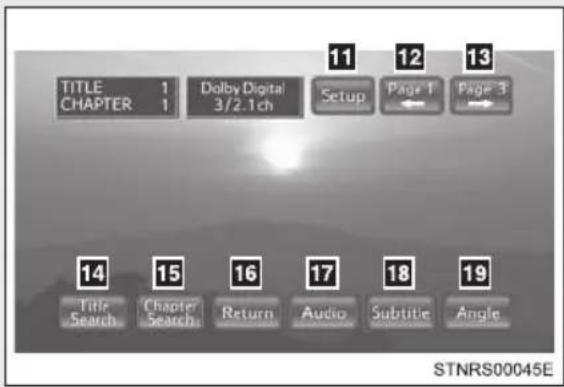
DVD video
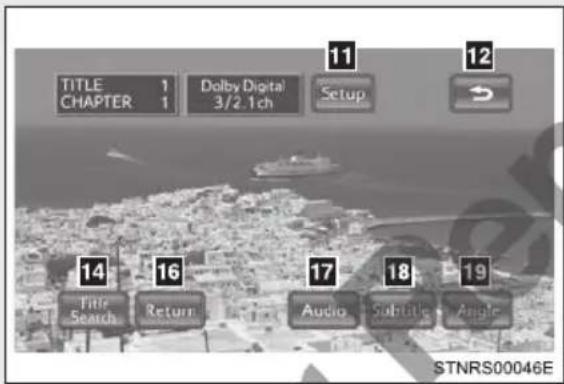
AVCHD
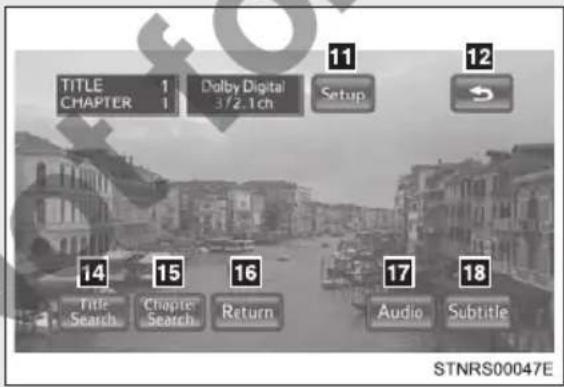
11 Displaying the initial setup screen
12 Displaying the top page
13 Displaying the third page
14 Searching for a title
15 Searching for a chapter
16 Returning to the predetermined scene
17 Changing the audio language
18 Changing the subtitle language
19 Changing the angle
20 Changing the playback mode
21 Changing the audio channel
BDAV
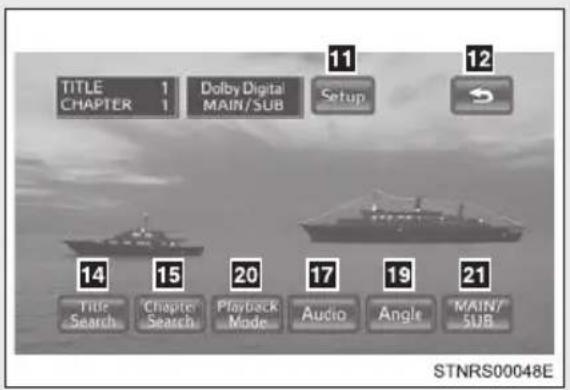
●Third page
BD video
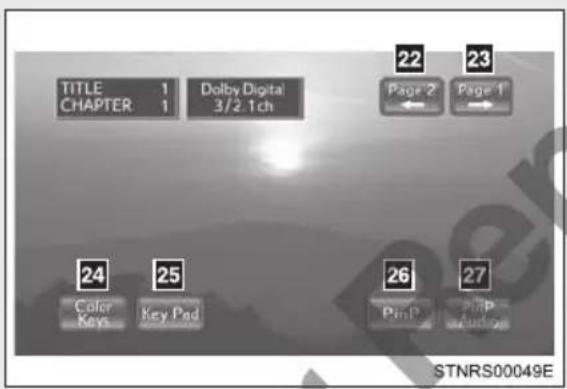
22 Displaying the second page
23 Displaying the top page
24 Displaying the color key buttons
25 Displaying the 10 key pad
26 Displaying the secondary video (Picture-in-picture)
27 Changing the secondary audio
Turning on the BD/DVD mode
Insert a disc or Press with a disc inserted.
The player will start to play the disc automatically.
Playing/pausing a disc
Press to play/pause.
Press and hold while pausing, the video is played slowly.
Selecting a chapter
Press 📄 until the desired chapter appears.
Fast forwarding/rewinding a disc
Press and hold


Operating the disc menu
STEP 1
Press
TOP MENU

MENU

STEP 2
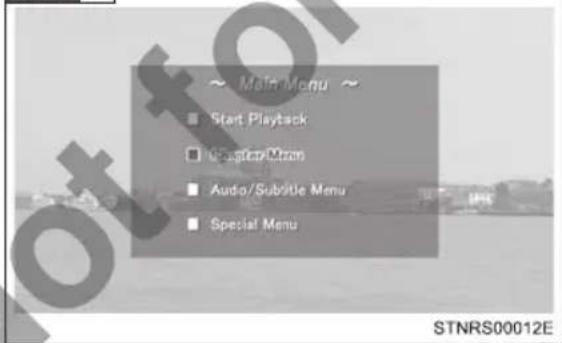
Select the menu item using the


o r
and press

nter.
Option screen
■Displaying the option screen
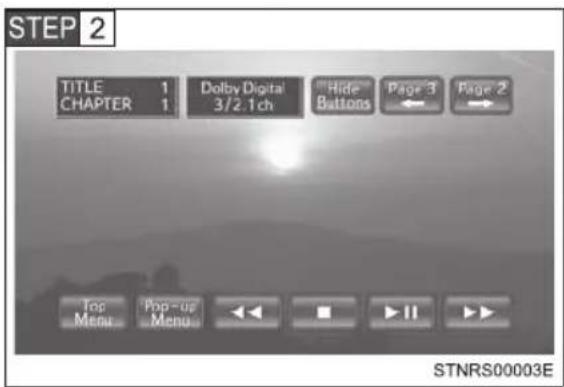
The option screen is displayed.
Press OPTION once again or select "Hide Buttons" to turn off the option screen.
■Displaying the pop-up menu (BD video)
Some BD video discs have a pop-up navigation menu that can be called up and be operated on the screen without interrupting play-back.
STEP 1 Select "Pop-up Menu".
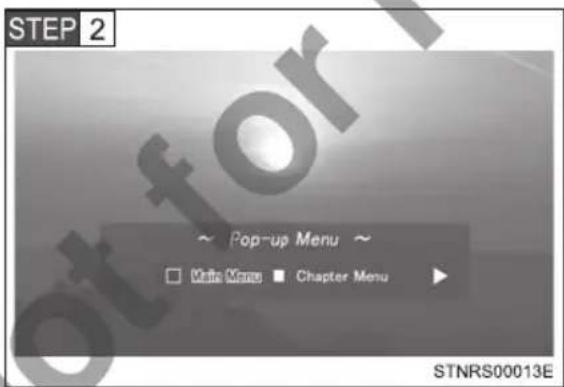
Select the menu item using the

■Searching for a title or chapter
STEP 1 Select "Page 2" or "Settings".
STEP 2 Select "Title Search" or "Chapter Search".
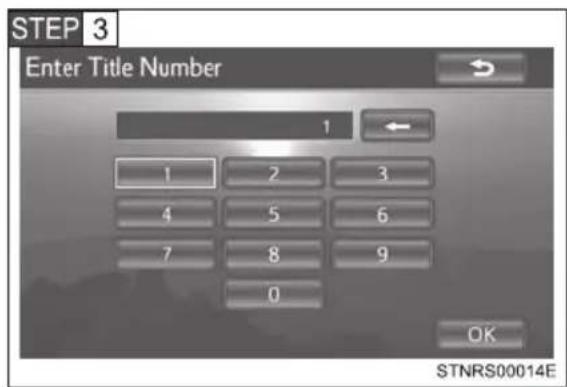
Input the title number or chapter number, and select "OK".
■Changing the angle
The angle can be changed for discs that are multi-angle compatible when the angle mark appears on the screen.
STEP 1 Select "Page 2" or "Settings".
STEP 2 Select "Angle".
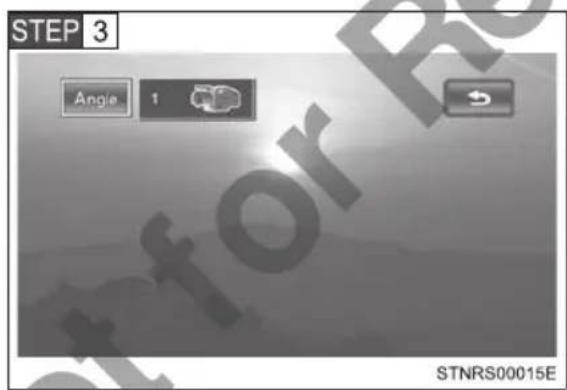
Each time "Angle" is selected, the angle changes.
■Changing the subtitle language
The subtitle language can be changed for discs with multiple subtitle languages.
STEP 1 Select "Page 2" or "Settings".
STEP 2 Select "Subtitle".
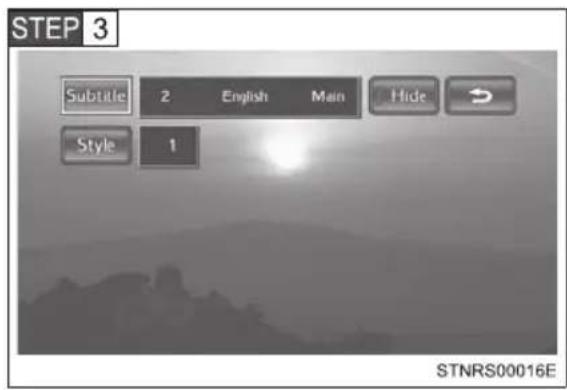
Each time “Subtitle” is selected, another language available on the disc is selected.
"Hide": Subtitle can be hidden
"Style" (BD video only): Subtitle style can be changed
■Changing the audio language
The audio language can be changed for discs with multiple audio languages.
STEP 1 Select "Page 2" or "Settings".
STEP 2 Select "Audio".
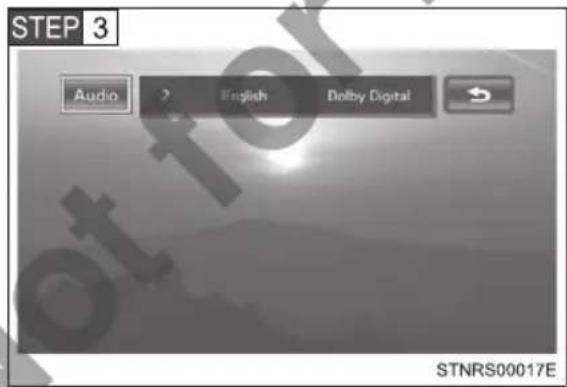
Each time "Audio" is selected, another language available on the disc is selected.
■Changing the audio channel (BDAV)
The audio channel can be changed for discs with multiple audio channels.
STEP 1 Select "Settings".
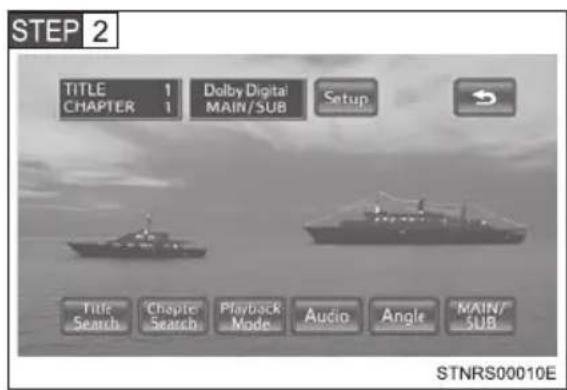
Each time “MAIN/SUB” is selected, the mode changes in the following order:
"MAIN": Main audio channel
"SUB": Sub audio channel
"MAIN/SUB": Both the main and sub audio channels
■Changing the playback mode (BDAV)
The playback mode can be changed to program mode or playlist mode. Playlist mode cannot be selected if a playlist is not stored on the disc.
STEP 1 Select "Settings".
STEP 2 Select "Playback Mode".
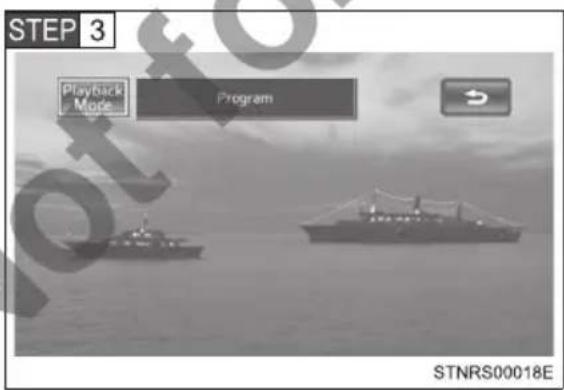
Each time "Playback Mode" is selected, the mode changes.
Program mode: Playback the disc in order of program number
Playlist mode: Playback the disc in order of playlist number
■Displaying the secondary video (Picture-in-picture) (BD video)
Picture-in-picture is a secondary video that plays embedded in the primary video. The secondary video can be played from a disc compatible with the picture-in-picture function.
STEP 1 Select "Page 3".
STEP 2 Select "PinP".
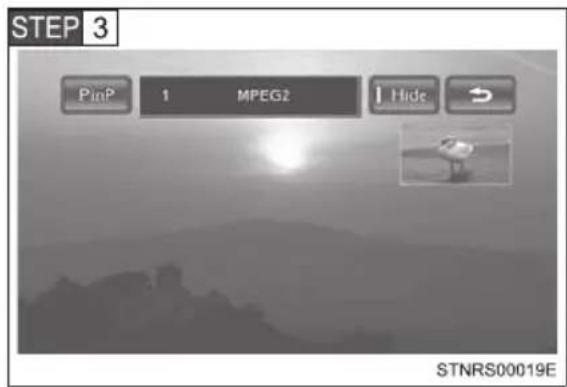
The secondary video is displayed on the screen.
Each time "PinP" is selected, another secondary video available on the disc is selected.
"Hide": Secondary video can be hidden
■Changing the secondary audio (BD video)
The secondary audio that for the secondary video can be changed.
STEP 1 Select "Page 3".
STEP 2 Select "PinP Audio".
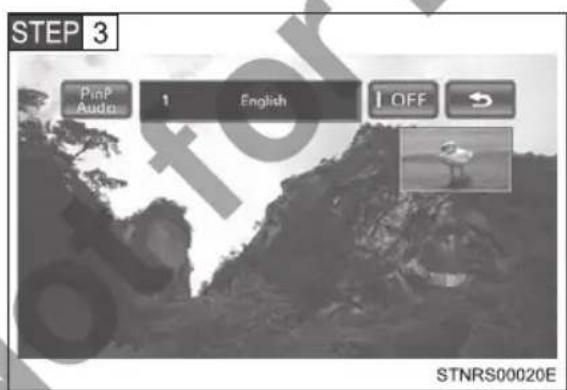
Each time "PinP Audio" is selected, another secondary audio stored on the disc is selected.
"OFF": Secondary audio can be turned off
■Displaying the color key buttons (BD video)
The color button is used for various uses according to directions of contents.
STEP 1 Select "Page 3".
STEP 2 Select "Color Keys".
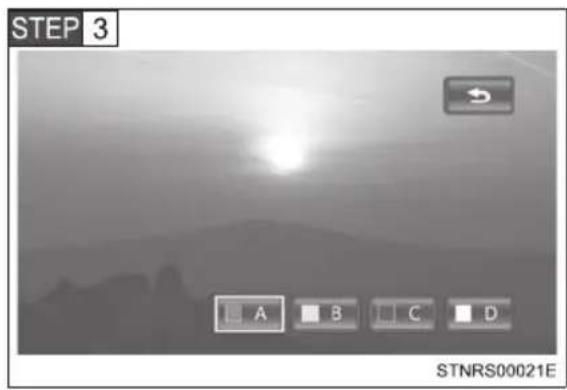
The color key buttons are displayed on the screen.
■Displaying the 10 key pad (BD video)
The 10 key pad is used when inputting numbers according to directions of contents.
STEP 1 Select "Page 3".
STEP 2 Select "Key Pad".
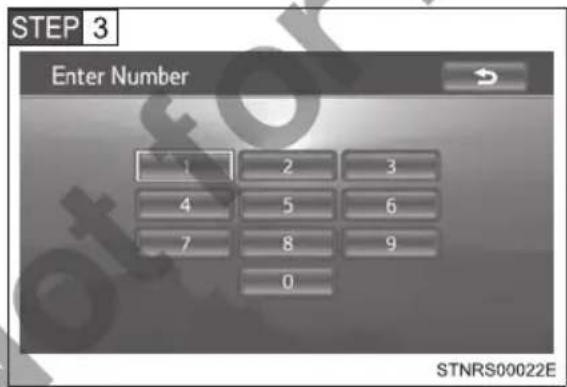
The 10 key pad is displayed on the screen.
■Initial setup
●Displaying the initial setup screen
STEP 1 Select "Page 2" or "Settings".
STEP 2 Select "Setup".
STEP 3 Select the settings to be changed.
Page 1
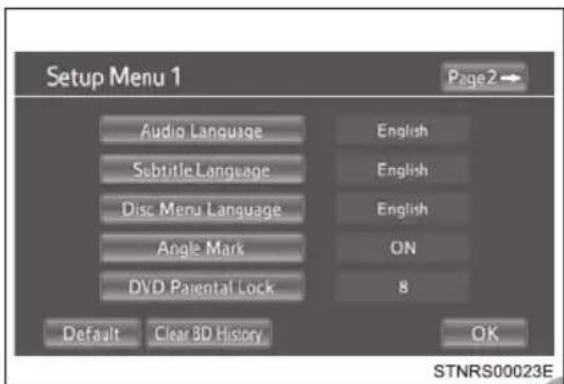
Page 2
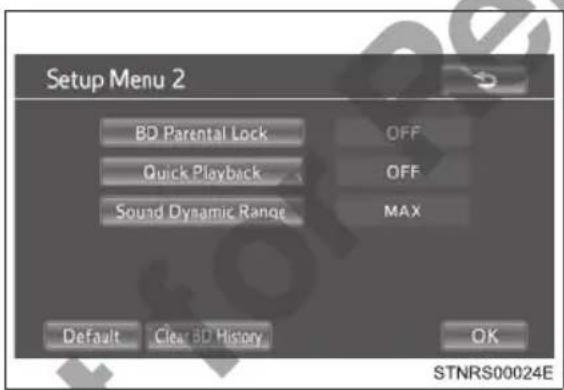
After the settings are changed, select "OK".
"Page 2": Goes to next page
"Default": Restores default settings
"Clear BD History": BD history data such as bookmarks and resume point can be deleted.
●Changing the initial audio language
STEP 1 Select "Audio Language".
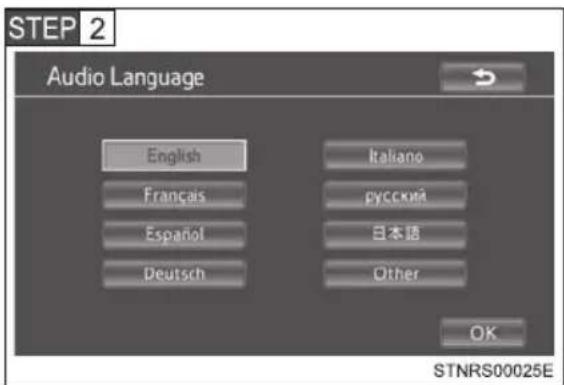
Select the desired language.
If you cannot find the desired language, select "Other" and input the desired language code. (→P. 335)
●Changing the initial subtitle language
STEP 1 Select "Subtitle Language".
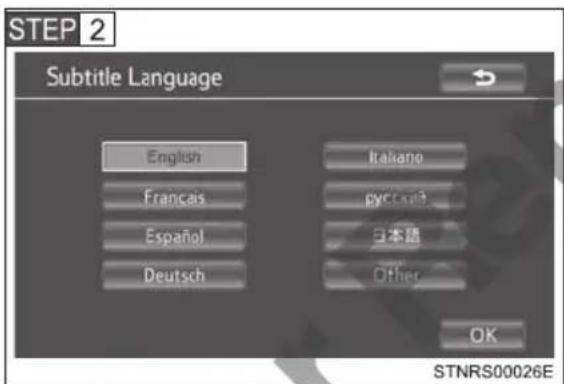
Select the desired language.
If you cannot find the desired language, select "Other" and input the desired language code. (→P. 335)
●Changing the initial language of the disc menu
STEP 1 Select "Disc Menu Language".
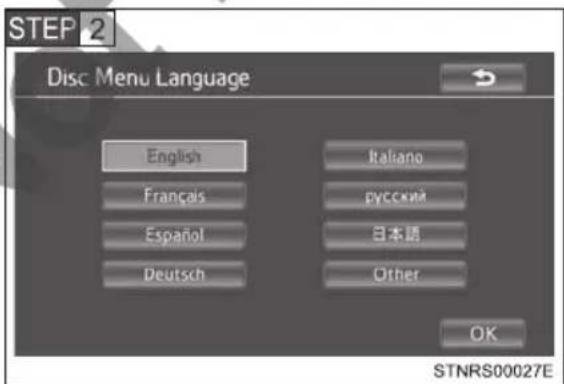
Select the desired language.
If you cannot find the desired language, select "Other" and input the desired language code. (→P. 335)
●Setting the angle mark
If the BD/DVD disc has angle options, you can turn the angle mark on/off.
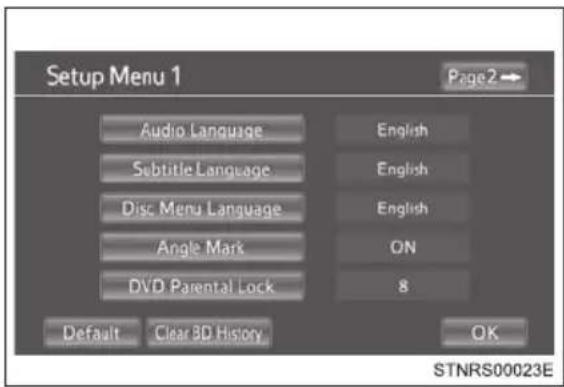
Each time “Angle Mark” is selected, “ON” or “OFF” can be selected.
●Setting the DVD parental lock
The level of viewer restrictions can be set.
STEP 1 Select "DVD Parental Lock".
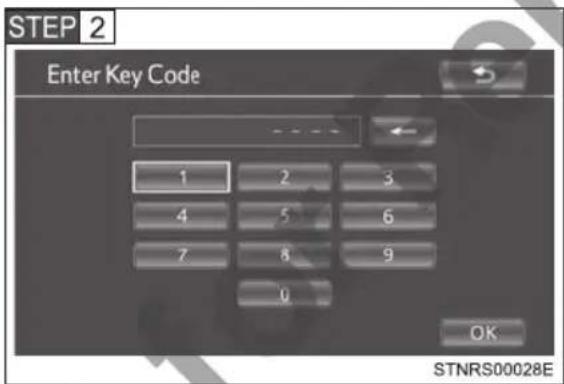
Input the 4-digit personal code and then select "OK".
Select 10 times to reset the personal code in case the code was forgotten.
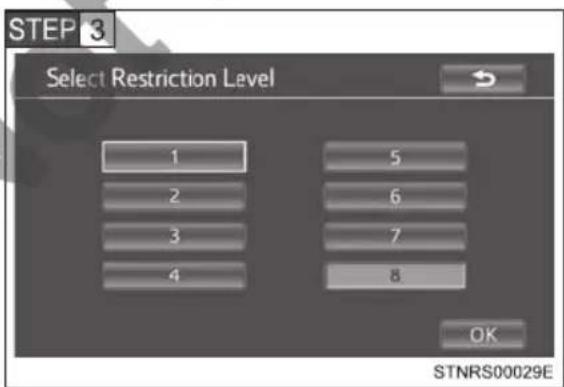
Select a restriction level (1-8) and then select "OK".
●Setting the BD parental lock
The age of viewer restrictions can be set.
STEP 1 Select "BD Parental Lock".
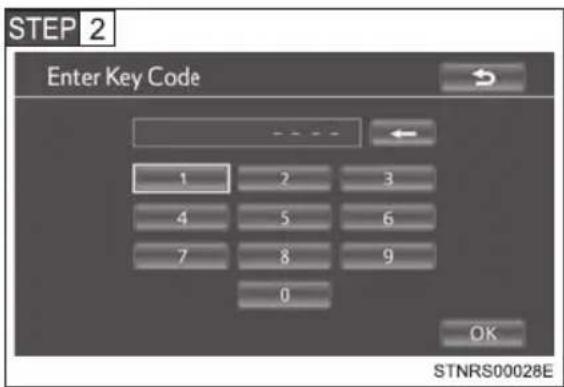
Input the 4-digit personal code and then select "OK".
Select 10 times to reset the personal code in case the code was forgotten.
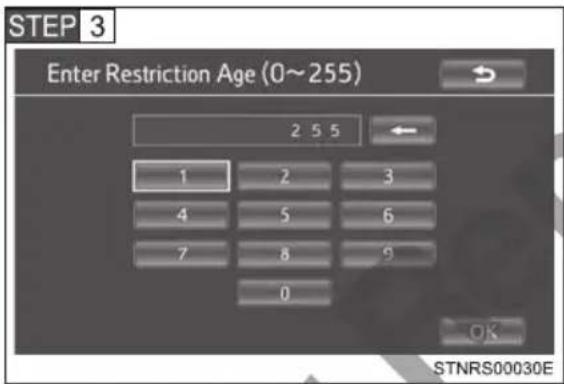
Input a restriction age (0-255) and then select "OK".
●Setting a quick playback (BD video)
After inserting a BD disc you can skip over to the first playback point and can immediately playback the main story.
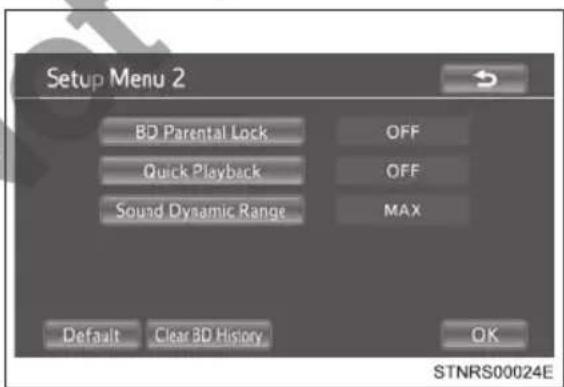
Each time “Quick Playback” is selected, “ON” or “OFF” can be selected.
●Setting a sound dynamic range
The difference between the lowest and highest sound volumes can be adjusted.
Each time “Sound Dynamic Range” is selected, the setting changes in the following order:
“MAX”: Maximum dynamic range
"STD": Standard dynamic range ↓
"MIN": Minimum dynamic range
■ Discs that can be used ( P. 309)
BD/DVD video discs
- Compatible media
Media that can be used for playback are BD-ROMs, BD-Rs, BD-REs, DVD-ROMs, DVD-Rs and DVD-RWs.
● Compatible disc formats
Disc formats that can be used for playback are BD video formats, BDAV formats, AVCHD formats, and DVD video formats
● This player conforms to NTSC/PAL color TV formats.
- Region codes
Some BD/DVD video discs have a region code indicating the region in which you can use the BD/DVD video disc.
If the BD video disc is not labeled "B" or "ABC" or if the DVD video disc is not labeled "4" or "ALL", you cannot use it on this player.
If you attempt to play BD/DVD video discs with incompatible region codes on this player, an error message appears on the screen. Even if the BD/DVD video disc does not have a region code, in some cases it cannot be used.
- When storing content on BD-R, BD-RE, DVD-R or DVD-RW discs, they must be finalized using a recorder. Discs that are not finalized cannot be played by this system.
●Discs that are recorded with multi session cannot be played by this system. - BD-Live™ is not supported.
Symbols shown on BD/DVD video discs
| Symbol Meaning | |
| PAL/NTSC | Indicates PAL/NTSC format |
 | Indicates the number of audio tracks |
 | Indicates the number of language subtitles |
 | Indicates the number of angles |
  | Indicates the screen display ratios availableWide screen: 16:9Standard: 4:3 |
    | Indicates the disc's region codeBD video“ABC”: all regionsAlphabet: region codeDVD video“ALL”: all regionsNumber: region code |
■BD/DVD video disc information
●Parental controls
This feature limits what can be viewed in conformity with the level of restrictions of the country. The level of restrictions varies depending on the BD/DVD video disc. Some BD/DVD video discs cannot be played at all, or violent scenes are skipped or replaced with other scenes.
- DVD video
Level 1: DVD video discs for children can be played.
Level 2 - 7: DVD video discs for children and G-rated movies can be played.
Level 8: All types of DVD video discs can be played.
- BD video
Parental controls of BD videos can be set up by inputting an age. If the target age of BD video exceeds the age restriction that was set up, then playback will not be possible.
●Multi-angle feature
You can enjoy the same scene from different angles.
●Multi-language option
You can select the subtitle and audio languages.
- Region codes
The region codes are provided on BD/DVD players and BD/DVD discs. If the BD/DVD disc does not have the same region code as the BD/DVD player, you cannot play the disc on the player.
● Title and chapter
Video and audio programs stored in BD/DVD video discs are divided into parts by title and chapter.
Title: The largest unit of the video and audio programs stored on BD/DVD video discs. Usually, one movie, one album, or one audio program is assigned as a title.
Chapter: A title comprises of one or more chapters.
AVCHD
AVCHD is a new format (standard) for high definition video cameras that can record and play high-resolution HD images.
DVDs and SD cards with videos recorded in AVCHD format can playback on this system.
●BDAV (Blu-ray Disc™ Audio/Visual)
BDAV is one of the audio/video recording formats for Blu-ray Disc™, has been made primarily for the purpose of broadcasting the recording.
It is used when recording to BD-R and BD-RE by Blu-ray™ recorder.
BD-J
Some BD video discs contain Java applications, and these applications are called BD-J. You can enjoy various interactive features in addition to playing normal video.
- Pop-up menu
Some BD video discs have a pop-up navigation menu that can be called up and be operated on the screen without interrupting playback.
●Picture-in-picture
This is a function of BD video that plays the primary video and secondary video simultaneously. For instance, the function is capable of playing the original movie as the primary video while playing video commentary from the film director on a small screen as a secondary video.
●DUBA (Disc Unbound BD-J Application)
For BD videos that come as a 2 disc set or more, after finishing and ejecting one of the discs, continuation of the video can be seen shortly after replacing the disc with the proper disc.
● Playlist (BDAV only)
A playlist of favorite scenes by Blu-ray™ recorder can be created and the scenes can playback via playlist.
Audio
This player can play liner PCM, Dolby digital, DTS and MPEG audio format. Other decoded types cannot be played.
Language codes list
| Code Language | Code Language |
| 0514 English | 0401 Danish |
| 0618 French | 0426 Bhutani |
| 0405 German | 0515 Esperanto |
| 0920 Italian | 0520 Estonian |
| 0519 Spanish | 0521 Basque |
| 2608 Chinese | 0601 Persian |
| 1412 Dutch | 0609 Finnish |
| 1620 Portuguese | 0610 Fiji |
| 1922 Swedish | 0615 Faroese |
| 1821 Russian | 0625 Frisian |
| 1115 Korean | 0701 Irish |
| 0512 Greek | 0704 Scots-Gaelic |
| 0101 Afar | 0712 Galician |
| 0102 Abkhazian | 0714 Guarani |
| 0106 Afrikaans | 0721 Gujarati |
| 0113 Amharic | 0801 Hausa |
| 0118 Arabic | 0809 Hindi |
| 0119 Assamese | 0818 Croatian |
| 0125 Aymara | 0821 Hungarian |
| 0126 Azerbaijani | 0825 Armenian |
| 0201 Bashkir | 0901 Interlingua |
| 0205 Byelorussian | 0905 Interlingue |
| 0207 Bulgarian | 0911 Inupiak |
| 0208 Bihari | 0914 Indonesian |
| 0209 Bislama | 0919 Icelandic |
| 0214 Bengali | 0921 Inuktitut |
| 0215 Tibetan | 0923 Hebrew |
| 0218 Breton | 1001 Japanese |
| 0301 Catalan | 1009 Yiddish |
| 0315 Corsican | 1023 Javanese |
| 0319 Czech | 1101 Georgian |
| 0325 Welsh | 1111 Kazakh |
| Code Language |
| 1112 Greenlandic |
| 1113 Cambodian |
| 1114 Kannada |
| 1119 Kashmiri |
| 1121 Kurdish |
| 1125 Kirghiz |
| 1201 Latin |
| 1214 Lingala |
| 1215 Laothian |
| 1220 Lithuanian |
| 1222 Latvian |
| 1307 Malagasy |
| 1309 Maori |
| 1311 Macedonian |
| 1312 Malayalam |
| 1314 Mongolian |
| 1315 Moldavian |
| 1318 Marathi |
| 1319 Malay |
| 1320 Maltese |
| 1325 Burmese |
| 1401 Nauru |
| 1405 Nepali |
| 1415 Norwegian |
| 1503 Occitan |
| 1513 (Afan) Oromo |
| 1518 Oriya |
| 1601 Punjabi |
| 1612 Polish |
| 1619 Pashto, Pushto |
| 1721 Quechua |
| 1813 Rhaeto-Romance |
| 1814 Kirundi |
| Code Language | |
| 1815 Romanian | |
| 1823 Kinyarwanda | |
| 1901 Sanskrit | |
| 1904 Sindhi | |
| 1907 Sangho | |
| 1908 Serbo-Croatian | |
| 1909 Sinhalese | |
| 1911 Slovak | |
| 1912 Slovenian | |
| 1913 Samoan | |
| 1914 Shona | |
| 1915 Somali | |
| 1917 Albanian | |
| 1918 Serbian | |
| 1919 Siswati | |
| 1920 Sesotho | |
| 1921 Sundanese | |
| 1923 Swahili | |
| 2001 Tamil | |
| 2005 Telugu | |
| 2007 Tajik | |
| 2008 Thai | |
| 2009 Tigrinya | |
| 2011 Turkmen | |
| 2012 Tagalog | |
| 2014 Setswana | |
| 2015 Tonga | |
| 2018 Turkish | |
| 2019 Tsonga | |
| 2020 Tatar | |
| 2023 Twi | |
| 2107 Uighur | |
| 2111 Ukrainian | |
| 2118 Urdu | |
| 2126 Uzbek | |
| 2209 Vietnamese | |
| 2215 Volapük | |
| 2315 Wolof |
| Code Language |
| 2408 Xhosa |
| 2515 Yoruba |
| 2601 Zhuang |
| 2621 Zulu |

WARNING
■Certification for the player
This product is a class I laser product.
● A laser beam leak may result in hazardous radiation exposure.
- Do not open the cover of the player or attempt to repair the unit yourself. Refer servicing to qualified personnel.
●Laser power: No hazardous
■BD/DVD video precaution
Conversational speech on some BDs/DVDs is recorded at a low volume to emphasize the impact of sound effects. If you adjust the volume assuming that the conversations represent the maximum volume level that the BD/DVD will play, you may be startled by louder sound effects or startled when you change to a different audio source.
Loud sounds may have a significant impact on the human body or pose a driving hazard. Keep this in mind when you adjust the volume.

NOTICE
■Discs and adapters that cannot be used
Do not use the following types of CDs.
Also, do not use 8 cm (3 in.) CD adapters, DualDiscs or printable discs.
Doing so may damage the player and/or disc insert/eject function.
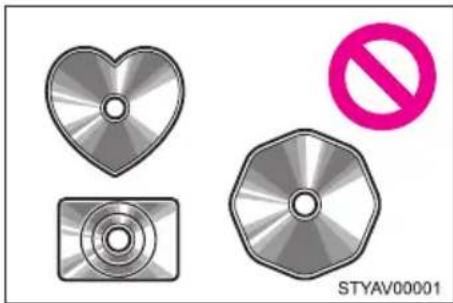
natural_image
Three metallic discs with heart-shaped and octagonal shapes, one marked with a pink prohibition symbol (no text or labels on discs)● Discs that have a diameter that is not 12 cm (4.7 in.).
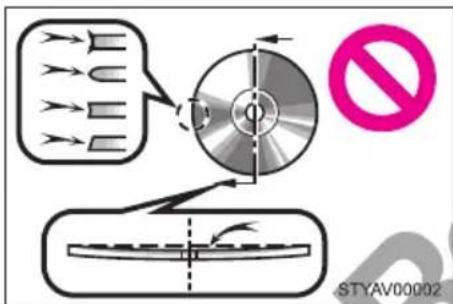
● Low-quality or deformed discs.
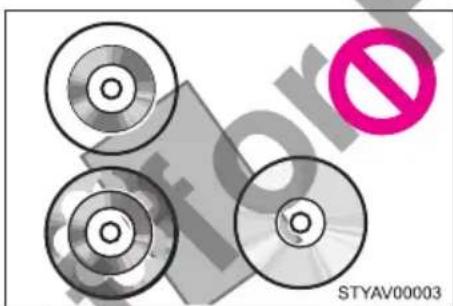
natural_image
Three circular discs with a pink prohibition symbol overlay (no readable text or symbols on discs)● Discs with a transparent or translucent recording area.
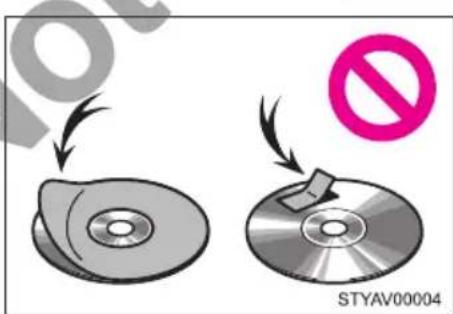
● Discs that have tape, stickers or labels attached to them, or that have had the label peeled off.

NOTICE
Player precautions
Failure to follow the precautions below may result in damage to the discs or the player itself.
- Do not insert anything other than discs into the disc slot.
- Do not apply oil to the player.
●Store discs away from direct sunlight.
●Never try to disassemble any part of the player.
3-3. Using the rear seat entertainment system
Playing an audio CD and MP3/WMA discs\*
Press DISC if a disc has already been loaded in the disc slot. The player will start to play the disc automatically.
■ Remote controller
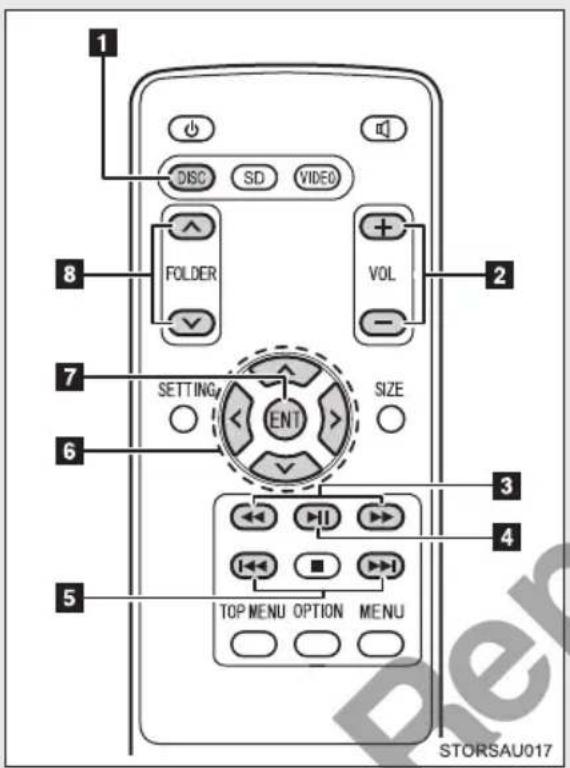
1 Turning on the audio CD and MP3/WMA mode
2 Volume up/down
3 Fast-forward/rewind
4 Play/pause
5 Selecting a track/file
6 Selecting a control icon
7 Inputting the selected control icon
8 Selecting a folder
Control screen
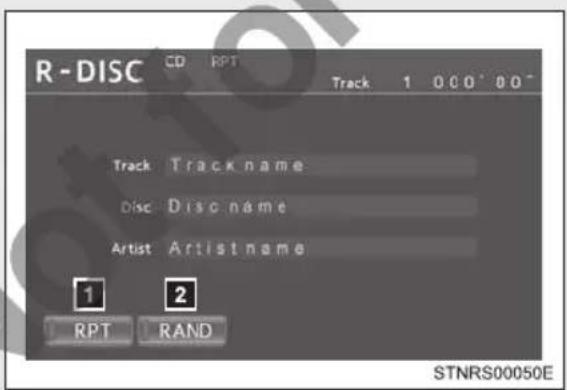
1 Repeat play
2 Random playback
Turning on the audio CD and MP3/WMA mode
Insert a disc or Press with a disc inserted.
The player will start to play the disc automatically.
Selecting a track/file
Press 📄 until the desired track/file number appears.
Fast forwarding or rewinding a track/file
Press and hold


Selecting a folder (MP3/WMA)
Press ☑ of "FOLDER" until the desired folder number appears.
Press and hold, the top file stored in the top folder in the disc will be selected.
Repeat play
Each time "RPT" is selected, the mode changes as follow:
Audio CD
“RPT” (track repeat) → Off
MP3/WMA
“RPT” (file repeat) → “FLD.RPT” (folder repeat) → Off
Random playback
Each time "RAND" is selected, the mode changes as follow:
Audio CD
“RAND” (random) → Off
MP3/WMA
“RAND” (1 folder random) → “FLD.RAND” (1 disc random) → Off
■ Discs that can be used ( P. 309)
■Displaying the title and artist name
If a CD-TEXT disc is inserted, the titles of the disc and track will be displayed.
■MP3 and WMA files
MP3 (MPEG Audio LAYER3) is a standard audio compression format.
Files can be compressed to approximately 1/10 of their original size by using MP3 compression.
WMA (Windows Media Audio) is a Microsoft audio compression format.
This format compresses audio data to a size smaller than that of the MP3 format.
There is a limit to the MP3 and WMA file standards and to the media/formats recorded by them that can be used.
●MP3 file compatibility
- Compatible standards MP3 (MPEG1 LAYER3, MPEG2 LSF LAYER3)
- Compatible sampling frequencies MPEG1 LAYER3: 32, 44.1, 48 (kHz) MPEG2 LSF LAYER3: 16, 22.05, 24 (kHz)
- Compatible bit rates (compatible with VBR) MPEG1 LAYER3: 64, 80, 96, 112, 128, 160, 192, 224, 256, 320 (kbps) MPEG2 LSF LAYER3: 64, 80, 96, 112, 128, 144, 160 (kbps)
- Compatible channel modes: stereo, joint stereo, dual channel and mono
●WMA file compatibility
- Compatible standards WMA Ver. 7, 8, 9
- Compatible sampling frequencies 32, 44.1, 48 (kHz)
- Compatible bit rates (only compatible with 2-channel playback)
Ver. 7, 8, 9: CBR 48, 64, 80, 96, 128, 160, 192 (kbps)
- Compatible media
Media that can be used for MP3 and WMA playback:
• CD-ROM/R/RW
• DVD-ROM/R/RW
Playback in some instances may not be possible, depending on the status of the disc. Playback may not be possible or the audio may jump if the disc is scratched or marked with fingerprints.
●Compatible disc formats
The following disc formats can be used.
• Disc formats: CD-ROM Mode 1
CD-ROM XA Mode 2 Form 1
- File formats: ISO9660 Level 1, Level 2 (Romeo, Joliet) UDF (2.01 or lower)
MP3 and WMA files written in any format other than those listed above may not play correctly, and their file names and folder names may not be displayed correctly.
Items related to standards and limitations are as follows.
• Maximum directory hierarchy: 8 levels
• Maximum length of folder names/file names: 20 characters
• Maximum number of folders: 255 (including the root)
• Maximum number of files per disc: 512
- File names
The only files that can be recognized as MP3/WMA and played are those with the extension .mp3 or .wma.
Multi-sessions
As the audio system is compatible with multi-sessions, it is possible to play discs that contain MP3 and WMA files.
ID3 and WMA tags
ID3 tags can be added to MP3 files, making it possible to record the track title, artist name, etc.
The system is compatible with ID3 Ver. 1.0, 1.1, and Ver. 2.3 ID3 tags. (The number of characters is based on ID3 Ver. 1.0 and 1.1.)
WMA tags can be added to WMA files, making it possible to record the track title and artist name in the same way as with ID3 tags.
●MP3 and WMA playback
When a disc containing MP3 or WMA files is inserted, all files on the disc are first checked. Once the file check is finished, the first MP3 or WMA file is played. To make the file check finish more quickly, we recommend you do not write in any files other than MP3 or WMA files or create any unnecessary folders.
If the discs contain a mixture of music data and MP3 or WMA format data, only music data can be played.
• Extensions
If the file extensions .mp3 and .wma are used for files other than MP3 and WMA files, they will be mistakenly recognized and played as MP3 and WMA files. This may result in large amounts of interference and damage to the speakers.
●Playback
- To play MP3 files with steady sound quality, we recommend a fixed bit rate of 128 kbps and a sampling frequency of 44.1 kHz.
- Playback may not be possible in some instances, depending on the characteristics of the disc.
- There is a wide variety of freeware and other encoding software for MP3 and WMA files on the market, and depending on the status of the encoding and the file format, poor sound quality or noise at the start of playback may result. In some cases, playback may not be possible at all.
- When files other than MP3 or WMA files are recorded on a disc, it may take more time to recognize the disc and in some cases, playback may not be possible at all.

NOTICE
Discs and adapters that cannot be used ( P. 338)
■ Player precautions (→P. 339)
3-3. Using the rear seat entertainment system
Playing an SD card\*
This system can play still pictures and AVCHD video that are stored in an SD card. It does not support music playback.
Press SD if an SD card has already been inserted in the SD card slot.
■ Remote controller
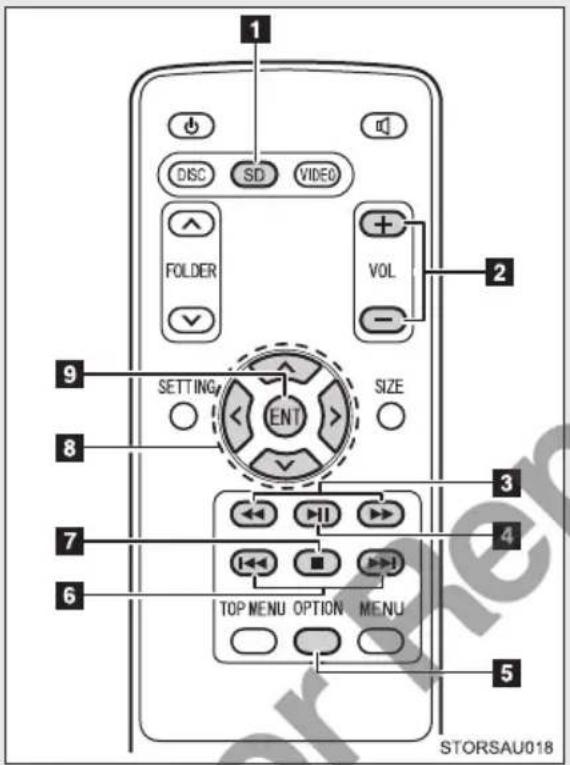
1 Turning on the SD card mode
2 Volume up/down
3 Fast-forward/rewind
4 Play/pause
5 Displaying the option screen
6 Selecting a chapter
7 Stop
8 Selecting a control icon
9 Inputting the selected control icon
Main menu
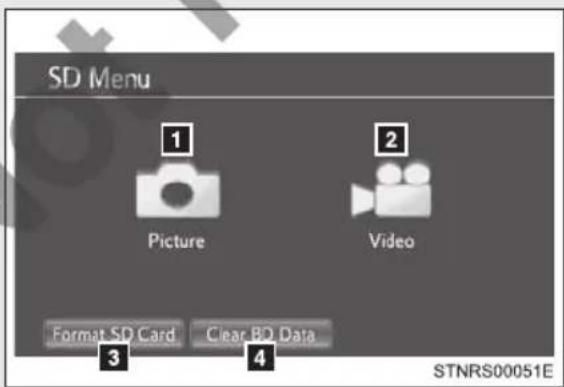
1 Playing still pictures
2 Playing AVCHD video
3 Formatting the SD card
4 Deleting the BD history data
Playing still pictures
■Displaying the still pictures
You can display still pictures that are stored in an SD card.
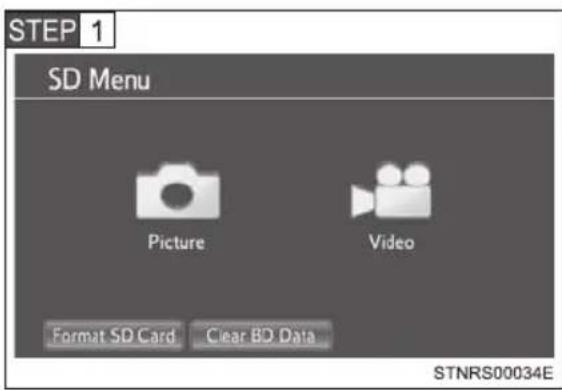
Select "Picture".
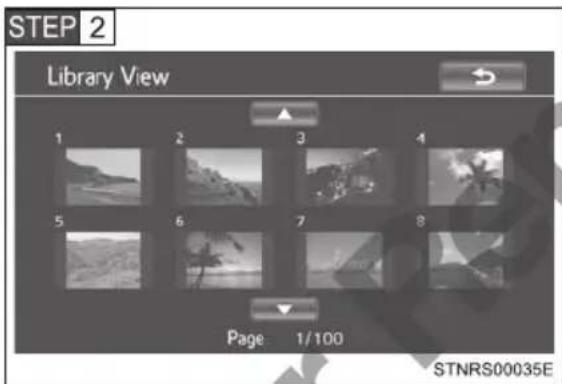
Select the desired still picture to show.
Select ▲ or ▼ to show the next or previous page.
natural_image
Black-and-white coastal scene with waves on shore and hills in background (no text or symbols)Selected picture is displayed on the screen.
Press “<” o> r “ENT” o n to
display the next or previous still picture.
Press to return to the "SD Menu" screen.
Option screen
●Displaying the option screen
STEP 1 Press OPTION
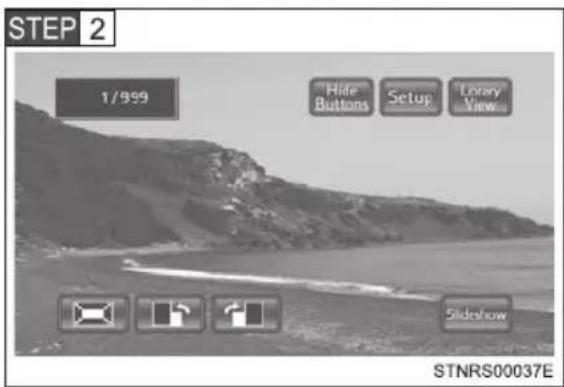
The option screen is displayed.
Press once again or select "Hide Buttons" to turn off the control screen. "Library View": Return to "Library View" screen
●Starting slideshow
You can display still pictures one by one at a constant interval. Select "Slideshow" to start slideshow.
When pressing “<” or “>” on [ENT] during slideshow, the previous or next still picture will be shown, and the slideshow will continue from that picture.
Press ON to stop slideshow.
●Rotating the still pictures
Select or to rotate a still picture.
The rotate information will be maintained until the system is turned off or the SD card is removed.
●Zoom out the still pictures
This function is only available for small-sized still pictures.
Select to zoom out the still pictures.
Select again to cancel zoom out.
● Slideshow settings
STEP 1 Select "Setup".
STEP 2 The slideshow settings can be changed. After the settings are changed, select "OK".
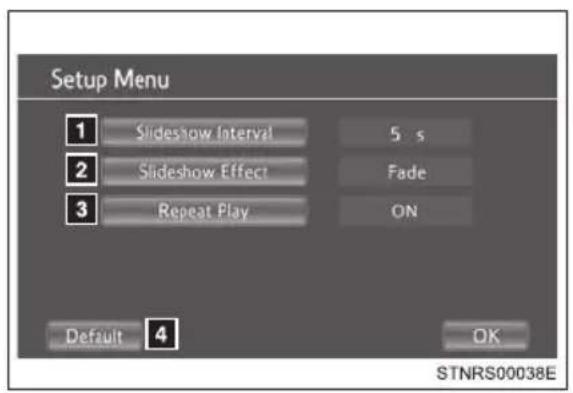
1 Selects slideshow interval time
"5s" → "10s" → "15s" → "30s" → "60s"
2 Selects slideshow effect
“Fade” → “Slide” → “Wipe1” → “Wipe2” → “Dissolve” → “Zoom” → “OFF”
3 Selects on/off to repeat slide-show
4 Restores default settings
Playing AVCHD video
You can play AVCHD videos that are stored in an SD card.
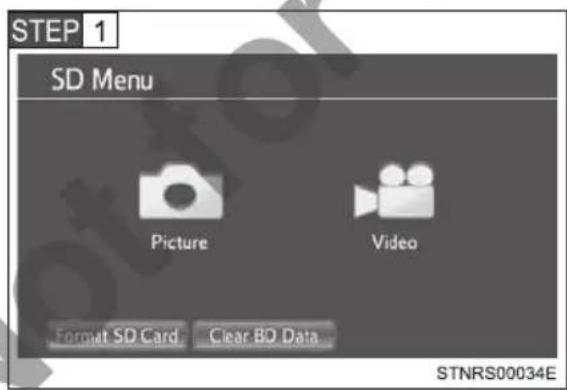
Select "Video".
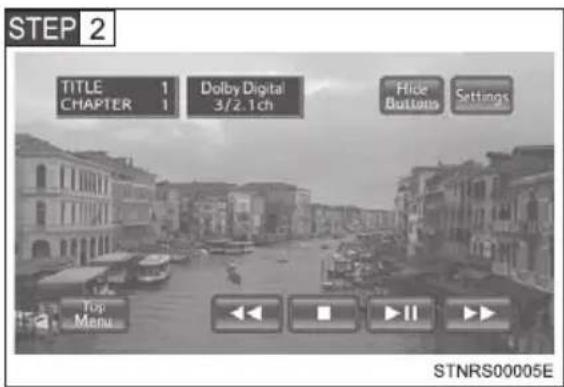
AVCHD video will start playing.
Controls for AVCHD video ( P. 315)
Press to return to the "SD Menu" screen.
Formatting the SD card
STEP 1 Select "Format SD Card".
STEP 2 Select "Yes" to format the SD card.
If the SD card is formatted, all data on the card will be erased.
Deleting the BD history data
The BD history data such as bookmarks and resume information can be deleted.
STEP 1 Select "Clear BD Data".
STEP 2 Select "Yes" to delete the BD history data.
■ SD cards that can be used ( P. 309)
■ Compatible files
The following files can be displayed.
●Picture file format: JPEG
• Picture resolution: between 34×34 and 8192×8192 pixels
- Gray scale JPEG is not supported
●Video file format: AVCHD
SD cards
- An SD card is not provided with the rear seat entertainment system and needs to be purchased separately.
●Compatible formats
This system is compatible with SD memory cards that meet SD card specifications FAT16 formats, SDHC memory cards in FAT32 format, and SDXC memory cards in exFAT format.
- The Panasonic SD memory card format software version 3.1 or higher is recommended.
● Data stored in an SD card may be lost. Before playing back pictures and videos stored in an SD card, make certain to back up the data. - Before an SD card that contains any kind of data is played, slide the lock switch on the SD card to "LOCK" in order to prevent any data from being accidentally deleted or overwritten.

WARNING
SD cards
Keep away from children.
These are small and if swallowed by a child they can cause choking.

NOTICE
■SD card precautions
Failure to follow the precautions below may result in damage to the SD cards or the SD card slot.
- Do not insert anything other than an SD card into the SD card slot.
- Do not stick labels or stickers on SD card. There is a possibility that it may become impossible to eject the SD card from inside the slot.
- Do not handle an SD card with wet hands. Doing so may cause electric shock or a malfunction.
- Do not allow hands or metal objects to contact the interface pins of SD cards.
- Do not place SD cards on the instrument panel, on any place with direct sunlight or in areas with a lot of moisture.
- Do not use SD cards in any place where static electricity or electric noise adversely affects SD cards. This may cause data corruption or data loss.
● Always place the SD card in its storage case when not in use.
3-3. Using the rear seat entertainment system
Using the video mode\*
The rear seat entertainment system plays videos and sound when audio-video equipment is connected to the A/V input port.
Press VIDEO to turn on the video mode.
■ Remote controller
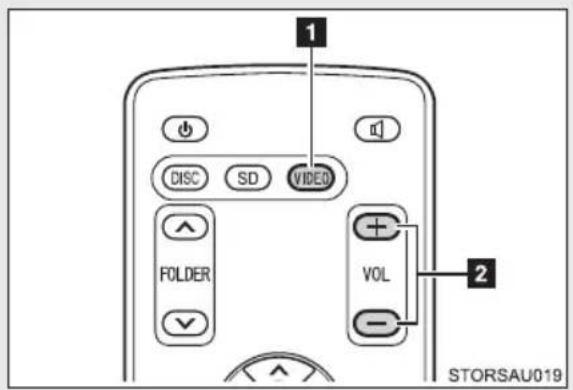
1 Turning on the video mode
2 Volume up/down
■ Using the A/V input port
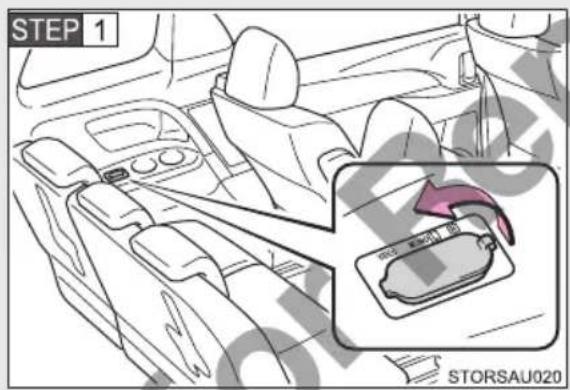
Open the cover and connect audio-video equipment to the A/V input port.
The A/V input port is composed of 3 input jacks.
Yellow: Video input
White: Left channel audio input
Red: Right channel audio input
STEP 2 Turn on the power of the audio-video equipment
STEP 3 Press to turn on the video mode.
- Operating the audio-video equipment connected to the system
The volume can be adjusted using the vehicle's audio controls. All other operations must be made on the audio-video equipment itself.
For details about operation of audio-video equipment, refer to the manufacturer's instructions.

NOTICE
■When the A/V input port is not in use
Keep the A/V input port cover closed.
Inserting anything other than an appropriate plug may cause electrical failure or a short circuit.
3-4. Using the interior lights
Interior lights list
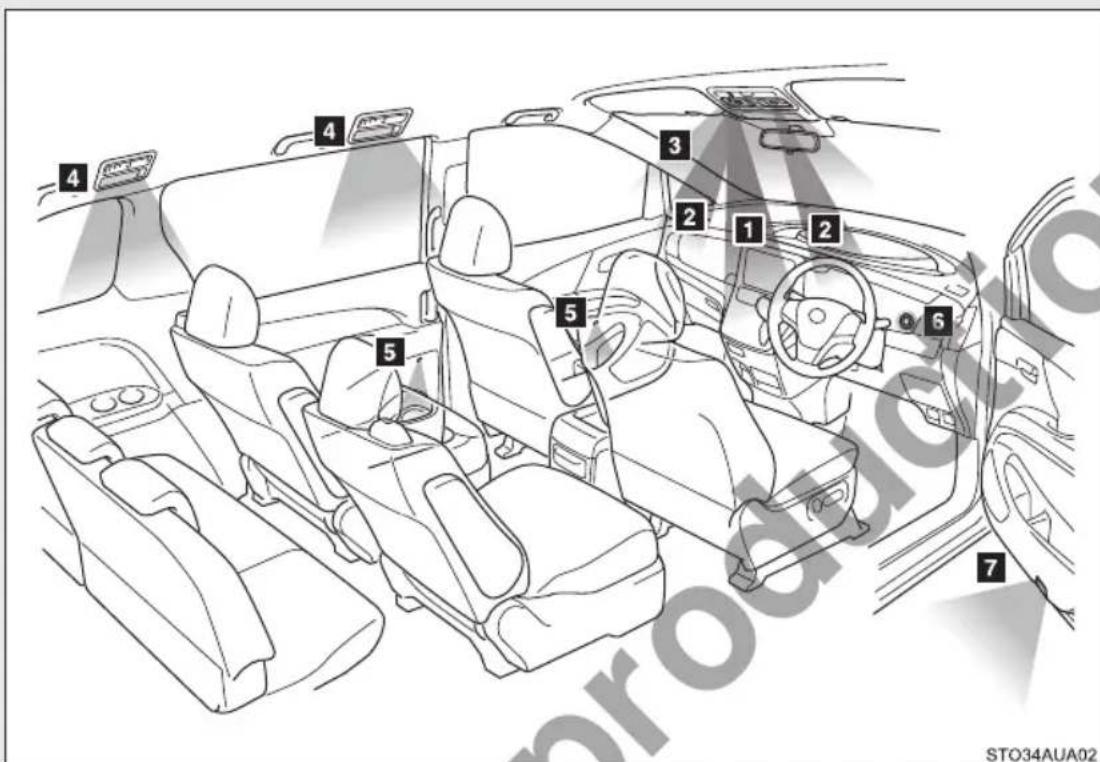
1 Spotlight
2 Front personal lights ( P. 355)
3 Interior light ( P. 355)
4 Rear personal lights ( P. 355)
5 Indirect lights (if equipped)
6 "ENGINE START STOP" switch light
7 Door courtesy lights
Personal lights
Front
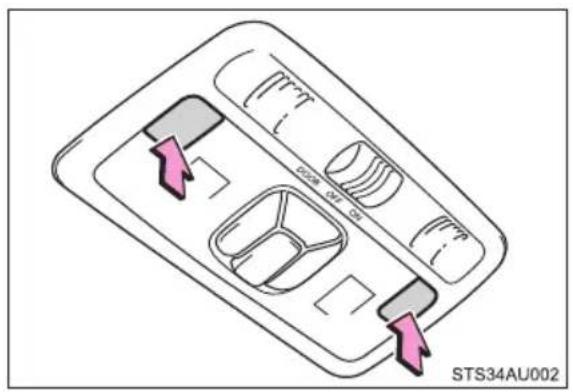
Turns the lights on/off
Rear
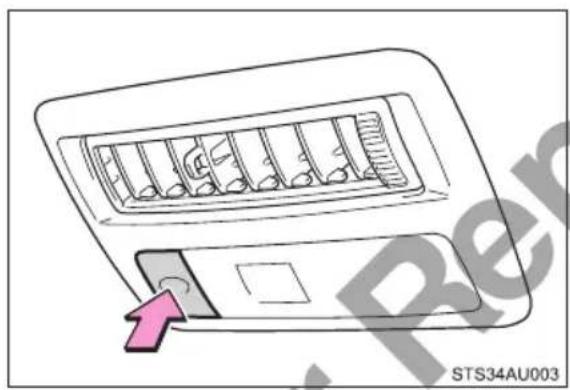
natural_image
Diagram of a car air conditioner unit with a pink arrow pointing to the outlet (no text or symbols on the device itself)Turns the lights on/off
Interior light
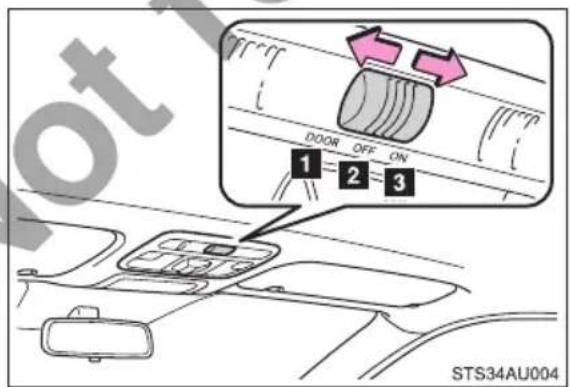
1 Turns the door position on
2 Turns the lights off
3 Turns the lights on
■Illuminated entry system
The lights automatically turn on/off according to “ENGINE START STOP” switch mode, the presence of the electronic key, whether the doors are locked/unlocked, and whether the doors are open/closed.
■Indirect lights (if equipped)
The indirect lights will come on when the “ENGINE START STOP” switch is in IGNITION ON mode. When the shift lever is moved out of the P, the intensity of the light will be reduced.
■To prevent battery discharge
If the lights remain on when the door is not fully closed and the interior light switch is in the "DOOR" position, the lights will go off automatically after 20 minutes.
■ Customization that can be configured at Toyota dealer
Settings (e.g. the time elapsed before lights turn off) can be changed. (Customizable features → P. 551)
3-5. Using the storage features
List of storage features
7-passenger models
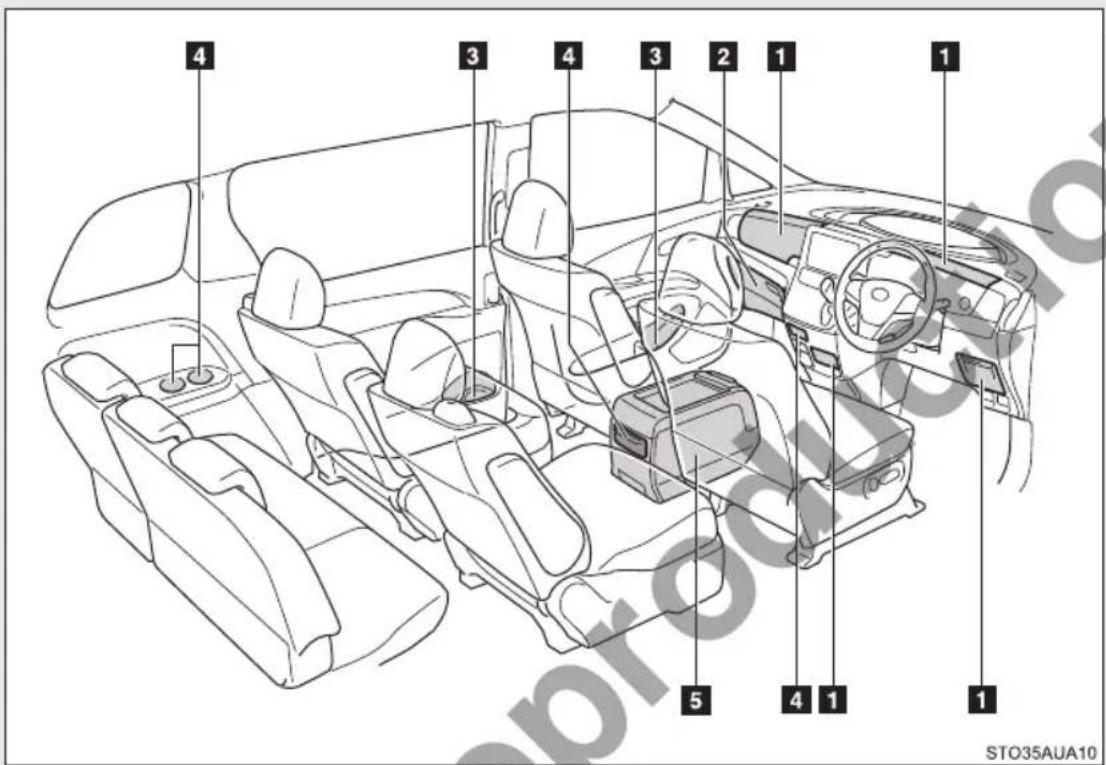
1 Auxiliary boxes
2 Glove box
3 Bottle holders
4 Cup holders
5 Console box
8-passenger models
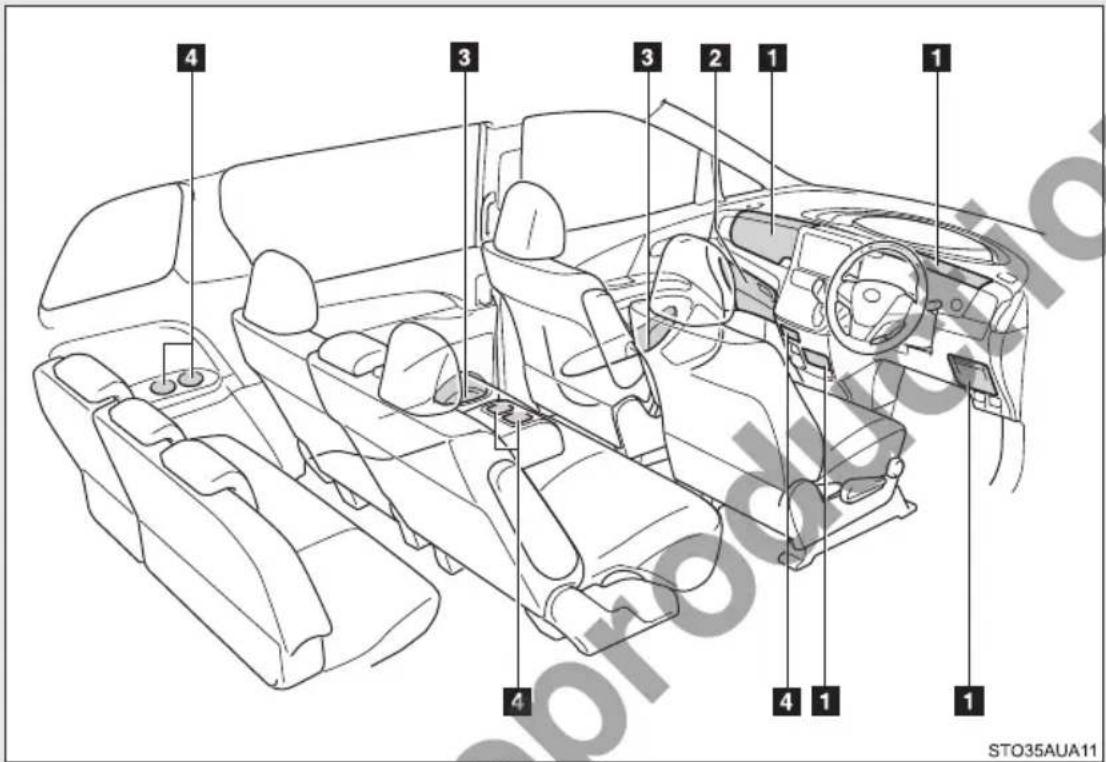
1 Auxiliary boxes
2 Glove box
3 Bottle holders
4 Cup holders

WARNING
■Items that should not be left in the storage spaces
Do not leave glasses, lighters or spray cans in the storage spaces, as this may result in the following when cabin temperature becomes high:
●Glasses may be deformed by heat or cracked if they come into contact with other stored items.
●Lighters or spray cans may explode. If they come into contact with other stored items, the lighter may catch fire or the spray can may release gas, causing a fire hazard.
Glove box
The glove box can be opened by pulling the lever, locked and unlocked by using the mechanical key.
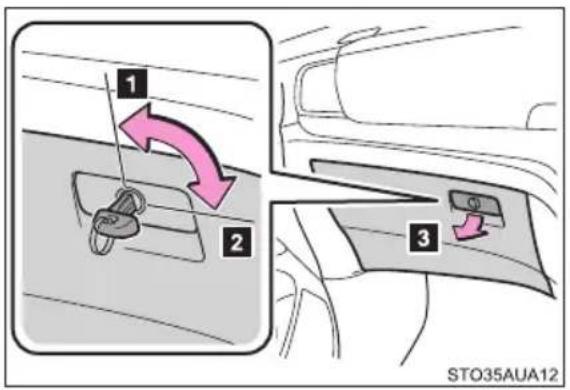
1 Unlock
2Lock
3 Open

WARNING
■While driving
Keep the glove box closed. In the event of sudden braking, an accident may occur due to an occupant being struck by the open glove box or the items stored inside.
Console box (7-passenger models)
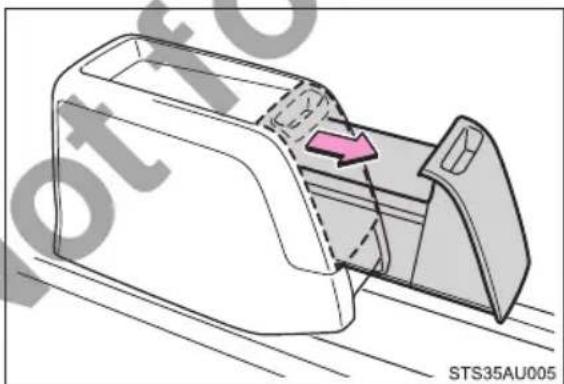
natural_image
Technical line drawing of a mechanical component with a highlighted section and directional arrow (no text or symbols)Slide the console box lid.
■Sliding the console box
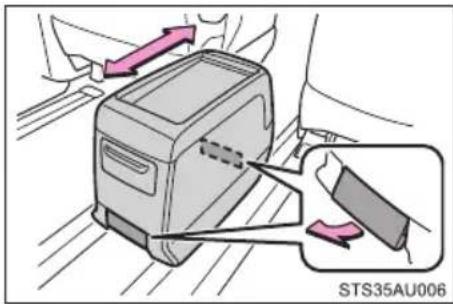
Pull up the lever and slide the console box.
Release the lever after sliding the console box to the desired position.

WARNING
■While driving
Keep the console box closed. In the event of sudden braking, an accident may occur due to an occupant being struck by the open console box or the items stored inside.
■Console box adjustment precaution
- Do not adjust the position of the console box while the vehicle is moving. This may cause the driver to mishandle the vehicle and may lead to an accident that results in death or serious injury.
- Be careful not to get hands or feet pinched between the front console box and the center panel or rear seats.
- Be careful not to allow the front console box to hit any passengers while adjusting its position.
●After adjusting the console box, make sure it is securely locked in position.
Cup holders
Front seats
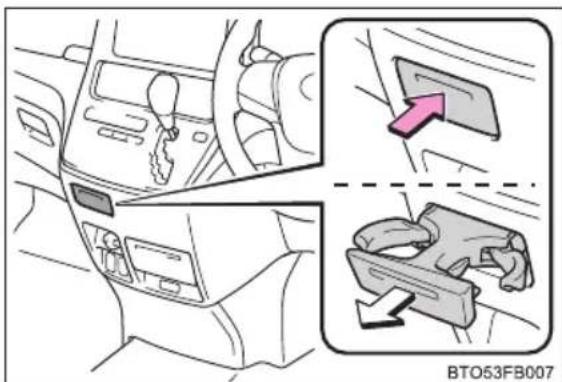
Press in and release the front cup holders.
Second seats (with 7-passenger models)
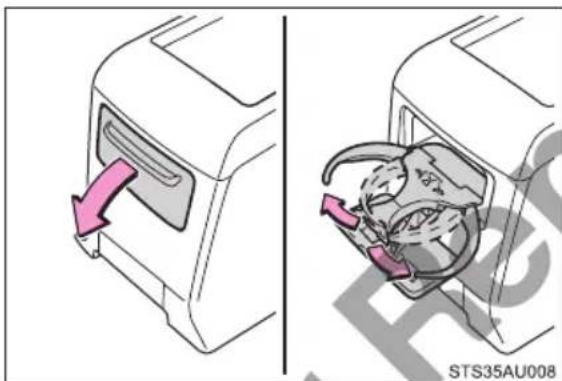
natural_image
Diagram showing a device with a pink arrow pointing to a component, and a close-up of internal components (no text or symbols)Pull out and open the cup holders.
Second seats (with 8-passenger models)
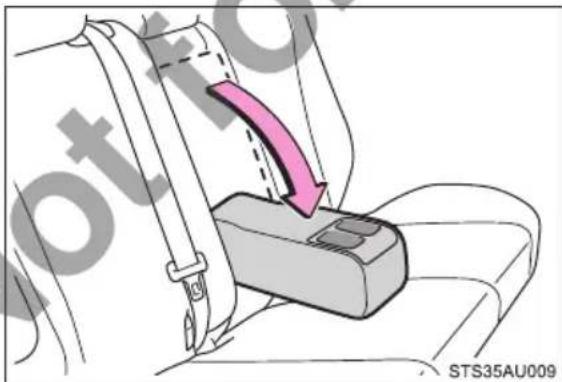
Pull the armrest down.
Third seats
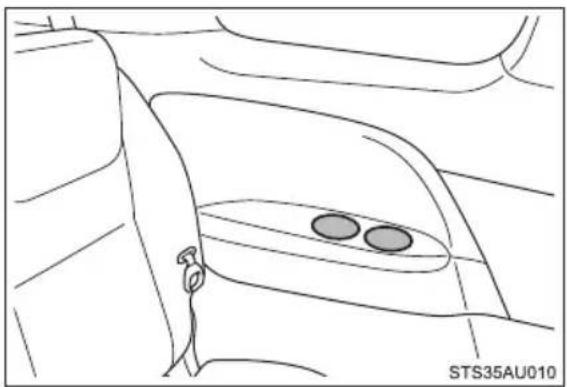
natural_image
Line drawing of a car interior showing the dashboard and seat area (no text or symbols)
WARNING
■Items unsuitable for the cup holder
Do not place anything other than cups or beverage cans in the cup holders. Other items may be thrown out of the holders in the event of an accident or sudden braking, causing injury. If possible, cover hot drinks to prevent burns.
■When not in use (except third seats)
Keep the cup holders closed. In the event of sudden braking, an accident may occur due to an occupant being struck by the open cup holders or the items stored inside.
Bottle holders
Front doors
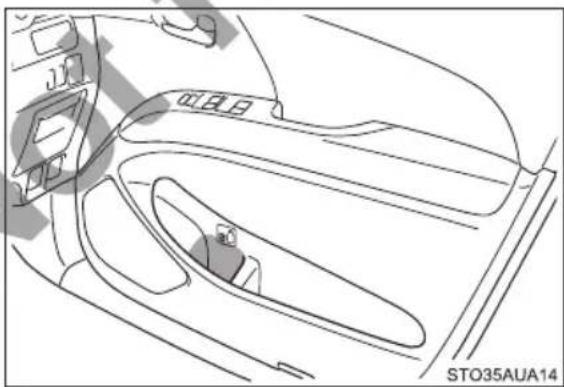
natural_image
Line drawing of a car interior showing the dashboard and seat area (no text or symbols)Sliding doors
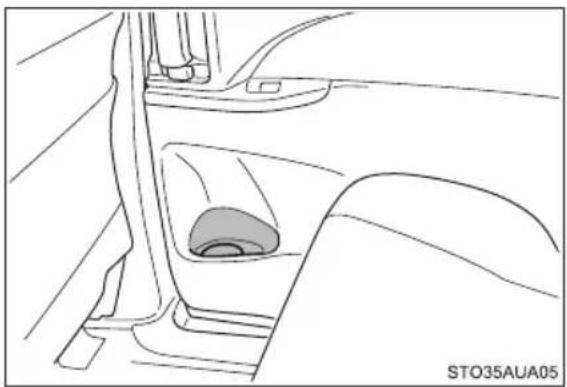
natural_image
Line drawing of a car's side arm and seat, showing the wheel and seat area (no text or symbols)■When using the bottle holder
- When storing a bottle, close the cap.
●The bottle may not be stored depending on its size or shape.

WARNING
■Items unsuitable for the bottle holder
Do not place anything other than a bottle in the bottle holders.
Other items may be thrown out of the holders in the event of an accident or sudden braking and cause injury.

NOTICE
Items that should not be stowed in the bottle holders
Put the cap on before stowing a bottle. Do not place open bottles in the bottle holders, or glasses and paper cups containing liquid. The contents may spill and glasses may break.
Auxiliary boxes
Type A
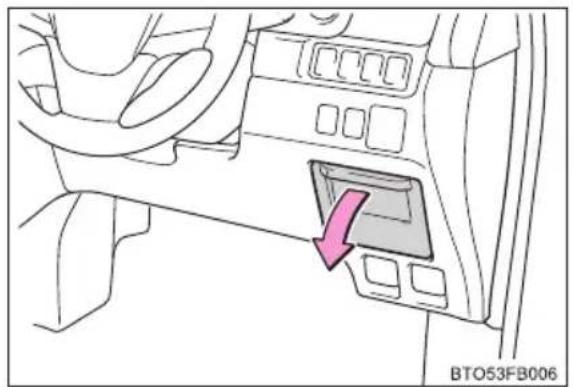
natural_image
Interior view of a car dashboard with a highlighted control panel (no text or symbols)Pull the lid.
Type B
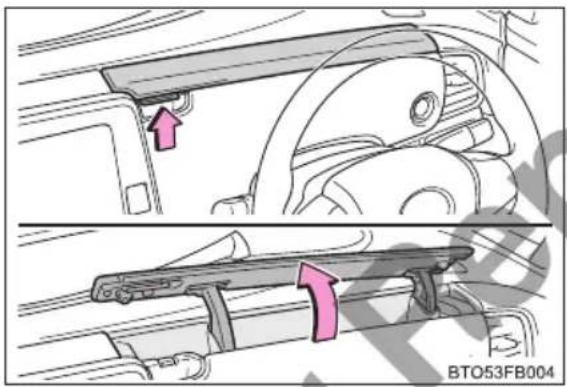
Lift the lid while pulling up the lever to release the lock.
Type C
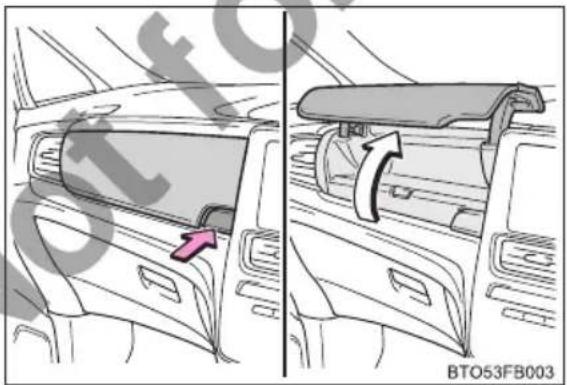
natural_image
Side-by-side diagram of a car interior showing dashboard and rearview views with no text or symbolsPress the button to open the lid.
Type D
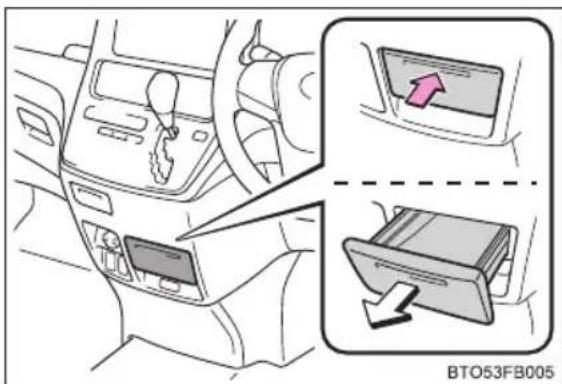
Press the lid to open.

WARNING
While driving
Keep the auxiliary boxes closed. In the event of sudden braking, an accident may occur due to an occupant being struck by an open auxiliary box or the items stored inside.
■Auxiliary box precaution (type D)
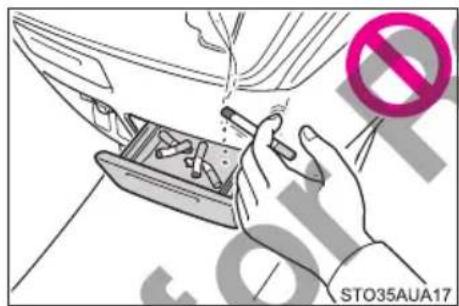
The auxiliary box is not an ashtray. Do not put matches, cigarette ash, etc., in the box.
3-6. Other interior features
Sun visors
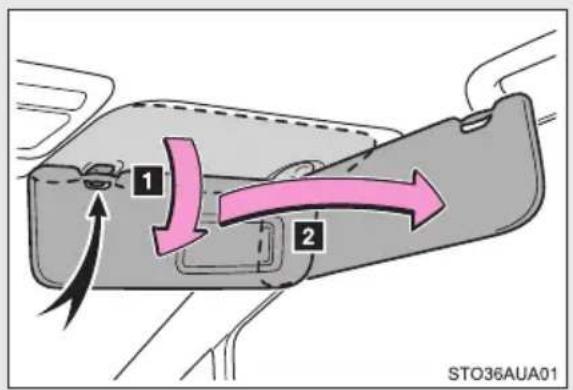
1 To set the visor in the forward position, flip it down.
2 To set the visor in the side position, flip down, unhook, and swing it to the side.
3-6. Other interior features
Vanity mirrors
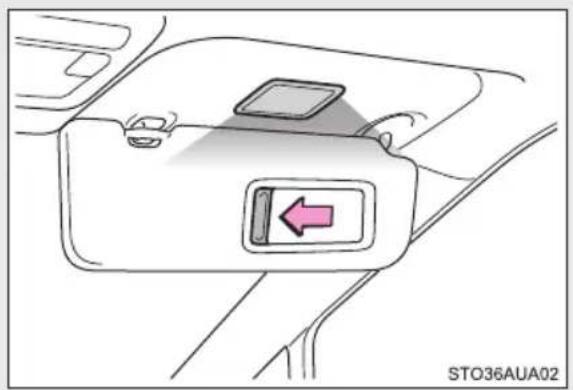
natural_image
Diagram of a car seatbelt switch with a pink left-pointing arrow (no text or symbols)Slide the cover to open.
The light turns on when the cover is opened.
■ Vanity lights can be used when
The "ENGINE START STOP" switch is IGNITION ON mode.

NOTICE
■To prevent battery discharge
Do not leave the vanity lights on for extended periods while the engine is off.
3-6. Other interior features
Conversation mirror
The conversation mirror can be used when a driver needs to confirm the rear seat condition.
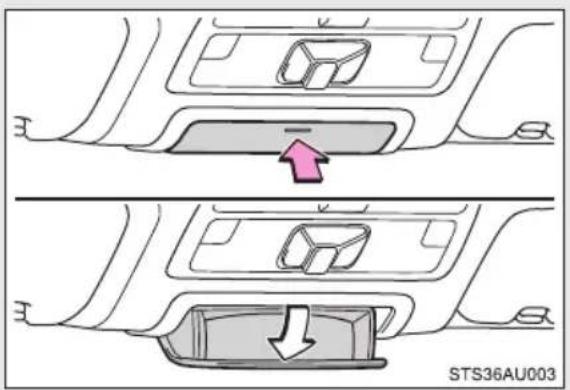
Press the lid to open.
3-6. Other interior features
Clock
The clock can be adjusted by pressing the buttons.
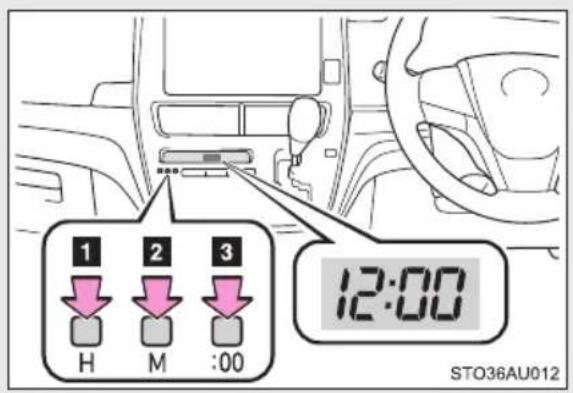
1 Adjusts the hours
2 Adjusts the minutes
3 Rounds to the nearest hour*
*:e.g. 1:00 to 1:29 → 1:00
1:30 to 1:59 → 2:00
■The clock is displayed when
The "ENGINE START STOP" switch is in ACCESSORY ON mode.
■When disconnecting and reconnecting battery terminals
The time display will automatically be set to 1:00.
3-6. Other interior features
Outside temperature display
The temperature display shows temperatures within the range of -40^ ( -40^ ) and 50^ ( 122^ ).
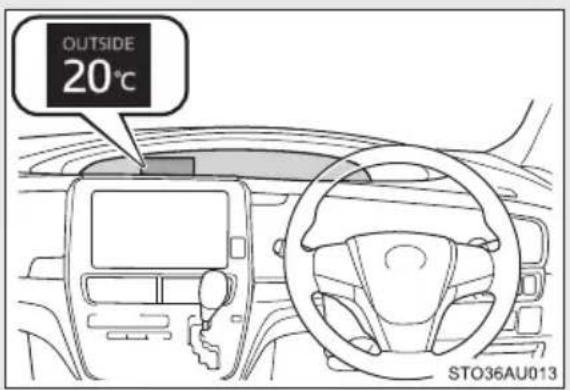
The outside temperature is displayed when
The "ENGINE START STOP" switch is in IGNITION ON mode.
■Display
In the following situations, the correct outside temperature may not be displayed, or the display may take longer than normal to change:
- When the vehicle is stopped, or moving at low speeds (less than 25 ~km / h [16 mph])
- When the outside temperature has changed suddenly (at the entrance/exit of a garage, tunnel, etc.)
■ When “- -” is displayed
The system may be malfunctioning. Take your vehicle to your Toyota dealer.
3-6. Other interior features
Power outlets
The power outlet can be used for 12 V accessories that run on less than 10 A.
Front
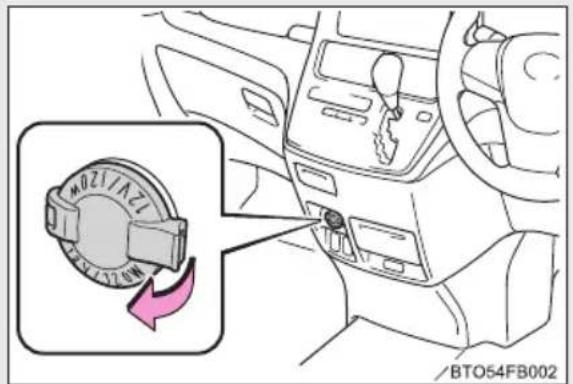
Rear
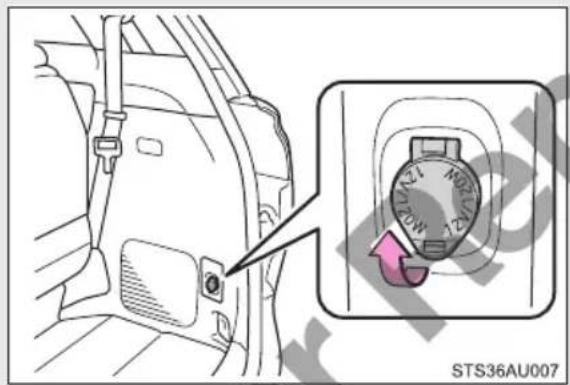
■The power outlet can be used when
The "ENGINE START STOP" switch is in ACCESSORY or IGNITION ON mode.

NOTICE
■To avoid damaging the power outlet
Close the power outlet lid when the power outlet is not in use.
Foreign objects or liquids that enter the power outlet may cause a short circuit.
■To prevent blown fuse
Do not use an accessory that uses more than 12 V 10 A.
■To prevent battery discharge
Do not use the power outlet longer than necessary when the engine is not running.
3-6. Other interior features
Seat heaters\*
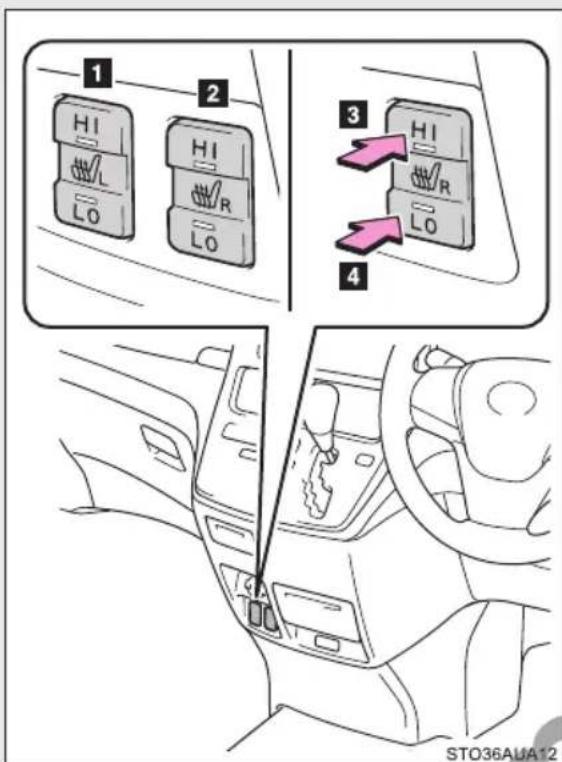
1 Heats the left front seat
2 Heats the right front seat
3 High temperature
4 Low temperature
The indicator light comes on when the switch is on.
■The seat heaters can be used when
The "ENGINE START STOP" switch is in IGNITION ON mode.
■When not in use
Turn the seat heater off.

WARNING
Burns
- Use caution when seating the following persons in a seat with the seat heater on to avoid the possibility of burns:
- Babies, small children, the elderly, the sick and the physically challenged
- Persons with sensitive skin
- Persons who are fatigued
- Persons who have taken alcohol or drugs that induce sleep (sleeping drugs, cold remedies, etc.)
- Do not cover the seat with anything when using the seat heater.
Using the seat heater with a blanket or cushion increases the temperature of the seat and may lead to overheating. - Do not use the seat heater more than necessary. Doing so may cause minor burns or overheating.

NOTICE
■To prevent seat heater damage
Do not put heavy objects that have an uneven surface on the seat and do not stick sharp objects (needles, nails, etc.) into the seat.
■To prevent battery discharge
Turn the seat heaters off when the engine is not running.
3-6. Other interior features
Armrest
Front seats
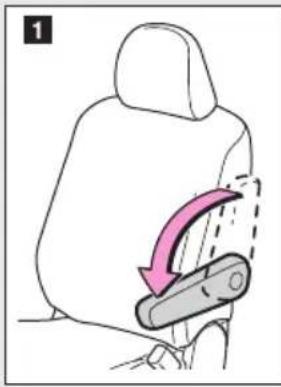
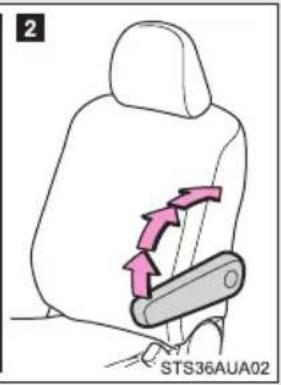
1 Fold down the armrest for use.
2 Raise the armrest to the desired position and it will be fixed.
When the armrest is fixed, you cannot just lower it.
When you want to lower it, raise it once more to the top-most position.
Second seats (with 7-passenger models)
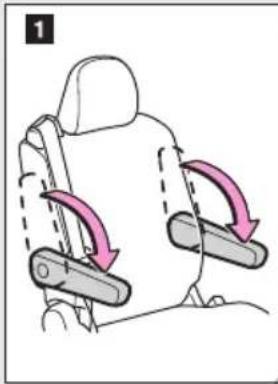
natural_image
Diagram of a car seat with two side-mounted seats and one seatbelt, showing directional arrows indicating movement (no text or symbols)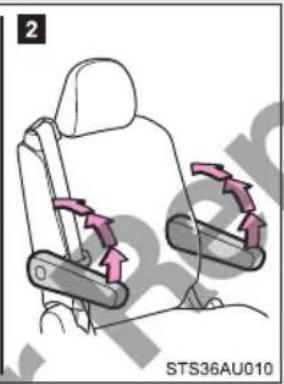
1 Fold down the armrest for use.
2 Raise the armrest to the desired position and it will be fixed.
When the armrest is fixed, you cannot just lower it.
When you want to lower it, raise it once more to the top-most position.
Second seats (with 8-passenger models)
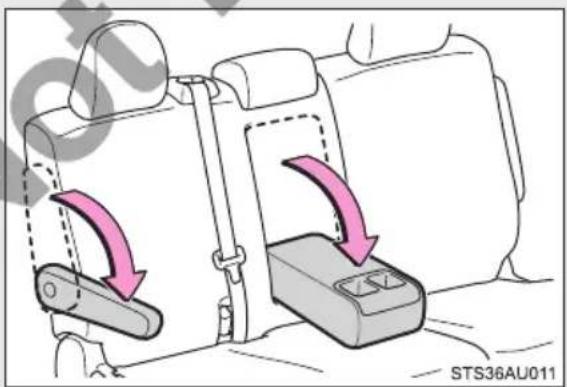
Fold down the armrest for use.

NOTICE
■To prevent damage to the armrest
Do not apply too much load on the armrest.
3-6. Other interior features
Assist grips
An assist grip (type A) installed on the ceiling can be used to support your body while sitting on the seat.
An assist grip (type B) installed on the pillar can be used when getting in or out of the vehicle and others.
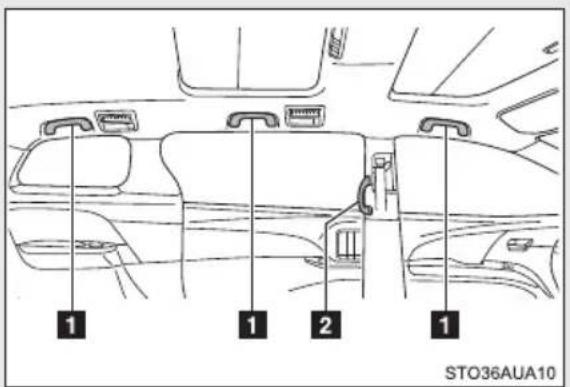
1 Assist grip (type A)
2 Assist grip (type B)

WARNING
■Assist grip (type A)
Do not use the assist grip (type A) when getting in or out of the vehicle or rising from your seat.

NOTICE
■To prevent damage to the assist grip
Do not hang any heavy object or put a heavy load on the assist grip.
3-6. Other interior features
Floor mat
Use only floor mats designed specifically for vehicles of the same model and model year as your vehicle. Fix them securely in place onto the carpet.
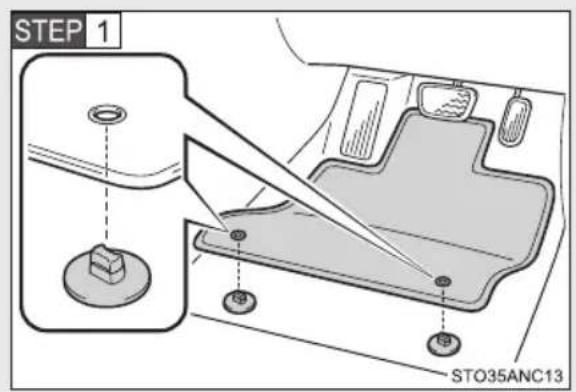
Insert the retaining hooks (clips) into the floor mat eye-lets.
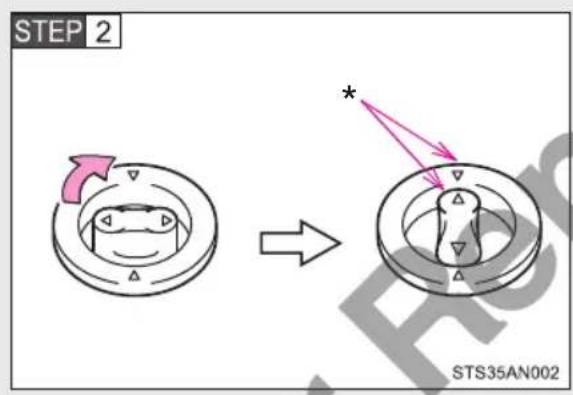
Turn the upper knob of each retaining hook (clip) to secure the floor mats in place.
*: Always align the marks.
The shape of the retaining hooks (clips) may differ from that shown in the illustration.

WARNING
Observe the following precautions.
Failure to do so may cause the driver's floor mat to slip, possibly interfering with the pedals while driving. An unexpectedly high speed may result or it may become difficult to stop the vehicle. This could lead to an accident, resulting in death or serious injury.
■When installing the driver's floor mat
- Do not use floor mats designed for other models or different model year vehicles, even if they are Toyota Genuine floor mats.
- Only use floor mats designed for the driver's seat.
●Always install the floor mat securely using the retaining hooks (clips) provided. - Do not use two or more floor mats on top of each other.
- Do not place the floor mat bottom-side up or upside-down.
Before driving
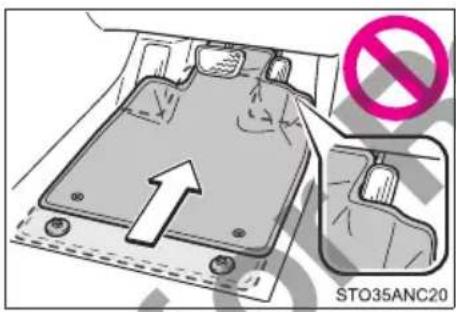
- Check that the floor mat is securely fixed in the correct place with all the provided retaining hooks (clips). Be especially careful to perform this check after cleaning the floor.
With the engine stopped and the shift lever in P, fully depress each pedal to the floor to make sure it does not interfere with the floor mat.
3-6. Other interior features
Luggage compartment features
Cargo hooks
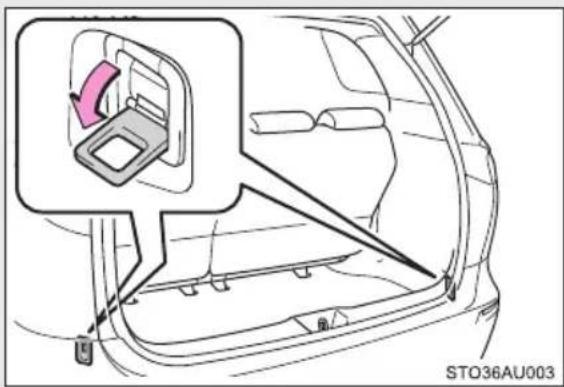
Pull the hook down to use.
The cargo hooks are provided for securing loose items.
■Warning reflector holder
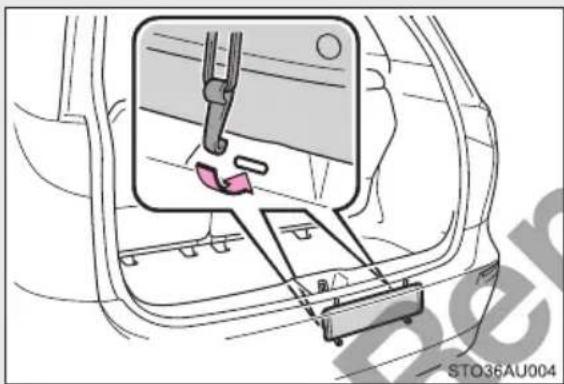
Secure the warning reflector.
To stow the warning reflector holder, use the holding bands and make sure the warning reflector is secured.
Vehicles with a compact spare tire: Take out holding bands from the tool bag. (→P. 500)
Vehicles with a full-size spare tire: Holding bands can be purchased at your Toyota dealer.
Auxiliary box
Type A
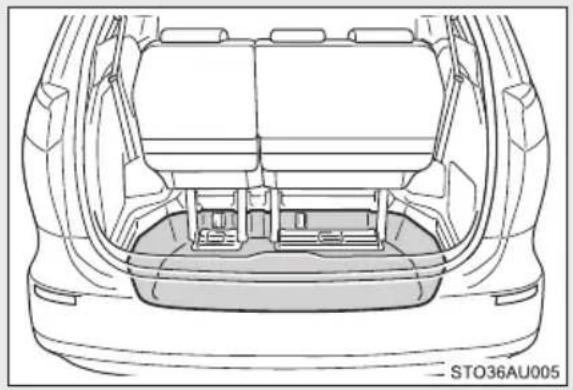
natural_image
Technical line drawing of a car rear bumper with internal compartments and structural ribs (no text or symbols)Type B
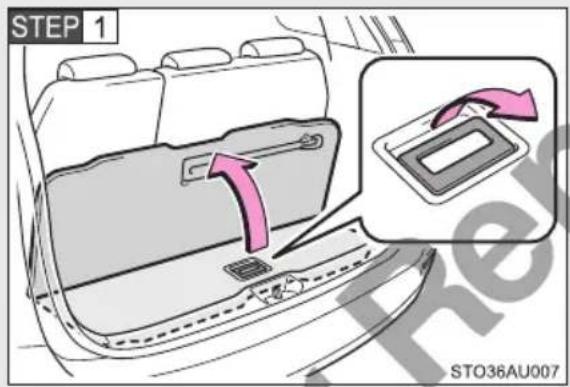
Pull up the lever and open the deck board.
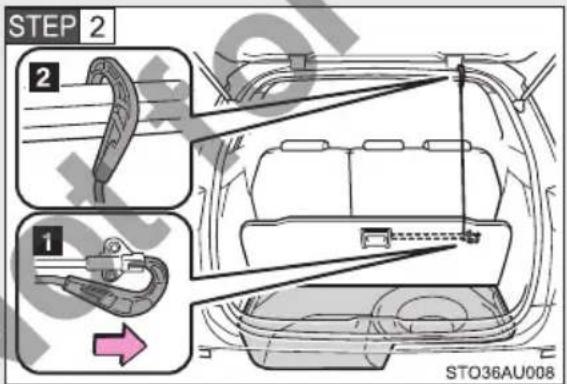
Secure the deck board, using the strap hook provided.
1 Remove the strap hook
2 Secure the hook
Removing the deck board (type B)
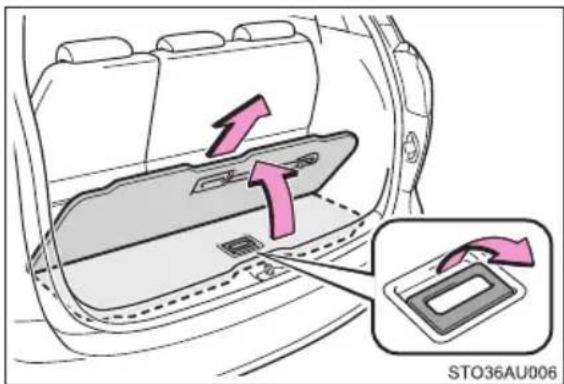
Lift the deck board and pull it toward you to remove it.

WARNING
■When the cargo hooks are not in use
To avoid injury, always return the cargo hooks to their stowed positions.
■When operating the deck board (type B)
Do not place anything on the deck board when operating the board. Otherwise, your fingers may be caught or an accident may result causing injuries.

NOTICE
■When the warning reflector holder is not in use
Stow the holding bands in the tool bag.
Maintenance and care
4
4-1. Maintenance and care
Cleaning and protecting the vehicle exterior ...... 384
Cleaning and protecting the vehicle interior ...... 388
4-2. Maintenance
Maintenance requirements.... 391
4-3. Do-it-yourself maintenance
Do-it-yourself service precautions.... 393
Hood 396
Positioning a floor jack..... 398
Engine compartment...... 401
Tires 416
Tire inflation pressure ..... 420
Wheels 422
Air conditioning filter ..... 424
Electronic key battery ..... 427
Rear seat entertainment system controller battery.... 429
Checking and replacing fuses.... 431
Light bulbs 447
4-1. Maintenance and care
Cleaning and protecting the vehicle exterior
Perform the following to protect the vehicle and maintain it in prime condition:
● Working from top to bottom, liberally apply water to the vehicle body, wheel wells and underside of the vehicle to remove any dirt and dust.
●Wash the vehicle body using a sponge or soft cloth, such as a chamois.
- For hard-to-remove marks, use car wash soap and rinse thoroughly with water.
●Wipe away any water.
●Wax the vehicle when the waterproof coating deteriorates.
If water does not bead on a clean surface, apply wax when the vehicle body is cool.
■Automatic car washes
●Before washing the vehicle:
- Fold the mirrors.
- Turn off the power sliding door system (if equipped).
Make sure to extend the mirrors before driving.
- Brushes used in automatic car washes may scratch the vehicle surface and harm your vehicle's paint.
In certain automatic car washes, the rear spoiler may interfere with machine operation. This may prevent the vehicle from being cleaned properly or result in damage to the rear spoiler.
■High pressure car washes
- Do not allow the nozzles of the car wash to come within close proximity of the windows.
● Before using the car wash, check that the fuel filler door on your vehicle is closed properly.
■Aluminum wheels (if equipped)
-
Remove any dirt immediately by using a neutral detergent. Do not use hard brushes or abrasive cleaners. Do not use strong or harsh chemical cleaners.
Use the same mild detergent and wax as used on the paint. -
Do not use detergent on the wheels when they are hot, for example after driving for long distance in the hot weather.
●Wash detergent from the wheels immediately after use.
To preserve the wheels' luster, do not allow hot water, such as from steam cleaning, to contact them directly.
Bumpers
Do not scrub with abrasive cleaners.

WARNING
■When washing the vehicle
Do not apply water to the inside of the engine compartment. Doing so may cause the electrical components, etc. to catch fire.
■Precautions regarding the exhaust pipe
Exhaust gasses cause the exhaust pipe to become quite hot.
When washing the vehicle, be careful not to touch the pipe until it has cooled sufficiently, as touching a hot exhaust pipe can cause burns.

NOTICE
■To prevent paint deterioration and corrosion on the body and components (aluminum wheels, etc.)
●Wash the vehicle immediately in the following cases:
• After driving near the sea coast
• After driving on salted roads
- If coal tar or tree sap is present on the paint surface
- If dead insects, insect droppings or bird droppings are present on the paint surface
• After driving in an area contaminated with soot, oily smoke, mine dust, iron powder or chemical substances
- If the vehicle becomes heavily soiled with dust or mud
- If liquids such as benzene and gasoline are spilled on the paint surface
- If the paint is chipped or scratched, have it repaired immediately.
● To prevent the wheels from corroding, remove any dirt and store in a place with low humidity when storing the wheels.
■Cleaning the exterior lights
- Wash carefully. Do not use organic substances or scrub with a hard brush. This may damage the surfaces of the lights.
- Do not apply wax to the surfaces of the lights. Wax may cause damage to the lenses.
■To prevent damage to the windshield wiper arms
When lifting the wiper arms away from the windshield, pull the driver side wiper arm upward first, and repeat for the passenger side. When returning the wipers to their original position, do so from the passenger side first.
■To prevent damage to the vehicle body and components when using high pressure car washes
Observe the following precautions to avoid damage to and deformation of the vehicle body and components.
- Do not allow the nozzles of the car wash to come within close proximity of the vehicle.
- Do not concentrate the high-pressure water spray on any individual point.

NOTICE
■When using a high pressure car wash
Do not bring the nozzle tip close to boots (rubber or resin manufactured cover), connectors or the following parts. The parts may be damaged if they come into contact with high-pressure water.
- Traction related parts
- Steering parts
- Suspension parts
- Brake parts
4-1. Maintenance and care
Cleaning and protecting the vehicle interior
The following procedures will help protect your vehicle's interior and keep it in top condition:
■Protecting the vehicle interior
- Remove dirt and dust using a vacuum cleaner. Wipe dirty surfaces with a cloth dampened with lukewarm water.
- If dirt cannot be removed, wipe it off with a soft cloth dampened with neutral detergent diluted to approximately 1%.
● Wring out any excess water from the cloth and thoroughly wipe off remaining traces of detergent and water.
■Cleaning the leather areas
- Remove dirt and dust using a vacuum cleaner.
●Wipe off any excess dirt and dust with a soft cloth dampened with diluted detergent.
Use a diluted water solution of approximately 5% neutral wool detergent.
● Wring out any excess water from the cloth and thoroughly wipe off all remaining traces of detergent.
●Wipe the surface with a dry, soft cloth to remove any remaining moisture. Allow the leather to dry in a shaded and ventilated area.
■ Cleaning the synthetic leather areas
- Remove dirt and dust using a vacuum cleaner.
●Wipe it off with a soft cloth dampened with neutral detergent diluted to approximately 1%.
● Wring out any excess water from the cloth and thoroughly wipe off remaining traces of detergent and water.
■ Caring for leather areas
Toyota recommends cleaning the interior of the vehicle at least twice a year to maintain the quality of the vehicle's interior.
■Shampooing the carpets
There are several commercial foaming-type cleaners available. Use a sponge or brush to apply the foam. Rub in overlapping circles. Do not use water. Wipe dirty surfaces and let them dry. Excellent results are obtained by keeping the carpet as dry as possible.
Seat belts
Clean with mild soap and lukewarm water using a cloth or sponge. Also check the belts periodically for excessive wear, fraying or cuts.

WARNING
Water in the vehicle
- Do not splash or spill liquid in the vehicle.
Doing so may cause electrical components, etc. to malfunction or catch fire. - Do not get any of the SRS components or wiring in the vehicle interior wet. (→P. 136)
An electrical malfunction may cause the airbags to deploy or not function properly, resulting in death or serious injury.
■ Cleaning the interior (especially instrument panel)
Do not use a polish wax or polish cleaner. The instrument panel may reflect off the windshield, obstructing the driver's view and lead to an accident, resulting in death or serious injury.

NOTICE
■Cleaning detergents
- Do not use the following types of detergent, as they may discolor the vehicle interior or cause streaks or damage to painted surfaces:
• Non-seat portions: Organic substances such as benzene or gasoline, alkaline or acidic solutions, dye, and bleach - Seats: Alkaline or acidic solutions, such as thinner, benzene, and alcohol
- Do not use a polish wax or polish cleaner. The instrument panel's or other interior part's painted surface may be damaged.
■Preventing damage to leather surfaces
Observe the following precautions to avoid damage to and deterioration of leather surfaces:
- Remove any dust or dirt from leather surfaces immediately.
- Do not expose the vehicle to direct sunlight for extended periods of time. Park the vehicle in the shade, especially during summer.
- Do not place items made of vinyl, plastic, or containing wax on the upholstery, as they may stick to the leather surface if the vehicle interior heats up significantly.
Water on the floor
Do not wash the vehicle floor with water.
Vehicle systems such as the audio system may be damaged if water comes into contact with electrical components such as the audio system above or under the floor of the vehicle. Water may also cause the body to rust.
- Cleaning the inside of the rear window and the rear quarter windows
- Do not use a glass cleaner to clean the rear window and the rear quarter windows, as this may cause damage to the rear window defogger heater wires or antennas. Use a cloth dampened with lukewarm water to gently wipe the window clean. Wipe the window in strokes running parallel to the heater wires or antennas.
- Be careful not to scratch or damage the heater wires or antennas.
To ensure safe and economical driving, day-to-day care and regular maintenance are essential. Toyota recommends the following maintenance.
■Scheduled maintenance
Scheduled maintenance should be performed at specified intervals according to the maintenance schedule.
For full details of your maintenance schedule, refer to the "Warranty and Service Booklet".
■Do-it-yourself maintenance
What about do-it-yourself maintenance?
Many of the maintenance items are easy to do yourself if you have a little mechanical ability and a few basic automotive tools.
Note, however, that some maintenance tasks require special tools and skills. These are best performed by qualified technicians. Even if you are an experienced do-it-yourself mechanic, we recommend that repairs and maintenance be conducted by your Toyota dealer who will keep a record of maintenance on your vehicle. This record could be helpful should you ever require Warranty Service.
■ Where to go for maintenance service?
It makes good sense to take your vehicle to your local Toyota dealer for maintenance service as well as other inspections and repairs.
Toyota technicians are well-trained specialists receiving the latest service information through technical bulletins, service tips, and in-dealership training programs. They learn to work on Toyota before they work on your vehicle, rather than while they are working on it. Doesn't that seem like the best way?
Your Toyota dealer has invested a lot of money in special Toyota tools and service equipment. It helps them to do the job better and at less cost.
Your Toyota dealer's service department will perform all of the scheduled maintenance on your vehicle reliably and economically.
■ Does your vehicle need repair?
Be on the alert for changes in performance and sounds, and visual tip-offs that indicate service is needed. Some important clues are:
●Engine misfire, stumbling, or pinging
● Appreciable loss of power
●Strange engine noises
- A fluid leak under the vehicle (However, water dripping from the air conditioning system after use is normal.)
- Change in exhaust sound (This may indicate a dangerous carbon monoxide leak. Drive with the windows open and have the exhaust system checked immediately.)
● Flat-looking tires, excessive tire squeal when cornering, uneven tire wear
● Vehicle pulls to one side when driving straight on a level road
●Strange noises related to suspension movement
- Loss of brake effectiveness, spongy feeling brake pedal, pedal almost touches the floor, vehicle pulls to one side when braking
●Engine coolant temperature continually higher than normal
If you notice any of these clues, take your vehicle to your Toyota dealer as soon as possible. Your vehicle may need adjustment or repair.

WARNING
If your vehicle is not properly maintained
Improper maintenance could result in serious damage to the vehicle and possible death or serious injury.
■Handling of the battery
Battery posts, terminals and related accessories contain lead and lead compounds which are known to cause brain damage. Wash your hands after handling. ( P. 410)
4-3. Do-it-yourself maintenance
Do-it-yourself service precautions
If you perform maintenance by yourself, be sure to follow the correct procedures as given in these sections.
| Items Parts and tools | |
| Battery condition (→P. 410) | ·W a r m w a t e r·Baking soda·Grease·Conventional wrench(for terminal clamp bolts)·Distilled water |
| Engine coolant level (→P. 408) | ·“Toyota Super Long Life Coolant”or a similar high quality ethyleneglycol-based non-silicate, non-amine, non-nitrite and non-boratecoolant with long-life hybridorganic acid technology. “ToyotaSuper Long Life Coolant” is pre-mixed with 50% coolant and 50%deionized water.·Funnel (used only for adding cool-ant) |
| Engine oil level (→P. 404) | ·“Toyota Genuine Motor Oil” orequivalent·Rag or paper towel·Funnel (used only for addingengine oil) |
| Fuses (→P. 431) | ·Fuse with same amperage ratingas original |
| Light bulbs (→P. 447) | ·Bulb with same number and watt-age rating as original·Phillips-head screwdriver·Flathead screwdriver·Wrench |
| Radiator and condenser(→P. 409) | — |
| Tire inflation pressure (→P. 420) | • Tire pressure gauge• Compressed air source |
| Washer fluid (→P. 414) | • Water or washer fluid containing antifreeze (for winter use)• Funnel (used only for adding water or washer fluid) |

WARNING
The engine compartment contains many mechanisms and fluids that may move suddenly, become hot, or become electrically energized. To avoid death or serious injury, observe the following precautions:
■When working on the engine compartment:
- Keep hands, clothing and tools away from the moving fan and engine drive belt.
●Be careful not to touch the engine, radiator, exhaust manifold, etc. right after driving as they may be hot. Oil and other fluids may also be hot. - Do not leave anything that may burn easily, such as paper and rags, in the engine compartment.
- Do not smoke, cause sparks or expose an open flame to fuel or the battery. Fuel and battery fumes are flammable.
●Be extremely cautious when working on the battery. It contains poisonous and corrosive sulfuric acid.
Take care because brake fluid can harm your hands or eyes and damage painted surfaces. If fluid gets on your hands or in your eyes, flush the affected area with clean water immediately.
If you still experience discomfort, consult a doctor.

WARNING
■When working near the electric cooling fans or radiator grille
Be sure the “ENGINE START STOP” switch is off. With the “ENGINE START STOP” switch in IGNITION ON mode, the electric cooling fans may automatically start to run if the air conditioning is on and/or the coolant temperature is high. (→P. 409)
■Safety glasses
Wear safety glasses to prevent flying or falling material, fluid spray, etc. from getting in your eyes.

NOTICE
■If you remove the air cleaner filter
Driving with the air cleaner filter removed may cause excessive engine wear due to dirt in the air.
■If the fluid level is low or high
It is normal for the brake fluid level to go down slightly as the brake pads wear or when the fluid level in the accumulator is high.
If the reservoir needs frequent refilling, it may indicate a serious problem.
4-3. Do-it-yourself maintenance
Hood
Release the lock from the inside of the vehicle to open the hood.
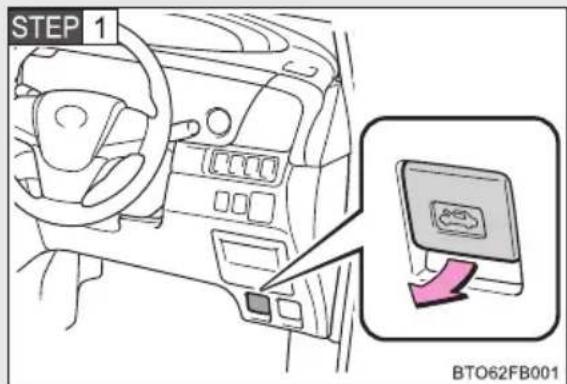
Pull the hood lock release lever.
The hood will pop up slightly.
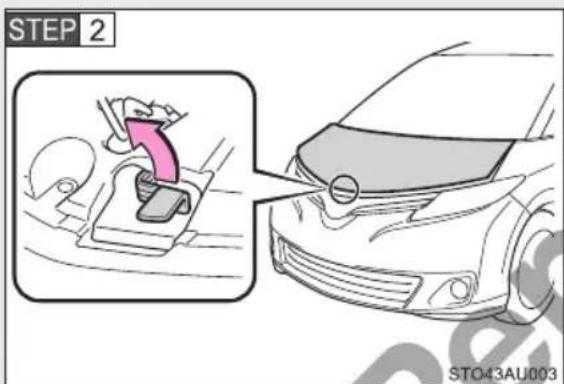
Pull up the auxiliary catch lever and lift the hood.
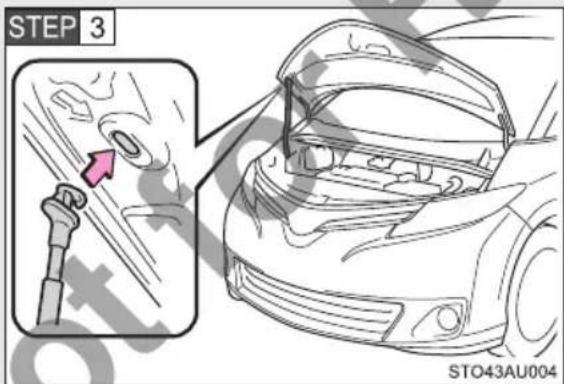
Hold the hood open by inserting the supporting rod into the slot.

WARNING
■Pre-driving check
Check that the hood is fully closed and locked.
If the hood is not locked properly, it may open while the vehicle is in motion and cause an accident, which may result in death or serious injury.
■After installing the support rod into the slot
Make sure the rod supports the hood securely from falling down on to your head or body.

NOTICE
■When closing the hood
Be sure to return the support rod to its clip before closing the hood. Closing the hood without returning the support rod properly could cause the hood to bend.
4-3. Do-it-yourself maintenance
Positioning a floor jack
When raising your vehicle with a floor jack, position the jack correctly. Improper placement may damage your vehicle or cause injury.
Front
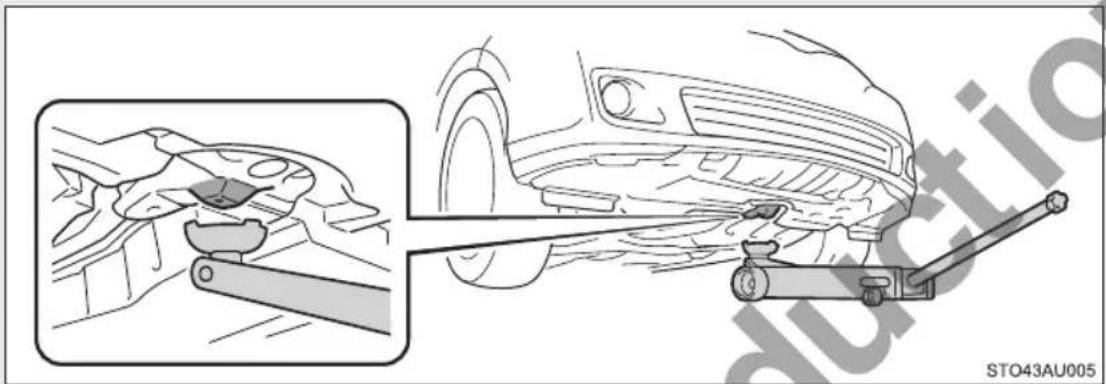
Rear
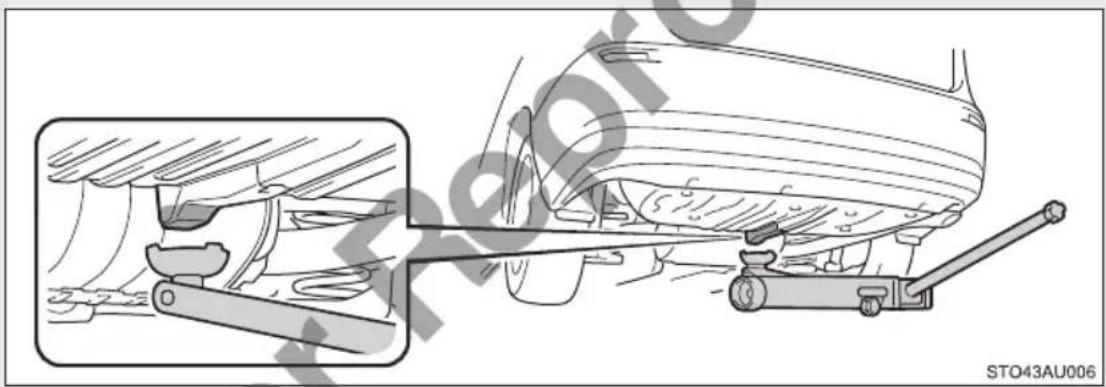
natural_image
Technical illustration of a car suspension system with mechanical components and a close-up inset showing the assembly (no text or symbols)
WARNING
■When raising your vehicle
Make sure to observe the following precautions to reduce the possibility of death or serious injury:
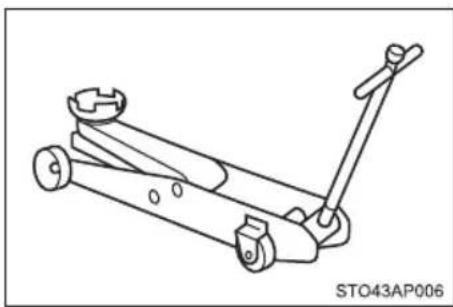
natural_image
Technical line drawing of a mechanical lever assembly (no text or symbols)- Lift up the vehicle using a floor jack such as the one shown in the illustration.
- When using a floor jack, follow the instructions of the manual provided with the jack.
- Do not use the jack that was supplied with your vehicle.
- Do not put any part of your body underneath the vehicle when it is supported only by the floor jack.
●Always use floor jack and/or automotive jack stands on a solid, flat, level surface. - Do not start the engine while the vehicle is supported by the floor jack.
- Stop the vehicle on level, firm ground, firmly set the parking brake and shift the shift lever to P.
● Make sure to set the floor jack properly at the jack point. Raising the vehicle with an improperly positioned floor jack will damage the vehicle and may cause the vehicle to fall off the floor jack.
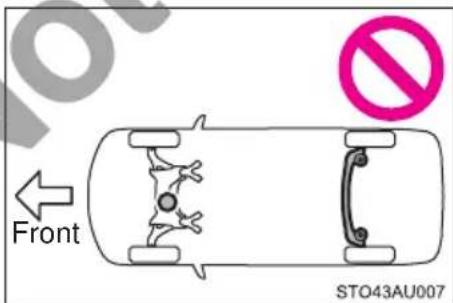
- Do not jack the vehicle at the suspension. The suspension may be damaged.

WARNING
- Do not raise the vehicle while someone is in the vehicle.
- When raising the vehicle, do not place any object on top of or underneath the floor jack.
4-3. Do-it-yourself maintenance
Engine compartment
2AZ-FE engine
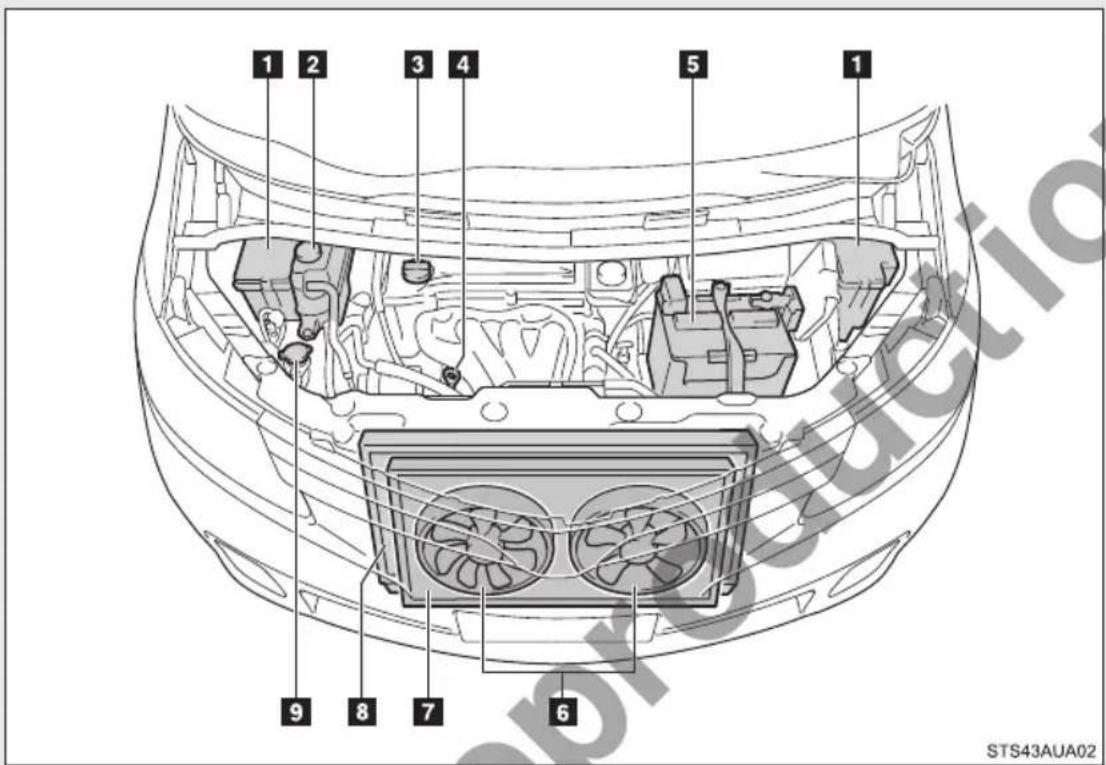
1 Fuse boxes (→P. 431)
2 Engine coolant reservoir (→P. 408)
3 Engine oil filler cap (→P. 405)
4 Engine oil level dipstick
(→P. 404)
5 Battery ( P. 410)
6 Electric cooling fans
7 Condenser ( P. 409)
8 Radiator ( P. 409)
9 Washer fluid tank ( P. 414)
2GR-FE engine
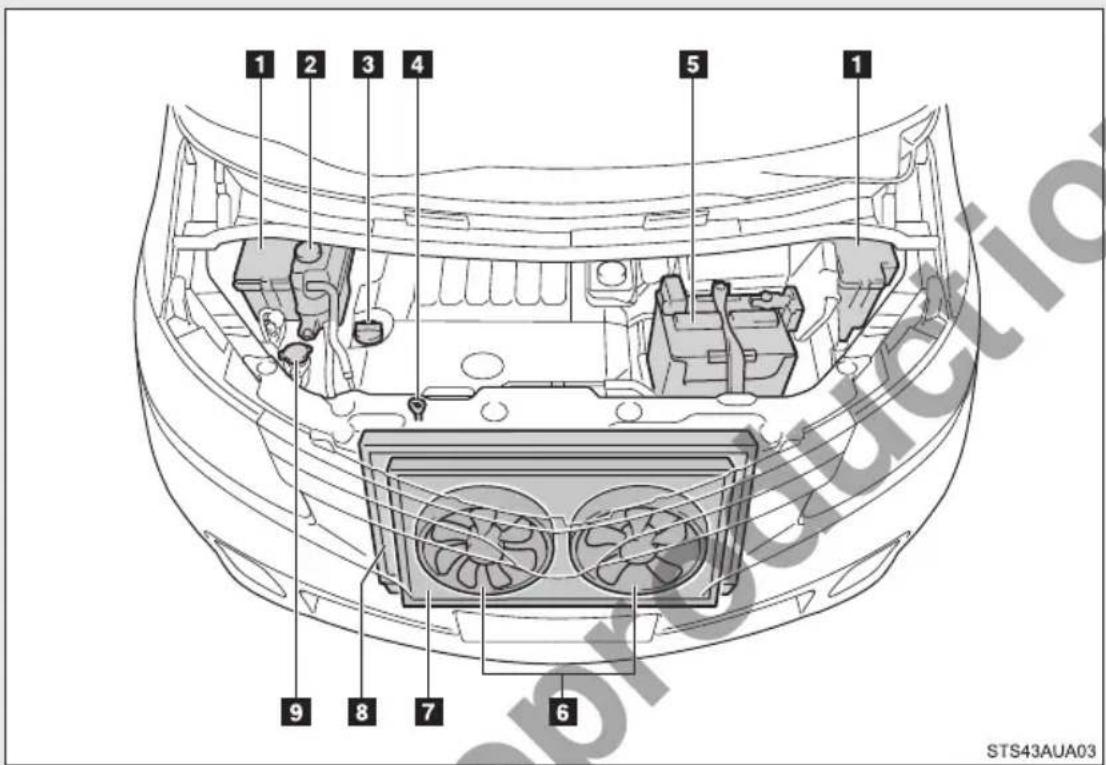
1 Fuse boxes (→P. 431)
2 Engine coolant reservoir
(→P. 408)
3 Engine oil filler cap (→P. 405)
4 Engine oil level dipstick
(→P. 404)
5 Battery ( P. 410)
6 Electric cooling fans
7 Condenser ( P. 409)
8 Radiator ( P. 409)
9 Washer fluid tank ( P. 414)
Engine compartment cover
■Removing the engine compartment cover
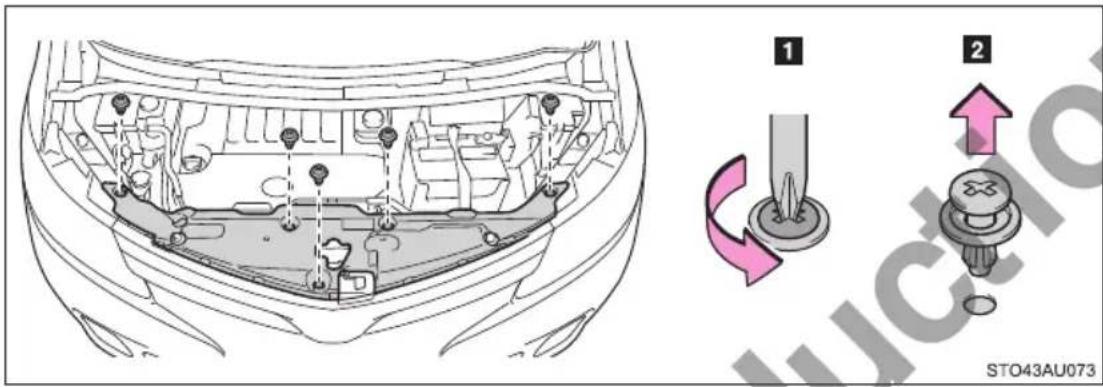
Installing the clips
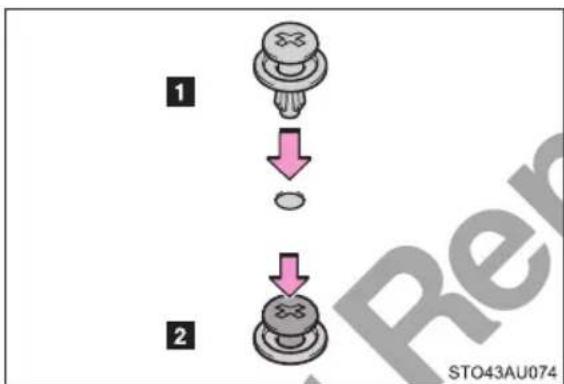
NOTICE
■After installing an engine compartment cover
Make sure that the cover is securely installed in its original position.
Engine oil
With the engine at operating temperature and turned off, check the oil level on the dipstick.
- Checking the engine oil
STEP 1 Park the vehicle on level ground. After warming up the engine and turning it off, wait more than 5 minutes for the oil to drain back into the bottom of the engine.
STEP 2 Holding a rag under the end, pull the dipstick out.
2AZ-FE engine
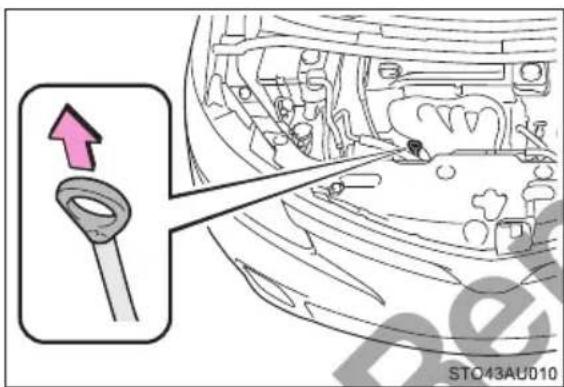
2GR-FE engine
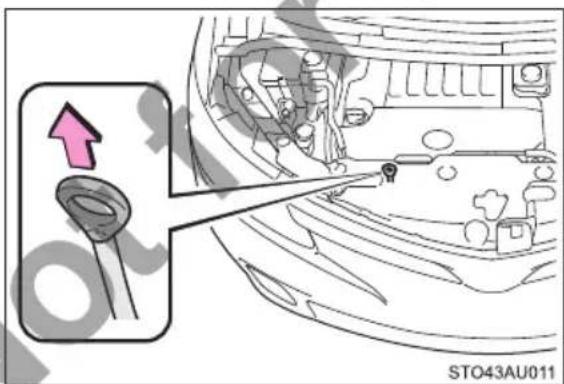
STEP 3 Wipe the dipstick clean.
STEP 4 Reinsert the dipstick fully.
STEP 5 Holding a rag under the end, pull the dipstick out and check the oil level.
2AZ-FE engine
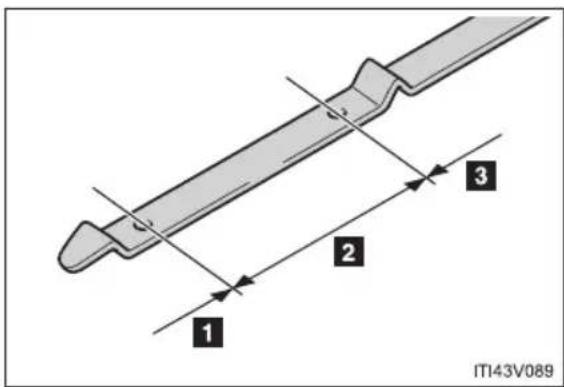
1 Low
2 Normal
3 Excessive
The shape of the dipstick may differ depending on the type of vehicle or engine.
2GR-FE engine
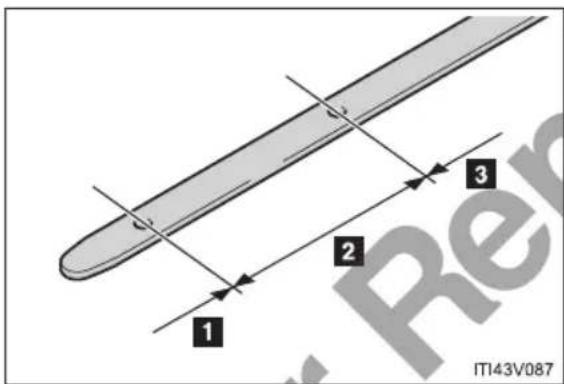
1 Low
2 Normal
3 Excessive
The shape of the dipstick may differ depending on the type of vehicle or engine.
STEP 6 Wipe the dipstick and reinsert it fully.
■ Adding engine oil
If the oil level is below or near the low level mark, add engine oil of the same type as that already in the engine.
2AZ-FE engine
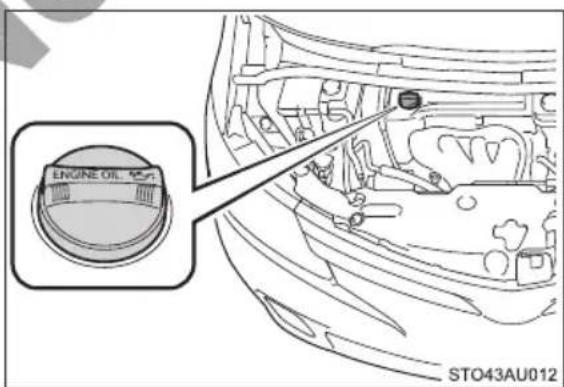
2GR-FE engine
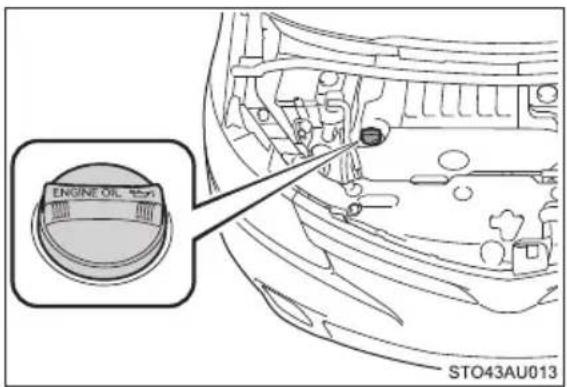
Make sure to check the oil type and prepare the items needed before adding oil.
| Engine oil selection →P. 540 | |
| Oil quantity(Low → Full) | 2AZ-FE engine1.1 L (1.2 qt., 1.0 Imp.qt.)2GR-FE engine1.5 L (1.6 qt., 1.3 Imp.qt.) |
| Item Clean funnel | |
STEP 1 Remove the oil filler cap by turning it counterclockwise.
STEP 2 Add engine oil slowly, checking the dipstick.
STEP 3 Install the oil filler cap by turning it clockwise.
Engine oil consumption
A certain amount of engine oil will be consumed while driving. In the following situations, oil consumption may increase, and engine oil may need to be refilled in between oil maintenance intervals.
When the engine is new, for example directly after purchasing the vehicle or after replacing the engine
● If low quality oil or oil of an inappropriate viscosity is used
- When driving at high engine speeds or with a heavy load, or when driving while accelerating or decelerating frequently
- When leaving the engine idling for a long time, or when driving frequently through heavy traffic

WARNING
■Used engine oil
●Used engine oil contains potentially harmful contaminants which may cause skin disorders such as inflammation and skin cancer, so care should be taken to avoid prolonged and repeated contact. To remove used engine oil from your skin, wash thoroughly with soap and water.
- Dispose of used oil and filters only in a safe and acceptable manner. Do not dispose of used oil and filters in household trash, in sewers or onto the ground. Call your Toyota dealer, service station or auto parts store for information concerning recycling or disposal.
●Do not leave used engine oil within the reach of children.

NOTICE
■To prevent serious engine damage
Check the oil level on a regular basis.
■When replacing the engine oil
- Be careful not to spill engine oil on the vehicle components.
● Avoid overfilling, or the engine could be damaged. - Check the oil level on the dipstick every time you refill the vehicle.
- Be sure the engine oil filler cap is properly tightened.
Engine coolant
The coolant level is satisfactory if it is between the "FULL" and "LOW" lines on the reservoir when the engine is cold.
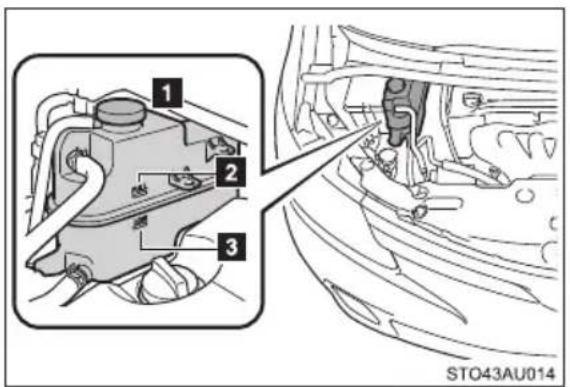
1 Reservoir cap
2 "FULL" line
3 "LOW" line
If the level is on or below the "LOW" line, add coolant up to the "FULL" line.
Coolant selection
Only use “Toyota Super Long Life Coolant” or a similar high quality ethylene glycol based non-silicate, non-amine, non-nitrite, and non-borate coolant with long-life hybrid organic acid technology.
"Toyota Super Long Life Coolant" is a mixture of 50% coolant and 50% deionized water. (Minimum temperature: -35°C [-31°F])
For more details about engine coolant, contact your Toyota dealer.
If the coolant level drops within a short time of replenishing
Visually check the radiator, hoses, engine coolant reservoir cap, drain cock and water pump.
If you cannot find a leak, have your Toyota dealer test the cap and check for leaks in the cooling system.

WARNING
■When the engine is hot
Do not remove the engine coolant reservoir cap.
The cooling system may be under pressure and may spray hot coolant if the cap is removed, causing serious injuries, such as burns.

NOTICE
■When adding coolant
Coolant is neither plain water nor straight antifreeze. The correct mixture of water and antifreeze must be used to provide proper lubrication, corrosion protection and cooling. Be sure to read the antifreeze or coolant label.
If you spill coolant
Be sure to wash it off with water to prevent it from damaging parts or paint.
Radiator and condenser
Check the radiator and condenser and clear away any foreign objects.
If either of the above parts are extremely dirty or you are not sure of their condition, have your vehicle inspected by your Toyota dealer.

WARNING
■When the engine is hot
Do not touch the radiator or condenser as they may be hot and cause serious injuries, such as burns.
Battery
Check the battery as follows:
Battery exterior
Make sure that the battery terminals are not corroded and that there are no loose connections, cracks, or loose clamps.
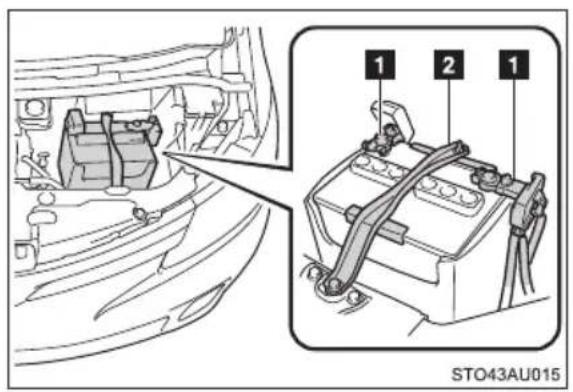
1 Terminals
2 Hold-down clamp
- Checking battery fluid
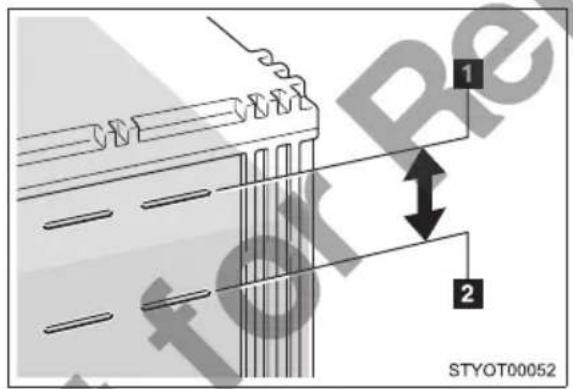
Check that the level is between the "UPPER LEVEL" and "LOWER LEVEL" lines.
1 "UPPER LEVEL" line
2 "LOWER LEVEL" line
If the fluid level is at or below the "LOWER LEVEL" line, add distilled water.
■ Adding distilled water
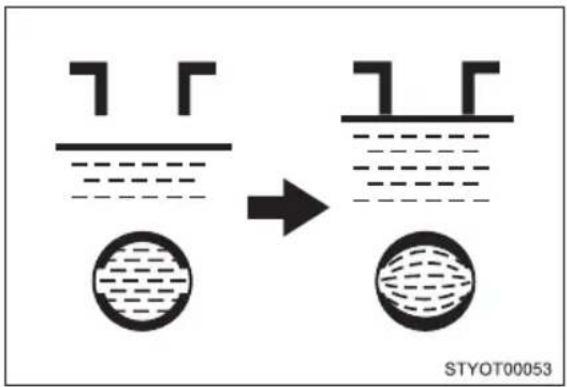
STEP 1 Remove the vent plug.
STEP 2 Add distilled water.
If the "UPPER LEVEL" line cannot be seen, check the fluid level by looking directly at the cell.
STEP 3 Put the vent plug back on and close it securely.
■Before recharging
When recharging, the battery produces hydrogen gas which is flammable and explosive. Therefore, observe the following before recharging:
- If recharging with the battery installed on the vehicle, be sure to disconnect the ground cable.
● Make sure the power switch on the charger is off when connecting and disconnecting the charger cables to the battery.
■ After recharging/reconnecting the battery
- Vehicles with a smart entry & start system: Unlocking the doors using the smart entry & start system may not be possible immediately after reconnecting the battery. If this happens, use the wireless remote control or the mechanical key to lock/unlock the doors.
Start the engine with the "ENGINE START STOP" switch in ACCESSORY mode. The engine may not start with the "ENGINE START STOP" switch turned off. However, the engine will operate normally from the second attempt.
- The “ENGINE START STOP” switch mode is recorded by the vehicle. If the battery is reconnected, the vehicle will return the “ENGINE START STOP” switch mode to the status it was in before the battery was disconnected. Make sure to turn off the engine before disconnect the battery. Take extra care when connecting the battery if the “ENGINE START STOP” switch mode prior to discharge is unknown.
If the engine will not start even after multiple attempts, contact your Toyota dealer.

WARNING
■Chemicals in the battery
Batteries contain poisonous and corrosive sulfuric acid and may produce hydrogen gas which is flammable and explosive. To reduce the risk of death or serious injury, take the following precautions while working on or near the battery:
- Do not cause sparks by touching the battery terminals with tools.
- Do not smoke or light a match near the battery.
●Avoid contact with eyes, skin and clothes.
●Never inhale or swallow electrolyte.
●Wear protective safety glasses when working near the battery. - Keep children away from the battery.
■Where to safely charge the battery
Always charge the battery in an open area. Do not charge the battery in a garage or closed room where there is insufficient ventilation.

WARNING
Emergency measures regarding electrolyte
●If electrolyte gets in your eyes
Flush your eyes with clean water for at least 15 minutes and get immediate medical attention. If possible, continue to apply water with a sponge or cloth while traveling to the nearest medical facility.
●If electrolyte gets on your skin
Wash the affected area thoroughly. If you feel pain or burning, get medical attention immediately.
●If electrolyte gets on your clothes
It can soak through clothing on to your skin. Immediately take off the clothing and follow the procedure above if necessary.
●If you accidentally swallow electrolyte
Drink a large quantity of water or milk. Get emergency medical attention immediately.

NOTICE
■When recharging the battery
Never recharge the battery while the engine is running. Also, be sure all accessories are turned off.
■When adding distilled water
Avoid overfilling. Water spilled during battery recharging may cause corrosion.
Washer fluid
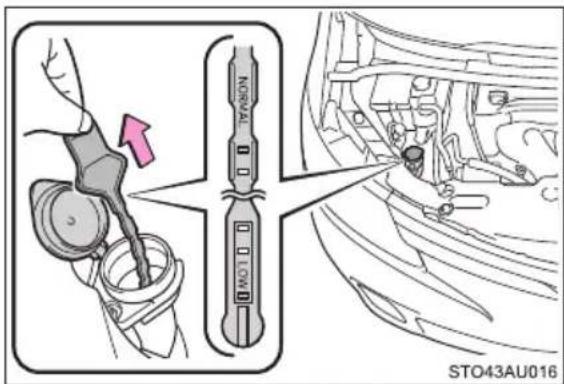
If the washer fluid level is at "LOW", add washer fluid.
Using the gauge
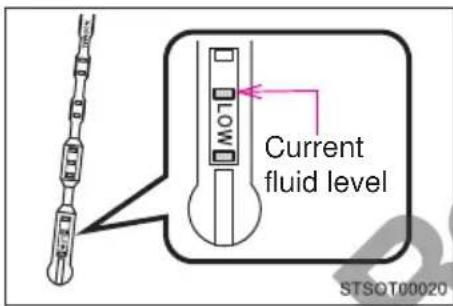
The washer fluid level can be checked by observing the position of the level on the liquid covered holes in the gauge.
If the level falls below the second hole from the bottom (the "LOW" position), refill the washer fluid.

WARNING
■When adding washer fluid
Do not add washer fluid when the engine is hot or running as washer fluid contains alcohol and may catch fire if spilled on the engine, etc.

NOTICE
■ Do not use any fluid other than washer fluid
Do not use soapy water or engine antifreeze instead of washer fluid. Doing so may cause streaking on the vehicle's painted surfaces.
Diluting washer fluid
Dilute washer fluid with water as necessary.
Refer to the freezing temperatures listed on the label of the washer fluid bottle.
4-3. Do-it-yourself maintenance
Tires
Replace or rotate tires in accordance with maintenance schedules and treadwear.
Checking tires
Check if the treadwear indicators are showing on the tires. Also check the tires for uneven wear, such as excessive wear on one side of the tread.
Check the spare tire condition and pressure if not rotated.
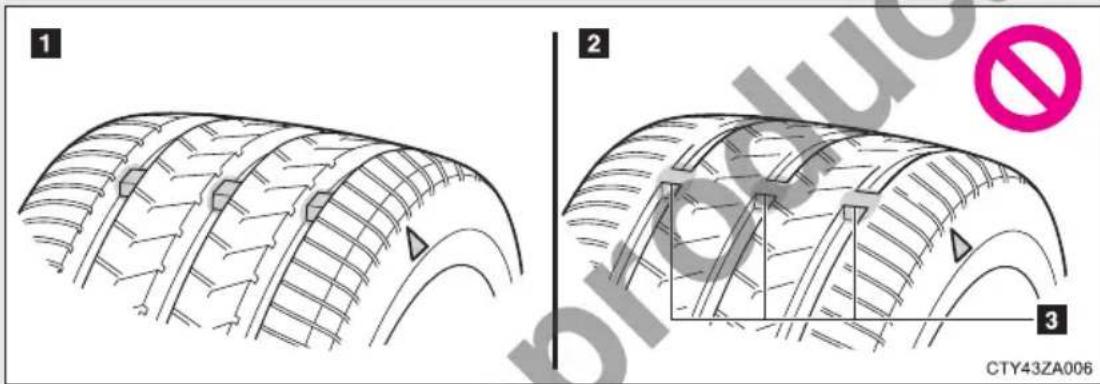
1 New tread
2 Worn tread
3 Treadwear indicator
The location of treadwear indicators is shown by a “TWI” or “Δ” mark, etc., molded into the sidewall of each tire.
Replace the tires if the treadwear indicators are showing on a tire.
Tire rotation
Vehicles with a spare tire of different wheel type from the installed tires
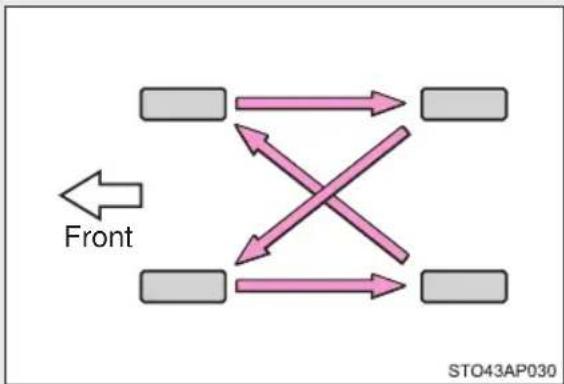
flowchart
graph TD
    A["Gray Block 1"] --> B["Gray Block 2"]
    C["Gray Block 3"] --> D["Gray Block 4"]
    E["Gray Block 5"] --> F["Gray Block 6"]
    G["Gray Block 7"] --> H["Gray Block 8"]
    I["Gray Block 9"] --> J["Gray Block 10"]
    K["Gray Block 11"] --> L["Gray Block 12"]
    M["Gray Block 13"] --> N["Gray Block 14"]
    O["Gray Block 15"] --> P["Gray Block 16"]
    Q["Gray Block 17"] --> R["Gray Block 18"]
    S["Gray Block 19"] --> T["Gray Block 20"]
    U["Gray Block 21"] --> V["Gray Block 22"]
    W["Gray Block 23"] --> X["Gray Block 24"]
    Y["Gray Block 25"] --> Z["Gray Block 26"]
    AA["Gray Block 27"] --> AB["Gray Block 28"]
    AC["Gray Block 29"] --> AD["Gray Block 30"]
    AE["Gray Block 31"] --> AF["Gray Block 32"]
    AG["Gray Block 33"] --> AH["Gray Block 34"]
    AI["Gray Block 35"] --> AJ["Gray Block 36"]
    AK["Gray Block 37"] --> AL["Gray Block 38"]
    AM["Gray Block 39"] --> AN["Gray Block 40"]
    AO["Gray Block 41"] --> AP["Gray Block 42"]
    AQ["Gray Block 43"] --> AR["Gray Block 44"]
    AS["Gray Block 45"] --> AT["Gray Block 46"]
    AU["Gray Block 47"] --> AV["Gray Block 48"]
    AW["Gray Block 49"] --> AX["Gray Block 50"]
    AY["Left Arrow"] --> AZ["Front"]
Rotate the tires in the order shown.
To equalize tire wear and help extend tire life, Toyota recommends that tire rotation is carried out approximately every 10000 km (6000 miles).
Vehicles with a spare tire of the same wheel type as the installed tires
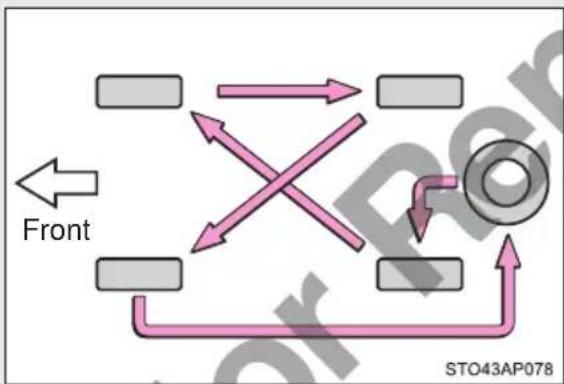
flowchart
graph TD
    A["Left Component"] --> B["Right Component"]
    B --> C["Left Side"]
    C --> D["Right Side"]
    D --> E["Bottom Segment"]
    E --> F["Left Side"]
    F --> G["Right Side"]
    G --> H["Left Side"]
    H --> I["Right Side"]
    I --> J["Left Side"]
    J --> K["Right Side"]
    K --> L["Left Side"]
    L --> M["Right Side"]
    M --> N["Left Side"]
    N --> O["Right Side"]
    O --> P["Left Side"]
    P --> Q["Right Side"]
    Q --> R["Left Side"]
    R --> S["Right Side"]
    S --> T["Left Side"]
    T --> U["Right Side"]
    U --> V["Left Side"]
    V --> W["Right Side"]
    W --> X["Left Side"]
    X --> Y["Right Side"]
    Y --> Z["Left Side"]
    Z --> AA["Right Side"]
    AA --> AB["Left Side"]
    AB --> AC["Right Side"]
    AC --> AD["Left Side"]
    AD --> AE["Right Side"]
    AE --> AF["Left Side"]
    AF --> AG["Right Side"]
    AG --> AH["Left Side"]
    AH --> AI["Right Side"]
    AI --> AJ["Left Side"]
    AJ --> AK["Right Side"]
    AK --> AL["Left Side"]
    AL --> AM["Right Side"]
    AM --> AN["Left Side"]
    AN --> AO["Right Side"]
    AO --> AP["Left Side"]
    AP --> AQ["Right Side"]
    AQ --> AR["Left Side"]
    AR --> AS["Right Side"]
    AS --> AT["Left Side"]
    AT --> AU["Right Side"]
    AU --> AV["Left Side"]
    AV --> AW["Right Side"]
    AW --> AX["Left Side"]
    AX --> AY["Right Side"]
Rotate the tires in the order shown.
To equalize tire wear and help extend tire life, Toyota recommends that tire rotation is carried out approximately every 10000 km (6000 miles).
- When to replace your vehicle’s tires
Tires should be replaced if:
●The treadwear indicators are showing on a tire.
- You have tire damage such as cuts, splits, cracks deep enough to expose the fabric, and bulges indicating internal damage
● A tire goes flat repeatedly or cannot be properly repaired due to the size or location of a cut or other damage
If you are not sure, consult with your Toyota dealer.
Tire life
Any tire over 6 years old must be checked by a qualified technician even if it has seldom or never been used, or damage is not obvious.
If the tread on snow tires wears down below 4 mm (0.16 in.)
The effectiveness of the tires as snow tires is lost.

WARNING
■When inspecting or replacing tires
Observe the following precautions to prevent accidents.
Failure to do so may cause damage to parts of the drive train as well as dangerous handling characteristics, which may lead to an accident resulting in death or serious injury.
- Do not mix tires of different makes, models or tread patterns.
Also, do not mix tires of remarkably different treadwear. - Do not use tire sizes other than those recommended by Toyota.
- Do not mix differently constructed tires (radial, bias-belted or bias-ply tires).
- Do not mix summer, all season and snow tires.
- Do not use tires that have been used on another vehicle.
Do not use tires if you do not know how they were used previously.
● Vehicles with a compact spare tire: Do not tow if your vehicle has a compact spare tire installed.

NOTICE
■Driving on rough roads
Take particular care when driving on roads with loose surfaces or potholes. These conditions may cause losses in tire inflation pressure, reducing the cushioning ability of the tires. In addition, driving on rough roads may cause damage to the tires themselves, as well as the vehicle's wheels and body.
If tire inflation pressure of each tire becomes low while driving
Do not continue driving, or your tires and/or wheels may be ruined.
4-3. Do-it-yourself maintenance
Tire inflation pressure
Make sure to maintain proper tire inflation pressure. Tire inflation pressure should be checked at least once per month. However, Toyota recommends that tire inflation pressure be checked once every two weeks. ( P. 547)
■Effects of incorrect tire inflation pressure
Driving with incorrect tire inflation pressure may result in the following:
●Reduced fuel economy
●Reduced driving comfort and poor handling
●Reduced tire life due to wear
●Reduced safety
●Damage to the drive train
If a tire needs frequent inflating, have it checked by your Toyota dealer.
■ Instructions for checking tire inflation pressure
When checking tire inflation pressure, observe the following:
- Check only when the tires are cold.
If your vehicle has been parked for at least 3 hours or has not been driven for more than 1.5 km or 1 mile, you will get an accurate cold tire inflation pressure reading.
● Always use a tire pressure gauge.
It is difficult to judge if a tire is properly inflated based only on its appearance. - It is normal for the tire inflation pressure to be higher after driving as heat is generated in the tire. Do not reduce tire inflation pressure after driving.
- The spare tire inflation pressure should also be checked.
The spare tire check should be performed out of the vehicle ( P. 508).

WARNING
■Proper inflation is critical to save tire performance
Keep your tires properly inflated.
If the tires are not properly inflated, the following conditions may occur which could lead to an accident resulting in death or serious injury:
Excessive wear
Uneven wear
●Poor handling
● Possibility of blowouts resulting from overheated tires
●Air leaking from between tire and wheel
●Wheel deformation and/or tire damage
●Greater possibility of tire damage while driving (due to road hazards, expansion joints, sharp edges in the road, etc.)

NOTICE
■When inspecting and adjusting tire inflation pressure
Be sure to put the tire valve caps back on.
If a valve cap is not installed, dirt or moisture may get into the valve and cause an air leak, resulting in decreased tire inflation pressure.
4-3. Do-it-yourself maintenance
Wheels
If a wheel is bent, cracked or heavily corroded, it should be replaced. Otherwise, the tire may separate from the wheel or cause a loss of handling control.
Wheel selection
When replacing wheels, care should be taken to ensure that they are equivalent to those removed in load capacity, diameter, rim width and inset *.
Replacement wheels are available at your Toyota dealer.
*: Conventionally referred to as "offset".
Toyota does not recommend using the following:
●Wheels of different sizes or types
●Used wheels
●Bent wheels that have been straightened
■Aluminum wheel precautions (if equipped)
●Use only Toyota wheel nuts and wrenches designed for use with your aluminum wheels.
- When rotating, repairing or changing your tires, check that the wheel nuts are still tight after driving 1600 km (1000 miles).
- Be careful not to damage the aluminum wheels when using tire chains.
●Use only Toyota genuine balance weights or equivalent and use a plastic or rubber hammer when balancing your wheels.

WARNING
■When replacing wheels
- Do not use wheels that are a different size from those recommended in the Owner's Manual, as this may result in a loss of handling control.
●Never use an inner tube in a leaking wheel which is designed for a tubeless tire. Doing so may result in an accident, causing death or serious injury.
■When installing the wheel nuts
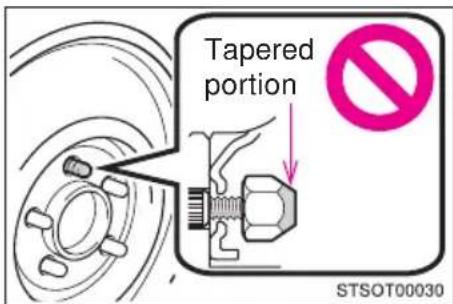
- Be sure to install the wheel nuts with the tapered ends facing inward. Installing the nuts with the tapered ends facing outward can cause the wheel to break and eventually cause the wheel to come off while driving, which could lead to an accident resulting in death or serious injury.
●Never use oil or grease on the wheel bolts or wheel nuts.
Oil and grease may cause the wheel nuts to be excessively tightened, leading to bolt or disc wheel damage. In addition, the oil or grease can cause the wheel nuts to loosen and the wheel may fall off, causing an accident and resulting in death or serious injury. Remove any oil or grease from the wheel bolts or wheel nuts.
4-3. Do-it-yourself maintenance
Air conditioning filter
The air conditioning filter must be changed regularly to maintain air conditioning efficiency.
Replacement method
STEP 1 Turn the "ENGINE START STOP" switch off.
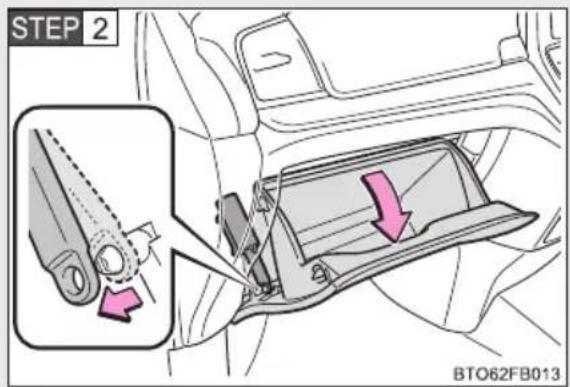
Open the glove box. Slide off the damper.
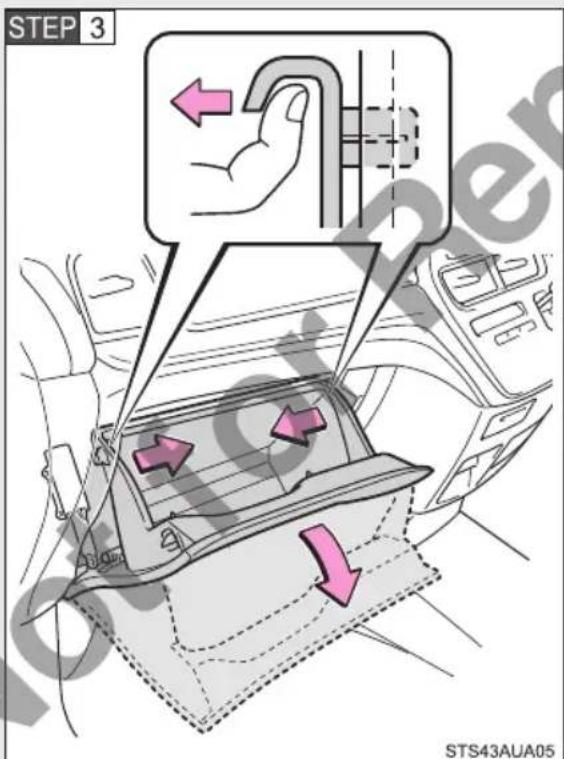
Pull both side of the glove box from the inside to disconnect the upper claws.
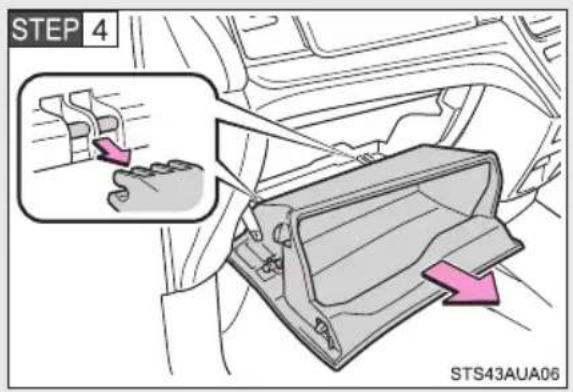
Pull out the glove box and disconnect the lower claws.
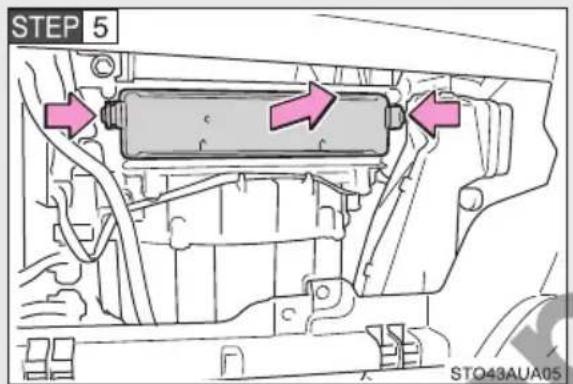
Remove the filter cover.
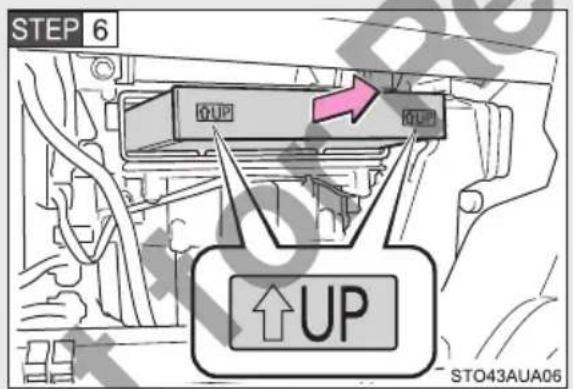
Remove the air conditioning filter.
The “↑UP” marks shown on the filter should be pointing up.
- Checking interval
Inspect and replace the air conditioning filter according to the maintenance schedule. In dusty areas or areas with heavy traffic flow, early replacement may be required. (For scheduled maintenance information, please refer to the “Warranty and Service Booklet”.)
If air flow from the vents decreases dramatically
The filter may be clogged. Check the filter and replace if necessary.
■ Air conditioning filter with deodorizing function
When fragrances are placed in your vehicle, the deodorizing effect may become significantly weakened in a short period.
When an air conditioning odor comes out continuously, replace the air conditioning filter.

NOTICE
■When using the air conditioning system
Make sure that a filter is always installed.
Using the air conditioning system without a filter may cause damage to the system.
4-3. Do-it-yourself maintenance
Electronic key battery
Replace the battery with a new one if it is depleted.
■You will need the following items:
●Flathead screwdriver
●Lithium battery (CR1632)
■Replacing the battery
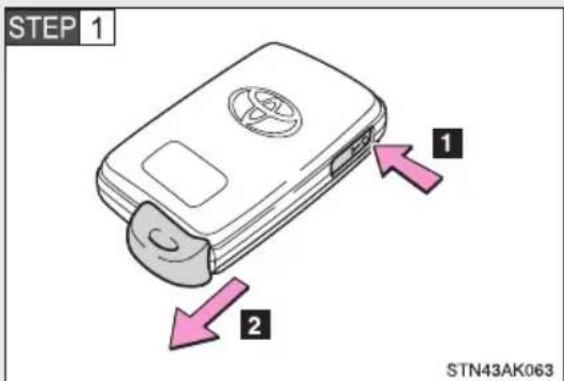
Take out the mechanical key.
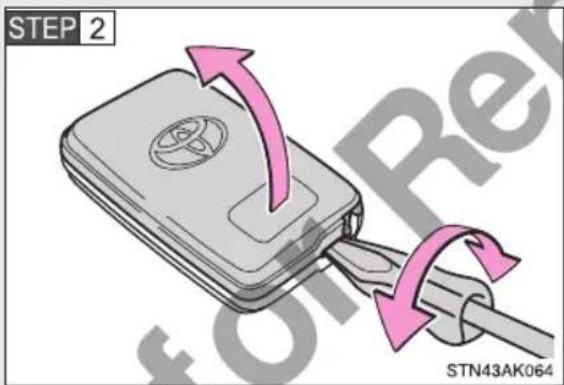
Remove the cover.
To prevent damage to the key, cover the tip of the screwdriver with a rag.
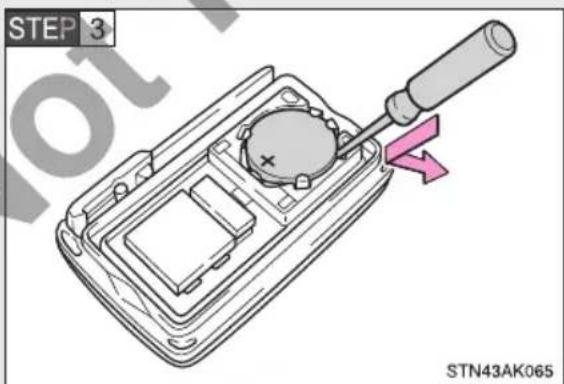
Remove the depleted battery.
Insert a new battery with the "+" terminal facing up.
■Use a CR1632 lithium battery
●Batteries can be purchased at your Toyota dealer, local electrical appliance shops or camera stores.
- Replace only with the same or equivalent type recommended by the manufacturer.
● Dispose of used batteries according to local laws.
If the electronic key battery is depleted
The following symptoms may occur:
● The smart entry & start system or push-button start system and wireless remote control will not function properly.
●The operational range will be reduced.

WARNING
■Removed battery and other parts
These parts are small and if swallowed by a child, they can cause choking. Keep away from children. Failure to do so could result in death or serious injury.

NOTICE
■For normal operation after replacing the battery
Observe the following precautions to prevent accidents:
●Always work with dry hands.
Moisture may cause the battery to rust.
Do not touch or move any other component inside the remote control.
Do not bend either of the battery terminals.
4-3. Do-it-yourself maintenance
Rear seat entertainment system controller battery\*
Replace the battery with new one if they are depleted.
■You will need the following items:
Lithium battery (CR2025)
■Replacing the battery
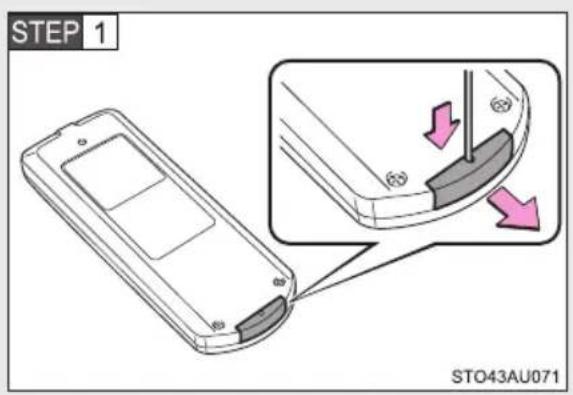
Remove the battery case by inserting a sharp point into the hole and remove the case.
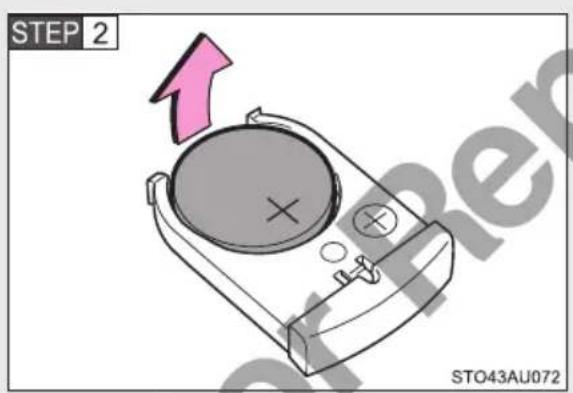
Remove the depleted battery.
Insert a new battery with the "+" terminal facing up.
■Use a CR2025 lithium battery
●Batteries can be purchased at your Toyota dealer, local electric appliance shops or camera stores.
- Replace only with the same or equivalent type recommended by the manufacturer.
● Dispose of used batteries according to the local laws.
If the batteries are depleted
The following symptoms may occur:
● The rear seat entertainment system control will not function properly.
●The operational range will be reduced.

WARNING
■Removed battery and other parts
These parts are small and if swallowed by a child, they can cause choking. Keep away from children. Failure to do so could result in death or serious injury.

NOTICE
■For normal operation after replacing the battery
Observe the following precautions to prevent accidents:
●Always work with dry hands.
Moisture may cause the battery to rust.
- Do not touch or move any other component inside the controller.
- Do not bend either of the battery terminals.
4-3. Do-it-yourself maintenance
Checking and replacing fuses
If any of the electrical components do not operate, a fuse may have blown. If this happens, check and replace the fuses as necessary.
STEP 1 Turn the "ENGINE START STOP" switch off.
STEP 2 Open the fuse box cover.
Engine compartment (type A fuse box)
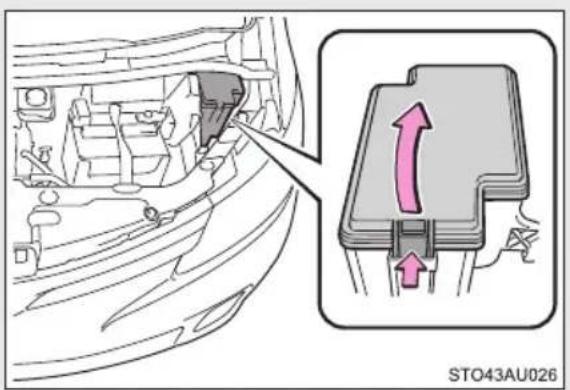
Push the tab in and lift the lid off.
Engine compartment (type B fuse box)
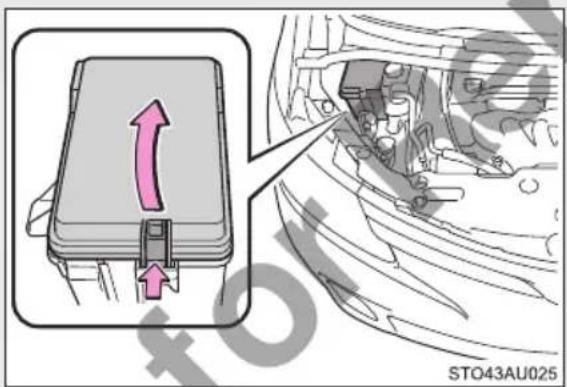
Push the tab in and lift the lid off.
Under the instrument panel (type C fuse box)
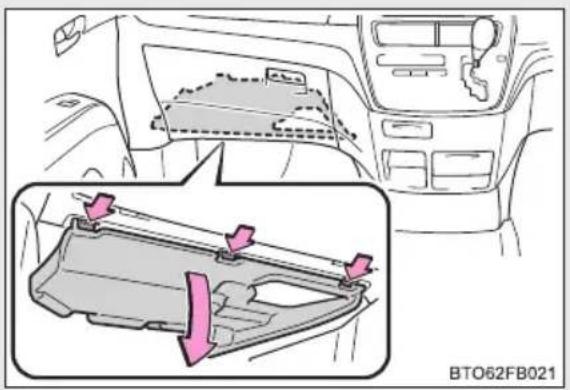
1 Remove the cover.
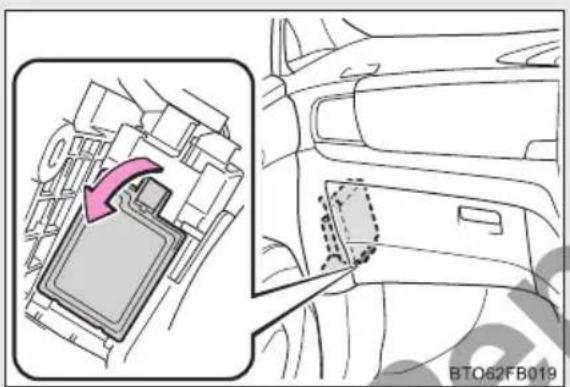
2 Remove the lid.
Under the instrument panel (type D fuse box)
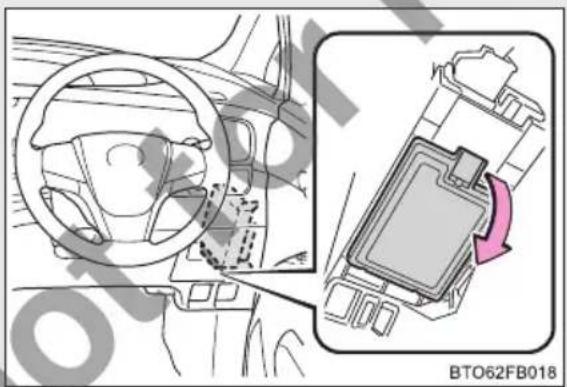
natural_image
Interior view of a car dashboard and internal components, showing steering wheel, dashboard, and battery cover (no text or symbols)Remove the lid.
Under the instrument panel (type E fuse box)
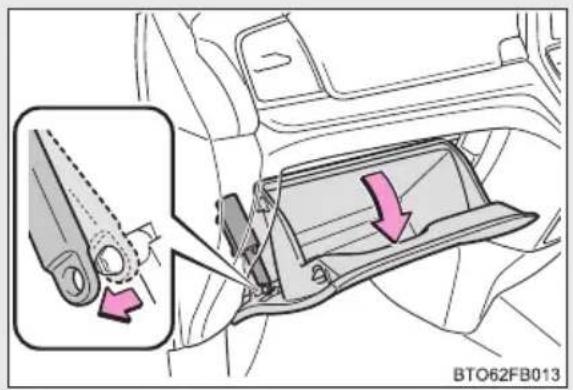
1 Open the glove box. Slide off the damper.
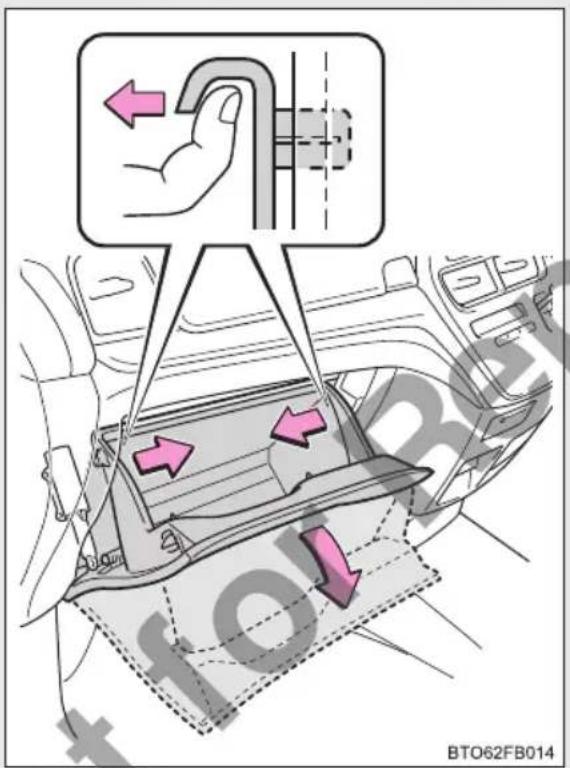
2 Pull both side of the glove box from the inside to disconnect the upper claws.
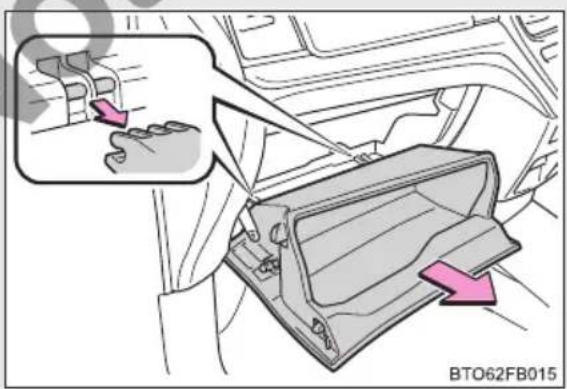
3 Pull out the glove box and disconnect the lower claws.
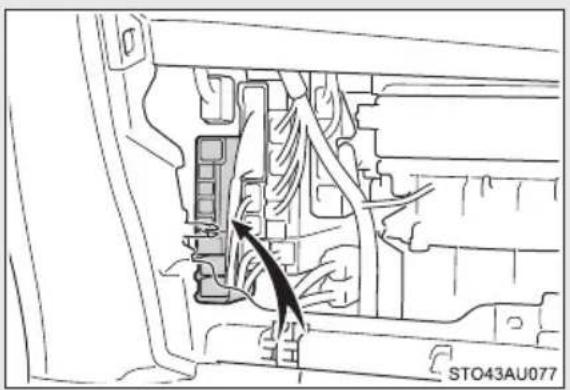
STEP 3 After a system failure, see "Fuse layout and amperage ratings" (→P. 436) for details about which fuse to check.
STEP 4 Remove the fuse.
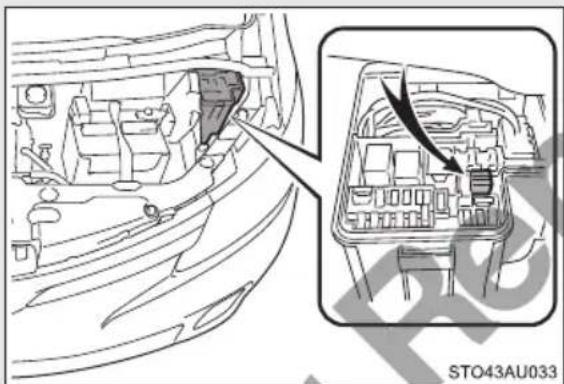
Only type A fuse can be removed using the pullout tool.
STEP 5 Check if the fuse is blown.
Type A
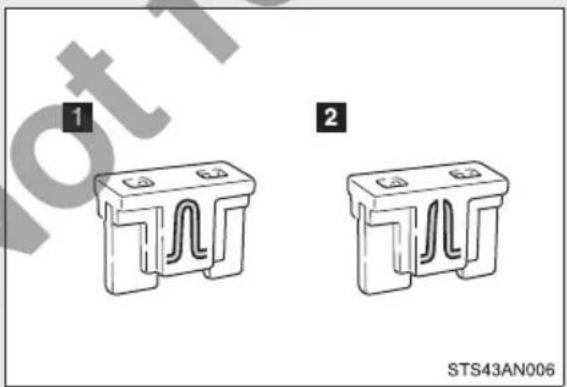
natural_image
Two technical diagrams of a mechanical component with internal channels, labeled 1 and 2, no text or symbols present.1 Normal fuse
2 Blown fuse
Replace the blown fuse with a new fuse of an appropriate amperage rating. The amperage rating can be found on the fuse box lid.
Type B
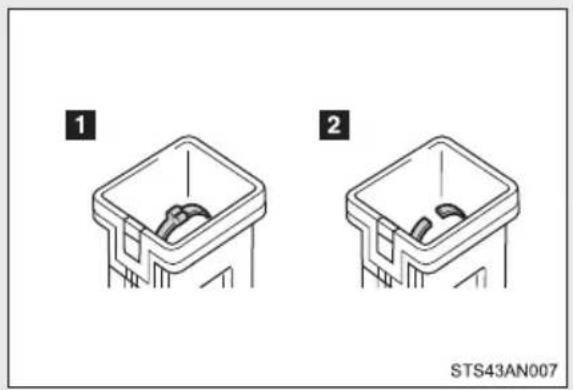
natural_image
Two technical diagrams of a plastic container with internal components, labeled 1 and 2, no text or symbols present.1 Normal fuse
2 Blown fuse
Replace the blown fuse with a new fuse of an appropriate amperage rating. The amperage rating can be found on the fuse box lid.
Type C
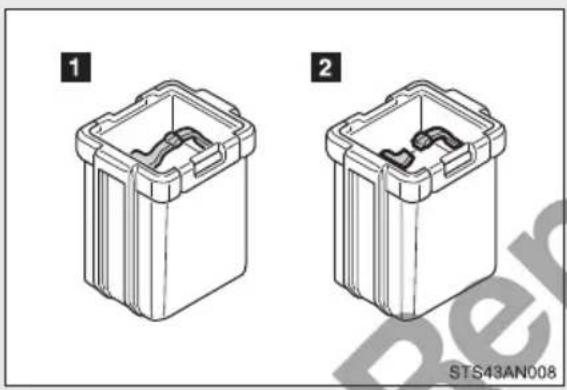
natural_image
Two technical line drawings of a plastic container with internal slots, labeled 1 and 2 (no text or symbols on the diagrams themselves)1 Normal fuse
2 Blown fuse
Replace the blown fuse with a new fuse of an appropriate amperage rating. The amperage rating can be found on the fuse box lid.
Fuse layout and amperage ratings
Engine compartment (type A fuse box)
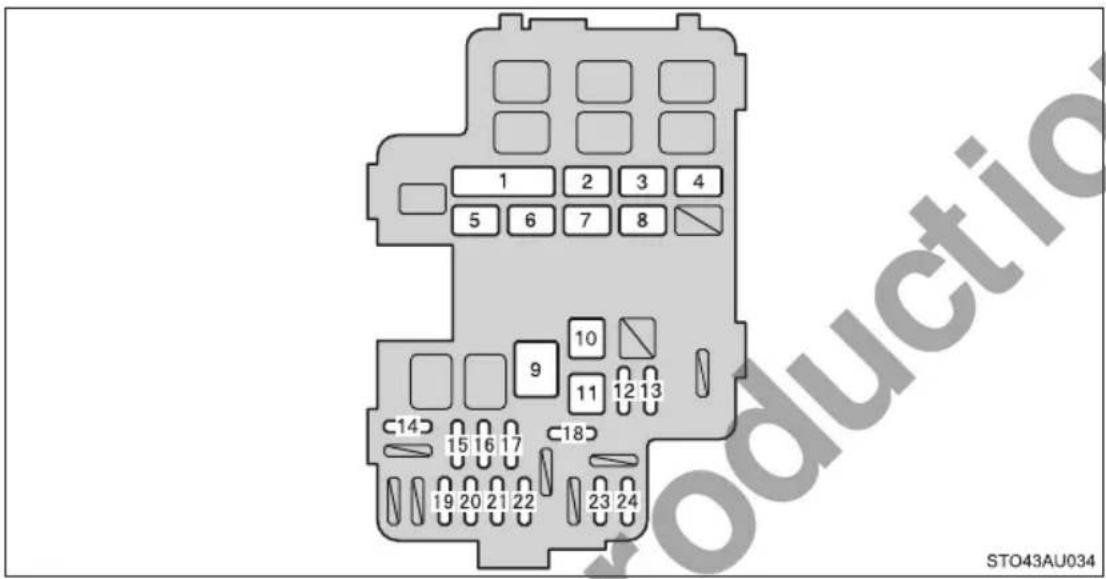
| Fuse Ampere Circuit | |||
| 1 RH R/B ALT 100 A | CDS FAN, RDI FAN, PTC NO.1, PTC NO.2, PTC NO.3, H-LPCLAN, FOG fuse | ||
| 2 RH-MAIN-JB 60 A | STOP, AM1, STP LP NO.3, STPLP NO.1, STP LP NO.2, OBD, P/W RR, PSB, P/W FR, RR FOG, P/SEAT RH, PSD RH, CIG, ECU-ACC, RAD NO.2, P/POINT, FRWIP, SEAT HTR RH, RH ECU-IG fuse | ||
| 3 LH-MAIN-JB 80 A | TAIL, PANEL, P/W RL, PSD LH, S/R, 4WD, PBD, P/W FL, DRLOCK, GAUGE NO.1, RR WIP,SEAT HTR LH, GAUGE NO.2, LHECU-IG, WASH fuse | ||
| 4 SUB R/B 80 A | HTR, RR A/C, 3RD SEAT RH,3RD SEAT LH fuse | ||
| 5 F/B ALT 100 A ABS NO.1, ABS NO.2, DEF fuse | |||
| Fuse | Ampere | Circuit | |
| 6 ALT 140 A | Gauges and meters, charging system, F/B ALT, SUB R/B, RH-MAIN-JB, LH-MAIN-JB, RH R/B ALT fuse | ||
| 7 F/B BATT 120 A | EPS, ST, A/F, EFI, TRN HAZ, IG2, FR DOOR, ETC-S, AM2 NO.2, AM2 NO.1, DOME, ECU-B, RAD NO.1 fuse | ||
| 8 RH R/B BATT 60 A | Headlight cleaners, H-LP RL, H-LP LL, S/HORN, ECU-B3, ECU-B2, AMP, STRG LCK, HORN, H-LP RH, H-LP LH fuse | ||
| 9 EPS 80 A Electric power steering | |||
| 10 ST 30 A | Multiport fuel injection system/ sequential multiport fuel injection system, smart entry & start sys- tem, push-button start system | ||
| 11 ABS NO.1 50 A | Anti-lock brake system, vehicle stability control | ||
| 12 ABS NO.2 30 A | Anti-lock brake system, vehicle stability control | ||
| 13 DEF 25 A Rear window defogger | MIR HTR | ||
| 14 EFI 20 A | Multiport fuel injection system/ sequential multiport fuel injection system | ||
| 15 ECU-B | 10 A | Gauges and meters, air condition- ing system, smart entry & start sys- tem, push-button start system, power sliding doors, multiplex com- munication system, wireless remote control system | |
| Fuse Ampere Circuit | |||
| 16 | DOME 7.5 A | Interior lights, luggage compartment light, door courtesy lights, front personal lights, rear personal lights, multiplex communication system | |
| 17 | RAD NO.1 15 A | Audio system, rear seat entertainment system | |
| 18 | MIR HTR 10 A No circuit | ||
| 19 | ETC-S 10 A | Multiport fuel injection system/sequential multiport fuel injection system | |
| 20 | AM2 NO.2 7.5 A | Multiport fuel injection system/sequential multiport fuel injection system, smart entry & start system, push-button start system | |
| 21 | TRN HAZ 15 A | Turn signal lights, emergency flashers | |
| 22 | IG2 15 A | Multiport fuel injection system/sequential multiport fuel injection system, smart entry & start system, push-button start system, starting system, MET, IGN fuse | |
| 23 | FR DOOR 30 A | Smart entry & start system, push-button start system, multiplex communication system | |
| 24 | A/F 30 A | Multiport fuel injection system/sequential multiport fuel injection system | |
Engine compartment (type B fuse box)
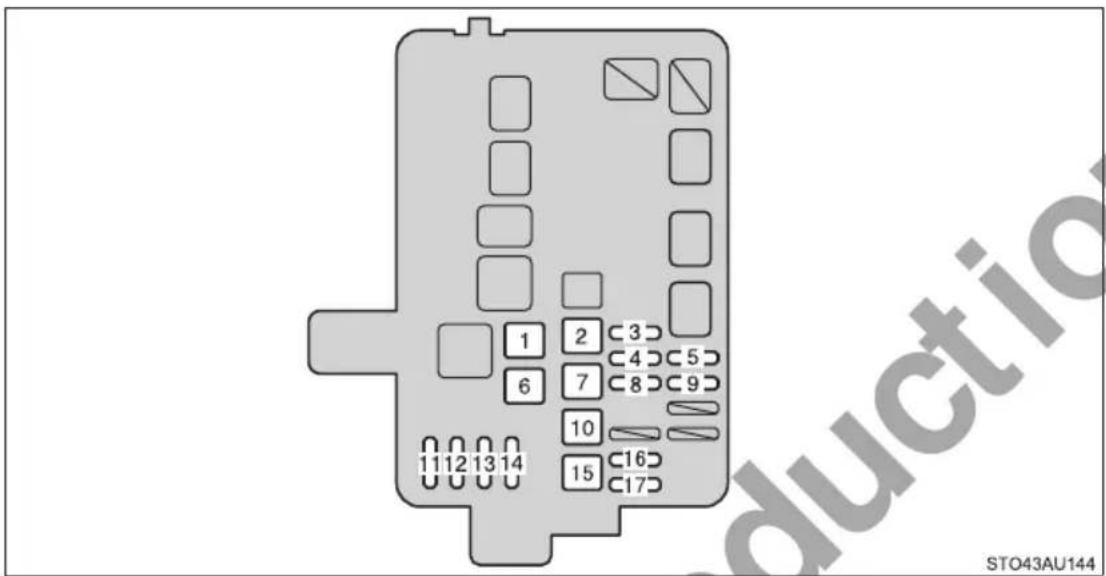
| Fuse Ampere Circuit | |||
| 1 | CDS FAN*1 | 50 A Electric cooling fans | |
| RDI FAN NO.2*2 | |||
| 2 H | -LP CLN 30 A Headlight cleaners | ||
| 3 | E C U - | B 3 7 | Smart entry & start system, push-button start system |
| 4 E | CU-B2 7.5 A Power windows | ||
| 5 H | ORN 10 A Horns | ||
| 6 | RDI FAN*1 | 50 A Electric cooling fans | |
| RDI FAN NO.1*2 | |||
| 7 PTC NO.3 50 A Air conditioning system | |||
| 8 S/HORN 10 A Smart entry & start system | |||
| 9 STRG LCK 20 A | Smart entry & start system, push-button start system, steering lock system | ||
| 10 PTC NO.2 50 A Air conditioning system | |||
| 11 | H-LP LH | 15 A Left-hand headlight (high beam) | |
| 12 H-LP RH | 15 A Right-hand headlight (high beam) | ||
Fuse Ampere Circuit
13 H-LP LL 15 A Left-hand headlight (low beam)
14 H-LP RL 15 A
Headlight leveling system, right-hand headlight (low beam)
15 PTC NO.1 50 A Air conditioning system
16 DEICER *^2
20 A No circuit
17 FOG 15 A Front fog lights
*1: 2AZ-FE engine
*2: 2GR-FE engine
Under the instrument panel (type C fuse box)
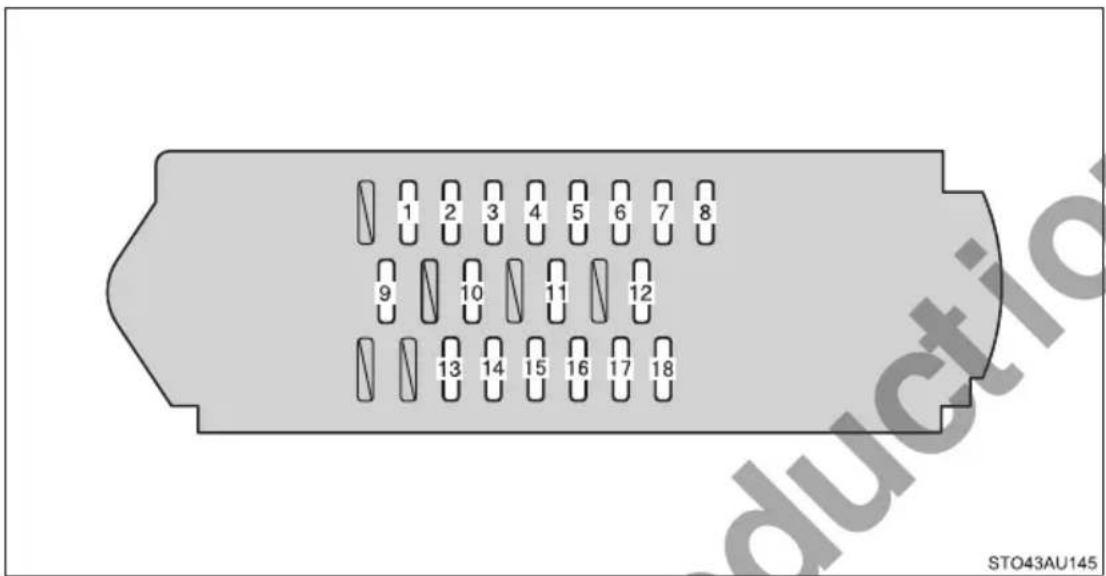
| Fuse Ampere Circuit | |||
| 1 4 | WD 7.5 A No circuit | ||
| 2 AC INV 15 A No circuit | |||
| 3 DR LOCK 30 A | Smart entry & start system, push-button start system, multiplex communication system | ||
| 4 P/W FL 20 A Power windows | |||
| 5 S/R 20 A Rear sunshade | |||
| 6 PSD LH 30 A Power sliding doors | |||
| 7 P/W RL 20 A Power windows | |||
| 8 PBD 30 A No circuit | |||
| 9 RR WIP 15 A | Windshield wipers and washer, rear window wiper and washer, headlight cleaners | ||
| 10 GAUGE NO.1 | 10 A | Anti-lock brake system, vehicle stability control, adaptive front-lighting system, electric cooling fans, Toyota parking assist-sensor, headlight cleaners | |
| Fuse Ampere Circuit | |||
| 11 | PANEL 10 A | Instrument panel lights, Toyota parking assist-sensor | |
| 12 | TAIL 10 A | Front fog lights, tail lights, front position lights, license plate lights | |
| 13 | LH ECU-IG 10 A | Adaptive front-lighting system,multiplex communication system,smart entry & start system, push-button start system, power sliding doors, power seat (third seats) | |
| 14 | SEAT HTR LH 10 A | Seat heater LH | |
| 15 | GAUGE NO.2 10 A | Charging system, automatic trans-mission system/continuously vari-able transmission system, back-uplights, Toyota parking assist-sen-sor, power seat (third seats) | |
| 16 | STP LP NO.1 7.5 A | No circuit | |
| 17 | STP LP NO.3 7.5 A | No circuit | |
| 18 | STP LP NO.2 7.5 A | No circuit | |
Under the instrument panel (type D fuse box)
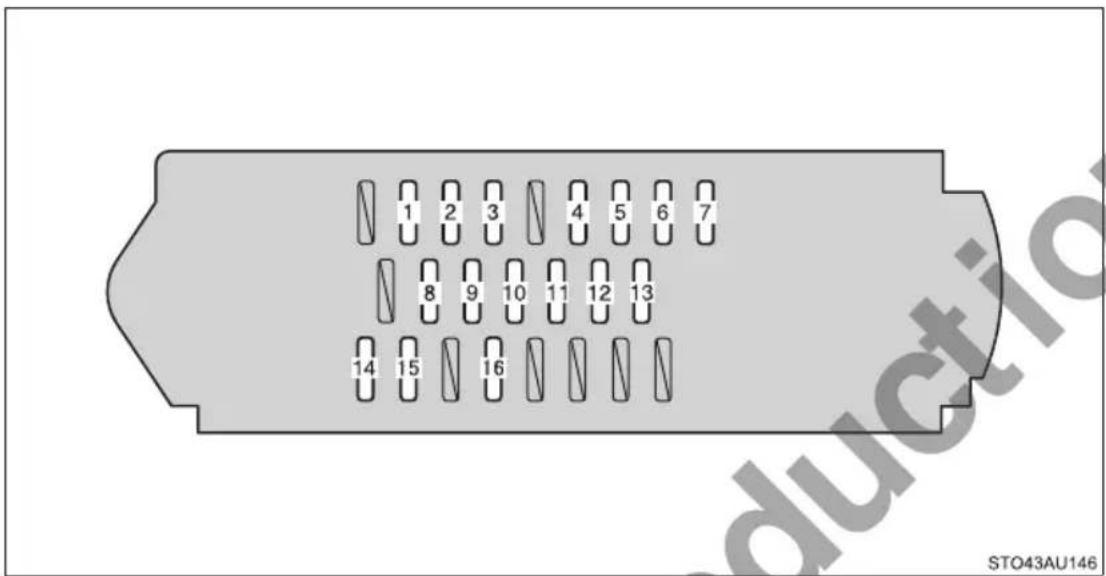
| Fuse Ampere Circuit | |||
| 1 RR FOG 7.5 A No circuit | |||
| 2 P/W FR 20 A Power windows | |||
| 3 P/SEAT RH 30 A Power seat (Front seat) | |||
| 4 STOP 15 A | Stop lights, high mounted stop-light, automatic transmission sys-tem/continuously variabletransmission system, shift locksystem, multiport fuel injectionsystem/sequential multiport fuelinjection system, anti-lock brakesystem, vehicle stability control | ||
| 5 OBD 7.5 A On-board diagnosis system | |||
| 6 PSD RH 30 A Power sliding doors | |||
| 7 P/W RR 20 A Power windows | |||
| 8 P/POINT 15 A Power outlet | |||
| 9 P/POINT NO.2 15 A Power outlet | |||
| 10 | RAD NO.2 | 7.5 A | Audio system, rear seat entertain-ment system |
| 11 | ECU-ACC 7.5 A | Smart entry & start system, push-button start system, outside rear view mirrors, shift lock system | |
| 12 | IGN 10 A | Multiport fuel injection system/sequential multiport fuel injection system, SRS airbag system, multiplex communication system | |
| 13 | MET 7.5 A Gauges and meters | ||
| 14 | FR WIP 30 A Windshield wipers and washer | ||
| 15 | SEAT HTR RH 10 A | Seat heater | RH |
| 16 | RH ECU-IG 10 A | Vehicle stability control, air conditioning system, Toyota parking assist-sensor, automatic transmission system/continuously variable transmission system, electric power steering, smart entry & start system, push-button start system, power sliding doors, rear sunshade, shift lock system, turn signal lights, emergency flashers, vanity lights, multiplex communication system | |
Under the instrument panel (type E fuse box)
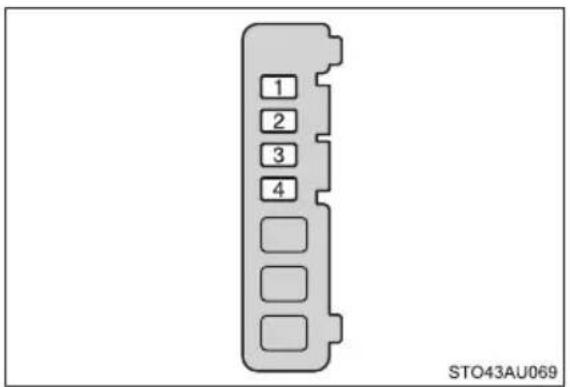
| Fuse Ampere Circuit | ||
| 1 H | TR 50 A | Air conditioning system |
| 2 3 | RD SEAT RH 30 A Power seat (Third seats) | |
| 3 3 | RD SEAT LH 30 A Power seat (Third seats) | |
| 4 R | R A/C 30 A | Air conditioning system |
■After a fuse is replaced
- If the lights do not turn on even after the fuse has been replaced, a bulb may need replacement. (→P. 447)
- If the replaced fuse blows again, have the vehicle inspected by your Toyota dealer.
If there is an overload in a circuit
The fuses are designed to blow, protecting the wiring harness from damage.

WARNING
■To prevent system breakdowns and vehicle fire
Observe the following precautions.
Failure to do so may cause damage to the vehicle, and possibly a fire or injury.
●Never use a fuse of a higher amperage rating than that indicated, or use any other object in place of a fuse.
●Always use a genuine Toyota fuse or equivalent.
Never replace a fuse with a wire, even as a temporary fix.
- Do not modify the fuses or fuse boxes.

NOTICE
■Before replacing fuses
Have the cause of electrical overload determined and repaired by your Toyota dealer as soon as possible.
4-3. Do-it-yourself maintenance
Light bulbs
You may replace the following bulbs by yourself. The difficulty level of replacement varies depending on the bulb. As there is a danger that components may be damaged, we recommend that replacement is carried out by your Toyota dealer.
■Preparing for light bulb replacement
Check the wattage of the light bulb to be replaced. (→P. 549)
■Removing the engine compartment cover
$$ \rightarrow \mathrm{P.403} $$
■Turning off the "PWR DOOR OFF" switch (if equipped)
$$ \rightarrow \mathrm{P.51} $$
■ Clip removal and installation
Remove the clip using the clip remover.
When the clips are damaged, new ones can be purchased at a Toyota dealer.
Front bulb locations
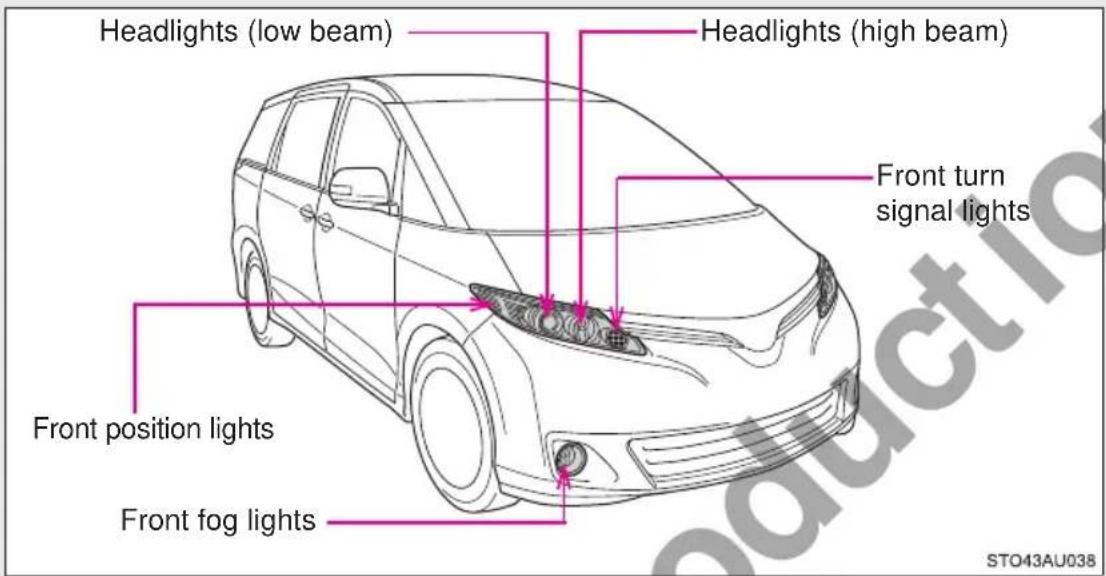
■Rear bulb locations
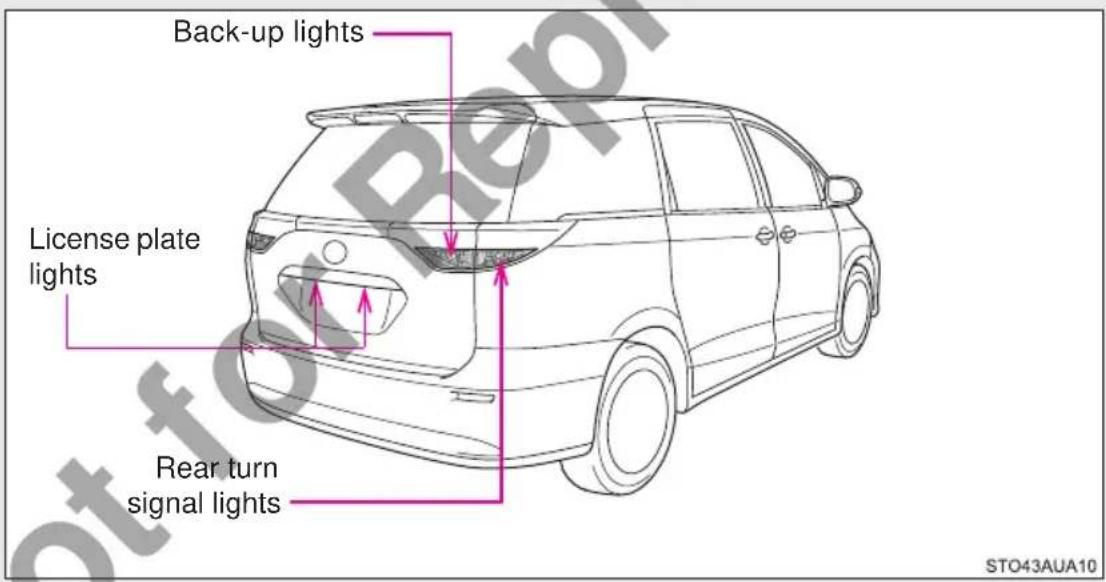
Replacing light bulbs
■Headlights (low beam) [vehicles with halogen headlights]
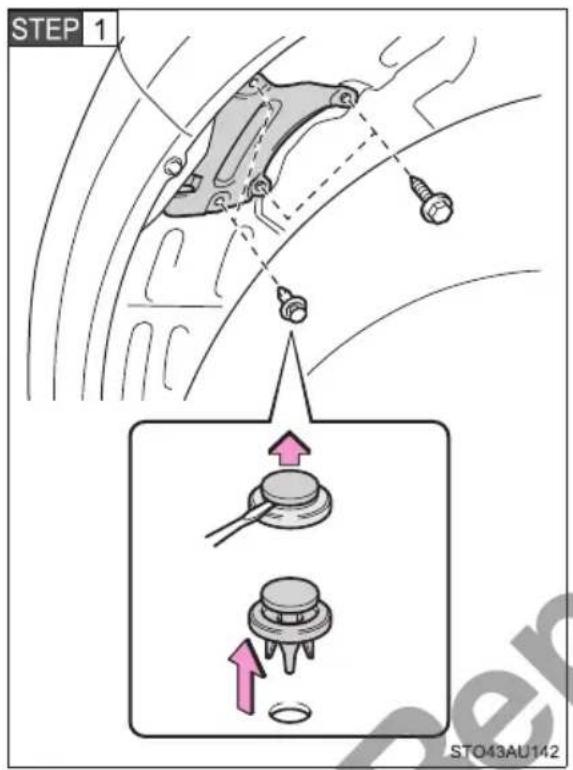
Remove the fender liner bolts and clips, and remove the fender liner.
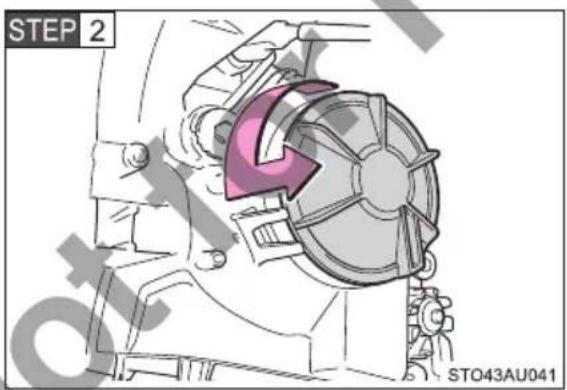
Turn the cover counterclockwise and remove it.
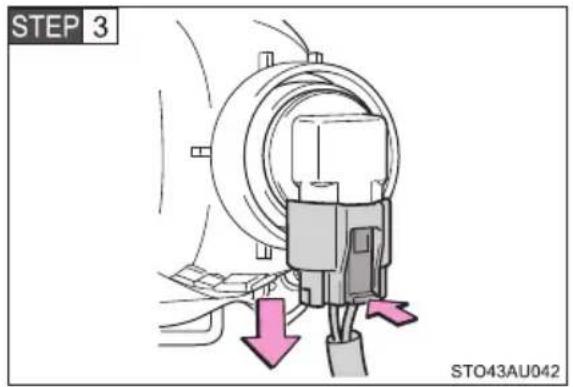
Unplug the connector while depressing the lock release.
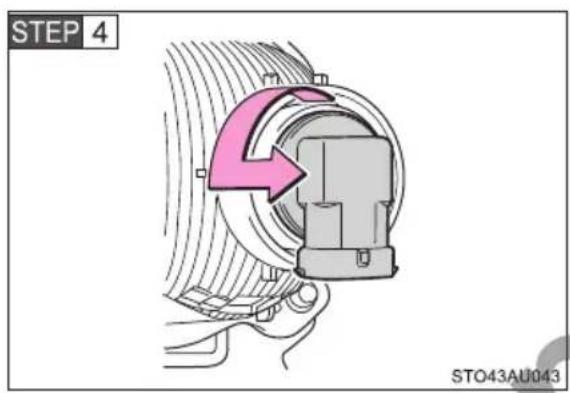
Turn the bulb base counterclockwise.
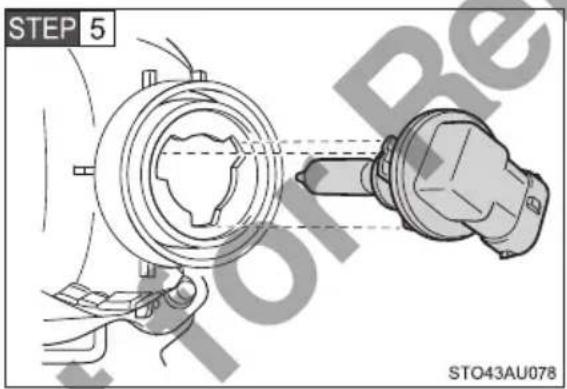
Replace the light bulb, and install the bulb base.
Align the 3 tabs on the light bulb with the mounting, and insert.
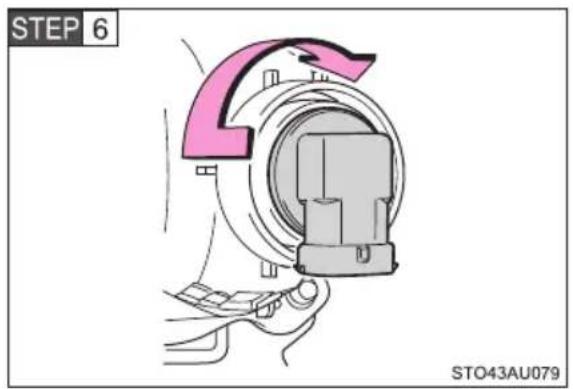
Turn and secure the bulb base.
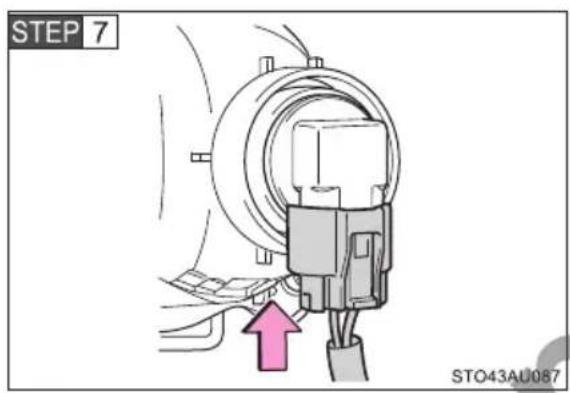
Connect the connector.
Shake the bulb base gently to check that it is not loose, turn the headlight low beams on once and visually confirm that no light is leaking through the mounting.
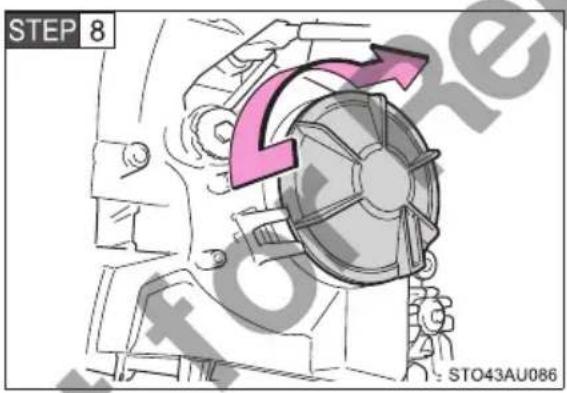
Turn the cover clockwise to install it.
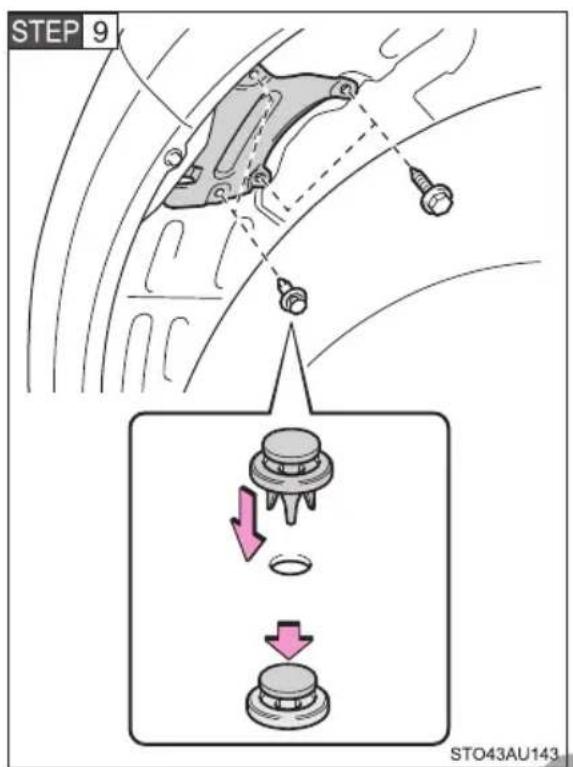
Install the fender liner and then install the fender liner bolts and clips.
■Headlights (high beam)
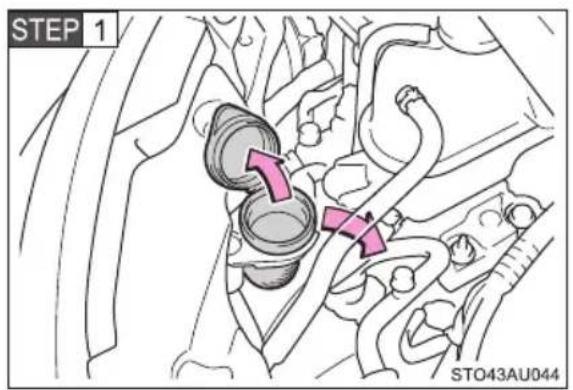
Right side only: Open the lid of the washer fluid filler opening and then move the opening to allow easy access to the light bulbs.
STEP 2 Remove the engine compartment cover ( P. 403).
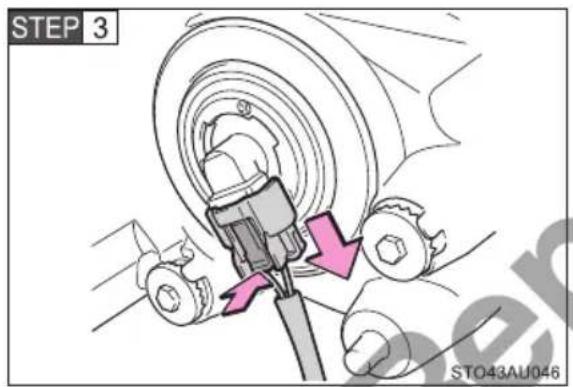
Unplug the connector while depressing the lock release.
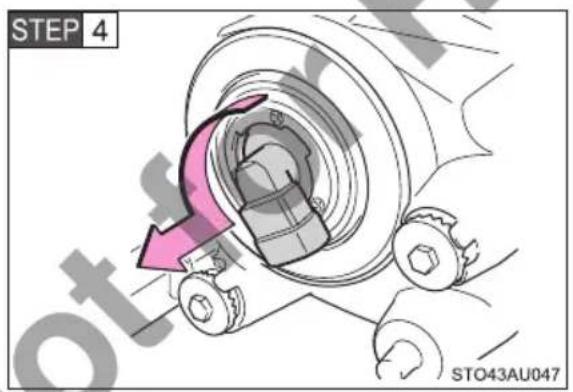
Turn the bulb base counterclockwise.
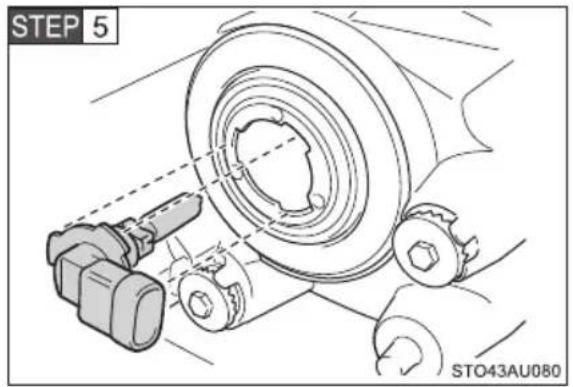
Replace the light bulb, and install the bulb base.
Align the 3 tabs on the light bulb with the mounting, and insert.
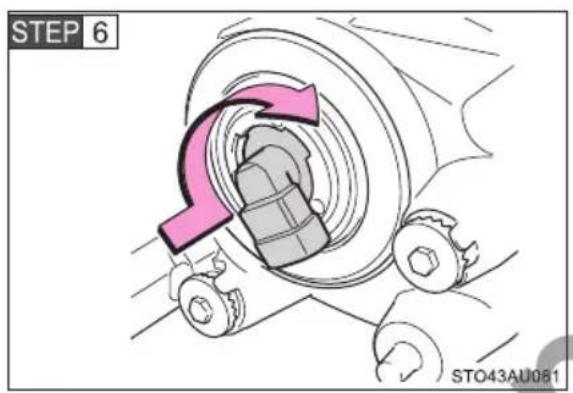
Turn and secure the bulb base.
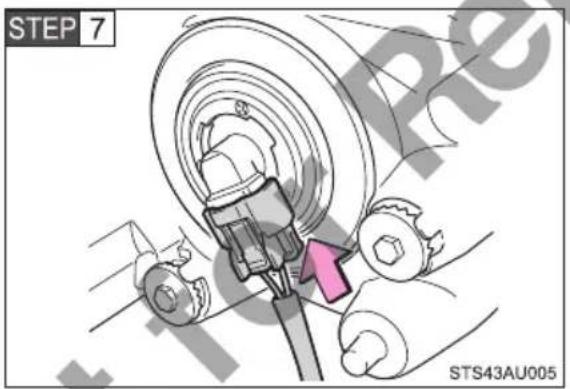
Connect the connector.
Shake the bulb base gently to check that it is not loose, turn the headlight high beams on once and visually confirm that no light is leaking through the mounting.
STEP 8 Install the engine compartment cover ( P. 403).
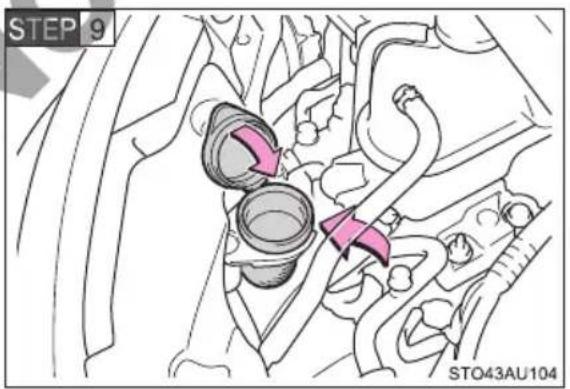
Right side only: Install the washer fluid filler opening to the original position and close the lid.
■Front fog lights
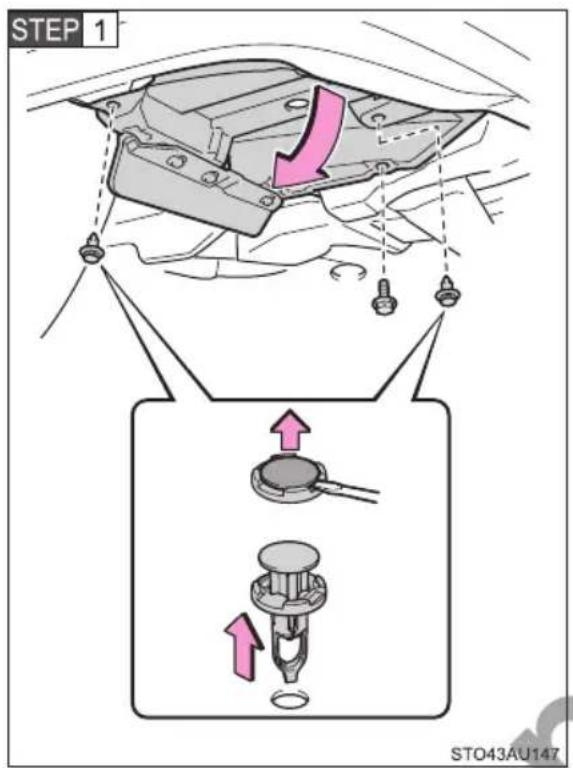
Remove the fender liner bolt and clips, and partly remove the fender liner.
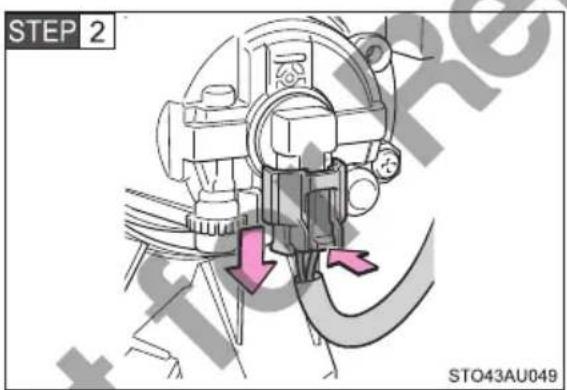
Unplug the connector while depressing the lock release.
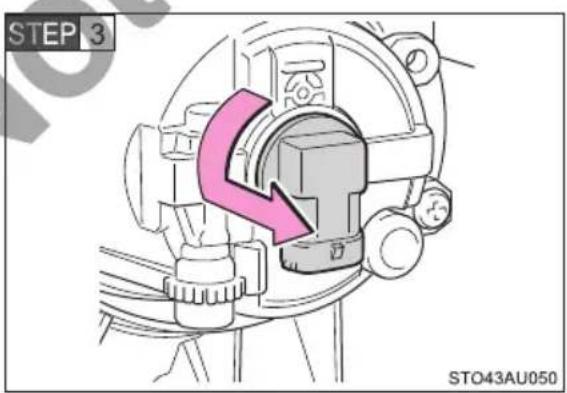
Turn the bulb base counterclockwise.
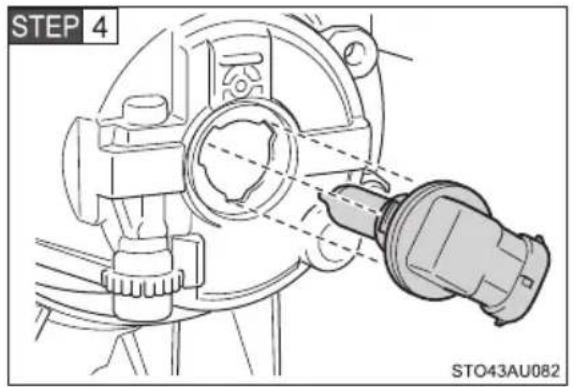
Replace the light bulb, and install the bulb base.
Align the 3 tabs on the light bulb with the mounting, and insert.
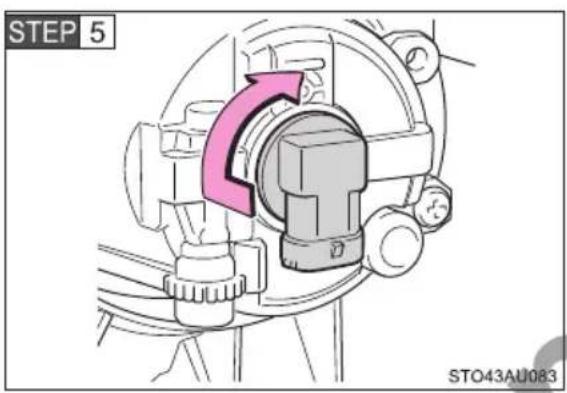
Turn and secure the bulb base.
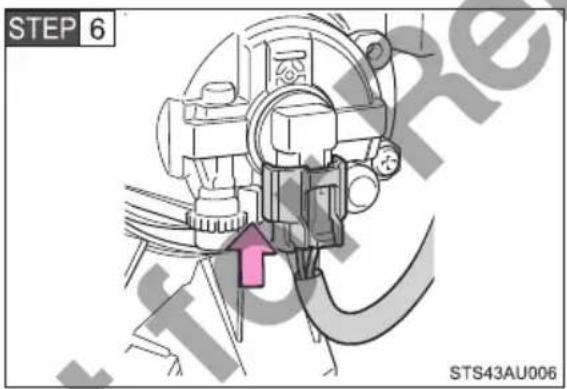
Connect the connector.
Shake the bulb base gently to check that it is not loose, turn the front fog lights on once and visually confirm that no light is leaking through the mounting.
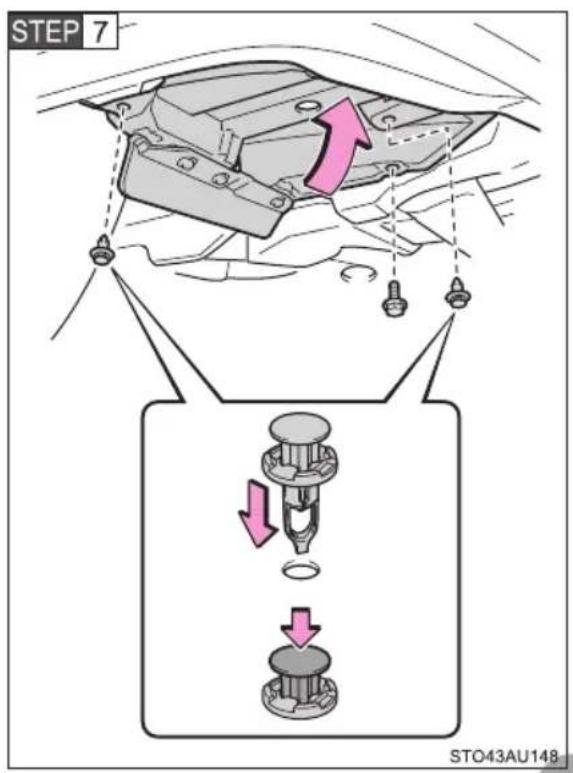
Install the fender liner and then install the fender liner bolt and clips.
■Front position lights
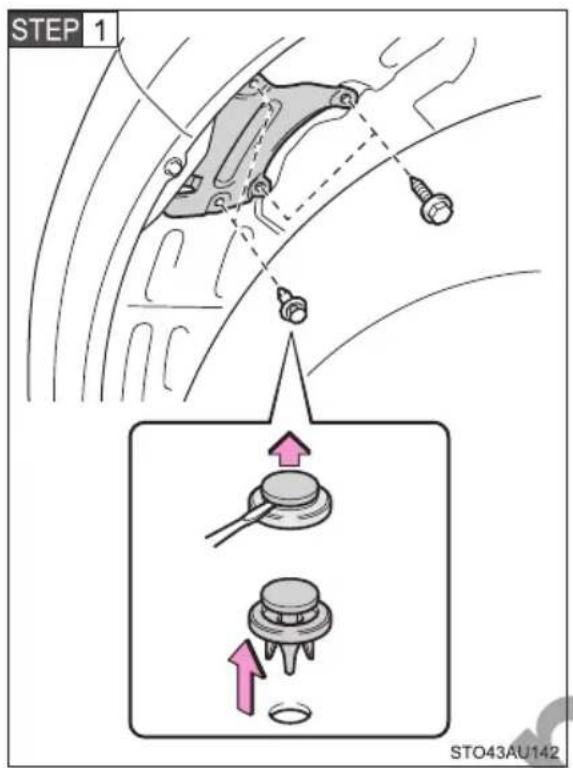
Remove the fender liner bolts and clips, and remove the fender liner.
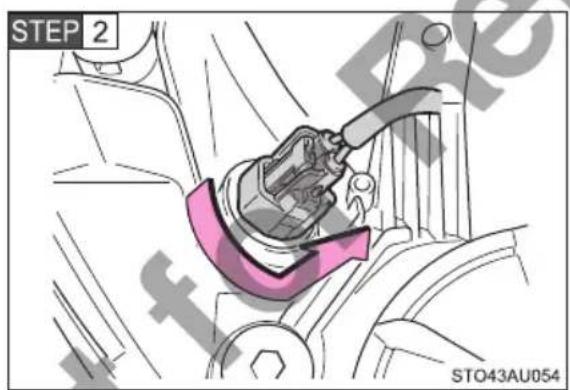
Turn the bulb base counterclockwise.
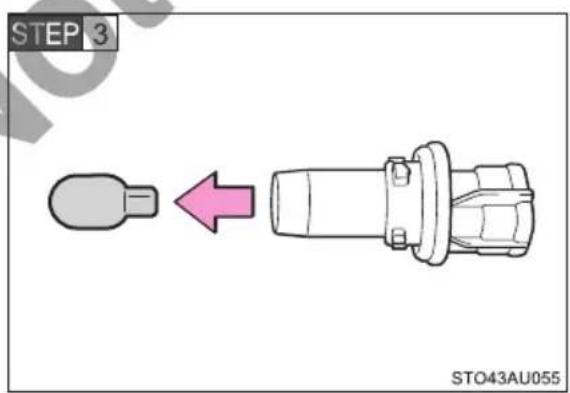
Remove the light bulb.
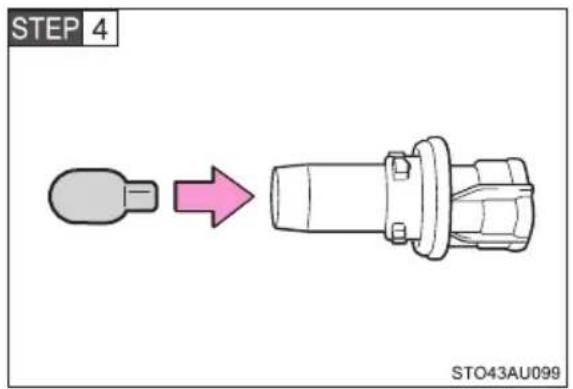
Install the new light bulb.
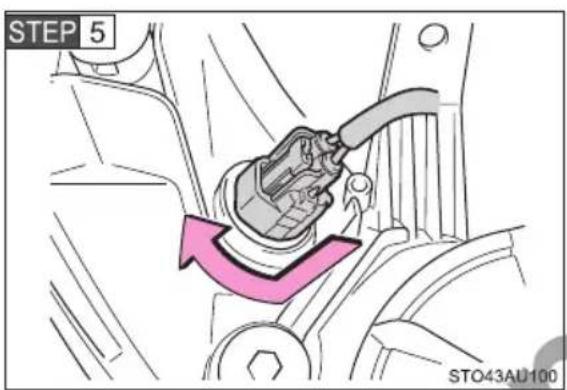
Turn the bulb base clockwise.
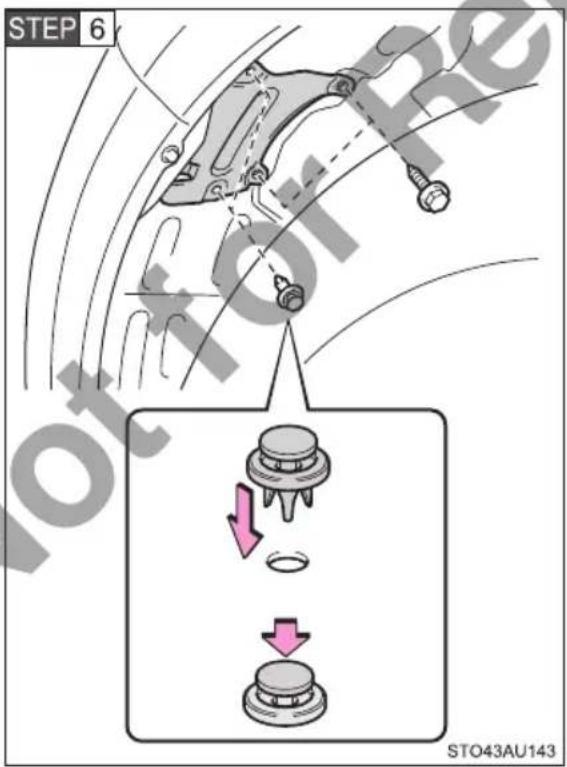
Install the fender liner and then install the fender liner bolts and clips.
■Front turn signal lights
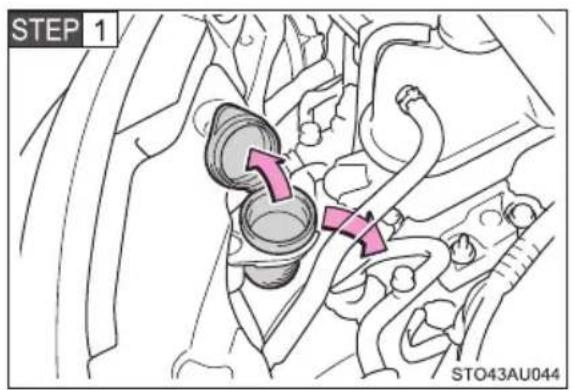
Right side only: Open the lid of the washer fluid filler opening and then move the opening to allow easy access to the light bulbs.
STEP 2 Remove the engine compartment cover ( P. 403).
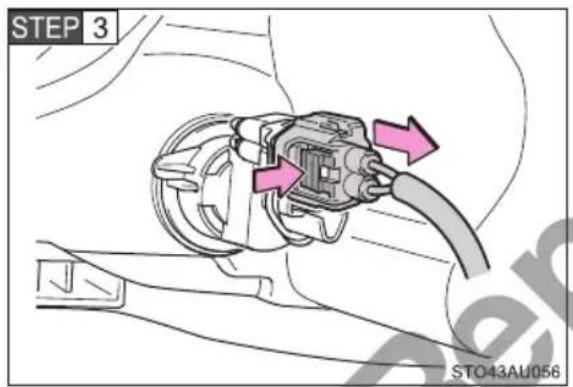
Unplug the connector while depressing the lock release.
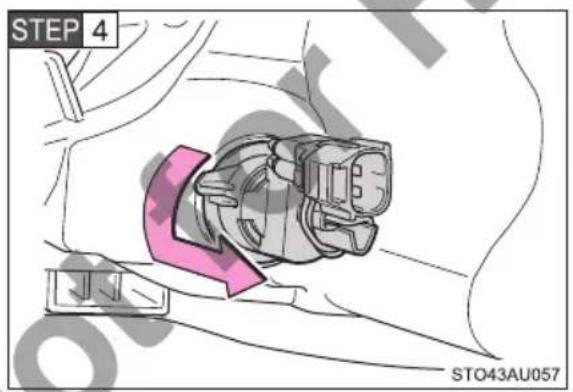
Turn the bulb base counterclockwise.
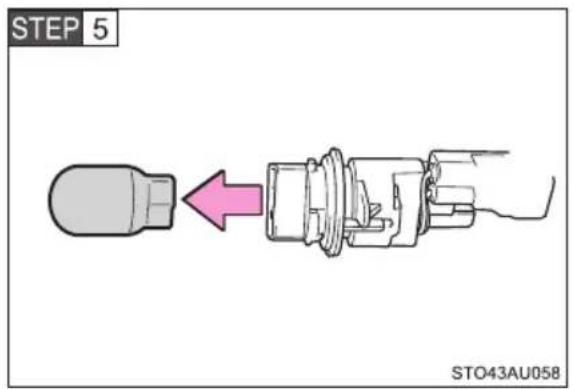
Remove the light bulb.
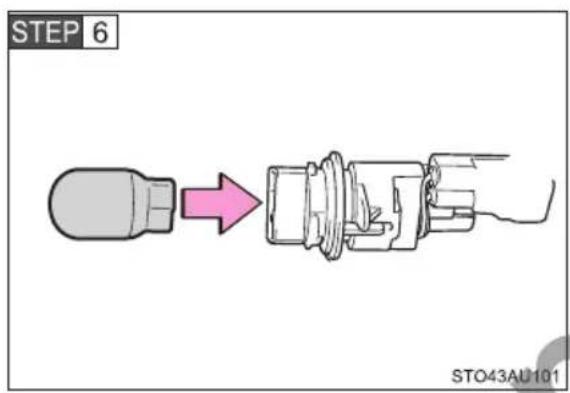
Install the new light bulb.
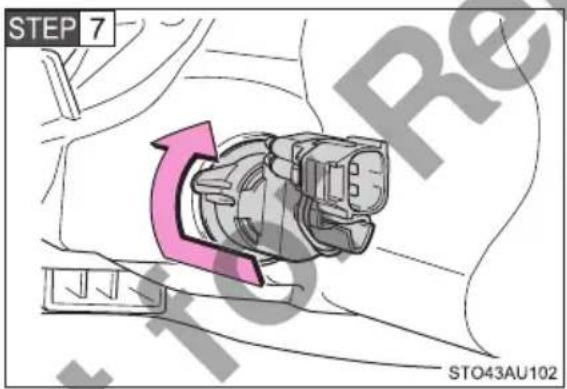
Turn the bulb base clockwise.
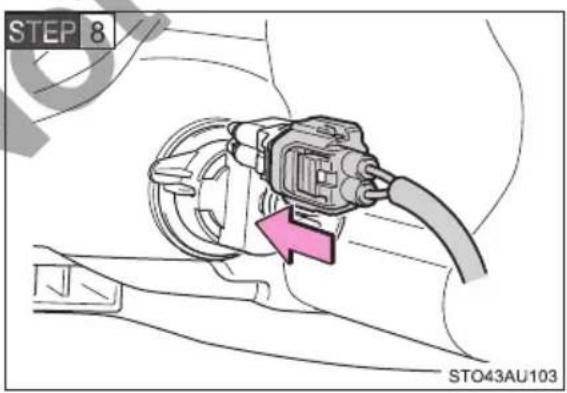
Connect the connector.
STEP 9 Install the engine compartment cover ( P. 403).
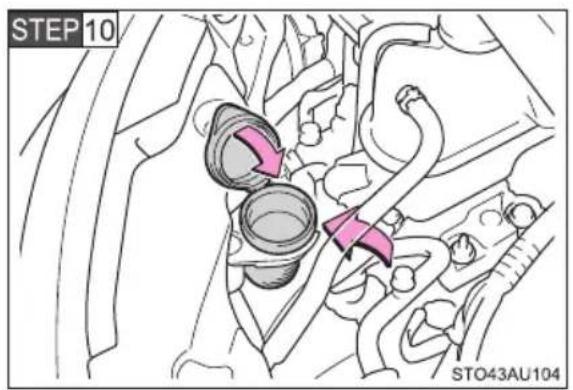
Right side only: Washer fluid filler opening installed to the original position and close the lid.
■Rear turn signal lights
In order to replace the rear turn signal lights, it is necessary to purchase parts (gaskets) at the Toyota dealer.
If the bulb replacement seems difficult to perform, contact your Toyota dealer.
Rear light unit gasket for rear light unit ( P. 471)
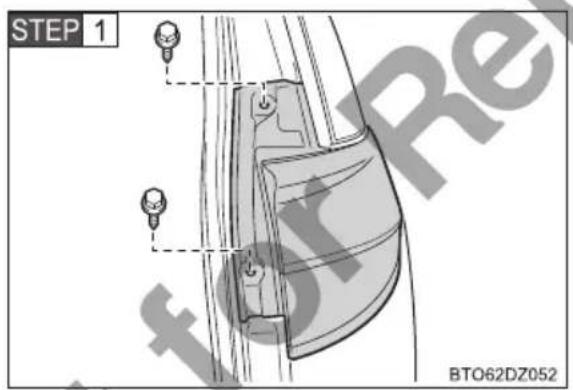
Open the back door and remove the bolts.
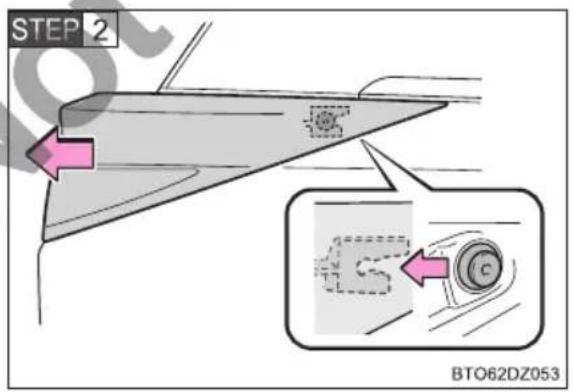
Pull the light unit toward the rear of the vehicle to remove it.
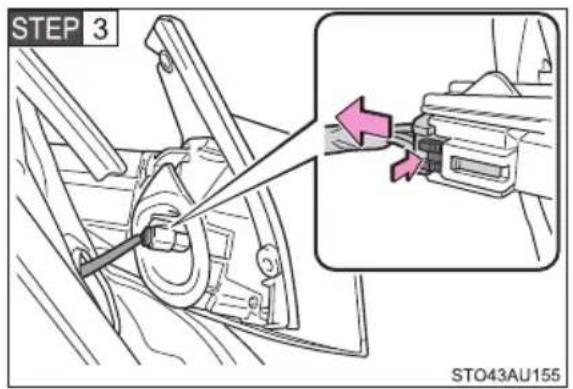
Unplug the connector while depressing the lock release.
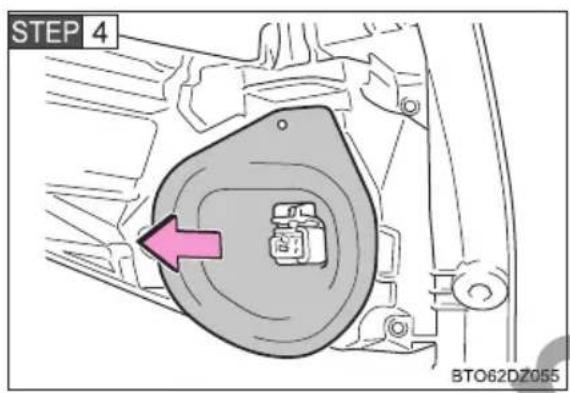
Remove the gasket.
Check for gasket remanents on the light unit.
If there are any, remove all rema- nents.
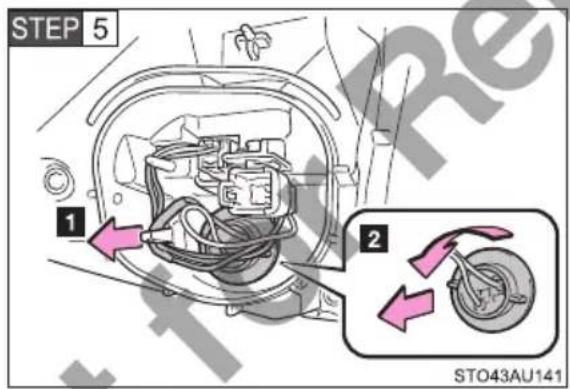
1 Remove the harness from the hook.
2 Turn the bulb base counterclockwise.
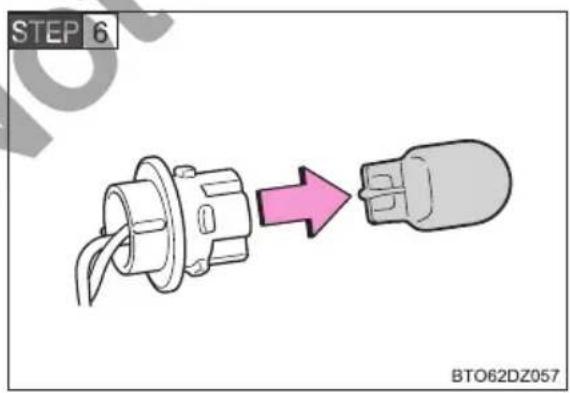
Remove the light bulb.
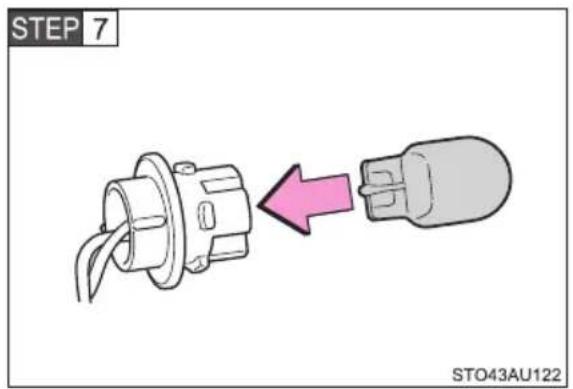
Install the new light bulb.
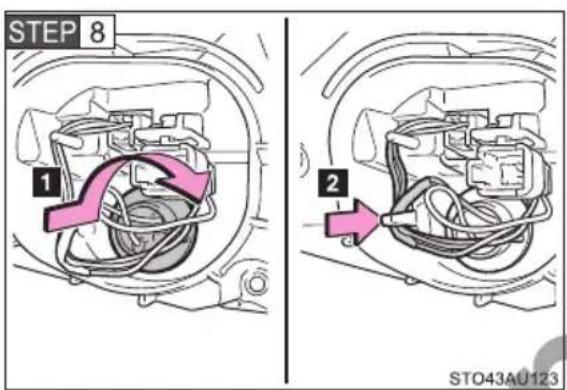
1 Turn the bulb base clockwise.
2 Attach the harness to the hook.
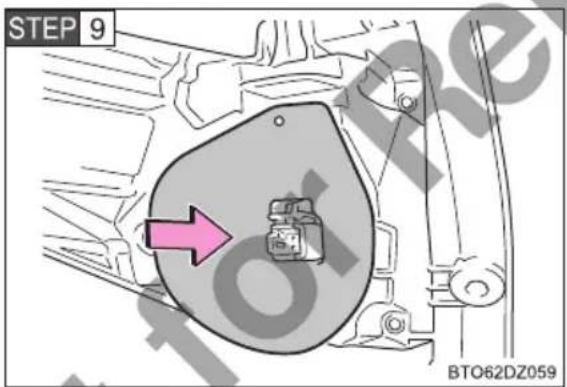
Attach the new gasket in the original position.
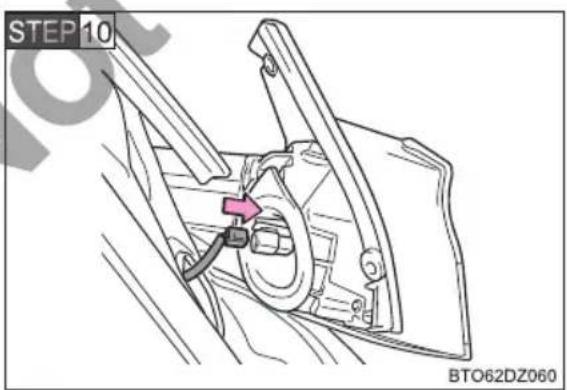
Connect the connector.
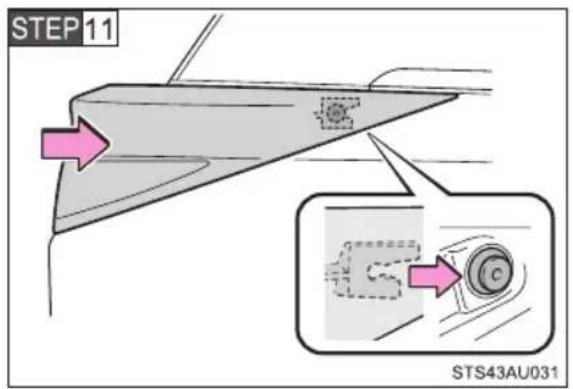
Push the light unit forward and attach to the clip.
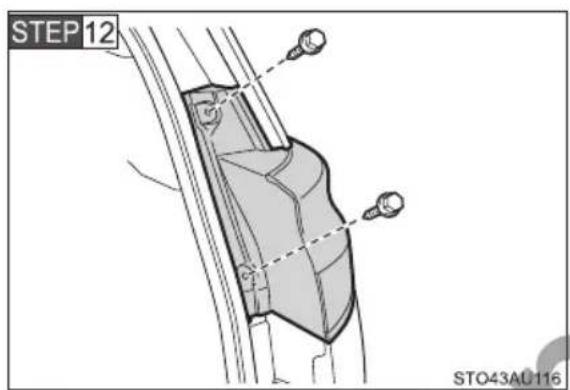
Install the bolts.
■Back-up lights
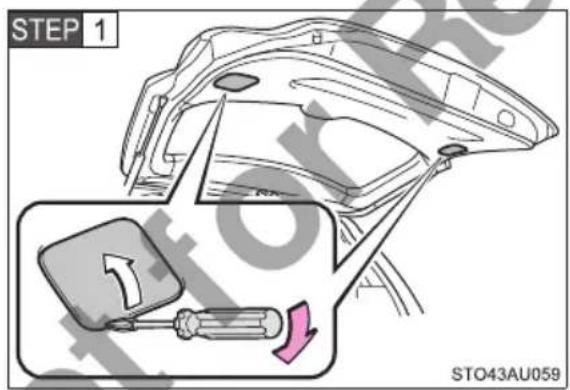
Open the back door and remove the back door cover.
To prevent damaging the vehicle, wrap the screwdriver with a rag.
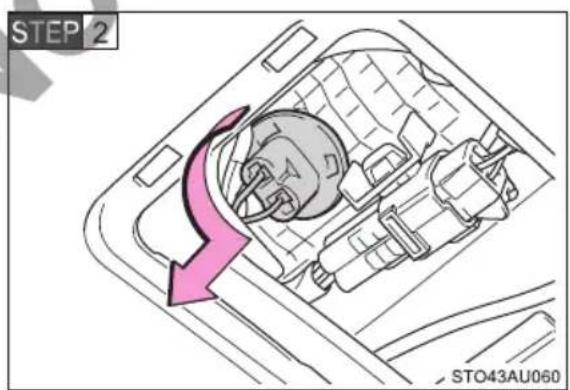
Turn the bulb base counterclockwise.
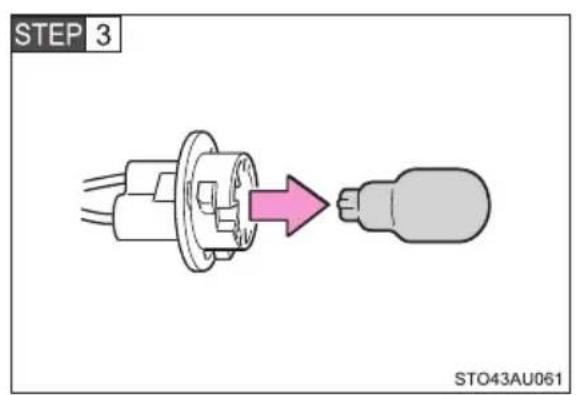
Remove the light bulb.
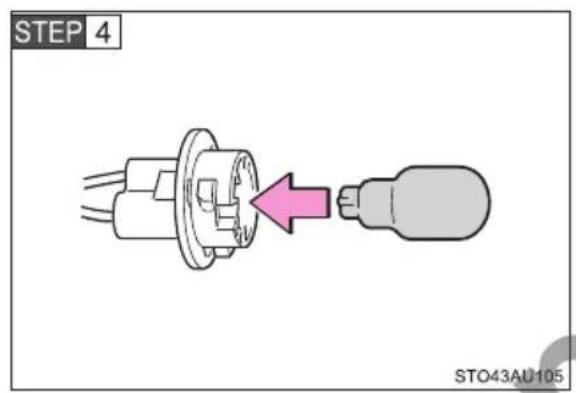
Install the new light bulb.
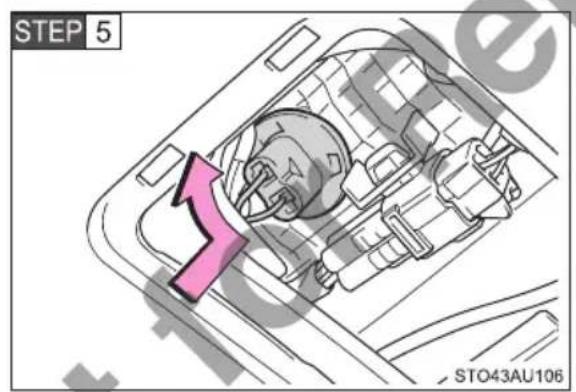
Turn the bulb base clockwise.
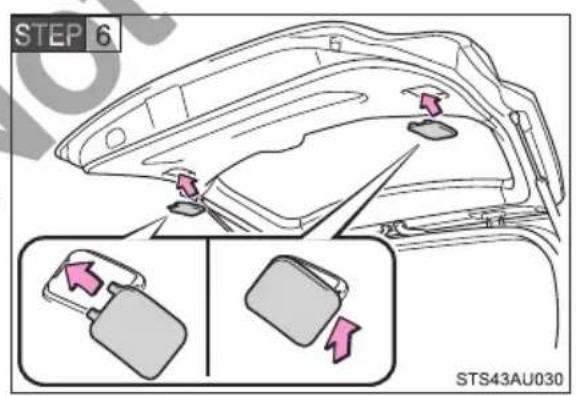
Install the back door cover.
License plate lights
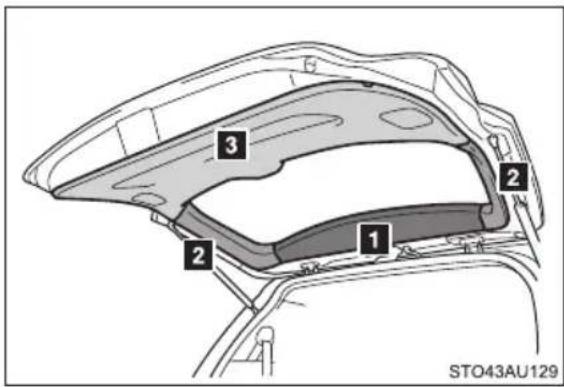
STEP 1 Open the back door.
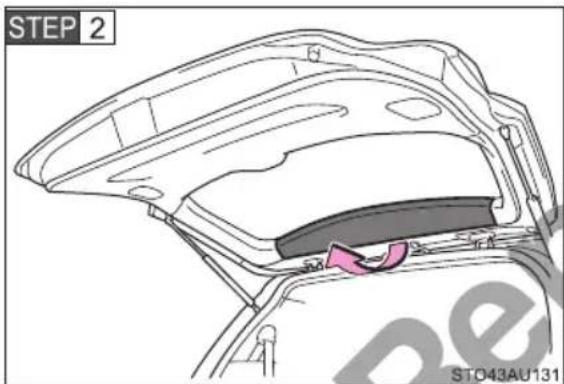
Remove the "Back door trim A".
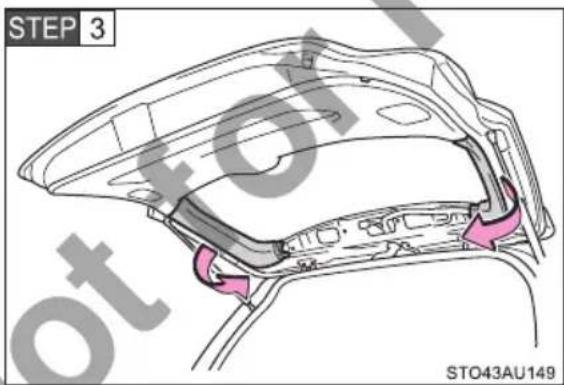
Remove the "Back door trim B".
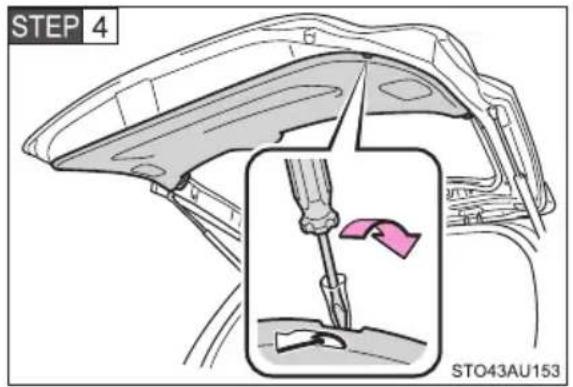
Remove the "Back door trim C".
To prevent damaging the vehicle, wrap the screwdriver with a rag.
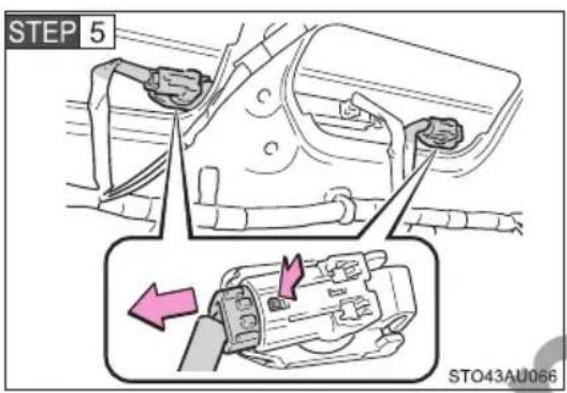
Unplug the connector while depressing the lock release.
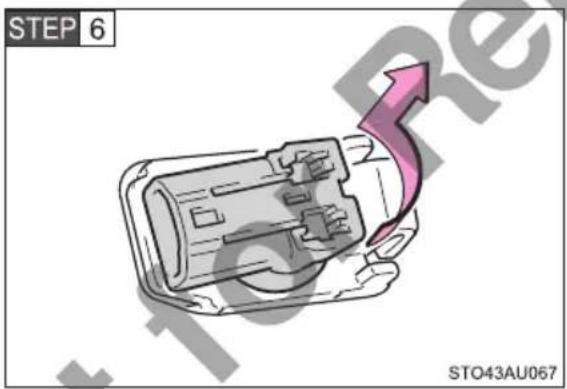
Turn the bulb base counterclockwise.
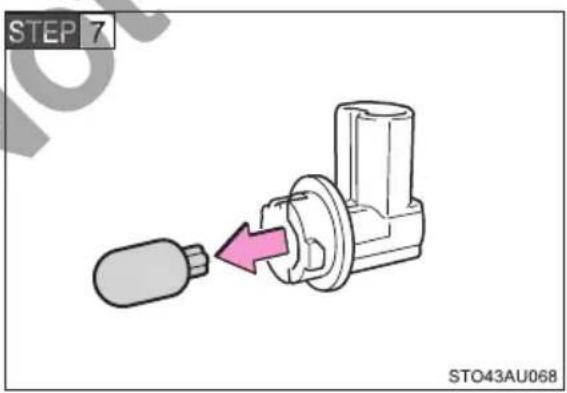
Remove the light bulb.
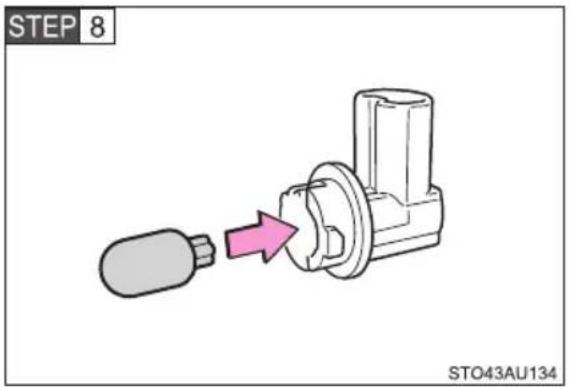
Install the new light bulb.
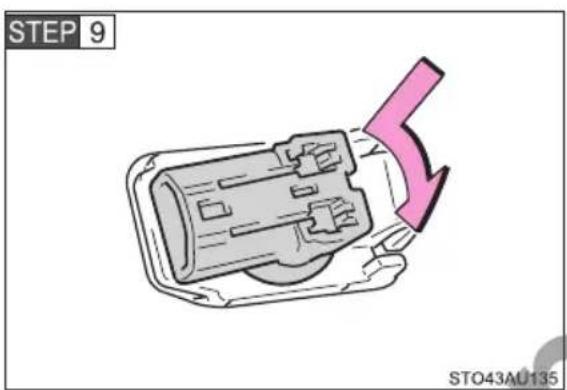
Turn clockwise and set the bulb base.
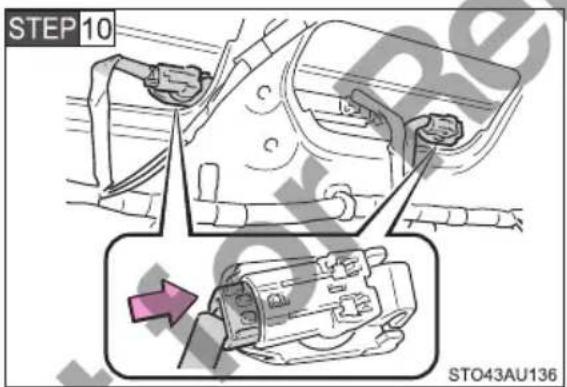
Connect the connector.
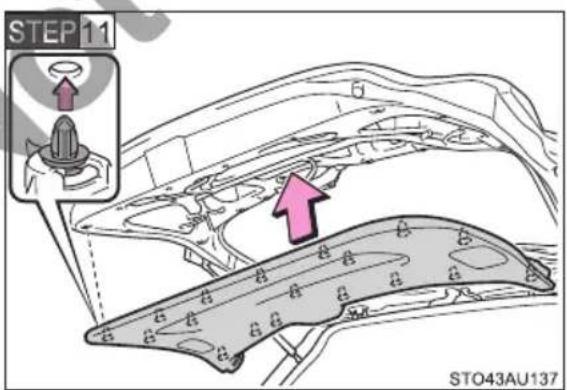
Attach the "Back door trim C" to the back door.
Check whether any clips are remaining on the back door.
If any clips remain on the back door, remove them, install them to the back door trim, and then install the back door trim. (→P. 447)
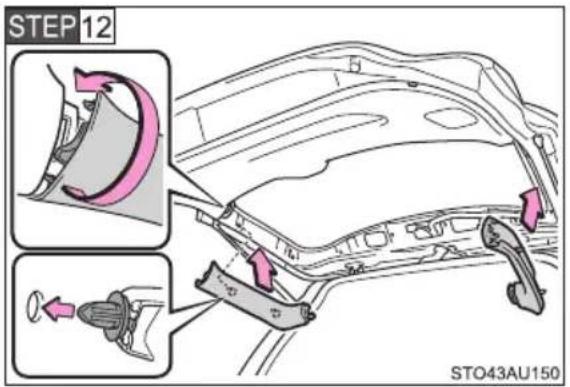
Attach the "Back door trim B".
Check whether any clips are remaining on the back door.
If any clips remain on the back door, remove them, install them to the back door trim, and then install the back door trim. (→P. 447)
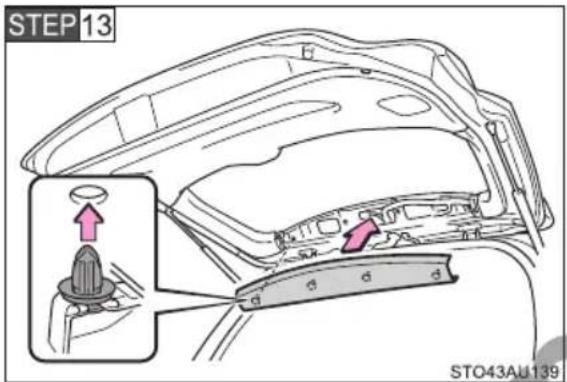
Attach the "Back door trim A".
Check whether any clips are remaining on the back door.
If any clips remain on the back door, remove them, install them to the back door trim, and then install the back door trim. (→P. 447)
■Lights other than the above
If any of the lights listed below has burnt out, have it replaced by your Toyota dealer.
●Headlight low beams (vehicles with discharge headlights)
●Side turn signal lights
- Stop/tail lights
●Tail lights
●High mounted stoplight
■Discharge headlights (if equipped)
If voltage to the discharge bulbs is insufficient, the bulbs may not come on, or may go out temporarily. The discharge bulbs will come on when normal power is restored.
■LED light bulbs
The side turn signal lights, stop/tail lights, tail lights and high mounted stop-light consist of a number of LEDs. If any of the LEDs burn out, take your vehicle to your Toyota dealer to have the light replaced.
■Condensation build-up on the inside of the lens
Temporary condensation build-up on the inside of the headlight lens does not indicate a malfunction. Contact your Toyota dealer for more information in the following situations:
● Large drops of water have built up on the inside of the lens.
●Water has built up inside the headlight.
Parts No. list
This table lists parts that can be purchased at the Toyota dealer.
| Parts name Parts No. | |
| Rear light unit gasket | Right side:81552-28502Left side:81562-28502 |
| Back door trim clip 90467-10161 |

WARNING
■Replacing light bulbs
●Turn off the lights. Do not attempt to replace the bulb immediately after turning off the lights.
The bulbs become very hot and may cause burns.
- Do not touch the glass portion of the light bulb with bare hands. When it is unavoidable to hold the glass portion, use and hold with a clean dry cloth to avoid getting moisture and oils on the bulb.
Also, if the bulb is scratched or dropped, it may blow out or crack.
● Fully install light bulbs and any parts used to secure them. Failure to do so may result in heat damage, fire, or water entering the headlight unit. This may damage the headlights or cause condensation to build up on the lens.
■Discharge headlights (if equipped)
- Contact your Toyota dealer before replacing the discharge headlights (including light bulbs).
- Do not touch the discharge headlight's high voltage socket when the headlights are turned on.
An extremely high voltage of 30000 V will be discharged and could result in serious injury or death by electric shock. - Do not attempt to take apart or repair the low beam discharge headlight bulbs, connectors, power supply circuits, or related components.
Doing so could result in electric shock and serious injury or death.
■To prevent damage or fire
Make sure bulbs are fully seated and locked.

NOTICE
Rear turn signal lights replacement
- A new gasket is necessary in replacing the rear turn signal lights. Observe the following when attaching the gasket. Water entering the light unit. This may damage the rear turn signal lights or cause condensation to build up on the lens.
- Do not use the gasket again once it has been detached.
- When attaching the new gasket, be sure to attach it to the original position.
When trouble arises
5
5-1. Essential information
Emergency flashers...... 474
If your vehicle needs to be towed.... 475
If you think something is wrong.... 481
Fuel pump shut off system 482
5-2. Steps to take
in an emergency
If a warning light turns on or a warning buzzer sounds.... 483
If a warning message isdisplayed 488
If you have a flat tire ..... 498
If the engine will not start.... 516
If you lose your keys...... 518
If the electronic key does not operate properly ..... 519
If the vehicle battery is discharged.... 522
If your vehicle overheats... 528
If the vehicle becomesstuck ...... 531
If your vehicle has to be stopped in an emergency...... 533
5-1. Essential information
Emergency flashers
The emergency flashers are used to warn other drivers when the vehicle has to be stopped in the road due to a breakdown, etc.
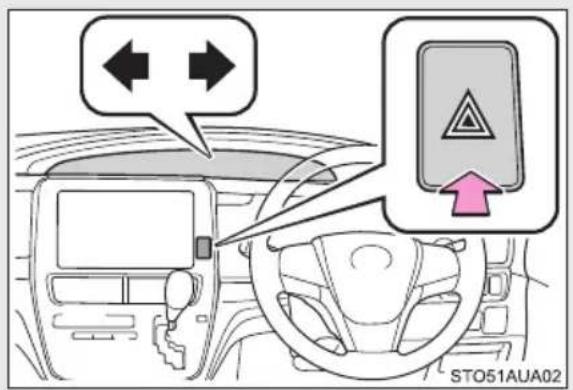
Press the switch.
All the turn signal lights will flash.
To turn them off, press the switch once again.
Emergency flashers
If the emergency flashers are used for a long time while the engine is not operating, the battery may discharge.
5-1. Essential information
If your vehicle needs to be towed
If towing is necessary, we recommend having your vehicle towed by your Toyota dealer or commercial towing service, using a wheel-lift type truck or flatbed truck.
Use a safety chain system for all towing, and abide by all state/provincial and local laws.
Situations when it is necessary to contact dealers before towing
The following may indicate a problem with your transmission. Contact your Toyota dealer or commercial towing service before towing.
●The engine is running but the vehicle does not move.
●The vehicle makes an abnormal sound.
Towing with a sling-type truck
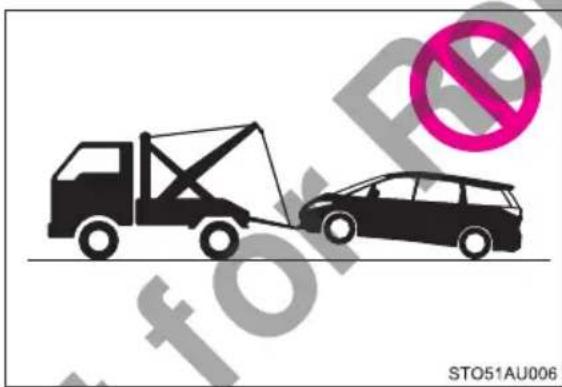
Do not tow with a sling-type truck to prevent body damage.
Towing with a wheel-lift type truck
From the front
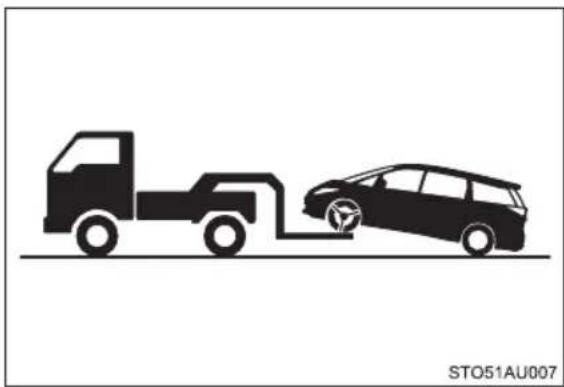
natural_image
Silhouette illustration of a truck and a car connected by an electric vehicle charging at a station (no text or symbols)Release the parking brake.
From the rear
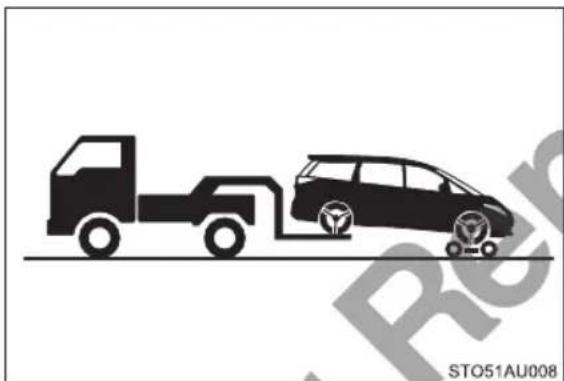
natural_image
Silhouette of a truck and car on a road, no text or symbols presentUse a towing dolly under the front wheels.
Using a flatbed truck
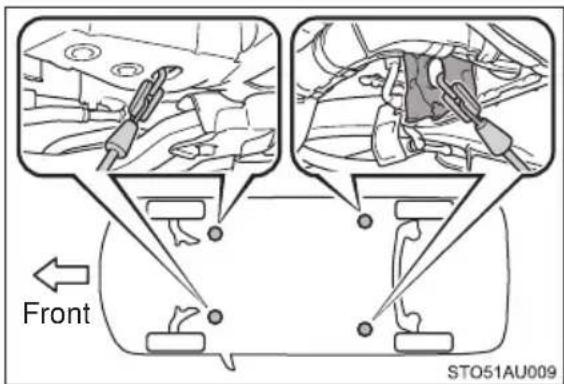
If your vehicle is transported by a flatbed truck, it should be tied down at the locations shown in the illustration.
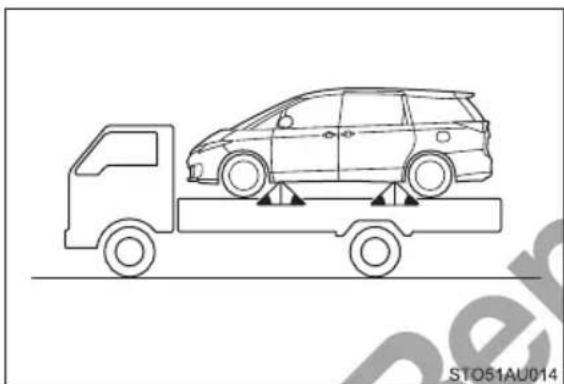
natural_image
Line drawing of a flatbed truck with a car on top, no text or symbols presentIf you use chains or cables to tie down your vehicle, the angles shaded in black must be 45^ .
Do not overly tighten the tie downs or the vehicle may be damaged.
Emergency towing
If a tow truck is not available in an emergency, your vehicle may be temporarily towed using cables or chains secured to the emergency towing eyelets. This should only be attempted on hard surfaced roads for at most 80 km (50 miles) at under 30 km/h (18 mph).
A driver must be in the vehicle to steer and operate the brakes. The vehicle's wheels, drivetrain, axles, steering and brakes must be in good condition.
Only the front towing eyelet may be used.
Emergency towing procedure
STEP 1 Take out the towing eyelet. (→P. 498)
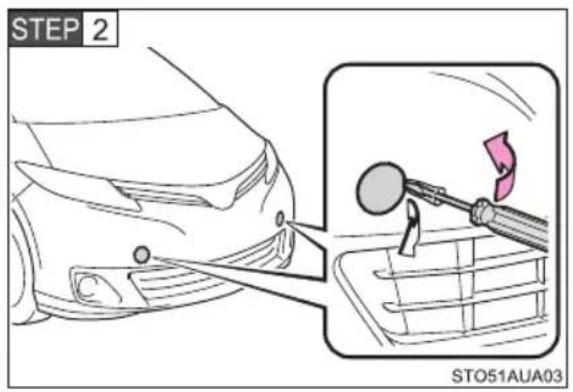
Remove the eyelet cover using a flathead screwdriver.
To protect the bodywork, place a rag between the screwdriver and the vehicle body as shown in the illustration.
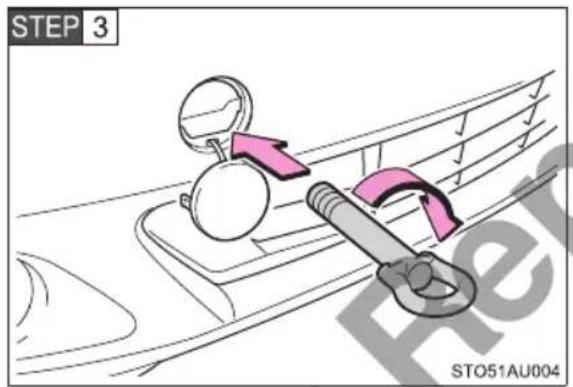
Insert the towing eyelet into the hole and tighten partially by hand.
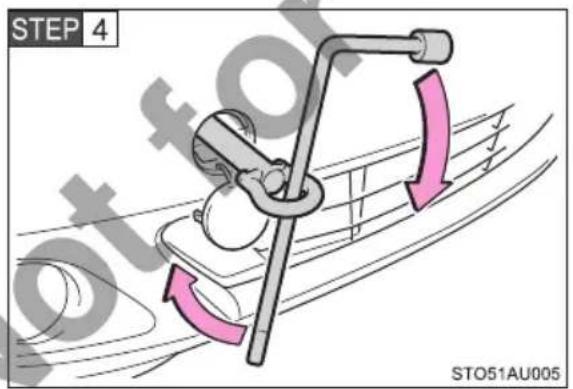
Tighten down the towing eyelet securely using a wheel nut wrench.
STEP 5 Securely attach cables or chains to the towing eyelet.
Take care not to damage the vehicle body.
STEP 6 Enter the vehicle being towed and start the engine.
If the engine does not start, turn the "ENGINE START STOP" switch to IGNITION ON mode.
STEP 7 Shift the shift lever to N and release the parking brake.
When the shift lever cannot be shifted: →P. 188, 194
■While towing
If the engine is not running, the power assist for the brakes and steering will not function, making steering and braking more difficult.
■Wheel nut wrench
Wheel nut wrench is installed in luggage compartment. (→P. 498)

WARNING
Observe the following precautions.
Failure to do so may result in death or serious injury.
■When towing the vehicle
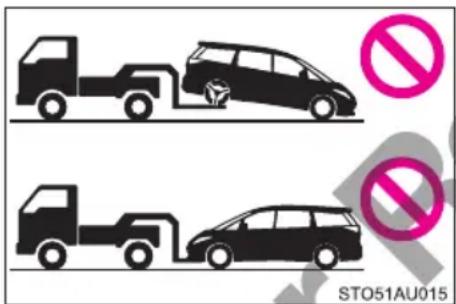
Be sure to transport the vehicle with the front wheels raised or with all four wheels raised off the ground. If the vehicle is towed with the front wheels contacting the ground, the drivetrain and related parts may be damaged.
While towing
- When towing using cables or chains, avoid sudden starts, etc. which place excessive stress on the towing eyelets, cables or chains. The towing eyelets, cables or chains may become damaged, broken debris may hit people, and cause serious damage.
- Do not turn the “ENGINE START STOP” switch off. There is a possibility that the steering wheel is locked and cannot be operated.
■Installing towing eyelets to the vehicle
Make sure that towing eyelets is installed securely. If not securely installed, towing eyelet may come loose during towing.

NOTICE
■To prevent damage to the vehicle when towing using a wheel-lift type truck
- Do not tow the vehicle from the rear when the "ENGINE START STOP" switch is off. The steering lock mechanism is not strong enough to hold the front wheels straight.
- When raising the vehicle, ensure adequate ground clearance for towing at the opposite end of the raised vehicle. Without adequate clearance, the vehicle could be damaged while being towed.
■To prevent damage to the vehicle when towing with a sling-type truck
Do not tow with a sling-type truck, either from the front or rear.
■To prevent damage to the vehicle during emergency towing
Do not secure cables or chains to the suspension components.
5-1. Essential information
If you think something is wrong
If you notice any of the following symptoms, your vehicle probably needs adjustment or repair. Contact your Toyota dealer as soon as possible.
■Visible symptoms
●Fluid leaks under the vehicle
(Water dripping from the air conditioning after use is normal.)
●Flat-looking tires or uneven tire wear
●High engine coolant temperature warning light comes on
Audible symptoms
●Changes in exhaust sound
●Excessive tire squeal when cornering
●Strange noises related to the suspension system
●Pinging or other noises related to the engine
Operational symptoms
●Engine misfire, stumbling or running roughly
●Appreciable loss of power
●Vehicle pulls heavily to one side when braking
●Vehicle pulls heavily to one side when driving on a level road
●Loss of brake effectiveness, spongy feeling, pedal almost touches the floor
5-1. Essential information
Fuel pump shut off system
To minimize the risk of fuel leakage when the engine stalls or when an airbag inflates upon collision, the fuel pump shut off system stops the supply of fuel to the engine.
Follow the procedure below to restart the engine after the system is activated.
STEP 1 Turn the "ENGINE START STOP" switch to ACCESSORY mode or turn it off.
STEP 2 Restart the engine.

NOTICE
■Before starting the engine
Inspect the ground under the vehicle.
If you find that fuel has leaked onto the ground, the fuel system has been damaged and is in need of repair. Do not restart the engine.
5-2. Steps to take in an emergency
If a warning light turns on or a warning buzzer sounds...
Calmly perform the following actions if any of the warning lights comes on or flashes. If a light comes on or flashes, but then goes off, this does not necessarily indicate a malfunction in the system. However, if this continues to occur, have the vehicle inspected by your Toyota dealer.
Stop the vehicle immediately. Continuing to drive the vehicle may be dangerous.
The following warning indicates a possible problem in the brake system. Immediately stop the vehicle in a safe place and contact your Toyota dealer.
| Warning light Warning light/Details | |
 | Brake system warning light (warning buzzer)*Low brake fluidMalfunction in the brake systemThis light also comes on when the parking brake is not released. If the light turns off after the parking brake is fully released the system is operating normally. |
*: Parking brake engaged warning buzzer:
The buzzer sounds to indicate that the parking brake is still engaged (with the vehicle having reached a speed of 5 km/h [3 mph]).
Stop the vehicle immediately.
The following warnings indicate the possibility of damage to the vehicle that may lead to an accident. Immediately stop the vehicle in a safe place and contact your Toyota dealer.
| Warning light Warning light/Details | |
 | Charging system warning lightIndicates a malfunction in the vehicle's charging system. |
*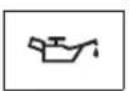 | Low engine oil pressure warning lightIndicates that the engine oil pressure is too low. |
*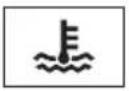 | High engine coolant temperature warning lightIndicates that the engine is overheating.As the coolant temperature rises, it comes on. (→P. 528) |
*:This light illuminates on the multi-information display.
Have the vehicle inspected immediately.
Failure to investigate the cause of the following warnings may lead to the system operating abnormally and possibly cause an accident. Have the vehicle inspected by your Toyota dealer immediately.
| Warning light Warning light/Details | |
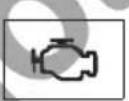 | Malfunction indicator lampIndicates a malfunction in:The electronic engine control system;The electronic throttle control system;The electronic continuously variable transmission or automatic transmission control system; orThe emission control system. |
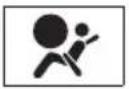 | SRS warning lightIndicates a malfunction in:The SRS airbag system; orThe seat belt pretensioner system. |
 | ABS warning lightIndicates a malfunction in:The ABS; orThe brake assist system. |
 | Electric power steering system warning light (warning buzzer)Indicates a malfunction in the EPS (Electric Power Steering) system. |
 | Slip indicator lightIndicates a malfunction in:The VSC system;The TRC system; orHill-start assist control. |
 (Flashes) (Flashes) | “AFS OFF” indicator light (if equipped)Indicates a malfunction in:The AFS system; orAutomatic headlight leveling system. |
Follow the correction procedures.
After taking the specified steps to correct the suspected problem, check that the warning light goes off.
| Warning light Warning light/Details Correction procedure | ||
 | Low fuel level warning lightIndicates that remaining fuel is about 9.7 L (2.6 gal., 2.1 Imp.gal.) or less. | Refuel the vehicle. |
 | Driver's and front passenger's seat belt reminder light (warning buzzer)*Warns the driver to fasten his/her seat belt. | Fasten the seat belt. |
| Warning light W | Warning light/Details Correction procedure | |
 | Master warning lightA buzzer sounds and the warning light comes on and flashes to indicate that the master warning system has detected a malfunction. | Take appropriate action in accordance with the message displayed on the multi-information display. |
*: Driver's and front passenger's seat belt reminders:
The driver's and front passenger's seat belt reminder buzzer sounds to alert the driver and front passenger that their seat belt is not fastened. The buzzer sounds for 30 seconds after the vehicle has reached a speed of at least 20km / h (12 mph). Then, if the seat belt is still unfastened, the buzzer will sound in a different tone for 90 more seconds.
■ Front passenger detection sensor and passenger seat belt reminder
- If luggage is placed on the front passenger seat, the front passenger detection sensor may cause the warning light to flash even if a passenger is not sitting in the seat.
- If a cushion is placed on the seat, the sensor may not detect a passenger, and the warning light may not operate properly.
Electric power steering system warning light (warning buzzer)
When the battery charge becomes insufficient or the voltage temporarily drops, the electric power steering system warning light may come on and the warning buzzer may sound.
If the malfunction indicator lamp comes on while driving
For some models, the malfunction indicator lamp will come on if the fuel tank becomes completely empty. If the fuel tank is empty, refuel the vehicle immediately. The malfunction indicator lamp will go off after several trips.
If the malfunction indicator lamp does not go off, contact your Toyota dealer as soon as possible.

WARNING
■When the electric power steering system warning light comes on
The steering wheel may become extremely heavy.
When steering wheel operations are heavier than usual, grip the steering wheel firmly and operate it using more force than usual.
5-2. Steps to take in an emergency
If a warning message is displayed
The multi-information display shows warnings of system malfunctions, incorrectly performed operations, or shows messages that indicate a need for maintenance. When a message is shown, perform the correction procedure appropriate to the message.
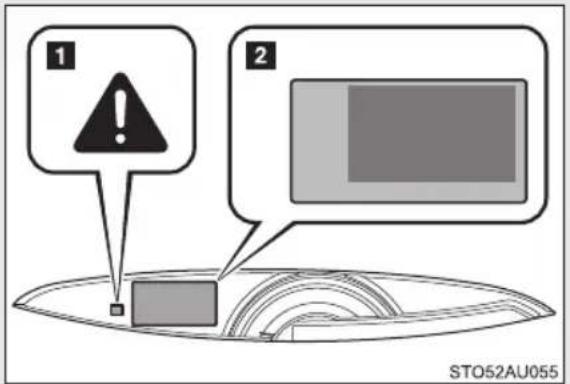
1 Master warning light
The master warning light comes on or flashes when a message is being shown on the multi-information display.
2 Multi-information display
If any of the warning messages is shown again after its correction procedure has been performed, contact your Toyota dealer.
Stop the vehicle immediately.
The following warnings indicate the possibility of damage to the vehicle that may lead to an accident. Immediately stop the vehicle in a safe place and contact your Toyota dealer.
| Warning message Details | |
 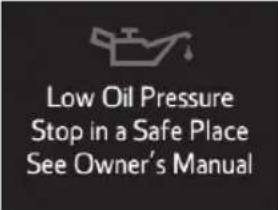 | Indicates an abnormal engine oil pressure.A buzzer also sounds.The warning light may turn on if the engine oil pres-sure is too low. |
 | |
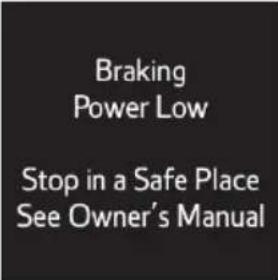 | Indicates a malfunction in the brake system.A buzzer also sounds. |
 (Flashes) (Flashes) | |
 | |
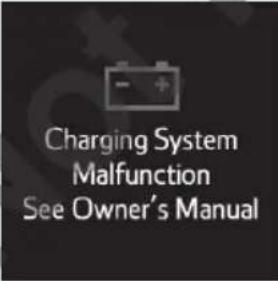 | Indicates a malfunction in the vehicle's charging system.Continuing to drive the vehicle may be dangerous. |
 | |
 | Indicates a malfunction in:• The ABS; or• The brake assist systemA buzzer also sounds.Continuing to drive the vehicle may be dangerous. |
 | |
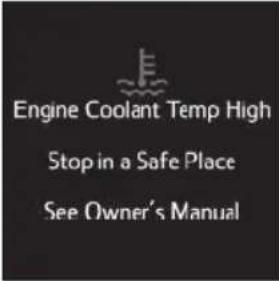 | Indicate that the engine coolant temperature is too highA buzzer also sounds.Handling method. (→P. 528)Continuing to drive the vehicle may be dangerous. |
 | |
Have the vehicle inspected immediately.
Failing to investigate the cause of the following warnings may lead to the system operating abnormally and possibly cause an accident. Have the vehicle inspected by your Toyota dealer.
| Warning message Details | |
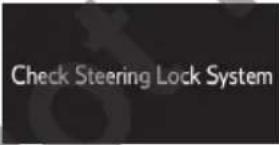  | Indicates a malfunction in the steering lock sys-tem.A buzzer also sounds. |
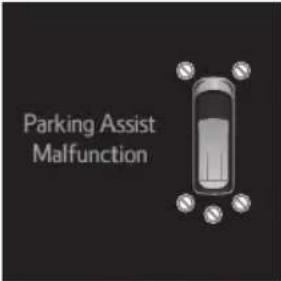  | Indicates a malfunction in the Toyota parking assist-sensor (if equipped) All the sensor lights flash. A buzzer also sounds. |
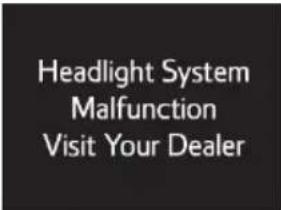  | Indicates a malfunction in: The automatic headlight leveling system; The discharge headlight system; or |
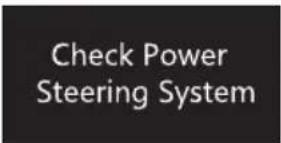  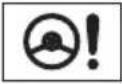 | Indicates a malfunction in the EPS (Electric Power Steering) system A buzzer also sounds. |
Follow the correction procedures.
A buzzer sounds and a warning message is shown on the multi-information display. After taking the specified steps to correct the suspected problem, check that the warning light turns off.
| Warning message Details Correction procedure | ||
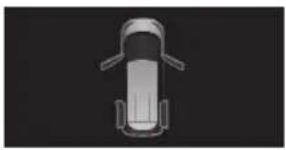 | Indicates that one or more of the side doors is not fully closed.The system also indicates which doors are not fully closed.A buzzer sounds to indicate that one or more of the doors is not fully closed (with the vehicle having reached a speed of 5 km/h [3 mph]). | Make sure that all of the side doors are closed. |
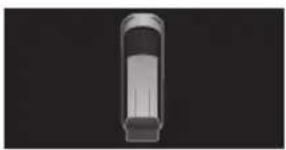 | Indicates that the back door is not fully closed.A buzzer sounds to indicate that one or more of the doors is not fully closed (with the vehicle having reached a speed of 5 km/h [3 mph]). | Close the back door. |
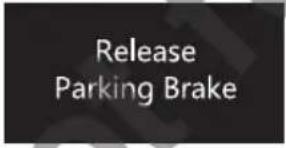 (Flashes) (Flashes)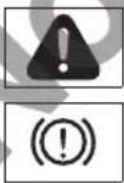 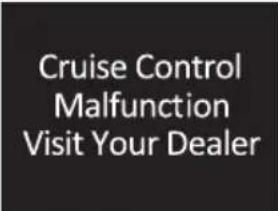  | Indicates that the parking brake is still engaged.A buzzer sounds to indicate that parking brake is still engaged (with the vehicle having reached a speed of more than 5 km/h [3 mph]).Indicates a malfunction in the cruise control system. Press the “ON-OFF” button once to deactivate the system, and then press the button again to reactivate the sys-tem. | Release the parking brake.Press the “ON-OFF” button. (→P. 226) |
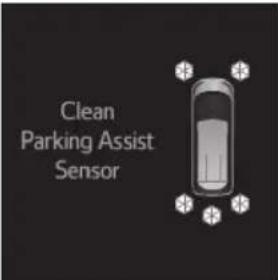  | Indicates that an Toyota park-ing assist-sensor is dirty or covered with ice (if equipped) All the sensor lights flash. A buzzer also sounds. | Clean the sensor. |
  (Flashes) (Flashes) | Indicates that the headlight switch is left on (with the key removed and the driver's door opened). A buzzer also sounds. | Turn the headlight switch off. |
  (Flashes) (Flashes) | Indicates that the window is not fully closed (with the engine switch off, and the driver's door open) A buzzer also sounds. | Close the window. |
 | Indicates that the TRC (Trac-tion Control) system has been deactivated | Turn the TRC on. (→P. 236) |
| Warning message D | Details Correction procedure | |
  | Indicates that the third seat operation is not yet complete. (if equipped)A buzzer also sounds. | Complete the third seat operation. |
Follow the correction procedures.
After taking the specified steps to correct the suspected problem, check that the warning light turns off.
| Interior buzzer | Exterior buzzer | Warning message Details | Correction procedure | ||
| Once | — | 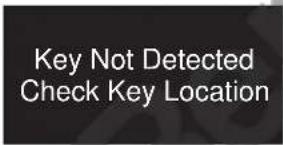  (Flashes) (Flashes) | Indicates that an attempt was made to start the engine without the electronic key being present, or the electronic key was not functioning normally. | Confirm the location of the electronic key. | |
| Once | 3 times | 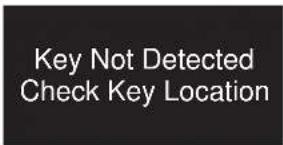  (Flashes) (Flashes) | Indicates that a door other than the driver's door has been opened or closed with the “ENGINE START STOP” switch in any mode other than off and the electronic key outside of the detection area. | Confirm the location of the electronic key. | |
| Interior buzzer | Exterior buzzer | Warning message Details | Correction procedure | ||
| Once | 3 times | 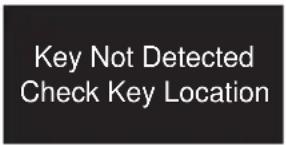  (Flashes) (Flashes) | Indicates that the driver's door has been opened or closed with the shift lever in "P", the "ENGINE START STOP" switch in any mode other than off and the electronic key outside of the detection area. | Turn the "ENGINE START STOP" switch off or confirm the location of the electronic key. | |
| Once | — |   (Flashes) (Flashes) | Indicate that the vehicle is being driven when the electronic key is outside of the detection area. | Confirm the location of the electronic key to inside of the vehicle. | |
| Continuous | — |   (Flashes) (Flashes) | Indicates that the driver's door has been opened with the shift lever out of "P" and the "ENGINE START STOP" switch in any mode other than off. | Shift the shift lever to "P". | |
| Continuous Continuous | 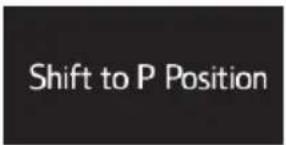 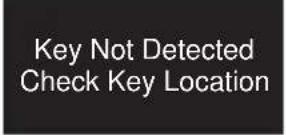   (Flashes) (Flashes) | Indicates that the driver's door has been opened or closed with the shift the shift lever out of in "P", the "ENGINE START STOP" switch in any mode other than off and the electronic key outside of the detection area. | Shift the shift lever to "P". Confirm the location of the electronic key. | ||
| Once | — | 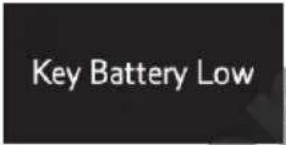  | Indicates that the key battery is low. | Replace the battery. | |
| Once | — | 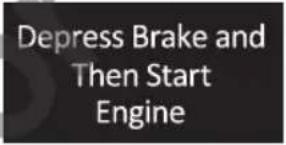  (Flashes) (Flashes) | Indicates that a door has been opened or closed and the "ENGINE START STOP" switch has been switched twice to ACCESSORY mode from off. | Press the "ENGINE START STOP" switch while applying the brakes. | |
| Once | — | 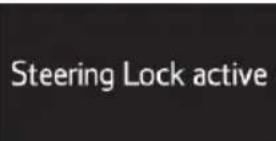  (Flashes) (Flashes) | Indicates that the steering lock has not released within 3 seconds of pressing the “ENGINE START STOP” switch. | Press the “ENGINE START STOP” switch again while turning the steering wheel with the brake pedal depressed. | |
| Continuously | — | 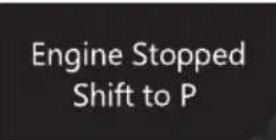  (Flashes) (Flashes) | The engine was stopped with the shift lever in a position other than P. | Shift the shift lever to P. | |
| Intermittently | — | 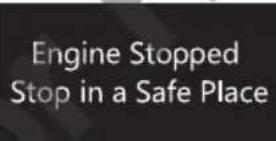  (Flashes) (Flashes) | The engine was stopped while driving. | Stop the vehicle in a safe place such as the shoulder of a road. | |
5-2. Steps to take in an emergency
If you have a flat tire
Your vehicle is equipped with a spare tire. The flat tire can be replaced with the spare tire.
■Before jacking up the vehicle
- Stop the vehicle in a safe place on a hard, flat surface.
- Set the parking brake.
●Shift the shift lever to P. - Stop the engine.
●Turn on the emergency flashers.
● Turn off the “PWR DOOR OFF” switch (if equipped). (→P. 51)
■ Location of the spare tire, jack and tools
Vehicles with a compact spare tire
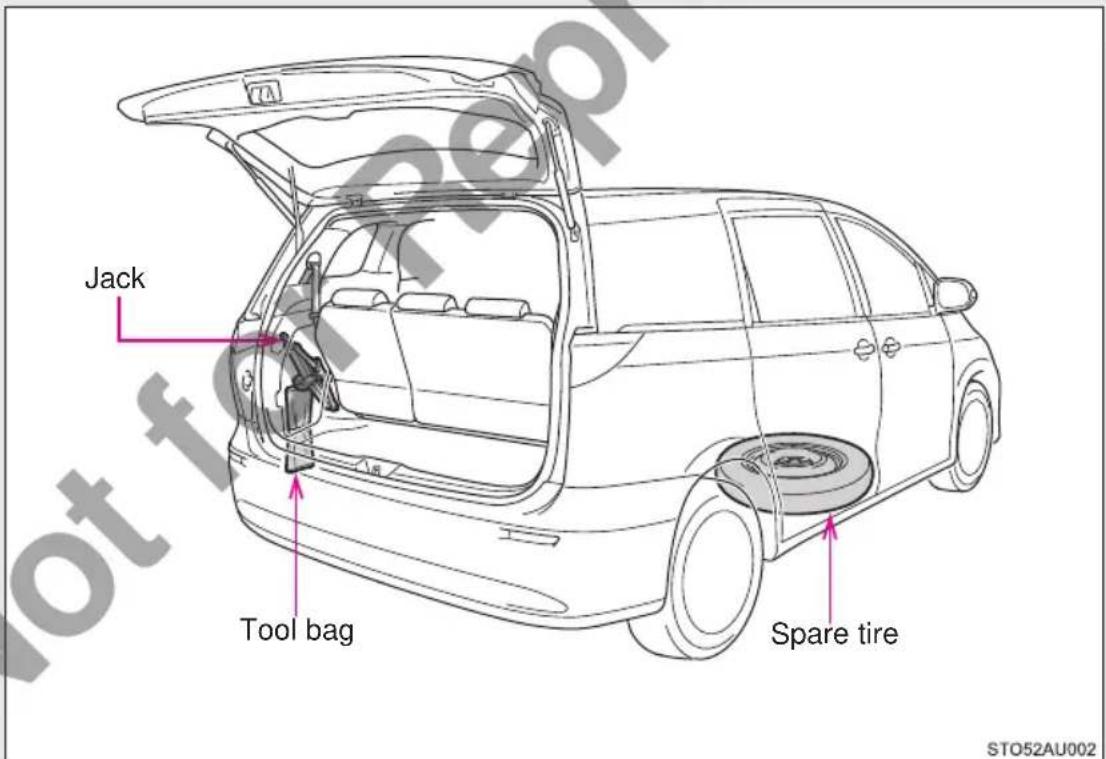
Vehicles with a full-size spare tire
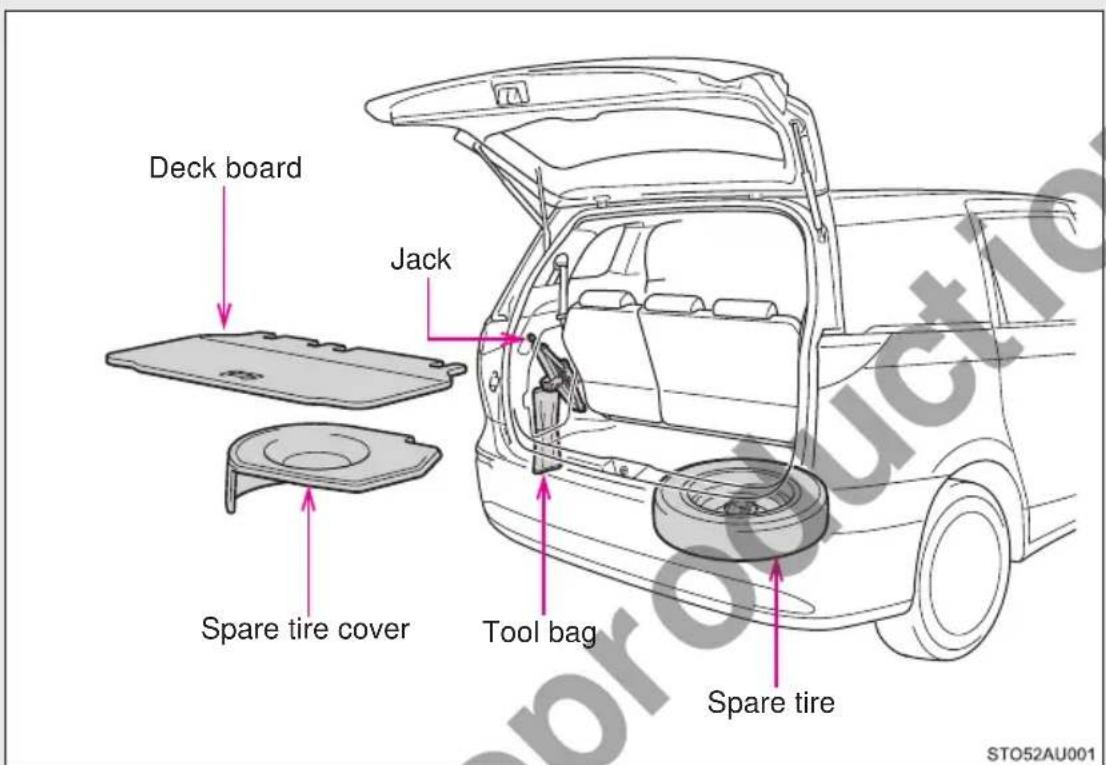
Tools
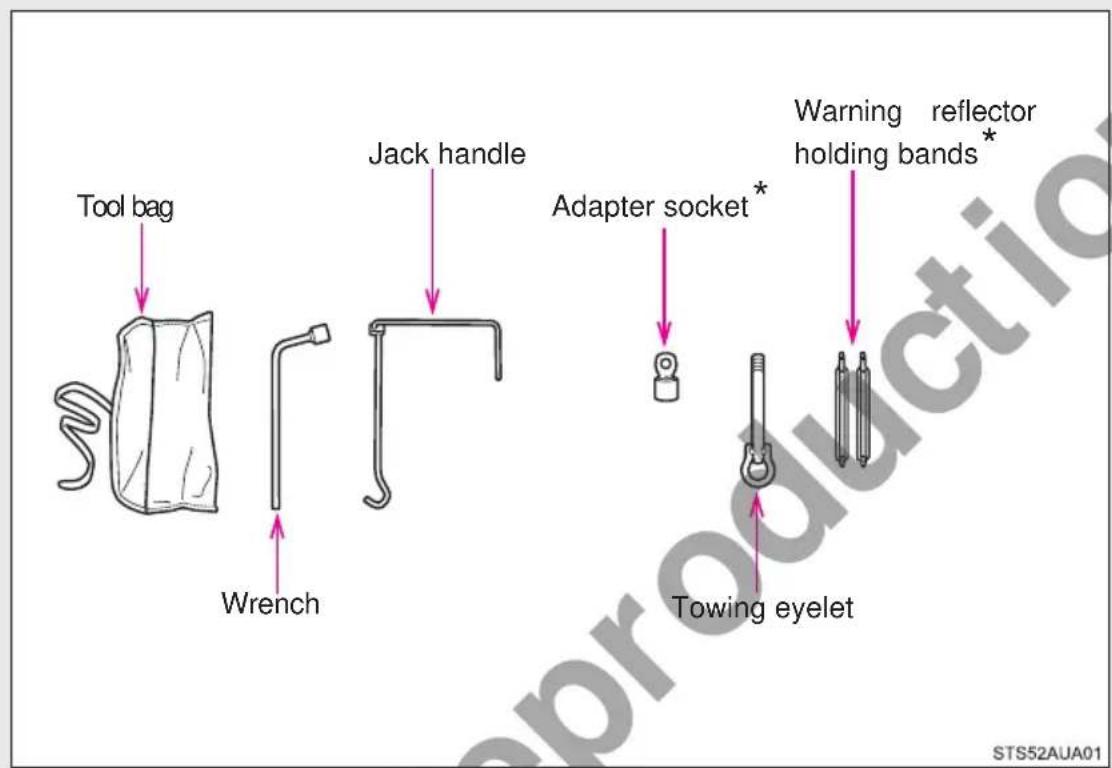
*: If equipped
STS52AUA01
Taking out the jack and tools
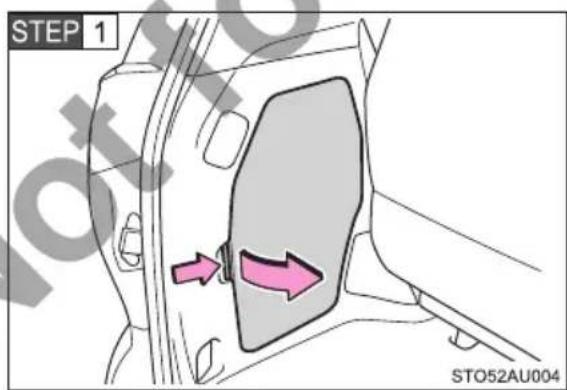
Remove the cover.
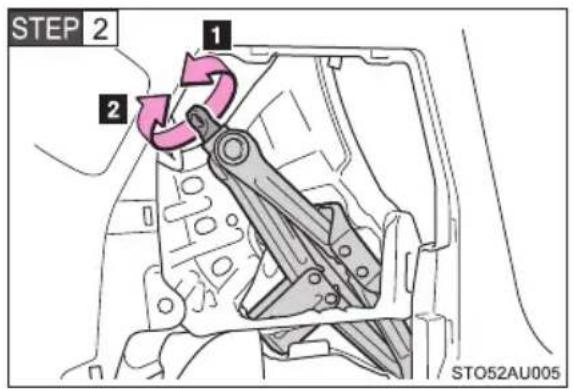
Take out the jack.
1 For tightening
2 For loosening
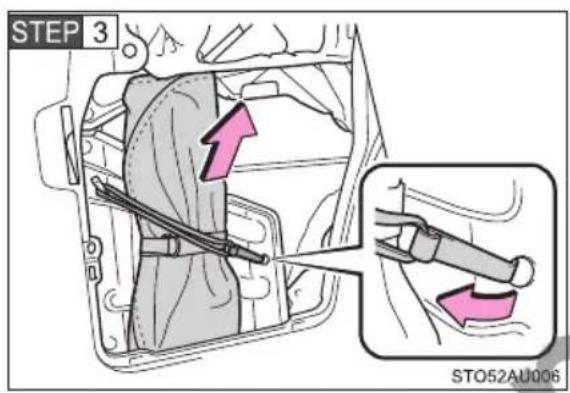
Unhook the rubber band and take out the tool bag.
Taking out the spare tire
Vehicles with a compact spare tire
STEP 1 Slide the driver's seat to the frontmost lock position and the right side second seat to the rearmost lock position.
This way, they will not interfere with the jack handle.
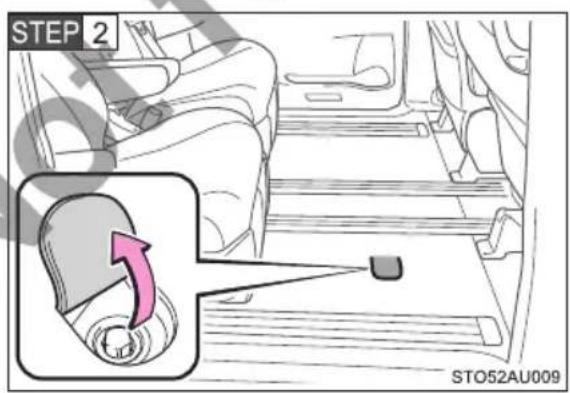
Pull back the flap to find the spare tire clamp bolt.
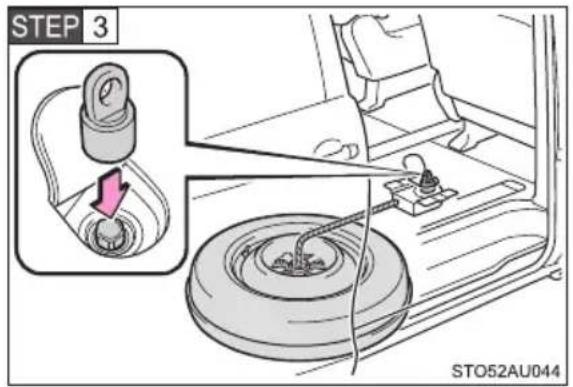
Attach the adapter socket to the spare tire clamp bolt.
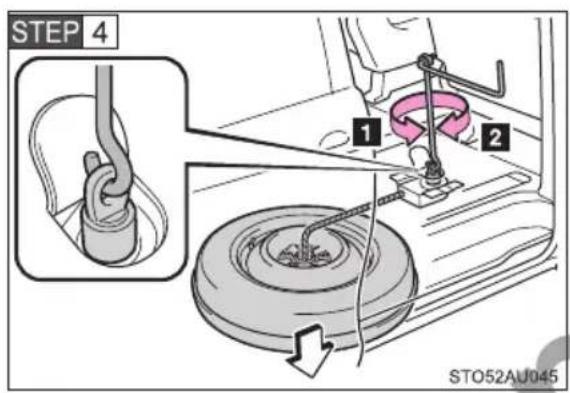
Connect the jack handle and the adapter socket. Turn the jack handle.
1 For lowering
2 For raising
The compact spare tire will be lowered completely to the ground.
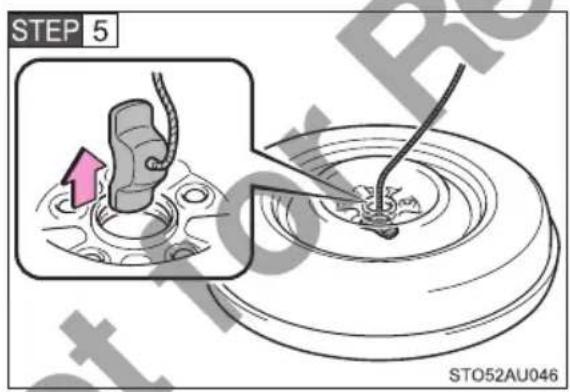
Take the compact spare tire and spare tire cover out from underneath the vehicle and remove the holding bracket.
Vehicles with a full-size spare tire
STEP 1 Remove the deck board. (→P. 382)
STEP 2 Tumbling the right side third seat. (→P. 98)
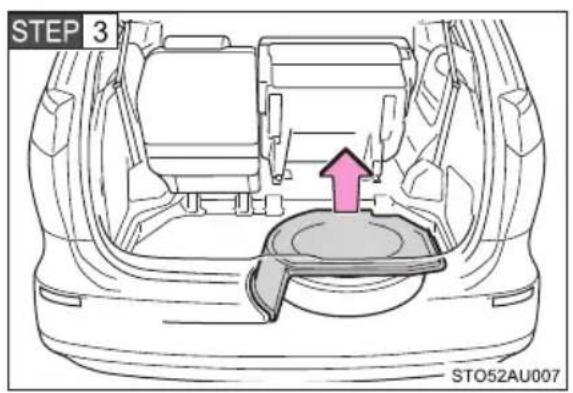
Remove the spare tire cover.
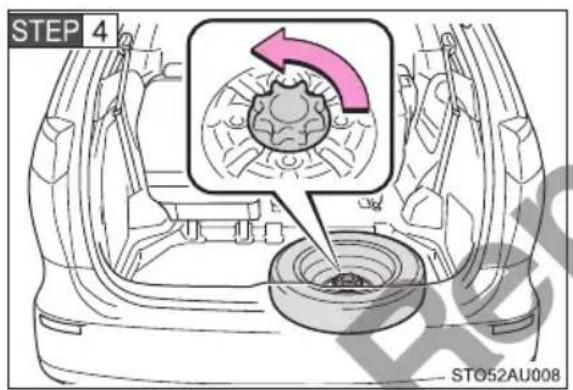
Loosen the center fastener that secures the spare tire.
Replacing a flat tire
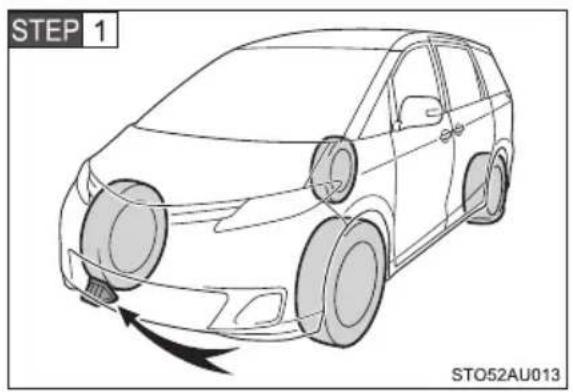
natural_image
Line drawing of a car with a directional arrow indicating motion, labeled 'STEP 1' and 'STO52AU013' (no text on the car itself)Chock the tires.
| Flat tire | Wheel chock positions | |
| Front | Left-hand side | Behind the rear right-hand side tire |
| Right-hand side | Behind the rear left-hand side tire | |
| Rear | Left-hand side | In front of the front right-hand side tire |
| Right-hand side | In front of the front left-hand side tire | |
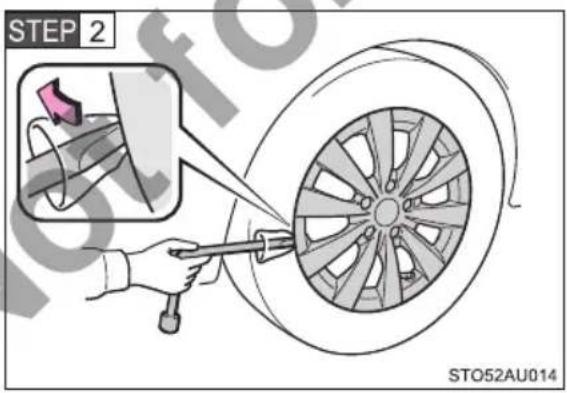
Vehicles with a steel wheel: Remove the wheel ornament using the wrench.
To protect the wheel ornament, place a rag between the wrench and the wheel ornament, as shown in the illustration.
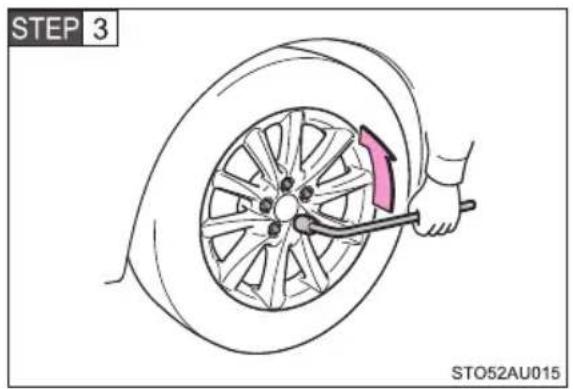
Slightly loosen the wheel nuts (one turn).
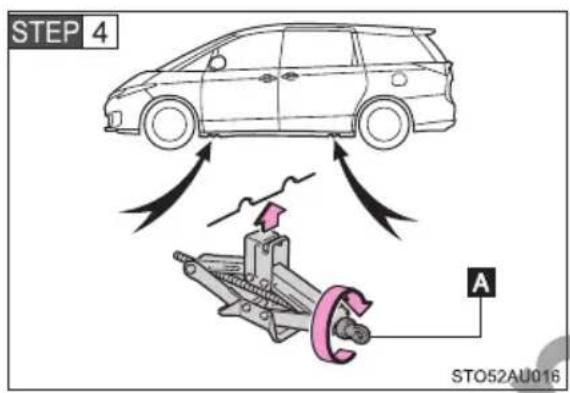
Turn the tire jack portion "A" by hand until the notch of the jack is in contact with the jack point.
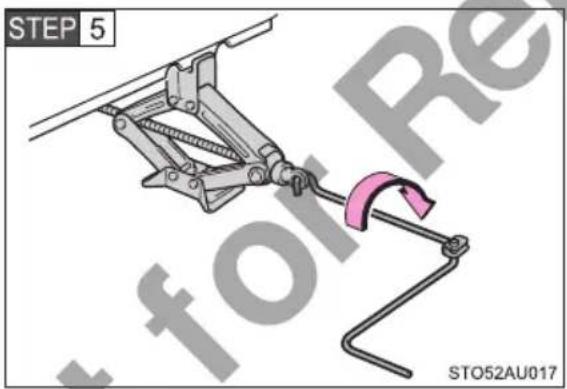
Raise the vehicle until the tire is slightly raised off the ground.
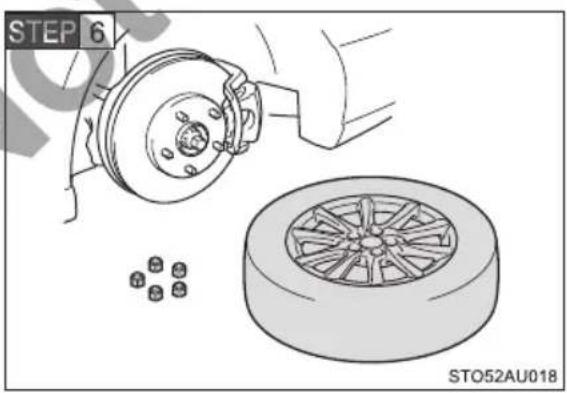
Remove all the wheel nuts and the tire.
When resting the tire on the ground, place the tire so that the wheel design faces up to avoid scratching the wheel surface.
Installing the tire
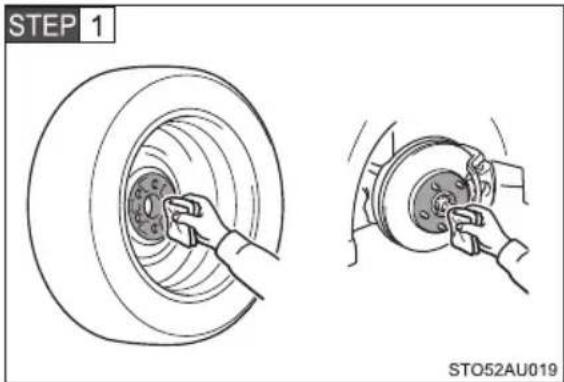
Remove any dirt or foreign matter from the wheel contact surface.
If foreign matter is on the wheel contact surface, the wheel nuts may loosen while the vehicle is in motion, causing the tire to come off.
STEP 2 Install the tire and loosely tighten each wheel nut by hand by approximately the same amount.
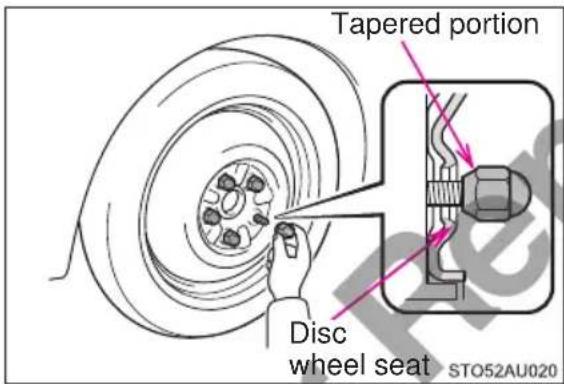
When replacing a steel wheel with a steel wheel (including a compact spare tire), tighten the wheel nuts until the tapered portion comes into loose contact with the disc wheel seat.
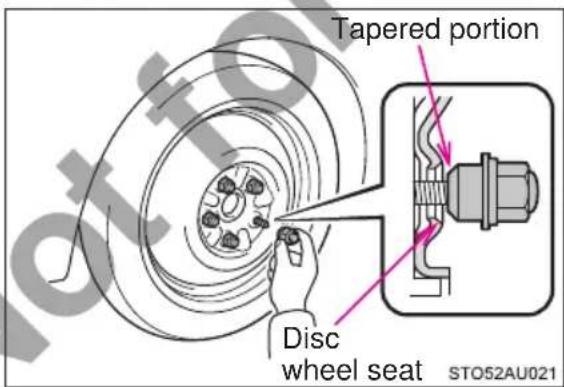
When replacing an aluminum wheel with a compact spare tire, tighten the wheel nuts until the tapered portion comes into loose contact with the disc wheel seat.
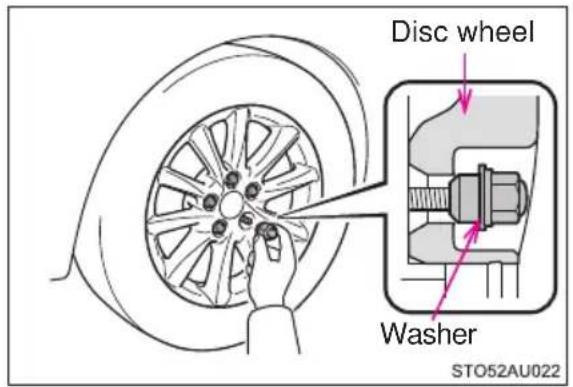
When replacing an aluminum wheel with an aluminum wheel, turn the wheel nuts until the washers come into contact with the disc wheel.
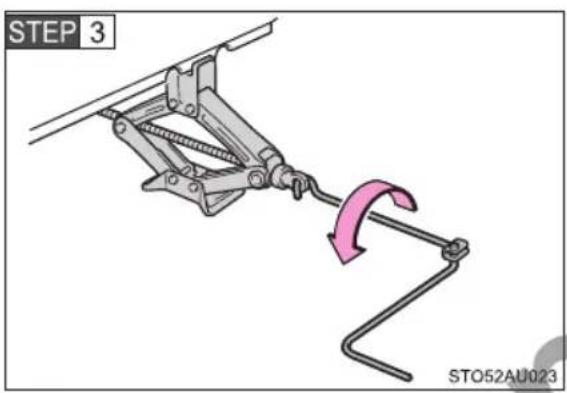
Lower the vehicle.
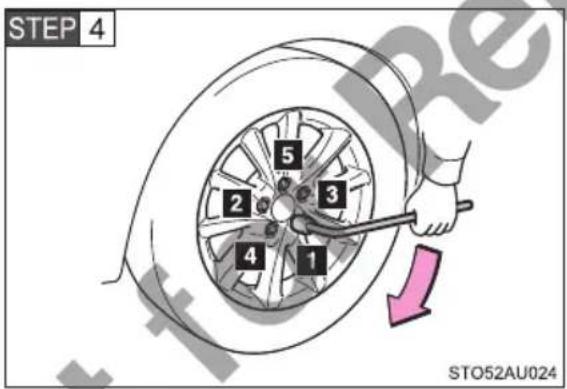
Firmly tighten each wheel nut two or three times in the order shown in the illustration.
Tightening torque:
103 N·m (10.5 kgf·m, 76 ft·lbf)
Do not use other tools or any additional leverage other than your hands, such as a hammer, pipe or your foot.
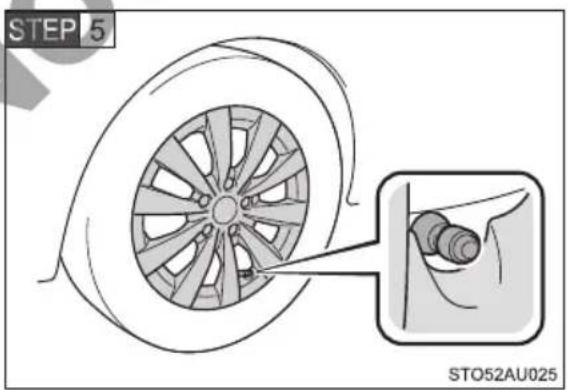
Vehicles with steel wheels (except compact spare tire): Reinstall the wheel ornament.
Align the cutout of the wheel ornament with the valve stem as shown.
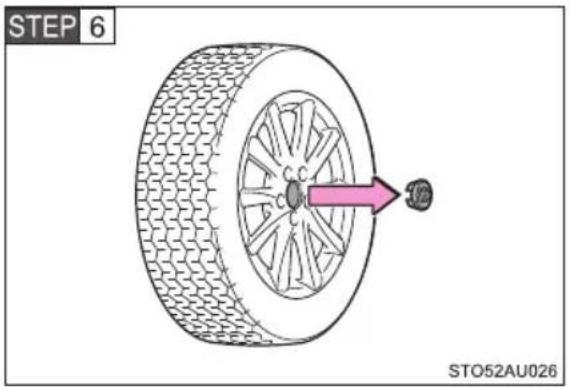
Vehicles with aluminum wheels: Remove the center wheel ornament by pushing from the reverse side.
Be careful not to lose the wheel ornament.
Stowing the flat tire, jack and tools
Vehicles with a compact spare tire
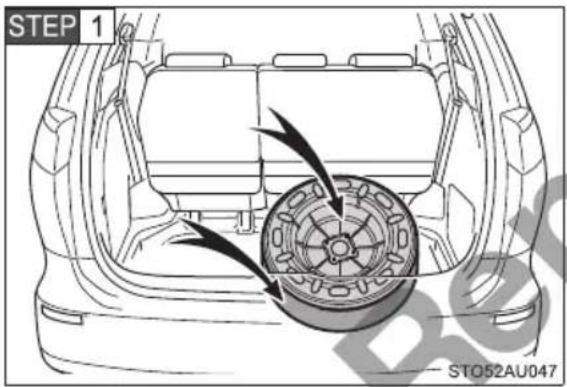
Stow the flat tire and spare tire cover, temporarily, in the luggage compartment.
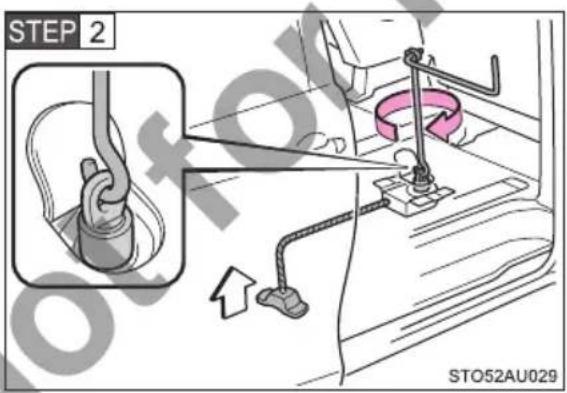
Secure the holding bracket by tightening the jack handle.
As the tire carrier is designed for the compact spare tire, the standard tire cannot be stored there.
STEP 3 Stow the jack and all tools.
Vehicles with a full-size spare tire
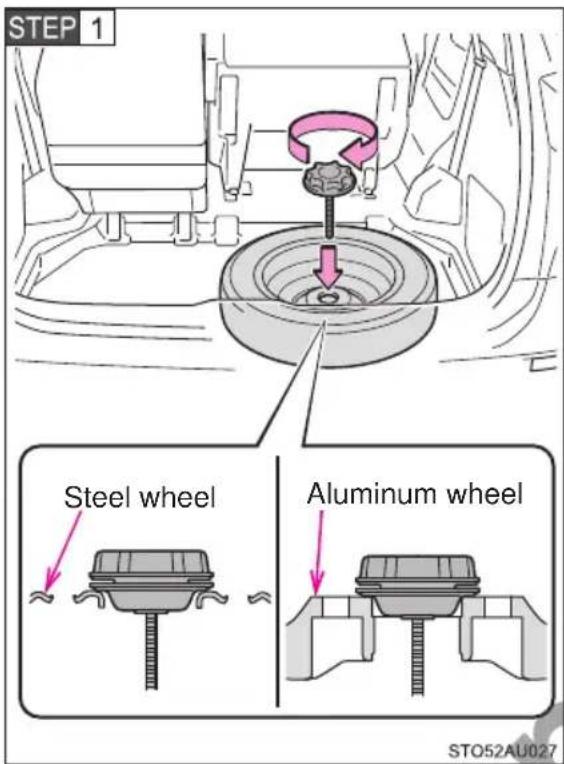
Stow the flat tire with the inner side of the wheel facing up.
Then secure the tire by tightening the center fastener.
Match the tapered portion to the center hole of the wheel.
STEP 2 Install the spare tire cover.
STEP 3 Return the right side third seat to its original position.
STEP 4 Install the deck board.
STEP 5 Stow the jack and all tools.
■The compact spare tire
The compact spare tire is identified by the label "TEMPORARY USE ONLY" on the tire sidewall.
Use the compact spare tire temporarily, and only in an emergency.
Make sure to check the tire inflation pressure of the compact spare tire. (→P. 547)
If you have a flat front tire on a road covered with snow or ice
Install the compact spare tire on one of the rear wheels of the vehicle. Perform the following steps and fit tire chains to the front tires:
STEP 1 Replace a rear tire with the compact spare tire.
STEP 2 Replace the flat front tire with the tire removed from the rear of the vehicle.
STEP 3 Fit tire chains to the front tires.
■ Stowing the compact spare tire
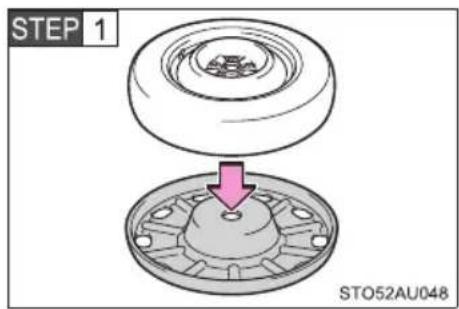
Set the spare tire cover on the ground and place the compact spare tire, with the outer side of the wheel facing up, on top of the spare tire cover.
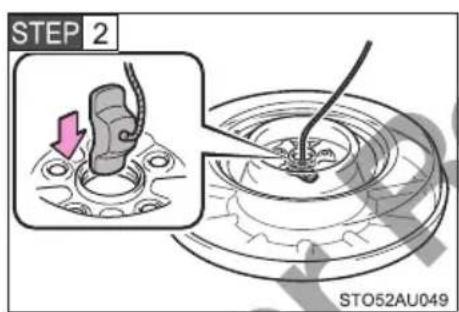
Attach the holding bracket to both the compact spare tire and spare tire cover.
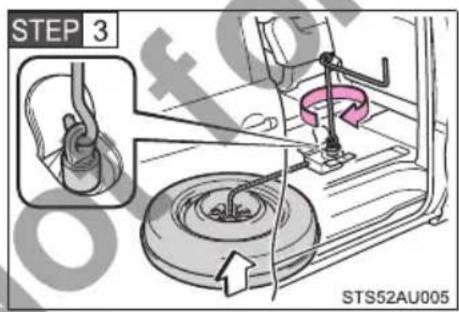
Secure the compact spare tire by tightening the jack handle.
Tightening torque:
37 N·m (3.7 kgf·m, 27 ft·lbf)
The compact spare tire goes straight up without catching on any other part.

WARNING
■When using the compact spare tire
●Remember that the compact spare tire provided is specifically designed for use with your vehicle. Do not use your compact spare tire on another vehicle.
- Do not use more than one compact spare tire simultaneously.
- Replace the compact spare tire with a standard tire as soon as possible.
●Avoid sudden acceleration, abrupt steering, sudden braking and shifting operations that cause sudden engine braking.
■When storing the full-size spare tire
Be careful not to catch fingers or other body parts between the full-size spare tire and the body of the vehicle.
■When the compact spare tire is attached
The vehicle speed may not be correctly detected, and the following systems may not operate correctly:
●ABS
Brake assist
VSC
TRC
Cruise control
EPS
■Speed limit when using the compact spare tire
Do not drive at speeds in excess of 80 km/h (50 mph) when a compact spare tire is installed on the vehicle.
The compact spare tire is not designed for driving at high speeds. Failure to observe this precaution may lead to an accident causing death or serious injury.

WARNING
■Using the tire jack
Improper use of the tire jack may cause the vehicle to suddenly fall off the jack, leading to death or serious injury.
- Do not use the tire jack for any purpose other than replacing tires or installing and removing tire chains.
- Only use the tire jack that comes with this vehicle for replacing a flat tire. Do not use it on other vehicles, and do not use other tire jacks for replacing tires on this vehicle.
●Always check that the tire jack is securely set to the jack point. - Do not put any part of your body under the vehicle while it is supported by the jack.
- Do not start or run the engine while your vehicle is supported by the jack.
- Do not raise the vehicle while someone is inside.
- When raising the vehicle, do not put an object on or under the jack.
- Do not raise the vehicle to a height greater than that required to replace the tire.
●Use a jack stand if it is necessary to get under the vehicle.
● Vehicles with a compact spare tire: Do not remove the compact spare tire when jacking up the vehicle. The tire carrier and the compact spare tire may interfere with the jack and cause a serious accident.
Take particular care when lowering the vehicle to ensure that no one working on or near the vehicle may be injured.

WARNING
■Replacing a flat tire
- Observe the following precautions.
Failure to do so may result in serious injury:
• Vehicles with a compact spare tire: Lower the spare tire completely to the ground before removing it from under the vehicle.
- Do not try to remove the wheel ornament by hand. Take due care in handling the ornament to avoid unexpected personal injury.
- Do not touch the disc wheels or the area around the brakes immediately after the vehicle has been driven.
After the vehicle has been driven the disc wheels and the area around the brakes will be extremely hot. Touching these areas with hands, feet or other body parts while changing a tire, etc. may result in burns.
●Failure to follow these precautions could cause the wheel nuts to loosen and the tire to fall off, resulting in death or serious injury.
- Have the wheel nuts tightened with a torque wrench to 103 N·m (10.5 kgf·m, 76 ft·lbf) as soon as possible after changing wheels.
- When installing a tire, only use wheel nuts that have been specifically designed for that wheel.
- If there are any cracks or deformations in the bolt screws, nut threads or bolt holes of the wheel, have the vehicle inspected by your Toyota dealer.
- When installing the wheel nuts, be sure to install them with the tapered ends facing inward. (→P. 423)
■Replacing a flat tire for vehicles with power sliding doors (if equipped)
In cases such as when replacing tires, make sure to turn off the “PWR DOOR OFF” switch ( P. 51). Failure to do so may cause the sliding door to operate unintentionally if the power sliding door switch is accidentally touched, resulting in hands and fingers being caught and injured.

WARNING
■After returning the third seat to the original position (vehicles with a full-size spare tire)
Observe the following precautions. Failure to do so may result in death or serious injury.
● Make sure the third seat is securely locked by pushing it forward and rearward.
- Check that the seat belts and the buckles are not twisted or caught in the seats.

NOTICE
■ Do not drive the vehicle with a flat tire
Do not continue driving with a flat tire.
Driving even a short distance with a flat tire can damage the tire and the wheel beyond repair.
■Be careful when driving over bumps with the compact spare tire installed on the vehicle
The vehicle becomes lower when driving with the compact spare tire compared to when driving with standard tires. Be careful when driving over uneven road surfaces.
- Driving with tire chains and the compact spare tire
Do not fit tire chains to the compact spare tire.
Tire chains may damage the vehicle body and adversely affect driving performance.
When loosening or tightening the spare tire clamp bolt (vehicles with a compact spare tire)
Do not use an impact wrench. Use the adapter socket and jack handle.
After taking out or stowing the compact spare tire
Make sure to secure the tire carrier by tightening the clamp bolt to prevent the holding bracket from hitting the under body of the vehicle during driving.

NOTICE
■ Using the tire carrier (vehicles with a compact spare tire)
As the tire carrier is designed for use with the compact spare tire, it cannot be used with standard tires.
- If the compact spare tire is flat, do not use the tire carrier, as the compact spare tire may not be held securely.
If the engine will not start even though correct starting procedures are being followed ( P. 180), consider each of the following points:
The engine will not start even though the starter motor operates normally.
One of the following may be the cause of the problem:
- There may not be sufficient fuel in the vehicle's tank. Refuel the vehicle.
●The engine may be flooded.
Try to restart the engine again following correct starting procedures. ( P. 180)
●There may be a malfunction in the engine immobilizer system. (→P. 132)
The starter motor turns over slowly, the interior lights and headlights are dim, or the horn does not sound or sounds at a low volume.
One of the following may be the cause of the problem:
● The battery may be discharged. (→P. 522)
●The battery terminal connections may be loose or corroded.
■The starter motor does not turn over.
The engine starting system may be malfunctioning due to an electrical problem such as an open circuit or a blown fuse. However, an interim measure is available to start the engine.
(→P. 517)
The starter motor does not turn over, the interior lights and headlights do not turn on, or the horn does not sound.
One of the following may be the cause of the problem:
●One or both of the battery terminals may be disconnected.
● The battery may be discharged. ( P. 522)
●There may be a malfunction in the steering lock system.
Contact your Toyota dealer if the problem cannot be repaired, or if repair procedures are unknown.
Emergency start function
When the engine does not start, the following steps can be used as an interim measure to start the engine if the “ENGINE START STOP” switch is functioning normally:
STEP 1 Set the parking brake.
STEP 2 Shift the shift lever to P.
STEP 3 Turn the “ENGINE START STOP” switch to ACCESSORY mode.
STEP 4 Press and hold the "ENGINE START STOP" switch for about 15 seconds while depressing the brake pedal firmly.
Even if the engine can be started using the above steps, the system may be malfunctioning. Have the vehicle inspected by your Toyota dealer.
5-2. Steps to take in an emergency
If you lose your keys
New genuine Toyota keys can be made by your Toyota dealer using the other key and the key number stamped on your key number plate.
5-2. Steps to take in an emergency
If the electronic key does not operate properly
If communication between the electronic key and vehicle is interrupted ( P. 44) or the electronic key cannot be used because the battery is depleted, the smart entry & start system (if equipped) and wireless remote control cannot be used. In such cases, the doors can be opened and the engine can be started by following the procedure below.
Unlocking and locking the doors
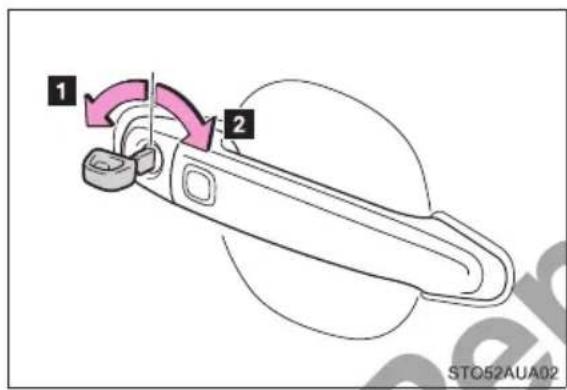
Use the mechanical key ( P. 25) in order to perform the following operations:
*: These settings must be customized at your Toyota dealer.
Starting the engine
STEP 1 Ensure that the shift lever is in P and firmly depress the brake pedal.
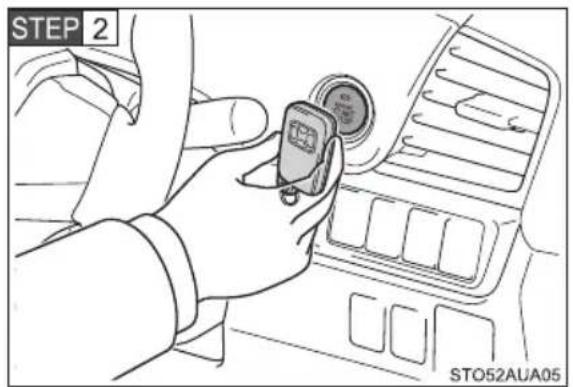
Touch the Toyota emblem side of the electronic key to the "ENGINE START STOP" switch.
If any of the doors is opened or closed while the electronic key is being touched to the "ENGINE START STOP" switch, an alarm will sound to indicate that the start function cannot detect the key.
STEP 3 Press the “ENGINE START STOP” switch within 5 seconds of the buzzer sounding, keeping the brake pedal depressed.
In the event that the “ENGINE START STOP” switch still cannot be operated, contact your Toyota dealer.
■Stopping the engine
Shift the shift lever to P and press the "ENGINE START STOP" switch as you normally do when stopping the engine.
■Replacing the key battery
As the above procedure is a temporary measure, it is recommended that the electronic key battery be replaced immediately when the battery is depleted. ( P. 427)
- Changing “ENGINE START STOP” switch modes
Within 10 seconds of the buzzer sounding, release the brake pedal and press the "ENGINE START STOP" switch.
The engine does not start and modes will be changed each time the switch is pressed. ( P. 181)
If the doors cannot be locked or unlocked by the smart entry & start system
Lock and unlock the doors by the mechanical key or wireless remote control.
■When the electronic key does not work properly
Make sure that the smart entry & start system or push-button start system has not been deactivated in the customization setting. If it is off, turn the function on. (Customizable features → P. 551)

WARNING
■When using the mechanical key and operating the power windows
Operate the power window after checking to make sure that there is no possibility of any passenger having any of their body parts caught in the window. Also, do not allow children to operate the mechanical key. It is possible for children and other passengers to get caught in the power window.
5-2. Steps to take in an emergency
If the vehicle battery is discharged
The following procedures may be used to start the engine if the vehicle's battery is discharged.
You can also call your Toyota dealer or a qualified repair shop.
If you have a set of jumper (or booster) cables and a second vehicle with a 12-volt battery, you can jump start your vehicle by following the steps below.
STEP 1 Open the hood. ( P. 396)
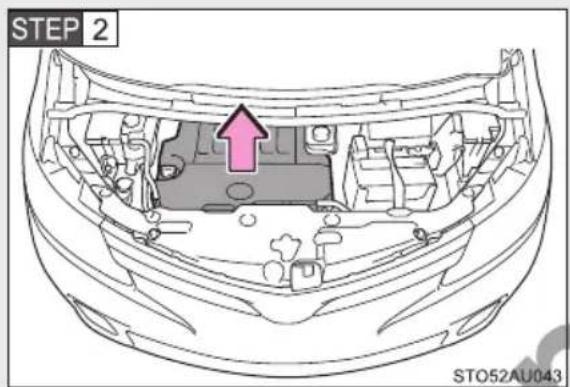
2GR-FE engine: Remove the engine cover.
STEP 3 Connect the jumper cables according to the following procedure:
2AZ-FE engine
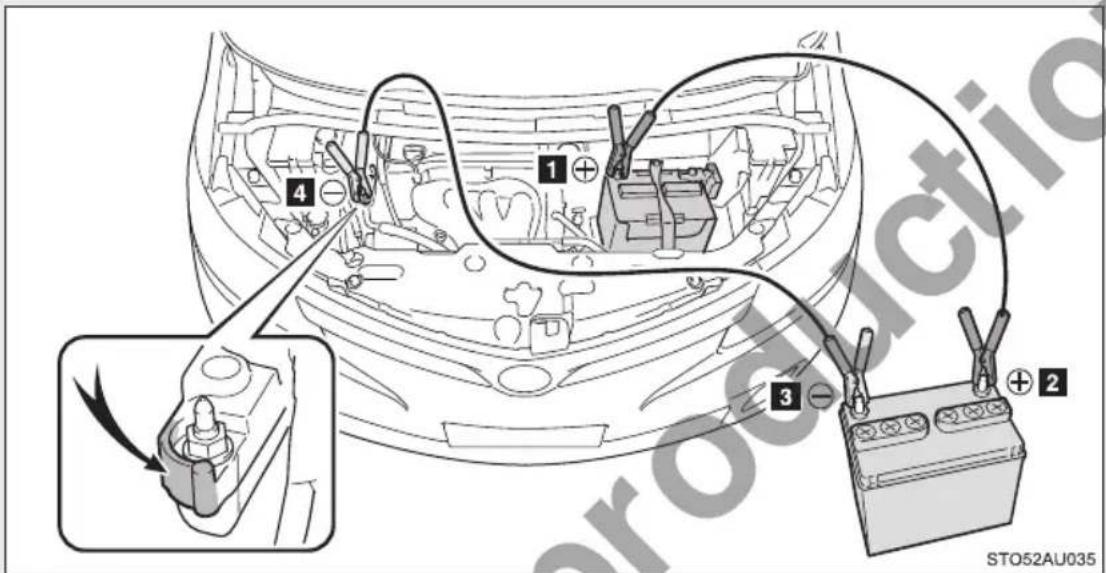
1 Connect a positive jumper cable clamp to the positive (+) battery terminal on your vehicle.
2 Connect the clamp on the other end of the positive cable to the positive (+) battery terminal on the second vehicle.
3 Connect a negative cable clamp to the negative (-) battery terminal on the second vehicle.
4 Connect the clamp at the other end of the negative cable to a solid, stationary, unpainted metallic point away from the battery and any moving parts as shown in the illustration.
2GR-FE engine
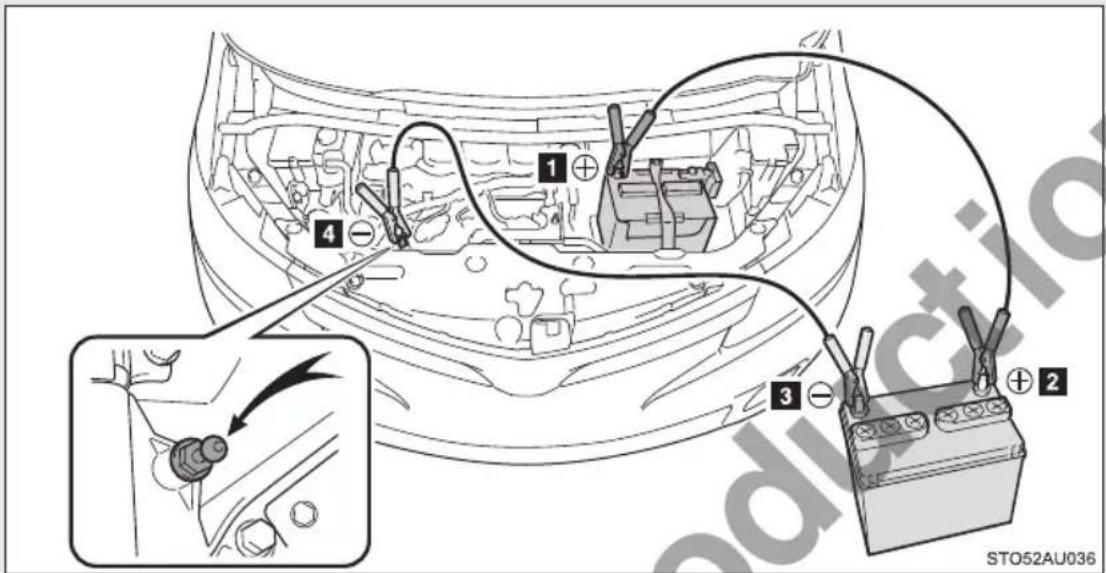
1 Connect a positive jumper cable clamp to the positive (+) battery terminal on your vehicle.
2 Connect the clamp on the other end of the positive cable to the positive (+) battery terminal on the second vehicle.
3 Connect a negative cable clamp to the negative (-) battery terminal on the second vehicle.
4 Connect the clamp at the other end of the negative cable to a solid, stationary, unpainted metallic point away from the battery and any moving parts as shown in the illustration.
STEP 4 Start the engine of the second vehicle. Increase the engine speed slightly and maintain at that level for approximately 5 minutes to recharge the battery of your vehicle.
STEP 5 Open and close any of the doors with the "ENGINE START STOP" switch turned off.
STEP 6 Maintain the engine speed of the second vehicle and turn the "ENGINE START STOP" switch to IGNITION ON mode, then start the vehicle's engine.
STEP 7 Once the vehicle's engine has started, remove the jumper cables in the exact reverse order from which they were connected.
Once the engine starts, have the vehicle inspected at your Toyota dealer as soon as possible.
■ Starting the engine when the battery is discharged
The engine cannot be started by push-starting.
■To prevent battery discharge
● Turn off the headlights and the audio system while the engine is off.
● Turn off any unnecessary electrical components when the vehicle is running at a low speed for an extended period, such as in heavy traffic.
■ When the battery is removed or discharged
● Vehicles with power sliding doors: The power sliding door must be initialized. (→P. 55)
● The power windows must be initialized. (→P. 122)
Charging the battery
The electricity stored in the battery will discharge gradually even when the vehicle is not in use, due to natural discharge and the draining effects of certain electrical appliances. If the vehicle is left for a long time, the battery may discharge, and the engine may be unable to start. (The battery recharges automatically during driving.)
■Precautions when the battery is discharged
In some cases, it may not be possible to unlock the doors using the smart entry & start system (if equipped) when the battery is discharged. Use the wireless remote control or the mechanical key to lock or unlock the doors.
●The engine may not start on the first attempt after the battery has recharged but will start normally after the second attempt. This is not a malfunction.
The "ENGINE START STOP" switch mode is memorized by the vehicle. When the battery is reconnected, the system will return to the mode it was in before the battery was discharged. Before disconnecting the battery, turn the "ENGINE START STOP" switch off.
If you are unsure what mode the "ENGINE START STOP" switch was in before the battery discharged, be especially careful when reconnecting the battery.

WARNING
■Avoiding battery fires or explosions
Observe the following precautions to prevent accidentally igniting the flammable gas that may be emitted from the battery:
●Make sure each jumper cable is connected to the correct terminal and that it is not unintentionally in contact with any other than the intended terminal.
- Do not allow the + and - clamps of the jumper cables to come into contact with each other.
- Do not smoke, use matches, cigarette lighters or allow open flame near the battery.

WARNING
Battery precautions
The battery contains poisonous and corrosive acidic electrolyte, while related parts contain lead and lead compounds. Observe the following precautions when handling the battery:
- When working with the battery, always wear safety glasses and take care not to allow any battery fluids (acid) to come into contact with skin, clothing or the vehicle body.
- Do not lean over the battery.
- In the event that battery fluid comes into contact with the skin or eyes, immediately wash the affected area with water and seek medical attention. Place a wet sponge or cloth over the affected area until medical attention can be received.
●Always wash your hands after handling the battery support, terminals, and other battery-related parts. - Do not allow children near the battery.
■To prevent damage to the vehicle
Do not pull- or push-start the vehicle as the three-way catalytic converter may overheat and become a fire hazard.
■To prevent an accident or injury when installing the engine cover
(2GR-FE engine)
- Do not install the engine cover while the engine is running.
- Do not touch the engine compartment while the engine is running or immediately after turning the engine off, as they may be hot. Doing so may cause burns.

NOTICE
When handling jumper cables
When connecting the jumper cables, ensure that they do not become entangled in the cooling fans or belt.
5-2. Steps to take in an emergency
If your vehicle overheats
The following may indicate that your vehicle is overheating.
- The high engine coolant temperature warning light (→P. 484) comes on and with the warning message (→P. 489), reaches the maximum, or a loss of engine power is experienced. (For example, the vehicle speed does not increase.)
●Steam comes out from under the hood.
Correction procedures
STEP 1 Stop the vehicle in a safe place and turn off the air conditioning system, and then stop the engine.
STEP 2 If you see steam: Carefully lift the hood after the steam subsides.
If you do not see steam:
Carefully lift the hood.
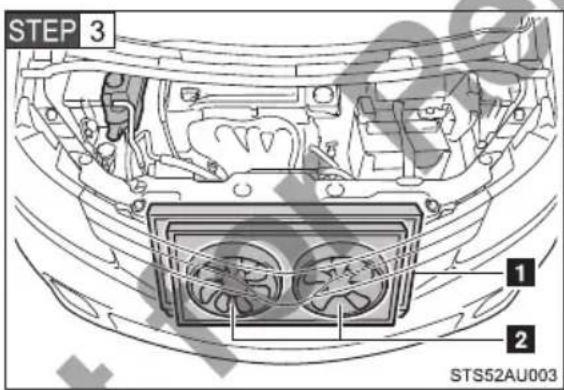
After the engine has cooled down sufficiently, inspect the hoses and radiator core (radiator) for any leaks.
1 Radiator
2 Cooling fans
If a large amount of coolant leaks, immediately contact your Toyota dealer.
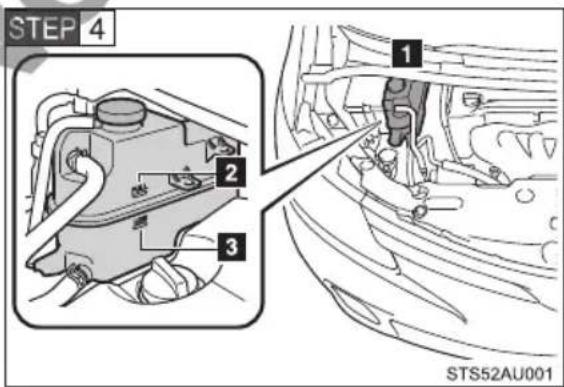
The coolant level is satisfactory if it is between the “FULL” and “LOW” lines on the reservoir.
1 Reservoir
2 "FULL"
3 "LOW"
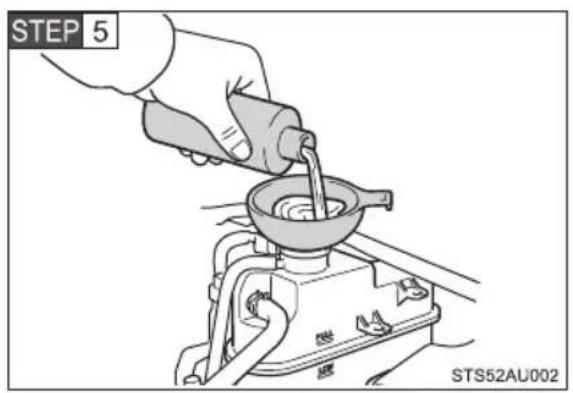
Add coolant if necessary.
Water can be used in an emergency if coolant is unavailable.
STEP 6 Start the engine and turn the air conditioning system on to check that the radiator cooling fan operates and to check for coolant leaks from the radiator or hoses.
The fan operates when the air conditioning system is turned on immediately after a cold start. Confirm that the fan is operating by checking the fan sound and air flow. If it is difficult to check these, turn the air conditioning system on and off repeatedly.
(The fan may not operate in freezing temperatures.)
STEP 7 If the fan is not operating:
Stop the engine immediately and contact your Toyota dealer.
If the fan is operating:
Have the vehicle inspected at the nearest Toyota dealer.

WARNING
■To prevent an accident or injury when inspecting under the hood of your vehicle
- If steam is seen coming from under the hood, do not open the hood until the steam has subsided. The engine compartment may be very hot, causing serious injuries such as burns.
- Keep hands and clothing (especially a tie, a scarf or a muffler) away from the fans and belts. Failure to do so may cause the hands or clothing to be caught, resulting in serious injury.
- Do not loosen the coolant reservoir cap while the engine and radiator are hot.
Serious injury, such as burns, may result from hot coolant and steam released under pressure.

NOTICE
■When adding engine coolant
Wait until the engine has cooled down before adding engine coolant.
When adding coolant, do so slowly. Adding cool coolant to a hot engine too quickly can cause damage to the engine.
■To prevent damage to the cooling system
Observe the following precautions:
● Avoid contaminating the coolant with foreign matter (such as sand or dust, etc.).
- Do not use any coolant additive.
5-2. Steps to take in an emergency
If the vehicle becomes stuck
Carry out the following procedures if the tires spin or the vehicle becomes stuck in mud, dirt or snow:
STEP 1 Stop the engine. Set the parking brake and shift the shift lever to P.
STEP 2 Remove the mud, snow or sand from around the front wheels.
STEP 3 Place wood, stones or some other material under the front wheels to help provide traction.
STEP 4 Restart the engine.
STEP 5 Shift the shift lever to the D or R and release the parking brake. Then, while exercising caution, depress the accelerator pedal.
■When it is difficult to free the vehicle
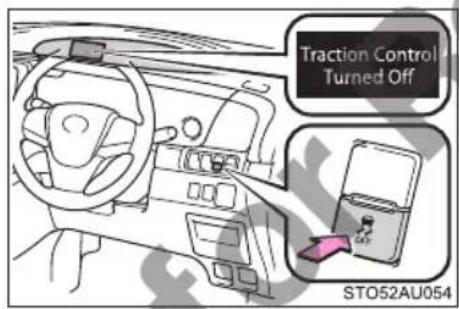
Press
off TRC.

WARNING
■When attempting to free a stuck vehicle
If you choose to push the vehicle back and forth to free it, make sure the surrounding area is clear to avoid striking other vehicles, objects or people. The vehicle may also lunge forward or lunge back suddenly as it becomes free. Use extreme caution.
■When shifting the shift lever
Be careful not to shift the shift lever with the accelerator pedal depressed. This may lead to unexpected rapid acceleration of the vehicle that may cause an accident resulting in death or serious injury.

NOTICE
■To avoid damage to the transmission and other components
● Avoid spinning the wheels and depressing the accelerator pedal more than necessary.
- If the vehicle remains stuck even after these procedures are performed, the vehicle may require towing to be freed.
5-2. Steps to take in an emergency
If your vehicle has to be stopped in an emergency
Only in an emergency, such as if it becomes impossible to stop the vehicle in the normal way, stop the vehicle using the following procedure:
STEP 1 Steadily step on the brake pedal with both feet and firmly depress it.
Do not pump the brake pedal repeatedly as this will increase the effort required to slow the vehicle.
STEP 2 Shift the shift lever to N.
If the shift lever is shifted to N
STEP 3 After slowing down, stop the vehicle in a safe place by the road.
STEP 4 Stop the engine.
If the shift lever cannot be shifted to N
STEP 3 Keep depressing the brake pedal with both feet to reduce vehicle speed as much as possible.
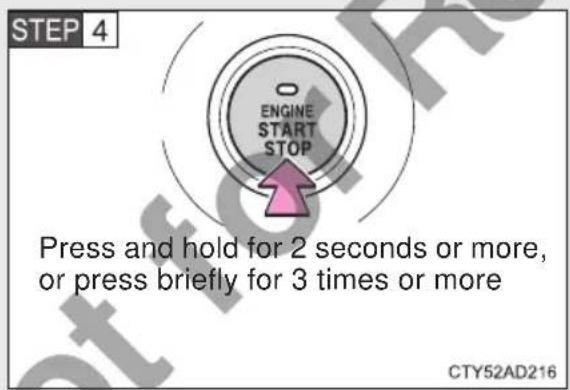
To stop the engine, press and hold the “ENGINE START STOP” switch for 2 consecutive seconds or more, or press it briefly for 3 times or more in succession.
STEP 5 Stop the vehicle in a safe place by the road.

WARNING
If the engine has to be turned off while driving
Power assist for the brakes and steering wheel will be lost, making the brake pedal harder to depress and the steering wheel heavier to turn. Decelerate as much as possible before turning off the engine.
Vehicle specifications
6
6-1. Specifications
Maintenance data
(fuel, oil level, etc.)...... 536
Fuel information...... 550
6-2. Customization
Customizable features..... 551
Items to initialize 553
6-1. Specifications
Maintenance data (fuel, oil level, etc.)
Dimensions
| Overall length 4795 mm (188.8 in.) | ||
| Overall width 1800 mm (70.9 in.) | ||
| Overall height | 1750 mm (68.9 in.)* ^1 1810 mm (71.3 in.)* ^2 | |
| Wheelbase 2950 mm (116.1 in.) | ||
| Tread | Front | 1570 mm (61.8 in.)* ^3 1545 mm (60.8 in.)* ^4 |
| Rear | 1575 mm (62.0 in.)* ^3 1550 mm (61.0 in.)* ^4 | |
*1: Vehicles without roof rails
*2: Vehicles with roof rails
*3: 205/65R16 tires
*4: 215/55R17 tires
Vehicle identification
■ Vehicle identification number
The vehicle identification number (VIN) is the legal identifier for your vehicle. This is the primary identification number for your Toyota. It is used in registering the ownership of your vehicle.
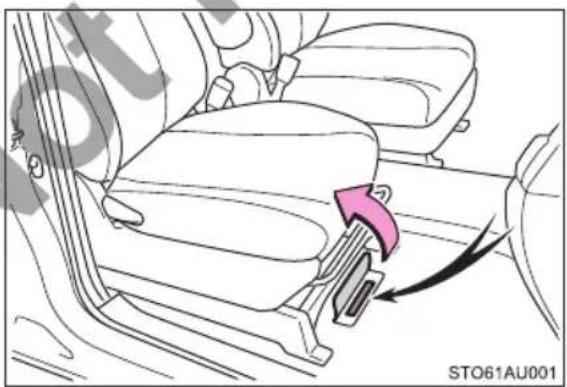
natural_image
Diagram of car seatbelt mechanism showing left and right side views with a pink arrow indicating clockwise motion (no text or symbols)This number is stamped under the right-hand front seat.
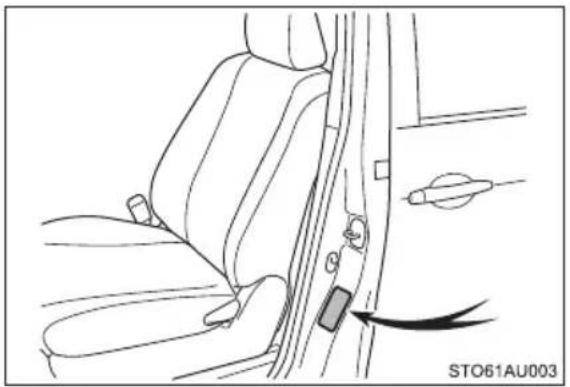
natural_image
Line drawing of a car seatbelt buckle assembly with no text or symbolsThis number is also on the manufacturer's label on the left-hand side center pillar.
Engine number
The engine number is stamped on the engine block as shown.
2AZ-FE engine
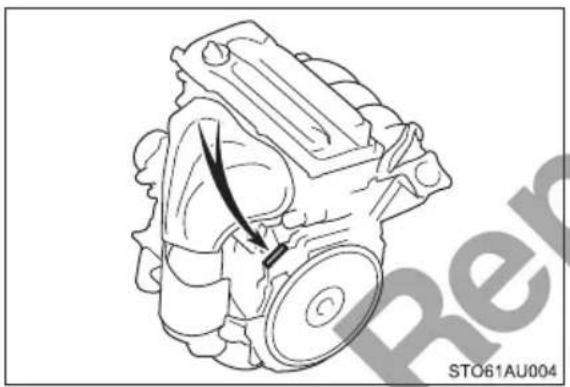
natural_image
Technical line drawing of a mechanical component with no visible text or symbols2GR-FE engine
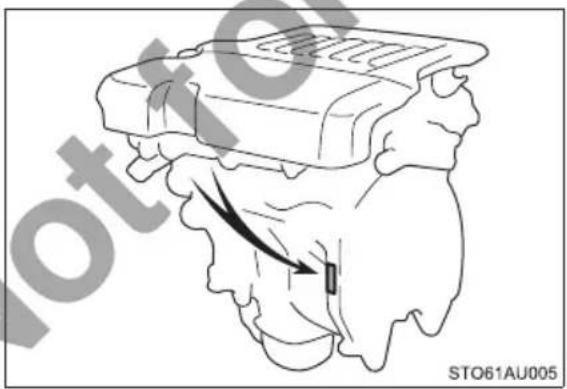
natural_image
Diagram of a mechanical component with an arrow indicating direction, no readable text or symbols presentEngine
| Model 2AZ-FE and 2GR-FE | |
| Type | 2AZ-FE engine4-cylinder in line, 4-cycle, gasoline2GR-FE engine6-cylinder V type, 4-cycle, gasoline |
| Bore and stroke | 2AZ-FE engine88.5 × 96.0 mm (3.48 × 3.78 in.)2GR-FE engine94.0 × 83.0 mm (3.70 × 3.27 in.) |
| Displacement | 2AZ-FE engine2362 cm3 (144.1 cu.in.)2GR-FE engine3456 cm3 (210.9 cu.in.) |
| Valve clearance (engine cold) | 2AZ-FE engineIntake: 0.19 — 0.29 mm (0.007 — 0.011 in.)Exhaust: 0.38 — 0.48 mm (0.015 — 0.019 in.)2GR-FE engineAutomatic adjustment |
| Drive belt tension Automatic adjustment | |
Fuel
| Fuel type | 2AZ-FE engineUnleaded gasoline2GR-FE enginePremium unleaded gasoline |
| Research octane number | 2AZ-FE engine91 or higher2GR-FE engine95 or higher |
| Fuel tank capacity (Reference) | 65 L (17.2 gal., 14.3 Imp.gal.) |
Lubrication system
| Oil capacity(Drain and refill— reference*)With filter | 2AZ-FE engine4.3 L (4.5 qt., 3.8 Imp.qt.)2GR-FE engine6.1 L (6.4 qt., 5.4 Imp.qt.) |
| Without filter | 2AZ-FE engine4.1 L (4.3 qt., 3.6 Imp.qt.)2GR-FE engine5.7 L (6.0 qt., 5.0 Imp.qt.) |
*: The engine oil capacity is a reference quantity to be used when changing the engine oil. Warm up and turn off the engine, wait more than 5 minutes, and check the oil level on the dipstick.
■Engine oil selection
“Toyota Genuine Motor Oil” is used in your Toyota vehicle. Use Toyota approved “Toyota Genuine Motor Oil” or equivalent to satisfy the following grade and viscosity.
2AZ-FE engine
Oil grade:
5W-30 and 10W-30:
API grade SL "Energy-Conserving", SM "Energy-Conserving" or SN "Resource-Conserving"; or ILSAC multigrade engine oil
15W-40:
API grade SL, SM or SN multigrade engine oil
Recommended viscosity (SAE):
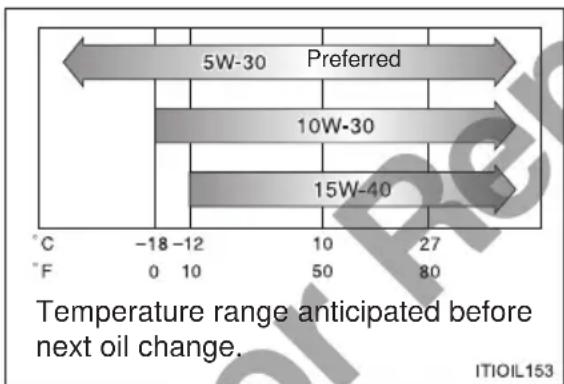
bar
| Temperature Range | Value | | :--- | :--- | | 5W-30 Preferred | -18 | | 10W-30 | -12 | | 15W-40 | -10 | | 5W-30 (labeled) | 27 | | 10W-30 (labeled) | 27 | | 15W-40 (labeled) | 27 | Temperature range anticipated before next oil change. ITIOIL153SAE 5W-30 is the best choice for good fuel economy and good starting in cold weather.
If you use SAE 10W-30 or a higher viscosity engine oil in extremely low temperatures, the engine may become difficult to start, so SAE 5W-30 engine oil is recommended.
Oil viscosity (5W-30 is explained here as an example):
- The 5W in 5W-30 indicates the characteristic of the oil which allows cold startability. Oils with a lower value before the W allow for easier starting of the engine in cold weather.
- The 30 in 5W-30 indicates the viscosity characteristic of the oil when the oil is at high temperature. An oil with a higher viscosity (one with a higher value) may be better suited if the vehicle is operated at high speeds, or under extreme load conditions.
How to read oil container labels:
Either or both API registered marks are added to some oil containers to help you select the oil you should use.
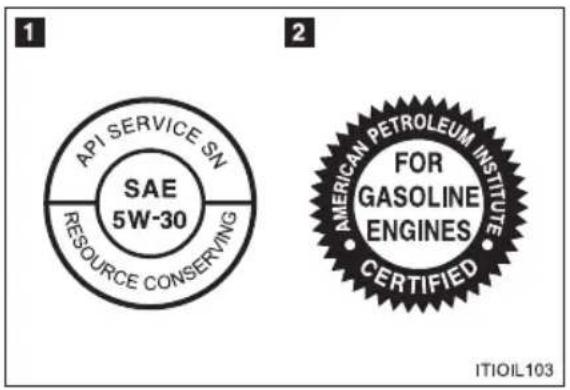
1 API Service Symbol
Top portion: "API SERVICE SN" means the oil quality designation by American Petroleum Institute (API).
Center portion: "SAE 5W-30" means the SAE viscosity grade.
Lower portion: “Resource-Conserving” means that the oil has fuel-saving and environmental protection capabilities.
2 ILSAC Certification Mark
The International Lubricant Specification Advisory Committee (ILSAC) Certification Mark is displayed on the front of the container.
2GR-FE engine
Oil grade:
0W-20, 5W-20, 5W-30 and 10W-30:
API grade SL "Energy-Conserving", SM "Energy-Conserving" or SN "Resource-Conserving"; or ILSAC multigrade engine oil
15W-40:
API grade SL, SM or SN multigrade engine oil
Recommended viscosity (SAE):
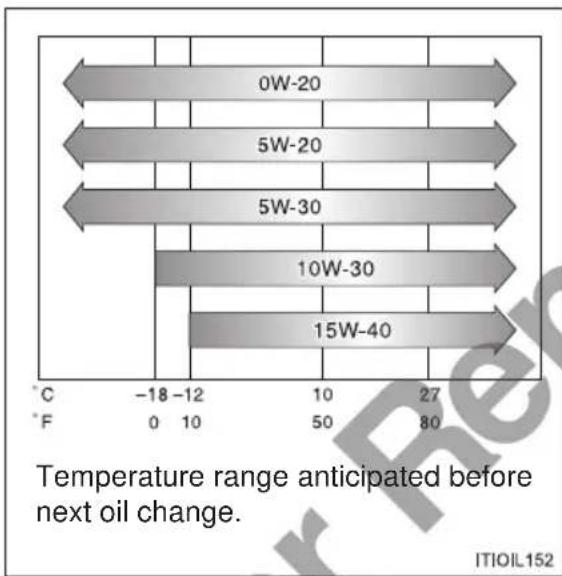
bar
| Temperature Range | Value | | :--- | :--- | | 0W-20 | -18 | | 5W-20 | -12 | | 5W-30 | -10 | | 10W-30 | 10 | | 15W-40 | 27 | The chart displays a horizontal bar with arrows indicating direction of temperature range before next oil change. The text below confirms that the temperature range is anticipated before the next oil change. It is part of a table for the data being presented in the image. The label 'ITIOIL152' appears in the bottom right corner. The axis labels are 'C' and 'F' at the bottom left.If you use SAE 10W-30 or a higher viscosity engine oil in extremely low temperatures, the engine may become difficult to start, so SAE 0W-20, 5W-20 or 5W-30 engine oil is recommended.
Oil viscosity (0W-20 is explained here as an example):
- The 0W in 0W-20 indicates the characteristic of the oil which allows cold startability. Oils with a lower value before the W allow for easier starting of the engine in cold weather.
- The 20 in 0W-20 indicates the viscosity characteristic of the oil when the oil is at high temperature. An oil with a higher viscosity (one with a higher value) may be better suited if the vehicle is operated at high speeds, or under extreme load conditions.
How to read oil container labels:
Either or both API registered marks are added to some oil containers to help you select the oil you should use.
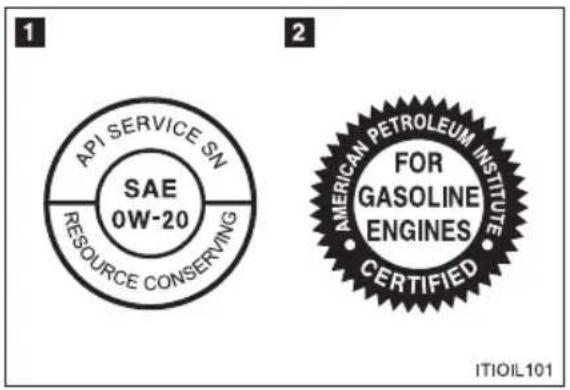
1 API Service Symbol
Top portion: "API SERVICE SN" means the oil quality designation by American Petroleum Institute (API).
Center portion: "SAE 0W-20" means the SAE viscosity grade.
Lower portion: “Resource-Conserving” means that the oil has fuel-saving and environmental protection capabilities.
2 ILSAC Certification Mark
The International Lubricant Specification Advisory Committee (ILSAC) Certification Mark is displayed on the front of the container.
Cooling system
| Capacity(Reference) | 2AZ-FE engine | Vehicles without towing package and a rear air conditioning system6.2 L (6.6 qt., 5.5 Imp.qt.) |
| Vehicles without towing package and with a rear air conditioning system8.1 L (8.6 qt., 7.1 Imp.qt.) | ||
| Vehicles with towing package and without a rear air conditioning system6.6 L (7.0 qt., 5.8 Imp.qt.) | ||
| Vehicles with towing package and a rear air conditioning system8.4 L (8.9 qt., 7.4 Imp.qt.) | ||
| 2GR-FE engine | Vehicles without a rear air conditioning sys-tem9.0 L (9.5 qt., 7.9 Imp.qt.) | |
| Vehicles with a rear air conditioning system10.9 L (11.5 qt., 9.6 Imp.qt.) | ||
| Coolant type | Use either of the following:“Toyota Super Long Life Coolant”A similar high-quality ethylene glycol-based non-silicate, non-amine, non-nitrite, and non-borate coolant with long-life hybrid organic acid technologyDo not use plain water alone. | |
Ignition system
| Spark plugMake | 2AZ-FE engineDENSO SK16R11NGK IFR5A112GR-FE engineDENSO FK20HR11 |
| Gap | 1.1 mm (0.043 in.) |

NOTICE
■Iridium-tipped spark plugs
Use only iridium-tipped spark plugs. Do not adjust the spark plug gap.
Electrical system
| BatterySpecific gravity reading at 20°C (68°F): | 1.25 or higherIf the specific gravity reading is lower than standard value, charge the battery. |
| Charging ratesQuick chargeSlow charge | 15 A max.5 A max. |
Continuously variable transmission
| Fluid capacity* 9.1 L (9.6 qt., 8.0 | Imp.qt.) |
| Fluid type Toyota Genuine CVT | Fluid FE |
*: The fluid capacity is the quantity of reference. If replacement is necessary, contact your Toyota dealer.

NOTICE
■Continuously variable transmission fluid type
Using continuously variable transmission fluid other than “Toyota Genuine CVT Fluid FE” may cause deterioration in shift quality, locking up of the transmission accompanied by vibration and, ultimately, damage to the vehicle’s transmission.
Automatic transmission
| Fluid capacity* 6.5 L (6.9 qt., 5.7 Imp. qt.) | |
| Fluid type Toyota Genuine ATF WS |
*: The fluid capacity is a reference quantity. If replacement is necessary, contact your Toyota dealer.

NOTICE
■Automatic transmission fluid type
Using automatic transmission fluid other than “Toyota Genuine ATF WS” may cause deterioration in shift quality, locking up of the transmission accompanied by vibration, and ultimately damage to the vehicle’s transmission.
Brakes
| Pedal clearance*1 | 103 mm (4.1 in.) Min. |
| Pedal free play | 1 — 6 mm (0.04 — 0.24 in.) |
| Parking brake pedal travel*2 | 4 — 6 clicks |
| Fluid type SAE J1703 or FMVSS No.116 DOT 3 | |
*1: Minimum pedal clearance when depressed with a force of 490 N (50 kgf, 110 lbf) while the engine is running
*2: Parking brake pedal travel when depressed with a force of 300 N (31 kgf, 67.5 lbf)
Steering
Free play Less than 30 mm (1.2 in.)
Tires and wheels
Type A
| Tire size | 205/65R16 95HT145/90D16 106M (Compact spare tire)* | ||
| Tire inflation pressure(Recommended cold tireinflation pressure) | Vehicle speed | Front wheelkPa (kgf/cm2 or bar, psi) | Rear wheelkPa (kgf/cm2 or bar, psi) |
| For driving at 160 km/h (100 mph) or over | 280 (2.8, 41) 280 (2.8, psi) | 41) | |
| For driving under 160 km/h (100 mph) | 230 (2.3, 33) | Vehicle load up to 6 occupants:230 (2.3, 33)Vehicle load more than 6 occupants:250 (2.5, 36) | |
| Tire inflation pressure (compact spare)(Recommended cold tireinflation pressure) | 420 kPa (4.2 kgf/cm2 or bar, 60 psi) | ||
| Wheel size | 16 × 6 1/2JJ,16 × 4T (Compact spare tire) | ||
| Wheel nut torque | 103 N·m (10.5 kgf·m, 76 ft·lbf) | ||
*: Vehicles with a compact spare tire
Type B
| Tire size | 215/55R17 94VT145/90D16 106M (Compact spare tire)* | ||
| Tire inflation pressure(Recommended cold tireinflation pressure) | Vehicle speed | Front wheelkPa (kgf/cm2 or bar, psi) | Rear wheelkPa (kgf/cm2 or bar, psi) |
| For driving at 160 km/h (100 mph) or over | 280 (2.8, 41) 280 (2.8, psi) | 41) | |
| For driving under 160 km/h (100 mph) | 240 (2.4, 35) | Vehicle load up to 6 occupants:240 (2.4, 35)Vehicle load more than 6 occupants:250 (2.5, 36) | |
| Tire inflation pressure(compact spare)(Recommended cold tireinflation pressure) | 420 kPa (4.2 kgf/cm2 or bar, 60 psi) | ||
| Wheel size | 17 × 7J,16 × 4T (Compact spare tire) | ||
| Wheel nut torque | 103 N·m (10.5 kgf·m, 76 ft·lbf) | ||
*: Vehicles with a compact spare tire
Light bulbs
| Light Bulbs W Type | |||
| Exterior | HeadlightsHigh beamLow beam (discharge bulbs)Low beam (halogen bulbs) | 653555 | ABC |
| Front fog lights 55 C | |||
| Front position lights 5 D | |||
| Front turn signal lights 21 E | |||
| Rear turn signal lights 21 E | |||
| Back-up lights | 16 D | ||
| License plate lights | 5 D | ||
| Interior | Interior light/front personal lights | 5 D | |
| Rear personal lights | 5 D | ||
| Door courtesy lights | 5 D | ||
| Luggage compartment light | 5 D | ||
| Vanity lights | 8 D |
A: HIR1 halogen bulbs B: D4S discharge bulbs
C: H11 halogen bulbs D: Wedge base bulbs (clear)
E: Wedge base bulbs (amber)
6-1. Specifications
Fuel information
2AZ-FE engine
You must only use unleaded gasoline.
Select unleaded gasoline with a Research Octane Number of 91 or higher for optimum engine performance.
2GR-FE engine
You must only use unleaded gasoline.
Select premium unleaded gasoline with a Research Octane Number of 95 or higher for optimum engine performance.
If this premium type cannot be obtained, you may temporarily use unleaded gasoline with a Research Octane Number as low as 91.
■ Use of ethanol blended gasoline in a gasoline engine
Toyota allows the use of ethanol blended gasoline where the ethanol content is up to 10%. Make sure that the ethanol blended gasoline to be used has a Research Octane Number that follows the above.
If your engine knocks
- Consult your Toyota dealer.
- You may occasionally notice light knocking for a short time while accelerating or driving uphill. This is normal and there is no need for concern.
NOTICE
■Notice on fuel quality
- Do not use improper fuels. If improper fuels are used, the engine will be damaged.
Do not use leaded gasoline.
Leaded gasoline will cause the three-way catalytic converter to lose its effectiveness and the emission control system to function improperly. - Do not use the methanol blended gasoline such as M15, M85, M100. The use of gasoline containing methanol may cause engine damage or failure.
Your vehicle includes a variety of electronic features that can be personalized to suit your preferences. Programming these preferences requires specialized equipment and may be performed by your Toyota dealer.
Some function settings are changed simultaneously with other functions being customized. Contact your Toyota dealer for further details.
| Item Function | Default setting | Customized setting | |
| Smart entry & start system and Wireless remote control (→P. 27, 43) | Time elapsed before automatic door lock function is activated if door is not opened after being unlocked | 30 seconds | 60 seconds |
| 120 seconds | |||
| Operation signal (Emergency flashers) | ON OFF | ||
| Operation signal (Buzzer) | ON OFF | ||
| Open door warning buzzer | ON OFF | ||
| Smart entry & start system (→P. 27) | Smart entry & start system ON OFF | ||
| Push-button start system (→P. 37) | Push-button start system ON OFF | ||
| Wireless remote control (→P. 43) | Wireless remote control ON OFF | ||
| Illumination (→P. 354) | Time elapsed before the interior lights turn off | 15 seconds | 7.5 seconds |
| 30 seconds | |||
| Operation after the “ENGINE START STOP” switch is turned off | ON OFF | ||
| Operation when the doors are unlocked | ON OFF | ||
| Indirect lighting (if equipped) | ON OFF | ||
| Automatic light control system (→P. 214) | Light sensor sensitivity 3 1 — 5 | ||
| Light sensor control reaction delay time | Standard Long | ||
| Toyota parking assist-sensor* (→P. 228) | Buzzer volume Level 3 Levels 1 to 5 | ||
| Distance which a sensor detects | 150 cm (4.9 ft.) | 60 cm (2.0 ft.) | |
| Power windows (→P. 121) | Mechanical key linked operation | OFF ON | |
| Wireless remote control linked operation | OFF ON | ||
| Open window reminder buzzer | ON OFF | ||
| Automatic air conditioning system (→P. 258) | Reaction when the A/C switch is touched | 02 | 01 (Fast) to 05 (Slow) |
| Operation noise when the A/C switch is touched | ON OFF | ||
*:if equipped
The following items must be initialized for normal system operation after such cases the battery being reconnected, or maintenance being performed on the vehicle.
| Item When to | initialize Reference | |
| Power sliding doors | After reconnecting or changing the batteryAfter changing a fuse | P. 55 |
| Power windows | After reconnecting or changing the batteryAfter changing a fuse | P. 122 |
Not for Reproduction
Index
Abbreviation list 556
Alphabetical index...... 557
What to do if... 568
| ABBREVIATIONS MEANING | |
| A/C Air Conditioning | |
| ABS Anti-lock Brake System | |
| AFS Adaptive Front-lighting System | |
| AI-SHIFT Artificial Intelligence Shift control | |
| CRS Child Restraint System | |
| ELR Emergency Locking Retractor | |
| EPS Electric Power Steering | |
| INT Intermittent | |
| LED Light Emitting Diode | |
| ODO Odometer | |
| PSD Power Sliding Door | |
| PWR Power | |
| RSE Rear Seat Entertainment System | |
| SRS Supplemental Restraint System | |
| TRC Traction Control | |
| TWI Treadwear Indicators | |
| VIN Vehicle Identification Number | |
| VSC Vehicle Stability Control | |
Alphabetical index Alphabetical index
A
A/C
Air conditioning filter......424
Front air conditioning system....258
Rear air conditioning system....272
A/V input port......352
ABS....235
Active head restraints......68
Adaptive front lighting system....216
AFS....216
Air conditioning filter .....424
Air conditioning system Air conditioning filter......424
Front air conditioning system....258
Rear air conditioning system....272
Airbags
Airbag operating conditions ....137
Airbag precautions for your child....141
Airbag warning light .....484
Curtain shield airbag operating conditions ....137
Curtain shield airbag precautions....141
General airbag precautions...141
Knee airbag precautions.....141
Locations of airbags......135
Modification and disposal of airbags....144
Proper driving posture....133, 141
Side airbag operating conditions....137
Side airbag precautions.....141
Side and curtain shield airbags operating conditions....137
Side and curtain shield airbags precautions......141
SRS airbags....135
Antenna 390
Anti-lock brake system .....235
Armrest....375
Assist grips....377
Audio system
Antenna 390
A/V input port....352
Blu-ray disc....315
CD player....282
DVD disc....315
DVD player 315
MP3/WMA disc 288
Optimal use....295
Radio 280
Rear seat entertainment system....301
SD card....345
Steering wheel audio switch ....298
Audio visual input ....352
Automatic air conditioning system
Air conditioning filter .....424
Front air conditioning system......258
Rear air conditioning system....272
B
Automatic headlight leveling system....217
Automatic light control system....214
Automatic transmission Automatic transmission.....190 If the shift lever cannot be shifted from P .....194 S mode.....192
Auxiliary box......364, 380
Back door Back door....61 Wireless remote control ....43
Back-up lights Replacing light bulbs....447 Wattage....549
Battery Checking....410 If the vehicle has a discharged battery....522 Preparing and checking before winter....244
Blu-ray disc....315 Bottle holders....362
Brake Fluid....546 Parking brake....197
Brake assist....235 Break-in tips....172
Brightness control Instrument panel light control....202
C
Care Exterior ....384 Interior....388 Seat belts....389
Cargo hooks....380 CD changer....282 CD player....282 Chains....244 Child-protectors....52
Child restraint system Baby seats, definition....145 Baby seats, installation....154 Child seats, definition....145 Child seats, installation....154 Installing CRS with ISOFIX rigid anchor....162 Installing CRS with top straps....164 Junior seats, definition....145 Junior seats, installation ....154
Child safety Airbag precautions....141 Back door precautions....63 Battery precautions....412, 527 Child-protectors ....52 Child restraint system ....145 How your child should wear the seat belt....113 Installing child restraints ....154 Moon roof precautions....125 Power window lock switch ....121 Power window precautions...123 Removed key battery precautions....428
Removed rear seat entertainment system controller battery....429
Seat belt precautions .....114
Seat heater precautions....373
Sliding doors precautions......56
Sunshade precautions......127
Cleaning
Exterior....384
Interior......388
Seat belts....389
Clock....369
Condenser....409
Console box 359
Continuously variable transmission
7-speed sport sequential shiftmatic mode ....187
Continuously variable transmission ....185
If the shift lever cannot be shifted from P .....188
Conversation mirror......368
Cooling system
Engine overheating....528
Cruise control ....224
Cup holders....361
Curtain shield airbags......135
Customizable features .....551
D
Deck board....380
Defogger
Rear window....277
Dimension....536
Display
Drive information......209
Multi-information display.....208
Warning message....488
Do-it-yourself maintenance ....393
Door courtesy lights
Door courtesy lights....354
Wattage 549
Doors
Back door....61
Door glasses....121
Door lock....27, 43, 46
Side doors....46, 48
Side mirrors ....119
Driver's and front
passenger's seat belt reminder light....485
Driving
Break-in tips....172
Correct posture......133
Procedures ......170
Winter driving tips ......244
DVD player ....315
E
Electric power steering......235
Electronic key
If the electronic key does not operate properly ....519
Replacing the battery......427
Emergency brake signal .....235
Emergency flashers
Switch 474
Emergency, in case of
If a warning message is displayed ....488
If the back door opener is in operative....63
If the electronic key does not operate properly ....519
If the engine will not start.....516
If the vehicle has a discharged battery....522
If the warning buzzer sounds....483
If the warning light turns on....483
If you have a flat tire .....498
If you lose your keys......518
If you think something is wrong....481
If your vehicle becomes stuck....531
If your vehicle has to be stopped in an emergency....533
If your vehicle needs to be towed....475
If your vehicle overheats.....528
Engine
Accessory mode.....180
Compartment......401
Engine switch....180
Hood 396
How to start the engine....180
Identification number .....536
If the engine will not start..... 516
Ignition switch....180
Overheating....528
Engine compartment cover ....403
Engine coolant
Capacity....544
Checking....408
Preparing and checking before winter....244
Engine coolant temperature
warning light......484
Engine immobilizer system....132
Engine oil
Capacity....539
Checking....404
Preparing and checking before winter....244
Engine switch ....180
Engine switch light....354
EPS 235
F
Floor mat ....378
Fluid
Washer....414
Fog lights
Replacing light bulbs......447
Switch 218
Wattage....549
Front fog lights
Replacing light bulbs......447
Switch 218
Wattage....549
Front position lights
Replacing light bulbs......447
Switch 214
Wattage....549
Front seats
Adjustment......67
Front turn signal lights
Replacing light bulbs......447
Switch 196
Wattage....549
Fuel
Capacity....538
Fuel gauge....200
Fuel pump shut off system....482
Gas station information......572
Information....550
Refueling....129
Type....538
Fuel door 129
Fuel filler door....129
Fuel pump shut off system.....482
Fuses 431
G
Gas station information .....572
Gauges 200
Glove box 359
H
Hazard lights
Switch......474
Head restraints
Adjusting 79
Headlights cleaner......223
Headlights
Adaptive front lighting system....216
Discharge headlights precautions....472
Replacing light bulbs......447
Switch......214
Wattage 549
Heaters
Seat heaters 373
Hill-start assist control......235
Hood 396
Hooks
Cargo....380
Horn 199
Identification
Engine....536
Vehicle....536
Ignition switch....180
Ignition switch light......354
Illuminated entry system......354
Immobilizer system ....132
Indicator lights....204
Inside rear view mirror .....118
Instrument cluster light control....202
Interior light
Interior light....354
Switch 354
Wattage....549
J Jack
Positioning a floor jack......398
Vehicle-equipped jack......498
Jack handle......498
K Keyless entry .....27, 43
Keys
Electronic key....24
Engine switch....180
If the electronic key does not operate properly .....519
If you lose your keys......518
Ignition switch 180
Key number......24
Keyless entry 27
Keys......24
Mechanical key .....24
Wireless remote control key....43
License plate lights
Replacing light bulbs.....447
Wattage 549
Light bulbs
Replacing......447
Wattage 549
Lights
Door courtesy lights......354
Emergency flasher switch.....474
Engine switch light....354
Fog light switch....218
Hazard light switch......474
Headlight switch.....214
Interior light list....354
Interior light switch....355
Luggage compartment light ....62
Personal light switch......355
Replacing light bulbs......447
Turn signal lever....196
Vanity lights ....367
Wattage 549
Lock steering column .....182
M Maintenance
Do-it-yourself maintenance...393
Maintenance data....536
Maintenance requirements...391
Manual headlight leveling
dial....215
Meter
Instrument panel light control....202
Meters....200
Mirrors
Inside rear view mirror.....118
Side mirrors ....119
Vanity mirrors......367
Moon roof....124
MP3 disc......288, 340
Multi-information display......208
0
Odometer....200
Oil
Engine oil....404
Opener
Back door....61
Outside rear view mirrors
Adjusting and folding......119
Outside temperature
display......370
Overheating, Engine......528
P
Parking brake....197
Personal lights
Personal lights ....354
Switch 355
Wattage....549
Power outlet......371
Power windows....121
Push-button start system .....37
R
Radiator....409
Radio....280
Rear cooler system ....275
Rear seat
Adjustment....70
Flattening second seats....84, 85
Folding third seats .....89, 90
Seat adjustment....70
Seat arrangement......81
Stowing third seats ..... 84, 93, 96
Tip-up second seats .....87
Tumbling third seats .....98
Rear seat entertainment
system....301
Rear sunshade....126
Rear turn signal lights
Replacing light bulbs.....447
Wattage 549
Rear window defogger......277
Rear window wiper......222
Remote controller....304
Replacing
Electronic key battery .....427
Fuses....431
Key battery....427
Light bulbs 447
Rear seat entertainment system control battery......429
Tires....498
Wireless remote control battery ....427
Roof luggage carrier .....241
S
SD card....345
Seat arrangement ....81
Seat belts
Adjusting the seat belt.....109
Child restraint system installation......154
Cleaning and maintaining the seat belts....389
Emergency Locking Retractor (ELR) ....113
How to wear your seat belt ...109
How your child should wear the seat belt....113
Pregnant women, proper seat belt use......115
Reminder light......485
Seat belt pretensioners.....113
Third center seat belt .....110
Seat heaters ....373
Seats
Adjustment......67
Adjustment precautions .....69
Arrangement......81
Child seats/child restraint system installation......154
Cleaning....388
Front seat adjustment......67
Head restraint 79
Properly sitting in the seat.....133
Rear seat adjustment....70
Seat heaters....373
Second seats
Adjustment....70
Shift lever
Automatic transmission.....190
Continuously variable transmission....185
If the shift lever cannot be shifted from P......188, 194
Shift lock system.....188, 193
Side airbags....135
Side mirrors
Adjusting and folding .....119
Side turn signal lights
Replacing light bulbs......447
Wattage 549
Sliding doors
Sliding doors....48
Wireless remote control key......43
Smart entry & start system
Antenna location....30
Entry function....27
Starting the engine....180
Spare tire
Inflation pressure....547
Storage location....498
Spark plug....545
Specifications....536
Speedometer....200
Steering
Column lock release .....182
Steering wheel
Adjustment......117
Audio switches......298
Stop lights
Replacing light bulbs......447
Wattage....549
Storage feature ....357
Storage precautions......242
Stuck
If your vehicle becomes stuck....531
Sun visors ....366
Sunshade....126
Switch
"AFS OFF" switch .....216
Clock adjustment switch .....369
Cruise control switch.....224
Emergency flasher switch.....474
"ENGINE START STOP" switch....180
Fog light switch .....218
Hazard light switch....474
Headlight cleaner switch.....223
Ignition switch .....180
Instrument cluster light control switch....202
Light switches ......214
Outside rear view mirror switch....119
Power door lock switch .....46
Power sliding door switch .....50
Power third seats switch ...90, 96
Power window switch......121
"PWR DOOR OFF" switch.....51
Rear sunshade switch .....126
Rear window defogger switch ....277
Rear window wiper and washer switch....222
Seat heater switches .....373
Steering wheel audio switch 298
Toyota parking assist-sensor switch 228
"TRIP" switch 201
VSC OFF switch 236
Window lock switch.....121
Wiper and washer switch 219, 222
T
Tachometer 200
Tail lights
Replacing light bulbs......447
Switch......214
Wattage 549
Theft deterrent system
Engine immobilizer system...132
Third seat
Adjustment....72
Tire inflation pressure......420
Tires
Chains....244
Checking......416
Compact spare tire .....498
If you have a flat tire .....498
Inflation pressure......420
Replacing......498
Rotating tires....416
Size....547
Snow tires....244
Spare tire....498
Tools 498
Towing
Emergency towing ....477
Trailer towing 248
Toyota parking
assist-sensor......228
Traction control 235
Trailer towing....248
Transmission shift
switches....187, 192
TRC 235
Trip meter....200
Turn signal lights
Replacing light bulbs......447
Switch 196
Wattage....549
V
Vanity lights
Vanity lights....367
Wattage....549
Vanity mirrors 367
Vehicle data recordings .....19
Vehicle identification
number 536
Vehicle stability control .....235
VSC 235
W
Warning buzzers
Brake system....483
Downshifting.....189, 195
Seat belt reminder .....485
Warning lights
"AFS OFF" indicator light.....484
Anti-lock brake system......484
Brake assist system......484
Brake system....483
Charging system....484
Cruise control indicator light....484
Electric power steering system......484
Electronic engine control system....484
High engine coolant temperature warning light...484
Low engine oil pressure..... 484
Low fuel level....485
Malfunction indicator lamp....484
Master warning light......485
Open door....485
Pretensioners....484
Seat belt reminder light.....485
Slip indicator light....485
Smart entry & start system......485
SRS airbags....484
Warning messages......488
Washer
Checking....414
Preparing and checking before winter....244
Switch 219, 222
Washing and waxing ....384
Wheels....422
Window glasses ......121
Window lock switch.....121
Windows
Power windows....121
Rear window defogger.....277
Washer....219, 222
Windshield wipers......219
Wireless remote control key
Locking/Unlocking......43
Replacing the battery......427
Wireless remote control .....43
WMA disc......288, 340
| A tire punctures | P. 498 | If you have a flat tire |
| The engine does not start | P. 516 | If the engine will not start |
| P. 132 | Engine immobilizer system | |
| P. 522 | If the vehicle battery is discharged | |
| P. 519 | If the electronic key does not operate properly | |
| The shift lever cannot be moved out | P. 188, 194 | If the shift lever cannot be shifted from P |
| The high engine coolant temperature warning light comes on | P. 528 | If your vehicle overheats |
| Steam can be seen coming from under the hood | ||
| The key is lost | P. 518 | If you lose your keys |
| The battery runs out | P. 522 | If the vehicle battery is discharged |
| The doors cannot be locked | P. 46 | Front doors |
| P. 48 | Sliding doors | |
| P. 61 | Back door | |
| P. 519 | If the electronic key does not operate properly | |
| P. 27 | Smart entry & start system | |
| The vehicle is stuck in mud or sand | P. 531 | If the vehicle becomes stuck |
A warning light or indicator light comes on
P. 483
If a warning light turns on or a warning buzzer sounds...
Instrument cluster
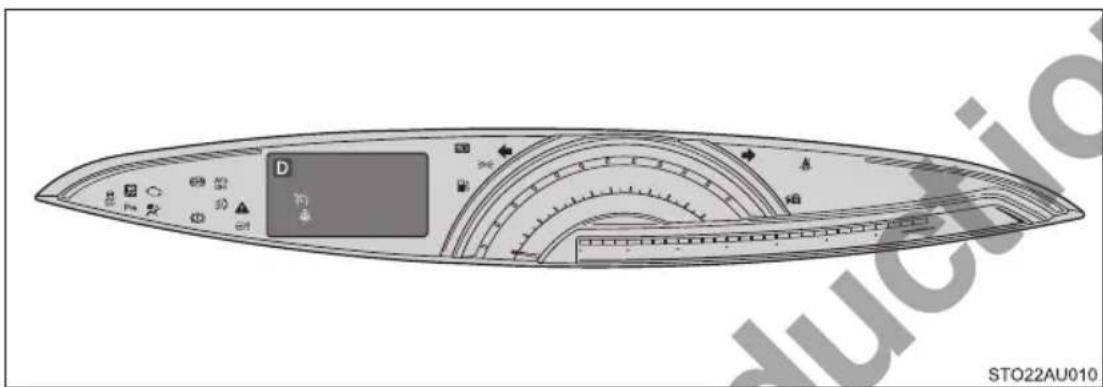
■Warning lights
Brake system warning light P. 483 P. 485
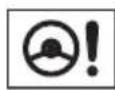
Electric power steering system warning light
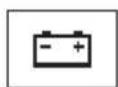
Charging system warning light ^*3 P. 484 P. 485
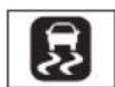
Slip indicator light ^*2
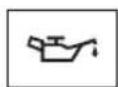
Low engine oil pressure warning light ^*3 P. 484 P. 485

"AFS OFF" indicator light ^*1
High engine coolant temperature warning light ^*3 P. 484 P. 485
Low fuel level warning light
Malfunction indicator lamp P. 484 P. 485
Driver's and front passenger's seat belt reminder light
SRS warning light P. 484 P. 486
Master warning light
ABS warning light P. 485
*1: The light flashes to indicate a malfunction.
^*2 :The light turns on to indicate a malfunction.
*3: This light illuminates on the multi-information display.
Not for Reproduction
GAS STATION INFORMATION
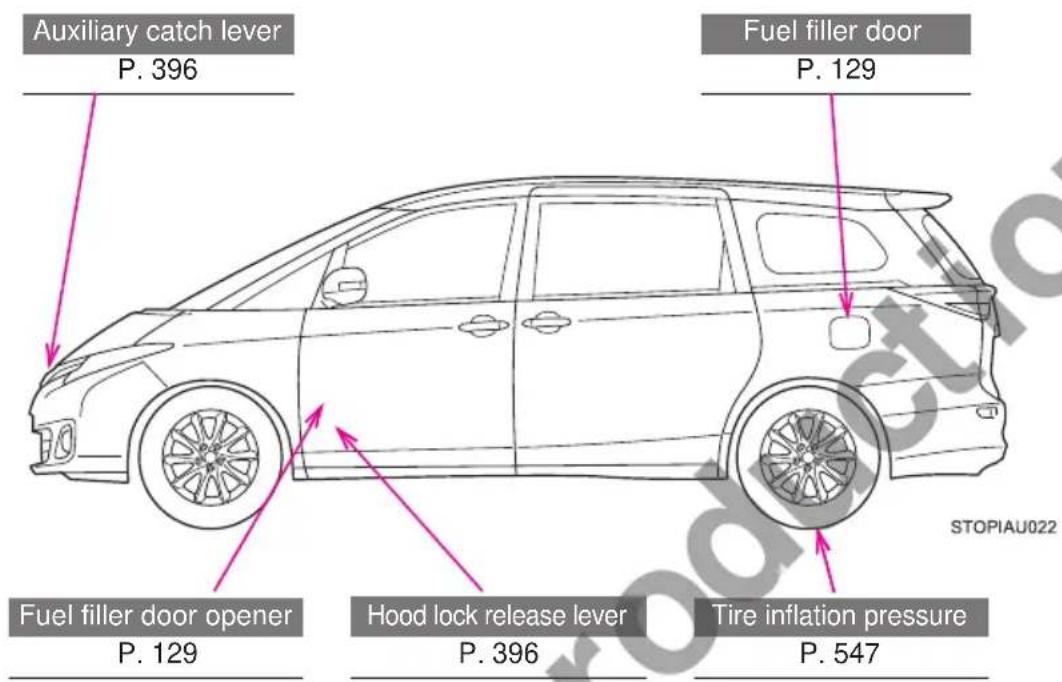
| Fuel tank capacity (Reference) | 65 L (17.2 gal., 14.3 Imp.gal.) | |
| Fuel type | 2AZ-FE engine | Unleaded gasoline, Research Octane Number 91 or higher |
| 2GR-FE engine | Premium unleaded gasoline, Research Octane Number 95 or higher | |
| Cold tire inflation pressure P. 547 | ||
| Engine oil capacity(Drain and refill — reference) | P. 539 | |
| Engine oil type P. 540 | ||
TOYOTA
- Owner's Manual
- TARAGO
- PREVIA
- ©2016 TOYOTA MOTOR CORPORATION
- Before driving
- 1-1. Key information
- 1-2. Opening, closing and locking the doors
- 1-3. Adjustable components (seats, mirrors, steering wheel)
- 1-4. Opening and closing the windows and moon roofs and sunshades
- 1-5. Refueling
- 1-6. Theft deterrent system
- 1-7. Safety information
- When driving
- 2-1. Driving procedures
- 2-2. Instrument cluster
- 2-3. Operating the lights and wipers
- 2-4. Using other driving systems
- 2-5. Driving information
- Interior features
- 3-1. Using the air conditioning system and defogger
- 3-2. Using the audio system
- 3-3. Using the rear seat entertainment system
- 3-4. Using the interior lights
- 3-5. Using the storage features
- 3-6. Other interior features
- Maintenance and care
- 4-1. Maintenance and care
- 4-2. Maintenance
- 4-3. Do-it-yourself maintenance
- When trouble arises
- 5-1. Essential information
- 5-2. Steps to take in an emergency
- Vehicle specifications
- 6-1. Specifications
- 6-2. Customization
- Index
- Pictorial index
- Interior
- Instrument panel
- Luggage compartment
- For your information
- Main Owner's Manual
- Accessories, spare parts and modification of your Toyota
- Installation of an RF-transmitter system
- Vehicle data recordings
- Scrapping of your Toyota
- Event data recorder
- WARNING
- ■General precautions while driving
- ■General precaution regarding children's safety
- Symbols used throughout this manual
- Warnings & Notices
- NOTICE
- Symbols used in illustrations
- Safety symbol
- Arrows indicating operations
- Before driving
- 1
- Using the mechanical key
- When required to leave the vehicle's key with a parking attendant
- ■Key number plate
- ■When riding in an aircraft
- ■To prevent key damage
- In case of a smart entry & start system malfunction or other key-related problems
- ■When a vehicle key is lost
- 1-2. Opening, closing and locking the doors Smart entry & start system\*
- Unlocking and locking the doors
- Unlocking and locking the back door
- Antenna location and effective range
- Antenna location
- ■ Effective range (areas within which the electronic key is detected)
- ■ Operation signals
- ■ Alarms and warning messages
- ■Security feature
- Battery-saving function
- ■Conditions affecting operation
- ■Notes for the entry function
- ■When the vehicle is not driven for extended periods
- ■To operate the system properly
- If the smart entry & start system does not operate properly
- Electronic key battery depletion
- ■When the electronic key battery is fully depleted
- If the smart entry & start system has been deactivated in a customized setting
- - Customization that can be configured at Toyota dealer
- ■Caution regarding interference with electronic devices
- 1-2. Opening, closing and locking the doors Push-button start system\*
- Antennas inside the cabin
- ■Effective range (areas within which the electronic key is detected)
- ■Alarms and warning messages
- Notes for the push-button start system
- If the push-button start system does not operate properly
- If the push-button start system has been deactivated in a customized setting
- ■ Customization that can be configured at Toyota dealer
- Wireless remote control
- Operation signals
- ■Door lock buzzer
- The power sliding door can be operated when (if equipped)
- ■Reversing the operation of the power sliding door (if equipped)
- ■ Conditions affecting operation
- If the wireless remote control does not operate properly
- ■When using the wireless remote control and operating the power windows
- Front doors
- Locking the front doors from the outside without a key
- ■ Using the mechanical key
- If the smart entry & start system has been deactivated in a customized setting (if equipped)
- ■To prevent an accident
- Sliding doors
- ■ Opening and closing the sliding doors
- Wireless remote control (vehicles with power sliding doors)
- Power sliding door switches (if equipped)
- Outside door handles
- Inside door handles
- ■Power sliding door switches (vehicles with power sliding doors)
- Canceling the power sliding door system (vehicles with power sliding doors)
- On\*
- Off
- Locking the sliding doors from the outside without the wireless remote control
- Sliding door child-protector locks
- ■Power sliding doors (if equipped)
- ■The situations in which the sliding door does not open completely
- ■Jam protection function (vehicles with power sliding doors)
- If the battery is disconnected (vehicles with power sliding doors)
- ■While driving
- ■When children are in the vehicle
- ■Operating the sliding doors
- ■To prevent damage to your vehicle
- ■To prevent battery discharge
- Back door
- When closing the back door
- Luggage compartment light
- ■ After the back door has been opened and then closed
- ■If the back door opener is inoperative
- While driving
- ■Operating the back door
- ■Back door damper stays
- 1-3. Adjustable components (seats, mirrors, steering wheel) Front seats
- Active head restraints
- ■Active head restraints
- ■Seat adjustment
- 1-3. Adjustable components (seats, mirrors, steering wheel) Rear seats
- Second seats
- Third seats
- Manual seat
- When getting in and out of the vehicle from third seats
- Using and stowing the ottoman (second captain seats only)
- ■Using the ottoman
- ■ Stowing the ottoman
- When sliding the second seats to the rear-most position (second captain seats only)
- Seat adjustment
- ■When getting in and out of the vehicle from the third seats
- ■After returning the rear seatback to the original position
- ■When adjusting the seat positions or the ottoman (second captain seats only)
- ■When using the ottoman (second captain seats only)
- ■Sliding the second seats
- ■To prevent an ottoman malfunction (second captain seats only)
- 1-3. Adjustable components (seats, mirrors, steering wheel) Head restraints
- Front seats, second center seat (bench seat) and third seats
- Second seats (captain seat) and second outer seats (bench seat)
- ■Removing the head restraints
- ■Head restraint precautions
- 1-3. Adjustable components (seats, mirrors, steering wheel) Seat arrangement
- Flattening the seats
- Luggage mode
- Flattening the front seats and second seats and stowing the third seats (if equipped)
- ■When returning the seats
- Flattening the second seats and third seats
- Tip-up the second seats (second bench seats only)
- ■Before tip-up the second seats
- ■Tip-up the second seats
- Folding the third seats (manual seat)
- Before folding the third seats
- ■Folding the third seatbacks
- ■Returning the third seatbacks
- Folding the third seats (power seat)
- Operation from outside
- Operation from inside
- Stowing the third seats (manual seat)
- Before stowing the third seats
- ■ Stowing the third seats
- ■Returning the third seats
- Stowing the third seats (power seat)
- Tumbling the third seats (if equipped)
- ■ Before tumbling the third seats
- Super relax mode (if equipped)
- When returning the seats
- If "3rd SEAT" is displayed on the multi-information display
- ■Seat arrangement
- ■When seat are flatted
- ■Tip-up the second seats (second bench seats only)
- ■Stowing the third seats (if equipped)
- ■Folding the third seats
- ■Tumbling the third seats (if equipped)
- ■After returning the seat to the original position
- ■ Stowing the seat belt
- ■Third seats arrangement operation
- 1-3. Adjustable components (seats, mirrors, steering wheel) Seat belts
- ■ Correct use of the seat belts
- Fastening and releasing the seat belt
- ■Adjusting the seat belt shoulder anchor height (front seats)
- Third center seat belt
- ■Releasing and stowing the seat belt
- Seat belt pretensioners (front seats)
- Emergency locking retractor (ELR)
- ■Child seat belt usage
- ■Replacing the belt after the pretensioner has been activated
- Seat belt regulations
- ■Wearing a seat belt
- ■ Pregnant women
- ■People suffering illness
- ■Seat belt pretensioners
- ■Adjustable shoulder anchor
- ■Seat belt damage and wear
- ■When using the third center seat belt
- 1-3. Adjustable components (seats, mirrors, steering wheel) Steering wheel
- The steering wheel can be adjusted to a comfortable position.
- ■After adjusting the steering wheel
- 1-3. Adjustable components (seats, mirrors, steering wheel) Anti-glare inside rear view mirror
- Adjusting the height of rear view mirror
- Anti-glare function
- 1-3. Adjustable components (seats, mirrors, steering wheel) Outside rear view mirrors
- Mirror angle can be adjusted using the switch.
- Folding the mirrors
- ■Mirror operating conditions
- ■When driving the vehicle
- ■When a mirror is moving
- 1-4. Opening and closing the windows and moon roofs and sunshades Power windows
- The power windows can be opened and closed using the switches.
- Window lock switch
- ■The power windows can be operated when
- - Operating the power windows after turning the engine off
- Jam protection function
- If the battery is disconnected when opening and closing the window
- ■Closing the windows
- 1-4. Opening and closing the windows and moon roofs and sunshades Moon roofs\*
- ■Tilting up the front moon roof
- - Tilting down the front moon roof
- Sunshades
- ■Tilting down the front moon roof
- 1-4. Opening and closing the windows and moon roofs and sunshades Sunshades\*
- ■The rear sunshade can be operated when
- ■When the rear sunshade does not close normally
- ■Closing the sunshade
- ■To ensure normal operation of the sunshade
- Opening the fuel tank cap
- Perform the following steps to open the fuel tank cap:
- ■Before refueling the vehicle
- ■ Opening the fuel tank cap
- Closing the fuel tank cap
- Fuel types
- ■Fuel tank opening for unleaded gasoline
- ■When refueling the vehicle
- When refueling
- ■When replacing the fuel tank cap
- Refueling
- ■ Opening the fuel filler door
- Engine immobilizer system
- System maintenance
- ■ Conditions that may cause the system to malfunction
- ■To ensure the system operates correctly
- Correct driving posture
- Drive with a good posture as follows:
- ■Adjusting the seat position
- SRS airbags
- SRS front airbags
- SRS side and curtain shield airbags
- SRS airbag system components
- ■If the SRS airbags deploy (inflate)
- ■ SRS airbag deployment conditions (SRS front airbags)
- ■ SRS airbag deployment conditions (SRS side and curtain shield airbags)
- ■Conditions under which the SRS airbags may deploy (inflate), other than a collision
- ■ Types of collisions that may not deploy the SRS airbags (SRS front airbags)
- ■Types of collisions that may not deploy the SRS airbags (SRS side and curtain shield airbags)
- ■When to contact your Toyota dealer
- ■SRS airbag precautions
- ■Modification and disposal of SRS airbag system components
- Points to remember
- Types of child restraints
- Child restraint system suitability for various seating positions
- Child restraint system suitability for various seating positions (with ISOFIX rigid anchors)
- ■When installing a child restraint system on the front passenger seat
- ■Selecting an appropriate child restraint system
- ■Using a child restraint system
- ■Child restraint precautions
- ■When the child restraint system is not in use
- Installing child restraints
- Installing child restraints using a seat belt
- Third outer seats
- ■ Forward-facing — Child seat (convertible seat)
- ■Junior seat (booster seat)
- Removing a child restraint installed with a seat belt
- Installation with ISOFIX rigid anchors (ISOFIX child restraint system)
- 7-passenger models
- 8-passenger models
- Child restraint systems with a top strap
- ■ When installing a child restraint system in the seat with ELR belt ( → P. 154)
- ■When installing a child restraint system
- AIRBAG
- ■To correctly attach a child restraint system to the anchors
- ■ Using child restraint anchorages
- When driving
- 2
- Driving the vehicle
- ■ Starting the engine
- Driving
- Stopping
- Parking the vehicle
- Starting off on a steep uphill
- ■When starting off on a uphill
- ■Driving in the rain
- ■Engine speed while driving
- ■Breaking in your new Toyota
- ■Drum-in-disc type parking brake system
- ■Operating your vehicle in a foreign country
- ■When starting the vehicle
- ■When driving on slippery road surfaces
- ■When shifting the shift lever
- If you hear a squealing or scraping noise (brake pad wear indicators)
- ■When the vehicle is stopped
- ■When the vehicle is parked
- Exhaust gases
- ■When taking a nap in the vehicle
- When braking
- ■When parking the vehicle
- ■Avoiding damage to vehicle parts
- ■If you get a flat tire while driving
- ■When encountering flooded roads
- Engine (ignition) switch
- ■Stopping the engine
- ■Changing "ENGINE START STOP" switch mode
- Off\*
- ACCESSORY mode
- IGNITION ON mode
- ■ Auto power off function
- ■ Notes for the entry function
- ■If the engine does not start
- Steering lock
- ■When the steering lock cannot be released
- When the "ENGINE START STOP" switch indicator flashes in amber
- ■If the electronic key battery is depleted
- Operation of the "ENGINE START STOP" switch
- If the smart entry & start system or push-button start system has been deactivated in a customized setting
- ■When starting the engine
- ■Stopping the engine in an emergency
- ■To avoid damaging the "ENGINE START STOP" switch
- ■Symptoms indicating a malfunction with the “ENGINE START STOP” switch
- Continuously variable transmission\*
- Changing gear steps in 7-speed sport sequential shiftmatic mode
- Gear step functions
- AI-SHIFT
- ■When driving with cruise control activated
- Shift lock system
- When the vehicle comes to a stop with the shift lever in the M position
- If the shift lever cannot be shifted from P
- If the 7-speed sport sequential shiftmatic mode indicator does not come on even after shifting the shift lever to M
- ■ Downshift restriction warning buzzer (in 7-speed sport sequential shift-matic mode)
- ■To prevent an accident when releasing the shift lock
- Automatic transmission\*
- Changing shift ranges in S mode
- Shift ranges and their functions
- S mode
- If the “S” mode indicator does not come on even after shifting the shift lever to S
- ■Downshifting restrictions warning buzzer (in S mode)
- Turn signal lever
- ■Turn signals can be operated when
- If the indicator flashes faster than usual
- Parking brake
- ■Parking brake engaged warning buzzer
- ■ Usage in winter time
- Horn
- Gauges and meters
- Changing the odometer/trip meter display
- Instrument cluster light control
- ■The meters and display operate when
- ■The brightness of the instrument cluster light
- When disconnecting and reconnecting battery terminals
- ■To prevent damage to the engine and its components
- Indicators and warning lights
- Indicators
- Warning lights
- If a safety system warning light does not come on
- Multi-information display
- Display contents
- Operating the steering wheel switches
- Drive Information
- Digital Speed Meter
- ECO
- ■Past Record (Monthly Avg.)
- Ranking
- 5min Consumption
- Settings
- Date and Time
- ■Pop-Up Guidance
- ■ Trip Summary Display
- ■ Initialization
- ■When the battery is disconnected
- ■Setting display automatic cancelation
- Liquid crystal display
- ■The information display at low temperatures
- ■Cautions during setting up the display
- ■During setting up the display
- Headlight switch
- The headlights can be operated manually or automatically.
- Turning on the high beam headlights
- Manual headlight leveling dial (if equipped)
- ■Guide to dial settings
- AFS (Adaptive Front-lighting System) (if equipped)
- ■Deactivating AFS
- ■Headlight control sensor
- ■Automatic light off system
- ■Automatic headlight leveling system (vehicles with discharge headlights)
- If the “AFS OFF” indicator flashes (vehicles with discharge headlights)
- Light reminder buzzer
- Fog light switch
- ■Fog lights can be used when
- Windshield wipers and washer
- ■When the windshield is dry
- ■When the washer fluid tank is empty
- ■When a nozzle becomes blocked
- Rear window wiper and washer
- The rear window wiper and washer can be operated when
- If no washer fluid sprays
- ■When the rear window is dry
- Headlight cleaner switch\*
- ■The headlight cleaners can be operated when
- ■Windshield washer linked operation
- Cruise control
- ■Adjusting the set speed
- ■ Canceling and resuming the constant speed control
- ■ Cruise control can be set when
- ■Accelerating after setting the vehicle speed
- ■Automatic cruise control cancellation
- If the warning message for the cruise control is shown on the multi-information display
- ■To avoid operating the cruise control by mistake
- ■Situations unsuitable for cruise control
- Toyota parking assist-sensor\*
- The distance display and buzzer
- ■Sensor operation and distance to an obstacle
- ■Buzzer operation and distance to an obstacle
- ■ Sensors that operate
- Detection range of the sensors
- ■The Toyota parking assist-sensor can be operated when
- ■Sensor detection information
- ■Caution when using the Toyota parking assist-sensor
- Notes when washing the vehicle
- Driving assist systems
- ■ABS (Anti-lock Brake System)
- Brake assist
- ■VSC (Vehicle Stability Control)
- ■TRC (Traction Control)
- Hill-start assist control
- ■EPS (Electric Power Steering)
- Emergency brake signal
- When the TRC/VSC systems are operating
- Disabling the TRC systems
- ■Turning off both TRC and VSC systems
- When the "TRC OFF" indicator light comes on even if has not been pressed
- ■ Sounds and vibrations caused by the ABS, brake assist, TRC, VSC and hill-start assist control systems
- EPS operation sound
- ■ Automatic reactivation of TRC and VSC systems
- ■Operating conditions of hill-start assist control
- ■Automatic system cancelation of hill-start assist control
- ■Reduced effectiveness of the EPS system
- If the slip indicator light comes on...
- ■ Operating conditions of emergency brake signal
- ■Automatic system cancelation of emergency brake signal
- ■The ABS does not operate effectively when
- ■Stopping distance when the ABS is operating may exceed that of normal conditions
- ■TRC may not operate effectively when
- ■Hill-start assist control does not operate effectively when
- ■When the VSC is activated
- ■When the TRC/VSC systems are turned off
- ■Replacing tires
- ■Handling of tires and the suspension
- Cargo and luggage
- ■Things that must not be carried in the luggage compartment
- ■Storage precautions
- ■Load and distribution
- ■Roof luggage carrier precautions
- When loading cargo (vehicles with moon roofs)
- ■Pre-winter preparations
- ■Before driving the vehicle
- Selecting tire chains
- Side chain
- Cross chain
- Regulations on the use of tire chains
- ■Tire chain installation
- ■Driving with snow tires
- ■Driving with tire chains
- Weight limits
- ■ Gross vehicle weight
- Gross axle weight
- Trailer tongue load
- Towing a trailer
- Hitch
- Before towing
- Break-in schedule
- Maintenance
- ■To avoid accident or injury
- Hitches
- ■When towing a trailer
- ■When installing a trailer hitch
- Brakes
- ■Do not directly splice trailer lights
- Trailer towing tips
- ■To avoid an accident
- Interior features
- 3
- 3-1. Using the air conditioning system and defogger Front automatic air conditioning system
- Using the automatic mode
- STEP 1 Touch
- STEP 2 Touch “^” on
- ■Automatic mode indicator
- Adjusting the settings manually
- Defogging the windshield
- Press FRONT.
- Air outlets and air flow
- Switching between outside air and recirculated air modes
- Changing the rear seat settings from the front seat (vehicles with a rear air conditioning system)
- Adjusting the position of the air outlets
- Front center outlets
- Front side outlets
- Opening and closing the air outlets
- Right side outlet
- Left side outlet
- ■ Using automatic mode
- Fogging up of the windows
- ■Outside/recirculated air mode
- ■ When the outside temperature falls to nearly 0°C (32°F)
- ■Switch operation sounds
- Notes on touch switch operation
- ■Situations when non-response may occur from normal touch switch operation
- ■Times when non-response from touch switch operation
- ■ When cleaning the air conditioning control panel
- ■Ventilation and air conditioning odors
- ■ Using the rear air conditioning system (vehicles with a rear air conditioning system)
- Air conditioning filter
- ■Changing the response of the switch for the air conditioning operation panel
- ■Turning ON/OFF the switch operation sound for the air conditioning operation panel
- Customization
- ■To prevent the windshield from fogging up
- 3-1. Using the air conditioning system and defogger Rear air conditioning system\*
- STEP 1
- STEP 2
- STEP 3
- Adjusting the position and opening and closing the air outlets
- 3-1. Using the air conditioning system and defogger Rear cooler system\*
- Using the rear cooler system
- Adjusting the fan speed
- 3-1. Using the air conditioning system and defogger Rear window defogger
- ■The defoggers can be operated when
- Audio system types\*
- Using cellular phones
- ■To avoid damaging the audio system
- Using the radio
- Setting station presets
- Scanning radio stations
- ■ Scanning the preset radio stations
- ■Scanning all the radio stations within range
- ■Reception sensitivity
- Using the CD player\*
- Loading CDs
- Ejecting CDs
- Selecting and scanning a track
- Selecting a track
- ■Scanning tracks
- Fast-forwarding and reversing tracks
- Selecting a CD (with external CD changer only)
- ■Selecting the desired CD
- ■ Scanning loaded CDs
- Random playback
- Current CD
- ■ All CDs (with external CD changer only)
- Repeat play
- ■Repeating a track
- ■Repeating all of the tracks on a CD (with external CD changer only)
- Switching the display
- ■Display
- Error messages
- ■Discs that can be used
- ■ CD player protection feature
- If a CD is left inside the CD player or in the ejected position for extended periods
- Lens cleaners
- ■Certification for the CD player
- ■ CDs and adapters that cannot be used
- ■ CD player precautions
- Playing back MP3 and WMA discs\*
- Loading and ejecting MP3 and WMA discs
- Selecting and scanning a folder
- ■Selecting a folder one at a time
- ■ Returning to the first folder
- ■ Scanning the first file of all the folders
- Selecting and scanning files
- ■Selecting a file
- ■ Scanning the files in a folder
- Fast-forwarding and reversing files
- Selecting MP3 and WMA discs (with external CD changer only)
- ■Playing files from a folder in random order
- ■Playing all the files from a disc in random order
- ■Repeating a file
- ■Repeating all the files in a folder
- ■MP3 and WMA files
- • Extensions
- ●Playback
- Optimal use of the audio system\*
- Using the audio control function
- ■Changing sound quality modes
- ■Adjusting sound quality
- ■Turning on/off the rear system lock (if equipped)
- ■Trademark owned by SRS Labs, Inc.
- ■Trademark owned by New Transducers Limited
- Using the steering wheel audio switches
- Turning on the power
- Changing the audio source
- Adjusting the volume
- Selecting a radio station
- Selecting a track/file or song
- Selecting a disc in the CD player (with external CD changer only)
- ■To reduce the risk of an accident
- 3-3. Using the rear seat entertainment system Rear seat entertainment system features\*
- Opening and closing the display
- ■ Opening the display
- Closing the display
- Loading and ejecting a disc
- Inserting and ejecting an SD card
- Remote controller
- ■Before using the remote controller (for new vehicle owners)
- ■Remote controller
- Turning on/off the rear seat entertainment system
- Turning on/off the speaker output
- Selecting a control icon
- Changing the screen size
- Adjusting the screen settings
- Operating from the front seats
- ■Turning on/off the rear system lock
- ■ Notice for rear seat entertainment system
- ■The rear seat entertainment system can be used when
- ■ SD cards that can be used
- SD card functions
- ■ Remote controller holder
- When the remote controller batteries are fully depleted (→P. 429)
- ■Copyrights and trademarks
- dts®
- Channel
- ■When the rear seat entertainment system is not used
- ■To prevent accidents and electric shock
- ■When the remote controller is not used
- ■Cleaning the display
- ■ Opening and closing the display
- To prevent damage to the remote controller
- Playing a Blu-ray Disc™ (BD) and DVD disc\*
- Option screen
- ●Second page
- Turning on the BD/DVD mode
- Playing/pausing a disc
- Selecting a chapter
- Fast forwarding/rewinding a disc
- Operating the disc menu
- ■Displaying the option screen
- ■Displaying the pop-up menu (BD video)
- ■Searching for a title or chapter
- ■Changing the angle
- ■Changing the subtitle language
- ■Changing the audio language
- ■Changing the audio channel (BDAV)
- STEP 1 Select "Settings".
- ■Changing the playback mode (BDAV)
- STEP 2 Select "Playback Mode".
- ■Displaying the secondary video (Picture-in-picture) (BD video)
- ■Changing the secondary audio (BD video)
- ■Displaying the color key buttons (BD video)
- ■Displaying the 10 key pad (BD video)
- ■Initial setup
- STEP 1 Select "BD Parental Lock".
- ■BD/DVD video disc information
- ●Parental controls
- AVCHD
- ●BDAV (Blu-ray Disc™ Audio/Visual)
- BD-J
- - Pop-up menu
- ●Picture-in-picture
- ●DUBA (Disc Unbound BD-J Application)
- ● Playlist (BDAV only)
- Audio
- ■Certification for the player
- ■BD/DVD video precaution
- ■Discs and adapters that cannot be used
- Player precautions
- Playing an audio CD and MP3/WMA discs\*
- Turning on the audio CD and MP3/WMA mode
- Selecting a track/file
- Fast forwarding or rewinding a track/file
- Selecting a folder (MP3/WMA)
- Audio CD
- MP3/WMA
- - Compatible media
- ●Compatible disc formats
- - File names
- Multi-sessions
- ID3 and WMA tags
- ●MP3 and WMA playback
- Playing an SD card\*
- Playing still pictures
- ■Displaying the still pictures
- Playing AVCHD video
- Formatting the SD card
- Deleting the BD history data
- ■ SD cards that can be used ( → P. 309)
- ■ Compatible files
- SD cards
- ■SD card precautions
- Using the video mode\*
- ■ Remote controller
- ■ Using the A/V input port
- - Operating the audio-video equipment connected to the system
- ■When the A/V input port is not in use
- Interior lights list
- Personal lights
- Interior light
- ■Illuminated entry system
- ■Indirect lights (if equipped)
- List of storage features
- ■Items that should not be left in the storage spaces
- Glove box
- Console box (7-passenger models)
- ■Sliding the console box
- ■Console box adjustment precaution
- Cup holders
- Front seats
- Second seats (with 7-passenger models)
- Second seats (with 8-passenger models)
- ■Items unsuitable for the cup holder
- ■When not in use (except third seats)
- Bottle holders
- ■When using the bottle holder
- ■Items unsuitable for the bottle holder
- Items that should not be stowed in the bottle holders
- Auxiliary boxes
- ■Auxiliary box precaution (type D)
- Sun visors
- Vanity mirrors
- ■ Vanity lights can be used when
- Conversation mirror
- Clock
- ■The clock is displayed when
- ■When disconnecting and reconnecting battery terminals
- Outside temperature display
- The outside temperature is displayed when
- ■ When “- -” is displayed
- Power outlets
- ■The power outlet can be used when
- ■To avoid damaging the power outlet
- ■To prevent blown fuse
- Seat heaters\*
- ■The seat heaters can be used when
- ■When not in use
- Burns
- ■To prevent seat heater damage
- Armrest
- ■To prevent damage to the armrest
- Assist grips
- ■Assist grip (type A)
- ■To prevent damage to the assist grip
- Floor mat
- ■When installing the driver's floor mat
- Luggage compartment features
- Auxiliary box
- Removing the deck board (type B)
- ■When the cargo hooks are not in use
- ■When operating the deck board (type B)
- ■When the warning reflector holder is not in use
- Maintenance and care
- 4
- Cleaning and protecting the vehicle exterior
- Perform the following to protect the vehicle and maintain it in prime condition:
- ■Automatic car washes
- ■High pressure car washes
- ■Aluminum wheels (if equipped)
- Bumpers
- ■When washing the vehicle
- ■Precautions regarding the exhaust pipe
- ■To prevent paint deterioration and corrosion on the body and components (aluminum wheels, etc.)
- ■Cleaning the exterior lights
- ■To prevent damage to the windshield wiper arms
- ■To prevent damage to the vehicle body and components when using high pressure car washes
- ■When using a high pressure car wash
- Cleaning and protecting the vehicle interior
- ■Protecting the vehicle interior
- ■Cleaning the leather areas
- ■ Cleaning the synthetic leather areas
- ■ Caring for leather areas
- ■Shampooing the carpets
- Seat belts
- Water in the vehicle
- ■ Cleaning the interior (especially instrument panel)
- ■Cleaning detergents
- ■Preventing damage to leather surfaces
- Water on the floor
- - Cleaning the inside of the rear window and the rear quarter windows
- ■Scheduled maintenance
- ■Do-it-yourself maintenance
- ■ Where to go for maintenance service?
- ■ Does your vehicle need repair?
- If your vehicle is not properly maintained
- ■Handling of the battery
- Do-it-yourself service precautions
- ■When working on the engine compartment:
- ■When working near the electric cooling fans or radiator grille
- ■Safety glasses
- ■If you remove the air cleaner filter
- ■If the fluid level is low or high
- Hood
- Release the lock from the inside of the vehicle to open the hood.
- ■Pre-driving check
- ■After installing the support rod into the slot
- ■When closing the hood
- Positioning a floor jack
- ■When raising your vehicle
- Engine compartment
- Engine compartment cover
- ■Removing the engine compartment cover
- Installing the clips
- ■After installing an engine compartment cover
- Engine oil
- - Checking the engine oil
- 2AZ-FE engine
- 2GR-FE engine
- ■ Adding engine oil
- Engine oil consumption
- ■Used engine oil
- ■To prevent serious engine damage
- ■When replacing the engine oil
- Engine coolant
- Coolant selection
- If the coolant level drops within a short time of replenishing
- ■When the engine is hot
- ■When adding coolant
- If you spill coolant
- Radiator and condenser
- Battery
- Battery exterior
- ■ Adding distilled water
- ■Before recharging
- ■ After recharging/reconnecting the battery
- ■Chemicals in the battery
- ■Where to safely charge the battery
- Emergency measures regarding electrolyte
- ■When recharging the battery
- ■When adding distilled water
- Washer fluid
- Using the gauge
- ■When adding washer fluid
- ■ Do not use any fluid other than washer fluid
- Diluting washer fluid
- Tires
- Checking tires
- Tire rotation
- - When to replace your vehicle’s tires
- Tire life
- If the tread on snow tires wears down below 4 mm (0.16 in.)
- ■When inspecting or replacing tires
- ■Driving on rough roads
- If tire inflation pressure of each tire becomes low while driving
- Tire inflation pressure
- ■Effects of incorrect tire inflation pressure
- ■ Instructions for checking tire inflation pressure
- ■Proper inflation is critical to save tire performance
- ■When inspecting and adjusting tire inflation pressure
- Wheels
- Wheel selection
- ■Aluminum wheel precautions (if equipped)
- ■When replacing wheels
- ■When installing the wheel nuts
- Replacement method
- - Checking interval
- If air flow from the vents decreases dramatically
- ■ Air conditioning filter with deodorizing function
- ■When using the air conditioning system
- Electronic key battery
- ■You will need the following items:
- ■Replacing the battery
- ■Use a CR1632 lithium battery
- If the electronic key battery is depleted
- ■Removed battery and other parts
- ■For normal operation after replacing the battery
- Rear seat entertainment system controller battery\*
- ■Use a CR2025 lithium battery
- If the batteries are depleted
- Checking and replacing fuses
- Engine compartment (type A fuse box)
- Engine compartment (type B fuse box)
- Under the instrument panel (type C fuse box)
- Under the instrument panel (type D fuse box)
- Under the instrument panel (type E fuse box)
- Type A
- Fuse layout and amperage ratings
- Fuse Ampere Circuit
- ■After a fuse is replaced
- If there is an overload in a circuit
- ■To prevent system breakdowns and vehicle fire
- ■Before replacing fuses
- Light bulbs
- ■Preparing for light bulb replacement
- ■Turning off the "PWR DOOR OFF" switch (if equipped)
- ■ Clip removal and installation
- Replacing light bulbs
- ■Headlights (low beam) [vehicles with halogen headlights]
- ■Headlights (high beam)
- STEP 2 Remove the engine compartment cover ( → P. 403).
- ■Front fog lights
- ■Front position lights
- ■Front turn signal lights
- ■Rear turn signal lights
- License plate lights
- STEP 1 Open the back door.
- ■Lights other than the above
- ■Discharge headlights (if equipped)
- ■LED light bulbs
- ■Condensation build-up on the inside of the lens
- Parts No. list
- ■Replacing light bulbs
- ■To prevent damage or fire
- Rear turn signal lights replacement
- When trouble arises
- 5
- 5-2. Steps to take
- in an emergency
- Emergency flashers
- If your vehicle needs to be towed
- Situations when it is necessary to contact dealers before towing
- Towing with a sling-type truck
- Towing with a wheel-lift type truck
- From the front
- From the rear
- Using a flatbed truck
- Emergency towing
- Emergency towing procedure
- ■While towing
- ■Wheel nut wrench
- ■When towing the vehicle
- While towing
- ■Installing towing eyelets to the vehicle
- If you think something is wrong
- ■Visible symptoms
- Audible symptoms
- Operational symptoms
- Fuel pump shut off system
- ■Before starting the engine
- If a warning light turns on or a warning buzzer sounds...
- Stop the vehicle immediately. Continuing to drive the vehicle may be dangerous.
- Stop the vehicle immediately.
- Have the vehicle inspected immediately.
- Follow the correction procedures.
- ■ Front passenger detection sensor and passenger seat belt reminder
- Electric power steering system warning light (warning buzzer)
- If the malfunction indicator lamp comes on while driving
- ■When the electric power steering system warning light comes on
- If a warning message is displayed
- If you have a flat tire
- ■Before jacking up the vehicle
- ■ Location of the spare tire, jack and tools
- Vehicles with a compact spare tire
- Taking out the spare tire
- Vehicles with a full-size spare tire
- Replacing a flat tire
- Installing the tire
- Tightening torque:
- Stowing the flat tire, jack and tools
- ■The compact spare tire
- If you have a flat front tire on a road covered with snow or ice
- ■ Stowing the compact spare tire
- ■When using the compact spare tire
- ■When storing the full-size spare tire
- ■When the compact spare tire is attached
- ■Speed limit when using the compact spare tire
- ■Using the tire jack
- ■Replacing a flat tire
- ■Replacing a flat tire for vehicles with power sliding doors (if equipped)
- ■After returning the third seat to the original position (vehicles with a full-size spare tire)
- ■ Do not drive the vehicle with a flat tire
- ■Be careful when driving over bumps with the compact spare tire installed on the vehicle
- - Driving with tire chains and the compact spare tire
- When loosening or tightening the spare tire clamp bolt (vehicles with a compact spare tire)
- After taking out or stowing the compact spare tire
- ■ Using the tire carrier (vehicles with a compact spare tire)
- The starter motor does not turn over, the interior lights and headlights do not turn on, or the horn does not sound.
- Emergency start function
- If you lose your keys
- If the electronic key does not operate properly
- Starting the engine
- ■Replacing the key battery
- - Changing “ENGINE START STOP” switch modes
- If the doors cannot be locked or unlocked by the smart entry & start system
- ■When the electronic key does not work properly
- ■When using the mechanical key and operating the power windows
- If the vehicle battery is discharged
- ■ Starting the engine when the battery is discharged
- ■ When the battery is removed or discharged
- Charging the battery
- ■Precautions when the battery is discharged
- ■Avoiding battery fires or explosions
- Battery precautions
- ■To prevent damage to the vehicle
- ■To prevent an accident or injury when installing the engine cover
- (2GR-FE engine)
- When handling jumper cables
- If your vehicle overheats
- The following may indicate that your vehicle is overheating.
- Correction procedures
- ■To prevent an accident or injury when inspecting under the hood of your vehicle
- ■When adding engine coolant
- ■To prevent damage to the cooling system
- If the vehicle becomes stuck
- ■When it is difficult to free the vehicle
- ■When attempting to free a stuck vehicle
- ■To avoid damage to the transmission and other components
- If your vehicle has to be stopped in an emergency
- If the shift lever is shifted to N
- If the shift lever cannot be shifted to N
- If the engine has to be turned off while driving
- Vehicle specifications
- 6
- Maintenance data (fuel, oil level, etc.)
- Vehicle identification
- ■ Vehicle identification number
- Engine number
- ■Engine oil selection
- API Service Symbol
- ILSAC Certification Mark
- ■Iridium-tipped spark plugs
- ■Continuously variable transmission fluid type
- Automatic transmission
- ■Automatic transmission fluid type
- Steering
- Tires and wheels
- Fuel information
- ■ Use of ethanol blended gasoline in a gasoline engine
- If your engine knocks
- ■Notice on fuel quality
- Alphabetical index Alphabetical index
- A
- A/C
- Airbags
- Audio system
- Automatic air conditioning system
- B
- C
- Cleaning
- Continuously variable transmission
- Cooling system
- D
- Defogger
- Display
- Door courtesy lights
- Doors
- Driver's and front
- E
- Electric power steering......235
- Electronic key
- Emergency brake signal .....235
- Emergency, in case of
- Engine
- Engine compartment cover ....403
- Engine coolant temperature
- Engine immobilizer system....132
- Engine switch ....180
- Engine switch light....354
- EPS 235
- F
- G
- H
- Identification
- J Jack
- K Keyless entry .....27, 43
- Keys
- Lights
- Lock steering column .....182
- M Maintenance
- Manual headlight leveling
- Meter
- Mirrors
- 0
- P
- R
- S
- Seats
- Shift lever
- Side mirrors
- Side turn signal lights
- Smart entry & start system
- Spare tire
- Steering wheel
- Stop lights
- Storage feature ....357
- Storage precautions......242
- Stuck
- Sun visors ....366
- Sunshade....126
- Switch
- T
- Tachometer 200
- Tail lights
- Theft deterrent system
- Third seat
- Tire inflation pressure......420
- V
- W
- Warning messages......488
- Washer
- Washing and waxing ....384
- Windows
- Windshield wipers......219
- Wireless remote control key
- Instrument cluster
- ■Warning lights
- TOYOTA
Brand : TOYOTA
Model : Previa (2016)
Category : Automobile