
NS-433 - Hi-Fi System Naxa - Free user manual and instructions
Find the device manual for free NS-433 Naxa in PDF.


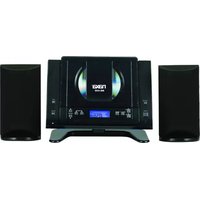
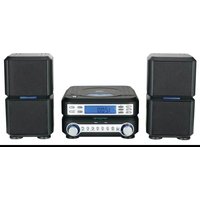
| Type | Digital CD Micro System with AM/FM Stereo Radio |
| Product Dimensions (W x H x D) | 291 x 82 x 202 mm |
| Speaker Dimensions (W x H x D) | 110 x 141 x 205 mm |
| Power Supply | AC 120V, 60 Hz |
| Power Consumption | 18 W |
| Tuning Range (AM) | 530-1710 KHz |
| Tuning Range (FM) | 88-108 MHz |
| Audio Output | Stereo Speakers (x2) |
| Peak Power Output | 2.2 W x 2 |
| CD Playback Modes | Play/Pause, Stop, Skip, Scan, Repeat One/All, Random, Program (up to 20 tracks) |
| Radio Bands | AM, FM, FM Stereo |
| AUX Input | 3.5 mm stereo line-in jack |
| Clock Display | 12H/24H selectable, visible in standby |
| DBBS (Dynamic Bass Boost System) | ON/OFF switch |
| Remote Control Battery | 2 x AA alkaline |
| Remote Control Range | Up to 15 feet (4.6 m) within ±60° angle |
| Mounting Options | Wall-mountable or stand-mountable (bracket included) |
| Laser Safety Class | Class 1 laser product |
| Protection Features | FCC Class B compliance, surge protection (unplug during storms) |
| Cleaning Instructions | Wipe with dry cloth; for CD lens use camera lens brush or dry cotton swab |
Frequently Asked Questions - NS-433 Naxa
User questions about NS-433 Naxa
0 question about this device. Answer the ones you know or ask your own.
Ask a new question about this device
Download the instructions for your Hi-Fi System in PDF format for free! Find your manual NS-433 - Naxa and take your electronic device back in hand. On this page are published all the documents necessary for the use of your device. NS-433 by Naxa.
USER MANUAL NS-433 Naxa
DIGITAL CD MICRO SYSTEM WITH AM/FM STEREO RADIO
NS-433

natural_image
Exterior view of a black desktop computer with two speakers and a CD, no visible text or symbols on the device itself.INSTRUCTION MANUAL
Please read this manual carefully before operation
PRECAUTIONS

CAUTION RISK OF ELECTRIC SHOCK DO NOT OPEN

CAUTION: TO REDUCE THE RISK OF ELECTRIC SHOCK, DO NOT REMOVE COVER ( OR BACK ), NO USER-SERVICEABLE PARTS INSIDE. REFER SERVICING TO QUALIFIED SERVICE PERSONNEL.
The lightning flash with arrowhead symbol within an equilateral triangle is intended to alert the user to the presence of uninsulated "dangerous" Voltage "within the product'enclosure that may be of sufficient magnitude To constitute a risk of electric shock.

The exclamation point within an equilateral triangles is intended to alert the The user to the presence of important operation and servicing instructions in The literature accompanying the appliance.
For Customer Use:
Enter below the serial number that is located on the unit .Retain this information for future reference.
Model No.
Serial No.
WARNING:
To prevent shock hazard, do not expose this device to rain or moisture. Dangerous high voltage is present inside the enclosure, Do not open the cabinet.
CAUTION :
To prevent electric shock ,match wide blade of plug to wide slot of outlet and fully insert .
WARNING:
Handling the cords on this product will expose to lead, a chemical known to the State of California to cause cancer, and birth defects of other reproductive harm. Wash hands after handling.
PROTECT YOUR HEARING:
Hearing experts advise against the constant use of personnel stereos played at high volume. Constant exposure to high volumes can lead to hearing loss. If you should experience ringing in the ears or hearing loss, discontinue use and seek medical advice.
PRECAUTIONS
CLASS 1 LASER PRODUCT
CLASS 1 LASER PRODUCT APPAREIL LASER DE CLASSE 1 PRODUCTO LASER DE CLASE 1
CAUTION INVISIBLE LASER RADIATION WHEN OPEN AND INTERLOCKS DEFEATED. AVOID EXPOSURE TO BEAM

This product contains a low power laser device.
Follow the advice below for safe operations.
ON PROTECTION AGAINST LASER ENERGY EXPOSURE
- As the laser beam used in this compact disc player is harmful to the eyes, do not attempt to disassemble the casing.
- Stop operation immediately if any liquid or solid object should fall into the cabinet.
- Do not touch the lens or poke at it. If you do, you may damage the lens and the player may not operate properly.
- Do not put anything in the safety slot. If you do, the laser diode will be ON when the CD door is still open.
- If the unit is not to be used for a long period of time, make sure that all power sources are disconnected from the unit. Remove all batteries from the battery compartment, and unplug the AC cord from the wall outlet. Make it a practice to remove the AC cord by grasping the main body and not by pulling the cord.
- This unit employs a laser. The use of controls or adjustment or performance of procedures other than those specified here may result in exposure to hazardous radiation.
ON PLACEMENT
- Do not use the unit in places which are extremely hot, cold, dusty or humid.
- Place the unit on a flat and even surface.
- Do not restrict the air-flow of the unit by placing it in a place with poor ventilation, by covering it with a cloth or by placing it on a carpet.
ON CONDENSATION
- When left in a heated room where it is warm and damp, water droplets or condensation may form inside the unit.
- When there is condensation inside the unit, the unit may not function normally.
- Let it stand for 1 to 2 hours before turning the power on, or gradually heat the room up and dry the unit before use.
Should any trouble occur, remove the power cord and refer servicing to qualified personnel.
IMPORTANT SAFETY INSTRUCTIONS
- Read these instructions - All the safety and operating instructions should be read before the appliance is operated
- Keep these instructions - The safety and operating instructions should be kept for future reference.
- Heed all warnings - All warnings on the appliance and in the operating instructions should be adhered to.
- Follow all instructions - All operation and use instructions should be followed.
- Do not use this apparatus near water - The appliance should not be used near water; for example, near a bathtub, washbowl, kitchen sink, laundry tub, in a wet basement, or near a swimming pool, and the like.
- Clean only with dry cloth - The appliance should be cleaned only as recommended by the manufacturer.
- Do not block any ventilation openings. Install in accordance with the manufacturer's instructions. - The appliance should be situated so that its location or position does not interfere with its proper ventilation. For example, the appliance should not be situated on a bed, sofa, rug, or similar surface that may block the ventilation openings; or placed in a built-in installation, such as a bookcase or cabinet that may impede the flow of air through the ventilation openings.
- Do not install near any heat sources such as radiators, heat registers, stoves or other apparatus (including amplifiers) that produce heat.
- Protect the power cord from being walked on or pinched particularly at plugs, convenience receptacles, and the point where they exit from the apparatus.
- Only use attachments / accessories specified by the manufacturer
- Use only with the cart, stand, tripod, bracket, or table specified by the manufacturer, or sold with the apparatus. When a cart is used, use caution when moving the cart/apparatus combination to avoid injury from tip-over.
- Unplug this apparatus during lightning storms or when unused for a long periods of time.
- Power Sources - The appliance should be connected to a power supply only of the type described in the operating instructions or as marked on the appliance. Do not overload wall outlet.
- Wall and Ceiling Mounting - The appliance should be mounted to a wall or ceiling only as recommended by the manufacturer.
- Power Lines - An outdoor antenna should be located away from power lines.
- Object and Liquid Entry - Care should be taken so that objects do not fall and liquids are not spilled into the enclosure through openings.
- Refer all servicing to qualified service personnel. Servicing is required when the apparatus has been damaged in any way, such as power-supply cord or plug is damaged, liquid has been spilled or objects have fallen into the apparatus, the apparatus has been exposed to rain or moisture, does not operate normally, or has been dropped.
- Servicing - The user should not attempt to service the appliance beyond that described in the operating instructions. All other servicing should be referred to qualified service personnel.

natural_image
Symbolic icon of a person climbing a ladder inside a circle with no text or symbolsCOMPLIANCE WITH FCC REGULATIONS
This equipment has been tested and found to comply with the limits for a Class B Digital Device, pursuant to Part 15 of the FCC Rules. These limits are designed to provide reasonable protection against harmful interference in a residential installation. This equipment generates, uses, and can radiate radio frequency energy and, if not installed and used in accordance with the instructions, may cause harmful interference to radio communication. However, there is no guarantee that interference will not occur in a particular installation, If this equipment doed cause harmful interference to radio or television reception, which can be determined by turing the equipment off and on, the user is encouraged to try to correct the interference by one or more of the following measures.
◆ Reorient or relocate the receiving antenna.
◆ Increase the separation between the equipment and receiver.
◆ Connect the equipment into an outlet on a circuit different from that to which the receiver is connected
◆ Consult the dealer or an experienced radio technician for help.
CD CARE & MAINTENANCE
Handling CDs
Holds a CD by its edges .Avoid touching the recorded side of the disc .To remove a CD from its storage case , press down on the center retention mechanism of the case and lift the disc ,
Cleaning the CDs
Use a dry cloth to wipe off any fingerprints and dusts from the playing surface of the disc. Wipe in a straight line radially from the center to the outside edge of the disc. Small dusts particles light stains will not affect playback quality.
◆ Never use chemical such as record sprays, anti-static sprays, benzene, or thinners to clean your CDs.
◆ To reduce the risk of scratches, always put CDs back in their case after use,
Do not subject CDs to prolonged exposures to direct sunlight, high humidity, or high temperature,
◆ Do not place sticklers or labels on either side of the CD.
Cleaning the CD Player lens
A dirty lens can cause CD playback to skip. If the lens is very dirty, the CD may not work at all, Unplug the power supply, open the CD door, and clean the lens as follows:
For Dusts or Dry Particles – use a camera lens brush /blower to blow on the lens a few times. Then wipe the lens with the brush, and blow on the lens once more.
- For Fingerprints – use a dry cotton swab to wipe the lens in a straight line radially from the center to the outside edge.
TABLE OF CONTENTS
PRECAUTIONS 1
IMPORTANT SAFETY INSTRUCTIONS 3
COMPLIANCE WITH FCC REGULATIONS 4
CD CARE & MAINTENANCE 5
Handling CDs 5
Cleaning CDs 5
Cleaning the CD Player Lens 5
TABLE OF CONTENTS 6
FUNCTIONS AND CONTROLS 7
Unit View 7
Remote Control 8
Connections 9
Speakers 9
Power 9
Remote Control 9
MOUNTING 10
CD MODE
Basic Operations 11
CD functions 11
Play/Pause /Stop 11
Previous /NEXT(Skip) 11
Reverse/Forward (Scan) 11
Repeat/Random Mode 11
Program(Memory) 11
RADIO MODE 12
Basic Operation 12
AUX MODE 12
Basic Operation 12
CLOCK ADJUSTMENT 13
DBBS SYSTEM 13
Volume Control 13
MUTE FUNCTION 13
TROUBLESHOOTING 14
TECHNICAL SPECIFICATIONS 15
FUNCTIONS AND CONTROLS
Unit

- CD DOOR
- VOL+/- BUTTON
- OPEN BUTTON
- REPEAT/RANDOM BUTTON
- ▶II PLAY/PAUSE
- PROGRAM
- STOP ■
- DBBS SWITCH
- BAND SWITCH(AM/FM/FM.ST)
- CD/AUX/RADIO MODE SWITCH
- STANDBY BUTTON
- STANDBY INDICATOR
- REMOTE RECEIVER
- LCD DISPLAY
- AUX IN JACK
- TUNING CONTROL
- AC IN JACK
- SPEAKER JACKS
- FM ANTENNA
- WALL MOUNT
FUNCTIONS AND CONTROLS
Remote Control
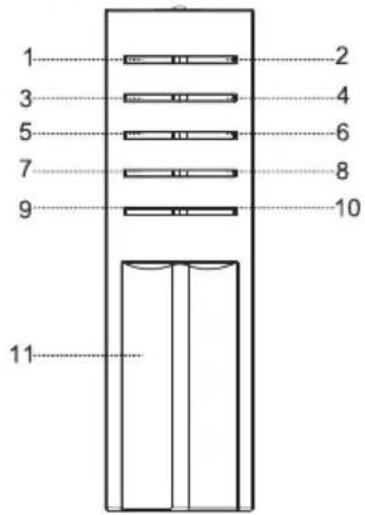
- POWER
- MUTE
- ▶II PLAY/PAUSE
- ■STOP
- REPEAT/RANDOM
- PROGRAM
- SKIP/SEARCH
- SKIP/SEARCH
- VOLUME-
- VOLUME+
- BATTERY COMPARTMENT
CONNECTIONS
Speakers
◆ Connect the black wire of the left speaker to the black terminal marked "L-"on the rear of the main unit.
◆ Connect the white wire of the left speaker to the red terminal marked "L+" on the rear of the main unit.
Connect the black wire of the right speaker to the black terminal marked "R-" on the rear of the main unit.
◆ Connect the white wire of the right speaker to the red terminal marked "R+" on the rear of the main unit.
Power
This unit runs on AC 120V power.
- Plug the power cord into an AC wall outlet.
- To turn the player on, press the STANDBY button to power on the unit.
Remote Control
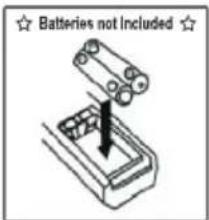
◆ Refer to the diagram .Remove the battery compartment cover located on the front of the remote control. Insert 2 × "AA" batteries, making sure to match Their polarities (+/-) to the markings on the Side of the compartment. Replace the cover.
◆ To use the remote ,point it at the remote sensor Of the player . Operate the remote within 15 feet Of the sensor and at an agle of +/-60 degrees.
◆ Batteries in the remote will last for approximately 6 months under Normal use. Replace the batteries if the remote control does not work. Do not mix old with new batteries, or different types of batteries.
◆ Remove the batteries from the remote if it will not be used for a long Period of time.
The battery used in this device may present a fire or chemical burn if mistreated. Do not recharge, disassemble, incinerate, or heat the battery(-212°F). Keep battery away from children.
MOUNTING THE UNIT TO THE WALL OR STAND
1. To mount the unit to the stand
A. Use 2 holes of the wall mounting bracket to match the 2 holes in the stand (refer to the following drawing).

natural_image
Technical line drawing of a mechanical device with internal components and mounting bracket (no text or symbols)B. Use a screwdriver to insert 2 screws to make the wall mounting steadily connecting to the stand, then hang the 4 slots on the bottom of the unit to the 4 hooks of the wall mounting bracket (refer to the following drawing).

natural_image
Diagram of a device being connected to a battery pack, showing internal components and wiring (no text or symbols)2. To mount the unit to the wall
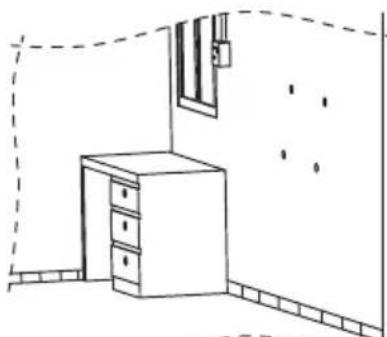
A. First cut 4 suitable holes on the wall(as drawing 1).
B. Use screwdriver to insert 4 screws to make the bracket steadily on the wall (as drawing 2).
natural_image
Line drawing of a room interior with a cabinet, drawers, and wall-mounted fixtures (no text or symbols)
natural_image
Technical line drawing of a mechanical assembly with a tool and component, no visible text or symbolsCD OPERATION
Basic Operation
- Press STANDBY to turn the player on.
- To open the CD Door, press open button. Insert a CD with its label facing up. Close the CD Door (it will click into place)
- Set the CD/AUX/Radio Mode switch to "CD" position.
- Press ▶ II to start CD playback.
CD Functions
Play/Pause/Stop
◆ Press ▶ II to start playback.
◆ Press ▶ II during playback to pause .Press ▶ II again to resume playback .
◆ Press ■ during playback to stop the disc.
Reverse/Forward(Scan)
◆ Press and hold ◀ to scan through the current track in a reverse direction.
◆ Press and hold ➤ to scan through the current track in a forward direction.
Previous/Next (Skip)
◆ Press ◀ to skip to the previous track.
◆ Press ➤ to skip to the next track.
Repeat/Random Mode
Press REPEAT/RANDOM to set the repeat/random mode of the player. Each successive press of REPEAT/RANDOM will change the mode as follows:
◆ Repeat One : Repeat the current track(flashing REPEAT display)
◆ Repeat All : Repeat all tracks in the CD(steady REPEAT display)
◆ Random: the unit will shuffle all the tracks in the CD and will play in random order(steady RANDOM display)
◆ Normal/Off: play all tracks in sequential order (no indicator)
PROGRAM (MEMORY)
Press Program to set a custom sequence of up to 20 tracks to be played.
- Press ■ to stop playback.
- Press PROGRAM to enter program mode.
- Press or to select a track, and then press PROGRAM to store it in memory.
- Repeat the previous step until you have selected up to 20 tracks.
- Press ▶ II to start program playback. To cancel program playback, press ■ or open the CD door.
RADIO OPERATION
Basic Operation
- Press STANDBY to turn the player on.
-
Set the CD/AUX/RADIO mode switch to the "RADIO" position.
-
Set the BAND SELECTOR switch to :
◆ AM: Listen to AM broadcast.
◆ FM: Listen to FM broadcast.
◆ FM.ST : Listen to FM stereo broadcasts.
Tuning
◆ Turn the AM/FM Tuning Dial down to tune to a lower station frequency.
◆ Turn the AM/FM Tuning Dial up to a higher station frequency.
Reception
For the best FM radio reception, position the FM Radio Antennal located on the rear of the unit away from the speaker and power cables.
The AM antenna is built directly into the unit, if AM reception is weak, you may need to rotate or move the unit to obtain a better signal.
AUX IN OPERATION
Auxiliary (Aux) mode allows you to play any audio device (e.g., MP3, cassette player, etc.) through your system.
Basic Operation
- Use a 3.5mm male to male line in cable (included) to connect the Line-out or Headphone out jack of an audio device to this system Auxiliary Line-In jack.
- Press STANDBY to turn the player on .
- Set the CD/AUX/RADIO Mode switch to the "AUX" position.
- Start playback on the external audio device.
◆ You must use the external audio device to control playback.
◆ To avoid distortion, do not set the volume from the external audio device to very high levels.
CLOCK ADJUSTMENT
- Place in the player in Standby mode(press STANDBY if the player is currently on). The time will be displayed when the player is in Standby.
- press PROGRAM to enter Setup mode. The 12H/24H setting will flash. Press or to change the setting.
◆ 12H : Displays the time in 12-hour time .
◆ 24H : Displays the time in 24-hour time . - Press PROGRAM. The hour setting will flash. Press or to change the setting.
- Press PROGRAM. The minutes setting will flash. Press or to change the setting.
- Press PROGRAM once more to save your changes.
DBBS System
Set the DBBS switch to the "ON" or "OFF" position to activate or inactivate the system.
VOLUME CONTROL
Use the VOLUME +/- button on the remote control or unit to adjust the volume level.
MUTE function
Press the MUTE button on the remote control to turn off the sound .Press the MUTE button again or use the VOLUME button to resume the sound .
TROUBLESHOOTING
There is no power to the device.
◆ Ensure that the power cord is securely connected to the unit and the proper wall outlier.
◆ Ensure that the voltage selector has been set properly.
There is no sound.
◆ Ensure that the speaker connections are secure and correct.
◆ Try to adjusting the volume.
◆ Ensure that the player is in the proper mode(CD,RADIO)
◆ Ensure that headphones are not connected to the unit.
The sound is distorted.
◆ The unit may be positioned too closely to a large appliance (e,g a TV or refrigerator). If possibel, turn the appliance off or move the unit to another location.
◆ Ensure that the raido is in broadcast reception range.
◆ Decrease the volume level.
The remote control doesn't work.
◆ Ensure that there are no obstacles between the remote and the player.
◆ Point the remote at the remote sensor on the main unit.
◆ Strong light(e.g, direct sunlight ,fluorescent lights , strobe lights )may interfere with the remote signal .
◆ Ensure that the batteries in the remote control retain a charge and have been installed correctly.
◆ Try replacing the remote's batteries.
The device does not play.
Moisture may have condensed inside the player. Remove the disc and leave the player on for 1-2 hours and then try again.
The CD will not play.
◆ Ensure that the CD has been loaded with its label facing up.
◆ Ensure that the CD is not damaged, scratched, or dirty.
◆ Ensure that the CD is an audio CD, or that it contains compatible MP3 or WMA files.
◆ DRM-encrypted WMA files are not supported.
Playback is "skipping"
◆ Ensure that the CD is not damaged, scratched, or dirty.
◆ Ensure that the unit has been installed in a stable location to avoid vibration and shock.
The player will only play one track, repeatedly.
◆ Ensure that REPEAT mode is off (press REPEAT to cancel).
The function mode is not working.
◆ Ensure that the CD Compartment Lid is closed.
The Function mode is not working.
◆ Ensure that the CD Compartmetn Lid is closed.
TECHNICAL SPECIFICATIONS
Power Supply : AC 120V 60 HZ
Power Consumption : 18 W
Tuning System : AM: 530-1710KHz
FM: 88-108MHz
Audio Output : Stereo Speaker (x2)
Peak Power : 2.2 W X 2
Speaker Dimensions : 110x141x205mm
Unit Dimensions : 291x 202x 82 mm
- DIGITAL CD MICRO SYSTEM WITH AM/FM STEREO RADIO
- INSTRUCTION MANUAL
- PRECAUTIONS
- For Customer Use:
- WARNING:
- CAUTION :
- PROTECT YOUR HEARING:
- CLASS 1 LASER PRODUCT
- ON PROTECTION AGAINST LASER ENERGY EXPOSURE
- ON PLACEMENT
- ON CONDENSATION
- IMPORTANT SAFETY INSTRUCTIONS
- COMPLIANCE WITH FCC REGULATIONS
- CD CARE & MAINTENANCE
- Handling CDs
- Cleaning the CDs
- Cleaning the CD Player lens
- TABLE OF CONTENTS
- PRECAUTIONS 1
- IMPORTANT SAFETY INSTRUCTIONS 3
- COMPLIANCE WITH FCC REGULATIONS 4
- CD CARE & MAINTENANCE 5
- Handling CDs 5
- Cleaning CDs 5
- Cleaning the CD Player Lens 5
- TABLE OF CONTENTS 6
- FUNCTIONS AND CONTROLS 7
- Connections 9
- MOUNTING 10
- CD MODE
- Basic Operations 11
- CD functions 11
- RADIO MODE 12
- Basic Operation 12
- AUX MODE 12
- CLOCK ADJUSTMENT 13
- DBBS SYSTEM 13
- Volume Control 13
- MUTE FUNCTION 13
- TROUBLESHOOTING 14
- TECHNICAL SPECIFICATIONS 15
- FUNCTIONS AND CONTROLS
- Unit
- CONNECTIONS
- Speakers
- Power
- Remote Control
- MOUNTING THE UNIT TO THE WALL OR STAND
- To mount the unit to the stand
- To mount the unit to the wall
- CD OPERATION
- Basic Operation
- CD Functions
- Play/Pause/Stop
- Reverse/Forward(Scan)
- Previous/Next (Skip)
- Repeat/Random Mode
- PROGRAM (MEMORY)
- RADIO OPERATION
- Tuning
- Reception
- AUX IN OPERATION
- CLOCK ADJUSTMENT
- DBBS System
- VOLUME CONTROL
- MUTE function
- TROUBLESHOOTING
- There is no power to the device.
- There is no sound.
- The sound is distorted.
- The remote control doesn't work.
- The device does not play.
- The CD will not play.
- Playback is "skipping"
- The player will only play one track, repeatedly.
- The Function mode is not working.
- TECHNICAL SPECIFICATIONS
Brand : Naxa
Model : NS-433
Category : Hi-Fi System