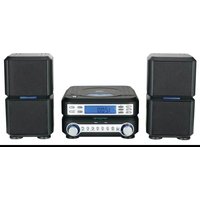
NS-438 - Hi-Fi System Naxa - Free user manual and instructions
Find the device manual for free NS-438 Naxa in PDF.


| Product Type | Hi-Fi System |
| Brand | Naxa |
| Model | NS-438 |
| Power Supply | AC 230V, 50Hz |
| Radio Bands | AM / FM |
| CD Player | Yes, plays standard CDs |
| Clock | Yes, with alarm function |
| Alarm Modes | Buzzer or Music (Radio/CD) |
| Headphone Jack | 3.5mm stereo |
| Speaker Output Jacks | Left and Right (external speakers included) |
| Antenna | Built-in AM, FM wire antenna |
| Display | LCD for clock and frequency |
| Programmable Playback | Up to 20 tracks |
| Repeat Play | Single track or all tracks |
| Remote Control | Yes (requires batteries) |
| Clock Battery | 2 x AAA 1.5V (not included) |
| Laser Class | Class 1 |
| Care Instructions | Clean with dust cloth; mild soap on front panel |
| Safety Features | Risk of electric shock warning, laser radiation warning |
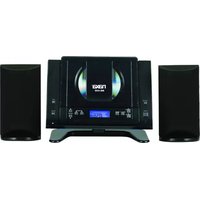
| Included Accessories | Left and right speakers, FM wire antenna, remote control |
Frequently Asked Questions - NS-438 Naxa
User questions about NS-438 Naxa
0 question about this device. Answer the ones you know or ask your own.
Ask a new question about this device
Download the instructions for your Hi-Fi System in PDF format for free! Find your manual NS-438 - Naxa and take your electronic device back in hand. On this page are published all the documents necessary for the use of your device. NS-438 by Naxa.
USER MANUAL NS-438 Naxa
natural_image
Black rectangular electronic device with two speakers and a blue indicator light (no visible text or symbols)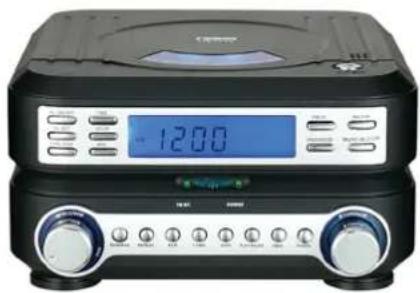
natural_image
Front view of a black and white electronic appliance with digital display and control knobs (no visible text or symbols)
natural_image
Black rectangular electronic device with two ports and a blue indicator light (no visible text or symbols)PLEASE READ THIS USER MANUAL COMPLETELY BEFORE OPERATING THIS UNIT AND RETAIN THIS BOOKLET FOR FUTURE REFERENCE.

CAUTION
RISK OF ELECTRIC SHOCK DO NOT OPEN
WARNING : SHOCK HAZARD-DO NOT OPEN
This marking is located on back side of the unit

The lighting flash with arrowhead symbol, within an equilateral triangle, is intended to alert the user to the presence of uninsulated dangerous voltage within the products enclosure that may be of sufficient magnitude to constitute a risk of electric shock to persons.
The exclamation point within an equilateral triangle, is intended to alert the user to the presence of important operating and maintenance (servicing) instructions in the literature accompanying the appliance.
The following label has been affixed to the unit, listing the proper procedure for working with the laser beam.
- THIS LABEL IS ATTACHED TO THE PLACE AS ILLUSTRATED TO INFORM THAT THE APPARATUS CONTAINS A LASER COMPONENT.
- THE WARNING LABEL INFORMING OF RADIATION IS PLACED INSIDE THE UNIT AS SHOWN IN THE ILLUSTRATION TO WARN AGAINST FURTHER MEASURES ON THE UNIT. THE EQUIPMENT CONTAINS A LASER RADIATING LASER RAYS EXCEEDING THE LIMIT OF LASER PRODUCT OF CLASS 1.
1
CLASS 1 LASER PRODUCT
DANGER : INVISIBLE LASER RADIATION WHEN OPEN AND INTERLOCKS DEFEATED, AVOID EXPOSURE TO BEAM

IMPORTANT SAFEGUARDS
- Read all instructions before using the product
• To protect against risk of electrical shock do not immerse product in water or other liquid. - Do not block any ventilation openings. Install in accordance with the manufacturer's instructions.
- Do not install near any heat sources such as radiators, stoves or other apparatus (including amplifiers) that produce heat.
- Do not operate product with a damaged cord or plug or after the appliance malfunctions, or is dropped or damaged in any manner. Return appliances to the nearest authorised service facility for examination, repair or electrical or mechanical adjustment.
- The use of attachment not recommended or sold by the manufacturer, may cause fire, electric shock or injury.
- Do not use outdoors or near water.
• Unplug this apparatus during lightning storms or when unused for long periods of time.
Battery usage
CAUTION
To prevent battery leakage which may result in bodily injury or damage to the unit:
Install all batteries correctly and as marked on the unit.
Do not mix batteries(old and new or carbon and alkaline, etc).
Remove batteries when the unit is not used for a long time.
Do not use this product for other than its intended use.

| 1.CD Door | 21. DBBS Control Knob |
| 2. CD Mirror | 22. Power Button |
| 3. Open/Close Button | 23. Radio Tuning Knob |
| 4. Right Speaker | 24. Power LED Indicator |
| 4. Left Speaker | 25. Buzz/Music Button |
| 5. Time Set Button | 26. Function Switch Button (Select Radio/CD) |
| 6. Hour Button (clock hour setting) | 27. Band Switch Button (Select AM/FM) |
| 7. Alarm On/Off Button | 28. FM ST On/Off Button |
| 8. Alarm Set Button | 29. Headphone Jack |
| 9. Time Display Button | 30. Right Speaker Output Jack |
| 10. Minute Button (Clock min setting) | 31. Left Speaker Output Jack |
| 11. CD LCD Display | 32. FM Antenna |
| 11. Clock and Frequency LCD Display | 33. Battery Cover (for the clock) |
| 12. FM Stereo LED Indicator | 34. Play/Pause Button |
| 13. Remote Sensor | 35. Stop Button |
| 14. Volume Control | 36. Repeat 1/All Button |
| 15. Program Button | 37. Skip/Search Backward Button |
| 16. Repeat Button | 38. Skip/Search Forward Button |
| 17. REWIND Button | 39. Battery Compartment (for Remote Control) |
| 18. FAST-FORWARD Button | |
| 19. Stop Button | |
| 20. Play/Pause Button |
Warning
Before using the unit. Check that the local mains supply is compatible with the HI-FI System (230V 50HZ).
Do not plug or unplug the power cable when your hands are wet. When planning not to use this unit for long periods of time (i.e. vacation etc.) disconnect the plug from the wall outlet. When disconnecting the power cord from the wall outlet, grasp the plug; do not pull the cord in order to avoid shock risks caused by the damaged cable.
Battery installation (for the clock)
Open the Battery cover (33) on the underside of the unit.
Insert 2 AAA 1.5V batteries (not included) following the polarity as indicated in the compartment. Alkaline batteries are recommended if used for long periods of time.
Press to close the battery cover (33) until it is tight.
Note: After cutting off the AC Power supply, the time information will be lost when the battery is moved.
Note: when planning not to use the remote control for a long time. Remove the batteries in order to avoid the electrolyte leakage.
Headphone Jack (29)
This unit will accept stereo headphones with a 3.5mm plug. Before connecting the headphones set the volume to minimum level so not to damage your cars or the headphones. Connect the headphones to the headphones jack (29). The speakers will be automatically disconnected.
Warning: Prolonged exposure to high sound levels may permanently damage your hearing.
Volume
Adjust the VOLUME control (14) to the desired level.
Listening To The Radio
Press FUNCTION Switch Button (26) to RADIO position.
Press the Band Switch Button (27) to select AM/FM.
Press Power Button (22) to On position to turn on the unit.
Turn TUNING Knob (23) to tune in desired Radio station.
Press FM ST On/Off button (28) for turn the FM Stereo on or off.
To turn off Radio, Press Power Button (22) to Auto position to turn off the unit.
Note: While in the Radio Mode, the display will indicate the Frequency.
You cannot set the time or alarm while the radio is in use. Your time setting will be invalid if frequency appears.
In radio mode, the frequency will appear at the location where time appears. Press and hold the Time display button (9) to display the current time, the time will be displayed for about 20 seconds then disappear automatically.
Antennas
An AM antenna is built inside the unit.
For better reception, FM wire antenna (32) should be fully untied and adjusted well.
Clock Settings
Press Time Display.
Press and hold Time SET Button (5) to set the clock.
Press Hour Set Button (6) or Min Set Button (10) respectively.
Alarm Time Settings
Press Time Display
Press and hold AI.SET Button (8) to set the Alarm time.
Press Hour Set Button (6) or Min Set Button (10) respectively.
Turn on the alarm function by pressing AL.ON/OFF button (7) until the alarm Icon appears.
Note: While the alarm time comes on, it will sound for 3 minutes. To turn off the alarm, press the AL.ON/OFF Button again.
After Setting the Alarm as your desired time press Power Button (22) to Auto position to implement the Alarm function.
Press Buzz/Music Button (25) to Buzz position to wake up to the buzzer.
To turn off the alarm simply press AL. ON/OFF Button (7) once.
Press Buzz/Music Button (25) to Music position to wake up to the Radio or CD.
To turn off the alarm simply press Al.On/Off Button (7) once.
Operating the CD Player
Playing A CD
Press Open/Close button (3) to open the CD door.
Insert a CD with the label facing up.
Close the CD Door.
Press Function Switch Button (26) to CD position and press Power button (22) to On position to turn on the unit.
Press PLAY/PAUSE Button (20) to start CD playback from the first track.
Press once more the PLAY/PAUSE Button (20) to momentarily pause.
To stop the playback, press the STOP Button (19).
Skipping Tracks
Press during play.
Backward----REW button (17)
Fast Forward----F.FWD button (18)
Press F.FWD Button (18) twice to skip to the beginning of the previous track.
Searching Tracks
Press and hold during play
Backward----REW button (17)
Fast Forward----F.FWD button (18)
Programmed Playback
Up to 20 tracks can be programmed in to play in any desired sequence.
Press Program button (15) unit "Prog" flashes in display.
Press F.FWD button (18) or REW button (17) to select a desired
track to be memorized.
Press Program Button (15) to program the track.
Repeat steps 7 and 8 to program tracks.
Press PLAY/PAUSE Button (20) to start playing.
To cancel program play, press STOP button (19) twice.
Repeat Play
To Repeat Single Track
Press REPEAT Button (16) while the track you want to repeat is playing. The "REP" flashing will appear in display.
To repeat another track, press REW button (17) or F.FWD
skip button (18).
To cancel repeat play, press REPEAT button (16) twice.
To Repeat all the tracks
Press REPEAT Button (16) twice during play. The "REP" indicator will appear in display. All tracks will be played through in sequence and then the sequence will be repeated continuously.
To cancel repeat play, press REPEAT button (16) once.
IF AN ABNORMAL DISPLAY INDICATION, OR AN OPERATING PROBLEM OCCURS, DISCONNECT THE AC POWER CORD. WAIT AT LEAST 10 SECONDS, THEN RECONNECT THE AC POWER CORD.
TROUBLESHOOTING GUIDE
You experience a problem with this unit check the chart below before calling of service.
| SYMPTOM | CAUSE | SOLUTION |
| CD player will Not turn on | · AC Cord not connected properly | |
| Disc will not play | · Disc inserted incorrectly· Defective compact disc· CD compartment not closed· Moisture condensation on disc | · Reinsert disc with label side facing up· Try another compact disc· Close CD compartment· Wipe disc with soft cloth |
| Erratic CD playback | · Dirty or defective disc | · Clean or replace disc |
| No sound | · Plug not inserted property· Volume control set to minimum· Defective compact disc FUNCTION is not set to the desired position | · Reinsert headphone or Speaker Plug into headphone or Speaker jack· Increase the volume· Try another compact disc· press FUNCTION SELECTOR |
| Noise or Sound distorted on radio | · Station not tuned properly for AM or FM· Unit is not positioned correctly | · Retune AM or FM broadcast station· Rotate unit until best reception is obtained |
CARE AND MAINTENANCE
CARING FOR COMPACT DISCS
---To keep the CD clean, handle it by its edge. Do not touch the surface.
---Do not stick paper or tape onto the CD.
---Do not expose the Cd to direct sunlight or heat sources such as holt air ducts.
Do not leave the CD in a car parked under direct sunlight.
CLEANING THE UNIT
---To prevent fire or shock hazard, disconnect your unit from the AC power source when cleaning.
---The finish on your unit may be cleaned with a dust cloth and cared for as other furniture. Use caution when cleaning and wiping the plastic parts.
---Mild soap and a damp cloth may be used on the front panel.

- CAUTION
- WARNING : SHOCK HAZARD-DO NOT OPEN
- CLASS 1 LASER PRODUCT
- IMPORTANT SAFEGUARDS
- Battery usage
- Warning
- Battery installation (for the clock)
- Headphone Jack (29)
- Volume
- Listening To The Radio
- Antennas
- Clock Settings
- Alarm Time Settings
- Operating the CD Player
- Playing A CD
- Skipping Tracks
- Searching Tracks
- Programmed Playback
- Repeat Play
- To Repeat all the tracks
- TROUBLESHOOTING GUIDE
- CARE AND MAINTENANCE
- CARING FOR COMPACT DISCS
- CLEANING THE UNIT
Brand : Naxa
Model : NS-438
Category : Hi-Fi System