
DPL933 - Home Theater THOMSON - Free user manual and instructions
Find the device manual for free DPL933 THOMSON in PDF.
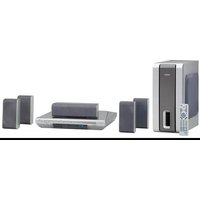


| Product Type | Home Cinema System |
| Model | DPL933 |
| Brand | Thomson |
| Speaker Configuration | 5.1 Channels (Front L/R, Center, Surround L/R, Subwoofer) |
| Total Power Output | 1000 Watts RMS |
| Amplifier Type | Built-in Digital Amplifier |
| Supported Audio Formats | Dolby Digital, DTS, MP3, WMA, AAC |
| Video Inputs | HDMI (2 inputs, 1 output with ARC), Composite Video |
| Audio Inputs | Optical, Coaxial, Analog RCA, USB, Bluetooth |
| Subwoofer Type | Wireless Active Subwoofer |
| Dimensions (Main Unit) | 430 x 65 x 310 mm (W x H x D) |
| Weight (Main Unit) | 3.2 kg |
| Dimensions (Each Satellite) | 260 x 120 x 120 mm |
| Weight (Each Satellite) | 0.8 kg |
| Dimensions (Subwoofer) | 360 x 360 x 380 mm |
| Weight (Subwoofer) | 5.5 kg |
| Power Supply | AC 220-240V, 50-60Hz |
| Power Consumption | 150W (Active), <0.5W (Standby) |
| Remote Control | Included (IR) |
| Wall Mountable | Yes (Satellite speakers only) |
| Cleaning Instructions | Wipe with dry soft cloth; do not use solvents |
| Safety Features | Overload protection, automatic shutdown |
| Spare Parts Availability | Remote control, power adapter available from Thomson support |
Frequently Asked Questions - DPL933 THOMSON
User questions about DPL933 THOMSON
0 question about this device. Answer the ones you know or ask your own.
Ask a new question about this device
Download the instructions for your Home Theater in PDF format for free! Find your manual DPL933 - THOMSON and take your electronic device back in hand. On this page are published all the documents necessary for the use of your device. DPL933 by THOMSON.
USER MANUAL DPL933 THOMSON
In accordance with the rating plate of the unit, this unit complies with current standards concerning electrical safety and electromagnetic compatibility.
LASER λ=780 nm, P max=5 mW
CAUTION - LASER RADIATION WHEN OPEN. DO NOT STARE INTO BEAM.

CLASS 1 LASER PRODUCT
Safety information - UK socket
Equipment for the UK is supplied with a mains cable fitted with a moulded plug.
Mains connection
This appliance is suitable for use on A.C. mains supply, 230 V - 50Hz only. It must not be connected to D.C. mains.
Note: The mains lead of the appliance is fitted with a moulded plug. If the mains sockets are not compatible or if for any reason the plug is removed please follow the directions below.
The moulded plug cannot be rewired and if removed must be disposed of safely. Remove the fuse to make it safer.
Do NOT under any circumstances plug the severed plug into any mains socket as this could result in an electric shock.
Important!
If the plug is removed, rewire new plug as follows: The wires in the mains plug are coloured in accordance with the following code:
BLUE - NEUTRAL
BROWN - LIVE
As the colours of the wires in the mains lead of this apparatus may not correspond with the coloured markings identifying the terminals in your plug, proceed as follows:
BLUE wire to the terminal coded N (Neutral) or coloured black.
BROWN wire to the terminal coded L (Live) or coloured red.

Do NOT make any connection to the terminal in the plug which is marked by the letter E or by the safety symbol ± or coloured green and yellow.
A fused plug must be fitted with a 13A fuse approved by ASTA or BS1362 and fuse covers must always be securely replaced.
If the fuse blows, check the mains cable for damage or call a qualified technician. Do not try to bridge the fuse or increase its rating!

! The OFF button ⏻ on the remote control and appliance does not completely disconnect the unit from the mains supply, but switches operating power on and off.
Table of Contents
Connections and Setup
Some points to check before you connect your TV set ..2
Accessories provided 2
Front panel controls....3
Front panel display ....3
Connecting to audio-visual equipment ....4
Connecting the aerial....5
Connecting the speakers ....5
Positioning speakers 6
The remote control 8
Basic Playback Operations
Operating the DVD player....10
Description of the various menus....10
Compatible discs ....10
Compatible formats....10
Regional coding....10
Playback....11
Accelerated play ....
Still image ...... 11
Frame advance ....11
Variable slow motion ....11
Changing chapter / track ....
Zoom....II
Info Menu
Using the Info menu....12
Time display ....13
Title/Chapter / Track ....13
Subtitles....13
Audio ....14
Play mode ....14
Bookmark 15
Camera angle 15
PBC (Playback Control) 15
Sleep 15
mp3, WMA, JPEG and DivX files
Using memory cards ....16
Displaying JPEG files or playing mp3 or WMA files ..17
Playing JPEG and mp3 music files at the same time ..18
Playing DivX files ....18
Radio
Manual tuning ....20
Storing radio stations....20
RDS for FM only 20
Player Menus
Using the player's menus ....21
Play....21
Play Mode selection ....21
Parental Control settings ......22
Display settings 23
Sound settings....24
Language settings....25
Additional Information
Troubleshooting 26
Precautions 27
Guarantee 27
Technical data 28
Discs and formats you can play 28
Sound Enhancement Systems....29
This THOMSON product is designed and manufactured with high quality materials and components which can be recycled and reused.

This symbol means that electrical and electronic equipment, at their end-of-life, should be disposed of separately from your household waste.
Please, dispose of this equipment at your local community waste collection/recycling centre.
In the European Union there are separate collection systems for used electrical and electronic product.
Please, help us to conserve the environment we live in!
HELPLINE THOMSON
You can contact THOMSON by dialling: 0871 712 1312 (for United Kingdom, £0.10/mn inc VAT)
www.thomson-europe.com
In the interest of improving the quality of our products, we reserve the right to modify their features. The information in this manual is, therefore, subject to change and does not represent any kind of contract.
Connections and Setup
Some points to check before you connect your TV set
- Ensure that the mains supply in your house complies with that indicated on the identification sticker located on the back of your appliance. • Install your appliance horizontally, away from any source of heat (fireplace) or appliances generating strong magnetic or electric fields. The components of this appliance are sensitive to heat. The maximum ambient temperature should not exceed 35° Celsius.
- Leave sufficient space around the appliance to allow adequate ventilation: 10 cm on either side and above it, as well as 5 cm at the back are ideal.
- The humidity of the room should not exceed 75%. If you have to use the appliance outdoors, do not expose it to rain or splashing water. The appliance should not be exposed to dripping or splashing and no objects filled with liquids, such as vases, should be placed on top of it.
- Moving it from a cold environment to a warm one is likely to cause condensation on some components inside the appliance. Let the condensation disappear of its own accord before turning the appliance on again.
- Before moving the player, make sure the disc tray is empty.
Other important information about using and cleaning your appliance is available at the end of the booklet.
Accessories provided

Remote control and 2 non-rechargeable batteries, type AAA

6 x Stripped wires for speakers
Left and right front speakers
Centre speaker
Subwoofer
Left and right rear speakers
Caution!
Invisible laser radiation when open. Avoid exposure to beam. Class I laser product. This appliance must only be opened by a qualified engineer to prevent accidents caused by the laser beam.
DVD copy protection
In accordance with the DVD standard, your DVD player is equipped with a Copy Protection system, which can be switched on and off by the DVD disc itself, in order to make any recording of the relevant DVD disc onto a videotape of very poor picture quality, or even impossible. "This product incorporates copyright protection technology that is protected by method claims of certain U.S. patents and other intellectual property rights owned by Macrovision Corporation and other rights owners. Use of this copyright protection technology must be authorized by Macrovision Corporation, and is intended for home use only unless otherwise authorized by Macrovision Corporation. Reverse engineering or disassembly is prohibited."
Front panel controls (buttons appearing left to right below)

ON/ECO - To switch the appliance on and off.
- To open and close the disc tray.
■ - To stop disc playback.
- To skip to the previous chapter or track during playback. To move back to the previous preset memory location in Tuner mode.
▶▶▶ - To skip to the next chapter or track
during playback. To move to the next preset memory location in Tuner mode.
▶II - To start playing a disc or pause.
SOURCE - To select the input source.
SUBWOOFER - To toggle between different subwoofer modes.
VOLUME +/- - To adjust the sound volume.
Front panel display

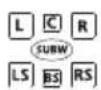
Speaker icons.
DVD / AUDIO / DivX / VCD / WMA / MP3
Type of disc loaded.
STEREO
Tuner stereo signal detected.
P-SCAN
Progressive Scan activated.
DIGITAL
Audio output in Dolby Digital mode.
PLII
Audio output in Dolby PL II Movie, Dolby PL II Music or Dolby Prologic Emulation mode.

Audio output in DTS mode.

Disc in playback or in pause.
TITLE
Title number (DVD).
TRK
Track number.
CHP
Chapter number (DVD).
PRESET
Preset station number.
PROG
Programme mode activated.
SLP
Sleep mode activated.
REP I / REP / A-B
Playback in repeat mode.
RDS
RDS data received.
kHz / MHz
Tuner frequency unit.
TUNED
Radio station tuned.
Notes:
DTS is a digital sound compression technique developed by Digital Theater Sound Systems for digital multichannel audio signals. "DTS" and "DTS Digital Surround" are registered trademarks of Digital Theater Systems Inc.
DOLBY and the double-D symbol are trademarks of Dolby Laboratories. Manufactured under license from Dolby Laboratories.
Connecting to audio-visual equipment

![graph TD A["VCR"] --> B["AUDIO OUT (VCR)"] B --> C["SAT"] C --> D["199"] D --> E["AUDIO OUT (SAT)"] E --> F["AUDIO-IN"] F --> G["AUX1"] F --> H["AUX2"] G --> I["L"] H --> J["R"] K["OPTICAL IN"] --> L["Ground"]](/content/2026/05/846322/images/90125f270b56a36475b48a52531b0caf28b483102d497e1175cfe65b9b9a62d0.jpg)
![graph TD A["TV"] --> B["COMPONENT VIDEO (TV)"] A --> C["S-VIDEO IN (TV)"] A --> D["VIDEO OUT"] B --> E["PR"] B --> F["Pb"] B --> G["Y"] C --> H["VIDEO OUT"] D --> I["S-VIDEO OUT"]](/content/2026/05/846322/images/56343af96beadb73e9dc04c4347f8cc8ff94d71aa126cf35287ef4881f61e7f1.jpg)
Note: Use only one of the connection methods shown above for each type of equipment.
SCART VIDEO OUT
Scart cable: The SCART video socket provides the best quality for video signal. If there is no Scart socket available on your TV set, check whether your TV has another Video socket (Composite, Component or S-Video) that you can use to connect your player.

VIDEO OUT socket

This socket (yellow) is also known as a composite video socket. The picture quality obtained using a video connection is poorer compared to that obtained using a Scart connection.
Component video out
The Y, Pb, Pr sockets provide optimum picture quality because the video signal is separated into three parts. To ensure maximum picture quality, use three video-grade cables for the connection. You can also buy bundled component video cables that are colour-coded to match the Y, Pb, Pr sockets (green, blue and red).
Note: If your TV set supports Progressive Scan, you can use the DVD player's progressive scan output to obtain the highest possible video resolution. In that case, you need to activate the Progressive Scan option in the Display menu (see page 23).

S-VIDEO OUT socket
The S-VIDEO OUT socket provides better picture quality than composite video (the VIDEO OUT socket) because the colour is kept separate from the black and white part of the video signal. If your TV has an S-Video socket, connect the appliance to the TV with an S-Video cable (not supplied).
Optical cable
Optical digital audio input (OPTICAL IN)
This socket offers a higher level of sound quality compared to that provided using an analogue audio connection. Use this socket to connect your satellite receiver to the DVD Player using an optical cable (not supplied).
Audio cables (red and white)
AUDIO IN L (left) and AUDIO IN R (right) sockets (AUX I and AUX 2)
These are analogue audio input sockets. The AUDIO L socket and cable are white, while the AUDIO R socket and cable are red.
Note: If one of the devices is not working, check that all the cables have been inserted properly into the sockets which they should be connected to.
Connecting the aerial
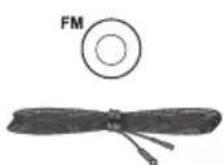
The FM aerial (provided) should be connected to the FM aerial socket at the back of the appliance.
Note: For FM reception, extend the aerial to its full length and install it so that you can obtain the best possible reception.
Connecting the speakers
![graph TD A["SUBWOOFER"] --> B["Purple / GREY STRIPED"] B --> C["401"] C --> D["REAR SPEAKERS (SURROUND SOUND)"] D --> E["RIGHT"] D --> F["LEFT"] C --> G["RED/GREY STRIPED"] G --> H["FIR LUSH & CENSUB"] H --> I["402"] I --> J["WHITE / GREY STRIPED"] J --> K["RIGHT"] J --> L["LEFT"] M["CENTER SPEAKER"…](/content/2026/05/846322/images/5632bdaabd40a71f7c67ca46cef25da690ba82f490e615be6711ffe928745b6e.jpg)
(1) (2)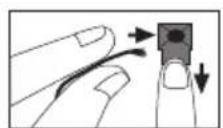

Six speakers are provided with the appliance (2 front, 1 centre, 2 rear, 1 subwoofer). In order to enjoy good surround effects, all six speakers need to be connected to the player.
One speaker wire is provided for each speaker connection. Speaker wires are colour-coded to match the colour-coded terminals.
Connect the speaker wire to the back of each speaker and to the corresponding colour terminal at the back of the appliance. Press down the tab to open the terminal and insert the wire (1). Release the tab to lock the wire in the terminal (2). Do the same for the centre speaker, rear speakers and the subwoofer.
Note: When connecting the speakers, make sure the polarities ("+" speaker wire to "+" on the player) of the speaker wires and terminals match. If the wires are reversed, the sound will be distorted and lack bass ("out of phase" effect). Do not ground the output line, as this will damage the speaker.
Positioning speakers

![graph TD A["Step ③"] --> B["Step ①"] B --> C["Step ②"] C --> D["Step ①"] D --> E["Step ③"] style A fill:#f9f,stroke:#333 style B fill:#ccf,stroke:#333 style C fill:#cfc,stroke:#333 style D fill:#fcc,stroke:#333 style E fill:#ffc,stroke:#333](/content/2026/05/846322/images/1885289515fa13cb545f5c122d37302ce0d9948cdea0e7b75e12ac6495cad48f.jpg)
① Left, Right (Front Speakers)
They mainly transmit music and sound effects.
② Centre
In surround mode, the centre speaker transmits much of the dialogue as well as music and effects. It should be positioned between the left and right speakers.
③ Surround (Rear Speakers)
Their overall sound balance should be as close as possible to the front speakers. Proper positioning is vital to establish an evenly distributed sound field.
Subwoofer
A subwoofer is designed to reproduce powerful low bass effects (explosions, the rumble of spaceships, etc.) which dramatically increases the involvement with the action on the screen.
Magnetic shielding
Speakers placed less than two feet from the TV set must be magnetically shielded in order to prevent picture distortion. Front and centre speakers supplied with this set are magnetically shielded to protect your TV set.
Note: It is not recommended to place the rear speakers and subwoofer near the TV set.
Front Speaker Position
Even if you cannot replicate this ideal home theatre setup exactly, the following suggestions for positioning the speakers will help you achieve better results.
Alignment
Align the centre speaker evenly with (A) or slightly behind (B) the left and right speakers, but not in front of them.
Angle
Placing the left and right speakers to form a 45-degree angle with your favourite viewing position will replicate the soundtrack mixer's arrangement.

Courtesy Dolby Laboratories

Courtesy Dolby Laboratories
Height
The mid- and high-frequency drivers of the three front speakers should be, as far as possible, at the same height. This often requires the centre speaker to be placed directly on top of (A) or beneath (B) the TV set.
Preferred surround position
Location
If possible, place surround speakers at either side of the viewing area, not behind it.
Height
If space permits, install surround speakers 2-3 feet above viewers. This helps minimise localisation effects.
Direction
Directing surround speakers straight across the room, rather than down at viewers, helps create a more open, spacious surround sound field.


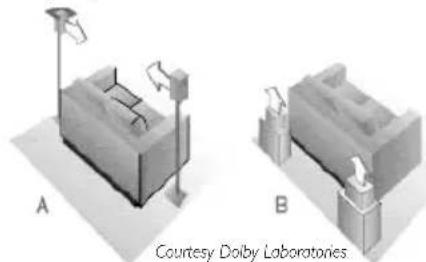
Alternative Surround Placement
Rear wall
If rear wall mounting is the only option, direct the speakers at each other (A), towards the front (B) or even towards the side walls (C, D). Experiment with their position until the surround sound seems to envelope you, rather than come from behind you.
No adjacent walls
Surround speakers can be placed on stands facing each other to replicate the preferred side wall mounting (A), or to the side or rear of the viewing area directed upwards. In the latter case, they can go right on the floor, or preferably, a few feet off the floor, such as on end tables (B).
Test tone / Channel balance
Channel balance
Your player is equipped with a test signal generator for balancing the channels. As the signal "travels" from channel to channel, adjust the level controls until each channel plays at the same volume level (see page 23).
Level adjustment & surround channel level expectation
Even though you adjust the surround channel to be as loud as the others on the test signal, you will find that, when watching an actual programme, the surround channel is usually much lower than the front. Don't be tempted to re-adjust the surround level; programme producers use surround mostly for subtle atmospheric effects and ambience, and only rarely for special effects. A good surround mix does not attract attention to itself; if it did, it would soon become distracting.
The remote control
Navigating through menus

Use the direction buttons to navigate through the menus. Press the OK button on the remote control to confirm any selection you make.
Functions in DVD-CD mode
To switch the appliance on and off.
DVD·CD To select the DVD player. To toggle between available media.
+ I - To adjust the sound volume.
(mute) To mute and restore the sound.
RETURN To return to the previous menu.
To directly access the next or previous chapter (DVD) or track (CD).
CLEAR To hide the Info menu. Return to main menu.
MENU To access the Disc menu during play (if there is one).
SURROUND (red) To change the Surround sound setting.
EQ. LEVEL (green) To toggle between equaliser, BASS/TRE and channel settings.
Note: The EQ.LEVEL function is not available in AUX1, AUX2 and TV modes.
INFO (yellow) To access the Info menu.
TITLE·GUIDE (blue) To access the disc menu.
SUBWOOFER (purple) To select among subwoofer output levels.
0-9 Number input.
ANGLE To access the Camera angle function in the Info menu.
AUDIO To access the Audio function in the Info menu.
REV To start reverse accelerated play or reverse slow motion.
PLAY To start playing a disc.
FWD To start forward accelerated play or forward slow motion.
STOP To stop play and access the main menu.
PAUSE To activate freeze frame, frame advance or slow motion.
ZOOM To access the Zoom function.
PLAY MODE To access the Play mode function in the Info menu.
AUX1 / AUX2 To select various audio/video sources or the optical input

Note: In AUX1, AUX2 and TV modes, you need to press the ⏻ button twice within two seconds to turn off the appliance.
Functions in Tuner mode
TUNER To select the tuner.

+/- To adjust the sound volume.

(mute) To mute and restore the sound.


To select programmed stations.
MENU To store a station.
TUNER- / TUNER+
To tune down and up the radio frequencies.
INFO·RDS To display RDS information.
AUDIO
To switch from Stereo to Mono mode and vice versa.
This remote control can be used with some recent TV set models from the following brands: Thomson, Saba, Brandt, Ferguson, Telefunken and Nordmende.
Note: The buttons described below operate as specified, provided that the relevant function is available on the television.
Functions in TV mode
TV To select the television.
PR+/- To change channel.
GO BACK
To return to the channel watched before last.
CLEAR To exit a menu.
MENU
To access the television's main menu.

To use the Zoom function (with a 16/9 television only).
INFO (yellow) To obtain information about the channel.
TITLE·GUIDE (blue) To display the programme guide.
Note: The coloured buttons can also be used to access the Teletext topics indicated in colour (if your television has the Teletext function available).
0-9
To select a channel. For 2-digit channels, first press 0.
1

2
3

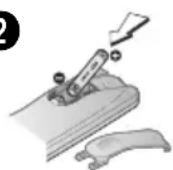
Inserting batteries in the remote control
- Do not mix different types of batteries or new and old batteries. Do not use rechargeable batteries.
- In order to avoid any risk of explosion, observe the polarities indicated inside the battery compartment. Replace only with the type of batteries specified above. Do not dispose of them in a fire or recharge them.
- If you are not using the remote control for a long period of time, remove the batteries.
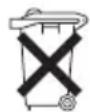
- Please respect the environment and prevailing regulations. Before you dispose of batteries or accumulators, ask your dealer whether they are subject to special recycling and if they will accept them for disposal.
Basic Playback Operations
Operating the DVD player
I. Switch on your TV set. 2. Press the DVD ·CD button on the remote control. Press the ⏻ button on the remote control or the ON/ECO button located on the DVD player's front panel. 3. When the player first comes on a menu appears asking you to select the player menu language. Select the language you want using the AR button, then press OK.
Description of the various menus


- Disc menu – The appearance and contents of this menu vary according to the type of disc you have inserted and are independent of the player's menus. When the disc is playing, press the TITLE·GUIDE button to display and hide this menu.
- Info menu – The player's Info menu appears as a bar at the top of the screen while the disc is playing. During this time, press the INFO button on the remote control to display and hide the Info menu.
- Player menu – If no disc has been inserted the player menu appears automatically. If a disc is being played press the STOP button to access this menu.
Note:A function is only available if it features on the disc you have inserted. For instance, if you select the Subtitles function from the Info menu subtitles will only appear if subtitles have actually been provided on the disc. If a menu or icon appears greyed out this means that this menu or the associated function is not available.
Compatible discs
• DVD • D VD-R, DVD-RW, DVD+R, DVD+RW • CD - CD-R, CD-RW.
Compatible formats
• D VD, VCD (Video Compact Disc), SVCD (Super Video Compact Disc), JPEG • C D, mp3, WMA, DivX, CD Kodak Picture.
More information about discs and compatible formats is available at the end of the booklet.
Regional coding
Your DVD player has been designed to process regional management information that is stored on DVD discs. DVD discs that have different regional codes to that of your player cannot be played. The regional code for your player is 2 (Europe, the Middle East, South Africa, Japan). ALL means all regions. When you buy a disc check that it bears the correct logo.
Playback
Switch the DVD player and TV set on.
1. Press the button on the front of the appliance to open the disc tray. 2. Put the disc in with the printed side upwards (in the case of a single-sided disc).
- Press again to close the disc tray.
- Play starts automatically, or
- the Disc menu appears. One of its options can be selected to start playing the disc. Select it and press OK, or else
- the player's main menu appears. Select the option Play and press OK.
- Press STOP to stop playback.
Notes:
The player stores the point where playback was interrupted. If you press PLAY again, playback resumes from this point. To stop playback completely or to start again from the beginning, press STOP twice.
If the player is left in STOP mode for more than five minutes without any user interaction, a screen saver is activated. Then, at the end of 30 minutes without any user interaction, the player switches off automatically.
Accelerated play
While the disc is playing, press the REV or FWD button one or more times to vary the speed and direction of the accelerated play. Press PLAY to resume normal playback.
Still image
While the disc is playing, press PAUSE once for freeze frame. Press PLAY to resume normal playback.
Frame advance
1. Press PAUSE twice. FRAME is displayed. 2. Press the REV or FWD button a number of times to advance backward or forward image by image. 3. Press PLAY to resume normal playback.
Variable slow motion
1. While the disc is playing, press the PAUSE button once. PAUSE is displayed.
- Press the REV or FWD button a number of times to vary the speed and direction of the slow motion.
- Press PLAY to resume normal playback.
Note: Backward slow motion is not available on VCDs.
Changing chapter / track
While the disc is playing, press the button to go immediately to the next or previous chapter, or to the next or previous track.
Zoom
1. While a disc is playing, press the ZOOM button until you reach the zoom size you require.
- Move from one area to another using the
You can display information about the disc during playback using the Info menu. It will also allow you to access certain functions. To display the menu, press PLAY to start playback and then press the INFO button on the remote control. Select the various options using the and buttons. Then follow the instructions which appear on the screen and use the or buttons on the remote control to scroll through the options.
Note: When one of the icons is greyed out, this means that the relevant function is not available on the disc being played.

The invalid symbol indicates that the function selected or the button used is not available at this stage.
Info menu (DVD)
Info menu (audio CD)
Info menu (VCD and SVCD)

Press the INFO button on the remote control while a disc is playing to display the Info menu.
Use the and buttons on the remote control to select the icon you want. Then use the and buttons to select an option and press OK to confirm your selection.
EN
01:49:37
Time display icon
Time display
Press the INFO button, select the Time display icon with the < and > buttons, then press the And buttons repeatedly to display in turn:
DVD: Chapter elapsed time, Chapter remaining time, Title elapsed time and Title remaining time;
VCD and audio CD: Track elapsed time and Track remaining time.
To directly access a location on the disc which does not correspond to the start of a title or chapter, enter a time with the numeric buttons (format hh:mm:ss).
Note: This function may not be available on all discs.
Title/Track and Chapter icons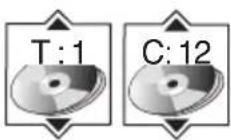
Title/Chapter (DVD) / Track (audio CD and VCD)
To directly access a title or a chapter (DVD), or a track (audio CD and VCD), press the INFO button, then select one of these icons with the and buttons, and choose a number using the and buttons or enter a number directly with the numeric buttons.
Note: Many discs only have one title.
Subtitles icon
Subtitles (DVD and DivX)
Subtitles are disabled by default. You enable the subtitle function as follows:
I. While the disc is playing, press the INFO button, then select the Subtitles icon using the and buttons. 2. Select a language using the and buttons. 3. To disable the subtitle function, select the Off option.
Notes:
When you change the language of the subtitles using the Info menu your choice of language only applies for the disc currently being played. When you eject the disc and switch off the player, the subtitles will be displayed again in the subtitle language you selected in the Languages menu (see page 25).
This function may not be available on all discs.

Audio icon
Audio (DVD, VCD and DivX)
Some discs have several audio tracks used for different languages or different audio formats.
To change the language or audio format during play:
I. Press the INFO button, then select the Audio icon with the < and > buttons, or press the AUDIO button on the remote control.
- Choose a language or an audio format with the and buttons.
Notes:
This option is only available if the disc offers a number of dialogue languages or audio formats.
When you change the dialogue language using the Info menu, your choice of language is only applicable to the disc being played. When you eject the disc or switch off the player, the dialogue language will revert to the one you selected in the
Languages menu (see page 25).
Play mode icon
Play mode (all discs except DivX)
Note: For mp3 play modes, please refer to page 17.
I. While the disc is playing, press the INFO button, then select the Play mode icon using the and buttons or press the PLAY MODE button on the remote control.
- Choose an option using the ▲ and ▼ buttons, then press OK:
- DVD play modes: standard, programme, title repeat, chapter repeat, A-B repeat.
Notes:
Repeat mode is only available with discs which display elapsed and remaining time.
To repeat a sequence between two points A and B, choose the A-B repeat option, and then follow the instructions for entering the two points. If, during a fast forward or reverse, point B is reached, the player continues playback at normal speed from point A. If, during a fast search, point A is reached, the player starts playback from point A at normal speed.
• VCD and SVCD play modes: standard, disc repeat, track repeat, A-B repeat.
- audio CD play modes: standard, programme, random, disc repeat, track repeat, A-B repeat, IntroScan.
Note: IntroScan plays the first ten seconds of each track. When all the tracks have been scanned IntroScan stops. If you want to continue playing the track being scanned, press the PLAY button. Press the STOP button to stop IntroScan.
- To stop the repeat playback, you have a choice between:
- selecting the Play mode icon and choosing the Standard option, and
- pressing the STOP button twice.
Bookmark icon
Bookmark (DVD and audio CD)
The player can store up to 12 disc locations as long as the disc remains in the player and the unit remains switched on.
Note: This function is only available with discs whose elapsed or remaining time appears in the Info menu.
1. Press the INFO button, then select the Bookmark icon with the < and > buttons, and press OK to confirm. Another menu is displayed describing six bookmarks. To display the other bookmarks, press the button.

Play button "Unmarked" icon
- To create a bookmark, select a position shown as "unmarked" using the <, >, ▲ and buttons, and then press OK.
- To start playback from a bookmark, select the ▶ button, then press OK to confirm.
- To delete a bookmark, select the 📄 button, and then press OK to confirm.
Camera angle icon
Camera angle (DVD)
Some discs offer different camera angles for specific scenes.
1. To change the camera angle, press the INFO button, then select the Camera angle icon with the and buttons, or press the ANGLE button on the remote control. 2. Choose the angle with the and buttons.
Note:
If the disc was recorded using a single camera angle, this function is not available. There are very few discs offering more than one angle.
Playback Control icon
PBC - PlayBack Control (VCD)
The PlayBack Control function offers scenes and information which can be selected interactively via a menu. It can also be used to display high-resolution pictures, if the disc contains any.
Press the INFO button, then select the PlayBack Control icon. Press the ▲ and buttons to enable or disable this function.
Sleep icon
Sleep
I. Press the INFO button, then select the Sleep icon with the < and > buttons. 2. Select one of the available options using the ▲ and ▼ buttons: Off, 30, 60, 90 or 120 minutes.
mp3, WMA, JPEG and DivX files
mp3 is an audio file format which compresses recorded music. It was developed in collaboration with THOMSON. The advantage of the mp3 format is that it means CD-quality music tracks can be stored on a personal computer in user-friendly compressed files.
WMA (Windows Media Audio) is another audio file format developed by Microsoft.
JPEG files are image files. Make sure that they have a resolution of less than 2 megapixels.
Note: The time taken for the contents of the disc to be displayed varies according to the size and number of JPEG files actually on the disc. If nothing is displayed after a few minutes, it is likely that certain files are too large. In this case, reduce the files' resolution and write another disc.
Your player is an Official DivX Certified™ product that plays DivX®5, DivX®4, DivX®3, and DivX®VOD video content, in compliance with DivX Certified™ technical requirements.
Using memory cards
Your player has two memory card slots. You can transfer information (JPEG or mp3 or WMA files) from your memory cards to the player and display the pictures on screen or play the mp3 or WMA files. The upper slot can read different formats; the lower slot is for Compact Flash Cards.
Compatible Memory Cards
Upper slot:
- Secure Digital Card
- MultiMedia Card
- Smart Media Card
- Memory Stick
Lower slot:
- Compact Flash Card 1 and 2
Reading Memory Cards
Note: Although your memory card may be compatible with the unit, the data on the card must be in a format the player can read (JPEG, MP3 or WMA).
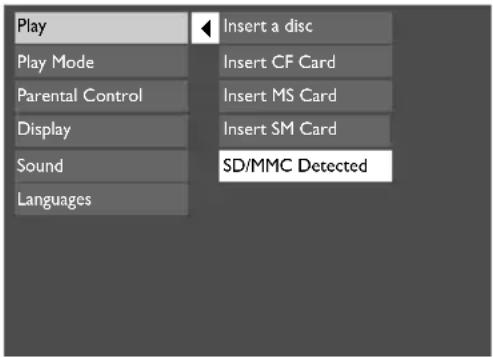
1. Insert your memory card into the slot. If a disc is playing, press the STOP button. 2. Use the ▲ and ▼ buttons to select the Play option from the main menu. 3. Use the ▲ and ▼ buttons to select the card you want to access and press OK. The contents of the card are displayed. 4. Follow the instructions below to display or play files. Note: Use the DVD·CD button to toggle between available media.
Displaying JPEG files or playing MP3 or WMA files
Before inserting a disc, check that it is compatible with the player.




1. Open the tray by pressing the button. 2. Place the disc with the printed side facing up. 3. Select a folder using the ▲ and ▼ buttons on the remote control, then press OK to display the list of files or press PLAY to start playing all the files contained in the folder.
- Select a file using the ▲, ▼, ◀, and ▶ buttons, then press OK and then PLAY to start playback.
- MP3 and WMA files: the player begins by playing the selected file, then all the files and subfolders contained in the same folder. The player then plays the contents of the folders at the same level as the folder containing the file selected at the start.
Note: While listening you can use the ◀ or ▶ button to go back to the previous track or go on to the next one.
- JPEG file: the player starts the slide show with the JPEG file you have selected and proceeds to display all the JPEG files in the same folder, then all the JPEG files in the subfolders located in the same folder.
Notes: During the slide show you can use the ANGLE button to rotate the picture 90°, the ZOOM button to magnify the picture, the ◀ or ▶ button to go back to the previous picture or go on to the next one and the STOP button to interrupt the slide show and display the disc's contents.
The Zoom function may not be available with some large JPEG files.
- Press the INFO button to display the Info menu during playback.
mp3 and WMA file: press the ▲ or ▼ button several times to select a playback mode (Standard, Random, Track repeat, Folder repeat, Disc repeat, Program), and then press OK.
JPEG file: press the ▲ or ▼ button to select a projection speed.
- When the player has played all the files the music or slide show stops and the disc's contents are displayed again.
- Press STOP to end playback.
Playing JPEG and mp3 music files at the same time
You can display JPEG files while listening to mp3 music files recorded on the same disc.


I. Insert the disc containing the two types of file in the player. 2. Select an image file using the <, >, ▲ and ▼ buttons, then press OK to confirm your selection. The name of the folder where the file is located and the name of the file appear on the right in the "Current selection" section. 3. Then select an mp3 music file using the <, >, ▲ and ▼ buttons, then press OK to confirm your selection. The name of the folder where the file is located and the name of the file appear on the right in the "Current selection" section.
Note: To delete your selection, press the CLEAR button.
- Press INFO to access the Info menu during simultaneous playback. You can change the slide show's projection speed using the AR button.
- During simultaneous playback you can use the ▶ and ▶ buttons to go back to the previous picture or go on to the next one.
Playing DivX files


Time display Audio Sleep
- Open the tray by pressing the button, insert the disc and then press the button again to close the tray.
- The disc's contents are displayed. Select the DivX file that you wish to play with the and buttons and press OK to select it.
Note: To delete your selection, press the CLEAR button.
- Press PLAY to start playback.
A note on copying: Before playing DivX or mpeg4 files, please be sure of their origin and that you have legally purchased or rented the contents. Pirate copying is illegal and may result in sanctions. Private copies of your own material for your own use may be legal in some countries. Make sure you are aware of any applicable laws.
- Press INFO to access the Info menu during playback. Use the and buttons to select an icon and the ▲ and Buttons to choose an option (see page 13).
Note: To guarantee playback of DivX files the audio must be mp3 format. DivX Certified devices can play back any interleaved mp3 audio at any bitrate, both CBR and VBR. The audio must be sampled at standard frequencies, such as 32 kHz, 44.1 kHz, and 48 kHz, and must conform to the AVI file specification. Apart from mp3, the audio formats recognised by your player are MPEG layer 1/2, AC3, DTS, PCM. Formats such as AAC and Ogg Vorbis are not supported by this player.
Renting (purchasing) DivX®VOD files
DivX VOD files are similar to DVD video rental discs. The difference lies in the access to the media. DivX VOD files are downloaded after paying a rental from certain commercial websites. Prior to downloading a VOD you need to input the registration number of your DVD player on the purchase form on the site.

Follow the instructions below to find the registration number of your player:
I. Insert a disc and select the Play Mode option from the player menu. 2. In the Play Mode menu, select DivX(R)VOD. The registration number is displayed on the TV set's screen. 3. Write down this VOD 8-character registration number so that you can fill in the form on the website you purchase your DivX VOD files from.
Note: If you cannot play a DivX VOD file recorded on a CD-R disc after downloading it, the rental period allocated during purchasing from the website may have expired. It is also possible that the recorded file is not compatible with your player because of different versions or incorrect download parameters. The parameters used when copying to CD-R may be another reason for this. Since it is not possible here to supply all the information, parameters and advice relating to the use of DivX VOD files, we recommend that you visit specialist websites such as www.divx.com/vod.
The player has a built-in tuner that allows for FM radio function.
Manual tuning
1. Connect the FM aerial in the correct manner. 2. Press the TUNER button on the remote control. 3. When the FM station broadcasts Stereo sound, ST is displayed. 4. Tune a station by pressing repeatedly TUNER + or TUNER - on the remote control until the desired station is found. Alternatively, you can press and hold the same button down for about one second to activate the automatic search function. In this mode the player will automatically tune frequencies until it finds a station. 5. Repeat steps 4 to tune to another radio station.
Note: If there is any interference, change the aerial's position until the ideal sound reception is obtained. TV and other electronic devices could be the cause of interference, so try to position the aerial away from them.
Storing radio stations
The player can store up to 40 radio stations in its memory. You can enter every single radio station yourself or the player can store all available radio stations automatically in ascending order.
Automatic preset programming
1. Press the TUNER button on the remote control to enter the Tuner mode. 2. Press and hold TUNER down for 3 seconds to start automatic preset programming.
Note: A weak signal can affect the "Automatic preset programming" function's efficiency. Adjust the aerial for better reception and a more efficient search.
- Radio frequencies will be browsed and radio stations stored automatically. When all the available radio stations are stored or all 40 memory locations are full, the auto preset programming function will stop.
Manual preset
1. Tune to a radio station (see "Manual tuning" for details). 2. Press MENU on the remote control. PRESET will appear on the display. 3. While the word P-- is still flashing, input your desired preset number (1-40) using the numeric buttons, then press MENU to store it.
Retrieving preset stations
1. Press the TUNER button on the remote control to enter the Tuner mode. 2. Press ◀ or ▶ on the unit or PR+ or PR- on the remote control to search up or down for the preset stations.
RDS for FM Only
The RDS icon is displayed when RDS (Radio Data System) data is received. The following information may be available for certain stations: Station frequency, Station name, Programme type.
Press the INFO•RDS button repeatedly on the remote control to select the type of information you want to display.
You can search for stations using one of the following programme types:
| NEWS = newsAFFAIRS = current affairsINFO = informationSPORT = sportEDUCAT = educationDRAMA = series and playsCULTURE = religion or national cultureSCIENCE = science and technologyVARIED = miscellaneousPOP M = pop musicROCK M = rock musicMOR M = middle-of-the-road music, easy-listening musicLIGHT M = classical musicCLASSICS = serious classicalOTHER M = unclassifiedWEATHER = weather, medical | FINANCE = stock market reportsCHILDREN = children’s programmesSOCIAL AFFAIR = sociology, history, geography, psychology, societyRELIGION = any aspect of beliefs, faith & God or GodsPHONE IN = public phone-in discussionTRAVEL = travellingHOBBY = recreational activities & leisureJAZZ = jazz musicCOUNTRY = country musicNATIONAL = national musicOLDIES = oldies musicFOLK = folk musicDOCUMENTARY = documentaries |
Using the player's menus
The player's main menu is displayed when there is no disc in the player or when the disc has been interrupted during playback by pressing the STOP button. Select a menu option using the ▲, ▶ ▲ and ▼ buttons. ProK to confirm your selection. Return to a previous menu using the ◀ button.
Play
When a disc and/or one or several memory cards are inserted at the same time, select the disc or card you want to play with the And buttons and press OK.
Play Mode selection
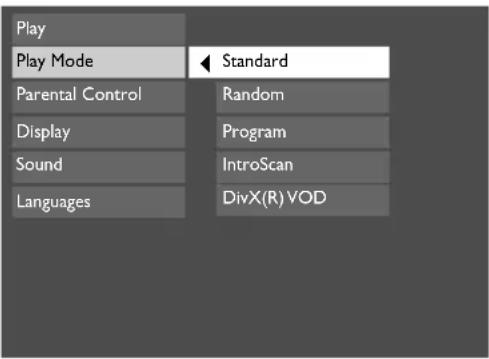
I. Load a disc and press STOP. 2. Select the Play Mode option and press OK to confirm.
Note: The contents of the Play Mode menu varies depending on the type of disc.
- Select a play mode with the and buttons, and press OK to confirm.
Standard
Press OK or the PLAY button to begin the disc's standard playback.
Random (all discs except DVD)
You can listen to all the tracks on the disc in a random order (chosen by the player) by choosing the Random option.
Press OK to start random playback. Press STOP to stop random playback. Press PLAY to resume normal playback.
Program (all discs except mp3+JPEG discs and JPEG)
With this option, you choose and programme the playback order. Lists vary according to the type of disc.
1a. DVD: select a title using the and buttons and press the button to access the list of chapters and select a chapter using the and buttons. 1b. Audio CD and VCD: select a track using the ▲ and ▼ buttons, or select start playing all the tracks.
1c. mp3, WMA and DivX CD: select a folder using the and buttons, then press the button to access the list of files, then select a file using the and buttons. 2. Press OK to add the title, chapter (DVD), track (audio CD and VCD) or file (mp3, WMA and DivX) selected to the list. Press the CLEAR button to remove the last title/chapter/track/file from the list. Press PLAY to start programme play or select Done and press OK. Repeat steps 1 and 2 as often as necessary.
IntroScan (Audio CD only)
This option plays the first ten seconds of each track.
Press OK to start the IntroScan, press STOP to stop it and PLAY to continue playing the current track.
DivX(R) VOD (DivX only)
Please refer to page 19.
All to
Parental Control settings

You can control access to the player and the type of discs your family can watch with the lock function. There are eight levels of parental control.
Select the Parental Control option from the main menu and press OK. The corresponding menu is displayed.
Lock Player
This setting prevents the playback of DVDs that may not be suitable for all audiences, by using the rating level that may be encoded on the disc. If the rating level on the disc is higher than the preset level, the playback function will not be enabled unless the password is entered.
I. To activate locking (☐) according to your preset rating limits, select the Lock Player option using the ▲ and ▼ buttons and press OK to confirm.
- You are asked for a new password. Enter four digits using the numeric buttons and press OK to confirm. You are asked for confirmation; repeat the operation.
Note: Choose a password that is easy to remember, or write it down.
- To unlock ( ), select the Parental Control option. Enter your password. Select the Lock Player function and press OK to confirm.
Change Password
I. To change the password, select this option and press OK to confirm. 2. Enter the four digits of your new password.
Rated Titles
The disc publisher is responsible for coding scenes according to the rating limits. In Europe, very few discs have coded scenes.
I. Select Rated Titles and press OK to confirm. 2. For the rating limit, select the level using the ▲ and ▼ buttons, then press OK to confirm.
Unrated Titles
I. To set up password-only access to unrated titles, select Unrated titles and press OK to confirm. 2. Select Password required using the ▲ and ▼ buttons, and press OK to confirm.
Note: Your selected rating limits will only be applied if you then put the player into Lock mode (see above).
Display settings

Select the Display option in the main menu using the ▲ and ▼ buttons, and press OK to confirm.
Select an option using the ▲ and ▼ buttons, and press OK to confirm.
TV Image
Depending on the format of the DVD disc, you can choose the picture format best suited to the format of your TV screen:
4x3 Letterbox: gives best reproduction of pictures recorded in this format (i.e. with horizontal bands at the top and bottom of the screen) or in 16x9.
4x3 Standard: reproduces a 4x3 picture without distortion.
16x9 Widescreen: reproduces 16x9 format films in full on a 16x9 screen.
Front Display
This option lets you choose how the front display of the DVD player appears. Three settings are available:
Auto: the front display brightness dims when a disc is playing.
Bright: the front display is always bright.
Dim: the front display is always dim.
Black level
This option lets you adjust the video brightness level.
Three settings are available: Normal, Dark and Light.
PAL/NTSC
In addition to PAL DVDs and VCDs, you can enjoy NTSC films as well (a 60Hz PAL compatible TV set is required). If the pictures from the DVD being played appear in black and white on your screen, try changing the colour standard.
Set the function to PAL or NTSC.
Video
This option lets you select the video output of your appliance: Component if your TV is connected to the component video socket of the player, or RGB if your TV is connected to the Scart socket of the player.
Progressive Scan
Progressive Scan provides high-quality pictures with less flicker. Turn on Progressive Scan if you used the Component Video sockets of the player to connect a TV or monitor compatible with a progressive scan signal.
Press OK to activate Progressive Scan.
Caution! Once Progressive Scan has been activated, an image will only be visible on a progressive scan TV or monitor. If you activate Progressive Scan by mistake, you should take the following steps to reset the unit: open the disc tray, press and hold the SUBWOOFER button on the front panel. The video output will be restored to the standard setting and a picture will once again be visible on a conventional analogue TV or monitor.
Sound settings

You can adapt your player to other equipment and access specific functions with the Sound menu.
1. Select the Sound option in the main menu using the ▲ and ▼ buttons and press OK to confirm. 2. Select an option using the ▲ and ▼ buttons, and press OK to confirm.
Night Mode
You can use this function to control the different sound levels via dynamic compression. It improves the quality of the sound track at a low volume and quietens the loudest sounds.
Select an option using the ▲ and ▼ buttons:
Quiet, Moderate or Off.
Note: This function is available only on DVD discs recorded in Dolby Digital.
Distance
All the basic settings have already been preset for the speakers included in the box. However, to make the surround sound more effective and suit the acoustic conditions in the room where you are listening, you may need to delay the signal coming from some of the speakers. Channel delay compensates for centre or surround speakers that are closer to the listening position than the front speakers.
1. Select Front, Center or Rear using the ▲ and ▼ buttons and press OK. 2. Adjust the distance using the ◀ and ▶ buttons and press OK.
Note: The receiver speaker distance default settings are as follows:
Front speakers (L/R): 4.5 m
Centre speaker (Cch): 3 m
Rear speaker (SUR): 3 m
Test Tone
This function is used to test the speaker setting and change the speaker level. A short noise comes successively from each speaker. Adjust the volume level using the ▲ and ▼ buttons.
Language settings

With this menu, you can set the language for player menus, dialogue, subtitles and the disc menus.
If you chose "English" during initial set-up, the main menu is displayed in English, any menus generated by the disc are in English, as is the language used in dialogue (if this language is available on the disc).
1. Select the Languages option in the main menu using the ▲ and ▼ buttons and press OK to confirm.
- Select one of the options using the and buttons, and press OK to confirm.
Player Menus
To change the language of the player menus, choose the language using the and buttons and press OK to confirm.
Disc Menus
To change the language of the disc menus, choose the language using the and buttons and press OK to confirm.
Audio
I. To change the dialogue language, choose the language using the and buttons and press OK to confirm.
Note: If the selected language is not available on a disc, the disc's default language will be used instead.
- To change the language during play, display the Audio icon by pressing the AUDIO button on the remote control (see page 14).
Subtitles
I. To change the subtitle language, choose the language using the and buttons and press OK to confirm.
Note: If the language chosen is available, it is automatically selected when you display the subtitles (see page 13). Otherwise, the subtitle language indicated on the disc is selected instead.
- To change the language of the subtitles during playback, display the Info menu by pressing the INFO button on the remote control (see page 13).
Additional Information
Troubleshooting
The appliance does not switch on.
- Make sure it is plugged into a mains socket.
- Press the button on the remote control or the ON/ECO button on the front of the appliance.
The device switches off spontaneously.
- The device switches off automatically when it is in STOP mode for more than 30 minutes without any user intervention. Switch it on again.
It is impossible to read the disc.
- Insert the disc with the printed side facing up.
- Check that the disc can actually be played by this device (see page 28).
- If you are trying to play a disc containing JPEG files, check that the files have a resolution of less than 2 megapixels.
- Check that the disc's regional code matches the player's regional code. This player's regional code is 2. • Clean the disc (see page 27).
There is no picture.
- Check you have switched on the TV set.
- Check the connections (see pages 4 and 5).
- Select the AV input assigned to the player on the TV.
The picture is of poor quality (with snow or lines).
- Check the connections (see pages 4 and 5).
There is no sound or the sound is of poor quality.
• Check the connections (see pages 4 and 5). - Make sure the speakers are connected. - Make sure the MUTE function is not on.
No surround sound.
- Check the speaker configuration in the Sound menu.
The remote control does not work or works only intermittently.
- Check that batteries are inserted or change them.
- Aim the remote control at the appliance. The infrared beam must not be blocked or interrupted.
- Check that the remote control is configured to control the device you are trying to operate with it. Press the DVD·CD button if you want to operate a DVD player, the TV button to operate a television set and the TUNER button to operate the radio.
The subtitles do not appear.
- Check that the DVD disc provides subtitles.
- Refer to the section on how to display subtitles (see page 13).
The disc menu language is not the correct one.
- The disc menu language has not been set up (see page 25).
- The language of your choice is not available on the disc (see page 25).
You have forgotten your password (Parental control).
- When the player is on and the disc tray is opened, press and hold the button on the front panel until the unit goes into standby mode. All system settings will be restored to default, and the parental password will also be reset.
Your DivX files won't play.
- When you encounter problems, make sure that the file you are trying to play actually contains DivX video. The files often use the term “DivX” in their filename even though they have in fact been coded in another format.
- Problems playing DivX version 5.1 and version 2.5 player: with some recent DivX versions, coding problems may arise that are directly linked to the ability of your computer to provide the total capacity of its microprocessor during the coding procedure. During playback, this leads to picture problems or a lack of synchronization between sound and picture.
Precautions
Use
- If your appliance has been stored in a cool place for any length of time, during a journey for example, wait for about 2 hours before using it.
- The openings located on the top and bottom are for ventilation and must not be obstructed.
- During thunderstorms, we recommend that you isolate the appliance from the electrical supply so that it is not damaged by electrical or electromagnetic surges.
- This appliance is designed for continuous use. Putting the DVD player into standby mode does not disconnect it from the mains supply. To completely isolate the equipment, remove the plug from the mains socket as some components remain connected to the electrical supply.
- If you notice any burning or smoke, disconnect the appliance immediately to avoid any risk of electrocution.
- Do not attempt to look inside the appliance through the disk tray opening or any other opening. You may be electrocuted or exposed to laser radiation.
- This appliance is for domestic use only and must not be used for industrial purposes.
- Total or partial copying of recordings protected by copyright legislation, without the explicit permission of the holder of the rights, contravenes current legislation. Copying or downloading music files for sale or any other business purpose constitutes or could constitute a violation of copyright law.
Cleaning
- Use a soft, dry, clean cloth. Regularly dust the vents at the back or sides.
- Using solvents, abrasive or alcohol-based products risks damaging the appliance.
- If an object or liquid enters inside the appliance, unplug it immediately and have it checked by an authorised engineer.
Handling and caring for discs

- Handle your discs with care. Hold the disc with your fingers at the edges or through the hole.
- Insert the disc with the label facing up (for a single-sided disc).
- Place the disc properly into the tray in the allotted holder.
- Use a soft cloth to clean discs if necessary, always wiping from the centre to the edge.
- Always put discs back in their cases after use and store in a vertical position.
- Do not close the tray with two discs in it or with a disc not sitting correctly in the holder.
- Do not play cracked, chipped or warped discs nor try to repair them with adhesive tape or glue.
- Do not write on a disc.
- Do not move the player when a disc is being played.
- Do not scratch discs or store them in places exposed to direct sunlight, high humidity or high temperatures.
- Do not use aerosol cleaners, benzene, anti-static liquids or any other solvent for cleaning discs. When cleaning, wipe gently with a soft damp (water only) cloth from the centre to the edge, avoiding circular motions, which could cause scratches and interference during playback.
Guarantee
- The type and production number of your appliance are printed on the guarantee certificate supplied with your appliance. Keep this certificate as well as the invoice. These documents are required in the event of claiming your guarantee rights.
- All repairs during the guarantee period must be carried out by an authorised engineer for our brand. If this condition is not met, your rights will no longer be valid.
- Never open the appliance yourself, since this may put you at risk or damage the equipment.
THOMSON does not accept any liability if the appliance is used in any way other than in accordance with this manual.
DISCLAIMER OF WARRANTIES: TO THE MAXIMUM EXTENT PERMITTED BY APPLICABLE LAW, DECLARATIONS AND WARRANTIES OF NON-INFRINGEMENT OF COPYRIGHT OR OTHER INTELLECTUAL PROPERTY RIGHTS RESULTING FROM THE USE OF THE PRODUCT IN CONDITIONS OTHER THAN THOSE SPECIFIED ABOVE ARE HEREBY DISCLAIMED.
Technical data
Mains supply: AC-230 V - 50 Hz
Power consumption: 85 W (1 W in standby)
Operating conditions: +5°C to +35°C
Surrounding humidity: 10% to 75% (no condensation)
Audio signal to noise ratio: 65dB (A wtd)
Dimensions (H x W x D inch):
Front and Surround Speakers - 6.1 x 3.1 x 3.5
Centre Speaker - 2.7 x 9.8 x 33.3
Subwoofer - 12.4 x 6.3 x 14
Amplifier section:
RMS Output Power: Dolby Digital Mode with 10% Total Harmonic Distortion
Rear Channels: 55 Watts each Channel (1kHz, 8 Ohm)
Front Channels: 55 Watts each Channel (1kHz, 8 Ohm)
Centre Channel: 100 Watts (1kHz, 4 Ohm)
Subwoofer Channel: 100 Watts (100Hz, 4 Ohm)
Total RMS Output Power, Dolby Digital mode: 420W
Muting Attenuation: 65dB
Frequency Response: 20kHz /-3dB, 1kHz ref.
Subwoofer Frequency Response: 10 Hz / -3dB, 80Hz ref.
Signal to Noise Ratio: 65dB (Dolby Digital mode)
Video Signal to Noise Ratio: from 40 dB to 60dB
FM tuner section:
Frequency Response: 15kHz +/-3dB, 1kHz ref.
Quieting: 24dBu
Signal to Noise: 60dB (stereo) / 65dB (mono)
IF Rejection: 50dB
Discs and formats you can play
In spite of the progress made to ensure playability of all disc types, it is not possible to guarantee playback of discs which do not comply with DVD, CD, VCD or SVCD standards. This unit may not play some recordings or files on CD-R, CD-RW, DVD-R, DVD-RW, DVD+R, DVD+RW due to differences in recording formats, software used and disc types.

DVD-Video
Digital video discs - 12 cm and 8 cm, single- or double-sided, single or dual layer. DVDs are high-density optical discs on which high-quality images and audio are recorded by means of digital signals.

DVD-R, DVD-RW, DVD+R, DVD+RW
Most DVD-R and DVD+R (one recording only), DVD-RW and DVD+RW discs (rewritable).
Depending on the DVD writer and discs used.
Recordings using DVD-R and DVD-RW discs must be made in Video DVD mode. Recordings using DVD+RW discs must be made in accordance with the specifications for DVD+RW discs with a 4.7 GB capacity.

VCD - Video Compact Disc
CD on which you can record up to 74 min. of VHS-quality video associated with still images, audio tracks and interactive menus.
SVCD - Super Video Compact Disc
Most SVCDs comply with the IEC62107 standard. SVCDs can be used to record up to 70 minutes of digital sound and images in accordance with MPEG-2 standards for video and MPEG-1 standards for audio.
Audio CDs
Audio CDs (8 and 12 cm).

CD-R, CD-RW
Most CD-R (one recording only) and CD-RW discs (rewritable).
This player can play most CD-R discs. CD-Rs written during a multisession recording can also be played, provided that the session has ended before the disc is played (depending on the write software). However, depending on the condition of the CD-writer, computer and the disc used, you may find that not all discs will play successfully. When playing a CD-R disc, it is completely normal for the unit to take up to 20 seconds to recognise the disc before starting to play. If the disc is not recognised after a period of 20 seconds, remove the disc, and then insert it again.
- Irrespective of the actual recording capacity of the CD-R, do not use its full capacity. • CD-Rs should be preferably used instead of CD-RWs (rewritable CDs) as, in certain cases, CD-RW playback may be faulty. Use reliable, good-quality CD write software. • Close all other applications on the computer to ensure reliable CD-R disc recording.

DivX files

DivX is the name of a revolutionary new video codec which is based on the new MPEG-4 compression standard for video. Whether DivX files play correctly on your player or not depends on the preparation and production of the audio and video files, the codecs and the type of recording equipment used, as well as on your computer's parameters. It is therefore possible that you cannot play a DivX file or that part or all of it is defective. It also sometimes happens that you can play the images (video) but not the sound (audio). DivX disc compatibility with this player is limited as follows: • The maximum resolution of the DivX file is below 720x576 (W x H) pixels. • DivX filenames should not exceed 56 characters. • If the video and audio structure of the recorded file is not interleaved, either video or audio is outputted. • If the file is recorded with GMC, the unit supports only 1-point GMC. GMC is the acronym for Global Motion Compensation. It is an encoding tool specified in the MPEG4 standard. Some MPEG4 encoders, like DivX or XviD, have this option. There are different levels of GMC encoding, usually called 1-point, 2-point, or 3-point GMC.

mp3 files
CD-R and CD-RW discs containing audio files in mp3 format. With regard to CD-R mp3 discs, please follow all the recommendations for CD-R above, along with the comments below:
- Your mp3 files should be ISO 9660 or JOLIET format. ISO 9660 format and Joliet mp3 files are compatible with Microsoft DOS and Windows, as well as with Apple Mac. These two formats are the most widely used. • mp3 filenames should not exceed 8 characters and should end with the ".mp3" extension. General name format: Title.mp3. When composing your title ensure that you use 10 characters or less, have no spaces in the name, and avoid the use of special characters including (., /, \, = ,+).• The total number of files on a disc should be less than 400.• Use a decompression transfer rate of at least 128 kB/sec (kilobytes/second) when recording mp3 files. Sound quality with mp3 files basically depends on the rate of compression/decompression you choose. Obtaining audio CD quality sound requires an analogue/digital sampling rate, that is conversion to mp3 format, of at least 128 kB/sec and up to 160 kB/sec. Choosing higher rates, such as 192 kB/sec or more, only rarely produces even better sound quality. Conversely, files with sampling rates below 128 kB/sec will not play properly. • Do not try recording copyright-protected mp3 files."Securized" files are encrypted and code-protected to prevent illegal copying.You must not copy such files.
Important: The above recommendations cannot be taken as a guarantee that the DVD player will play mp3 recordings, or as an assurance of sound quality. You should note that certain technologies and methods for mp3 file recording on CD-Rs prevent optimal playback of these files on your DVD player (i.e. degraded sound quality and even, in some cases, inability of the player to read the file).

WMA (Windows Media Audio) files CD-R with WMA files.
- WMA filenames should not exceed 8 characters, and should end with the ".wma" extension.
General name format: Title.wma. When composing your title ensure that you use 8 characters or less, have no spaces in the name, and avoid the use of special characters including (., /, \, =,
+).• The total number of files on a disc should be less than 999.

JPEG files
CD-R and CD-RW with JPEG files. Certain JPEG files, including progressive JPEG files, cannot be read by this player.
The total number of files and folders on the disc should be less than 650. Make sure that files have the ".jpg" extension. Files without the ".jpg" extension cannot be read by the player, even though the files are shown as JPEG images on your computer.

Kodak Picture CDs
Sound Enhancement Systems
This player is equipped with several built-in sound enhancement systems.

Dolby Pro Logic II
The Pro Logic II mode uses the built-in circuit to steer the Left, Centre, Right and Surround left and right channel audio signals and uses all five speakers to play both stereo and Dolby Pro Logic programme source, such as TV and VCR. Dolby Pro Logic II includes Dolby Pro Logic II Movie, Dolby Pro Logic II Music and Dolby Pro Logic Emulation.
You can use this mode to suit any stereo programme source to enjoy multi-channel sound experience.
Dolby Digital
The Dolby Digital mode lets you enjoy full digital surround from software processed in the Dolby Digital format. Dolby Digital provides better sound quality and a more powerful presence than conventional Dolby Surround.
This unit is equipped with a Dolby Digital 5.1 channel so that you can enjoy enhanced full digital surround sound. Differing from Dolby Pro Logic in that only four channels (Front Left, Front Right, Centre and Rear) are used, the new system provides stereo separation of the rear speakers (Rear-Right, Rear-Left). Adding the subwoofer channel for bass sounds (counted as 0.1 channel) to the 5 channels provides 5.1 channels (or 6 Channels) that bring you the most sophisticated Dolby Digital sound enjoyment.

Digital Theater Systems (DTS)
DTS is a digital surround system which delivers six channels of master-quality, 20-bit audio. It offers five full-range channels plus a special low frequency effect (LFE) channel for subwoofer, resulting in what is commonly known as 5.1 channels. It can be applied with existing 5.1 speaker configurations. DTS is available in DVD and CD mode.
DPL933VD
Model and serial number
THOMSON Multimedia Sales Europe
46, quai A. Le Gallo
92648 Boulogne Cedex
FRANCE
322 019 464 RCS NANTERRE
http://www.thomson-europe.com

© Copyright THOMSON 2004
Dealer's address

- SAFETY INFORMATION - UK SOCKET
- MAINS CONNECTION
- IMPORTANT
- TABLE OF CONTENTS
- CONNECTIONS AND SETUP
- BASIC PLAYBACK OPERATIONS
- INFO MENU
- MP3, WMA, JPEG AND DIVX FILES
- RADIO
- PLAYER MENUS
- ADDITIONAL INFORMATION
- HELPLINE THOMSON
- SOME POINTS TO CHECK BEFORE YOU CONNECT YOUR TV SET
- ACCESSORIES PROVIDED
- CAUTION
- DVD COPY PROTECTION
- FRONT PANEL CONTROLS (BUTTONS APPEARING LEFT TO RIGHT BELOW)
- FRONT PANEL DISPLAY
- STEREO
- P-SCAN
- DIGITAL
- PLII
- TITLE
- TRK
- CHP
- PRESET
- PROG
- SLP
- REP I / REP / A-B
- RDS
- KHZ / MHZ
- TUNED
- CONNECTING TO AUDIO-VISUAL EQUIPMENT
- SCART VIDEO OUT
- VIDEO OUT SOCKET
- COMPONENT VIDEO OUT
- S-VIDEO OUT SOCKET
- OPTICAL DIGITAL AUDIO INPUT (OPTICAL IN)
- AUDIO IN L (LEFT) AND AUDIO IN R (RIGHT) SOCKETS (AUX I AND AUX 2)
- CONNECTING THE AERIAL
- CONNECTING THE SPEAKERS
- POSITIONING SPEAKERS
- MAGNETIC SHIELDING
- FRONT SPEAKER POSITION
- ALIGNMENT
- ANGLE
- HEIGHT
- PREFERRED SURROUND POSITION
- LOCATION
- DIRECTION
- ALTERNATIVE SURROUND PLACEMENT
- REAR WALL
- NO ADJACENT WALLS
- TEST TONE / CHANNEL BALANCE
- CHANNEL BALANCE
- LEVEL ADJUSTMENT & SURROUND CHANNEL LEVEL EXPECTATION
- THE REMOTE CONTROL
- NAVIGATING THROUGH MENUS
- FUNCTIONS IN DVD-CD MODE
- FUNCTIONS IN TUNER MODE
- FUNCTIONS IN TV MODE
- INSERTING BATTERIES IN THE REMOTE CONTROL
- OPERATING THE DVD PLAYER
- DESCRIPTION OF THE VARIOUS MENUS
- COMPATIBLE DISCS
- COMPATIBLE FORMATS
- REGIONAL CODING
- PLAYBACK
- ACCELERATED PLAY
- STILL IMAGE
- FRAME ADVANCE
- VARIABLE SLOW MOTION
- CHANGING CHAPTER / TRACK
- ZOOM
- TIME DISPLAY
- TITLE/CHAPTER (DVD) / TRACK (AUDIO CD AND VCD)
- SUBTITLES (DVD AND DIVX)
- AUDIO (DVD, VCD AND DIVX)
- PLAY MODE (ALL DISCS EXCEPT DIVX)
- BOOKMARK (DVD AND AUDIO CD)
- CAMERA ANGLE (DVD)
- PBC - PLAYBACK CONTROL (VCD)
- SLEEP
- USING MEMORY CARDS
- COMPATIBLE MEMORY CARDS
- READING MEMORY CARDS
- DISPLAYING JPEG FILES OR PLAYING MP3 OR WMA FILES
- PLAYING JPEG AND MP3 MUSIC FILES AT THE SAME TIME
- PLAYING DIVX FILES
- RENTING (PURCHASING) DIVX®VOD FILES
- MANUAL TUNING
- STORING RADIO STATIONS
- AUTOMATIC PRESET PROGRAMMING
- MANUAL PRESET
- RETRIEVING PRESET STATIONS
- RDS FOR FM ONLY
- USING THE PLAYER'S MENUS
- PLAY
- PLAY MODE SELECTION
- STANDARD
- RANDOM (ALL DISCS EXCEPT DVD)
- PROGRAM (ALL DISCS EXCEPT MP3+JPEG DISCS AND JPEG)
- INTROSCAN (AUDIO CD ONLY)
- DIVX(R) VOD (DIVX ONLY)
- PARENTAL CONTROL SETTINGS
- LOCK PLAYER
- CHANGE PASSWORD
- RATED TITLES
- UNRATED TITLES
- DISPLAY SETTINGS
- TV IMAGE
- FRONT DISPLAY
- BLACK LEVEL
- PAL/NTSC
- VIDEO
- PROGRESSIVE SCAN
- SOUND SETTINGS
- NIGHT MODE
- QUIET, MODERATE OR OFF
- DISTANCE
- TEST TONE
- LANGUAGE SETTINGS
- DISC MENUS
- AUDIO
- SUBTITLES
- TROUBLESHOOTING
- THE APPLIANCE DOES NOT SWITCH ON
- THE DEVICE SWITCHES OFF SPONTANEOUSLY
- IT IS IMPOSSIBLE TO READ THE DISC
- THERE IS NO PICTURE
- THE PICTURE IS OF POOR QUALITY (WITH SNOW OR LINES)
- THERE IS NO SOUND OR THE SOUND IS OF POOR QUALITY
- NO SURROUND SOUND
- THE REMOTE CONTROL DOES NOT WORK OR WORKS ONLY INTERMITTENTLY
- THE SUBTITLES DO NOT APPEAR
- THE DISC MENU LANGUAGE IS NOT THE CORRECT ONE
- YOU HAVE FORGOTTEN YOUR PASSWORD (PARENTAL CONTROL)
- YOUR DIVX FILES WON'T PLAY
- PRECAUTIONS
- USE
- CLEANING
- HANDLING AND CARING FOR DISCS
- GUARANTEE
- TECHNICAL DATA
- AMPLIFIER SECTION
- FM TUNER SECTION
- DISCS AND FORMATS YOU CAN PLAY
- DVD-VIDEO
- DVD-R, DVD-RW, DVD+R, DVD+RW
- VCD - VIDEO COMPACT DISC
- SVCD - SUPER VIDEO COMPACT DISC
- AUDIO CDS
- CD-R, CD-RW
- DIVX FILES
- MP3 FILES
- JPEG FILES
- KODAK PICTURE CDS
- SOUND ENHANCEMENT SYSTEMS
- DOLBY PRO LOGIC II
- DOLBY DIGITAL
- DIGITAL THEATER SYSTEMS (DTS)
- DPL933VD
Brand : THOMSON
Model : DPL933
Category : Home Theater