
32 LED 614 PVR - TV ECG - Free user manual and instructions
Find the device manual for free 32 LED 614 PVR ECG in PDF.


| Product Type | LED TV |
| Screen Size | 32 inches (81 cm) |
| Resolution | 1366 x 768 pixels |
| Aspect Ratio | 16:9 |
| Energy Class | A |
| Power Consumption (Operating) | 60 W |
| Power Consumption (Standby) | ≤0.5 W |
| Dimensions with Stand (W x H x D) | 729 x 471 x 185 mm |
| Dimensions without Stand (W x H x D) | 729 x 431 x 83 mm |
| Weight | 4.7 kg |
| VESA Wall Mount | 100 x 200 mm |
| Digital Tuner | HD DVB-T MPEG2/4 |
| PVR Recording to USB | Yes |
| Timeshift | Yes |
| Audio Output | 2 x 8 W |
| HDMI Inputs | 3 |
| USB Port | 1 |
| SCART | 1 |
| Component YPbPr | 1 |
| VGA Input | 1 |
| Headphone Jack | Yes |
| Parental Lock | Yes |
| Main Power Switch | Yes |
| Supported File Formats (USB) | mpg, avi, ts, mp4, mkv, vob, mp3, wav, wmv, jpg |
| Cleaning Instructions | Unplug and wipe with dry cloth only |
| Safety Class | Class II (double insulation) |
Frequently Asked Questions - 32 LED 614 PVR ECG
User questions about 32 LED 614 PVR ECG
0 question about this device. Answer the ones you know or ask your own.
Ask a new question about this device
Download the instructions for your TV in PDF format for free! Find your manual 32 LED 614 PVR - ECG and take your electronic device back in hand. On this page are published all the documents necessary for the use of your device. 32 LED 614 PVR by ECG.
USER MANUAL 32 LED 614 PVR ECG
natural_image
Modern ECG monitor displaying a pink abstract background with flowing pink and black patterns (no text or symbols visible)32 LED 614 PVR
LED TV
NÁVOD K OBSLUZE
CZ
LED TV
NÁVOD NA OBSLUHU
SK
LED TV
INSTRUCTION MANUAL
GB
natural_image
Simple line drawing of a rectangular plate with a small protrusion and two notches, no text or symbols present.CZ


Základní operace
Zapnutí/vypnutí
natural_image
Tropical beach scene with lush green palm trees and clear blue sky (no text or symbols visible)Hudba
Text
ODSTRAŇOVÁNÍ POTÍŽÍ
CZ
natural_image
Three technical line drawings of a rectangular electronic component with mounting holes and a handle (no text or symbols)Základné operácie
Zapnutie/vypnutie
natural_image
Tropical beach scene with palm trees and clear blue sky (no text or symbols visible)Hudba
Text
ODSTRAŇOVANIE ŢAŽKOSTÍ
TV INSTALLATION AND SETUP ....52
Instructions for assembling the stand ....52
Positioning....52
Antenna and power connection....52
DESCRIPTION 53
TV and interface buttons....53
Inserting the batteries....55
Basic operations....55
TELEVISION CONTROLS 56
Input switch....56
Initial installation....56
Picture menu....57
Audio menu....59
Channel menu....60
Lock System menu....63
Setup Menu....64
USB control....66
TROUBLESHOOTING 68
TECHNICAL SHEET 69
SAFETY INSTRUCTIONS
Read carefully and save for future use!
Warning: The safety measures and instructions, contained in this manual, do not include all conditions and situations possible. The user must understand that common sense, caution and care are factors that cannot be integrated into any product. Therefore, these factors shall be ensured by the user/s using and operating this appliance. We are not liable for damages caused during shipping, by incorrect use, voltage fl uctuation or the modification or adjustment of any part of the appliance.
To protect against a risk of fire or electric shock, basic precautions shall be taken while using electrical appliances, including the following:

ATTENTION
RISK OF ELECTRIC SHOCK, DO NOT OPEN

TO REDUCE THE RISK OF ELECTRIC SHOCK, DO NOT OPEN THE COVER OR BACK PANEL OF THE DEVICE. THERE ARE NO COMPONENTS INSIDE THAT THE USER COULD REPAIR HIMSELF. ALWAYS REFER TO TRAINED SERVICE EMPLOYEES.

A lightning arrow symbol inside an isosceles triangle shall warn the user about uninsulated "dangerous voltage" inside the device, which can be high enough to cause injury by electric current.

An exclamation point inside an isosceles triangle shall inform the user about the abundant amount of important instructions for operating the device and its maintenance (or service) that can be found in the included manual.
- Read all of the instructions carefully.
- Keep the instructions for future use.
- Pay attention to warnings found in the manual.
- Follow all instructions.
- Do not use the device close to water.
-
Clean only with dry cloth.
-
Do not block exhaust vents. Install the device according to the manufacturer's instructions.
-
Do not install near heating sources, such as radiators, heating units, stoves, or other appliances (including amplifiers) producing heat.
-
Do not bypass the safety function of a grounded outlet. The power cord plug has two pins and one ground contact, ensuring your safety. If your socket does not match the power cord of this TV, ask an electrician to replace the old socket.
-
Protect the power cord, do not step on it, prevent against pinching the cord, particularly near the plug and the area where the cord exits the device.
-
Use only accessories and optional accessories recommended by the manufacturer.
-
Disconnect the power cord from the socket during thunderstorms or in case you do not plan to use the device for a long period of time.
-
Refer to qualified service workers for all necessary repairs. The device requires service if it is damaged in any way. For example, if the power cord or plug is damaged, liquid gets inside the device or a the device is penetrated by a foreign object, is exposed to rain or moisture, falls or does not function as usual.
-
The socket that the TV is connected to is used to disconnect the device from the power network and must be easy to access at all times.
-
Ventilation holes shall not be covered by objects such as newspapers, tablecloths, curtains etc., because this prevents the necessary ventilation of the device.
-
Do not place any sources of open fire on the device, for example burning candles.
-
Respect the ecological disposal of batteries.
- The device is designed for operation in mild climates.
- Prevent water dripping on the device and getting into the device. Do not place any objects filled with liquid on the device, e.g. a vase with flowers.
- Electric discharge can lead to failing device functions. Functions can be manually restored by turning the device off and on again.

WARNING:
Do not expose the device to rain or moisture to reduce the risk of fire or electric shock.

WARNING:
Protect the batteries against exposure to high temperatures, e.g. direct sunlight. Do not throw batteries into a fi re.
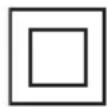
This symbol indicates the device is classified as a class II device, with double insulation between dangerous voltage and user access parts. Only use identical spare parts when performing service work.
Warning
This television receiver uses high voltage for operation. Do not remove the back cover of the device. Have all service operations carried out by qualified workers.
Attention
Make sure the power cord does not get caught under the TV.
Warning
Do not expose the device to rain or moisture to reduce the risk of fire or electric shock.
Attention
Do not lean against the TV, tilt or push the device. Pay close attention to the presence of children. A falling device could cause serious injury.
Warning
Prevent foreign objects entering the ventilation holes of the device. Protect the TV against liquid spills.
Attention
Do not install the TV on unstable carts, stands, shelves or tables. A fall could damage the device or cause injury.
Attention
Do not cover the ventilation holes on the back cover of the device. Sufficient ventilation is necessary for the proper functioning of electrical components.
Attention
Minimum spacing distances must be respected if the TV is installed in the entertainment centre compartment or other enclosed area. Overheating can shorten the service life of the device and can also be dangerous.
Attention
If you do not plan to use the device for a longer period of time, we recommend disconnecting the power cord from the socket.
INTRODUCTION
Thank you for purchasing this television product. In order to use this device to its full potential from the very start, read this manual carefully and keep handy for future use.
ATTENTION
Do not tamper with any internal device components and do not perform any adjustments that are not defined in this manual. LED TVs use high voltage. When cleaning dust from the screen or the cabinet of the device, you should first unplug the power cord from the outlet and then wipe the device with dry cloth. To prevent damaging the TV, disconnect the power cord and antenna during a thunderstorm. Refer to a qualified service centre for all necessary repairs.
ATTENTION:
Long term static image may permanently damage the TV set.
- Make sure that the static image does not stay on the screen of the LED TV longer than 2 hours. Otherwise, it could cause permanent burning of the image onto the screen. When displaying a static image, lower the brightness and the contrast to prevent permanent damage to the screen.
- Watching for long time TV in the screen aspect ratio 4:3 may cause permanent bars on the sides of the screen. When an image from video games or PC is displayed long-term it could cause burning of the static image onto the screen. When displaying a static image, lower the brightness and the contrast.
GB
TV INSTALLATION AND SETUP
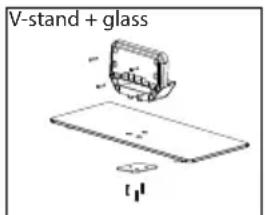
Instructions for assembling the stand
- Place the device on a fl at service with the screen facing down. Use a blanket or other soft fabric to protect the display.
- First, place plastic label on the turning axis.
- Insert the stand into the holder on the bottom of the TV set.
- Tighten the stand firmly in the holder, using the included screws.
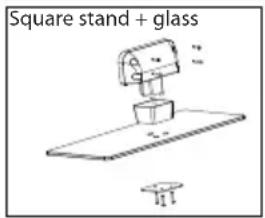
Positioning
- Place the unit within the room so that the display is not exposed to direct sunlight.
- Complete darkness or reflections on the screen can cause eye fatigue. Soft indirect light is recommended for comfortable viewing.
- Leave enough space between the device and wall to allow sufficient air circulation.
- Stay away from excessively warm areas to prevent damaging the case of the device or the premature ageing of components.
- Do not cover ventilation holes.
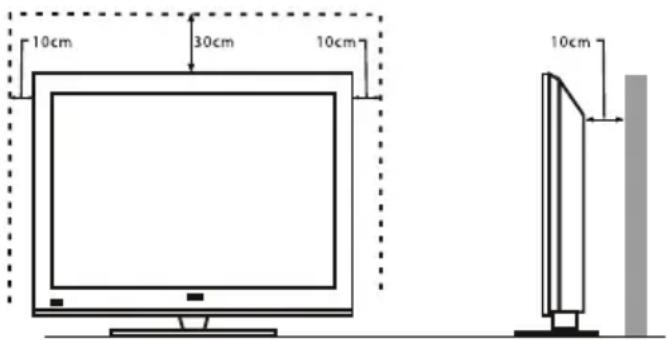
Antenna and power connection
- Connect the antenna cable to the antenna connector on the back side of the TV.
- Plug the power cord into the electric socket.
DESCRIPTION
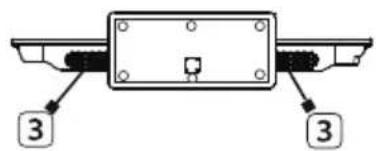
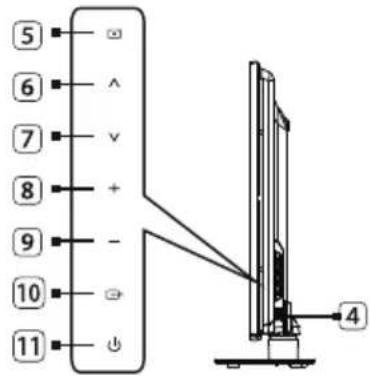
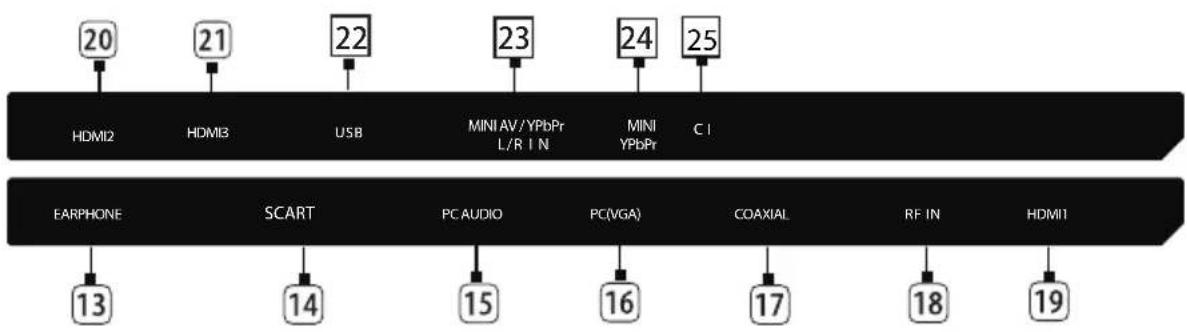
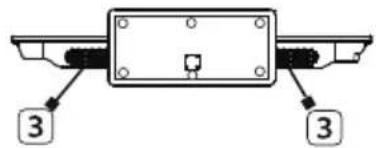
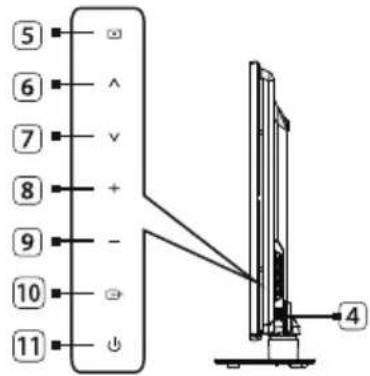
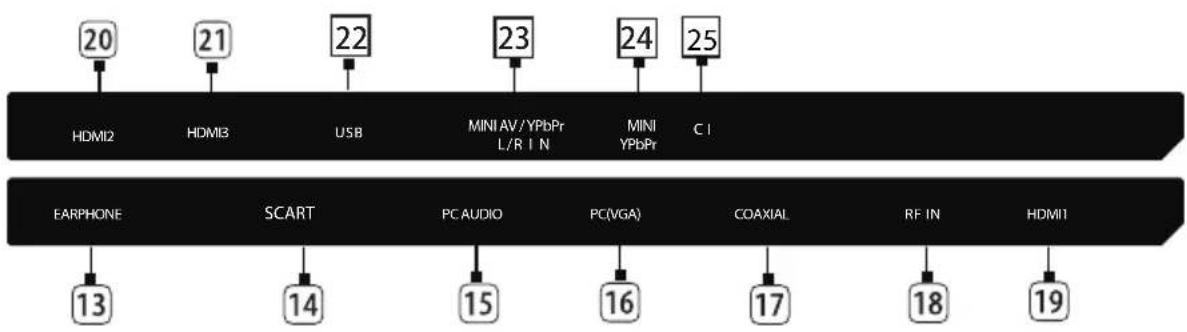
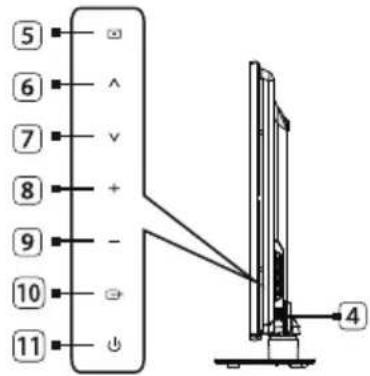
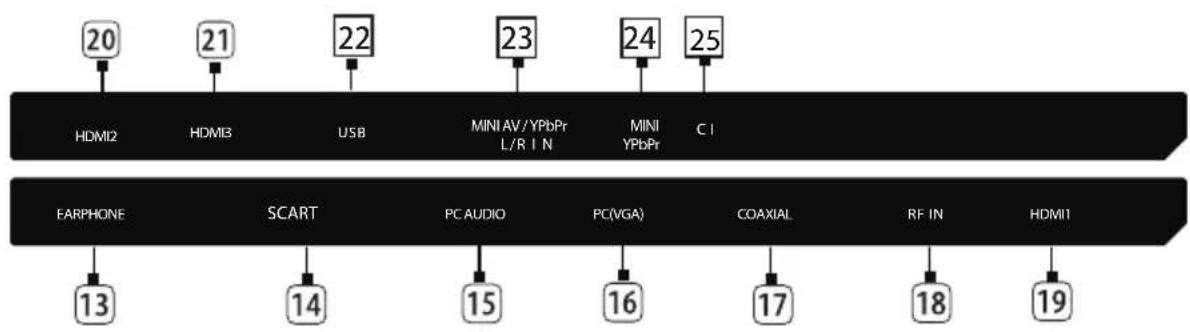
TV and interface buttons
Note:
The following description only represents a functional diagram. The actual position and layout can differ for various models.
- Remote controller sensor
- Power indicator
- Speaker
- On/Off switch
- Menu button
- "Program +" button
- "Program -" button
- "Volume +" button
- "Volume -" button
- Switch source button
- Standby mode button
- Power cord plug
- Headphones output
- SCART input
- PC AUDIO input
- PC (VGA) input
- COAXIAL input
- Antenna input
- HDMI 1
- HDMI 2
- HDMI 3
- USB
- MINI AV/YPbPr L/R input
- MINI YPbPr input
- Cl card slot
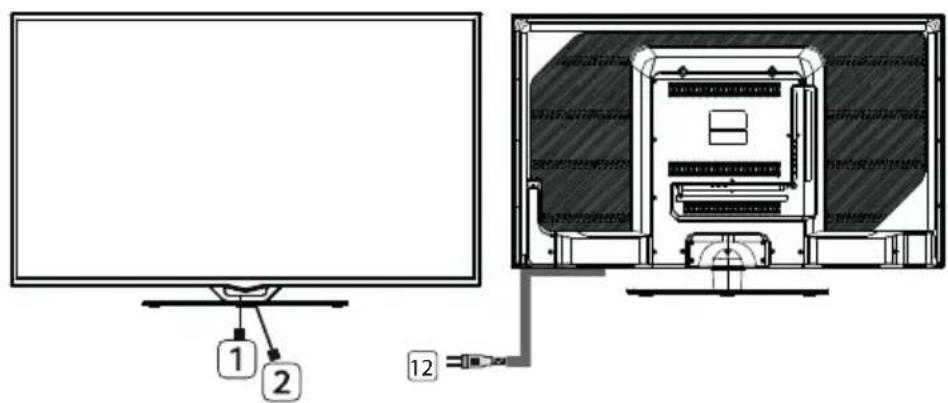
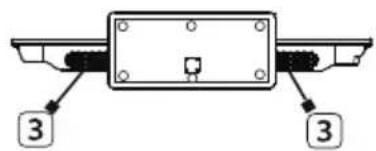
GB
Buttons on the remote controller
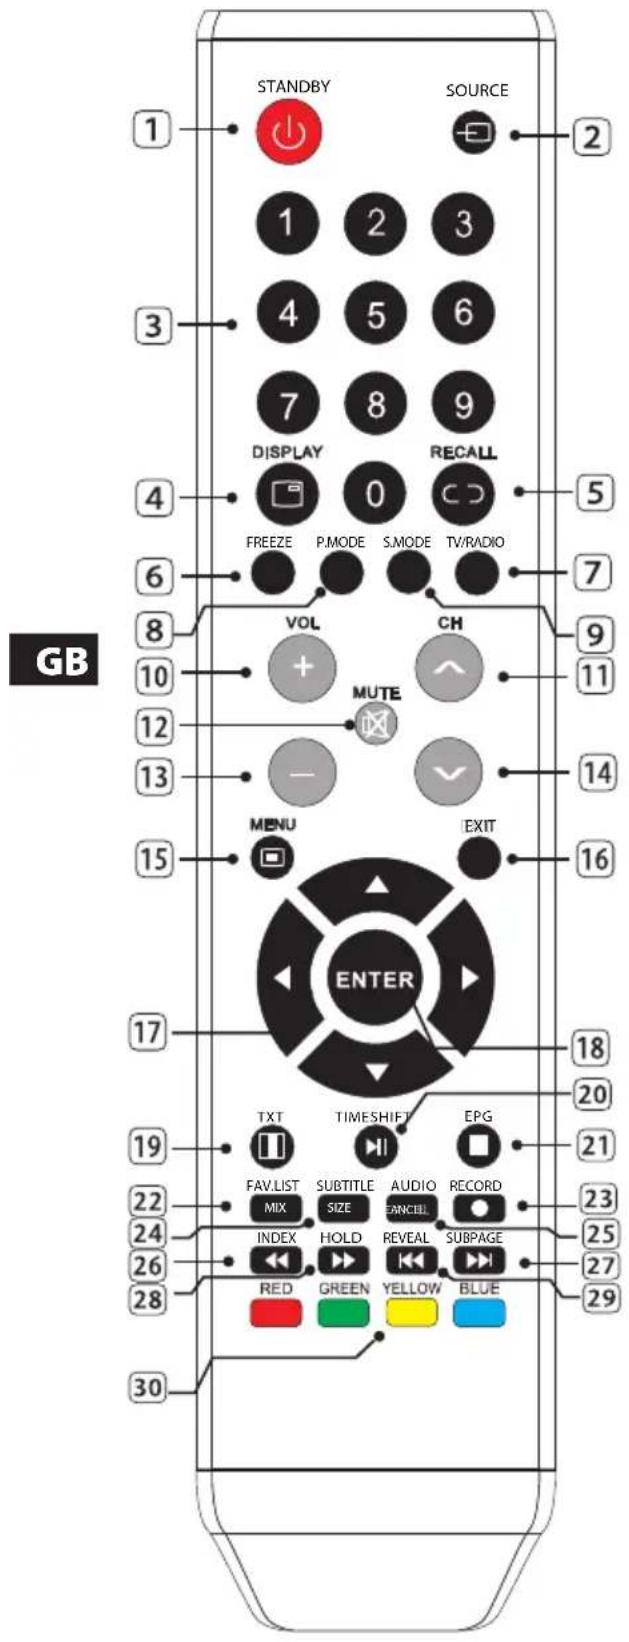
- ⏻: Turn the TV on or off into standby mode.
- SOURCE: Press to display the available sources of video and their selection.
- NUMERICAL BUTTONS: Direct channel entry.
- DISPLAY: Display information
- RECALL: Return to previous channel
- FREEZE: Freezes the display on the screen.
- TV/RADIO: Selection of television or radio mode.
- P.MODE: Display mode selection
- S.MODE: Audio mode selection
- VOL+: Increase volume.
- CH+: Switching to next channel.
- ☐MUTE: Audio on/off toggle.
- VOL -: Decrease volume.
- CH-: Switching to previous channel.
- MENU: Display main menu on screen.
- EXIT: Return to previous menu or leave menu.
- ARROWS: Menu controls.
- ENTER: Confirm selection.
- TXT: Open teletext.
- TIMESHIFT: Timeshift activation (DTV mode) or pause and resume playback (media playback mode)
- EPG: Entry to the electronic program guide or exit (in the media player playback mode, stopping playback and return to the file list).
- FAV/LIST: Access to the list of favourite channels.
- REC: Press to start recording the current TV program (in DTV mode).
- SUBTITLE: Selection of subtitle mode (in the DTV mode).
- AUDIO: Selection of TV audio mode
- INDEX: Display of index page. Fast reverse in the media mode.
- SUBPGAGE: Subpage mode. In the media mode: next song.
- HOLD: Hold current page. In the media mode: fast forward.
- REVEAL: Reveal of hidden information. In the media mode: previous song.
- Color buttons: Controlling the function indicated on the screen
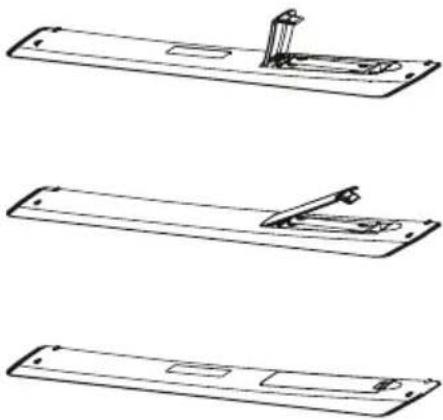
Inserting the batteries
- Open the back cover of the remote control.
- Insert two batteries (AAA) 1,5 V. Pay attention to correct polarity of the batteries.
-
Close the cover of the battery space. If you do not use the TV for a long period of time, remove the batteries from the remote control. If the remote control does not work properly, check the following points:
-
Make sure that the power supply is working and that the plug is properly inserted into the outlet.
• Make sure that the TV set is on. - Check if the polarity of the batteries in the remote control is correct.
- Check if the batteries are not empty.
- Make sure that the sensor of the remote control is not overwhelmed by fl fluorescent light, direct sunlight or another source of intense light.
Basic operations
On / Off
- Insert the plug of the power cord in the electrical outlet.
- Using the switch, turn on the TV power supply and press the button of the standby mode to turn on the TV set.
- Press the standby button again to switch off the TV set into standby mode.
Note: When you turn off the TV set using the switch, do not turn it on again immediately; wait at least 1 minute before using the switch again.
Standby mode
Press the standby button ⏻ to turn on the TV set.
Press it again ⏻ to switch it into standby mode. The power supply indicator will be red.
Do not leave the TV turned off for long time in standby mode. If you will not use the TV set for a long time, turn it off using the switch.
Input mode selection
This device allows to receive signal from various sources. Press SOURCE repeatedly to select required signal source.
TELEVISION CONTROLS
Input switch
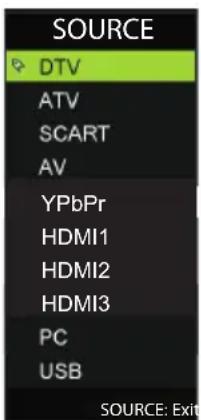
- Press SOURCE to display menu of input sources.
- Press ▼/▲ or SOURCE to select the required input.
- Press ENTER to switch to the selected input.
- Press EXIT to exit the menu.
Initial installation
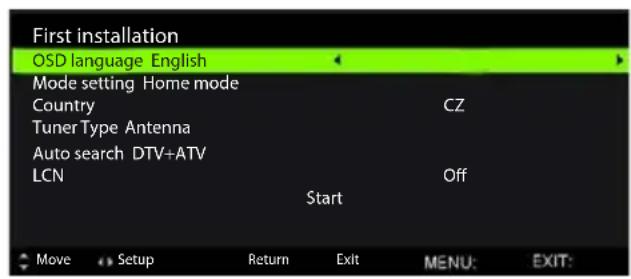
Connect the antenna to the "RF-IN" input on the back panel of the TV set. When you turn the TV on for the first time, the initial installation menu appears.
OSD language
Using the ◀/▶ buttons, select the language in which you want the TV to communicate with you via menu.
Mode setting
Using the ◀/▶ buttons, select mode
Country
Using the ◀/▶ buttons, select the required country.
Tuner Type
Using the ◀/▶ buttons, select antenna or cable
Auto search
Using the ◀/▶ buttons, select mode: DTV+ATV, DTV, ATV.
LCN
Using the ◀/▶ buttons, select On or Off
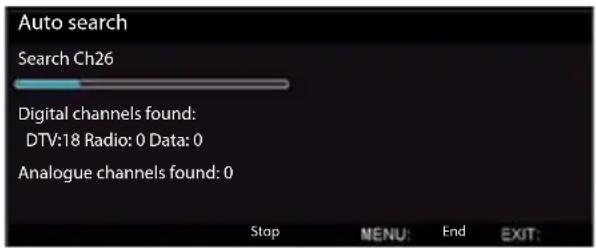
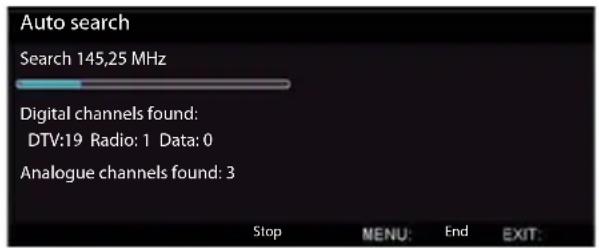
Auto tuning status
The TV set will first tune in the digital channels. If you want to skip the digital channels, press MENU. The tuning of the analogue channels will start. If you want to cancel the tuning of analogue channels, press MENU.
Picture menu
Press MENU to display the main menu.
Select PICTURE from the main menu via ◀/▶ and press ▼/ENTER to enter the menu.
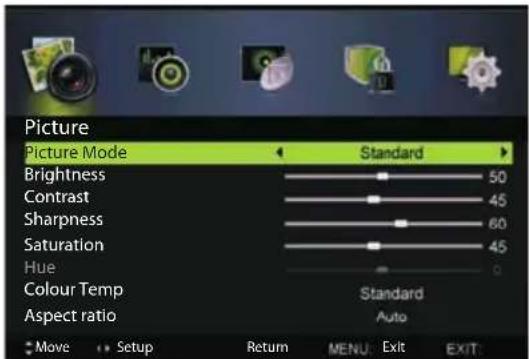
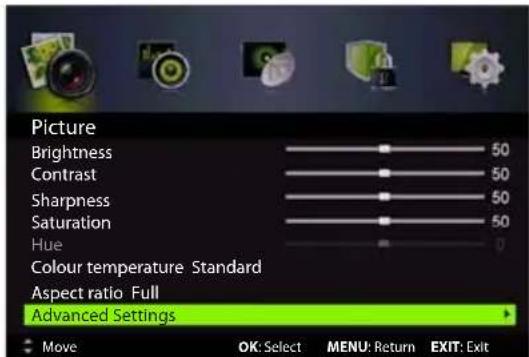
- Select the option you wish to configure in the PICTURE menu via ▼/▲.
- Press ENTER/◄/► to set.
- When you have finished with the configuration, press MENU to save the changes and return to the previous menu.
Picture Mode
Press ▼/▲ to select Screen Mode and set via ◀/▶.
Tip: Press PMODE to directly set the screen mode.
(Available picture modes: Standard, Fine, Personal, Dynamic)
Brightness/Contrast/Sharpness/Tint/Hue
Press ▼/▲ to make your selection and adjust via ◀/▶.
Brightness Brightness settings.
Contrast Contrast settings.
Sharpness Sharpness settings
Saturation Colour saturation settings.
Hue Colour hue settings. For signal in NTSC format only.
Colour Temp
Changes the overall colour representation of the picture.
Press ▼/▲ to select Color Temp and choose between Standard, Warm and Cool via the ◀/▶ buttons.
Standard Creates a live and fresh picture
Warm The picture is tuned to warm red tints
Cool The picture is tuned to cool blue tints
Aspect ratio
Press ▼/▲ to select Aspect Ratio and choose the desired aspect ratio via ◀/▶.
Auto Automatically adjusts the picture aspect ratio according to the current program
Full/4:3/Zoom1/Zoom2 Select from the available display formats.
PC setting
- Press SOURCE to select PC as the source.
- Press MENU to enter the main menu, then choose the PICTURE menu via ◀/▶.
- Press ENTER/▼ to enter the menu and press ▼ to choose PC Setting.
- Using ▼/▲ select PC setting and using ▼/▲ set the required value.
Auto setting Press MENU /▶ to set the optimum setting of the picture on the screen.
H-position Set the horizontal position of the picture
V-position Set the vertical position of the picture
Phase Minimizing the horizontal distortion
Clock Minimizing the vertical bands in the picture
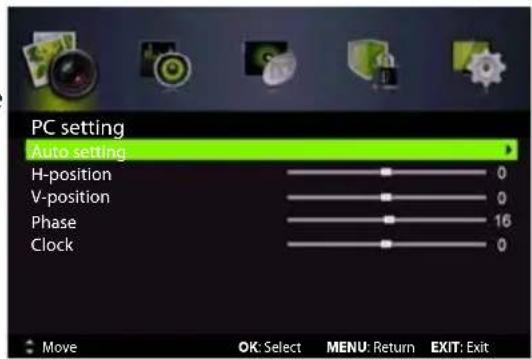
Screen mode
Using ▼/▲ select the HDMI mode and press the ◀/▶ buttons to select Auto, Video or PC. Available only when input is switched to HDMI.
Advanced Settings
- Setting advanced video functions can fi ne tune the picture parameters.
- Press ▼/▲ to select Advanced Settings and then press ENTER/▶ to enter the sub-menu.
NR
Set selections for suppressing noise in the picture.
Using ▼/▲ select NR and press the ◀/▶ to select.
OFF Select to turn off the noise detection Weak Weak detection and noise reduction of the picture Medium Medium detection and noise reduction of the picture Strong Intensified detection and noise reduction of the picture
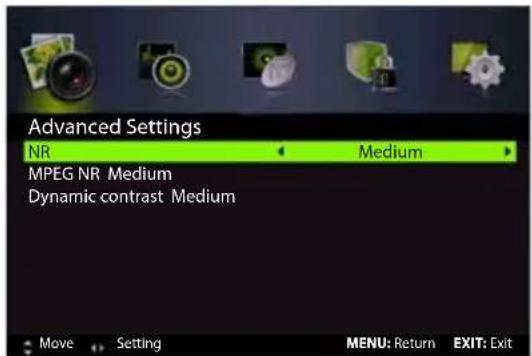
MPEG NR
Set selection for suppressing the MPEG noise.
Using ▼/▲ select MPEG NR and press the ◀/▶ buttons to select.
OFF Select to turn off the MPEG noise detection Weak Weak detection and MPEG noise reduction Medium Medium detection and MPEG noise reduction Strong Strong detection and MPEG noise reduction
Dynamic contrast
Automatic setting of picture details and brightness.
Using ▼/▲ highlight the item Dynamic contrast and press the buttons ◀/▶ to select.
(Available options for the dynamic contrast: Off, Weak, Medium, Strong)
Audio menu
Press MENU to display the main menu.
Select AUDIO from the main menu via ◀/▶ and press ENTER/▼ to enter the menu.
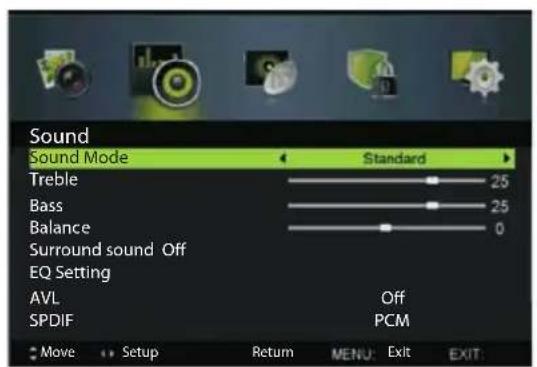
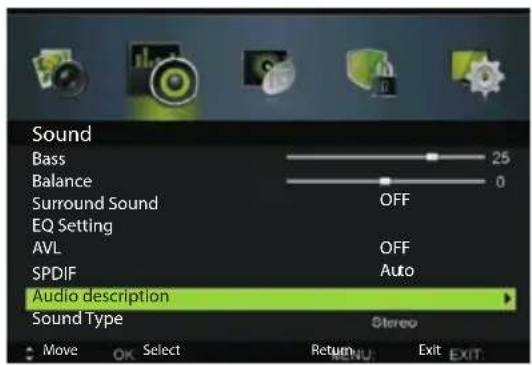
- Select the option you wish to configure in the AUDIO menu via ▼/▲.
- Press ENTER/◄/► to set.
- When you have finished with the configuration, press MENU to save the changes and return to the previous menu.
Sound Mode
Press ▼/▲ to select Sound Mode and choose the desired mode via ◀/▶. (Available audio modes: Standard, Music, Personal, Movie)
Treble / Bass / Balance
Press ▼/▲ to make your selection and adjust via ◀/▶.
Treble High frequency tones can be increased or decreased.
Bass Low frequency tones can be increased or decreased.
Balance The balance between left and right channel volume can be adjusted.
Surround Sound
Press ▼/▲ to select Surround Sound and choose On or Off via ◀/▶.
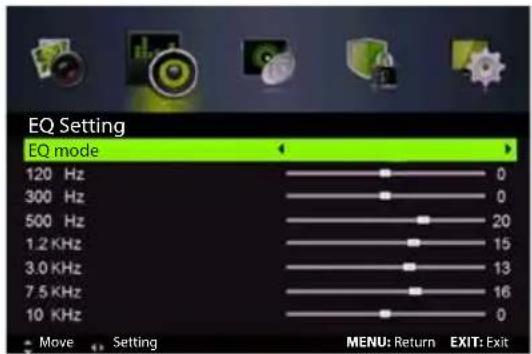
EQ Setting
The seven band equalizer curve can be set.
Press ▼/▲ to select EQ Setting and then press ENTER/▶ to enter the sub-menu.
EQ mode
Press ▼/▲ to select item EQ mode and use ◀/▶ to select. (Available options: Off, Rock, Pop, Jazz, User)
AVL
Automatic volume control setup.
Press ▼/▲ to select AVL and choose On or Off using ◀/▶.
SPDIF
Press ▼/▲ to select SPDIF and choose Off / Auto / PCM via ◀/▶.
Audio description
Press ▼/▲ to select Audio Description and then press ENTER/▶ to enter the sub-menu.
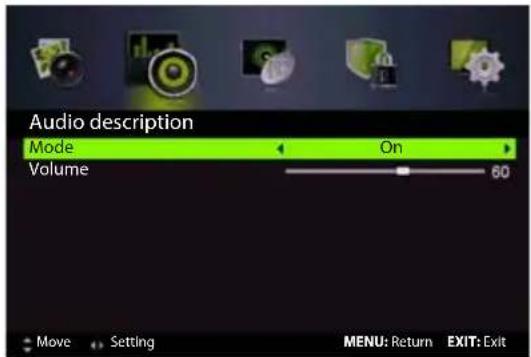
Mode
Press ▼/▲ to select item Mode and use ◀/▶ to select On or Off.
GB
Audio Type
Press ▼/▲ to select item Audio type and using ◀/▶ select from available options.
(Available options: Stereo, Dual I, Dual II, Mixed).
Channel menu
Press MENU to display the main menu.
Select CHANNEL from the main menu via ◀/▶ and press ENTER/▼ to enter the menu.
-
Select the option you wish to configure in the CHANNEL menu via ▼/▲.
-
Press ENTER to access the sub-menu.
-
Press MENU to return to the previous menu.
Tuner Type
Press ▼/▲ to select Tuner Type and choose Antenna or Cable via ◀/▶.
Auto Scan
Press ▼/▲ to select Auto Scan and then press ENTER/▶ to enter the sub-menu.
Country
Press ◀/▶ to select the country.
Mode
Press ◀/▶ to select the mode: DTV+ATV, DTV, ATV.
Scan Type
Press ◀/▶ to select the channel scan type: Advanced, Quick, Full.
Network ID
Press ◀/▶ to select the network ID: Auto or enter a number.
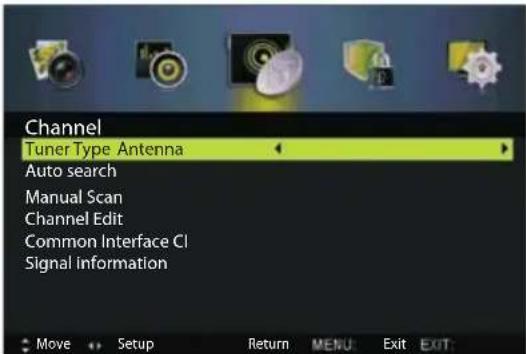
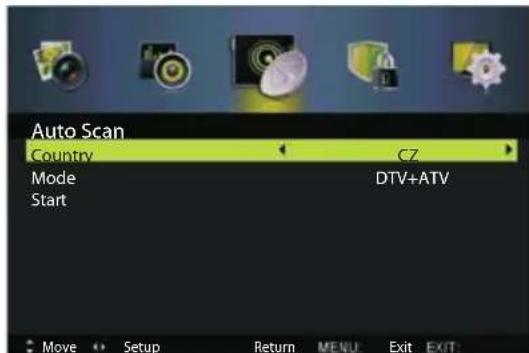
The tuner type is Antenna
Frequency
Press ◀/▶ to select the frequency: Auto or enter a number.
Symbol Rate
Press ◀/▶ to select the symbol rate: Auto or enter a number.
Start
Press ENTER / ▶ to start the auto scan process.
- The digital channels are scanned first, followed by the analog channels.
- Before starting the auto scan process, make sure the correct tuner type is selected (Antenna and Cable). An incorrectly configured signal type may result in no stations being found.
• Stations with encoded broadcasting will not appear among the stations found.
Manual Scan
Press ▼/▲ to select Manual Scan and then press ENTER/▶ to enter the sub-menu.
Digital Manual Scan
Press ▼/▲ to select Digital Manual Scan and then press ENTER/▶ to enter the sub-menu.
Network ID
Press ◀/▶ to select the network ID: Auto or enter a number.
Frequency
Press ◀/▶ to select the frequency: Auto or enter a number.
Symbol Rate
Press ◀/▶ to select the symbol rate: Auto or enter a number.
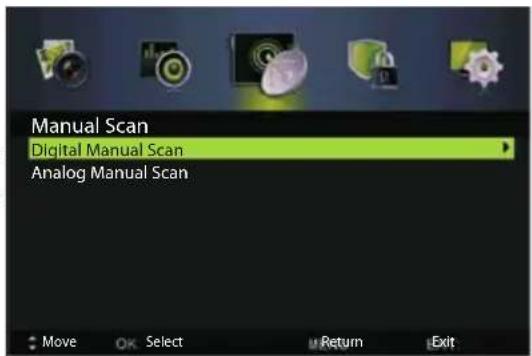
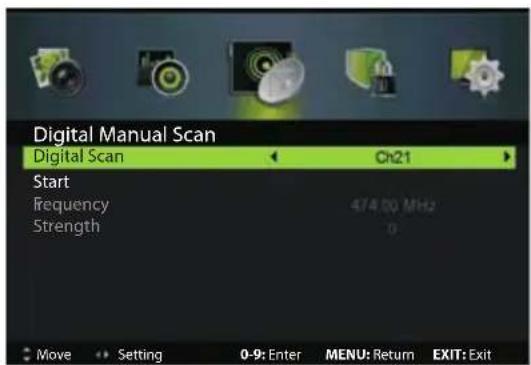
The tuner type is Antenna
Modulation
Press ◀/▶ to select the modulation: Auto, 16QAM, 32QAM, 64QAM, 128QAM, 256QAM.
Start
Press ENTER / ▶ to start the channel scan process.
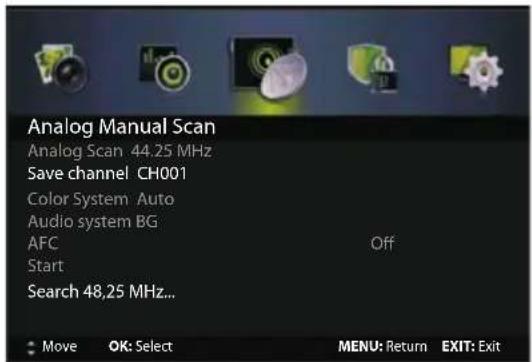
Analog Manual Scan
Press ▼/▲ to select Analog Manual Scan and then press ENTER/▶ to enter the sub-menu.
Analog Scan
Press ◀/▶ to select the Analog Scan.
Color System
Press ◀/▶ to select the color system: Auto, PAL or SECAM.
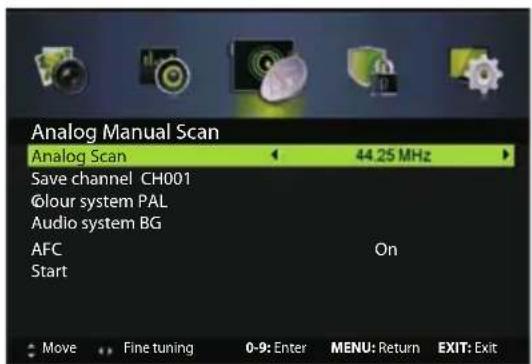
Sound System
Press ◀/▶ to select the Sound System: Auto, DK, BG, I or L.
Modulation
Press ◀/▶ to select the modulation: Auto, 16QAM, 32QAM, 64QAM, 128QAM, 256QAM.
AFC
Auto fi ne tune.
Press ◀/▶ to select On or Off.
Start
Press ENTER / ▶ to start the channel scan process.
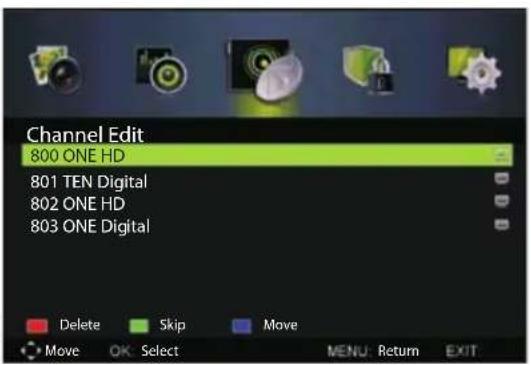
Channel Edit
Press ▼/▲ to select Channel Edit and then press ENTER/▶ to enter the sub-menu.
Three color buttons on the remote controller make organizing channels easier.
Use ▼/▲ to first highlight the channel you wish to delete, move or skip. Next:
- Press the red button
to delete the channel. - Press the green button to skip the selected channel. (When surfi ng through channels via CH+/-, these channels will automatically be skipped).

- Press the blue button to mark a channel to be moved. Use the buttons to move the channel to the desired position.
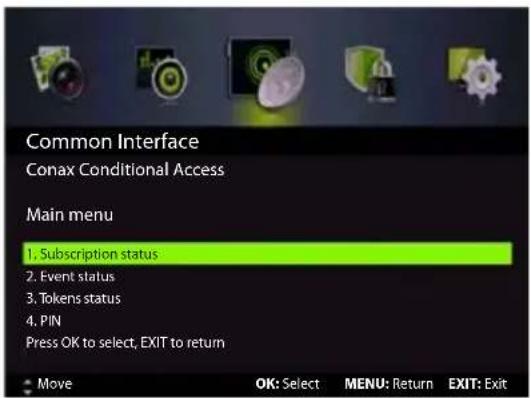
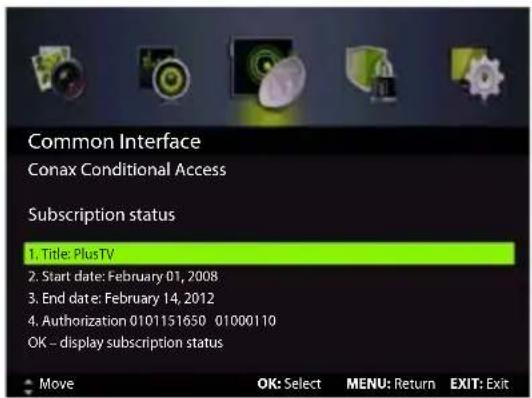
Common Interface
Press ▼/▲ to select Common Interface and then press ENTER to enter the sub-menu. This option is only available in DTV mode with an inserted CI card.
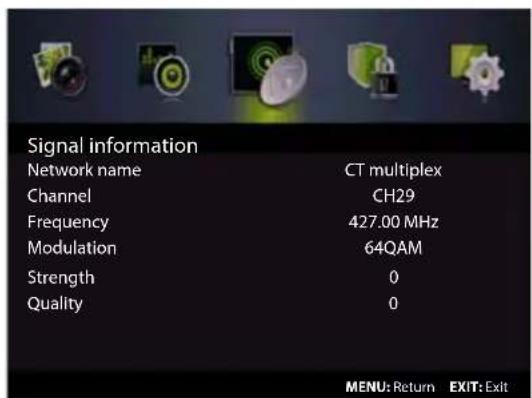
Signal information
Use ▼/▲ to select Signal Information and then press ENTER to display signal information. Available only in DTV mode.
Lock System menu
Press MENU to display the main menu.
Select LOCK SYSTEM from the main menu via ◀/▶ and press ENTER/▼ to enter the menu.
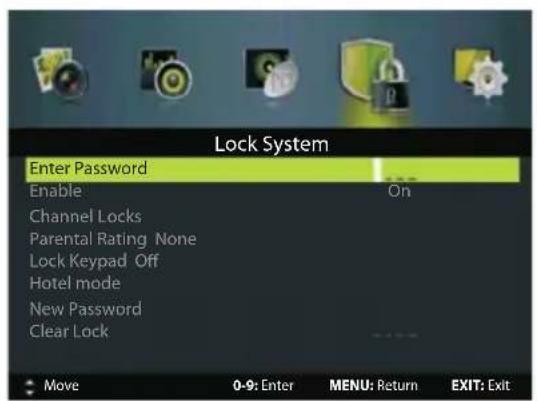
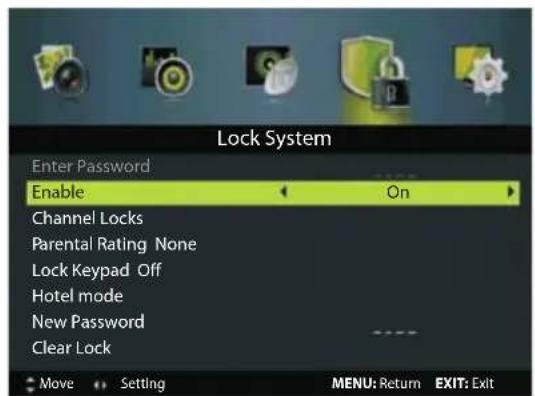
- Select the option you wish to configure in the LOCK SYSTEM menu via ▼/▲.
- Press ENTER/◄/► to set.
- When you have finished with the configuration, press MENU to save the changes and return to the previous menu.
Press ▼/▲ to select Enable and choose On or Off via ◀/▶.
- The Channel Locks, Parental Rating and Lock Keypad features are available when password use is enabled (Enable set to On).
• The default password is 0000. Should you forget your password, refer to a repair shop.
Enable
Press ▼/▲ to select Enable and choose On or Off via ◀/▶.
Channel lock, Parental rating and Keyboard lock functions are available, if Enable is set to On.
Channel Locks
Press ▼/▲ to select Channel Locks and then press ENTER/▶ to enter the sub-menu.
Parental Rating
Press ▼/▲ to select the Parental Rating and choose the desired protection level via ◀/▶.
Lock Keypad
By activating this option you can prevent undesirable use, for example, by children.
Press ▼/▲ to select Lock Keypad and choose On or Off via
◀/▶.
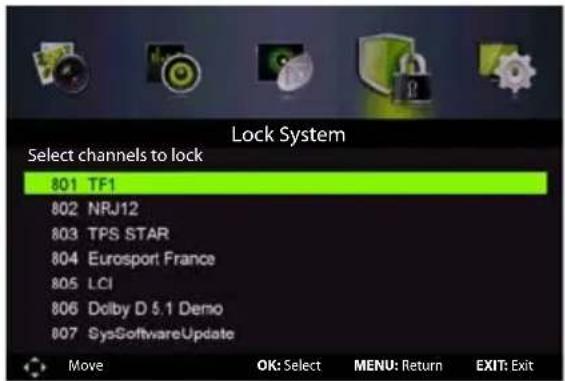
Hotel mode
Press ▼/▲ to select hotel mode.
New Password
Press ▼/▲ to select a New Password and enter a four digit number to use as the password. Enter the password again to confirm.
Clear Lock
Press ▼/▲ and select Clear Lock.
Setup Menu
Press MENU to display the main menu.
Select SETUP from the main menu via ◀/▶ and press ENTER/▼ to enter the menu.
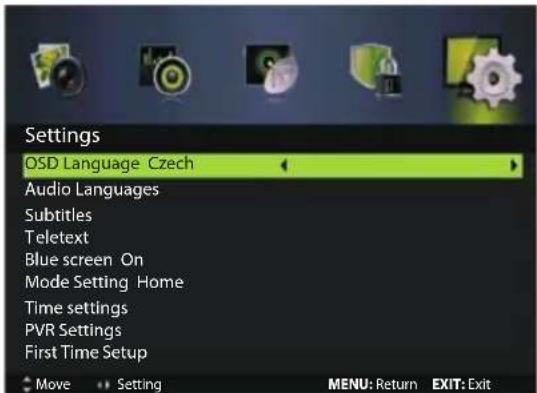
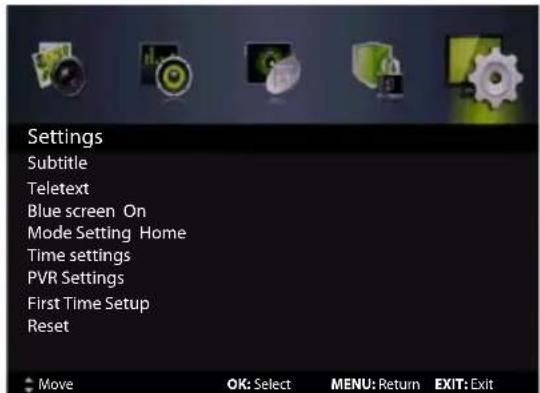
- Select the option you wish to configure in the SETUP menu via ▼/▲.
- Press ENTER/◄/► to set.
- When you have finished with the configuration, press MENU to save the changes and return to the previous menu.
GB
OSD Language
Press ▼/▲ to select the OSD Language and choose the desired language via ◀/▶.
Audio Languages
Press ▼/▲ to select the Audio Languages and then press ENTER to enter the sub-menu.
Select the Audio Primary Language and Audio Secondary Language using the ▼/▲/◄/► buttons.
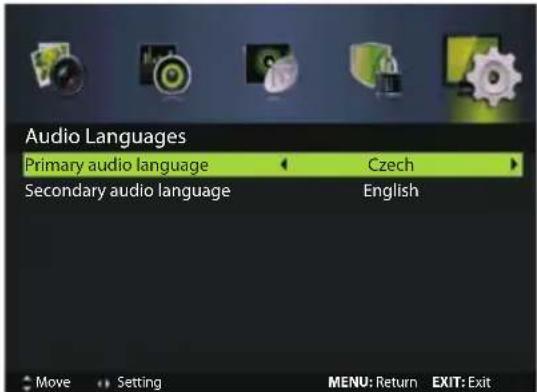
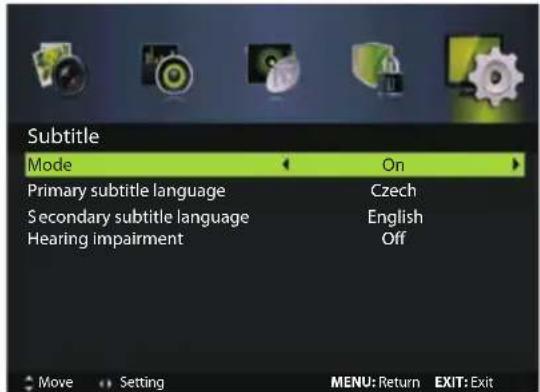
Subtitles
Press ▼/▲ to select Subtitles and then press ENTER to enter the sub-menu.
Mode
Press ▼/▲ to select item Mode and using ◀/▶ select On or Off.
Using ▼/▲ and ◀/▶ select the primary and the secondary languages of the subtitles.
Hearing impaired
Using the ◀/▶ buttons, select item Hearing impaired an press ▼/▲ to select On or Off.
Teletext
This item allows changing the teletext settings. The option is only available for DTV and ATV signal sources. Press ▼/▲ to select Teletext and then press ENTER/▶ to enter the sub-menu.
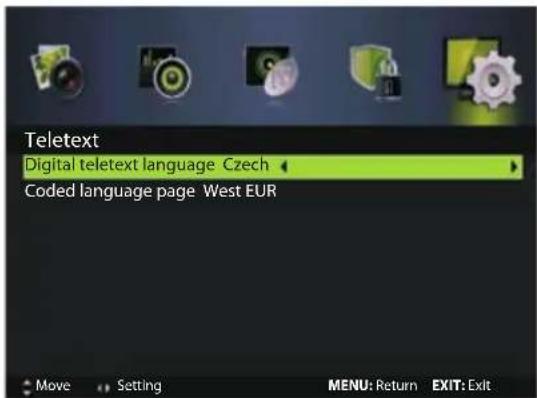
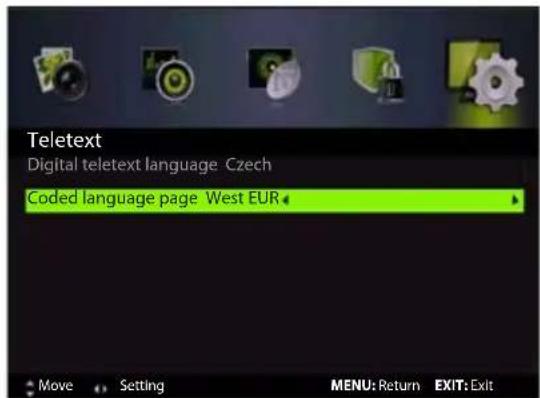
In case of DTV source, use the ◀/▶ buttons to select the language of the digital teletext. In case of ATV source, use the ◀/▶ buttons to select the coded page of the language.
Mode Setting
Press ▼/▲ to select Mode Setting.
Time settings
Press ▼/▲ to select Time Settings and then press ENTER/▶ to enter the sub-menu.
OSD Time
Press ▼/▲ to select item OSD Time and using ◀/▶ set the length of time for displaying information on the screen.
(You can set: Off, 10 seconds, 20 seconds, 30 seconds, 60 seconds)
Switch off timer
Set time interval after which the TV automatically shuts off .
Press ▼/▲ to select item Timer and using ◀/▶ set the shut off time.
Press ▼/▲ to select item Auto shut off and using ◀/▶ specify the period of inactivity after which the TV automatically shuts off. (You can set: Off, 3 hours, 4 hours, 5 hours).
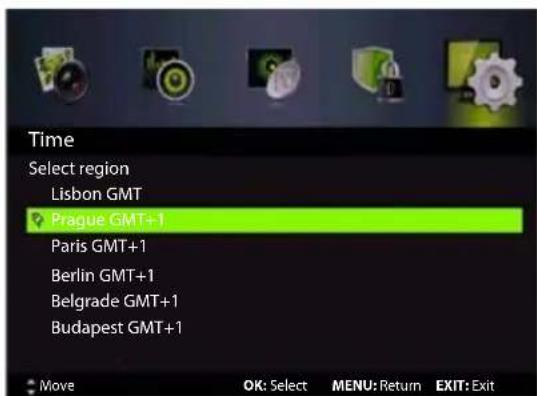
Time zone
Select your time zone.
Press ▼/▲ to select item Time zone and press ENTER / ▶ to enter submenu.
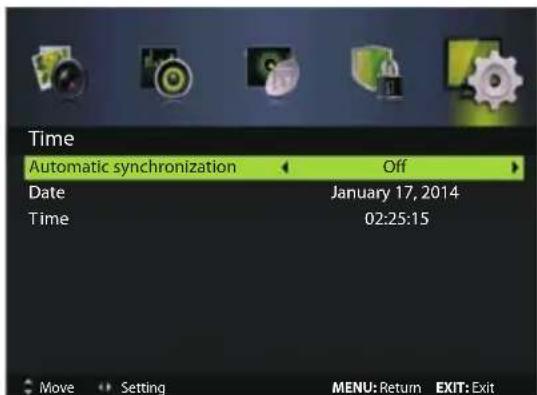
Time
Press ▼/▲ to select item Time and press ENTER / ▶ to enter submenu.
If you set the automatic time synchronization to Off, you can set time manually.
Note: V in case of power failure the clock setting will be erased.
![Settings OSD Languages Select please [Save mode] to save demo. Subtitle Press OK to continue, other buttons are to cancel. Teletext Mode Setting Home Time settings PVR Settings Move Setting MENU: Return EXIT: Exit](/content/2026/05/845503/images/c55e8990dd100d537015ccab8a15f000202a24ffa1e86b533dd37318f25c93c4.jpg)
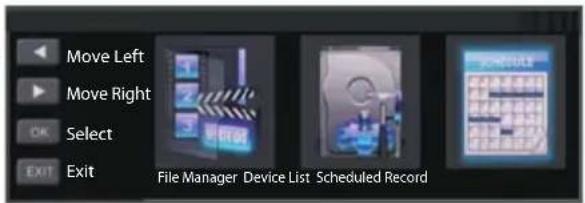
Setting PVR
Press ▼/▲ to select the PVR Settings and then press ENTER to enter the sub-menu.
The appliance will check the connected USB device.
First Time Setup
Press ▼/▲ to select First Time Setup and then press ENTER to enter first time setup mode.
EPG Menu
Press EPG on the remote control to enter the EPG menu.
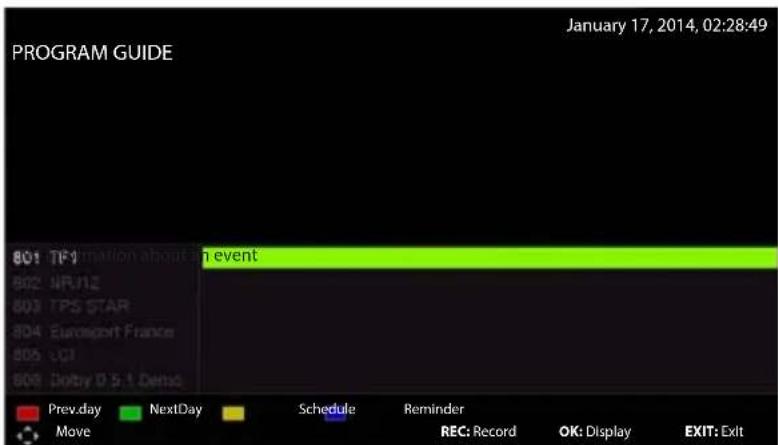
Note: The TV station operator is responsible for the information in the program guide.
Notes on ATV/HDMI/AV/YPbPr/PC
- Item PC Setting in the menu Picture is available only if PC input is switched on. Items Picture mode and HDMI CEC in the menu Settings are available only if the HDMI input is switched on.
- Items Audio Description and Sound type in the menu Sound are not available for this model.
- When you switch to input SCART / HDMI / AV / YPbPr / PC the menu Channeldoes not appear.
- You cannot apply setting of items in the SCART / HDMI / AV / YPbPr / PC modes Channel lock and Parental rating.
- In the SCART / AV / PC modes the setting of audio track, subtitle language and PVR setting are not valid.
USB control
Note: Before checking the USB menu, connect the USB device to the TV set and press SOURCE to switch the TV input to USB.
Use ◀/▶ to select USB from the input source menu and press ENTER to enter the menu.
Use ◀/▶ to select the item you wish to set from the USB menu and press ENTER to enter the menu.
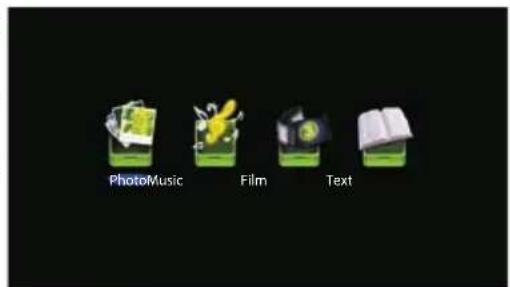
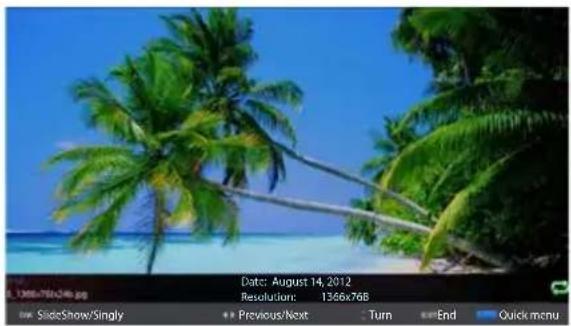
Photo
Using ◀/▶ select in the main menu PHOTO and press ENTER to enter the menu.
Using ◀/▶ select the memory disk, which you want to watch and press ENTER.
If you want to return to the previous menu, select using ◀/► the option Return.
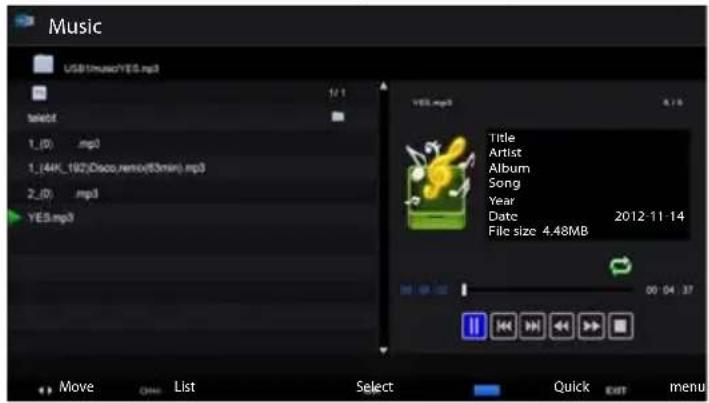
Music
Using ◀/▶ select in the main menu MUSIC and press ENTER to enter the menu. Using ▼/▲ select the required memory disk and press ENTER. If you want to return to the previous menu, select using ▼/▲ the option Return.
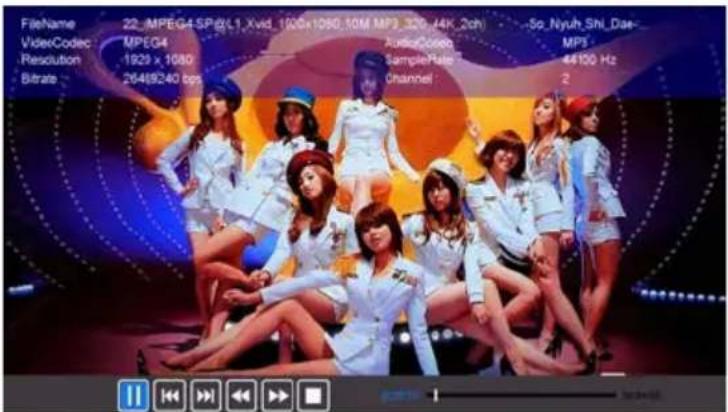
Movie
Using ◀/▶ select in the main menu MOVIE and press ENTER to enter the menu. Using ▼/▲ select the memory disk which you want to watch and press ENTER. If you want to return to the previous menu, select ▼/▲ the option Return.
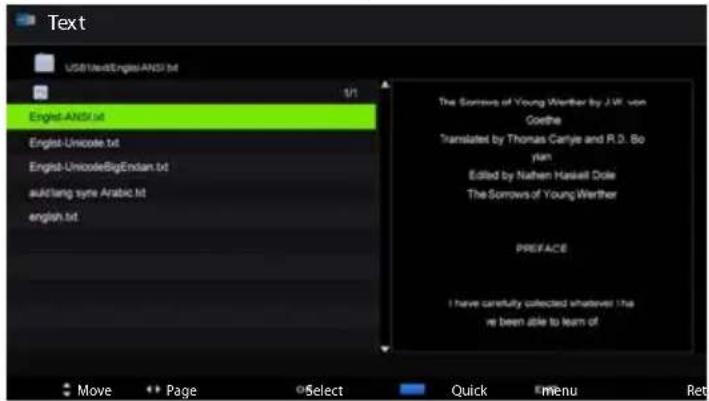
Text
Using ◀/▶ select TEXT in the main menu and press ENTER to enter menu. Using ▼/▲ select the required memory disk and press ENTER. If you want to return to the previous menu, select using ▼/▲ the option Return.
TROUBLESHOOTING
| Problem Solution | |
| No power • Make sure the power cord plug | is plugged into the electric socket. Unplug the TV from the power supply, wait about 60 seconds and then plug the TV in again and power on. |
| Bad signal reception • High buildings or hills | s can lead to analog signal reflection and shadows. Changing the antenna orientation can improve picture quality.• If you use an inside antenna, reception can be worse under certain circumstances. Try changing the antenna positioning to improve reception. If the picture does not improve, use an outdoor antenna. |
| No image • Make sure the antenna is correctly connected to the TV. | • Try changing to a different channel to verify the issue does not lie outside of your receiver. |
| The picture is fi ne, but no sound • Increase | the volume.• Make sure the sound on the TV is not muted. Press the mute button again to restore the previous volume. |
| The sound is fi ne, but no picture or incorrect colors | • Increase the contrast and brightness. |
| Snowy picture, noise or picture freezes • Make sure the antenna connection is correct. | |
| Interfering horizontal stripes through the picture | • Interference caused by electric appliances, such as hair dryers or vacuum cleaners. Switch appliances used near the TV off . |
| The TV does not react to remote controller operations | • Direct the remote controller towards the remote control sensor on the TV.• Remove any obstacles between the remote controller and the TV sensor.• Make sure the batteries in the remote controller are not dead. |
| No picture in PC mode • Make sure the video cable connection to the VGA connector is intact.• Makes sure the format of the picture from the PC is compatible with this TV. | |
| Vertical vibration (in PC mode) • Adjust the display frequency for the picture from the PC. | |
| The picture in PC mode is too light or dark | • Adjust the brightness and contrast. |
If the instructions above do not help eliminate the issue, unplug the TV from the power supply for about 60 seconds and then plug the TV in again. Should the issue persist, refer to a qualified repair shop. Do not attempt to repair the appliance yourself.
TECHNICAL SHEET
| MODEL 32 LED 614 PVR | |
| Screen | |
| Panel size 32" (81 cm) | |
| Aspect ratio 16:9 | |
| Resolution 1366 × 768 | |
| Tuner | |
| Digital tuner HD DVB-T MPEG2/4 | |
| Electronic Programme Guide EPG yes | |
| PVR recording to USB yes | |
| Timeshift yes | |
| Channel list yes | |
| Video system PAL B/G D/K I, SECAM B/G D/K | |
| Picture | |
| Progressive Scan yes | |
| Comb fi Iter 3D | |
| Noise reduction yes | |
| OSD menu | yes |
| Audio | |
| Sound output | 2×8 W |
| Pitch correction | Stereo balance, equalizer |
| Stereo sound NICAM/A2 | |
| Connectivity | |
| USB | 1 |
| Supported formats | mpg\.avi\.ts\.mp4\.mkv\.ts\.vob\.mp3\.jpg\.mp3\.wav\.wmv |
| HDMI | 3 |
| SCART | 1 |
| Component YPbPr | 1 |
| VGA (D-Sub5 pin) | 1 |
| PC audio in | 1 |
| Headphone jack | 1 |
| RF IN | 1 |
| General specifications | |
| Parent lock | yes |
| Power | |
| Power input 60 W | |
| Standby power input ≤0.5 W | |
| Power in off state 0 W | |
| Energy class A | |
| Main power switch yes | |
| Dimensions and weight | |
| Dimensions with stand (w × h × d) mm | 729 × 471 × 185 (square stand + glass pedestal) |
| Unit dimensions without the stand (w × h × d) mm | 729 × 431 × 83 |
| Weight 4.7 kg | |
| Wall hanging option VESA 100 × 200 |
GB
USE AND DISPOSAL OF WASTE
Wrapping paper and corrugated paperboard – deliver to scrapyard. Packing foil, PE bags, plastic elements – throw into plastic recycling containers.
DISPOSAL OF PRODUCTS AT THE END OF LIFETIME
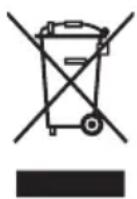
Disposal of electric and electronic equipment (valid in EU member countries and other European countries with an implemented recycling system)
The represented symbol on the product or package means the product shall not be treated as domestic waste. Hand over the product to the specified location for recycling electric and electronic equipment. Prevent negative impacts on human health and the environment by properly recycling your product.
Recycling contributes to preserving natural resources. For more information on the recycling of this product, refer to your local authority, domestic waste processing organization or store, where you purchased the product.
This product complies with EU directive requirements on electromagnetic compatibility and electrical safety.
08/05

The instruction manual is available at website www.ecg.cz.
Changes in text and technical parameters reserved.
bar
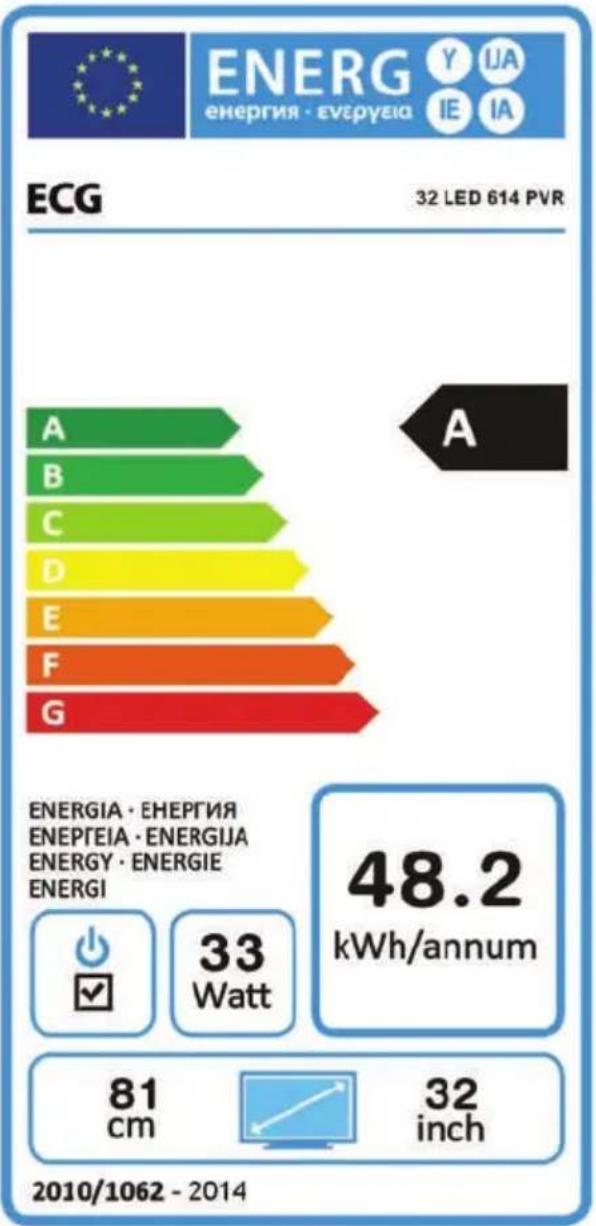
| Grade | ECG Value | |-------|-----------| | A | 32 LED 614 PVR | | B | 32 LED 614 PVR | | C | 32 LED 614 PVR | | D | 32 LED 614 PVR | | E | 32 LED 614 PVR | | F | 32 LED 614 PVR | | G | 32 LED 614 PVR | | ENERGIA · EHEPTEIA ENEPETIA · ENERGIJA ENERGY · ENERGIE ENERGI | 48.2 kWh/annum | | ENERGIA · EHEPTEIA ENEPETIA · ENERGIJA ENERGY · ENERGIE ENERGI | 48.2 kWh/annum | | ENERGIA · EHEPTEIA ENEPETIA · ENERGIJA ENERGY · ENERGIE ENERGI | 48.2 kWh/annum | | 33 Watt | 33 Watt | | 81 cm | 32 inch | | 2010/1062 - 2014 | 32 inch |GB
www.ecg.cz
- LED 614 PVR
- LED TV
- Základní operace
- Zapnutí/vypnutí
- Hudba
- Text
- ODSTRAŇOVÁNÍ POTÍŽÍ
- Základné operácie
- Zapnutie/vypnutie
- SAFETY INSTRUCTIONS
- Read carefully and save for future use!
- ATTENTION
- WARNING:
- Warning
- INTRODUCTION
- ATTENTION:
- GB
- TV INSTALLATION AND SETUP
- Instructions for assembling the stand
- Positioning
- Antenna and power connection
- DESCRIPTION
- TV and interface buttons
- Note:
- Inserting the batteries
- Basic operations
- On / Off
- Standby mode
- Input mode selection
- TELEVISION CONTROLS
- Input switch
- Initial installation
- OSD language
- Mode setting
- Country
- Tuner Type
- Auto search
- LCN
- Auto tuning status
- Picture menu
- Picture Mode
- Brightness/Contrast/Sharpness/Tint/Hue
- Colour Temp
- Aspect ratio
- PC setting
- Screen mode
- Advanced Settings
- NR
- MPEG NR
- Dynamic contrast
- Audio menu
- Sound Mode
- Treble / Bass / Balance
- Surround Sound
- EQ Setting
- EQ mode
- AVL
- SPDIF
- Audio description
- Mode
- Audio Type
- Channel menu
- Auto Scan
- Scan Type
- Network ID
- Frequency
- Symbol Rate
- Start
- Manual Scan
- Digital Manual Scan
- Modulation
- Analog Manual Scan
- Analog Scan
- Color System
- Sound System
- AFC
- Channel Edit
- Common Interface
- Signal information
- Lock System menu
- Enable
- Channel Locks
- Parental Rating
- Lock Keypad
- Hotel mode
- New Password
- Clear Lock
- Setup Menu
- Audio Languages
- Subtitles
- Hearing impaired
- Teletext
- Time settings
- OSD Time
- Switch off timer
- Time zone
- Time
- Setting PVR
- First Time Setup
- EPG Menu
- Notes on ATV/HDMI/AV/YPbPr/PC
- USB control
- Photo
- Music
- Movie
- USE AND DISPOSAL OF WASTE
- DISPOSAL OF PRODUCTS AT THE END OF LIFETIME
- www.ecg.cz
Brand : ECG
Model : 32 LED 614 PVR
Category : TV