
KH 1112 - Coffee maker BIFINETT - Free user manual and instructions
Find the device manual for free KH 1112 BIFINETT in PDF.

| Product Type | Coffee maker |
| Model | KH 1112 |
| Brand | BIFINETT |
| Power Supply | 230-240 V~, 50 Hz |
| Power Rating | 1000 W |
| Water Tank Capacity | Max. 1.3 litres |
| Coffee Pot Capacity | 1.3 litres (10 large cups) |
| Minimum Fill Quantity | 250 ml |
| Filter Type | Size 4 paper filter |
| Hotplate | Yes, keeps coffee warm |
| Water Level Display | Yes |
| Power Switch with Pilot Lamp | Yes |
| Cord Storage | Yes, cord compartment on back |
| Coffee Measure | Included |
| Safety Features | Auto shut-off not specified; manual switch-off required |
| Cleaning | Wipe exterior with damp cloth; wash filter holder and coffee pot |
| Descaling Interval | Every 30 uses (hard water) or 60 uses (soft water) |
| Dimensions | Not specified in manual |
| Weight | Not specified in manual |
| Country of Origin | Germany (Importer: KOMPERNASS GMBH) |
Frequently Asked Questions - KH 1112 BIFINETT
User questions about KH 1112 BIFINETT
0 question about this device. Answer the ones you know or ask your own.
Ask a new question about this device
Download the instructions for your Coffee maker in PDF format for free! Find your manual KH 1112 - BIFINETT and take your electronic device back in hand. On this page are published all the documents necessary for the use of your device. KH 1112 by BIFINETT.
USER MANUAL KH 1112 BIFINETT
natural_image
Black bifinett coffee maker with clear glass and a white digital display, accompanied by a white ceramic coffee maker on a table (no visible text or symbols on the main device)GB Coffee Maker KH 1112
Operating instructions
natural_image
White water heater with a hand inserting a plug into it, no visible text or symbols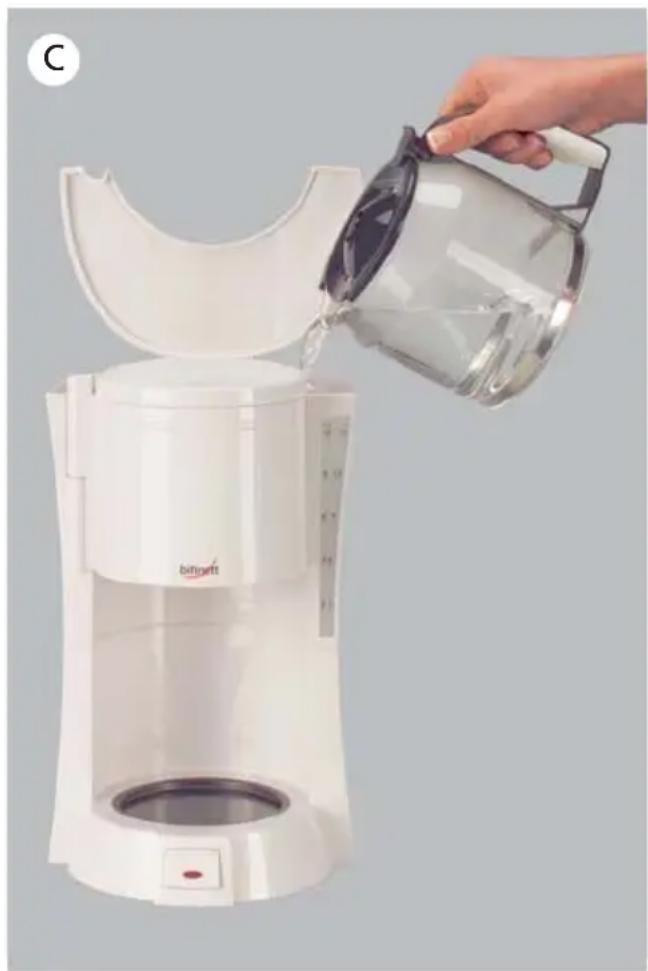
natural_image
White portable coffee maker with water being poured from a glass pitcher, no visible text or symbols on the device itself.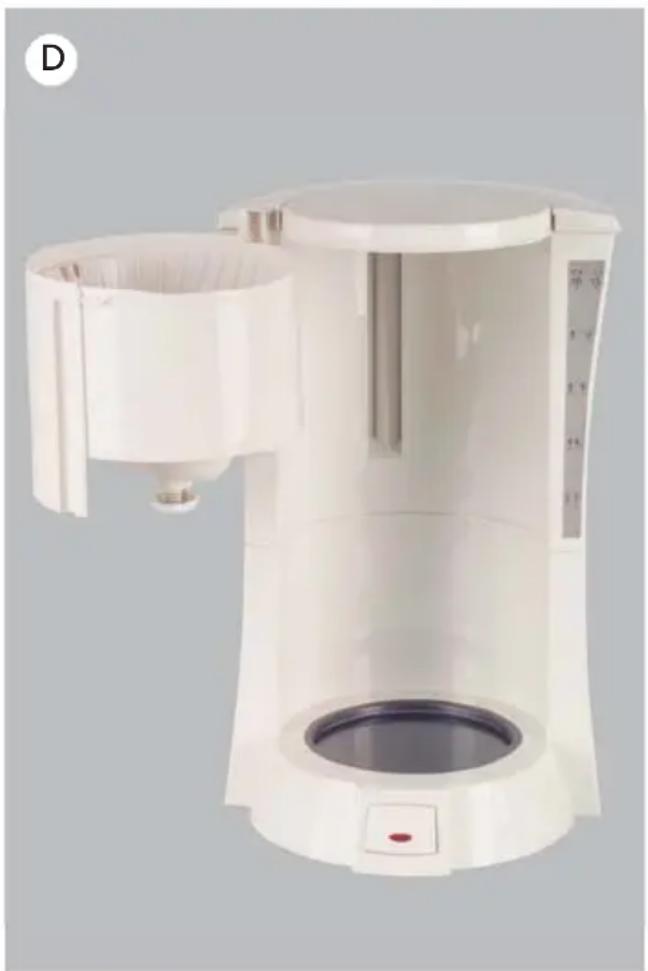
natural_image
White digital water heater with control panel and indicator lights (no text or symbols visible)Coffee maker KH 1112 Page
Safety instructions 4
Proper Use 5
Description 5
Device Overview / Items supplied 5
Installation and connection 5
Operation 6
Before the First Use 6
Fill in ground coffee 6
Fill water 6
Switching on and off 7
Wind up the cord 7
Cleaning 7
Decalcifying 8
Troubleshooting 8
Disposal 9
Technical Data 9
Warranty and Service 9
Importer 9
Read the operating instructions carefully before using the appliance for the first time and preserve this booklet for later reference. Hand over the manual to anyone, whom you pass on the appliance to.
Coffee Maker KH 1112
⚠️Safety instructions
⚠️Danger of electrocution!
- Only connect the properly installed and earthed wall socket with a mains voltage of 230 - 240 V\~ with 50 Hz.
- Pull the plug out when moving or filling the coffee maker, or in case of malfunction, when cleaning the machine or when it is not in use.
- Under no circum immerse the coffee maker in any fluid whatsoever. Do not expose the appliance to humidity and do not use it outdoors.
If by chance liquids do enter into the casing, unplug the appliance from the power socket immediately and have it repaired by a qualified technician.
- Never touch the cord or plug with wet hands.
- To disconnect, plug at the power socket, do not pull at the power cord.
- Do not b end or s cord.
- To avoid possible defective appliance to be checked and possibly repaired by qualified technicians, or contact our Customer Service Department.
- To avoid possible defective power cables to be replaced immediately by qualified technicians, or contact our Customer Service Department.
- Do not use extension cables.
⚠️ Fire hazard!
- Never leave the co unsupervised when it is in operation. - Never operate the without tap water and never pour more than 1.3 litres into it.
coffee maker to a
⚠️Injury hazard!
- Never attempt to pot of the coffee maker in the micro-t wave. the wall socke
- Never allow childr maker without adult supervision. Explain to children the dangers of the device.
s t a n c e s m u s t y o u
⚠️Risk of burning!
- Never touch hot su maker, in particular the hotplate and the glass coffee-pot.
⚠️Risk of scalding!
- Never use the glass coffee maker in the microwave.
- Do f e t m tack ue or h p lo ever Only remove the paper filter when I whale liquid hap finished running t h e through it.
- Do not hold your h q s t e a m.e z e t h e p o w e r
- Do not move the ce e the coffee-making procedure. range
- Only remove the machine has finished making the coffee and the water has completely run through the paper filter.
e Adl aw nagy es r s , lo as re rangelfore f switching the machine on, otherwise there is a danger of scalding due to steam and hot water.
⚠️Danger of tripping!
- Lay the power c treads or trips over it.
- Do not use exte
Proper Use
The coffee maker is intended solely for making coffee.
This coffee maker is intended for use in private households only. Please observe all information in these operating instructions, particularly the safety instructions. All other uses are deemed to be improper and can result in property damage
or even in personal injury. We shall not accept liability for damages caused due to improper use of the appliance.
Description
You can make freshly-brewed hot filtered coffee with this coffee maker. You can keep the coffee hot in the glass coffee-pot on the hotplate when the coffee maker is still on.
Device Overview / Items supplied
ord such that no one
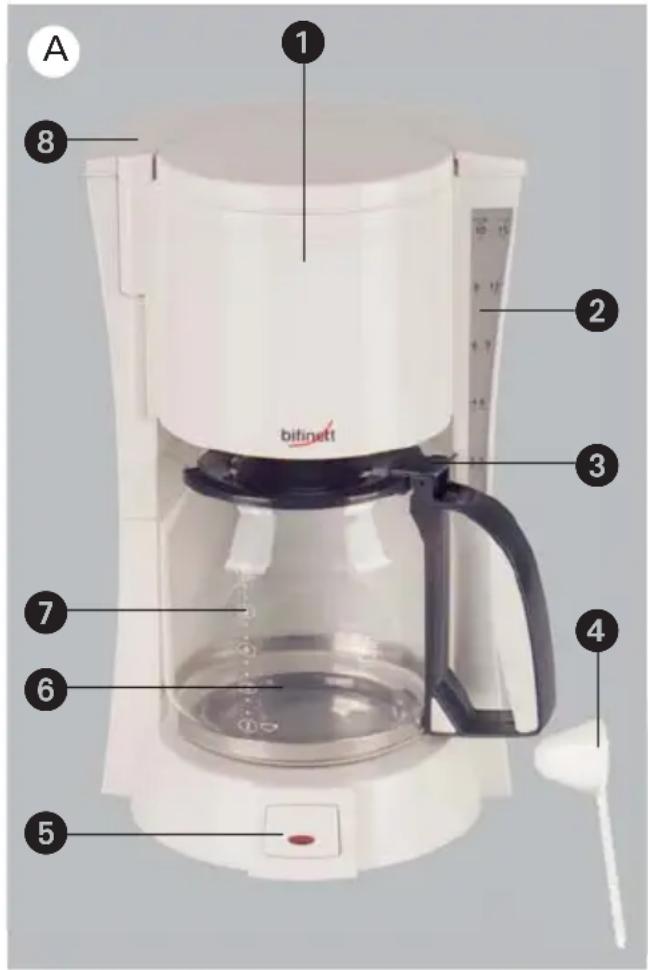
Figure A
①Filter holder a b l e s.
②Water level display
③Lid opener
4 Coffee measure
⑤Power switch with pilot lamp
6hotplate
⑦Glass coffee-pot with level marking
⑧ Water container lid
Warranty slip (no illustration)
Operating instructions
(no illustration)
Installation and connection
⚠️Danger of electrocution!
Never install the coffee maker near water used in sinks and other containers. Water always represents a hazard, even when the machine is not in operation. Therefore pull out the power plug after each use.
⚠️ Fire hazard!
Never install the coffee maker near sources of heat.
The appliance may be damaged.
⚠️ Important!
Only use the coffee maker on a level and dry surface.
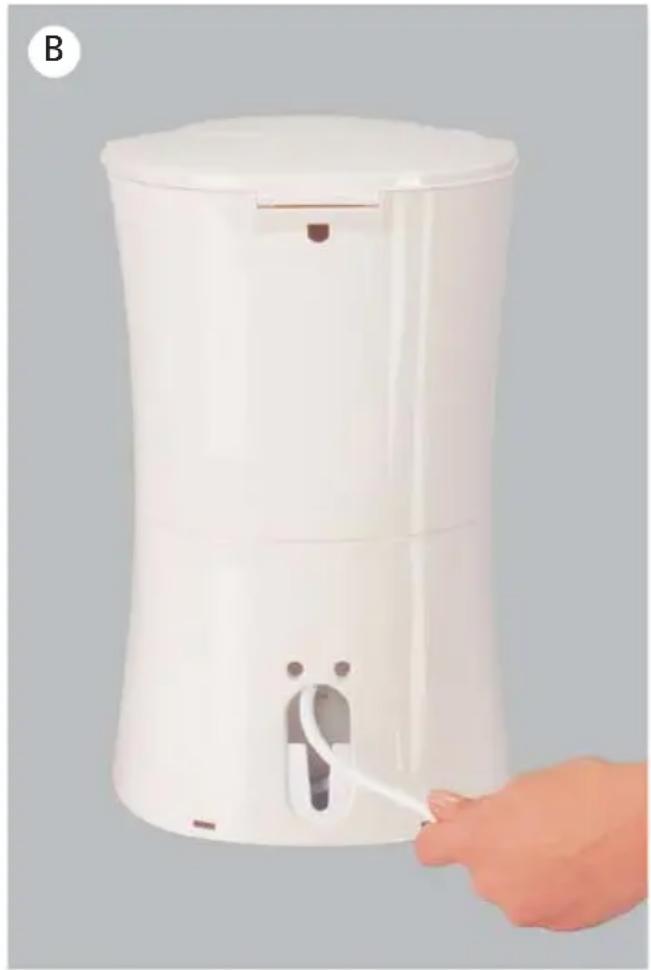
- When you wish to make, pull the power cord out of the cord compartment (fig.B).
- Then plug the pow wall socket.
Operation
Before the First Use
⚠️IMPORTANT!
- Never fill more of tap water into the water container. The minimum quantity in the water container and the minimum quantity of brewed coffee in the glass coffee-pot ⑦ is 250 ml. Otherwise the coffee maker could be damaged.
- Disconnect the power supply immediately after use. The coffee maker is only fully current-less when you pull the plug out of the wall socket.
- Only pour tap w container. Otherwise you may damage the coffee maker.
Fill in ground coffee
- Swing out the filt
- Place an opened si into the filter holder. (First fold the
t hbottom filter paper edge over f 1.3 - Fill the ground co filter.
① Allow approx. one level coffee measure per small cup of ground coffee.
For large cups, allow approx. one
c o f heaped coffee melasurer per cup. If m t l the coffee is too strong, you can reduce the amount of ground coffee per cup to taste.
a • t Cel ro is a t to h e h fe i lwt æ tre h
Fill water
- open the glass co Dfpeeen-ptohte ⑦ and thee r co water container.
- Fill the glass cof
- Carefully rinse thwater.water container
- Pour the tap water coffee required into the water
- Fill the glass cof container (figoC)t with max.
1.3 litres of tap water. - Close the water co
- Pour all the tap water into the wat container (fig.C).
- Place the empty glass coffee-pot on the hotplate.
- Switch the coffee maker on and wai until the coffee-making procedure has finished.
- Empty the glass coffee-pot.
- Switch the coffee maker off by pressing the mains switch again ⑤, until the power on light goes out.
Then you can use the coffee maker to make fresh coffee.
Switching on and off
- If you wish to make, press the power switch 5, until the red pilot lamp lights up.
- If you wish to make, press the power switch until the pilot lamp goes out.
- Then pull the wallsocket.
Wind up the cord
- Push the cord ment on the back of the machine (fig.B).
- If necessary, p of the plug into the holes above the cord compartment.
Cleaning
In order to always get the best possible, you should clean your coffee maker after each use.
- Pull the power plug out of the wall socket.
⚠️Danger of electrocution!
Before cleaning the coffee maker, you must always pull the power plug out of the wall socket. You must never immerse the appliance in water or hold it under running water during cleaning.
⚠️Risk of burning!
Always wait until the coffee maker has s wcoioled down before cleaning. Otheowisef e e the appliance could be damaged.
s w! Important! off the coffee
Do not use household cleaning agents or sharp objects to remove any dirt.
p o This may damage the coffee maker of the
- Wipe the casing of the coffee maker and the glass coffee-pot ⑦ with a soft cloth dampened with mild soapy
n t ovater. Remove any possible deposits p a t - in the glass coffee-pot.
- Remove the filter
u s hfilter holder after each cause ①. c o n t a c
- Remove the paper filter holder under running water.
Decalcifying
The lime content (degree of hardness) in the water in time causes the calcification of the coffee maker. Lime impairs the function of the machine and reduces the quality of the coffee.
① Ask your water supplier for the degree of hardness of your tap water. If your water has a high degree of hardness, the coffee maker must be decalcified after every 30 applications, low degrees of hardness need only be decalcified after every 60 applications. Use a decalcifying agent for household appliances and follow the instructions.
- Switch the coffee cool down completely
- Place the decalc water container.
- Fill up to them 1.3 litres.
- Put the glass co hotplate ⑥.
- Switch the coffee of the ON/OFF switch 5.
- Wait until the b finished.
- Rinse the water glass coffee-pot thoroughly several times with tap water.
- Then let the coffee maker brew only with tap water twice as described in the section entitled "Before the First Use".
Afterwards you can use the coffee maker normally again.
Troubleshooting
| Symptom Possible cause and remedy | |
| The coffee maker cannot be switched on. | The power plug is not in the wall socket. Push the power plug into the wall socket.A household fuse is faulty. Check the building fuses and replace them, if necessary.The wall socket is faulty. Try another wall socket.The coffee maker may be faulty. Have the coffee maker checked by servcie staff. |
| e make fying ximum amount of | er off and agent int o |
| The quality of the bre-ewedmoffek has deteriorated in conta | The co#emakthe is calcified. Decalcify the coffeeemaker n by me g procedure in ner and th |
Disposal
Do not dispose of the device in normal domestic waste.
Dispose of the device over a registered waste disposal firm or through your communal waste disposal facility. Observe the currently valid regulations. In case of doubt, consult your waste disposal facility.

Dispose of the packaging materials in an environmentally responsible manner.
Technical Data
Mains voltage: 230 - 240 V\~, 50 Hz
Rated output: 1000 W
Coffee filter: Size 4
Maximum filling level
Glass coffee-pot and: 1.3 litres, corresponds
to water container 10 large cups
Warranty and Service
The warranty conditions and the service address can be found on the warranty slip.
Importer
KOMPERNASS GMBH
BURGSTRASSE 21
D-44867 BOCHUM
DEUTSCHLAND / GERMANY
www.kompernass.com