
PK-9010 - Frying Pan Concept - Free user manual and instructions
Find the device manual for free PK-9010 Concept in PDF.


| Product Type | Electric Frying Pan |
| Brand | Concept |
| Model | PK-9010 |
| Power Consumption | 1500-1600 W |
| Voltage | 230 V ~ 50 Hz |
| Coating | Ceramic Non-Stick |
| Temperature Control | Adjustable (5 positions: 1-5) |
| Functions | Reheating, Simmering, Cooking, Grilling, Steaming |
| Accessories Included | Glass Lid, Stainless Steel Steaming Rack |
| Safety Features | Removable Control Module, Overheat Protection (via correct attachment) |
| Cleaning | Wipe with Damp Cloth; Do Not Immerse Control Module or Pan |
| Material | Ceramic Coated Aluminum/Body |
| Usage | Indoor Household Use Only |
| Storage | Cool, Dry Place Away from Heat Sources |
Frequently Asked Questions - PK-9010 Concept
User questions about PK-9010 Concept
0 question about this device. Answer the ones you know or ask your own.
Ask a new question about this device
Download the instructions for your Frying Pan in PDF format for free! Find your manual PK-9010 - Concept and take your electronic device back in hand. On this page are published all the documents necessary for the use of your device. PK-9010 by Concept.
USER MANUAL PK-9010 Concept
Electric frying pan with ceramic coating
natural_image
Three identical stainless steel cookware stoves with heat sinks, arranged side by side (no text or symbols visible)PK9010, 9020, 9030
CZ EN DESK PL LV

natural_image
Three empty rectangular boxes with no text or symbolsPODĚKOVÁNÍ
natural_image
Close-up of a black mechanical component with a handle and labeled part '6' (no text or symbols on the object itself)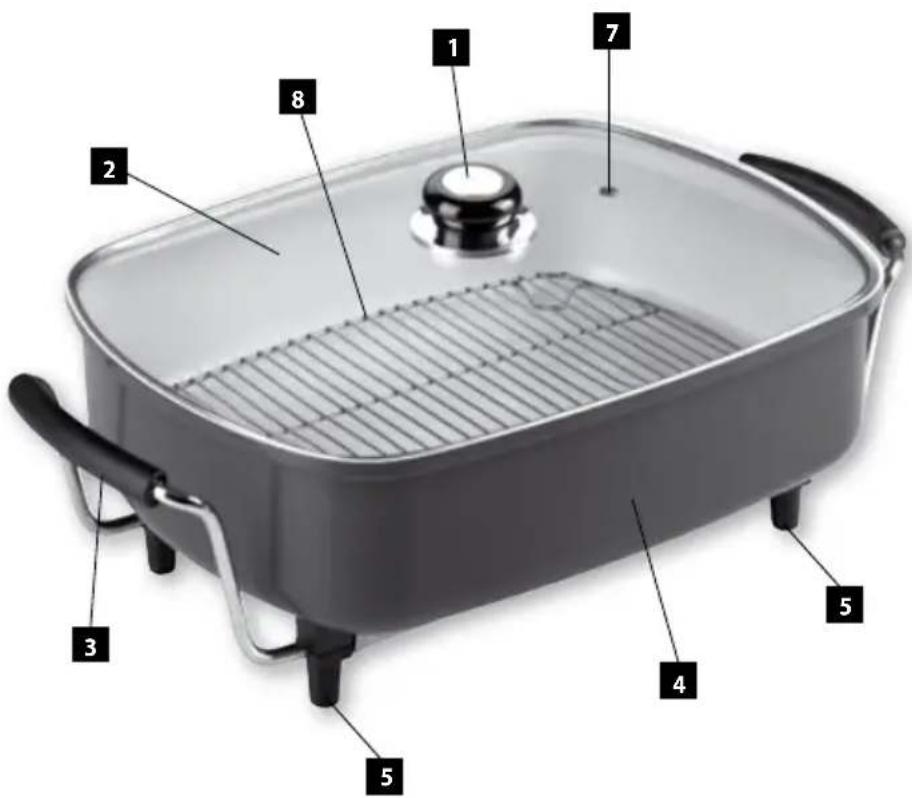
UPOZORNĚNÍ:
natural_image
Close-up of a black electrical plug with a circular dial and cable, next to a grid-patterned surface (no visible text or symbols)Obr. 1
natural_image
Close-up of a black mechanical component with a handle and labeled part '6' (no text or symbols on the object itself)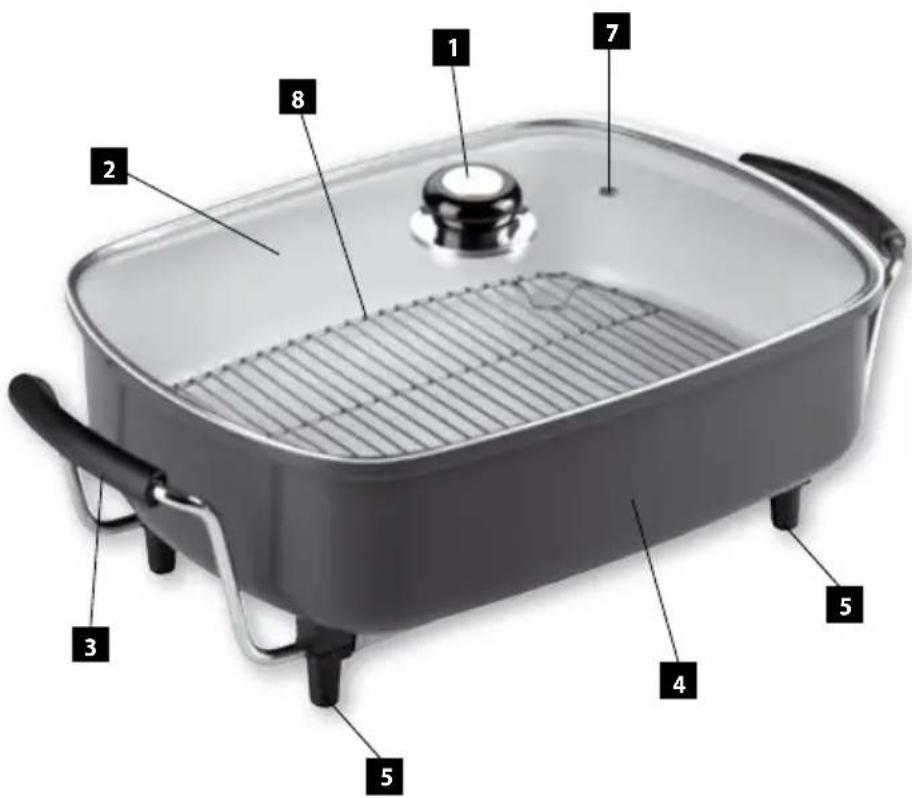
UPOZORNENIE:
natural_image
Close-up of a black electrical plug with a circular dial and cable, next to a grid-patterned surface (no visible text or symbols)Obr. 1
FUNKCIA Poloha regulátora teploty
natural_image
Close-up of a black mechanical component with a circular head and a labeled pin (no text or symbols on the object itself)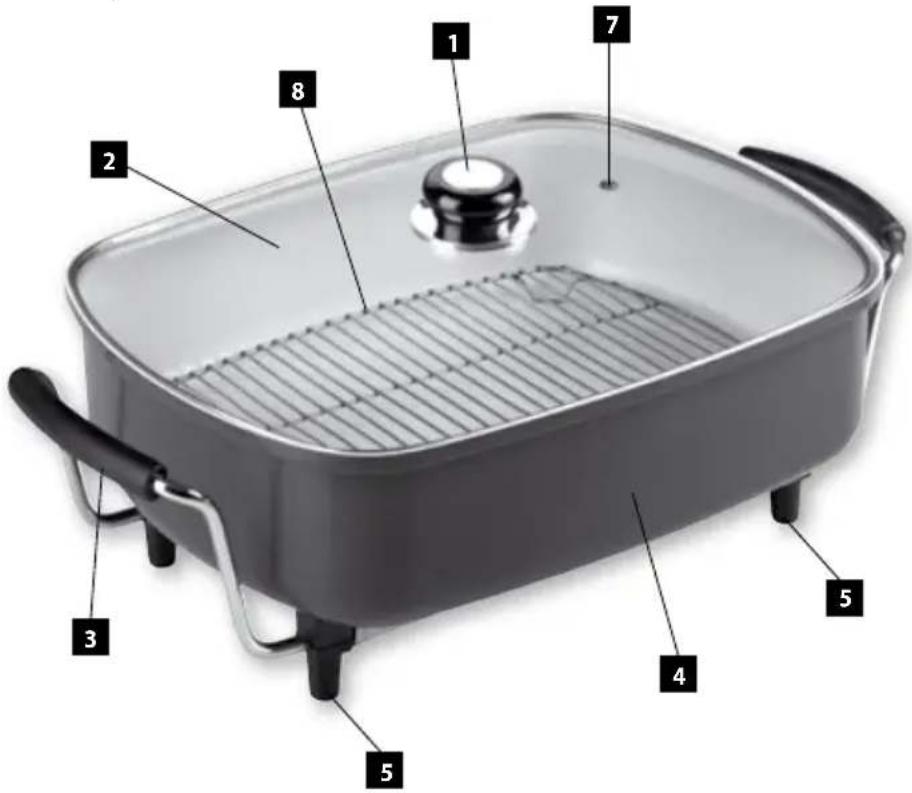
UWAGI:
natural_image
Close-up of a black mechanical component with a circular dial and threaded end, next to a grid-patterned surface (no visible text or symbols)Rys. 1
natural_image
Close-up of a black mechanical component with a circular head and a labeled part '6' (no text or symbols on the object itself)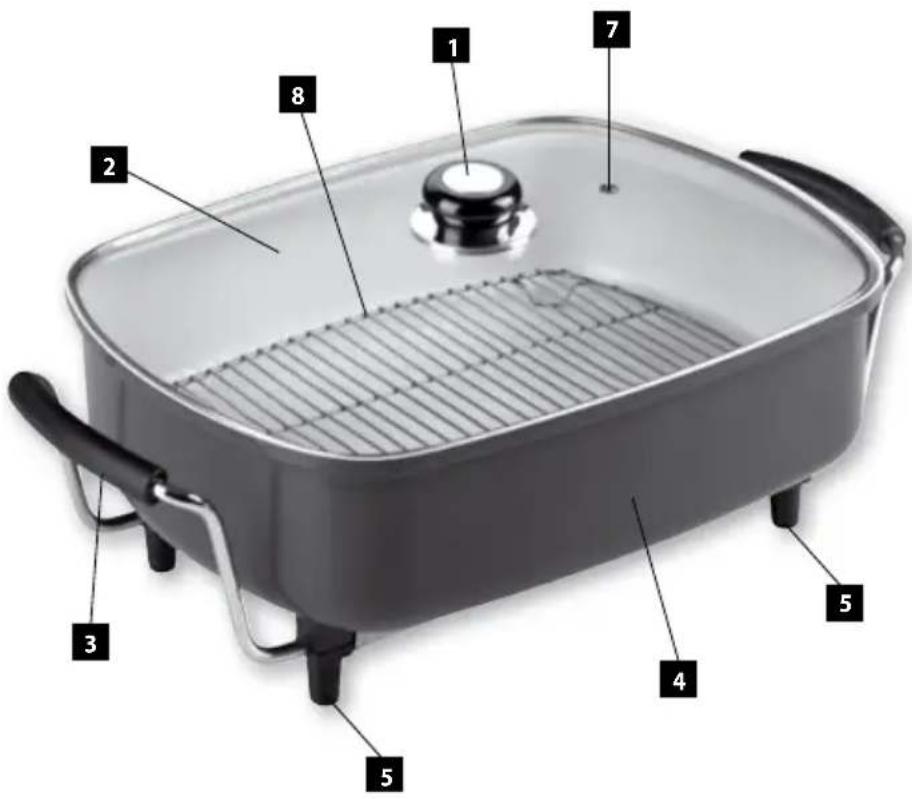
PIEZIME:
natural_image
Close-up of a black electrical connector with a circular dial and cable, next to a white fan-like device (no visible text or symbols)Att. 1
Thank you for purchasing a Concept product. We hope you will be satisfied with our product throughout its service life.
Please read the whole instruction manual carefully before you use the appliance for the first time; after reading, store and keep the instruction manual in a safe and handy place. Make sure that all other people using the appliance are familiar with the instruction manual.
| Technical parameters | |
| Voltage 230 V ~ 50 Hz | |
| Input 1500/1600 W | |
IMPORTANT SAFETY PRECAUTIONS:
- Use the unit only as described in this operating manual.
- Remove all the packaging and marketing materials from the unit before the first use.
- Make sure the mains voltage corresponds to the values on the rating plate. Use grounded wall outlets only.
- Do not install the unit just under the wall outlet.
- Do not leave the unit unattended while it is turned on or even only plugged into the wall outlet.
- Do not connect or disconnect the supply cable from the wall outlet until the control module is mounted correctly!
- The appliance can be used only with the supplied type of control module!
- Place the unit on a stable and heat-resistant surface out of the reach of other heat sources.
- Keep the minimum safe distance of at least 15 cm between the unit and flammable materials, such as furniture, curtains, lace, blankets, paper, clothing, and so on.
- Do not move a unit that is switched on or has hot contents in it.
- Do not touch hot surfaces. Use the handles and buttons.
- Unplug the appliance from the wall outlet when not in use.
- When disconnecting the unit from the wall outlet, never pull the power cord. Grasp the plug and disconnect it by pulling.
- Do not allow children or unskilled people to handle the unit. Use the unit out of the reach of these individuals.
• Take extra care when using the unit near children. - Don't let anyone use the unit as a toy.
- Persons with limited movement capacity, reduced sensory perception, insufficient mental capacity or those who are unaware of the proper handling should only use the appliance when under the supervision of a responsible person aware of the appliance use.
• Make sure the power does not overhang the working area, and that children cannot reach it. - Do not use the product outdoors or on wet surfaces. Electric shock hazard!
- Use only accessories recommended by the manufacturer.
- Never use an appliance with a damaged power cord or plug. Contact an authorized service center immediately to have defective components repaired or replaced.
- It is forbidden to pull and move the product by grasping the power cord.
- Keep the unit away from heat sources, such as radiators, ovens etc. Do not expose the unit to direct sunlight or moisture.
- Do not touch the unit with wet or damp hands.
-
Turn off the product and disconnect the plug from the mains outlet before installing accessories, performing maintenance, or in the case of any failure.
-
The unit is suitable for domestic use only. It is not designed for commercial operation.
- Do not immerse the power cord, plug, or appliance into water or any other liquid.
- Check the appliance and power cord for damage regularly. Do not switch on a damaged unit.
- Turn the unit off, unplug the power cord from the wall outlet, and let the unit cool down before cleaning and after use.
- Do not repair the appliance yourself. Contact an authorized service center.
Failure to follow the manufacturer's instructions may lead to refusal of warranty repair.
WARNING!
When filled with hot oil or grease, handle the pan with maximum care. Risk of burns!
Do not handle or move the pan during cooking.
Before filling with oil or grease, make sure that the pan is completely dry.
Do not throw food in hot oil or grease, but gently and slowly place the food in the pan.
Do not pour hot oil or grease out of the pan and clean the pan only after the oil or grease and the appliance cool down.
Do not touch the hot surfaces of the appliance!
PRODUCT DESCRIPTION
- lid handle
- glass lid
- side handles
- pan body
- legs
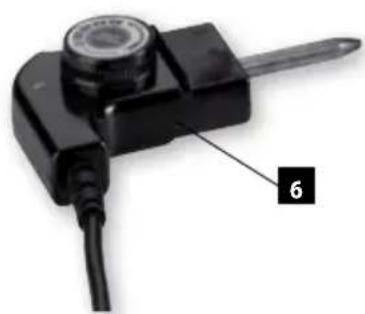
- control module with temperature regulator
- steam valve
- heating and steaming racks
natural_image
Close-up of a black mechanical component with a circular head and labeled part '6' (no text or symbols on the object itself)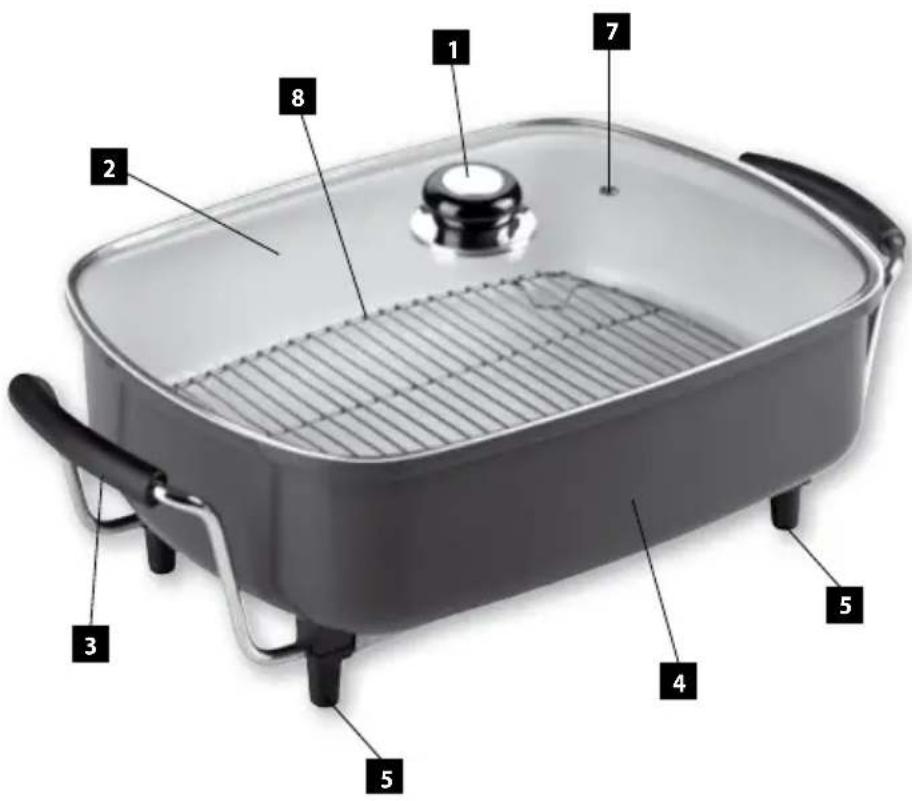
NOTE
The unit is equipped with a non-stick surface, which enables the preparation of food with a minimum amount of oil or fat. Prior to using a new unit, wipe the surface and the inside with a wet cloth for hygienic reasons.
Then turn on the unit without food at maximum temperature for 10 minutes (see the Operating Instructions below). It's possible that the unit will emit a slight smell and smoke, which should disappear after a while. Air the room well during this process.
OPERATING INSTRUCTIONS
- Put the deep fryer on a level and steady surface. Uncoil the whole supply cable. Make sure it does not touch any close sources of heat.
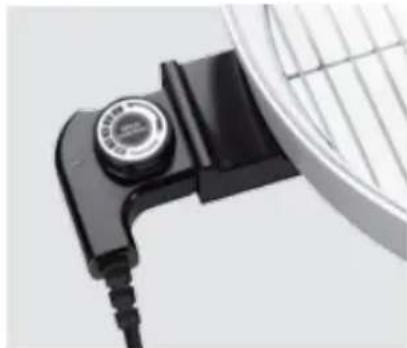
- Connect the removable control module to the heating body connector. Make sure it has reached the stop (Fig. 1). An incorrectly mounted control module cannot regulate the temperature accurately. This could lead to overheating and destruction of the unit.
- Set the temperature controller to the minimum and connect the fryer to the mains.
- Select the required temperature according to the food. Information values are provided in the table below.
natural_image
Close-up of a black electrical connector with a circular dial and cable, next to a white fan-like device (no visible text or symbols)Fig. 1
FUNCTION Temperature control position
reheating of finished dishes 1
simmering, steaming 2
classic cooking 3 - 4
grilling, frying, etc. 5
Warning:
Values shown in the table are for reference only! Always adjust the temperature to your needs and the type of the prepared food!
Before baking or grilling meat, it is recommended to fry the meat briefly on high heat till brown.
STEAMING AND HEATING
When heating or steaming food, place the stainless steel rack supplied with the appliance on the bottom of the pan. Pour enough water into the pan so that the rack is above the water level. Place the food on the rack and adjust the temperature using the regulator according to the recommendations.
Note:
During the preparation of food, the water evaporates. Always make sure that there is enough water on the bottom of the pan, and add as needed.
The red heating indicator will illuminate. Once it turns off, the pan surface has reached the preset temperature. 5. After use set the temperature controller to the minimum and disconnect the unit from the mains.
WARNING!
Do not use sharp metal objects on the grilling plate and do not cut anything on it. The non-stick surface can be scratched and damaged. Use wooden or heat-resistant kitchenware.
NOTE!
After several uses, the shape of the heating element may be burnt into the appliance and the ceramic coating may become slightly tinted. This is perfectly normal and does not indicate a fault.
CLEANING AND MAINTENANCE
Clean the unit after each use to prevent the accumulation of grease, burned-on remnants of food, and unpleasant smells. Turn the unit off, unplug the power cord from the wall outlet, and let the unit cool before cleaning and after use.
Do not immerse the power cord, plug, or appliance into water or any other liquid.
Clean the surface with a wet cloth.
Do not use steel wool, abrasive agents or solvents to clean the unit.
Clean the surface with a wooden scraper or other kitchen tool that will not scratch the non-stick surface.
Wipe the removable control module with a damp cloth or absorbent paper. Do not immerse this part into water or any other liquid. Clean the part on a dry surface so that the part cannot accidentally fall and become damaged.
Let all the parts dry before assembling the accessories.
SERVICING
Any extensive maintenance or repair that requires access to the inner parts of the product must be performed by an expert service centre.
ENVIRONMENTAL PROTECTION
- Packaging materials and obsolete appliances should be recycled.
- The transport box may be disposed of as sorted waste.
- Polyethylene bags shall be handed over for recycling.
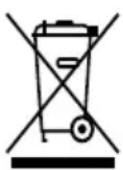
Appliance recycling at the end of its service life:
A symbol on the product or its packaging indicates that this product should not go into household waste. It must be taken to the collection point of an electric and electronic equipment recycling facility. By making sure this product is disposed of properly, you will help prevent the negative effects on the environment and human health that would otherwise result from inappropriate disposal of this product. You can learn more about recycling this product from your local authorities, a household waste disposal service or in the shop where you bought this product.
WIR DANKEN IHNEN FÜR IHR VERTRAUEN
natural_image
Close-up of a black mechanical component with a circular head and a labeled part '6' (no text or symbols on the object itself)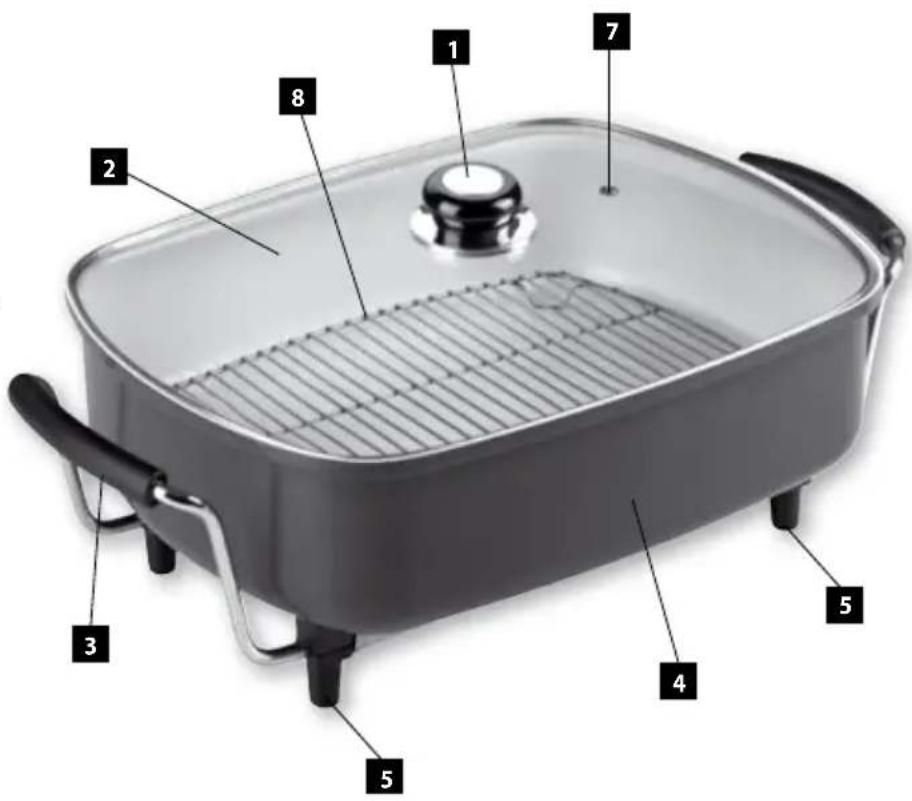
HINWEIS
natural_image
Close-up of a black electrical connector with a circular dial and wire, no visible text or symbolsAbb. 1
FUNKTION Stellung des Temperaturreglers

- PODĚKOVÁNÍ
- UPOZORNĚNÍ:
- UPOZORNENIE:
- FUNKCIA Poloha regulátora teploty
- UWAGI:
- PIEZIME:
- IMPORTANT SAFETY PRECAUTIONS:
- WARNING!
- PRODUCT DESCRIPTION
- NOTE
- OPERATING INSTRUCTIONS
- FUNCTION Temperature control position
- Warning:
- STEAMING AND HEATING
- Note:
- NOTE!
- CLEANING AND MAINTENANCE
- Do not immerse the power cord, plug, or appliance into water or any other liquid.
- SERVICING
- ENVIRONMENTAL PROTECTION
- Appliance recycling at the end of its service life:
- WIR DANKEN IHNEN FÜR IHR VERTRAUEN
- HINWEIS
- FUNKTION Stellung des Temperaturreglers
Brand : Concept
Model : PK-9010
Category : Frying Pan